an introduction to outdoor skills in iowa - iowa department of
TRANSCRIPT
Introduction to Outdoor Skills
A Teaching Module
Iowa Department of Natural Resources Des Moines, Iowa
i
This information is available in alternative formats by contacting the DNR at 515/725-8200 (TYY users – contact Relay Iowa, 800/735-7942) or by writing the DNR at 502 East 9th Street, Des Moines, IA 50319-0034.
Equal Opportunity Federal regulations prohibit discrimination on the basis of race, color, national origin, sex or handicap. State law prohibits discrimination on the basis of race, color, creed, sex, sexual orientation, gender identity, religion, national origin, or disability. If you believe you have been discriminated against in any program, activity, or facility as described above, or if you desire further information, please write to the Iowa DNR, Wallace State Office Building, 502 E. 9th Street, Des Moines, IA 50319-0034. Funding: Support for development of these materials was provided through Fish and Wildlife Restoration funding.

ii
Table of Contents Introduction ................................................................................................................................................. 1 Objectives ..................................................................................................................................................... 1 Materials ....................................................................................................................................................... 1 Module Overview......................................................................................................................................... 1 Teaching Suggestions .................................................................................................................................. 1 Background Information ............................................................................................................................ 2 A Working Landscape ............................................................................................................................ 2 Iowa Habitats .......................................................................................................................................... 2 Iowa’s Valuable Natural Resources ........................................................................................................ 3 Outdoor Recreation Basics ..................................................................................................................... 5 Activities A Look at the Land ............................................................................................................................... 10 Iowa’s Natural Areas ............................................................................................................................ 12 Safety and Ethics................................................................................................................................... 13 Planning a Trip ...................................................................................................................................... 14 Map and Compass ................................................................................................................................. 15 Determining General Directions .................................................................................................... 15 Topographic Map Exercises ........................................................................................................... 16
Reading the Map The Concept of Contours
Orienteering Compass Exercises ................................................................................................... 21 Identify the Parts of the Compass Get Your Bearings Orienteering in the Field
Using Map and Compass Together Exercises ................................................................................ 28 Reconciling Magnetic North and True North
Additional Resources................................................................................................................................. 31
Credits DNR Outdoor Skills Committee: Gail Kantak, Michelle Wilson, Diane Ford-Shivvers, Doug Harr, Merry Rankin, Rod Slings, Joli Vollers, A. Jay Winter Text, layout: Barb Gigar Reviewers: Eli Brewer, Boy Scouts of America; Cheryl Buntsma, Orange City Christian School; Ann Burns, Jackson County Conservation Board; Ann Pisarik, ISU Extension; Dawn Chapman, Woodbury County Conservation Board; Angela Christiansen, Bernard Elementary School (Dubuque); Katie Dalton, Louisa County Conservation Board; Diane Ford-Shivvers, DNR Volunteer Program; Doug Harr, DNR Wildlife Diversity Program; Carol Heaverlo, ISU Extension; Aaron Herschberger, Carroll County Conservation Board; Pamela Holz, Washington County Conservation Board; Missy King, Boone County Conservation Board; Judy Levings, ISU Extension; Lyle Lundgren, MOC-Floyd Valley High School; John Meyer, Midland High School (Wyoming); Miriam Patton, Palo Alto County Conservation Board; Jim Pease, ISU Extension; Merry Rankin, DNR Waste Management Bureau; Dave Reinders, Starkweather Elementary School (Rock Valley); Holly Schulte, DNR Regional Educator; Rod Slings, DNR Recreation Safety Program; Sheryle Stephens, ISU Extension; Joli Vollers, DNR Law Enforcement Training Officer; Michelle Wilson, DNR Conservation and Recreation Education Coordinator; Trish Yauk, DNR Regional Educator; Tom Zimmerman, Woodrow Wilson Junior High School (Council Bluffs) Special thanks to the Missouri Department of Conservation and the Wyoming Game and Fish Commission for use of activities from their outdoor skills materials.
1
An Introduction to Outdoor Skills in Iowa (safety, dress, ethics, Iowa’s natural resources, map and compass)
Introduction This module is designed to acquaint students with basic information about Iowa’s natural resources;
basics for recreating in the outdoors–safety, dress, ethics; and human interactions with natural resources. This is a very brief introduction to these concepts. An annotated bibliography of additional resources related to teaching these concepts/skills is included at the end of the module.
Objectives Students will be introduced to different values associated with natural resources. Students will be introduced to the basic natural areas found in Iowa. Students will become familiar with basic safety and dress guidelines for outdoor activities. Students will be introduced to basic guidelines to follow in emergencies. Students will develop a set of guidelines for ethical conduct for group and individual outdoor
activities. Students will be acquainted with ways humans interact with natural resources including individual
responsibility toward natural resources. Students will become familiar with navigational tools (map and compass) and demonstrate their
ability to use them to navigate successfully.
Materials Suggested materials are listed for each activity.
Module Overview The module is designed for upper elementary through adult audiences. It provides a basic introduction
to recreating in the outdoors.
The Background Information provides a brief overview for the educator or leader. It discusses Iowa’s natural resources and values related to them, including outdoor activities often pursued in different habitats. It also includes basic information about safety (including navigation), dress, and ethics for recreating in the outdoors.
Each Activity includes an overview of the activity, associated objectives, estimated time needed to complete the activity, a list of needed materials, directions to complete the activity, suggested evaluation, and extensions to the activity.
Teaching Suggestions Read through the background information. Depending on the goals for your program, select activities
that emphasize the information/skills you would like to cover. Activities are grouped by topic. You may choose to teach only some of the topic areas, but some activities need to be taught sequentially. For example, the “Orienteering in the Field” activities assume the student can use a compass, so you need to first complete “Identify the Parts of a Compass” and “Get Your Bearings.”
2
Background Information Most outdoor enthusiasts seek quality natural areas to recreate, so we need to understand how humans
have impacted Iowa’s natural habitats, how we are working to preserve/restore habitats, and how individual actions affect natural areas (in both positive and negative ways). Accessible, quality natural areas are an essential ingredient for enjoyable outdoor recreation.
A Working Landscape Iowa is a working landscape. We are among the nation’s leaders in production of corn, soybeans,
pork, and eggs. Over 90% of our land is used for agricultural purposes; approximately 60% for row crops and 30% for other agricultural purposes including pasture and hay land. By percentage, more land in Iowa is used for agriculture than any other state in the country. Another 1.7 million acres, nearly 5% of Iowa, is developed land. Nearly 14,000 acres were developed each year between 1992 and 1997. (2001 Iowa State Comprehensive Outdoor Recreation Plan, Iowa Department of Natural Resources)
Iowa has lost much of its original habitats. Within 100 years of Euro-American settlement, 95% of Iowa’s wetlands were drained or filled. Seventy percent of the forests were cleared, and more than 99% of the prairies were plowed. Soils were exposed and natural vegetation along rivers and streams was removed. This led to a drastic increase in erosion in Iowa’s watersheds and sediments entering our waters. Other land “improvements” included straightening stream channels (channelization), removal of streamside vegetation, and tiling* of wetlands (and wet soils) to increase agricultural productivity.
(* Tiles are pipes or tubes that drain wet soils. Tiles often empty into nearby ditches or streams.)
Iowa Habitats Whether hiking or biking, fishing or hunting, camping or bird watching, or just “hanging out,”
outdoor activities are enhanced by the natural surroundings. Each Iowa habitat offers opportunities for outdoor recreation.
Prairies At the time of settlement in Iowa, prairies covered approximately 28 million acres. Tall grasses
interspersed with flowering plants and few trees dominated the landscape. The tallgrass prairie has grasses such as big bluestem, Indian grass, and switchgrass that sometimes reach 12 feet in height. Flowers such as compass plant, blazingstar, black-eyed Susan, and purple coneflower also are icons of the prairie. The Loess Hills in western Iowa, and dry sandy hillsides in other parts of the state were covered with a mixture of tall and short prairie grasses. Small remnants of prairies with very sandy soils remain because they were too dry or sandy to farm.
Savannas were grasslands with the occasional burr oak tree. Prairie elk depended on savannas. They were more common than bison on the Iowa prairie. Red fox, badgers, pocket gophers, plains spadefoot toads, grassland birds, and an assortment of butterflies also are associated with prairies.
Prairie soils are rich in organic matter, ideal for growing crops. Only small, isolated tracts of native prairie remain due to the conversion of the land into more intensive agricultural pursuits. Some 99.9% of Iowa’s original prairie has been converted to other uses.
Fortunately, some of the best examples of our prairies have been protected through the state preserves system, the largest being 240 acres. Many government agencies, as well as private organizations and individuals reconstruct prairies because they are suited to Iowa’s soils and climate and they are an important part of our heritage. Prairies offer unique opportunities for birders. Prairie snowfalls also provide cross-country skiing and snowshoeing.
3
Woodlands In 1846, when Iowa became a state, there were 6.7 million acres of forests. In 2001, there were 2.5
million acres of forests and woodlands (fragmented forests). Just over 150,000 acres of forest are in urban areas. Over 90% of woodlands in Iowa are privately owned. Current State Forests include four major areas and six smaller units totaling about 41,000 acres. About 7% of Iowa is forested. A greater percentage of forests escaped development than prairies because many were in river floodplains and on steep slopes.
Forests offer a wide range of habitats. Forest types include: upland (oak, hickory, sugar maple, basswood, white ash), floodplain (silver maple, green ash, cottonwoods, willows), oak savannas (mostly grasses with isolated trees), windbreaks (multiple rows of trees and shrubs planted to block wind), urban forests (parks, neighborhoods), and plantations (planted specifically for harvest).
Waters The typical perception of Iowa is that it is not rich in water resources. However, our major border
rivers, the Mississippi and Missouri, total 494 miles in length and provide over 217,000 acres of diverse river environments near a large segment of the state’s population. Iowa is the only state bordered by two navigable rivers. Congress recognizes the Mississippi as both a fish and wildlife refuge and as a major transportation channel. This is the only such designation in the nation.
Iowa had an estimated four million acres of wetlands in the mid 1800’s (marshes, oxbows, floodplain wetlands, and natural lakes). As few as 27,000 acres remained in 1990 (over 99% had been eliminated), but thousands of acres of wetlands have been added/restored since the mid-1980’s through partnerships between government agencies and private conservation organizations.
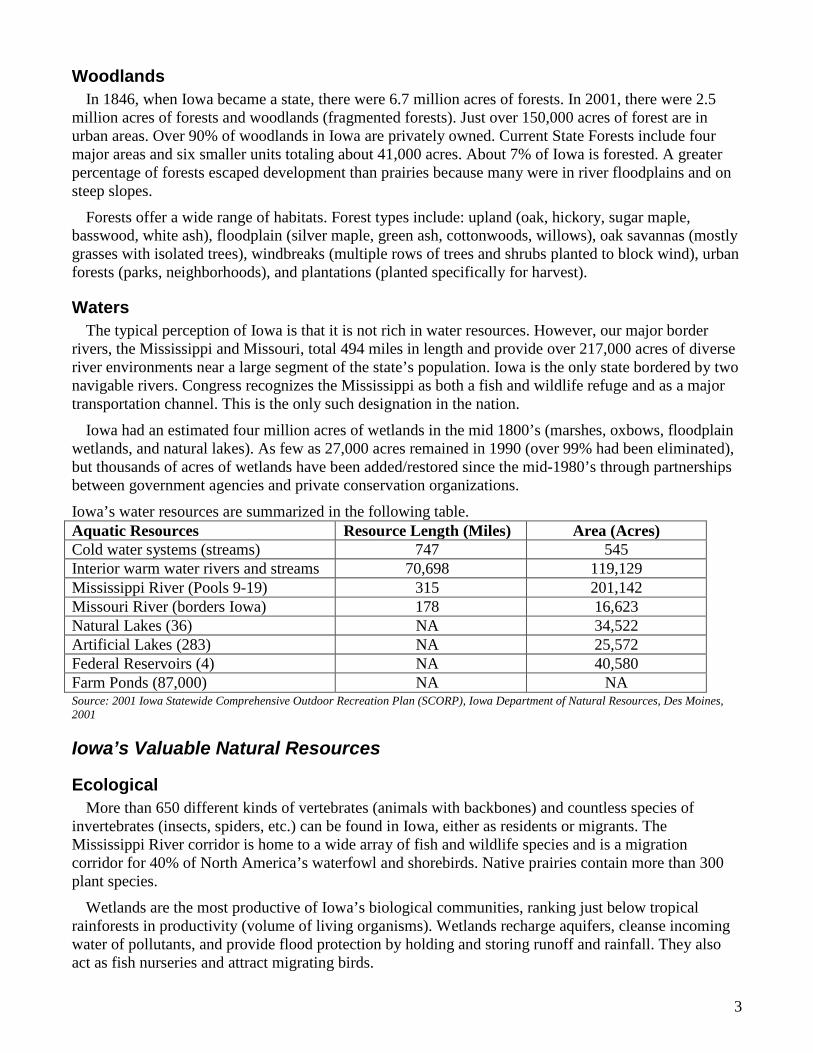
Iowa’s water resources are summarized in the following table. Aquatic Resources Resource Length (Miles) Area (Acres) Cold water systems (streams) 747 545 Interior warm water rivers and streams 70,698 119,129 Mississippi River (Pools 9-19) 315 201,142 Missouri River (borders Iowa) 178 16,623 Natural Lakes (36) NA 34,522 Artificial Lakes (283) NA 25,572 Federal Reservoirs (4) NA 40,580 Farm Ponds (87,000) NA NA Source: 2001 Iowa Statewide Comprehensive Outdoor Recreation Plan (SCORP), Iowa Department of Natural Resources, Des Moines, 2001
Iowa’s Valuable Natural Resources
Ecological More than 650 different kinds of vertebrates (animals with backbones) and countless species of
invertebrates (insects, spiders, etc.) can be found in Iowa, either as residents or migrants. The Mississippi River corridor is home to a wide array of fish and wildlife species and is a migration corridor for 40% of North America’s waterfowl and shorebirds. Native prairies contain more than 300 plant species.
Wetlands are the most productive of Iowa’s biological communities, ranking just below tropical rainforests in productivity (volume of living organisms). Wetlands recharge aquifers, cleanse incoming water of pollutants, and provide flood protection by holding and storing runoff and rainfall. They also act as fish nurseries and attract migrating birds.

4
Each plant and animal species may represent solutions to biological problems. Plants and animals provide medicines, food, and fibers. Many advances in biological and medical research have come through the studies of wild, or formerly wild, animals and plants. Individual animals and plants also contribute to the well-being of the ecosystems they inhabit. If even one, seemingly unimportant, species is removed this delicate balance may be disturbed. People have only begun to understand the intricate relationships among species. Extinction of a species cannot be reversed and may have impacts that are not known until much later.
Iowa’s biodiversity has declined over the past century because of intensive agriculture and urban development. Iowa has the unfortunate distinction as being perhaps the most ecologically altered state in the nation. Native ecosystems have been reduced in size and diversity. Many species of wildlife declined in numbers or disappeared from the state. In Iowa, 49 animals and 64 plants are listed as endangered (populations are low, scientists feel the species could become extinct). Another 89 plants and 36 animals are listed as threatened (populations are declining, may become endangered). Exotic species introduced from other lands (e.g., garlic mustard, purple loosestrife, zebra mussels, Eurasian watermilfoil, house sparrows, European starlings) out-compete native species, further reducing diversity. Maintaining or improving biodiversity is an important goal of natural resource managers.
Aesthetics (For the Sheer Beauty) If natural resources had no other value, they would still be worth preserving for their sheer beauty and
appeal to the human spirit. Aldo Leopold, an Iowan, author, and great conservationist, wrote of a “land ethic” in which plants and animals should have “at least in spots, their continued existence in a natural state.” According to Leopold, humans must change from “conqueror of the land community to a plain member and citizen of it.” He states in A Sand County Almanac, “The gadgets of industry bring us more comforts than the [passenger] pigeons did, but do they add as much to the glory of spring?” His sentiments give definition to the aesthetic and ethical values associated with natural resources.
Natural areas have positive impacts on people. Studies indicate that nature in or around the home appears to help protect the psychological well-being of children in rural areas. In poor, urban neighborhoods, green spaces are gathering places that create close-knit communities, improve well-being and in doing so, increase safety. A look at crime rates in such neighborhoods showed that they were much reduced in areas with trees, grass, and other plants.
Boaters and swimmers enjoy the beauty of a healthy ecosystem. Visitors to state parks and recreation areas cite scenery and natural features as important factors in selecting areas to visit.
Economics Iowans who participate in hunting, fishing, wildlife watching, or other wildlife related activities spend
$1.7 billion on food, lodging, transportation, and equipment annually. Visitors to Iowa state parks contribute an additional $160 million annually to Iowa’s economy.
Millions of residents rely on water from impoundments and rivers for public use, industrial supplies, power plant cooling, and wastewater treatment. In Iowa, surface water supplies about 20% of the state’s drinking water. Water is used for irrigation of crops in the Mississippi and Missouri River valleys.
The Missouri and Mississippi, like most large rivers in the U.S., are major modes of transportation. Barges transport food, fuel, and a host of other goods up and down the rivers. Current operation and maintenance costs on the Mississippi River for transportation are $140 million per year. The dam at Keokuk is used to generate electricity. The Cordova nuclear power plant, upstream from the Quad Cities, uses river water for cooling. The electricity generated is used by many homes, businesses, and industries. Close to three million pounds of fish are removed from the Mississippi River along Iowa’s border each year by commercial fishing.
5
Recreation More than one million Iowans (55% of Iowa’s population) participate in hunting, fishing, wildlife
watching, or other wildlife related activities. Iowans spend 750,000 guest days (number of campers x number of days stay) camping in state parks each year. There are almost 230,000 registered boats and watercraft in the state. This includes canoes, sail boats, motorboats, and other watercraft. Other activities people enjoy in the outdoors include hiking, biking, walking, campfire cooking, photography, skiing, snow shoeing, target shooting, archery, and even feeding and/or landscaping for wildlife.
Cultural People have always lived near water for drinking, food, and transportation. Iowa waters are no
exception. Portions of the Upper Mississippi River are thought to have the highest density of cultural sites in North America–a study by the Great River Environmental Action Team identified over 1,000 anthropological and nearly 4,000 historic sites in the Rock Island District. The Dakota, Iowa, Oto, Winnebago, Fox, and Pottawattamie Indian tribes, as well as early Euro-American explorers, used the Missouri River. The natural lakes of northwest Iowa also were centers of cultural activity for native and prehistoric peoples.
Values related to wildlife and other natural resources are expressed in different cultures through legends, myths, religious teachings and writings, symbols, and ceremonies. These values vary from person to person, culture to culture.
Outdoor Recreation Basics Safety Have a Plan!
Before any outdoor experience, the first order of business is to plan. Lack of planning and preparation can mean a miserable experience, or can even put participants in dangerous situations. Some things to include in your plan:
Where you are going and the route you are taking* When you will return Who is going Why you are going (what activities you’ll be doing) What you need to take with you Share at least your destination, the route you will be taking, and when you will return with someone just in case there is a problem. If you are going on an extended trip you should also check in with someone at specific intervals while on the trip. This could save your life. *It is important to stay on the route/path you planned. If you are injured, help can get to you faster if they know where to look.
Have a Buddy! Under the buddy system, groups are divided into teams of two. Partners can make learning new skills
easier, safer, and more fun. Partners can learn from each other, spotting errors and incorrect methods before they become bad habits. In the field, partners can assist each other and even call for help, if needed.
Know Where You Are! Being able to navigate across the land is useful and/or essential in a wide range of outdoor recreational
activities. Even if you are not in a large wilderness area, you can become disoriented and get lost. This
6
can be annoying, or it can even result in tragedy. Learn how to find your way using navigation tools such as the following:
Maps A map is a drawing that represents a portion of the earth’s surface. Transportation or highway maps
show roads, cities, landmarks, and other features. Most county or state parks have trail maps at trail heads that will be useful to you when you go on a hike, picnic, or camp. Plat books show roads and ownership boundaries so you can be sure you are staying on public lands or lands where you have permission to be. Topographical (topo) maps also include information about natural surface features in an area and have contour lines that provide information about the terrain (how steep or flat). Always make sure you have the right map for the outdoor activity in which you are engaging. Know where you are and how to get where you want to go.
Compass A compass has a steel needle that is attracted by the earth’s magnetic field. At rest, the needle points
to magnetic north. The best type of compass for use with maps to navigate outdoors is an orienteering compass. This compass is designed for use with topographic maps and is inexpensive and durable. An orienteering compass can be used to find direction from a topographical map. You also can “lock” your direction of travel onto the compass dial and ruled scales along the base plate of the compass can be used to determine scale distances from a map.
Global Positioning System (GPS) GPS receivers can be used to determine your location on Earth within 10-15 meters in a matter of
minutes or seconds. You also can enter a set of coordinates for a given location and the GPS receiver will provide a compass bearing and distance that is updated as you move across the land. Even without a map, you can enter your starting position as well as positions along your route that you can use to guide you back to the starting point.
However, you must have a working knowledge of maps and navigational procedures to effectively use a GPS unit. GPS units also require batteries, which means you should not rely solely on them for navigation.
The Sun and Stars The sun can indicate general directions. The sun moves across the sky from east to west during the
day. On a clear night, the North Star (Polaris) indicates north. (Note: In Iowa, the sun is a bit north of vertical during the summer and moves from southeast to southwest in the winter.)
Landmarks Major features on the landscape are important in finding your way. Features such as large trees,
streams, hills, and large structures can help you orient yourself. Whether you are using a map or not, acquaint yourself with landmarks and your location in relationship to them.
Be Prepared! It’s a good idea for everyone, especially outdoor skills instructors to be trained in basic first aid. Even
with the best planning and safety precautions, mishaps occur. First aid classes often are available through the local Red Cross or other community organizations.

7
First Aid Kit You should always have a basic first aid kit handy. The contents of the kit may vary depending on the
type of outdoor activity and how many people are participating. Following is a list of some basic items:
ace bandage first aid booklet or flier with basic instructions adhesive tape gauze pads analgesic cream insect repellent antiseptic ointment mole skin (blisters, hot spots) antiseptic towels plastic bag aspirin or other pain relief medication single use pocket face mask (CPR, mouth-to-mouth) band-aids sunscreen cold or heat source triangular bandages disposable rubber gloves tweezers flashlight (with fresh/extra batteries)
Emergency Plan* You should have an emergency plan whether you are taking a group on an extended backcountry trip
or an afternoon excursion. Some things to consider: Location of the nearest hospital How to contact help if someone is ill or injured Who will communicate with authorities, parents, and organization leaders, and how will they do so Exit routes from an area in case of flood, fire, tornado, etc. Procedure to follow if a participant or leader is lost or missing Who stays with the group if there is an accident or illness If local authorities know you are in the area If you have necessary health forms with you
*Modified from Outdoor Living Skills Program Manual, American Camping Association
Emergency Kit You never know when trouble will strike. If you are prepared, such situations may be annoying. If you
are not prepared, they can be deadly. Following are priorities for life and the general amount of time humans can survive without them:
Air: 3 minutes Shelter: 3 hours or less (in extreme conditions) Water: 3 days Food: 3 weeks
It makes good sense to carry an emergency kit. It is easy to assemble, inexpensive, and can fit in a backpack or the glove compartment of your car. Following are some items you might include.
SShheelltteerr:: garbage bags (2 large) and electrical or duct tape Garbage bags can be worn sturdy string or small rope or torn apart and taped to space blanket form a makeshift shelter.

8
FFiirree ssttaarrttiinngg:: 1-2 hard wax candles about four inches long “strike anywhere” wooden matches (waterproofed with a light coat of paraffin or fingernail polish) waterproof match container (cylindrical with a flint bottom) small plastic bottle of coarse, dry sawdust heat tabs (or similar fire starter) anything that will burn longer than a match after it’s been lit
DDrriinnkkiinngg:: small container aluminum foil (2-4 feet long) to make a pot to heat water Fold in accordion pleats and roll lengthwise around kit container to prevent holes that can form when
folded in squares bouillon, tea, coffee, soups, sugar, and/or honey iodine tablets (in case you can’t heat water)
CCoommmmuunniiccaattiioonnss//ssiiggnnaalliinngg ddeevviiccee whistle (loud, shrill) reflective device (mirror, aluminum foil, polished metal surface) money for a phone call cell phone
CCuuttttiinngg TTooooll:: small knife with sharp blades
FFoooodd:: Most people are rescued before food is a critical need (3+ weeks). Include high-energy items such as raisins and peanuts if you include food.
Dress Appropriate clothing is a must for outdoor activities. It can mean the difference between a fun-filled
time and a completely miserable experience. The basic principle is to dress in layers. Each layer should provide warmth, but allow for ventilation. Clothing should allow for freedom of movement during strenuous activity, but dangling or flapping garments can be a hazard, especially around fires. Properly fitting, sturdy footwear will protect feet and ankles on uneven terrain.
9
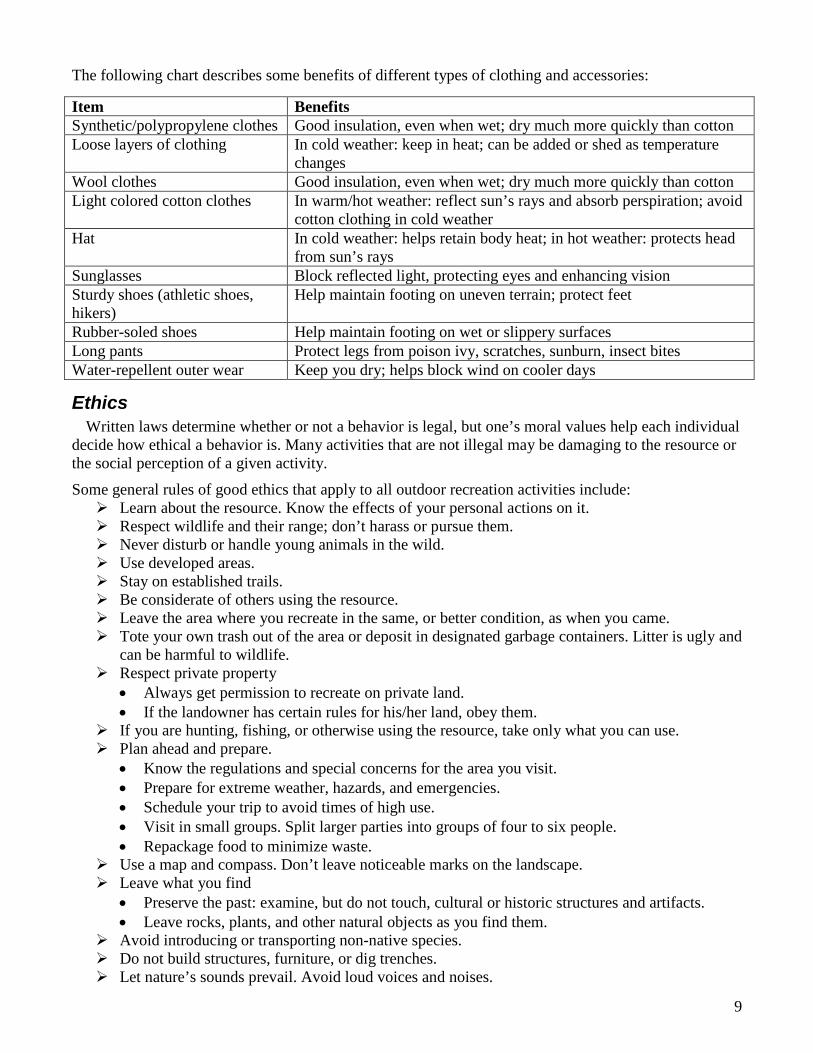
The following chart describes some benefits of different types of clothing and accessories:
Item Benefits Synthetic/polypropylene clothes Good insulation, even when wet; dry much more quickly than cotton Loose layers of clothing In cold weather: keep in heat; can be added or shed as temperature
changes Wool clothes Good insulation, even when wet; dry much more quickly than cotton Light colored cotton clothes In warm/hot weather: reflect sun’s rays and absorb perspiration; avoid
cotton clothing in cold weather Hat In cold weather: helps retain body heat; in hot weather: protects head
from sun’s rays Sunglasses Block reflected light, protecting eyes and enhancing vision Sturdy shoes (athletic shoes, hikers)
Help maintain footing on uneven terrain; protect feet
Rubber-soled shoes Help maintain footing on wet or slippery surfaces Long pants Protect legs from poison ivy, scratches, sunburn, insect bites Water-repellent outer wear Keep you dry; helps block wind on cooler days
Ethics Written laws determine whether or not a behavior is legal, but one’s moral values help each individual
decide how ethical a behavior is. Many activities that are not illegal may be damaging to the resource or the social perception of a given activity.
Some general rules of good ethics that apply to all outdoor recreation activities include: Learn about the resource. Know the effects of your personal actions on it. Respect wildlife and their range; don’t harass or pursue them. Never disturb or handle young animals in the wild. Use developed areas. Stay on established trails. Be considerate of others using the resource. Leave the area where you recreate in the same, or better condition, as when you came. Tote your own trash out of the area or deposit in designated garbage containers. Litter is ugly and
can be harmful to wildlife. Respect private property
• Always get permission to recreate on private land. • If the landowner has certain rules for his/her land, obey them.
If you are hunting, fishing, or otherwise using the resource, take only what you can use. Plan ahead and prepare.
• Know the regulations and special concerns for the area you visit. • Prepare for extreme weather, hazards, and emergencies. • Schedule your trip to avoid times of high use. • Visit in small groups. Split larger parties into groups of four to six people. • Repackage food to minimize waste.
Use a map and compass. Don’t leave noticeable marks on the landscape. Leave what you find
• Preserve the past: examine, but do not touch, cultural or historic structures and artifacts. • Leave rocks, plants, and other natural objects as you find them.
Avoid introducing or transporting non-native species. Do not build structures, furniture, or dig trenches. Let nature’s sounds prevail. Avoid loud voices and noises.

10
Activity: A Look at the Land Overview: Students trace the path of a small plane crossing Iowa as they listen to an essay written by the pilot. They discuss the author’s description of the Iowa landscape and then describe their perception of Iowa’s landscape. Associated Objectives: Students will be introduced to different types of values associated with natural resources. Students will become familiar with navigational tools (map and compass) and demonstrate their
ability to use them to navigate successfully. Time: 30 – 60 minutes
Materials: Writing materials, Iowa transportation (road) maps, copies of the essay, “A Look at the Land”
Directions: Hand out copies of Iowa transportation maps or use a large wall map. Have students work in pairs or
groups of three. Locate Woodbine. Show students where the plane starts and try to follow along as the teacher reads the text. Or using a large map in the classroom point out to students where they are as the teacher or a student reads the text. Ask the students some questions:
1. In what ways did the author show that Iowa is “blunt as a workbook” and “fine-textured as Japanese paper?”
2. What did the author mean when he said Iowa is “land”?
Have students close their eyes and think about a car drive they took to somewhere in Iowa, or even walking to school. Ask students to describe on a piece of paper their view of Iowa’s land from their experiences.
Evaluation: Students should be able to successfully locate the landmarks, towns, and rivers mentioned in the essay
on an Iowa map. Students should relate their perspective of the Iowa landscape based on personal experience.
Extensions: Have students relate their perception of natural areas in Iowa as a lead into the activity, “Iowa’s
Natural Areas.” (See the “Iowa Habitats” section of the Background Information for an overview of natural habitats found in Iowa.)
Construct a replica of a nearby natural area with unique features (e.g., loess hills, natural lakes, rivers, forest). Students can research the area and share their findings.
11
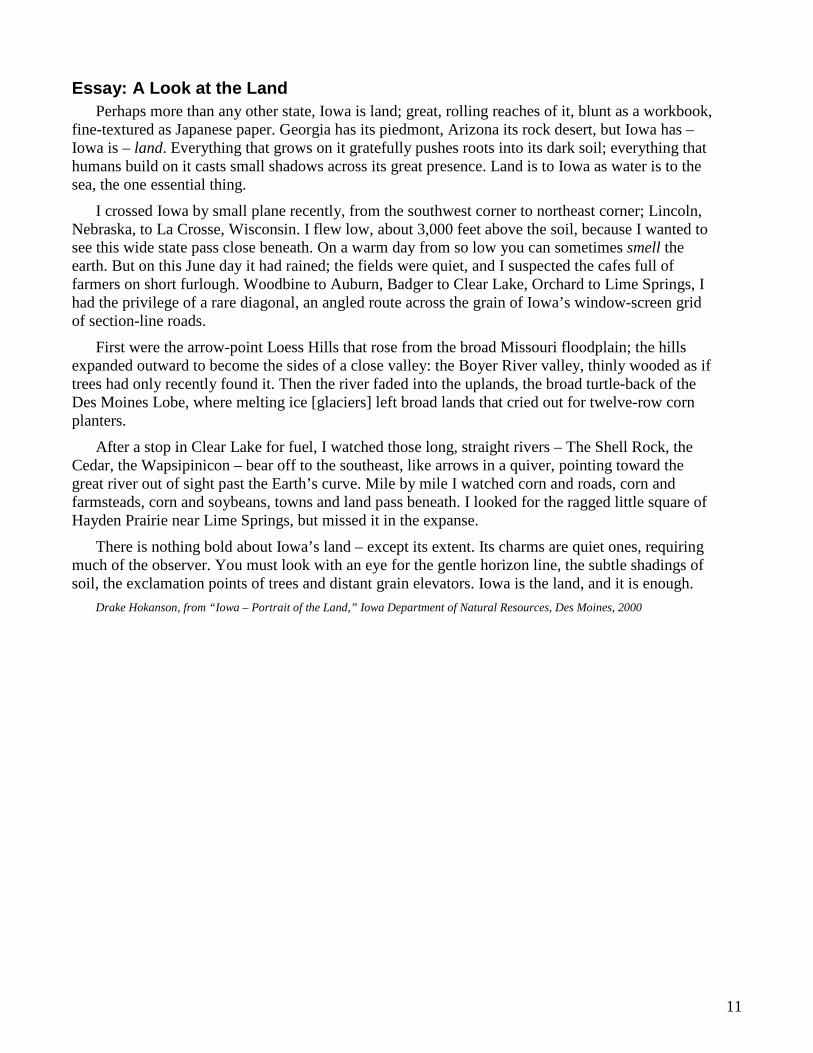
Essay: A Look at the Land Perhaps more than any other state, Iowa is land; great, rolling reaches of it, blunt as a workbook,
fine-textured as Japanese paper. Georgia has its piedmont, Arizona its rock desert, but Iowa has – Iowa is – land. Everything that grows on it gratefully pushes roots into its dark soil; everything that humans build on it casts small shadows across its great presence. Land is to Iowa as water is to the sea, the one essential thing.
I crossed Iowa by small plane recently, from the southwest corner to northeast corner; Lincoln, Nebraska, to La Crosse, Wisconsin. I flew low, about 3,000 feet above the soil, because I wanted to see this wide state pass close beneath. On a warm day from so low you can sometimes smell the earth. But on this June day it had rained; the fields were quiet, and I suspected the cafes full of farmers on short furlough. Woodbine to Auburn, Badger to Clear Lake, Orchard to Lime Springs, I had the privilege of a rare diagonal, an angled route across the grain of Iowa’s window-screen grid of section-line roads.
First were the arrow-point Loess Hills that rose from the broad Missouri floodplain; the hills expanded outward to become the sides of a close valley: the Boyer River valley, thinly wooded as if trees had only recently found it. Then the river faded into the uplands, the broad turtle-back of the Des Moines Lobe, where melting ice [glaciers] left broad lands that cried out for twelve-row corn planters.
After a stop in Clear Lake for fuel, I watched those long, straight rivers – The Shell Rock, the Cedar, the Wapsipinicon – bear off to the southeast, like arrows in a quiver, pointing toward the great river out of sight past the Earth’s curve. Mile by mile I watched corn and roads, corn and farmsteads, corn and soybeans, towns and land pass beneath. I looked for the ragged little square of Hayden Prairie near Lime Springs, but missed it in the expanse.
There is nothing bold about Iowa’s land – except its extent. Its charms are quiet ones, requiring much of the observer. You must look with an eye for the gentle horizon line, the subtle shadings of soil, the exclamation points of trees and distant grain elevators. Iowa is the land, and it is enough.
Drake Hokanson, from “Iowa – Portrait of the Land,” Iowa Department of Natural Resources, Des Moines, 2000

12
Activity: Iowa’s Natural Areas Overview: Students use the Internet and local resources to research natural resources in their area.
Associated Objectives: Students will be introduced to the basic types of natural areas found in Iowa. Students will be introduced to different values associated with natural resources. Students will be acquainted with ways humans interact with natural resources including individual
responsibility toward natural resources. Time: Two 30 – 60 minute sessions with time for research
Materials: Writing materials, access to Internet, contact information for local professionals in natural resources
Directions: Have students research natural areas in your county, region of the state, etc. Find out: What types of
facilities do they have? What unique features do they contain? What sort of wildlife do they support? Why were these areas set aside? How were they purchased/obtained? What outdoor activities can you do there? What kinds of natural resources used to be in your area? Are additional natural resources being protected in your area? Possible resources include county conservation boards, state parks, DNR conservation officers, and web sites. Encourage participants to share their perspective on the value of natural resources in your area, in Iowa, and worldwide. Discuss the different values – economic, ecological, aesthetic, cultural. Discuss human interactions – positive and negative – with natural resources. How do human values affect how they interact with natural areas?
Ask students: What if Iowa no longer had any prairies, woodlands, streams, or lakes? What would this mean for: Other animals? Businesses? Your family? How do natural resources benefit your life?
Refer to the “Iowa Habitats” section of the Background Information for more information about our natural resources and the benefits they provide. Share with students any information they don’t garner through their survey and discussion. Option: Have students do a survey asking other teachers, their parents, and siblings these questions and bring them to class to share.
Evaluation: Students will present information about natural resources in your area and be able to discuss human
interactions with and values of natural resources.
Extensions: Select a public natural area near you. Learn more about its history, unique features, and importance to
the local area. Find out if there are actions you can take to help maintain or improve the area.
Internet Resources: Iowa DNR Iowa Geographic Map Server United States Geological Survey mapping website The Nature Conservancy, Iowa Chapter Iowa Association of County Conservation Boards National Wildlife Refuge System

13
Activity: Safety and Ethics Overview: Students discuss different aspects of safety and ethics in the outdoors. They prepare an emergency plan, emergency kit, and set of ethics for outdoor activities.
Associated Objectives: Students will become familiar with basic safety and dress guidelines for outdoor activities. Students will be introduced to basic guidelines to follow in case of an emergency. Students will develop a set of guidelines for ethical conduct for group and individual outdoor
activities.
Time: Two or three 30 – 60 minute sessions
Materials: Writing materials, poster-sized paper and markers, supplies for an emergency kit, variety of outdoor clothing
Directions: Refer to the “Safety” portion of the Outdoor Recreation Basics section in the Background
Information. Discuss basic safety and preparedness rules. Discuss the importance of being prepared in the outdoors. Ask students if they have ever been in an emergency situation in the outdoors. Have them share what happened.
Then, ask students to write down on a piece of paper what 10 items they would want to have with them if they got lost in the woods. After students have created their list individually ask them to share what they wrote with another student, then with the class. Create a list on the board and discuss the items they included in their lists.
Ask students: How well do the items listed provide for your basic survival needs (not wants)? Show students a basic emergency kit (see pages 7-8). Ask students to brainstorm what each item is used for and compare their lists to your basic emergency kit. Have them practice using some of the items (not knives or sharp objects).
Prepare a set of basic safety rules for learning and practicing your outdoor skills. Make sure students agree to and understand the reasons for the rules. Keep the list short, so everyone can remember it. Post the rules as a reminder for everyone. Go over your emergency plan (example on page 7).
First Aid – Find out how much members of the group know about first aid. Discuss basic procedures to follow in an emergency situation (emergency plan). Discuss the contents of a basic first aid kit (see page 7). Make sure everyone has a copy of basic procedures. Review emergency plans before any field experience.
Dress – Have a “fashion” show with a variety of outdoor clothing. Have students write descriptions for each item, including its benefits/limitations for outdoor recreation. See page 9 for information about different types of clothing.
Ethics – Discuss the difference between laws and ethics. Have students develop a set of rules for conduct when you are doing recreational activities as a group. Have students develop a set of individual ethics for themselves. They may or may not share them with the rest of the group. (See page 9 for a general list.)
Evaluation: Students should follow basic safety and ethical guidelines agreed to by the group during outdoor activities. Students will follow set emergency procedures if presented with an emergency situation. Students will dress appropriately for outdoor activities.

14
Activity: Planning a Trip Overview: Students plan for an outdoor activity.
Associated Objectives: Students will become familiar with basic safety and dress guidelines for outdoor activities. Students will be introduced to basic guidelines to follow in case of an emergency. Time: One 30 – 60 minute session
Materials: Writing materials
Directions: Plan for a real or imaginary outdoor excursion. Refer to “Have a Plan!” in the Outdoor Recreation
Basics section of the Background Information. Have students discuss the following:
1. What activity(ies) will you be doing? (e.g., hiking, fishing, camping) 2. Where will you go? (state park, private area – get permission!, other) What is the site like? What
facilities does it have? 3. How long will you be gone? 4. What supplies will you need? Include safety and emergency items. Be sure to consider where you
will be going, what you will be doing, and the season/weather. 5. Who will you share your plan/route with? 6. Other considerations?
Have students work individually or in groups to develop a plan, then have them share their plans. Discuss any items/considerations they omitted. How would this impact their trip? Would it make their experience less enjoyable? Unsafe? Based on your discussions, develop a basic plan outline to use for planning future trips.
Evaluation: Students will develop a plan outline for outdoor activities that includes considerations for safety, comfort, and enjoyment of participants.
Extension: Use the plan outline to plan additional trips. Score plans by assigning points for including appropriate items. Deduct points for omitting items or including unnecessary ones. Use the plan to go on an outdoor excursion.

15
Activities: Map and Compass
Determining General Directions Modified with permission from Outdoor Living Skills Series: Map and Compass, Missouri Department of Conservation Overview: Students use the sun and stars to determine general directions.
Associated Objectives: Students will become familiar with navigational tools (map and compass) and demonstrate their
ability to use them to navigate successfully. Time: One 30 – 60 minute session
Materials: Analog watch (Part 1)
PPaarrtt 11((AA WWaattcchh aass aa CCoommppaassss)) Directions:
Hold an analog watch horizontally with the hour hand pointing toward the sun. South is mid-way between the hour hand and the number twelve going the shortest way around the face of the watch. Notes: The watch must be set to standard time for the time zone you are in. This method works between 6 a.m. and 6 p.m. on a sunny day, but is not very reliable if the sun is high.
PPaarrtt 22 ((FFiinnddiinngg tthhee NNoorrtthh SSttaarr)) Directions:
Use the stars to determine north on a clear night. Imagine a line extending from the bottom edge of the “pan” of the Big Dipper to the tail star (end of the handle) of the Little Dipper. This is Polaris, the North Star.
Evaluation: Students will be able to determine south using an analog watch on a sunny day and north using Polaris on a clear night.
Extension: Research and/or construct a sundial. Research and learn to locate additional stellar objects used in navigation.

16
Topographic Mapping Exercise 1: Reading the Map Modified with permission from Outdoor Recreation Education Opportunities, Wyoming Game and Fish Department Overview: Students locate features on a topographic map.
Associated Objective: Students will become familiar with navigational tools (map and compass) and demonstrate their
ability to use them to navigate successfully. Time: One or two 30 – 60 minute sessions
Materials: 7.5-minute (1:24,000) topographic map (laminated), erasable markers [For a comprehensive listing of map symbols, go to the USGS topographic map symbol web page (web site at the end of this activity).]
Directions: Obtain topographic maps of a local area. If possible, laminate them so students can write on them with
erasable markers. The 7.5 minute (1:24,000 scale) maps work well for beginning exercises. For more information about topographical maps and a complete listing of symbols, check out the U.S. Geological Survey mapping web site (erg.usgs.gov/isb/pubs/booklets/symbols/).
Distribute the worksheet. Have students locate basic map features on their map. (If maps are laminated, students can mark features with erasable markers.)
Sources for Topographic Maps: Iowa Geographic Map Server U.S. Geological Survey Evaluation: Students will be able to locate and describe selected information and features on a topographic map. Extension: none
17
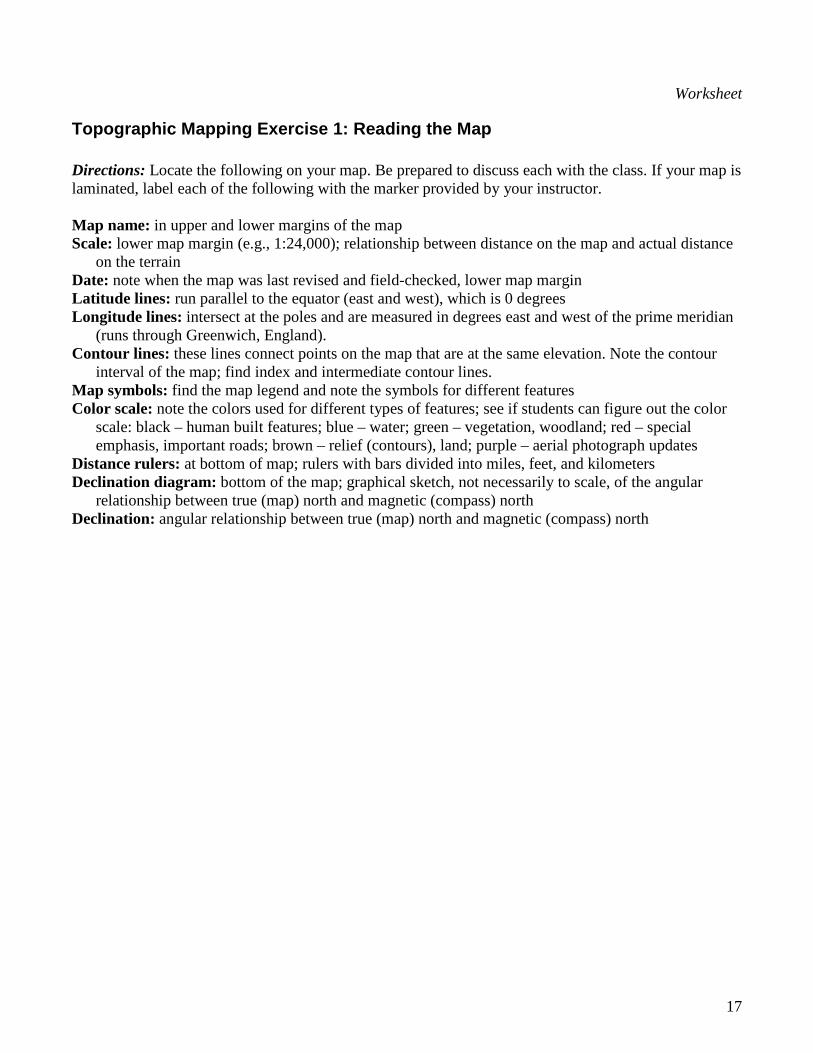
Worksheet
Topographic Mapping Exercise 1: Reading the Map Directions: Locate the following on your map. Be prepared to discuss each with the class. If your map is laminated, label each of the following with the marker provided by your instructor. Map name: in upper and lower margins of the map Scale: lower map margin (e.g., 1:24,000); relationship between distance on the map and actual distance
on the terrain Date: note when the map was last revised and field-checked, lower map margin Latitude lines: run parallel to the equator (east and west), which is 0 degrees Longitude lines: intersect at the poles and are measured in degrees east and west of the prime meridian
(runs through Greenwich, England). Contour lines: these lines connect points on the map that are at the same elevation. Note the contour
interval of the map; find index and intermediate contour lines. Map symbols: find the map legend and note the symbols for different features Color scale: note the colors used for different types of features; see if students can figure out the color
scale: black – human built features; blue – water; green – vegetation, woodland; red – special emphasis, important roads; brown – relief (contours), land; purple – aerial photograph updates
Distance rulers: at bottom of map; rulers with bars divided into miles, feet, and kilometers Declination diagram: bottom of the map; graphical sketch, not necessarily to scale, of the angular
relationship between true (map) north and magnetic (compass) north Declination: angular relationship between true (map) north and magnetic (compass) north

18
Topographic Mapping Exercise 2: The Concept of Contours
Creating Contour Lines Modified with permission from Outdoor Living Skills Series: Map and Compass, Missouri Department of Conservation Overview: Students construct contour lines for a three-dimensional object.
Associated Objective: Students will become familiar with navigational tools (map and compass) and demonstrate their
ability to use them to navigate successfully. Time: One 30 – 60 minute session
Materials: (Part 1) dark marker, light colored bowl;(Part 2) large irregular-shaped rock, water, siphon, grease pencil, large container (see diagram)
PPaarrtt 11 Directions:
(The following can be done as a demonstration, or as a group activity.) Using a dark marker, draw lines parallel to the rim of a bowl at one-inch intervals. View the bowl from above. Note how the lines form concentric circles that look much like contour lines.
PPaarrtt 22 Directions:
To further illustrate the concept, place a large, irregular-shaped rock in a container of water so it is completely covered. Siphon water out of the container until one inch of the rock is exposed. Use a grease pencil to mark a line around the rock at water level. Repeat the procedure until the rock is completely exposed. View the rock from above.
Evaluation: Students will be able to construct contour lines for a three-dimensional object.
Extension: none

19
Visualizing Structures Based on Contour Lines Modified with permission from Outdoor Recreation Education Opportunities, Wyoming Game and Fish Department Overview: Students match vertical profiles and written descriptions with contour lines that represent them.
Associated Objective: Students will become familiar with navigational tools (map and compass) and demonstrate their
ability to use them to navigate successfully. Time: One 30 – 60 minute session
Materials: Contour diagrams, writing utensil (extension: topographic map)
Directions: It is important to be able to visualize what features on a map look like on the ground and to be able to
express what is portrayed on a contour map. Have students complete the worksheet.
Evaluation: Students will be able to match profiles and verbal descriptions of structures to the correct contour line depiction.
Extension: After completing this exercise, have students use the topographic map used in Topographic Mapping Exercise 1: Reading the Map and try to locate features similar to those depicted in Part 1 of the worksheet. Have them describe features on the map either verbally or in written form.
Answers to Worksheets: Part 1: Part 2: 1) D 2) A 3) F 4) B 5) C
20
Worksheet
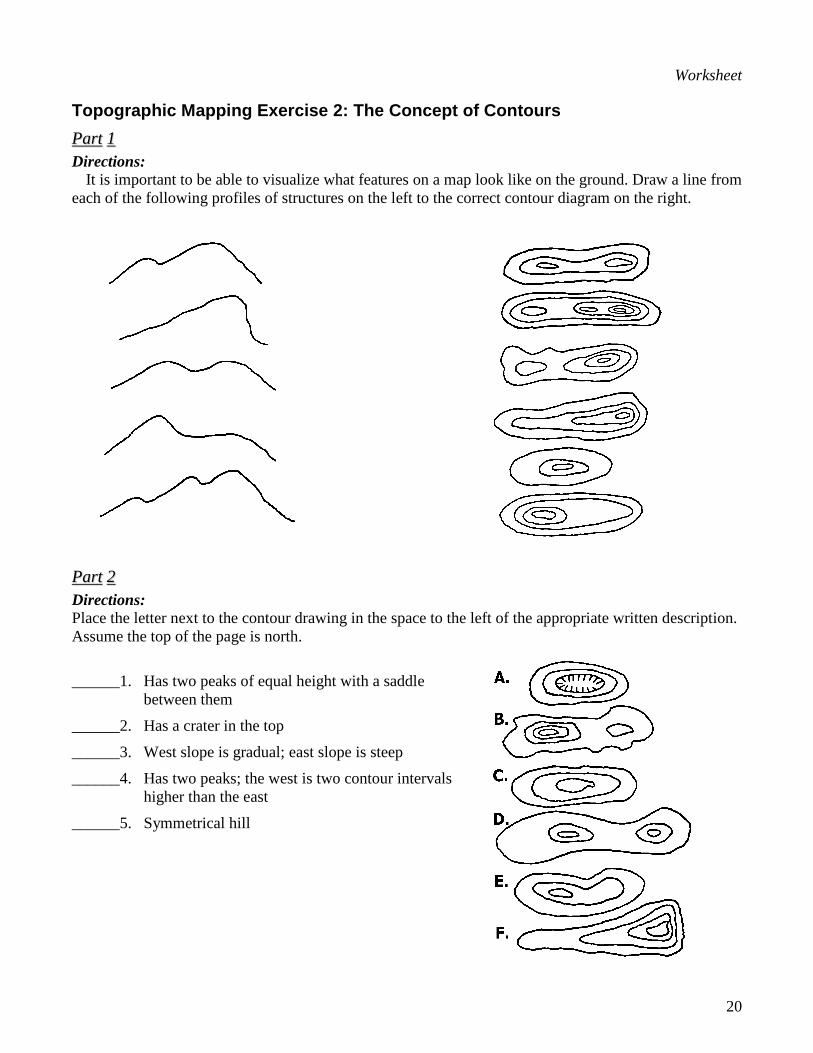
Topographic Mapping Exercise 2: The Concept of Contours PPaarrtt 11 Directions:
It is important to be able to visualize what features on a map look like on the ground. Draw a line from each of the following profiles of structures on the left to the correct contour diagram on the right.
PPaarrtt 22 Directions: Place the letter next to the contour drawing in the space to the left of the appropriate written description. Assume the top of the page is north.
______1. Has two peaks of equal height with a saddle
between them
______2. Has a crater in the top
______3. West slope is gradual; east slope is steep
______4. Has two peaks; the west is two contour intervals higher than the east
______5. Symmetrical hill

21
Orienteering Compass Exercise 1: Identify the Parts of a Compass Modified with permission from Outdoor Recreation Education Opportunities, Wyoming Game and Fish Department Overview: Students identify the parts of a compass.
Associated Objective: Students will become familiar with navigational tools (map and compass) and demonstrate their
ability to use them to navigate successfully. Time: One 30 – 60 minute session
Materials: Copies of worksheet, writing utensil
Directions: Have students complete the worksheet. See the Additional Resources section for more compass
activities.
Evaluation: Students will locate and describe the parts of a compass.
Extension: Obtain orienteering compasses and have students locate the part of the compass.
Answers to Worksheet: 1) orienting arrow 2) degree reading (bearing) 3) magnetic needle 4) orienting lines 5) declination scale 6) compass base (base plate) 7) compass housing (vial) 8) direction of travel arrow
22
Worksheet
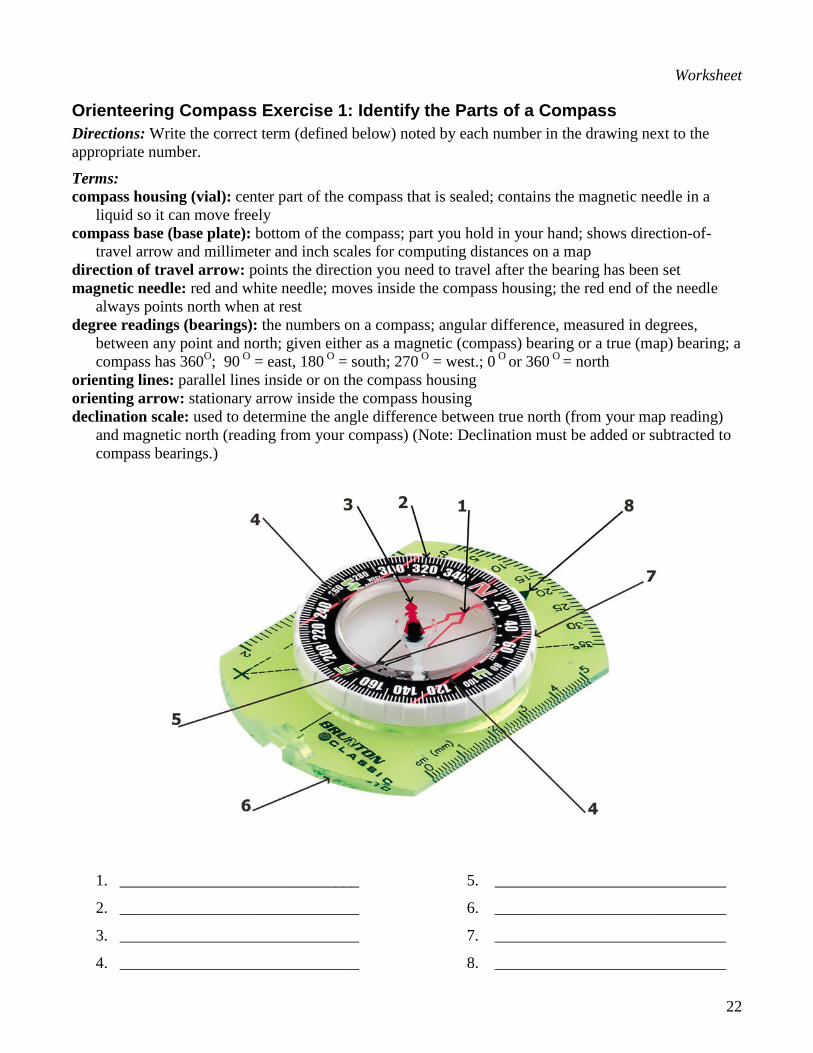
Orienteering Compass Exercise 1: Identify the Parts of a Compass Directions: Write the correct term (defined below) noted by each number in the drawing next to the appropriate number.
Terms: compass housing (vial): center part of the compass that is sealed; contains the magnetic needle in a
liquid so it can move freely compass base (base plate): bottom of the compass; part you hold in your hand; shows direction-of-
travel arrow and millimeter and inch scales for computing distances on a map direction of travel arrow: points the direction you need to travel after the bearing has been set magnetic needle: red and white needle; moves inside the compass housing; the red end of the needle
always points north when at rest degree readings (bearings): the numbers on a compass; angular difference, measured in degrees,
between any point and north; given either as a magnetic (compass) bearing or a true (map) bearing; a compass has 360O; 90 O = east, 180 O = south; 270 O = west.; 0 O or 360 O = north
orienting lines: parallel lines inside or on the compass housing orienting arrow: stationary arrow inside the compass housing declination scale: used to determine the angle difference between true north (from your map reading)
and magnetic north (reading from your compass) (Note: Declination must be added or subtracted to compass bearings.)
1. ______________________________
2. ______________________________
3. ______________________________
4. ______________________________
5. _____________________________
6. _____________________________
7. _____________________________
8. _____________________________
23
Orienteering Compass Exercise 2: Get Your Bearings Modified with permission from Outdoor Recreation Education Opportunities, Wyoming Game and Fish Department Overview: Students use a compass to determine bearings/direction.
Associated Objective: Students will become familiar with navigational tools (map and compass) and demonstrate their ability
to use them to navigate successfully. Time: One 30 – 60 minute session
Materials: Copies of diagrams, orienteering compass, writing utensil
Directions: Review the parts of a compass. Show students how the magnetic needle always points north. Have
students align the orienting arrow and magnetic needle, then use the compass to complete the worksheet.
Evaluation: Students will correctly use a compass to determine bearings from one point to another.
Extension: Mark locations on a topographical map and have students take bearings between points.
Answers to Worksheet:
PPaarrtt 11:: A) 0 o or 360o, north B) 180 o, south C) 135 o, southeast D) 315 o, northwest E) 90 o, east F) 270 o, west G) 45 o, northeast H) 225 o, southwest
PPaarrtt 22:: X to A = 2) 316 o X to B = 8) 256 o X to C = 4) 216 o X to D = 1) 34 o X to E = 5) 100 o X to F = 7) 156 o
24
Worksheet Orienteering Compass Exercise 2: Get Your Bearings
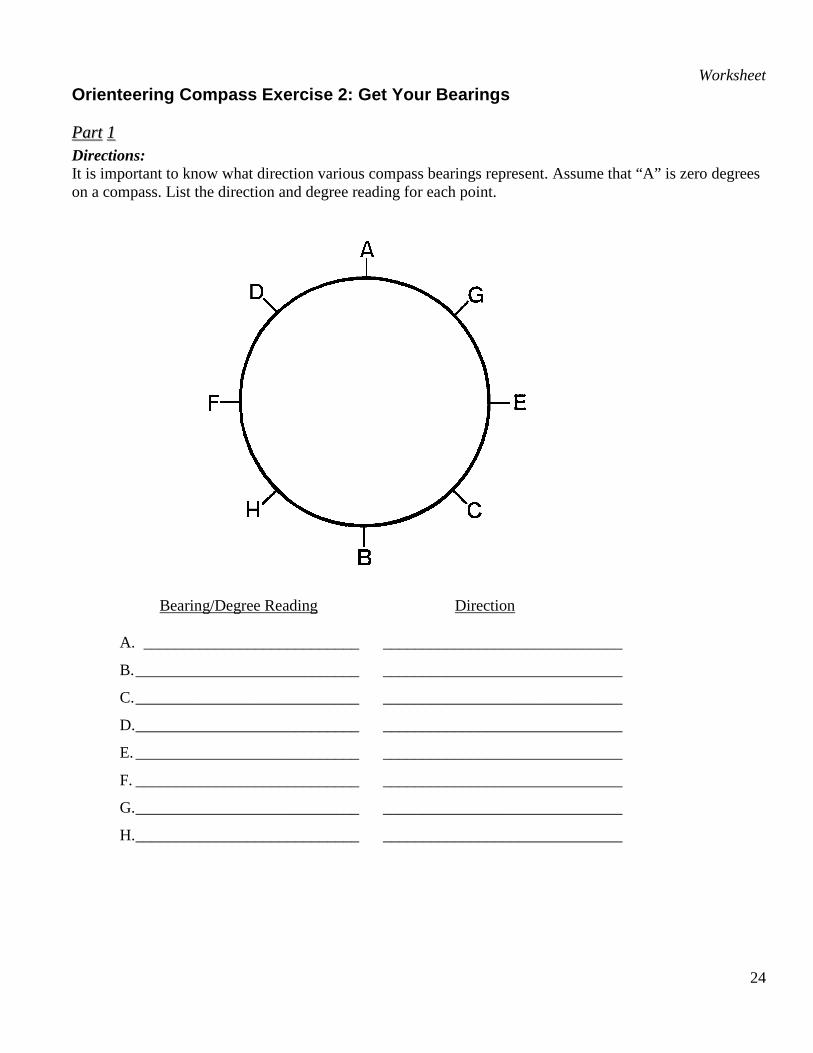
PPaarrtt 11 Directions: It is important to know what direction various compass bearings represent. Assume that “A” is zero degrees on a compass. List the direction and degree reading for each point.
Bearing/Degree Reading Direction
A. ___________________________ ______________________________
B. ____________________________ ______________________________
C. ____________________________ ______________________________
D. ____________________________ ______________________________
E. ____________________________ ______________________________
F. ____________________________ ______________________________
G. ____________________________ ______________________________
H. ____________________________ ______________________________

25
PPaarrtt 22 Directions: Your location is noted by the “X” below. Set the declination of your compass at 0o. Determine the compass bearing from the center of “X” to the dot next to each letter. Select the correct reading from the list of possible answers below and write it in the appropriate space.
Possible Answers: 1) 34o 2) 316 o 3) 10 o 4) 216 o 5) 100 o 6) 188 o 7) 156 o 8) 256 o
______ X to A ______ X to D ______ X to B ______ X to E ______ X to C ______ X to F Hint: The “N” on the compass should point toward the top of the map or be parallel to the “N” lines on your map.
26
Orienteering Compass Exercise 3: Orienteering in the Field Modified with permission from Outdoor Living Skills Series: Map and Compass, Missouri Department of Conservation Overview: Students determine their pace using a pre-measured course, then practice pacing.
Associated Objective: Students will become familiar with navigational tools (map and compass) and demonstrate their ability
to use them to navigate successfully. Time: One 30 – 60 minute session
Determine Your Pace Materials: Measuring tape, flags or stakes to mark distance, paper and writing utensil, clipboard to hold writing materials (optional)
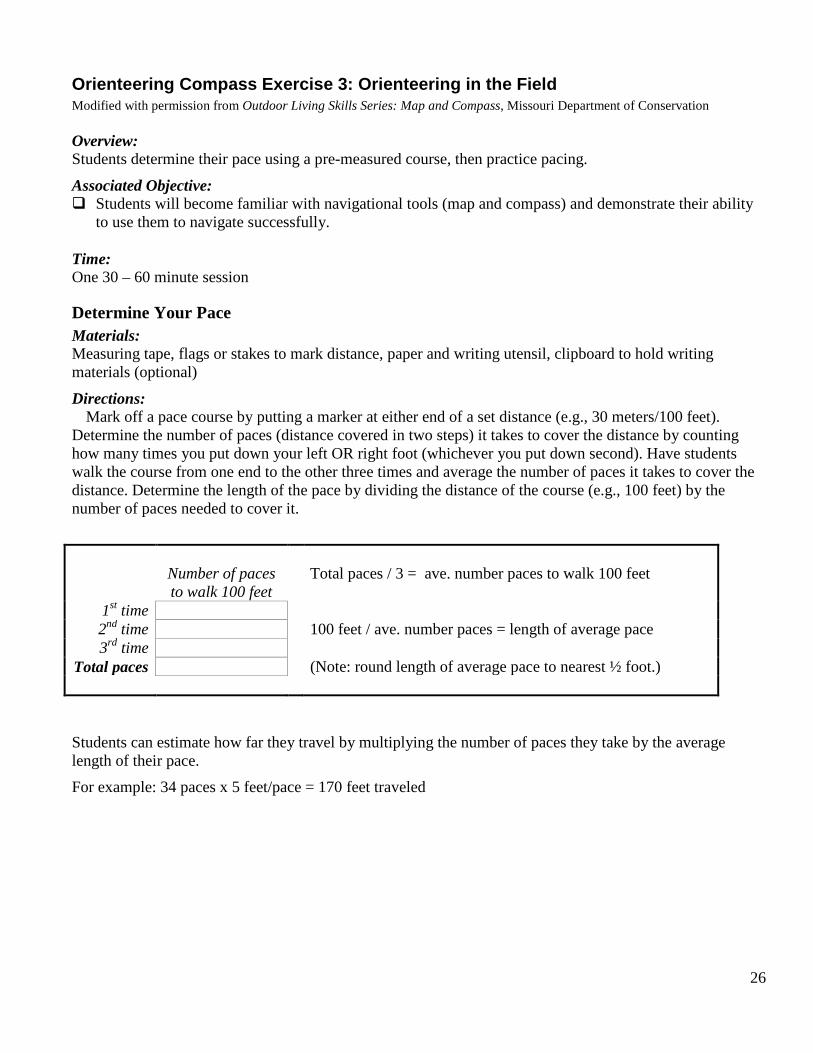
Directions: Mark off a pace course by putting a marker at either end of a set distance (e.g., 30 meters/100 feet).
Determine the number of paces (distance covered in two steps) it takes to cover the distance by counting how many times you put down your left OR right foot (whichever you put down second). Have students walk the course from one end to the other three times and average the number of paces it takes to cover the distance. Determine the length of the pace by dividing the distance of the course (e.g., 100 feet) by the number of paces needed to cover it.
Number of paces to walk 100 feet
Total paces / 3 = ave. number paces to walk 100 feet
1st time 2nd time 100 feet / ave. number paces = length of average pace 3rd time
Total paces (Note: round length of average pace to nearest ½ foot.)
Students can estimate how far they travel by multiplying the number of paces they take by the average length of their pace.
For example: 34 paces x 5 feet/pace = 170 feet traveled
27
Pace a Square Materials: Flags to mark corners, compass, worksheet, writing utensil, clipboard to hold worksheet (optional)
Directions: 1. Find an area where there are no obstacles at least 50 feet in either direction. Place a flag in the ground to
mark your starting point.
2. Determine the number of paces you must take to travel 50 feet. (See “Determine Your Pace.”) Number of paces to travel 50 feet: ______
3. Stand next to the flag marking your starting point. Set any bearing you wish on your compass and travel 50 feet.
4. When you have traveled 50 feet, STOP. Place a flag to mark your new location.
5. Add 90o to the bearing on your compass. Travel 50 feet in the new direction, STOP and mark the new location. Repeat this procedure twice. You should end up at your original location. If not, how far are you from your starting point? _________
Straight Ahead, or Not? Materials: Blindfold, partner Directions:
Most people travel in a circle with a radius under one-half mile when they are lost. The direction of the circle depends on the terrain and the length of each leg. (Most people have one leg slightly longer than the other.) You usually veer the direction of the shorter leg on level ground. This exercise helps demonstrate why you need a compass to travel in a straight line.
Have students work in pairs. One stands next to a tree or other large object facing another object that is at least 100 yards away. (You can use flags to mark starting and ending points if there are no large objects in the area.) Have the other student place the blindfold on the first student. The first student then walks toward the distant object. The partner should walk alongside the first student and alert them only if they are about to run into something. He should not influence the blindfolded student’s direction.
After students have traveled about 100 yards (See “Determine Your Pace.”) remove the blindfold. The blindfolded student should sight back to the starting point. Did she travel in a straight line? If not, in which direction did she veer?
Evaluation: Students will be able to pace a square. Students will demonstrate how difficult it is to walk a straight line without using a compass.
Extension: Have students pace other geometric figures.

28
Using Map and Compass Together Exercise 1: Reconciling Magnetic North and True North Overview: Students practice using a topographical map and compass together.
Associated Objective: Students will become familiar with navigational tools (map and compass) and demonstrate their ability
to use them to navigate successfully. Time: One 30 – 60 minute session
Materials: Compass, copies of worksheet
Directions: Review how to read a topographic map and use an orienteering compass. Have students answer the
questions on the worksheet using the sample topographic map and an orienteering compass. Alternative: Use a topographic map of a local area and develop your own set of questions.
Evaluation: Students will be able to reconcile true north with magnetic north, then determine compass bearings between locations on a topographic map.
Extensions: Geocaching
Students could go geocaching and use a topographical map, GPS unit, and compass to locate a cache. This is an activity where people hide containers around the world and post the GPS coordinates on a web site. Locations of some 35,000 geocaches are listed on the geocaching web site: www.geocaching.com. There is an on-line form if you would like to place a cache. Be sure to follow the guidelines on the site and get permission before placing a cache. Also, get permission before searching on private land. Iowa State University Extension has GPS kits located at Extension offices and area education agencies around the state.
Answers to Worksheet: 1) E; 1230 feet 2) A or H; 1050 feet 3) 10 feet 4) F 5) 180 feet 6) G 7) 5½o east 8) 340o 9)64.5 o 10) H
29
Worksheet
Using Map and Compass Together Exercise 1: Reconciling Magnetic North and True North Directions:
Align the map on the following page so the magnetic needle and orienteering arrow are pointing at its north (top) edge. Find the declination diagram to determine the angle of declination between true north (star/TN) and magnetic north (MN). If the angle of declination is to the east (right), subtract it from the compass reading. If the angle of declination is to the west, add it to your compass readings. Take all compass readings from the center of the circle (where the letter is located).
Questions: 1. On the map, which letter denotes the highest point? What is its elevation?
2. On the map, which letter denotes the lowest point? What is its elevation?
3. What is the contour interval of this map?
4. Which letter represents the steepest area: C, F, or I?
5. What is the difference in elevation between point E and H?
6. Which has the higher elevation, C or G?
7. What is the angle of declination on this map?
8. You want to head from point E to point F. What would your bearing be?
A) 320 o B) 333 o C) 340 o C) 345 o
9. Suppose you wish to travel from the boat ramp on the river to point E, what bearing would you take?
A) 64.5 o B) 74.5 o C) 296 o C) 304 o
10. You are somewhere along the Middle Raccoon River. If the Moffit Grove Cemetery is at a bearing of 110 o and the Springbrook Lake dam is at a bearing of 43 o, where are you?

30
Bagley Quadrangle 7.5 Minute Map Contour interval = 10 feet
31
Additional Resources America’s National Wildlife Refuge System geocaching.com – guidelines for the sport; locations of geocaches Iowa Geographic Map Server – topographic and land cover maps available online Iowa Association of County Conservation Boards Teaching Map and Compass: Navigating from the Classroom to the Outdoors - general map and compass
teaching principles and suggested curriculum OA Guide to Map & Compass - Outdoor Action Guide to Map and Compass; information taken from “The
Backpackers Field Manual” by Rick Curtis Orienteering Unlimited, Inc. - Map Adventure Programs for schools, teacher training, and camps; includes
general information about orienteering United States Geological Survey mapping website University of Texas Libraries - links to topographic and other maps