alwaysassist user guide – vision care provider … user guide vision care provider portal ......
TRANSCRIPT

AlwaysAssist User Guide – Vision Care Provider Portal |Page 0
AlwaysAssist User Guide – Vision Care Provider Portal |Page 1
AlwaysAssist User Guide
Vision Care Provider Portal
Table of Contents
Entering the Site ......................................................................................................................................... 2
Provider Login ......................................................................................................................................... 2
Password Change ................................................................................................................................... 3
Password Request .................................................................................................................................. 3
Site Navigation ........................................................................................................................................... 4
Members .................................................................................................................................................... 5
Member Search ...................................................................................................................................... 5
Member Search Results .......................................................................................................................... 6
Member Information ................................................................................................................................ 7
Authorizations ........................................................................................................................................... 10
Authorization Creation ........................................................................................................................... 10
Authorization Search ............................................................................................................................. 11
Authorization Search Results ................................................................................................................ 13
Authorization Information ...................................................................................................................... 14
Claims ...................................................................................................................................................... 16
Claim Creation / Claim Draft .................................................................................................................. 16
Claim Calculator .................................................................................................................................... 20
Claim Submission ................................................................................................................................. 21
Claim Search ........................................................................................................................................ 22
Claim Search Results ............................................................................................................................ 24
Claim Information .................................................................................................................................. 25
Toolbox .................................................................................................................................................... 27
Toolbox ................................................................................................................................................. 27
What’s New ........................................................................................................................................... 27
Products and Programs ........................................................................................................................ 28
Forms and Documents .......................................................................................................................... 28
User Preferences .................................................................................................................................. 29
Contact Us ................................................................................................................................................ 30
AlwaysAssist User Guide – Vision Care Provider Portal |Page 2
Entering the Site
Provider Login
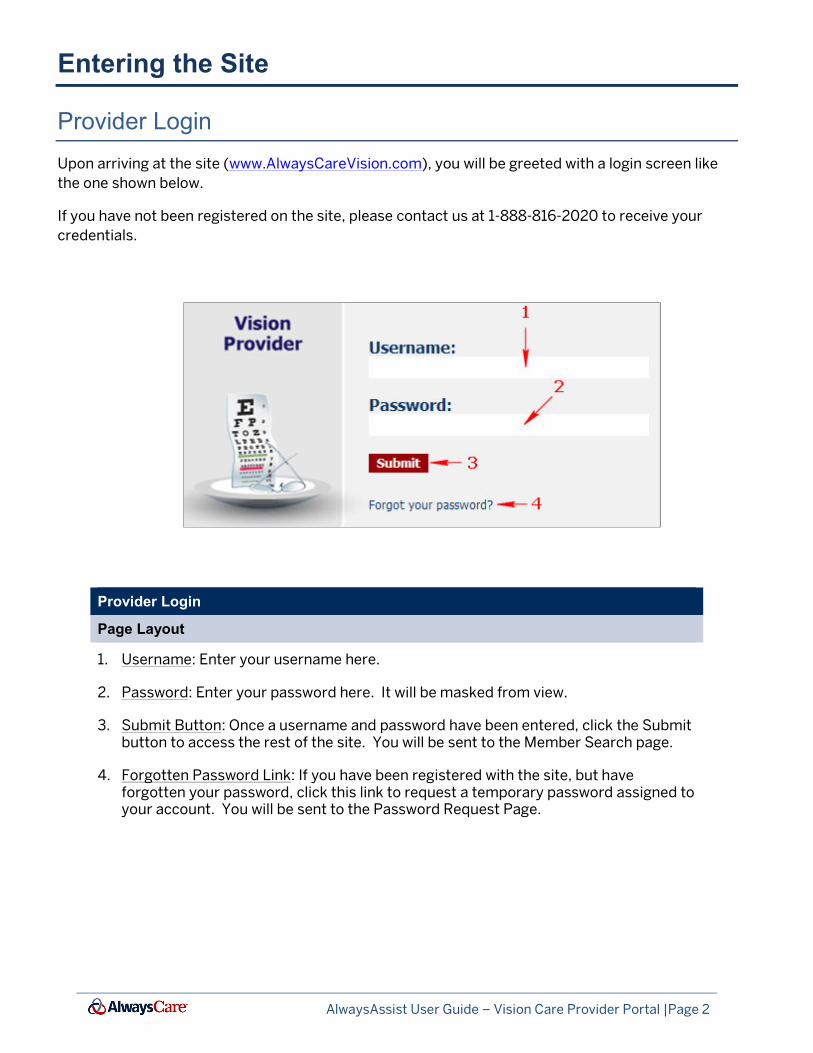
Upon arriving at the site (www.AlwaysCareVision.com), you will be greeted with a login screen like
the one shown below.
If you have not been registered on the site, please contact us at 1-888-816-2020 to receive your
credentials.
Provider Login
Page Layout
1. Username: Enter your username here.
2. Password: Enter your password here. It will be masked from view.
3. Submit Button: Once a username and password have been entered, click the Submit button to access the rest of the site. You will be sent to the Member Search page.
4. Forgotten Password Link: If you have been registered with the site, but have forgotten your password, click this link to request a temporary password assigned to your account. You will be sent to the Password Request Page.
AlwaysAssist User Guide – Vision Care Provider Portal |Page 3
Password Change
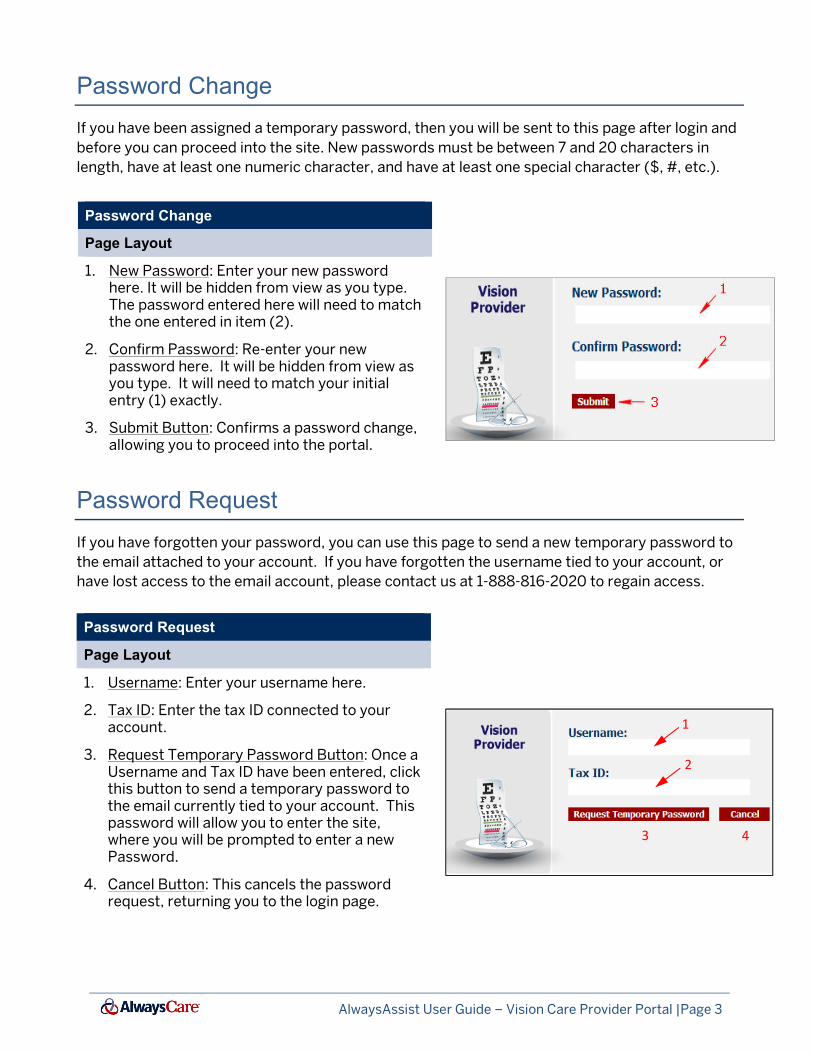
If you have been assigned a temporary password, then you will be sent to this page after login and
before you can proceed into the site. New passwords must be between 7 and 20 characters in
length, have at least one numeric character, and have at least one special character ($, #, etc.).
Password Change
Page Layout
1. New Password: Enter your new password here. It will be hidden from view as you type. The password entered here will need to match the one entered in item (2).
2. Confirm Password: Re-enter your new password here. It will be hidden from view as you type. It will need to match your initial entry (1) exactly.
3. Submit Button: Confirms a password change, allowing you to proceed into the portal.
Password Request
If you have forgotten your password, you can use this page to send a new temporary password to
the email attached to your account. If you have forgotten the username tied to your account, or
have lost access to the email account, please contact us at 1-888-816-2020 to regain access.
Password Request
Page Layout
1. Username: Enter your username here.
2. Tax ID: Enter the tax ID connected to your account.
3. Request Temporary Password Button: Once a Username and Tax ID have been entered, click this button to send a temporary password to the email currently tied to your account. This password will allow you to enter the site, where you will be prompted to enter a new Password.
4. Cancel Button: This cancels the password request, returning you to the login page.
1
2
3 4
AlwaysAssist User Guide – Vision Care Provider Portal |Page 4
Site Navigation
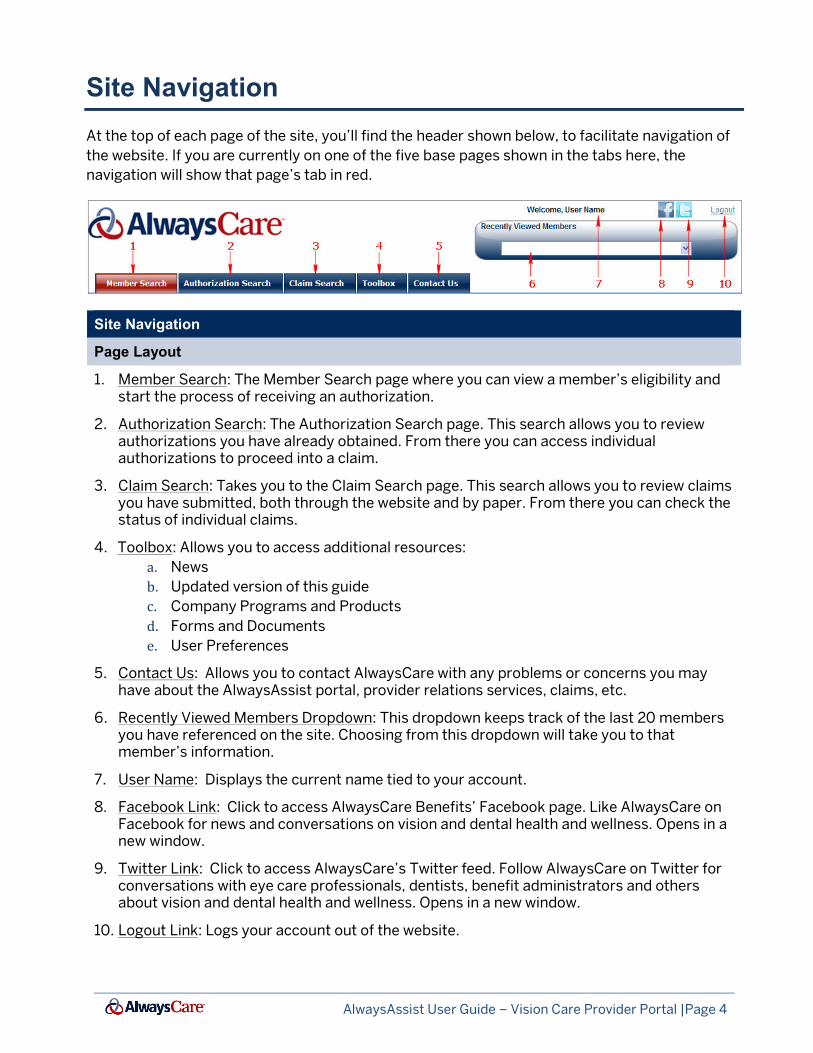
At the top of each page of the site, you’ll find the header shown below, to facilitate navigation of
the website. If you are currently on one of the five base pages shown in the tabs here, the
navigation will show that page’s tab in red.
Site Navigation
Page Layout
1. Member Search: The Member Search page where you can view a member’s eligibility and start the process of receiving an authorization.
2. Authorization Search: The Authorization Search page. This search allows you to review authorizations you have already obtained. From there you can access individual authorizations to proceed into a claim.
3. Claim Search: Takes you to the Claim Search page. This search allows you to review claims you have submitted, both through the website and by paper. From there you can check the status of individual claims.
4. Toolbox: Allows you to access additional resources:
a. News
b. Updated version of this guide
c. Company Programs and Products
d. Forms and Documents
e. User Preferences
5. Contact Us: Allows you to contact AlwaysCare with any problems or concerns you may have about the AlwaysAssist portal, provider relations services, claims, etc.
6. Recently Viewed Members Dropdown: This dropdown keeps track of the last 20 members you have referenced on the site. Choosing from this dropdown will take you to that member’s information.
7. User Name: Displays the current name tied to your account.
8. Facebook Link: Click to access AlwaysCare Benefits’ Facebook page. Like AlwaysCare on Facebook for news and conversations on vision and dental health and wellness. Opens in a new window.
9. Twitter Link: Click to access AlwaysCare’s Twitter feed. Follow AlwaysCare on Twitter for conversations with eye care professionals, dentists, benefit administrators and others about vision and dental health and wellness. Opens in a new window.
10. Logout Link: Logs your account out of the website.
AlwaysAssist User Guide – Vision Care Provider Portal |Page 5
Members
Member Search
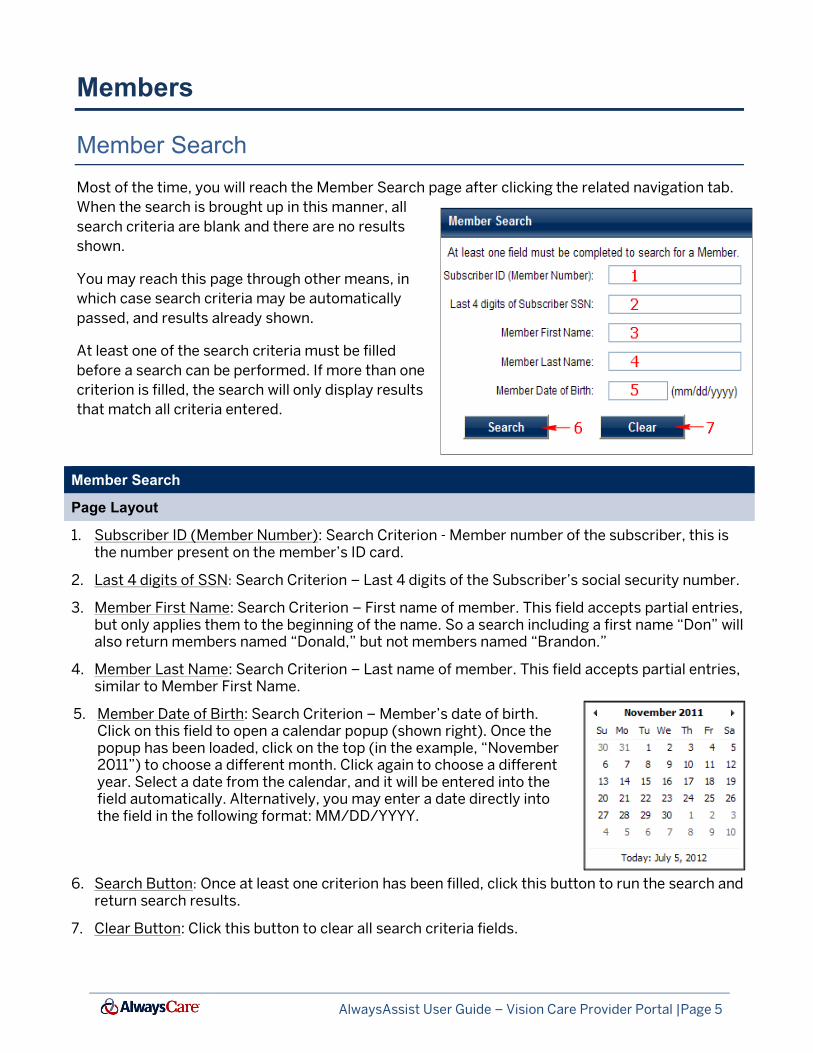
Most of the time, you will reach the Member Search page after clicking the related navigation tab.
When the search is brought up in this manner, all
search criteria are blank and there are no results
shown.
You may reach this page through other means, in
which case search criteria may be automatically
passed, and results already shown.
At least one of the search criteria must be filled
before a search can be performed. If more than one
criterion is filled, the search will only display results
that match all criteria entered.
Member Search
Page Layout
1. Subscriber ID (Member Number): Search Criterion - Member number of the subscriber, this is the number present on the member’s ID card.
2. Last 4 digits of SSN: Search Criterion – Last 4 digits of the Subscriber’s social security number.
3. Member First Name: Search Criterion – First name of member. This field accepts partial entries, but only applies them to the beginning of the name. So a search including a first name “Don” will also return members named “Donald,” but not members named “Brandon.”
4. Member Last Name: Search Criterion – Last name of member. This field accepts partial entries, similar to Member First Name.
5. Member Date of Birth: Search Criterion – Member’s date of birth. Click on this field to open a calendar popup (shown right). Once the popup has been loaded, click on the top (in the example, “November 2011”) to choose a different month. Click again to choose a different year. Select a date from the calendar, and it will be entered into the field automatically. Alternatively, you may enter a date directly into the field in the following format: MM/DD/YYYY.
6. Search Button: Once at least one criterion has been filled, click this button to run the search and return search results.
7. Clear Button: Click this button to clear all search criteria fields.
AlwaysAssist User Guide – Vision Care Provider Portal |Page 6
Member Search Results
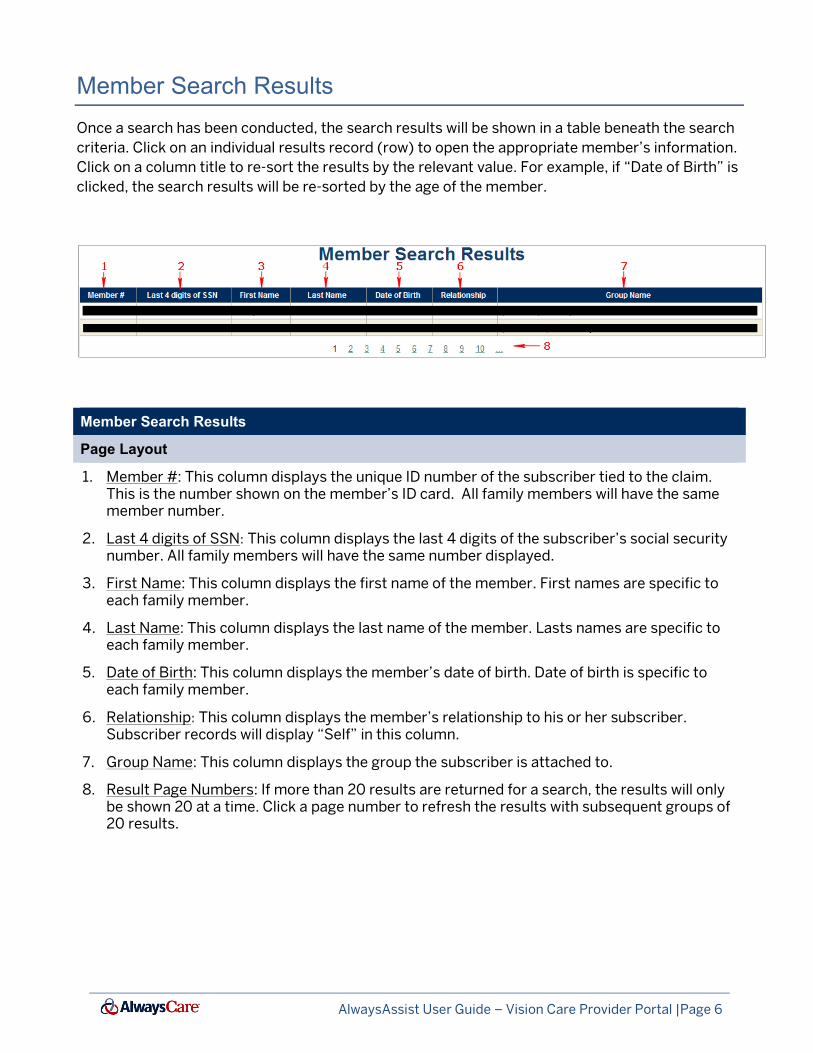
Once a search has been conducted, the search results will be shown in a table beneath the search
criteria. Click on an individual results record (row) to open the appropriate member’s information.
Click on a column title to re-sort the results by the relevant value. For example, if “Date of Birth” is
clicked, the search results will be re-sorted by the age of the member.
Member Search Results
Page Layout
1. Member #: This column displays the unique ID number of the subscriber tied to the claim. This is the number shown on the member’s ID card. All family members will have the same member number.
2. Last 4 digits of SSN: This column displays the last 4 digits of the subscriber’s social security number. All family members will have the same number displayed.
3. First Name: This column displays the first name of the member. First names are specific to each family member.
4. Last Name: This column displays the last name of the member. Lasts names are specific to each family member.
5. Date of Birth: This column displays the member’s date of birth. Date of birth is specific to each family member.
6. Relationship: This column displays the member’s relationship to his or her subscriber. Subscriber records will display “Self” in this column.
7. Group Name: This column displays the group the subscriber is attached to.
8. Result Page Numbers: If more than 20 results are returned for a search, the results will only be shown 20 at a time. Click a page number to refresh the results with subsequent groups of 20 results.
AlwaysAssist User Guide – Vision Care Provider Portal |Page 7
Member Information
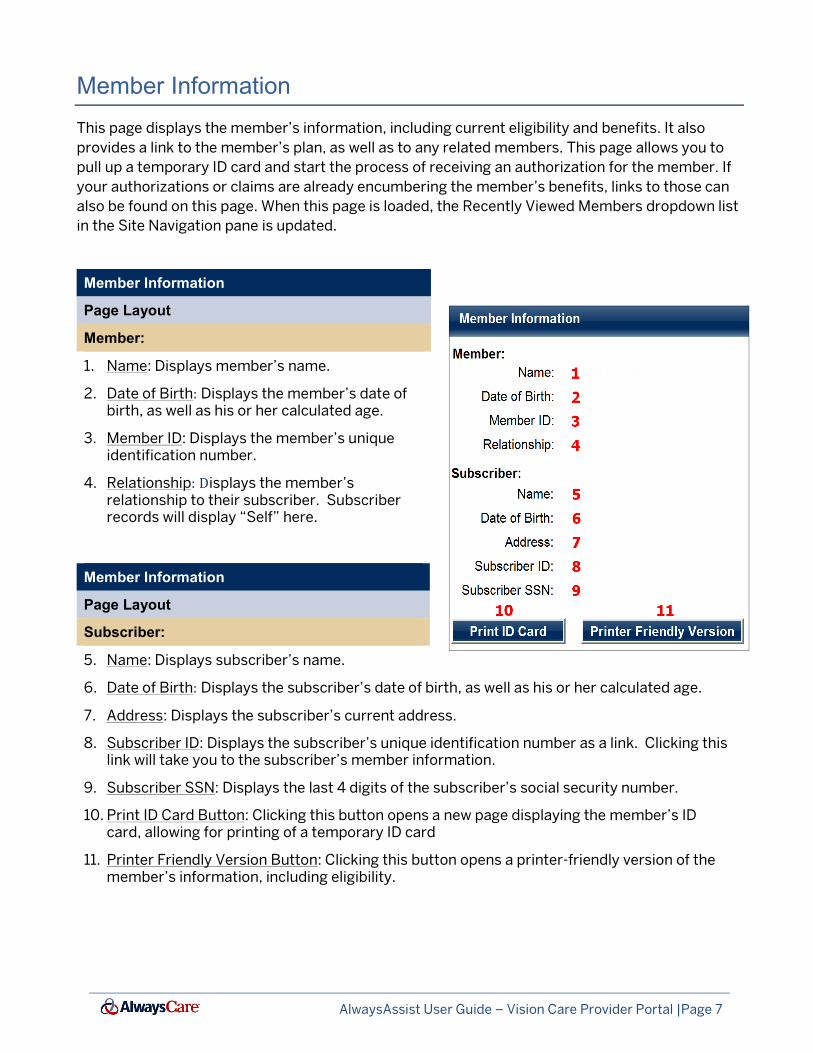
This page displays the member’s information, including current eligibility and benefits. It also
provides a link to the member’s plan, as well as to any related members. This page allows you to
pull up a temporary ID card and start the process of receiving an authorization for the member. If
your authorizations or claims are already encumbering the member’s benefits, links to those can
also be found on this page. When this page is loaded, the Recently Viewed Members dropdown list
in the Site Navigation pane is updated.
Member Information
Page Layout
Member:
1. Name: Displays member’s name.
2. Date of Birth: Displays the member’s date of birth, as well as his or her calculated age.
3. Member ID: Displays the member’s unique identification number.
4. Relationship: Displays the member’s relationship to their subscriber. Subscriber records will display “Self” here.
Member Information
Page Layout
Subscriber:
5. Name: Displays subscriber’s name.
6. Date of Birth: Displays the subscriber’s date of birth, as well as his or her calculated age.
7. Address: Displays the subscriber’s current address.
8. Subscriber ID: Displays the subscriber’s unique identification number as a link. Clicking this link will take you to the subscriber’s member information.
9. Subscriber SSN: Displays the last 4 digits of the subscriber’s social security number.
10. Print ID Card Button: Clicking this button opens a new page displaying the member’s ID card, allowing for printing of a temporary ID card
11. Printer Friendly Version Button: Clicking this button opens a printer-friendly version of the member’s information, including eligibility.
AlwaysAssist User Guide – Vision Care Provider Portal |Page 8
Member Information
Page Layout
Subscriber:
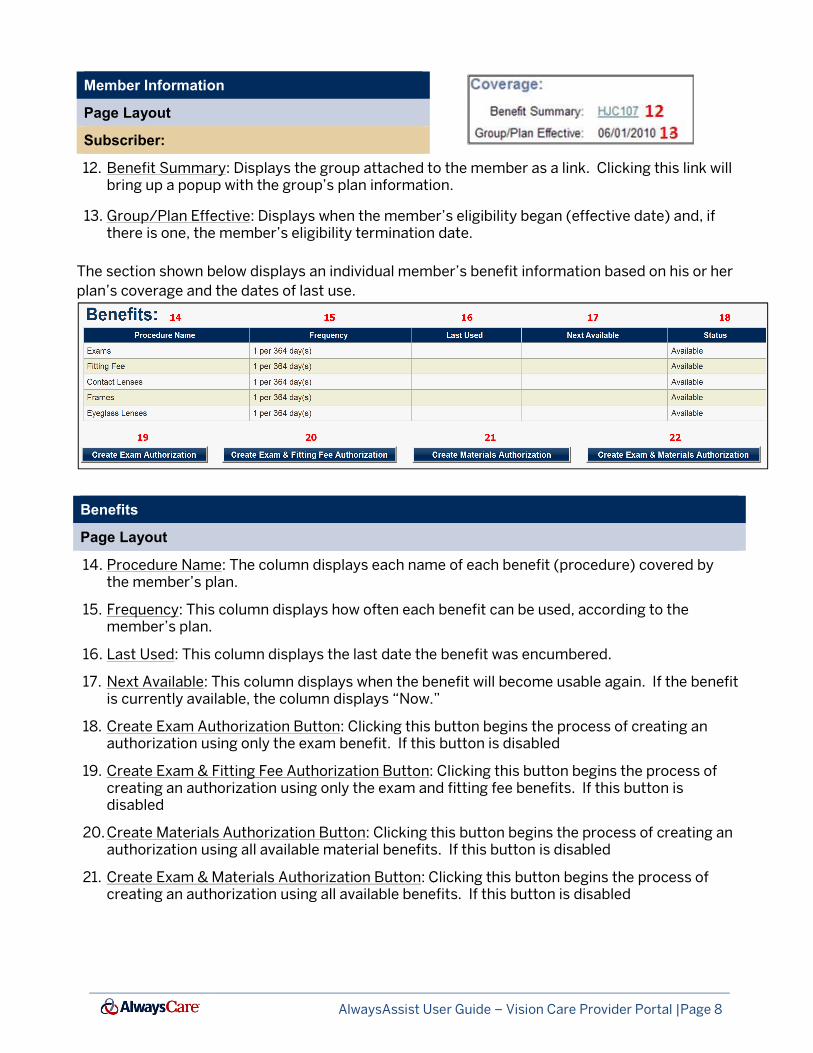
12. Benefit Summary: Displays the group attached to the member as a link. Clicking this link will bring up a popup with the group’s plan information.
13. Group/Plan Effective: Displays when the member’s eligibility began (effective date) and, if there is one, the member’s eligibility termination date.
The section shown below displays an individual member’s benefit information based on his or her
plan’s coverage and the dates of last use.
Benefits
Page Layout
14. Procedure Name: The column displays each name of each benefit (procedure) covered by the member’s plan.
15. Frequency: This column displays how often each benefit can be used, according to the member’s plan.
16. Last Used: This column displays the last date the benefit was encumbered.
17. Next Available: This column displays when the benefit will become usable again. If the benefit is currently available, the column displays “Now.”
18. Create Exam Authorization Button: Clicking this button begins the process of creating an authorization using only the exam benefit. If this button is disabled
19. Create Exam & Fitting Fee Authorization Button: Clicking this button begins the process of creating an authorization using only the exam and fitting fee benefits. If this button is disabled
20. Create Materials Authorization Button: Clicking this button begins the process of creating an authorization using all available material benefits. If this button is disabled
21. Create Exam & Materials Authorization Button: Clicking this button begins the process of creating an authorization using all available benefits. If this button is disabled
AlwaysAssist User Guide – Vision Care Provider Portal |Page 9
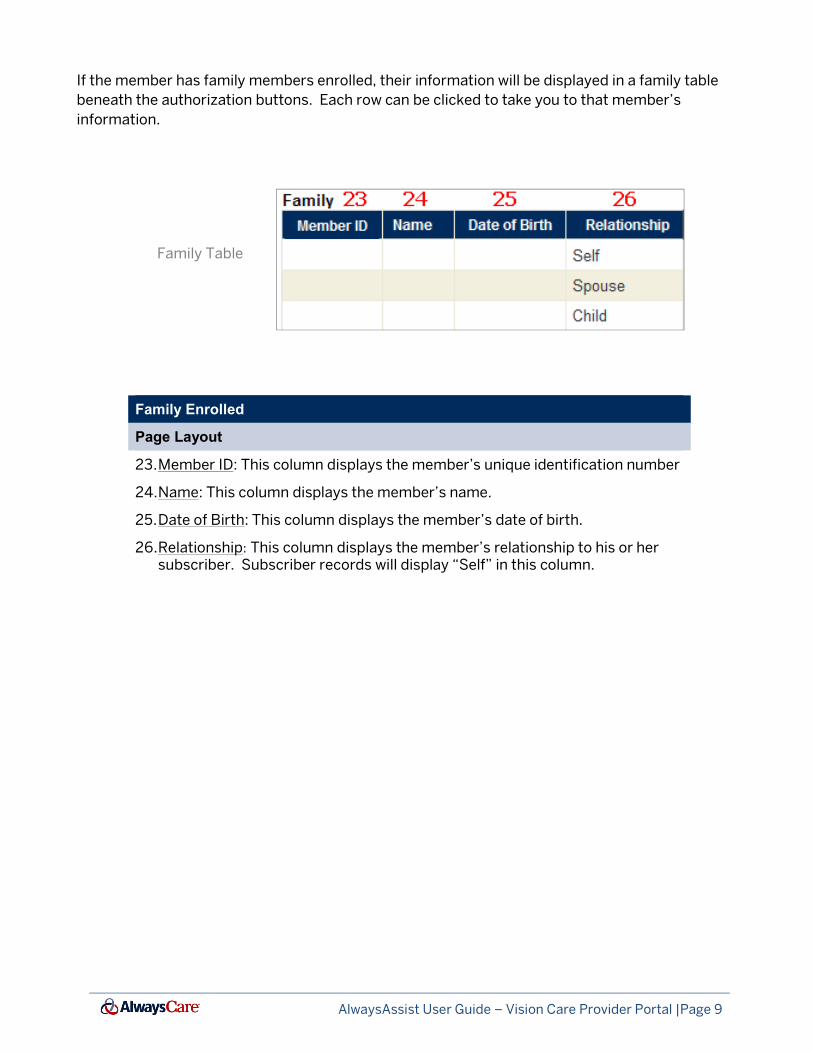
If the member has family members enrolled, their information will be displayed in a family table
beneath the authorization buttons. Each row can be clicked to take you to that member’s
information.
Family Table
Family Enrolled
Page Layout
23. Member ID: This column displays the member’s unique identification number
24. Name: This column displays the member’s name.
25. Date of Birth: This column displays the member’s date of birth.
26. Relationship: This column displays the member’s relationship to his or her subscriber. Subscriber records will display “Self” in this column.

AlwaysAssist User Guide – Vision Care Provider Portal |Page 10
Authorizations
Authorization Creation
The Authorization Creation page allows you to confirm what benefits you are about to have
authorized before any benefits are encumbered.
Authorization Creation
Page Layout
1. Subscriber ID: This row displays the subscriber’s unique identification number
2. Member Name: This row displays the member’s name.
3. Date of Birth: This row displays the member’s date of birth.
4. Relationship: This row displays the member’s relationship to his or her subscriber. Subscribers will display “Self” in this column.
5. Place of Service: Choose a Location Button: If you have access to more than one location, clicking this button allows you to choose which location you will be assigning the authorization to.
6. Location/Store/Address: This section displays the location the authorization will be tied to.
7. Procedures Selected: Displays the benefits that will be encumbered as part of the new authorization.
8. Create Authorization Button: Clicking this button will create the authorization with the information shown. Benefits will be encumbered, and you will be taken to the new Authorizations information page.
9. Cancel Button: Clicking this button will cancel the authorization. No benefits will be encumbered, and you will be returned to the member’s information page.

AlwaysAssist User Guide – Vision Care Provider Portal |Page 11
Authorization Search
You will reach the Authorization Search page after clicking the related navigation tab. When the
search is brought up in this manner, all search criteria are blank and there are no results shown.
At least one of the search criteria must be filled before a search can be performed. If more than
one criterion is filled, the search will only display results that match all criteria entered.
Authorization Search
Page Layout
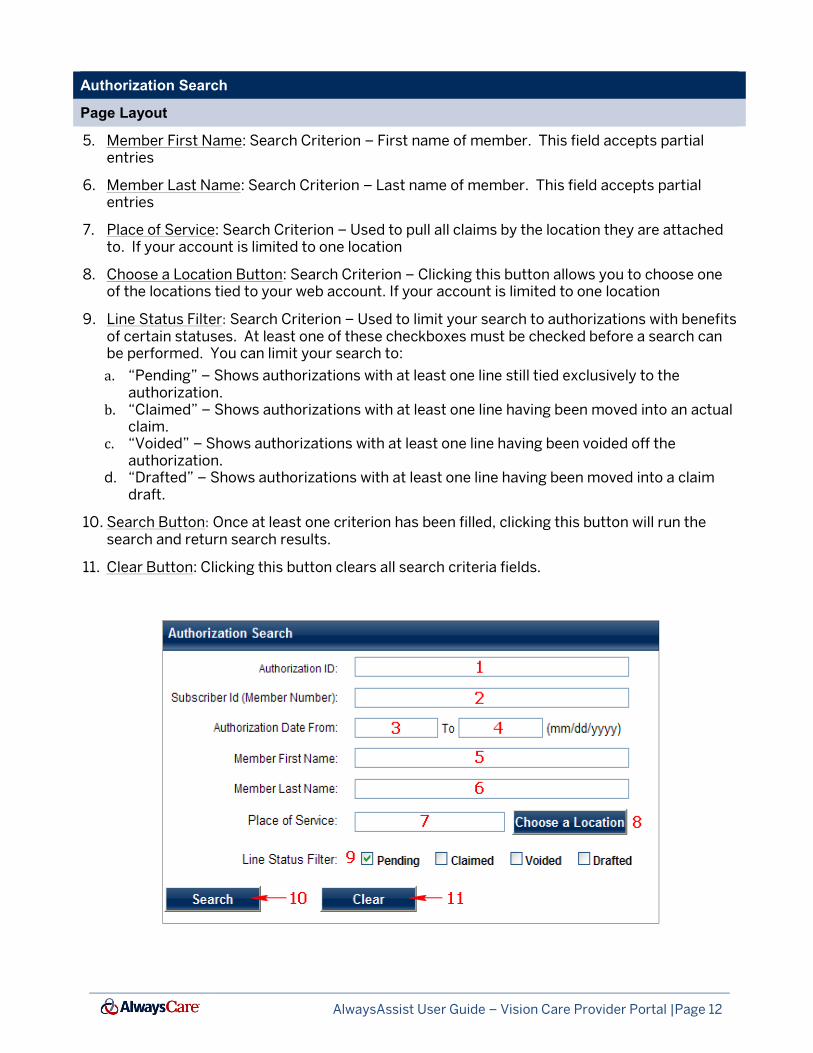
1. Authorization ID: Search Criterion – An authorization’s unique number. If this criterion is used and the search succeeds, you will be taken directly to that authorization’s information page instead of search results.
2. Subscriber ID (Member Number): Search Criterion - Member number of the subscriber. This is the number present on the member’s ID card.
3. Authorization Date - From: Search Criterion – Used to pull all authorizations in a given time window. This field is the starting date for the time window. Clicking on this field opens a calendar popup (shown right). Once the popup has been loaded, clicking on the top (in the example, “November 2011”), will allow you to choose a different month. Clicking the top again will allow you to choose a different year. Once a date has been selected, it will be entered into the field automatically. Alternatively, you may enter a date directly into the field in the following format: MM/DD/YYYY.
4. Authorization Date - To: Search Criterion – Used to pull all authorizations in a given time window. This field is the end date for the time window. This field can be filled in the same way as the “From” field.
AlwaysAssist User Guide – Vision Care Provider Portal |Page 12
Authorization Search
Page Layout
5. Member First Name: Search Criterion – First name of member. This field accepts partial entries
6. Member Last Name: Search Criterion – Last name of member. This field accepts partial entries
7. Place of Service: Search Criterion – Used to pull all claims by the location they are attached to. If your account is limited to one location
8. Choose a Location Button: Search Criterion – Clicking this button allows you to choose one of the locations tied to your web account. If your account is limited to one location
9. Line Status Filter: Search Criterion – Used to limit your search to authorizations with benefits of certain statuses. At least one of these checkboxes must be checked before a search can be performed. You can limit your search to:
a. “Pending” – Shows authorizations with at least one line still tied exclusively to the authorization.
b. “Claimed” – Shows authorizations with at least one line having been moved into an actual claim.
c. “Voided” – Shows authorizations with at least one line having been voided off the authorization.
d. “Drafted” – Shows authorizations with at least one line having been moved into a claim draft.
10. Search Button: Once at least one criterion has been filled, clicking this button will run the search and return search results.
11. Clear Button: Clicking this button clears all search criteria fields.
AlwaysAssist User Guide – Vision Care Provider Portal |Page 13
Authorization Search Results
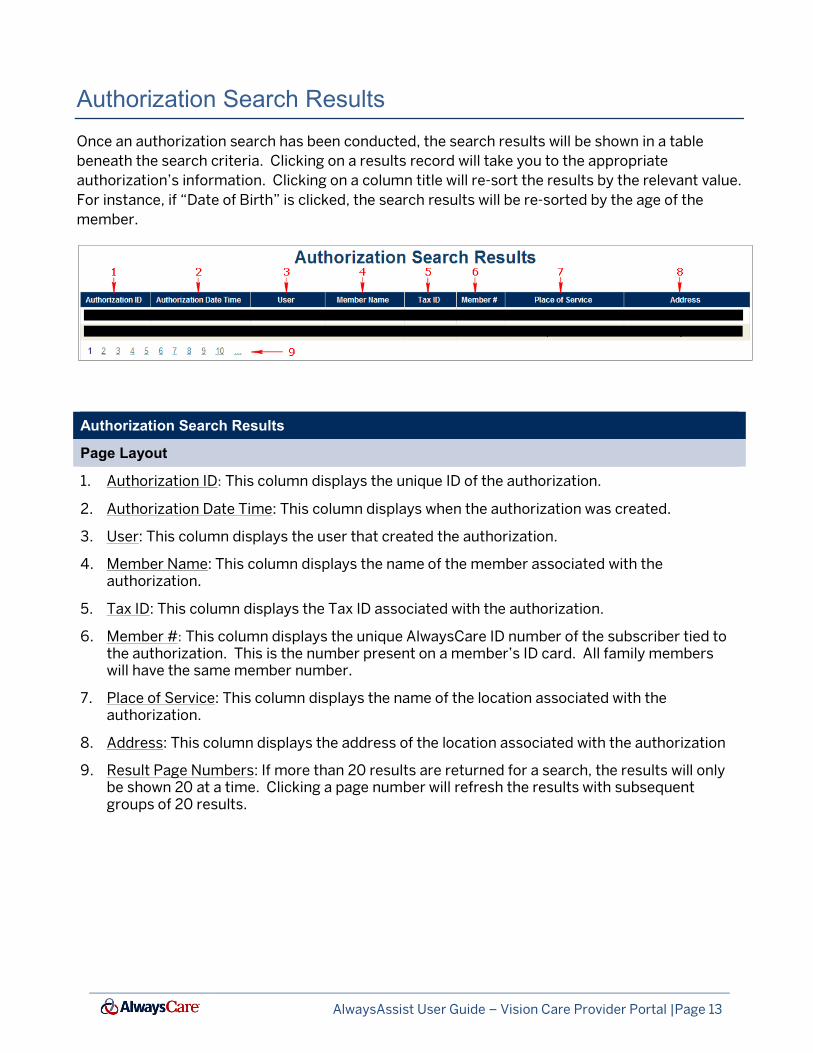
Once an authorization search has been conducted, the search results will be shown in a table
beneath the search criteria. Clicking on a results record will take you to the appropriate
authorization’s information. Clicking on a column title will re-sort the results by the relevant value.
For instance, if “Date of Birth” is clicked, the search results will be re-sorted by the age of the
member.
Authorization Search Results
Page Layout
1. Authorization ID: This column displays the unique ID of the authorization.
2. Authorization Date Time: This column displays when the authorization was created.
3. User: This column displays the user that created the authorization.
4. Member Name: This column displays the name of the member associated with the authorization.
5. Tax ID: This column displays the Tax ID associated with the authorization.
6. Member #: This column displays the unique AlwaysCare ID number of the subscriber tied to the authorization. This is the number present on a member’s ID card. All family members will have the same member number.
7. Place of Service: This column displays the name of the location associated with the authorization.
8. Address: This column displays the address of the location associated with the authorization
9. Result Page Numbers: If more than 20 results are returned for a search, the results will only be shown 20 at a time. Clicking a page number will refresh the results with subsequent groups of 20 results.

AlwaysAssist User Guide – Vision Care Provider Portal |Page 14
Authorization Information
This page displays the authorization’s information, including the services authorized and the
status of each line of the authorization. It also provides a quick way of making additional
authorizations for the member or their family. This page allows you to start the process of
submitting a claim, or clearing your authorization to free up the member’s benefits.
Authorization Information
Page Layout
1. Printer Friendly Version: Clicking this button opens a printer-friendly version of the authorization’s information, including the member’s eligibility.
2. Authorization ID: Displays authorization’s unique ID.
3. Authorization Created: Displays when the authorization was created.
4. Member Name: Displays member’s name as a link. Clicking this will take you to the member’s information page.
5. Subscriber ID (Member Number): Displays the subscriber’s unique identification number as a link. Clicking this link will take you to the subscriber’s member information.
6. Group: Displays the group attached to the member as a link. Clicking this link will bring up a popup with the group’s plan information.
7. Place of Service - Location: Displays the name of location tied to the authorization.
8. Place of Service - Store: Displays the store number (if available) of the location tied to the authorization.
9. Place of Service - Address: Displays the address of the location tied to the authorization.
AlwaysAssist User Guide – Vision Care Provider Portal |Page 15
Authorization Information
Page Layout
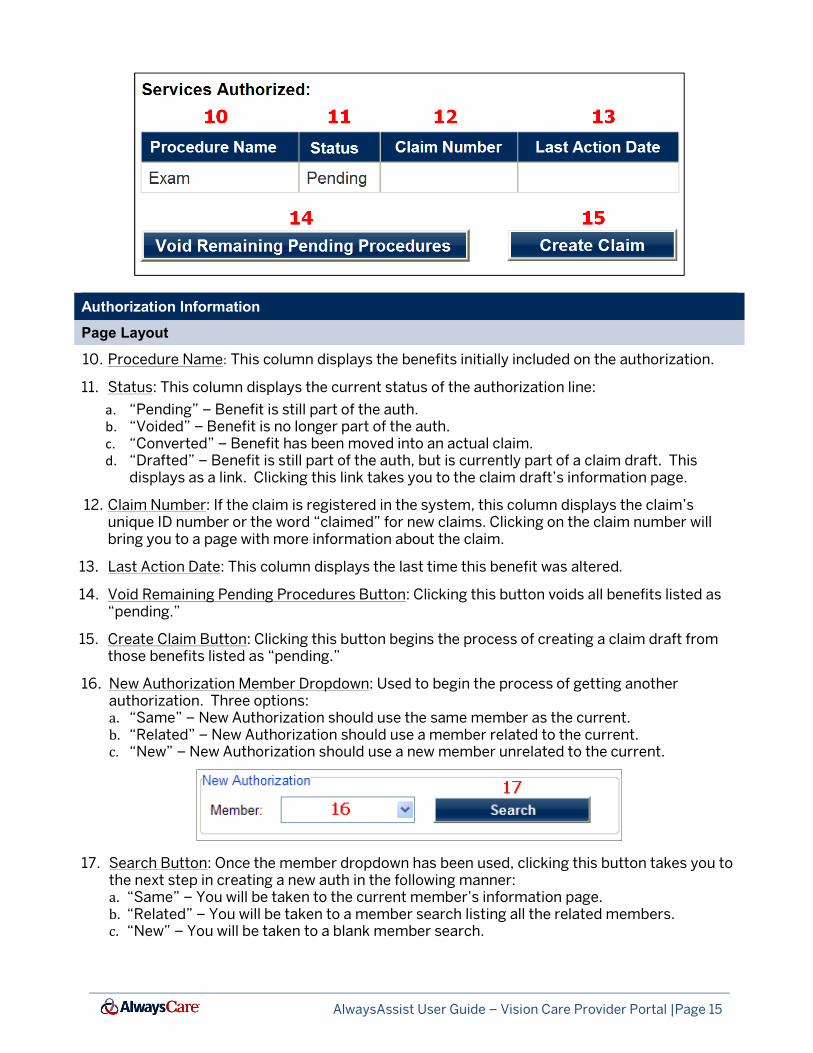
10. Procedure Name: This column displays the benefits initially included on the authorization.
11. Status: This column displays the current status of the authorization line:
a. “Pending” – Benefit is still part of the auth. b. “Voided” – Benefit is no longer part of the auth. c. “Converted” – Benefit has been moved into an actual claim. d. “Drafted” – Benefit is still part of the auth, but is currently part of a claim draft. This
displays as a link. Clicking this link takes you to the claim draft’s information page.
12. Claim Number: If the claim is registered in the system, this column displays the claim’s unique ID number or the word “claimed” for new claims. Clicking on the claim number will bring you to a page with more information about the claim.
13. Last Action Date: This column displays the last time this benefit was altered.
14. Void Remaining Pending Procedures Button: Clicking this button voids all benefits listed as “pending.”
15. Create Claim Button: Clicking this button begins the process of creating a claim draft from those benefits listed as “pending.”
16. New Authorization Member Dropdown: Used to begin the process of getting another authorization. Three options: a. “Same” – New Authorization should use the same member as the current. b. “Related” – New Authorization should use a member related to the current. c. “New” – New Authorization should use a new member unrelated to the current.
17. Search Button: Once the member dropdown has been used, clicking this button takes you to the next step in creating a new auth in the following manner: a. “Same” – You will be taken to the current member’s information page. b. “Related” – You will be taken to a member search listing all the related members. c. “New” – You will be taken to a blank member search.

AlwaysAssist User Guide – Vision Care Provider Portal |Page 16
Claims
Claim Creation / Claim Draft
The claim draft page allows you to enter the additional information needed to submit claims on
benefits you’ve already authorized. You can also save your process as a draft. Saved drafts are
also shown on this page. Once claim information has been entered, this page also allows you to
calculate the member responsibility of the claim.
Claim Creation/Claim Draft
Page Layout
1. Member Name: This row displays the member’s name.
2. Member Date of Birth: This row displays the member’s date of birth.
3. Subscriber ID (Member Number): This row displays the subscriber’s unique identification number
4. Provider Dropdown: Lists the providers available at the location tied to the authorization.
5. Will Be Paid To: Displays the vendor information.

The next section of the claim draft
authorization on which the draft is based. If the page is loading a claim draft, this section will also
include any data already saved as part of the draft.
Claim Draft/Authorization Procedures
Page Layout
6. Choose Checkbox: Checking this box marks the benefit for use in the claimmust be checked if you wish to save any of the information you enter on this line.
7. Service Date Field: Enter the service date of the benefClicking on this field opens a calendar popup (shown right). Once the popup has been loaded, clicking on the top (in the example, “November 2011”), will allow you to choose a different month. Clicking the top again will allow you to choose a different year. Once a date has been selected, it will be entered into the field automatically. Alternatively, you may enter a date directly into the field in the following format: MM/DD/YYYY.
8. Procedure Code Dropdownbenefits line. A procedure code must be chosen on any line claimed
9. Procedure Name: Displays the name of the benefit.
10. Modifier Field: Optional field allowing you to type in any modifiers you wish to put on the benefit line. For Fitting Fechosen a Fitting Fee type.
AlwaysAssist User Guide – Vision Care Provider Portal
raft, Authorized Procedures, will list the pending benefits from the
the draft is based. If the page is loading a claim draft, this section will also
include any data already saved as part of the draft.
tion Procedures
: Checking this box marks the benefit for use in the claimmust be checked if you wish to save any of the information you enter on this line.
Enter the service date of the benefit here. Clicking on this field opens a calendar popup (shown right). Once the popup has been loaded, clicking on the top (in the example, “November 2011”), will allow you to choose a different month. Clicking the top again will allow you to
ferent year. Once a date has been selected, it will be entered into the field automatically. Alternatively, you may enter a date directly into the field in the following
Procedure Code Dropdown: Offers the list of procedure codes possible for the benefits line. A procedure code must be chosen on any line claimed.
Displays the name of the benefit.
: Optional field allowing you to type in any modifiers you wish to put on For Fitting Fee claims, this field will be filled in for you once you have
chosen a Fitting Fee type.
Vision Care Provider Portal |Page 17
will list the pending benefits from the
the draft is based. If the page is loading a claim draft, this section will also
: Checking this box marks the benefit for use in the claim. This box must be checked if you wish to save any of the information you enter on this line.
ssible for the
: Optional field allowing you to type in any modifiers you wish to put on e claims, this field will be filled in for you once you have
Claim Draft/Authorization Procedures
Page Layout
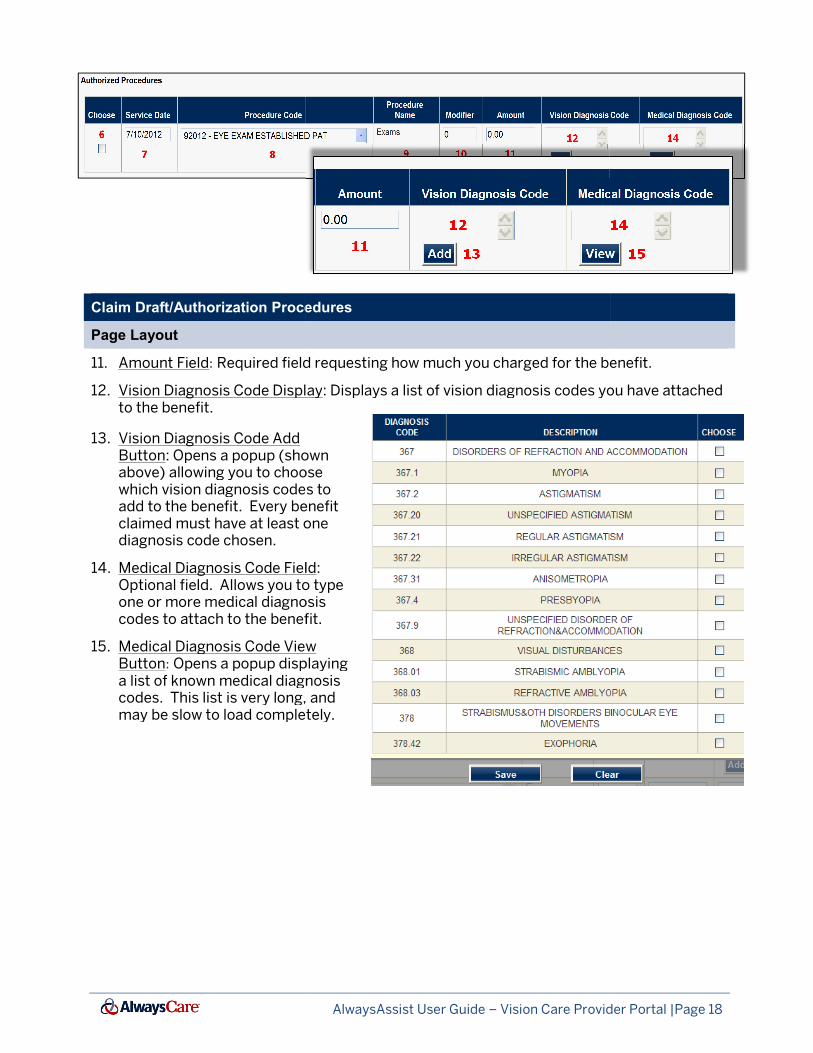
11. Amount Field: Required field requesting how much you charged for the benefit.
12. Vision Diagnosis Code Displayto the benefit.
13. Vision Diagnosis Code Add Button: Opens a popup (shown above) allowing you to choose which vision diagnosis codes to add to the benefit. Every benefit claimed must have at least one diagnosis code chosen.
14. Medical Diagnosis Code FieldOptional field. Allows you to type one or more medical diagnosis codes to attach to the benefit.
15. Medical Diagnosis Code View Button: Opens a popup displaying a list of known medical diagnocodes. This list is very long, and may be slow to load completely.
AlwaysAssist User Guide – Vision Care Provider Portal
Claim Draft/Authorization Procedures
Required field requesting how much you charged for the benefit.
play: Displays a list of vision diagnosis codes you have attached
: Opens a popup (shown above) allowing you to choose which vision diagnosis codes to add to the benefit. Every benefit
least one
Medical Diagnosis Code Field: . Allows you to type
one or more medical diagnosis codes to attach to the benefit.
Medical Diagnosis Code View Opens a popup displaying
a list of known medical diagnosis codes. This list is very long, and may be slow to load completely.
Vision Care Provider Portal |Page 18
Required field requesting how much you charged for the benefit.
: Displays a list of vision diagnosis codes you have attached

AlwaysAssist User Guide – Vision Care Provider Portal |Page 19
The next section of the claim draft, Non-Authorized Procedures, offers you a list of additional
procedures you may want to add to the claim, with the understanding that these lines were not
authorized and so are unlikely to be covered by the member’s plan.
Claim Draft/Non-Authorized Procedures
Page Layout
16. Choose Checkbox: Checking this box marks the non-authorized procedure for use in the claim. This box must be checked if you wish to save any of the information you enter on this line.
17. Service Date Field: Enter the service date of the non-authorized procedure here. This field can be filled in the same way as the Service Date Field for Authorized Procedures.
18. Procedure Name: Displays the name of the non-authorized procedure.
19. Modifier Field: Optional field allowing you to type in any modifiers you wish to put on the non-authorized procedure.
20. Amount Field: Required field requesting how much you charged for the non-authorized procedure.
Claim Draft/Non-Authorized Procedures
Page Layout
21. Calculate Member Responsibility Button: Clicking this button uses the currently entered information to estimate the member and plan responsibilities in a popup window.
22. Submit Button: Clicking this button submits the claim.
23. Save & Finish Later Button: Clicking this button saves the currently entered information as a claim draft.
24. Return to Authorization Button: Clicking this button saves no changes, and returns you to the authorization. This button is only shown when viewing a previously created claim draft.
25. Clear Draft – Return to Authorization Button: Clicking this button clears the current draft and returns you to the authorization.
AlwaysAssist User Guide – Vision Care Provider Portal |Page 20
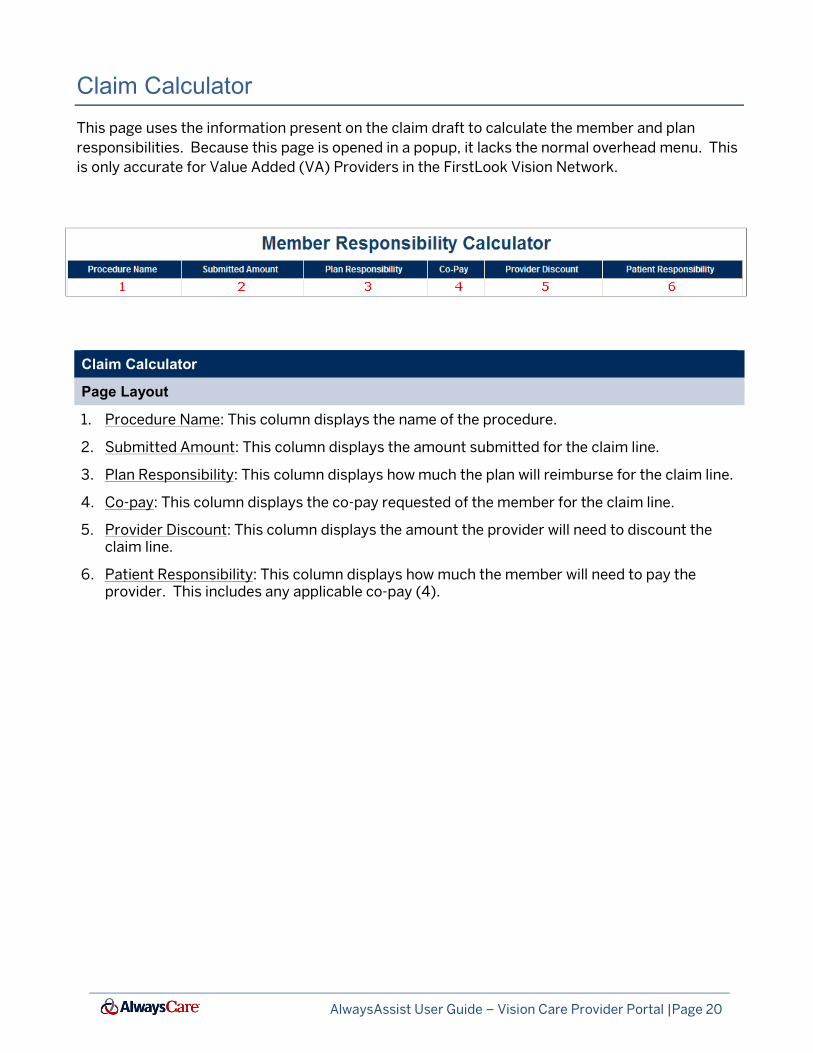
Claim Calculator
This page uses the information present on the claim draft to calculate the member and plan
responsibilities. Because this page is opened in a popup, it lacks the normal overhead menu. This
is only accurate for Value Added (VA) Providers in the FirstLook Vision Network.
Claim Calculator
Page Layout
1. Procedure Name: This column displays the name of the procedure.
2. Submitted Amount: This column displays the amount submitted for the claim line.
3. Plan Responsibility: This column displays how much the plan will reimburse for the claim line.
4. Co-pay: This column displays the co-pay requested of the member for the claim line.
5. Provider Discount: This column displays the amount the provider will need to discount the claim line.
6. Patient Responsibility: This column displays how much the member will need to pay the provider. This includes any applicable co-pay (4).
AlwaysAssist User Guide – Vision Care Provider Portal |Page 21
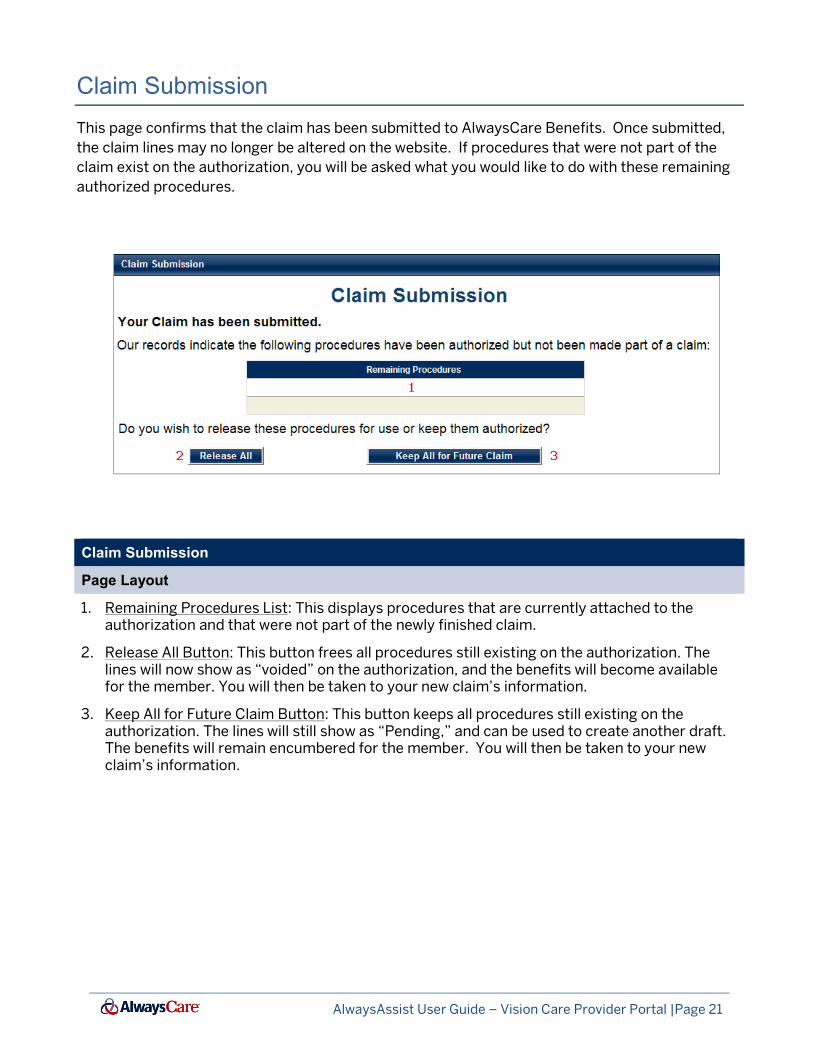
Claim Submission
This page confirms that the claim has been submitted to AlwaysCare Benefits. Once submitted,
the claim lines may no longer be altered on the website. If procedures that were not part of the
claim exist on the authorization, you will be asked what you would like to do with these remaining
authorized procedures.
Claim Submission
Page Layout
1. Remaining Procedures List: This displays procedures that are currently attached to the authorization and that were not part of the newly finished claim.
2. Release All Button: This button frees all procedures still existing on the authorization. The lines will now show as “voided” on the authorization, and the benefits will become available for the member. You will then be taken to your new claim’s information.
3. Keep All for Future Claim Button: This button keeps all procedures still existing on the authorization. The lines will still show as “Pending,” and can be used to create another draft. The benefits will remain encumbered for the member. You will then be taken to your new claim’s information.
AlwaysAssist User Guide – Vision Care Provider Portal |Page 22
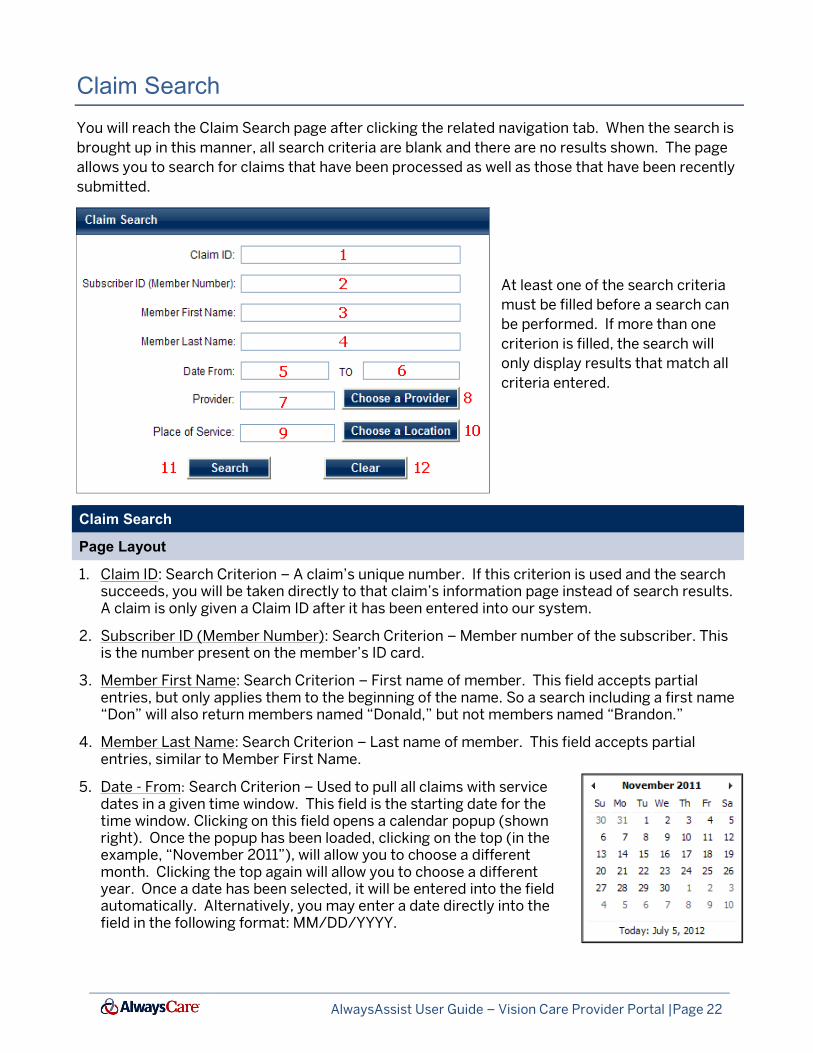
Claim Search
You will reach the Claim Search page after clicking the related navigation tab. When the search is
brought up in this manner, all search criteria are blank and there are no results shown. The page
allows you to search for claims that have been processed as well as those that have been recently
submitted.
At least one of the search criteria
must be filled before a search can
be performed. If more than one
criterion is filled, the search will
only display results that match all
criteria entered.
Claim Search
Page Layout
1. Claim ID: Search Criterion – A claim’s unique number. If this criterion is used and the search succeeds, you will be taken directly to that claim’s information page instead of search results. A claim is only given a Claim ID after it has been entered into our system.
2. Subscriber ID (Member Number): Search Criterion – Member number of the subscriber. This is the number present on the member’s ID card.
3. Member First Name: Search Criterion – First name of member. This field accepts partial entries, but only applies them to the beginning of the name. So a search including a first name “Don” will also return members named “Donald,” but not members named “Brandon.”
4. Member Last Name: Search Criterion – Last name of member. This field accepts partial entries, similar to Member First Name.
5. Date - From: Search Criterion – Used to pull all claims with service dates in a given time window. This field is the starting date for the time window. Clicking on this field opens a calendar popup (shown right). Once the popup has been loaded, clicking on the top (in the example, “November 2011”), will allow you to choose a different month. Clicking the top again will allow you to choose a different year. Once a date has been selected, it will be entered into the field automatically. Alternatively, you may enter a date directly into the field in the following format: MM/DD/YYYY.
AlwaysAssist User Guide – Vision Care Provider Portal |Page 23
Claim Search
Page Layout
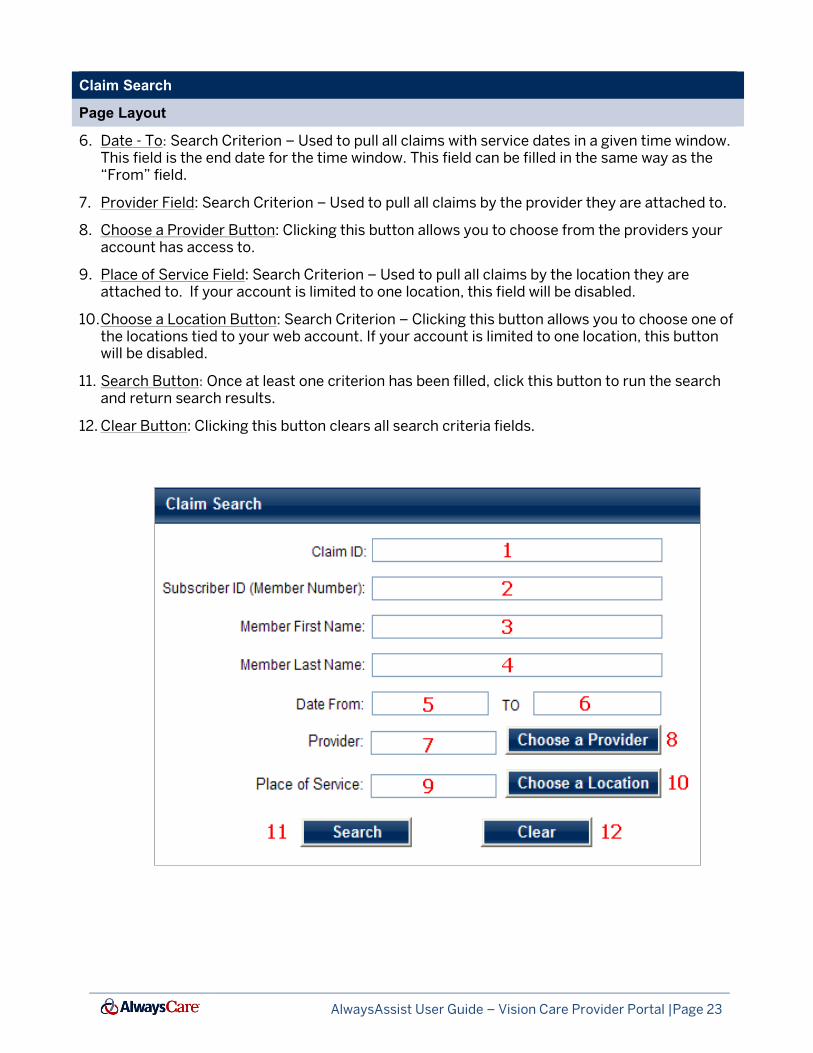
6. Date - To: Search Criterion – Used to pull all claims with service dates in a given time window. This field is the end date for the time window. This field can be filled in the same way as the “From” field.
7. Provider Field: Search Criterion – Used to pull all claims by the provider they are attached to.
8. Choose a Provider Button: Clicking this button allows you to choose from the providers your account has access to.
9. Place of Service Field: Search Criterion – Used to pull all claims by the location they are attached to. If your account is limited to one location, this field will be disabled.
10. Choose a Location Button: Search Criterion – Clicking this button allows you to choose one of the locations tied to your web account. If your account is limited to one location, this button will be disabled.
11. Search Button: Once at least one criterion has been filled, click this button to run the search and return search results.
12. Clear Button: Clicking this button clears all search criteria fields.
AlwaysAssist User Guide – Vision Care Provider Portal |Page 24
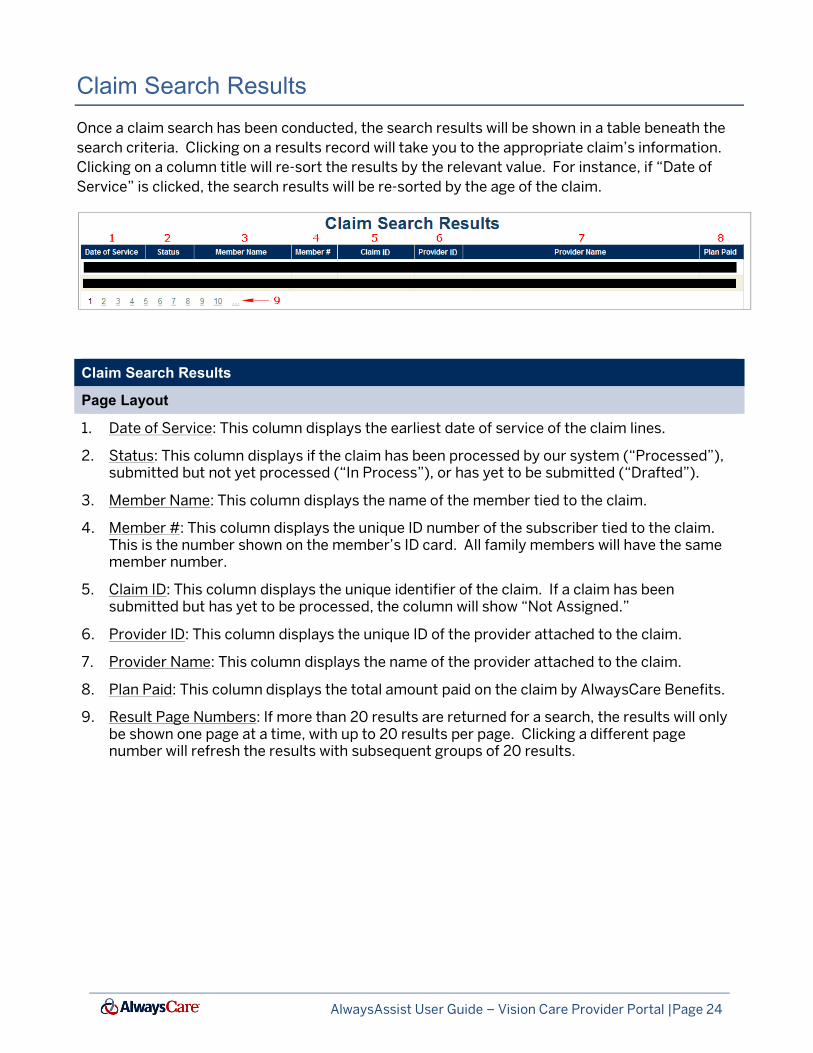
Claim Search Results
Once a claim search has been conducted, the search results will be shown in a table beneath the
search criteria. Clicking on a results record will take you to the appropriate claim’s information.
Clicking on a column title will re-sort the results by the relevant value. For instance, if “Date of
Service” is clicked, the search results will be re-sorted by the age of the claim.
Claim Search Results
Page Layout
1. Date of Service: This column displays the earliest date of service of the claim lines.
2. Status: This column displays if the claim has been processed by our system (“Processed”), submitted but not yet processed (“In Process”), or has yet to be submitted (“Drafted”).
3. Member Name: This column displays the name of the member tied to the claim.
4. Member #: This column displays the unique ID number of the subscriber tied to the claim. This is the number shown on the member’s ID card. All family members will have the same member number.
5. Claim ID: This column displays the unique identifier of the claim. If a claim has been submitted but has yet to be processed, the column will show “Not Assigned.”
6. Provider ID: This column displays the unique ID of the provider attached to the claim.
7. Provider Name: This column displays the name of the provider attached to the claim.
8. Plan Paid: This column displays the total amount paid on the claim by AlwaysCare Benefits.
9. Result Page Numbers: If more than 20 results are returned for a search, the results will only be shown one page at a time, with up to 20 results per page. Clicking a different page number will refresh the results with subsequent groups of 20 results.

AlwaysAssist User Guide – Vision Care Provider Portal |Page 25
Claim Information
This page displays the claim’s information,
including the details of each line of the claim. It
also provides summary information concerning
payments on the claim.
Claim Information
Page Layout
1. Printer Friendly Version Button: Clicking this button opens a printer-friendly version of the claim’s information.
2. Claim ID: Displays the unique ID of the claim. If a claim has been submitted but has yet to be processed, the row will show “Not Assigned.”
3. Date Received: Displays when the claim was received.
4. Claim Status: Displays if the claim has been processed by our system, or has been submitted but not yet processed.
5. Authorization: If the claim originated from an authorization, the authorization’s unique ID number is displayed as a link back to the authorization’s information. If the claim did not originate from an authorization, “No Authorization Available” is displayed.
6. Member Information - Name: Displays the member’s name as a link to that member’s information.
7. Member Information - Address: Displays the current address of the member.
8. Member Information – Date of Birth: Displays the member’s date of birth and age.
9. Provider Information - Name: Displays the name of the provider linked to the claim.
10. Provider Information – Location: Displays information on the location linked to the claim, including location name, store number, and address.
11. Provider Information – Tax ID: Displays the Tax ID linked to the claim.
AlwaysAssist User Guide – Vision Care Provider Portal |Page 26
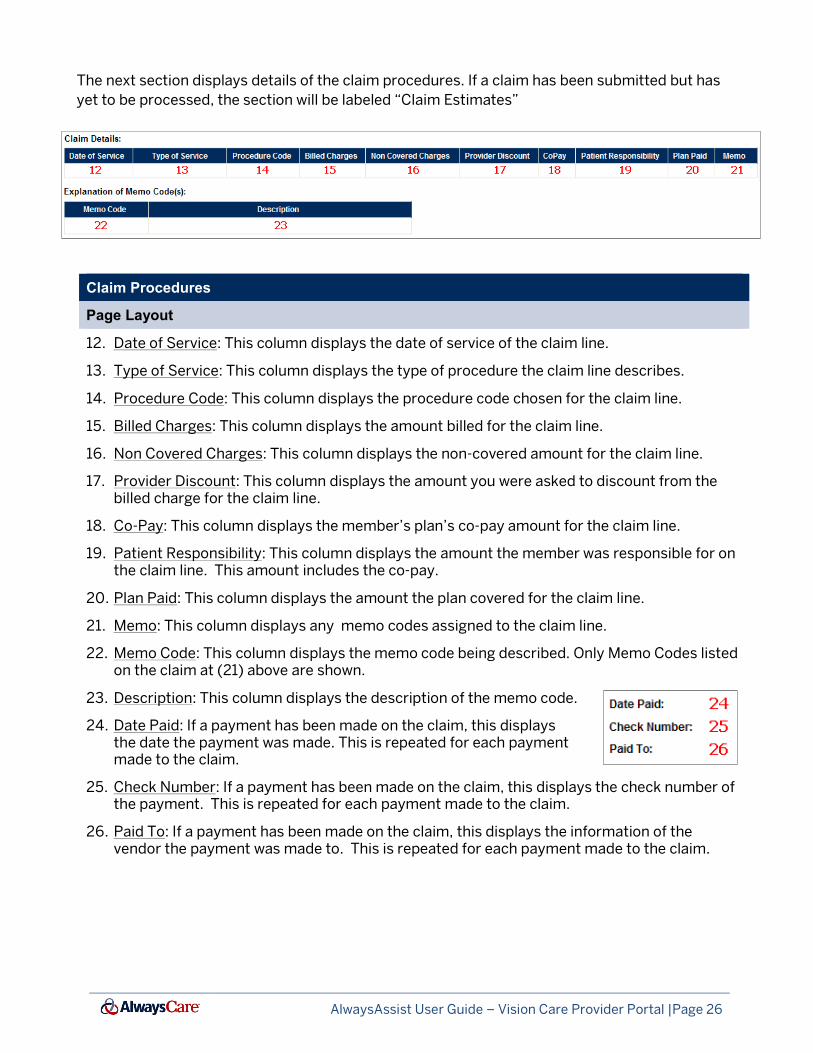
The next section displays details of the claim procedures. If a claim has been submitted but has
yet to be processed, the section will be labeled “Claim Estimates”
Claim Procedures
Page Layout
12. Date of Service: This column displays the date of service of the claim line.
13. Type of Service: This column displays the type of procedure the claim line describes.
14. Procedure Code: This column displays the procedure code chosen for the claim line.
15. Billed Charges: This column displays the amount billed for the claim line.
16. Non Covered Charges: This column displays the non-covered amount for the claim line.
17. Provider Discount: This column displays the amount you were asked to discount from the billed charge for the claim line.
18. Co-Pay: This column displays the member’s plan’s co-pay amount for the claim line.
19. Patient Responsibility: This column displays the amount the member was responsible for on the claim line. This amount includes the co-pay.
20. Plan Paid: This column displays the amount the plan covered for the claim line.
21. Memo: This column displays any memo codes assigned to the claim line.
22. Memo Code: This column displays the memo code being described. Only Memo Codes listed on the claim at (21) above are shown.
23. Description: This column displays the description of the memo code.
24. Date Paid: If a payment has been made on the claim, this displays the date the payment was made. This is repeated for each payment made to the claim.
25. Check Number: If a payment has been made on the claim, this displays the check number of the payment. This is repeated for each payment made to the claim.
26. Paid To: If a payment has been made on the claim, this displays the information of the vendor the payment was made to. This is repeated for each payment made to the claim.
AlwaysAssist User Guide – Vision Care Provider Portal |Page 27
Toolbox
Toolbox
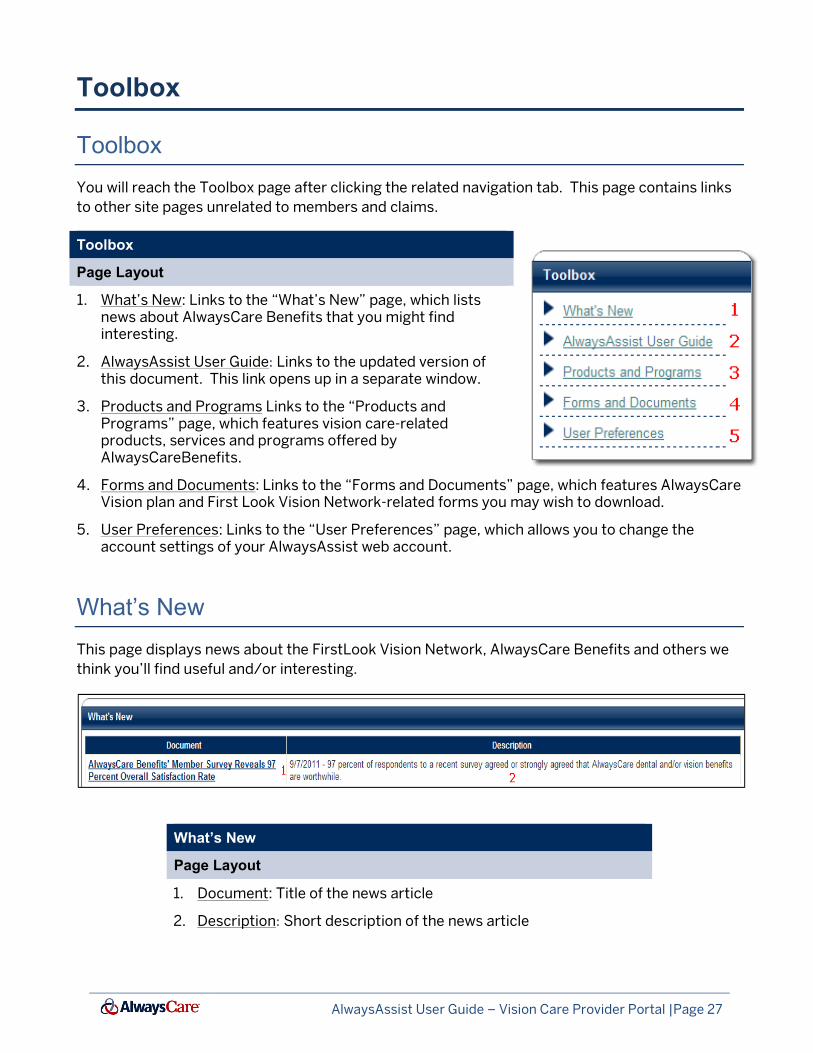
You will reach the Toolbox page after clicking the related navigation tab. This page contains links
to other site pages unrelated to members and claims.
Toolbox
Page Layout
1. What’s New: Links to the “What’s New” page, which lists news about AlwaysCare Benefits that you might find interesting.
2. AlwaysAssist User Guide: Links to the updated version of this document. This link opens up in a separate window.
3. Products and Programs Links to the “Products and Programs” page, which features vision care-related products, services and programs offered by AlwaysCareBenefits.
4. Forms and Documents: Links to the “Forms and Documents” page, which features AlwaysCare Vision plan and First Look Vision Network-related forms you may wish to download.
5. User Preferences: Links to the “User Preferences” page, which allows you to change the account settings of your AlwaysAssist web account.
What’s New
This page displays news about the FirstLook Vision Network, AlwaysCare Benefits and others we
think you’ll find useful and/or interesting.
What’s New
Page Layout
1. Document: Title of the news article
2. Description: Short description of the news article
AlwaysAssist User Guide – Vision Care Provider Portal |Page 28
Products and Programs
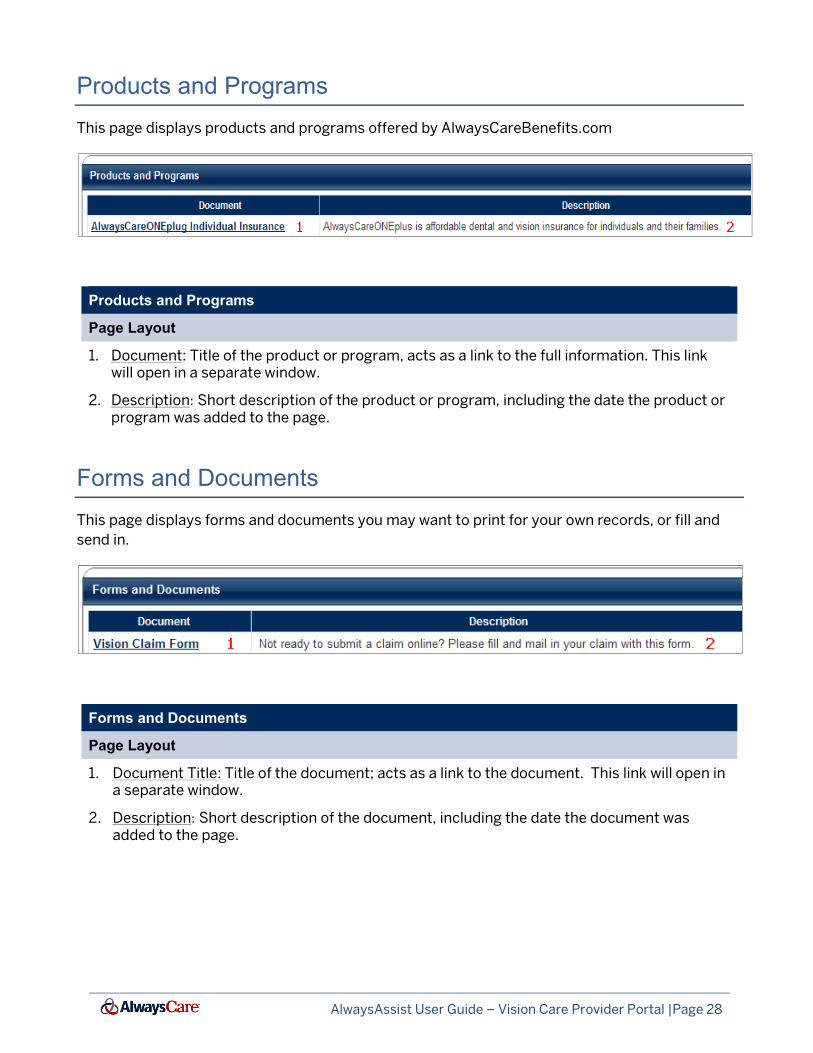
This page displays products and programs offered by AlwaysCareBenefits.com
Products and Programs
Page Layout
1. Document: Title of the product or program, acts as a link to the full information. This link will open in a separate window.
2. Description: Short description of the product or program, including the date the product or program was added to the page.
Forms and Documents
This page displays forms and documents you may want to print for your own records, or fill and
send in.
Forms and Documents
Page Layout
1. Document Title: Title of the document; acts as a link to the document. This link will open in a separate window.
2. Description: Short description of the document, including the date the document was added to the page.
AlwaysAssist User Guide – Vision Care Provider Portal |Page 29
User Preferences
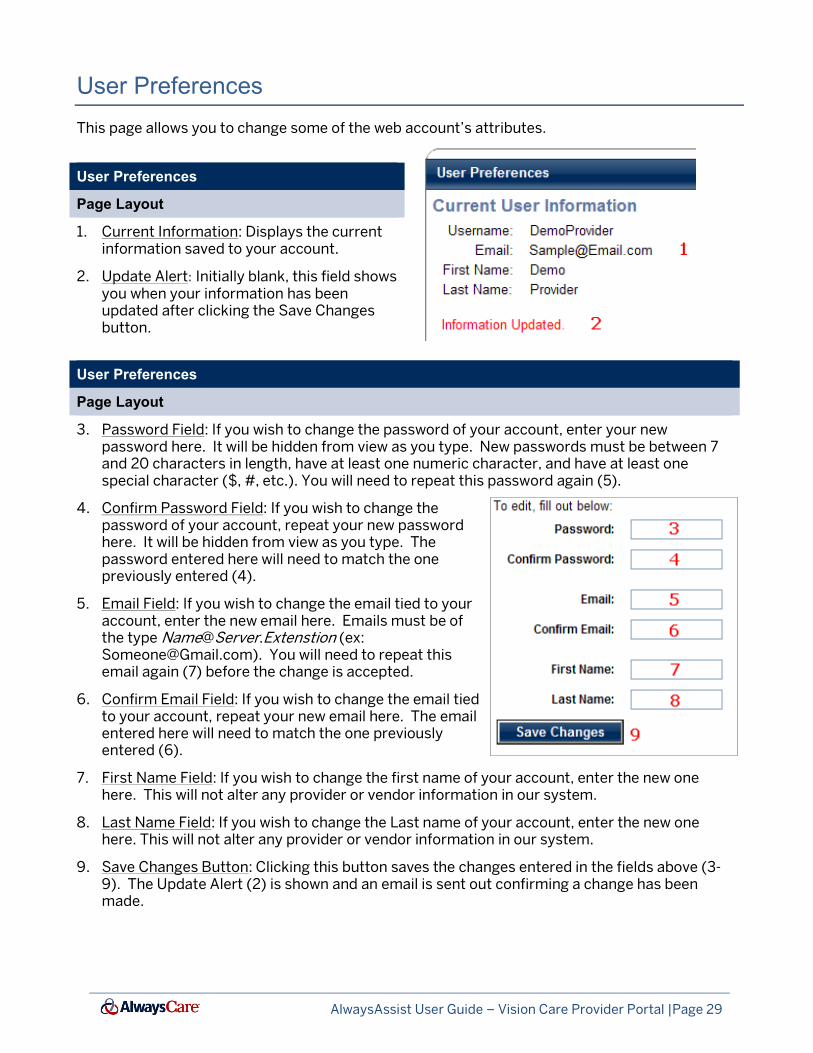
This page allows you to change some of the web account’s attributes.
User Preferences
Page Layout
1. Current Information: Displays the current information saved to your account.
2. Update Alert: Initially blank, this field shows you when your information has been updated after clicking the Save Changes button.
User Preferences
Page Layout
3. Password Field: If you wish to change the password of your account, enter your new password here. It will be hidden from view as you type. New passwords must be between 7 and 20 characters in length, have at least one numeric character, and have at least one special character ($, #, etc.). You will need to repeat this password again (5).
4. Confirm Password Field: If you wish to change the password of your account, repeat your new password here. It will be hidden from view as you type. The password entered here will need to match the one previously entered (4).
5. Email Field: If you wish to change the email tied to your account, enter the new email here. Emails must be of the type [email protected] (ex: [email protected]). You will need to repeat this email again (7) before the change is accepted.
6. Confirm Email Field: If you wish to change the email tied to your account, repeat your new email here. The email entered here will need to match the one previously entered (6).
7. First Name Field: If you wish to change the first name of your account, enter the new one here. This will not alter any provider or vendor information in our system.
8. Last Name Field: If you wish to change the Last name of your account, enter the new one here. This will not alter any provider or vendor information in our system.
9. Save Changes Button: Clicking this button saves the changes entered in the fields above (3-9). The Update Alert (2) is shown and an email is sent out confirming a change has been made.

AlwaysAssist User Guide – Vision Care Provider Portal |Page 30
User Preferences
Page Layout
10. Username Field: If you wish to change the username of your account, enter the new one here.
11. Change Username Button: Clicking this button saves the new username entered (10). If the chosen username is already in use, no change will be made and the Update Alert (2) will show a warning. If the username is changed, you will be logged out of the system and returned to the login page, allowing you to log in with your new username.
Contact Us
You will reach the Contact Us page after clicking the related navigation tab. This page allows you
to send AlwaysCare questions or comments, or contact us directly through the provided contact
information.
Contact Us
Page Layout
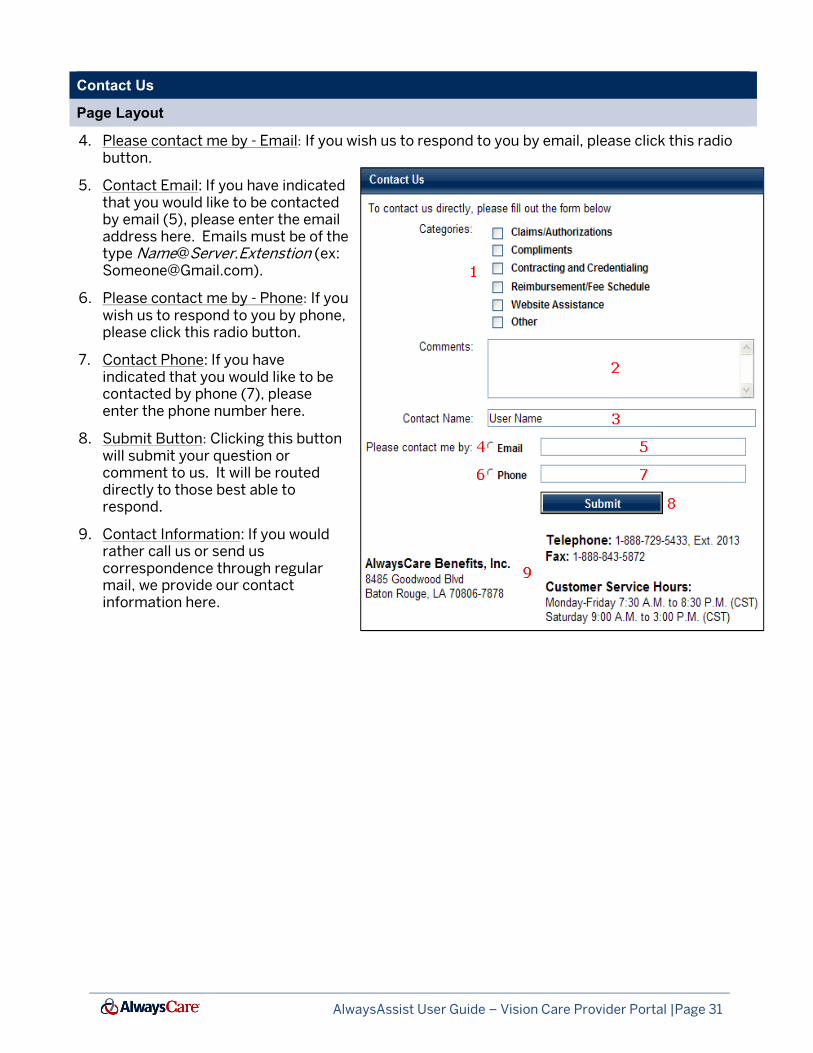
1. Categories: Lists some of the most frequent categories related to AlwaysCare customers’ questions and comments. Choose one or more categories that your question or comment fits into. If your question or comment does not fit into one of the listed categories, pick “Other.”
2. Comments: Enter your question or comment here.
3. Contact Name: Enter the name of the person we may contact in response to your question or comment. This field is defaulted to the name attached to your web account, but may be edited.
AlwaysAssist User Guide – Vision Care Provider Portal |Page 31
Contact Us
Page Layout
4. Please contact me by - Email: If you wish us to respond to you by email, please click this radio button.
5. Contact Email: If you have indicated that you would like to be contacted by email (5), please enter the email address here. Emails must be of the type [email protected] (ex: [email protected]).
6. Please contact me by - Phone: If you wish us to respond to you by phone, please click this radio button.
7. Contact Phone: If you have indicated that you would like to be contacted by phone (7), please enter the phone number here.
8. Submit Button: Clicking this button will submit your question or comment to us. It will be routed directly to those best able to respond.
9. Contact Information: If you would rather call us or send us correspondence through regular mail, we provide our contact information here.

© 2012 AlwaysCare Benefits, Inc. All rights reserved.
AlwaysCare, t
are trademarks or service marks of AlwaysCare
Benefits, Inc., registered in the U.S.
Every effort has been made to ensure that the
information in this manual is accurate. AlwaysCare is
not responsible for printing or c
Document Number
© 2012 AlwaysCare Benefits, Inc. All rights reserved.
AlwaysCare, the AlwaysCare logo, and AlwaysAssist,
are trademarks or service marks of AlwaysCare
Benefits, Inc., registered in the U.S.
Every effort has been made to ensure that the
information in this manual is accurate. AlwaysCare is
not responsible for printing or clerical errors.
Document Number