altiris notification server 6.0 reference -...
TRANSCRIPT

ALTIRIS®
Notification Server 6.0 SP3 Reference

© 1998-2005 Altiris, Inc. All rights reserved.
Document Date: January 12, 2006
Protected by one or more of the following U.S. Patents: 5764593, 6144992, 5978805, 5778395, 5907672, 4701745, 5016009, 5126739, 5146221, 5414425, 5463390, 5506580. Other patents pending.
Due to the inherently complex nature of computer software, Altiris does not warrant that the Altiris software is error-free, will operate without interruption, is compatible with all equipment and software configurations, or will otherwise meet your needs.
The content of this documentation is furnished for informational use only, is subject to change without notice, and should not be construed as a commitment by Altiris. Altiris, Inc. assumes no responsibility or liability for any errors or inaccuracies that may appear in this documentation. For the latest documentation, visit our Web site at www.altiris.com.
Altiris, the Altiris logo, BootWorks, Eality, ImageBlaster, Inventory Solution, PC Transplant, RapiDeploy, RapidInstall, and Vision are registered trademarks of Altiris, Inc. in the United States. Altiris, the Altiris Logo, and ManageFusion are registered trademarks of Altiris, Inc. in other countries.
Altiris Connector, Altiris eXpress, Altiris Protect, Application Management Solution, Application Metering Solution, Asset Control Solution, Asset Management Suite, Carbon Copy, Client Management Suite, Compliance Toolkit, Connector Solution, Contract Management Solution, Deployment Server, Deployment Solution, Energy Saver Toolkit, Education Management Suite, FSLogic, Handheld Management Suite, Helpdesk Solution, Lab Management Suite, ManageFusion, Migration Toolkit, Mobile Client for SMS, Monitor Solution, Network Discovery, Notification Server, Package Importer, Patch Management Solution, Problem Management Suite, Recovery Solution, Security Solution, Server Management Suite, Site Monitor Solution, Software Delivery Solution, SNMP Management, Software Delivery Suite, TCO Management Solution, UNIX Client for SMS, Web Administrator, Web Reports, and other product names are trademarks of Altiris, Inc. in the United States and other countries.
AuditExpress, Scan on Detect, and SecurityExpressions are trademarks of Pedestal Software Inc. in the United States. Audit on Connect and Audit on Detect are trademarks of Pedestal Software inc. in the United States and other countries.
WebLens and Guaranteeing Your Net Works are registered trademarks of Tonic Software Inc. in the United States.
WebInsight and RUM are a trademarks of Tonic Software Inc. in the United States.
Microsoft, Windows, and the Windows logo are trademarks, or registered trademarks of Microsoft Corporation in the United States and/or other countries.
HP and Compaq are registered trademarks of the Hewlett-Packard Corporation.
Dell is a registered trademark of Dell Inc.
Macintosh is a registered trademark of the Apple Computer Corporation.
Palm OS is a registered trademark of Palm Computing, Inc.
BlackBerry is a service mark and a trademark of Research In Motion Limited Corporation.
RIM is a service mark and trademark of Research In Motion (RIM).
Other company names, brands, or product names are or may be trademarks of their respective owners.
Notification Server Reference 2
Contents
Part I: Getting Started . . . . . . . . . . . . . . . . . . . . . . . . . . . . . . . . . . . . . . . .6
Chapter 1: Introduction . . . . . . . . . . . . . . . . . . . . . . . . . . . . . . . . . . . . . . . . . . . . . . . . . . 7Tasks Performed by Notification Server . . . . . . . . . . . . . . . . . . . . . . . . . . . . . . . . . . . . . . 7Notification Server Data Flow . . . . . . . . . . . . . . . . . . . . . . . . . . . . . . . . . . . . . . . . . . . . . 9
Part II: Altiris Agent . . . . . . . . . . . . . . . . . . . . . . . . . . . . . . . . . . . . . . . .10
Chapter 2: Altiris Agent Overview . . . . . . . . . . . . . . . . . . . . . . . . . . . . . . . . . . . . . . . . . 11
Chapter 3: Altiris Agent Installation . . . . . . . . . . . . . . . . . . . . . . . . . . . . . . . . . . . . . . . . 12Altiris Agent Requirements . . . . . . . . . . . . . . . . . . . . . . . . . . . . . . . . . . . . . . . . . . . . . . . . . . . 12Installing the Altiris Agent Using the Altiris Agent Installation Program . . . . . . . . . . . . . . . . . . . . . 13
Example of Installing the Altiris Agent Using a Login Script . . . . . . . . . . . . . . . . . . . . . . . . . . 14AeXNSC Command Line Arguments . . . . . . . . . . . . . . . . . . . . . . . . . . . . . . . . . . . . . . . . . . 15
Installing the Altiris Agent Using Active Directory Policies (Intellimirror) . . . . . . . . . . . . . . . . . . . . 16Altiris Agent Bootstrap Program . . . . . . . . . . . . . . . . . . . . . . . . . . . . . . . . . . . . . . . . . . . . . . . . 19
AeXSWDInstSvc Command Line Arguments. . . . . . . . . . . . . . . . . . . . . . . . . . . . . . . . . . . . . 20Altiris Agent Installation Troubleshooting. . . . . . . . . . . . . . . . . . . . . . . . . . . . . . . . . . . . . . . . . . 21
Push Status Events. . . . . . . . . . . . . . . . . . . . . . . . . . . . . . . . . . . . . . . . . . . . . . . . . . . . . . 22
Chapter 4: Using the Altiris Agent . . . . . . . . . . . . . . . . . . . . . . . . . . . . . . . . . . . . . . . . . 24Data Flow for a Newly Installed Altiris Agent . . . . . . . . . . . . . . . . . . . . . . . . . . . . . . . . . . . . . . . 25Altiris Agent Directory Structure. . . . . . . . . . . . . . . . . . . . . . . . . . . . . . . . . . . . . . . . . . . . . . . . 28Switching Altiris Agents from between Notification Servers . . . . . . . . . . . . . . . . . . . . . . . . . . . . . 29
Altiris Agent Utility . . . . . . . . . . . . . . . . . . . . . . . . . . . . . . . . . . . . . . . . . . . . . . . . . . . . . . 29LAN, WAN, and Disconnected Environments . . . . . . . . . . . . . . . . . . . . . . . . . . . . . . . . . . . . . . . 31Software Delivery and the Altiris Agent . . . . . . . . . . . . . . . . . . . . . . . . . . . . . . . . . . . . . . . . . . . 32
Package Snapshot Caching . . . . . . . . . . . . . . . . . . . . . . . . . . . . . . . . . . . . . . . . . . . . . . . . 33Viewing the Version of Altiris Agent Components through the Altiris Console . . . . . . . . . . . . . . . . . 33Accessing Altiris Agent Configuration Information. . . . . . . . . . . . . . . . . . . . . . . . . . . . . . . . . . . . 33Event Queue Size . . . . . . . . . . . . . . . . . . . . . . . . . . . . . . . . . . . . . . . . . . . . . . . . . . . . . . . . . . 33Disk Imaging with Altiris Agent installed . . . . . . . . . . . . . . . . . . . . . . . . . . . . . . . . . . . . . . . . . . 34Altiris Agent Log On Events . . . . . . . . . . . . . . . . . . . . . . . . . . . . . . . . . . . . . . . . . . . . . . . . . . . 34Altiris Agent Diagnostics . . . . . . . . . . . . . . . . . . . . . . . . . . . . . . . . . . . . . . . . . . . . . . . . . . . . . 34Altiris Agent Registry Keys. . . . . . . . . . . . . . . . . . . . . . . . . . . . . . . . . . . . . . . . . . . . . . . . . . . . 35
Part III: Notification Server . . . . . . . . . . . . . . . . . . . . . . . . . . . . . . . . . .41
Chapter 5: Memory Configuration. . . . . . . . . . . . . . . . . . . . . . . . . . . . . . . . . . . . . . . . . . 42Understanding NS and Memory . . . . . . . . . . . . . . . . . . . . . . . . . . . . . . . . . . . . . . . . . . . . . . . . 42Configure Virtual Memory . . . . . . . . . . . . . . . . . . . . . . . . . . . . . . . . . . . . . . . . . . . . . . . . . . . . 45Configure SQL Memory . . . . . . . . . . . . . . . . . . . . . . . . . . . . . . . . . . . . . . . . . . . . . . . . . . . . . . 45
Chapter 6: Inventory Forwarding . . . . . . . . . . . . . . . . . . . . . . . . . . . . . . . . . . . . . . . . . . 46Inventory Forwarding and Data Forwarding to SMS . . . . . . . . . . . . . . . . . . . . . . . . . . . . . . . . . . 46
Notification Server Reference 3

Introduction. . . . . . . . . . . . . . . . . . . . . . . . . . . . . . . . . . . . . . . . . . . . . . . . . . . . . . . . . . . 48Overview. . . . . . . . . . . . . . . . . . . . . . . . . . . . . . . . . . . . . . . . . . . . . . . . . . . . . . . . . . . . . 49
Package Server Requirements . . . . . . . . . . . . . . . . . . . . . . . . . . . . . . . . . . . . . . . . . . . . . . . . . 51Package Server Agent Rollout . . . . . . . . . . . . . . . . . . . . . . . . . . . . . . . . . . . . . . . . . . . . . . . . . 51Package Server User Interface . . . . . . . . . . . . . . . . . . . . . . . . . . . . . . . . . . . . . . . . . . . . . . . . . 56
Package Server . . . . . . . . . . . . . . . . . . . . . . . . . . . . . . . . . . . . . . . . . . . . . . . . . . . . . . . . 57Properties . . . . . . . . . . . . . . . . . . . . . . . . . . . . . . . . . . . . . . . . . . . . . . . . . . . . . . . . . . . . 57
Icons . . . . . . . . . . . . . . . . . . . . . . . . . . . . . . . . . . . . . . . . . . . . . . . . . . . . . . . . . . . . 57History . . . . . . . . . . . . . . . . . . . . . . . . . . . . . . . . . . . . . . . . . . . . . . . . . . . . . . . . . . . . . . 57
Package Server for UNIX and Linux . . . . . . . . . . . . . . . . . . . . . . . . . . . . . . . . . . . . . . . . . . . . . 58Deleting the Package Server Agent. . . . . . . . . . . . . . . . . . . . . . . . . . . . . . . . . . . . . . . . . . . . . . 65Using Package Servers without Software Delivery Solution . . . . . . . . . . . . . . . . . . . . . . . . . . . . . 65Using Package Servers to Send Files over the Network . . . . . . . . . . . . . . . . . . . . . . . . . . . . . . . . 65Selecting a Different Package Destination Location on your Package Servers . . . . . . . . . . . . . . . . . 65Package Status and Synchronization. . . . . . . . . . . . . . . . . . . . . . . . . . . . . . . . . . . . . . . . . . . . . 66Deleting Software Delivery Packages from Package Servers. . . . . . . . . . . . . . . . . . . . . . . . . . . . . 67Getting Status on Package Servers . . . . . . . . . . . . . . . . . . . . . . . . . . . . . . . . . . . . . . . . . . . . . . 68Disk Space Planning . . . . . . . . . . . . . . . . . . . . . . . . . . . . . . . . . . . . . . . . . . . . . . . . . . . . . . . . 69Recovering and Replacing Files. . . . . . . . . . . . . . . . . . . . . . . . . . . . . . . . . . . . . . . . . . . . . . . . . 69Viewing Package Information on the Altiris Agent. . . . . . . . . . . . . . . . . . . . . . . . . . . . . . . . . . . . 69Package Servers and the Altiris Agent. . . . . . . . . . . . . . . . . . . . . . . . . . . . . . . . . . . . . . . . . . . . 69Package Distribution . . . . . . . . . . . . . . . . . . . . . . . . . . . . . . . . . . . . . . . . . . . . . . . . . . . . . . . . 69Package Download Retry . . . . . . . . . . . . . . . . . . . . . . . . . . . . . . . . . . . . . . . . . . . . . . . . . . . . . 70Windows Package Server Configuration Settings . . . . . . . . . . . . . . . . . . . . . . . . . . . . . . . . . . . . 71Package Server for UNIX and Linux Configuration Settings . . . . . . . . . . . . . . . . . . . . . . . . . . . . . 73
Chapter 8: Software Delivery . . . . . . . . . . . . . . . . . . . . . . . . . . . . . . . . . . . . . . . . . . . . . 78
Chapter 9: Reports . . . . . . . . . . . . . . . . . . . . . . . . . . . . . . . . . . . . . . . . . . . . . . . . . . . . . 80Generating Reports Automatically. . . . . . . . . . . . . . . . . . . . . . . . . . . . . . . . . . . . . . . . . . . . . . . 80
Chapter 10: Monitoring Notification Server Operations . . . . . . . . . . . . . . . . . . . . . . . . . 81Altiris Agent and Notification Server Event Queues . . . . . . . . . . . . . . . . . . . . . . . . . . . . . . . . . . . 81Common Notification Server Events . . . . . . . . . . . . . . . . . . . . . . . . . . . . . . . . . . . . . . . . . . . . . 90
Status Event Categories . . . . . . . . . . . . . . . . . . . . . . . . . . . . . . . . . . . . . . . . . . . . . . . . . . 91Examples . . . . . . . . . . . . . . . . . . . . . . . . . . . . . . . . . . . . . . . . . . . . . . . . . . . . . . . . . . . . 94
Using Reports to monitor Notification Server Load . . . . . . . . . . . . . . . . . . . . . . . . . . . . . . . . . . . 95
Chapter 11: Notification Database . . . . . . . . . . . . . . . . . . . . . . . . . . . . . . . . . . . . . . . . . 98Notification Database and Altiris Solution Uninstallation . . . . . . . . . . . . . . . . . . . . . . . . . . . . . . . 98Extending the Notification Database . . . . . . . . . . . . . . . . . . . . . . . . . . . . . . . . . . . . . . . . . . . . . 98Notification Database Schema . . . . . . . . . . . . . . . . . . . . . . . . . . . . . . . . . . . . . . . . . . . . . . . . . 99
Database Tables. . . . . . . . . . . . . . . . . . . . . . . . . . . . . . . . . . . . . . . . . . . . . . . . . . . . . . . 101Database Views . . . . . . . . . . . . . . . . . . . . . . . . . . . . . . . . . . . . . . . . . . . . . . . . . . . . . . . 104
Chapter 12: Disaster Recovery and High Availability . . . . . . . . . . . . . . . . . . . . . . . . . . 108Disaster Recovery. . . . . . . . . . . . . . . . . . . . . . . . . . . . . . . . . . . . . . . . . . . . . . . . . . . . . . . . . 108
Back up Notification Server . . . . . . . . . . . . . . . . . . . . . . . . . . . . . . . . . . . . . . . . . . . . . . . 108Restore Notification Server . . . . . . . . . . . . . . . . . . . . . . . . . . . . . . . . . . . . . . . . . . . . . . . 109Restore the Notification Server with a previous configuration. . . . . . . . . . . . . . . . . . . . . . . . 110
High Availability . . . . . . . . . . . . . . . . . . . . . . . . . . . . . . . . . . . . . . . . . . . . . . . . . . . . . . . . . . 111
Notification Server Reference 4
Understanding Global Privileges . . . . . . . . . . . . . . . . . . . . . . . . . . . . . . . . . . . . . . . . . . . . . . . 112Security Roles . . . . . . . . . . . . . . . . . . . . . . . . . . . . . . . . . . . . . . . . . . . . . . . . . . . . . . . . . . . 114Understanding Permissions . . . . . . . . . . . . . . . . . . . . . . . . . . . . . . . . . . . . . . . . . . . . . . . . . . 115
Permissions Inheritance . . . . . . . . . . . . . . . . . . . . . . . . . . . . . . . . . . . . . . . . . . . . . . . . . 116Configure Resource Manager . . . . . . . . . . . . . . . . . . . . . . . . . . . . . . . . . . . . . . . . . . . . . . 116
Understanding Item tasks . . . . . . . . . . . . . . . . . . . . . . . . . . . . . . . . . . . . . . . . . . . . . . . . . . . 117Understanding Resource Reports & Security . . . . . . . . . . . . . . . . . . . . . . . . . . . . . . . . . . . . . . 119Sample Multiple-Access User Scenario . . . . . . . . . . . . . . . . . . . . . . . . . . . . . . . . . . . . . . . . . . 119Sample Simple-Access User Scenario . . . . . . . . . . . . . . . . . . . . . . . . . . . . . . . . . . . . . . . . . . . 121
Chapter 14: Integrating IIS Lockdown and URLScan . . . . . . . . . . . . . . . . . . . . . . . . . . 123
Part IV: General Reference . . . . . . . . . . . . . . . . . . . . . . . . . . . . . . . . . .125
Chapter 15: Troubleshooting . . . . . . . . . . . . . . . . . . . . . . . . . . . . . . . . . . . . . . . . . . . . 126Troubleshooting on the Notification Server and Altiris Agent . . . . . . . . . . . . . . . . . . . . . . . . . . . 126Troubleshooting the Package Server . . . . . . . . . . . . . . . . . . . . . . . . . . . . . . . . . . . . . . . . . . . . 127Problem Seeing the Solution Center when using a Proxy Server . . . . . . . . . . . . . . . . . . . . . . . . . 127Name Resolution . . . . . . . . . . . . . . . . . . . . . . . . . . . . . . . . . . . . . . . . . . . . . . . . . . . . . . . . . 127Package Download Error . . . . . . . . . . . . . . . . . . . . . . . . . . . . . . . . . . . . . . . . . . . . . . . . . . . . 128E-mail Notification Not Working . . . . . . . . . . . . . . . . . . . . . . . . . . . . . . . . . . . . . . . . . . . . . . . 128Event Viewer Security Log Receiving Too Many Logon/Logoff Errors . . . . . . . . . . . . . . . . . . . . . . 128Sending Events to NS, But You Don’t See Any Data on the Notification Server Computer . . . . . . . 129Rebuilding a Notification Server . . . . . . . . . . . . . . . . . . . . . . . . . . . . . . . . . . . . . . . . . . . . . . . 130Unable to Validate the Software Delivery Connection Point Credentials . . . . . . . . . . . . . . . . . . . . 131Windows XP: Problem Deploying Altiris Agent in a WorkGroup . . . . . . . . . . . . . . . . . . . . . . . . . . 132 Log Error: Exceeding Optimal Number of Connections When Using MSDE. . . . . . . . . . . . . . . . . . 132 Configure NS to operate on Windows 2003 with IE hardening enabled . . . . . . . . . . . . . . . . . . . . 133
Chapter 16: Registry and Configuration Settings . . . . . . . . . . . . . . . . . . . . . . . . . . . . . 134Registry Settings . . . . . . . . . . . . . . . . . . . . . . . . . . . . . . . . . . . . . . . . . . . . . . . . . . . . . . . . . 134Configuration Settings. . . . . . . . . . . . . . . . . . . . . . . . . . . . . . . . . . . . . . . . . . . . . . . . . . . . . . 140
Altiris NS Configurator . . . . . . . . . . . . . . . . . . . . . . . . . . . . . . . . . . . . . . . . . . . . . . . . . . 143Using Registry and Configuration Settings . . . . . . . . . . . . . . . . . . . . . . . . . . . . . . . . . . . . . . . . 144
Configuring Notification Server to use a Proxy Server . . . . . . . . . . . . . . . . . . . . . . . . . . . . . 144Performance Counters. . . . . . . . . . . . . . . . . . . . . . . . . . . . . . . . . . . . . . . . . . . . . . . . . . . . . . 145
Chapter 17: Log Files . . . . . . . . . . . . . . . . . . . . . . . . . . . . . . . . . . . . . . . . . . . . . . . . . . 147
Index. . . . . . . . . . . . . . . . . . . . . . . . . . . . . . . . . . . . . . . . . . . . . . . . . . . . . . . . . . . . . . . 151
Notification Server Reference 5

Notification Server Reference 6
Part I
Getting Started
Welcome to the Altiris Notification Server Reference, a complete reference manual and administration guide for the Notification Server and its components (the Notification System), and for managing resources.
For help on using the Notification Server with the Altiris Console and the Resource Manager, see the Altiris Notification Server Help.
Quick Links
Introduction on page 7 Introduction to the Notification System.

Chapter 1Introduction
For a comprehensive introduction to the the Altiris Console, the Notification System, Altiris Solutions, and Altiris Suites see Notification Server Help.
The diagrams in this section give a more complete description of detail that already appears in Notification Server Help.
Tasks Performed by Notification ServerCollects and stores Altiris Agent reported information in the Notification Database.
Forwards Altiris Agent inventory to SMS (with the installation of the Altiris Connector for Microsoft SMS).
Schedules the running and storing of reports.
Notification Server Reference 7

Sends policy enforcement criteria to Altiris Agents and responds to incoming events associated with these policies. (Policies can include transmission of SNMP traps, generation of reports, e-mailing notification of the event to an SMTP address, and invoking any process with command-line context.) For information on the handling of these events, see Altiris Agent and Notification Server Event Queues on page 81.
Notification Server Reference 8

Notification Server Reference 9

Notification Server Reference 10
Part II
Altiris Agent
This section provides information on the Altiris Agent, including how to deploy it to your various computers throughout your enterprise.
Quick Links
Altiris Agent Overview on page 11
Learn about the Altiris Agent.
Altiris Agent Installation on page 12
Install the Altiris Agent throughout your enterprise.
Using the Altiris Agent on page 24
Learn how to effectively use the Altiris Agent.

Notification Server Reference 11
Chapter 2Altiris Agent Overview
The Altiris Agent is a program that you can install on your managed computers, allowing Notification Server to gather information from and interact with your managed computers. Computers running the Altiris Agent are called managed computers. managed computers receive configuration information from and send data to the Notification Server. The Altiris Agent also helps in the downloading of files. Altiris solutions that interact with Windows operating system based managed computers use the Altiris Agent. Altiris solutions that do not interact with managed computers do not use the Altiris Agent.
Many Altiris solutions interact with the Altiris Agent. Example: you can use Inventory Solution to gather detailed information from all of your computers that are running the Altiris Agent. With the Altiris Agent installed, you can set up Software Delivery tasks to run policies on a schedule. So, with Inventory Solution, you can run a detailed inventory on a group of managed computers every day and run a detailed inventory on another group every week.
The Altiris Agent provides shared functionality, such as providing a common transport mechanism, and providing the user interface for changing settings on the end-user computer. It also provides the core (bootstrap) capabilities for installing and managing various solution-specific agents.
Several Altiris solutions include additional solution-specific agents that provide additional capabilities to the base functionality of the Altiris Agent. These agents (called Solution agents) snap on to the Altiris Agent.

Chapter 3Altiris Agent Installation
This section contains Altiris Agent installation topics, including requirements for installation and Push and Pull installation.
NoteWhen Notification Server is installed, the Altiris Agent is installed automatically on the Notification Server computer.
NoteThe Altiris Agent uses IP to communicate with the Notification Server. Port 80 is used for this communication. Except for when Power Management is used, in that a specific TCP port is specified, the Altiris Agent initiates communications with the Notification Server.
For installation requirements, see Altiris Agent Requirements on page 12.
There are several options for installing the Altiris Agent:
Agent Push installation - This is a Notification Server initiated Altiris Agent installation. The Notification Server pushes Altiris Agent files to the managed computers (for Windows NT/2000/XP/2003 managed computers only). For information on the Altiris Agent Push installation, see Altiris Notification Server Help.
Agent Pull installation - This is a managed computer initiated Altiris Agent installation. In this type of installation, managed computers pull Altiris Agent files from the Notification Server. For information on the Altiris Agent Pull installation, see Altiris Notification Server Help.
The Altiris Agent installation file is run from the network or locally. This file can be distributed through e-mail or distributed media. For information, see Installing the Altiris Agent Using the Altiris Agent Installation Program on page 13.
The Altiris Agent files are installed over the network using Active Directory policies (Intellimirror). For information, see Installing the Altiris Agent Using Active Directory Policies (Intellimirror) on page 16.
Altiris Agent GUID Creation
Each Altiris Agent has a unique GUID. This GUID is created by the Notification Server after the Altiris Agent sends the computer name and domain to the Notification Server. This Name and Domain is found in the AeX AC Identification class.
Altiris Agent RequirementsGeneral
8 MB available Hard Disk (more required to install additional Solution agents and software packages if using Software Delivery Solution)
64 MB RAM
Notification Server Reference 12

Current version of DCOM
Windows Me comes with the required version of DCOM
Internet Explorer 4.01 SP1
Microsoft TCP/IP
Windows NT 4 Computers
Service Pack 4
Internet Explorer 4.01 SP1
Local administrator rights on the computer to install the Altiris Agent on the Windows NT computer
Microsoft TCP/IP
Windows 2000/XP/2003 Computers
Internet Explorer 5.0
Local administrator rights on the computer to install the Altiris Agent on the Windows 2000/XP/2003 computer
ImportantMicrosoft Windows XP enables Simple File Sharing during installation. Simple File Sharing must be turned off for you to install the Altiris Agent to the Windows XP computer. For information, see Windows XP: Problem Deploying Altiris Agent in a WorkGroup on page 132.
Microsoft XP SP2 with firewall enabled
Unblock ports 80 and 445. After installation, these ports can be re-blocked.
Create an exception for the Altiris Agent in the Windows Firewall dialog.
NoteIf all Altiris Agents are installed in one location, a group policy can be applied to create the exception on all XP SP2 computers. Agents running separately also require separate exceptions. Example: Deployment Server Agent (DS), Carbon Copy Agent.
Installing the Altiris Agent Using the Altiris Agent Installation Program
The Altiris Agent installation program (AeXNSC.exe) extracts the Altiris Agent installation files into a temporary location and then runs the Altiris Agent installation setup on a single computer. You can install the Altiris Agent installation program on multiple computers using login scripts (see Example of Installing the Altiris Agent Using a Login Script on page 14).
The Altiris Agent bootstrap program usually downloads and runs the Altiris Agent installation program (see Altiris Agent Bootstrap Program on page 19). However, if you run the Altiris Agent installation program run using login scripts, you need to specify the
Notification Server Reference 13

By default, the Altiris Agent is not added to Add/Remove Programs. You can add the Altiris Agent to the Add/Remove Programs by using the /ADDREMOVE switch. If the Altiris Agent is not added to the Add/Remove Programs, you can only remove the Altiris Agent from the managed computer using these methods:
Uninstall the Altiris Agent using the Altiris Agent uninstall option on the Altiris Console.
Run AeXNSC.exe with the /remove argument on the managed computer.
Run AeXAgentUtil.exe with the /clean argument on the managed computer.
Add a registry value to HKLM\SOFTWARE\Microsoft\Windows\CurrentVersion\Uninstall\{92F2A534-C3E4-4B18-BEBD-329F5E848C8B}DisplayName = “Altiris Agent”. This causes the Altiris Agent to be displayed in the Add/Remove Programs and can be uninstalled from there.
To install the Altiris Agent by running the Altiris Agent installation program
1. Run the AeXNSC.exe on the target computer (see AeXNSC Command Line Arguments on page 15). (On the Notification Server, this file is found at NSCap\Bin\Win32\X86\NS Client Package.)
After the Altiris Agent installation setup program completes, you will see a new icon in the system tray of the managed computer, if you set this option.
As part of the setup process, you define the name of the Notification Server that the Altiris Agent will interact with, the hostname for the Notification Server, and the IP address. You can also use the fully qualified domain name. From the managed computer, you must be able to resolve the hostname entered. You can verify this by running ping <hostname> from a command prompt at the managed computer.
Example 1:
aexnsc.exe –s –a ns=”lab1.altiris.com” nsweb=”http://lab1.altiris.com/Altiris” NOSTARTMENU NOTRAYICON OKTOREBOOT /s
The above command line installs the Altiris Agent on the computer connecting to the Notification Server on “lab1.altiris.com”. No start menu is installed. Tray icon will not be shown on startup. The installation may ask to reboot if needed. The entire installation process will be done silently.
Example 2:
The command line to perform an automated install is:
aexnsc.exe -s -a ns=”lab1.altiris.com” nsweb=”http://lab1.altiris.com/Altiris” /s
Example of Installing the Altiris Agent Using a Login ScriptThe following is an example of using a login script to install the Altiris Agent.
Notification Server Reference 14

If you use this example, ensure that you include the quotes around the URL path as shown, substitute MY_NS_SERVER with your Notification Server name, and substitute domain with your domain name.
if exist c:\winnt\sytem32\aexswdinstsvc.exe goto install
net use n: \\MY_NS_SERVER\x86 /persistent:nocopy n:\aexswdinstsvc.exe c:\winnt\system32
net use n: /delete
:install
if exist c:\winnt\system32\aexnsc.log goto end
c:\winnt\system32\aexswdinstsvc.exe -u “http://MY_NS_SERVER/Altiris/nscap/bin/win32/x86/ns client package/aexnsc.exe” -s MY_NS_SERVER.domain.com -w http://MY_NS_SERVER/Altiris
:end
AeXNSC Command Line Argumentsaexnsc.exe [-s] [-a arguments] [ns= “NotificationServer”] [nsweb=“NotificationServerWeb”] [path=InstallationPath] [NOSTARTMENU] [NOTRAYICON] [OKTOREBOOT] [/Nologging] [/remove] [/ADDREMOVE] [/s] [reinstall]
Parameter Description
-s Silent mode for the package to extract the files for the Altiris Agent installation setup.
-a arguments Specifies the arguments to be passed to the Altiris Agent installation setup.
ns=“NotificationServer” Specifies the Notification Server that the Altiris Agent connects to.
Notification Server Reference 15

Installing the Altiris Agent Using Active Directory Policies (Intellimirror)
This section describes how to install the Altiris Agent to computers and automatically configure it using Group Policy. The Altiris Agent installation service requires parameters to specify the Notification Server to download and report to once the Altiris Agent is installed. Using MsiExec.exe, you can create an Administrative Install containing the required public properties.
NoteIf you want to install the Altiris Agent to remote computers, behind a firewall, use the Altiris Agent Bootstrap Program on page 19.
The installation process consists of the following steps:
1. Create the Administrative Install.
2. Create a file share to distribute the Install service.
3. Create the AD Group Policy.
4. Add/Move machines to target OU.
nsweb=“NotificationServerWeb”
Specifies the Notification Server Web that the Altiris Agent connects to. This is optional. By default, it is “http://NSName/Altiris”.
path=InstallationPath Specifies the folder where the Altiris Agent is installed.
NOSTARTMENU Specifies that no start menu item will be installed for the Altiris Agent.
NOTRAYICON Specifies that the Altiris Agent will not show tray icon on initial startup.
OKTOREBOOT Specifies that the installation will prompt for rebooting the managed computer if needed. If this switch is not specified, the installation will not prompt or attempt to reboot the managed computer.
/nologging Turns off logging.
/regdiags Enables diagnostics. These diagnostics allow the user to view the log file through the Altiris Agent User Interface. It also displays other current settings on the Altiris Agent. We only recommended enabling diagnostics for test environments, or when troubleshooting.
/remove Specifies that the Altiris Agent will be uninstalled from the managed computer. This is a silent uninstall. You can create a task to send this to all managed computers you want to uninstall the Altiris Agent from.
/ADDREMOVE Specifies that the Altiris Agent will be added to Add/Remove Programs.
/s Silent mode for the Altiris Agent installation setup.
/reinstall Specifies that the Altiris Agent can be installed on a computer with Altiris Agent already installed.
Parameter Description
Notification Server Reference 16

Installation using Active Directory/Group Policy Objects should be performed following the Windows 2000/2003 documentation. It is suggested that you create organizational units (OUs) to contain the computers you will be deploying the Altiris Agent to.
For information on this process, see the MS KB Article “HOW TO: Use Group Policy to Remotely Install Software in Windows 2000 (Q314934)” that outlines the steps required to do this. You can find this article by clicking on the following URL.
http://support.microsoft.com/default.aspx?scid=kb;en-us;Q314934
For suggestions on how to use Active Directory Group Policies to install the Altiris Agent, see the Altiris Support Forums on the Altiris Web site. Go to www.altiris.com and select Support > Forums.
Step 1 - Create the Administrative Install
At \\nsserver\NSCap\Bin\Win32\X86\NS Client Installation enter the following path and your required public properties:
msiexec /a <path to AeXNSCInstSvc.msi> [MSI Public Properties]
MSI Public Properties
Properties Description
NS Name of the Notification Server the Altiris Agent will report to (without leading \\). This argument is required. See AeXNSC Command Line Arguments on page 15.
NS_WEB Specifies the Notification Server Web the Altiris Agent connects to. This is optional. By default, it is http://NSName/Altiris. See AeXNSC Command Line Arguments on page 15.
SOURCE_URL URL used to download AEXNSC. By default, it will be retrieved from the Notification Server. See AeXNSC Command Line Arguments on page 15.
Notification Server Reference 17

Example:
msiexec /a AeXNSCInstSvc.msi NS="www.yourserver.com" AGENT_PARAMS="-notrayicon -nostartmenu" SERVICE_PARAMS="-c 2048 -p 15"
This Altiris Agent install will will not show the tray icon on initial startup and no start menu item will be installed. Also, the Altiris Agent is configured to download 2048 bytes of data each time, with 15ms between each chunk download. See AeXSWDInstSvc Command Line Arguments on page 20 for information.
Step 2 - Create a file share to distribute the Install Service
Once the transform is created, it must be placed on a share so all target machines have access. See http://support.microsoft.com/default.aspx?scid=kb;EN-US;278472 for information.
Step 3 - Create the AD Group Policy
1. Create a new OU for machines that will have the 'AeXNSCInstSvc.msi' deployed to them in Active Directory Users and Computers MMC.
2. Right-click the OU and select Properties from the right-click menu menu.
3. Click the Group Policy tab of the displayed dialog.
4. Click New to create a new group policy object and then name it.
5. Select the new group policy object and click Edit to display the Group Policy Object Editor window.
6. Select the Computer Configuration\Software Settings\Software installation item, right-click and select New > Package.
7. Select the MSI from the share on the DC. When the Deploy software dialog appears select the Assigned option and click OK to continue.
AGENT_PARAMS Altiris Agent parameters in AexSVCInstSvc that can be passed to AEXNSC.EXE:
notrayicon
nostartmenu
preconfig
See AeXSWDInstSvc Command Line Arguments on page 20 for information.
SERVICE_PARAMS Parameters that can be passed to AexSVCInstSvc:
-d path
-c chunk_size
-p pause_interval
-checkonly
-exe
See AeXSWDInstSvc Command Line Arguments on page 20 for information.
MSI Public Properties
Properties Description
Notification Server Reference 18

9. Select the Install the software at logon checkbox.
10. Click OK to save the options to the package.
Step 4 - Add machines to Target OU
After creating the AD group polic,y add or move the machines, that will have the software deployed to them, to the new OU with the Agent GPO applied.
NoteFor Windows XP and Windows Server 2003 machines, it may be necessary to set the Always wait for the network at computer startup and logon policy if the package deployment is required at logon. See http://support.microsoft.com/default.aspx?scid=kb;en-us;305293.
NoteThe Agent install service only will be downloaded from the file share and the Agent install executable will be 'trickle' downloaded from the /NScap share on the Notification Server itself.
Altiris Agent Bootstrap ProgramWhen the Altiris Agent is installed using a Push or Pull installation, a small (approximately 100 KB) bootstrap program is used. This program, the Altiris Agent Bootstrap program, downloads a larger (approximately 4.5 MB) program, the Altiris Agent installation program, that actually performs the Altiris Agent installation. The Altiris Agent Bootstrap program gets sent to all managed computers at the same time to prevent an overload of the network. The Altiris Agent Bootstrap program then handles the network throughput (starting and stopping), until it downloads the Altiris Agent installation program to the managed computer.
Because the Altiris Agent Bootstrap program controls how fast the Altiris Agent installation program gets downloaded to the managed computer, it can reliably download the Altiris Agent on remote computers or managed computers with poor connections.
For information on the command line arguments that the Altiris Agent Bootstrap program accepts, see AeXSWDInstSvc Command Line Arguments on page 20.
The following steps show the installation process during an Altiris Agent installation using a Push or Pull installation:
1. The Altiris Agent bootstrap program (AeXSWDInstSvc.exe) is downloaded to the managed computer (either by Push or by Pull).
This program is quite small (approximately 100k) and can be sent quickly even over a slow line. Because the Altiris Agent bootstrap program is an NT service, it runs as soon as it is downloaded.
Notification Server Reference 19

2. The Altiris Agent bootstrap program downloads the Altiris Agent installation program (AeXNSC.exe) from the Notification Server. It has the ability to stop and start again until the Altiris Agent installation program is downloaded completely.
3. The Altiris Agent bootstrap program runs the Altiris Agent installation program.
4. The Altiris Agent installation program installs the Altiris Agent onto the computer.
NoteThe Altiris Agent installation program adds itself to the registry run key so that, if the computer is rebooted, it will run when a user logs on.
5. When the installation is complete, you will see an Altiris Agent icon in the system tray of the managed computer, if you selected that option.
NoteDuring the installation process, status messages are sent back to the Notification Server. There is a chance that one or more of these messages can end up in a Bad event directory on the Notification Server and not be processed into the Notification Database (see NSE Processing and Bad Event Directories on page 86). However, the Altiris Agent installation could still be successful. For information on how to determine if the Altiris Agent installation was successful, see Altiris Agent Installation Troubleshooting on page 21.
NoteFrom the time you start a Push or Pull installation, it can take several minutes before the Altiris Agent icon appears in the system tray. This is because the Altiris Agent bootstrap program is downloaded, then the Altiris Agent bootstrap program downloads the Altiris Agent installation package, then the Altiris Agent installation package installs the Altiris Agent on the computer. Depending on the network traffic, this process can take some time.
NoteThere is an MSI program available, AeXNSCInstSvc.msi, that also installs the Altiris Client Installation Service. This service downloads the Altiris Agent installation program from the Notification Server and installs it on the managed computer. The only parameter that AeXNSCInstSvc.msi takes is [NS=NSName.domain.com], where NSName is the name of your Notification Server and domain is the domain that your Notification Server is on. This MSI supports the elevated privilege install (see Installing the Altiris Agent Using Active Directory Policies (Intellimirror) on page 16).
AeXSWDInstSvc Command Line ArgumentsAeXSWDInstSvc [-u URL] [-s server_name]
Notification Server Reference 20

Altiris Agent Installation TroubleshootingThe following are some tips for checking to see if your Altiris Agent was installed on your managed computers and how to troubleshoot if the installation fails.
Run reports to find out if managed computers have the Altiris Agent installed on them - Click the Reports tab and navigate to Reports > Notification Server Infrastructure > Agent in the left pane:
AeXSWDInstSvc Parameters
Parameter Description
u URL URL to download the Altiris Agent setup program from. This is an HTTP site. This argument is required.
s server_name Name of the Notification Server that the Altiris Agent will report to (without leading \\). This argument is required.
w URL URL that the Altiris Agent will use to report to the server. This argument is required.
d path Destination path the Altiris Agent will be installed to.
c chunk_size Size (in bytes) of data to download each time. If omitted, 1 KB is used.
p pause_interval Time (in ms) between downloading each chunk. If omitted, 25 ms is used.
exe Forces the program to run as an EXE under Windows NT/2000/XP/2003, ignoring any service registration to this EXE. This option has no effect under Windows 95, 98, 98 SE, or Me.
checkonly Forces the program to check the Altiris Agent minimum requirements are met. Details are displayed on screen.
notrayicon Specifies that the Altiris Agent will not show the tray icon on initial startup. This will be overridden by the Altiris Agent Settings policies as soon as they are downloaded.
nostartmenu Specifies that no start menu item will be installed for the Altiris Agent.
preconfig If specified, the program and the Altiris Agent will use the existing client proxy configuration. If omitted, both will attempt to connect to the Notification Server directly.
? or h Shows the usage dialog.
Notification Server Reference 21

Altiris Agent Discovery - These reports let you see what computers have been discovered by Notification Server, if your Push installation failed on any computers, and a report listing managed computers with Altiris Agents installed on them using methods other than Push.
Altiris Agent Inventory - There are two reports in this group that are of interest for troubleshooting: one that lists your newest installed/registered managed computers, and one that lists your oldest managed computers.
Check the logs on the managed computer if the Altiris Agent installation failed.
AeXSWDInstSvc.log - The Altiris Agent bootstrap program (AeXSWDInstSvc.exe) creates this log file in the OS directory (WINNT on Windows NT/2000/2003 and windows\system on Windows 9x after a Push installation and WinDir\system32 after a Pull installation). This log file records the process of downloading the Altiris Agent installation program and installing it. Look in this log file to determine if the Push or Pull part of the installation failed. If there is an entry in this log file saying that the “Remote Install Finished”, it means that the download of the Altiris Agent installation program was a success and the command to install it was performed.
AeXNSC.log - The Altiris Agent installation program (AeXNSC.exe) creates this log file in the OS directory (WINNT\system32 on Windows NT/2000/2003 and windows\system on Windows 95/98/Me/XP). This log file records the process of installing the Altiris Agent on the computer. If there is an entry in this log file saying that the installation failed, it means the actual Altiris Agent installation failed.
After the Altiris Agent is up and running, the AeXNSAgent.exe process should be on the managed computer (viewed by using the Task Manager).
Click Update Configuration on the Altiris Agent and ensure the Configuration Last requested time reflects the time of the action. Also, ensure that any new policies have been downloaded.
Ensure the installdrive\program files\altiris agent\site code folder is free of files.
Run AexAgentDiagnostics.dll. Click Run on the Start menu and enter the following command; regsrv32"C:\program files\altiris\altiris agent\AexAgentDiagnostics.dll". Right-click the Altiris Agent icon, navigate to Diagnostics > Log View and check for errors.
View the Push status events for specific managed computers. See Push Status Events on page 22.
Push Status EventsPush Status events let you see if the Altiris Agent installation requirements were met and if the Altiris Agent installation succeeded.
To access the Push Status events
1. In the Resource Manager, click the Events tab. (See Altiris Notification Server Help.)
2. In the left pane, navigate to Data Classes > Computer Events and select AeX Push Status.
Notification Server Reference 22

status 1 - The Altiris Agent installation requirements were met.
status 2 - The Altiris Agent installation requirements were not met.
In both of the above cases, the message contains a list of the requirements and the detected versions.
status 3 - The Altiris Agent installation succeeded.
status 4 - The Altiris Agent installation failed.
In the case of status 4, the message contains a description of the error.
Notification Server Reference 23

Chapter 4Using the Altiris Agent
The Altiris Agent retrieves Altiris Agent Settings policy requests, downloads files from the Notification Server, and posts status feedback information and settings to the Notification Server. The Altiris Agent interface lets the end user view Software Delivery tasks for programs that can be installed onto a local computer. It also lets the end user view basic configuration settings about the Altiris Agent.
You can define the programs (stored in packages) that can be installed on each managed computer. Software Delivery packages are usually software installation programs that can perform actions such as installing new applications, updating the operating system components, updating virus definition files, and so forth. Software Delivery Solution must be installed in order to create Software Delivery packages.
When Software Delivery tasks, with only the notify user option set, are sent to the Altiris Agent by the administrator, a pop-up notification is received (if not running in silent mode). From this pop-up notification, the user can start the Software Delivery task, view the properties of the package (and subsequently execute it), dismiss the pop-up, or postpone the reminder for some time period. On Windows XP/2003 a balloon is displayed before the pop-up, and the pop-up is displayed only if the balloon is clicked.
ImportantICMP (ping) traffic is required in order for the Altiris Agent to access Package Servers and to utilize bandwidth control.
NoteIf a user runs a Software Delivery task that has been scheduled “once” using the pop-up, this Software Delivery task will not be run again at the scheduled time. If the administrator has set a recurring scheduled Software Delivery task, then it will run at the scheduled time regardless of whether the user has executed it already.
Quick Links
Data Flow for a Newly Installed Altiris Agent on page 25
Altiris Agent Directory Structure on page 28
Switching Altiris Agents from between Notification Servers on page 29
LAN, WAN, and Disconnected Environments on page 31
Software Delivery and the Altiris Agent on page 32
Viewing the Version of Altiris Agent Components through the Altiris Console on page 33
Accessing Altiris Agent Configuration Information on page 33
Event Queue Size on page 33
Disk Imaging with Altiris Agent installed on page 34
Altiris Agent Log On Events on page 34
Altiris Agent Diagnostics on page 34
Notification Server Reference 24

Data Flow for a Newly Installed Altiris AgentAfter the Altiris Agent is installed, it does the following:
1. Requests and gets a Global Unique Identifier (GUID) from the Notification Server that it was installed from.
Requests a MachineGuid from the Notification Server using the CreateResource.aspx page. It gives its name and domain to the Notification Server. The Notification Server then generates the MachineGuid and gives it to the Altiris Agent. The Altiris Agent places its MachineGuid in its registry at:
HKLM\SOFTWARE\Altiris\Altiris Agent
This is used by Notification Server as a unique identifier for the managed computer.
2. The Altiris Agent generates and sends the computer’s basic inventory to the Notification Server. Basic inventory contains basic identification information of the managed computer, such as the IP address, computer name and domain, operating system, and so on.
Notification Server Reference 25

When the Notification Server next runs its Collection Update, it places the Altiris Agent in one or more collections based on the information in the basic inventory (such as whether it is a Windows or UNIX computer, and so on). The Notification Server cannot send the Altiris Agent any policies until it is in a collection. For information, see Altiris Notification Server Help.
NoteBy default, the Altiris Agent sends basic inventory every 1 day. This can be changed in the Altiris Agent Settings policy configuration.
3. The Altiris Agent asks the Notification Server for its Altiris Agent Settings policies.
It does this by running the GetClientPolicies.aspx page from the Notification Server. Every 15 minutes, the Altiris Agent requests the latest Altiris Agent Settings policies from the Notification Server. The Notification Server evaluates all of its policies and sends only the policies to the Altiris Agent that apply to the collection that the Altiris Agent is in. The Altiris Agent Settings policies contain instructions for the Altiris Agent such as the schedules for downloading packages and sending back basic inventory. To see the Altiris Agent Settings policies that the Altiris Agent has received, look in the following directory on the managed computer:
Notification Server Reference 26

Look in the file named for your Notification Server to ensure the Altiris Agent is receiving the correct configuration changes.
NoteSeveral Altiris Agent Settings policies are provided out-of-the-box by Notification Server. We recommend you leave the settings in these policies as-is until you have set up a test environment and become familiar with Notification Server. Then you can adjust the settings for your enterprise.
4. The Altiris Agent sends events to the Notification Server. These events are generated either when policies send information back to the Notification Server or when inventory needs to be sent to the Notification Server.
On the Notification Server, there is a file in the install path\Altiris\Notification Server directory called PostEvent.asp, that is the entry point for sending and posting events from the Altiris Agent.
The events that are sent from the Altiris Agent can be viewed in the Resource Manager in the Events tab. For information, see Altiris Notification Server Help.
Notification Server Reference 27

The Altiris Agent can request its Altiris Agent Settings policies before it sends its basic inventory. (This could happen if an Altiris Agent was moved from one Notification Server to another Notification Server.) If the Notification Server receives a request for Altiris Agent Settings policies from an unknown Altiris Agent, it creates a computer resource for that Altiris Agent and places the managed computer in the All Computers collection. However, the Notification Server will not send Altiris Agent Settings policies to the Altiris Agent until it receives the basic inventory from it.
Data Flow Troubleshooting Example
The Altiris Agent requests Altiris Agent Settings policies by running the GetClientPolicies.aspx page (the entry point for Altiris Agent Settings policies) with this MachineGUID as the parameter: Gand so onlientPolicies.aspx?{60418A85-577E-98D3-3430F6EE66DC}. The Notification Server doesn’t return any Altiris Agent Settings policies.
If you just installed the Altiris Agent, it is possible that the Notification Server has not processed the basic inventory yet. If the Notification Server has not received basic inventory from the Altiris Agent, it has not created any Altiris Agent Settings policies for the Altiris Agent.
The speed this happens depends on the Altiris Agent Settings policies request interval and how often the basic inventory is sent.
NoteWhen the Altiris Agent receives Altiris Agent Settings policies from the Notification Server, it always caches them into the XML file found in the Client Policies directory. Check this file to know if the Altiris Agent is receiving all the Altiris Agent Settings policies.
Altiris Agent Directory StructureThis section describes the Altiris Agent directory and its subdirectories found on the managed computer after the Altiris Agent has been installed. This directory is found at: install path\Altiris\Altiris Agent.
Client Policies - This directory contains the Altiris Agent Settings policies it receives from the Notification Server. The Altiris Agent Settings policies are appended to a file named after the Notification Server that sent them.
Package Delivery - This directory exists on all managed computers the Package Server Agent is loaded on. This is where Package Server packages are stored on a Package Server. This directory contains packages that have been downloaded from
Notification Server Reference 28

Package Server Agent - This directory contains the files necessary for running the Package Server Agent. The Package Server Agent is loaded on the managed computer if it has been selected to be a Package Server. For information, see Altiris Notification Server Help.
Queue - This directory contains the event queue used by the Altiris Agent. Events that are generated by the Altiris Agent are placed in a subdirectory named after the Notification Server that needs to receive the events. Events are only stored here temporarily. They are sent to the Notification Server as soon as possible.
Software Delivery - This directory contains all the Software Delivery information used by the Altiris Agent. This is where the Software Delivery packages are stored on the managed computer. This directory also contains package status information.
Tasks - This directory is used by the Task Scheduler.
Troubleshooting Tip: If the Altiris Agent is not functioning correctly, check the Client Policies and Queue directories to ensure policies and events are getting processed correctly.
Switching Altiris Agents from between Notification Servers
You can switch Altiris Agents from one Notification Server to another and still use the same Software Delivery packages without needing to re-download them. Packages are Notification Server independent. A utility is provided that lets you do this. For information on this utility, see Altiris Agent Utility on page 29.
To switch an Altiris Agent from one Notification Server to another
1. From the Altiris Agent, run the following from the install path\Altiris\Altiris Agent directory:
AeXAgentUtil.exe /Server:NSName
where NSName is the name of the Notification Server that you want the Altiris Agent to be attached to.
Notes The packages that are the same (have exact IDs) on both of the Notification Servers will not need to be downloaded again onto the managed computer unless the version has changed. Even if the version has changed, the Altiris Agent will compare the snapshots and only download the differences.
The packages on the new Notification Server, but not on the old one, are downloaded onto the managed computer.
The packages on the old Notification Server, but not on the new one, are deleted from the managed computer when they expire.
Altiris Agent UtilityThe Altiris Agent utility lets you:
Notification Server Reference 29

Set the default Notification Server that the Altiris Agent is configured to.
Clean the Altiris Agent from a client computer.
Set up a log file for logging all running processes of the managed computer.
IMPORTANTAn Altiris Agent can only communicate with one Notification Server at a time. If you want to change the Notification Server that the Altiris Agent reports to, use this utility.
AeXAgentUtil [/?] [/Start] [/Stop] [/Clean] [/Server:server] [/Web:web] [/RegisterMSXML] [/EnableSmsClient] [/RegisterClient] [/DeleteDevices] [/UninstallAgents] [/ListProcess] [/EnableASP] [/Log:logname]
Switches:
AeXAgentUtil Parameters
Parameter Description
? Shows a usage dialog.
Start Starts the Altiris Agent (6.0 or later)
Stop Stops the Altiris Agent (Altiris Agent 6.0 or NS Client 5.x)
Clean Attempts to completely remove the Altiris Agent. This will attempt to detect the relevant version and remove all files and registry entries.
This is provided in the event of Altiris Agent install failing on managed computers. You can use this to “clean” the managed computer, and then try a fresh Altiris Agent install.
Server:server Sets server as the Notification Server.
Web:web Sets the URL of the Notification Server. This is only valid if used with /Server.
Lets you specify the Notification ServerWeb for your server. By default, the Notification ServerWeb is http://server01/Altiris.
Example:
To add a server with NSWeb specified:
AeXAgentUtil.exe Server:server02 Web:http://server02/Altiris
Notification Server Reference 30

LAN, WAN, and Disconnected Environments The Altiris Agent is specifically designed to work with LAN, WAN, and infrequently connected environments. The following core capabilities are part of every Altiris Agent on all Windows computers:
Throttled download of files - When the Altiris Agent receives a policy indicating a set of files needing to be downloaded, the Altiris Agent limits the rate the files are downloaded from Notification Server. The bandwidth used by the Altiris Agent when downloading files from the Notification Server is controlled from the Altiris Console.
Restart and recovery during the downloading of files - When the Altiris Agent is downloading files associated with a policy, it maintains a record of downloaded files. If the network link to the Notification Server is discontinued during a download, the Altiris Agent will resume later. Files that were already downloaded are not downloaded twice.
Queuing of information to be sent to the Notification Server - All of the solution products that can be installed on the Altiris Agent have data returned from the Altiris Agent to the Notification Server. These include inventory results, event log data, and process data. This information is placed in a file queue on the Altiris Agent. When a file is placed in the file queue directory, the Altiris Agent tries to post this data to Notification Server. If the connection to the Notification Server is not available, the information remains in the queue on the Altiris Agent. The Altiris Agent then retries later to establish the connection to the Notification Server and post the information.
RegisterMSXML Registers the MSXML library (MSXML through MSXML4).
The MSXML library is used by the Altiris Agent and this parameter is provided for your managed computers that do not have the MSXML library registered.
EnableSmsClient Activates the SMS Client.
NoteInstalling the Notification Server Client 5.x will automatically disable the SMS Client.
RegisterClient Registers the DLLs of the Altiris Agent.
DeleteDevices Deletes the known Altiris legacy device drivers.
UninstallAgents Deletes all registered agents installed by Altiris solutions (excluding the Altiris Agent).
ListProcess Logs all running processes to the filename set by /Log. In order to use this, /Log must be set.
EnableASP Permits use of ASP pages (only for IIS 6 or later).
Log:logname Sets the log filename that will be used in the system32 directory. If this parameter is omitted, CEReportEvent logger will be used. Quotes are required if the filename has spaces.
Examples:
/Log:somelog.log
/Log:“long name.log”
AeXAgentUtil Parameters (Continued)
Parameter Description
Notification Server Reference 31

NoteBecause the HTTP protocol works independently of Windows NT/2000/2003 domains and security, managed computers do not have to be a member of a domain, nor does the user on a managed computer need to log in to a Windows domain in order for the Altiris Agent to be managed.
Basic inventory transfer - After the Altiris Agent is installed on a Windows computer, it sends a basic inventory record. This basic inventory record includes information about the operating system, the domain, and the TCP/IP settings on the computer. The Altiris Agent sends this basic inventory record to Notification Server regardless of whether you have installed Inventory Solution. (Inventory Solution provides much more comprehensive inventory information.)
Software Delivery and the Altiris AgentThe Altiris Agent downloads files from Notification Server in order to perform basic Software Delivery functions, such as policy updates and agent distribution. You can see the status of the Software Delivery tasks on the local computer by running the Altiris Agent interface, if available, in the system tray. After additional solutions are purchased, the following Software Delivery policies are sent to the Altiris Agent:
Software that is installed to support one of the Notification Server solution products such as Inventory Solution or Event Solution. These solutions are installed on managed computers when they are installed on Notification Server. No license for Software Delivery Solution is required for this capability. The installation of the solution on the Notification Server defines the software package and the policies that cause the files to be installed on the managed computers.
Software that is installed as part of a standalone Software Delivery task. In this case, the package and Software Delivery task are defined using the Altiris Console. You must have a valid license for Software Delivery Solution in order to use this capability.
Example: You can define a package to update a virus definition file or install a service pack for Windows 2000 computers.
Software that is installed as a result of a Microsoft SMS advertisement that is targeted to an Altiris Agent. You must have a valid license for Software Delivery Solution in order to use this capability.
All three of the different types of Software Delivery tasks are consistently presented to the end user in the Altiris Agent interface. The end user can’t tell the type.
Notification Server Reference 32

To improve performance, the Notification Server sends a snapshot of each package to the Altiris Agent. When there has been a change in the package, the Altiris Agent will know by comparing the snapshots. It will then download only the new or updated files in the package.
NoteIf the package was only partially downloaded, the downloading will resume from where it was interrupted.
Viewing the Version of Altiris Agent Components through the Altiris Console
If you want to find the installed version of your Altiris Agents, you can run a report from the Altiris Console.
To run the Altiris Agent version report
1. In the Altiris Console, select the Reports tab.
2. In the left pane, navigate to Reports > Notification Server Infrastructure > Agent > Altiris Agent Deployment.
3. Run the Altiris Agent version report.
Accessing Altiris Agent Configuration InformationYou can access configuration information about an Altiris Agent from a browser by using the following URL:
http://NSName/Altiris/NS/Agent/Gand so onlientPolicies.aspx?xml= <Request><WrkstaGuid>GUID</WrkstaGuid><WrkstaName>ClientName</WrkstaName></Request>
NSName is the name of the Notification Server computer, ClientName is the managed computer that you want configuration information on, and the GUID is replaced by the GUID of the managed computer.
The Altiris Agent configuration information is also stored in the following file:
install path\Altiris\Altiris Agent\Client Policies\NSName.xml
where NSName is the name of your Notification Server.
Event Queue SizeEach managed computer contains an event queue. The event queue size is managed by two registry key values (found at HKLM\Software\Altiris\Altiris Agent\Transport).
Max Queue (percent free space) - This is the maximum size the queue is allowed to grow to as a percentage of free space on the drive the Altiris Agent is installed on. This is set to 5 by default. If it is set to 0, it is ignored.
Notification Server Reference 33

Once the queue is full, the oldest 10% of the events are discarded.
Disk Imaging with Altiris Agent installedYou can image a computer that has the Altiris Agent installed and then deploy that image to other computers. However, there are some steps you need to perform before doing so to prevent all of your computers from having the same managed computer GUID (MachineGUID). If you do not do these steps, you will have an inventory reporting problem as you will only see the name of the last computer that has reported that managed computer GUID to the database.
Before making an image, do the following
1. Stop the Altiris Agent, set its stills to autostart.
2. Open the managed computer’s Registry Editor.
3. Search for and delete the MachineGuid registry value from the HKLM\Software\Altiris key and all child keys. Ensure you delete HKLM\Software\Altiris\Altiris Agent\MachineGuid.
4. In the file system under install path\Altiris\Altiris Agent\Client Policies, delete any .xml files.
5. In the file system, delete all subdirectories in the install path\Altiris\Altiris Agent\Software Delivery directory.
6. In the file system, under the install path\Altiris\Altiris Agent directory and subdirectories, delete all *.nsi, *.nse, and *.tmp files.
7. Shut down the computer and image it. Make the image before the Altiris Agent posts any event to the Notification Server (when this happens, a new unique MachineGUID will be created by the Notification Server and sent to the Altiris Agent). All deleted files will be regenerated.
Altiris Agent Log On EventsEvery time a user logs on or off a computer, the Altiris Agent records a logon/logoff event. These primary user events are sent to the Notification Server as part of basic inventory. These events can be viewed in the Resource Manager by clicking the Events tab, and then navigating to Data Classes > Computer Events > AeX Client LogOn.
Altiris Agent DiagnosticsThe Altiris Agent diagnostics let the user view the log file through the Altiris Agent User Interface. It also displays other current settings on the Altiris Agent. Enabling the diagnostics is only recommended for test environments, or when troubleshooting.
Notification Server Reference 34

ImportantAltering Registry Keys incorrectly can cause serious problems that may require you to re-install the Altiris Agent to correct them.
Basic Inventory Registry Keys
[HKEY_LOCAL_MACHINE\SOFTWARE\Altiris\Altiris Agent\Inventory]
Agent Policy Registry Keys
[HKEY_LOCAL_MACHINE\SOFTWARE\Altiris\Altiris Agent\Servers]
[HKEY_LOCAL_MACHINE\SOFTWARE\Altiris\Altiris Agent\Servers\NSHOSTNAME.DOMAIN.COM]
Value Type Default Description
ConnectionTimeLan DWORD variable Storage for basic inventory details. Cannot be modified, will be overwritten by system.
ConnectionTimeWan DWORD variable As above.
ConnectionTimeNone DWORD variable As above.
PrimaryUser STRING variable As above.
PrimaryUserMaxEntries DWORD variable As above.
ConnectionTimeMaxDays DWORD variable As above.
Value Type Default Description
Default STRING variable Fully qualified hostname of the Notification Server the Altiris Agent reports to.
Value Type Default Description
Version STRING variable Notification Server version.
Policy Next Request STRING variable Time of next policy config request in "YYYY-MM-DD HH:MM:SS" format.
Basic Inventory Next Post
STRING variable Time to next send basic inventory in "YYYY-MM-DD HH:MM:SS" format.
Web STRING variable URL of the Notification Server, that is, "HTTP://NSHOSTNAME.DOMAIN.COM:80/Altiris/".
Policy Last Requested STRING variable Time of last policy config request in "YYYY-MM-DD HH:MM:SS" format.
Policy Last Received STRING variable Time of last policy config received in "YYYY-MM-DD HH:MM:SS" format.
Policy Update Interval (mins)
DWORD variable Interval between policy update requests in minutes.
Notification Server Reference 35

Software Delivery Registry Keys
[HKEY_LOCAL_MACHINE\SOFTWARE\Altiris\Altiris Agent\Software Delivery]
Policy Retry Interval (mins)
DWORD variable Interval between policy retry requests in minutes.
Basic Inventory Hash STRING variable HASH of last inventory results
Basic Inventory Last Post STRING variable Time of last inventory post to Notification Server in "YYYY-MM-DD HH:MM:SS" format.
Basic Inventory Update Interval (mins)
DWORD variable Interval between basic inventory generation in minutes.
Value Type Default Description
ExecutionHistorySize DWORD 0000001e Size of history to keep regarding SWD execution.
DefaultImmediateDownload DWORD 00000001 Immediate download or download before run.
DefaultMinDownloadSpeed DWORD 00000000 Minimum interface speed to download packages.
DefaultMinRunSourceSpeed DWORD ffffffff Minimum interface speed to execute advertisements.
ShowOptions DWORD 00000001 Show 'options' in Altiris Agent UI.
DefaultMinConnectionSpeed DWORD 00000000 Minimum interface speed to connect to the Notification Server.
NotifyRunPrograms (Mins) DWORD 00000000 Interval between program notification and execution.
NotifyMandatoryAds DWORD 00000000 Notify regarding mandatory assigned advertisements.
NotifyOptionalAds DWORD 00000001 Notify regarding optional assigned advertisements.
AgentUITasksFoldout DWORD 00000001 Expand 'Tasks' in UI by default.
AgentUIActionsFoldout DWORD 00000001 Expand 'Actions' in UI by default.
AgentUIDescFoldout DWORD 00000001 Expand 'Description' in UI by default.
AgentUIOptionFoldout DWORD 00000000 Expand 'Options' in UI by default.
AgentUIShowDisabled DWORD 00000000 Show 'Disabled' advertisements in UI by default.
AgentUIShowInternal DWORD 00000000 Show 'Internal' advertisements in UI by default.
AgentUIShowMandatory DWORD 00000000 Show 'Mandatory' advertisements in UI by default.
AgentUISplitPosition DWORD 00000000 Default position of 'split' between left and right hand panes of Agent UI.
Auto Restart Agent (mins) DWORD 00000000 How often the Agent Service will restart.
Value Type Default Description
Notification Server Reference 36

[HKEY_LOCAL_MACHINE\SOFTWARE\Altiris\Altiris Agent\Transport]
Installer Registry Keys
[HKEY_LOCAL_MACHINE\SOFTWARE\Altiris\APackageStub]
Communications Registry Keys
[HKEY_LOCAL_MACHINE\SOFTWARE\Altiris\Communications]
Value Type Default Description
ExecutionHistorySize STRING variable Path to local Agent file queue.
DefaultImmediateDownload DWORD 0000c350 Size of Buffer when copying files locally.
DefaultMinDownloadSpeed DWORD 00000005 Percentage of available disk space to use as maximum file queue size.
DefaultMinRunSourceSpeed DWORD 00000000 Maximum number of events for file queue, "00000000" = Limited only by File queue size.
ShowOptions DWORD 00000000 System flag - When queue is full oldest 10% of NSE are dumped.
DefaultMinConnectionSpeed STRING BLANK Support debugging option, alternate dump for NSE traffic.
NotifyRunPrograms (Mins) DWORD 00032000 Maximum size of NSE data before compression is used.
NotifyMandatoryAds DWORD 000007d0 Delay between posts of NSE data to Notification Server.
Value Type Default Description
LastExecute STRING variable Last process executed by the Altiris packager
LastTemp STRING variable Last TEMP path used by Altiris packager
Execute STRING variable Last sub process spawned by Altiris packager including arguments
Value Type Default Description
Enable Bandwidth Control DWORD 00000001 Enable bandwidth throttling.
Absolute Throttle DWORD 00000000 Maximum allowed throughput when throttling is enabled, in bytes per second.
Relative Throttle DWORD 00000000 Percentage of available bandwidth to use (0 - 100%).
Bandwidth Threshold DWORD 77359400 Throughput threshold (minimum) at that bandwidth throttling is enabled. In bytes per second.
Network Test Frequency (secs)
DWORD 0000003c Period at which the Altiris Agent transport will re-check available throughput to network connections
Notification Server Reference 37

Package Delivery Registry Keys
[HKEY_LOCAL_MACHINE\SOFTWARE\Altiris\Communications\Package Delivery]
Listener Port DWORD 00000000 Listener Port for Power Management.
Multicast Address STRING NULL Multicast address for Power Management.
Multicast Port DWORD 00000000 Multicast Port for Power Management.
HTTP Timeout (secs) DWORD 0000000f HTTP timeout period in seconds.
Require Intermediate Cache Revalidation
DWORD 00000001 System HTTP setting.
Package Access User STRING variable UID for IIS and UNC package authentication.
Package Access Password STRING variable PWD for IIS and UNC package authentication (encoded).
IP Expiry (mins) DWORD 00000168 Number of minutes before connectivity to an Host is retested.
Speed Expiry (mins) DWORD 00000168 Number of minutes before connection speed to an Host is retested.
Error Expiry (mins) DWORD 0000003c Number of minutes a Host will be flagged as unavailable.
MaxErrorsPerServer DWORD 00000014 Number of errors allowed before a host is flagged as unavailable.
Proxy Server STRING NULL Proxy server to be used for HTTP connections.
Proxy Port DWORD 00000000 Proxy port to be used for HTTP connections.
Proxy Auto Detect DWORD 00000001 Use HTTP proxy settings from IE configuration.
Trusted Servers STRING variable List of servers that can remote Power Manage the Altiris Agent. Only SYSTEM can modify this setting.
Blockouts STRING variable Altiris Agent blockout periods as set through UI
MaxServersToCheck DWORD 00000006
Value Type Default Description
Download history size DWORD 0000001e Number of Package download events to save as history.
Maximum download attempt time (mins)
DWORD 0000001e Maximum time permitted for attempting downloads.
Maximum download attempts
DWORD 00000000 Number of Package download events permitted.
Value Type Default Description
Notification Server Reference 38

[HKEY_LOCAL_MACHINE\SOFTWARE\Altiris\Communications\Server Profiles\Servers]
[HKEY_LOCAL_MACHINE\SOFTWARE\Altiris\eXpress]
Logging Registry Keys
[HKEY_LOCAL_MACHINE\SOFTWARE\Altiris\eXpress\Event Logging]
Compatibility Registry Keys
[EventQueuePath\Altiris\eXpress\NS Client]]
[HKEY_LOCAL_MACHINE\SOFTWARE\Altiris\eXpress\NS Client\NSs\Nshostname.DOMAIN.COM]]
Maximum retry delay (mins)
DWORD 00000078 Maximum time permitted for delay before retrying downloads.
Min Disk Free Space DWORD 000001f4 Sets the minimum disk free space for package delivery.
Package Source Expiry DWORD 0000001a Sets the package source expiry.
Retry Delay DWORD 00000013 Time before retrying downloads.
Value Type Default Description
NShostname BINARY variable NS server profile (dynamic data)
Value Type Default Description
MachineGUID STRING variable Altiris Agent unique identifier.
Value Type Default Description
FilePath STRING PATH Path for log files install path\Logs.
FileName STRING agent.log Naming format for log files.
Severity DWORD variable Severity level of message logging.
Value Type Default Description
DefaultServer STRING variable Default Notification Server that the Altiris Agent connects to.
Version STRING variable Version number of the installed Altiris Agent.
IntsallDir STRING variable Install path for the Altiris Agent.
MachineGUID STRING variable Unique identifier for the Altiris Agent.
Value Type Default Description
NSweb STRING variable HTTP string for Altiris Agent to server communications, 'HTTP://Nshostname.DOMAIN.COM:80/ALTIRIS’
Value Type Default Description
Notification Server Reference 39

[HKEY_LOCAL_MACHINE\SOFTWARE\Altiris\Scheduler]]
Value Type Default Description
Enable Logging DWORD 00000000 Enable verbose logging.
Execution Queue Size DWORD 00000032 Queue size of tasks to execute.
Thread Pool Size DWORD 00000005 Available threads to allocate to scheduled tasks.
WorkFolder STRING path Path where scheduled tasks are stored - install path\Altiris Agent\Tasks
Notification Server Reference 40

Notification Server Reference 41
Part III
Notification Server
This section provides detailed reference information on the Notification Server and its components.
Quick Links
Memory Configuration on page 42
Learn how Notification Server events affect memory usage and how to configure memory settings for both the Notification Server and the SQL Server.
Inventory Forwarding on page 46
Learn how to gather basic inventory from managed computers and, if you desire, forward that inventory to SMS.
Package Servers on page 48 Package Servers can be set up to distribute your Software Delivery packages to your Altiris Agents. This helps reduce the load on Notification Servers as well as reduce network traffic.
Software Delivery on page 78 Software Delivery is the mechanism for delivering software packages to your managed computers.
Monitoring Notification Server Operations on page 81
Provides information on how to monitor Notification Server operations. This helps you understand how to monitor the performance and load on your Notification Server.
Extending the Notification Database on page 98
Provides supports options for extending your Notification Database.
Disaster Recovery and High Availability on page 108
Provides information on how to keep your data recoverable if disaster strikes.
Security Management on page 112
Understand security in the Notification Server, know how roles, privileges, permissions, and item tasks are configured and used.
Integrating IIS Lockdown and URLScan on page 123
Learn the requirements for integrating NS with the Microsoft IIS Lockdown Utility and URLScan.
Registry and Configuration Settings on page 134
Provides important registry and configuration settings that can help you configure Notification Server and the Altiris Agent.

Chapter 5Memory Configuration
The Notification Server and the SQL server require resources from the operating system to manage events and databases. The most important of these resources is memory. This section describes how Notification Server events affect memory usage and how to configure memory settings for both the Notification Server and the SQL Server.
Understanding NS and MemoryIf the Notification Server and SQL server are running on the same computer, the SQL server will use approximately 10 times more memory than the Notification Server. So, when looking to optimize memory usage it is more important to have your SQL server configured appropriately. The following processes visible in Task Manager are very useful for memory configuration:
AeXSvc.exe
SQLservr.exe
win2k3, w3wp.exe, or win2k aspnet_wp.exe (ASP worker processes)
NoteAeXSvc.exe will not usually operate using more than 1 GB of memory.
Example of memory usage
For a Notification Server Event, (example: basic inventory or full inventory) memory useage is approximately 4 times the memory size of the Notification Server Event through processing. The processing of NSEs involves the following steps that result in the increase of memory usage by 4:
Receives the file
Drops the file into a queue
Loads the file to memory
Loads the file to IS
An NSE can be processed in multiple threads. To calculate the maximum memory usage for an NSE, take the largest NSE in any queue, multiply that figure by the number of threads, and multiply your result by 4. It can be represented by the following equation;
Max. Memory Usage = NSE Size * No. Threads * 4
Example: in EventQueueFast, the maximum size NSE is 8 KB and it uses 10 threads. Using the formula, the size required in memory for processing this NSE is 320 KB.
NoteThis example applies to legacy format NSEs, new format types are mainly streamed directly to the database.
Notification Server Reference 42

Altiris Agent posting NSE (Notification Server Events) to the Notification Server
If an NSE file is less then 512 KB, it is processed in memory. If it is greater then 512 KB, it is streamed to the Notification ServerCap\Temp folder as a temporary store. After the complete NSE file has been received, it is written to the file queue.
512 KB is the default setting for the above process. This value can be modified using the LargeEventThreshold registry value (in bytes).
The Event Router then checks the NSE file for basic formatting and writes the file to the appropriate file-based queue. The target file queue is determined using the following rules:
Files less than the FastQueueThreshold registry value (in bytes) are written to the Notification ServerCap\EvtQFast queue. The default value is 15 KB.
Files less than the SlowQueueThreshold registry value (in bytes) are written to the Notification ServerCap\EvtQueue queue. The default value is 1048 KB.
Files less that the LargeQueueThreshold registry value (in bytes) are written to the Notification ServerCap\EvtQSlow queue. The default value is 2097 KB.
Any file greater than the 2097 KB (2 MB) slow queue threshold is written to the Notification ServerCap\EvtQLarge folder.
The event router process runs under the IIS anonymous user security context. This is necessary so anonymous connections can post data to the event router through the postevent.asp page. Grant read, change, and delete permissions when modifying default NTFS security (everyone = full) on the folders listed above, so that the incoming NSE is processed.
A maximum of 20,000 (default) files are written to any of the file-based queues. This value is set by the MaxFileQEventCount registry value. The file-based queues may grow to a maximum size of 512,000 KB (by default). This value is set by the MaxFileQSize registry value. If the file-based queues reach a maximum limit, the event router stops accepting NSE files posted by Altiris Agents. An HTTP 503 "server busy" error is then returned to the Altiris Agents after the attempt and the Altiris Agent will go to a back-off and re-try process.
NoteAll registry values above are DWORD and located in hKLM\Software\Altiris\eXpress\Notification Server.
Notification Server Reference 43

Standalone Win32 Inventory sending NSE to the Notification Server
This process copies the NSE file using SMB to the Notification ServerCap\EvtInbox folder under the \\NShostname\NScap share.
The Altiris NS Receiver Service monitors the Notification ServerCap\EvtInbox folder, and passes any files written to this queue over to the Event Router process. Stopping the receiver service stops the transfer of NSE files from the EvtInbox to the event router.
The NSE files are then processed by the event router using the same logic as if received through postevent.asp.
Processing of the file-based queues
The Altiris Agent message Dispatcher Service monitors the file-based queues for NSE files. Stopping the Dispatcher Service stops the processing of files from the queues.
The Dispatcher Service is multi-threaded and processes multiple NSE files at once. We don’t recommend modifying the default values as it can result in SQL data locks.
The EvtQFast queue has 10 threads allocated to processing NSE files. The number of threads is defined by the MaxConcurrentFastMsgs element of the coresettings.config file.
The EvtQueue queue has 3 threads allocated to processing NSE files. The number of threads is defined by the MaxConcurrentSlowMsgs element of the coresettings.config file.
The EvtQSlow queue is limited to a single processing thread. This can’t be modified and protects against excessive memory usage by Notification Server.
The EvtQLarge queue is NOT monitored by the Dispatcher Service and NSE files sent to this queue aren’t processed. We don’t recommend files greater then 20 MB, as they consume too much memory. However, they can be processed manually.
The processing threads extract the XML from the NSE and execute the dataloader process to write the data into the Notification Database. After the XML data has been successfully written to the Notification Database, the NSE file is deleted.
Queue / Folder No. Threads Default Value Recommended value if receiving Inventory Forwarding
NSCap\EvtQFast queue value
10 15 KB 15 KB
NSCap\EvtQueue queue
3 1048 KB Value > 8 KB, < 20 KB
NSCap\EvtQSlow queue
1 2097 KB 8 MB
NSCap\EvtQLarge folder
N/A 2097 KB 8 MB
Notification Server Reference 44

Configure Virtual MemoryWe recommend you configure virtual memory (VM) to optimize free disk usage for running your Notification Server.
To configure virtual memory:
1. On a server with less than 2.6 GB RAM, set the minimum virtual memory to 1.5 times the available RAM;
Minimum VM = Available RAM * 1.5
2. On a server with more than 2.6 GB RAM, set the maximum virtual memory to minimum VM plus 50 MB;
Maximum VM = Minimum VM + 50 MB
NoteThese recommendations are dependant upon free disk space.
Configure SQL MemoryWe recommend you configure SQL Enterprise Memory to optimize free disk usage for running your Notification Server.
To configure virtual memory:
1. On a server with less than 4 GB RAM, limit SQL memory usage to 50% of available RAM. Example: limit memory to 1 GB on a server with 2 GB RAM.
2. On a server with 4 GB RAM or more, SQL memory usage can be left unrestricted.
NoteThese recommendations apply to a computer sharing SQL Server and the Notification Server. If you are running SQL on its own server follow Microsoft guidelines.
Notification Server Reference 45

Chapter 6Inventory Forwarding
If you have more than one Notification Server on your network, you can forward inventory information from one Notification Server to one or more Notification Servers.
When a Notification Server is set up to forward information, the Notification Server inserts its Site Code, if necessary, and then uses the Client Transport tool to send the Notification Server event message to the target Notification Servers. The entire inventory message and all inventory Notification Server events are forwarded.
Notification Server uses a store and forward method for sending messages. This means that if the Notification Servers are connected to the target Notification Server, the messages are sent immediately. If the Notification Servers are not connected, the messages are queued (saved on disk) and are sent when the connection resumes. After messages are forwarded, they will not be present unless a re-synchronization is manually executed. The default Inventory Solution policies re-send all inventory once a month.
NoteYou can use the policies in Inventory Solution to allow the full inventory to be sent to your target Notification Server. See “Deploying and Collecting Inventory Solution Data” in the Altiris Inventory Solution Reference.
NoteAn Inventory Forwarding Status report is available that lists the destination Notification Server that is receiving forwarded inventory and the last time the inventory was sent. See Altiris Notification Server Help.
Inventory Forwarding and Data Forwarding to SMSWithin Notification Server, there are two forms of Inventory Forwarding: Inventory Forwarding to another Notification Server and Inventory Forwarding to SMS (using the Altiris Connector for Microsoft SMS). These operate separately from each other.
With Inventory Forwarding, one Notification Server computer would be receiving inventory that has been forwarded from one or many other Notification Server computers. This computer (top of the tree) could then forward all inventory data to SMS, if you are forwarding data to an SMS server.
Notification Server Reference 46

Some items to keep in mind when forwarding data
To set up Inventory Forwarding to another Notification Server, in the Configuration tab of the Altiris Console, navigate to Configuration > Server Settings > Notification Server Infrastructure > Inventory Forwarding. If you want to do Data Forwarding to SMS to another computer or to the same computer (if you have installed SMS on the local computer), then configure it as specified in the Altiris Connector for Microsoft SMS Help.
If you have Inventory Forwarding to another Notification Server and/or Data Forwarding to SMS, set up on a computer and you no longer want to forward to either a Notification Server or SMS, then remove the settings for the one you want to remove. If you remove the Notification Server or SMS from the destination computer (either a remote computer, or in the case of SMS, possibly the same computer as the Notification Server), and the Notification Server is still set up to forward data, you will end up with errors on the sending Notification Server computer, unable to forward data. You should always remove the Inventory Forwarding to another Notification Server or Data Forwarding to SMS settings first.
Notification Server Reference 47

Chapter 7Package Servers
IntroductionPackage Servers let you distribute your Software Delivery packages to different computers on your network where Altiris Agents can download the packages. Distributing packages reduces the load on the Notification Server and reduces network traffic, since the Altiris Agent accesses the closest Package Server to it for package downloads.
Notification Server Reference 48

OverviewPackage Servers receive configuration information through Altiris Agent policies. In versions of Notification Server prior to Notification Server 6.0 SP1, the configuration XML document contained package information, along with source locations (also called codebases). As the number of defined package servers and packages increases, there is an exponential increase in the amount of time that the database takes to retrieve the source location information for all packages for a given Package Server.
The Package Server configuration includes information on packages that a given Package Server is to host. Source location information is not included.
Before the Package Server is going to download a package's files, it gets the source locations for the package through the GetPackageInfo.aspx page, which returns only the source locations for the requested packages.
Also, the source locations that are returned are sourced from other Package Servers that are in the same site as the requesting Package Server, where possible. To determine which computers are used as the source of the source locations, the following rules are followed in order:
1. If Package servers download packages from the Notification Server only is selected in the Package Servers Configuration page, and no sites have been defined, the Notification Server will be the only source for source locations.
2. Retrieve source locations from Package Servers in the same site as the requesting Package Server.
3. If no source locations are found in step 2 and any sites have been defined (regardless of whether the requesting Package Server is in one of these sites), then only unconstrained Package Servers will download from the Notification Server source locations. Any additional Package Servers will wait for the unconstrained servers to finish before download.
4. If no source locations are found in step 2 and no sites have been defined, then return all source locations from Package Servers in the same subnet as the requesting Altiris Agent. If there are no available codebases all Package Servers are searched. If codebases are still not available the Notification Server codebases are returned. This rule assumes the Notification Server installation is a small one (Example: no sites and a small number of Package Servers and packages).
For information on how to specify an Altiris Agent as a Package Server, see Altiris Notification Server Help.
You can create any number of Package Servers you want (up to the number of managed computers you have). We recommend having at least one Package Server in each location of your company.
For a computer to be designated as a Package Server, the computer must be running:
one of the following operating systems - Windows NT/2000/XP/2003
one of the supported UNIX or Linux operating systems
Notification Server Reference 49

NoteAny reference to Package Servers in this chapter applies to both Windows and UNIX or Linux Package Servers unless otherwise specified. Please refer to Package Server for UNIX and Linux on page 58 for details on designating a UNIX or Linux computer as a Package Server.
How Package Servers are chosen
When an Altiris Agent downloads a package, it considers the Notification Server where the package was created and uses GetPackageInfo to obtain a list of Package Servers for as download sources. The source selected is based on the subnet of the source (the Altiris Agent looks for the closest source) or ICMP speed testing. If sites are defined, the subnets containing Package Servers need to be assigned to sites in the Site Management page. Without sites, Package Servers can be used regardless of the Altiris Agent location. For information, see Altiris Notification Server Help.
Quick Links
Package Server Requirements on page 51
Package Server Agent Rollout on page 51
Package Server User Interface on page 56
Package Server for UNIX and Linux on page 58
Deleting the Package Server Agent on page 65
Using Package Servers without Software Delivery Solution on page 65
Using Package Servers to Send Files over the Network on page 65
Selecting a Different Package Destination Location on your Package Servers on page 65
Package Status and Synchronization on page 66
Deleting Software Delivery Packages from Package Servers on page 67
Getting Status on Package Servers on page 68
Disk Space Planning on page 69
Recovering and Replacing Files on page 69
Viewing Package Information on the Altiris Agent on page 69
Package Servers and the Altiris Agent on page 69
Package Distribution on page 69
Package Download Retry on page 70
Windows Package Server Configuration Settings on page 71
Package Server for UNIX and Linux Configuration Settings on page 73
Notification Server Reference 50

General
500 MB Hard Disk free space minimum
Package Server for Windows
64 MB RAM minimum ( 128 MB recommended)
NTFS File System
NT4 SP6a, XP, Windows 2000 and Windows 2003 operating systems supported
IIS 4 or later version. IIS is required for HTTP downloads. Microsoft File & Print is required for UNC downloads.
ImportantIf you wish to use PAC to secure package locations, the Package Server must be a member of the domain or a trusting domain of the account you are using.
Package Server for UNIX and Linux
All UNIX or Linux operating systems that can run the Package Server for UNIX and Linux are supported. No additional RAM or disk space is required for the Package Server Agent itself.
Apache Web Server 1.3 or 2.0 is required for HTTP/HTTPS downloads. The Apache Web Server must be suitably configured and running. See Package Server for UNIX and Linux, and Apache Web Server integration on page 58.
Package Server Agent RolloutThe Package Server Agent handles the downloading of packages between the Notification Server and the Altiris Agent. When managed computers are selected as Package Servers on the Package Server configuration page, the Package Server Agent is downloaded and installed on the designated Package Server. The Notification Server uses the Package Server Agent Install policy to deliver the Package Server Agent to the designated Package Servers.
IMPORTANTThe Altiris Agent for UNIX and Linux running on a client computer must have the same version of the Altiris Agent that is installed on the Notification Server. If the Altiris Agent version is older it must be upgraded first to become a Package Server candidate.
Notification Server Reference 51

The following describes the process of adding and using Package Servers
1. Specify one or more managed computers as Package Servers. See Altiris Notification Server Help.
2. The Notification Server rolls out the Package Server Agent to the specified Win32 or UNIX or Linux Package Servers (using the Package Server Agent Install policy specific to the OS of the target Package Server).
When the Package Server for Windows Agent gets installed, it creates a virtual directory called http://localhost/Altiris/PS/{GUID}, where GUID is the package GUID. This virtual directory will be accessed by managed computers to download the package.
NoteIf you have upgraded from Package Server 5.5, a virtual directory called http://localhost/AeXPS/{GUID} will already exist. The Package Server for Windows will maintain this directory for 2 weeks while transitioning packages to the new virtual directory (http://localhost/Altiris/PS/{GUID}).
When the Package Server for UNIX and Linux is installed, it creates a link to a package location called http://localhost/Altiris/PS/Packages/{GUID}, where GUID is the package GUID.
3. If you are using sites then, for each Package Server, assign the subnets containing Package Servers to the appropraite sites (see Site Maintenance in Altiris Notification Server Help).
4. Create or edit a package on the Notification Server and specify which Package Servers to send the package to. You can select all Package Servers , individual Package Servers , Package Servers by site, or allow automatic selection with manual
Notification Server Reference 52

NoteYou need to have Software Delivery Solution or the Software Delivery Solution for UNIX and Linux installed in order to create packages.
ImportantIn a mixed Windows and UNIX Package Server environment special care must be taken when configuring or targeting the All Computers with Package Server Agent Installed collection.
5. The Package Server Agent wakes on a schedule and requests package information (using an Altiris Agent Settings policies request) from the Notification Server.
6. The Package Server Agent uses this information to verify if packages have been modified or need to be downloaded for the first time. When the Package Server Agent downloads a package, it considers the Notification Server where the package was created and uses GetPackageInfo to obtain a list of Package Servers for as download sources. The source selected is based on the subnet of the source (the Altiris Agent looks for the closest source) or ICMP speed testing. If sites are defined, the subnets containing Package Servers need to be assigned to sites in the Site Management page. Without sites, Package Servers can be used regardless of the Altiris Agent location.
7. To determine packages for first time download the Package Server Agent compares the list of packages returned in the Package Server policy to the packages it has already downloaded.
The Package Server Agent manages the virtual directories (the package file locations on the network). It makes sure that the packages on the Package Server are synchronized with the packages on the Notification Server (see Package Status and Synchronization on page 66).
When the Package Server Agent receives the Altiris Agent Settings policies and processes them, it disables the virtual directory and updates the files. When it is finished updating the files in the package, it re-enables the virtual directory.
8. The Package Server Agent sends back an event to the Notification Server saying it has the latest package and is ready to deploy it to requesting Altiris Agents.
9. The Notification Server now knows that the Package Server has the package and is ready to deploy it to Altiris Agents.
The Notification Server always knows which Package Servers have downloaded a particular package. Every time an Altiris Agent requests details about a Software Delivery task that has the corresponding package, the Notification Server tells the Altiris Agent which Package Servers in the environment have the package ready for download. This way, the Altiris Agent only asks for a package from Package Servers that actually have the package downloaded.
Notification Server Reference 53

10. After the Altiris Agent receives the Software Delivery task, it chooses the Package Server that will download the applicable package fastest. Then, if it determines that the Software Delivery task is either ASAP, or has a scheduled run time, it downloads the package from the Package Server.
ImportantThe UNIX, Linux or Mac Altiris Agent can’t access packages from Win32 Package Servers using UNC-share. In a UNIX and Windows mixed environment, enable IIS on Windows Package Servers to make packages accessible through HTTP/HTTPS protocol.
11. If you have set up Notification Server to get packages from an SMS Distribution Point (using Altiris Connector for Microsoft SMS), Notification Server points to an SMS Distribution Point to download the SMS packages from.
NoteIf you create a package, the Altiris Agents will not know about it until it is attached to a Software Delivery task. However, with Package Servers, as soon as the package has been created, the next time an assigned Package Server requests Altiris Agent Settings policies, the package will be downloaded to it. Package Servers do not need a Software Delivery task in order to download a package.
Notification Server Reference 54

If packages are not getting delivered to the specified Package Servers, try the following:
Check if the packages are getting sent to a share that exists. The Package Server Agent can create a folder location that doesn't exist but will not create a share. Packages that are assigned to a custom location will not have a custom share created for them. If the share does not exist, the package delivery fails.
NoteThis only applies when downloading Package Server packages to non-default locations.
If there is an error with the package delivery, view the package properties on the Altiris Agent. See Altiris Notification Server Help.
Package Server Agent for Windows Directories
The Package Server Agent for Windows creates two subdirectories in the install path\Altiris\Altiris Agent directory on the Package Server: Package Delivery and Package Server Agent.
The Package Delivery directory contains packages that have been downloaded from the Notification Server, or another Package Server. Each package is in a directory named after the package GUID. The contents of the GUID directory are:
cache - This directory contains the package files.
log.xml - This file contains a record of the package downloads (start time, end time, source, transfer rates, history of downloads, etc.).
package.xml - This file contains package information including the list of available Package Servers to download packages from.
snapshot.xml - This file contains a snapshot of the package (file names, size, last modified time). This snapshot information is used by the Package Server Agent to determine if the package is up-to-date. Only files that have changed will be downloaded. Periodically, the Package Server Agent accesses the http://[NS_Name or Package_Server_Name]/Altiris/PS/GetPackageSnapshot.aspx page from its download source. This page generates a new snapshot.xml file. The Package Delivery Agent then compares the new snapshot.xml file with the one it has. This is how it knows what package files to download.
The Package Server Agent directory contains the files necessary for running the Package Server Agent.
When you configure a package, you can specify where that package will be located on the Package Server. The default location is in the install path\Altiris\AltirisAgent\Package Delivery\{GUID}\cache directory. If you specify a different package location on the Package Server, the contents of the cache directory will be moved there. However, the log.xml, package.xml, and snapshot.xml files will still be located in the GUID directory.
Example:
If you create a package and you specify C:\Package as the package file location on the Package Server, the package information will be placed on the Package Server as follows:
C:\Package - This directory contains the package files.
Notification Server Reference 55

See Also
Selecting a Different Package Destination Location on your Package Servers on page 65
Package Server Agent for UNIX and Linux Directories
The Package Server Agent for UNIX and Linux creates directories on the client computer and on the Apache Web Server’s virtual directory webspace.
The Package Server Agent for UNIX and Linux will create the following directories on the managed computer:
/opt/altiris/notification/psagent - default install location of the Package Server Agent for UNIX and Linux. Always in the same directory as the Altiris Agent.
<installdir>/bin - contains any binaries required by the Agent.
<installdir>/etc - contains the Package Server Agent config file; psagent.conf.
<installdir>/var/queue - contains queued batched Package Server events waiting to be sent.
<installdir>/packages - contains the actual packages stored by the Package Server. Each package is in a directory name that matches its GUID.
<installdir>/PackageStatus - contains status summary files for each package.
<installdir>/authfiles - contains any HTTPD authentication files created by htpasswd and used when PACs are specified.
There are two directories created in the Apache Web Server’s virtual directory webspace under /Altiris/PS. If /Altiris/PS is defined as an Apache Web Server alias it will be used, otherwise the /Altiris/PS virtual directory will be created in the Apache webspace. See also Package Server for UNIX and Linux, and Apache Web Server integration on page 58.
/Altiris/PS/Snapshots - this directory contains symlinks (symbolic links) to the snapshot files in the packages currently hosted by the Package Server. These are always available through anonymous HTTP. This directory must be created by the Agent, it must not already exist or be a symbolic link.
/Altiris/PS/Packages - contains symlinks to the package directories. These are locked down by PACs if necessary. This directory must be created by the Agent and can’t already exist, or be a symbolic link.
Package Server User InterfaceA Package Server is a managed computer that receives packages from an Altiris server and passes those packages on to other managed computers. System administrators use packages to install programs on computers throughout a network. Example: instead of an Altiris server sending a package to all of the computers on a network, it can send the package to several or more Package Servers, which in turn, send the package to the rest of the computers on the network.
System administrators can assign one or more computers (that have the Altiris Agent installed) to be Package Servers. The Notification Server uploads the Package Server Agent to all assigned Package Server computers.
Notification Server Reference 56

After the Package Server Agent is installed on a computer, it becomes part of the Altiris Agent. A Package Server tab is placed in the Altiris Agent user interface of Win32 Altiris Agents. To start the Win32 Altiris Agent user interface, do one of the following:
Click Start > Programs > Altiris > Altiris Agent.
Click on the Altiris Agent icon in the system tray.
Run install path\Altiris\Notification Server\ALTIRIS AGENT\AeXAgentActivate.exe.
For more information on the Win32 Altiris Agent user interface, see the Altiris Agent Help.
For information on the Altiris Agent for UNIX and Linux, see the Altiris Agent Help for UNIX and Linux.
Package Server The Package Server tab lets you view all packages that have been assigned to this Package Server. The end-user can quickly view general information about the packages, such as the number of available packages. Each package assigned to this Package Server is also listed in the package table. The Status column tells you if the package is ready for use by this Package Server.
To view details on a specific package, double-click the package name.
Properties The Properties tab shows details of a package that has been assigned to this Package Server. The Source server is the name of the Altiris server that the packages get downloaded from.
Icons
About ( ) - Click to see information about the Altiris Agent. For more information on this, see the Altiris Agent Help.
Help ( ) - Click to view Package Server Help.
History The History tab shows source location and history information on a package that has been assigned to this Package Server.
Source location - Physical location on the Altiris server from which the package is downloaded.
Download History - History of the package downloads from the Altiris server to this Package Server.
Notification Server Reference 57

In order for a UNIX or Linux computer to be designated as a Package Server, the computer must be running the following software:
Altiris Agent for UNIX and Linux 6.0 SP3
NoteThe Altiris Agent for UNIX and Linux running on a managed computer must have the same version of the Altiris Agent that is installed on the Notification Server. If the Altiris Agent version is older, it must be upgraded first to become a Package Server candidate.
Apache Web Server version 1.3 or 2.0
NotePackage Server Agent for UNIX and Linux requires Notification Sever 6.0 SP2 with Hot Fix 18, or greater.
Package Server for UNIX and Linux, and Apache Web Server integration
The primary purpose of the integration of the Package Server for UNIX and Linux, and Apache Web Server is to expose packages and Package Snapshots downloaded from the Notification Server to Altiris Agents (on all platforms) through HTTP URLs. The packages and Package Snapshots are always downloaded to Package Server directories.
The only files created in the Apache Web Server are directories, symbolic links to the package files, symbolic links to the snapshot files, and .htaccess files to lock down package files with passwords.
When a UNIX or Linux computer becomes a Package Server, the Package Server Agent will attempt to create two main HTTP shares in the Apache Web Server virtual webspace:
1. /Altiris/PS/Snapshots
2. /Altiris/PS/Packages
Note/Altiris/PS directory will also be created if required.
IMPORTANTThe Package Manifest file is not used when a Package Server for UNIX and Linux downloads a package for distribution (unless the package is located in the same directory for the Package Server for UNIX and Linux and Software Delivery), and all package file permissions are set to allow Apache Web Server clients access (typically 0x744).
Depending on the specific configuration of the Apache Web Server, actual directory creation will take place in the root of the web directory (Example: /var/www/html on a typical Redhat system). The Package Server Agent will read the Apache Web Server configuration file to determine this location.
Notification Server Reference 58

Detecting the Apache Web Server
Automatic Detection - the Altiris Agent looks for the Apache HTTPD or HTTPD2 executable in the following directory locations:
1. /bin:/usr/bin:/sbin:/usr/sbin:/usr/lbin:/usr/etc:/etc:/usr/bsd:/usr/local/bin:/usr/contrib/bin/.
2. System PATH variable.
3. /opt/apache/bin:/usr/apache/bin:/usr/apache2/bin:/usr/local/apache/bin:/usr/local/apache2/bin:/usr/local/bin:/opt/freeware/apache/bin:/opt/freeware/apache2/bin:/opt/freeware/apache/sbin:/opt/hpws/apache/bin:/opt/apache2:/usr/local/apache+php.
If both HTTPD and HTTPD2 executable sare found (indicating that both Apache 1.3 and Apache 2.0 are installed), the executable that matches a running process will be used, with a preference for HTTPD2.
Manual Detection - If the Apache Web Server can’t be detected automatically (Example: the Apache executable might have been renamed) or if it finds the wrong Apache Web Server in the case of multiple installations, then the Apache Web Server location should be specified manually.
NoteIn the case of multiple installations, the [httpd Integration] section of the Unix Agent's client.conf should be edited and the "apache_exe_location" setting specified.
When the Apache Web Server executable is located, it is used to determine the default location of the Apache Web Server configuration file. The configuration file is required to determine if the Apache Web Server setup is suitable for Package Server use, and to determine settings applicable to the Package Server (Example: the ports used, or if it is SSL-enabled).
If the Altiris Agent for UNIX and Linux cannot find the Apache Web Server configuration file it searches in the following locations: /etc/httpd/conf and /etc/httpd/2.0/conf. As an alternative to Automatic Detection the [Httpd Integration] section of the Agent for UNIX and Linux's client.conf file can be edited so that the apache_config_location is specified. Any setting changed will be used as preference.
NotesIf the Apache Web Server "-f" option has been used in the installation to relocate the configuration file from it's default location, then the apache_config_location setting needs to be specified.
Package Server for UNIX and Linux does not support mod_perl generated httpd.conf files.
Notification Server Reference 59

For the Package Server for UNIX and Linux to work with the Apache Web Server the following requirements must be met. When the following requirements are met the Agent for UNIX and Linux sends the "Apache Http Server" role, that allows the computer to be used as a Package Server for UNIX and Linux.
Apache Web Server version 1.3, or 2.0, installed.
The Package Server for UNIX and Linux must use only the main or default Apache Web Server. All other virtual host sections in the Apache Web Server configuration are ignored with the following exceptions;
The global settings and the "_default_" VirtualHost are read for the main server settings.
The first VirtualHost that defines a SSL server is considered to be the main SSL server, its settings are used for integrating and all other SSL VirtualHosts are ignored.
The Apache Web Server webspace location where the Package Server files and directories are to be created (virtual directory /Altiris/PS/), must have the FollowSymLinks option and the AllowOverride option enabled. It must also be accessible through anonymous HTTP. To change this location, see Package Server for UNIX and Linux Configuration Settings on page 73.
If both HTTP and HTTPS are defined for the Apache Web Server, the HTTPS server will be used.
Non-standard ports are detected and used, but the main Apache Web Server must be accessible through the computer's hostname. Also, the "Listen" directive for the main server must come before all other "Port" statements and Listen directives in the configuration file.
Apache Web Server must be running.
Package Delivery doesn’t support any uncompressing modules for the Apache Web Server.
NoteThe Altiris Agent for UNIX and Linux may need to be restarted for changes made to the httpd.conf file to take effect.
HTTPS and HTTP
The Agent for UNIX and Linux will use whichever type of Apache Web Server is available, HTTP or HTTPS. If the Apache Web Server supports both, the Package Server for UNIX and Linux will integrate with the SSL (HTTPS) part of the server, by default, as this is the more secure option.
If you wish to use the HTTP server the [httpd Integration] "integrate_with" setting can be changed accordingly.
Recommended Apache Web Server Configurations
We recommend one of the following approaches for installing the Apache Web Server to support Package Servers for UNIX and Linux:
If possible, install a packaged version of Apache Web Server. On Linux, the distributed Apache Web Server is most suitable. This installation contains the executable and support exe's in /usr/sbin or /usr/bin.
Notification Server Reference 60

If any changes are made to the Apache Web Server configuration files when the Altiris Agent is running, it will take a short time before the Apache Web Server role data is sent to the Notification Server allowing the computer to be a candidate Package Server. If you wish to speed up this process, manually run the aex-sendbasicinventory executable file to update the Notification Server with any changes.
Example 1: Configuration using Main Web Directory for Package Server links
This setup generally requires the minimal modification to an ‘out of the box’ default Apache Web Server setup common to many distributions. In this configuration a virtual directory called "/Altiris/PS" is automatically created under the main Apache HTML directory. It contains two directories, "Snapshots" and "Packages" in which symbolic links will be created to each shared package. The packages themselves will be stored under the Package Server Agent's "var" directory.
This setup has both a HTTP and HTTPS Apache server. The Package Server will use the HTTPS server if it's available as this ensures a more secure operating environment, and allows the use of Package Access credentials.
Configuration files checks
The configuration files used in this section are from the default installation of the Apache Web Server as part of a Redhat AS 2.1 Linux Distribution.
a. Check number 1; Listen statement
…
## When we also provide SSL we have to listen to the
## standard HTTP port (see above) and to the HTTPS port
##
<IfDefine HAVE_SSL>
Listen 80
Listen 443
Listen 10.10.10.10:8080
</IfDefine>
…
Ensure the Listen statement for each of the main servers is the first Listen statement of their type in the configuration file. So, the main HTTP and HTTPS servers should be the first two Listen statements. The IP should be removed, or if it remains it must be the IP that the hostname (as reported to the Notification Server) resolves to.
b. Check number 2; Main Directory options
...
# DocumentRoot: The directory out of which you will serve your
Notification Server Reference 61
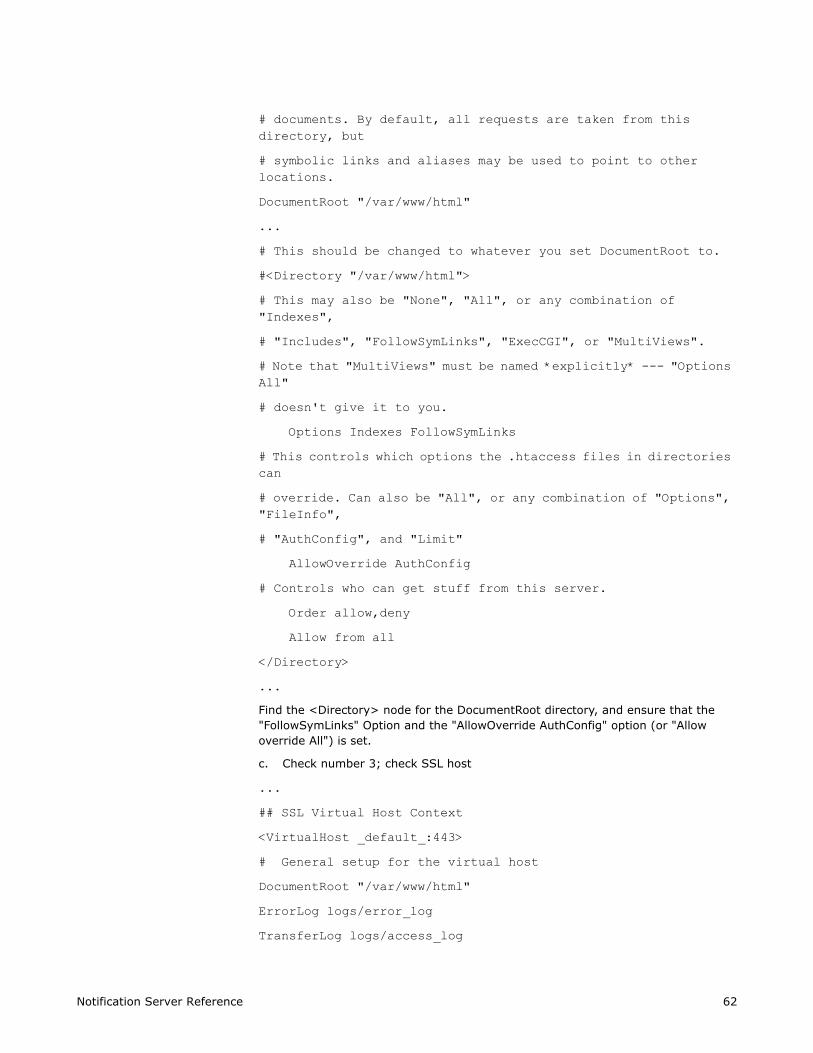
# symbolic links and aliases may be used to point to other locations.
DocumentRoot "/var/www/html"
...
# This should be changed to whatever you set DocumentRoot to.
#<Directory "/var/www/html">
# This may also be "None", "All", or any combination of "Indexes",
# "Includes", "FollowSymLinks", "ExecCGI", or "MultiViews".
# Note that "MultiViews" must be named *explicitly* --- "Options All"
# doesn't give it to you.
Options Indexes FollowSymLinks
# This controls which options the .htaccess files in directories can
# override. Can also be "All", or any combination of "Options", "FileInfo",
# "AuthConfig", and "Limit"
AllowOverride AuthConfig
# Controls who can get stuff from this server.
Order allow,deny
Allow from all
</Directory>
...
Find the <Directory> node for the DocumentRoot directory, and ensure that the "FollowSymLinks" Option and the "AllowOverride AuthConfig" option (or "Allow override All") is set.
c. Check number 3; check SSL host
...
## SSL Virtual Host Context
<VirtualHost _default_:443>
# General setup for the virtual host
DocumentRoot "/var/www/html"
ErrorLog logs/error_log
TransferLog logs/access_log
Notification Server Reference 62

# Enable/Disable SSL for this virtual host.
SSLEngine on
...
Ensure that the "_default_" SSH Virtual host has the correct port (matching the first SSH Listen) and that it's DocumentRoot is the same as the main server.
Alternatively the DocumetnRoot can be different, but it must have a <Directory> node configured with the same options specified in Check Number 2.
Example 2: Configuration Using an Alias for Package Server links
We recommend this approach for users who want to keep the Package Server for UNIX and Linux virtual directory completely separate from the Apache Web Server directory. This keeps all the symbolic links out of the main Apache Web Server directory and ensures that the FollowSymLinks options are not required in the main directory.
An alias is used in the Apache Web Server configuration file to separate out the "/Altiris/PS" virtual directory. The Package Server for UNIX and Linux automatically detects this alias and creates the "Packages" and "Snapshots" sub directories in the correct location. The actual packages are downloaded, as in the above example, to the agents var directory.
Configuration file checks
The configuration files used in this section are from the default installation of the Apache Web Server as part of a Redhat AS 2.1 Linux Distribution.
d. Check number 1; Listen statement
…
## When we also provide SSL we have to listen to the
## standard HTTP port (see above) and to the HTTPS port
##
<IfDefine HAVE_SSL>
Listen 80
Listen 443
Listen 10.10.10.10:8080
</IfDefine>
…
Ensure that the Listen statement for each of the main servers is the first Listen statement of their types in the configuration file. The main HTTP and HTTPS servers should be the first two Listen statements. The IP should be removed, or if it remains it must be the IP that the hostname (as reported to the Notification Server) resolves to.
You may use port numbers other than 80 and 443. The Package Server for UNIX and Linux will detect the ports, but it will always use the port of the first Listen in the Apache Web Server configuration file.
Check number 2; Create Alias and aliases directory options
Notification Server Reference 63

# Aliases: Add here as many aliases as you need (no limit). The format is
# Alias fakename realname
#
<IfModule mod_alias.c>
...
Alias /Altiris/PS /var/altiris/www/ps
<Directory /var/altiris/www/ps >
Options FollowSymLinks
AllowOverride All
</Directory>
</IfModule>
# End of aliases.
Create both the Alias statement and the <Directory> node for the alias’s destination directory, and ensure that the "FollowSymLinks" Option and the "AllowOverride AuthConfig" option (or "Allow override All") are set on that directory.
Next, create the destination directory and set the correct permissions on it to ensure that Apache Web Server clients can download files from there. Testing that the directory works by placing a text file in it and browsing to a URL like http://your.server.name/Altiris/PS/testfile.txt is advised.
Check number 3; check SSL host
...
## SSL Virtual Host Context
<VirtualHost _default_:443>
# General setup for the virtual host
DocumentRoot "/var/www/html"
ErrorLog logs/error_log
TransferLog logs/access_log
# SSL Engine Switch:
# Enable/Disable SSL for this virtual host.
SSLEngine on
...
Ensure that the "_default_" SSH Virtual host has the correct port (matching the first SSH Listen) and that it's DocumentRoot is the same as the main server.
Notification Server Reference 64

Delete a Package Server Agent by deleting it from the Package Servers configuration page.
1. From the Altiris Console, click the Configuration tab.
2. In the left pane, navigate to Configuration > Server Settings > Notification Server Infrastructure.
3. Click Package Servers.
4. In the content pane in the Status tab, select one or more Package Servers, from which you want to delete the Package Server Agent.
5. Click the Remove Package Server icon.
6. Click Apply.
Using Package Servers without Software Delivery Solution
If you have set up Notification Server to use Package Servers, but do not have Software Delivery Solution installed, the following will happen:
The Package Server Agent will get rolled out to the designated Package Servers.
The Altiris Agent package will get rolled out to the designated Package Servers.
Any solution provided packages will get rolled out to the designated Package Servers.
Software Delivery Solution lets you use the full functionality of Package Servers. Without Software Delivery Solution, you will not be able to define new packages.
Using Package Servers to Send Files over the Network
Create a package and specify one or more Package Servers as the delivery mechanism. Packages get sent to the Package Servers when they (packages) are created. They do not wait until Software Delivery tasks are created.
This is a powerful tool that lets you replicate any files and packages throughout your network. Example: every Deployment Server has a share directory called eXpress. You can maintain a library of rips and images and use Package Servers to deploy and replicate these packages throughout your network to this eXpress directory. See the Deployment Server Product Guide documentation for more information.
Selecting a Different Package Destination Location on your Package Servers
When you configure a package, you can choose where to save the package on the Package Server if you do not want to use the default location.
Notification Server Reference 65

NoteWhen files are removed from a package, the Package Server will delete them the next time it refreshes the package. However, removed files will not be deleted if the package has a custom location because it cannot be determined if files located at a custom location are part of the package. Example: several packages could be set up to have the same destination or the custom location could contain user files.
In the location field, you can specify a directory path or use system environment variables found on the Package Server.
Example: the following are valid paths:
c:\share
f:\
\\%COMPUTERNAME%\share
\\%COMPUTERNAME%\eXpress
/var/packages/
On every Deployment Server, there is a share directory called eXpress. If you want to replicate images to any Deployment Serves, use \\%COMPUTERNAME%\eXpress in the location field.
In mixed Win32 and UNIX or Linux environments, all backward slashes in path names will be replaced with forward slashes. Also, any single alphabetic characters followed by a colon, or UNC type computer names at the start of a path will be removed. For example C:\temp\bigpackage becomes /temp/bigpackage and \\%COMPUTERNAME%\share becomes /share.
If a fileStore attribute is changed, added, or removed, but the version of the package stays the same (the distribution points have not been updated), then the existing package storage directory contents will be renamed, or moved. In other words, the files will not be downloaded more than once from the Notification Server.
With careful selection of directories, and/or creation of symbolic links on the Package Servers for UNIX and Linux, it is possible for a single path specification to be applicable and usable on Package Servers for Windows and Package Servers for UNIX and Linux.
NoteIf these mixed Win32 and Linux/UNIX conditions are not taken into account by the Notification Server Administrator, packages may be stored in unexpected and undesirable locations.
Package Status and SynchronizationThe Package Server Agent sends the event, “codebase enabled” , to the Notification Server to inform it of the following:
Notification Server Reference 66

That a package is ready to be downloaded by an Altiris Agent.
The package file location.
This information allows the Notification Server to notify Altiris Agents when to download packages and where to download them from.
Package Server Refresh Interval
At an interval, the Package Server refreshes and does the following:
Reapplies package credentials.
Refreshes virtual directories (package file locations).
This is done on the Package Server using the last Altiris Agent Settings policy the Package Server Agent received. This refresh interval is controlled by the AgentExecInterval (sec) registry entry.
Summary Event Interval
The Package Server Agent sends a single event with information about the current status of packages that are ready and invalid.
This summary event interval, which defaults to 24 hours, is controlled by the SummaryInfoSendInterval (min) registry entry.
Deleting Software Delivery Packages from Package Servers
After Software Delivery packages have been created and replicated to Package Servers, you can delete them from the Notification Server or one or more Package Servers.
If you want to keep a package on the Notification Server, but you want to remove it from one or more Package Servers, do the following:
1. From the Altiris Console, click the Resources tab.
2. In the left pane, navigate to Resources > Software Management > Software Delivery > Windows.
3. In the content pane, click the package name and click Edit Resource.
4. In the content pane, click the Advanced tab.
5. Clear the checkbox that is associated with the Package Server you no longer want to receive the package.
NoteIf you have selected All Package Servers, clear this option and then clear the checkbox that is associated with the Package Server you no longer want to receive the package.
6. Click Apply.
If you want to delete a package from the Notification Server, do the following:
1. From the Altiris Console, click the Tasks tab.
2. In the left pane, navigate to the package you want to delete.
Notification Server Reference 67

NoteYou can’t delete a package attached to a Software Delivery task.
Packages that are removed from a Notification Server or Package Server will be:
Removed from the user interface of the Altiris Agent (if they are removed from the Notification Server or from all Package Servers). This prevents managed computer users from trying to perform actions on a deleted package. The virtual directory for the package is also deleted.
Stored for a specified number of days (specified on the Package Server page) on the Package Server after they are deleted from the Notification Server. This is in case the package is re-enabled. After the specified number of days, if the package has not been re-enabled, it is deleted from the hard drive of the Package Server. If the package gets re-enabled before the specified number of days lapses, its files are synchronized and its virtual directory is re-enabled.
NoteDeleting packages from a Notification Server works in the same way if you use Package Servers. If you are not using Package Servers and remove packages from a Notification Server, they will not be available to the managed computer users. However, the package files will be left on the managed computer for the specified number of days.
Getting Status on Package ServersThere are several reports that let you get status on your Package Servers. To access these reports, in the Altiris Console, select the Reports tab, then navigate to Reports > Notification Server Infrastructure > Server > Package Server Status.
These reports are:
Package Distribution Event - Reports on the status, transfer rate, and event time for each package and server.
Package Server password expiry - This report lists Package Servers with local ACC passwords due.
Package Server account creation failure - List of Package Servers that failed to create a local ACC account.
Package Server DC account creation failure - List of Package Servers with local ACC accounts created on a DC when the Create Account option is disabled.
Package Server account locked - List of Package Servers with locked out local ACC account.
Package summary - Reports on the size and version of a package and how many servers they reside in.
Recovered Packages - Lists recovered packages.
Server load summary - Lists amount of packages downloaded (from the Notification Server or another Package Server), and their average transfer rate.
Server summary - Gives a summary of each Package Server, the packages hosted, the status, and disk space used.
Servers With Recovered Events - Reports on servers with recovered events.
Notification Server Reference 68
Disk Space PlanningThe Package Server is installed on the same drive/UNIX filesystem as the Altiris Agent. If you want the Package Server to be installed on a different drive/UNIX filesystem, you will need to install the Altiris Agent on that drive/UNIX filesystem. When you install the Altiris Agent, you can choose where to install.
When you create a package, you can choose to download it to the default directory or specify your own directory.
Recovering and Replacing FilesIf a package is being downloaded on a Package Server, and the downloading fails, the process restarts and continues until completed. If a package is being updated, only the files that have changed will be downloaded.
Viewing Package Information on the Altiris AgentWindows Package Server package information can be viewed on the Altiris Agent. See Altiris Notification Server Help.
You can view information on all managed computers, including Package Servers, by viewing the AeX AC Client Agent Inventory Agent. This can be viewed in the Resource Manager by clicking the Inventory tab (see Altiris Notification Server Help).
For further details on how Package Server for UNIX and Linux package information can be viewed, see Altiris Agent for UNIX and Linux Help.
Package Servers and the Altiris AgentThe Altiris Agent has no concept of Package Servers. The Altiris Agent receives Software Delivery tasks when it performs an Altiris Agent Settings policy request. The Altiris Agent only knows that it has choices of where to download the package from. It does not differentiate whether the package is coming from a Package Server or the Notification Server (or even any other location). If there is more than one package file location to choose from, the Altiris Agent chooses the best one and downloads the package. This provides seamless package delivery. You have the flexibility of adding and removing Package Servers as your needs warrant.
For information on how packages get updated, see Software Delivery on page 78.
Package DistributionSoftware Delivery tasks are delivered to Altiris Agents through Altiris Agent policies. In previous versions of the NS (5.5 and earlier), the Altiris Agent policies (called NS Client policies) not only contained information about how to execute each task, but also where to download any packages associated with each task. These package locations, referred
Notification Server Reference 69

The following rules control what codebases are returned for each Software Delivery package by the GetPackageInfo.aspx page:
1. No sites defined.
All ready Package Server codebases that belong to subnets which contain the requester, or
All ready Package Server codebases, if none belong to subnets which contain the requester, or
NS codebases
2. The Altiris Agent is not contained within a site.
NS codebases only
3. The Altiris Agent is contained within a site, but the site has no Package Servers
NS codebases only
4. The Altiris Agent is contained within a site that has one or more Package Servers, but the requested package is the Package Server Agent Package and is not 'ready' on any of the available Package Servers.
NS codebases only
5. The Altiris Agent is contained within a site that has one or more Package Servers, but the requested package is not the Package Server Agent Package and is not 'ready' on any of the available Package Servers.
Nothing -- Altiris Agent will wait until the package becomes 'ready' on one of the Package Servers.
6. The Altiris Agent is contained within a site that has one or more Package Servers and the requested package is ready on one or more of the Package Servers.
Package Server codebases within the same sites as the Altiris Agent making the request.
NoteThe principle of staggered deployment of Package Servers over time, should also be applied to packages deployed to the Package Server; a few a time on all Package Servers, or a reasonable amount of packages to only a few package servers at a time.
Package Download RetryIf a package isn’t downloaded successfully the Package Download Retry feature will begin. Each subsequent failure of that package to download doubles the amount of time
Notification Server Reference 70

For details on configuring maximum number of download attempts and time on Win32 Package Servers see Windows Package Server Configuration Settings on page 71.
For details on configuring maximum number of download attempts and time on Linux/UNIX Package Servers see Package Server for UNIX and Linux Configuration Settings on page 73.
The Altiris Agent retries according to the following pattern until the package is sent:
Windows Package Server Configuration SettingsImportantAltering Registry Keys incorrectly can cause serious problems that may require re-installation to correct them.
Package Server root
[HKEY_LOCAL_MACHINE\SOFTWARE\Altiris\Altiris Agent\Package server]
1st Retry 2 minutes
2nd Retry 4 minutes
3rd Retry 8 minutes
4th Retry 16 minutes
5th Retry 32 minutes
6th Retry 1 hour
7th Retry 2 hours
nth Retry 2 hours
Value Type Default Description
MaxPackageEventsPerMessage
DWORD 1000 Maximum amount of package events contained per message sent to the Notification Server.
BatchModeThreshold DWORD 5 Number of downloading packages that put the package server into a batch event mode. This means that the Package Server will send events in batches. If there are less than BatchModeThreshold packages downloading, one event will be sent for each package. When the number is greater the events will be batched.
MessageFlushInterval (min)
DWORD 60 (mins) Number of minutes any queued events are kept before being sent to the Notification Server.
Notification Server Reference 71

AgentExecInterval (sec) DWORD 86400 Interval that a Package Server will do a full validation of all packages, file permissions and virtual directories. This process will take a long time if there are large numbers of packages.
AgentPolicyProcessed DWORD 1 This flag is used to inform Package Server if policy processing was interrupted (a value of 0 indicates that it was interrupted).
EnableUNC DWORD 1 Package Server will publish UNC codebases.
EnableWeb DWORD 1 Package Server will publish HTTP/HTTPS codebases.
IISLogLastSentTime SZ <blank> Time stamp for the last time the Package Server sent out IIS log events.
IISLogMaxPackages DWORD 100 If the Package Server exceeds this value, it will not produce any IIS log events.
NotePrevents an NSE flood to the Notification Server.
IISLogSendInterval (min)
DWORD 1440 Interval before Package Server sends IIS log events. See IISLogLastSentTime.
PackageServerBaseDir SZ Path where the DLL for Package Server is installed..
PkgCleanupInterval (min)
DWORD 10080 Time before a Package Server will delete packages that are not active or referenced.
SummaryInfoLastSentTime
SZ Time of the last summary event that was sent to the Notification Server.
SummaryInfoSendInterval (min)
DWORD Interval before Package Server sends the summary event. See SummaryInfoLastSentTime.
SecurePackages DWORD 0 If set to 1, Package server will publish HTTPS codebases and lock down IIS for SSL access only.
NoteFor this to work, a valid certificate needs to be installed in IIS.
UserSidString SZ SID used to lockdown and access packages on Package Server.
Value Type Default Description
Notification Server Reference 72

[HKEY_LOCAL_MACHINE\SOFTWARE\Altiris\Communications\Package Delivery
Package Server for UNIX and Linux Configuration Settings
ImportantWe don’t support chroot mapping on Package Servers for UNIX and Linux.
1. Altiris Agent for UNIX and Linux "client.conf" Settings.
There are a number of options that can be specified in the Agent for UNIX and Linux’s client.conf file that affect the Package Server for UNIX and Linux. These settings need to be configured before deploying the Package Server to the UNIX or Linux computer.
Value Type Default Description
Server Request Maximum Backoff Interval (mins)
DWORD 120 (mins)
Length of time the Package Delivery will backoff for. When an error occurs it will backoff for 3 minutes, then 6 minutes, and then 12 minutes up to a maximum of Server Request Maximum Backoff Interval (mins) minutes. When it succeeds in connecting it will start to retry at 3 minutes, otherwise it will retry at the maximum backoff interval
Maximum download attempts
DWORD 0 Maximum number of attempts to download a package. The default value is 0, which denotes unlimited attempts. You can configure this setting to a different number which, if reached, will result in an invalid status being sent and download attempting terminated
Maximum download attempt time (mins)
DWORD 0 Length of time Package Delivery will continue to attempt to download packages for. By default this setting is 0, unlimited time.
Notification Server Reference 73

[httpd Integration] Section
Configuration Parameters
Value Description
ps_integration_dir Specifies which Apache Web Server directory is used for the Package Server. The directory must have FollowSymLinks defined for the "Apache" role to be sent and for this computer to be considered as a Package Server candidate. Default value is /Altiris/PS.
ps_send_apache_role Controls the sending of the Apache Web Server role for Package Server Integration. "auto" will check for the Apache Web Server and then check Apache Web Server configuration. "always" and "never" are other possibilities. Default value is “auto”.
Value Description
apache_exe_location Setting this value overrides any search for HTTPD2, if set only this value is used. Blank, by default.
apache_config_location Setting this value overrides any previously compiled Apache Web Server or default values. Use if the “-f” option has been used on the Apache Web Server to specify a different location for the config file. Blank, by default.
integrate_with When both HTTPS and HTTP are available this specifies which of the two will be used. HTTPS is the default value.
ifdefine_variables Specifies any variables passed to Apache on the command line. Used when parsing the Apache config file to determine which <IfDefine> nodes are used. Default value is “HAVE_SSL,SSL’”
NoteIf your apache is a non-SSL setup, this value should be set to "NONE", otherwise it's possible the Package Server will detect SSL and try to integrate with it.
Value Description
package_disable_server_pings
When this setting is disabled, Package Delivery will attempt to detect the server with the best throughput when several Package Servers are available on the network. Change this setting to 1 to select Package Servers randomly. Enabling this setting is very useful in very secure networks, with ICMP protocol disabled and ping inoperative, where throughput wouldn’t be detected accurately. The default value is 0, disabled.
package_refresh_interval
Package Delivery interval between package integrity checks (in minutes). If a package is missing, broken, or deleted by a user it will be recovered when the interval period has elapsed. It is set to 24 hours, by default, and the minimum period allowed is 9 minutes.
Notification Server Reference 74

There are also a number of settings that can be adjusted in the Package Server Agent for UNIX and Linux once it is deployed to a UNIX computer. These settings are in a separate file located in /opt/altiris/notification/psagent/etc/psagent.conf for a default installation. The "psagent" directory is always on a peer with the "nsagent" directory (the base directory of the Agent for UNIX and Linux).
When changing any of these settings ensure that you stop the Agent for UNIX and Linux before changing the settings and then restart it.
ImportantThe Package Server Agent for UNIX and Linux does not detect changes in these settings. Example: if the URLBase location is changed after packages have already been downloaded by the Package Server Agent then the old web share directories and links will need to be moved or deleted as the Package Server will create new ones at the new location upon startup.
This is an example of the psclient.conf file showing defaults:
[General]
# This is the interval (in minutes) at which the Package Server refreshes all it's packages
# The default is 1440 (24hrs).
AgentExecInterval=1440
# These directories will be created under ps_integration_dir define in the client.conf.
package_simultaneous_ downloads
Maximum number of simultaneous downloads allowed. If you have 5 packages to be downloaded, they will be downloaded in parallel, not one by one as on Win32 Agents. This setting has obvious performance benefits, depending on the size of packages. We don’t recommend setting this value higher than 10. The default, and optimum value, is 5.
package_check_removed_packages_interval
Package Delivery interval between package removal checks (in minutes). It is set to every 30 minutes, by default, and the minimum period allowed is 5 minutes.
package_max_total_tries
Represents the number of download attempts for each package that Package Delivery will perform after download failure. The default value is 0, unlimited attempts.
package_max_total_tries_time
Determines how long Package Delivery will continue to perform package download attempts after download failure (in minutes). It is set to 2 weeks, by default.
package_retry_delay Determines how long to wait before the next download attempt after download failure (in minutes). Default value is 3 minutes.
package_retry_delay_ factor
Package_retry_delay will be multiplied by this value on each subsequent download attempt. The default value is 2. In the case of an initial 3 minute delay, the delay between attempts would be 6, 12, 24, n. minutes.
package_max_retry_ delay
Maximum value for delay between unsuccessful downloads (in minutes). The default value is 120 minutes.
Value Description
Notification Server Reference 75

PackagesSubDir=Packages
SnapshotsSubDir=Snapshots
# This directory, relative to the psagent install, will contain all the actual package files.
PSVirtualDirBase=var/packages
[ClientEventBatch]
# Batching combines Package status events when there are a lot so that a single event sent to
# the Notification server combines many package Server events. This allows the NS to support
# more package servers, and large numbers of package. Changing these values without consulting
# Altiris support can have a detrimental effect on NS performance in some environments.
#
# This setting controls the point at which batch mode applies. If there are less than this many
# messaqges pending they are sent imediately to improve responsivity.
BatchModeThreshold=5
# The longest time (in minutes) that messages will be accumulated before sending the batch.
MessageFlushInterval=60
# The maximum number of messages in a batch. Once this number have accumulated, the batch is sent
# regardless of any other settings.
MaxPackageEventsPerMessage=1000
[General] Section, User editable settings
[ClientEventBatch] Section, User editable settings
Value Description
PackagesSubDir The URLBase location where the package links are created.
SnapshotsSubDir The URLBase location where the snapshot links are created.
PSVirtualDirBase The psagent install directory where the actual package files are downloaded and stored.
Notification Server Reference 76

values could have a detrimental effect on Notification Server load.
Value Description
BatchModeThreshold Number of events allowed to queue to the Notification Server before the Package Server will begin to batch events so that a single NSE will contain many Package Server package events.
UnactiveFlushInterval Not used.
MessageFlushInterval The longest time, in minutes, that events can be queued
MaxPackageEventsPerMessage
Maximum size of a batch. Once this number of events are queued, the batch is sent.
Notification Server Reference 77

Chapter 8Software Delivery
The Notification Server contains components that let you deliver software packages to your managed computers. It comes with packages and Software Delivery tasks that let you take advantage of these Software Delivery components. If you want to create your own packages and policies, you will need to purchase Software Delivery Solution. For information, see the Altiris Software Delivery Solution Help.
The Software Delivery components work by utilizing packages, programs, and Software Delivery tasks. A package can contain one or more programs. A Software Delivery task is linked to one package and one program from that package. A Software Delivery task is a policy, and therefore can be downloaded to all managed computers in the collection it applies to. When the Altiris Agent receives a Software Delivery task, it downloads the package and runs the program based on its schedule.
Package Updates
After files in Software Delivery packages are created, they are updated as needed. The following describes the interaction between Notification Server and the Altiris Agent when this happens:
1. Software Delivery packages have a schedule for updating. At the scheduled time, the Notification Server recreates the package snapshot, checks if it is different (added, updated, or removed), and replaces the current snapshot if different. See Package Snapshot Caching on page 33.
NoteThis schedule (Package Refresh) is set in the Shared Schedules configuration item in the Altiris Console Configuration tab by navigating to Configuration > Server Settings > Notification Server Settings.
2. If package files have been added, updated, or removed, the Notification Server updates the distribution point (location where the package is stored and accessed by the Altiris Agent).
The distribution point can be:
a. The Notification Server, where the distribution point is manually updated with files by the customer, or
b. A Package Server, updated when the Package Server Agent requests a configuration. This works the same as for Altiris Agents.
3. The Altiris Agent then updates the package files after it has received its Altiris Agent Settings policies from the Notification Server. The new snapshot does not affect the Altiris Agent until it has received its Altiris Agent Settings policies.
4. When the Altiris Agent next receives the Altiris Agent Settings policies, it checks for any updates to the package. If there have been any updates (added, changed, or deleted files), it implements the changes.
Notification Server Reference 78

Notification Server Reference 79
Notification Server Reference 80
Chapter 9Reports
Generating Reports AutomaticallyNotification Policies include a Report Automated Action that lets you create a report and e-mail that report to employees.
The Report Automated Action lets you select a report to generate and even notify one or more recipients through e-mail that the report has been generated.
Example: To automatically generate a report on high priority items filed by Alert Manager. In the Tasks tab, navigate to Tasks > Incident Resolution > Incidents > Alert Manager > Notification Policies. Click the High Priority Items Not Assigned within ‘N’ Minutes policy. This policy has a Report Automated Action already created that generates a report on a schedule. You can edit this Automated Action to send an e-mail notification when this report is generated. You can also change the schedule by selecting a pre-defined schedule or creating your own. Be sure to click Apply when you are finished to save your changes.

Chapter 10Monitoring Notification Server Operations
This section contains information to help you understand how to monitor the performance and load on your Notification Server.
Quick Links
Altiris Agent and Notification Server Event Queues on page 81
Common Notification Server Events on page 90
Using Reports to monitor Notification Server Load on page 95
Altiris Agent and Notification Server Event QueuesAltiris Agents send Notification Server Event (NSE) files to the Notification Server in XML format. NSEs have the following components and behavior:
Data from solutions (items such as inventory or application metering data or Carbon Copy usage data).
Status messages (such as how the Altiris Agent is proceeding with the download of a software package, or the results of the installation of a piece of software).
NSEs are placed in the Notification Database.
Depending on the number of managed computers, there are times when a Notification Server can receive a large amount of NSEs from managed computers in a short amount of time. Example: when an Altiris Agent executes a Software Delivery task. If you have 5000 managed computers and each one generates 5 status messages as part of the Software Delivery task. In this case, your Notification Server would receive 25,000 NSEs. (Status messages are small, but may be disabled. For information, see the Altiris Notification Server Help.)
Both the Notification Server and the Altiris Agent contain queues that hold NSEs. The Notification Server contains four event queues:
Event queue.
Fast event queue.
Slow event queue.
Large event queue.
Each Altiris Agent also contains a queue that is used to store NSEs when an event queue on the Notification Server is full. This creates a scalable queuing system because it scales with the number of installed Altiris Agents.
The event queue is found in the following directory:
install path\Altiris\Notification Server\NSCap\EvtQueue
The fast event queue is found in the following directory:
install path\Altiris\Notification Server\NSCap\EvtQFast
Notification Server Reference 81

install path\Altiris\Notification Server\NSCap\EvtQSlow
The large event queue is found in the following directory:
install path\Altiris\Notification Server\NSCap\EvtQLarge
The queue on the Altiris Agent is found in the following directory:
install path\Altiris\Altiris Agent\Queue\Server Name
The Altiris Agent places NSEs into the Altiris Agent event queue. The Altiris Agent sends these NSEs to the Notification Server as soon as it can. If there are no NSEs in this queue, all generated NSEs have been sent to the Notification Server.
The Altiris Agent generally uses the PostEvent.asp file in the install path\Altiris\Notification Server directory on the Notification Server to post the NSEs to the Notification Server (this .asp file lets the Altiris Agent post the NSEs using HTML).
The following graphic shows how the Notification Server queuing works.
NSEs that contain inventory data are typically 15 to 999 KB. NSEs that contain status messages are typically around 1 KB. The event queues that Notification Server uses are file queues.
Notification Server sets up the following file queues:
Notification Server Reference 82

EvtQFast - Holds NSEs under 15 KB (usually around 1 KB). These smaller NSEs are usually status messages that are around 1 KB. This is a fast queue because small NSEs can be processed very quickly. The size of NSEs that get placed in this queue is determined by the FastQueueThreshold registry setting (see Registry and Configuration Settings on page 134).
EvtQSlow - Holds large NSEs that the Notification Server is capable of processing (between 1 and 20 MB by default). NSEs that are in this queue are processed one at a time. The size of NSEs that get placed in this queue is determined by the SlowQueueThreshold registry setting (see Registry and Configuration Settings on page 134).
EvtQLarge - Holds large NSEs that the Notification Server cannot process (over 20 MB by default). This queue is designed to protect the Notification Server and not overload the host server. Tools will be developed in the future to break up and process these large NSEs. The size of NSEs that get placed in this queue is determined by the LargeQueueThreshold registry setting (see Registry and Configuration Settings on page 134).
The Notification Server processes the files in the four queues independently. Each small NSE (status message) takes much less time to process than a larger NSE (inventory data file). In this way, the Notification Server can process the larger inventory NSEs without stopping the processing of smaller status message NSEs. Therefore, the fast event queue is the fastest queue. Many status messages (that are smaller files) come to the Notification Server and need to be processed quickly to keep the event queue from filling up.
Most solution data files get placed in the event queue (EvtQueue). Few solution data files come to the Notification Server, but since they are larger, they take longer to process.
Notification Server Event Data Flow
The following graphic shows how a typical inventory NSE is processed by the Notification Server.
Notification Server Reference 83

Description of the above graphic1a - The Altiris Agent passes the inventory data to the Notification ServerCap\EvtInbox directory. A thread created by the Altiris NS Receiver Service monitors the EvtInbox directory. When an NSE appears, the Notification Server Receiver Service renames the NSE file and spawns a Router Object, that routes the NSE to a queue. This is normally used for stand alone inventory.
1b - The Altiris Agent passes the NSE through HTTP to the PostEvent.asp Web page. The NSE is passed through IIS which creates a Router Object. This Router Object
Notification Server Reference 84

2 - The Router Object places the NSE into one of the event queues. The regular event queue (EvtQueue) is primarily where inventory and other solution data is placed. The fast event queue (EvtQFast) is primarily where status messages are placed.
3 - The Notification Server Dispatcher Service monitors all event queues using a Dispatcher thread pool for each event queue. NSEs get processed generally on a last in - first out basis.
There is no order to NSE processing.
4 - When an NSE appears in one of the event queues, the Dispatcher thread monitoring that queue moves the data into the Process directory.
NoteThe large event queue can contain NSEs that are too large to process. If so, the NSEs stay in the EvtQLarge directory instead of being moved to the Process directory.
5 - The Notification Server Dispatcher Service, through a Dispatcher thread, gives the NSE in the Process directory to the Notification Server processes.
6 - Event Processor processes the event. This Event Processor finds that policy the NSE is attached to, looks at the Automated Actions that are in the policy, and then acts on the NSE based on the policy and Automated Actions. This usually includes inserting the NSE data into the Notification Database. If the data is corrupted, or can’t be processed, it is placed in a Bad event directory by the Notification Server Dispatcher Service.
Optional (can only happen if you have the Altiris Connector for SMS installed):
7 - If you have installed the Altiris Connector for SMS and the Notification Server is set up to forward data to SMS, MTS creates a process to pass the inventory data in native SMS format (MIF) to an SMS CAP (Client Access Point).
8 - The SMS Server picks up the inventory data from the SMS CAP.
9 - The SMS Server places the inventory data into the SMS database.
Event Queue Directories
When a Notification Server Dispatcher Service thread retrieves an NSE from the EvtQueue, EvtQFast, or EvtQSlow directories, the thread moves the NSE to the Process directory and calls the EventProcessor component (in the MTS package) to process the message. If the call succeeds, the file is deleted from the Process directory. If the call returns a fail code, the file is moved to a Bad event directory (see Notification Server Data Flow on page 9).
Example: If a package is being retrieved, but is stopped before it is completely retrieved, then any NSEs being processed are placed in a Bad event directory. You can move these files back into the Process directory to complete the package retrieval. The files that have errors will immediately be placed back in a Bad event directory and corresponding errors will be placed in the log file.
Notification Server Reference 85
NSE Processing and Bad Event Directories
The Notification Server Dispatcher Service (using a Dispatcher thread) gets NSEs (one at a time) from the Event Queues and passes them to the Event Processor to process. The Event Processor evaluates the NSE, figures out the policy it applies to, and has the policy process the NSE. Automated Actions in the policy process the NSE. The Event Processor and the policy are in the MTS package.
When the Notification Server receives an NSE but cannot process it into the database, the NSE gets placed in a Bad event directory (sorted by category) by the Notification Server Dispatcher Service. There are several reasons why this could happen:
The NSE format is not correct.
The XML in the NSE cannot be loaded (is not recognized as XML code).
No such policy exists.
If the Event Processor cannot find the policy that the NSE is supposed to go to, it returns a ‘Failed’ message to the Notification Server Dispatcher Service, which places the NSE in a Bad event directory.
Example: if an inventory agent sends an NSE to the Notification Server, but the Notification Server does not have Inventory Solution installed any more, then the NSE cannot be processed and gets placed in a Bad event directory. If you install Inventory Solution, then place this NSE back in the Event Queue, it should be processed correctly.
The MTS package is restarted while the NSE is being processed. If a process restarts the MTS package, then all of the NSEs that have not been processed get placed in a Bad event directory. Good files can end up in a Bad event directory because the MTS package was shut down while the NSEs were being processed.
If the Event Processor cannot process the NSE, it returns a ‘Failed’ message back to the Notification Server Dispatcher Service. The Notification Server Dispatcher Service then places the NSE in a Bad event directory.
Notification Server Reference 86

The Bad event directories are found in the following directory paths:
For regular NSEs - install path\Altiris\Notification Server\NSCap\EvtQueue\Bad
For small NSEs - install path\Altiris\Notification Server\NSCap\EvtQFast\Bad
For large NSEs - install path\Altiris\Notification Server\NSCap\EvtQLarge\Bad
Subdirectories are created as needed in the Bad directory. These subdirectories contain one or more NSEs. The following table describes the subdirectories that can be created and what type of error the NSEs caused that are placed in them.
Event Error Directories
Explanation of Error
\UnexpectedError Undefined error.
\OutOfMemory Altiris components did not have enough available memory to process the data.
Notification Server Reference 87

We recommend you monitor the Bad event directories periodically. If you find files in these directories, move them to the Process directory. If the files were placed there due to a system shutdown, they should process correctly. If the Notification Server Dispatcher Service thread places them back into a Bad event directory, there is something wrong with the XML code in the files.
Many of the factors causing an NSE to be rejected are temporary, such as deadlock, server not ready, operation aborted, and server busy. After the issue is resolved, the NSEs can be moved back into the Process directory for re-processing:
Unknown resource GUID rejections can occur during large Altiris Agent rollout or upgrade scenarios, when the basic inventory sent by the Altiris Agent is queued for processing in the EvtQueue, and smaller Software Delivery and Logon events are processed through the EvtQFast prior to a resource being added to the Notification Database. These events can be reprocessed after the EvtQueue has processed all events.
After a licence issue is resolved, NSEs rejected because of an “out of license” error can be reprocessed.
The contents of an unknown item NSE can be examined to determine the missing system-side XML componentg. The solution, package, or policy can be restored and the NSE reprocessed. The NSEs can be deleted if the data is not required and the Altiris Agents sending the data should be modified to prevent sending of further unneeded data.
Contents of XML parse error NSEs should be examined to determine the cause. The typical cause of error is an Altiris Agent not formatting the NSE correctly before sending or including reserved XML characters. Custom Inventory is a common cause of this error.
All other errors should be further investigated as they cannot be easily explained and may be an indication of a server problem.
Generally, most NSEs can be reprocessed back through the queue to confirm that they were not a result of a temporary condition.
If you find that an NSE is not being processed by the Notification Server, but you know it has been sent from the Altiris Agent, look for it in a Bad event directory.
\InvalidArguments Error within Altiris components.
\OperationAborted Process Interrupted.
\AccessDenied Security restriction prevented completion of process.
\UnknownClient Resource GUID in XML unknown / not in database.
\ServerBusy Server could not process data due to load.
\GeneralFailure Undefined error.
\ServerNotReady Server could not process data due to system state.
\Deadlock SQL deadlock due to concurrent table/row access.
\OutOfLicense Number of resources has exceeded licence levels.
\UnknownItem XML item does not exist (package, solution, or policy).
\XmlParseError XML in NSE has corrupt format and cannot be loaded.
\RPCError DCOM access error.
\Other\<ErrorCode> Unknown error code returned, directory name is error code.
Event Error Directories
Explanation of Error
Notification Server Reference 88

Technical Details
There is a thread in the Notification Server Receiver Service, with the interval setting EvtQueueCheckSecs, that checks whether the event queues are full. A queue is considered full if the number of queued NSEs is greater than MaxFileQEventCount or the total queued NSE size is greater than MaxFileQSize(KB).
This thread checks for the possible event queues: EvtQueue, EvtQFast, and EvtQSlow. When an NSE is delivered to one of these queues, the NSE is only accepted if the appropriate event queue is not full. Otherwise, the Notification ServerClientTransport fails to post the NSE to the Notification Server, places the NSE in the Altiris Agent queue, and retries later. the Notification ServerClientTransport retries according to the following pattern until the NSE is sent:
The event queuing behavior is controlled by the Notification Server registry settings FastQueueThreshold, LargeQueueThreshold, and SlowQueueThreshhold.
If the NSE is smaller than FastQueueThreshold, it gets placed in the EvtQFast directory.
If the NSE is larger than FastQueueThreshold but smaller than the SlowQueueThreshhold, it gets placed in the EvtQueue directory.
If the NSE is larger than SlowQueueThreshold but smaller than the LargeQueueThreshhold, it gets placed in the EvtQSlow directory.
1st Retry 2 minutes
2nd Retry 4 minutes
3rd Retry 8 minutes
4th Retry 16 minutes
5th Retry 32 minutes
6th Retry 1 hour
7th Retry 2 hours
nth Retry 2 hours
KEY Value Description
HKLM\SOFTWARE\Altiris\eXpress\Notification Server
MaxFileQEventCount REG_DWORD Maximum number of NSEs in a file queue. This applies to both queues. 20,000, by default.
MaxFileQSize(KB) REG_DWORD Maximum total size of NSEs in a file queue. This applies to both queues. 512,000, by default.
EvtQueueCheckSecs REG_DWORD Interval, in seconds, to check event queues. 180, by default.
Notification Server Reference 89

The Notification Server Dispatcher Service (AeXNSDspSvc) uses one thread pool to process NSEs for each of the event queues. By default, the standard MaxDispatchThreads setting is used to specify the number of threads in the EvtQueue and EvtQFast event queues (the default is 2). The setting, MaxDispatchThreadsFast, may be used to increase the threads for the fast event queue. The MaxDispatchThreads key only applies to the EvtQueue and EvtQFast event queues when the MaxDispatchThreadsFast key does not exist.
Example: To set up the Notification Server Dispatcher Service to use three threads for the event queue (EvtQueue) and five threads for the fast event queue (EvtQFast), create the following registry settings under HKLM\SOFTWARE\Altiris\eXpress\Notification Server:
When the Altiris Agent tries to send an NSE to the Notification Server and the server event queues are full, it will get a server busy message. The Altiris Agent then queues the NSE in the following directory:
install path\Altiris\Altiris Agent\Queue\Server Name
The queue on the Altiris Agent is limited by hard drive size. A registry key called EventQueueSize contains the amount (as a percentage) of the hard drive size that the queue can use up. It is 5%, by default. This means that the Altiris Agent queue can use only 5% of the hard drive. If the queue size reaches 5% of the hard drive, a queue full message is placed in the queue and every message after that is discarded.
This setting can be changed and is found at the following location in the registry.
Common Notification Server EventsThis section describes the most common events for Notification Server. Situations that might cause large numbers of these events to be generated are also described.
When performing certain operations on the Notification Server, particularly in regards to Software Delivery, it is important to have some idea of the number of events that might be generated per computer, as well as the total number of events that will be generated across all computers in the organization.
Although a Notification Server is theoretically capable of processing these events at a rate of greater than 1 per second (more than 86400 per day), this will cause the
Name Type Data
MaxDispatchThreads REG_DWORD 0x00000003 (3)
MaxDispatchThreadsFast REG_DWORD 0x00000005 (5)
KEY Value Description
HKLM\SOFTWARE\Altiris\eXpress\Altiris Agent
EventQueueSize REG_DWORD Percentage of the hard drive space the queue on the Altiris Agent can take up. 5%, by default.
Notification Server Reference 90
We recommend you disable the capture of these events if you are doing something that could cause very large numbers of these events to be generated, and if the information contained within these events is not considered useful. This can be done using the Global Altiris Agent Settings page under the Configuration tab of the Altiris Console. Most of the time, disabling the capture of AeX SWD Status and AeX SWD Package events will be sufficient.
After the surge in activity as a result of these changes has subsided, the capture of these events can be re-enabled.
Status Event Categories
Client Transport Status
This event gets generated whenever the event queue on the Altiris Agent becomes full. The event will get generated once only each time the queue becomes full.
The events for this category are:
Queue Full
Queue OK
SWD Execution
This event gets generated whenever the Altiris Agent executes a Software Delivery task. The event is SWDExecutionEvent.
SWD Package
This event gets generated whenever the Altiris Agent:
Starts or resumes downloading a package from a Package Server.
Finishes downloading a package from a Package Server.
Is interrupted while downloading a package for any reason.
Very large numbers of these events can be generated in the following situations:
A problem occurs on a Package Server that terminates the download of packages to managed computers. This situation might occur:
When the IIS server on a Package Server is stopped.
When a Package Server computer fails or is powered down.
When the virtual directory for one or more packages is removed or becomes disabled.
When the Altiris Agent is unable to continue the download from a given Package Server, it will generate an AeX SWD Package event indicating that the download was interrupted and will then attempt to find another Package Server and continue the download. When the download is recommenced from the new Package Server, a new AeX SWD Package event will be generated to indicate this fact.
The source files of many packages are changed that causes Altiris Agents to have to re-download packages from the Package Servers.
The events for this category are:
Notification Server Reference 91

package removed - Sent after the package is finally deleted.
new package - Sent when a new package is first received in the configuration XML file.
package updated - Sent when a package is downloaded because the files have changed or been deleted.
download complete - Sent when a package download has completed.
package download blocked - Sent because a blockout is preventing package download.
insufficient disk space to download package - Sent when there is not enough disk space to download a package.
unable to check package - Sent if a communication error occurs when attempting to download a package
start - initial - Sent when a package download begins after the download actually starts. This is not sent when the Altiris Agent starts downloading but cannot reach the Notification Server.
end - complete - Sent when a package download has finished if any data was downloaded.
NoteFailed download events are only sent once. If the Altiris Agent gets an error downloading a package, it sends an end download event to the Notification Server. The Altiris Agent will then go into retry mode for the package, however, if the same error is received on more retry attempts it will not send another failed download event.
SWD Status
This event gets generated whenever the Altiris Agent:
Gets informed of a new Software Delivery task in its configuration XML.
Gets informed of changes to the details of a Software Delivery task or program in its configuration XML.
Because so many things can cause this type of event to be created, it is easy to get situations where very large numbers of these events can be created and cause a possible overload on the Notification Server.
Very large numbers of these events can be generated in the following situations:
A large number of Software Delivery tasks or programs are created, deleted, or modified on the server in a short period of time. This could occur:
During a Software Delivery synchronization with SMS. An SMS system can have a large number of Software Delivery tasks defined and it is possible that during the short time of a Software Delivery synchronization with SMS, a large number of these objects get created in Notification Server. When an Altiris Agent gets these Software Delivery tasks in its configuration XML, it will send an AeX SWD Status and SWD Package event for each new object. This will cause a large number of these events if there are a large number of managed computers.
Notification Server Reference 92

By the user creating, deleting, or modifying a large number of Software Delivery tasks in the console within a short period of time. Typically, the impact of this will be lessened simply because of the limited rate at that a user can make these changes manually.
The events for this category are:
new job - A new Software Delivery task. This is sent when the Altiris Agent first notices the task in the Altiris Agent Settings policy.
job updated - Sent when the Altiris Agent notices changes to a Software Delivery task.
job removed - Sent when the Software Delivery task no longer applies to the Altiris Agent. Example: the task is disabled or the Altiris Agent is removed from the collection that applies to the task.
job expired - Sent when the task availability time expires. This is configured on the Notification Server when the task is created.
job disabled - Sent when the task is disabled on the Altiris Agent. This is mostly used for SMS tasks.
job activated - Sent when the task is enabled on the Altiris Agent, if previously disabled.
Agent Install Status (formerly Push Status)
These events are generated by the Altiris Agent installation service when an Altiris Agent is pushed out to a computer through the Agent Installation page on the Notification Server
The events for this category are:
starting 'Altiris Agent install service' - The Altiris Agent installation service is being created and started
checking prerequisites - Starts checking Installation Prerequisites.
checked prerequisites - Finishes checking Installation Prerequisites.
starting download - Starts downloading the Altiris Agent install package.
finished download - Finishes downloading the Altiris Agent install package.
starting install - Starts installing the Altiris Agent.
finished install - Finishes Installing the Altiris Agent.
remote install finished - Altiris Agent Install process is complete
NSC User LogOn Events
These events are generated whenever a user logs on or off an managed computer. However, anything that causes the Altiris Agent service to start or stop, will cause a logon and log-off event to be generated, even if the managed computer did not actually log off. These events can occur during an upgrade of the Altiris Agent, install of Package Server, uninstall of package server, install and upgrade of certain solution agents.
Notification Server Reference 93

LogOn
LogOff
ExamplesHere are some common Software Delivery situations and the events received.
SWD Status – new package (Altiris Agent gets a new package and Software Delivery task)
Package download completes without interruption
1. SWD Status – new job
2. SWD Package – start package download
3. SWD Status – download complete
4. SWD Package – end package download
5. SWD Execution – command executed
Package download completes with one interruption
6. SWD Status – new job
7. SWD Package – start package download
8. SWD Package – new package
9. SWD Status – unable to check package
10. SWD Package – end package download
11. SWD Package – start package download
12. SWD Status – download complete
13. SWD Package – end package download
14. SWD Execution – command line executed
SWD Package – start package download (Altiris Agent gets informed of a change in the files contained within a package)
1. SWD Package – package updated
2. SWD Package – start package download
3. SWD Status – download complete
4. SWD Package – end package download
SWD Status – new package (Upgrade of Altiris Agent)
1. SWD Status – new job
2. SWD Package – start package download
3. SWD Status – download complete
4. SWD Package – end packages download
5. SWD Execution – command line executed
Notification Server Reference 94
7. SWD Client LogOn – user logged in
SWD Status – new package (Altiris Agent is disconnected after downloading configuration, but before downloading the package)
1. SWD Status – new job
2. SWD Status – Unable to check package
SWD Status – new package (Not enough space on the hard drive)
1. SWD Status – new job
2. SWD Status – Insufficient space on disk
Using Reports to monitor Notification Server LoadNotification Server provides several reports that let you see how much load has been placed on your Notification Server. These reports are found in the Altiris Console.
There are three general types of actions that cause load on the Notification Server.
Altiris Agents requesting an Altiris Agent Settings policy update from the Notification Server.
Scheduled events that run based on system times on the Notification Server.
Processing of event data received from managed computers.
The reports outlined below indicate how you can easily measure the load on your Notification Server in each of these areas. Through proper use of these reports, you can understand how the system is impacted when you change various configuration settings.
Reports are also provided that help you monitor the versions of all the solution agents that are installed on all the managed computers.
The following is not a comprehensive list of provided reports. However, these reports provide useful information that helps you monitor your Notification Server.
AeX Config Request Group
When the Altiris Agent performs an Altiris Agent Settings policy request from the Notification Server, it also sends up an indication of the current configuration last loaded
on the managed computer (a hash number). After the Notification Server has finished processing the request, if there is no change in the settings as compared tothe hash that the Altiris Agent sent up, then the full configuration is not re-sent over the network. The Altiris Agent is told its current settings are up to date. The reports on the Altiris Agent Settings policy requests do not indicate if the configuration data was actually sent to the Altiris Agent, they only indicate how big the configuration data was that was generated on the server before deciding if it was already up to date. The configuration reports are most useful to see how many requests are being processed – they do not indicate how much outbound traffic was generated as the response to the Altiris Agent Settings policy request.
Clients with no configuration in last N days - Lists Altiris Agent Settings policy requests. This can be used to see that Altiris Agents are not actively requesting updated Altiris Agent Settings policy settings from the Notification Server.
Notification Server Reference 95

Configuration request summary statistics - Computes the time it took to process Altiris Agent Settings policy requests for the last week. This is useful because it gives you a summary of CPU usage and response times for the last week.
Configuration requests requiring > 5 seconds to process - Lists Altiris Agent Settings policy requests that took more than 5 seconds to process. This helps you pinpoint where performance problems are occurring. Generally, you should see Altiris Agent Settings policy requests being responded to in under 100 milliseconds on a reasonable server. You will note from time to time that the time to process an individual request will be larger – this is due to flushing a refreshing cached data. If you consistently have large numbers of Altiris Agents taking more than 5 seconds to receive a Altiris Agent Settings policy request, this indicates a performance issue on the computer.
Configuration requests that result in error - Lists Altiris Agent Settings policy requests that result in error. This helps you check if any Altiris Agent Settings policy requests are resulting in errors and gives you valuable information to help with troubleshooting.
Last N Configuration requests - Lsts the last N Altiris Agent Settings policy requests where N is the number of items to report.
AeX Scheduled Event Group
The updating of collections is generally the most commonly scheduled task that occurs on the Notification Server. You can change the collections update settings on the Automatic Collection Updating configuration page on the Configuration tab of the Altiris Console.
Count scheduled events - Lists the selected scheduled events and the number of times they have run.
Last N scheduled events - Lists the last N Altiris Agent scheduled events where N is the number of items to report.
Scheduled events requiring > 5 seconds to process - Lists NS scheduled events that took more than 5 seconds to process.
Scheduled events statistics by time - Computes the amount of network traffic and the time to process NS scheduled events for the last week. This lists each individual day and the scheduled events statistics for each day.
Scheduled events summary statistics - Computes the amount of network traffic and the time to process NS scheduled events for the last week. This lists a summary of the scheduled events statistics.
Client Deployment Group
Altiris Solution Agent version vs. collection - Counts distinct Altiris Agent versions. It lists the Altiris Agents found on your managed computer and the number of copies of each Altiris Agent.
Inventory collection method - Compares inventory collected from an Altiris Agent with inventory collected using the zero footprint method. It lists the inventory collection method and the number of computers that used each method.
Notification Server Reference 96

Discovered Computers
Discovered computers not reporting inventory - This report shows you computers without inventory that exist in the network from a prior discovery operation. (See the Discovered Computers section in Altiris Notification Server Help.)
Policy Reports Group
Policy Event History - Lists the event history of a policy. This history lists the last N policies that were run and the number of events that they generated. If your Notification Server is receiving a large number of events, you can use this report to pinpoint that policies are generating the most events. You can then use this information to solve this problem, such as choosing to turn off these policies, adding another Notification Server, re-configuring your Notification Server, and so on.
NoteWhen you run this report, you may see “Win32 Inventory Policy” listed. The Win32 Inventory Policy is used for processing Inventory Solution data. There are also internal Software Delivery policies that deploy and cause the Inventory Solution files to be executed. The policies listed in this report are not the processing of policies, but the processing of data.
Some capture of events can be turned on or off at the Advanced Settings configuration page on the Configuration tab of the Altiris Console.
Example: Suppose you want to know how much time the Notification Server is using to process inventory data and how many inventory events it received in one day. You could create a policy titled “Report newly discovered applications (daily)” that would create events whenever an application was discovered. Then, when you run the Policy Event History report, you can see how many events this policy generated.
Notification Server Reference 97

Chapter 11Notification Database
Quick Links
Notification Database and Altiris Solution Uninstallation on page 98
Extending the Notification Database on page 98
Notification Database Schema on page 99
Database Tables on page 101
Database Views on page 104
Notification Database and Altiris Solution Uninstallation
When you uninstall an Altiris solution, all items belonging to that solution are marked “uninstalled” in the Notification Database. They become non-functional and do not appear anywhere in the Altiris Console. They are not removed permanently in the event that the Altiris solution gets re-installed.
If you want to remove these items permanently (example: to reclaim disk space), run the following command line:
AeXConfig.exe /unconfigure Product_Installation_GUID/deleteitems
This physically deletes all items in the Notification Database belonging to the Altiris solution. The AeXConfig executable is found in the install path\Altiris\Notification Server\bin directory.
You can find the Product Installation GUIDs in the registry at HKLM\SOFTWARE\Altiris\eXpress\ Notification Server\ProductInstallations\<GUID>.
Extending the Notification DatabaseWe encourage all customers looking to extend the Notification Database to use existing Altiris mechanisms where possible. By default, we provide numerous mechanisms for extending the Notification Database that are covered under your support agreement (some limitations apply). They also help preserve data integrity and ensure smooth upgrades. If you are considering extending your database, please ensure that you have examined your supported options below.
Asset Control – We recommend this method for general database extension.
The Asset Control Solution allows you to create and define custom tables in the Notification Database, using a GUI interface. While designed primarily for tracking company assets, Asset Control can be used to extend the database and host virtually any kind of data. This is also the recommended method for importing data from other data sources, including Active Directory. Asset Control is inexpensive and is the best way to successfully model virtually any type of data into Notification
Notification Server Reference 98

Extending Inventory on the Altiris Agent
Customizable VB application - Used to prompt an end user for information during an Inventory Solution scan. See the Altiris Inventory Solution Reference for additional details. Use of the utility (as it is shipped) is fully covered under your support agreement. Customization of the application for individual needs is not covered.
AeXCustInv.exe - Application that enables Inventory Solution customers to capture additional data from WMI, the registry, and INI files. See the Altiris Inventory Solution Reference for additional details. This application is fully covered under your support agreement.
MIF2NSI utility - Check with your Altiris representative for information on this utility, that allows you to convert data provided by a third party vendor from MIF format to our XML schema, allowing instant integration into our database schema. This utility is currently available in the Altiris Technical Resource Kit.
Additional Options
Professional Services – Our Professional Services group can help you create a solution for your extended database needs. And since they are Altiris Certified staff members, they can ensure that your solution is implemented with all concern for preserving the integrity of your existing Altiris solutions. In addition, their work will be fully covered under your Altiris support agreement (limitations may apply). Please contact a member of our Professional Services group today to arrange for a consultation.
Important Information
If one of these mechanisms does not meet your needs, and you feel it necessary to extend the database using your own methods, you may encounter the following issues:
You may invalidate your support agreement.
You may potentially damage or ‘break’ your Altiris software.
If you have registered your new table in one of our existing tables, such as the InventoryClass or InventoryClassAttributes table, you may break the database upgrade when upgrading to the most recent version of Notification Server. You are encouraged to remove these entries before upgrading to a new version of Notification Server.
Data may not be fully available with other Altiris Solutions.
Notification Database SchemaThis section outlines a high level description of the Notification Server 6.0 data model. All tables listed in this section are for informational purposes only. They are not published interfaces to the Notification Server database and are subject to change. Future releases may not maintain backward compatibility to the table interfaces.
All tables, except DataClass tables, should only be used by the Notification Server internally.
All views with their names prefixed "v", example:vComputer, may be used by external parties.
Notification Server Reference 99

All DataClass tables, with the prefix "Inv_" or "Evt_" may be used publicly to access resource data.
Notification Server Reference 100
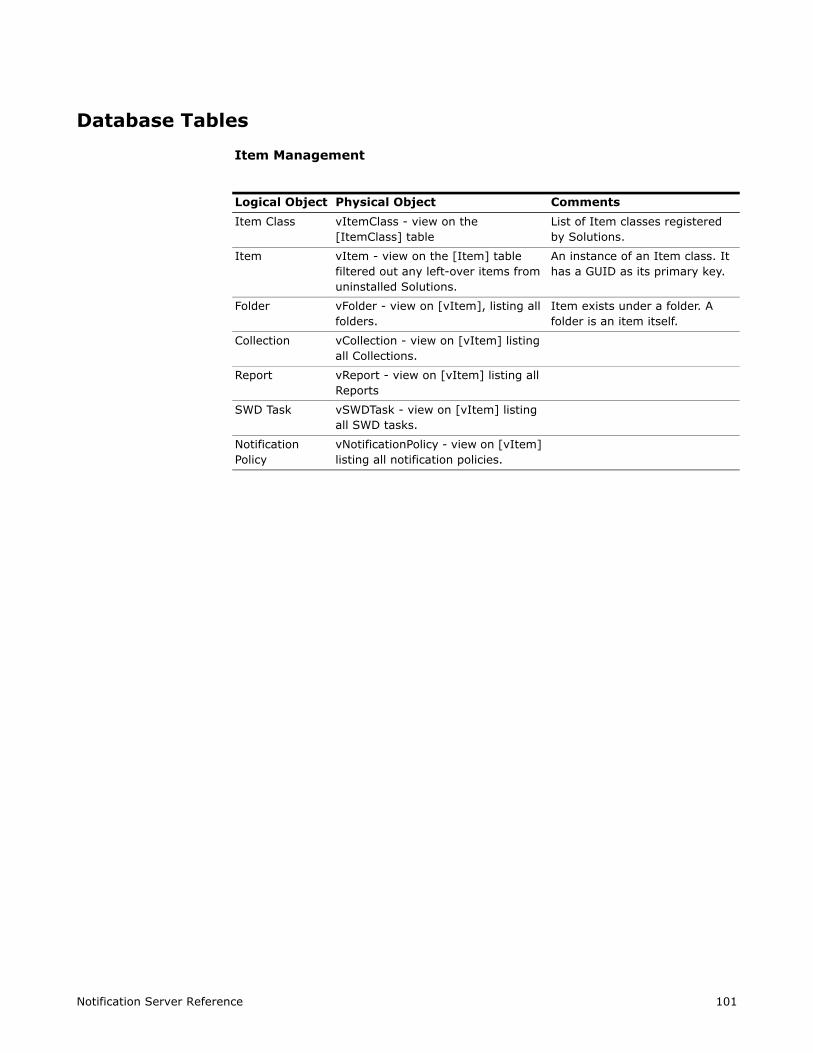
Item Management
Logical Object Physical Object Comments
Item Class vItemClass - view on the [ItemClass] table
List of Item classes registered by Solutions.
Item vItem - view on the [Item] table filtered out any left-over items from uninstalled Solutions.
An instance of an Item class. It has a GUID as its primary key.
Folder vFolder - view on [vItem], listing all folders.
Item exists under a folder. A folder is an item itself.
Collection vCollection - view on [vItem] listing all Collections.
Report vReport - view on [vItem] listing all Reports
SWD Task vSWDTask - view on [vItem] listing all SWD tasks.
Notification Policy
vNotificationPolicy - view on [vItem] listing all notification policies.
Notification Server Reference 101

Logical Object Physical Object Comments
Resource vResource, vResourceItem, vResourceEx are views on [vItem] joined to [ItemResource]
vResource includes all non-deleted resources.
vResourceItem includes all non-deleted resources joined with the [vItem].
vResourceEx extends vResource to include the IsLocal flag.
An instance of a Resource Type.
Has a GUID as its primary key.
Has a Name for display and information purposes.
Has a Managed flag to indicate that this resource is currently under management.
Has zero or more Resource Keys.
The Managed flag is automatically set upon receiving AeX AC Client Agent data. It is set to 1 if there are any client agents, 0 if no client agent.
A resource's IsLocal is 1 (The OwnerNSGuid is vThisNS.Guid) means the resource is owned by the local NS.
Resource Type vResourceType is a view on [ResourceType]
Has a Guid as its primary key.
Has a unique Name.
Associated with zero or more Data Classes.
Fixed Asset vFixedAsset, vActiveFixedAsset are views on [vResource].
vFixedAsset includes all resources that are of "Fixed Asset" resource type - 'B9EE0AB2-AE0E-4867-BF4C-41D4A382163B'.
vActiveFixedAsset joins to vFixedAsset and includes Fixed Assets that are "Active".
The "Fixed Asset" resource type has an association to the "Fixed Asset State" resource type. There are 2 core states by default - Active and Retired/Disposed.
A fixed asset is "Active" if the resource has no association with a Fixed Asset State, or the resource has an association with the "Active" Fixed Resource State.
For any fixed assets that are not "Active":
- NS will not return client policies for the resource.
- NS will not process NSEs for the resource.
Notification Server Reference 102

Computer vComputerResource and vComputer are views on [vActiveFixedAsset].
vComputerResource includes all active fixed assets that are based of the Computer resource type.
vComputer is all vComputerResource left outer joins with data classes to includes additional computer related data.
Computer resource type is derived from the Fixed Asset resource type.
Inventory Class vInventoryClass is a view on [DataClass] where type is Inventory
Identified by a GUID.
Has Name, Manufacturer and Platform attributes, together uniquely identifying the data class.
Defines the schema for the associated data table and history table.
Event Class vEventClass is a view on [DataClass] where type is Event
As above.
Inventory Data Table
For each data class the table is [Inv_nnnn] where nnnn is derived from the Data Class' name, manufacturer and platform.
This table contains a _ResourceGuid column that should be used to join to the resource Guid.
Inventory History Table
For each data class the table is [InvHist_nnnn] where nnnn is derived from the Data Class's name, manufacturer and platform.
As above.
Event Data Table
For each data class the table is [Evt_nnnn] where nnnn is derived from the Data Class's name, manufacturer and platform.
This table contains a _ResourceGuid column that should be used to join to the resource Guid.
Resource Key vResourceKey is a view on [ResourceKey]
A key for a resource. This is ResourceGuid, KeyName, KeyValue.
Item to Data Class Summaries
vItemDataClassSummary and vItemDataClassHistSummary
NoteReplacement for Notification Server 5.5 WrkstaInventory (and WrkstaEvent).
Logical Object Physical Object Comments
Notification Server Reference 103

Resource Management
Security
Notification Server Reference 104

Standard Resources
Notification Server Reference 105

Site Management
Product Installation
Notification Server Reference 106

Notification Server Reference 107

Chapter 12Disaster Recovery and High Availability
Your Notification Server data is important to you. This section shows how to recover your data if disaster strikes.
Three failure modes that can cause Notification Server to be unavailable:
This section contains the following information:
Disaster Recovery on page 108 - Information you need for backing up and recovering your data in case of system failure. If you follow the instructions listed here, you should have your Notification Server running with your latest backed up data in 1 to 2 hours.
High Availability on page 111 - Have the Notification Server and Altiris solutions available to users within 5 to 10 minutes of a system failure. This is meant as a quick fix while you recover your data using the steps found in Disaster Recovery.
Disaster RecoveryThe key to disaster recovery is performing regular backups to your data. This section discusses the necessary backups you will need to perform and how to restore Notification Server due to system failure.
Quick Links
Back up Notification Server on page 108
Restore Notification Server on page 109
Restore the Notification Server with a previous configuration on page 110
Back up Notification ServerWe recommend that you regularly back up your Notification Server system. How often depends on how critical you consider your data to be.
You should back up:
When numerous Reports are created.
When numerous Notification Policies are created.
On a regular interval, based on how critical your data is. We recommend that you back up at least weekly.
Failure Action
Loss of hard drive Install new hard drive and restore database. See Disaster Recovery on page 108.
Loss of computer Go to standby Notification Server computer. See High Availability on page 111.
Network failure This is out of the scope of Notification Server disaster recovery.
Notification Server Reference 108

Before performing a back up, stop your Microsoft SQL Server (Notification Server does not need to be stopped). This will ensure that the database gets backed-up properly. Any data that needs to go into the database will be queued until the Microsoft SQL Server is restarted.
NoteIf you are using a shared Microsoft SQL Server and cannot shut it down, it lets you dump the database into a back up file.
You should regularly back up your Notification Database. You should also back up the registry. If you do not back up the registry and there is a problem with it, you can restore Notification Server registry information by re-installing Notification Server. After you have reinstalled, configure Notification Server to use the existing SQL database.
If possible, you should make a complete back up of the system, including the registry. You should back up the following:
Notification Database
Notification Server program files (\Altiris folder)
Registry
Notes
You can use Deployment Solution to create an image of the drive your Notification Server is on.
If you need to back up items or groups, you can do so individually. See Altiris Notification Server Help.
If you have multiple sites, there is a tool on the Altiris Technical Resource Kit that lets you import and export policies and reports across sites. Contact your Altiris representative for information.
Some programs let you back up a Microsoft SQL Server database while Microsoft SQL Server is running. Although these programs will probably work fine with Notification Server, they are not supported by Altiris. If you use such a program, we recommend you verify that your database was backed-up properly.
Restore Notification ServerRestoring the Notification Server is an easy process, as long as you performed the recommended backup (see Back up Notification Server on page 108).
To restore Notification Server
1. Reconstruct the Notification Database from the backup.
2. Reinstall Notification Server.
Notification Server Reference 109
3. If you backed up your Notification Server program files (\Altiris folder), restore them.
4. If you backed up your registry, reinstall your registry information.
5. Export all Collections, Packages, Policies, and Reports groups. (See Altiris Notification Server Help.)
6. Uninstall your solutions.
7. Re-install your solutions.
8. Re-import all Collections, Packages, Policies, and Reports groups. (See Altiris Notification Server Help.)
9. Reinstall your product licenses.
NoteIf you did not back up your registry, you will need to reconfigure the Notification Server. (See Altiris Notification Server Help.)
NoteIf you have multiple sites, there is a tool on the Altiris Technical Resource Kit that lets you import and export policies and reports across sites. Contact your Altiris representative for information.
Restore the Notification Server with a previous configurationAn Altiris solution installation consists of two parts:
1. The MSI installation creates and populates the file system (folders/files) and then it writes the required entries in the registry.
2. AeXConfig.exe is launched with the /configure switch; this command is used to import the database schema and the objects into the configured Notification Server database.
NoteWhen solutions are installed, and then configured any existing solution specific data in the database will be over-written.
To restore Notification Server with previous configuration
When Notification Server is installed as a Disaster Recovery process, and when an existing database is required to be used, perform the following steps:
1. The new Notification Server and installed solutions need to be the same Product state and Version state as the old Notification Server.
2. Install Notification Server and configure it to use a temporary database - generally it is advised to use a name other than 'Altiris' since this may be the name of the existing database.
Notification Server Reference 110

used with the same Version states.
4. Install only the solutions used with the old Notification Server Product state and Version state.
5. Once the new Notification Server and installed solutions are in the same Product and Version state as was the old Notification Server, click the Configuration tab of the Notification Server Admin web console and use the Database Settings option to point Notification Server to the existing database.
6. This step is optional. Replace the CoreSettings.config file on the new Notification Server with the most recent CoreSettings.config file from the old Notification Server as this file is essentially the registry of the Notification Server.
NoteThe above steps will preserve all custom items created on the original Notification Server and stored in the original database (and CoreSettings.config file).
High AvailabilityThe following are suggestions for keeping your Notification Server and Altiris solutions available to users within 5 to 10 minutes of a system failure:
Package Servers - Implement the Package Server component of Notification Server. For information on Package Servers, see Package Servers on page 48.
Standby Notification Server - Set up a duplicate Notification Server computer that can be accessed quickly. Remember, you do not need to purchase a license for another Notification Server; you can set up as many Notification Servers as you need for no charge.
Notification Server Reference 111

Chapter 13Security Management
Security in the Notification Server is role-based. To understand security in the Notification Server, you need to know how roles, privileges, permissions, and item tasks are configured and used.
Each role contains privileges to perform various actions on the Altiris console. Privileges can be given globally through the use of roles in the Security Roles folder in the Configuration tab.
For a user to perform these tasks they need permissions to access the appropriate parts of the Altiris console. Permissions can be granted to folders or items in the Security Role Manager console or by right-clicking on the folder or item in the left pane, then selecting Properties. When the Properties page appears, click the Security tab to view and grant permissions.
Quick Links
Understanding Global Privileges on page 112
Understanding Permissions on page 115
Security Roles on page 114
Understanding Item tasks on page 117
Understanding Resource Reports & Security on page 119
Sample Multiple-Access User Scenario on page 119
Sample Simple-Access User Scenario on page 121
Understanding Global Privileges A privilege is specified globally by the administrator to a role. As the administrator, you can either create roles or use roles that are created when the Notification Server is installed. You can then assign global privileges to each role. Roles that are created at installation have global privileges already assigned to them. The roles created at installation are Altiris Administrators, Altiris Guests, Altiris Level 1 Workers, Altiris Level 2 Workers, and Altiris Supervisors.
This is similar to using Windows NT groups. In fact, roles that are created in the Altiris Console are created and managed as Windows NT groups.
After roles are created, members need to be added to them for the role to be useful. When the Notification System is installed, the administrator is automatically added to the Altiris Administrator role. No other roles that are created during installation have members assigned to them. Members can be added to roles based on corporate needs.
Notification Server Reference 112

NoteThe Altiris Management Privileges will not apply unless the corresponding Altiris Console Privileges Tab checkbox is selected. Example: click the View Resources tab to be able to Create Collections.
Altiris Management Privileges
Create Agent Settings
Create or clone new Altiris Agent settings to control its behaviour and how it communicates with the Notification Server.
Create Collections Create or clone new collections of resources, targets of tasks, policies, or reports.
Create Secured Collections
Create or clone secure collections of resources. Secured collections limit the resources used when creating new collections.
Create Reports Create or clone new reports to provide information about managed computers and the Notification Server configuration.
Create Notification Policies
Create or clone new Notification Policies that let the Notification server perform a variety of actions when defined conditions occur.
Create Shortcuts Create or clone new shortcuts to items on the Shortcuts tab. You can create custom views used by an administrator to provide information configured for a specific user group.
Altiris System Privileges
Change Security Change security configuration information. This includes security information relating to permissions, privileges, and roles.
Import XML Create an item or resource in the Notification Server from information stored in a specially structured XML file, usually from a menu item on a folder's context menu. Creating an item this way bypasses all security checks. Example: a user could create a report by importing its XML when that user does not have the Create Reports privilege or the Create Children permission to the containing folder. So, this privilege is very security sensitive. By default, it is only granted to the Altiris Administrators role and should not be granted to non-administrators.
Take Ownership Take ownership of a security entity. This grants the owner full permissions on the entity.
Notification Server Reference 113

NoteIf any of the Altiris Console Privileges are not selected you will not be able to see or perform any of the tasks in that particular tab's left pane.
Security RolesYou can handle all of your role management settings through the Security Roles on the Configuration tab and the Security Role Manager console. In the Notification Server, roles are granted privileges that allow access to elements of the Notification Server
View Security View security configuration information. This includes security information relating to permissions, privileges, and roles.
Edit SQL Directly Create or modify SQL used in reports. This lets a user proficient in SQL and familiar with the Notification Server database structure to write very specific, efficient reports. However, it can also be used to avoid the report builder's checks.
IMPORTANTPoorly written SQL queries can return incorrect results or be inefficient, consuming excessive memory and CPU time on the database server. Also, a malicious SQL query can delete, modify or add data anywhere in the database. Therefore, this privilege is very security sensitive and is only granted to the Altiris Administrators role by default.
If role members edit SQL directly, use the report specific application credentials to force reports to use an account with restricted database access. To configure this setting click the Configuration tab, navigate to Configuration > Server Settings > Notification Server > Database Settings, and click the Reports tab in the right pane. This setting helps protect the database and prevent users reading sensitive data.
Altiris Console Privileges
View Resources Tab View the Resources Tab on the Altiris Console.
View Configuration Tab
View the Configuration Tab on the Altiris Console.
View Reports Tab View the Reports Tab on the Altiris Console.
View Tasks Tab View the Tasks Tab on the Altiris Console.
View Getting Started Tab
View the Getting Started Tab on the Altiris Console.
View Shortcuts Tab Vew the Shortcuts Tab on the Altiris Console.
Altiris System Privileges
Notification Server Reference 114

There are a number of default roles in the Security Roles folder on the Configuration tab and each has its own set of Global Privileges. These roles can be used and tweaked, or new roles can be created to suit user requirements.
See “Go to Security Role Manager” in Notification Server Help.
Understanding PermissionsWhile privileges are given globally through the use of roles, permissions are given for specific folders or items (such as tasks, collections, reports, and configuration items) in the left pane. Permissions give users the ability to act on a folder or item. Each folder or item in the Altiris Console can be secured by permissions. A folder or item may have one or more permissions available to users. Available permissions include read and write.
Example: you can give a user the privilege to view the Reports tab in general. However, the user will need to be given permission to read a particular report. The user will need to be in a role that has the View Reports tab privilege and the Read permission on the Reports tab. Unless the users are given permissions on folders and reports on the Reports tab all they will see is an Access Denied page.
If you want to give users in a role the privilege to run a report, you need to grant the View Reports Tab global privilege to the role, grant the role Read permission to the Reports folder and the report in the Reports tab, and grant the role Run Report permission to the specific report.
Each solution creates folders and items. Each of these folders and items has certain permissions available to assign to users. Solutions may also create roles that apply specifically to the solution and assign privileges to those roles.
When the Notification Server is installed, the local administrator and the Altiris Administrator role are given permissions on all items in the console. Permissions for any other role must be configured after installation.
When a role does not have any permission on a folder users belonging to this role will only be able to see those folders in the console if they have permission to view child folders or items. If a role doesn’t have permission to view an item users in this role will be unable to view the items in the console. Read permission is the minimum permission required on a folder or item.
The best way to administor permissions is through the Security Role Manager console. This console features:
Open role-based security user interface
Easy role creation and modification
View the left pane as it appears for any given role
For information see Go to Security Role Manager in Notification Server Help.
Setting permissions in the Properties dialog
The Permissions tab on the Security tab of the Properties dialog also lets you view and define permissions for a folder or item. You can also access this tab by clicking the Advanced button in the Security Role Manager console. To set permissions, click Add to select a role and configure using the Permission Selecting dialog.
Notification Server Reference 115
Inheritance allows permissions on groups of items to be controlled by a single set of permissions. It works between a folder and its child items. Set the desired permissions on the folder and these filter down to the child items automatically, that is, they are inherited, as are files on an NTFS volume on Windows. The permission inheritance system using in Notification Server was modelled on the Windows method.
(Give an example)
An item inheriting permissions can have additional permissions added. Inherited and non-inherited permissions are kept separate on each item but both apply equally. However, it is not possible to edit inherited permissions on inheriting items. To modify the inherited permissions on a child item, you need to edit the permissions on the parent folder. All permissions are inherited from the parent folder. By default, when you create or change permissions for a parent object, such as a folder, all existing child objects, such as items or subfolders, inherit those permissions.
You can disable inheritance on an item by clearing the Inherit the permission entries from parent object that apply to child objects checkbox. When you click Apply to save your changes the Inherited Permissions Behaviour dialog opens. This dialog lets you copy the permissions exclusively to the item or remove them entirely.
IMPORTANTRemoving inherited permissions may result in an unexpected denial of access. Ensure there are sufficient uninherited permissions on the item for continued access.
By default, when you create or change permissions for a parent object, such as a folder, all existing child objects, such as items or subfolders, inherit those permissions. However, if you clear the Inherit the permission entries from parent object that apply to child objects checkbox, this object will not inherit any permission from the parent object.
To remove all non-inherited permissions on a folder select the Replace permissions on all child objects checkbox. This can be used to re-acquire permissions that have been removed from child objects. Example: if you have a folder with the sub-folder tree of Sub 1/Sub 2/Sub 3/Sub 4, and you wish to remove permissions from the Sub 3 folder; clear the Inherit the permission entries from parent object that apply to child objects box, select the Replace permissions on all child objects box, click Remove, and then click Apply. Now, from the left pane, you will not be able to see the Sub 3 or Sub 4 folders. If now you access the Properties on the Sub 2 folder, then go to the Security tab and the Permissions tab, select the Replace permissions on all child objects box, click Apply, and you will be able to view the Sub 3 and Sub 4 folders again.
Configure Resource ManagerTo see any of the Inventory and Event Data classes in Resource Manager, the user must have the Read permission on the data class. Security is set on data classes on the Configuration tab, under Resource Settings > Data Classes.
To set permissions on the Summary tab right-click each summary, select Properties and then click the Security tab. The only permission that applies to these pages is Read. That is, a user requires the Read permission to be allowed see the node on the tree.
Notification Server Reference 116

List of Permissions
Understanding Item tasksSome actions than can be performed on Items are dependent upon Permissions set in the Security tab of the Properties dialog. Item tasks are configured separately to item permissions as a security feature.
Altiris System Permissions
Delete Delete the item in question (or folder and so on).
Read View an item.
Write Create an item or change its data.
Read Permissions Read the security permissions associated with an entity (user must have View Security Privilege).
Change Permissions Change the security permissions associated with the item (the user must have the View Security, Change Security Privileges, and Read Permission permissions on the item).
Clone Clone an item.
Altiris Reports Permissions
Run Reports Run a report.
Save Reports Save a report.
Altiris Tasks Permissions
Apply To Collections Apply a task to a collection of resources.
Enable Policy Enable\disable a policy.
Altiris Resource Management Permissions
Read Resource Data Read resource data of a resource data class.
Write Resource Data Write resource data of a resource data class.
Read Resource Association
Read resource data of a resource association class.
Write Resource Association
Write resource data of a resource association class.
Altiris Folder Permissions
Create Children Create new child entities
Notification Server Reference 117
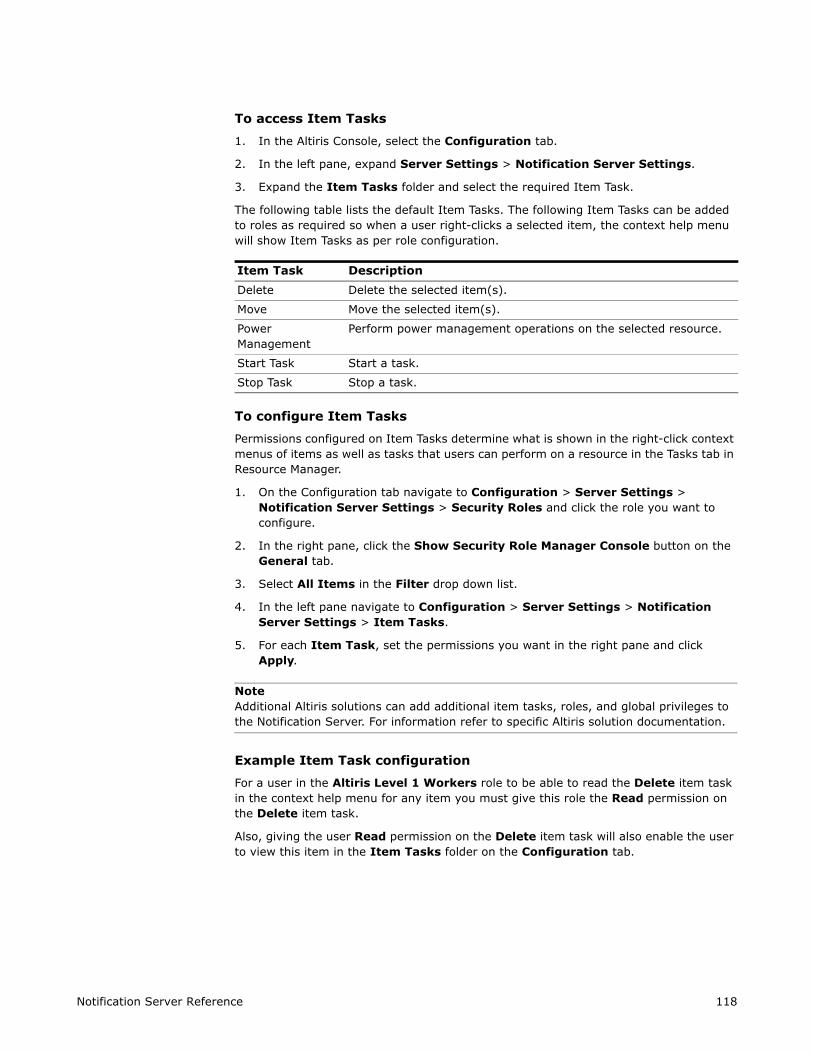
1. In the Altiris Console, select the Configuration tab.
2. In the left pane, expand Server Settings > Notification Server Settings.
3. Expand the Item Tasks folder and select the required Item Task.
The following table lists the default Item Tasks. The following Item Tasks can be added to roles as required so when a user right-clicks a selected item, the context help menu will show Item Tasks as per role configuration.
To configure Item Tasks
Permissions configured on Item Tasks determine what is shown in the right-click context menus of items as well as tasks that users can perform on a resource in the Tasks tab in Resource Manager.
1. On the Configuration tab navigate to Configuration > Server Settings > Notification Server Settings > Security Roles and click the role you want to configure.
2. In the right pane, click the Show Security Role Manager Console button on the General tab.
3. Select All Items in the Filter drop down list.
4. In the left pane navigate to Configuration > Server Settings > Notification Server Settings > Item Tasks.
5. For each Item Task, set the permissions you want in the right pane and click Apply.
NoteAdditional Altiris solutions can add additional item tasks, roles, and global privileges to the Notification Server. For information refer to specific Altiris solution documentation.
Example Item Task configuration
For a user in the Altiris Level 1 Workers role to be able to read the Delete item task in the context help menu for any item you must give this role the Read permission on the Delete item task.
Also, giving the user Read permission on the Delete item task will also enable the user to view this item in the Item Tasks folder on the Configuration tab.
Item Task Description
Delete Delete the selected item(s).
Move Move the selected item(s).
Power Management
Perform power management operations on the selected resource.
Start Task Start a task.
Stop Task Stop a task.
Notification Server Reference 118

Users need read access to these reports if they need access to the Resource Selector dialog when creating or editing collections. The All Resources Picker Report runs when you open the resource Selector dialog (Example: when editing a collection). Removing read access on this report will prevent the user from viewing anything in the Selector dialog. In order for resources to appear in the resource Selector dialog users will require read persmissions on the corresponding resource report.
To access Resource Reports
1. In the Altiris Console, select the Reports tab.
2. In the left pane, naviagte to Notification Server Infrastructure > Server > Resource Reports.
To configure Resource Reports
1. On the Configuration tab navigate to Configuration > Server Settings > Notification Server Settings > Security Roles and click the role you want to configure Resource Reports for.
2. In the right pane, click the Show Security Role Manager Console button on the General tab.
3. Select All Items in the Filter drop down list.
4. In the left pane navigate to Reports > Notification Server Settings > Server > Resource Reports.
5. For each Resource Reports, set the permissions you want in the right pane and click Apply.
Sample Multiple-Access User ScenarioIn this scenario we wish to create two roles in the Altiris Console for a company with two mutually exclusive roles responsible for computer management. One administrator role is responsible for servers and the other administrator role is responsible for desktops.
The ServerAdmin role needs access to the Windows Servers collection on the Resource tab. It must also be able to create and delete collections in the Windows Servers collection folder.
TheDesktopAdmin role requires access to the Windows Workstation collection on the resource tab. It must also be able to create and delete collections in the Windows Workstation collection folder.
Step 1 - Create New Roles
1. In the Altiris Console, select the Configuration tab.
2. In the left pane, navigate to Configuration > Server Settings > Notification Server Settings.
3. Right-click Security Roles and select New > Security Role.
4. In the New Role dialog, enter the role name ServerAdmin and click OK.
5. On the General tab enter a role description, in this case how this role is for administrators that manage servers.
Notification Server Reference 119

7. Use the Select Users or Groups dialog to find users or groups to add to the role.
8. Select one or more users or groups, and then click OK.
Step 2 - Add Global Privileges
1. Click the Priveleges tab, select the View Resources tab in the Altiris Console Privileges section.
2. Select the Create Secured Collection tab in the Altiris Management Console Privileges section.
3. Click Apply to finish.
NoteRepeat Step 1 and Step 2 for the DesktopAdmin role.
Step 3 - Add Permissions to the ServerAdmin role
1. In the left pane, navigate to Configuration > Server Settings > Notification Server Settings.
2. Click the ServerAdmin role in the left pane.
3. Click the Show the Security Role Manager button on the General tab.
4. In the Security Role Manager console, select Tree > Resources in the Filter drop down list.
5. In the left pane, navigate to Resource Management > Collections > Computer Collections > Windows Servers.
6. Select the Read checkbox in the Altiris System Permissions section and click Apply.
Step 4 - Add Permissions to the DesktopAdmin role
1. In the left pane, navigate to Configuration > Server Settings > Notification Server Settings click the DesktopAdmin role.
2. Click the Show the Security Role Manager button on the General tab.
3. In the Security Role Manager console, select Tree > Resources in the Filter drop down list.
4. In the left pane, navigate to Resource Management > Collections > Computer Collections > Windows Servers.
5. Select the Read checkbox in the Altiris System Permissions section and click Apply.
Step 5- Set Item task permissions
1. On the Configuration tab, navigate to Configuration > Server Settings > Notification Server Settings > Security Roles and click the ServerAdmin role.
2. In the right pane, click the Show Security Role Manager Console button on the General tab.
3. Select All Items in the Filter drop down list.
Notification Server Reference 120

Server Settings > Item Tasks.
5. Click the Delete item task and select the Read checkbox in the Altiris System Permissions section.
6. Click Apply.
Step 6 - Configure Resource Reports
1. On the Configuration tab, navigate to Configuration > Server Settings > Notification Server Settings > Security Roles and click the ServerAdmin role.
2. In the right pane, click the Show Security Role Manager Console button on the General tab.
3. Select All Resource Reports in the Filter drop down list.
4. Select the Read checkbox in the Altiris System Permissions section and click Apply.
Step 7 - Configure Resource Manager
1. On the Configuration tab, navigate to Configuration > Server Settings > Notification Server Settings > Security Roles and click the DesktopAdmin role.
2. In the right pane, click the Show Security Role Manager Console button on the General tab.
3. Select Tree > Configuration in the Filter drop down list.
4. In the left pane, navigate to Configuration > Resource Settings > Data Classes.
5. Select the Read checkbox in the Altiris System Permissions section and click Apply.
6. Repeat these steps for the ServerAdmin role.
Sample Simple-Access User ScenarioIn this sample scenario the requirement is to create roles with access to a limited set of objects. This role is based on Domain Groups and will access the console through the Shortcuts tab.
Step 1 - Create New Roles
1. In the Altiris Console, click the Configuration tab.
2. In the left pane, navigate to Configuration > Server Settings > Notification Server Settings > Security Roles.
3. Right-click the Security Roles folder and select New > Security Role.
4. In the New Role dialog, enter the role name LimitedUser and click OK.
5. On the General tab enter a role description.
6. Click the Membership tab and add one or more members to the role. If possible, use Domain Groups as members of the new role.
7. Use the Select Users or Groups dialog to find users or groups to add to the role.
Notification Server Reference 121

Step 2 - Add Global Privileges
1. On the Privileges tab do not select any Altiris Console Privileges as our work will be performed on the Shortcuts tab.
2. Click Apply to finish.
Step 3 - Add Permissions
1. On the Configuration tab, navigate to Configuration > Server Settings > Notification Server Settings > Security Roles and click the LimitedUser role.
2. In the right pane, click the Show Security Role Manager Console button on the General tab.
3. Select Tree > Shortcuts in the Filter drop down list.
4. Select the Read checkbox in the Altiris System Permissions section, and click Apply.
5. Click Advanced.
6. From the Properties dialog box, select the Inherit the permission entries from parent object that apply to child objects option if your target is a folder and click Apply and close the window when finished.
Step 4 - Configure Resource Reports
1. On the Configuration tab, navigate to Configuration > Server Settings > Notification Server Settings > Security Roles and click the LimitedUser role.
2. In the right pane, click the Show Security Role Manager Console button on the General tab.
3. Select All Resource Reports in the Filter drop down list.
4. Select the Read checkbox in the Altiris System Permissions section and click Apply.
Step 5 - Configure the Shortcuts tab
1. Click the Shortcuts tab page
2. Right-click the Shortcuts folder in the left pane and navigate to New > Folder.
3. Enter the name of the new folder and click Apply.
4. Right-click the new folder in the left and navigate to New > Shortcut.
5. Select the target folder or item in the Items Selector window and click Apply.
NoteBe sure to validate your settings, by authenticating to the Notification Server web console as a user assigned to the new role. Your new role should only be able to view the Shortcuts tab, and only be able to actively use objects in their folder.
Notification Server Reference 122

Chapter 14Integrating IIS Lockdown and URLScan
This section describes the requirements for integrating NS with the Microsoft IIS Lockdown Utility and URLScan. The core NS features require that Web Service (HTTP) must be enabled and Active Server Pages (.asp) must be supported.
Integrating IIS Lockdown
When the IIS Lockdown utility is launched, you are prompted to select the "Server Template" that best matches the servers role. Dynamic Web Server (ASP enabled) best describes the role of the Notification Server.
NoteIf some other template is selected, then the services that will be modified will differ and may require additional configuration.
The Internet Services that are associated with the Dynamic Web server templates are:
Web service (HTTP) - must be enabled to respond to Web client requests
File Transfer Service (FTP) - not used by NS
E-mail service (SMTP) - If the Notification Server server is also to be an SMTP server then this option must be enabled
News Service (NNTP) - not used by NS
The utility provides the ability to disable Script Maps and Active Server Pages (.asp) is the only entry that must NOT be disabled.
The IIS Lockdown Wizard allows for additional security settings but the Notification Server doesn’t require any of these settings to be enabled.
Integrating URLScan
The IIS Lockdown Wizard provides the capability of installing the Microsoft URLScan utility or it can be installed manually. When URLScan installs it creates a WINNT\SYSTEM32\INETSRV\URLSCAN\URLSCAN.INI file. This file can be tuned to meet specific needs. Installing the URLScan utility as part of the IIS Lockdown wizard with the Dynamic Web server (ASP enabled) template configures the URLSCAN.INI file with these settings.
The following extensions must be added to allow for core NS functionality;
.vbe (used in the creation of the various web pages within the console. Data is pulled from a SQL database to create Dynamic web pages)
.jse (used in the creation of the various web pages within the console. Data is pulled from a SQL database to create Dynamic web pages)
.aspx
.xsl
.bmp
Notification Server Reference 123

.exe (only needed to install the Notification Server client to the server or to push the client to remote machines. This extension also needs to be removed from the ‘deny extensions’ list.)
.lpk
.css
.cab (needed for the loading of cab files during the initial load of the web console and installing of additional solutions through the Solution Center. Remote Administrator Consoles and Web Reports will also install cab files during the initial opening of the console)
.ico
If other NS processes fail to function, refer to the WINNT\SYSTEM32\INETSRV\URLSCAN\URLSCAN.LOG file. It will describe that files have failed because the extensions are not specifically allowed.
These extensions can then be added to the list. The World Wide Web publishing service must be restarted for the changes to take affect.
NoteRefer to Technet for specifics on the URLScan.ini file.
When the Internet Information Services Lockdown wizard runs, modifications are written to the C:\WINNT\System32\Obit-log.log file.
Other security settings
For NS Client to be able to communicate to the server the client must have rights to read and execute from the AeXNS virtual directory (we leave anonymous access to this directory by default. If anonymous access is removed then they have to ensure that all the users have rights to the Notification Server directory).
The Anonymous Access account must have full control of the following file directories:
install path\Altiris\eXpress\Notification Server\NSCap\EvtInbox
install path\Altiris\eXpress\Notification Server\NSCap\EvtQFast
install path\Altiris\eXpress\Notification Server\NSCap\EvtQueue
install path\Altiris\eXpress\Notification Server\NSCap\EvtQSlow
install path\Altiris\eXpress\Notification Server\NSCap\EvtQLarge
install path\Altiris\eXpress\Notification Server\NSCap\Temp
In addition to the above, read and execute permissions must always be permitted on the Postevent.asp, Gand so onlientPolicies.asp, and the CreateResource.asp files for the Anonymous Access account.
Notification Server Reference 124

Notification Server Reference 125
Part IV
General Reference
This section provides general reference information.
Quick Links
Troubleshooting on page 126 Provides general troubleshooting information.
Registry and Configuration Settings on page 134
Provides registry and configuration settings that are useful to administrators.
Log Files on page 147 Discusses log files and how they are used for troubleshooting.

Chapter 15Troubleshooting
This section lists common troubleshooting problems and gives probable resolutions.
Quick Links
Troubleshooting on the Notification Server and Altiris Agent on page 126
Troubleshooting the Package Server on page 127
Problem Seeing the Solution Center when using a Proxy Server on page 127
Name Resolution on page 127
Package Download Error on page 128
E-mail Notification Not Working on page 128
Event Viewer Security Log Receiving Too Many Logon/Logoff Errors on page 128
Sending Events to NS, But You Don’t See Any Data on the Notification Server Computer on page 129
Rebuilding a Notification Server on page 130
Unable to Validate the Software Delivery Connection Point Credentials on page 131
Windows XP: Problem Deploying Altiris Agent in a WorkGroup on page 132
Log Error: Exceeding Optimal Number of Connections When Using MSDE on page 132
Configure NS to operate on Windows 2003 with IE hardening enabled on page 133
Troubleshooting on the Notification Server and Altiris Agent
You troubleshoot the Notification Server and the Altiris Agent by analyzing their log files.
1. To configure Notification Server error logging
a. In the Altiris Console, select the Configuration tab.
b. In the left pane, navigate to Configuration > Server Settings > Notification Server Settings > Error Logging.
c. In the content pane, select all four boxes.
d. Click Apply.
e. To view the log, click View Status Messages.
This link views the latest logged information in an ASP page at http://NSName/Altiris/NS/LogView.asp with the severity level default of 1.
NoteFor information, see Log Files on page 147.
Notification Server Reference 126

Notification Server.
a. In the registry, go to HKLM\SOFTWARE\Altiris\eXpress\Event Logging\LogFile.
b. Add a file name (Example: LogView). Right-click in the right pane, select New > String Value. Type FileName, then press Enter. Right-click on FileName, select Modify, then enter a value for FileName in the Value data field.
c. Add a file path (Example: install path\Altiris Agent\Logs). Right-click in the right pane, select New > String Value. Type FilePath, then press Enter. Right-click on FilePath, select Modify, then enter a value for FilePath in the Value data field.
d. Add a Severity value (enter 15 to log all severity levels). Right-click in the right pane, select New > DWORD Value. Type Severity, then press Enter. Right-click on Severity, select Modify, then enter a value for Severity in the Value data field.
e. This will create the following file: install path\Altiris Agent\Logs\LogView.
NoteIf further help is needed, these log files can be sent through e-mail to Altiris support.
Troubleshooting the Package ServerThe URL http://Package Server Name/AltirisPS/PackageServerStatus.xml provides real time status from a Package Server about the status of various packages.
Problem Seeing the Solution Center when using a Proxy Server
If your Notification Server computer is using a proxy server and your Internet Explorer is not configured for the proxy server, you will not be able to see the Solution Center (found on the Upgrade/Install Additional Solutions configuration item). If this happens, you will need to add a ProxyServer registry key.
To add the ProxyServer registry key
1. Open a registry editor (such as Regedit).
2. Navigate to HKLM\SOFTWARE\Altiris\eXpress\Notification Server.
3. Create a String Value registry key called ProxyServer.
4. Enter the following for the value of the ProxyServer registry key:
http://proxy:80
where proxy is the name of your proxy server.
Name ResolutionNotification Server will work with or without a DNS server. Notification Server will try all available sources for name resolution.
Notification Server Reference 127

If DNS is not present, the console and Altiris Agent use any of the following sources in an order based on Windows operating system conventions.
HOSTS file (in %SYSTEMROOT%\system32\drivers\and so on if present)
Local NetBIOS name cache (to view, use “nbtstat -c”)
WINS (if supplied)
Broadcast on local subnet
LMHOSTS file (in %SYSTEMROOT%\system32\drivers\and so on if present)
Package Download ErrorIf you receive an error on Altiris Agent while downloading a package, and there are MAP files in the package, here is the probable cause and a solution:
Probable Cause: First, IIS reserves the MAP file extension for image maps. (See http://support.microsoft.com/support/kb/articles/Q251/2/19.ASP for information.) This means that you will receive an error if you are downloading a MAP file larger than 128 KB in size. The error will say “Failed to download package”.
Solution: The workaround is to rename the MAP file(s) to a different extension before performing the download. Next, run a batch file that renames the file(s) back to the MAP extension before you proceed with the program setup/installation.
E-mail Notification Not WorkingIf your e-mail notification is not working, try using the following command:
telnet <hostname> 25
If you type
telnet webmail 25
this should provide a message like the following:
220 webmail.altiris.com Microsoft ESMTP MAIL Service, Version: 5.0.2195.1600 ready at Tue, 8 May 2001 15:14:22 -0600
Event Viewer Security Log Receiving Too Many Logon/Logoff Errors
Notification Server impersonates users to ensure that its processes have sufficient credentials to write to disk from the Web, and so on. When this impersonation happens, that it does frequently, events are generated and sent to the Event Viewer Security Log on either your Notification Server computer or your domain controller.
Notification Server Reference 128

To turn these events off, do the following:
On a Notification Server computer
1. Browse to Control Panel > Administrative Tools > Local Security Policy.
2. In the left tree navigate to Local Policies > Audit Policy.
3. In the right pane, double-click on Audit logon events.
4. Clear the Success and Failure boxes.
5. Click OK.
On a Domain Controller
1. Browse to Control Panel > Administrative Tools > Local Security Policy.
2. In the left tree navigate to Local Policies > Audit Policy.
3. In the right pane, double-click on Audit account logon events.
4. Clear the Success and Failure boxes.
5. Click OK.
Sending Events to NS, But You Don’t See Any Data on the Notification Server Computer
If you are sending events to the Notification Server, but you don’t see any data on it, check the NT event log. If there is an error message in the NT event log stating that postevent.asp cannot write to the evtqueue directory, you need to do the following (in Windows 2000):
1. Click Start > Programs > Administrative Tools > Internet Services Manager to open Internet Information Services.
2. Click the server name, then Default Web Site.
3. Right-click on Altiris, then select Properties.
4. Click the Directory Security tab.
5. Under Anonymous access and authentication control, select Edit.
6. Under Anonymous access, select Edit.
The username entered must have access to write to the evtqueue directory in order for events to make it to your Notification Server.
Notification Server Reference 129

1. Back up Notification Server and any applicable solutions, if you have valuable data. See Back up Notification Server on page 108.
2. Backup up your queues if they contain events that you would like to be processed. See Altiris Agent and Notification Server Event Queues on page 81.
3. In Control Panel > Add/Remove Programs, uninstall anything related to Notification Server including the packages. There are also the solution packages that you can uninstall if you need to (Inventory Solution, Web Admin for SMS, Helpdesk Solution, Altiris Agent, Unix solutions, and so on.).
4. Reboot the computer on that Notification Server was installed.
5. Delete the Notification Server directory structure from install path\Altiris\Notification Server on down.
NoteIf you want to uninstall only Notification Server and leave all your solutions, then delete everything in the Notification Server directory structure except the X86 and Unix directories.
Notification Server Reference 130
6. Clear the registry from HKLM\SOFTWARE\Altiris\eXpress on down for the Notification Server items (Notification Server and any of the package listings that might still exist). Don't delete items related to Altiris Agent or Deployment Server (if applicable).
7. Delete all Temporary Internet Files from the internet browser as well as any objects that are registered there (NS admin component is the key item; we also have the flexgrid and other items with Altiris or AeX on them).
8. Search %windir% and %windir%\system32 and delete all files that match AeX*.* and Altiris*.*.
9. Delete the temp files under Internet Explorer. This will cause a download of the new CAB files.
10. Reinstall Notification Server.
11. Install solutions from the Solution Center as necessary. Enable the Altiris Agent and individual agent upgrade policies.
Unable to Validate the Software Delivery Connection Point Credentials
You may get the following message when setting up a package:
Unable to validate the Software Delivery connection point credentials. The account specified in the Application Identity configuration page does not have permission to validate user accounts. Altiris Agent and Package Servers may not be able to download this package.
This message can appear when you select Access Package from Existing UNC, enter the required information and click Apply. This is a warning message stating that the connection point credentials could not be validated. The credentials associated with a UNC package location cannot always be validated but may still be valid.
The following are items that you can do to ensure your connection point credentials are valid:
ensure that the Distribution Point Connection Parameters section on the Package Service Access tab of the Package Servers configuration page contains user credentials that have permission to access the specified UNC.
Run a test and see if the Altiris Agents and Package Servers are able to download the package. If they can, then your connection point credentials are correct.
ensure that the account specified in the Application Identity configuration page has permission to validate user accounts.
Check the following setting:
Under Administrative Tools, there is an option for Local Security Policy. Under this option, drill down to Local Policies > User Rights Assignments. Locate the option for Act as part of the operating system. ensure the account specified for Software Delivery exists here and has administrative rights.
Notification Server Reference 131

Problem
If the following points apply to your environment:
You have a Windows XP Altiris Agent in a workgroup environment
You have no NT or Active Directory domains
Your users do not have local admin rights
Simple File Sharing is enabled
then you will not be able to install Altiris Agent using Push or any method that tries to make a remote connection to the managed computer.
Cause
Simple File Sharing is enabled during Windows XP Home Edition installation by default. Windows XP Professional enables Simple File Sharing by default when XP Professional is installed in a Workgroup. When installed in a domain, Simple File Sharing is not enabled by default.
The following is found in the Windows XP documentation concerning Simple File Sharing:
“When Simple File Sharing is enabled, remote administration and remote registry editing does not work as expected from a remote computer because all remote users authenticate as Guest, that has no administrative privileges.”
Notification Server requires administrative access to install the Altiris Agent on a computer.
Solution
The problem involving Simple File Sharing is beyond the scope of Notification Server. However, here are two things you can do:
Develop a script that can be used by a low rights user in conjunction with a login script to turn off Simple File Sharing. There are scripts available that do this. Contact Altiris Support if you need help finding these scripts.
NoteThese scripts are not supported by Altiris.
Visit each computer, either in person or with Remote Desktop to disable Simple File Sharing.
Log Error: Exceeding Optimal Number of Connections When Using MSDE
If you get an error in your logs saying that you are exceeding the optimal number of connections and you are using MSDE, here are a few suggestions.
Decrease the MaxDispatchThreads registry key. The default for this key is 5. Try decreasing it to 2 or 3. See Registry and Configuration Settings on page 134.
Notification Server Reference 132

Configure NS to operate on Windows 2003 with IE hardening enabled
There are certain Active X settings required for NS to operate on Windows 2003 with IE hardening enabled.
Noteyou can still use the default settings for all the zones. Only 3 sites need to be added to the correct zone and everything should operate without problem.
Ensure that all internet zones are set to the default levels (if set correctly the Default Level button will be disabled).
Internet -High
Local Intranet - Medium/Low
Trusted Sites - Medium
Restricted Sites - High
Add the following to the Local intranet zone.
If using http:
localhost (or http://localhost)
if using https:
https://localhost
MachineName.DomainName.Com
Add the following to the Trusted sites zone
*.solutionsam.com
Do one of the following:
Block access to internet on the Notification Server server (that is, solutionsam.com)
Add ‘*.macromedia.com’ to the Trusted sites zone
The ‘Local intranet’ zone has all the correct settings when using the default settings needed to run the Active X controls without being prompted. The Trusted Sites zone will allow restricted uses of Active X controls on SolutionSam.com and allow the shockwave Internet Explorer plug-in to be installed.
Notification Server Reference 133

Chapter 16Registry and Configuration Settings
This section lists important registry and configuration settings that can help you configure Notification Server and the Altiris Agent.
Quick Links
Registry Settings on page 134
Configuration Settings on page 140
Using Registry and Configuration Settings on page 144
Performance Counters on page 145
Registry SettingsThe following registry settings can be found on your Notification Server computer in: HKLM\SOFTWARE\Altiris\.
KEY Value Type Description
HKLM\SOFTWARE\Altiris\eXpress
MachineGuid REG_SZ:{a long number}
Used to identify the managed computer when sending data to Notification Server.
HKLM\SOFTWARE\Altiris\eXpress\NSMailQueue
BadMailDir REG_SZ This folder is used to store bad e-mails.
MaxConcurrentSends REG_SZ Maximum number of concurrent e-mails sent to Notification Server. Default value is 3.
MonitoredDir REG_SZ This is the mail queue folder. Located at C:\Program Files\Altiris\Notification Server\Mail.
PollInterval REG_SZ Number of milliseconds between checks for e-mails. Default value is 30,000.
PurgeDays REG_SZ Number of days that Bad and Sent e-mails are kept for. Default value is 7 days.
Retries REG_SZ Number of times to retry a failed email before putting it into the bad folder. Default value is 3.
RetryInterval REG_SZ Time in milliseconds it takes to retry failed emails. Default value is 180000.
SaveBadMail REG_SZ Used to save bad e-mails. Default value is True that saves bad e-mails.
SaveSentMail REG_SZ Used to save sent e-mails. Default value is True that saves sent e-mails.
SentMailDir REG_SZ This folder is used to store sent e-mails.
Notification Server Reference 134
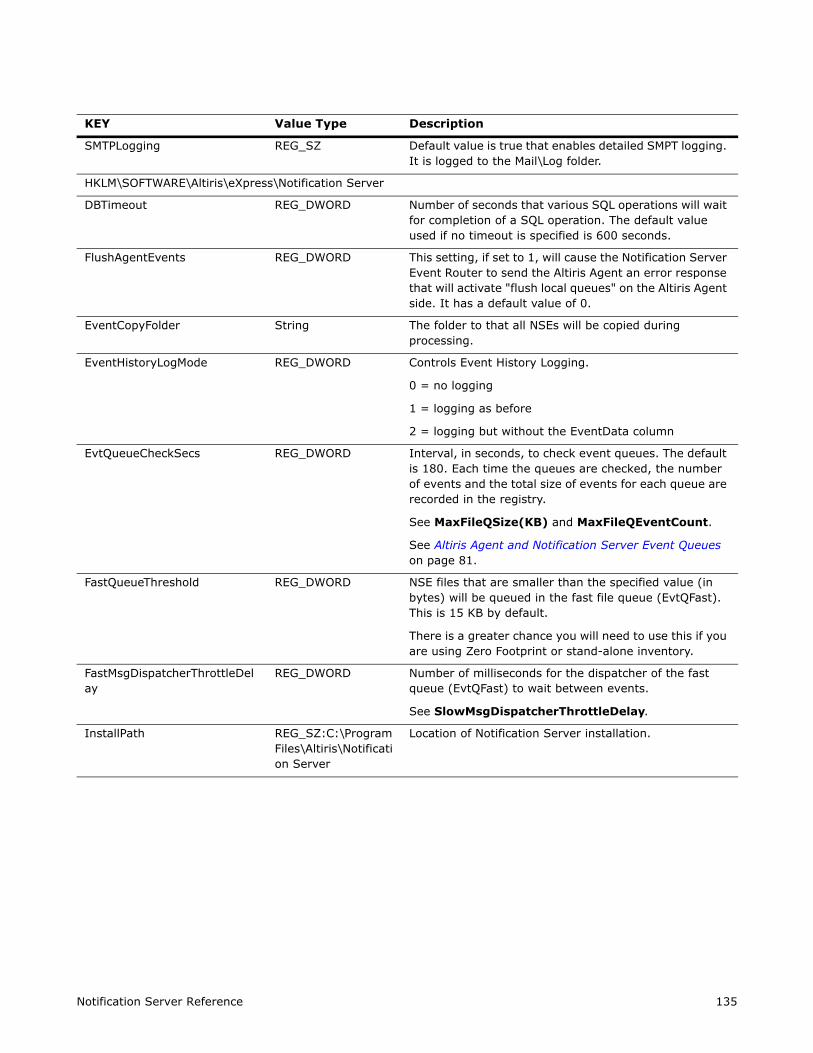
SMTPLogging REG_SZ Default value is true that enables detailed SMPT logging. It is logged to the Mail\Log folder.
HKLM\SOFTWARE\Altiris\eXpress\Notification Server
DBTimeout REG_DWORD Number of seconds that various SQL operations will wait for completion of a SQL operation. The default value used if no timeout is specified is 600 seconds.
FlushAgentEvents REG_DWORD This setting, if set to 1, will cause the Notification Server Event Router to send the Altiris Agent an error response that will activate "flush local queues" on the Altiris Agent side. It has a default value of 0.
EventCopyFolder String The folder to that all NSEs will be copied during processing.
EventHistoryLogMode REG_DWORD Controls Event History Logging.
0 = no logging
1 = logging as before
2 = logging but without the EventData column
EvtQueueCheckSecs REG_DWORD Interval, in seconds, to check event queues. The default is 180. Each time the queues are checked, the number of events and the total size of events for each queue are recorded in the registry.
See MaxFileQSize(KB) and MaxFileQEventCount.
See Altiris Agent and Notification Server Event Queues on page 81.
FastQueueThreshold REG_DWORD NSE files that are smaller than the specified value (in bytes) will be queued in the fast file queue (EvtQFast). This is 15 KB by default.
There is a greater chance you will need to use this if you are using Zero Footprint or stand-alone inventory.
FastMsgDispatcherThrottleDelay
REG_DWORD Number of milliseconds for the dispatcher of the fast queue (EvtQFast) to wait between events.
See SlowMsgDispatcherThrottleDelay.
InstallPath REG_SZ:C:\Program Files\Altiris\Notification Server
Location of Notification Server installation.
KEY Value Type Description
Notification Server Reference 135

InvForwardFullLoggingEnabled REG_DWORD Enables full logging when Notification Server to Notification Server inventory forwarding is taking place.
There are two valid values for this key: 0 and 1.
1 = enable extra logging
0 = disable extra logging
The default is 0.
NoteThis registry setting does not get added at installation time. You must create it when it is needed.
LargeQueueThreshold REG_DWORD NSE files that are larger than the specified value (in bytes) will be queued in the large file queue (EvtQLarge). This is 20 MB by default.
NoteThese NSEs are not processed by any dispatcher. This queue is designed to protect the Notification Server from excessive memory use.
LogPackageInfoEvents REG_DWORD Enables the logging of package information events.
1 = enabled
0 = disabled
MaxConcurrentConnections REG_DWORD Maximum number of concurrent connections to Notification Server.
Minimum value is 1
Maximum value is 1000
Default is 50
MaxDispatchThreads REG_DWORD Maximum number of simultaneous events that the Notification Server Dispatcher Service can process (default is 5). This is a hidden setting - its default is 5 if it does not appear in the registry. If you want to set it to something other than 5, you must create it in the registry.
MaxEventProcessTime REG_DWORD Specifies the number of seconds a script associated with a solution can take before Notification Server will cancel the script. Default is 15 minutes * 60 seconds = 900.
MaxFileQEventCount REG_DWORD Maximum number of NSEs in a file queue. This applies to all file queues (if applicable). The default is 20,000.
See MaxFileQSize(KB) and EvtQueueCheckSecs.
See Altiris Agent and Notification Server Event Queues on page 81.
KEY Value Type Description
Notification Server Reference 136

MaxFileQSize(KB) REG_DWORD Maximum total size of NSEs in a file queue. This applies to all file queues (if applicable). The default is 512,000.
See MaxFileQEventCount and EvtQueueCheckSecs.
See Altiris Agent and Notification Server Event Queues on page 81.
MaxNPResultRows REG_DWORD Specifies the maximum number of rows returned when using %Results% in the message body of an Email Handler in a Notification Policy. The default is 100 rows.
MaxResultRows REG_DWORD Specifies the maximum number of rows returned in a user initiated report.
PauseActivities REG_DWORD Used to pause all activities between Notification Server and the Altiris Agents. The default is 0, meaning that activities are being sent.
0 - PauseActivities is turned off (all activities are being sent)
1 - PauseActivities is turned on (all activities are paused)
See Also
BlockClientMessages
PauseNSMessaging REG_DWORD Used to pause the internal Notification Server message queue, this queue is used for internal Notification Server operations.
0 - PauseNSMessaging is turned off (all activities are being sent)
1 - PauseNSMessaging is turned on (all activities are paused)
NoteWe recommend using the UI to pause activities and not the registry setting directly.
PauseTaskManagers REG_DWORD Used to pause any tasks running in Notification Server Task Manager. The default is 0, meaning that tasks are not paused.
SlowQueueThreshold REG_DWORD NSE files that are larger than the specified value (in bytes) but smaller than LargeQueueThreshold will be queued in the slow queue. The default is 1 MB. Only 1 message at a time is processed by the slow queue dispatcher.
SlowMsgDispatcherThrottleDelay
REG_DWORD Number of milliseconds for the dispatcher of the EvtQFast to wait between events.
See FastMsgDispatcherThrottleDelay.
KEY Value Type Description
Notification Server Reference 137

SMTPFromAddress REG_SZ The reply address used when sending e-mail messages.
If this registry setting does not exist, the default reply address is used ([email protected]).
See Altiris Notification Server Help.
This is used to specify a valid reply address or for environments where SMTP relay is restricted by source domain (Example: where only hosts in specific domains can relay through secure SMTP gateways).
NoteThis registry setting does not get added at installation time. You must create it when it is needed.
SolutionCenter REG_SZ:http://www.solutionsam.com/Solutions/5_1_0
Source for Solutions Download Page.
SolutionCenterRunning REG_DWORD Prevent the NS receiver service from restarting services. As some solutions manually reset PauseActivities, and cause unwanted service restarts, this setting prevents any services restarting. To enable, set to 1.
HKLM\SOFTWARE\Altiris\eXpress\Notification Server\Collections Update
Last Run Date REG_SZ Holds the last date/time the update collections ran.
If the Last Run Date registry value does not exist, it will be created automatically.
HKLM\SOFTWARE\Altiris\eXpress\Notification Server\Primary User Update
MaxProcessMachines REG_DWORD This specifies the maximum number of different computers the primary user inventory will process.
If this registry value does not exist, the default is 20.
HKLM\SOFTWARE\Altiris\eXpress\Event Logging\LogFile
FileName REG_SZ The file name of initial log file. See Altiris Notification Server Help and Log Files on page 147. If this setting does not exist, the default file name is LogView.
FilePath REG_SZ The path of the Logs directory. If this setting does not exist, the default path is install path\Altiris\Notification Server\Logs.
Severity REG_DWORD The level of severity of error messages to record in the FileName. See Altiris Notification Server Help and Log Files on page 147. If this setting does not exist, the default severity is 7, meaning Errors, Warnings, and Information severity levels are recorded.
MaxSize REG_DWORD The maximum size of a Log file. If this setting does not exist, the default is 100 KB.
MaxFiles REG_DWORD The maximum number of log files in the Logs directory. If this setting does not exist, the default is 50.
KEY Value Type Description
Notification Server Reference 138

HKLM\SOFTWARE\Altiris\Altiris Agent\Transport
Max Queue Count REG_DWORD The maximum number of events that can be in the Altiris Agent event queue. The default is 0, that means it is limited only by the size of the Altiris Agent event queue.
Max Queue (percent free space)
REG_DWORD The percentage of available disk space to use as the maximum size of the Altiris Agent event queue. The default for this setting is 5.
HKLM\SOFTWARE\Altiris\Altiris Agent\Package Server\
IISMetabaseSaveInterval (min)
REG_DWORD Controls how often the metabase is saved by the Package Server Agent. This value is 10 minutes by default.
When virtual directories are created or updated a flag is set indicating that a metabase save should be performed.
After the specified config time has elapsed the metabase will be saved.
NoPACLockdown REG_DWORD Prevents the Package Server from locking down packages when a Package Access Credential is being used, and is disabled by default.
If NoPACLockDown is 0 then lockdown is enabled.
If NoPACLockDown is 1 then packages are not locked down.
If package access credentials are specified for the package servers and if NoPACLockDown is 0, the packages on the package server will have the following permissions:
Package access credentials user -- Read, Execute.
Administrators and System -- Full control.
If package access credentials are specified for the package servers and if NoPACLockDown is 1, the packages on the package server will have the following permissions:
Everyone -- Read, Execute.
Administrators and System -- Full control.
NoteThis setting only appears after Package Server Agent rollout.
HKLM\SOFTWARE\Altiris\Communications
KEY Value Type Description
Notification Server Reference 139

Configuration SettingsNotification Server uses .Net, so configuration files are used that contain configuration settings.
The following configuration settings can be found on your Notification Server computer at: Install Path\Altiris\Notification Server\Config.
ProfileNetbiosServerName REG_DWORD This setting can disable all netbios name resolution by profile. If this value is 0 the Server profiler will not profile the server using it's netbios name and will only use the FQDN.
This value is on (or 1) by default.
ProxyMode REG_DWORD If set to 0 this setting will force the Altiris Agent to use proxy only. If set to 1 the Altiris Agent will firstly try to connect directly to the Notification Server and only if it gets the WSAEHOSTUNREACH error will it try to use the proxy.
This value is on (or 1) by default.
HKLM\SOFTWARE\Altiris\Communications\Multicast
MinBandwidth (bytes per sec) REG_DWORD Controls the minimum transfer rate required to participate in a multicast session.
It has a default value of 64*1024, that is 64 Kb/sec.
KEY Value Type Description
Configuration Settings found in the CoreSettings.config file:
BlockClientMessages REG_DWORD Used to block NSEs from being sent to the Notification Server from all Altiris Agents. The default is 0, meaning that NSEs are being sent.
All NSEs are queued on the Altiris Agents instead of being sent to the Notification Server until this setting is turned off.
This can be used to clear out the Event Queues on the Notification Server.
0 - BlockClientMessages is turned off (all NSEs are being sent)
1 - BlockClientMessages is turned on (all NSEs are paused)
See Also PauseActivities.
KEY Value Type Description
Notification Server Reference 140

ClientPolicyCacheTimeoutSecs REG_DWORD This value controls how long cached Altiris Agent Settings policies are valid on the Notification Server. If a cached Altiris Agent Settings policy is valid, the cached policy is used when building the Altiris Agent Settings policy. Once a cached Altiris Agent Settings policy is older than this value, it is regenerated based on the latest data in the Notification Database.
The default is 600 (10 minutes).
This key is not created automatically. If you want a different setting other than 10 minutes, you must create this key and set it to the desired time (in seconds).
CustomWebProxyEnabled local 0 = Proxy server is disabled.
1 = Proxy server is enabled.
CustomWebProxyAddress local The address of the proxy you are adding. Example: http://proxyserver:80
CustomWebProxyByPassOnLocalAddresses
local 1 = Access the proxy server for local IP addresses and hostnames.
0 = Do not access the proxy server for local IP addresses and hostnames.
CustomWebProxyCredentialDomain local Enter the domain if the proxy server requires a domain. Example: if integrated authentication is used for ISA.
CustomWebProxyCredentialUser local The user to authenticate.
Enter nothing to use the default INET settings.
CustomWebProxyCredentialPassword local The user password to authenticate.
DispatcherThrottleDelay REG_DWORD Number of milliseconds for the dispatcher of the EvtQueue to wait between events. This is useful if you have a continuously busy system and want to slow it down.
ForwardInventoryIntervalMins local The time that the Inventory Forwarding is expected to take. If data is not seen at the destination Notification Server within this interval, it is assumed to be lost in transit. The data verification schedule will then force the data to be sent again.
The default value is 1440 that is one day.
MaxConcurrentConfigRequests REG_DWORD Maximum number of Altiris Agent Settings policies requests that can be handled simultaneously.
Minimum value is 1
Maximum value is 1000
Default is 10
KEY Value Type Description
Notification Server Reference 141

MaxConcurrentFastMsgs REG_DWORD The maximum number of messages from the fast queue (EvtQFast) that will be processed at the same time.
MaxConcurrentSlowMsgs REG_DWORD The maximum number of messages from the slow queue (EvtQSlow) that will be processed at the same time.
MaxInvForwardThreads REG_DWORD The number of threads per forwarding rule.
The default is 2.
This key is used by the component that handles Notification Server to Notification Server inventory forwarding. Using this key can help to decrease forwarding times.
MinMsgSizeBeforeTriggeringGC(KB) REG_DWORD The minimum size in KB of the Notification Server message that will trigger a GC of generation 2. This is only used by the slow queue dispatcher.
AutoClassRegistration REG_DWORD Allows NSEs to automatically register inventory classes.It is activated automatically with a default setting of 1. This setting has been introduced as a security feature to prevent custom inventory classes on one NS being forwarded to another NS and creating a custom Inventory Class. To prevent this disable the setting by changing its value to 0.
KeepTreeCacheMins local This setting enables tree caching as the tree will not always show the latest data automatically. It will refresh automatically every 15 minutes.
ResourceAssociationTablelockThreshold local If the dataloader is about to insert more than the number of rows defined by this setting into resource association it will use a coarse table lock. The default value is 20.
DisableAutomaticLicenseReclaim local This settings disables automatic license reclaiming. If this is set licences only get reclaimed on the 4 hourly schedule or if the refresh button is clicked on the licences page. The default value is 1.
PreferredNSHost local This settings allows the user to specify a preferred NS hostname for SWD codebase and snapshot URLs that point to the Notification Server (Package Server URLs are unaffected).
NSPackageShareLockDown local This setting directs the Notification Server not to lock down the shares on the packages that it creates if set to 0.When set to 0 it will also give Everyone read access in addition to Administrators having full control.
When set to 1 it will either give Authenticated users read access (if no Package Access credential is specified) or it will give the Package Access Credential user read access. The default value is 1.
KEY Value Type Description
Notification Server Reference 142

Altiris NS ConfiguratorThe Altiris NS Configurator is a plugin that allows you to modify commonly-used Notification Server settings. Previously, these settings could only be modified manually by editing the coresettings.config file, or changing the Windows registry settings. the Notification Server Configurator provides a single point of access to all of these settings, showing default and recommended values with a description of what each setting does. A search function is also provided to help search for a particular setting. Settings include Database Settings, Events Settings, Inventory Forwarding and Power Management.
PkgSvrDownloadFromNSOnly local Instructs Package Servers to download from Notification Servers only.
It is set to 0 (disabled), by default, allowing Package Servers to download from other Package Servers and the Notification Server. Set to 1 (enabled), Package Servers will only download from Notification Server.
GenerateNSUNCPackageCodebases local Disable the generation of UNC codebases for the Notification Server.
It is set to 1, UNC codebases enabled, by default. Set to 0 to disable the UNC codebases.
NoteAn error will be displayed in the log if the user disables both UNC and HTTP/HTTPS codebases.
GenerateNSHTTPPackageCodebases local Disable the generation of HTTP/HTTPS codebases for the Notification Server.
It is set to 1, HTTP/HTTPS codebases enabled, by default. Set to 0 to disable the HTTP/HTTPS codebases.
NoteAn error will be displayed in the log if the user disables both UNC and HTTP/HTTPS codebases.
DisableOLEDBConnection REG_WORD This setting lets you disable the OLEDB connection. If OLEDB connections are disabled, all DB connections will use the .Net SQL provider.
It is set to 1, OLEDB connection disabled, by default. Set it to 0 to enable the connection.
MaxConcurrentPackageInfoRequests REG_WORD This setting limits the number of GetPackageInfo requests from Altiris Agents, that can be serviced simultaneously, before the Altiris Agent is instructed to retry later. By default, it is set to 10.
Note Previously, MaxConcurrentConfigRequests set this limit, but is now only used for GetClientPolicies requests.
KEY Value Type Description
Notification Server Reference 143

Install NSConfiguratorSetup_6_0.msi that is located at C:\Program Files\Altiris\Notification Server\NSCAP\Bin\win32\X86\NSConfigurator.
The following table describes the Notification Server Configurator page items.
Open the Notification Server Configurator and edit a core setting
1. On the Start menu navigate to Programs > Altiris > Tools > NS Configurator.
2. In the left pane select the core setting you want.
3. In the Value text box enter the setting you want.
4. Click Apply to finish.
Using Registry and Configuration Settings
Configuring Notification Server to use a Proxy ServerYou can configure Notification Server to use a proxy server by manually changing a few configuration settings. These configuration settings are found in the CoreSettings.config file and are discussed in Configuration Settings on page 140.
To configure custom proxy settings, manually change these settings in the CoreSettings.config file:
Set CustomWebProxyEnabled to 1 to enable proxy settings.
Set CustomWebProxyAddress to the address of your proxy server. Example: http://proxyserver:80.
Set CustomWebProxyByPassOnLocalAddresses to 1 to bypass the proxy server for local addresses or 0 to not bypass the proxy server for local addresses.
Set CustomWebProxyCredentialDomain to the domain to authenticate against.
Set CustomWebProxyCredentialUser to the user if you are using an authenticated proxy server, to anything if you are using a non-authenticated proxy server, and to nothing to use the default INET settings.
Set CustomWebProxyCredentialPassword to the user password.
NoteChanging these settings in the CoreSettings.config file does not require a restart of Notification Server or IIS services.
Item Description
Setting Name Core setting name.
Description Brief description of its purpose.
Type Type of setting. Example: registry or local.
Default Value Its default value at install.
Value Enter the value you want, if applicable.
Notification Server Reference 144

<customSetting key=“CustomWebProxyEnabled” type=“local” value=“1” /><customSetting key=“CustomWebProxyAddress” type=“local” value=“http://theproxy:3128” /><customSetting key=“CustomWebProxyByPassOnLocalAddresses” type=“local” value=“1” /><customSetting key=“CustomWebProxyCredentialDomain” type=“local” value=“” /><customSetting key=“CustomWebProxyCredentialUser” type=“local” value=“jbloggs” /><customSetting key=“CustomWebProxyCredentialPassword” type=“local” value=“thisismypassword” />
Example: Configuring Notification Server to use a non-authenticated Proxy Server
<customSetting key=“CustomWebProxyEnabled” type=“local” value=“1” /><customSetting key=“CustomWebProxyAddress” type=“local” value=“http:// theproxy:3128” /><customSetting key=“CustomWebProxyByPassOnLocalAddresses” type=“local” value=“1” /><customSetting key=“CustomWebProxyCredentialDomain” type=“local” value=“” /><customSetting key=“CustomWebProxyCredentialUser” type=“local” value=“AnyTextNotBlank” /><customSetting key=“CustomWebProxyCredentialPassword” type=“local” value=“” />
NoteIn this example, CustomWebProxyCredentialUser must contain at least one character. However, CustomWebProxyCredentialUser and CustomWebProxyCredentialPassword are not evaluated by the proxy server and what you enter for the value of CustomWebProxyCredentialUser does not get used by the proxy server.
Performance CountersThe mechanism by that Windows collects performance data on various system resources is the performance counter. Windows contains a pre-defined set of performance counters with that we can interact; each counter is related to a specific area of system functionality. Examples include counters that monitor a processor's busy time, memory usage, or the number of bytes received over a network connection.
With the .NET PerformanceCounter component Altiris has created custom performance counters to monitor different aspects of the Notification Server.
Notification Server Reference 145

The following performance counters have been implemented in the following categories.
Uninstalling Counters
When the Counters class is being disposed due to the termination of the Altiris Service, all counters are unregistered from the system.
Disabling Counters
If a need to disable the counters arises, the DisableCounters CoreSettings.config key can be set to cause the counters to be disabled. To do so set alter the setting from 0 to 1.
Category Description Counters
Event Queue This category consists of 16 counters. Counters in this category relate to the 4 event queues the Notification Server is running.
The queues are;
Event Queue
Event Fast Queue
Event Slow Queue
Event Large Queue
Each queue has the following 4 counters:
Count – Number of events currently in the queue
Size – Queue file size (MB)
Bad Count – Number of events in bad queue (unprocessed NSE’s)
Bad Size - Queue file size (MB)
Event Processing This category consists of 2 counters. Counters in this category relate to the number of events the Notification Server processes.
TotalNumEventsProcessed – Counts the total number of events processed by the Notification Server since last reset.
NumEventsProcessedPM – Counts the number of events processed per minute.
Client Policies Request
This category consists of 3 counters. Counters in this category relate to the number of client requests.
ClientPoliciesRequestsPM – Number of client requests per minute.
ClientPoliciesSuccessfulResponsePM – Client policies that were processed successfully.
ClientPoliciesBusyResponsePM – Client policies that were not processed due to a server busy response.
Notification Server Reference 146

Chapter 17Log Files
Notification Server uses log files as a mechanism for capturing and displaying error messages.
NoteFor clarity, in this section, the term “error message(s)” includes these severity levels: Errors, Warnings, Information, and Trace. See Altiris Notification Server Help.
All components on Notification Server write error message information into the install path\Altiris\Notification Server\Logs directory by default. This can be changed in the registry. See Log File Settings on page 147.
The Logs directory can contain up to 50 Log files (by default). The first log file that gets created is called a.log. When this file reaches its maximum size (200 KB default), it gets renamed to a1.log. The a.log file then fills up again and when it reaches its maximum size, gets renamed to a2.log. This process repeats until there are 50 Log files (by default). At this point, when the log file reaches its maximum size, its contents will be deleted and the latest error messages will be written into it. So, when the maximum number of files is reached, the a.log file always contains the most current messages (and the other Log files get more and more outdated).
If your Notification Server has been running for a while and you start having problems, it is a good idea to transfer all of your Log files into another directory and let Notification Server generate fresh Log files (the Logs directory will need to be empty so the Log files can be refreshed).
To change the SIZE of each Log file
The maximum size of the Log files can be changed by adding the MaxSize registry setting. If the MaxSize registry setting does not exist, the default maximum size is 200 KB. The MaxSize registry setting is a DWORD. This setting can be added at:
HKLM\SOFTWARE\Altiris\eXpress\Event Logging\LogFile\MaxSize
Example - to set the MaxSize registry setting to 300 KB:
MaxSize REG_DWORD 0x0000012c (300)
To change the NUMBER of Log files that can get created
The maximum number of Log files can be changed by adding the MaxFiles registry setting. If the MaxFiles registry setting does not exist, the default maximum number of Log Files is 50. The MaxFiles registry setting is a DWORD. This setting can be added at:
HKLM\SOFTWARE\Altiris\eXpress\Event Logging\LogFile\MaxFiles
Example - to set the MaxFiles registry setting to 10:
MaxFiles REG_DWORD 0x00000010 (10)
Log File Settings
The default behavior of error logging is as follows:
Notification Server Reference 147

NoteThe default severity level is 7 (Severity = 7), that causes the Errors, Warnings, and Information severity levels to be recorded.
The maximum number of Log files is 50.
The maximum size of a Log file is 200 KB.
Any Log files older than 7 days are deleted.
For configuration, you can specify override Log file settings in the registry under HKLM\Software\Altiris\eXpress\Event Logging.
To control logging to a file, you create a subkey called LogFile under Event Logging (this subkey only needs to start with LogFile and multiple LogFile subkeys are allowed).
NoteYou can create different LogFile subkeys for different severities. This would allow you to look up all Errors in one location, all Warnings in another location, and so forth.
Under this key you can then define the following values (the following shows the defaults that are used if the values are not created):
FileName=a.log
Filepath=%SystemDrive%\Program Files\Altiris\Notification Server\Logs
Severity=7
MaxSize=200
PurgeDays=7
Example: to control logging to the NTEventLog, you can create a subkey called NTEventLog and under this you can have the following value:
Severity=7
NoteThe values for severity (7) in the above examples represent the default severity of Errors+Warnings+Information.
To view the log file
Access the ASP page at http://NSName/Altiris/NS/LogView.asp. This lets you view all error messages found in the log file.
When viewing log files using the LogView.asp page, the following applies:
Errors shows up in red and has an ‘E’ next to the date.
Warnings shows up in blue and has a ‘W’ next to the date.
Information shows up in black and has an ‘I’ next to the date.
Trace shows up in gray and has a ‘T’ next to the date.
Notification Server Reference 148

There are four main levels of severity in the Log files:
Errors
Warnings
Information
Trace
You can choose one or more severity levels to view within the a.log file (or the other Log files). Each severity level has a number attached to it. This number lets you select one or more severity levels to view using the ASP page. The numbers are:
Errors = 1
Warnings = 2
Information = 4
Trace = 8
You add these together to specify the desired level of detail to see in the browser.
To view only Errors, access the ASP page with:
http://NSName/Altiris/NS/LogView.asp?severity=1
To view Warnings, access the ASP page with:
http://NSName/Altiris/NS/LogView.asp?severity=2
To view Errors and Warnings, access the ASP page with:
http://NSName/Altiris/NS/LogView.asp?severity=3
To view Errors and Information, access the ASP page with:
http://NSName/Altiris/NS/LogView.asp?severity=5
To view all severity levels, access the ASP page with:
http://NSName/Altiris/NS/LogView.asp?severity=15
To view the a.log file on another computer
You can access the page with LogView.asp?server=NSName, where NSName is the name of your Notification Server. This causes LogView.asp to open the a.log file from the default location on the specified Notification Server. This is very useful for examining the a.log file on an managed computer.
To specify the path to the a.log file on another computer
Go to LogView.asp?server=NSName&path=PathName, where NSName is the name of your Notification Server and PathName is the path where a.log is found.
This lets you access the a.log file found at PathName on NSName.
To view another log file other than a.log
You can view another Log file other than a.log using the ASP page using the file parameter.
Example:
Notification Server Reference 149

http://NSName/Altiris/NS/LogView.asp?severity=3&file=a2.log
To view an Altiris Agent log file from a Notification Server
You can view log files on an managed computer using the LogView.asp page.
NoteThis works best on Windows NT/2000/XP/2003 as Windows 9x does not have any default shares.
Use
http://NSName/Altiris/NS/LogView.asp?server=NSName?path=PathName
where NSName is the name of your Notification Server and PathName is the UNC path to the directory the log files are stored on the managed computer. If you want to do this with Windows 9x computers, share the Logs directory and use http://NSName/Altiris/NS/LogView.asp?server=NSName?path=Logs
For this to work, you need to be running the LogView.asp page logged into a computer that has admin privileges on the destination/remote/client computer because you are connecting to an administrative share.
This is very useful when viewing Altiris Agent log files because the bare log file can be difficult to read.
Notes/Warnings
The current version of LogView.asp assumes the default Log file path:
install path\Altiris\Notification Server\Logs
To allow the ASP script to do event reporting/logging, ensure that the local IUSR_<machine> and IWAM_<machine> users have read/write access to the logs folder.
Notification Server Reference 150

Index
Aa.log 147
148severity 149viewing 149viewing on another computer 149
Active Directory Policies 16administration
Altiris Agent 24AeXNSC.exe 14AeXNSC.log 22AeXNSCInstSvc.msi 20AeXSWDInstSvc.log 22agent
package server 51
Altiris Agentadministration 24bootstrap program 19data flow for newly installed 25directory structure 28event queue 82file size 19imaging 34installation troubleshooting 21log files 22package servers 58, 69, 69processes 22switching Notification Servers 29troubleshooting 126viewing log files from NS 150
Altiris Agent configuration information 33Altiris Agent Diagnostics 34Altiris Agent registry keys 35Altiris Agent Settings policies 21, 26, 28Apache Web Server 58automated action 80availability 108
Bback up of Notification Server 108Bad event directories 86bootstrap program 19
Cclient event queues 81client log on events 34component versions 33computer usage 34Configuration Settings 140
connectionsMSDE 132
credentials 131custom package destination 65
Ddata flow
Altiris Agent 25NSE 83
databaseextending 98
database schema 99DCOM 13
Altiris Agent requirements 13default package destination 65delete
packages 67Deployment Solution
rip and image deployment 65diagnosing Notification Server problems 81diagnosing NS 95diagnostics 34directories
package server agent 55, 56directory
package delivery 55package server agent 55
directory structureAltiris Agent 28
disaster recovery 108disconnected environments 31disk imaging 34dispatcher service 86download
package 70
Eerror
credentials 131package download 128UNC credentials 131
eventprocessing 86
event data flow 83event processor 86event queue
Altiris Agent 82event queue size 33event queues 81
events 27, 81not making it to Notification
Server 129stop sending to NS 140
EvtQFast 85EvtQueue 85extending the Notification Database 98
Ffile download recovery 31file throttling 31firewall 32forwarding data
Inventory and SMS 46forwarding inventory 46
GGUID 34GUID creation 12
HHOSTS file 128HTTP protocol 32
IICMP 24IIS Lockdown 123imaging 34information queuing 31inheritance
permissions 116installing Altiris Agent
bootstrap program 19login script 14
integrating 123, 123inventory 7, 32, 97, 109inventory forwarding 46, 46, 141
LLAN environments 31Linux/Unix computer 58Linux/UNIX Package Server configuration settings 73LMHOSTS file 128log files 127, 147, 149
settings 147login script
installing Altiris Agent 14LogView.asp 148
Notification Server Reference 151

optimal connections 132
Nname resolution 127NetBIOS 128Notification Database
extending 98notification policy 80Notification Server
back up 108data flow 9monitoring 81rebuilding 130restoration 109, 110troubleshooting 126
NS Configurator 143NS dispatcher service 86NS operations 81NSE 81
processing 86NSE data flow 83
Ppackage delivery 55package destination 65package distribution
Altiris Agent 69package download error 128package download retry 70package server 48, 127
agent rollout 51information on Altiris Agent 69
package server agent 55package server agent directories 55, 56package servers
Altiris Agent 69sending any files on network 65software delivery solution 65troubleshooting 55using 51
package snapshot caching 33package status 127package updates 78packages
deleting from Package Servers 67removing from Package
Servers 67Performance Counters 145
permissionsinheritance 116
postevent.asp 82primary user inventory 138processes
Altiris Agent 22proxy settings 144push status events 22
Qqueue
Altiris Agent 82queue size 33queues
event 81halting events being sent to
NS 140queuing information 31
Rrebuilding a Notification Server 130recovery during file download 31Registry Settings 134registry settings 134remove
packages 67report 80reports
diagnosing NS 95Resource Reports & Security 119restoring Notification Server 109, 110
Sscheduling 7Security Management 112Security Role Manager 114server event queues 81settings
registry 134SMS data forwarding 46SMS inventory 7snapshot.xml
package server 55SNMP 8software delivery 29, 32
package updates 78Software Delivery Solution 32software delivery solution
package servers 65SQL memory configuration 45
Tthrottling 31troubleshooting
Altiris Agent 126Notification Server 126
package delivery 55
UUNC error 131Understanding Global Privileges 112, 112Understanding Item tasks 117Understanding Permissions 115, 115updates
package 78URLScan 123usage 34
Vversions of components 33Virtual memory configuration 45VPN 32
WWAN environments 31web proxy 144Windows 2003 with IE hardening enabled 133Windows Package Server configuration settings 71Windows XP
problem deploying Altiris Agent 132
WINS 128
Notification Server Reference 152

Notification Server Reference 153