alice - cooperandhunter.org owners manual.pdf · explanation of symbols indicates a hazardous...
TRANSCRIPT

HIGH-WALL DUCTLESSAIR CONDITIONING &HEATING SYSTEM
OWNER'S MANUAL
Models:GWH09KF-A3DNB4A(115V)GWH12KF-A3DNB4A(115V)GWH09KF-D3DNB4F(230V)GWH12KF-D3DNB4F(230V)GWH18KG-D3DNB4F(230V)GWH24KG-D3DNB4A(230V)
ALICE

GWH09KF-A3DNB4A(115V)System Includes: GWH09KF-A3DNB4A/I, GWH09KF-A3DNA5A/O
GWH12KF-A3DNB4A(115V)System Includes: GWH12KF-A3DNB4A/I, GWH12KF-A3DNA5A/O
GWH09KF-D3DNB4F(230V)System Includes: GWH09KF-D3DNB4F/I, GWH09KF-D3DNA5F/O
GWH12KF-D3DNB4F(230V)System Includes: GWH12KF-D3DNB4F/I, GWH12KF-D3DNA5F/O
GWH18KG-D3DNB4F(230V)System Includes: GWH18KG-D3DNB4F/I, GWH18KG-D3DNA5F/O
GWH24KG-D3DNB4A(230V)System Includes: GWH24KG-D3DNB4A/I, GWH24KG-D3DNA5A/O
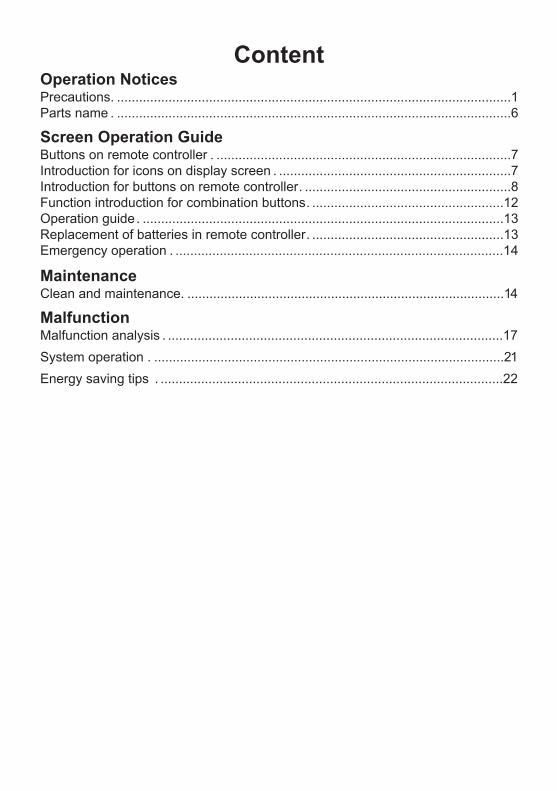
ContentOperation NoticesPrecautions. ...........................................................................................................1Parts name . ...........................................................................................................6
Screen Operation GuideButtons on remote controller . ................................................................................7Introduction for icons on display screen . ...............................................................7Introduction for buttons on remote controller . ........................................................8Function introduction for combination buttons . ....................................................12Operation guide . ..................................................................................................13Replacement of batteries in remote controller . ....................................................13Emergency operation . .........................................................................................14
MaintenanceClean and maintenance. ......................................................................................14
MalfunctionMalfunction analysis . ...........................................................................................17System operation . ...............................................................................................21Energy saving tips . .............................................................................................22

Explanation of Symbols
Indicates a hazardous situation that, if not avoided, willresult in death or serious injury.
Indicates a hazardous situation that, if not avoided, could result in death or serious injury.
Indicates a hazardous situation that, if not avoided, mayresult in minor or moderate injury.
Indicates important but not hazard-related information, used to indicate risk of property damage.
Indicates a hazard that would be assigned a signal word WARNING or CAUTION.

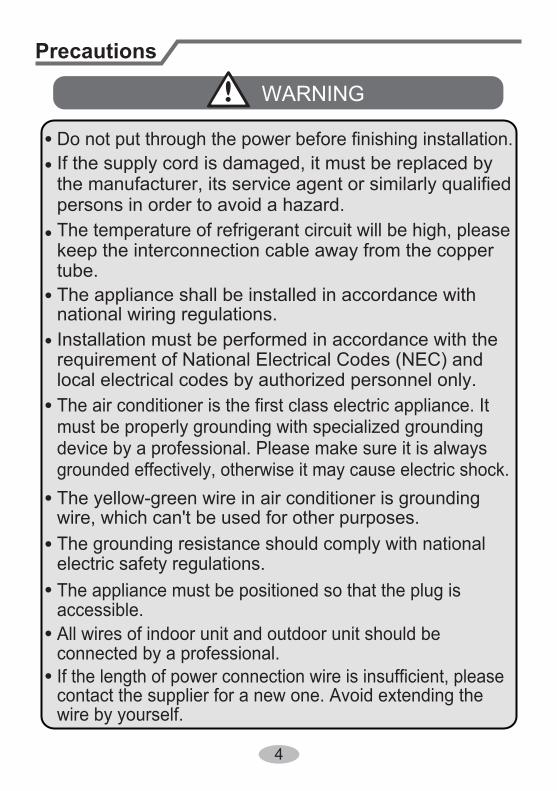
Precautions
WARNING
Do not connect air conditioner to multi-purpose socket.
This appliance can be used by children aged from 8 Operation and Maintenance
If the supply cord is damaged, it must be replaced by the manufacturer, its service agent or similarly qualified persons in order to avoid a hazard.
Do not spray water on indoor unit. It may cause electricshock or malfunction.
Otherwise, it may cause fire hazard.
Children shall not play with the appliance.Cleaning and user maintenance shall not be made by children without supervision.
years and above and persons with reduced physical, sensory or mental capabilities or lack of experience and knowledge if they have been given supervision or instruction concerning use of the appliance in a safe way and understand the hazards involved.
Do not wash the air conditioner with water to avoid electric shock.
After removing the filter, do not touch fins to avoid injury.Do not use fire or hair dryer to dry the filter to avoiddeformation or fire hazard.
Do disconnect power supply when cleaning air conditioner. Otherwise, it may cause electric shock..
1

Do not block air outlet or air inlet. It may cause malfunction.
remote controller may be broken.
● Power cord is overheating or damaged.● There’s abnormal sound during operation.● Circuit break trips off frequently.● Air conditioner gives off burning smell.● Indoor unit is leaking.
contact the dealer or qualified professionals for service.
When turning on or turning off the unit by emergency operation switch, please press this switch with an insulating object other than metal.
outlet. It may cause personal injury or damage.
Precautions
WARNING
conditioner and disconnect power immediately, and then
If the air conditioner operates under abnormal conditions, it may cause malfunction, electric shock or fire hazard.
Do not spill water on the remote controller, otherwise the
electric shock or damage. Please contact dealer when you need to repair air conditioner.
Do not repair air conditioner by yourself. It may cause
objects. It may cause damage or personal injury.Do not step on top panel of outdoor unit, or put heavy
When below phenomenon occurs, please turn off air
Do not extend fingers or objects into air inlet or air
Maintenance must be performed by qualified professionals. Otherwise, it may cause personal injury or damage.
2

Do install the circuit break. If not, it may cause malfunction.
of at least 1/8(3mm) in all poles should be connected in fixed wiring.
magnet buckle and heating buckle function, it can protectthe circuit-short and overload.
power supply circuit and circuit break.
Precautions
WARNING
note the following table.Air switch should be included
Make sure the power supply matches with the requirement of air conditioner.Unstable power supply or incorrect wiring or malfunction. Please install proper power supply cables before using the air conditioner.
An all-pole disconnection switch having a contact separation
Must follow the electric safety regulations when installing the unit.
grounding wire of power socket.Properly connect the live wire, neutral wire and
any work related to electricity and safety.Be sure to cut off the power supply before proceeding
Including an circuit break with suitable capacity, please
Air Conditioner should be properly grounded. Incorrect
Don't use unqualified power cord.grounding may cause electric shock.
According to the local safety regulations, use qualified
Installation must be performed by qualified professionals. Otherwise, it may cause personal injury or damage.
Attachment
3
Installation must be performed in accordance with the
persons in order to avoid a hazard.
must be properly grounding with specialized grounding device by a professional. Please make sure it is always grounded effectively, otherwise it may cause electric shock.
The appliance must be positioned so that the plug is accessible.
If the length of power connection wire is insufficient, please contact the supplier for a new one. Avoid extending the wire by yourself.
All wires of indoor unit and outdoor unit should be connected by a professional.
national wiring regulations.
requirement of National Electrical Codes (NEC) and local electrical codes by authorized personnel only.
Precautions
WARNING
wire, which can't be used for other purposes.The grounding resistance should comply with national electric safety regulations.
The air conditioner is the first class electric appliance. It
keep the interconnection cable away from the copper tube.
The temperature of refrigerant circuit will be high, please
the manufacturer, its service agent or similarly qualified If the supply cord is damaged, it must be replaced by
The yellow-green wire in air conditioner is grounding
The appliance shall be installed in accordance with
Do not put through the power before finishing installation.
4

The indoor unit should be installed close to the wall. Instructions for installation and use of this product are provided by the manufacturer.
Precautions
WARNING
If you need to relocate the air conditioner to another place, only thequalified person can perform the work. Otherwise, it may causepersonal injury or damage.
For the air conditioner without plug, an circuit break must be installed in the line.
Select a location which is out of reach for children and far away fromanimals or plants.If it is unavoidable, please add the fence for safetypurpose.
For the air conditioner with plug, the plug should be reachable afterfinishing installation.
Working temperature range
NOTICE:
5
●
Indoor side DB/WB(°F/°C ) Outdoor side DB/WB(°F/°C)Maximum cooling 89.6/73.4(32/23) 109.4/78.8(43/26)Maximum heating 80.6/-(27/-) 75.2/64.4(24/18)
The operating temperature range (outdoor temperature) for cooling only unit is 64.4°F(18°C) ~ 109.4°F(43°C) ; for heat pump unit is 19.4°F(-7°C) ~ 109.4°F(43°C) .
For model: GWH09KF-A3DNB4A(115V), GWH12KF-A3DNB4A(115V)
NOTICE:●
Indoor side DB/WB(°F/°C ) Outdoor side DB/WB(°F/°C)Maximum cooling 89.6/73.4(32/23) 109.4/78.8(43/26)Maximum heating 80.6/-(27/-) 75.2/64.4(24/18)
The operating temperature range (outdoor temperature) for cooling only unit is 5°F(-15°C)~ 109.4°F(43°C) ; for heat pump unit is 5°F(-15°C) ~ 109.4°F(43°C) .
For model: GWH09KF-D3DNB4F(230V), GWH12KF-D3DNB4F(230V)
NOTICE:●
Indoor side DB/WB(°F/°C ) Outdoor side DB/WB(°F/°C)Maximum cooling 89.6/73.4(32/23) 115/78.8(46/26)Maximum heating 80.6/-(27/-) 75.2/64.4(24/18)
The operating temperature range (outdoor temperature) for cooling only unit is 5°F(-15°C)~ 115°F(46°C) ; for heat pump unit is 5°F(-15°C) ~ 115°F(46°C) .
For model: GWH18KG-D3DNB4F(230V), GWH24KG-D3DNB4A(230V)

6
Parts Name
Outdoor Unit
air inletair inlet air inlet
handle handle
handle
air outlet air outlet air outlet
Actual product may be different from above graphics, please refer to actual products.
(Display content or position may be different from above graphics, please refer to actual products)
Indoor Unit
air inlet panel
horizontal louverair outlet
heating indicator
temp. indicator
cooling indicator
power indicator
receiver windowaux.button
drying indicator
display
FAN AUTOOPER
HEALTHAIR
FILTERTURBO
ON/OFF
X-FAN
HOUR
HUMIDITY
ON/OFF MODE
FAN
X-FAN
TURBO
TEMP TIMER
SLEEP LIGHT
remote controller
(Note: This dispaly is not available for some models.)
NOTICE:
7
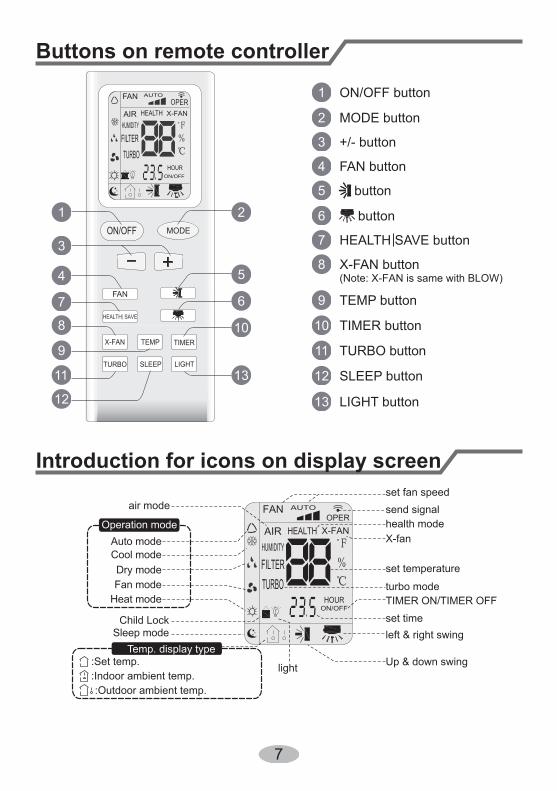
Buttons on remote controller
Introduction for icons on display screen
FAN AUTOOPER
HEALTHAIR
FILTERTURBO
ON/OFF
X-FAN
HOUR
HUMIDITY
ON/OFF MODE
FAN
X-FAN
TURBO
TEMP TIMER
SLEEP LIGHT
2
5
6
10
13
12
11
9
8
3
4
7
1
1 ON/OFF button
2 MODE button
3 +/- button
4 FAN button
5 button
8 X-FAN button (Note: X-FAN is same with BLOW)
9 TEMP button
10 TIMER button
11 TURBO button
12 SLEEP button
13 LIGHT button
7 HEALTH SAVE button
6 button
FANOPER
AUTO
HEALTHAIR
FILTERTURBO
ON/OFF
X-FAN
HOUR
HUMIDITY
Up & down swing
left & right swingset timeTIMER ON/TIMER OFFturbo mode
set temperature
X-fanhealth modesend signalset fan speed
light
Temp. display type:Set temp.
:Outdoor ambient temp.:Indoor ambient temp.
Sleep modeChild Lock
Heat modeFan modeDry mode
Cool modeAuto mode
Operation mode
air mode

8
● After selecting auto mode, air conditioner will operate automatically according to ambient temperature. Set temperature can’t be adjusted and also can’t be displa- yed. Press "FAN" button can adjust fan speed. Press " " button can adjust swing angle.● After selecting cool mode, air conditioner operates under cool mode. Cool indicator " " on indoor unit is ON. You can press "+" or "-" button to adjust set temperature. Press "FAN" button can adjust fan speed. Press " " button can adjust swing angle.● After selecting dry mode, air conditioner operates under dry mode at low speed. Dry indicator " " on indoor unit is ON. Under dry mode, fan speed can’t be ad- justed. Press " " button to adjust swing angle.● After selecting fan mode, air conditioner operates only under fan mode, All mode indicators on indoor unit is OFF. Operation indicator is ON. Press "FAN" button can
adjust fan speed. Press ● After selecting heat mode, air conditioner operates under heat mode. Heat indicator " " on indoor unit is ON. You can press "+" or "-" button to adjust set temperature. Press "FAN" button to adjust fan speed. Press " " button to adjust swing angle. (Cooling only unit can’t receive the signal for heating mode.)
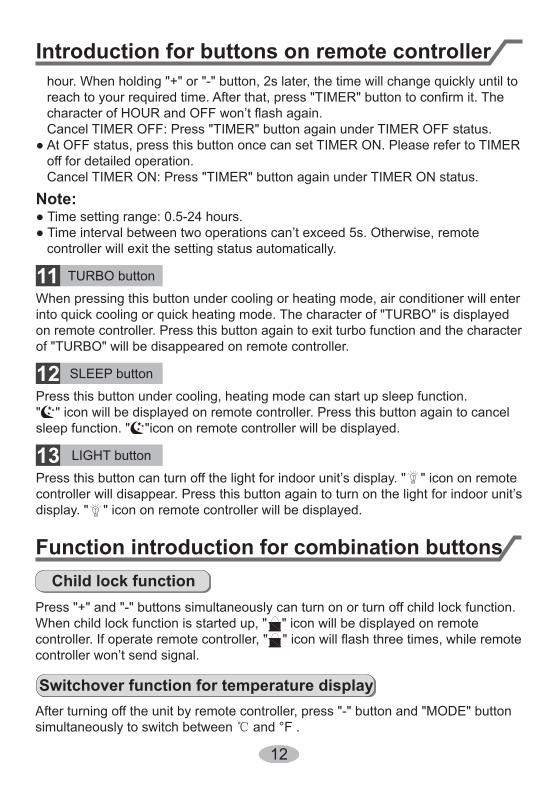
Introduction for buttons on remote controllerNote:● After putting through power, air conditioner will give out a sound and operation indicator " " is ON (red indicator). You can operate the air conditioner through the remote controller. ● At ON status, after each pressing button on remote controller, the signal icon " "
indicates the signal has been sent to air conditioner.● At OFF status, display screen on remote controller displays set temperature. At on status, display screen on remote controller displays the corresponding startup function’s icon.
ON/OFF button
MODE button
1
2
Press this button can turn on or turn off the air conditioner. After turning on the unit,operation indicator " " on indoor unit is ON (green indicator. Color may be differ-ent for different models)and indoor unit gives out a sound.
Press this button can select your required operation mode.
AUTO COOL FANDRY HEAT
" " button to adjust swing angle.

9
Introduction for buttons on remote controller
"+" or "-" button3● After each pressing of "+" or "-" button, it can increase or decrease set temper- ature 33.8°F(1°C) . Hold "+" or "-" button, 2s later, set temperature on remote controller will change quickly. After reaching to your required time, loosen the button. Temperature indicator on indoor unit will also change accordingly. (Temperature can’t be adjusted under auto mode)● Under TIMER ON, TIMER OFF or Clock setting, you can press "+"or "-" button to adjust time. (Refer to TIMER button for details)
FAN button4Pressing this button can set fan speed circularly as: auto (AUTO), low( ),medium( � � � � � � � � � ), high( ).
Auto
Note:● Under AUTO Speed,IDU fan motor will adjust the fan speed (high, medium or
low speed) according to ambient temperature.● Fan speed under dry mode is low speed.
5● Press this button to start or stop up & down swing function.The remote controller defaults to simple swing condition.● Press + button and � � � � � � � � � � � � � � � � � � � � button at the same time at unit OFF to switch between simple swing and static swing; � � � � � � � � � � � � � � � � � � � � blinks for 2 seconds.● In static swing condition, pressing � � � � � � � � � � � � � � � � � � � � button, the swing angle of up & down louver changes as below:
● If the unit is turned off during swing operation,the louver will stop at present position.
no display(horizontal louvers stopsat current position)
� � � � � � � � � � � button
Note:For preventing cold wind, after starting up heating mode, indoor fan will blow fanafterdelaying 1-5min. (Details time is decided by indoor ambient temperature)Temperature setting range on remote controller: 60.8~86°F (16~30°C). Fan speed setting range: auto, low speed, medium speed and high speed.

10
HEALTH SAVE button7HEALTH FUNCTION:After pressing HEALTH button, remote controller will switch circularly as below:"HEALTH"→"AIR"→"AIR HEALTH"→"no display"● When selecting "HEALTH" by remote controller, HEALTH function will be started up.● When selecting "AIR" by remote controller, AIR function will be started up.● When selecting "AIT HEALTH", AIR and HEALTH function will be started up.● When there’s no display on remote controller, AIR and HEALTH function will be turned off.● AIR function is applicable for some models.
Introduction for buttons on remote controllerNote: When selecting " " with remote controller, it’s auto swing. Horizontal louver of air conditioner will swing up&down automatically at the maximum angle.When selecting " 、 、 、 、 swing. Horizontal louver of air conditioner will stop at that position as shown by theicon to swing.
● When selecting " " with remote controller, it’s auto swing. Horizontal louver of air conditioner will swing left&right automatically at the maximum angle.● When selecting " 、 、 、 、 " position swing. Horizontal louver of air conditioner will stop at that position as shown by the icon to swing.● When selecting
Note: There is no this function for the units. If press this key, the main unit will click, but it also runs under original status.
" ", it’s the circulating swing. Horizontal louver of
air conditioner will swing circularly according to the angle as shown by the icon.(swing angle is displayed dynamically)
6 button
no display(horizontal louvers stops
at current position)(swing angle is dis-played dynamically)
● Press this button to start or stop left & right swing function. The remote controller defaults to simple swing condition.● Press + button and button at the same time at unit OFF to switch between simple swing and static swing; blinks for 2 seconds.● In static swing condition, pressing button, the swing angle of left & right louver changes as below:
● If the unit is turned off during swing operation,the louver will stop at present position.

11
Introduction for buttons on remote controller
TIMER button10● At ON status, press this button once can set TIMER OFF. The character of HOUR
TIMER ON. After each pressing of "+" or "-" button, time will increase or decrease half an
Note:● Outdoor ambient temperature display may can’t be selected for some models. When indoor unit receives " " signal, it displays indoor set temperature.● Only for the model whose indoor unit has dual-8 display.
TEMP button9Press this button can see indoor set temperature, indoor ambient temperature or outdoor ambient temperature on indoor unit’s display. Temperature is set circularly by remote controller as below:
no display
● When selecting " " by remote controller or no display, temperature indicator on indoor unit displays set temperature.● When selecting " " by remote controller, temperature indicator on indoor unit displays indoor ambient temperature.● When selecting " " by remote controller, temperature indicator on indoor unit displays outdoor ambient temperature.
SAVE function:Under cool mode, press SAVE button and the unit will operate under SAVE mode.Dual-8nixie tube on remote controller displays "SE". Air conditioner will operate at auto speed. Set temperature can’t be adjusted. Press SAVE button again to exit SAVE mode. Air conditioner turn back to original set speed and set temperature.● This function is applicable to partial of models.
X-FAN button8After pressing this button under cooling or dry mode, remote controller displays the character of "X-FAN" and X-FAN function is started up. Press this button again to cancel X-FAN function. The character of "X-FAN" will disappear.Note:● After starting up X-FAN function, when turning off the unit, indoor fan will continue to operate for a while at low speed to dry the residual water inside the indoor unit.● When the unit operates under X-FAN mode, press "X-FAN" button can turn off X-FAN function. Indoor fan stops operation immediately.
12
Function introduction for combination buttons
Introduction for buttons on remote controller
TURBO button11When pressing this button under cooling or heating mode, air conditioner will enter into quick cooling or quick heating mode. The character of "TURBO" is displayed on remote controller. Press this button again to exit turbo function and the character of "TURBO" will be disappeared on remote controller.
SLEEP button12Press this button under cooling, heating mode can start up sleep function." " icon will be displayed on remote controller. Press this button again to cancel sleep function. " "icon on remote controller will be displayed.
LIGHT button13Press this button can turn off the light for indoor unit’s display. " " icon on remotecontroller will disappear. Press this button again to turn on the light for indoor unit’s display. " " icon on remote controller will be displayed.
Child lock function
Switchover function for temperature display
Press "+" and "-" buttons simultaneously can turn on or turn off child lock function. When child lock function is started up, " " icon will be displayed on remote
controller won’t send signal.
After turning off the unit by remote controller, press "-" button and "MODE" buttonsimultaneously to switch between ℃ and °F .
Note:● Time setting range: 0.5-24 hours.● Time interval between two operations can’t exceed 5s. Otherwise, remote controller will exit the setting status automatically.
hour. When holding "+" or "-" button, 2s later, the time will change quickly until to
Cancel TIMER OFF: Press "TIMER" button again under TIMER OFF status.● At OFF status, press this button once can set TIMER ON. Please refer to TIMER off for detailed operation. Cancel TIMER ON: Press "TIMER" button again under TIMER ON status.

13
Operation guide1. After putting through the power, press " " button on remote controller to turn on the air conditioner.2. Press " " button to select your required mode: AUTO, COOL, DRY, FAN, HEAT.3. Press "+" or "-" button to set your required temperature. (Temperature can’t be adjusted under auto mode).4. Press " " button to set your required fan speed: auto, low, medium and high speed.5. Press " " button to select fan blowing angle.
ON/OFF
MODE
FAN
Replacement of batteries in remote controller
1. Press the back side of remote controller marked
the cover of battery box along the arrow direction.2. Replace two 7# (AAA 1.5V) dry batteries, and make sure the position of "+" polar and "-" polar are correct.3. Reinstall the cover of battery box.
signal sender battery
Cover of battery box
remove
reinstall
● During operation, point the remote control signal sender at the receiving window on indoor unit.● The distance between signal sender and receiving window should be no more than 26.2ft (8m), and there should be no obstacles between them.
or wireless telephone; remote controller should be close to indoor unit during operation.● Replace new batteries of the same model when replacement is required.● When you don’t use remote controller for a long time, please take out the batteries.● If the display on remote controller is fuzzy or there’s no display, please replace batteries.
NOTICE

14
Emergency operation
aux. button
panel
If remote controller is lost or damaged, please use auxiliary button to turnon or turn off the air conditioner. The operation in details are as below:
conditioner. When the air conditioner is turned on, it will operate underauto mode.
WARNING:Use insulated object to press the auto button
Clean and maintenance
■ Turn off the air conditioner and disconnect the power before cleaning the air conditioner to avoid electric shock.
■ Do not wash the air conditioner with water to avoid electric shock.
■ Do not use volatile liquid to clean the air conditioner.
Clean surface of indoor unit
When the surface of indoor unit is dirty, it is recommended to use a soft dry cloth or wet cloth to wipe it.
● Do not remove the panel when cleaning it.
WARNING
NOTICE:

15
Clean and maintenance
1
2
3
4
Open panelPull out the panel to a certain ● Use dust catcher or water to
clean the filter. ● When the filter is very dirty use the water (below 113°F(45°C)) to clean it, and then put it in a shady and cool place to dry.
panel cover tightly.
operation environment, clean frequency can be increased.
WARNING

16
Clean and maintenance
1. Check whether air inlets and air outlets are blocked.2. Check whether circuit break, plug and socket are in good condition.
4. Check whether mounting bracket for outdoor unit is damaged or corroded. If yes, please contact dealer.5. Check whether drainage pipe is damaged.
1. Disconnect power supply.
3. Check whether mounting bracket for outdoor unit is damaged or corroded. If yes, please contact dealer.
Notice for recovery1. Many packing materials are recyclable materials. Please dispose them in appropriate recycling unit.2. If you want to dispose the air conditioner, please contact local dealer or consultant service center for the correct disposal method.
NOTICE: Checking before use-season
NOTICE: Checking after use-season

17
Malfunction analysisGeneral phenomenon analysis
Please check below items before asking for maintenance. If the malfunction stillcan’t be eliminated, please contact local dealer or qualified professionals.
Phenomenon Check items Solution
Indoor unitcan’t receiveremotecontroller’ssignal orremotecontrollerhas noaction.
● Whether it's interfered severely (such as static electricity, stable voltage)?● Whether remote controller is within the signal receiving range?
● Whether there are obstacles?● Whether remote controller is pointing at the receiving window?● Is sensitivity of remote contro- ller low; fuzzy display and no display?
● No display when operating remote controller?
● Fluorescent lamp in room?
● Pull out the plug. Reinsert the plug after about 3min, and then turn on the unit again.
● Signal receiving range is 8m.
● Remove obstacles.● Select proper angle and point the remote controller at the re- ceiving window on indoor unit.● Check the batteries. If the power of batteries is too low, please replace them.
● Take the remote controller close to indoor unit.● Turn off the fluoresent lamp and then try it again.
● Check whether remote cont- roller appears to be damaged. If yes, replace it.
No air emittedfrom indoorunit
● Air inlet or air outlet of indoor unit is blocked?
● Eliminate obstacles.
● Under heating mode, indoor temperature is reached to set temperature?
● After reaching to set temper- ature, indoor unit will stop bl- owing out air.
● Heating mode is turned on just now?
● In order to prevent blowing out cold air, indoor unit will be started after delaying for sev- eral minutes, which is a nor- mal phenomenon.

18
Malfunction analysis
● Power failure?
● Is plug loose?
● Circuit break trips off or fuse is burnt out?● Wiring has malfunction?
● Unit has restarted immediately after stopping operation?
● Whether the function setting for remote controller is correct?
● Reset the function.
● Wait for 3min, and then turn on the unit again.
● Ask professional to replace it.
● Ask professional to replace circuit break or fuse.
● Reinsert the plug.
● Wait until power recovery.
Air condit-ioner can’t operate
Mist is em-itted from indoor unit’s air outlet
● Indoor temperature and hum- idity is high?
● Because indoor air is cooled rapidly. After a while, indoor temperature and humidity will be decrease and mist will disappear.
Phenomenon Check items Solution
Set temper-ature can’t be adjusted
● Unit is operating under auto mode?
● Temperature can’t be adju- sted under auto mode. Please switch the operation mode if you need to adjust temperature.
● Your required temperature exceeds the set temperature range?
● Set temperature range: 60.8~86°F (16~30°C).
Cooling (heating) effect is not good.
● Voltage is too low? ● Wait until the voltage resumes normal.
● Filter is dirty? ● Clean the filter.
● Set temperature is in proper range?
● Adjust temperature to proper range.
● Door and window are open? ● Close door and window.

19
Phenomenon Check items Solution
Odours are emitted
● Whether there’s odour source, such as furniture and cigarette, etc.
● Eliminate the odour source.● Clean the filter.
Air conditioner operates nor-mally suddenly
● Whether there’s interference, such as thunder, wireless devices, etc.
● Disconnect power, put back power, and then turn on the unit again.
Outdoor unit has vapor
● Heating mode is turned on?
● During defrosting under he- ating mode, it may generate vapor, which is a normal phenomenon.
“Water flowing” noise
● Air conditioner is turned on or turned off just now?
● The noise is the sound of refrigerant flowing inside the unit, which is a normal phenomenon.
Cracking noise
● Air conditioner is turned on or turned off just now?
● This is the sound of friction caused by expansion and/or contraction of panel or other parts due to the change of temperature.
Malfunction analysis

20
Malfunction analysisError Code
● When air conditioner status is abnormal, temperature indictor on indoor unit will
ation of error code.
Indoor display
Error code Above indicator diagram is only for reference. Please refer to actual product for the actualindicator and position.
Below listed error codes are only part error codes. Please refero to error code list in serive manual for more information.
Error code
E5
E6
E8
U8
H6
C5
F1
F2
Troubleshooting
It can be eliminated after restarting the unit. If not, please
It can be eliminated after restarting the unit. If not, please
It can be eliminated after restarting the unit. If not, please
It can be eliminated after restarting the unit. If not, please
It can be eliminated after restarting the unit. If not, please
Means defrosting status. It’s the normal phenomenon.Heating indicatorON 10s OFF 0.5s
■ When below phenomenon occurs, please turn off air conditioner and discon-
for service. ● Power cord is overheating or damaged. ● There’s abnormal sound during operation. ● Circuit break trips off frequently. ● Air conditioner gives off burning smell. ● Indoor unit is leaking.
■ If the air conditioner operates under abnormal conditions, it may cause
WARNING

COOLING OPERATION
How it works:In cooling mode, your alice indoor unit will absorb heat from the room, then the alice outdoor unit will discharge the heat to the outdoors. The alice cooling capacity decreases as the outdoor temperature increases. This causes the alice to work harder and longer to hold the selected room temperature.
Indoor Coil Freeze Protection:Frost may form on the indoor coil during cooling operations when the outdoor temperature below 50°F (10°C). Prolong operation may cause ice to form on the indoor coil and block air�ow. If the alice indoor unitmicrocomputer detects ice on the indoor coil it will stop the compressor to defrost the coil and protect the unit.
HEATING OPERATION
How it works:In heating mode, your alice outdoor unit will absorb heat from the outdoor ambient, then the alice indoor unit will discharge the heat to the room. The alice heating capacity decreases as the outdoor temperature decreases.
During extreme cold outdoor temperatures, you may need an additional heating source to supplement the alice heating output.
Defrost Function:In heating mode, frost may form on the outdoor coil during humid and low outdoor temperature conditions. Prolong operation may cause ice to form on the outdoor coil and block air�ow. This will reduce the alice’s heating capacity.
If the alice microcomputer detects ice on the outdoor coil, it will switch automatically to defrost mode to melt the ice and clear the coil. During defrost mode, heating will be discontinued and the alice indoor unitwill �ash the Defrost indicator. The compressor will continue to run while indoor and outdoor fans will stop. It is normal to see steam or vapor coming from the outdoor unit during defrost mode. Defrost mode will terminate 12 minutes after initiation of defrost cycle or when the outdoor coil temperature is 50°F (10°C) or greater.
SYSTEM OPERATION
21

ENERGY SAVING TIPS
1. Relaxing room temperature at night is OK: During the nighttimehours you don’t require the same level of conscious cooling or heating.Try using Sleep Mode to gradually relax room temperature and allow theunit to run less and save energy.
2. Curtains and shades: In the summer, you need to block the effects ofthe sun. Close window curtains and shades on the south and west sideof your home to help block solar heat. In winter, the sun is your friend.Open curtains and shades to allow solar heat into your room.
3. Close doors: If you don’t need to heat and cool your whole home,confine the heating and cooling to one room by closing doors. Limit thespace you’re heating and cooling to specified capability of the unit.
4. Service the unit: Some basic maintenance might be all you need. Theoutdoor unit will greatly benefit from a good hosing out, especially intreed areas where seeds and other debris can stick to coil fins and makethe unit work up to 15% harder!
5. Rearrange the room: Furniture that obstructs airflow means you couldbe heating and cooling the back of a chair or the front of a sofa insteadof the actual living space. Use the Swing Louvers to help direct the air inthe right direction for the room; remove or rearrange obstacles blockingairflow.
6. Lighting: Turning lights off can help reduce your heat. Each light bulb isa tiny heater. Your air conditioner must waste energy overcoming theheat from your lights to reach and hold your desired room temperature.
7. Is anyone home? If possible, while you’re away turn your unit to Automode and make sure windows and drapes are closed. Although theroom temperature will be uncomfortable for a few minutes when youcome home, the unit will have the room back to your desiredtemperature in no time.
8. Don’t forget the fan: The fan is much like a car. The faster it runs, themore energy is uses. Sometimes we need the car to go fast, but slow isgood enough most of the time. Try saving money by using thecomfortable quiet low fan speed as much as possible.
22

LIMITED WARRANTY STATEMENTDuctless Heat Pump Split System
FOR WARRANTY SERVICE OR REPAIR:
Contact your installing contractor. You may find the installer’s name on the equipment or in your Owner’s packet.
Complete product registration below and send back by e-mail at
PRODUCT REGISTRATION:
Model No.: ______________________________________________________________________________________________
Serial No.: _______________________________________________________ Date of Installation: ______________________
Owner Name: ____________________________________________________________________________________________
Address of Installation:_____________________________________________________________________________________
Installing Contractor: ______________________________________________________________________________________
Address: ________________________________________________________________________________________
Phone No. / E-mail: _______________________________________________________________________________
C&H distributor (hereinafter “Company”) warrants this product against failure due to defect in materials or workmanship
under normal use and maintenance as follows. All warranty periods begin on the date of original installation. If the date cannot
be verified, the warranty period begins one hundred twenty (120) days from date of manufacture. If a part fails due to defect
during the applicable warranty period Company will provide a new or remanufactured part, at Company’s option, to replace the
failed defective part at no charge for the part. This limited warranty is subject to all provisions, conditions, limitations and
exclusions listed below.
A warranty period of Seven (7) years on compressor to the original registered end-user.
A warranty period of Five (5) years on all parts to the original registered end user.
A warranty period of One (1) year on the remote control provided with the original unit.
Limited warranty applies only to systems that are properly installed by a state certified or licensed HVAC contractor,
under applicable local and state law in accordance with all applicable building codes and permits; C&H installation
and operation instructions and good trade practices.
Warranty applies only to products remaining in their original installation location.
Defective parts must be returned to the distributor through a registered servicing dealer for credit.
www.cooperandhunter.us

LIMITATIONS OF WARRANTIES: ALL IMPLIED WARRANTIES AND/OR CONDITIONS (INCLUDING IMPLIED WARRANTIES OR
CONDITIONS OF MERCHANTABILITY AND FITNESS FOR A PARTICULAR USE OR PURPOSE) ARE LIMITED TO THE DURATION OF
THIS LIMITED WARRANTY, SOME STATES OR PROVINCES DO NOT ALLOW LIMITATIONS ON HOW LONG AN IMPLIED WARRANTY
OR CONDITION LASTS, SO THE ABOVE MAY NOT APPLY TO YOU. THE EXPRESS WARRANTIES MADE IN THIS WARRANTY ARE
EXCLUSIVE AND MAY NOT BE ALTERED, ENLARGED, OR CHANGED BY ANY DISTRIBUTOR, DEALER, OR OTHER PERSON,
WHATSOEVER.
THIS WARRANTY DOES NOT COVER:
1. Labor or other costs incurred for diagnosing, repairing, removing, installing, shipping, servicing or handling of either
defective parts, or replacement parts, or new units.
2. Product cleaning required prior to warranty service and repair.
3. Normal maintenance as outlined in the installation and servicing instructions or Owner’s Manual, including filter
cleaning and/or replacement and lubrication.
4. Failure, damage or repairs due to faulty installation, misapplication, abuse, improper servicing, unauthorized
alteration or improper operation.
5. Failure to start due to voltage conditions, blown fuses, open circuit breakers, or damages due to the inadequacy or
interruption of electrical service.
6. Failure or damage due to floods, winds, fires, lightning, accidents, corrosive environments (rust, etc.) or other
conditions beyond the control of the Company.
7. Failure or damage of coils or piping due to corrosion on installations within one (1) miles of sea coast or corrosive
body.
8. Parts not supplied or designated by Company, or damages resulting from their use.
9. Products installed outside continental USA and Canada.
10. Electricity or fuel costs, or increases in electricity or fuel costs from any reason whatsoever, including additional or
unusual use of supplemental electric heat.
11. Any cost to replace, refill or dispose of refrigerant, including the cost of refrigerant.
12. Shipping damage or damage as a result of transporting the unit.
13. Accessories such as condensate pumps, line sets and so forth are not covered.
14. Any special, indirect or consequential property or commercial damage of any nature whatsoever. Some states or
provinces do not allow the exclusion of incidental or consequential damages, so the above limitation may not apply to
you.
This warranty gives you specific legal rights, and you may also have other rights which vary from state to state or province to
province.
66162927