air rifle training manual - black powder cartridge...
TRANSCRIPT
A-CR-CCP-177/PT-001
CANADIAN CADET MOVEMENT
AIR RIFLE TRAINING AIDE-MÉMOIRE

A-CR-CCP-177/PT-001
i
TABLE OF CONTENTS
PAGE
PART 2 – AIR RIFLE TRAINING AIDE-MÉMOIRE............................................................................................... 2-1
General................................................................................................................................................................... 2-1
Safety ..................................................................................................................................................................... 2-2
Air Rifle Ranges .................................................................................................................................................... 2-4
The Daisy 853C Air Rifle and Pellets................................................................................................................... 2-5
Proper Eye Usage ................................................................................................................................................. 2-6
Prone Position....................................................................................................................................................... 2-7
Standing Position.................................................................................................................................................. 2-9
Aiming .................................................................................................................................................................. 2-11
Natural Alignment ............................................................................................................................................... 2-12
Breathing ............................................................................................................................................................. 2-13
Trigger Control and Follow-through ................................................................................................................. 2-14
Use of the Sling ................................................................................................................................................... 2-15
Loading, Firing and Unloading the Air Rifle..................................................................................................... 2-16
Pumping the Air Rifle.......................................................................................................................................... 2-17
Cleaning the Air Rifle.......................................................................................................................................... 2-18
Immediate Action and Stoppages ..................................................................................................................... 2-19
Range Commands and Procedures .................................................................................................................. 2-20
Marksmanship Equipment ................................................................................................................................. 2-21
Physical Training ................................................................................................................................................ 2-22
Coaching.............................................................................................................................................................. 2-23
A-CR-CCP-177/PT-001
2-1
PART 2
AIR RIFLE TRAINING AIDE-MÉMOIRE
GENERALThe purpose of this aide-mémoire is to provide corps, squadrons and Cadet Summer Training Centres with asimple guide to essential marksmanship knowledge and skills. It has been formatted to be easily distributed in theform of handouts. The information found in this document is derived from the Air Rifle Training Manual, whichshould still be consulted for in-dept reference on any marksmanship subject.
This manual does not take precedence over any Cadet Administrative Training Order (CATO), Canadian ForcesTechnical Order (CFTO), Canadian Forces Administrative Order (CFAO), or any other Department of NationalDefence (DND) regulation or order.
When an item refers to a right-handed marksman, the reverse of that item refers to a left-handed marksman.
References to the directions left and right are described from the perspective of a marksman that is in the firingposition.
Suggestions for improvements to this document are encouraged and may be submitted to the Staff Officerresponsible for marksmanship within each Area/Region.

A-CR-CCP-177/PT-001
2-2
SAFETY CATCH
ON = no red (safe)OFF = red (ready)
SAFETYFirearms safety is the number one priority on and off the range so everyone must do their
part to prevent accidents. In this sport, the majority of incidents are caused by theignorance of proper rifle operating procedures or by mishandling.
SAFETY CATCH
SAFETY ROD
To ensure that air rifles are not removed from the firing point or stored with a pellet in the chamber or barrel, asafety rod is to be inserted in the barrel from the muzzle end.
SAFE RIFLE STATUS
When not being handled on the range or in a training environment, the air rifle must be in a safe status. Thefollowing options denote various “safe rifle status”.
DIAGRAM NOT TO SCALE
1/8" dowling 57 cm (22.46") in length
7.62 cm (3")in length
1 1/8" dowling
Option OneIn the rifle case
Safety catch is ONBolt is forwardAction is not cockedSafety rod is in the casePump lever is partially open
Option TwoOn the firing line
Safety catch is ONBolt is to the rearPump lever is partially open
Option ThreeNot on the firing line
Safety catch is ONBolt is to the rearSafety rod is in barrelPump lever is partially open

A-CR-CCP-177/PT-001
2-3
REMOVING A RIFLE FROM THE CASE
The rifle case should be clearly marked on the outside with an arrow, indicating in what direction the rifle inside ispointing. This will ensure that when the case is opened, the rifle is pointing in a safe direction. The rifle must be ina safe status when removed from its case.
INDIVIDUAL SAFETY PRECAUTIONS
Upon receiving a rifle or when the “safe rifle status” is uncertain, individual safety precautions should be done toconfirm that the rifle is safe. An individual must ensure that:
a. The bolt is open fully to the rear;
b. The safety catch is in the ON position;
c. The pump lever is partially open; and
d. A safety rod is inserted in the barrel.
SAFETY REGULATIONS
Safety regulations are all common sense and are easy to apply when people understand why they are necessaryto help prevent accidents.
The following is a list of essential safety regulations:
a. A rifle should always be treated as if it is loaded and be considered dangerous unless proven otherwise;
b. A rifle should never be pointed at anyone;
c. A rifle should always point in a safe direction;
d. A rifle should be held in the vertical position with the muzzle pointing up when transporting it;
e. Fingers should be kept off the trigger unless the marksman is ready to fire;
f. Hearing protectors should always be worn; and
g. The wearing of safety glasses or shatterproof eyeglasses is mandatory when firing.
DISPOSAL OF LEAD PELLETS AND PERSONAL HYGIENE
Each time someone handles pellets, a small trace of lead is left on their hands and can be transferred to otherparts of their body or to food. Over a period of time, this contact could increase lead levels in the body. It istherefore recommended that hands be washed thoroughly following all contact with pellets.
Spent pellets are regarded as hazardous waste and must be disposed of in accordance with localregulations.

A-CR-CCP-177/PT-001
2-4
AIR RIFLE RANGESThe marksmanship CATO, specifically the annexes on Ranges and Security should be
consulted for all the technical details relevant to this subject.
Air rifles may only be fired on a properly prepared air rifle range. The principal dangers found on an air rifle rangeare:
a. The ricochet of pellets after they strike a reflecting surface; and
b. Improper firearms handling.
It is the responsibility of the RSO to ensure that the range is safe and meets all range requirements. It is essentialthat no part of the pellet stop area may cause a pellet to ricochet.
ITEMS REQUIRED TO SET UP AN AIR RIFLE RANGE
a. Area 15 metres long with controlled access;
b. Numbered target backstops and firing lanes;
c. Flags (red and green);
d. First aid kit and stretcher;
e. Appropriate mats;
f. Spotting scopes;
g. Hearing protectors;
h. Safety glasses;
i. Targets;
j. Pellets; and
k. Hand washing facility.
RANGE MAINTENANCE
The range must be cleaned after each use and the lead disposed of as contaminated waste. The pellet stop mustbe inspected regularly to ensure that deterioration has not occurred.

A-CR-CCP-177/PT-001
2-5
THE DAISY 853C AIR RIFLE AND PELLETSCHARACTERISTICS
These are the main characteristics and parts of the Daisy 853C air rifle and the pellets used with this rifle:
a. Action – single pump pneumatic, straight pull-bolt;
b. Length – 97.8 cm;
c. Weight – 2.5 kg;
d. Calibre – 0.177” calibre (4.5 mm);
e. Front sight – Global type with interchangeable aperture inserts;
f. Rear sight – Fully adjustable peep rear sight with micrometer click adjustment;
g. Muzzle velocity – 150.8 metres per second;
h. Loading – Single or auto indexing 5 pellet clip; and
i. Stock – Full-length, sporter-styled hardwood with adjustable length.
PARTS
AIR RIFLE PELLETS
The most popular pellet design is the hourglass-shaped air rifle pellet, commonly referred to as the diabolo. Thereare a number of variations on the basic diabolo design. For marksmanship and competition training, the wadcutterpellet is used. This flatheaded pellet is designed for cutting neat, clean holes in paper, which allows for accurate,precise scoring of the target.
A-CR-CCP-177/PT-001
2-6
PROPER EYE USAGEThe master eye must be determined before individuals begin firing. It should be noted that
the master eye is not always on the same side of the body as the writing hand.
SELECTING THE MASTER EYE
Everyone has a master (or dominant) eye which is stronger than the other one. This is the eye to be used whenaiming. If the master eye is on the opposite side of the body than the writing hand, it is advisable to changeshoulders and fire with the opposite hand and use the master eye. This should not however, be done at theexpense of comfort.
NOTE
If changing shoulders in order to accommodate the master eye proves uncomfortable, cadetsshould fire the way they feel most comfortable.
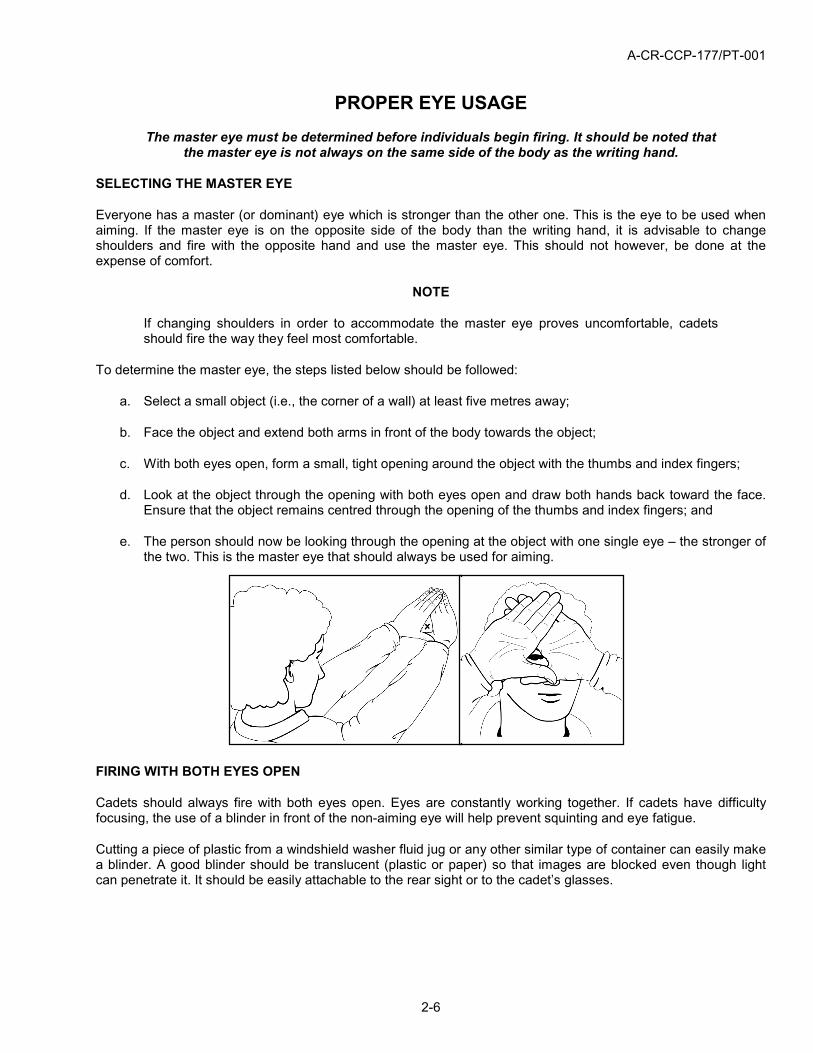
To determine the master eye, the steps listed below should be followed:
a. Select a small object (i.e., the corner of a wall) at least five metres away;
b. Face the object and extend both arms in front of the body towards the object;
c. With both eyes open, form a small, tight opening around the object with the thumbs and index fingers;
d. Look at the object through the opening with both eyes open and draw both hands back toward the face.Ensure that the object remains centred through the opening of the thumbs and index fingers; and
e. The person should now be looking through the opening at the object with one single eye – the stronger ofthe two. This is the master eye that should always be used for aiming.
FIRING WITH BOTH EYES OPEN
Cadets should always fire with both eyes open. Eyes are constantly working together. If cadets have difficultyfocusing, the use of a blinder in front of the non-aiming eye will help prevent squinting and eye fatigue.
Cutting a piece of plastic from a windshield washer fluid jug or any other similar type of container can easily makea blinder. A good blinder should be translucent (plastic or paper) so that images are blocked even though lightcan penetrate it. It should be easily attachable to the rear sight or to the cadet’s glasses.

A-CR-CCP-177/PT-001
2-7
PRONE POSITIONObtaining a good prone position is one of the most, if not the most important principle of marksmanship.Although an excellent position will not guarantee an excellent performance, a poor position can almost
assure a substantially negative effect on results.
OBJECTIVES OF A GOOD POSITION
The position should be:
a. Natural;
b. Without strain;
c. Comfortable;
d. Stable;
e. As such that body weight is equally distributed; and
f. Consistent throughout the relay.
CHARACTERISTICS OF A GOOD POSITION
a. The body should form a 5-20° angle to theline of sight;
b. The body should not be twisted and thespine should be straight;
c. The left leg should be parallel with thespine;
d. The right foot should turn out and point to the right; the left footshould be straight behind on the toe or pointed to the rightaccording to the comfort of the individual;
e. The right knee should be brought up so that the thigh forms anangle between 30-45° with the left leg. The right knee should bebent in order to improve stability;

A-CR-CCP-177/PT-001
2-8
f. The left elbow should be positioned slightly to the left of the rifle. In orderto maintain consistency throughout the relay, the left elbow should not bemoved, even while pumping the rifle;
g. The left forearm should form at least an angle of 30° with the ground;
h. The left hand should rest in the sling and firmly against the sling swivel andthe fingers should not grip the fore end of the stock;
i. Once a good position is established, the right hand should grip the small of thebutt with constant pressure;
j. The right thumb should be placed on the stock directly behind the rear sight;
k. The position of the right elbow is established after the rest of the body is in place.After placing the right hand on the small of the butt, the right elbow should restnaturally where it falls and feels comfortable;
l. The shoulders should be straight and form right angles with the spine;
m. The butt plate is kept firmly in the hollow of the right shoulder; and
n. The head rests comfortably on the butt and remains straight.

A-CR-CCP-177/PT-001
2-9
STANDING POSITIONThe standing position has the smallest area of support of all firing positions, thus it is themost difficult to hold steady. Cadets must come to grips with the fact that when firing in
the standing position, they may never achieve complete immobility.
The standing position should be: natural, without strain, comfortable, stable, balanced in such a way that bodyweight is equally distributed, and consistent throughout the relay.
CENTRE OF GRAVITY
The centre of gravity is the point where the weight of the rifle andthe cadet’s body weight are evenly distributed between the feet.In order to compensate for the weight of the rifle, the cadet’sback is bent to the right and rearward in order to gain bonesupport and stability.
If the cadet stands straight, the weight of the rifle will pull thebody to the front. Muscle strain will appear in the back as thecadet attempts to keep their body from falling forward. Bybending back and to the right, a shift in body weight will occurslightly towards the right foot. At a certain point, the weight of thebody on the right foot will equal the weight on the left foot. Thebody-rifle combination then reaches a state of balance, with thecentre of gravity located between the cadet’s two feet.
The combination of back bend and body twistis the most important feature of the standingposition and will contribute significantly to thecadet’s level of performance. However,cadets should understand that discomfort iscommon during the first few practicesessions. After a short period of time,however, this discomfort will diminish and anincreasingly stable hold will be achieved.
A-CR-CCP-177/PT-001
2-10
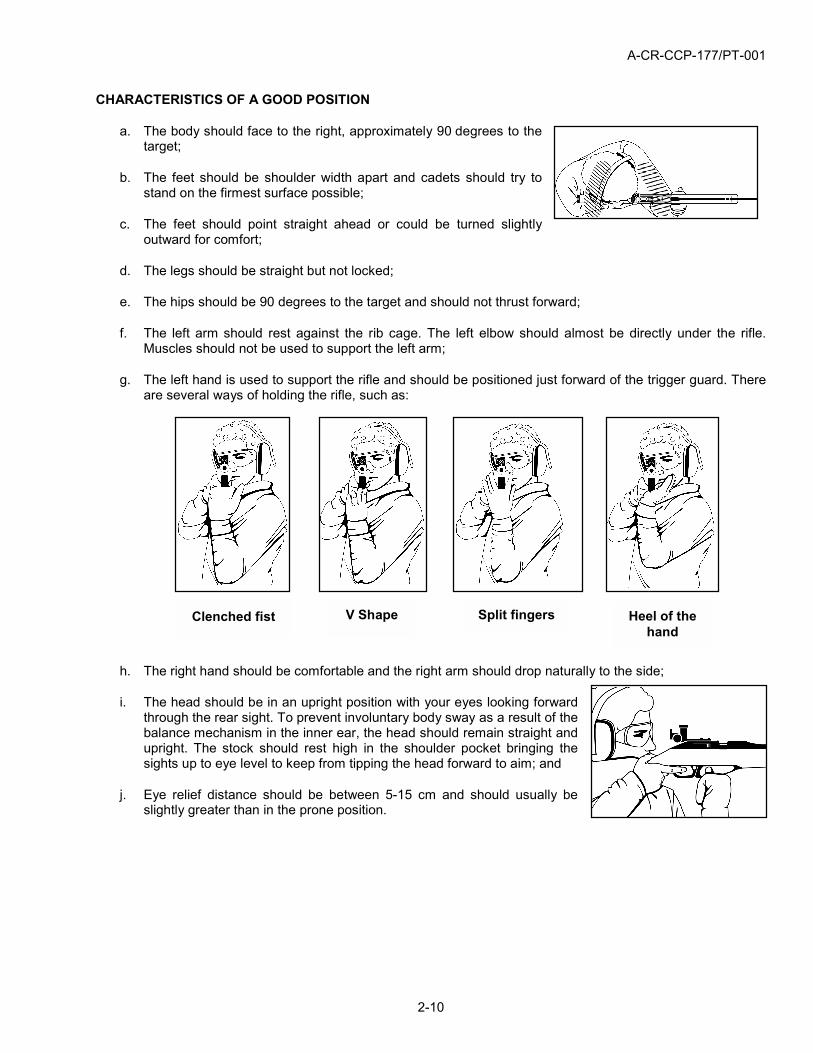
CHARACTERISTICS OF A GOOD POSITION
a. The body should face to the right, approximately 90 degrees to thetarget;
b. The feet should be shoulder width apart and cadets should try tostand on the firmest surface possible;
c. The feet should point straight ahead or could be turned slightlyoutward for comfort;
d. The legs should be straight but not locked;
e. The hips should be 90 degrees to the target and should not thrust forward;
f. The left arm should rest against the rib cage. The left elbow should almost be directly under the rifle.Muscles should not be used to support the left arm;
g. The left hand is used to support the rifle and should be positioned just forward of the trigger guard. Thereare several ways of holding the rifle, such as:
h. The right hand should be comfortable and the right arm should drop naturally to the side;
i. The head should be in an upright position with your eyes looking forwardthrough the rear sight. To prevent involuntary body sway as a result of thebalance mechanism in the inner ear, the head should remain straight andupright. The stock should rest high in the shoulder pocket bringing thesights up to eye level to keep from tipping the head forward to aim; and
j. Eye relief distance should be between 5-15 cm and should usually beslightly greater than in the prone position.
Clenched fist V Shape Split fingers Heel of thehand

A-CR-CCP-177/PT-001
2-11
REMEMBER: SIGHT ADJUSTMENT
UP & RIGHT = clockwiseDOWN & LEFT = counterclockwise
TOP OF BARRELWEIGHT
FRONT SIGHT TUBE
REAR SIGHT
TARGETAPERTURE
AIMINGCadets must constantly strive to maintain proper sight alignment, while obtaining a sight picture. It is the
most critical element of the aiming process.
FRONT SIGHT
The front aperture should be selected to provide the best sight picture. A good sized aperture should appear1 ½ times bigger than the aiming mark.
REAR SIGHT
The adjustment of the knobs is measured in clicks that can be felt as the knob is turned. It takes three clicks tomove the point of impact approximately one pellet width.
a. Elevation. To lower the point of impact, turn theelevation knob counterclockwise (to the left). To raisethe point of impact, turn the elevation knob clockwise(to the right), as per the arrow and the word “UP”.
b. Windage. To move the point of impact to the left,turn the windage knob counterclockwise (to the left).To move the point of impact to the right, turn thewindage knob clockwise (to the right), as per thearrow and the letter “R”.
EYE RELIEF
Eye relief is the distance between the eye and the rear sight. Depending on an individual’s build and position, thisdistance is usually 5 to 15 cm. It is important for them to maintain the same eye relief from shot to shot and to findan eye relief that allows them to keep their head as erect as possible during the firing process.
SIGHT ALIGNMENT
Sight alignment is the most critical element of the aimingprocess. It is the alignment of the eye, the rear sight, and thefront sight.
Proper sight alignment is a matter of centering the front sighthood in the rear sight. The hood will not quite fill the rear sightand cadets will be able to see light around the outside of thehood; we call this a “line of white.”
SIGHT PICTURE
To obtain a proper sight picture, a bullseye is simply added to theinnermost ring. The goal during the aiming process is to maintainproper sight alignment while keeping the bull centered in the frontsight.

A-CR-CCP-177/PT-001
2-12
NATURAL ALIGNMENTIt is essential that cadets use their bones to support the rifle, so that their muscles remainrelaxed. Under no circumstances should they use their muscles to change the point of aim
by moving the rifle from side to side.
Natural alignment is obtained when the rifle can be perfectly aimed at the target without being muscled intoachieving this. In a comfortable position, the cadet does not force the air rifle to point to the target, which wouldcreate muscular tension.
After establishing a comfortable position, the cadet must now make sure that their body and rifle are directlyaligned with the target. In order to ensure that the position is directly in line with the target, cadets should followthese steps:
a. Assume the prone position, look through the sights and acquire a proper sight picture;
b. Close their eyes, take several normal breaths and relax into a comfortable position;
c. Once comfortable, look through the sights again. If they are perfectly centred with the target, proceed withfiring;
d. If they are not directly centred with the target, they will need to re-orient their position slightly. To do this,they will need to pivot their body on their left elbow, more precisely:
(1) If they are aiming too far to the left, move the lower body slightly to the left;
(2) If they are aiming too far to the right, move the lower body slightly to the right;
(3) If they are aiming too low, move the lower body slightly back (if this does not work, they can tightenthe sling); and
(4) If they are aiming too high, move the lower body slightly forward (if this does not work, they canloosen the sling); and
e. Close their eyes and do a final check on their alignment. If they are still not perfectly aligned, they muststart over! They must remember to never move their left elbow when they shift their position around.

A-CR-CCP-177/PT-001
2-13
BREATHINGCadets should use breathing as a way to confirm that the rifle is moving up and down in a
perfect vertical manner and that the rifle is not canted. Also, when breathing in and out,cadets can visually confirm that they are aiming on the proper diagram.
IMPORTANCE OF BREATHING
While breathing, the oxygen inhaled is used to supply muscles with energy, ensuring optimal potential of thesemuscles. This includes the muscles that are involved in the position, as well as the muscles in the eyes. Formaximum stability when firing, cadets will have to stop breathing for a few seconds. It is of the utmost importancethat they do not hold their breath for more than five to seven seconds, as the tension will increase in their chestmuscles and reduce stability.
THE BREATHING CYCLE
In order to achieve a proper breathing sequence, the information in the following graph should be adhered to:
BREATHING CYCLE
1 2 3 4 5 6 7 8 9 10 11 12 13 14 15 16 17 18 19 20 21 22 23 24 25 26 27 28
Time in seconds
Volu
me
of a
ir
EXHALE
BREATH HELD FOR A MAXIMUMOF SEVEN SECONDS
SHOTFIRED
RETURN TO NORMAL
DEEP INHALE
NORMALBREATHING
EXHALE
Again, it is important for cadets not to fire if they feel they want to breathe again. Their shot will not be perfect andtheir end result will be affected.

A-CR-CCP-177/PT-001
2-14
TRIGGER CONTROL AND FOLLOW-THROUGHTrigger control is the manipulation of the trigger in such a way that there is no disturbanceor motion of the foresight. It must be constant, controlled, slow and deliberate. Consistent
squeezing of the trigger assures the desired trajectory upon the departure of the pellet.
POSITION OF THE HAND ON THE RIFLE
Cadets should have a relatively firm grip on the small of thebutt with the bottom three fingers of their hand. The thumbshould point forward and rest in a relaxed position behind therear sight along the rifle stock or should be wrapped around thesmall of the butt.
TRIGGER FINGER POSITION
The index finger should be placed on the trigger halfwaybetween the tip of the finger and the first joint. The index fingernever touches the stock of the rifle and must be verticallycentered on the trigger.
SQUEEZING THE TRIGGER
Trigger pressure should only be applied when the cadet isready to fire. It must be applied straight to the rear by bendingthe second joint of the index finger. Cadets should make surethe pressure they apply is constant and that they slowlysqueeze the trigger while they are holding their breath.
FOLLOW-THROUGH
Follow-through is defined as the act of remaining in position for a few seconds after the pellet’s departure and itrequires both physical and mental effort. It aids in developing proper hold of the rifle, maintaining stability,ensuring that there is no movement of the rifle as the shot is being fired, and calling the shot after it is fired.
When done properly, it permits the cadet to call their shot with extreme accuracy and ensures consistency duringthe firing session. This becomes particularly important when trying to improve performance or correct faults. If theposition is stable, the aiming picture should return to the same place it was before the vibrations caused by therelease of compressed air.

A-CR-CCP-177/PT-001
2-15
USE OF THE SLINGThe sling provides maximum support of the rifle with the least amount of physical effort
on the part of the individual.
ASSEMBLING THE SLING
To assemble the sling, follow the steps listed below:
a. Hold the sling parallel to the ground with the short section in the left hand, ensuring that the rounded tip ofthe top buckle is pointing left;
b. Take the short section, loop it up through the middle slot of the metallic clasp and then back downthrough the front slot (nearest the rounded tip). The short section will now form a circle; and
c. Turn the sling over and slide the sling swivel onto the long section. Ensure the sling swivel hangsdownwards, as it will later attach to the rifle. Loop the long section up through the middle slot and thenback down through the front slot. It is now important to take the remaining end and loop it back throughthe rear slot, locking the sling in place. This will ensure that the sling will not come undone or loosenduring firing.
POSITION OF THE SLING ON THE ARM
The sling should be positioned on the upper left arm above the biceps near the shoulder. This is the area on thearm where the smallest amount of pulse can be felt. The sling should never be twisted.
ATTACHMENT OF THE SLING TO THE RIFLE
The sling should be attached to the rifle using its hook. To attach the sling, the hook on the sling should beopened by pressing on its side screw. The hook pin should be slipped into the attachment clamp on the rifle’ssling swivel and the hook should be screwed over the pin to ensure it will not fall out.
ADJUSTMENT OF THE SLING
If the sling is too loose it will no longer act as a method of support and the cadet will hold the rifle using theirmuscles. If the sling is too tight, blood flow will be restricted and cause a more pronounced pulse, which will havea negative effect on the cadet’s hold.

A-CR-CCP-177/PT-001
2-16
LOADING, FIRING AND UNLOADING THE AIR RIFLEThese steps should be adhered to in order to safely fire the Daisy 853C air rifle.
LOADING THE AIR RIFLE
The following steps should be followed when loading the rifle:
a. Pick up and hold the rifle with the left hand;b. Ensure the safety catch is in the ON position;c. Place the sling on the rifle;d. Pump the rifle;e. When the pump handle is fully extended, pause for about three seconds;f. Bring the pump lever back to the closed position;g. Load a pellet or a five pellet clip; andh. Close the bolt.
FIRING THE AIR RIFLE
The following actions should be performed in order to fire the rifle:
a. Place the safety catch in the OFF position;b. Aim the rifle at the target;c. Squeeze the trigger;d. Open the bolt, pump the rifle, reload, aim and fire;e. Repeat the last step until the firing is done;f. Upon completion, place the safety catch in the ON position and partially open the pump lever; andg. Lay the rifle down.
UNLOADING THE AIR RIFLE
These steps should be followed when unloading the rifle:
a. Pick up the rifle;b. Remove the five pellet clip (if used);c. Pump the rifle;d. Move the bolt forward (do not insert a pellet);e. Place the safety catch in the OFF position;f. Aim the rifle at the target;g. Squeeze the trigger;h. Open the bolt;i. Place the safety catch in the ON position;j. Open the pump lever slightly;k. Wait to be cleared by the RSO; andl. Lay the rifle down.
A-CR-CCP-177/PT-001
2-17
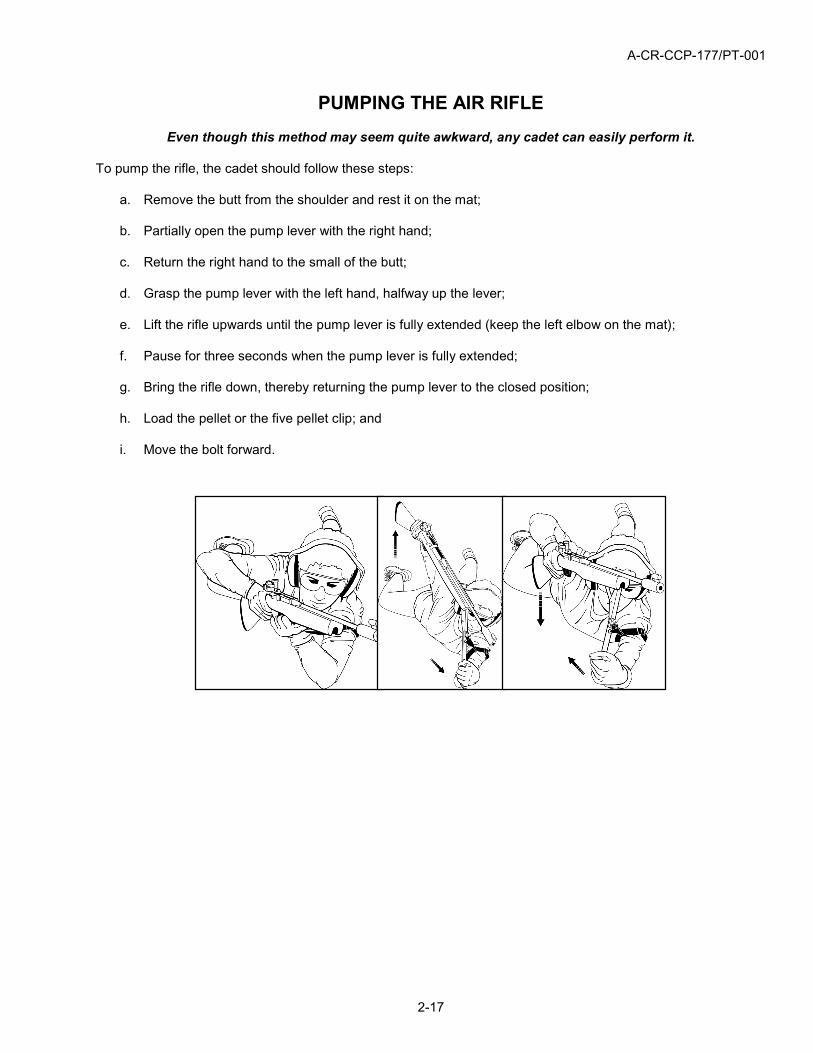
PUMPING THE AIR RIFLEEven though this method may seem quite awkward, any cadet can easily perform it.
To pump the rifle, the cadet should follow these steps:
a. Remove the butt from the shoulder and rest it on the mat;
b. Partially open the pump lever with the right hand;
c. Return the right hand to the small of the butt;
d. Grasp the pump lever with the left hand, halfway up the lever;
e. Lift the rifle upwards until the pump lever is fully extended (keep the left elbow on the mat);
f. Pause for three seconds when the pump lever is fully extended;
g. Bring the rifle down, thereby returning the pump lever to the closed position;
h. Load the pellet or the five pellet clip; and
i. Move the bolt forward.

A-CR-CCP-177/PT-001
2-18
CLEANING THE AIR RIFLENo one should attempt to clean a rifle until individual safety precautions have beenperformed on the rifle and it is certain that the barrel is clear of any obstructions.
CLEANING THE BORE
When Action
Before firing Fire 2-3 felt cleaning pellets.
After firing Fire 2-3 felt cleaning pellets.
Periodic Fire a felt cleaning pellet soaked in SAE 30 motor oil;Wait 5 minutes; andFire 3 felt cleaning pellets.
Storage of three months or longer Fire 2-3 felt cleaning pellets;Fire one felt cleaning pellet soaked in SAE 30 motor oil; andFire 3 felt cleaning pellets when taking rifle out of storage.
CLEANING OF OTHER PARTS
a. Stock. The stock should be frequently wiped clean with a damp cloth;
b. Metallic Parts. The exterior metallic parts of the rifle should be cleaned on a regular basis with the aid ofa lightly oiled flannel patch; and
c. Pivot Points. The pivot points should also be lightly lubricated on a regular basis.

A-CR-CCP-177/PT-001
2-19
IMMEDIATE ACTION AND STOPPAGESWhen a problem occurs, the cadet must point the rifle down range at all times and notify
the RSO.
PROBLEM SOLUTION
Pellet incorrectly seated in chamber Place the safety catch in the ON position;Open the bolt fully to the rear; andRSO will insert a safety rod in the barrel to clear the pellet.
Pellet stuck in barrel Place the safety catch in the ON position;Open the bolt fully to the rear; andRSO will insert a safety rod in the barrel to clear the pellet.
Two pellets lodged in the barrel orchamber
Attempt twice to fire the pellets out.If unsuccessful:
a. Place the safety catch in the ON position;b. Open the bolt fully to the rear; andc. RSO will insert a safety rod in the barrel to clear the pellet.
Rifle does not fire Conduct a functioning test:a. Place the safety catch in the ON position;b. Open the bolt fully to the rear;c. Close the bolt;d. Place the safety catch in the OFF position; ande. Squeeze the trigger.
If the rifle still does not fire, conduct a pumping functioning test:a. Place the safety catch in the ON position;b. Open the bolt fully to the rear;c. Pump the rifle;d. Close the bolt;e. Place the safety catch in the OFF position; andf. Squeeze the trigger.
If the rifle still does not fire, clear the rifle:a. Place the safety catch in the ON position;b. Open the bolt fully to the rear and partially open the pump lever;
andc. RSO will insert a safety rod in the barrel to clear the pellet.

A-CR-CCP-177/PT-001
2-20
RANGE COMMANDS AND PROCEDURESThe following range commands will be given by the RSO and must be learned by cadets before they fire
on a range.
COMMAND ACTION
Cover off your firing point Stand up, move behind the firing point and await further commands.Place your equipment down andstand back
Lay the equipment down on the mat and stand back when finished.
Adopt the prone position Adopt the prone position, pick up the rifle, ready the equipment and puton the hearing and eye protection.
Type of firing This command includes information about the range and type of firing.i.e., Relay No.__, 10 metres, five rounds, Grouping, On Your Own Time...
Relay, load, commence firing Ensure the safety catch is in the ON position;Pump the rifle;When the pump lever is fully extended, pause for about three seconds;Load the pellet;Close the bolt;Place the safety catch in the OFF position;Aim the rifle at the target;Squeeze the trigger;Open the bolt;Repeat the sequence for each shot;Place the safety catch in the ON position and partially open the pump;lever immediately after firing the practice; andLay down the rifle.
MAY BE GIVENRelay, cease fire Stop firing, put the safety catch in the ON position and lay the rifle down.Relay, resume fire Put the safety in the OFF position and continue the practice.Relay, unload Pick up the rifle;
Remove the five pellet clip if used;Pump the rifle;Close the bolt;Place the safety catch in the OFF position;Aim rifle at target;Pull the trigger;Open the bolt;Place safety catch in the ON position;Open the pump lever 5-8 cm;Wait to be cleared by the RSO;Lay the rifle down; andRemove hearing and eye protection.
Relay, stand up Stand up and leave the equipment on the ground.Change targets Move forward, walk down the lane to remove old targets and replace
them with new ones. Return to the firing point.Change relays Cadets who have just fired pick up their personal equipment and move of
the firing point. The new relay covers off behind the firing point.

A-CR-CCP-177/PT-001
2-21
MARKSMANSHIP EQUIPMENTCadets performance can be easily improved by providing them with adequate apparel. This apparel will
help to increase both stability and comfort.
MARKSMANSHIP JACKET
A jacket offers some support and helps stabilize the body. Rubber padsare attached to the elbows and to the right shoulder to soften contactwith the ground and with the rifle. The jacket must be large enough topermit the wearing of sweaters.
MARKSMANSHIP GLOVE
The marksmanship glove protects the back or interior of the hand againstpressures created by the sling and the sling swivel.
MARKSMANSHIP HAT
The marksmanship hat has flap sides and an elongated peak, which creates atunnel vision and helps in avoiding neighbouring distractions.
SWEATERS
It is of the utmost importance to wear at least one sweater under the marksmanship jacket. If possible, twosweaters should be worn. These sweaters increase stability and absorb pulse beat.
TELESCOPE
Telescopes are used so that the cadet or coach can view the target and make sight adjustments based on thefired shots.
MATS
Mats or ground sheets are used to aid the comfort of the cadets. However, they may not be used to provide anartificial support.

A-CR-CCP-177/PT-001
2-22
PHYSICAL TRAININGPhysical training improves and develops the strength and endurance required to hold the rifle steady for
long periods of time without fatigue.
WARM-UP EXERCISES TO BE DONE BEFORE STATIC STRETCHING
Each exercise should last about 20-30 seconds and it is important not to bounce or jerk when doing them.
STATIC STRETCHING EXERCISES
Neck Shoulders Trunk
Head and neck Shoulders, arms and wrists
Back
Before a competition orpractice, a warm-up exerciseis recommended in order toget the blood flowing and themuscles tuned.
Stretching exercises canhelp the individual’sflexibility and level ofcomfort during the firingsession.

A-CR-CCP-177/PT-001
2-23
COACHINGDUTIES OF A COACH
The role of a coach is to aid, assist, teach and help improve a cadet’s performance. A good coach is able torecognise and improve imperfections in position, holding and firing. The following are tasks commonly performedby coaches:
a. Providing positive reinforcement;
b. Instilling self-confidence;
c. Correcting marksmanship principles and techniques;
d. Correcting position problems;
e. Maintaining a coaching diary; and
f. Analyzing targets.
ANALYSIS OF COMMON ERRORS
Anticipation of recoil
No follow-through or anticipation
Jerking the trigger Squeezing the trigger at an angleImproper usage of the sling
Improper position of the buttplateVariance in breathingVariance in eye relief
Sling slippingLeft hand moving forward
Anticipation of recoil