air quality surveillance branch … sop e-bam4-13.pdfair quality surveillance branch . standard...
TRANSCRIPT

AIR QUALITY SURVEILLANCE BRANCH
STANDARD OPERATING PROCEDURES
FOR
MET ONE INSTRUMENTS E-BAM MASS MONITOR
AND AIRSIS AQEB-2000
TELEMETRY SYSTEM
AQSB SOP 411
First Edition
MONITORING AND LABORATORY DIVISION
May 2007

AQSB SOP 411 Met One E-BAM First Edition, April 2007
Approval of Standard Operating Procedures (SOP) Title: Met One Instruments E-BAM Mass Monitor and Airsis AQEB-2000
Telemetry System SOP: AQSB SOP 411, First Edition Section: Special Purpose Monitoring Branch: Air Quality Surveillance Branch (AQSB) Division: Monitoring and Laboratory Division (MLD) Prepared by: Neil Adler Approval: This SOP has been reviewed and approved by:
Reginald L. Smith, Manager Date Operation Support Section Air Quality Surveillance Branch Kenneth R. Stroud, Chief Date
Air Quality Surveillance Branch

AQSB SOP 411 Met One E-BAM
First Edition, May 2007
TABLE OF CONTENTS
MET ONE INSTRUMENTS E-BAM MASS MONITOR AND
AIRSIS AQEB-2000 TELEMETRY SYSTEM
Page(s) Date 1.0 GENERAL INFORMATION 6-7 05/07 1.1 Introduction 6 1.2 Principle of Operation 6 1.3 Interferences/Limitations 7 2.0 INSTALLATION PROCEDURE 8-12 05/07 2.1 List of Tools/Supplies 8 2.2 Physical Inspection 8-9 2.3 Hardware Set-Up 9-12 2.3.1 Assemble Tripod 9 2.3.2 Install E-BAM Cabinet 9 2.3.3 Install E-Bam Adapter Tube 9 2.3.4 Install PM2.5 and PM10 inlet 9 2.3.5 Install Cross arm and Temperature Sensor 10 2.3.6 Connect Power Source 10 3.0 INITIAL E-BAM START-UP PROCEEDURE 13-17 05/07 3.1 ARE YOU READY TO START? 13 3.2 LOCATION 13 3.3 TAPE ADVANCE 14 3.4 REALTIME AVG 14 3.5 REMOVE PACKING MATERIAL 14-15 3.6 LOAD FILTER TAPE 15-16 3.7 BATTERY 16 3.8 SELF TEST 16-17 4.0 OPERATION 18-22 05/07 4.1 REVIEW OPERATING SETTINGS ` 18 4.1.1 Date and Time 18-19 4.1.2 Real Time Concentration 19

AQSB SOP 411 Met One E-BAM
First Edition, May 2007
4.1.3 Hourly Concentration 19 4.1.4 E-BAM Status 19 4.2.5 Sample Flow Rate 20 4.1.6 Wind Speed and Direction 20 4.1.7 Ambient Temperature 20 4.1.8 Relative Humidity Internal and Filter Temperature 20-21 4.1.9 Relative Humidity External 21 4.1.10 Battery Voltage 21 4.1.11 Secondary Flow 21 4.2 E-BAM INLET HEATER 21-22 5.0 SELF TEST 23-24 05/07 6.0 CALIBRATION 25 05/07 6.1 CALIBRATION OVERVIEW 25 6.2 FLOW CALIBRATION 25 6.2.1 TEMPERATURE 26-27 6.2.2 PRESSURE 27-29 6.3 FLOW SYSTEM 29 6.3.1 Leak Check 29-30 6.3.2 Fixing a Leak 30 6.4 FLOW AUDIT/CALIBRATION 30 6.4.1 Flow Audit 30-31 6.4.2 Flow Calibration 31 6.4.3 FLOW 31-33 6.4.4 MEMBRANE TEST 33-37 6.4.5 Inlet Heater Maintenance 37-38 6.4.6 PUMP TEST 38-39 6.4.7 Replacing the Pump 39-40 7.0 ROUTINE SERVICE CHECKS AND MISCELLANEOUS
MAINTENANCE 41 7.1 ROUTINE SERVICE CHECKS 41 7.2 MISCELLANIOUS MAINTENANCE 41-42 FIGURES Figure 1 Front Panel 9 Figure 2 Front View Interior 20

AQSB SOP 411 Met One E-BAM
First Edition, May 2007
APPENDICES Appendix A Monthly Quality Control Maintenance Check Sheet 46 Appendix B Quality Control Maintenance Check Sheet 47-48

AQSB SOP 411 Met One E-BAM
First Edition, May 2007
1.0 GENERAL INFORMATION 1.1 Introduction: The purpose of this Standard Operating Procedure (SOP) is to document the
Met One E-BAM (E-BAM) procedures used by the Air Quality Surveillance Branch of the California Air Resources Board (ARB). The goal of this SOP is two fold; to formalize E-BAM installation, configuration and operation procedures in order to ensure comparability among all E-BAM data, and to describe supplemental information and modifications to the E-BAM Operation Manual necessary to successfully integrate the E-BAM into California’s ambient air monitoring network. The E-BAM Operation Manual contains a significant source of information pertinent to the operation, maintenance and understanding of this instrument, and therefore the ARB highly recommends a thorough review of the E-BAM Operation Manual.
1.2 Principle of Operation: The E-BAM is a portable real-time beta attenuation monitor (BAM) for automated PM2.5 and PM10 measurement. The E-BAM is based upon the principle of beta attenuation, which is defined as the decrease in the number of beta particles due to absorption by a medium. The E-BAM uses 14Carbon (14C), a naturally occurring radioactive isotope, as the source for beta particles. Due to the low mass and low energy, beta particles can only travel a foot or two through the air and can be completely attenuated with a few sheets of notebook paper. It is this property of attenuation of beta particles that allows the measurement of mass. In the E-BAM, a three-step process measures the mass of the suspended particulate matter. Step one is to make a first count of beta particles across a piece of filter paper. Next, particle-laden air is passed through the paper, and the particulate matter is deposited on the paper. In step three a second count of beta particles is made across the filter paper with the deposited particulate matter. This second count will be less than the first count due to the absorption of beta particles by the deposited particulate matter. Knowing the volume of air sampled and the difference in the measured beta counts, some simple calculations can be made to determine the concentration of particulate matter in the sampled air, expressed in mass per unit volume..
6

AQSB SOP 411 Met One E-BAM
First Edition, May 2007
1.3 Interferences/Limitations:
Moisture is the primary interference of concern when monitoring PM2.5 using the E-BAM. To alleviate the effects of moisture on the E-BAM measurements, all Met One E-BAMs are equipped with a moisture-controlled inlet heater. The inlet heater is used to prevent condensation on the filter paper and is controlled through a feed-back loop using temperature and relative humidity sensors that are located downstream of the filter. The presence of condensation on the filter paper can result in a positive bias in the mass measurements. By heating the air stream in a controlled manner, condensation is avoided and proper mass measurements are calculated. The Met One E-BAM is equipped with a Smart Heater. NOTE: Moisture entering and running down the inlet tube will not be dried using this heater; therefore, additional care must be taken to avoid moisture intrusion to the inlet tube. The use of the PM10 sampling inlet typically minimizes intrusion of water into the inlet.
7

AQSB SOP 411 Met One E-BAM
First Edition, May 2007
2.0 INSTALLATION PROCEDURE 2.1 List of Tools/Supplies:
Allen wrench Phillips head screw driver NIST-traceable flow audit device NIST-traceable temperature standard NIST-traceable barometric pressure standard for calibrations and/or audits.
2.2 Physical Inspection:
Upon receipt of an E-BAM, inspect equipment and accessories for completeness and for shipping damage. If components are missing or damage is found, contact the Met One service department at [email protected] or (541)471-7111. List of E-BAM Components:
E-BAM Console Ambient temperature probe Inlet adaptor tube Tripod Communication cable Filter tape, 1 roll E-BAM operation manual PM10 head (BX-802) Cross arm support TUS software External power cable Zero calibration plate Span calibration plate E-BAM calibration sheet.
The following options may also be included: 034B Wind Sensor PM2.5 sharp cut cyclone (SCC) (BX-807) Total suspended particulate (TSP) sampling head
8

AQSB SOP 411 Met One E-BAM
First Edition, May 2007
BX-305 flow test inlet valve Battery 12 Volt DC Battery charger AC power module.
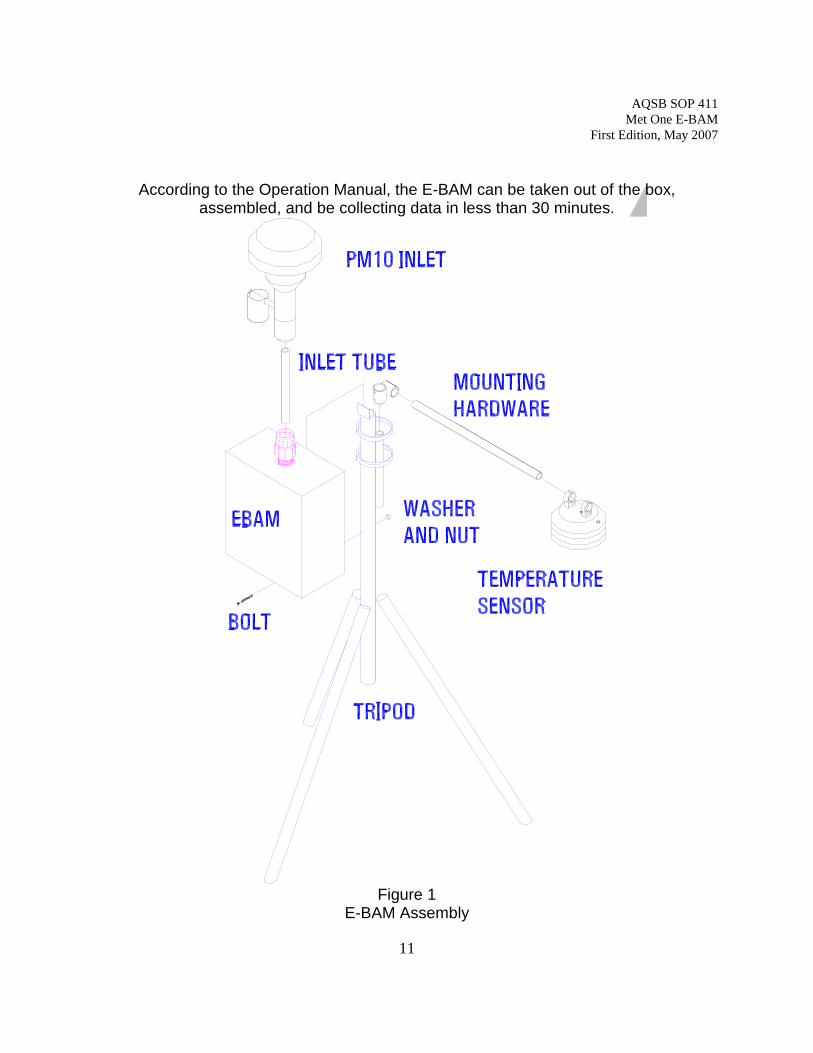
2.3 Hardware Set-Up: Figure 1 illustrates the E-BAM setup assembly. The six basic steps to
assembling the E-BAM monitor are given below:
1) Assemble tripod: Lift the tripod and remove the three lock pins. Spread the tripod legs and re-insert the three lock pins.
If the E-BAM is to be used under conditions that require additional stability, the tripod may be bolted to a firm surface using the 1/4-inch holes in the tripod feet.
2) Install E-BAM cabinet: Lift up the E-BAM enclosure with the aerosol inlet oriented upwards.
Slide the slot on the back of the cabinet down over the tab on top of the tripod. Attach the bottom of the cabinet to the tripod using the 1/4-inch nut and bolt provided.
3) Install E-BAM inlet adaptor tube: Remove the plastic end caps from the inlet adaptor tube and push the
tube into the E-BAM inlet. It must go through two O-rings so push and twist it all the way in until it stops. Hand-tighten the large black lock screw located at the top of the E-BAM enclosure.
4) Install PM2.5 and PM10 inlet:
Push the PM2.5 sampling inlet onto the inlet adaptor tube. It must go through an O-ring seal so push and twist it all the way in until it stops. NOTE: The O-rings are factory lubricated, but with frequent removal/replacement they will need to be re-lubricated with silicone O-ring grease. Push the PM10 sampling inlet onto the PM2.5 inlet. It must go through an O-ring seal so push and twist it all the way in until it stops. NOTE: The O-rings are factory lubricated, but with frequent removal/replacement they will need to be re-lubricated with silicone O-ring grease.
9

AQSB SOP 411 Met One E-BAM
First Edition, May 2007
5) Install cross arm and temperature sensors:
Install the cross arm on the pipe at the top of the tripod and tighten the two Allen screws. Clip the temperature sensor onto one arm of the tripod, and plug the signal cable into the 5-pin plug under the cabinet.
Attach any accessory sensors to the other arm of the cross arm. 6) Connect the power source. NOTE: The standard E-BAM is supplied
without a power source. However, several options exist for supplying power to the E-BAM. The selection and acquisition of an appropriate power source should be made prior to field deployment. The use of a solar panel may be particularly attractive in remote locations where long-term monitoring may be conducted. The power requirements for the E-BAM are 11-16 Volts DC at 3 amps continuous during operation but must also be able to provide 10 amps during the initial start up of the pump. These requirements mean the E-BAM can be operated off a standard 12 Volt DC batteries or off an AC power source using an AC to DC converter.
If a reliable source of 110 Volt AC power is available, it is recommended that this source be used to power the E-BAM. Locate the 110 Volt AC power cord configured with an AC to DC converter. This cord has a standard 110 Volt AC plug on one end and a six-pin connector that fits into a matching socket on the bottom of the E-BAM as depicted in Figure 2. Connect the power cord to the power source and to the E-BAM.
If no source of 110 Volt AC power is available, any 12 Volt DC power source, such as a car battery, can be used to power the E-BAM. Locate the external power cable that has a four-wire connector on one end and four terminated wires at the other end.
Connect the red wire with a terminal lug to the positive pole of the battery. Connect the black wire with a terminal lug to the negative pole of the battery. The white and blue wires are the contact closure for the E-BAM and are not needed for normal operation. Connect the four-wire connector to the matching socket on the bottom of the E-BAM as depicted in Figure 2.
There are various power sources and accessories including a solar panel that may be used to charge a 12 Volt battery.
10
AQSB SOP 411 Met One E-BAM
First Edition, May 2007
According to the Operation Manual, the E-BAM can be taken out of the box, assembled, and be collecting data in less than 30 minutes.
Figure 1
E-BAM Assembly
11

AQSB SOP 411 Met One E-BAM
First Edition, May 2007
Figure 2
Four Wire Connectors on Bottom of E-BAM
POWER
COMM EXTERNAL SENSOR
WS/WD
12

AQSB SOP 411 Met One E-BAM
First Edition, May 2007
3.0 INITIAL E-BAM START-UP PROCEDURE
After the E-BAM is assembled and the power is connected, the E-BAM is ready to be operated. During start up, the E-BAM quickly runs through a minimum of eight start-up screens. These screens verify that the time, date, and averaging period are correct. They also check for filter tape and proper operation of vital subsystems during the E-BAM Self Test. The following procedures describe the steps to be followed to start up the E-BAM. 1) ARE YOU READY TO START?
Undo the latch and swing open the E-BAM door. Note that the display is on and displaying, ARE YOU READY TO START? Press the white “hot” key under YES to proceed.
If the time and date on the display are correct, push the right “soft” key on the keypad directly under where YES is displayed. Press NO to make a change. Use the arrow keys to make changes. When finished, press SET to save the changes. Press CONTINUE to exit without making changes.
2) LOCATION
The next screen depicts the E-BAM location filter advance and averaging start-up screen. LOCATION is a description for the E-BAM. Data that are downloaded will have a location ID number to enable tracking of measurement information. This may be a value from 0 to 99. To make changes, press EDIT. Press OK to proceed to the next screen. Press EDIT to make changes. Use the arrow keys to make changes.
DATE: 10-APR-2007 TIME: 08:41:45
IS THIS CORRECT? NO YES
WELCOME TO E-BAM ARE YOU READY TO START?
YES
13

AQSB SOP 411 Met One E-BAM
First Edition, May 2007
3) TAPE ADVANCE
Tape Advance is how often the E-BAM will advance to a new spot of filter paper. The filter tape advances according to the value at which it is set. This value can be any of the following times: 1, 2, 3, 4, 6, 8, 12, or 24 hours. Note: The filter advance does not change how often the concentration is calculated. The real-time concentration is always updated every minute and the hourly concentration is always updated each hour. NOTE: The filter tape will also automatically advance if the concentration is too high or the ambient temperature exceeds safe operation. When the filter tape is advanced due to high concentrations, an event is written to the alarm log. When the filter tape is advanced due to ambient temperature, an event is written to the alarm log.
4) REALTIME AVG
Real Time Avg is the averaging period for the real-time concentration value. The real-time concentration is calculated every minute from two 4-minute counts. The REALTIME AVG takes the mean value for the selected time period for the real-time concentration. The REALTIME AVG may be set to the following time periods: 1, 5, 10, 15, 30, or 60 minutes. Press SAVE to save the changes, or press CONTINUE to proceed and not make changes.
5) REMOVE PACKING MATERIAL
If the nozzle packing material has not been removed, the nozzle will move upward and the display screen, as shown below, will ask you to remove nozzle-packing material.
LOCATION: 01 TAPE ADVANCE: 24 HRS REALTIME AVG: 1 MIN EDIT OK
14

AQSB SOP 411 Met One E-BAM
First Edition, May 2007
Remove the stainless steel nozzle-packing material from under the nozzle and press CONTINUE. Note: this nozzle-packing slide is also the zero adjustment membrane.
6) LOAD FILTER TAPE
The next screen will be shown while the unit checks to see if the filter paper is loaded.
If the unit finds that the filter tape is not loaded, the following screen will ask you to load the filter tape.
Remove both of the clear plastic spool covers by unscrewing the captive knobs. An empty tape roll core tube must be installed on the hub of the take-up spool. Special care should be taken when handling unused filter tape because it tears easily. Figure 3.1 illustrates filter tape installation. Place a full roll of filter tape on supply (right) spool, with the tape feeding upward and counter-clockwise. Feed end of filter tape so that it enters the take-up spool in a counter-clockwise direction. Using any available adhesive tape, attach the leading end of the filter tape to the core tube to prevent slipping. Gently tension the tape. Reinstall both spools. When finished, press CONTINUE. The filter tape will move and take up tension.
PLEASE LOAD TAPE! E-BAM WILL NOT OPERATE WITHOUT TAPE. CONTINUE
CHECKING FOR LOADED TAPE.
PLEASE WAIT...
PLEASE REMOVE NOZZLE PACKING
MATERIAL. CONTINUE
15

AQSB SOP 411 Met One E-BAM
First Edition, May 2007
Figure 3
Filter Tape Installation.
7) BATTERY After the tape is checked, the BATTERY condition is displayed in the power start-up screen, as shown below. Press CONTINUE to proceed.
8) SELF TEST
SELF TEST will take several minutes and cannot be bypassed by the operator.
BATTERY: 13.0 VOLTS ESTIMATED OPERATION TIME FOR 100 AMP-HRS IS 42 HRS. CONTINUE
16

AQSB SOP 411 Met One E-BAM
First Edition, May 2007
After SELF TEST is complete, the following screen is displayed. Press CONTINUE and the E-BAM will begin sampling.
The Self Test can fail during any of the following sub-tests: Tape Broken Nozzle Motor Failed Beta Counts Failed Flow System Failed Pressure Sensor Failed If any fault is located during Self Test, the name and type of fault will be shown. If there is a reasonable expectation that the operator could correct the fault, an instruction for correction will be shown on the E-BAM display with step-by-step instructions to test and verify the system integrity. The operator must acknowledge any errors within one minute or the unit will automatically begin operation. NOTE: When the E- BAM is first powered on it will require a one-hour warm-up period. Data acquired during the first hour should be discarded. After moving through the start-up screen process, the E-BAM defaults to the OPERATE screen, on which the date and time, concentration, and sampling condition are displayed.
SELF TEST COMPLETE: E-BAM FUNCTIONING
PROPERLY. CONTINUE
SELF TEST RUNNING... *****************999
17

AQSB SOP 411 Met One E-BAM
First Edition, May 2007
4.0 OPERATION 4.1 REVIEW OPERATING SETTINGS
The default sampling screen for the E-BAM is shown below. The E-BAM sampling screen is 13 lines long, but only four lines are visible due to the display size. Using the UP � and DOWN � arrow key will move the window so the other lines (shown underneath the box below) can be viewed. During normal operation, the OPERATE SCREEN will come on and display the following: The lines consist of:
Line Display Line Description 08-JUL-2001 08:23:41 Date and Time 9.999 MG/M3 01:00 Real-Time Concentration 9.999 MG/M3 (HR) Hourly Concentration SAMPLING... E-BAM Status FLOW: 99.9 LPM Sample Flow Rate WS: 999.9 M/S Wind Speed WD: 999.9 DEG Wind Direction AT: -99.9 C Ambient Temperature FT: -99.9 C Filter Temperature RHi: 999 % Relative Humidity Internal RHx: 999 % Relative Humidity External BV: 99.9 V Battery Voltage FLOW: 99.9 SLPM Secondary Flow
It is recommended that the operator view each line to ensure proper operation of the E-BAM.
(1 Date and Time Check to ensure that the date and time are correct. The date and time can be changed during start up as described in Chapter 3, or by using the procedure given below. NOTE: The date and time are displayed as the DAY-MONTH-YEAR, and cannot be modified.
18

AQSB SOP 411 Met One E-BAM
First Edition, May 2007
1. Press the MENU key on the E-BAM keypad. Pressing this key will bring up the main MENU for the E-BAM. 2. Press the DOWN � arrow to highlight the SETUP selection and press MENU/SELECT. The first SETUP screen is the DATE/TIME screen with two identical dates and times showing on the first two lines of the display. 3. Using the RIGHT/LEFT arrow keys highlight the value(s) that need to be changed. 4. Use the UP/DOWN arrow keys to increase or decrease the selection to a higher or lower value. 5. Once the date and time are correct, press SET and continue until the main menu is displayed.
(2 Real-Time Concentration During normal sampling, the real-time mass concentration is updated on the display every 60 seconds. However, the concentration recorded in the datalogger is based on a user-selectable time period. This selectable time period is called the REALTIME AVG and it may be any of the following values: 1, 5, 10, 15, 30, or 60 minute(s). The REALTIME AVG setting can be modified in the E-BAM start up as described in Chapter 3, or by using the procedure given below. 1. Press MENU/SELECT 2. Highlight SETUP with the curser and press MENU/SELECT again. 3. Press CONTINUE to bypass the DATE/TIME screen. 4. The next screen is the Location Averaging Period screen. Modify the settings by highlighting the value(s) and incrementing the reading with the UP/DOWN keys. Press SET to select the desired setting.
(3 Hourly Concentration Hourly concentration is computed from an initial count compared to a second count. These two counts are separated by 60 minutes. This means that there are 60 minutes from the start of the initial count until the end of the final count. At the beginning of an hour, the last hour’s calculation is written to the datalogger. This value is held constant until the start of the next hour when it is updated with the new calculation of concentration.
(4 E-BAM Status The status line is an indicator of the current E-BAM operation. The E-BAM status messages will display either SAMPLING or UNIT OFF. Press the hot key directly under the message to initiate sampling if the display reads UNIT OFF.
19

AQSB SOP 411 Met One E-BAM
First Edition, May 2007
(5 Sample Flow Rate
The sample flow rate displays the instantaneous flow rate. The E-BAM flow rate may be set to a value from 10 LPM to 17.5 LPM. The flow can be controlled to ACTUAL or STANDARD conditions. The flow settings can be modified in E-BAM start up as described in the SETUP menu as described below. 1. Press MENU/SELECT 2. Highlight SETUP with the curser and press MENU/SELECT again. 3. Press CONTINUE twice to bypass the DATE/TIME screen and the LOCATION screen. The next screen is the FLOW RATE screen. Modify the settings by highlighting the value(s) and incrementing the reading with the UP/DOWN keys. Press SET to select the desired setting.
(6 Wind Speed and Direction This is an optional accessory for the E-BAM. Units are displayed in meters per second (m/s) and degrees. The sensor can be mounted directly to the E-BAM tripod or remotely on an existing structure. It plugs directly into the E-BAM without the need for programming.
(7 Ambient Temperature Every E-BAM comes equipped with an ambient temperature sensor. This sensor allows the E-BAM to control the flow to ACTUAL conditions and report the concentration in actual conditions. The ambient temperature sensor mounts directly to the E-BAM tripod. The sensor has a temperature range of –50 to 50 Celsius and an accuracy of 0.1 Celsius. Check to ensure that the temperature value displayed seems appropriate for the ambient conditions. NOTE: The pump will not come on in OPERATE mode if the temperature sensor is not connected.
(8 Relative Humidity Internal and Filter Temperature These are standard measurements of the E-BAM. Both sensors are located downstream of the filter paper. By adding heat to the air stream in a controlled manner, condensation is avoided and proper mass measurements are calculated. To ensure that the sample does not get over heated, filter temperature is also measured. The filter temperature and the ambient temperature are used to calculate a Delta-Temperature. The Delta-Temperature is the Filter Temperature minus the Ambient Temperature. The set points for the moisture-controlled heater can be modified during E-BAM start up as described below. 1. Press MENU/SELECT
20

AQSB SOP 411 Met One E-BAM
First Edition, May 2007
2. Highlight SETUP with the cursor and press MENU/SELECT again. 3. Press CONTINUE three times to bypass the DATE/TIME screen, the LOCATION screen, and the FLOW screen. 4. The next screen is the HEATER screen. Modify the settings by highlighting the value(s) and incrementing the reading with the UP/DOWN keys. Press SET to select the desired setting. NOTE: Set Delta-T to NO unless it is required, otherwise the E-BAM will turn off the heater even though the humidity is high.
(9 Relative Humidity External This is an optional accessory for the E-BAM. The relative humidity (RH) external sensor has a measurement range from 0 to 100 percent with an accuracy of 3 percent. The sensor can be mounted directly to the E-BAM tripod or remotely to an existing structure.
(10 Battery Voltage This is a measurement of the incoming power. If the unit is connected to a battery, this will allow the logging of the power during the sample period. If the unit is connected to AC power through a DC power supply, this should be a constant number.
(11 Secondary Flow This channel is used only when the FLOW type is selected as STANDARD flow. Standard flow will be displayed on line five of the sampling screen. This channel will display ACTUAL flow. If ACTUAL flow is selected this line will be blank.
4.2 E-BAM INLET HEATER
To ensure the sample does not get over heated, filter temperature is measured. The filter temperature and the ambient temperature are used to calculate a Delta-Temperature. The Delta-Temperature is calculated as the difference between the filter temperature and the ambient temperature. A maximum Delta-Temperature can be set to limit the heat applied to the sample air. The set points for the moisture-controlled heater can be modified in the SETUP menu as described below. Press MENU/SELECT Highlight SETUP with the curser and press MENU/SELECT again. Press CONTINUE three times to bypass the DATE/TIME screen, the LOCATION screen, and the FLOW screen. The next screen is the HEATER control screen. Modify the settings by highlighting the value(s) and incrementing
21

AQSB SOP 411 Met One E-BAM
First Edition, May 2007
the reading with the UP/DOWN keys. Met One recommends using an RH set point of 45 percent and a Delta-T set point of 8 Celsius with RH control set to ON.
The Inlet Heater operates according to the following parameters: When RH control is ON, the heater will be turned ON when the RH is above set point and will turn OFF 1 percent below set point. When the Delta-T set point is exceeded by 1 C, the heater is turned OFF. The Delta-T control overrides the RH set point control. o Delta-T is the result of the filter temperature minus the ambient air temperature. Anytime the pump is OFF, the heater is OFF. Delta-T violations are reported to the Alarm log, which sets the alarm relay. o A violation occurs when the RH control is ON and the Delta-T reading exceeds the Delta-T set point by 1 C. o Reset the alarm at power up and beginning of tape advance. NOTE: As with any instrument, it is always important to exit out to the Main Menu and then return to check if the changes were in fact saved.
RH SETPOINT: 45 % DELTA-T SETPT: 10 C
RH CONTROL: ON SAVE CONTINUE
22

AQSB SOP 411 Met One E-BAM
First Edition, May 2007
5.0 SELF TEST
The E-BAM has a SELF TEST mode that will automatically test all parameters. If any fault is located, the name and type of fault will be shown. If there is a reasonable expectation that the operator could correct the fault, an instruction for correction is shown. The following procedures should be used to conduct a SELF TEST: Go to the MENU SCREEN Use the UP/DOWN arrow keys to select SELF TEST. Press the SELECT key.
The E-BAM display will indicate SELF TEST RUNNING
The SELF TEST will take several minutes and cannot be bypassed by the operator. After SELF TEST is finished, the following screen is displayed.
SELF TEST RUNNING...
***************999
SELF TEST FIELD CALIBRATION SHUTDOWN/SHIPPING VI SELF TEST RUNNING...
OPERATE LOAD TAPE SETUP MEMORY
23

AQSB SOP 411 Met One E-BAM
First Edition, May 2007
Answer CONTINUE and the E-BAM will begin sampling If SELF TEST failed (e.g., if the pump failed to turn on), the following screen will appear
.
FLOW SYSTEM FAILED!
CONTINUE
SELF TEST COMPLETE: E-BAM FUNCTIONING
PROPERLY. CONTINUE
24

AQSB SOP 411 Met One E-BAM
First Edition, May 2007
6.0 CALIBRATION 6.1 CALIBRATION OVERVIEW
Calibration of the E-BAM is done using the same calibration standard used for the calibration of BAM1020. The BAM1020 is certified by the U.S. EPA as an Equivalent Method for PM10 and is calibrated with NIST-traceable transfer standards. The following screen is used to verify the operation of the E-BAM:
Selecting FIELD CALIBRATION opens the following screen:
6.2 FLOW CALIBRATION A flow calibration includes an audit of the temperature and pressure sensors. To perform a valid flow calibration, follow the step-by-step procedure below. NOTE:
FILTER TEMP PUMP TEST ANALOG AUDIT MEMBRANE TEST
TEMPERATURE PRESSURE FLOW FILTER RH
SELF TEST FIELD CALIBRATION SHUTDOWN/SHIPPING VI SELF TEST RUNNING...
OPERATE LOAD TAPE SETUP MEMORY
25

AQSB SOP 411 Met One E-BAM
First Edition, May 2007
Before a flow calibration is completed, a temperature and pressure audit must first be conducted. (1 TEMPERATURE
The temperature sensor audit is typically conducted at two temperatures. One is at ambient conditions where the E-BAM and audit temperature sensors measure the ambient air. The second is at low temperature when the E-BAM and audit temperature sensors are submersed in an ice bath. Go to the MENU SCREEN and use the UP/DOWN arrow keys to select FIELD CALIBRATION, then press the SELECT key.
The FIELD CALIBRATION screen has seven selections. The first three selections (TEMPERATURE, PRESSURE, and FLOW) are used in a flow audit. Actual Flow is calculated from all three components. Select TEMPERATURE from the FIELD CALIBRATION screen.
FILTER RH FILTER TEMPERATURE PUMP TEST
TEMPERATURE PRESSURE FLOW MEMBRANE TEST
SELF TEST FIELD CALIBRATION SHUTDOWN/SHIPPING VIEW ALARM LOG ABOUT
OPERATE LOAD TAPE SETUP MEMORY
26

AQSB SOP 411 Met One E-BAM
First Edition, May 2007
The calibration screens for TEMPERATURE, PRESSURE, and FLOW are all similar. Each screen has a set point, E-BAM, REF, CALIBRATE, and DEFAULT entry, as shown below.
Set point: This is the intended value for the sensor. In the TEMPERATURE screen, two values are selectable — HIGH and LOW. These correspond to ambient and ice bath values. E-BAM: This is the measurement that the E-BAM is calculating for the selected sensor. REF: This is the value that the Reference sensor is calculating. By entering the reference value into this entry and pressing CALIBRATE, the E-BAM measurement will be calibrated to the entered value. CALIBRATE: Press this key to recalibrate the E-BAM sensor to the inputted REF value. DEFAULT: Press this key to restore factory default values. Place a NIST-traceable temperature sensor in close proximity to the E-BAM temperature sensor. Allow an equilibration period of at least 15 minutes when the E-BAM and Reference temperatures are at the same location. If the test is an ambient test [above 20 Celsius (68 F)], select POINT:HIGH. If the test is an ice bath test, select POINT: LOW. NOTE: It is recommended that the ambient point (HIGH) be done first, due to the long equilibration period required for the temperature sensors to warm up. Compare the reference temperature reading to the E-BAM reading on the LCD. If the readings are within 0.5 C (1 F), no recalibration is necessary. If the readings differ by more than 0.5 C (1 F), enter the reference temperature measurement into the REF:XX.X field and press CALIBRATE. Repeat above steps for the second point.
2) PRESSURE
POINT: LOW E-BAM: 21.8 C REF: -30.0 C CALIBRATE DEFAULT
27

AQSB SOP 411 Met One E-BAM
First Edition, May 2007
The pressure sensor audit is conducted with a single-point calibration. If the pressure values are within 2 mmHg, no recalibration is necessary. Go to the MENU SCREEN and use the UP/DOWN arrow keys to select FIELD CALIBRATION, then press the SELECT key.
The FIELD CALIBRATION screen has seven selections. The first three selections (TEMPERATURE, PRESSURE, and FLOW) are used in a flow audit. Actual Flow is calculated from all three components. Select PRESSURE from the FIELD CALIBRATION screen.
The calibration screens for TEMPERATURE, PRESSURE, and FLOW are all similar. Each screen has a set point, E-BAM, REF, CALIBRATE, and DEFAULT entry, as shown below.
FILTER RH FILTER TEMPERATURE PUMP TEST
TEMPERATURE PRESSURE FLOW MEMBRANE TEST
SELF TEST FIELD CALIBRATION SHUTDOWN/SHIPPING VIEW ALARM LOG ABOUT
OPERATE LOAD TAPE SETUP MEMORY
28

AQSB SOP 411 Met One E-BAM
First Edition, May 2007
E-BAM: This is the measurement that the E-BAM is calculating for the selected sensor. REF: This is the value that the Reference sensor is calculating. By entering the reference value into this entry and pressing CALIBRATE, the E-BAM measurement will be calibrated to the entered value. CALIBRATE: Press this key to recalibrate the E-BAM sensor to the inputted REF value. DEFAULT: Press this key to restore factory default values. Place a NIST-traceable pressure sensor in close proximity to the E-BAM. Compare the reference pressure reading to the E-BAM reading on the LCD. If the readings are within 2 mmHg, no recalibration is necessary. If the readings differ by more than 2 mmHg, enter the reference pressure measurement into the REF:XX.X field and press CALIBRATE.
6.3 FLOW SYSTEM After initial installation or relocation of the E-BAM, two checks required to verify the operation of the E-BAM are a LEAK CHECK and FLOW AUDIT procedure. The flow system should be audited periodically to insure that accurate data are being collected.
(1 Leak Check During normal operation, the flow system is under a vacuum of 160 mmHg (6 in Hg). The leak check procedure increases this vacuum to 400 mmHg (16 in Hg). This 2.5 times increase in vacuum finds problems before they can affect the data. To perform a valid leak test, follow the step-by-step procedure below.
OPERATE LOAD TAPE SETUP MEMORY
POINT: LOW E-BAM: 21.8 C REF: -30.0 C CALIBRATE DEFAULT
29

AQSB SOP 411 Met One E-BAM
First Edition, May 2007
Selecting FIELD CALIBRATION opens the following screen:
E-BAM is in the PUMP TEST screen located in the MAIN MENU/FIELD CALIBRATION/PUMP TEST. This screen has two modes – LEAK CHECK and PUMP TEST. Select LEAK CHECK. Remove the PM10 inlet and replace with a leak test valve (BX-305). NOTE: When looking for a leak, it might be necessary to remove both the PM10 inlet and the PM2.5 inlet. This would help pinpoint the leak more accurately. Close the valve on the leak test valve. Flow rate should drop to under 1.5 liters per minute (LPM). If the flow is under 1.5 LPM, remove the leak test valve and replace the PM10 head. If the flow is greater than 1.5 LPM, proceed to Section 6.3.2, Fixing a Leak.
(2 Fixing a Leak If you have performed the steps of a leak check and found that the E-BAM fails to have a flow rate less than 1.5 LPM, there is a problem with the integrity of the flow system. If a leak is detected, the most likely cause is build up of material on the nozzle or vane. During normal operation, the nozzle of the E-BAM can have a build up of filter material on the sealing surface. Build up can also occur on the vane, which is the crosshatch-piece under the filter paper. Both of these must be cleaned periodically
FILTER RH FILTER TEMPERATURE PUMP TEST
TEMPERATURE PRESSURE FLOW MEMBRANE TEST
SELF TEST FIELD CALIBRATION SHUTDOWN/SHIPPING VIEW ALARM LOG ABOUT
30

AQSB SOP 411 Met One E-BAM
First Edition, May 2007
using alcohol and a Q-tip. Met One suggests cleaning these areas at least every two months of continuous operation.
6.4 FLOW AUDIT/CALIBRATION
(1 Flow Audit
After the leak check, the next procedure to validate a flow system is a FLOW AUDIT. In an E-BAM, the flow audit process has been simplified to allow quick and accurate flow audits. The following procedure should be followed to conduct a flow audit of the E-BAM. Connect the audit device (i.e., flow transfer standard) to the E-BAM inlet. If the flow standard uses tubing, a BX-305 will allow easy connection to the E-BAM inlet. Be sure that the flow standard and the E-BAM are measuring the flow on the same units and type. Compare the reading of the audit device with the flow rate value displayed by the E-BAM. If the difference between the E-BAM flow rate and the audit device reading is greater than 2 percent, a FLOW CALIBRATION will need to be done. NOTE: The E-BAM reports the flow rates as either ACTUAL flow (i.e., reported at actual ambient conditions), or as STANDARD flow (i.e., reported at standard conditions). Ensure that the audit device and the E-BAM report flow under the same conditions. To check the setting of the flow type in the E-BAM, go the SETUP screen in the MAIN MENU.
(2 Flow Calibration A flow calibration includes an audit of the temperature and pressure sensors. To perform a valid flow calibration, follow the step-by-step procedure below. NOTE: Before a flow calibration is completed, a temperature and pressure audit must first be conducted.
(3 FLOW
The flow audit is typically conducted in the FLOW SCREEN; three points are selectable — 14.0, 16.7, and 17.5 LPM. Go to the MENU SCREEN and use the UP/DOWN arrow keys to select FIELD CALIBRATION and press the SELECT key.
31

AQSB SOP 411 Met One E-BAM
First Edition, May 2007
In the FIELD CALIBRATION screen, select FLOW. NOTE: TEMPERATURE and PRESSURE must be audited prior to the FLOW.
The FLOW calibration screen is similar to all E-BAM calibration screens.
FLOW SP: This is the flow rate value. In the FLOW screen, three points are selectable — 14.0, 16.7, and 17.5 LPM. E-BAM: This is the measurement that the E-BAM is calculating for the selected sensor. REF: This is the value that the Reference sensor is calculating. By entering the reference value into this entry and pressing CALIBRATE, the E-BAM measurement will be calibrated to the entered value. CALIBRATE: Press this key to recalibrate the E-BAM sensor to the inputted
SELF TEST FIELD CALIBRATION SHUTDOWN/SHIPPING VIEW ALARM LOG ABOUT
OPERATE LOAD TAPE SETUP MEMORY
FLOW SP: 16.7 LPM E-BAM: 16.7 LPM REF: 16.4 LPM CALIBRATE DEFAULT
TEMPERATURE PRESSURE >FLOW MEMBRANE TEST
32

AQSB SOP 411 Met One E-BAM
First Edition, May 2007
REF value. DEFAULT: Press this key to restore factory default values. Once a set point is selected, the E-BAM will automatically turn on the pump and regulate to the flow set point. Remove the PM10 inlet and place the reference flow audit device on the inlet tube. Wait for 5 minutes for the flow to equilibrate. Compare the reference flow to the E-BAM flow. If the flows are within 2 percent, no recalibration is necessary. To recalibrate the flow, enter the Reference Flow Meter reading into the REF:XX.X LPM entry and press CALIBRATE. Repeat the above procedure for the remaining FLOW SP. The FLOW system is checked and verified by the Leak and Flow tests. When the E-BAM passes both these tests, the FLOW system will work correctly.
(4 Membrane Test Verification is accomplished using two calibration plates that represent a ZERO and SPAN factory set calibration points. The set of calibration plates are unique to each E-BAM. Always check that the serial number on the calibration plates matches the serial number of the E-BAM to be calibrated. The SPAN calibration plate has a fragile membrane covering the hole. The membrane calibration will take approximately 16 minutes. Figure 2 shows the ZERO and SPAN plates being inserted. NOTE: Never bump or touch the membrane. Always keep the membrane in their protective plastic case when not in use. When inserting the membrane into the E-BAM, be careful that you do not scrape or rub the filter tape with the metal plate or a calibration error may result.
33

AQSB SOP 411 Met One E-BAM
First Edition, May 2007
Figure 4 Inserting the Zero /Span Plates
With the E-BAM door still open, turn on the display and press any key. Go to the MENU SCREEN and use the UP and DOWN arrow keys to select FIELD CALIBRATION, and press the SELECT key.
SELF TEST FIELD CALIBRATION SHUTDOWN/SHIPPING VIEW ALARM LOG ABOUT
OPERATE LOAD TAPE SETUP MEMORY
34

AQSB SOP 411 Met One E-BAM
First Edition, May 2007
From the FIELD CALIBRATION MENU, select MEMBRANE TEST and press the SELECT key.
Press the START key once you are ready to start the calibration.
The filter tape will advance, the nozzle will lower, and the E-BAM will take a 4-minute blank ZERO count. Press CANCEL to re-start the test.
After the 4-minute count, the nozzle will move up and wait for you to insert the ZERO membrane.
INSERT ZERO MEMBRANE CANCEL
BLANK ZERO COUNT CANCEL
MEMBRANE TEST START ZERO TEST
START
TEMPERATURE PRESSURE >FLOW MEMBRANE TEST
35

AQSB SOP 411 Met One E-BAM
First Edition, May 2007
Insert the ZERO Membrane; the nozzle will lower and the E-BAM will take a 4-minute ZERO count.
After the 4-minute sample, the nozzle will move up and ask you to remove the ZERO membrane.
When the ZERO membrane is removed, the nozzle will lower and the E-BAM will take a 4-minute blank SPAN count.
After the 4-minute blank SPAN count, the nozzle will move up and wait for you to insert the SPAN membrane.
INSERT SPAN MEMBRANE CANCEL
BLANK SPAN COUNT CANCEL
REMOVE MEMBRANE CANCEL
CAL ZERO COUNT CANCEL
36

AQSB SOP 411 Met One E-BAM
First Edition, May 2007
After you insert the SPAN membrane, the nozzle will lower and the E-BAM will take a 4-minute SPAN count.
Note the test results and take out the SPAN membrane. .
If the ZERO or SPAN test failed, rerun the test. If the failure continues, clean the detector and re-run the test. If the failure persists, contact the factory service center. Press OK to return to the FIELD CALIBRATION MENU. NOTE: The measuring system performance is checked and verified by completion of the Zero and Span tests.
(5 Inlet Heater Maintenance The inlet heater needs periodic maintenance for the Filter RH and Filter Temperature sensors. Both sensors can be audited and calibrated from the E-BAM display. Filter RH The filter RH sensor is used to control the heater during periods when the sample air has an RH value that exceeds the set point. The Filter RH audit display is located in the MAIN MENU/FIELD CALIBRATION/FILTER RH screen.
MEMBRANE TEST RESULT ZERO MEMBRANE: PASS SPAN MEMBRANE: PASS
OK
CAL SPAN COUNT CANCEL
37

AQSB SOP 411 Met One E-BAM
First Edition, May 2007
E-BAM: This is the measurement that the E-BAM is calculating for the selected sensor. REF: This is the value that the Reference sensor is calculating. By entering the reference value into this entry and pressing CALIBRATE, the E-BAM measurement will be calibrated to the entered value. CALIBRATE: Press this key to recalibrate the E-BAM sensor to the inputted REF value. DEFAULT: Press this key to restore factory default values. Filter Temperature The filter temperature sensor is used to limit the heat added during periods when the sample air has an RH value that exceeds the set point. The filter temperature audit display is located in the MAIN MENU/FIELD CALIBRATION/FILTER TEMPERATURE screen.
E-BAM: This is the measurement that the E-BAM is calculating for the selected sensor. REF: This is the value that the Reference sensor is calculating. By entering the reference value into this entry and pressing CALIBRATE, the E-BAM measurement will be calibrated to the entered value. CALIBRATE: Press this key to recalibrate the E-BAM sensor to the inputted REF value. DEFAULT: Press this key to restore factory default values.
(6 Pump Test The dual diaphragm pump in the E-BAM has an 8,000-hour estimated lifetime. Under normal use, it should be serviced once a year. The pump cannot be rebuilt. A replacement pump must be purchased and installed.
FILTER TEMPERATURE E-BAM: xx.x C REF: -xx.x C CALIBRATE DEFAULT
FILTER RH E-BAM: 57 % REF: xxx % CALIBRATE DEFAULT
38

AQSB SOP 411 Met One E-BAM
First Edition, May 2007
Testing the Pump A flow test inlet valve (BX-305) will be needed to test the pump. This test is found in the PUMP TEST screen. This display is located in the MAIN MENU/FIELD CALIBRATION/PUMP TEST screen. There are two modes in this screen, which are LEAK TEST and PUMP TEST. Select PUMP TEST mode.
Remove the inlet head(s). Place the flow test inlet valve over the inlet tube on the top of the E-BAM. Turn the E-BAM on and allow the pump to equilibrate at 16.7 LPM. Slowly close the valve on the BX-305 until the flow is one of the values in Table 1 Let the pump run at that flow rate for at least 1 minute. Readjust as necessary.
MODE: PUMP TEST FLOW: 16.7 LPM PRES: 999999 PA EXIT
39

AQSB SOP 411 Met One E-BAM
First Edition, May 2007
Table 1 Vacuum Test for Pump Condition.
Compare the pressure reading to the acceptable pressure readings in Table 1. If the pressure is within tolerances, the pump does not need to be replaced. If it is out of tolerance, replace the pump.
(7 Replacing the Pump In addition to the steps listed below, Figure 2 illustrates how to remove the pump for replacement. Turn off the power to the E-BAM. Open the cabinet door and remove the two 8-32 Phillips-head screws holding the pump cover plate on. Disconnect the pump power connector from the printed circuit board. Take out the four 6-32 Phillips-head screws holding the inlet tube to the pump. Slide the upper sealing collar upward. There are no threads on the collar and it should move up with a slight twist and firm push. Slide the lower sealing cover upward. Take out the inlet tube. Take out the three 6-32 Phillips-head screws holding the pump mount to the front panel.
40

AQSB SOP 411 Met One E-BAM
First Edition, May 2007
Pull off the four 3/8-inch Tygon tubes from the pump ports. Be sure to mark the tubes so they go back on the same pump ports later. The pump can now be taken out of the cabinet. Re-install the pump in the reverse order.
Figure 5 Removing the Pump for Replacement
41

AQSB SOP 411 Met One E-BAM
First Edition, May 2007
7.0 ROUTINE SERVICE CHECKS AND MISCELLANEOUS MAINTENANCE 7.1 ROUTINE SERVICE CHECKS
Normal E-BAM maintenance requires keeping the E-BAM central unit and inlet dust free. Every year of operation, the accumulated dust on the detector-sensing region should be cleaned off as well. Table 2 lists the manufacturer’s recommendations that are required for calibration or replacement over various time periods.
Table 2 Maintenance Schedule
7.2 MISCELLANEOUS MAINTENANCE
(1 Alarm Log: Check this log to see if certain errors are occurring regularly. This log can be checked in the MAIN MENU under the heading of View Error Log. Note the errors and correct if necessary. For a troubleshooting guide, see Section 8.
42

AQSB SOP 411 Met One E-BAM
First Edition, May 2007
(2 Clean the PM10 Inlet Head: Under continuous use, the PM10 inlet head should be removed and cleaned every six months. The PM10 inlet requires removal from the inlet tube, disassembly, and cleaning. Disassemble the PM10 inlet and wipe clean with a lint-free cloth. Ensure that all O-ring surfaces are in excellent shape and are re-installed correctly. If O-rings are damaged, contact Met One for replacement parts. (3 Clean the PM2.5 SCC: The PM2.5 SCC inlet requires removal from the inlet tube, disassembly, and cleaning. Disassemble the SCC and wipe clean with a lint-free cloth. Ensure that all O-ring surfaces are in excellent shape and are re-installed correctly. If O-rings are damaged, contact Met One for replacement parts. (4 Filter Tape: Depending on Filter Tape Advance settings and concentration, the filter tape will need to be replaced. A simple check each month will prevent the E-BAM from running out of filter tape.
(5 Cleaning the PMT: All E-BAMs manufactured after June 2003 have a new style of PMT installed and cannot be cleaned with a Q-tip and alcohol like the older style of PMT. The new style PMT should only be cleaned with low-pressure clean air. Care must be taken that the PMT surface does not come into contact with any other surface.
43

AQSB SOP 411 Met One E-BAM
First Edition, May 2007
8.0 TROUBLESHOOTING
A basic troubleshooting guide is provided in Table 2.
Table 2 Troubleshooting Guide for E-BAM Mass Monitor.
44

AQSB SOP 411 Met One E-BAM
First Edition, May 2007
9.0 CARB Calibration Introduction:
The purpose of this section is to outline the Met One E-BAMs calibration procedures used by the Monitoring and Laboratory Division of the California Air Resources Board (ARB). The Met One E-BAM Operation Manual is an important resource of information, and the ARB recommends a thorough review of the manual.
9.1 Calibration Overview: This procedure calibrates the flowmeter response by measuring the flowmeter zero voltage and determining the flow scale factor. These two factors are used during measurements to calculate the actual airflow through the flowmeter. An external flow-measuring device, which is traceable to an NIST primary standard, is used to calculate the actual airflow of the instrument. The instrument response is then adjusted until the internal flowmeter is reading the actual flowrate.
9.2 Calibration Transfer Standards and Equipment:
Standard external flowmeter capable of reading air flow rates in the range of 10 to 20 slpm, with a low resistance to flow, traceable to a primary standard such as NIST.
45

AQSB SOP 411 Met One E-BAM
First Edition, May 2007
10.0 ROUTINE SERVICE CHECKS 10.1 General Information:
Perform the following service checks according to the procedures documented in this section. Routine service checks may be performed more frequently, but should be performed at least at the prescribed intervals.
10.2 Daily Checks:
Review data to ensure instrument is operating properly.
10.3 Weekly Checks:
Ensure sampler flow on display is within 16.67 Lpm +/- 4%.
10.4 Monthly Checks: 1) Perform leak, flow verification, tape check, alarm check and verify
accuracy of temperature, pressure, and any external sensors. 2) Thoroughly clean inlet. 3) Download and submit E-BAM datalogger data and maintenance sheets.
10.5 Bi-Monthly Checks: Perform pump test. 10.6 Semi-Annual Checks: 1) Perform flow Calibration, analog check for external data logger and clean
inlet. 2) Calibrate temperature, pressure, and any external sensors. 10.7 Annual Checks:
Perform Zero and Span Verification.
46

AQSB SOP 411 Met One E-BAM
First Edition, May 2007
CARB QUALITY CONTROL MAINTENANCE CHECK SHEET MET ONE E-BAM SAMPLER
Site Name:
Site Number: Operator/Agency:
Month/Year: Sampler ID Number: Date of Last Calibration:
Instrument Checks:
1) Daily checks: Review for correct operation of E-BAM. 2) Weekly checks: Check filter tape & replace when necessary (approx. 2 months per roll). 3) Bi-Weekly checks: Perform E-BAM flow and leak. 4) Monthly checks: Complete and submit this Quality Control Check Sheet. Thoroughly clean inlets.
Download and submit data from E-BAM. Sampler Flow Rate, Ambient Temp and Pressure Check Results:
Flow Rate Standard
Temperature Standard
Pressure Standard
Standard Make/Model:
Std. ARB ID Number:
Std. Certification Date:
Standard Slope:
Standard Intercept:
Date Checked:
Std. Display Reading:
Std. 'Actual' Reading:
E-BAM Display:
Design Flow % Diff.:
Leak Check Value:
Volumetric Flow Acceptance Criteria: <+/-4% of 16.67 LPM (16.00 to 17.34 VLPM) Operator Comments: Reviewed by__________
Appendix A Quality Control Maintenance Check Sheet
46 AQSB QC FORM 411 (E-BAM)

AQSB SOP 411 Met One E-BAM
First Edition, May 2007
ARB Calibration Report - E-BAM
Met One Instruments E-BAM Mass Monitor Includes BGI Delta/Tri Calibration
ID Information:
Station Name: Sacramento As Is: Site #: E 4 Final: X
Property #: 20021405 Calib. Date: 04/13/07 Agency: ARB Last Cal: NA
Pressure & Temperature Transfer Standard:
slope (m) : Intercept (b):
True Press. = 1.0000 * Display + 0.000 Flow Std. ID#: 20024733
True Temp. = 1.0000 * Display + 0.0000 Flow Cert.Date: 09/18/06 MFM 30 L = N/A * Display + N/A P/T Std.ID#: N/A
FTS Streamline = N/A * Display + N/A P/T Cert. Date: N/A
Flow Controller Check Pass/Fail Flow Device Used:
MFM
13.0 LPM: Pass FTS 18.0 LPM: Pass BGI X
Temperature Sensor Calibration: MFM
Temp: FTS Temp K: BGI Temp:
BAM Temp. Display: Std. Temp. Display: Corrected Temp: 22.30
22.30 22.30 Diff. In degrees: 0.00 Temperature = +/- 2.0
Celsius
Pressure Sensor Calibration: MFM
Press.: FTS (Atm): BGI Pressure:
BAM Press.Display: Std. Press. Display: Corrected Press.: 761 763 761 Diff. In Pressure: 1.6
Pressure = +/- 10 mm Hg
48

AQSB SOP 411 Met One E-BAM
First Edition, May 2007
Flow Calibration: MFM Flow:
FTS Flow: BGI Flow:
BAM Flow Display: Std. Display: Corrected Flow: 16.71
16.70 16.71 % Diff.: 0.24%
Flow = +/- 2.0%
Flow Verification: MFM Ver.:
FTS Ver.: BGI Ver.:
BAM display: Std. Display: Corrected Flow: % Diff.:
Flow = +/- 2.0%
Comments: Leak rate: 0.4 lpm.
Calibrated by: Checked by:
Appendix B Quality Control Maintenance Check Sheet
49