air force specialty code 4b071 bioenvironmental … · given a hapsite® (gc/ms), perform...
TRANSCRIPT

DEPARTMENT OF THE AIR FORCE
Headquarters US Air Force
QTP 4B071-16
24 March 2015Washington, DC 20330-1030
AIR FORCE SPECIALTY CODE 4B071
BIOENVIRONMENTAL ENGINEERING
Water/Liquid Sampling
QUALIFICATION TRAINING PACKAGE
Accessibility: Publications and forms are available on the e-publishing website at
http://www.e-publishing.af.mil for downloading or ordering.
Realeasability: There are no releasability restrictions on this publication.

AFQTP 4B071-16 Craftsman Training Guide: Water/Liquid Sampling
i
Table of Contents
STS Line Item 4.15.3.5.1: Portable GC/MS (HAPSITE®) ...................................................................................................... 1
TRAINER GUIDANCE ........................................................................................................................................................... 1
TASK STEPS ........................................................................................................................................................................... 2
PERFORMANCE CHECKLIST .............................................................................................................................................. 8
STS Line Item 4.15.3.5.2: Portable laboratory analysis kit (e.g. DREL) ............................................................................ 12 TRAINER GUIDANCE ......................................................................................................................................................... 12
TASK STEPS ......................................................................................................................................................................... 14
PERFORMANCE CHECKLIST ............................................................................................................................................ 17
STS Line Item 4.15.3.5.3: FT-IR (e.g., HazMatID) ............................................................................................................... 20 TRAINER GUIDANCE ......................................................................................................................................................... 20
TASK STEPS ......................................................................................................................................................................... 21
PERFORMANCE CHECKLIST ............................................................................................................................................ 23
STS Line Item 4.15.3.6: Calibrate / Operate water sampling equipment ........................................................................... 25 TRAINER GUIDANCE ......................................................................................................................................................... 25
TASK STEPS ......................................................................................................................................................................... 27
PERFORMANCE CHECKLIST ............................................................................................................................................ 30

AFQTP 4B071-16 Craftsman Training Guide: Water/Liquid Sampling
1
STS Line Item 4.15.3.5.1: Portable GC/MS (HAPSITE®)*
TRAINER GUIDANCE
Proficiency Code: 3c
PC Definition: Can do all parts of the task. Needs only a spot check of completed work. Can identify
why and when the task must be done and why each step is needed.
Prerequisites: Complete Computer Based Training.
Training References:
Inficon Equipment User’s Manual.
HAPSITE®
Smart Plus Chemical Identification System Operating Manual (ESOH
Service Center Website)
Additional Supporting
References:
Fundamentals of Industrial Hygiene, 5th
Edition, Chapter 17.
Technical Report on BE HAPSITE® Preventive Maintenance and KD Analytical
Support Guidance, July 21, 2010
HAPSITE® GC/MS Training Guide – United States Training Version, 2002
CDC Reference: 4B051
Training Support Material: HAPSITE
® (GC/MS)
VOC test sample
Specific Techniques: Conduct hands-on training and evaluation.
Criterion Objective: Given a HAPSITE
® (GC/MS), perform pre-operational check and operate instrument
successfully completing all checklist items with NO trainer assistance.
Notes:
*The HAPSITE® is a gas chromatograph/mass spectrometer (GC/MS) proven to provide verifiable data for critical health-
risk decisions. The HAPSITE® systems deliver fast, dependable on-site analysis of volatile organic compounds (VOCs) in
air, water, and soil for emergency response, environmental, hazardous waste, industrial hygiene, process monitoring, and
medical applications. The HAPSITE® Headspace sampling system supports the HAPSITE
® Smart Chemical Identification
System in detecting and identifying VOCs in water or soil on-site or from another location.
INFICON recommends storing the HAPSITE® Smart in extended standby mode. This keeps the NEG (pump) operating at
400°C and the ion pump ON to maintain proper vacuum conditions. Extended standby ensures the battery is charged and
ready for deployment/response. While extended standby is recommended, it is not a substitute for system use and it is not a
feature to extend the time period between system operations. Using the system or running a weekly Blank Run is the best
method to ensure overall operational readiness.
The Guidance Document (HAPSITE® Field Guide) referenced above is designed to provide user’s the capability to
maximize the use of deployment technology at both garrison and deployed environments in both routine and emergency
response situations.
Completion of this Craftsman QTP Training Module also satisfies Craftsman QTP Training 4.5.2.6.3.

AFQTP 4B071-16 Craftsman Training Guide: Water/Liquid Sampling
2
TASK STEPS
START UP FROM STANDBY MODE:
(These steps are ONLY for resuming use when the HAPSITE®
has been placed in STANDBY MODE.)
1. Using your thumbs, Open front panel of HAPSITE®.1
2. Insert purple-banded Nitrogen gas canister into the opening with the purple stripe2.
3. Insert yellow-banded Internal Standard gas canister into bottom canister opening marked with yellow stripe.2
4. Insert a fully charged battery into the rectangular opening to the left of the canister openings.3
5. Ensure the sample loop is installed.4
6. Naviigate to main menu.
7. Allow the HAPSITE® to boot up and run auto tune check (self-calibration).
5
HAPSITE® SEQUENCE OF OPERATION (SURVEY MODE):
1. Ensure HASPITE is turned on and warmed up.
2. Navigate to main screen.
3. Choose “Return to Main Menu”
4. Choose “Run Method”
5. Choose JPMESG Rev 2 Methods
6. Choose JPMESG Survey
7. Ensure Tune parameters are OK,
8. Press Run and sample background in ambient air surrounding for about a minute to allow the background to drop and
stabilize.6
9. Get a volatile organic compound (VOC) sample to test (e.g., toluene, acetone, gasoline).
10. Hold probe over sample for up to one minute while monitoring the TIC count. Look for a response (spike) and pull
probe away. (Remember: TIC count over 60 million is indicative of oversaturation.)
11. Keep running the HAPSITE® for at least one minute away from the sample and allow background to drop again.
12. After the clean background has been obtained leave the HAPSITE® running in the clean area for a minimum of a minute
prior to entering a suspected contaminated area.
13. When entering an area ensure the TIC count is being observed at all times, if the TIC count reaches 60,000,000 back
away from the area.
14. Return to the clean area and let HAPSITE® run for 1 minute
15. Select Escape to end the method and return to main menu.
16. Review findings
HAPSITE® SEQUENCE OF OPERATION (SAMPLE LOOP BLANK):
1. Ensure HASPITE is turned on and warmed up.
2. Navigate to main screen.
3. Choose “Return to Main Menu”
4. Choose “Run Method”
5. Choose JPMESG Rev 2 Methods
6. Choose JPMESG GCMS
7. Ensure the Sample Loop is installed with the correct cover. Sample Loop cover will have Sample Loop written on it.
8. Select JPMESG Loop Method
9. Select gc_sl.
10. Press Run.
11. HAPSITE® will start sampling as soon as the user selects the run button.
12. Sample collection time is 60 seconds, collection of sample is indicated on the bottom of the screen as “loop fill”
13. When complete, review the blank run. It should show the following:8
Air Peak at 1:20 +/- 10 seconds
Internal Standard #1 at 2:30 minutes +/- 10 seconds (TRIS)
Internal Standard #2 at: 8:00 minutes +/- 10 seconds (BPFB)
No additional peaks and low background
All four criteria constitute a satisfactory blank run. See the figure below for an example of a good Sample Loop blank
run with all three peaks identified and no additional peaks.

AFQTP 4B071-16 Craftsman Training Guide: Water/Liquid Sampling
3
Sample Loop Blank Chromatogram
HAPSITE® SEQUIENCE OF OPERATION (TRI-BED CONCENTRATOR BLANK):
1. Ensure HASPITE is turned on and warmed up.
2. From Main screen, choose press the ESC button
3. Ensure that the Tri-bed concentrator is installed with groove facing up and the appropriate cover is attached. If a problem
should occur when running a concentrator, the following message may appear:
No Concentrator Installed/Incorrect Concentrator:
(1) Indicates the concentrator cover may not be on.
(2) Indicates the concentrator is not being recognized; may be due to a chipped end at the base of tube. Chipped
concentrator will show Low Column Pressure Warning.9
4. Choose “Run Method”
5. Choose JPMESG Rev 2 Methods
6. Choose JPMESG GCMS
7. Choose JPMESG Concentrator
8. Select JPMESG Concentrator Clean-out (gc_cbcl). Press Run and observe the maximum TIC during this three-minute
run. If the TIC is greater than 500,000 at the end of run, repeat clean-out.
9. Note the number of clean-outs required to get TIC below 500,000, and note the actual TIC in comments.10
10. Choose “Return to Main Menu”
11. Choose “Run Method”
12. Choose JPMESG Rev 2 Methods
13. Choose JPMESG GCMS
14. Choose JPMESG Concentrator
15. Select JPMESG Tri-bed concentrator method (gc_cb1m), and press Run. (Check the Tune Report if you have not
already done so.)
16. Sample collection time is 60 seconds, collection of sample is indicated on the bottom of the screen as “conc fill”
17. When complete, review the blank run. It should show the following:11
Air Peak at 1:20 +/- 10 seconds
Internal Standard #1 at 2:30 minutes +/- 10 seconds (TRIS)
Internal Standard #2 at: 8:00 minutes +/- 10 seconds (BPFB)
No additional peaks and low background.

AFQTP 4B071-16 Craftsman Training Guide: Water/Liquid Sampling
4
All four criteria constitute a satisfactory blank run. See Below for an example of a good blank run.
Tri-bed Concentrator Blank Chromatogram
HAPSITE® SEQUENCE OF OPERATION (HEADSPACE SAMPLING SYSTEM (HSS) SET-UP METHOD):
12
1. Ensure HAPSITE® is in Extended Standby Mode.
2. Attach “Y”-Cable Power Splitter. Connect the single connector end of the cable to the Convertec, power supply.
Connect one of the split ends of the cable to the left side of the HAPSITE® and the other to the back of the Headspace
unit.
Back of HAPSITE
® Analytical Module

AFQTP 4B071-16 Craftsman Training Guide: Water/Liquid Sampling
5
3. Remove probe from the HAPSITE®. Connect the HSS transfer line and ensure that the end of the HSS transfer line with
the yellow label marked “This End to HAPSITE®” is connected to HAPSITE
®. Connect the end of transfer line with the
white label marked “This End to Headspace” to the back of the HSS.
HAPSITE
® Headspace Transfer Line
4. Insert a nitrogen canister and a charged battery into the HSS and turn on the power.
HAPSITE® SEQUENCE OF OPERATION (HEADSPACE TRI-BED PERFORMANCE STANDARD):
1. Select Run Method from Main Menu.
2. Select JPMESG GCMS Methods
3. JPMESG HeadSpace
4. Select Headspace. Select hs_slwqc method.
5. HAPSITE® warm-up heaters window will appear. This process takes approximately 15–20 minutes.
6. Automatic tune will initiate (see HAPSITE® LCD screen). The message Instrument is Tuned should appear.
7. Measure 20 mL of deionized or sterile water into a 40 mL vial. Inject 1 μL of the Headspace Performance Standard into
the 20 mL of de-ionized water through the septum. Gently mix, and then place in the Headspace. Place a clean empty
vial in the Headspace next to the vial with Performance Standard.
8. Close yellow cover and press Run to start method. Observe on HAPSITE® or laptop screen. Data file name will
automatically be generated on HAPSITE® LCD screen.
9. After the run is complete, follow screen directions. Put needle in clean vial and press SEL to purge. Purging takes
approximately two minutes.
10. Press SEL to view results from front panel LCD.

AFQTP 4B071-16 Craftsman Training Guide: Water/Liquid Sampling
6
Headspace Tri-bed Performance Test Method
RECORD DATA:
1. Utilize DOEHRS or equivalent as applicable.
LOCAL REQUIREMENTS:
NOTES:
1. Place hands on top of front panel, using thumbs, pull panel down and outward to open. Care should be taken not to tear
the seal.
2. Insert instructions for canisters are located on the inside of the front panel and require the operator to press and hold the
PUSH button located to the right of the containment area while inserting canister. With canister pushed in, release the
button and this should engage the canister to stay in the containment area. If you can pull it out then it was not inserted
properly.
3. The battery is loaded in the opening to the left of the canisters. The INFICON name will be in the upper left corner of
the battery and the TEST button in the upper right corner when the battery has been inserted correctly. When the
HAPSITE® is in extended standby a battery should be in the machine. The battery will be recharged while in extended
standby.
4. Sample loop is located to the right of the canisters. When installing the Sample Loop do not over tighten.

AFQTP 4B071-16 Craftsman Training Guide: Water/Liquid Sampling
7
5. When tune check is complete, PRESS ANY BUTTON TO CONTINUE will appear at the top of the display screen. Any
button you press on the HAPSITE® will cause the display window to show the MAIN MENU.
6. TIC generally should be less than 200,000. If not, check area for inteferents such as chemicals that may be in the area.
7. Instrument will continuously run until you stop it while in Survey Mode.
8. Monitoring what a normal blank looks like is one step in verifying the operation of the HAPSITE® and determining if
there is a problem. If there are additional peaks in the blank spectrum, and they cannot be removed with additional
blank runs, review your blank chromatogram, note the additional analytes, and contact the ESOH Service Center.
9. It is important to blow out the ferrule chamber to ensure broken pieces of the chipped tube are not imbedded.
10. Clean-outs required.
11. If there are additional peaks in the blank spectrum, and they cannot be removed with additional blank runs, AND they
are not getting in the way of other analytes, note the additional analytes, and adjust your sample spectrum accordingly.
Remember that in future samples, if the chemical that showed up in the blank run is sampled, there will be an increase
in peak heights.
12. The Headspace Performance Standard is a test of the HAPSITE® and Headspace connections using the Tri-bed
concentrator.

AFQTP 4B071-16 Craftsman Training Guide: Water/Liquid Sampling
8
PERFORMANCE CHECKLIST
STS Line Item 4.15.3.5.1: Portable GC/MS (HAPSITE®)
Proficiency Code: 3c
PC Definition: Can do all parts of the task. Needs only a spot check of completed work. Can identify
why and when the task must be done and why each step is needed.
DID THE TRAINEE…
YES NO
START UP FROM STANDBY MODE
1. Use thumbs to open front panel of HAPSITE®?
2. Insert purple-banded Nitrogen gas canister into the opening with the purple stripe?
3. Insert yellow-banded Internal Standard gas canister into bottom canister opening marked with
yellow stripe?
4. Insert a fully charged battery into the rectangular opening to the left of the canister openings?
5. Ensure the sample loop is installed?
6. Press and hold the power button located on the outside of the HAPSITE®s face panel?
7. Allow the HAPSITE® to boot up and run auto tune check (self-calibration)?
HAPSITE® SEQUENCE OF OPERATION (SURVEY MODE)
1. Ensure HASPITE is turned on and warmed up?
2. From Main screen, choose Press the ESC button?
3. Choose Return to Main Menu?
4. Choose Run Method?
5. Choose JPMESG Rev 2 Methods?
6. Choose JPMESG Survey?
7. Ensure Tune parameters are OK
8. Press Run and sample background in ambient air surrounding for about a minute to allow
the background to drop and stabilize?
9. Get a volatile organic compound (VOC) sample to test?

AFQTP 4B071-16 Craftsman Training Guide: Water/Liquid Sampling
9
10. Hold probe over sample for up to one minute while monitoring the TIC count?
11. Keep running the HAPSITE® for at least one minute away from the sample and allow
background to drop again repeating steps 4 and 5 two or three times?
12. After the clean background has been obtained leave the HAPSITE® running in the clean
area for a minimum of a minute prior to entering a suspected contaminated area?
13. When entering an area ensure the TIC count is being observed at all times?
14. Return to the clean area and let HAPSITE® run for one minute?
15. Select ESC to end the method and return to main menu?
16. Review findings?
HAPSITE® SEQUENCE OF OPERATION (SAMPLE LOOP BLANK)
1. Ensure HASPITE is turned on and warmed up?
2. From Main screen, choose press the ESC button?
3. Choose Return to Main Menu?
4. Choose Run Method?
5. Choose JPMESG Rev 2 Methods?
6. Choose JPMESG GCMS?
7. Ensure the Sample Loop is installed with the correct cover?
8. Select JPMESG Loop Method?
9. Select gc_sl?
10. Press Run?
11. Allow sample collection time of 60 seconds?
12. When complete, review the blank run?
HAPSITE® SEQUIENCE OF OPERATION (TRI-BED CONCENTRATOR BLANK)
1. Ensure HASPITE® is turned on and warmed up?
2. From Main screen, choose the ESC button?

AFQTP 4B071-16 Craftsman Training Guide: Water/Liquid Sampling
10
3. Ensure that the Tri-bed concentrator is installed with groove facing up and the appropriate
cover is attached?
4. Choose Return to Main Menu?
5. Choose Run Method?
6. Choose JPMESG Rev 2 Methods?
7. Choose JPMESG GCMS?
8. Choose JPMESG Concentrator?
9. Select JPMESG Concentrator Clean-out (gc_cbcl)?
10. Press Run and observe the maximum TIC during this three-minute run?
11. Note the number of clean-outs required to get TIC below 500,000, and note the actual TIC
in comments?
12. Choose Return to Main Menu?
13. Choose Run Method?
14. Choose JPMESG Rev 2 Methods?
15. Choose JPMESG GCMS?
16. Choose JPMESG Concentrator?
17. Select JPMESG Tri-bed Concentrator Method (gc_cb1m)?
18. Press Run?
19. Allow a sample collection time of 60 seconds?
20. When complete, review the blank run?
HAPSITE® SEQUENCE OF OPERATION (HEADSPACE SAMPLING SYSTEM (HSS) SET-UP METHOD)
1. Ensure HAPSITE® is in Extended Standby Mode?
2. Attach “Y”-Cable Power Splitter?
3. Remove probe from the HAPSITE®?
4. Connect the HSS transfer line?

AFQTP 4B071-16 Craftsman Training Guide: Water/Liquid Sampling
11
5. Ensure that the end of the HSS transfer line with the yellow label marked “This End to
HAPSITE®” is connected to HAPSITE
®?
6. Connect the end of transfer line with the white label marked “This End to Headspace” to the
back of the HSS?
7. Insert a nitrogen canister and a charged battery into the HSS and turn on the power?
HAPSITE® SEQUENCE OF OPERATION (HEADSPACE TRI-BED PERFORMANCE STANDARD)
1. Select Run Method from Main Menu?
2. Select JPMESG GCMS Methods?
3. Select Headspace?
4. Select hs_slwqc method?
5. Wait until the message Instrument Is Tuned appeared?
6. Measure 20 mL of deionized or sterile water into a 40 mL vial?
7. Inject 1 μL of the Headspace Performance Standard into the 20 mL of de-ionized water
through the septum?
8. Gently mix, and then place in the Headspace?
9. Place a clean empty vial in the Headspace next to the vial with Performance Standard?
10. Close yellow cover?
11. Press Run to start method?
12. Observe on HAPSITE® or laptop screen?
13. After the run completed, follow screen directions?
14. Put needle in clean vial and press SEL to purge?
15. Press SEL to view results from front panel LCD?
RECORD DATA
Utilize DOEHRS or equivalent as applicable
Did the trainee successfully complete the task?
TRAINEE NAME (PRINT) TRAINER NAME (PRINT)

AFQTP 4B071-16 Craftsman Training Guide: Water/Liquid Sampling
12
STS Line Item 4.15.3.5.2: Portable laboratory analysis kit (e.g. DREL)
TRAINER GUIDANCE
Proficiency Code: 3c
PC Definition: Can do all parts of the task. Needs only a spot check of completed work. Can identify
why and when the task must be done and why each step is needed.
Prerequisites: N/A
Training References: DREL 2800™ USER MANUAL, Aug 2013 , 4
th edition
AFI 48-144, Drinking Water Surveillance Program, 28 Sept 2010
Additional Supporting
References:
DREL 2800™ Spectrophotometer PROCEDURES MANUAL, Aug 2013 , 4th
edition
USAFSAM Automated Sample Guide or servicing laboratory guidance
40 CFR 141, National Primary Drinking Water Regulations
Sampling, Analysis and Monitoring (SAM) Plan, if available
EPA SOP #2013, Surface Water Sampling
USAFSAM Automated Sample Guide or servicing laboratory guidance
CDC Reference: 4B051
Training Support Material:
DREL 2800™ Spectrophotometer
Plug-in power supply
Dust cover
Cell adapter B
Light Shield
Protective Cover
Deionized water
Water sample for testing
Ultra Low Range (ULR) Chlorine Buffer Solution, 1.5 ml ampules
DPD Indicator Solution for (ULR) Chlorine, 1.5 ml ampules
Blanking Reagent for ULR Chlorine
Beaker, 250 ml
Cylinder, graduated mixing, 50 ml
Pipet, Tensette®, 0.1 to 1.0 ml
Pipet Tips for TenSette®
Pipet x 2
Pour-Thru Module and Cell
Specific Techniques: Conduct hands-on training and evaluation.
Criterion Objective: Given a DREL 2800™ Spectrophotometer, perform pre-operational check and operate
instrument successfully completing all checklist items with no trainer assistance.

AFQTP 4B071-16 Craftsman Training Guide: Water/Liquid Sampling
13
Notes:
DREL 2800™ Complete Water Quality Lab with Meters is designed to function as a fully equipped portable laboratory,
able to run approximately 100 tests on 20 different parameters. We cannot cover all of the tests in this QTP so we will
concentrate on one test, the test for Chlorine using the Pour-Thru Cell method. This method is designed for clean water,
low in color and turbidity. The main applications include monitoring for trace chlorine break-through of activated carbon
beds and feedwater to reverse osmosis membranes or ion-exchange resins.
Before starting the Chlorine test it must be noted that samples have be analyzed immediately. Samples containing
chlorine cannot be preserved for later analysis. Additionally, be aware that ampules, in order to ease transfer, contain
more than the 1.0 ml of solution needed. Discard excess reagent.
Refer to the instrument USER MANUAL for Pour-Thru cell and module assembly and installation.
The Task Steps below require that determining the blanking reagent value is completed while the DREL 2800™ is still
on and the Pour-Thru Cell is still attached.
To protect the Pour-Thru Cell from contamination when not in use by inverting a small beaker over the top of the glass
funnel. See Treating Analysis Labware on page 6 of the DREL 2800™ Spectrophotometer PROCEDURES MANUAL.

AFQTP 4B071-16 Craftsman Training Guide: Water/Liquid Sampling
14
TASK STEPS
Determining Level of Chlorine Using the Pour-Thru Cell Method
1. Ensure the DREL 2800™ is plugged in.1
2. Press and hold the ON/OFF switch (located on the back of DREL 2800™ for about 1 second to turn the DREL 2800™
on.2
3. Press STORED PROGRAMS in the Main Menu.
4. Use arrows to scroll down and select Chlorine from the list.3
5. Press START to begin the test.
6. Insert Adapter B.
7. Install the Pour-Thru Cell with the 1-inch (round) path in line with the adapter arrow.
8. Flush the Pour-Thru Cell with 50 ml of deionized water.
9. Pour at least 50-ml of sample into the Pour-Thru Cell.
10. When the flow stops, press TIMER>OK.4
11. When the timer expires, press ZERO.5
12. Break open one ULR Chlorine Buffer Solution Ampule.
13. Using a Tensette ®
Pipet and a clean tip, transfer 1.0 ml of buffer from the ampule to a clean, treated 50-ml graduated
mixing cylinder.
14. Break open on ampule of DPD Indicator Solution for ULR Chlorine.
15. Using a Tensette ®
Pipet and a clean tip, transfer 1.0 ml of indicator from the ampule to the graduated mixing cylinder
and swirl to mix.6
16. Avoiding extra agitation, carefully fill the cylinder to the 50-ml mark with collected water sample and stopper the
cylinder.
17. Gently invert it twice to mix.
18. Press TIMER>OK.7
19. Introduce the contents of the graduated mixing cylinder into the Pour-Thru Cell.
20. When the timer expires, press READ.8
21. Flush the Pour-Thru Cell with at least 50-ml of deionized water immediately after use.
Determining the Reagent Blank Value 22. Press STORED PROGRAMS in the Main Menu.
23. Use arrows to scroll down and select Chlorine Total ULR from the list.3
24. Press START to begin the test.
25. Make sure that the reagent blank setting is off by pressing OPTION>MORE>REAGENT BLANK>OFF.
26. Collect about 100-ml of deionized or tap water in a clean, 250-ml beaker.
27. Using a Tensette ®
Pipet, add 1.0 ml of Blanking Reagent to the beaker and swirl several times to mix.9
28. Press OPTIONS>MORE>TIMER>GENERAL TIMER.
29. Set a 5-minute timer and press OK.
30. After the timer expires, break open one ampule of ULR Chlorine Buffer Solution.
31. Using a Tensette ®
Pipet and a clean tip, transfer 1.0 ml of buffer from the ampule to a clean 50-ml graduated mixing
cylinder.
32. Break open on ampule of DPD Indicator Solution for ULR Chlorine.
33. Using a Tensette ®
Pipet and a clean tip, transfer 1.0 ml of indicator from the ampule to the cylinder and swirl to mix the
reagents.10
34. Fill the cylinder to the 50-ml mark with dechlorinated water from Step 27. 11
35. Cap the cylinder and invert twice.
36. Press TIMER>OK. 12
37. During the reaction period, flush the Pour-Thru Cell with the remainder of original dechlorinated water from Step 27.
38. When the flow stops, press ZERO. 13
39. When the timer expires, introduce the contents of the cylinder into the Pour-Thru Cell.
40. Press READ. 14
41. Use value obtained in Step 40 to correct the sample result obtained in Step 20. 15

AFQTP 4B071-16 Craftsman Training Guide: Water/Liquid Sampling
15
42. Flush the Pour-Thru Cell with at least 50-ml of deionized water immediately after use.
43. Record results.
44. Press and hold the ON/OFF switch for 3-5 seconds to turn the DREL 2800™ off.16
45. Properly dispose of sample solution.17
Reporting Results 46. Report IAW local policy.
47. Record data in OEHMIS (DOEHRS or equivalent) as applicable.
LOCAL REQUIREMENTS:
NOTES:
1. Or insert the battery for field analysis.
2. Each time the DREL 2800™ is turned on, a score of diagnostic tests are performed automatically. This operational check
will take approximately two minutes. A check mark confirms each test was completed and functions correctly.
3. All of the stored programs are listed in alphabetical order with program numbers.
4. A three-minute reaction period will begin. This time allows turbidity or solids to settle and ensures a stable reading.
5. The display will show 0 µ/L.
6. Proceed to Step 16 within one minute.
7. A three-minute reaction time will begin. Measure the reacted sample 3-4 minutes after mixing the sample and reagents.
If less than three minutes elapses, the reaction with chloramines may be incomplete. A reading after four minutes may
result in higher reagent blank values.
8. Results are in µ/L chlorine. If a dechlorinating agent such as sulfite or sulfur dioxide is present, the sample result
(corrected for the reagent blank) will read “0” or a slightly negative value.
9. The Blanking Reagent removes chlorine and chloramines from the water.
10. Proceed to Step 34 within one minute.
11. Save the remaining water for Step 37.
12. A three-minute reaction time will begin.
13. The display will show 0 µ/L Cl2.
14. Results are in 0 µ/L chlorine.

AFQTP 4B071-16 Craftsman Training Guide: Water/Liquid Sampling
16
15. The reagent blank value is most important to measure and subtract from test results when measuring low concentrations.
For example, subtracting a reagent blank value of 0.02 µ/L from a test result of 0.06 µ/L changes the result by more
than 30 percent. On the other hand, subtracting a reagent blank value of 0.02 µ/L from a result of 1.23 µ/L changes the
results by less than 2 percent.
16. An acoustic signal confirms that the instrument has been switched off.
17. If the solution contains other regulated materials such as chloroform or heavy metals, it may still need to be collected for
hazardous waste disposal. Never flush hazardous wastes down the drain.
DREL 2800™ Spectrophotometer

AFQTP 4B071-16 Craftsman Training Guide: Water/Liquid Sampling
17
PERFORMANCE CHECKLIST
STS Line Item 4.15.3.5.2: Portable laboratory analysis kit (e.g. DREL)
Proficiency Code: 3c
PC Definition: Can do all parts of the task. Needs only a spot check of completed work. Can identify
why and when the task must be done and why each step is needed.
DID THE TRAINEE…
YES NO
DETERMINING LEVEL OF CHLORINE USING THE POUR-THRU CELL METHOD:
1. Ensure the DREL 2800™ is plugged in?
2. Press and hold the ON/OFF switch (located on the back of DREL 2800™ for about 1 second
to turn the DREL 2800™ on?
3. Press STORED PROGRAMS in the Main Menu?
4. Use arrows to scroll down and select Chlorine from the list?
5. Press START to begin the test?
6. Insert Adapter B?
7. Install the Pour-Thru Cell with the 1-inch (round) path in line with the adapter arrow?
8. Flush the Pour-Thru Cell with 50 ml of deionized water?
9. Pour at least 50-ml of sample into the Pour-Thru Cell?
10. When the flow stops, press TIMER>OK?
11. When the timer expires, press ZERO?
12. Break open one ULR Chlorine Buffer Solution Ampule?
13. Using a Tensette ®
Pipet and a clean tip, transfer 1.0 ml of buffer from the ampule to a clean,
treated 50-ml graduated mixing cylinder?
14. Break open on ampule of DPD Indicator Solution for ULR Chlorine?
15. Using a Tensette ®
Pipet and a clean tip, transfer 1.0 ml of indicator from the ampule to the
graduated mixing cylinder and swirl to mix?

AFQTP 4B071-16 Craftsman Training Guide: Water/Liquid Sampling
18
16. Avoiding extra agitation, carefully fill the cylinder to the 50-ml mark with collected water
sample and stopper the cylinder?
17. Gently invert it twice to mix?
18. Press TIMER>OK?
19. Introduce the contents of the graduated mixing cylinder into the Pour-Thru Cell?
20. When the timer expires, press READ?
21. Flush the Pour-Thru Cell with at least 50-ml of deionized water immediately after use?
DETERMINING THE REAGENT BLANK VALUE:
22. Press STORED PROGRAMS in the Main Menu?
23. Use arrows to scroll down and select Chlorine Total ULR from the list?
24. Press START to begin the test?
25. Make sure that the reagent blank setting is off by pressing OPTION>MORE>REAGENT
BLANK>OFF?
26. Collect about 100-ml of deionized or tap water in a clean, 250-ml beaker?
27. Using a Tensette ®
Pipet, add 1.0 ml of Blanking Reagent to the beaker and swirl several
times to mix?
28. Press OPTIONS>MORE>TIMER>GENERAL TIMER?
29. Set a 5-minute timer and press OK?
30. After the timer expires, break open one ampule of ULR Chlorine Buffer Solution?
31. Using a Tensette ®
Pipet and a clean tip, transfer 1.0 ml of buffer from the ampule to a clean
50-ml graduated mixing cylinder?
32. Break open on ampule of DPD Indicator Solution for ULR Chlorine?
33. Using a Tensette ®
Pipet and a clean tip, transfer 1.0 ml of indicator from the ampule to the
cylinder and swirl to mix the reagents?
34. Fill the cylinder to the 50-ml mark with dechlorinated water from Step 27?
35. Cap the cylinder and invert twice?
36. Press TIMER>OK?
37. During the reaction period, flush the Pour-Thru Cell with the remainder of original
dechlorinated water from Step 27?

AFQTP 4B071-16 Craftsman Training Guide: Water/Liquid Sampling
19
38. When the flow stops, press ZERO?
39. When the timer expires, introduce the contents of the cylinder into the Pour-Thru Cell?
40. Press READ?
41. Use value obtained in Step 40 to correct the sample result obtained in Step 20?
42. Flush the Pour-Thru Cell with at least 50-ml of deionized water immediately after use?
43. Record results?
44. Press and hold the ON/OFF switch for 3-5 seconds to turn the DREL 2800™ off?
45. Properly dispose of sample solution?
REPORTING RESULTS:
46. Report IAW local policy?
47. Record data in OEHMIS (DOEHRS or equivalent) as applicable?
Did the trainee successfully complete the task?
TRAINEE NAME (PRINT) TRAINER NAME (PRINT)

AFQTP 4B071-16 Craftsman Training Guide: Water/Liquid Sampling
20
STS Line Item 4.15.3.5.3: FT-IR (e.g., HazMatID)
TRAINER GUIDANCE
Proficiency Code: 3c
PC Definition: Can do all parts of the task. Needs only a spot check of completed work. Can identify
why and when the task must be done and why each step is needed
Prerequisites: Complete Computer Based Training.
Training References: HazMatID Equipment User’s Manual 2009
Additional Supporting
References: ESOH service center HazMatID checklist
CDC Reference: 4B051, Volume 3 Unit 4
Training Support Material:
HazMatID
Liquid sample
Pipette/ Eye dropper
Liquids well
Volatile cover
Specific Techniques: Conduct hands-on training and evaluation.
Criterion Objective: Given a HazMatID, perform pre-operational check and operate instrument successfully
completing all checklist items with limited assistance on only the hardest parts.
Notes:
* The HazMatID can be used for qualitative analysis of solids, powders, pastes, gels and liquids. The HazMatID is intended
to provide initial determinations, presence and absence, of hazardous chemicals. The information obtained from the
HazMatID is not an absolute or conclusive identification of unknown substances.
*WARNING:
The HazMatID is NOT intrinsically safe.
DO NOT open battery compartment door in a contaminated environment.
HazMatID CANNOT identify sulfur, phosphorus, ionic salts, sodium chloride and calcium chloride.
CANNOT detect substances that are less than 10% of the sample composition.
CANNOT DETECT BIOLOGICAL AGENTS! Only detects the presence of proteins.

AFQTP 4B071-16 Craftsman Training Guide: Water/Liquid Sampling
21
TASK STEPS
START UP FROM OFF:
1. Open the battery compartment.1
2. Plug the power cable into the power connection in the battery compartmentor into electrical outlet, if available.
3. Turn the black power switch to ON position.2
PREPARE FOR DATA COLLECTION:
4. Log on to the system.
5. Click START to proceed.
6. Clean the crystal with isopropyl alcohol.
7. Select CONTINUE to proceed to background collection.
8. Enter the Incident Name and Sample ID by using the Keyboard feature. 3, 4
PREPARE LIQUID SAMPLES:
9. Ensure that the pressure application arm is fully disengaged.
10. Apply the liquid directly to the crystal using a pipette, eye dropper, or other suitable tool.5
PERFORM THE ANALYSIS:
11. Click on Continue to proceed.6
12. Select the VISUAL COMPARE button to compare the sample spectrum to spectra from the search list.7
13. Click OVERLAY to view the spectra over one another.
14. Accurately identify three criteria for positive identification.8
LOCAL REQUIREMENTS:

AFQTP 4B071-16 Craftsman Training Guide: Water/Liquid Sampling
22
NOTES:
1. Lift the small round screw cover on the right of the battery compartment. Using a flat/slotted screw driver, turn the
battery cover screw counterclockwise.
2. Allow the analyzer to warm up for 20 minutes. You will be prompted on the screen to “Please Log In”.
3. See the “Testing a Material” section of the HazMatID Software User’s Guide for additional details.
4. The Sample ID name will have a date and time stamp added to the end of the name. Use names that you will be able to
identify at a later date.
5. For highly volatile samples use the liquids well and volatile cover. This will prevent the sample from evaporating prior
to the analysis being completed. Position and reanalyze the sample until an absorbance of 0.1 is achieved.
6. When the collection process is complete, your spectral data and library search results will be displayed.
7. The Compare Spectra dialog box is displayed.
8. Additionally, the following three criteria must be met for a positive identification:
• Quality (correlation) over 0.95
• Sample and library match VISUALLY
• PHYSICAL properties match
AFQTP 4B071-16 Craftsman Training Guide: Water/Liquid Sampling
23
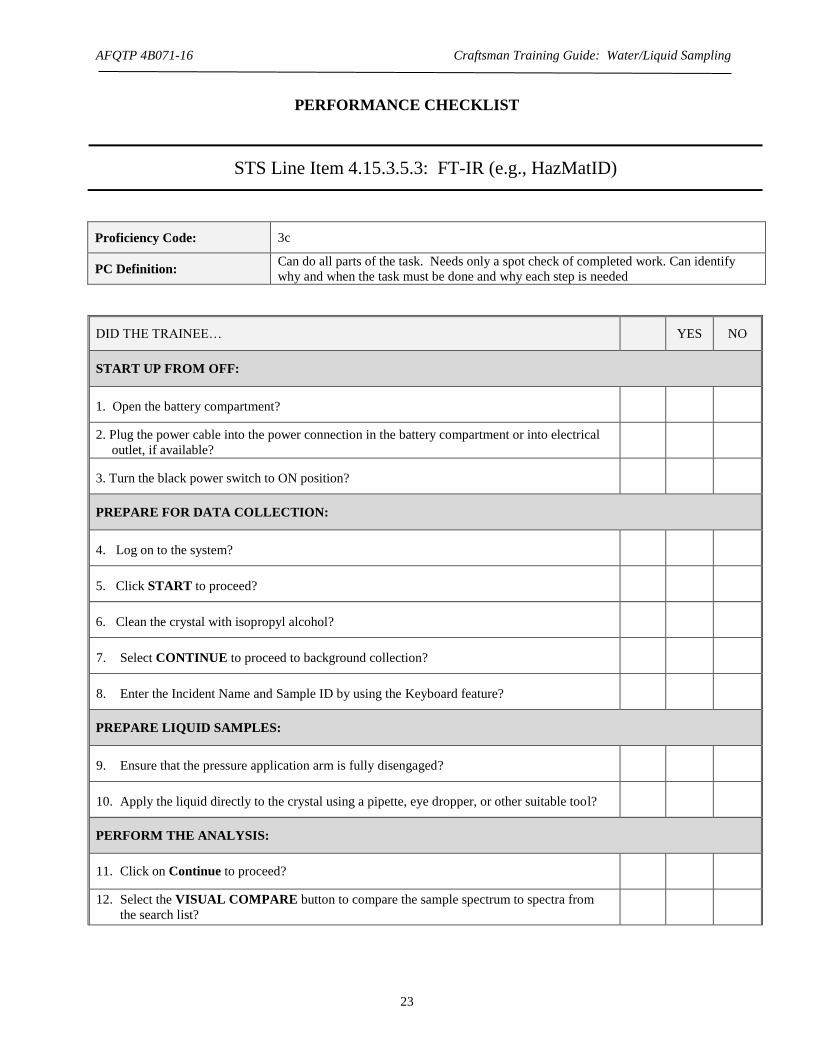
PERFORMANCE CHECKLIST
STS Line Item 4.15.3.5.3: FT-IR (e.g., HazMatID)
Proficiency Code: 3c
PC Definition: Can do all parts of the task. Needs only a spot check of completed work. Can identify
why and when the task must be done and why each step is needed
DID THE TRAINEE…
YES NO
START UP FROM OFF:
1. Open the battery compartment?
2. Plug the power cable into the power connection in the battery compartment or into electrical
outlet, if available?
3. Turn the black power switch to ON position?
PREPARE FOR DATA COLLECTION:
4. Log on to the system?
5. Click START to proceed?
6. Clean the crystal with isopropyl alcohol?
7. Select CONTINUE to proceed to background collection?
8. Enter the Incident Name and Sample ID by using the Keyboard feature?
PREPARE LIQUID SAMPLES:
9. Ensure that the pressure application arm is fully disengaged?
10. Apply the liquid directly to the crystal using a pipette, eye dropper, or other suitable tool?
PERFORM THE ANALYSIS:
11. Click on Continue to proceed?
12. Select the VISUAL COMPARE button to compare the sample spectrum to spectra from
the search list?

AFQTP 4B071-16 Craftsman Training Guide: Water/Liquid Sampling
24
13. Click OVERLAY to view the spectra over one another?
14. Accurately identify three criteria for positive identification?
Did the trainee successfully complete the task?
TRAINEE NAME (PRINT) TRAINER NAME (PRINT)

AFQTP 4B071-16 Craftsman Training Guide: Water/Liquid Sampling
25
STS Line Item 4.15.3.6: Calibrate / Operate water sampling equipment
TRAINER GUIDANCE
Proficiency Code: 3c
PC Definition: Can do all parts of the task. Needs only a spot check of completed work. Can identify
why and when the task must be done and why each step is needed.
Prerequisites: N/A
Training References: DREL 2800™ USER MANUAL, November 2009, Edition 3
AFI 48-144, Drinking Water Surveillance Program, 28 Sept 2010
Additional Supporting
References:
DREL 2800™ Spectrophotometer PROCEDURES MANUAL, June 2007 Edition 2
USAFSAM Automated Sample Guide or servicing laboratory guidance
40 CFR 141, National Primary Drinking Water Regulations
Sampling, Analysis and Monitoring (SAM) Plan, if available
EPA SOP #2013, Surface Water Sampling
USAFSAM Automated Sample Guide or servicing laboratory guidance
CDC Reference: 4B051
Training Support Material:
DREL 2800™ Spectrophotometer
Plug-in power supply
Dust cover
Cell adapter B
Light Shield
Protective Cover
Deionized water
Water sample for testing
Ultra Low Range (ULR) Chlorine Buffer Solution, 1.5 ml ampules
DPD Indicator Solution for (ULR) Chlorine, 1.5 ml ampules
Blanking Reagent for ULR Chlorine
Beaker, 250 ml
Cylinder, graduated mixing, 50 ml
Pipet, Tensette®, 0.1 to 1.0 ml
Pipet Tips for TenSette®
Pipet x 2
Pour-Thru Module and Cell
Specific Techniques: Conduct hands-on training and evaluation.
Criterion Objective: Given a DREL 2800™ Spectrophotometer, perform pre-operational check and operate
instrument successfully completing all checklist items with NO trainer assistance.
AFQTP 4B071-16 Craftsman Training Guide: Water/Liquid Sampling
26
Notes:
DREL 2800™ Complete Water Quality Lab with Meters is designed to function as a fully equipped portable laboratory,
able to run approximately 100 tests on 20 different parameters. We cannot cover all of the tests in this QTP so we will
concentrate on one test, the test for Chlorine using the Pour-Thru Cell method. This method is designed for clean water,
low in color and turbidity. The main applications include monitoring for trace chlorine break-through of activated carbon
beds and feedwater to reverse osmosis membranes or ion-exchange resins.
Before starting the Chlorine test it must be noted that samples have be analyzed immediately. Samples containing
chlorine cannot be preserved for later analysis. Additionally, be aware that ampules, in order to ease transfer, contain
more than the 1.0 ml of solution needed. Discard excess reagent.
Refer to the instrument USER MANUAL for Pour-Thru cell and module assembly and installation.
The Task Steps below require that determining the blanking reagent value is completed while the DREL 2800™ is still
on and the Pour-Thru Cell is still attached.
To protect the Pour-Thru Cell from contamination when not in use by inverting a small beaker over the top of the glass
funnel. See Treating Analysis Labware on page 6 of the DREL 2800™ Spectrophotometer PROCEDURES MANUAL.

AFQTP 4B071-16 Craftsman Training Guide: Water/Liquid Sampling
27
TASK STEPS
Determining Level of Chlorine Using the Pour-Thru Cell Method
1. Ensure the DREL 2800™ is plugged in.1
2. Press and hold the ON/OFF switch (located on the back of DREL 2800™ for about 1 second to turn the DREL 2800™
on.2
3. Press STORED PROGRAMS in the Main Menu.
4. Use arrows to scroll down and select Chlorine from the list.3
5. Press START to begin the test.
6. Insert Adapter B.
7. Install the Pour-Thru Cell with the 1-inch (round) path in line with the adapter arrow.
8. Flush the Pour-Thru Cell with 50 ml of deionized water.
9. Pour at least 50-ml of sample into the Pour-Thru Cell.
10. When the flow stops, press TIMER>OK.4
11. When the timer expires, press ZERO.5
12. Break open one ULR Chlorine Buffer Solution Ampule.
13. Using a Tensette ®
Pipet and a clean tip, transfer 1.0 ml of buffer from the ampule to a clean, treated 50-ml graduated
mixing cylinder.
14. Break open on ampule of DPD Indicator Solution for ULR Chlorine.
15. Using a Tensette ®
Pipet and a clean tip, transfer 1.0 ml of indicator from the ampule to the graduated mixing cylinder
and swirl to mix.6
16. Avoiding extra agitation, carefully fill the cylinder to the 50-ml mark with collected water sample and stopper the
cylinder.
17. Gently invert it twice to mix.
18. Press TIMER>OK.7
19. Introduce the contents of the graduated mixing cylinder into the Pour-Thru Cell.
20. When the timer expires, press READ.8
21. Flush the Pour-Thru Cell with at least 50-ml of deionized water immediately after use.
Determining the Reagent Blank Value 22. Press STORED PROGRAMS in the Main Menu.
23. Use arrows to scroll down and select Chlorine Total ULR from the list.3
24. Press START to begin the test.
25. Make sure that the reagent blank setting is off by pressing OPTION>MORE>REAGENT BLANK>OFF.
26. Collect about 100-ml of deionized or tap water in a clean, 250-ml beaker.
27. Using a Tensette ®
Pipet, add 1.0 ml of Blanking Reagent to the beaker and swirl several times to mix.9
28. Press OPTIONS>MORE>TIMER>GENERAL TIMER.
29. Set a 5-minute timer and press OK.
30. After the timer expires, break open one ampule of ULR Chlorine Buffer Solution.
31. Using a Tensette ®
Pipet and a clean tip, transfer 1.0 ml of buffer from the ampule to a clean 50-ml graduated mixing
cylinder.
32. Break open on ampule of DPD Indicator Solution for ULR Chlorine.
33. Using a Tensette ®
Pipet and a clean tip, transfer 1.0 ml of indicator from the ampule to the cylinder and swirl to mix the
reagents.10
34. Fill the cylinder to the 50-ml mark with dechlorinated water from Step 27. 11
35. Cap the cylinder and invert twice.
36. Press TIMER>OK. 12
37. During the reaction period, flush the Pour-Thru Cell with the remainder of original dechlorinated water from Step 27.
38. When the flow stops, press ZERO. 13
39. When the timer expires, introduce the contents of the cylinder into the Pour-Thru Cell.
40. Press READ. 14
41. Use value obtained in Step 40 to correct the sample result obtained in Step 20. 15

AFQTP 4B071-16 Craftsman Training Guide: Water/Liquid Sampling
28
42. Flush the Pour-Thru Cell with at least 50-ml of deionized water immediately after use.
43. Record results.
44. Press and hold the ON/OFF switch for 3-5 seconds to turn the DREL 2800™ off.16
45. Properly dispose of sample solution.17
Reporting Results 46. Report IAW local policy.
47. Record data in OEHMIS (DOEHRS or equivalent) as applicable.
LOCAL REQUIREMENTS:
NOTES:
1. Or insert the battery for field analysis.
2. Each time the DREL 2800™ is turned on, a score of diagnostic tests are performed automatically. This operational check
will take approximately two minutes. A check mark confirms each test was completed and functions correctly.
3. All of the stored programs are listed in alphabetical order with program numbers.
4. A three-minute reaction period will begin. This time allows turbidity or solids to settle and ensures a stable reading.
5. The display will show 0 µ/L.
6. Proceed to Step 16 within one minute.
7. A three-minute reaction time will begin. Measure the reacted sample 3-4 minutes after mixing the sample and reagents.
If less than three minutes elapses, the reaction with chloramines may be incomplete. A reading after four minutes may
result in higher reagent blank values.
8. Results are in µ/L chlorine. If a dechlorinating agent such as sulfite or sulfur dioxide is present, the sample result
(corrected for the reagent blank) will read “0” or a slightly negative value.
9. The Blanking Reagent removes chlorine and chloramines from the water.
10. Proceed to Step 34 within one minute.
11. Save the remaining water for Step 37.
12. A three-minute reaction time will begin.
13. The display will show 0 µ/L Cl2.
14. Results are in 0 µ/L chlorine.
AFQTP 4B071-16 Craftsman Training Guide: Water/Liquid Sampling
29
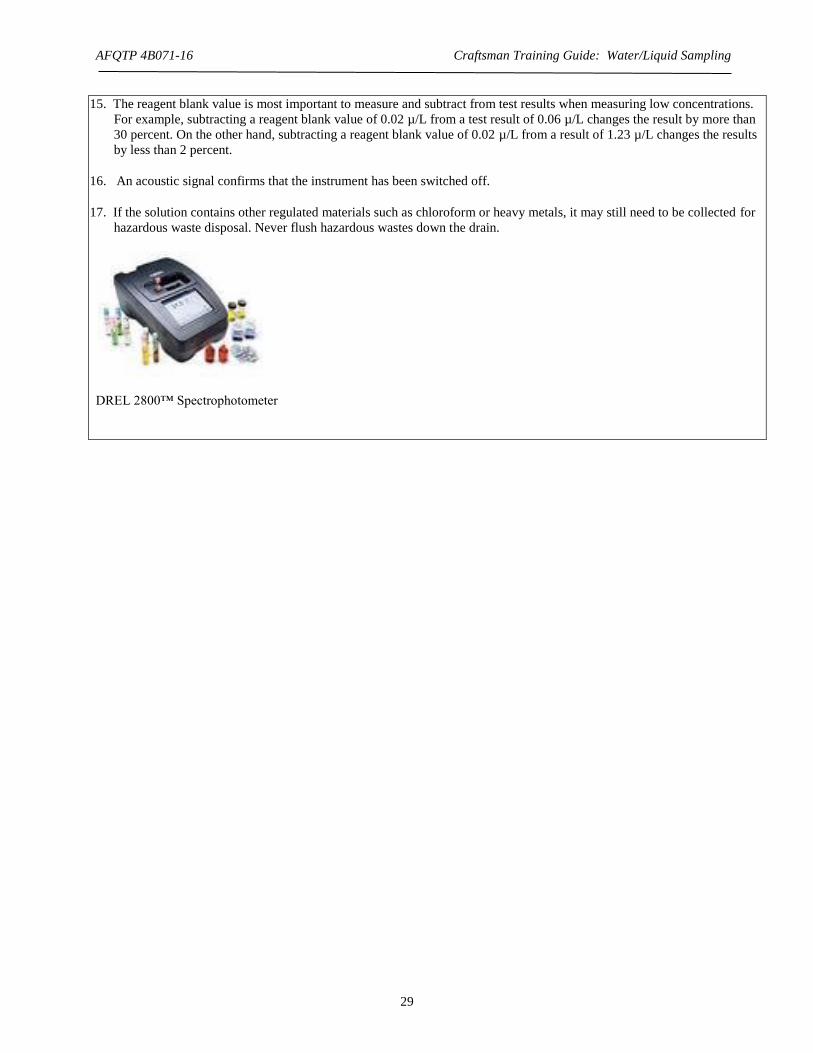
15. The reagent blank value is most important to measure and subtract from test results when measuring low concentrations.
For example, subtracting a reagent blank value of 0.02 µ/L from a test result of 0.06 µ/L changes the result by more than
30 percent. On the other hand, subtracting a reagent blank value of 0.02 µ/L from a result of 1.23 µ/L changes the results
by less than 2 percent.
16. An acoustic signal confirms that the instrument has been switched off.
17. If the solution contains other regulated materials such as chloroform or heavy metals, it may still need to be collected for
hazardous waste disposal. Never flush hazardous wastes down the drain.
DREL 2800™ Spectrophotometer

AFQTP 4B071-16 Craftsman Training Guide: Water/Liquid Sampling
30
PERFORMANCE CHECKLIST
STS Line Item 4.15.3.6: Calibrate / Operate water sampling equipment
Proficiency Code: 3c
PC Definition: Can do all parts of the task. Needs only a spot check of completed work. Can identify
why and when the task must be done and why each step is needed.
DID THE TRAINEE…
YES NO
DETERMINING LEVEL OF CHLORINE USING THE POUR-THRU CELL METHOD:
1. Ensure the DREL 2800™ is plugged in?
2. Press and hold the ON/OFF switch (located on the back of DREL 2800™ for about 1 second
to turn the DREL 2800™ on?
3. Press STORED PROGRAMS in the Main Menu?
4. Use arrows to scroll down and select Chlorine from the list?
5. Press START to begin the test?
6. Insert Adapter B?
7. Install the Pour-Thru Cell with the 1-inch (round) path in line with the adapter arrow?
8. Flush the Pour-Thru Cell with 50 ml of deionized water?
9. Pour at least 50-ml of sample into the Pour-Thru Cell?
10. When the flow stops, press TIMER>OK?
11. When the timer expires, press ZERO?
12. Break open one ULR Chlorine Buffer Solution Ampule?
13. Using a Tensette ®
Pipet and a clean tip, transfer 1.0 ml of buffer from the ampule to a clean,
treated 50-ml graduated mixing cylinder?
14. Break open on ampule of DPD Indicator Solution for ULR Chlorine?
15. Using a Tensette ®
Pipet and a clean tip, transfer 1.0 ml of indicator from the ampule to the
graduated mixing cylinder and swirl to mix?

AFQTP 4B071-16 Craftsman Training Guide: Water/Liquid Sampling
31
16. Avoiding extra agitation, carefully fill the cylinder to the 50-ml mark with collected water
sample and stopper the cylinder?
17. Gently invert it twice to mix?
18. Press TIMER>OK?
19. Introduce the contents of the graduated mixing cylinder into the Pour-Thru Cell?
20. When the timer expires, press READ?
21. Flush the Pour-Thru Cell with at least 50-ml of deionized water immediately after use?
DETERMINING THE REAGENT BLANK VALUE:
22. Press STORED PROGRAMS in the Main Menu?
23. Use arrows to scroll down and select Chlorine Total ULR from the list?
24. Press START to begin the test?
25. Make sure that the reagent blank setting is off by pressing OPTION>MORE>REAGENT
BLANK>OFF?
26. Collect about 100-ml of deionized or tap water in a clean, 250-ml beaker?
27. Using a Tensette ®
Pipet, add 1.0 ml of Blanking Reagent to the beaker and swirl several
times to mix?
28. Press OPTIONS>MORE>TIMER>GENERAL TIMER?
29. Set a 5-minute timer and press OK?
30. After the timer expires, break open one ampule of ULR Chlorine Buffer Solution?
31. Using a Tensette ®
Pipet and a clean tip, transfer 1.0 ml of buffer from the ampule to a clean
50-ml graduated mixing cylinder?
32. Break open on ampule of DPD Indicator Solution for ULR Chlorine?
33. Using a Tensette ®
Pipet and a clean tip, transfer 1.0 ml of indicator from the ampule to the
cylinder and swirl to mix the reagents?
34. Fill the cylinder to the 50-ml mark with dechlorinated water from Step 27?
35. Cap the cylinder and invert twice?
36. Press TIMER>OK?
37. During the reaction period, flush the Pour-Thru Cell with the remainder of original
dechlorinated water from Step 27?

AFQTP 4B071-16 Craftsman Training Guide: Water/Liquid Sampling
32
38. When the flow stops, press ZERO?
39. When the timer expires, introduce the contents of the cylinder into the Pour-Thru Cell?
40. Press READ?
41. Use value obtained in Step 40 to correct the sample result obtained in Step 20?
42. Flush the Pour-Thru Cell with at least 50-ml of deionized water immediately after use?
43. Record results?
44. Press and hold the ON/OFF switch for 3-5 seconds to turn the DREL 2800™ off?
45. Properly dispose of sample solution?
REPORTING RESULTS:
46. Report IAW local policy?
47. Record data in OEHMIS (DOEHRS or equivalent) as applicable?
Did the trainee successfully complete the task?
TRAINEE NAME (PRINT) TRAINER NAME (PRINT)