agilent io libraries installation and configuration guide...
TRANSCRIPT
Agilent IO Libraries Installation and ConfigurationGuide for Windows
Manual Part Number: E2094-90022Printed in U.S.A. E0701


ContentsIO Libraries Installation and Configuration Guide for Windows
Front Matter............................................................................................... 5Notice ............................................................................................ 5Warranty Information .................................................................... 5U.S. Government Restricted Rights .............................................. 5Trademark Information ................................................................. 6Printing History ............................................................................. 6Copyright Information ................................................................... 6
1. Introducing the IO Libraries ................................................................ 7Using This Guide ........................................................................... 9
What’s in This Guide? ............................................................ 9If You Need Help .................................................................... 9
IO Libraries Overview .................................................................. 10Agilent VISA Description ...................................................... 10Agilent SICL Description ...................................................... 12IO Config Description ........................................................... 13VISA Assistant Description ................................................... 13VXI Resource Manager Description ..................................... 14LAN Server Description ........................................................ 14
2. Installing the IO Libraries .................................................................. 15Getting Started............................................................................. 17
Before You Begin ................................................................. 17System Requirements .......................................................... 18Supported Interfaces ............................................................ 19IO Libraries Versions Support .............................................. 20
Installing New IO Libraries ........................................................... 21Steps to Install New IO Libraries (Standard) ........................ 21Steps to Install New IO Libraries (Modified) ......................... 27What Was Created During Installation? ............................... 33Where to go Next ................................................................. 35
Upgrading Existing IO Libraries ................................................... 36Steps to Upgrade the IO Libraries ........................................ 36What Was Created During Installation? ............................... 42Where to go Next ................................................................. 44
Maintaining Existing IO Libraries ................................................. 45Steps to Modify the IO Libraries ........................................... 45Steps to Repair the IO Libraries ........................................... 48Steps to Remove the IO Libraries ........................................ 50
Contents 3

3. Using IO Configuration Utilities ........................................................ 53Getting Started .............................................................................55
Before You Begin Configuration ...........................................55Getting Started Using IO Configuration Utilities ....................55
Using IO Config ............................................................................56IO Config Requirements .......................................................56Running IO Config ................................................................57Example: Using IO Config .....................................................59
Using VISA Assistant....................................................................61VISA Assistant Overview ......................................................61Running VISA Assistant ........................................................61
Using the VXI Resource Manager ................................................62VXI Resource Manager Overview .........................................62Opening VXI Resource Manager ..........................................63Displaying VXI Resource Manager Output ...........................66
Using the LAN Server...................................................................67Starting the LAN Server ........................................................67Stopping the LAN Server ......................................................67
4. Configuring I/O Interfaces .................................................................69Configuring GPIB Interfaces.........................................................71
GPIB Interfaces Overview .....................................................71Configuring GPIB (82350 PCI) Interfaces .............................72Configuring GPIB (82341 ISA) Interfaces .............................75
Configuring VXI Interfaces............................................................78VXI Interfaces Overview .......................................................78Configuring GPIB-VXI (E1406A) Interfaces ..........................79Configuring VXI (E8491B) Interfaces ....................................82
Configuring LAN Interfaces ..........................................................85LAN Interfaces Overview ......................................................85Configuring LAN Client Interfaces .........................................90Configuring VISA LAN Client Interfaces ...............................94Configuring LAN Server Interfaces .....................................100
Configuring Other Interfaces ......................................................103ASRL and GPIO Interface Overview ...................................103Configuring ASRL Interfaces ..............................................104Configuring GPIO Interfaces ...............................................107
Index ......................................................................................................111
Contents 4

NoticeThe information contained in this document is subject to change without notice.
Agilent Technologies shall not be liable for any errors contained in this document. Agilent Technologies makes no warranties of any kind with regard to this document, whether express or implied. Agilent Technologies specifically disclaims the implied warranties of merchantability and fitness for a particular purpose. Agilent Technologies shall not be liable for any direct, indirect, special, incidental, or consequential damages, whether based on contract, tort, or any other legal theory, in connection with the furnishing of this document or the use of the information in this document.
Warranty InformationA copy of the specific warranty terms applicable to your Agilent Technologies product and replacement parts can be obtained from Agilent Technologies, Inc.
U.S. Government Restricted RightsThe Software and Documentation have been developed entirely at private expense. They are delivered and licensed as "commercial computer software" as defined in DFARS 252.227- 7013 (Oct 1988), DFARS 252.211-7015 (May 1991) or DFARS 252.227-7014 (Jun 1995), as a "commercial item" as defined in FAR 2.101(a), or as "Restricted computer software" as defined in FAR 52.227-19 (Jun 1987)(or any equivalent agency regulation or contract clause), whichever is applicable. You have only those rights provided for such Software and Documentation by the applicable FAR or DFARS clause or the Agilent standard software agreement for the product involved.
5

Trademark InformationMicrosoft®, Windows ® 95, Windows ® 98, Windows ® 2000, Windows ® Me and Windows NT® are U.S. registered trademarks of Microsoft Corporation. All other brand and product names are trademarks or registered trademarks of their respective companies.
Printing HistoryEdition 1 - September 1995Edition 2 - May 1996Edition 3 - October 1996Edition 4 - May 2000Edition 5 - July 2001
Copyright InformationAgilent IO Libraries Installation and Configuration Guide for Windows Edition 5Copyright © 1984, 1985-1988 Sun Microsystems, Inc.Copyright © 1996 Microsoft CorporationCopyright © 1995-1996, 2000-2001 Agilent Technologies, Inc. All rights reserved.
6

1
Introducing the IO Libraries
7

Introducing the IO Libraries
This Agilent IO Libraries Installation Guide for Windows shows how to install and configure Agilent IO Libraries on Windows 95, Windows 98, Windows Me, Windows NT 4.0, and Windows 2000.
This chapter shows how to use this guide and provides an overview of the Agilent IO Libraries.
� Chapter 2 - Installing the IO Libraries provides an overview of the Agilent IO Libraries and shows how to install, update, and maintain the libraries on Windows platforms.
� Chapter 3 - Configuring I/O Interfaces gives guidelines to use the I/O utilities (IO Config, VISA Assistant, VXI Resource Manager, and LAN Server) to configure GPIB, VXI, LAN, RS-232, and GPIO interfaces.
NOTE
This guide does not include instructions to install IO Libraries on HP-UX systems. See the I/O Libraries Installation and Configuration Guide for HP-UX for HP-UX system installation.
Unless otherwise indicated, Windows NT refers to Windows NT 4.0.
8 Chapter 1

Introducing the IO LibrariesUsing This Guide
Using This GuideThis guide shows how to install and configure the Agilent IO Libraries software.
What’s in This Guide?The steps described in this guide assume:
� The software will be installed on a Windows-based PC instrument system. The PC can be an external or an embedded PC.
� You have already installed and configured the interfaces for your system and have installed any required application programs (C/C++, Agilent VEE, etc.).
� For an overview of the Agilent IO Libraries, see Chapter 1 - Introducing the IO Libraries. To install the Agilent IO Libraries, see Chapter 2 - Installing the IO Libraries. To use IO utilities (such as IO Config) to configure the IO Libraries, see Chapter 3 - Using IO Configuration Utilities. For details on configuring interfaces, see Chapter 4 - Configuring I/O Interfaces.
If You Need Help� In the USA and Canada, you can reach Agilent Technologies at
these telephone numbers:
USA: 1-800-452-4844Canada: 1-877-894-4414
� Outside the USA and Canada, contact your country’s Agilent support organization. A list of contact information for other countries is available on the Agilent web site:
http://www.agilent.com/find/assist
Chapter 1 9

Introducing the IO LibrariesIO Libraries Overview
IO Libraries OverviewThe Agilent IO Libraries application consists of two libraries: Agilent Virtual Instrument Software Architecture (VISA) and Agilent Standard Instrument Control Library (SICL) plus four I/O Utilities: IO Config, VISA Assistant, VXI Resource Manager, and LAN Server. See Chapter 3 - Configuring I/O Interfaces for details on the I/O Utilities.
Agilent VISA DescriptionAgilent Virtual Instrument Software Architecture (VISA) is an I/O library that can be used to develop I/O applications and instrument drivers that comply with the VXIplug&play standards. Applications and instrument drivers developed with VISA can execute on VXIplug&play system frameworks that have the VISA I/O layer. Therefore, software from different vendors can be used together on the same system.
Use VISA if you want to use VXIplug&play instrument drivers in your applications, or if you want the I/O applications or instrument drivers that you develop to be compliant with VXIplug&play standards. If you are using new instruments or are developing new I/O applications or instrument drivers, we recommend you use Agilent VISA.
VISA Support The 32-bit version of VISA is supported on this version of the Agilent IO Libraries for Windows 95, Windows 98, Windows Me, Windows NT, and Windows 2000. Support for the 16-bit version of VISA was removed in version H.01.00. However, versions through G.02.02 support 16-bit VISA. C, C++, and Visual Basic are supported on all these Windows versions.
VISA Users VISA has two specific types of users. The first type is the instrumentation end user who wants to use VXIplug&play instrument drivers in his or her applications. The second type of user is the instrument driver or I/O application developer who wants to be compliant with VXIplug&play standards.
NOTE
Since VISA and SICL are different libraries, using VISA functions and SICL functions in the same I/O application is not supported.
10 Chapter 1

Introducing the IO LibrariesIO Libraries Overview
Software development using VISA is intended for instrument I/O and C/C++ or Visual BASIC programmers who are familiar with Windows 95, Windows 98, Windows Me, Windows 2000, or Windows NT. To perform VISA installation and configuration on Windows NT, you must have system administration privileges on the Windows NT system.
VISA Documentation
This table shows associated documentation you can use when programming with Agilent VISA.
Agilent VISA Documentation
Document DescriptionAgilent VISA User’s Guide Shows how to use Agilent VISA and provides the VISA
language reference.
VISA Online Help Information is provided in the form of Windows Help.
VISA Example Programs Example programs are provided online to help you develop VISA applications.
VXIplug&play System Alliance VISA Library Specification 4.3
Specifications for VISA.
IEEE Standard Codes, Formats, Protocols, and Common Commands
ANSI/IEEE Standard 488.2-1992.
VXIbus Consortium specifications (when using VISA over LAN)
TCP/IP Instrument Protocol Specification - VXI-11, Rev. 1.0TCP/IP-VXIbus Interface Specification - VXI-11.1, Rev. 1.0TCP/IP-IEEE 488.1 Interface Specification - VXI-11.2, Rev. 1.0TCP/IP-IEEE 488.2 Instrument Interface Specification - VXI-11.3, Rev. 1.0
Chapter 1 11

Introducing the IO LibrariesIO Libraries Overview
Agilent SICL DescriptionAgilent Standard Instrument Control Library (SICL) is an I/O library developed by Agilent that is portable across many I/O interfaces and systems. I/O applications using this library can be ported at the source code level from one system to another with few (or no) changes. You can use Agilent SICL if you have been using SICL and want to remain compatible with software currently implemented in SICL.
SICL Support The 32-bit version of SICL is supported on this version of the Agilent IO Libraries for Windows 95, Windows 98, Windows Me, Windows NT, and Windows 2000. Support for the 16-bit version of SICL was removed in version H.01.00. However, versions through G.02.02 support 16-bit SICL. C, C++, and Visual BASIC are supported on all these Windows versions.
SICL Users SICL is intended for instrument I/O and C/C++ or Visual Basic programmers who are familiar with Windows 95, Windows 98, Windows Me, Windows 2000, or Windows NT. To perform SICL installation and configuration on Windows NT, you must have system administration privileges on the Windows NT system.
SICL Documentation
This table shows associated documentation you can use when programming with Agilent SICL.
Agilent SICL Documentation
Document DescriptionAgilent SICL User’s Guide for Windows
Shows how to use Agilent SICL and provides the SICLlanguage reference.
SICL Online Help Information is provided in the form of Windows Help.
SICL Example Programs Example programs are provided online to help you develop SICL applications.
VXIbus Consortium specifications (when using VISA over LAN)
TCP/IP Instrument Protocol Specification - VXI-11, Rev. 1.0TCP/IP-VXIbus Interface Specification - VXI-11.1, Rev. 1.0TCP/IP-IEEE 488.1 Interface Specification - VXI-11.2, Rev. 1.0TCP/IP-IEEE 488.2 Instrument Interface Specification - VXI-11.3, Rev. 1.0
12 Chapter 1

Introducing the IO LibrariesIO Libraries Overview
IO Config DescriptionThe IO Config utility is used by the Agilent IO Libraries to configure instrument I/O hardware interfaces. An interface must be configured with IO Config before the interface can be used with the IO Libraries. You can configure all available interfaces with IO Config for use with the Agilent IO Libraries. With IO Config, you can also add, edit, or remove configuration entries for the interface(s) you specify.
IO Config is an interactive program that searches your system for installed interfaces that VISA and SICL support. You select the interface(s) you want to configure and IO Config selects default parameters required to configure the interface(s).
You can run IO Config at any time. However, you must first install an interface card in your system before you can configure the interface. IO Config will verify that an interface card is installed before a configuration entry will be added for the card.
You must have system administrator privileges on Windows 2000/NT to run IO Config. You may also need to reboot the computer if you add or modify interfaces with IO Config to load or update driver files for specific interfaces in the Windows kernel. IO Config will inform you if it is necessary to reboot your computer.
VISA Assistant DescriptionVISA Assistant is an application program that uses the IO Libraries to communicate with and to control VXI, GPIB, and serial Instruments.
VISA Assistant can automatically detect and assign VXIplug&play instrument drivers to instruments. VISA Assistant can also be used to send and receive strings to instruments which support formatted I/O. For other instruments, VISA Assistant allows you to read and write memory areas. VISA Assistant also describes attributes that are associated with an instrument.
Chapter 1 13

Introducing the IO LibrariesIO Libraries Overview
VXI Resource Manager DescriptionIf your system includes an E8491 IEEE-1394 PC Link to VXI interface, you can view the output of the VXI Resource Manager to determine if your system is properly configured. The easiest way to view this output is to use the IO Config utility to run the VXI Resource Manager.
The VXI Resource Manager initializes and prepares the VXI system for use. The VXI Resource Manager will run when:
� VXI mainframe power is applied or cycled� The E8491 Reset button is pressed� It is activated from the IO Config utility� It is activated from the Agilent IO Libraries Control icon � The computer is rebooted
In VXI systems with multiple E8491s, individual mainframes can be turned off without affecting other mainframes in the system. When a mainframe is turned on, the VXI Resource Manager reconfigures the mainframe.
LAN Server DescriptionIf you configured the LAN server on your system using IO Config, you must now start the LAN server process on the system. To start the LAN server, you can either restart (reboot) your system now or manually start the LAN server process on your system.
14 Chapter 1

2
Installing the IO Libraries
15

Installing the IO Libraries
This chapter shows how to install the libraries on Windows 95, Windows 98, Windows Me, Windows NT, and Windows 2000. Chapter contents are:
� Getting Started� Installing New IO Libraries� Upgrading Existing IO Libraries� Maintaining Existing IO Libraries
See the following table to select the applicable installation section for your PC configuration. Note that IO Library version numbers skip from H to J. There are no I versions of the Agilent IO Libraries.
Version Installed
Action See*
None Install a new version of the IO Libraries
“Installing New IO Libraries”
H.01.03 or earlier
Upgrade existing IO Libraries to the latest version
“Upgrading Existing IO Libraries”
J.01.00 or later
Modify, repair, or remove the same version of existing IO Libraries
“Maintaining Existing IO Libraries”
* See “Getting Started” first
16 Chapter 2

Installing the IO LibrariesGetting Started
Getting StartedThis section gives guidelines to get started installing the Agilent IO Libraries, including system requirements and supported interfaces. You should verify that your system meets the minimum requirements shown and the system interfaces are supported before you install the Agilent IO Libraries.
Before You BeginBefore you begin installation of the Agilent IO Libraries, please consider the following items.
Create an Emergency Repair Disk
The Agilent IO Libraries include I/O drivers for various PCI plug-in cards. Extensive testing of these drivers and cards has revealed that early revisions of the BIOS code in several PCs are not completely PCI-compliant. This has caused problems when running the Agilent IO Libraries, whether or not the PCI card is installed. Problems can include system errors, operating system crashes, or card initialization failures.
For Windows 2000/NT operating systems, most PC manufacturers recommend that before installing any PCI card, you first create an EMERGENCY REPAIR DISK. If your PC exhibits any abnormal behavior following installation of the Agilent IO Libraries, we recommend a BIOS upgrade to the PC. BIOS upgrades are available from most PC manufacturers’ websites.
Must Configure with IO Config Utility
Before you can use an interface with SICL or VISA, you must first configure the interface with the IO Config utility. See Chapter 3 - Using IO Configuration Utilites for details on IO Config. Do not attempt to manually edit the Windows registry to configure your interfaces for use with SICL or VISA.
See the Readme File
When the Agilent IO Libraries are installed, an Agilent IO Libraries Readme file is created. This file contains very important information that you should read BEFORE you configure IO interfaces. To access the Readme file, click the blue IO icon (on the taskbar). Then, click View Documentation and then click IO Libraries Readme.
Chapter 2 17

Installing the IO LibrariesGetting Started
System RequirementsThe following table summarizes minimum hardware and software requirements to install and use the IO Libraries. Adding additional RAM may improve overall system performance.
Item Minimum Requirements
Hardware Requirements
PC Operation/Memory
100 MHz operation and 16 MB RAM.
PC Plug-in Slots EISA I/O slots for GPIB, RS-232, or GPIO interface or for a LAN adapter. PCI slots for GPIB (PCI) and IEEE-1394 interfaces.1
Hard Drive Space At least 40 MB for VISA and SICL installation.
Software Requirements
Operating System Windows 95, Windows 98, Windows Me, Windows 2000, or Windows NT.
Language Tools (one of the listed tools)
- Microsoft 32-bit Visual C++ Version 2.0 or later or equivalent Microsoft 32-bit C/C++ tools
- Borland C++ Version 4.0 or later- Microsoft 32-bit Visual Basic Version 4.0 or later- Other programming tools, such as Agilent VEE,
etc.1 If you use an RS-232 interface with VISA and SICL, see the RS-232 documentation for your Windows product, since VISA and SICL use the RS-232 capabilities built into Windows.
18 Chapter 2

Installing the IO LibrariesGetting Started
Supported InterfacesThis table shows the I/O interfaces supported for 32-bit applications (16-bit applications are not supported). The table shows the IO Libraries version (or later) required, based on the IO interface and operating system used. For example, a J.02.00 entry means version J.02.00 or later.
Windows95
Windows 98
Windows Me
Windows 2000
Windows NT 4.0
ISA Interfaces
82335B GPIB Interface for MS Windows and DOS
J.02.00 SICL Only1
No No No No
82341C High-Performance GPIB Interface for Windows
J.02.00 J.02.00 No J.02.00 J.02.00
82341D High-Performance GPIB Interface for Windows
J.02.00 No No No No
E2075A General Purpose IO Interface for Windows
J.02.00 SICL Only
J.02.00 SICL Only
No J.02.00 SICL Only
J.02.00 SICL Only
PCI Interface
82350A PCI High-Performance GPIB Interface for Windows
J.02.00 J.02.00 J.02.00 J.02.00 J.02.00
VXI Interfaces
E1406A VXI GPIB Command Module (C-Size)
J.02.00 J.02.00 J.02.00 J.02.00 J.02.00
E623x VXI Embedded Pentium Controllers
G.02.02 or H.01.02
No No No G.02.02 or H.01.02
E8491 IEEE-1394 PC Link to VXI, C-Size
J.02.00 J.02.00 J.02.00 J.02.00 J.02.00
E985x Embedded VXI Controllers
No No No No H.01.03
Other Interfaces
E2050 LAN/GPIB Gateway J.02.00 J.02.00 J.02.00 J.02.00 J.02.00
RS-232 Serial Interface J.02.00 J.02.00 J.02.00 J.02.00 J.02.00
1 Not Recommended
Chapter 2 19

Installing the IO LibrariesGetting Started
IO Libraries Versions SupportThis table shows the operating systems and interfaces supported by versions G.02.00 through K.01.00 of the Agilent IO Libraries. See “Supported Interfaces” for a description of each interface.
IO Libraries Version
Supported Operating Systems
Supported Interfaces
See Note
K.01.00 Windows 98Windows MeWindows NT 4.0Windows 2000
82341C82350A E2050AE1406A
E8491BE623xE985xRS-232
1
J.02.00 Windows 95Windows 98Windows MeWindows NT 4.0Windows 2000
82341C82341D82350AE2050A/B
E2075AE1406AE8491BRS-232
2
H.01.02 orH.01.03
Windows 95Windows 98Windows NT 4.0
82341C82341D82350AE2050A/BE2075A
E1406AE623xE985xE8491A/B
3
G.02.02 Windows 95Windows 98Windows NT 4.0Windows 3.51
82341C82341D82350A
E0250A/BE2075AE1406A
4
1 82341D and E2075A are not supported on version K.01.00. Use previous versions of IO Libraries. The E2075A is supported on SICL only for Windows 95/98/Me/2000/NT 4.0.
2 ISA interfaces are not supported on Windows Me. The 82341D is supported on Windows 95 only. The E2075A is supported on SICL only for Windows 95/98/2000/NT 4.0.
3 H.01.03 ships with the E985x controllers. These versions do not support Windows 3.1 and 3.51 or 16-bit applications on Windows 95/98/Me.The 82341D is supported on Windows 95 only. The E2075A is supported on SICL only for Windows 95/98/Me/2000/NT 4.0.
4 The 82341D is supported on Windows 95 only. The E2075A is supported on SICL only for Windows 95/98/Me/2000/NT 4.0.
20 Chapter 2

Installing the IO LibrariesInstalling New IO Libraries
Installing New IO LibrariesUse these steps to install a new version of the IO Libraries on your PC. The steps in this section assume no version of the IO Libraries is installed on the PC.
� If you have a version of the IO Libraries already installed on your PC and want to upgrade, see “Upgrading Existing IO Libraries”.
� If you want to modify, repair, or remove the same version of an existing IO Library, see “Maintaining Existing IO Libraries”.
Steps to Install New IO Libraries (Standard)This section shows how to install new IO Libraries for a standard installation. For the systems listed in the following NOTE, skip this section and go to “Steps to Install New IO Libraries (Modified)”.
1 Turn the PC OFF and install all IO interface cards required for your application. See the applicable hardware installation guide for installation steps.
2 Turn the PC ON and close all open applications. As required, install application software such as C/C++, VEE, etc. on your PC.
3 Insert the Agilent IO Libraries for Instrument Control CD into the CD-ROM drive and wait a few seconds for the application to run. The installer should automatically start when the CD is inserted. If not, select Start|Run and type <drive>:setup.exe where drive is your CD-ROM drive letter.
NOTE
This section does NOT apply to a Windows 95/98/Me/2000 operating system and a 1394 PCI FireWire card connected to an Agilent E8491B VXI interface or to a Windows 95/98/Me/2000 operating system and an Agilent 82350 PCI GPIB card.
For these systems, SKIP this section and go to “Steps to Install New IO Libraries (Modified)”. For other interfaces, or for Windows NT 4.0, use this section and SKIP “Steps to Install New IO Libraries (Modified)”.
Chapter 2 21

Installing the IO LibrariesInstalling New IO Libraries
4 The InstallShield� Wizard appears to begin the IO Libraries installation.
5 When the title screen appears, click Next > to go to the License Agreement screen and then click Yes to accept the license terms and to display the Readme Information screen.
6 Click Next > to display the SICL installation directory screen. By default, SICL is installed in C:\Program Files\Agilient\IO Libraries. Click Next > if you accept the default setting, or set the directory you want and then click Next > to display the VISA installation directory screen.
7 By default, VISA is installed in C:\Program Files\VISA. Click Next > if you accept the default setting, or set the directory you want and then click Next > to display the Select Type of Installation screen
NOTE
The Readme Information screen contains important information on the IO Libraries. We suggest you read this information before continuing with IO Libraries installation.
22 Chapter 2

Installing the IO LibrariesInstalling New IO Libraries
8 Use this table for guidelines to select the type of installation for your application. Then, click Next > to install the option.
Option Description1. SICL and Agilent
VISA InstallationInstalls SICL and Agilent VISA with the default options for your computer configuration. This option allows development and runtime capabilities using SICL and Agilent VISA.
The option also allows you to select Agilent E8491 IEEE-1394 to VXI support. If another vendor’s VISA is installed, installing this option will overwrite the other vendor’s VISA.
Chapter 2 23

Installing the IO LibrariesInstalling New IO Libraries
2. SICL and side-by-side Agilent VISA Installation
Installs SICL and side-by-side Agilent VISA with the default options for your computer configuration. With this option, another vendor’s VISA will not be overwritten.
Beginning with version K.01.00, you can install Agilent VISA as a secondary VISA (side-by-side). When this is done, Agilent VISA will not overwrite another vendor's VISA, if one is present on the computer.
Normal VISA programs use visa32.dll which is installed in the Windows system directory. Agilent VISA is implemented in agvisa32.dll which is also installed in the Windows system directory.
� If Agilent VISA is installed as the primary VISA, the Agilent version of visa32.dll is installed in the Windows system directory and forwards all VISA calls to agvisa32.dll.
� If Agilent VISA is installed as a secondary VISA, agvisa32.dll is installed but Agilent's visa32.dll is not installed. Thus, Agilent VISA will not overwrite another vendor's visa32.dll which may already be installed.
� If Agilent VISA is installed as a secondary VISA, the support files in the 'bin', 'include' and 'lib' directories of the <VISA Path> (e.g., C:\program files\visa\winnt on Window NT/2000 or C:\program files\visa\win95 on Windows 95/98/Me) are not installed since they would overwrite another vendor's support files.
Copies of the Agilent version of the VISA support files are in the 'agbin', 'include' and 'lib' subdirectories under <VISA Path>\agvisa. These files are installed even when Agilent VISA is the primary VISA.
The Agilent VISA utilities vifind32.exe and VISA Assistant use Agilent VISA even if another vendor's VISA is installed as primary VISA.
Normally, a VISA program will use the primary VISA (i.e., call through visa32.dll). However, if a VISA program is linked with agvisa32.lib or dynamically loads agvisa32.dll, the program will use Agilent VISA even if it is not the primary VISA.
Option Description
24 Chapter 2

Installing the IO LibrariesInstalling New IO Libraries
9 For the SICL and Agilent VISA Installation (Options 1 and 2) and the SICL Installation (Option 3) ONLY, the Question screen for E8491 support appears on Windows 95 and Windows NT. (This support is installed by default on Windows 98, Windows Me, and Windows 2000.) Click Yes to install Agilent E8491 IEEE-1394 to VXI support, click No to not install it.
10 Move through the screens (as applicable to the option selected) until you get to the IO Libraries Configuration screen. Then, select the type of configuration you want performed (automatic, manual, or none) and click Next > to start the installation.
11 When installation is complete, the Installation Complete screen appears. Note that you must re-start your computer to initialize the IO Libraries. Select the Yes or No option, remove any disks from their drives, and then click Finish to complete the installation.
3. SICL Installation Installs SICL (but not Agilent VISA) with the default options for your computer configuration. This option allows development and runtime capabilities using SICL.
The option also allows you to select Agilent E8491 IEEE-1394 to VXI support. If another vendor’s VISA is installed, installing this option will not overwrite the other vendor’s VISA.
4. Compact SICL Installation
Installs SICL (but not Agilent VISA) with the default options for your computer configuration. This option allows runtime capabilities ONLY (no development capabilities) using SICL for Serial (RS-232) and LAN client interfaces. If another vendor’s VISA is installed, installing this option will not overwrite the other vendor’s VISA.
5. Agilent GPIB-VXI Installation
Use this option if your system includes an Agilent VXI Command Module (such as an E1406, etc.) and another vendor’s VISA. This option provides GPIB-VXI support for VXI Command Modules on another vendor’s VISA. SICL and Agilent VISA are not installed.
6. Custom Installation
Allows you to install individually selected components of the IO Libraries, including SICL, including SICL, VISA, E8491, I-SCPI, and GPIB-VXI Support components. I-SCPI is supplied for backward compatibility but is not recommended for new applications.
Option Description
Chapter 2 25

Installing the IO LibrariesInstalling New IO Libraries
NOTE
A different screen will appear if it is not necessary to restart the computer. Even if you are not prompted to restart the computer, if you experience difficulty after installing the IO Libraries, restart the computer to see if this solves the problem.
26 Chapter 2

Installing the IO LibrariesInstalling New IO Libraries
Steps to Install New IO Libraries (Modified)
1 Turn the PC ON and close all open applications. As required, install application software such as C/C++, VEE, etc. on your PC.
2 Insert the Agilent IO Libraries for Instrument Control CD into the CD-ROM drive and wait a few seconds for the application to run. The installer should automatically start when the CD is inserted. If not, select Start|Run and type <drive>:setup.exe where drive is your CD-ROM drive letter.
3 The InstallShield� Wizard appears to begin the IO Libraries installation.
NOTE
This section applies ONLY to the systems listed. For a Windows NT 4.0 operating system OR for other IO cards, do NOT use this section. Use “Steps to Install New IO Libraries (Standard)”.
� Windows 95/98/Me/2000 operating system and a 1394 PCI FireWire card connected to an Agilent E8491B VXI interface
or
� Windows 95/98/Me/2000 operating system and an Agilent 82350 PCI GPIB card.
Chapter 2 27

Installing the IO LibrariesInstalling New IO Libraries
4 When the title screen appears, click Next > to go to the License Agreement screen and then click Yes to accept the license terms and to display the Readme Information screen.
5 Click Next > to display the SICL installation directory screen. By default, SICL is installed in C:\Program Files\Agilient\IO Libraries. Click Next > if you accept the default setting, or set the directory you want and then click Next > to display the VISA installation directory screen.
6 By default, VISA is installed in C:\Program Files\VISA. Click Next > if you accept the default setting, or set the directory you want and then click Next > to display the Select Type of Installation screen.
NOTE
The Readme Information screen contains important information on the IO Libraries. We suggest you read this information before continuing with IO Libraries installation.
28 Chapter 2

Installing the IO LibrariesInstalling New IO Libraries
7 Use this table for guidelines to select the type of installation for your application. Then, click Next > to install the option.
Option Description
1. SICL and Agilent VISA Installation
Installs SICL and Agilent VISA with the default options for your computer configuration. This option allows development and runtime capabilities using SICL and Agilent VISA.
The option also allows you to select Agilent E8491 IEEE-1394 to VXI support. If another vendor’s VISA is installed, installing this option will overwrite the other vendor’s VISA.
2. SICL and side-by-side Agilent VISA Installation
Installs SICL and side-by-side Agilent VISA with the default options for your computer configuration. With this option, another vendor’s VISA will not be overwritten.
Beginning with version K.01.00, you can install Agilent VISA as a secondary VISA (side-by-side). When this is done, Agilent VISA will not overwrite another vendor's VISA, if one is present on the computer.
Normal VISA programs use visa32.dll which is installed in the Windows system directory. Agilent VISA is implemented in agvisa32.dll which is also installed in the Windows system directory.
� If Agilent VISA is installed as the primary VISA, the Agilent version of visa32.dll is installed in the Windows system directory and forwards all VISA calls to agvisa32.dll.
� If Agilent VISA is installed as a secondary VISA, agvisa32.dll is installed but Agilent's visa32.dll is not installed. Thus, Agilent VISA will not overwrite another vendor's visa32.dll which may already be installed.
� If Agilent VISA is installed as a secondary VISA, the support files in the 'bin', 'include' and 'lib' directories of the <VISA Path> (e.g., C:\program files\visa\winnt on Window NT/2000 or C:\program files\visa\win95 on Windows 95/98/Me) are not installed since they would overwrite another vendor's support files.
Chapter 2 29

Installing the IO LibrariesInstalling New IO Libraries
8 For the SICL and Agilent VISA Installation (Options 1 and 2) and the SICL Installation (Option 3) ONLY, the Question screen for E8491 support appears on Windows 95 and Windows NT. (This support is installed by default on Windows 98, Windows Me, and Windows 2000.) Click Yes to install Agilent E8491 IEEE-1394 to VXI support, click No to not install it.
2. SICL and side-by-side Agilent VISA Installation (continued)
Copies of the Agilent version of the VISA support files are in the 'agbin', 'include' and 'lib' subdirectories under <VISA Path>\agvisa. These files are installed even when Agilent VISA is the primary VISA.
The Agilent VISA utilities vifind32.exe and VISA Assistant use Agilent VISA even if another vendor's VISA is installed as primary VISA.
Normally, a VISA program will use the primary VISA (i.e., call through visa32.dll). However, if a VISA program is linked with agvisa32.lib or dynamically loads agvisa32.dll, the program will use Agilent VISA even if it is not the primary VISA.
3. SICL Installation Installs SICL (but not Agilent VISA) with the default options for your computer configuration. This option allows development and runtime capabilities using SICL.
The option also allows you to select Agilent E8491 IEEE-1394 to VXI support. If another vendor’s VISA is installed, installing this option will not overwrite the other vendor’s VISA.
4. Compact SICL Installation
Installs SICL (but not Agilent VISA) with the default options for your computer configuration. This option allows runtime capabilities ONLY (no development capabilities) using SICL for Serial (RS-232) and LAN client interfaces. If another vendor’s VISA is installed, installing this option will not overwrite the other vendor’s VISA.
5. Agilent GPIB-VXI Installation
Use this option if your system includes an Agilent VXI Command Module (such as an E1406, etc.) and another vendor’s VISA. This option provides GPIB-VXI support for VXI Command Modules on another vendor’s VISA. SICL and Agilent VISA are not installed.
6. Custom Installation
Allows you to install individually selected components of the IO Libraries, including SICL, including SICL, VISA, E8491, I-SCPI, and GPIB-VXI Support components. I-SCPI is supplied for backward compatibility but is not recommended for new applications.
Option Description
30 Chapter 2

Installing the IO LibrariesInstalling New IO Libraries
9 Move through the screens (as applicable to the option selected) until you get to the IO Libraries Configuration screen. Then, select the type of configuration you want performed (automatic, manual, or none) and click Next > to start the installation.
10 When installation is complete, the Installation Complete screen appears. Note that you must re-start your computer to initialize the IO Libraries. Select the Do not configure interfaces now option, remove any disks from their drives, and click Finish to complete the installation.
11 Shut down the computer and turn power off. Install an IEEE-1394 FireWire card and/or Agilent 82350A PCI GPIB card. Use a FireWire cable to connect the IEEE-1394 card to an E8491B VXI interface card in a VXI mainframe. Power up the mainframe.
12 Turn the computer ON. As Windows 95/98/Me/2000 restarts, the Found New Hardware Wizard will start. Use this Wizard to complete the installation as shown in Steps 14 and/or 15.
Chapter 2 31

Installing the IO LibrariesInstalling New IO Libraries
13 1394 FireWire Card connected to an E8491B VXI Interface Card
� Windows 95. If the Wizard asks for the HPI/OLibraries CD, click OK. When the Wizard asks for the wn1394.vxd file, browse to C:\windows\system\ and click OK.
� Windows 98. If the Wizard asks for the 1394bus.sys file, you must provide the CD for the Windows 98 operating system and let the Wizard search for and install the file. When the Wizard asks for the IO Libraries CD, provide the CD or continue to where the Wizard asks for the 1394ipt.sys file. Then, browse to C:\Winnt\system32\drivers\ and click OK.
� Windows Me. When the Wizard asks for the IO Libraries CD, provide the CD or continue to where the Wizard asks for the 1394ipt.sys file. Then, browse to C:\Winnt\system32\drivers\ and click OK.
14 82350 PCI GPIB Card
� Windows 95. When the Wizard asks for the HPI/OLibraries CD, click OK. When the Wizard asks for the ag350i32.vxd file, browse to C:\windows\system\ and click OK.
� Windows 98/Me. When the Wizard asks for the HPIOLibraries CD, click OK. When the Wizard asks for the hpioclas.dll file, browse to C:\windows\system\ and click OK.
32 Chapter 2

Installing the IO LibrariesInstalling New IO Libraries
What Was Created During Installation?Depending on the installation option you selected, SICL and/or VISA were installed and several program icons were created. In addition, an Agilent IO Libraries Control was created.
Program Groups Created
During installation, the Agilent IO Libraries program group was created. To access this group, click Start|Programs|Agilent IO Libraries to display the following icons. Three utilities were installed you can use with the IO Libraries: IO Config, VISA Assistant, and VXI Resource Manager. See Chapter 3 - Using IO Configuration Utilities for information on using these utilities.
Agilent IO Libraries Control Icon
In addition to the IO Libraries icons, an Agilent IO Libraries Control icon was created. This icon is located on the Windows taskbar and is shown as a blue IO symbol. If the IO Libraries Control icon is not visible, you can display the icon by clicking Start|Programs|Agilent IO Libraries|IO Control.
The IO Libraries Control allows you to run VISA Assistant, IO Config, and Message/Event Viewer. It also allows you to select different modes of operation for VISA Logging. See Chapter 3 - Using IO Configuration Utilitiesfor details on using IO Config and VISA Assistant.
Opens the IO Manuals Folder
Opens the IO Config utility. Useto configure the IO Libraries.
Refers you to the Agilent IOLibraries Control (blue IO iconon the taskbar). This will alsoplace the icon on the taskbarif the icon is not visible.
Displays the DOS screen for theLAN Server
SICL Help Files
VISA Help Files
Opens the VISA Assistant utility.
Opens the VXI Resource Managerutility to configure E8491 interface
IO Libraries Readme File
Opens the Readme File for theISCPI utility
Chapter 2 33

Installing the IO LibrariesInstalling New IO Libraries
A typical display follows when View Documentation is selected. You can run IO Config, VISA Assistant, or VXI Resource Manager to configure your specific system. In addition, you can run the Event Viewer (Message Viewer) for troubleshooting or you can select VISA Logging for logging messages.
Electronic manuals(.pdf files)
Shows installation pathinfo for IO Libraries,VISA, and Registry
IO Libraries ReadmeFile
* Event Viewer is called Message Viewer on Windows 95, Windows 98, and Windows Me
VISA/SICL Help files
Runs Event Viewer* forsystem troubleshooting
Runs VXI ResourceManager to configureVXI systems
Runs VISA Assistant
Runs IO Config
Allows you to select Off,Event Viewer*, or DebugWindow for VISA Logging
NOTE
The Readme Information screen contains important information on the IO Libraries. We suggest you read this information before continuing with IO Libraries installation.
Adobe Acrobat Reader is required to view manuals available from the Agilent IO Libraries Control. (Online Help files and the IO Libraries Readme File do not require Acrobat Reader.) If Adobe Acrobat Reader is not present, no error message appears but manuals will not be displayed.
34 Chapter 2

Installing the IO LibrariesInstalling New IO Libraries
Clicking View Documentation|Installation and Paths Information displays the IO Libraries, VISA, and Registry installation paths. This is primarily useful for troubleshooting installation problems. See the following figures for typical displays. The first figure shows Agilent VISA as the primary VISA, while the second figure shows Agilent VISA installed side-by-side with another vendor’s VISA.
Where to go NextYou have now completed installation of the Agilent IO Libraries. Go to Chapter 3 - Using IO Configuration Utilities for guidelines to configure the Agilent IO Libraries for your PC configuration.
Chapter 2 35

Installing the IO LibrariesUpgrading Existing IO Libraries
Upgrading Existing IO LibrariesUse these steps to upgrade existing IO Libraries on your PC. The steps in this section assume version H.01.03 or earlier of the IO Libraries is already installed on your PC and you are installing version J.01.00 or later of the IO Libraries.
� If no version of the IO Libraries is installed on your PC and you want to install a new version, see “Installing New IO Libraries”.
� If you want to modify, repair, or remove the same version of an existing IO Library, see “Maintaining IO Libraries”.
Steps to Upgrade the IO Libraries
1 Turn the PC ON and close all open applications.
2 As required, install application software such as C/C++, VEE, etc. on your PC.
3 Insert the Agilent IO Libraries for Instrument Control CD into the CD-ROM drive and wait a few seconds for the application to run. The installer should automatically start when the CD is inserted.If not, select Start|Run and type <drive>:setup.exe where drive is your CD-ROM drive letter.
4 The InstallShield� Wizard appears to begin the IO Libraries installation.
36 Chapter 2

Installing the IO LibrariesUpgrading Existing IO Libraries
5 An Upgrade screen appears that shows the current version installed and the new version that will be installed.
6 Click Next > to go to the License Agreement screen and then click Yes to accept the license terms and to display the Readme Information screen.
NOTE
The Readme Information screen contains important information on the IO Libraries. Please read this information before continuing with IO Libraries upgrade.
NOTE
If you are installing version J.01.00 or greater of the Agilent IO Libraries, Steps 7 through 9 are skipped.
Chapter 2 37

Installing the IO LibrariesUpgrading Existing IO Libraries
7 After reading the ReadMe information, click Next > to display the Select Type of Installation screen.
8 Use this table for guidelines to select the type of installation for your application. Then, click Next > to install the option.
Option Description1. SICL and Agilent
VISA InstallationInstalls SICL and Agilent VISA with the default options for your computer configuration. This option allows development and runtime capabilities using SICL and Agilent VISA. The option also allows you to select Agilent E8491 IEEE-1394 to VXI support. If another vendor’s VISA is installed, installing this option will overwrite the other vendor’s VISA.
38 Chapter 2

Installing the IO LibrariesUpgrading Existing IO Libraries
2. SICL and side-by-side Agilent VISA Installation
Installs SICL and side-by-side Agilent VISA with the default options for your computer configuration. With this option, another vendor’s VISA will not be overwritten.
Beginning with version K.01.00, you can install Agilent VISA as a secondary VISA (side-by-side). When this is done, Agilent VISA will not overwrite another vendor's VISA, if one is present on the computer.
Normal VISA programs use visa32.dll which is installed in the Windows system directory. Agilent VISA is implemented in agvisa32.dll which is also installed in the Windows system directory.
� If Agilent VISA is installed as the primary VISA, the Agilent version of visa32.dll is installed in the Windows system directory and forwards all VISA calls to agvisa32.dll.
� If Agilent VISA is installed as a secondary VISA, agvisa32.dll is installed but Agilent's visa32.dll is not installed. Thus, Agilent VISA will not overwrite another vendor's visa32.dll which may already be installed.
� If Agilent VISA is installed as a secondary VISA, the support files in the 'bin', 'include' and 'lib' directories of the <VISA Path> (e.g., C:\program files\visa\winnt on Window NT/2000 or C:\program files\visa\win95 on Windows 95/98/Me) are not installed since they would overwrite another vendor's support files.
Copies of the Agilent version of the VISA support files are in the 'agbin', 'include' and 'lib' subdirectories under <VISA Path>\agvisa. These files are installed even when Agilent VISA is the primary VISA.
The Agilent VISA utilities vifind32.exe and VISA Assistant use Agilent VISA even if another vendor's VISA is installed as primary VISA.
Normally, a VISA program will use the primary VISA (i.e., call through visa32.dll). However, if a VISA program is linked with agvisa32.lib or dynamically loads agvisa32.dll, the program will use Agilent VISA even if it is not the primary VISA.
Option Description
Chapter 2 39

Installing the IO LibrariesUpgrading Existing IO Libraries
9 For the SICL and Agilent VISA Installation (Options 1 and 2) and the SICL Installation (Option 3) ONLY, the Question screen for E8491 support appears on Windows 95 and Windows NT. (This support is installed by default on Windows 98, Windows Me, and Windows 2000.) Click Yes to install Agilent E8491 IEEE-1394 to VXI support, click No to not install it.
10 Move through the screens (as applicable to the option selected) until you get to the IO Libraries Configuration screen. Then, select the type of configuration you want performed (refresh, automatic, manual, or do not configure) and click Next > to start the installation.
3. SICL Installation Installs SICL (but not Agilent VISA) with the default options for your computer configuration. This option allows development and runtime capabilities using SICL. The option also allows you to select Agilent E8491 IEEE-1394 to VXI support. If another vendor’s VISA is installed, installing this option will not overwrite the other vendor’s VISA.
4. Compact SICL Installation
Installs SICL (but not Agilent VISA) with the default options for your computer configuration. This option allows runtime capabilities ONLY (no development capabilities) using SICL for Serial (RS-232) and LAN client interfaces. If another vendor’s VISA is installed, installing this option will not overwrite the other vendor’s VISA.
5. Agilent GPIB-VXI Installation
Use this option if your system includes an Agilent VXI Command Module (such as an E1406, etc.) and another vendor’s VISA. This option provides GPIB-VXI support for VXI Command Modules on another vendor’s VISA. SICL and Agilent VISA are NOT installed.
6. Custom Installation
Allows you to install individually selected components of the IO Libraries, including SICL, including SICL, VISA, E8491, I-SCPI, and GPIB-VXI Support components. I-SCPI is supplied for backward compatibility but is NOT recommended for new applications.
Option Description
NOTE
The Refresh Configured Interfaces option will not search for any unconfigured interfaces. This option will only refresh interfaces that are already configured.
40 Chapter 2

Installing the IO LibrariesUpgrading Existing IO Libraries
11 When installation is complete, the Installation Complete screen appears. Note that you must re-start your computer to initialize the IO Libraries. Select the Yes or No option, remove any disks from their drives, and click Finish to complete the installation.
NOTE
A different screen will appear if it is not necessary to restart the computer. Even if you are not prompted to restart the computer, if you experience difficulty after installing the IO Libraries, restart the computer to see if this solves the problem.
Chapter 2 41

Installing the IO LibrariesUpgrading Existing IO Libraries
What Was Created During Installation?Depending on the installation option you selected, SICL and/or VISA were installed and several program icons were created. In addition, an Agilent IO Libraries Control was created.
Program Groups Created
During installation, the Agilent IO Libraries program group was created. To access this group, click Start|Programs|Agilent IO Libraries to display the following icons. Three utilities were installed you can use with the IO Libraries: IO Config, VISA Assistant, and VXI Resource Manager. See Chapter 3 - Using IO Configuration Utilities for information on using these utilities.
Agilent IO Libraries Control Icon
In addition to the IO Libraries icons, an Agilent IO Libraries Control icon was created. This icon is located on the right-hand side of the taskbar and is shown as a blue IO symbol. If the IO Libraries Control icon is not visible, you can display the icon by clicking Start|Programs|Agilent IO Libraries|IO Control.
The IO Libraries Control allows you to run VISA Assistant, IO Config, and Message/Event Viewer. It also allows you to select different modes of operation for VISA Logging. See Chapter 3 - Using IO Configuration Utilitiesfor details on using IO Config and VISA Assistant.
Opens the IO Manuals Folder
Opens the IO Config utility. Useto configure the IO Libraries.
Refers you to the Agilent IOLibraries Control (blue IO iconon the taskbar). This will alsoplace the icon on the taskbarif the icon is not visible.
Displays the DOS screen for theLAN Server
SICL Help Files
VISA Help Files
Opens the VISA Assistant utility.
Opens the VXI Resource Managerutility to configure E8491 interface
IO Libraries Readme File
Opens the Readme File for theISCPI utility
42 Chapter 2

Installing the IO LibrariesUpgrading Existing IO Libraries
A typical display follows, with View Documentation highlighted. You can run IO Config, VISA Assistant, or VXI Resource Manager to configure your specific system. In addition, you can run the Event Viewer (Message Viewer) for troubleshooting or you can select VISA Logging for logging messages.
Electronic manuals(.pdf files)
Shows installation pathinfo for IO Libraries,VISA, and Registry
IO Libraries ReadmeFile
* Event Viewer is called Message Viewer on Windows 95, Windows 98, and Windows Me
VISA/SICL Help files
Runs Event Viewer* forsystem troubleshooting
Runs VXI ResourceManager to configureVXI systems
Runs VISA Assistant
Runs IO Config
Allows you to select Off,Event Viewer*, or DebugWindow for VISA Logging
NOTE
The Readme Information screen contains important information on the IO Libraries. We suggest you read this information before continuing with IO Libraries installation.
Adobe Acrobat Reader is required to view manuals available from the Agilent IO Libraries Control. (Online Help files and the IO Libraries Readme File do not require Acrobat Reader.) If Adobe Acrobat Reader is not present, no error message appears but manuals will not be displayed.
Chapter 2 43

Installing the IO LibrariesUpgrading Existing IO Libraries
Clicking View Documentation|Installation and Paths Information displays the IO Libraries, VISA, and Registry installation paths. This is primarily useful for troubleshooting installation problems. See the following figures for typical displays. The first figure shows Agilent VISA as the primary VISA, while the second figure shows Agilent VISA installed side-by-side with another vendor’s VISA.
Where to go NextYou have now completed installation of the Agilent IO Libraries. Go to Chapter 3 - Using IO Configuration Utilities for guidelines to configure the Agilent IO Libraries for your PC configuration.
44 Chapter 2

Installing the IO LibrariesMaintaining Existing IO Libraries
Maintaining Existing IO LibrariesThis section gives guidelines to modify, repair, or remove the same version of the IO Libraries (version J.01.00 or later) currently installed on your PC.
� To modify the same version of an existing IO Library, see “Steps to Modify IO Libraries”.
� To repair the same version of an existing IO Library, see “Steps to Repair IO Libraries”.
� To remove the same version of an existing IO Library, see “Steps to Remove IO Libraries”.
Steps to Modify the IO Libraries
1 Turn the PC ON and close all open applications.
2 Insert the Agilent IO Libraries for Instrument Control CD into the CD-ROM drive and wait a few seconds for the application to run. The installer should automatically start when the CD is inserted. If not, select Start|Run and type <drive>:setup.exe where drive is your CD-ROM drive letter.
3 The InstallShield� Wizard appears to begin the IO Libraries modification process.
Chapter 2 45

Installing the IO LibrariesMaintaining Existing IO Libraries
4 After a few seconds, the Setup Maintenance screen appears. From this screen, select Modify and then click Next > to modify the current IO Libraries installation.
5 When the Tree View screen appears, select the components you want to install and clear the components you do not want to install.Then, click Next > to begin the (modified) installation.
46 Chapter 2

Installing the IO LibrariesMaintaining Existing IO Libraries
6 After the modified setup is installed, the IO Libraries Configuration screen appears. Select an option and then click Next > to complete the modification process.
� If you select “Refresh configured interfaces” or “Auto-configure all interfaces”, all applicable interfaces are refreshed or configured.
� If you select “Manually configure interfaces”, the IO Config utility appears from which you can manually configure interfaces. See Chapter 3 - Using IO Configuration Utilities for information on IO Config.
� If you select “Do not configure interfaces now”, the Setup Complete screen appears that reminds you to run the IO Config utility. See Chapter 3 - Using IO Configuration Utilities for information on IO Config.
Chapter 2 47

Installing the IO LibrariesMaintaining Existing IO Libraries
7 For any option selected, when the Setup Complete screen appears, (see the following figure) click Finish to complete the process and then remove the IO Libraries for Instrument Control CD.
Steps to Repair the IO Libraries
1 Turn the PC ON and close all open applications.
2 Insert the Agilent IO Libraries for Instrument Control CD into the CD-ROM drive and wait a few seconds for the application to run.The installer should automatically start when the CD is inserted. If not, select Start|Run and type <drive>:setup.exe where drive is your CD-ROM drive letter.
3 The InstallShield� Wizard appears to begin the IO Libraries modification process.
48 Chapter 2

Installing the IO LibrariesMaintaining Existing IO Libraries
4 After a few seconds, the IO Libraries Setup Maintenance screen appears. From this screen, select Repair and then click Next > to re-install the current IO Libraries components.
5 The Setup Status screen appears, and the existing IO Library components are re-installed.
Chapter 2 49

Installing the IO LibrariesMaintaining Existing IO Libraries
6 When re-installation is complete, the Setup Complete screen appears. Click Finish to complete the process and then remove the IO Libraries for Instrument Control CD.
Steps to Remove the IO Libraries
1 Turn the PC ON and close all open applications.
2 Insert the Agilent IO Libraries for Instrument Control CD into the CD-ROM drive and wait a few seconds for the application to run. The installer should automatically start when the CD is inserted. If not, select Start|Run and type <drive>:setup.exe where drive is your CD-ROM drive letter.
3 The InstallShield� Wizard appears to begin the IO Libraries modification process.
50 Chapter 2

Installing the IO LibrariesMaintaining Existing IO Libraries
4 After a few seconds, the IO Libraries Setup Maintenance screen appears. From this screen, select Remove and then click Next > to remove the current IO Libraries installation.
5 The Confirm Delete screen appears. Click Yes to delete all currently installed IO Libraries components.
Chapter 2 51

Installing the IO LibrariesMaintaining Existing IO Libraries
6 When component removal is complete, the following screen appears. Click Finish to complete the process and then remove the IO Libraries for Instrument Control CD.
52 Chapter 2

3
Using IO Configuration Utilities
53

Using IO Configuration Utilities
This chapter gives guidelines to use IO utilities to configure I/O interfaces, including:
� Getting Started� Using I/O Config� Using VISA Assistant� Using VXI Resource Manager� Using LAN Server
NOTE
In most cases, you can open and run the IO Config utility and use the default choices for your specific interface. If you have questions about interface configuration or you want to change the interface settings, see Chapter 4 - Configuring IO Interfaces.
54 Chapter 3

Using IO Configuration UtilitiesGetting Started
Getting StartedDepending on the hardware interfaces in your system, you can use one or more IO utilities to configure the Agilent IO Libraries for your system. This section shows how to get started using these utilities.
Before You Begin ConfigurationIf you have Windows 95/98/Me and Windows 2000/NT environments on your system and you installed the IO Libraries on both environments, you will need perform the configuration procedures in this chapter twice – once on Windows 95/98/Me and once on Windows 2000/NT.
Before you can use an I/O interface with SICL or VISA, you must first configure the interface with the IO Config utility (located in the Agilent IO Libraries program folder). IO Config should be used exclusively to configure all interfaces used with SICL and VISA.
Getting Started Using IO Configuration UtilitiesTo get started using the IO Configuration utilities:
1 Determine the IO interfaces for your system (GPIB, VXI, LAN, etc.).
2 As required, see the applicable section in Chapter 4 - Configuring IO Interfaces for guidelines to configure the interface(s). For example, see “Configuring GPIB Interfaces” for GPIB interfaces, etc.
3 See “Using IO Config” in this chapter for guidelines to use the IO Config utility to configure interfaces.
4 As required, see “Using VISA Assistant”, “Using VXI Resource Manager”, or “Using LAN Server” for configuration information.
Chapter 3 55

Using IO Configuration UtilitiesUsing IO Config
Using IO ConfigThis section gives guidelines to use the IO Libraries configuration utility IO Config. You can use IO Config to configure hardware interfaces (such as an 82350A GPIB card, etc.) for use with VISA and SICL on a Windows 95, Windows 98, Windows Me, Windows 2000, or Windows NT environment.
IO Config RequirementsThe IO Config utility is used by the Agilent IO Libraries to configure instrument I/O hardware interfaces. An interface must be configured with IO Config before the interface can be used with the IO Libraries. You can configure all available interfaces with IO Config for use with the Agilent IO Libraries. With IO Config, you can also add, edit, or remove configuration entries for the interface(s) you specify.
IO Config is an interactive program that searches your system for installed interfaces that VISA and SICL support. You select the interface(s) you want to configure and IO Config selects default parameters required to configure the interface(s).
You can run IO Config at any time. However, you must first install an interface card in your system before you can configure the interface. IO Config will verify that an interface card is installed before a configuration entry will be added for the card.
You must have system administrator privileges on Windows 2000/NT to run IO Config. You may also need to reboot the computer if you add or modify interfaces with IO Config to load or update driver files for specific interfaces in the Windows kernel. IO Config will inform you if it is necessary to reboot your computer.
When you configure VISA with IO Config, the default configuration is to identify all VISA devices at application runtime. If you experience slow performance when running VISA applications, you may want to edit the VISA configuration to identify devices at configuration time (not at runtime). See the VISA User’s Guide to edit the VISA configuration.
NOTE
If any VISA or SICL applications are running when changes are made using IO Config, these changes will not take effect until all currently executing applications have completed.
56 Chapter 3

Using IO Configuration UtilitiesUsing IO Config
Running IO ConfigThe purpose of IO Config is to configure an I/O interface for use with VISA or SICL. IO Config does this by associating a unique VISA and/or SICL name with a hardware interface. To begin this configuration:
1 Open IO Config by double-clicking the IO Config icon in the IO Libraries program group or by clicking the Agilent IO Libraries Control icon (blue IO icon on the Windows taskbar) and then selecting Run IO Config. The following figure shows a typical display.
NOTE
If your system includes interfaces not shown on the typical display in the following figure, those interface names will automatically appear on the main screen. Follow the on-screen instructions to use IO Config to configure your system.
Chapter 3 57

Using IO Configuration UtilitiesUsing IO Config
2 The above figure shows the available interface types (ASRL, GPIB, etc.) you can configure with IO Config and a description of each interface. In addition, the figure shows Configured Interfaces (interfaces already configured). Each configured interface has an associated VISA and/or SICL name.
In this figure, a configured ASRL (RS-232) interface has VISA name ASRL1 and SICL name COM1, a configured GPIB interface has VISA name GPIB0 and SICL name hpib7, etc. These names are used to open interface paths with the VISA viOpen command or the SICL iopen command. See the Agilent VISA User’s Guide for Windows for information on VISA commands. See the Agilent SICL User’s Guide for Windows for details on SICL commands.
3 To use IO Config to configure an interface, highlight the interface type and click the Configure button. The applicable configuration screen then appears. For example, for this figure, the 82350 PCI GPIB Card Configuration screen appears.
4 When the screen appears (see the following figure), set the VISA and SICL Interface Names and the Logical Unit and Bus Address values, as required. Then, click the OK button. If you have more than one 82350 card in your system, repeat for remaining cards. If you have questions about using IO Config for a specific interface, click the Help button on the IO Config dialog box.
58 Chapter 3

Using IO Configuration UtilitiesUsing IO Config
5 If you want IO Config to automatically configure new interfaces, click the Auto Add button. However, Auto Add will not add an 82341 ISA GPIB card, nor will it remove any interfaces that are no longer installed.
6 In most cases, you can use the automatic defaults. However, if you need to change a value, click the arrows next to the value’s field. If there are no arrows, click the field and type in the value you want.
7 Note the name of the interface (such as hpib7, etc.) and the logical unit number of the interface for use in SICL applications, and the device address for use in VISA applications.
8 When you have finished configuring interfaces, click OK to store the changes.
Example: Using IO ConfigAn IO interface can be defined as both a hardware interface and as a software interface. The purpose of the IO Config utility is to associate a unique interface name with a hardware interface.
The IO Libraries use an Interface Name or Logical Unit Number to identify an interface. This information is passed in the parameter string of the viOpen function call in a VISA program or in the iopen function call in a SICL program. IO Config assigns an Interface Name and Logical Unit Number to the interface hardware, as well as other necessary configuration values for an interface when the interface is configured.
The GPIB interface system in the following figure consists of a Windows PC with two 82350 GPIB cards connected to three GPIB instruments via GPIB cables. For this system, the IO Config utility has been used to assign GPIB card #1 a VISA name of “GPIB0” and a SICL name of “hpib7”. IO Config has also been used to assign GPIB card #2 a VISA name of “GPIB1” and a SICL name of “hpib8”. With these names assigned to the interfaces, the VISA/SICL addressing is as shown in the figure.
Since unique names have been assigned by IO Config, you can use the VISA viOpen command to open the IO paths to the GPIB instruments as shown in the above figure. Or, you can use the SICL iopen command to open the IO paths shown. See the Agilent VISA User’s Guide for details on VISA commands. See the Agilent SICL User’s Guide for Windows for details on SICL commands.
Chapter 3 59

Using IO Configuration UtilitiesUsing IO Config
5
82350 GPIB Card #1
Windows PC
3
3
GPIB InstrumentsGPIB CableInterface VISA/SICL Names
82350 GPIB Card #2
VISA Name SICL Name
"GPIB0" "hpib7"
"GPIB1" "hpib8"
VISA/SICL Addressing
VISA: viOpen (... "GPIB0::5::INSTR"...) viOpen (... "GPIB0::3::INSTR"...) viOpen (... "GPIB1::3::INSTR"...)
SICL: iopen ("hpib7, 5") iopen ("hpib7,3") iopen ("hpib8,3")
GPIB Interface (82350 PCI GPIB Cards)
Open IO path to GPIB instrument at address 5 using 82350 Card #1Open IO path to GPIB instrument at address 3 using 82350 Card #1Open IO path to GPIB instrument at address 3 using 82350 Card #2
Open IO path to GPIB instrument at address 5 using 82350 Card #1Open IO path to GPIB instrument at address 3 using 82350 Card #1Open IO path to GPIB instrument at address 3 using 82350 Card #2
60 Chapter 3

Using IO Configuration UtilitiesUsing VISA Assistant
Using VISA AssistantVISA Assistant is an application program that uses the IO Libraries to communicate with and to control VXI, GPIB, and serial Instruments.
VISA Assistant OverviewVISA Assistant can automatically detect and assign VXIplug&play instrument drivers to instruments. VISA Assistant can also be used to send and receive strings to instruments which support formatted I/O. For other instruments, VISA Assistant allows you to read and write memory areas. VISA Assistant also describes attributes that are associated with an instrument.
Running VISA AssistantTo run VISA Assistant, either click Start|Programs|Agilent IO Libraries|VISA Assistant or click the Agilent IO Libraries Control and then click Run VISA Assistant. A typical display showing the system Instrument View follows. For information on using VISA Assistant, click the Help menu button.
Chapter 3 61

Using IO Configuration UtilitiesUsing the VXI Resource Manager
Using the VXI Resource ManagerIf your system includes an E8491 IEEE-1394 PC Link to VXI interface, you can view the output of the VXI Resource Manager to determine if your system is properly configured.
VXI Resource Manager OverviewThe VXI Resource Manager initializes and prepares the VXI system for use. The VXI Resource Manager will run when:
� VXI mainframe power is applied or cycled� The E8491 Reset button is pressed� It is activated from the IO Config utility� It is activated from Agilent IO Libraries Control icon � Computer is rebooted
In VXI systems with multiple E8491s, individual mainframes can be turned off without affecting other mainframes in the system. When a mainframe is turned on, the Resource Manager reconfigures the mainframe.
NOTE
The Agilent IO Libraries Control utility must be running to enable the VXI Resource Manager to run. The VXI Resource Manager is installed when the E8491 interface is configured using IO Config. Click the blue IO icon on the taskbar to access the IO Libraries Control utility.
If the IO Libraries Control icon is not visible, you can display the icon by clicking . The displays in this section are from Windows 2000. Displays for Windows 95, Windows 98, Windows Me, or Windows NT may be slightly different.
62 Chapter 3

Using IO Configuration UtilitiesUsing the VXI Resource Manager
Opening VXI Resource ManagerThe easiest way to view this output is to use the IO Config utility to run the VXI Resource Manager. Click Start|Programs|Agilent IO Libraries|IO Config OR click the Agilent IO Libraries Control icon and select Run IO Config to display the IO Config main panel. Highlight the E8491 IEEE 1394 to VXI entry. Then, click Configure.
On the E8491 VXI Board Configuration screen, change the settings for your system, as required. When complete, click OK to re-display the main screen.
Chapter 3 63

Using IO Configuration UtilitiesUsing the VXI Resource Manager
On the main screen, highlight the vxi entry and then click Edit to re-display the E8491 VXI Board Configuration screen.
Click Edit VISA Config... on this screen to display the Show Devices screen.
64 Chapter 3

Using IO Configuration UtilitiesUsing the VXI Resource Manager
On the Show Devices screen, you can add or remove devices manually or auto-add devices. Click OK when you have added/deleted devices manually.
NOTE
If the Identify devices at run-time box is not checked, the only devices that VISA can open are the ones listed in the Devices present on interface VXIn box. You can add or remove devices from this box using the Add device or Remove device buttons, respectively.
If the Identify devices at run-time box is checked, at runtime VISA will will look for all devices so entries are not required in the Devices present on interface VXIn box.
Chapter 3 65

Using IO Configuration UtilitiesUsing the VXI Resource Manager
Displaying VXI Resource Manager OutputIf an E8491 has previously been installed and configured with IO Config, the VXI Resource Manager will automatically run every time Windows starts. If you change the E8491 configuration in IO Config, the VXI Resource Manager will run automatically (after a 5-second delay) when IO Config is closed.
After the VXI Resource Manager has run, you can view its output. To display the Resource Manager screen, click the Agilent IO Libraries Control icon on the taskbar and select Edit VXI Resource Manager. See the following figure for a typical display.
To view the system configuration (the VXI Resource Manager output), click RM Output. The following figure shows a part of a typical display.
66 Chapter 3

Using IO Configuration UtilitiesUsing the LAN Server
Using the LAN ServerIf you configured the LAN server on this system using IO Config, you must now start the LAN server process on this system.
Starting the LAN Server� To start the LAN server, you can either restart (reboot) this system
now or manually start the LAN server process on this system.
� To manually start the LAN server process on the system after the LAN server has been configured using IO Config, click the LAN Server icon in the Agilent IO Libraries program group.
� The LAN server is now running. You can now minimize the LAN Server window so that the LAN Server process is listed on the Windows taskbar.
Stopping the LAN ServerTo stop the LAN server process from running on the system:
1 Open the LAN Server window on the screen and move the cursor into the LAN Server window.
2 Press Ctrl+C or click the Close box to close the window. The LAN server process is stopped.
Chapter 3 67

Using IO Configuration UtilitiesUsing the LAN Server
68 Chapter 3

4
Configuring I/O Interfaces
69

Configuring I/O Interfaces
This chapter gives guidelines to use IO configuration utilities to configure I/O interfaces, including:
� Configuring GPIB Interfaces� Configuring VXI Interfaces� Configuring LAN Interfaces� Configuring Other Interfaces
NOTE
See Chapter 3 - Using IO Configuration Utilities for information on using IO Configuration utilities (IO Config, VISA Assistant, VXI Resource Manager, and LAN Server) to configure I/O interfaces.
70 Chapter 4

Configuring I/O InterfacesConfiguring GPIB Interfaces
Configuring GPIB InterfacesThis section gives guidelines to use the IO Config utility to configure GPIB interfaces, including:
� GPIB Interface Overview� Configuring GPIB (82350 PCI) Interfaces� Configuring GPIB (82341 ISA) Interfaces
GPIB Interfaces OverviewAs shown in the following figure, a typical GPIB interface consists of a Windows PC with one or more GPIB cards (PCI and/or ISA) cards installed in the PC and one or more GPIB instruments connected to the GPIB cards via GPIB cable. I/O communication between the PC and the instruments is via the GPIB cards and the GPIB cable. This figure shows GPIB instruments at addresses 3 and 5.
5
82350 GPIB Card #1
Windows PC
3
3
GPIB InstrumentsGPIB Cable
82350 GPIB Card #2
GPIB Interface (82350 PCI GPIB Cards)
Chapter 4 71

Configuring I/O InterfacesConfiguring GPIB Interfaces
Configuring GPIB (82350 PCI) InterfacesAn IO interface can be defined as both a hardware interface and as a software interface. The purpose of the IO Config utility is to associate a unique interface name with a hardware interface.
The IO Libraries use an Interface Name or Logical Unit Number to identify an interface. This information is passed in the parameter string of the viOpen function call in a VISA program or in the iopen function call in a SICL program. IO Config assigns an Interface Name and Logical Unit Number to the interface hardware, as well as other necessary configuration values for an interface when the interface is configured.
Using IO Config to Configure GPIB (82350) Interfaces
To configure GPIB (82350) interfaces using the IO Config utility, click the Agilent IO Libraries Control icon (blue icon on the Windows taskbar) and click Run IO Config. When the main screen appears, highlight the GPIB 82350 PCI GPIB Card menu item (see the following figure) and then click the Configure button.
72 Chapter 4

Configuring I/O InterfacesConfiguring GPIB Interfaces
When the 82350 PCI GPIB Card Configuration screen appears (see the following figure), set the VISA and SICL Interface Names and the Logical Unit and Bus Address values as required. Then, click the OK button. If you have more than one 82350 card in your system, repeat for remaining cards.
Example: Configuring GPIB (82350) Interface
The GPIB interface system in the following figure consists of a Windows PC with two 82350 GPIB cards connected to three GPIB instruments via GPIB cables. For this system, the IO Config utility has been used to assign GPIB card #1 a VISA name of “GPIB0” and a SICL name of “hpib7”. IO Config has also been used to assign GPIB card #2 a VISA name of “GPIB1” and a SICL name of “hpib8”. With these names assigned to the interfaces, the VISA/SICL addressing is as shown in the figure.
Since unique names have been assigned by IO Config, you can use the VISA viOpen command to open the I/O paths to the GPIB instruments as shown in the above figure. Or, you can use the SICL iopen command to open the I/O paths shown. See the Agilent VISA User’s Guide for details on VISA commands. See the Agilent SICL User’s Guide for Windows for details on SICL commands.
NOTE
After the system is configured, this screen may also display an Edit VISA Config... button. Clicking this button allows you to manually configure the interface as desired. See the IO Libraries Readme file for details.
Chapter 4 73

Configuring I/O InterfacesConfiguring GPIB Interfaces
5
82350 GPIB Card #1
Windows PC
3
3
GPIB InstrumentsGPIB CableInterface VISA/SICL Names
82350 GPIB Card #2
VISA Name SICL Name
"GPIB0" "hpib7"
"GPIB1" "hpib8"
VISA/SICL Addressing
VISA: viOpen (... "GPIB0::5::INSTR"...) viOpen (... "GPIB0::3::INSTR"...) viOpen (... "GPIB1::3::INSTR"...)
SICL: iopen ("hpib7, 5") iopen ("hpib7,3") iopen ("hpib8,3")
GPIB Interface (82350 PCI GPIB Cards)
Open IO path to GPIB instrument at address 5 using 82350 Card #1Open IO path to GPIB instrument at address 3 using 82350 Card #1Open IO path to GPIB instrument at address 3 using 82350 Card #2
Open IO path to GPIB instrument at address 5 using 82350 Card #1Open IO path to GPIB instrument at address 3 using 82350 Card #1Open IO path to GPIB instrument at address 3 using 82350 Card #2
74 Chapter 4

Configuring I/O InterfacesConfiguring GPIB Interfaces
Configuring GPIB (82341 ISA) InterfacesAn IO interface can be defined as both a hardware interface and as a software interface. The purpose of the IO Config utility is to associate a unique interface name with a hardware interface.
The IO Libraries use an Interface Name or Logical Unit Number to identify an interface. This information is passed in the parameter string of the viOpen function call in a VISA program or in the iopen function call in a SICL program. IO Config assigns an Interface Name and Logical Unit Number to the interface hardware, as well as other necessary configuration values for an interface when the interface is configured.
Using IO Config to Configure GPIB (82341) Interfaces
To configure GPIB (82341) interfaces using the IO Config utility, click the Agilent IO Libraries Control icon (blue icon on the Windows taskbar) and click Run IO Config. When the main screen appears, highlight the GPIB 82341 PCI GPIB Card menu item (see the following figure) and then click the Configure button.
Chapter 4 75

Configuring I/O InterfacesConfiguring GPIB Interfaces
When the 82341 ISA GPIB Card Configuration screen appears, set the VISA and SICL Interface Names and the Logical Unit, IRQ Line, and Bus Address values as required. Then, click the OK button. If you have more than one 82341 card in your system, repeat for remaining cards.
Example: Configuring GPIB (82341) Interface
The GPIB interface system in the following figure consists of a Windows PC with two 82341 GPIB cards connected to three GPIB instruments via GPIB cables. For this system, the IO Config utility has been used to assign GPIB card #1 a VISA name of “GPIB0” and a SICL name of “hpib7”. IO Config has also been used to assign GPIB card #2 a VISA name of “GPIB1” and a SICL name of “hpib8”. With these names assigned to the interfaces, the VISA/SICL addressing is as shown in the figure.
NOTE
After the system is configured, this screen may also display an Edit VISA Config... button. Clicking this button allows you to manually configure the interface as desired. See the IO Libraries Readme file for details.
76 Chapter 4

Configuring I/O InterfacesConfiguring GPIB Interfaces
Since unique names have been assigned by IO Config, you can use the VISA viOpen command to open the I/O paths to the GPIB instruments as shown in the above figure. Or, you can use the SICL iopen command to open the I/O paths shown. See the Agilent VISA User’s Guide for details on VISA commands. See the Agilent SICL User’s Guide for Windows for details on SICL commands.
5
82341 GPIB Card #1
Windows PC
3
3
GPIB InstrumentsGPIB CableInterface VISA/SICL Names
82341 GPIB Card #2
VISA Name SICL Name
"GPIB0" "hpib7"
"GPIB1" "hpib8"
VISA/SICL Addressing
VISA: viOpen (... "GPIB0::5::INSTR"...) viOpen (... "GPIB0::3::INSTR"...) viOpen (... "GPIB1::3::INSTR"...)
SICL: iopen ("hpib7, 5") iopen ("hpib7,3") iopen ("hpib8,3")
GPIB Interface (82341 ISA GPIB Cards)
Open IO path to GPIB instrument at address 5 using 82341 Card #1Open IO path to GPIB instrument at address 3 using 82341 Card #1Open IO path to GPIB instrument at address 3 using 82341 Card #2
Open IO path to GPIB instrument at address 5 using 82341 Card #1Open IO path to GPIB instrument at address 3 using 82341 Card #1Open IO path to GPIB instrument at address 3 using 82341 Card #2
Chapter 4 77

Configuring I/O InterfacesConfiguring VXI Interfaces
Configuring VXI InterfacesThis section gives guidelines to use the IO Config utility to configure VXI interfaces, including:
� VXI Interfaces Overview� Configuring GPIB-VXI (E1406A) Interfaces� Configuring VXI (E8491B) Interfaces
VXI Interfaces OverviewAs shown in the following figure, a typical VXI interface consists of one of two main hardware configurations: E1406A Command Module or E8491B IEEE-1394 to VXI Module.
82350 GPIB Card
Windows PC
. . .
VXI Interfaces
E1406A
VXI
Instr
VXI
Instr
VXI
Instr
. .
VXI Mainframe
GPIB
. . .
E8491B
VXI
Instr
VXI
Instr
VXI
Instr
. .IEEE-1394OHCI-Compliant
PC Card
IEEE-1394to VXI
78 Chapter 4

Configuring I/O InterfacesConfiguring VXI Interfaces
� The E1406A Command Module version consists of a Windows PC with an 82350 (or equivalent) GPIB card and a VXI mainframe with an E1406A Command Module and one or more VXI instruments. I/O communication from the PC to the VXI instruments is via the GPIB card, GPIB cable, and E1406A Command Module.
� The E8491B Module version consists of a Windows PC with an IEEE-1394 OHCI-Compliant (FireWire) PC card and a VXI mainframe with an E8491B IEEE-1394 to VXI Module and one or more VXI instruments. I/O communication from the PC to the VXI instruments is via the PC card, IEEE-1394 to VXI cable, and E8491B Module.
Configuring GPIB-VXI (E1406A) InterfacesAn IO interface can be defined as both a hardware interface and as a software interface. The purpose of the IO Config utility is to associate a unique interface name with a hardware interface.
The IO Libraries use an Interface Name or Logical Unit Number to identify an interface. This information is passed in the parameter string of the viOpen function call in a VISA program or in the iopen function call in a SICL program. IO Config assigns an Interface Name and Logical Unit Number to the interface hardware, as well as other necessary configuration values for an interface when the interface is configured.
Using IO Config to Configure GPIB-VXI (E1406A) Interfaces
To configure GPIB-VXI (E1406A Command Module) interfaces using the IO Config utility, click the Agilent IO Libraries Control icon (blue icon on the Windows taskbar) and click Run IO Config. When the main screen appears, highlight the GPIB-VXI menu item (see the following figure) and then click the Configure button.
When the GPIB-VXI Command Module Configuration screen appears, set the VISA Interface Name, GPIB Interface Name, and GPIB Primary Address as required. Then, click the OK button.
NOTE
After the system is configured, this screen may also display an Edit VISA Config... button. Clicking this button allows you to manually configure the interface as desired. See the IO Libraries Readme file for details.
Chapter 4 79

Configuring I/O InterfacesConfiguring VXI Interfaces
80 Chapter 4
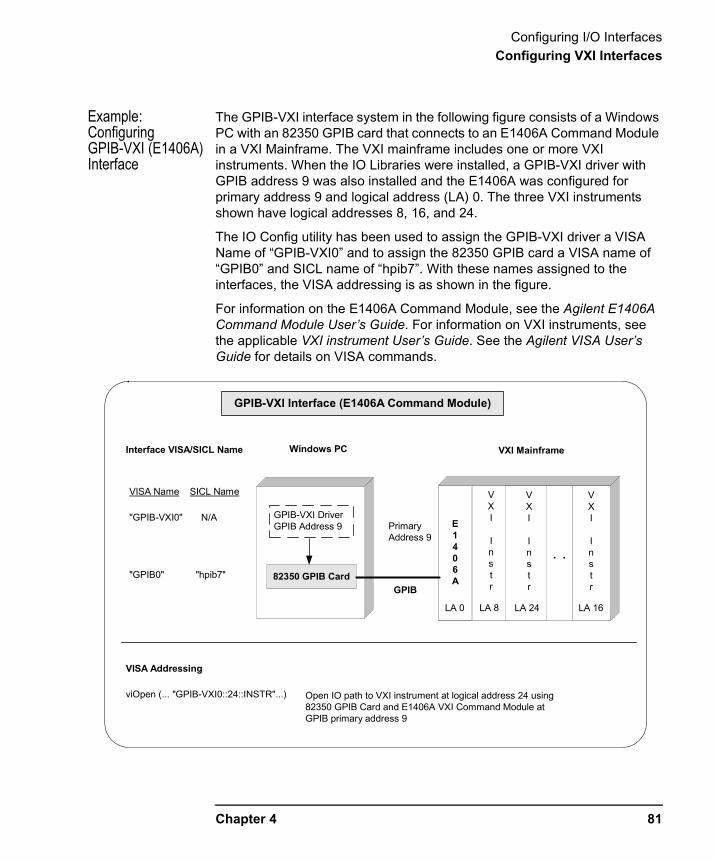
Configuring I/O InterfacesConfiguring VXI Interfaces
Example: Configuring GPIB-VXI (E1406A) Interface
The GPIB-VXI interface system in the following figure consists of a Windows PC with an 82350 GPIB card that connects to an E1406A Command Module in a VXI Mainframe. The VXI mainframe includes one or more VXI instruments. When the IO Libraries were installed, a GPIB-VXI driver with GPIB address 9 was also installed and the E1406A was configured for primary address 9 and logical address (LA) 0. The three VXI instruments shown have logical addresses 8, 16, and 24.
The IO Config utility has been used to assign the GPIB-VXI driver a VISA Name of “GPIB-VXI0” and to assign the 82350 GPIB card a VISA name of “GPIB0” and SICL name of “hpib7”. With these names assigned to the interfaces, the VISA addressing is as shown in the figure.
For information on the E1406A Command Module, see the Agilent E1406A Command Module User’s Guide. For information on VXI instruments, see the applicable VXI instrument User’s Guide. See the Agilent VISA User’s Guide for details on VISA commands.
82350 GPIB Card
Windows PC
. . .
Interface VISA/SICL Name
VISA Name SICL Name
"GPIB-VXI0" N/A
"GPIB0" "hpib7"
VISA Addressing
viOpen (... "GPIB-VXI0::24::INSTR"...)
GPIB-VXI Interface (E1406A Command Module)
Open IO path to VXI instrument at logical address 24 using82350 GPIB Card and E1406A VXI Command Module atGPIB primary address 9
E1406A
VXI
Instr
VXI
Instr
VXI
Instr
. .
VXI Mainframe
GPIB
GPIB-VXI DriverGPIB Address 9 Primary
Address 9
LA 0 LA 8 LA 24 LA 16
Chapter 4 81

Configuring I/O InterfacesConfiguring VXI Interfaces
Configuring VXI (E8491B) InterfacesAn IO interface can be defined as both a hardware interface and as a software interface. The purpose of the IO Config utility is to associate a unique interface name with a hardware interface.
The IO Libraries use an Interface Name or Logical Unit Number to identify an interface. This information is passed in the parameter string of the viOpen function call in a VISA program or in the iopen function call in a SICL program. IO Config assigns an Interface Name and Logical Unit Number to the interface hardware, as well as other necessary configuration values for an interface when the interface is configured.
Using IO Config to Configure VXI (E8491B) Interfaces
To configure VXI (E8491B module) interfaces using the IO Config utility, click the Agilent IO Libraries Control icon (blue icon on the Windows taskbar) and click Run IO Config. When the main screen appears, highlight the VXI E8491 IEEE-1394 to VXI menu item (see the following figure) and click the Configure button.
82 Chapter 4

Configuring I/O InterfacesConfiguring VXI Interfaces
When the E8491 VXI Board Configuration screen appears, set the VISA Interface Name, as required. Then, click the OK button.
NOTE
After the system is configured, this screen may also display an Edit VISA Config... button. Clicking this button allows you to manually configure the interface as desired. See the IO Libraries Readme file for details.
Chapter 4 83

Configuring I/O InterfacesConfiguring VXI Interfaces
Example: Configuring VXI (E8491B) Interfaces
The VXI interface system in the following figure consists of a Windows PC with an E8491 PC card that connects to an E8491B IEEE-1394 to VXI Module in a VXI Mainframe. The VXI mainframe includes one or more VXI instruments. For this system, the three VXI instruments shown have logical addresses 8, 16, and 24.
The IO Config utility has been used to assign the E8491 PC card a VISA name of “VXI0” and SICL name of “vxi”. With these names assigned to the interface, you can use the VISA/SICL addressing shown in the figure.
For information on the E8491B module, see the Agilent E8491B User’s Guide. For information on VXI instruments, see the applicable VXI Instrument User’s Guide. See the Agilent VISA User’s Guide for details on VISA commands. See the Agilent SICL User’s Guide for Windows for details on SICL commands.
E8491 PC Card
Windows PC
. . .
Interface VISA/SICL Name
VISA Name SICL Name
"VXI0" "vxi"
VISA/SICL Addressing
VISA: viOpen (... "VXI0::24::INSTR"...)
SICL: iopen ("vxi,24")
VXI Interface (E18491B IEEE-1394 to VXI Module)
Open IO path to VXI instrument at logical address 24 usingE8491 PC Card and E8491 IEEE-1394 to VXI Module
Open IO path to VXI instrument at logical address 24 usingE8491 PC Card and E8491 IEEE-1394 to VXI Module
E8491B
VXI
Instr
VXI
Instr
VXI
Instr
. .
VXI MainframeIEEE-1394 to VXI
LA 8 LA 24 LA 16
84 Chapter 4

Configuring I/O InterfacesConfiguring LAN Interfaces
Configuring LAN InterfacesThis section gives guidelines to use the IO Config utility to configure LAN interfaces, including:
� LAN Interfaces Overview� Configuring LAN Client Interfaces� Configuring VISA LAN Client Interfaces� Configuring LAN Server Interfaces
LAN Interfaces OverviewThis section gives guidelines to use the Agilent IO Libraries to configure instruments over a LAN (Local Area Network). A LAN is a way to extend the control of instrumentation beyond the limits of typical instrument interfaces. To communicate over the LAN, you must first configure the LAN Client interface.
LAN Client/Server Model
The LAN software provided with the Agilent IO Libraries allows instrumentation control over a LAN. Using standard LAN connections, instruments can be controlled from computers that do not have special interfaces for instrument control.
The LAN software uses the client/server model of computing. Client/server computing refers to a model where an application (the client) does not perform all necessary tasks of the application itself. Instead, the client makes requests of another computing device (the server) for certain services.
LAN Hardware Architecture
As shown in the following figure, a LAN client (such as a Series 700 HP-UX workstation or a Windows 95/98/Me/NT/2000 PC) makes VISA requests over the network to a LAN server (such as a Series 700 HP-UX workstation, a Windows 95/98/Me/NT/2000 PC, or an E2050 LAN/GPIB Gateway).
The LAN server is connected to the instrumentation or devices to be controlled. Once the LAN server has completed the requested operation on the instrument or device, the LAN server sends a reply to the LAN client. This reply contains requested data and status information that indicates whether or not the operation was successful. The LAN server acts as a gateway between the LAN software that the client system supports and the instrument-specific interface that the device supports.
Chapter 4 85

Configuring I/O InterfacesConfiguring LAN Interfaces
Series 700 PCs or Windows 95/98/Me/2000/NT PCs
Client
LAN
Server
Series 700 PCs orWindows 95/98/Me/2000/NT PCs
GPIBbus
GPIBInstrument
GPIBInstruments
E2050LAN/GPIBGateway
GPIB bus(or other)
LAN Instruments(VXI-11.2 GPIB Emulation orVXI-11.3 LAN Instruments)
86 Chapter 4

Configuring I/O InterfacesConfiguring LAN Interfaces
LAN Software Architecture
As shown in the following figure, the client system contains the LAN client software and the LAN software (TCP/IP) needed to access the server (gateway). The gateway contains the LAN server software, LAN (TCP/IP) software, and the instrument driver software needed to communicate with the client and to control the instruments or devices connected to the gateway.
Client VISA System
Application
Agilent VISA
SICL
LAN Client
TCP
IP
LAN Interface
Application
SICL
LAN Client
TCP
IP
LAN Interface
Client SICL System
Server (Gateway) Instrument
LAN Server
TCP Instrument IP Driver
LAN Interface
InstrumentFirmware
GPIB bus (or other)
Chapter 4 87

Configuring I/O InterfacesConfiguring LAN Interfaces
The LAN software is built on top of standard LAN networking protocols. There are two LAN networking protocols provided with the Agilent IO Libraries software. You can use one or both of these protocols when configuring your systems (via Agilent IO Libraries configuration) to use VISA and SICL over LAN.
� SICL-LAN Protocol is a networking protocol developed by Agilent that is compatible with all VISA LAN products. This LAN networking protocol is the default choice in the Agilent IO Libraries configuration when configuring the LAN client. The SICL LAN protocol on HP-UX 10.20, Windows 95/98/Me/2000/NT supports VISA operations over LAN to GPIB interfaces.
� VXI-11 (TCP/IP Instrument Protocol) is a networking protocol developed by the VXIbus Consortium based on the SICL LAN Protocol that permits interoperability of LAN software from different vendors who meet the VXIbus Consortium standards.
When using either of these networking protocols, the LAN software uses the TCP/IP protocol suite to pass messages between the LAN client and the LAN server. The server accepts device I/O requests over the network from the client and then proceeds to execute those I/O requests on a local interface (GPIB, etc.).
By default, the LAN Client supports both protocols by automatically detecting the protocol the server is using. When a VISA viOpen or SICL iopen call is performed, the LAN Client driver first tries to connect using the SICL-LAN protocol. If that fails, the driver will try to connect using the VXI-11 protocol.
If you want to control the protocol used, you can configure more than one LAN Client interface and set each interface to a different protocol. The protocol used will then depend on the interface you are connecting through. Thus, you can have more than one SICL-LAN and one VXI-11 protocols for your system.
In VISA, the protocol used is determined by the configuration settings and cannot be changed programatically. In SICL, the programmer can override the configuration settings by specifying the protocol in the iopen string. Some examples are:
88 Chapter 4

Configuring I/O InterfacesConfiguring LAN Interfaces
� iopen("lan[machineName]:hpib7,1") will use the configured default protocol. If AUTO is configured, SICL-LAN protocol will be attempted. If that is not supported, VXI-11 protocol will be used.
� iopen("lan;auto[machineName]:hpib7,1") will automatically select the protocol (SICL-LAN if available and VXI-11 otherwise.)
� iopen("lan;sicl-lan[machineName]:hpib7,1") will use SICL-LAN protocol.
� iopen("lan;vxi-11[machineName]:hpib7,1") will use VXI-11 protocol.
The LAN Client also supports TCP/IP socket reads and writes. To open a socket session, use iopen("lan,socketNbr[machineName]"). For example, iopen("lan,7777[machineName]") will open a socket connection for socket number 7777 on 'machineName'.
When you have configured VISA LAN Client interfaces, you can then use the interface name specified during configuration in a VISA viOpen call of your program. However, the LAN server does not support simultaneous connections from LAN clients using the SICL-LAN Protocol and from LAN clients using VXI-11 (TCP/IP Instrument Protocol).
There are three LAN servers that can be used with VISA and SICL: the E2050 LAN/GPIB Gateway, an HP Series 700 computer running HP-UX, or a PC running Windows 95/98/Me/2000/NT. To use this capability, the LAN server must have a local GPIB interface configured for I/O.
Chapter 4 89

Configuring I/O InterfacesConfiguring LAN Interfaces
Configuring LAN Client InterfacesAn IO interface can be defined as both a hardware interface and as a software interface. The purpose of the IO Config utility is to associate a unique interface name with a hardware interface.
The IO Libraries use an Interface Name or Logical Unit Number to identify an interface. This information is passed in the parameter string of the viOpen function call in a VISA program or in the iopen function call in a SICL program. IO Config assigns an Interface Name and Logical Unit Number to the interface hardware, as well as other necessary configuration values for an interface when the interface is configured.
Using IO Config to Configure LAN Client Interfaces
To configure LAN Client interfaces using the IO Config utility, click the Agilent IO Libraries Control icon (blue icon on the Windows taskbar) and click Run IO Config. When the main screen appears, highlight the TCPIP LAN Client (LAN Instruments) menu item (see the following figure) and click the Configure button.
90 Chapter 4

Configuring I/O InterfacesConfiguring LAN Interfaces
When the LAN Client screen appears, set the VISA Interface Name and Logical Unit number, as required. Also, you can select the Default Protocol (AUTO, VXI-11, or SICL-LAN) and choose whether or not to Log Errors. Then, click the OK button.
NOTE
After the system is configured, this screen may also display an Edit VISA Config... button. Clicking this button allows you to manually configure the interface as desired. See the IO Libraries Readme file for details.
Chapter 4 91

Configuring I/O InterfacesConfiguring LAN Interfaces
Example: Configuring LAN Client (Gateway) Interface
The LAN Client interface system in the following figure consists of a Windows PC with a LAN card, an E2050 LAN/GPIB gateway, and two GPIB instruments. For this system, the IO Config utility has been used to assign the LAN card a VISA name of “TCPIP0” and SICL name of “lan”.
With these names assigned to the interface, VISA/SICL addressing is as shown in the figure. Since unique names have been assigned by IO Config, you can now use the VISA viOpen command or the SICL iopen command to open the IO paths to the GPIB instruments as shown in the figure.
See the Agilent VISA User’s Guide for details on VISA commands. See the Agilent SICL User’s Guide for Windows for details on SICL commands.
5LAN Card
Windows PC
3
GPIB InstrumentsLAN/GPIB GatewayInterface VISA/SICL Names
VISA Name SICL Name
"TCPIP0" "lan"
VISA/SICL Addressing (Using LAN Client)
VISA: viOpen (... "TCPIP0::machine1::hpib,5::INSTR"...) viOpen (..."TCPIP0::machine1::hpib,3::INSTR "...)
SICL: iopen ("lan [machine1]:hpib,5") iopen ("lan [machine1]:hpib,3")
LAN Client (Gateway)
Open IO path to GPIB instrument at address 5Open IO path to GPIB instrument at address 3
Open IO path to GPIB instrument at address 5Open IO path to GPIB instrument at address 3
E2050
LAN GPIB Cable
machine1hpib-name = hpib
92 Chapter 4

Configuring I/O InterfacesConfiguring LAN Interfaces
Example: Configuring LAN Client (LAN) Interface
The LAN Client interface system in the following figure consists of a Windows PC with a LAN card and three LAN instruments. Instrument1 and instrument2 are VXI-11.2 (GPIB Emulation) instruments and instrument3 is a VXI-11.3 LAN instrument.
For this system, the IO Config utility has been used to assign the LAN card a VISA name of “TCPIP0” and SICL name of “lan”. For the addressing examples, instrument1 has been addressed by its machine name, instrument 2 has been addressed by its IP address, and instrument3 by its LAN name (inst0).
Since unique names have been assigned by IO Config, you can now use the VISA viOpen command or the SICL iopen command to open the I/O paths to the GPIB instruments as shown in the figure. See the Agilent VISA User’s Guide for details on VISA commands. See the Agilent SICL User’s Guide for details on SICL commands.
5
LAN Card
Windows PC LAN InstrumentsInterface VISA/SICL Names
VISA Name SICL Name
"TCPIP0" "lan"
VISA/SICL Addressing (Using LAN Client)
VISA: viOpen (... "TCPIP0::instrument1::gpib0,5::INSTR"...) viOpen (... "TCPIP0::1.2.3.4::gpib0,3::INSTR "...) viOpen (... "TCPIP0::instrument3::inst0::INSTR"...)
SICL: iopen ("lan [instrument1]:gpib0,5") iopen ("lan [1.2.3.4]:gpib0,3") iopen ("lan [instrument3]:inst0")
LAN Client (LAN)
Open IO path to LAN instrument at address 5Open IO path to LAN instrument at address 3Open IO path to LAN instrument3
Open IO path to LAN instrument at address 5Open IO path to LAN instrument at address 3Open IO path to LAN instrument3
LAN
instrument1 machine name
gpib0,5
3
1.2.3.4 IP address
gpib0,3
instrument3
inst0
VXI-11.2 GPIB Emulation
VXI-11.2 GPIB Emulation
VXI-11.3 LAN instrument
Chapter 4 93

Configuring I/O InterfacesConfiguring LAN Interfaces
Configuring VISA LAN Client InterfacesAn IO interface can be defined as both a hardware interface and as a software interface. The purpose of the IO Config utility is to associate a unique interface name with a hardware interface.
The IO Libraries use an Interface Name or Logical Unit Number to identify an interface. This information is passed in the parameter string of the viOpen function call in a VISA program or in the iopen function call in a SICL program. IO Config assigns an Interface Name and Logical Unit Number to the interface hardware, as well as other necessary configuration values for an interface when the interface is configured.
Using IO Config to Configure VISA LAN Client Interfaces
To configure VISA LAN Client interfaces using the IO Config utility, click the Agilent IO Libraries Control icon (blue icon on the Windows taskbar) and click Run IO Config. When the main screen appears, highlight the GPIB VISA LAN Client (e.g. 2050) menu item (see the following figure) and click the Configure button.
When the VISA LAN Client Interface (LAN to GPIB) screen appears, set the VISA Interface Name and LAN Client SICL Interface Name, as required. Then, click the OK button.
NOTE
You must install a LAN Client interface BEFORE you can use a VISA LAN Client interface. See “Configuring LAN Client Interfaces” for details on configuring LAN Client interfaces.
NOTE
After the system is configured, the VISA LAN Client Interface (LAN to GPIB) screen may also display an Edit VISA Config... button. Clicking this button allows you to manually configure the interface as desired. See the IO Libraries Readme file for details.
94 Chapter 4

Configuring I/O InterfacesConfiguring LAN Interfaces
Chapter 4 95

Configuring I/O InterfacesConfiguring LAN Interfaces
Example: Configuring VISA LAN Client (Gateway) Interface
The VISA LAN Client interface system in the following figure consists of a Windows PC with a LAN card, an E2050 LAN/GPIB gateway, and two GPIB instruments. The IO Config utility has been used to assign the LAN card a VISA name of “TCPIP0” and SICL name of “lan”. In addition, a VISA LAN Client has been configured with the interface names and host names shown in the figure. Also, the E2050 LAN/GPIB Gateway has been assigned a name of machine1 and an hpib-name = hpib.
Since unique names have been assigned by IO Config, you can now use the VISA viOpen command or the SICL iopen command to open the IO paths to the GPIB instruments as shown in the figure. Note, however, that SICL addressing is not supported when using VISA LAN Client. See the Agilent VISA User’s Guide for details on VISA commands. See the Agilent SICL User’s Guide for Windows for details on SICL commands
96 Chapter 4

Configuring I/O InterfacesConfiguring LAN Interfaces
5
LAN Card
Windows PC
3
GPIB InstrumentsLAN/GPIB GatewayInterface VISA/SICL Names
VISA Name SICL Name
"GPIB1" N/A
"TCPIP0" "lan"
VISA/SICL Addressing (Using LAN Client)
VISA: viOpen (... "TCPIP0::machine1::hpib,5::INSTR"...) viOpen (..."TCPIP0::machine1::hpib,3::INSTR "...)
SICL: iopen ("lan [machine1]:hpib,5") iopen ("lan [machine1]:hpib,3")
VISA LAN Client (Gateway)
Open IO path to GPIB instrument at address 5Open IO path to GPIB instrument at address 3
Open IO path to GPIB instrument at address 5Open IO path to GPIB instrument at address 3
E2050
LAN GPIB Cable
VISA LAN Client "GPIB1" "lan" "machine1" "hpib"
machine1hpib-name = hpib
VISA LAN Client Parameters
VISA Interface NameLAN Client SICL Interface NameRemote Host NameRemote SICL Interface Name
"GPIB1""lan""machine1""hpib"
VISA Addressing (Using VISA LAN Client)
VISA: viOpen (... "GPIB1::5::INSTR"...) viOpen (... "GPIB1::3::INSTR "...)
Open IO path to LAN instrument at address 5Open IO path to LAN instrument at address 3
Chapter 4 97

Configuring I/O InterfacesConfiguring LAN Interfaces
Example: Configuring VISA LAN Client (LAN) Interface
The VISA LAN Client interface system in the following figure consists of a Windows PC with a LAN card and three LAN instruments. Instrument1 and instrument2 are VXI-11.2 (GPIB Emulation) instruments and instrument3 is a VXI-11.3 LAN instrument.
For this system, the IO Config utility has been used to assign the LAN card a VISA name of “TCPIP0” and SICL name of “lan”. In addition, two VISA LAN Clients have been configured with the interface names and host names shown in the figure.
For the addressing examples, instrument1 has been addressed by its machine name, instrument 2 has been addressed by its IP address, and instrument3 by its LAN name (inst0).
Since unique names have been assigned by IO Config, you can now use the VISA viOpen command or the SICL iopen command to open the IO paths to the GPIB instruments as shown in the figure. Note, however, that you cannot talk to instrument3 with VISA LAN Client. You must use the LAN Client (with VISA or SICL) to talk to instrument3, since instrument3 is not a remote gpib interface.
See the Agilent VISA User’s Guide for details on VISA commands. See the Agilent SICL User’s Guide for Windows for details on SICL commands.
NOTE
When using the VXI-11 protocol with VISA LAN Client, the Remote SICL Interface Name must be of the form gpibN where N is 0 or a positive integer. This restriction does not apply to the SICL-LAN protocol.
98 Chapter 4

Configuring I/O InterfacesConfiguring LAN Interfaces
5
LAN Card
Windows PC LAN InstrumentsInterface VISA/SICL Names
VISA Name SICL Name
"GPIB1" N/A
"GPIB2" N/A
"TCPIP0" "lan"
VISA/SICL Addressing (Using LAN Client)
VISA: viOpen (... "TCPIP0::instrument1::gpib0,5::INSTR"...) viOpen (... "TCPIP0::1.2.3.4::gpib0,3::INSTR "...) viOpen (... "TCPIP0::instrument3::inst0::INSTR"...)
SICL: iopen ("lan [instrument1]:gpib0,5") iopen ("lan [1.2.3.4]:gpib0,3") iopen ("lan [instrument3]:inst0")
VISA LAN Client (LAN)
Open IO path to LAN instrument at address 5Open IO path to LAN instrument at address 3Open IO path to LAN instrument3
Open IO path to LAN instrument at address 5Open IO path to LAN instrument at address 3Open IO path to LAN instrument3
LAN
VISA LAN Client "GPIB1" "lan" "instrument1" "gpib0"
instrument1 machine name
gpib0,5
3
1.2.3.4 IP address
gpib0,3
instrument3
inst0
VISA Addressing (Using VISA LAN Client)
VISA: viOpen (... "GPIB1::5::INSTR"...) viOpen (... "GPIB2::3::INSTR "...) Cannot talk to instrument3
Open IO path to LAN instrument at address 5Open IO path to LAN instrument at address 3
VISA LAN Client "GPIB2" "lan" "1.2.3.4" "gpib0"
VISA LAN Client Parameters
VISA Interface NameLAN Client SICL Interface NameRemote Host NameRemote SICL Interface Name
GPIB1
"GPIB1""lan""instrument1""gpib0"
GPIB2
"GPIB2""lan""1.2.3.4""gpib0"
VXI-11.2 GPIB Emulation
VXI-11.2 GPIB Emulation
VXI-11.3 LAN instrument
Chapter 4 99

Configuring I/O InterfacesConfiguring LAN Interfaces
Configuring LAN Server InterfacesAn IO interface can be defined as both a hardware interface and as a software interface. The purpose of the IO Config utility is to associate a unique interface name with a hardware interface.
The IO Libraries use an Interface Name or Logical Unit Number to identify an interface. This information is passed in the parameter string of the viOpen function call in a VISA program or in the iopen function call in a SICL program. IO Config assigns an Interface Name and Logical Unit Number to the interface hardware, as well as other necessary configuration values for an interface when the interface is configured.
Using IO Config to Configure VISA LAN Server Interface
To configure VISA LAN Server interfaces using the IO Config utility, click the Agilent IO Libraries Control icon (blue icon on the Windows taskbar) and click Run IO Config. When the main screen appears, highlight the n/a LAN Server (PC as Server) menu item (see the following figure) and click the Configure button.
NOTE
The LAN Server supports both VXI-11 and SICL-LAN protocol.
100 Chapter 4

Configuring I/O InterfacesConfiguring LAN Interfaces
When the Agilent LAN Server screen appears, set the Server Timeout as required. Also, as required, set Log Errors, Log Locks and Connections and/or Use Keepalive Client Probes. Then, click the OK button.
Example: Configuring LAN Server Interface
The LAN Server interface system in the following figure consists of a Windows PC acting as a LAN client, a second PC acting as a LAN server, and a GPIB instrument. The IO Config utility has been used to assign the LAN card a VISA name of “TCPIP0” and SICL name of “lan”. Also, the GPIB card in the LAN server PC has been assigned VISA name of “GPIB0” and SICL name of “hpib7”. The LAN server PC has been assigned a name of machine2.
Since unique names have been assigned by IO Config, you can now use the VISA viOpen command or the SICL iopen command to open the IO paths to the GPIB instruments as shown in the figure. See the Agilent VISA User’s Guide for details on VISA commands. See the Agilent SICL User’s Guide for details on SICL commands.
Chapter 4 101

Configuring I/O InterfacesConfiguring LAN Interfaces
5LAN Card
Windows PC(LAN Client)
GPIB InstrumentInterface VISA/SICL Names
VISA Name SICL Name
LAN Card: "TCPIP0" "lan"GPIB Card: "GPIB0" "hpib7"
VISA/SICL Addressing
VISA: viOpen (... "TCPIP0::machine2::hpib7,5::INSTR".....)
SICL: iopen ("lan,[machine2]:hpib7, 5")
LAN Server (PC as Server)
Open IO path to GPIB instrument at address 5
Open IO path to GPIB instrument at address 5
GPIB Card
Windows PC(LAN Server)
LAN GPIB
machine2
SICL namehpib7
102 Chapter 4

Configuring I/O InterfacesConfiguring Other Interfaces
Configuring Other InterfacesThis section gives guidelines to use the IO Config utility to configure ASRL (RS-232) and GPIO interfaces, including:
� ASRL and GPIO Interfaces Overview� Configuring ASRL Interfaces� Configuring GPIO Interfaces
ASRL and GPIO Interface OverviewAs shown in the following figure, a typical ASRL (RS-232) interface consists of a Windows PC with one or more RS-232 COM Ports. Each COM port can be connected to one, and only one, Serial instrument via an RS-232 cable. A typical GPIO interface consists of a Windows PC with an E2075A GPIO card that is connected to a GPIO instrument via a GPIO cable.
RS-232 COM Port 1
Windows PC SerialInstruments
RS-232 Cable
RS-232 COM Port 2
ASRL Interface (RS-232 COM Ports)
Windows PC GPIOInstrument
GPIO Cable
E2075A ISA Card
GPIO Interface (E2075A ISA Card)
Chapter 4 103

Configuring I/O InterfacesConfiguring Other Interfaces
Configuring ASRL InterfacesAn IO interface can be defined as both a hardware interface and as a software interface. The purpose of the IO Config utility is to associate a unique interface name with a hardware interface.
The IO Libraries use an Interface Name or Logical Unit Number to identify an interface. This information is passed in the parameter string of the viOpen function call in a VISA program or in the iopen function call in a SICL program. IO Config assigns an Interface Name and Logical Unit Number to the interface hardware, as well as other necessary configuration values for an interface when the interface is configured.
Using IO Config to Configure ASRL Interfaces
To configure ASRL interfaces using the IO Config utility, click the Agilent IO Libraries Control icon (blue icon on the Windows taskbar) and click Run IO Config. When the main screen appears, highlight the ASRL RS-232 COM Ports menu item (see the following figure) and click the Configure button.
104 Chapter 4

Configuring I/O InterfacesConfiguring Other Interfaces
When the RS-232 COM Ports screen appears, set the VISA Interface Name and Serial port attributes, as required. Then, click the OK button.
Example: Configuring ASRL Interfaces
The ASRL interface system in the following figure consists of a Windows PC with two RS-232 COM ports, each of which is connected to a single Serial instrument via RS-232 cables. The IO Config utility has been used to assign COM Port 1 a VISA name of “ASRL1” and SICL name of “COM1”. The IO Config utility has been used to assign COM Port 2 a VISA name of “ASRL2” and SICL name of “COM2”.
Since unique names have been assigned by IO Config, you can now use the VISA viOpen command to open the IO paths to the GPIB instruments as shown in the figure. See the Agilent VISA User’s Guide for details on VISA commands. See the Agilent SICL User’s Guide for Windows for details on SICL commands.
Chapter 4 105

Configuring I/O InterfacesConfiguring Other Interfaces
RS-232 COM Port 1
Windows PC SerialInstruments
RS-232 CableInterface VISA/SICL Names
RS-232 COM Port 2
VISA Name SICL Name
"ASRL1" "COM1"
"ASRL2" "COM2"
VISA/SICL Addressing
VISA: viOpen (... "ASRL1::INSTR"...) viOpen (... "ASRL2::INSTR"...)
SICL: iopen ("COM1,488") iopen ("COM2,488")
ASRL Interface (RS-232 COM Ports)
Open IO path to Serial instrument using COM Port 1Open IO path to Serial instrument using COM Port 2
Open IO path to Serial instrument using COM Port 1Open IO path to Serial instrument using COM Port 2
106 Chapter 4

Configuring I/O InterfacesConfiguring Other Interfaces
Configuring GPIO InterfacesAn IO interface can be defined as both a hardware interface and as a software interface. The purpose of the IO Config utility is to associate a unique interface name with a hardware interface.
The IO Libraries use an Interface Name or Logical Unit Number to identify an interface. This information is passed in the parameter string in the iopen function call in a SICL program. IO Config assigns an Interface Name and Logical Unit Number to the interface hardware, as well as other necessary configuration values for an interface when the interface is configured.
Using IO Config to Configure GPIO Interfaces
To configure GPIO interfaces using the IO Config utility, click the Agilent IO Libraries Control icon (blue icon on the Windows taskbar) and click Run IO Config. When the main screen appears, highlight the n/a E2075A ISA GPIO Card menu item (see the following figure) and click the Configure button.
Chapter 4 107

Configuring I/O InterfacesConfiguring Other Interfaces
When the E2075 ISA GPIO Card Configuration screen appears, set the attributes as desired. Then, click the OK button.
Example: Configuring GPIO Interfaces
The GPIO interface system in the following figure consists of a Windows PC with an E2075A GPIO card that is connected to a GPIO instrument via GPIO cable.
The IO Config utility has been used to assign the E2075A GPIO card a SICL name of “gpio12”. (GPIO is NOT supported by VISA.) Since unique names have been assigned by IO Config, you can now use the SICL iopen command to open the I/O paths to the GPIB instruments as shown in the figure. See the Agilent SICL User’s Guide for Windows for details on SICL commands.
108 Chapter 4

Configuring I/O InterfacesConfiguring Other Interfaces
E2075 GPIO Card
Windows PC GPIO InstrumentGPIO CableInterface SICL Name
VISA Name SICL Name
N/A "gpio12"
SICL Addressing
iopen ("gpio12")
GPIO Interface (E2075A ISA Card)
Open IO path to GPIO instrument
Chapter 4 109

Configuring I/O InterfacesConfiguring Other Interfaces
Notes:
110 Chapter 4

Index
AAgilent telephone numbers, 9Agilent web site, 9ASRL interfaces
configuring, 104overview, 103
Cconfiguring GPIB interfaces, 71configuring I/O interfaces, 70configuring LAN interfaces, 85configuring VXI interfaces, 78copyright information, 6
Eemergency repair disk, 17examples
Configuring ASRL Interfaces, 105Configuring GPIB (82341) Interface, 76Configuring GPIB (82350) Interface, 73Configuring GPIB-VXI (E1406A) Interface, 81Configuring GPIO Interfaces, 108Configuring LAN Client (Gateway) Interface, 92Configuring LAN Client (LAN) Interface, 93Configuring LAN Server Interface, 101Configuring VISA LAN Client (Gateway) Interface, 96Configuring VISA LAN Client (LAN) Interface, 98Configuring VXI (E8491B) Interfaces, 84Using IO Config to Configure an Interface, 59
GGPIB interfaces
configuring, 71configuring 82341 ISA card, 75configuring 82350 PCI card, 72overview, 71
GPIO interfacesconfiguring, 107overview, 103
II/O interfaces, configuring, 70installation type, 23, 29installing IO Libraries, 15, 21introducing IO Libraries, 8IO Config
requirements, 56running, 57using, 56
IO Librariesgetting started, 17installation type, 23, 29installing, 15installing new, 21introducing, 8IO Libraries Control icon, 33, 42modifying, 45program groups created, 33, 42Readme file, 17readme file, 22, 28, 34, 43removing, 45, 50repairing, 45, 48supported interfaces, 19system requirements, 18upgrading, 36
IP address, 93
Index 111

LLAN, client/server model, 85LAN Client
definition, 85interfaces, 90
LAN interfacesclient/server model, 85configuring, 85configuring LAN Server, 100hardware architecture, 85LAN Client interfaces, 90overview, 85software architecture, 87VISA LAN Client Interfaces, 94
LAN Serverdefinition, 85using, 67
Mmodifying IO Libraries, 45
Pprinting history, 6program groups created, 33, 42
Rreadme file, 22, 28, 34, 43removing IO Libraries, 45, 50repairing IO Libraries, 45, 48restricted rights, 5running IO Config, 57
SSICL
description, 12documentation, 12support, 12users, 12
S (continued)SICL-LAN protocol, 88supported interfaces, 19system requirements, 18
TTCP/IP instrument protocol, 88telephone numbers, Agilent, 9trademark information, 6
Uupgrading IO Libraries, 36using IO Config, 56using this guide, 9
VVISA
description, 10documentation, 11support, 10users, 10
VISA Assistant, using, 61VXI interfaces
configuring, 78configuring E1406A, 79configuring E8491B, 82overview, 78
VXI Resource Managerdisplaying output, 66using, 62
VXI-11 protocol, 88
Wwarranty, 5web site, Agilent, 9
112 Index