agilent g5761a surescan dx microarray scanner system · 2018-11-05 · agilent g5761a surescan dx...
TRANSCRIPT

Agilent G5761ASureScan Dx Microarray Scanner System
User GuideOctober 2018
For In Vitro Diagnostic Use
Rx only
Agilent Technologies

Notices© Agilent Technologies, Inc. 2012–2018
No part of this manual may be reproduced in any form or by any means (including elec-tronic storage and retrieval or translation into a foreign language) without prior agree-ment and written consent from Agilent Technologies, Inc. as governed by United States and international copyright laws.
Manual Part NumberG5761-90000
EditionOctober 2018
Manufactured by Agilent Technologies Singapore Pte. Ltd., No. 1 Yishun Avenue 7 Singapore, 768923
WarrantyThe material contained in this docu-ment is provided “as is,” and is sub-ject to being changed, without notice, in future editions. Further, to the max-imum extent permitted by applicable law, Agilent disclaims all warranties, either express or implied, with regard to this manual and any information contained herein, including but not limited to the implied warranties of merchantability and fitness for a par-ticular purpose. Agilent shall not be liable for errors or for incidental or consequential damages in connec-tion with the furnishing, use, or per-formance of this document or of any information contained herein. Should Agilent and the user have a separate written agreement with warranty terms covering the material in this document that conflict with these terms, the warranty terms in the sep-arate agreement shall control.
Technology Licenses The hardware and/or software described in this document are furnished under a license and may be used or copied only in accor-dance with the terms of such license.
Restricted Rights LegendU.S. Government Restricted Rights. Soft-ware and technical data rights granted to the federal government include only those rights customarily provided to end user cus-tomers. Agilent provides this customary commercial license in Software and techni-cal data pursuant to FAR 12.211 (Technical Data) and 12.212 (Computer Software) and, for the Department of Defense, DFARS 252.227-7015 (Technical Data - Commercial Items) and DFARS 227.7202-3 (Rights in Commercial Computer Software or Com-puter Software Documentation).
Safety Notices
CAUTION
A CAUTION notice denotes a haz-ard. It calls attention to an operat-ing procedure, practice, or the like that, if not correctly performed or adhered to, could result in damage to the product or loss of important data. Do not proceed beyond a CAUTION notice until the indicated conditions are fully understood and met.
WARNING
A WARNING notice denotes a hazard. It calls attention to an operating procedure, practice, or the like that, if not correctly per-formed or adhered to, could result in personal injury or death. Do not proceed beyond a WARNING notice until the indicated condi-tions are fully understood and met.
for Agilent Technologies Singapore (Interna-tional) Pte. Ltd. No. 1 Yishun Avenue 7, Singapore 768923
This guide applies to the Microarray Scan Con-trol Software 9.1.11 or higher until superseded.
Authorized Representative for the European Union
AGILENT TECHNOLOGIES FRANCE PARC TECHNOPOLIS – ZA COURTABOEUF 3 AVENUE DU CANADA 91978 LES ULIS CEDEX, FRANCE
For In Vitro Diagnostic UseUSA: Class II 510(k) Exempt Medical Device
Rx onlyEurope: CE IVD
2 SureScan Dx System User Guide
SureScan Dx System User Guide
Intended Use:
The SureScan Dx Microarray Scanner system, consisting of SureScan Dx Microarray Scanner with autoloader and Agilent Microarray Scan Control software, is intended to measure fluorescence signals of labeled DNA and RNA target hybridized to microarrays.
Indications for Use:
The SureScan Dx Microarray Scanner system is indicated for use in a clinical laboratory environment when measuring fluorescence signals of labeled DNA and RNA target hybridized to microarrays used as part of a validated diagnostic assay.
Special Condition for Use:
For use with separately cleared microarray assays.
Limitations for Use:
The SureScan Dx Microarray Scanner system has been validated for use with Agilent G3 Gene Expression and Cytogenetic microarrays.
Intended User:
The SureScan Dx Microarray Scanner is intended for use by trained laboratory professionals working in a clinical laboratory environment.
Notice:
This manual is intended as a resource guide only. Each laboratory must establish their own operational protocols and procedures in accordance with local regulations and the requirements of the validated diagnostic assays they intend to perform.
Software Security:
The SureScan Dx Microarray Scanner System is an in vitro diagnostic medical device.
3

4
The SureScan Dx Microarray Scanner System is intended for use in an environment in which system access is controlled by persons who are responsible for the content of electronic records that are on the system.
The Health Care Organization (HCO) where the SureScan Dx Microarray Scanner System is installed is responsible for maintaining system security on computer systems used with the SureScan Dx Microarray Scanner and Scan Control software.
The SureScan Dx Microarray Scanner and Scan Control software are clinical laboratory tools appropriate for use with computers and networks that meet all relevant security requirements for Electronic Protected Health Information (EPHI). Applicable administrative, physical, and technical safeguards must be in place prior to the installation and use of the CytoDx application.
• Computer systems must be physically and electronically protected
• HCO policies must be in place allowing only authorized users access to these systems
• An endpoint security solution must be installed on these systems that includes Virus, Spyware, Proactive, and Network threat protection
• Systems must be set to automatically secure themselves after periods of inactivity
• System and application security logs and audit trails must be monitored and evaluated against potential threats
SureScan Dx System User Guide

SureScan Dx System User Guide
SYMBOLS LEGEND
∴
5

6
SureScan Dx System User Guide
Contents
1 Introduction 15
Microarray Analysis 16
System Description 17
Hardware and software features 17Parts list 17Computer system requirements 18Scanner physical description 19Site preparation 20Safety guidelines 20
Principles of Operation 22
Slide positioning 22Laser excitation 22Scanning 22Fluorescence detection 22
Programs Installed on the Computer Workstation 23
2 Getting Started 25
Operating the Scanner 26
Step 1. Turn on the SureScan Dx Microarray Scanner and start the Scan Control program 26
Step 2. Insert slides into slide holders 28Step 3. Load the slide holders into the cassette 32Step 4. Set or change protocol scan settings 35Step 5. Add slides to the scan queue 36Step 6. Scan your slides 36Step 7. Remove the slides 37
SureScan Dx System User Guide 7

Contents
About Scan Protocols 38
Offline Mode 39
Turning Off the SureScan Dx Scanner 40
3 Using the Scan Control Program 41
Using the Slot Table 42
To change a Slide ID 42To set or change the scan protocol 43To change the output folder for a scan 43To apply a selection to multiple slides 43To add a slide to the scan queue 44To add all slides to the queue 44To move a slide in the queue 44To remove a slide from the scan queue 45To remove all slides from the scan queue 45To open the scanner door 45To close the scanner door 46To start a scan 46
Changing Slide Scan Settings 47
To change settings for a single slide 47To change settings for multiple slides 48To add a description for the slide 48To add a user name 48
4 Using Scan Control Tools 49
Creating and Changing Scan Protocols 50
To create a scan protocol 50To change an existing scan protocol 50To export a scan protocol 51To import a scan protocol 51To remove a scan protocol 52
8 SureScan Dx System User Guide

Contents
Creating and Changing Scan Regions 53
To create a user-defined custom scan region 53To change an existing user-defined custom scan region 53To export a scan region 54To import a scan region 55To remove a scan region 55
Adding a Barcode 56
To add a barcode 56
Turning on Lasers Manually 58
To turn on lasers 58
Troubleshooting Tools 59
To display recent errors 59To display log files 59To create a snapshot of the instrument state 60To reset calibration warnings 60To run a self test 61
Setting up Scanner Defaults 62
To set the default scan data folder 62To set the laser saver delay 62
Mapping Scan Protocols to Designs 63
To map a scan protocol to a slide design 63
5 Maintaining and Troubleshooting Your System 65
Maintaining Your System 66
Scheduled maintenance activities for hardware/software 66Preventative maintenance for the instrument 66Tips to prevent problems 67
Troubleshooting Your System 69
Technical Support 69Frequently Asked Questions (FAQs) 71
SureScan Dx System User Guide 9

Contents
Hardware Troubleshooting 72Software Troubleshooting 74File locations 75SureScan Dx system error messages 76
Using the Diagnostic Display 83
Updating the Scanner Firmware and Scan Control Program 85
To update the Scan Control program and firmware 85To verify the software installation 86
6 Reference 87
Scan Control Program Window Reference 88
Scan Control main window 88Tools menu 90Help menu 91Slot table 93Function buttons 96Settings pane 98Log tabs 99
Scan Control Program Dialog Box Reference 102
Agilent Installation Qualification Tool 102Export Scan Protocol dialog box 103Export Scan Region dialog box 104Input Barcode dialog box 105Scan Protocol Editor dialog box 106Scan Region Editor dialog box 113Self Test dialog box 115Settings dialog box – General Settings 117Settings dialog box – Design To Protocol Mapping 119
About Adding Slides 121
SureScan Dx Scanner Specifications 122
Slide Specifications 128
10 SureScan Dx System User Guide
Contents
Scan dimensions 128Glass specifications 128Barcode and barcode label specifications 129
Regulatory Information 130
7 Basic Instructions for Use (multilingual) 133
English instructions 134
Safety guidelines 134Humidity conditions 134Operating instructions 135
Инструкции на български 144Насоки за безопасност 144Условия на влага 144Инструкции за работа 145
Základní pokyny 155Bezpečnostní pokyny 155Hladina vlhkosti ovzduší 155Návod k obsluze 156
Upute na hrvatskom jeziku 166
Sigurnosne smjernice 166Vlaga 166Upute za korištenje 167
Grundlæggende brugsanvisning 177
Sikkerhedsretningslinjer 177Fugtige omgivelser 177Betjeningsvejledning 178
Les instructions de base pour l'utilisation 188
Consignes de sécurité 188Conditions d'humidité 188Instructions de fonctionnement 189
SureScan Dx System User Guide 11

Contents
Οδηγίες στα Ελληνικά 199Οδηγίες ασφαλείας 199Συνθήκες υγρασίας 199Οδηγίες λειτουργίας 200
Grundlegende Hinweise für den Einsatz 210
Sicherheitsrichtlinien 210Luftfeuchtigkeitsbedingungen 210Bedienungsanweisungen 211
Istruzioni di base per l'uso 222
Linee guida di sicurezza 222Condizioni di umidità 222Istruzioni d'uso 223
Norādes latviešu valodā 233Ieteikumi par drošību 233Mitrums 233Darbības norādījumi 234
Instrukcijos lietuvių kalba 244Saugos rekomendacijos 244Drėgmės sąlygos 244Naudojimo instrukcijos 245
Instrukcje w języku polskim 255Zalecenia dotyczące bezpieczeństwa 255Wilgotność powietrza 255Instrukcje dotyczące używania urządzenia 256
Instruções em Português 266
Regras de segurança 266Condições de humidade 266Instruções de utilização 267
Instrucţiuni în limba română 277Instrucţiuni de siguranţă 277
12 SureScan Dx System User Guide

Contents
Condiţii de umiditate 277Instrucţiuni de operare 278
Slovenské pokyny 288Bezpečnostné pokyny 288Vlhkostné podmienky 288Prevádzkové pokyny 289
Navodila v angleščini 299Varnostni napotki 299Vlažni pogoji 299Navodila za uporabo 300
Instrucciones básicas para el uso 310
Instrucciones de seguridad 310Condiciones de humedad 310Instrucciones de utilización 311
Grundläggande instruktioner för användning 321
Säkerhetsriktlinjer 321Fuktighetsförhållanden 321Driftanvisningar 322
Türk talimatlar 332Güvenlik kuralları 332Nem koşulları 332Çalıştırma talimatları 333
Suomenkieliset käyttöohjeet 343
Turvaohjeistus 343Kosteus 343Käyttöohjeistus 344
Index 355
SureScan Dx System User Guide 13

14
Contents
SureScan Dx System User Guide

SureScan Dx Microarray Scanner System User Guide
1Introduction
Microarray Analysis 16
System Description 17
Principles of Operation 22
Programs Installed on the Computer Workstation 23
This chapter provides a general introduction to the SureScan Dx system.
15Agilent Technologies

1 Introduction
Microarray Analysis
16
The SureScan Dx Microarray Scanner is part of the SureScan Dx Microarray Scanner system solution from Agilent Technologies. The SureScan Dx Microarray Scanner is a laser-induced fluorescence scanner designed to read microarrays printed on Agilent slides.
The SureScan Dx scanner measures the fluorescence intensity of labeled sample nucleic acid (DNA and RNA) bound to microarrays. Its ability to measure fluorescence from two dyes simultaneously facilitates two-color microarray studies. This technology provides for rapid, automated scanning of microarrays.
a
Figure 1 SureScan Dx Microarray Scanner
Each slide is scanned in minutes, and the files are prepared for data analysis.
SureScan Dx System User Guide

Introduction 1 Hardware and software features
System Description
SureScan Dx System User Guide
In this section you find listings of hardware and software features, parts, and computer requirements. A physical description of the SureScan Dx scanner and information on site preparation and safety are also provided.
Hardware and software features
The SureScan Dx scanner provides the following features:• Dynamic autofocus
• Single and dual color scanning
• Automatic photomultiplier tube (PMT) gain calibration before each scan
• 2-, 3-, 5-, or 10-micron pixel size
• Dynamic range of >104 for a single scan in 16-bit scan mode, >105 for a single scan in 20-bit scan mode, and >106 for a dual scan in 16-bit scan mode (XDR)
• Uniformity specification of <5% CV (Coefficient of Variation)
• TIFF image file compression
• Flip and rotate images
• Internal and external barcode reading
The Agilent Dx Microarray Scan Control program allows you to select the dye (fluorescence) channels, scan regions, resolution, dynamic range, PMT gain, and output folders for each of the slides in the cassette. You can load these settings automatically from saved application-specific protocols, or set them manually in the slot table.
Parts list
The G5761A SureScan Dx microarray scanner system consists of the following components:• SureScan Dx Microarray Scanner with integral 24-slide cassette
17

18
1 Introduction Computer system requirements
• 24 slide holders
• Computer workstation with recovery software on CD
• Power cords and network cable
• Agilent Microarray Scan Control Software installed
• Agilent Installation Qualification Tool Software installed
• Envelope containing Declaration of Conformity and other product documentation
Computer system requirements
The SureScan Dx system comes with a computer that meets or exceeds the following configuration. Agilent Technologies supports only the computer provided with the SureScan Dx system.Software
• Windows 7 64-bit Professional or Windows 10 64-bit operating system
Hardware
• Intel Core 2 Duo E8500 3.16 GHz or equivalent
• 8 GB RAM
• Minimum 250-GB hard disk. (Proper disk maintenance is required to ensure that you always have available disk space for data generation. See Table 12 for estimated sizes of scanned images.)
SureScan Dx System User Guide

Introduction 1 Scanner physical description
Scanner physical description
SureScan Dx System User Guide
Scanner front view
Power On/Off
Door
Status indicator light
Removable front panel
Figure 2 SureScan Dx Microarray Scanner, front view
19

20
1 Introduction Site preparation
Scanner rear view
Laser cooling
Power fuse Power plug socket
LAN connector
Laser cooling air outlet
air inletMain cooling air outlet
Main cooling air inlet
Power supply air outlet
Figure 3 SureScan Dx Microarray Scanner, rear view
Site preparation
Make sure that the environment meets the “SureScan Dx Scanner Specifications” on page 122 of Chapter 6. If you have any questions, contact your local Agilent sales and support center or www.genomics.agilent.com.Safety guidelines
The SureScan Dx scanner is designed for safety and ease of use. Be sure that you understand and observe all the warnings and cautions before operating the SureScan Dx scanner.SureScan Dx S
ystem User Guide
Introduction 1 Safety guidelines
WARNING Do not attempt to repair or gain access to SureScan Dx scanner internal components. You risk exposure to high voltage and harmful laser radiation. Removing the main cover voids the warranty.
WARNING Connect the SureScan Dx scanner to a grounded power outlet. It relies on a protective earth ground for safety.
CAUTION In order to minimize vibration due to the rapid scanning of the laser excitation across the microarray, install the scanner on a sturdy lab bench or table. Do not install the scanner in proximity to other lab equipment that might cause vibration.
CAUTION The SureScan Dx scanner is sensitive to condensing humidity conditions. Follow precautions stated in product documentation. See “Preventative maintenance for the instrument” on page 66 of Chapter 5 and the relative humidity specifications on page 122 of Chapter 6.
SureScan Dx System User Guide 21

1 Introduction Slide positioning
Principles of Operation
22
This section describes the operating features of the SureScan Dx Microarray Scanner.
Slide positioning
The SureScan Dx scanner holds up to 24 slides in a nonremovable cassette. During scanning, the slides are sequentially transported into scanning position, scanned, and then returned to the cassette. Slides can be added to and removed from the scanner queue dynamically without stopping the scanner.Laser excitation
The SureScan Dx Microarray Scanner uses two lasers; a green diode-pumped solid-state laser (532 nm) and a red diode laser (640 nm). The lasers excite Cyanine-3 (Cy-3) and Cyanine-5 (Cy-5) labeled RNA or DNA to measure fluorescence after hybridization of the target nucleic acid to the microarray probes.Scanning
The laser excitation is scanned rapidly back and forth across the microarray. The dynamic autofocus ensures that the microarray is always positioned in the focal plane of the scan lens, resulting in a uniform and calibrated-intensity scan.Fluorescence detection
Fluorescence from the labeled samples is converted to an electrical signal by a high-performance PMT. Amplifiers and digital integrators process the PMT signal into a digital measurement that is recorded in the TIFF file.SureScan Dx System User Guide

Introduction 1 Fluorescence detection
Programs Installed on the Computer Workstation
SureScan Dx System User Guide
The computer that is included with your SureScan Dx system has the following software programs preinstalled.
Agilent Microarray Scan Control program – used to set up and operate the scanner.
Agilent Feature Extraction program – used to extract feature data from the scanner-generated TIFF image.
Agilent Installation Qualification Tool program – verifies that the Scan Control program was installed correctly and was not corrupted after installation. Produces an Installation Qualification Report for your records.
23

24
1 Introduction Fluorescence detection
SureScan Dx System User Guide

SureScan Dx Microarray Scanner System User Guide
2Getting Started
Operating the Scanner 26
Step 1. Turn on the SureScan Dx Microarray Scanner and start the Scan Control program 26
Step 2. Insert slides into slide holders 28
Step 3. Load the slide holders into the cassette 32
Step 4. Set or change protocol scan settings 35
Step 5. Add slides to the scan queue 36
Step 6. Scan your slides 36
Step 7. Remove the slides 37
About Scan Protocols 38
Offline Mode 39
Turning Off the SureScan Dx Scanner 40
This chapter describes how to operate the scanner, including how to set up and scan your slides quickly and easily.
If you have any problems, see Chapter 5 for troubleshooting information.
25Agilent Technologies

2 Getting Started Step 1. Turn on the SureScan Dx Microarray Scanner and start the Scan Control program
Operating the Scanner
26
The following steps explain how to operate the scanner. For more information on how to use the Scan Control program, see Chapter 3, “Using the Scan Control Program”.
Step 1. Turn on the SureScan Dx Microarray Scanner and start the Scan Control program
1 Turn on the SureScan Dx scanner using the power switch on the front of the instrument. The SureScan Dx scanner loads and initializes its firmware.
When the scanner is ready (about two minutes), the status indicator light turns off.
To learn how to set up the lasers to turn on and off automatically, see “To set the laser saver delay” on page 62.
2 Turn on the computer workstation and wait for it to boot up.
3 Double-click the Agilent Microarray Scan Control icon to start the Scan Control program.
Or
Select Start > All Programs > Agilent > Agilent Microarray Scan Control.
Figure 4 Agilent Microarray Scan Control icon
When the program starts, the Agilent Microarray Scan Control program main window opens and the scanner performs its initialization sequence.
• The Scan Control program communicates with the scanner via the LAN cable, sending commands and parameters, and receiving status and data.
• The lasers turn on and start to warm up.
• The autoloader initializes and performs a slide eject cycle (to make sure that no slide is loaded).
SureScan Dx System User Guide

Getting Started 2 Step 1. Turn on the SureScan Dx Microarray Scanner and start the Scan Control program
SureScan Dx System User Guide
If the scanner has 24 slides loaded when you turn it on, the initialization
NOTEwill fail because it cannot perform the slide eject cycle.• The scanning system is initialized and the data acquisition system is calibrated.
After the initialization sequence finishes, the Open Door button is enabled and you can load slides.
Figure 5 Agilent Microarray Scan Control program window – ready to add slides
27

28
2 Getting Started Step 2. Insert slides into slide holders
The status of the scanner is indicated at the lower right corner of the Scan Control window, in the status bar.
Initialize
The scanner is initializing. When the initialization is finished, the Open Door button is enabled, and the lasers continue to warm up.WarmUp
The lasers take up to 5 minutes to warm up. During warm-up, you can load slides, set protocols, and add slides to the queue. Once the lasers are warmed up, you can start scanning.LasersOff
Indicates that the lasers are turned off.Ready
You can load slides or begin a scan.Error
Indicates that the scanner has encountered an error. Close the Scan Control program then shut off the scanner. Restart the scanner and the Scan Control program. If the error continues, contact Agilent technical support.You cannot start scanning until both lasers are warmed up, at least one
Step 2. Insert slides into slide holders
NOTEslide is in the queue, and the scanner status is Ready.
A slide is inserted into a slide holder before loading it into the scanner.
Fingerprints cause errors in the fluorescence detection. For accurate readings, touch only the edges of the slide and always use gloves when handling slides. Do not write on the slides with markers or place any labels on the slide other than an appropriate barcode in the appropriate slide location.
1 Before you insert the slide, place the slide holder on a flat surface, with the clear cover facing up, and the tab on the right. This helps to ensure that you have the slide aligned properly when you insert it into the slide holder.
2 Gently push in and pull up on the tabbed end of the clear plastic cover to open it.
Do not push on the tab in a sideways direction (relative to the base) as this can make the cover difficult to open
SureScan Dx System User Guide

Getting Started 2 Step 2. Insert slides into slide holders
SureScan Dx System User Guide
Figure 6 Opening the slide holder
tab
CAUTION Do not push in the tab any further than is needed to unlatch the cover. Doing so may damage the slide holder and prevent proper latching.
Do not use damaged slide holders as they may get stuck inside the scanner.
3 Insert the slide into the holder, as follows:
a Hold the slide at the barcode end.
b Make sure that the active microarray surface faces up, toward the slide cover, with the barcode on the left.
c Carefully place the end of the slide without the barcode label onto the slide ledge. See Figure 7.
d Gently lower the slide into the slide holder. See Figure 8.
e Close the plastic slide cover, pushing on the tab end until you hear it “click”. This moves the slide into position in the holder.
f Gently push in and pull up on the tabbed end of the clear plastic cover to open it again and verify that the slide is correctly positioned.
Once inserted, the slide lies flat and matches up with the alignment points on the slide holder.
g Close the plastic slide cover, pushing on the tab end until you hear it “click”. See Figure 9.
If the tab on the plastic slide cover is over-stretched, it may not
CAUTIONproperly “click” into place. Dispose of slide holders that no longer click when you close them.29

30
2 Getting Started Step 2. Insert slides into slide holders
When properly closed, the top of the tab is flush with the surface of the
CAUTIONbase or below the surface of the base. If it is not, do not use the slide holder as the tab may be damaged.Figure 7 Inserting slide into the slide holder
Figure 8 Slide inserted in slide holder
Slide ledge
SureScan Dx System User Guide

Getting Started 2 Step 2. Insert slides into slide holders
SureScan Dx System User Guide
Figure 9 Slide holder – closed with slide
For instructions on removing the slides, see “Step 7. Remove the slides” on page 37.
Agilent slides have two barcodes, one on each side of the glass. See Figure 10. Place the active microarray side of the slide facing toward the slide holder cover.
See “Barcode and barcode label specifications” on page 129 to apply a second readable barcode.
If you have a slide whose active surface is on the side opposite to the barcode, the scanner cannot read the barcode.
CAUTION An improperly inserted slide can damage the SureScan Dx scanner.
A damaged slider holder or improperly closed slide holder can get stuck in the scanner.
31

32
2 Getting Started Step 3. Load the slide holders into the cassette
Figure 10 Slide orientation
Step 3. Load the slide holders into the cassette
When the slides are properly inserted in the slide holders, you can load the slide holders into the cassette. The cassette and slide holders are designed to ensure that the slide holders are inserted correctly.Do not load slide holders that do not contain slides into the SureScan Dx
NOTEMicroarray Scanner.SureScan Dx System User Guide

Getting Started 2 Step 3. Load the slide holders into the cassette
SureScan Dx System User Guide
Arrow helps identifyscanner orientation
Finger-hold
Figure 11 Slide holder helps you to insert slides correctly
1 In the Scan Control program window, click Open Door to open the scanner door.
CAUTION The correct way to open the scanner door is using the Open Door button in the Scan Control program. Do not attempt to open the door manually.
2 Pick up the slide holder using the finger-hold. The arrow on top of the slide holder points to the left when you pick up the slide holder correctly. See Figure 11.
The SureScan Dx Microarray Scanner scans slides in the order set in the scan queue. The scanner skips over any empty slots. See “To add a slide to the scan queue” on page 44.
Insert a slide holder into any open slot. The slot numbers are clearly labeled on the slide cassette. Do not force the slide holder into the cassette; it inserts easily if properly aligned with the finger-hold on top and the arrow facing to the left.
33

34
2 Getting Started Step 3. Load the slide holders into the cassette
If there is resistance placing the slide holder into the cassette, the
CAUTIONslider holder may not be properly closed or it may be damaged. Check the slide holder and close or replace it as needed.Figure 12 Inserting slide holder into cassette
3 Make sure that the slide holder is seated in the bottom of the cassette slot.
The slot number for the loaded slide blinks blue.
4 Repeat steps 2 through 3 until all slide holders are loaded in the cassette.
The slide numbers next to the cassette and in the slot table of the Scan Control program window change color to indicate the state of the slot. For more information, see Table 9 on page 94.
5 In the Scan Control program, click Close Door. The following
CAUTION Improper placement of the slide holder in the cassette can result in severe damage to the SureScan Dx Microarray Scanner.
events happen:
SureScan Dx System User Guide

Getting Started 2 Step 4. Set or change protocol scan settings
SureScan Dx System User Guide
• The scanner door closes.
• The scanner reads the barcode for each slide.
• The barcode is displayed under Slide ID in the Scan Control software slot table.
• Default output folder is applied.
For information on how to map scan protocols to slide designs, see “To map a scan protocol to a slide design” on page 63.
• For slides that have a scan protocol mapped to their design, the scan protocol is assigned in the Slot Table, and the slot State changes to “Ready for queue.”
For slides that do not have a scan protocol mapped to their design, the scan protocol remains empty and the slot State remains “Present”. Assign a scan protocol, as described in “Step 4. Set or change protocol scan settings”. For more information on the Scan Control program main window, see “Scan Control Program Window Reference” on page 88.
You can add slides to the cassette while a scan is in process. See “About
Step 4. Set or change protocol scan settings
NOTEAdding Slides” on page 121.
The current scan protocol settings are displayed for each selected slide in the right pane of the Scan Control software main window. For more information on these settings, see “Scan Control Program Window Reference” on page 88.
The first time you set up to scan a slide, select a scan protocol to use. See “About Scan Protocols” on page 38. Once the slide is scanned, the program remembers that scan protocol and assigns it to all slides with the same microarray design. You can change these assignments later. You can also manually set scan settings for a selected slide.
1 For each slide in the slot table, click the Scan Protocol and select a scan protocol to use for scanning the slide. See “About Scan Protocols” on page 38 and “To set or change the scan protocol” on page 43.
2 (0ptional) For a selected slide, in the scan settings pane, change one or more scan settings to use for scanning only that slide. See “Changing Slide Scan Settings” on page 47.
35

2 Getting Started Step 5. Add slides to the scan queue
Step 5. Add slides to the scan queue
Once you add a slide to the scan queue, you cannot change its scan settings. To change the scan settings, remove the slide from the queue.36
1 In the Scan Control main window, click All to Queue to add all slides in the slot table with a State of “Ready for queue” to the scan queue.
A confirmation dialog box appears. Click Yes to add the slides to the queue.
OR
To add a slide to the scan queue, its State must be “Ready for queue.”
In the Scan Control slot table, click the State cell for the first slide to scan and click Add to Queue.
2 For each additional slide you want to scan,
• Click the State cell and select Add to queue first to add the slide to the top of the scan queue.
OR
• Click the State cell and select Add to queue last to add the slide to the bottom of the scan queue.
As each slide is added to the queue, its State indicates that it is in the queue and the order in which the slide is scanned. (In queue 1, In queue 2, for example.) The status indicator light changes to solid blue.
Step 6. Scan your slides
1 If necessary, in the Scan Control main window, click CloseDoor.
Wait until the door closes and the Start Scan button is enabled.
2 In the Scan Control main window, click Start Scan to begin scanning the slides that were added to the queue. The scanner scans the slides in their order in the scan queue. See “Step 5. Add slides to the scan queue” on page 36.
During a scan, you see the following:
• The slot status indicator light for the current slide blinks green during the scan process, and the scan progress (for example, Scanning 50%) is displayed in the slot State.
SureScan Dx System User Guide

Getting Started 2 Step 7. Remove the slides
SureScan Dx System User Guide
• The remaining scan time and required disk space are displayed at the bottom of the Scan Control main window. See “Scan Control Program Window Reference” on page 88.
• Events during the scan are logged in the Scan Log and Status Log. See “Log tabs” on page 99.
Step 7. Remove the slides
When the Open Door button is enabled, you can unload the slide holders from the cassette and then remove the slides from the slide holders.The Open Door button is not available while the cassette is in motion. Wait a moment for the button to illuminate again.
1 In the Scan Control main window, click Open Door to open the scanner door.
2 Remove the slide holders from the cassette.
3 Remove the slides from the slide holders, as follows:
a Hold the slide holder on the sides with the Agilent logo facing up.
b Gently push in and pull up on the tabbed end of the clear plastic cover to open it.
c Push up on the barcode end of the slide from underneath the slide holder to avoid fingerprints on the sample area.
d Grasp the slide from the sides and remove from the slide holder.
37

2 Getting Started Step 7. Remove the slides
About Scan Protocols
38
A scan protocol is a collection of scan and image settings that, when selected, is applied to the slide as it is scanned.
Agilent supplies eight preloaded protocols for your selection and use with Agilent high density (HD) microarrays and Agilent G3 microarrays.
AgilentHD_GX_2Color
Agilent HD 2-color gene expression microarraysAgilentHD_GX_1Color
Agilent HD 1-color gene expression microarraysAgilentG3_GX_2Color
Agilent G3 2-color gene expression microarraysAgilentG3_GX_1Color
Agilent G3 1-color gene expression microarraysAgilentHD_CGH
Agilent HD CGH/CGH+SNP/CNV/ChIP microarraysAgilentG3_CGH
Agilent G3 CGH/CGH+SNP/CNV/ChIP microarraysAgilentHD_miRNA
Agilent HD miRNA microarraysAgilentG3_miRNA
Agilent G3 miRNA microarraysSelect the predefined protocol that applies to your type of Agilent microarray.
Agilent may provide additional assay-specific protocols as part of an in vitro diagnostic test.
SureScan Dx System User Guide

Getting Started 2 Step 7. Remove the slides
Offline Mode
SureScan Dx System User Guide
If no instrument is available, the Scan Control program runs in “offline mode”. In this mode, you can create, import, and export scan protocols and scan regions. You can also open log files, display recent errors, set general settings, and map scan protocols to design IDs.
39

2 Getting Started Step 7. Remove the slides
Turning Off the SureScan Dx Scanner
40
1 In the Scan Control program window, make sure that the SureScan Dx Microarray Scanner is not scanning, ejecting, or loading a slide.
2 Click Open Door to open the scanner door.
3 Remove the slide holders from the scanner cassette.
4 Remove the slides from the slide holders.
5 Click Close Door.
CAUTION You cannot open the scanner door manually. Use the Open Door/Close Door button in the Scan Control program to open and close the door.
6 In the Scan Control main window, click the red X at the upper right corner to close the program. The lasers are turned off automatically when you close the program.
7 Turn off the power switch on the front of the SureScan Dx Microarray Scanner.
SureScan Dx System User Guide

SureScan Dx Microarray Scanner System User Guide
3Using the Scan Control Program
Using the Slot Table 42
Changing Slide Scan Settings 47
The Scan Control program is used to control all features of the SureScan Dx Microarray Scanner, including setting and changing scan settings and protocols, starting and stopping scans, reviewing scan status, and troubleshooting.
This chapter describes how you use the Scan Control program to set up and run the scanner.
41Agilent Technologies

3 Using the Scan Control Program To change a Slide ID
Using the Slot Table
42
The slot table provides a display of the cassette and its contents. Once you load slides into the cassette and close the door, the Scan Control program reads the barcode for each slide and shows it as the Slide ID in the slot table. The numbers to the left of the table correspond to the slots in the scanner cassette. The color of the number indicates the status of the slot. For details on the Scan Control main window, see “Scan Control Program Window Reference” on page 88.
The topics in this section describe how to use the Scan Control slot table to prepare for scanning slides.
To change a Slide ID
The Slide ID is used in the image filename. By default, it is the slide barcode read by the scanner. See “Barcode and
barcode label specifications” on page 129 for information on barcodes.
Typically, the scanner automatically reads the barcode for a slide and displays it as the Slide ID in the slot table. To add or change the Slide ID in the table,
1 In the slot table, click the Slide ID cell for the slide you want to add or change. Cell editing is enabled only when the slot has a slide loaded and is not yet in the queue.
2 Type the new slide ID.
After you change the Slide ID, move your mouse cursor over the Slide ID
NOTEcell in the scan table to see the barcode for the slide. The barcode appears in a tooltip.SureScan Dx System User Guide

Using the Scan Control Program 3 To set or change the scan protocol
To set or change the scan protocol
A scan protocol is a predefined set ofscan settings. Several default scan protocols are provided with the
software. See “About Scan Protocols” on page 38.
SureScan Dx System User Guide
If no scan protocol is selected for a slide, or if you want to change the scan protocol,
1 In the slot table, click the Scan Protocol cell for the selected slide and then click again to show the list of available scan protocols.
2 Click a scan protocol from the drop-down list.
You cannot change scan protocols for slides in the queue.
To change the output folder for a scan
NOTE
The output folder is where the scanned image files for a slide are saved. By
default, the output folder is D:\ScanData.
1 In the slot table, click the Output Folder cell for a slide.
2 Click the browse icon.
The Browse For Folder dialog box opens.
3 Browse to the location where you want to save the scanned image files for this slide, and click OK.
To apply a selection to multiple slides
Within the slot table, you can select more than one slide and then make a selection for Scan Protocol and Output Folder.1 In the slot table, click to highlight the first slide.
2 To select multiple contiguous slides, hold down the Shift key and then select a second slide.
All slides between and including the selected slides are highlighted in the slot table.
OR
To select a series of noncontiguous slides, hold down the Ctrl key and then click additional slides you want to select. Selected slides are highlighted in the slot table.
3 Within the last selected slide, select the Scan Protocol or Output Folder cell.
The selection is applied to all highlighted slides.
43

3 Using the Scan Control Program To add a slide to the scan queue
To add a slide to the scan queue
NOTE You cannot make changes to slides in the queue.
44
1 In the slot table, click the State cell for the slide you want to add to the queue.
2 Click Add to queue (if no other slides are in the queue).
OR
Click Add to queue first to add the slide to the beginning of the queue.
OR
Click Add to queue last to add the slide to the end of the queue.
To add all slides to the queue
1 In the Scan Control main window, click All to Queue.A confirmation dialog box appears.
2 Click Yes.
All slides in the slot table with a State of “Ready for queue” are added to the queue, in the order they appear in the slot table.
To move a slide in the queue
1 In the slot table, click the State cell for the slide you want tomove.
2 Click again to show selections for the slide.
3 Click one of the following possible options to move the slide position in the queue:
Move to first — Move the slide to the first position
Move to last — Move the slide to the last position
Move up — Move the slide up one position
Move down — Move the slide down one position
SureScan Dx System User Guide

Using the Scan Control Program 3 To remove a slide from the scan queue
To remove a slide from the scan queue
SureScan Dx System User Guide
1 In the slot table, click the State cell for the slide you want to remove from the queue.
2 Click again to show selections for the slide.
3 Click Remove from queue.
The slide is removed from the queue and its State changes to “Ready for queue.”
To remove all slides from the scan queue
1 In the Scan Control main window, click Empty Queue.A confirmation dialog box appears.
2 Click Yes.
All queued slides are removed from the queue, and the State changes to “Ready for queue.”
To open the scanner door
You must use the Scan Control program to open the scanner door.• In the Scan Control main window, click Open Door.
You cannot open the door while the scanner is loading or ejecting a slide.
45

3 Using the Scan Control Program To close the scanner door
To close the scanner door
You must close the door before you can start a scan. After the scan begins, you can open the door and add or remove slides.
46
• In the Scan Control main window, click Close Door.
You must use the Scan Control program to close the scanner door.
To start a scan
• In the Scan Control main window, click Start Scan.The slot status indicator light blinks green during the scan process. The scan progress (for example, Scanning 50%) is displayed in the slot State cell.
SureScan Dx System User Guide

Using the Scan Control Program 3 To change settings for a single slide
Changing Slide Scan Settings
SureScan Dx System User Guide
When you select a slide in the slot table of the Scan Control main window, the scan settings for that slide are shown in the Settings Pane on the right side of the window. See “Scan Control Program Window Reference” on page 88. The values displayed are defined in the selected Scan Protocol for that slide.
There are two ways to change scan settings:
• Make one-time changes to the scan settings for a slide before it is added to the queue. These instructions are shown in the following sections.
• Select a different scan protocol or create a new one. See “To create a scan protocol” on page 50.
You can also apply setting changes to multiple slides. For information, see “To apply a selection to multiple slides” on page 43.
To change settings for a single slide
You can only change the scan settings for a slide when it is not in the scan queue. See “To remove a slide from the scan queue” on page 45.1 In the scan table, select the slide whose settings you want to change.
2 In the Scan Settings area, click the arrow next to the setting you want to change, and then select the new setting.
When you manually change a setting, the Scan Protocol for the slide changes to <Customized>.
3 When you are finished changing the settings, click the State cell and add the slide to the queue. See “To add a slide to the scan queue” on page 44.
For more information on all the settings, see Chapter 6, “Reference”.
47

3 Using the Scan Control Program To change settings for multiple slides
To change settings for multiple slides
You can only change the scan settings for a slide when it is not in the scan queue. See “To remove a slide from the scan queue” on page 45.48
1 In the scan table, click to select the first slide whose settings you want to change.
2 Hold down the Ctrl key and then click to select other slides.
OR
To select a contiguous block of slides, click to select the first slide, and then hold down the Shift key and then click the last slide.
3 In the Scan Settings area, click the arrow next to the setting you want to change, and then select the new setting.
When you manually change a setting, the Scan Protocol for the selected slides changes to <Customized>.
4 When you are finished changing the settings, add the slides to the queue. See “To add a slide to the scan queue” on page 44 or “To add all slides to the queue” on page 44.
To add a description for the slide
You can only change the slide scan description for a slide when it is not in the scan queue. See “To remove a slide from the scan queue” on page 45.1 In the slot table, select the slide whose settings you want to change.
2 In the Scan Description area, type information about the slide and scan, as desired.
3 When you are finished typing the description, click the State cell and add the slide to the queue. (See “To add a slide to the scan queue” on page 44.)
To add a user name
You can only change the user name for a slide when it is not in the scan queue. See “To remove a slide from the scan queue” on page 45.1 In the slot table, select the slide whose settings you want to change.
2 In the User area, type user information.
3 When you are finished typing the user, click the State cell and add the slide to the queue. (See “To add a slide to the scan queue” on page 44.)
SureScan Dx System User Guide

SureScan Dx Microarray Scanner System User Guide
4Using Scan Control Tools
Creating and Changing Scan Protocols 50
Creating and Changing Scan Regions 53
Adding a Barcode 56
Turning on Lasers Manually 58
Troubleshooting Tools 59
Setting up Scanner Defaults 62
Mapping Scan Protocols to Designs 63
The Tools menu in the Scan Control program provides general settings and functions that help with troubleshooting. Scan control tools let you
• Create or change scanner protocols
• Change the scanning region for slides
• Input barcodes
• Switch on and off lasers
• Display recent errors and log files
• Create a “snapshot” file of the current scanner state
• Reset calibration warnings
• Perform a self test
• Set general scanner settings
• Map protocols to slide designs
This chapter describes how to use the tools available in the Scan Control program.
49Agilent Technologies

4 Using Scan Control Tools To create a scan protocol
Creating and Changing Scan Protocols
50
The Scan Control program comes with a default set of scan protocols that are designed to work with typical Agilent microarray slide designs. See “About Scan Protocols” on page 38. You cannot change these default scan protocols. However, you can create a scan protocol by saving an existing protocol using a different name. You can then change the new scan protocol.
To create a scan protocol
You cannot modify a scan protocol that is currently assigned to a slide in the slot table.You can create a protocol from any existing protocol by saving the existing protocol with a new name.
1 Select Tools > Scan Protocol Editor.
2 Select an existing protocol that is similar to the scan protocol you want to create.
3 Click Save As to save the existing protocol with a new name.
The Save As New Name dialog box appears.
4 Type a new name for the protocol, and then click Save.
The scan protocol settings become active.
5 Change the scan and image settings as desired. For information on the available settings, see “Scan Protocol Editor dialog box” on page 106.
6 When you are finished, click Save.
To change an existing scan protocol
You cannot change the default scan protocols provided with the scanner. To change one of these scan protocols, save it with a different name first,1 Select Tools > Scan Protocol Editor.
2 Select an existing protocol you want to change.
3 In the Scan Protocol Editor dialog box, change one or more settings.
4 Click Save.
SureScan Dx System User Guide

Using Scan Control Tools 4 To export a scan protocol
To export a scan protocol
SureScan Dx System User Guide
You can export one or more scan protocols to a file on your hard disk, as a backup, or to import on another SureScan Dx system.
1 Select Tools > Scan Protocol Editor.
The Scan Protocol Editor dialog box opens.
2 Click Export.
The Export Scan Protocol dialog box opens. A list of scan protocols in the program is displayed.
3 Click to select a scan protocol to export.
OR
To select a series of contiguous protocols to export, click to select a scan protocol, and then hold down the Shift key and click another scan protocol.
OR
Click to select a scan protocol, and then hold down the Ctrl key and select additional noncontiguous protocols to export.
4 Click Export.
The Save As dialog box appears.
5 Browse to the location where you want to save the exported protocol file.
6 Type a name for the exported protocol file, and click Save.
To import a scan protocol
If a scan protocol in the file has the same name as an existing scan protocol, the program does not import it.1 Select Tools > Scan Protocol Editor.
The Scan Protocol Editor dialog box opens.
2 Click Import.
The Open dialog box appears.
3 Browse to where the exported scan protocol file you want to import is located. Exported scan protocol files have .exp extensions.
4 Click to select the scan protocol file, and click Open.
The scan protocols in the file are imported.
51

4 Using Scan Control Tools To remove a scan protocol
To remove a scan protocol
You cannot remove any of the default scan protocols or any scan protocols that are currently assigned to a slide in the slot table.52
1 Select Tools > Scan Protocol Editor.
The Scan Protocol Editor dialog box opens.
2 In the Scan Protocol list, select a scan protocol to remove.
3 Click Remove.
SureScan Dx System User Guide

Using Scan Control Tools 4 To create a user-defined custom scan region
Creating and Changing Scan Regions
The scan region determines the area of the slide that is scanned. The larger the
region, the longer the scan time.
SureScan Dx System User Guide
You can create or change a user-defined custom scan region up to the maximum scan region of 71 mm x 21.6 mm. The new region appears as a selection in the slot table and in the Protocol Editor.
To create a user-defined custom scan region
Make sure that the scan region is at least 4 mm away from the barcode label and does not overlap any other opaque or translucent areas of the slide.1 In the Scan Control program menu bar, click Tools > Scan Region Editor.
The Scan Region Editor opens.
2 Use an existing scan region as a template.
a In the list next to Scan Region, select one of the available scan regions.
b Select Save As.
The Save As New Name dialog box appears.
c Type the name for the new scan region, and then click OK.
The scan region settings become active.
3 Under Scan Region, type the dimensions (in mm) for the region. If you type an invalid value, a red box appears around the dimension.
The red box at the top of the dialog box shows the scan region currently defined.
4 Click Save.
If no errors are found, the Scan Region Editor appears with the new region listed in the Scan Region Editor.
To change an existing user-defined custom scan region
You can only change the user-defined custom scan regions that you created. You cannot change or remove the regions provided by Agilent.53

54
4 Using Scan Control Tools To export a scan region
When creating a scan region or using existing scan regions, make sure that the scan region is at least 4 mm away from the barcode label.
1 In the Scan Control program menu bar, click Tools > Scan Region Editor.
The Scan Region Editor opens.
2 In the list next to Scan Region, select the scan region you want to modify.
3 Change the dimensions for the region, as desired. For more information on the settings available, see “Scan Region Editor dialog box” on page 113.
4 Click Save to save the changes for the selected scan region.
If the defined region is used in one or more protocols, the Save button is grayed out. In this case, click Save As and save with a new name.
To export a scan region
1 In the Scan Control program menu bar, click Tools > ScanRegion Editor.
The Scan Region Editor opens.
2 Click Export.
The Export Scan Region dialog box opens.
3 Click to select the scan region you want to export.
OR
To select noncontiguous scan regions to export, hold down the Ctrl key and then click additional scan regions.
OR
To select a contiguous set of scan regions to export, click to select the first scan region, and then hold down the Shift key and then click to select the last scan region to export.
4 Click Export.
5 The Save As dialog appears.
6 Browse to the location where you want to save the exported scan region file.
SureScan Dx System User Guide

Using Scan Control Tools 4 To import a scan region
SureScan Dx System User Guide
7 In File name, type the name for the exported scan region file.
8 Click Save.
To import a scan region
If a scan region in the file has the same name as an existing scan region, the program does not import it.1 In the Scan Control program menu bar, click Tools > Scan Region Editor.
The Scan Region Editor opens.
2 Click Import.
The Open dialog box appears.
3 Browse to where the exported scan regions file you want to import is located. Exported scan regions files have .exp extensions.
4 Click to select the scan regions file, and click Open.
To remove a scan region
You cannot remove any of the default scan regions or any scan region that is currently used in a scan protocol.1 Select Tools > Scan Region Editor.
The Scan Region Editor dialog box opens.
2 In the Scan Region list, select a scan region to remove.
3 Click Remove.
55

4 Using Scan Control Tools To add a barcode
Adding a Barcode
56
Barcodes are the means by which microarray slides are identified, both physically and within the Scan Control program. In addition, the barcode is saved in the metadata of the TIFF image, and is displayed in Feature Extraction reports.
To add a barcode
NOTE By default, the scanner reads the barcode of a slide and displays it as the Slide ID in the Scan Control program Scan Table. If you change the Slide ID, you can still see the barcode of the slide by moving the mouse cursor over its Slide ID. The barcode appears in a tooltip.
To add a barcode, you can use an external barcode reader or your keyboard to type the barcode.
If, for some reason, the barcode of a microarray slide is not readable by the scanner, you can add it manually. To add a barcode manually, at least one slot of the cassette must be available.
1 If the scanner door is not open, in the Scan Control program main window, click Open Door, and wait for the door to open.
2 (Optional) If the barcode for a slide already in a slot is unreadable, remove the slide holder that contains the slide from the cassette.
3 In the Scan Control main window, click Tools > Input Barcode.
The Input Barcode dialog box appears.
4 Use an external barcode reader or in the Barcode text box, type the barcode.
5 Insert the slide holder that contains the slide into the designated slot of the cassette.
6 Click Set.
In the Scan Table, the barcode is displayed in the Slide ID for that slot. The slot State changes to “Present.”
SureScan Dx System User Guide

Using Scan Control Tools 4 To add a barcode
SureScan Dx System User Guide
7 If desired, follow step 3 through step 6 to add another barcode.
8 When finished, click Close.
57

4 Using Scan Control Tools To turn on lasers
Turning on Lasers Manually
58
The lasers are turned on automatically when you start the Scan Control program, or when you add slides to the queue. They turn off automatically, based on the Laser Saver Delay settings. See “To set the laser saver delay” on page 62. This section describes how to turn on the lasers manually.
To turn on lasers
• In the Scan Control program window, click Tools > Switch onLasers.
The lasers are turned on. The Status Log displays “Warming up lasers” and the status bar displays “Warming up.”
When the lasers are warmed up, the status bar displays “Ready.”
SureScan Dx System User Guide

Using Scan Control Tools 4 To display recent errors
Troubleshooting Tools
SureScan Dx System User Guide
To help with troubleshooting, you can display recent errors, or open log files that were generated for the scanner. You can also create a file that contains a “snapshot” of the current state of the instrument.
To display recent errors
NOTE The troubleshooting tools described in this section are typically used when you are working with an Agilent technical support specialist.
• In the Scan Control program menu bar, click Tools > Show Recent Errors.
The LogMessages.txt file opens in Notepad (or your default text editor program).
To display log files
1 In the Scan Control program menu bar, click Tools > LogFiles.
The C:\ProgramData\Agilent\MicroArrayScanner\Logs folder opens with a list of log files:
ScanLog.csv – contains information about scan activity
SysLog-<datestamp>-<timestamp>.csv – contains information about system activity
ExceptionLog.txt – contains information about special conditions that affect the software execution
2 Double-click to select and open a log file.
Files with the .csv (comma-separated variable) extension are opened by default with an available spreadsheet program. These are read-only files. Files with the .txt extension are opened by default with an available text editor.
59

4 Using Scan Control Tools To create a snapshot of the instrument state
To create a snapshot of the instrument state
60
• In the Scan Control program menu bar, click Tools > State Snapshot.
A file is created in the C:\ProgramData\Agilent\MicroArrayScanner\Snapshots\StateSnapshots folder.
To reset calibration warnings
During typical operation, the SureScan Dx Microarray Scanner calibrates the PMTs before every scan. It also calibrates the lasers during system initialization. If the calibration is unsuccessful, or if the calibration changes significantly since the previous time it was performed, the scanner software records this information, and generates warnings in the Scan Log.The PMT calibration warning is set when the PMT gain changes by more than 20% from the previous calibration value.
The laser calibration warnings are set when the lasers cannot achieve their specified power within the warm-up period. If this problem occurs, the system sets the warning, and recalibrates the lasers at 80% of their specified power. The Scan Control program scales the TIFF file to compensate for the lower laser power.
If the next calibration is again unsuccessful, and the warnings reappear, contact your local Agilent sales and support center.
To reset calibration warnings,
• In the Scan Control menu bar, click Tools > Reset Calibration Warnings.
SureScan Dx System User Guide
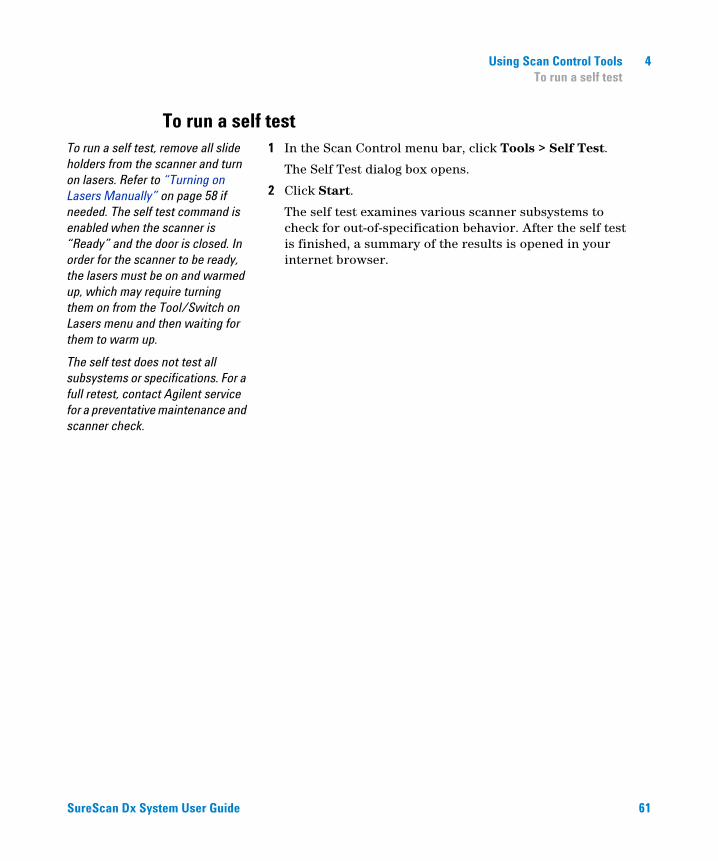
Using Scan Control Tools 4 To run a self test
To run a self test
To run a self test, remove all slide holders from the scanner and turn on lasers. Refer to “Turning on Lasers Manually” on page 58 if needed. The self test command is enabled when the scanner is “Ready” and the door is closed. In order for the scanner to be ready, the lasers must be on and warmed up, which may require turning them on from the Tool/Switch on Lasers menu and then waiting for them to warm up.SureScan Dx System User Guide
1 In the Scan Control menu bar, click Tools > Self Test.
The Self Test dialog box opens.
2 Click Start.
The self test examines various scanner subsystems to check for out-of-specification behavior. After the self test is finished, a summary of the results is opened in your internet browser.
The self test does not test all subsystems or specifications. For a full retest, contact Agilent service for a preventative maintenance and scanner check.
61

4 Using Scan Control Tools To set the default scan data folder
Setting up Scanner Defaults
To set the default scan data folder
By default, the scan data output folder is D:\ScanData.62
This location is the default output folder where the image files generated by the scanner are deposited. This file is shown by default as the Output Folder in the slot table. You can change the output folder manually for a scan before it is added to the queue.
1 In the Scan Control program menu bar, click Tools > Settings.
The Settings dialog box appears.
2 Next to Default Scan Data Folder, type the path for the folder where you want to save the scan images.
OR
Click Browse and browse to the location where you want to save the scan images, and then click OK.
3 Click Save.
Changes to the scan data folder setting are not applied to slides with barcodes already read by the scanner. To change the default setting for slides already in the slot table, open and then close the scanner door so that the scanner reads the barcodes again.
To set the laser saver delay
The lasers turn on automatically when you start the Scan Control program, and after you add scans to a queue. You can also turn them on manually. See “Turning on Lasers Manually” on page 58.The laser saver delay is designed to turn off the lasers automatically when not in use, to maximize the lifetime of the lasers.
1 In the Scan Control program menu bar, click Tools > Settings.
The Settings dialog box appears.
2 Next to Laser Saver Delay, select a value for the number of minutes (from 1 to 100) that the scanner waits after the last scan before it turns off the lasers.
3 Click Save.
SureScan Dx System User Guide

Using Scan Control Tools 4 To map a scan protocol to a slide design
Mapping Scan Protocols to Designs
SureScan Dx System User Guide
The first time you scan a microarray of a given design, the Scan Control program assigns, or “maps” the selected protocol to that design. After that, any time the Scan Control program recognizes a slide with the same design, the Scan Control program automatically fills in that scan protocol for the slide in the slot table. You can also assign scan protocols to slide designs manually.
To map a scan protocol to a slide design
1 In the Scan Control program menu bar, click Tools >Settings.
The Settings dialog box appears.
2 Click the Design to Protocol Mapping tab.
3 Under Design ID, type the Design ID number for the design you want to assign to the scan protocol. The Design ID is determined from an Agilent slide barcode. All barcodes start with 25. The following five digits are the Design ID. For example, the Design ID for barcode 251727810298 is 17278.
4 Under Scan Protocol, select a scan protocol to use for slides for the selected design.
5 (Optional) Under Description, type information about the protocol or design, as desired.
6 Click Save.
Whenever you add a slide that was manufactured with the mapped design, the program automatically uses the selected scan protocol in the slot table.
63

64
4 Using Scan Control Tools To map a scan protocol to a slide design
SureScan Dx System User Guide

SureScan Dx Microarray Scanner System User Guide
5Maintaining and Troubleshooting Your System
Maintaining Your System 66
Scheduled maintenance activities for hardware/software 66
Preventative maintenance for the instrument 66
Troubleshooting Your System 69
Technical Support 69
Frequently Asked Questions (FAQs) 71
Hardware Troubleshooting 72
Software Troubleshooting 74
SureScan Dx system error messages 76
Updating the Scanner Firmware and Scan Control Program 85
To update the Scan Control program and firmware 85
To verify the software installation 86
This chapter provides maintenance and troubleshooting information for the SureScan Dx system.
65Agilent Technologies

5 Maintaining and Troubleshooting Your System Scheduled maintenance activities for hardware/software
Maintaining Your System
Scheduled maintenance activities for hardware/software
66
Perform the maintenance activities in Table 1 according to the recommended frequency to help maintain the performance of your computer workstation and operating system.
Table 1 Scheduled maintenance for system software and hardware
Component Maintenance activity Frequency
Software Check the disk space and archive data as needed. Weekly
Software Delete any temporary files (*.mp, *.tmp files) from the C:\Temp folder.
Weekly
Software If sluggish performance is observed, defragment the hard disk using defragmentation software.
As needed
Hardware Check all vents to ensure that they are not blocked by dust, debris, furniture, or other instrumentation.
Weekly
Preventative maintenance for the instrument
On-going preventative maintenance checks (PM) must be performed by Agilent-trained service personnel in order to assure optimal performance of the instrument. Contact Agilent technical support to schedule PM services.Visit www.agilent.com/genomics/contactus to find worldwide contact information for Agilent technical support.
SureScan Dx System User Guide

Maintaining and Troubleshooting Your System 5 Tips to prevent problems
Tips to prevent problems
SureScan Dx System User Guide
Follow these tips to help you maintain the SureScan Dx Microarray Scanner and its performance.
Tips to avoid data loss
• Avoid running software programs that cause high CPU workload, that can affect the acquisition of data during scanning.
Tips to avoid damage to the scanner
• Keep liquids and vapors away from the SureScan Dx scanner.
• Never place anything on the SureScan Dx scanner or on the scanner door.
• Minimize and control temperature fluctuations.
Do not place the SureScan Dx scanner in direct sunlight. Do not locate the SureScan Dx scanner near windows even if they have blinds or window coverings. The hot sun can heat up the SureScan Dx scanner housing in a nonuniform fashion, which can cause problems with the alignment of the optics.
Scan only when the laboratory temperature is consistent with the operating temperature specifications for the SureScan Dx scanner. To assure optimal SureScan Dx scanner performance, operate the scanner only in the specified temperature ranges. (See “SureScan Dx Scanner Specifications” on page 122.)
• Control the humidity.
The SureScan Dx scanner is sensitive to condensing humidity conditions. To ensure optimal performance, operate the SureScan Dx scanner only in the specified humidity ranges. (See “SureScan Dx Scanner Specifications” on page 122.) Always allow 12 hours thermal equilibration time on site before opening the shipping box.
• If the power cord needs to be replaced, use a power cord that is appropriately rated.
67

68
5 Maintaining and Troubleshooting Your System Tips to prevent problems
Tips to maintain hardware performance
• Avoid moving the SureScan Dx scanner.
If you must move the SureScan Dx scanner, there is a chance for adverse affects on performance. Call your local Agilent sales and support center for assistance in moving the SureScan Dx scanner.
• Place the SureScan Dx scanner on a sturdy lab bench or table.
• Avoid leaning on the SureScan Dx scanner.
• To extend the life of the lasers, set up your lasers to turn on and off automatically. See “To set the laser saver delay” on page 62.
• After turn-on, allow time for laser warm-up and stabilization. Warm-up time is less than a minute.
• Do not use acetone or other solvents for cleaning.
WARNING Do not remove the main cover. Do not attempt to repair or gain access to internal components. You risk exposure to high voltage and harmful laser radiation.
SureScan Dx System User Guide

Maintaining and Troubleshooting Your System 5 Technical Support
Troubleshooting Your System
SureScan Dx System User Guide
The SureScan Dx Microarray Scanner was designed for low maintenance and high ease of use. If you cannot resolve a problem with the system, read this chapter. If the problem still exists, contact your local Agilent sales and support center.
Technical Support
Technical support is available for the SureScan Dx system. Read the rest of this chapter before calling your local Agilent sales and support center.SureScan Dx Microarray Scanner support
If you have a problem with your SureScan Dx scanner that requires assistance from your local Agilent sales and support center, be prepared to provide the latest diagnostic log files created by the Scan Control program. To open the folder that contains the log files, in the Scan Control program main window, click Tools > Log Files. Log files are located in the folder C:\ProgramData\Agilent\MicroArrayScanner\Logs.
Each SureScan Dx scanner has a unique 10-character serial number. The serial number is located on the front of the instrument at the lower right and on the rear of the instrument.
When corresponding with your local Agilent sales and support center about your SureScan Dx scanner, be sure to include the model number and 10-character serial number.
69

70
5 Maintaining and Troubleshooting Your System Technical Support
Make a note of the serial number of your SureScan Dx scanner, the software version # and the installation date in the spaces shown (if you print this page) or on a sheet of paper that you keep close to your scanner.
Scanner information
Model #:
Serial #:
Installation Date:
Software Version#:
Software Update Version#/Date:
Software Update Version#/Date:
Find the version information for scanner software
1 Select Help > About from the menu bar to find version information.
2 To close the About window, click OK.
SureScan Dx System User Guide

Maintaining and Troubleshooting Your System 5 Frequently Asked Questions (FAQs)
Frequently Asked Questions (FAQs)
SureScan Dx System User Guide
The following are frequently asked questions (FAQs) that can help you operate and maintain the SureScan Dx system and troubleshoot issues that occur.
Table 2 FAQs
FAQ Answer
I want to move the SureScan Dx Microarray Scanner to another area.
The move can adversely affect scanner performance. Call your local Agilent sales and support center for assistance in moving the scanner and assuring proper operation afterward.
Can I save files over the network while scanning?
Agilent recommends that you save your data files directly to the local hard disk. You can also save data files to a network folder. If a network access problem is experienced during the scan, data is saved to a temporary local folder, and a warning is included in the scan log.
Where do I find support information, such as drivers, guides, and troubleshooting solutions, for my computer workstation?
If you have a problem with your computer workstation, see the documentation that came with the computer. If you are still unable to resolve the problem, contact your local Agilent sales and support center.
Can I open the door to the scanner manually?
No. You must use the Open Door/Close Door button in the Scan Control program to open or close the scanner door.
The SureScan Dx Microarray Scanner is turned on and the Scan Control program is open, but the scanner does not scan.
1 Close and then restart the Scan Control program.You must turn on the SureScan Dx Microarray Scanner before starting the Scan Control program. If you started the Scan Control program first, the connection is not made when the scanner is turned on.
2 Contact your local Agilent sales and support center.
I want to remove a slide from the scanner, but the Scan Control program will not let me open the door.
The Scan Control program prevents you from opening the door while it is loading or ejecting a slide. Wait until the Open Door button is available to open the door. If you continue to have problems, check the Status Log and contact Agilent technical support.
71

5 Maintaining and Troubleshooting Your System Hardware Troubleshooting
Hardware Troubleshooting
72
Except for the power fuse, the SureScan Dx Microarray Scanner has no user-serviceable parts. The status indicator light on the front of the scanner indicates possible problems. You can also replace the fuses that protect the system. For any other problems, including jams, contact your local Agilent sales and support center.
Troubleshooting with the status indicator light
The front panel has an indicator light that shows the status of the SureScan Dx Microarray Scanner.
Figure 13 Location of the status indicator light
Table 3 describes the possible states of the indicator light.
Status indicatorlight
SureScan Dx System User Guide

Maintaining and Troubleshooting Your System 5 Hardware Troubleshooting
SureScan Dx System User Guide
Checking and replacing scanner fuses
The SureScan Dx Microarray Scanner has two fuses for the power supply, on the rear of the SureScan Dx Microarray Scanner. The power supply fuses are directly above the power cord plug.
The fuses are ordered directly from Agilent Technologies.
Table 3 Scanner status indicator light states
Light state Meaning/action required
Yellow Scanner is initializing. The yellow light appears after you turn on the scanner, and also when the Scan Control program connects and initializes communication with the scanner.
Off Scanner is fully initialized
Green Scanning is in process.
Red An error has occurred. Check the Scan Control Status log, Scan log, and list of recent errors, and then contact Agilent technical support.
WARNING Always disconnect the power cord before checking or replacing the fuses.
Checking and replacing the power supply fuses If you cannot turn on the SureScan Dx Microarray Scanner, even though the power outlet is active when tested, check, and replace the fuses if needed.
1 Disconnect the power cord.
2 Use a small flat-edge screwdriver to pry up the small plastic tab on the bottom edge of the fuse holder until it releases.
3 Pull out the fuse holder, and check the fuse integrity.
73

74
5 Maintaining and Troubleshooting Your System Software Troubleshooting
4 If a fuse is blown, replace the fuse with a T4A, 250 VAC rated fuse (part number 2110-1491).
5 Push the fuse holder back in until it clicks into place.
6 Plug in the power cord.
CAUTION Replace the fuses with only the same or equivalent rated fuses. If you are unsure about the fuses, contact your local Agilent sales and support center before installing.
Software Troubleshooting
Power supply fuse holder
In case you experience a computer failure or you want to reload the hard drive image that Agilent ships with the computer, Agilent supplies a recovery CD that lets you re-image the hard drive.
SureScan Dx System User Guide

Maintaining and Troubleshooting Your System 5 File locations
File locations
SureScan Dx System User Guide
The SureScan Dx system uses the following folders:
Scan Control program files (installation folder)
C:\Program Files (x86)\Agilent\ScanControl
Log files
C:\ProgramData\Agilent\MicroarrayScanner\Logs
Scanned image files (default – otherwise as set in Scan Control Settings)
D:\ScanData
Scanned image files (in case of failure to find a network storage location)
If the Default Scan Data Folder set in Tools > Settings is not available, the program performs the following actions:
• Posts an error message in the Status Log
• Clears the Default Scan Data Folder set in Tools > Settings
• Sets the Output Folder in the Slot Table to C:\ProgramData\Agilent\MicroArrayScanner\Temp
75

5 Maintaining and Troubleshooting Your System SureScan Dx system error messages
SureScan Dx system error messages
76
This section explains how to use error messages and error logs generated by the system.
Hardware monitoring
The SureScan Dx Microarray Scanner continuously monitors internal temperatures and fan speeds, as well as fault conditions on many subsystems.
• If the monitored parameters reach warning levels, a message is displayed in the status log, and the instrument goes into a “scanning suspended” state. In this state, the currently running scan finishes, but no new scan starts.
• If the monitored parameters reach alarm levels, the instrument immediately stops scanning, and reduces its power consumption as much as possible.
To display details of the fault that shut down the instrument, in the Scan Control program, click Tools > Show Recent Errors.
Where scanner error messages can appear
Error messages appear in the following places:
• Error messages appear in the Status Log in the Scan Control program main window. If the error can result in compromised data, it also appears in the Scan Log.
• Errors are also captured in greater detail in the system log file. System log files are saved as comma separated value files, with extension .csv. They can be opened with a text editor program (such as Notepad) or with Microsoft Excel. To open the folder where system log files are located, click Tools > Log Files.
• To display the most recent errors, click Tools > Show Recent Errors. The recent errors are opened in Notepad.
SureScan Dx System User Guide

Maintaining and Troubleshooting Your System 5 SureScan Dx system error messages
SureScan Dx System User Guide
Troubleshooting with error messages
The SureScan Dx system creates error messages to help you solve issues that arise. Many of the error messages include a solution within the text box; follow those instructions.
The following table contains some of the error messages that appear in popup dialog boxes, along with descriptions and suggested actions. If a problem continues after you try the suggested action, contact Agilent technical support.
ialog boxes
Table 4 Error messages in popup dError message Description and suggested action
A slide has been placed in the active slot (Slot number *).
Remove the slide to allow scanning to continue.
A slide is currently in the active slot and the scanner cannot return the scanned slide to its slot in the cassette. No additional scans can take place, and Close Door is disabled.
Remove the slide from the active slot.
Cannot connect to instrument: Firmware version is more recent than host software version.
Firmware version: *
Host software version: *
Contact Agilent product support.
Instrument firmware does not match the Scan Control program version.
Contact Agilent technical support.
Cannot connect to instrument: Verify firmware failed.
*
Contact Agilent product support.
Scan Control cannot communicate with the scanner due to a firmware problem and goes into offline mode.
Contact Agilent technical support.
Check disk space failed: * Occurs when you try to add a scan to the queue but there is not enough disk space for the scan to complete.
Clean up your hard disk to provide adequate space for storage of scan files.
Configuration items are missing from config files. Cannot save.
Reinstall the Scan Control program.
Configuration items missing. Reinstall the Scan Control program.
Error during shutdown: * An error occurred when closing the Scan Control program.
Restart the Scan Control program and try again.
77

5 Maintaining and Troubleshooting Your System SureScan Dx system error messages
Find log files failed: * Close the Scan Control program and restart it. If the problem continues, reinstall the Scan Control program.
Find recent errors failed: * Close the Scan Control program and restart it. If the problem continues, reinstall the Scan Control program.
Get 'About' information failed: * Close the Scan Control program and restart it. If the problem continues, reinstall the Scan Control program.
Initialize logger failed: * Log file is open in another application. Close the log file and restart the Scan Control program.
Instrument is busy: Please wait for the instrument to become idle.
Occurs when you attempt a command that cannot be completed while the instrument is busy. Wait and try the action again.
Instrument self test failed: * Re-run the self test and if it fails again, contact Agilent technical support.
Load application configuration failed: * Scan Control program installation is corrupt. Reinstall the Scan Control program.
Load instrument configuration failed: * Scan Control program installation is corrupt. Reinstall the Scan Control program.
Load scan configurations failed: * Scan Control program installation is corrupt. Reinstall the Scan Control program.
Load test script set failed: * Reinstall the Scan Control program.
Open Online Support website failed: * Web page is currently unavailable. Check your internet connection. Try again later.
Open Scanner Home Page website failed: *
Web page is currently unavailable. Check your internet connection. Try again later.
Open Users Guide '*' failed: * Close the Scan Control program and restart it. If the problem continues, reinstall the Scan Control program.
Recovering door jam failed: * An error occurred when the instrument tried to recover from a door jam.
Close the Scan Control software, restart the scanner, and then restart the Scan Control program.
Save instrument state failed: * Close the Scan Control program first. Then, after the window closes, shut off the scanner. Restart the scanner and the Scan Control program. If the problem continues, reinstall the Scan Control program.
Table 4 Error messages in popup dialog boxes (continued)
Error message Description and suggested action
78 SureScan Dx System User Guide

Maintaining and Troubleshooting Your System 5 SureScan Dx system error messages
Show 'About' information failed: * Close the Scan Control program and restart it. If the problem continues, reinstall the Scan Control program.
Update firmware failed: * Update of the instrument firmware failed. The scanner must be on when the firmware is updated. Make sure the scanner is on then retry the firmware update. If the problem persists, contact Agilent technical support.
Table 4 Error messages in popup dialog boxes (continued)
Error message Description and suggested action
* Detail added when the message is generated
SureScan Dx System User Guide
The following table shows error messages that appear in the Status Log or Scan Log. When an error occurs, to display additional information, click Tools > Show Recent Errors.
Table 5 Error message in logs
Error message Description and suggested action
* State Machine unknown error during state '*': *.
Multiple possible causes. Try restarting the scanner and Scan Control program. If the problem persists, contact Agilent technical support.
Activity EjectSlide failed. Multiple possible causes. Try restarting the scanner and Scan Control program. If the problem persists, contact Agilent technical support.
Activity InitLoader failed Multiple possible causes. Try restarting the scanner and Scan Control program. If the problem persists, contact Agilent technical support.
Activity InitStages failed Multiple possible causes. Try restarting the scanner and Scan Control program. If the problem persists, contact Agilent technical support.
Activity LaserWarmup completed with warnings
Try restarting the scanner and Scan Control program. If the problem persists, contact Agilent technical support.
Activity LaserWarmup failed. Try restarting the scanner and Scan Control program. If the problem persists, contact Agilent technical support.
Activity LoadSlide failed Multiple possible causes. Try restarting the scanner and Scan Control program. If the problem persists, contact Agilent technical support.
AutoFocus hold percentage is more than warning limit
Inspect slide and slide holder. Clean and/or re-seat slide as needed. Replace slide holder if slide cannot be properly held in place.
Data system calibration completed with warnings
Indicates data system calibration failure. If the problem persists, contact Agilent technical support.
79

5 Maintaining and Troubleshooting Your System SureScan Dx system error messages
Data system calibration failed Indicates data system calibration failure. If the problem persists, contact Agilent technical support.
Default scan data folder verification '*' failed: *
The default folder has been removed or cannot be accessed. Recreate it or fix the network connection.
Eject failed: unable to move slide into cassette.
Restart the scanner and Scan Control program contact Agilent technical supportto attempt to clear fault.
Fanspeed error detected: Instrument operation halted
Hardware problem — contact Agilent technical support.
Fanspeed warning cleared: Instrument operation resuming
Hardware problem — contact Agilent technical support.
Fanspeed warning detected: Instrument operation suspended.
Hardware problem — contact Agilent technical support.
Find focus failed Multiple possible causes. Try restarting the scanner and Scan Control program. If the problem persists, contact Agilent technical support.
General communication failure. Check the LAN cable. Restart the scanner and the Scan Control program.
Green Laser power is not set to calibrated value
Laser power has been reduced. Compensation was applied to the output TIFF. The green laser may fail soon. Try restarting the scanner and Scan Control program. If the problem persists, contact Agilent technical support.
Green PMT calibration completed with warnings
Indicates PMT calibration completed successfully, but some of the values it calculated are not good. Try restarting the scanner and Scan Control program. If the problem persists, contact Agilent technical support.
Hardware error detected in subsystem '*':Instrument operation halted
Low-level error. Restart scanner and Scan Control program. Contact Agilent technical support.
Hardware warning detected in subsystem '*':Instrument operation suspended
Low-level error. Check recent errors and contact Agilent technical support.
High temperature error detected: Instrument operation halted
Check ventilation slots.
High temperature warning cleared: Instrument operation resuming
Check ventilation slots.
High temperature warning detected: Instrument operation suspended
Check ventilation slots.
Table 5 Error message in logs (continued)
Error message Description and suggested action
80 SureScan Dx System User Guide

Maintaining and Troubleshooting Your System 5 SureScan Dx system error messages
PMT calibration failed Indicates PMT calibration failure. If the problem persists, contact Agilent technical support.
Red Laser power is not set to calibrated value
Laser power has been reduced. Compensation was applied to the output TIFF. The red laser may fail soon. Try restarting the scanner and Scan Control program. If the problem persists, contact Agilent technical support.
Red PMT calibration completed with warnings
Indicates PMT calibration issues. If the problem persists, contact Agilent technical support.
Scan slide failed Multiple possible causes. Click Tools > Show Recent Errors for more information. Try restarting the scanner and the Scan Control program. If the problem persists, contact Agilent technical support.
State machine failure * Low-level software error. Contact Agilent technical support.
Status communication failure Check connection to instrument.
Suspending autoloader operation due to autoloader errors
Click Tools > Show Recent Errors for more information.
Unable to access folder \"*\": Saving output file in folder \"*\"
Destination folder was not available during the scan.
Watchdog communication failure: *. Low-level error. If the problem recurs, call Agilent technical support.
Table 5 Error message in logs (continued)
Error message Description and suggested action
* Detail added when the message is generated
SureScan Dx System User Guide
If an error message does not appear in the table
This table does not list all the possible error messages. If you have an error message that is not listed and you are unable to resolve the problem, do the following:
1 Write down the error message.
2 Restart the Scan Control program.
81

82
5 Maintaining and Troubleshooting Your System SureScan Dx system error messages
3 If step 2 does not solve the problem, do the following:
a Close the Scan Control program.
a Restart the computer workstation.
b Turn off the SureScan Dx Microarray Scanner, and then back on.
c Restart the Scan Control program.
4 If step 3 does not solve the problem, contact your local Agilent sales and support center.
SureScan Dx System User Guide

Maintaining and Troubleshooting Your System 5 SureScan Dx system error messages
Using the Diagnostic Display
SureScan Dx System User Guide
The SureScan Dx Microarray Scanner diagnostic display is used for advanced troubleshooting tasks. This display is located on the front of the instrument, behind the upper front cover. To open the cover, grasp the finger-holds on the sides of the cover, and pull forward. You see the diagnostic display and a 4-way control switch.
NOTE Use the diagnostic display switch only when requested by Agilent technical support.
Figure 14 Diagnostic display location
Upper front cover
Finger holds
4-way control switch
Diagnostic display
83

84
5 Maintaining and Troubleshooting Your System SureScan Dx system error messages
The diagnostic display control switch has the following capabilities:
• Before Scan Control connects to the instrument, the display shows the IP address of the scanner. If the IP address is not displayed, the firmware is not running.
• Toggle the switch Up to cycle through a menu, with the following choices:
• The first item lets you reset the IP address to factory default (10.0.0.2).
• The second item lets you reboot the firmware. (The firmware is also reset by power cycling the instrument.)
• To perform the selected operation, move the switch to the right (to the Select position).
• Once the Scan Control program connects to the instrument, the display reads “Client Connected”.
SureScan Dx System User Guide

Maintaining and Troubleshooting Your System 5 To update the Scan Control program and firmware
Updating the Scanner Firmware and Scan Control Program
SureScan Dx System User Guide
Agilent Technologies occasionally makes software updates available. Firmware updates (if necessary) are included with the Scan Control program update. This section describes how to update the scanner program and firmware.
Updating of the scanner firmware or the Scan Control program may require
To update the Scan Control program and firmware
NOTErevalidation of your in-house operational protocols and procedures. Refer to your laboratory operational policies for guidance.
1 Make sure the scanner is powered on.
2 From the Scan Control main window, click Help > Scanner Home Page.
The Agilent Technologies Genomics – SureScan Microarray Scanner Overview web page opens.
3 In the web page, click Download Software.
4 Follow the instructions to read the Release Notes and Installation Notes
5 Click Download Software to download the software installer and save it to your computer.
6 Start the software installer and follow the prompts to install the software. Accept the defaults. It is not necessary to remove the previous version of the software.
Software updates do not overwrite scan regions, protocols, or the
NOTEcalibration of the instrument.7 When the software installation is finished, start the Scan Control program.
8 If a firmware update is needed, a message appears, and the Scan Control program changes to Offline Mode.
9 Close the Scan Control program.
85

86
5 Maintaining and Troubleshooting Your System To verify the software installation
10 Turn off the power to the scanner.
11 Wait 10 seconds, and then turn on the scanner power.
12 Start the Scan Control program.
The Scan Control program and scanner firmware are now updated. If you have problems, contact Agilent technical support.
To verify the software installation
The SureScan Dx system workstation includes an installation qualification tool (IQT). Use this program after updating your software to verify that the update installed correctly.1 Click Start > All Programs > Agilent Technologies > Installation Qualification Tool.
Figure 15 Agilent Installation Qualification Tool dialog box
2 Select the box next to Agilent Microarray Scan Control.
3 Under Products to be qualified, click Qualify.
The installation is verified, and an installation qualification report is generated. If you selected Open report after qualification, the installation qualification report opens in your internet browser.
4 When finished, click the close button in the upper right corner of the program dialog box.
SureScan Dx System User Guide

SureScan Dx Microarray Scanner System User Guide
6Reference
Scan Control Program Window Reference 88
Scan Control Program Dialog Box Reference 102
About Adding Slides 121
SureScan Dx Scanner Specifications 122
Slide Specifications 128
Regulatory Information 130
This chapter includes descriptions of the Microarray Scan Control program windows and dialog boxes. It also contains specifications and regulatory information.
87Agilent Technologies

6 Reference Scan Control main window
Scan Control Program Window Reference
88
This section describes the main window of the Microarray Scan Control program and its contents.
Scan Control main window
Figure 16 Agilent Microarray Scan Control main window
Menu bar
Slot table
Function buttons
Settings pane
Logs
Status bar
Slot status indicators
Image processingstatus
SureScan Dx System User Guide

Reference 6 Scan Control main window
SureScan Dx System User Guide
The Microarray Scan Control window appears when you start the Microarray Scan Control Program. It has the following features:
Table 6 Scan Control window features
Feature Description
Menu bar Open tools menu and help.
Slot table Display status, scan protocols, and output folders for microarray slides currently in the scanner.
Settings pane Display settings for selected slide. For slides not in the queue, you can change settings from here.
Slot status indicators Indicates the status of the slot. Matches the slot indicator lights on the cassette.
Function buttons • Add and remove slides from the scan queue
• Open and close the scanner door• Start and stop a scan
Logs Display instrument and scan status logs.
Status bar Show status of scanner, remaining scan time, and disk space required for the scan.
89
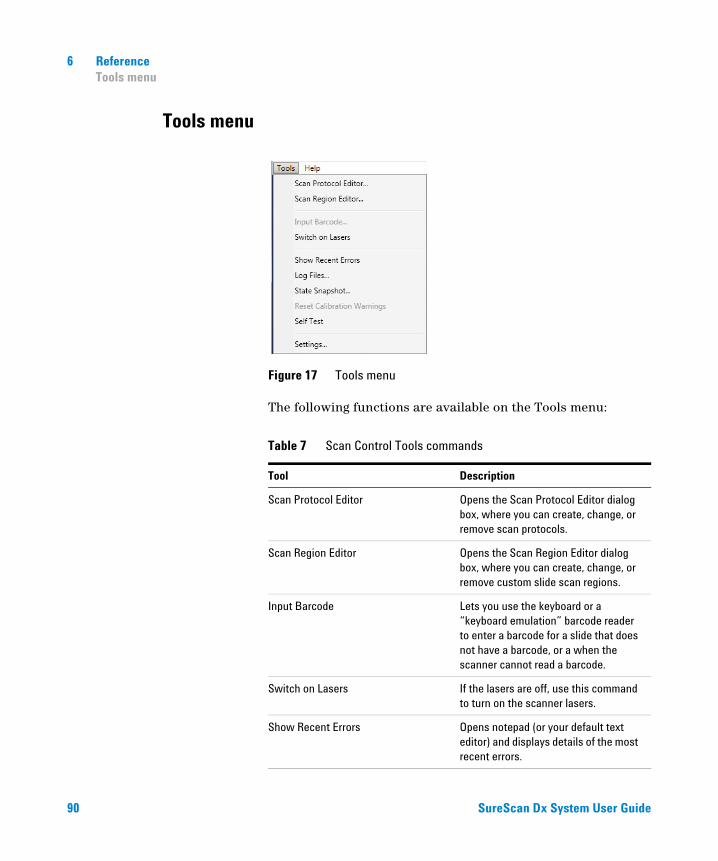
6 Reference Tools menu
Tools menu
90
Figure 17 Tools menu
The following functions are available on the Tools menu:
Table 7 Scan Control Tools commands
Tool Description
Scan Protocol Editor Opens the Scan Protocol Editor dialog box, where you can create, change, or remove scan protocols.
Scan Region Editor Opens the Scan Region Editor dialog box, where you can create, change, or remove custom slide scan regions.
Input Barcode Lets you use the keyboard or a “keyboard emulation” barcode reader to enter a barcode for a slide that does not have a barcode, or a when the scanner cannot read a barcode.
Switch on Lasers If the lasers are off, use this command to turn on the scanner lasers.
Show Recent Errors Opens notepad (or your default text editor) and displays details of the most recent errors.
SureScan Dx System User Guide

Reference 6 Help menu
SureScan Dx System User Guide
Log Files Opens the Logs folder, where you can open any of the logs created by the program.
State Snapshot Creates a file that contains the status of the scanner at the time the snapshot was created. This file is helpful in troubleshooting.
Reset Calibration Warnings Laser calibration warnings are set when the lasers cannot achieve their specified power within the warm-up period. If this problem occurs, the system sets the warning, and recalibrates the lasers at 80% of their specified power. Use this function to reset the warnings to default settings.
Self Test The self test examines various scanner subsystems to check for out-of-specification behavior. After the self test is finished, a summary of the results is opened in your internet browser.
Settings Opens the Settings dialog box, where you can set defaults and map scan protocols to microarray designs.
Table 7 Scan Control Tools commands
Tool Description
Help menu
Figure 18 Scan Control Help menu
91

92
6 Reference Help menu
The following commands are available in the Help menu:
* The first time you open the Scan Control software, you are prompted to select your preferred version of the User Guide. Until the preferred version is selected, the User Guide option on the Help menu is unavailable for selection. You can change the selected User Guide at any time from the Settings dialog box (see “Settings dialog box – General Settings” on page 117).
Table 8 Scan Control Help commands
Item Description
Users Guide* Opens this guide in Adobe Reader.
Scanner Home Page Opens the Agilent Technologies website for the SureScan Dx Microarray Scanner in your internet browser. Click the SureScan Dx Microarray Scanner tab to view information on the Dx version of the scanner.
Online support Opens the Agilent Technologies Technical Support web page, where you can find support information for your scanner.
About Agilent Scan Control Displays version information for the Scan Control program and the serial number and model of your scanner.
SureScan Dx System User Guide

Reference 6 Slot table
Slot table
SureScan Dx System User Guide
Figure 19 Scan Control program slot table
The slot table is a virtual representation of the contents of your scanner cassette. It is used to set up, start/stop, and monitor the progress of scans.
Slot Status Indicator
Numbers to the left of the slot table are identical to the slot status indicator lights on the cassette. The color of the number changes to indicate the status of the slot and scan, as described in Table 9 on page 94.
Slide ID
The Slide ID used to name the scanned image file. After you load slides into the scanner cassette and close the scanner door, the program reads the barcode label for each slide in the cassette and displays it in this column. You can change the Slide93

94
6 Reference Slot table
ID to any text acceptable in a file name. The barcode for the slide is retained, and is shown when you move the mouse over its Slide ID in the Scan Table.
State
Displays the current state of the slot. Possible states and the color of the slot status indicator are shown in the following table.Table 9 Slot states and indicators
Slot status indicator State Meaning
Off Empty No slide is present in the cassette.
Blinks blue Present Slide is present in the cassette slot. When barcode is read successfully, it appears in Slide ID. Slide is not ready to add to a queue because it has no scan protocol assigned yet.
Blinks blue Ready for queue The slide is ready to add to a scan queue.
Solid blue In queue x Slide is in the scan queue, in position x, where x indicates the order in which the slides are scanned.
Blinks green Scanning (x%) Slide is in the process of scanning, where x% indicates the percent of completion for the scan.
Solid green Complete Scan finished successfully.
Yellow Warning A warning was generated during the scan.
Red Error An error occurred during the scan.
SureScan Dx System User Guide

Reference 6 Slot table
Blinks yellow Removed A slide that was “Ready” or “In Queue” was removed from the cassette.
Blinks yellow Replaced A slide was placed into a slot whose state was “Removed.”
• If the barcode matches the original slide that was removed, the State is changed back to “Ready for queue” or “In Queue.”
• If the barcode does not match the slide that was removed, the Status changes to “Ready for queue” if a protocol is mapped to the slide Design ID. It changes to “Present” if no protocol is mapped to the slide Design ID.
Table 9 Slot states and indicators (continued)
Slot status indicator State Meaning
SureScan Dx System User Guide
Menu selections for State
For slides that are not scanning, commands are available that let you add or remove a slide from the queue. The selections available for a particular slide vary depending on the location of the slide in the queue, or if the slide is ready to add to the queue.
Table 10 Menu selections for State
Selection Description
Move to First Moves the slide to the first position in the queue.
Move to Last Moves the slide to the last position in the queue.
Move up Moves the slide one place up in the scan queue.
95

96
6 Reference Function buttons
Move down Moves the slide one place down in the slide queue.
Remove from queue Removes the slide from the scan queue and sets the State to Ready for Queue.
Add to queue Available if no slides are in the scan queue. Adds the selected slide to the scan queue.
Add to queue first Adds slide to the first position in the queue. If a scan is already in process, the slide becomes the first slide to scan after completion of the current scan.
Add to queue last Adds the slide to the last position in the queue.
Table 10 Menu selections for State (continued)
Selection Description
Scan Protocol
Displays the scan protocol to use for scanning the selected slide. Available scan protocols include the default Agilent-supplied scan protocols and any scan protocols that were created or imported. See “About Scan Protocols” on page 38.Output Folder
Displays the folder where image files created by the scanner are saved. By default, this location is D:\ScanData. You can change the default output folder in Tools > Settings. You can change the output folder for a slide before it is added to the queue. The Browse button lets you select a folder to store the data from each scan. Agilent recommends that the data be acquired to a local folder on a secondary hard drive. You can also select a network folder. If a network access problem is experienced during the scan, data is saved to a temporary local folder, and a warning is included in the scan log.Function buttons
Buttons next to the slot table are available depending on the instrument status.SureScan Dx System User Guide

Reference 6 Function buttons
All to Queue
SureScan Dx System User Guide
Adds all slides not currently in the slide queue to the slide queue. Slides are added to the queue in the order they appear in the slot table.
Empty Queue
Removes all slides from the queue, except those currently scanning.Open Door/Close Door
Opens or closes the door on the scanner.Start Scan/Stop Scan
Starts or stops the scan. Slides are scanned in the order they appear in the scan queue.97

6 Reference Settings pane
Settings pane
98
Figure 20 Scan Control – settings pane
The settings pane lets you change individual settings for a selected slide. To change settings, the slide must not be in the scan queue. For more information on the settings available in this table, see “Scan Protocol Editor dialog box” on page 106.
SureScan Dx System User Guide
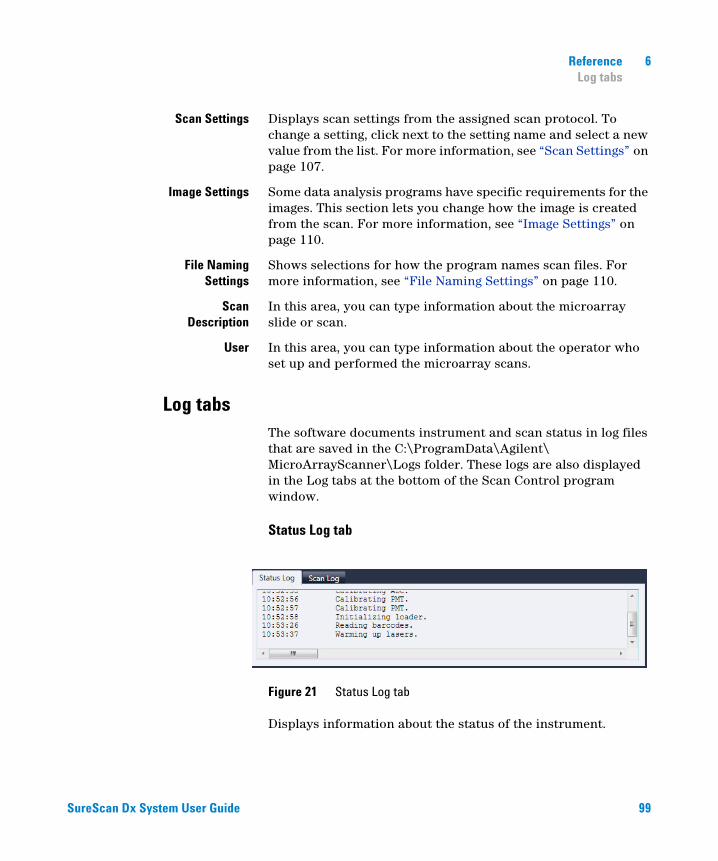
Reference 6 Log tabs
Scan Settings
SureScan Dx System User Guide
Displays scan settings from the assigned scan protocol. To change a setting, click next to the setting name and select a new value from the list. For more information, see “Scan Settings” on page 107.
Image Settings
Some data analysis programs have specific requirements for the images. This section lets you change how the image is created from the scan. For more information, see “Image Settings” on page 110.File Naming Settings
Shows selections for how the program names scan files. For more information, see “File Naming Settings” on page 110.
Scan Description
In this area, you can type information about the microarray slide or scan.
User
In this area, you can type information about the operator who set up and performed the microarray scans.Log tabs
The software documents instrument and scan status in log files that are saved in the C:\ProgramData\Agilent\MicroArrayScanner\Logs folder. These logs are also displayed in the Log tabs at the bottom of the Scan Control program window.Status Log tab
Figure 21 Status Log tab
Displays information about the status of the instrument.
99

100
6 Reference Log tabs
Scan Log tab
Figure 22 Scan Log tab
Displays information about the scans. When you start the Scan Control program, the Scan Log displays the scans from the previous 30 days.
Right-click in one of the log tabs to open a shortcut menu with the following options:
Table 11 Shortcut menu options for log tabs
Menu command Description
Clear Clears the contents of the tab. The contents of the log file is not affected.
Copy Active after you hold down the mouse button and drag to select a portion of the log. Copies the selected region to the Clipboard. You can paste the selection into a text editor or program of your choice.
SureScan Dx System User Guide

Reference 6 Log tabs
SureScan Dx System User Guide
Select all Selects all of contents of the log tab.
Auto Scroll Turns auto scrolling within the log on or off. If autoscroll is on, when a new message appears, the program automatically scrolls to the bottom of the log so you can see it easily. If autoscroll is off, the pane does not scroll when new messages appear. Turning off autoscroll is useful if you want to review the log while the scanner is active.
Table 11 Shortcut menu options for log tabs
Menu command Description
101

6 Reference Agilent Installation Qualification Tool
Scan Control Program Dialog Box Reference
102
This section contains descriptions of the parameters available in the dialog boxes that appear when you use the Scan Control program. The dialog box descriptions appear in alphabetical order.
Agilent Installation Qualification Tool
Figure 23 Installation Qualification Tool dialog box
Purpose: Verifies that the Scan Control program was installed correctly and generates an Installation Qualification report.
To open: In the Windows Start menu, click All Programs > Agilent Technologies > Installation Qualification Tool.
Show OK files in report
When selected, the qualification report includes a list of all files verified as OK. (Default is not selected. Invalid files are always shown.)
Open report after
qualification
When selected, the qualification report opens in your web browser, after the installation qualification is finished.
Products to be qualified
Displays a list of Agilent software products that you can qualify with the tool.
Qualify
Starts the installation qualification for the selected product.Re-Qualify
Appears after installation qualification. Lets you requalify the installation. Requalify after you correct any problems, to generate a new installation qualification report.SureScan Dx System User Guide

Reference 6 Export Scan Protocol dialog box
Report saved at
SureScan Dx System User Guide
Appears after installation qualification is finished. Displays a link to the location of the qualification report. Click the link to open the report in your web browser.
Opens the IQT reports folder.
Export Scan Protocol dialog box
Figure 24 Export Scan Protocol dialog box
Purpose: Lets you select available scan protocols to export.
To open: In the Scan Protocol Editor dialog box, click Export.
103

6 Reference Export Scan Region dialog box
Export
104
When one or more scan protocols are selected, this command opens the Save As dialog box, where you select a location and file name for the exported protocols file.
Close
Closes the dialog box.Export Scan Region dialog box
Figure 25 Export Scan Region dialog box
Purpose: Displays available scan regions that you can select to export.
To open: In the Scan Regions Editor dialog box, click Export.
Export
When one or more scan regions are selected, this command opens the Save As dialog box, where you select a location and file name for the exported scan regions file.Close
Closes the dialog box.SureScan Dx System User Guide

Reference 6 Input Barcode dialog box
Input Barcode dialog box
SureScan Dx System User Guide
Figure 26 Input Barcode dialog box
Purpose: Used to type or enter a barcode for a slide without a barcode or whose barcode is unreadable by the scanner.
To Open: In the Scan Control program, click Tools > Input Barcode.
Barcode
The barcode you enter using an external barcode reader or your keyboard.Set
After the barcode is entered and the slide is loaded into slot 1 of the scanner, this button is used to assign the barcode to the slide in slot 1.Close
Used to close the dialog box.105

6 Reference Scan Protocol Editor dialog box
Scan Protocol Editor dialog box
106
Figure 27 Scan Protocol Editor dialog box
Purpose: Used to create or change scan protocols.
To open: In the Scan Control program window, click Tools > Scan Protocol Editor.
Scan Protocol
Displays a list of available scan protocols. The settings for the selected scan protocol are displayed in the Scan Protocol Editor dialog box.SureScan Dx System User Guide

Reference 6 Scan Protocol Editor dialog box
SureScan Dx System User Guide
General
Agilent Defined
A protocol provided by Agilent.Locked
When a protocol is locked, it cannot be changed.Scan Settings
Dye channel
Determines whether only red (for example, Cy-5 dye), only green (for example, Cy-3 dye), or both dye channel information is gathered. The selection has no effect on the scan time, but selecting only one dye channel does reduce file size up to a factor of 2.Scan region
The scan region determines the area of the slide that is scanned. It must be large enough to capture the entire print region of the microarray. It must be small enough to avoid scanning too close to the barcode or other nontransparent border areas of the slide and affecting the ability of the scanner to auto focus properly. Minimizing the scan region also reduces scan time and save storage space.Agilent provides a scan region suitable for all Agilent High Density and G3 slides, and another suitable for scanning full 25.4 mm × 76.2 mm slides without barcode labels.
Resolution
Sets the scan resolution (pixel size) to 2, 3, 5 or 10 microns. In addition to setting the pixel size, the Resolution pull-down menu offers other specifications for the scanning process that impact image resolution. Specifically, these options are:• Double – This option refers to double-scanning mode, and it is offered as a selection for 2-, 3-, and 5-micron scans (10-micron scans are always performed in double-scanning mode). In double-scanning, each row of pixels in the TIFF image represents the average of two scan lines, one acquired in each direction. This process reduces the noise floor and provides increased sensitivity for low-intensity signals, but it doubles the scan time. When double-scanning is not selected, the scanner acquires only a single scan line for each image row.
107

108
6 Reference Scan Protocol Editor dialog box
• High sensitivity – The high-sensitivity scan mode is available at all scan resolutions. The high-sensitivity mode reduces the noise floor by reducing scan speed and increasing the samples per pixel, which provides increased sensitivity for low-intensity signals. The sensitivity is comparable to the double-pass mode but with scan times reduced by 25%.
TIFF Dynamic Range
Sets the dynamic range to 16-bit or 20-bit. The G5761A scanner has extended the dynamic range of the PMT and signal processing electronics. When you select the 20-bit TIFF file option, you can access this extended range, enabling quantitation of high and low signal features in a single scan. This allows scanning of higher intensity features without saturating the measurement. The resulting file size is larger, but the scan time is unaffected.
If 20-bit option is selected, no XDR option is allowed; if an XDR option is
NOTEselected already, it is reset automatically.Table 12 shows the storage space and scan time for single and double pass scans for each resolution selected, for either a 16-bit TIFF dynamic range or a 20-bit range. The Scan Region is 61 X 21.6 mm.
The status bar at the bottom of the Scan Control main window shows an estimate of the storage space and run time required for the current queue of slides.
Table 12 Storage space and scan time
Resolution Storage Space, Mb, 16-bit
Storage Space, Mb, 20-bit
Scan Time, min.
2-micron single pass 1300 1600 24
3-micron single pass 620 760 16
5-micron single pass 200 300 10
10-micron single pass 52 115 10
2-micron double pass 1300 1600 46
SureScan Dx System User Guide

Reference 6 Scan Protocol Editor dialog box
SureScan Dx System User Guide
Double pass scans do not require more storage space than single pass scans, but they take twice as long to finish.
3-micron double pass 620 760 31
5-micron double pass 200 300 19
2-micron high-sensitivity 1300 1600 36
3-micron high-sensitivity 620 760 24
5-micron high-sensitivity 200 300 15
10-micron high-sensitivity 52 115 15
Table 12 Storage space and scan time (continued)
Resolution Storage Space, Mb, 16-bit
Storage Space, Mb, 20-bit
Scan Time, min.
Red PMT Sensitivity (%)
and Green PMT
Sensitivity (%)
Sets the sensitivity level of the red channel and green channel PMTs. The PMT detects fluorescence emitted by the microarray.
The default output level (100%) sets the gain to the factory-calibrated level; this setting is recommended for Agilent microarrays. You can reduce each color channel setting independently to as low as 1%.
If a microarray is so bright that the upper end of the output signal is saturated, the PMT sensitivity level can be lowered to a sensitivity range that allows all the information to be read.
XDR Ratio
Before 20-bit TIFF file dynamic range was available, the eXtended Dynamic Range function was used to capture all the data scanned between very low signal features and very high signal features. Now, instead of using XDR, you can select the 20-bit TIFF file dynamic range to capture the wide dynamic range of data. With the XDR function, the scanner scans the slide twice to extend the dynamic range, taking longer to complete the scan. The 20-bit TIFF function extends the dynamic range with a single scan, making it the faster option.If 20-bit option is selected, no XDR option is allowed.
NOTE109

110
6 Reference Scan Protocol Editor dialog box
Image Settings
Transform Image
Some analysis programs require data from one-color images rotated 90 degrees. If you select Flip/Rotate, the image is transformed as shown in Figure 28.
Figure 28 Image with Flip/Rotate option set
Split
When you select Yes, the color file is split into two color files. The split files now have the names of FileName_green and FileName_red, where FileName is the name that was automatically assigned to the file before it was split.This option is available only for 16-bit TIFF dynamic range scans.
If a single dye channel, 20-bit scan, or any XDR option is selected, no Split
NOTEoption is allowed; if the Split option is selected already, it is reset automatically.Compress
When you select Yes, the program reduces the final amount of storage space occupied by scan images by compressing the TIFF files. The compression algorithm used, LZW, reduces the storage space by 20 to 70 percent.File Naming Settings
Field 1, Field 2, and Field 3
Displays the settings used for naming TIFF image files created by the scanner. Choices are shown in Table 13.
SureScan Dx System User Guide

Reference 6 Scan Protocol Editor dialog box
SureScan Dx System User Guide
Scan files are named using the following rules.
Table 13 Choices for file naming fields
Choice Description
<none> The field is not included in the image file name.
Instrument SN Includes the serial number of the scanner in the image file name.
Slide ID Includes the slide identification number (barcode) in the image file name.
Scan DateTime Includes the date and time of the scan in the image file name.
Customize Lets you type custom information to include in the image file name. After you select Customize, double-click Field X. (Where X = the field number 1, 2, or 3.) In the adjacent box, type the custom information to include in the file name.
For standard scans, the Scan Control program uses up to three user-defined name prefixes to compose the file name. These prefixes are defined in the scan protocol.
Field1_Field2_Field3_ScanNumber.tif
For XDR scans, an additional segment (either _H or _L) is added to the file name to distinguish the XDR Hi image from the XDR Lo image:
Field1_Field2_Field3_ScanNumber_H.tif Field1_Field2_Field3_ScanNumber_L.tif
The Scan Control program automatically assigns the Scan Number.
The program compares the file name of a new scan with file names in the selected data folder.
111

112
6 Reference Scan Protocol Editor dialog box
If Field1_Field2_Field3 is unique, the scan number is set to S01.
If a match is found, the scan number is increased until the file name is unique.
Example
US4510PP02_251485023883_S03.tif
• Instrument Serial # = US4510PP02
• Slide ID = 251485023883
• ScanNumber = S03. Indicates the third scan file in the folder with the same Instrument Serial # and Slide ID.
Image File Info
This section is a read-only area that displays information about the image file name, geometry of the slide, disk space required for the file, and estimated time to finish the scan.
SureScan Dx System User Guide

Reference 6 Scan Region Editor dialog box
Scan Region Editor dialog box
SureScan Dx System User Guide
Figure 29 Scan Region Editor dialog box
Purpose: Lets you adjust or define the area of the slide that is scanned.
To open: In the Scan Control program menu bar, click Tools > Scan Region Editor.
113

114
6 Reference Scan Region Editor dialog box
General
Agilent Defined
A protocol provided by Agilent.Locked
When a protocol is locked, it cannot be changed.Scan Region
TopLeft X
X-axis dimension for the upper left corner. Type this dimension and that of the Y-axis in mm to position the region on the slide.TopLeft Y
Y-axis dimension for the upper left corner.Width
Width of the scan region measured from the end of the x-axis dimension in the upper left corner.Height
Height of the scan region measured from the end of the Y-axis dimension in the upper left corner.Chip Package
A chip package describes the maximum size of the scan region for slides of a designated type. This read-only area displays the default scan region for the selected chip package. There are two types of chip packages; Full Agilent for Agilent slides with barcode labels, and Full Standard for slides without barcode labels.
Save
Saves the current scan region values in the current slide scan region. This button is unavailable if the scan region is an Agilent defined scan region or if it is used in an existing scan protocol.Save As
Opens the Save As New Name dialog box, where you can save the current scan region with a new name.Remove
Removes the selected scan region. This button is unavailable if the scan region is an Agilent defined scan region or if it is used in an existing scan protocol.Import
Opens the Open dialog box, where you select an exported scan region file to import to the program.Export
Opens the Export Scan Region dialog box, where you select one or more scan regions to export.Close
Closes the dialog box.SureScan Dx System User Guide

Reference 6 Self Test dialog box
Self Test dialog box
SureScan Dx System User Guide
Figure 30 Self Test dialog box
Purpose: Examines various scanner subsystems to check for out-of-specification behavior. After the self test is finished, a summary of the results is opened in your internet browser. The test results are also saved in the C:\ProgramData\Agilent\MicroArrayScanner\SelfTestReport folder.
To open: In the Scan Control program menu bar, click Tools > Self Test.
Start/Stop
Starts or stops the self test.Show Last Results
If more than one self test was run without closing this dialog box, this command opens your internet browser with the results.
Close
Closes the Self Test dialog box and reinitializes the scanner.115

116
6 Reference Self Test dialog box
If an Evaluate message appears:
NOTE• Make sure the latest version of the Scan Control software is installed.• Close the Scan Control program.
• Turn off and restart the scanner.
• Start the Scan Control program and run the self test again. Refer to “To run a self test” on page 61 for required conditions.
If an Evaluate message continues to appear, contact Agilent technical support for scanner service.
The self test does not directly measure the scanner measurement performance. The QC metrics in the Agilent Feature Extraction program are derived directly from the image data and indicate the scanning quality and general assay quality. These metrics can be used to verify quality of scans performed before and after the self test reported an Evaluate message. Technical support can assist with this determination.
SureScan Dx System User Guide

Reference 6 Settings dialog box – General Settings
Settings dialog box – General Settings
SureScan Dx System User Guide
Figure 31 Settings dialog box – General Settings tab
Browse
For settings that require a folder location, lets you browse to the folder and select it, rather than typing the path.Save
Saves the settings. If you change settings and want to save them, select this button before you close the dialog box.Close
Closes the dialog box without saving changes.Timeouts
Laser Saver Delay
When no scan or scan queue is running, the lasers automatically turn off after this amount of time (1 to 100 minutes).
117

118
6 Reference Settings dialog box – General Settings
Data
Default Scan Data Folder
Displays the folder where images created by the scanner are stored by default. You can change this folder for a scan in the Scan Table.
Feature Extraction
Location of Feature Extraction executable
The folder where the Feature Extraction software is installed.
Run Feature Extraction after scan is complete
When set to No, the Feature Extraction software does not automatically initiate after a scan is complete. Change to Yes if you want each scan to be automatically processed.
User Guide Preference
Preferred User Guide
Select the user guide that you want to open when accessed from the Help menu in the Scan Control program.
SureScan Dx System User Guide

Reference 6 Settings dialog box – Design To Protocol Mapping
Settings dialog box – Design To Protocol Mapping
SureScan Dx System User Guide
Figure 32 Settings dialog box - Design To Protocol Mapping tab
Purpose: Used to assign default scan protocols to microarray slide Design IDs. Whenever the scanner recognizes a slide that has a scan protocol mapped to its design, the program automatically fills in the mapped scan protocol in the Slot Table.
To open: In the Scan Control program menu bar, click Tools > Settings and then click Design To Protocol Mapping.
Design ID
For Agilent microarray slides, you can determine the Design ID from the barcode. All barcodes start with 25; the next five digits represent the Design ID. For example, the Design ID for barcode 251727810298 is 17278.119
6 Reference Settings dialog box – Design To Protocol Mapping
Scan Protocol
120
The scan protocol that is assigned to the Design ID. This scan protocol is automatically assigned in the Slot Table whenever the scanner recognizes a slide with the associated Design ID.
Description
An area where you can type information about the mapped scan protocol.SureScan Dx System User Guide

Reference 6 Settings dialog box – Design To Protocol Mapping
About Adding Slides
SureScan Dx System User Guide
You can add slides to the SureScan Dx Microarray Scanner even when it is scanning. Use the following guidelines when adding slides to the scanner.
• You can add slides (in slide holders) to the cassette even when scanning is in process. If a slide is actively loading or unloading, you cannot open the door. Wait approximately 30 seconds for the loading or unloading process to finish.
• When the door is open, the scanner waits to eject a slide that is currently scanning.
• If the door is left open with no activity for 5 minutes after the current scan completes, a message appears to warn you that the door is about to close, and then the door closes automatically.
• If you place a slide into the slot for a slide that is currently scanning (as indicated by the flashing green slot status indicator), the slot status indicator turns red, and a message appears instructing you to remove the slide.
• If the door jams while closing (due to an incorrectly inserted slide holder, for example) a dialog is displayed that asks you to clear the jam and then click OK to try again.
121

6 Reference Settings dialog box – Design To Protocol Mapping
SureScan Dx Scanner Specifications
Approximate dimensions
122
Height: 42 cm (16.5 in)
Width: 43 cm (17 in)
Depth: 67 cm (26 in)
Weight
56.8 kg (125 lbs)Power input
100–240 Vac, 50–60 Hz, 250 VA max.Fuses
Two power supply fuses: T4A, 250 VAC (part# 2110-1491)Temperature range
Operating: 15 ° to 30 °C
Storage: –40 ° to +50 °C
Humidity
Operating: 15% to 85% RH at 30 °CPotentially sensitive to condensing humidity conditions. Follow precautions stated in “Tips to avoid damage to the scanner” on page 67. Always allow 12 hours thermal equilibration time on site before opening the shipping box.
Altitude
Operating maximum: 2,300 m (7,500 ft)Storage maximum: 9,200 m (30,000 ft) at –40 °C
Usage
Indoor useLaser information
Wavelengths:
• Green solid-state laser: 532 nm
• Red solid-state laser: 640 nm
Power: 20 mW at 532 and 640 nm, both controlled to 13 mW
Maximum scan region
71 mm × 21.6 mm
Suggested microarray
print region
1 mm smaller than scan region on the right, 2 mm on the left, and 0.6 mm on the top and bottom.
Dyes supported
Cyanine-3 (Cy-3) and cyanine-5 (Cy-5) and dyes similar to Cy-3 and Cy-5 and Alexa 647, 555, and 660 dyesSureScan Dx System User Guide

Reference 6 Settings dialog box – Design To Protocol Mapping
Resolution (pixel size)
SureScan Dx System User Guide
2, 3, 5 or 10 microns
Pixel placement error
1 pixel at 5-micron resolution
Uniformity
Average Global non-uniformity: ≤ 5% using 100 μm2 featuresAverage Local non-uniformity: ≤ 2% using 100 μm2 features*
PMT adjustment
Automatic PMT gain calibration before each run; allows adjustment of signal levels from 100% (default) to 1%Detection limit
0.01 chromophores per square micronGlass dimensions supported
Width: 24.95 mm to 26.1 mm Length: 74.8 mm to 76.45 mm Thickness: 0.9 mm to 1.1 mmScan time
*Typical average Local non-uniformity is ≤ 1% using 100 μm2 features
Table 14 Scan Time for Single and Double Pass Scans for Agilent HD Scan Region 61 × 21.6 mm
Resolution Scan Time, min.
2-micron single pass 24
3-micron single pass 16
5-micron single pass 10
10-micron single pass 10
2-micron double pass 46
3-micron double pass 31
5-micron double pass 19
2-micron high-sensitivity 36
3-micron high-sensitivity 24
5-micron high-sensitivity 15
10-micron high-sensitivity 15
123

6 Reference Settings dialog box – Design To Protocol Mapping
Dynamic AutoFocus
124
Continually adjusts scanner’s focus to keep features in focus
Dynamic range
Single scan 16-bit dynamic range >104Single scan 20-bit dynamic range >105
Dual scan extended dynamic range (XDR) >106
Autoloader
24-slide cassetteIntegrated Barcode Reader
Reads code 128 (A,B,C), Code 39, Code 93, and CODABARPrecision/ Reproducibility:
Non-clinical bench testing was performed to validate the suitability of the SureScan Dx Microarray Scanner to measure fluorescence signals of labeled DNA and RNA target hybridized to microarrays. Testing was performed on a representative cohort of microarrays across multiple operators and multiple instruments.
Two classes of biological microarrays were run as part of the representative cohort, Gene Expression Microarrays (RNA) and CGH+SNP Microarrays (DNA). Testing was performed across 24 discrete sampling points using two operators and three instruments.
Data was collected from each scan of the cohort yielding 96 CHG+SNP microarray measurements and 192 GE microarray measurements.
For the GE cohort, the total precision of the signal intensity was estimated using a general nested analysis of variance.
A subset of the 10 × 35 E1A spike-in control probes (in vitro synthesized, polyadenylated transcripts) that were detectable in all the scans were used in the gene expression microarray analysis of the signal intensity.
With 10 probes being used, the number of results expected was 134,400 (2 slides × 10 probes × 35 replicates × 8 arrays × 4 days × 6 times).
The acceptance criteria were that the upper bound of the 1-sided 95% confidence interval on the coefficient of variation using the total standard deviation from the model must be less than 15%.
SureScan Dx System User Guide

Reference 6 Settings dialog box – Design To Protocol Mapping
SureScan Dx System User Guide
For the CGH+SNP cohort, the components of variance that pertain to multiple operators, scanners, slides, days, arrays and probes, were assessed using a general nested analysis of variance on the data.
The six-hundred (600) probes that are replicated were used in the CGH+SNP microarray analysis of the log-ratios. The number of results expected was 576,000 (2 slides × 600 probes × 5 replicates × 4 arrays × 4 days × 6 times).
The acceptance criterion was set that the upper bound of a 1-sided 95% confidence interval of the sum of the standard deviations from the model associated with the scanner, operator and day components must be less than 0.06.
Table 15 Gene expression analysis of the signal intensity
GE Signals N Mean Upper bound of 1-sided 95% CI of CV using McKay’s Procedure
gBG Sub Signal 134,400 3.19 4.32
rBG Sub Signal 134,400 3.09 4.82
125

126
6 Reference Settings dialog box – Design To Protocol Mapping
lysis of the log-ratios
1 Degrees of freedom are estimated using Welch-Satterthwaite's equation for combining independent sample variances.2 Upper bound of a 1-sided 95% confidence interval of the standard deviation using a Chi-square procedure.
Table 16 CGH+SNP microarray ana
Component Variance Component Estimate Std Dev df1 1-sided 95% CI2
Day 1.896e-6 0.00138 3
Scanner 2.037e-7 0.00045 2
Operator 0 0 1
Day × Scanner 1.267e-7 0.00036 6
Day × Operator 2.844e-9 0.00005 3
Scanner × Operator 1.789e-9 0.00004 2
Residual 0.000819 0.0286 570,007
Sum of Day, Operator, and Scanner 2.10e-6 0.00145 4 0.0042
Sum of Day, Operator, and Scanner, and Residual
0.000821 0.0287 281,446 0.03
Instrument Uniformity was assessed across a population of 106 instruments using a chemically coated uniformity chip. The chip was divided into a set of O(145,000) virtual features. Each virtual feature was 100 µm2. Both local and global uniformity were assessed.
Each virtual feature was assigned an independent red and green signal level value, based upon the mean signal level of the 400 pixels that comprise the virtual feature.
The signal level values of each virtual feature were stored as arrays of positional data, and used to compute the global and local uniformity metrics for the scanner under test.
SureScan Dx System User Guide

Reference 6 Settings dialog box – Design To Protocol Mapping
SureScan Dx System User Guide
lysis (across 106 instruments)
Table 17 Instrument uniformity anaPerformance Specification Spec Min Max Mean Median STDEV
Red Global Uniformity Ratio (%) ≤ 5% 1.60% 4.20% 2.95% 2.90% 0.0056
Red Local Uniformity Ratio (%) ≤ 2% 0.40% 1.50% 0.85% 0.70% 0.0026
Green Global Uniformity Ratio (%) ≤ 5% 1.90% 4.90% 3.43% 3.40% 0.0069
Green Local Uniformity Ratio (%) ≤ 2% 0.30% 1.70% 0.73% 0.50% 0.0044
127

6 Reference Scan dimensions
Slide Specifications
Scan dimensions
128
The scan region for a standard Agilent microarray is specified in Figure 33. All dimensions are in millimeters and the reference point is the lower right side of the glass.
Figure 33 Default scan region for G5761A scanner
Glass specifications
Bar
code
Lab
el
Scan Region
4.0
61.0
1.9
21.6
4.2
25.4 + 0.7 or -0.45
76.2 +0.25 -1.4
1.0
The SureScan Dx Microarray Scanner uses slide holders to move the microarrays in and out of the cassette. These slide holders are designed to accept a 25.4 mm × 76.2 mm nominal piece of glass.
The detailed specifications of the glass are as follows:
• 25.4 mm (–0.45 mm, or +0.7 mm)
• 76.2 mm (+0.25 mm, or –1.4 mm)
• 1 mm thick (+/-0.1 mm)
• No mirrored slides
• High quality with low intrinsic fluorescence
• Index of refraction from 1.510 to 1.515
SureScan Dx System User Guide

Reference 6 Barcode and barcode label specifications
Barcode and barcode label specifications
SureScan Dx System User Guide
Barcode specifications for Agilent slides
The G5761A scanner reads barcodes placed on the active side of the slide.
For backwards compatibility with the G2565AA model scanners, Agilent microarrays continue to have barcodes on both sides. The label with the text “Agilent” denotes the active side; the label with the numeric value is the inactive side.
Figure 34 Agilent slide barcode orientation vs. microarray surface
129

6 Reference Barcode and barcode label specifications
Regulatory Information
130
This section lists regulatory information for the SureScan Dx system, which includes the G5761A SureScan Dx microarray scanner, computer workstation, and control software.
Acoustic noise information
Manufacturer’s Declaration:
English
This statement is provided to comply with the requirements of the German Sound Emission Directive, from 18 January 1991. Sound Pressure Lp < 70 dB(A), at operator’s position, normal operation, according to EN 27779/ISO 7779 (Type Test).Deutsch
Die folgende Information wird in Übereinstimmung mit den Anforderungen der Maschinenlärminformationsverordnung vom 18. Januar 1991 erteilt. Schalldruckpegel am Arbeisplatz bei normalem Betrieb, Lp < 70 dB(A), nach EN 27779/ISO 7779 (Typprüfung).Recycling and disposal
Contact Agilent Technologies for more information on recycling and disposal.
This device is designed to accommodate recycling at the end of its useful life. Please dispose of this device in accordance with local regulations.
Electromagnetic interference
The scanner is intended for use with shielded cables only.
Emissions
Complies with the emissions limits for Class A, Group 1 equipment specified in CISPR 11/EN5011 as required in IEC 61326-1 for Class A equipment. This equipment is not intended for use in residential areas.Immunity
This device complies with the immunity levels required in IEC 61326-2-6 for a non-controlled, electromagnetic environment. This equipment is not intended for use in residential or industrial environment. See accompanying Declaration of Conformity for specific levels.SureScan Dx System User Guide

Reference 6 Barcode and barcode label specifications
Canada
SureScan Dx System User Guide
This ISM (Industrial-Scientific-Medical) device complies with Canadian ICES-001.
Cet appareil ISM est conforme a la norme NMB-001 du Canada.
Australia/ New Zealand
This ISM (Industrial-Scientific-Medical) device complies with AS/NZS CISPR 11.
Safety information
CAUTION If the SureScan Dx system is used in a manner not specified by Agilent, the protection provided by the equipment may be impaired.
This scanner complies with the following safety standards:
CAN/CSA-. C22.2
No. 61010-1 - 04
Safety Requirements for Electrical Equipment for Measurement, Control, and Laboratory Use, Part 1: General Requirements
UL Std No. 61010-1 (2nd Edition)
Safety Requirements for Electrical Equipment for Measurement, Control, and Laboratory Use: Part 1: General Requirements
IEC 61010-1:2001 Safety Requirements for Electrical Equipment for Measurement, Control, and Laboratory Use, Part 1: General Requirements
IEC 61010-2-101:2002 Safety Requirements for Electrical Equipment for Measurement, Control, and Laboratory Use – Part 2-101: Particular Requirements for In Vitro Diagnostic (IVD) Medical Equipment
EN 61010-1:2001 Safety Requirements for Electrical Equipment for Measurement, Control, and Laboratory Use – Part 1: General Requirements
131

132
6 Reference Barcode and barcode label specifications
• Pollution Degree: 2
• Installation Category: II
• Class I Equipment; requires a grounding system
• Class 1 Laser Product
• CSA and NRTL Certified Product
EN 61010-2-101:2002 Safety Requirements for Electrical Equipment for Measurement, Control, and Laboratory Use – Part 2-101: Particular Requirements for In Vitro Diagnostic (IVD) Medical Equipment
RoHS Directive 2011/65/EU —
EN 50581:2012 Technical Documentation for the Assessment of Electrical and Electronic Products With Respect to the Restriction of Hazardous Substances
SureScan Dx System User Guide
133Agilent Technologies
SureScan Dx Microarray Scanner System User Guide
7Basic Instructions for Use (multilingual)
English instructions 134Инструкции на български 144Základní pokyny 155Upute na hrvatskom jeziku 166Grundlæggende brugsanvisning 177Les instructions de base pour l'utilisation 188Οδηγίες στα Ελληνικά 199Grundlegende Hinweise für den Einsatz 210Istruzioni di base per l'uso 222Norādes latviešu valodā 233Instrukcijos lietuvių kalba 244Instrukcje w języku polskim 255Instruções em Português 266Instrucţiuni în limba română 277Slovenské pokyny 288Navodila v angleščini 299Instrucciones básicas para el uso 310Grundläggande instruktioner för användning 321Türk talimatlar 332Suomenkieliset käyttöohjeet 343
This chapter provides the minimal Instructions For Use in multiple languages.

134 SureScan Dx System User Guide
7 Basic Instructions for Use (multilingual) Safety guidelines
English instructions
Safety guidelinesThe SureScan Dx scanner is designed for safety and ease of use. Be sure that you understand and observe all the warnings and cautions before operating the SureScan Dx scanner.
Humidity conditionsThe SureScan Dx scanner is sensitive to condensing humidity conditions. Always allow 12 hours thermal equilibration time on site before opening the shipping box.
To ensure optimal performance, operate the SureScan Dx scanner only in the following humidity range.
Operating: 15% to 85% RH at 30 °C
WARNING Do not attempt to repair or gain access to SureScan Dx scanner internal components. You risk exposure to high voltage and harmful laser radiation. Removing the main cover voids the warranty.
WARNING Connect the SureScan Dx scanner to a grounded power outlet. It relies on a protective earth ground for safety.
CAUTIONCAUTION In order to minimize vibration due to the rapid scanning of the laser excitation across the microarray, install the scanner on a sturdy lab bench or table. Do not install the scanner in proximity to other lab equipment that might cause vibration.
CAUTIONCAUTION The SureScan Dx scanner is sensitive to condensing humidity conditions. Follow precautions stated in product documentation. See “Humidity conditions” on page 134.

Basic Instructions for Use (multilingual) 7 Operating instructions
SureScan Dx System User Guide 135
Operating instructionsStep 1. Turn on the SureScan Dx Microarray Scanner and start the Scan Control program
1 Turn on the SureScan Dx scanner using the power switch on the front of the instrument
2 Turn on the computer workstation and wait for it to boot up.
3 Double-click the Agilent Microarray Scan Control icon to start the Scan Control program.
Figure 35 Agilent Microarray Scan Control icon
When the program starts, the Agilent Microarray Scan Control program main window opens and the scanner performs its initialization sequence. After the initialization sequence finishes, the Open Door button is enabled and you can load slides. See Figure 36 on page 136.
143
NOTE If the scanner has 24 slides loaded when you turn it on, the initialization will fail because it cannot perform the slide eject cycle.
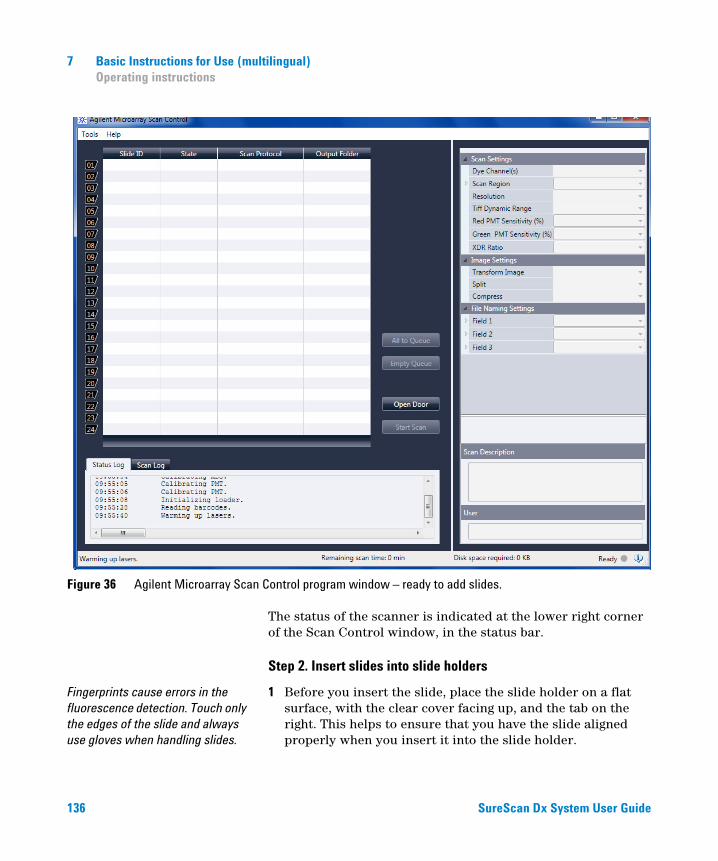
136 SureScan Dx System User Guide
7 Basic Instructions for Use (multilingual) Operating instructions
Figure 36 Agilent Microarray Scan Control program window – ready to add slides.
The status of the scanner is indicated at the lower right corner of the Scan Control window, in the status bar.
Step 2. Insert slides into slide holders
Fingerprints cause errors in the fluorescence detection. Touch only the edges of the slide and always use gloves when handling slides.
1 Before you insert the slide, place the slide holder on a flat surface, with the clear cover facing up, and the tab on the right. This helps to ensure that you have the slide aligned properly when you insert it into the slide holder.

Basic Instructions for Use (multilingual) 7 Operating instructions
SureScan Dx System User Guide 137
2 Gently push in and pull up on the tabbed end of the clear plastic cover to open it.
Figure 37 Opening the slide holder
3 Insert the slide into the holder, as follows:
a Hold the slide at the barcode end.
b Make sure that the active microarray surface faces up, toward the slide cover, with the barcode on the left.
c Carefully place the end of the slide without the barcode label onto the slide ledge. See Figure 38.
d Gently lower the slide into the slide holder. See Figure 39.
e Close the plastic slide cover, pushing on the tab end until you hear it “click”. This moves the slide into position in the holder.
f Gently push in and pull up on the tabbed end of the clear plastic cover to open it again and verify that the slide is correctly positioned.
Once inserted, the slide lies flat and matches up with the alignment points on the slide holder.
g Close the plastic slide cover, pushing on the tab end until you hear it “click”. See Figure 40.
CAUTIONCAUTION Do not push in the tab any further than is needed to unlatch the cover. Doing so may damage the slide holder and prevent proper latching.
Do not use damaged slide holders as they may get stuck inside the scanner.

138 SureScan Dx System User Guide
7 Basic Instructions for Use (multilingual) Operating instructions
Figure 38 Inserting slide into the slide holder
Figure 39 Slide inserted in slide holder
CAUTIONCAUTION If the tab on the plastic slide cover is over-stretched, it may not properly “click” into place. Dispose of slide holders that no longer click when you close them.
CAUTIONCAUTION When properly closed, the top of the tab is flush with the surface of the base or below the surface of the base. If it is not, do not use the slide holder as the tab may be damaged.
Slide ledge

Basic Instructions for Use (multilingual) 7 Operating instructions
SureScan Dx System User Guide 139
Figure 40 Slide holder – closed with slide
Agilent slides have two barcodes, one on each side of the glass. See Figure 41. Place the active microarray side of the slide facing toward the slide holder cover.
Figure 41 Slide orientation
CAUTIONCAUTION An improperly inserted slide can damage the SureScan Dx scanner.
A damaged slider holder or improperly closed slide holder can get stuck in the scanner.

140 SureScan Dx System User Guide
7 Basic Instructions for Use (multilingual) Operating instructions
Step 3. Load the slide holders into the cassette
1 In the Scan Control program window, click Open Door to open the scanner door.
2 Pick up the slide holder using the finger-hold. The arrow on top of the slide holder points to the left when you pick up the slide holder correctly. See Figure 42.
Figure 42 Slide holder helps you to insert slides correctly
Insert a slide holder into any open slot. The slot numbers are clearly labeled on the slide cassette. Do not force the slide holder into the cassette; it inserts easily if properly aligned with the finger-hold on top and the arrow facing to the left.
CAUTIONCAUTION The correct way to open the scanner door is using the Open Door button in the Scan Control program. Do not attempt to open the door manually.
Arrow helps identifyscanner orientation
Finger-hold

Basic Instructions for Use (multilingual) 7 Operating instructions
SureScan Dx System User Guide 141
Figure 43 Inserting slide holder into cassette
3 Make sure that the slide holder is seated in the bottom of the cassette slot.
The slot number for the loaded slide blinks blue.
4 Repeat steps 2 through 3 until all slide holders are loaded in the cassette.
5 In the Scan Control program, click Close Door.
For slides that do not have a scan protocol mapped to their design, the scan protocol remains empty and the slot State remains “Present”. Assign a scan protocol, as described in “Step 4. Set or change protocol scan settings”.
CAUTIONCAUTION If there is resistance placing the slide holder into the cassette, the slider holder may not be properly closed or it may be damaged. Check the slide holder and close or replace it as needed.
CAUTIONCAUTION Improper placement of the slide holder in the cassette can result in severe damage to the SureScan Dx Microarray Scanner.

142 SureScan Dx System User Guide
7 Basic Instructions for Use (multilingual) Operating instructions
Step 4. Set or change protocol scan settings
The current scan protocol settings are displayed for each selected slide in the right pane of the Scan Control software main window.
The first time you set up to scan a slide, select a scan protocol to use.
• For each slide in the slot table, click the Scan Protocol and select a scan protocol to use for scanning the slide.
Agilent supplies eight preloaded protocols for your selection and use with Agilent high density (HD) microarrays and Agilent G3 microarrays.
AgilentHD_GX_2Color Agilent HD 2-color gene expression microarrays
AgilentHD_GX_1Color Agilent HD 1-color gene expression microarrays
AgilentG3_GX_2Color Agilent G3 2-color gene expression microarrays
AgilentG3_GX_1Color Agilent G3 1-color gene expression microarrays
AgilentHD_CGH Agilent HD CGH/CGH+SNP/CNV/ChIP microarrays
AgilentG3_CGH Agilent G3 CGH/CGH+SNP/CNV/ChIP microarrays
AgilentHD_miRNA Agilent HD miRNA microarrays
AgilentG3_miRNA Agilent G3 miRNA microarrays
Step 5. (Optional) Change the output folder
You can change the specified output folder where the program saves the image files created by the scanner.
• For each slide the slot table, click the Output Folder and browse to the location of the desired folder.
Agilent recommends selecting a local folder on a secondary hard drive.
Step 6. Add slides to the scan queue
1 In the Scan Control main window, click All to Queue to add all slides in the slot table with a State of “Ready for queue” to the scan queue.
A confirmation dialog box appears. Click Yes to add the slides to the queue.
OR
Basic Instructions for Use (multilingual) 7 Operating instructions
SureScan Dx System User Guide 143
In the Scan Control slot table, click the State cell for the first slide to scan and click Add to Queue.
2 For each additional slide you want to scan,
• Click the State cell and select Add to queue first to add the slide to the top of the scan queue.
OR
• Click the State cell and select Add to queue last to add the slide to the bottom of the scan queue.
If you need to remove all slides from the queue, click Empty Queue in the Scan Control main window.
Step 7. Scan your slides
1 If necessary, in the Scan Control main window, click Close Door.
Wait until the door closes and the Start Scan button is enabled.
2 In the Scan Control main window, click Start Scan to begin scanning the slides that were added to the queue.
Step 8. Remove the slides
1 In the Scan Control main window, click Open Door to open the scanner door.
2 Open the scanner door and remove the slide holders from the cassette.
3 Remove the slides from the slide holders, as follows:
a Hold the slide holder on the sides with the Agilent logo facing up.
b Gently push in and pull up on the tabbed end of the clear plastic cover to open it.
c Push up on the barcode end of the slide from underneath the slide holder to avoid fingerprints on the sample area.
d Grasp the slide from the sides and remove from the slide holder.

144 SureScan Dx System User Guide
7 Basic Instructions for Use (multilingual) Насоки за безопасност
Инструкции на български
Насоки за безопасностСкенерът SureScan Dx е конструиран за безопасна и лесна употреба. Уверете се, че разбирате и съблюдавате всички редупреждения, преди да използвате скенера SureScan Dx.
Условия на влагаСкенерът SureScan Dx е чувствителен към условия на кондензиране на влага. Винаги оставяйте 12 часа за установявае на термално равновесие в помещението, преди да отворите кутията с доставката.
ПРЕДУПРЕЖДЕНИЕ Не опитвайте да поправяте или да осъществявате контакт с вътрешните компоненти на скенера SureScan Dx. Рискувате да се изложите на високо напрежение или на опасно лазерно лъчение. Свалянето на основния капак анулира гаранцията.
ПРЕДУПРЕЖДЕНИЕ Свържете скенера SureScan Dx към заземен ел. контакт. Той разчита на защитно заземяване за безопасност.
ВНИМАНNЕ За да намалите вибрациите от бързото сканиране на лазерното възбуждане в микроматрицата, монтирайте скенера върху стабилна лабораторна поставка или маса. Не монтирайте скенера в близост до друго лабораторно оборудване, което може да причини вибрации.
ВНИМАНNЕ Скенерът SureScan Dx е чувствителен към условия на кондензиране на влага. Следвайте предпазните мерки, посочени в документацията на продукта. Вж. “Условия на влага” на страница 144.

Basic Instructions for Use (multilingual) 7 Инструкции за работа
SureScan Dx System User Guide 145
За да гарантирате оптимална производителност, работете със скенера SureScan Dx само в обхвата на влажност, посоен по-долу.
При работа: 15% до 85% RH при 30 °C
Инструкции за работаСтъпка 1. Включете SureScan Dx Microarray Scanner и стартирайте програмата Scan Control (Контрол на сканиране)1 Включете скенера SureScan Dx чрез ключа на
захранването в предната част на уреда.
2 Включете компютърната работна станция и я изчакайте да зареди.
3 Щракнете двукратно върху иконата Agilent Microarray Scan Control, за да стартирате програмата Scan Control (Контрол на сканиране).
Фигура 36 Икона Agilent Microarray Scan Control
Когато програмата се стартира, основният прозорец на програмата Agilent Microarray Scan Control се отваря и скенерът изплнява своята последователност за инициализация. След като последователността за инициализация завърши, бутонът Open Door (Отваряне на вратичка) ще стане достъпен и ще можете да заредите слайдове. Вж. Фигура 37 на страница 146.
ЗАБЕЛЕЖКА Ако в скенера има заредени 24 слайда, когато го включите, инициализацията ще бъде неуспешна, тъй като няма да може да осъществи цикъла за изваждане на слайдове.

146 SureScan Dx System User Guide
7 Basic Instructions for Use (multilingual) Инструкции за работа
Фигура 37 Прозорец на програмата Agilent Microarray Scan Control – готовност за добавяне на слайдове.
Състоянието на скенера се указва в долния десен ъгъл на прозореца на Scan Control (Контрол на сканиране) – в лентта на състоянието.
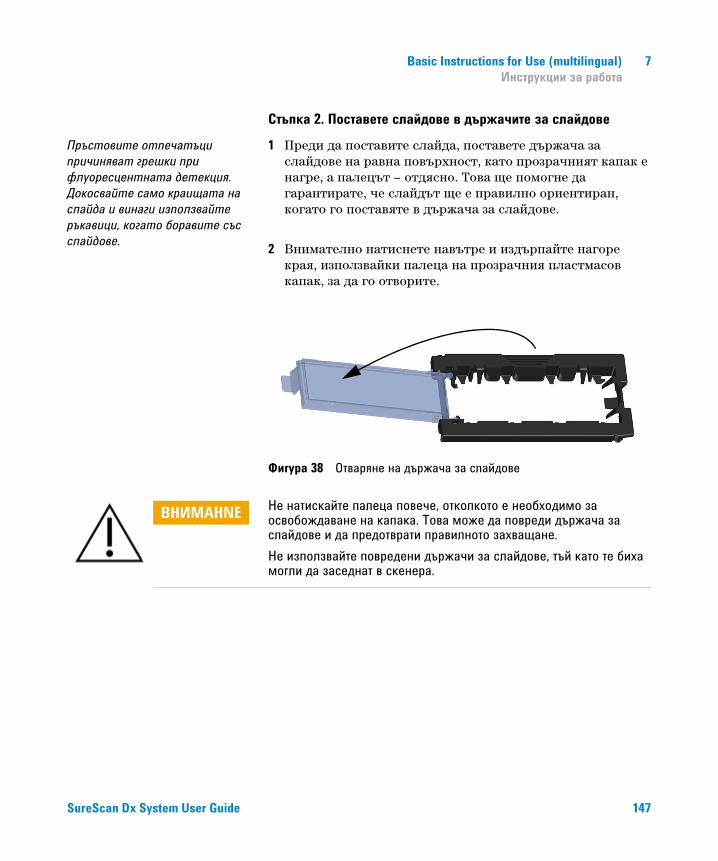
Basic Instructions for Use (multilingual) 7 Инструкции за работа
SureScan Dx System User Guide 147
Стъпка 2. Поставете слайдове в държачите за слайдовеПръстовите отпечатъци причиняват грешки при флуоресцентната детекция. Докосвайте само краищата на слайда и винаги използвайте ръкавици, когато боравите със слайдове.
1 Преди да поставите слайда, поставете държача за слайдове на равна повърхност, като прозрачният капак е нагре, а палецът – отдясно. Това ще помогне да гарантирате, че слайдът ще е правилно ориентиран, когато го поставяте в държача за слайдове.
2 Внимателно натиснете навътре и издърпайте нагоре края, използвайки палеца на прозрачния пластмасов капак, за да го отворите.
Фигура 38 Отваряне на държача за слайдове
ВНИМАНNЕ Не натискайте палеца повече, отколкото е необходимо за освобождаване на капака. Това може да повреди държача за слайдове и да предотврати правилното захващане. Не използвайте повредени държачи за слайдове, тъй като те биха могли да заседнат в скенера.

148 SureScan Dx System User Guide
7 Basic Instructions for Use (multilingual) Инструкции за работа
3 Поставете слайда в държача, както следва:
a Дръжте слайда в края откъм баркода.
b Уверете се, че повърхността с активната микроматрица е нагоре, към капака на слайда, като баркодът е вляво.
c Внимателно поставете края на слайда без етикета с баркод върху поличката за слайд. Вж. Фигура 39.
d Внимателно спуснете слайда в държача за слайдове. Вж. Фигура 40.
e Затворете пластмасовия капак за слайда, като натискате края с палеца, докато не чуете щракване. Това ще привижи слайда на точното място в държача.
f Внимателно натиснете навътре и издърпайте нагоре края, използвайки палеца на прозрачния пластмасов капак, за да го отворите отново, и проверете дали слайдът е правилно позициониран.
След като веднъж е поставен, слайдът лежи равно и е изравнен с точките за подравняване на държача за слайдое.
g Затворете пластмасовия капак за слайда, като натискате края с палеца, докато не чуете щракване. Вж. Фигура 41.
ВНИМАНNЕ Ако палецът на пластмасовия капак за слайда е прекомерно разпънат, е възможно да не щракне на правилното място. Изхвърляйте държачите за слайдове, при които не чувате щракване при затварянето им.
ВНИМАНNЕ При правилно затваряне горната част на палеца е на едно ниво с повърхността на базата или малко под нея. Ако случаят не е такъв, не използвайте държача за слайдове, тъй като палецът може да бъде повреден.

Basic Instructions for Use (multilingual) 7 Инструкции за работа
SureScan Dx System User Guide 149
Фигура 39 Поставяне на слайд в държача за слайдове
Фигура 40 Слайд, поставен в държача за слайдове
Фигура 41 Държач за слайдове – затворен със слайд
Поличка за слайд

150 SureScan Dx System User Guide
7 Basic Instructions for Use (multilingual) Инструкции за работа
Слайдовете на Agilent имат два баркода – по един от всяка страна на стъклото. Вж. Фигура 42. Поставете страната с активната микроматрица на слайда с лице към капака на държача за слайдове.
Фигура 42 Ориентация на слайда
Стъпка 3. Заредете държачите за слайдове в касетата1 В прозореца на програмата Scan Control (Контрол на
сканиране) щракнете върху Open Door (Отваряне на вратичка), за да отворите вратичката на скенера.
ВНИМАНNЕ Неправилно поставеният слайд може да повреди скенера SureScan Dx.Повреденият или неправилно затворен държач за слайдове може да заседне в скенера.
ВНИМАНNЕ Правилният начин за отваряне на вратичката на скенера е да използвате бутона Open Door (Отваряне на вратичка) в програмата Scan Control (Контрол на сканиране). Не опитвайте да отворите вратичката ръчно.

Basic Instructions for Use (multilingual) 7 Инструкции за работа
SureScan Dx System User Guide 151
2 Хванете държача за слайдове за оребрения участък. Стрелката отгоре на държача за слайдове сочи наляво, когто сте хванали правилно държача за слайдове. Вж. Фигура 43.
Фигура 43 Държачът за слайдове ви помага да поставите слайдовете правилно
Поставете държача за слайдове в който и да е празен слот. Номерата на слотовете са ясно посочени на касетат за слайдове. Не натискайте насила държача за слайдове в касетата; той се поставя лесно, ако е правилно подравнен с оребрения участък отгоре и стрелката – сочеща наляво.
Стрелката помага да определитеориентацията на скенера
Оребрен участък
ВНИМАНNЕ Ако усетите съпротивление при поставянето на държача на слайдове в касетата, е възможно той да е повреден или да не е затворен правилно. Проверете държача за слайдове и при нужда го затворете или сменете.

152 SureScan Dx System User Guide
7 Basic Instructions for Use (multilingual) Инструкции за работа
Фигура 44 Поставяне на държача за слайдове в касетата
3 Уверете се, че държачът за слайдове е разположен в дъното на слота на касетата.
Номерът на слота за заредения слайд мига в синьо.
4 Повторете стъпки от 2 до 3, докато всички държачи за слайдове са заредени в касетата.
5 В програмата Scan Control (Контрол на сканиране) щракнете върху Close Door (Затваряне на вратичка).
За слайдове, които към своя дизайн нямат присвоен протокол за сканиране, протоколът за сканиране остава прзен и състоянието на слота остава "Present" (Присъства). Назначете протокол за сканиране според описаното в “Стъпка 4. Задайте или променете настройките на протокол за сканиране”.
ВНИМАНNЕ Неправилното поставяне на държача за слайдове в касетата може да доведе до голяма повреда на SureScan Dx Microarray Scanner.

Basic Instructions for Use (multilingual) 7 Инструкции за работа
SureScan Dx System User Guide 153
Стъпка 4. Задайте или променете настройките на протокол за сканиране
Текущите настройки на протокола за сканиране са показани за всеки избран слайд в десния панел на основния розорец на софтуера Scan Control (Контрол на сканиране).
Първия път, когато извършвате настройка за сканиране на даден слайд, изберете протокол за сканиране, който да използвате.
• За всеки отделен слайд в таблицата за слотове щракнете върху Scan Protocol (Протокол за сканиране) и изберете дадн протокол за сканиране, който да използвате за сканирането на слайда.
Agilent предоставя осем предварително заредени протокола, от които да изберете и които да използвате с микромтриците с висока плътност Agilent high density (HD) и матриците Agilent G3.
AgilentHD_GX_2Color Agilent HD 2-цветни микроматрици за генна експресия
AgilentHD_GX_1Color Agilent HD 1-цветни микроматрици за генна експресия
AgilentG3_GX_2Color Agilent G3 2-цветни микроматрици за генна експресия
AgilentG3_GX_1Color Agilent G3 1-цветни микроматрици за генна експресия
AgilentHD_CGH Agilent HD CGH/CGH+SNP/CNV/ChIP микроматрици
AgilentG3_CGH Agilent G3 CGH/CGH+SNP/CNV/ChIP микроматрици
AgilentHD_miRNA Agilent HD miRNA микроматрици
AgilentG3_miRNA Agilent G3 miRNA микроматрици
Стъпка 5. (По избор) Променете изходната папкаМожете да промените указаната изходна папка, където програмата записва файловете с изображения, създадени от скенера.
• За всеки слайд в таблицата за слотове щракнете върху Output Folder (Изходна папка) и отидете до местоположението а желаната папка.
Agilent препоръчва да изберете локална папка на вторичен твърд диск.
Стъпка 6. Добавете слайдове към опашката за сканиране1 В основния прозорец на Scan Control (Контрол на
сканиране) щракнете върху All to Queue (Всички в опашката), за да добавите всички слайдове в таблицата за слотове със състояние "Ready for queue" (Готовнот за опашка) към опашката за сканиране.
Ще се покаже диалогов прозорец за потвърждение. Щракнете върху Yes (Да), за да добавите слайдовете към опашката.
ИЛИ

154 SureScan Dx System User Guide
7 Basic Instructions for Use (multilingual) Инструкции за работа
В таблицата за слотове на Scan Control (Контрол на сканиране) щракнете върху клетката State (Състояние) за първия слайд, който ще се сканира, след което щракнете върху Add to Queue (Добавяне към опашката).
2 За всеки допълнителен слайд, който искате да сканирате: • Щракнете върху клетката State (Състояние) и изберете
Add to queue first (Добавяне като първи към опашката), за да добавите слайда най-отгоре в опашката за сканиране.
ИЛИ • Щракнете върху клетката State (Състояние) и изберете
Add to queue last (Добавяне като последен към опашката), за да добавите слайда най-отдолу в опашката за сканиране.
Ако трябва да премахнете всички слайдове от опашката, щракнете върху Empty Queue (Изпразване на опашката) в основния прозорец на Scan Control (Контрол на сканиране).
Стъпка 7. Сканирайте слайдовете1 Ако е необходимо, в основния прозорец на Scan Control
(Контрол на сканиране) щракнете върху Close Door (Затваряне на вратичка).Изчакайте, докато вратичката се затвори и бутонът Start Scan (Старт на сканиране) се активира.
2 В основния прозорец на Scan Control (Контрол на сканиране) щракнете върху Start Scan (Старт на сканиране), за да започнете сканирането на слайдовете, които са добавени в опашката.
Стъпка 8. Премахнете слайдовете1 В основния прозорец на Scan Control (Контрол на
сканиране) щракнете върху Open Door (Отваряне на вратичка), за да отворите вратичката на скенера.
2 Отворете вратичката на скенера и извадете държачите за слайдове от касетата.
3 Извадете слайдовете от държачите за слайдове, както следва:a Хванете държача за слайдове отстрани, като логото
Agilent е нагоре.b Внимателно натиснете навътре и издърпайте нагоре
края, използвайки палеца на прозрачния пластмасов капак, за да го отворите.
c Бутнете нагоре края с баркода на слайда от долната страна на държача за слайдове, за да не оставите пръстов отпечатъци върху областта на пробата.
d Хванете слайда за страните и го извадете от държача за слайдове.

Basic Instructions for Use (multilingual) 7 Bezpečnostní pokyny
SureScan Dx System User Guide 155
Základní pokyny
Bezpečnostní pokynySkener je konstruovaný tak, aby byl bezpečný a snadno použitelný. Před použitím skeneru SureScan Dx se ujistěte, že správně rozumíte všem varováním a upozorněním a že je dodržujete.
Hladina vlhkosti ovzdušíSkener SureScan Dx je citlivý na podmínky, při nichž dochází ke kondenzaci vzdušné vlhkosti. Přepravní krabici nechte vždy stát na místě určení po dobu 12 hodin pro dosažení vyrovnání teplot.
VAROVÁNÍ Nepokoušejte se opravit nebo získat přístup k vnitřním součástkám skeneru SureScan Dx. Vystavujete se riziku zasažení vysokým napětím a škodlivým laserovým zářením. Odstraněnm hlavního krytu pozbývá záruka platnosti.
VAROVÁNÍ Připojte skener SureScan Dx k uzemněné elektrické zásuvce. Tím bude zajištěna bezpečnost.
UPOZORNĚNÍUPOZORNĚNÍ Za účelem minimalizace vibrací vznikajících díky rychlému snímání laserového buzení prostřednictvím mikročipu, instalujte skener na stabilní laboratorní lavici nebo stůl. Neinstalujte skener v blízkosti jiného laboratorního vybavení, které by mohlo být zdrojem vibrací.
UPOZORNĚNÍUPOZORNĚNÍ Skener SureScan Dx je citlivý na podmínky, při nichž dochází ke kondenzaci vzdušné vlhkosti. Dodržujte opatření uvedená v dokumentaci produktu. Viz “Hladina vlhkosti ovzduší” na straně 155.
156 SureScan Dx System User Guide
7 Basic Instructions for Use (multilingual) Návod k obsluze
Pro dosažení optimálního výkonu pracujte se skenerem SureScan Dx pouze v následujícím rozsahu hladin vlhkosti ovzduší.
Provozní hodnoty: 15 % až 85 % RV při 30 °C
Návod k obsluzeKrok 1. Zapněte skener SureScan Dx Microarray a spusťte program Scan Control1 Zapněte skener SureScan Dx pomocí vypínače na přední
straně přístroje.
2 Zapněte počítač a počkejte, než dojde ke spuštění operačního systému.
3 Pro spuštění programu Scan Control dvakrát klikněte na ikonu Agilent Microarray Scan Control.
Obrázek 36 Ikona programu Agilent Microarray Scan Control
Jakmile se program spustí, otevře se hlavní okno programu Agilent Microarray Scan Control a skener provede inicializační sekvenci. Po ukončení inicializační sekvence dojde k aktivaci tlaítka Open Door (otevřít dvířka) a k umožnění vložení čipů. Viz Obrázek 37 na straně 157.
POZNÁMKA Je-li ve skeneru při jeho spuštění umístěno 24 čipů, inicializace neproběhne, protože nelze provést cyklus vysunutí čipu.

Basic Instructions for Use (multilingual) 7 Návod k obsluze
SureScan Dx System User Guide 157
Obrázek 37 Okno programu Agilent Microarray Scan Control – připraven pro vkládání čipů.
Stav skeneru je zobrazen v pravém dolním rohu okna programu Scan Control, ve stavovém řádku.
Krok 2. Vložte čipy do držákůOtisky prstů způsobují chybu fluorescenční detekce. Dotýkejte se pouze okrajů čipu a vždy používejte ochranné rukavice při manipulaci s čipy.
1 Před vložením čipu umístěte držák na rovný povrch průsvitným krytem směrem nahoru tak, aby byla západka umístěna vpravo. Tím dojde k zajištění správného zarovnání čipu při vložení do držáku.

158 SureScan Dx System User Guide
7 Basic Instructions for Use (multilingual) Návod k obsluze
2 Pro otevření držáku jemně zatlačte na západku a odklopte průsvitný plastový kryt.
Obrázek 38 Otevření držáku čipu
3 Vložte čip do držáku následujícím způsobem:
a Držte čip za okraj, kde je umístěn čárový kód.
b Ujistěte se, že aktivní povrch čipu směřuje nahoru ke krytu a že je čárový kód umístěný na levé straně.
c Opatrně umístěte okraj čipu bez čárového kódu na lištu držáku. Viz Obrázek 39.
d Opatrně spusťte čip do držáku. Viz Obrázek 40.
e Zavřete plastový kryt a zatlačte na západku, dokud neuslyšíte cvaknutí. Tím dosáhnete správného umístění čipu v držáku.
f Jemně zatlačte na západku, znovu odklopte průsvitný plastový kryt a ujistěte se, že je čip správně umístěn.
Po vložení leží čip na plocho a je zarovnán s kontrolními body na držáku.
g Zavřete plastový kryt a zatlačte na západku, dokud neuslyšíte cvaknutí. Viz Obrázek 41.
UPOZORNĚNÍUPOZORNĚNÍ Netlačte západku dále, než je potřeba k uvolnění krytu. Mohlo by to poškodit zásuvný držák a zabránit správnému zaháknutí. Nepoužívejte poškozené zásuvné držáky, protože by se mohly zaseknout uvnitř skeneru.

Basic Instructions for Use (multilingual) 7 Návod k obsluze
SureScan Dx System User Guide 159
Obrázek 39 Vložení čipu do držáku
Obrázek 40 Čip umístěn v držáku
UPOZORNĚNÍUPOZORNĚNÍ Je li západka plastového krytu opotřebovaná, nemusí správně zapadnout na své místo. Zlikvidujte všechny držáky, při jejichž zavření se již neozývá cvaknutí.
UPOZORNĚNÍUPOZORNĚNÍ Když je skener správně zavřený, horní část západky je vyrovnaná s povrchem základny nebo pod jejím povrchem. Pokud tomu tak není, nepoužívejte zásuvný držák, protože by se tím mohla západka poškodit.
Lišta pro čip

160 SureScan Dx System User Guide
7 Basic Instructions for Use (multilingual) Návod k obsluze
Obrázek 41 Držák čipu – zavřený, s čipem
Čipy Agilent mají dva čárové kódy, každý na jedné straně skla. Viz Obrázek 42. Umístěte aktivní povrch čipu tak, aby směřoval nahoru ke krytu.
Obrázek 42 Orientace čipu
UPOZORNĚNÍUPOZORNĚNÍ Nesprávně umístěný čip může poškodit skener SureScan Dx.Poškozený nebo nesprávně zavřený zásuvný držák se může zaseknout ve skeneru.

Basic Instructions for Use (multilingual) 7 Návod k obsluze
SureScan Dx System User Guide 161
Krok 3. Vložte držáky do zásobníku1 Pro otevření dvířek skeneru klikněte v okně programu Scan
Control na Open Door (otevřít dvířka).
2 Uchopte držák za vyznačený výčnělek a zvedněte jej. Zvednete-li držák čipy správně, šipka na jeho horní straně směřuje doleva. Viz Obrázek 43.
Obrázek 43 Držák pomáhá vložit čip správně
Vložte čip do libovolného otevřeného slotu. Čísla slotů jsou jasně označena na zásobníku. Nepoužívejte ke vložení držáku do zásobníku sílu. Je-li držák umístěn správně výčnělkem pro uchopení nahoru a šipkou směřující doleva, dojde ke snadnému vložení.
UPOZORNĚNÍUPOZORNĚNÍ Správný způsob, jak otevřít dvířka skeneru je použití tlačítka Open Door (otevřít dvířka) v programu Scan Control. Nepokoušejte se otevřít dvířka manuálně.
Šipka pomáhá identifikovatorientaci skeneru
Výčnělek určený pro uchopení držáku

162 SureScan Dx System User Guide
7 Basic Instructions for Use (multilingual) Návod k obsluze
Obrázek 44 Vložení čipu do zásobníku
3 Ujistěte se, že držák čipů sedí zcela ve spodní části slotu zásobníku.
Číslo slotu vloženého čipu bliká modře.
4 Opakujte kroky 2 a 3, dokud nejsou všechny držáky vloženy v zásobníku.
5 V programu Scan Control klikněte na Close Door (zavřít dvířka).
UPOZORNĚNÍUPOZORNĚNÍ Pokud při umísťování zásuvného držáku do kazety pociťujete odpor, nemusí být zásuvný držák správně zavřený nebo může být poškozený. Držák zkontrolujte a podle potřeby zavřete nebo vyměňte.
UPOZORNĚNÍUPOZORNĚNÍ Nesprávné umístění držáku v zásobníku může mít za následek vážné poškození skeneru SureScan Dx Microarray.

Basic Instructions for Use (multilingual) 7 Návod k obsluze
SureScan Dx System User Guide 163
U snímků, které nemají implementován skenovací protokol, zůstává tento prázdný a stav slotu zůstává na hodnotě „Present“ (dosavadní). Přiřaďte skenovací protokol tak, jak je popsáno v bodě “Krok 4. Nastavení nebo změna parametrů skenovacího protokolu”.
Krok 4. Nastavení nebo změna parametrů skenovacího protokoluAktuální nastavení parametrů skenovacího protokolu je zobrazeno pro každý vybraný čip v pravém podokně hlavního okna programu Scan Control.
Při prvním nastavení skenování čipu vyberte příslušný skenovací protokol.
• Pro výběr skenovacího protokolu pro každý čip v tabulce slotů klikněte na Scan Protokol a vyberte skenovací protokol pro skenování čipu.
Společnost Agilent dodává osm předinstalovaných protokolů, které lze zvolit a použít s čipy Agilent s vysokou hustotou (HD) a s čipy Agilent G3.
AgilentHD_GX_2Color Čipy Agilent HD 2-barevné zobrazení genu
AgilentHD_GX_1Color Čipy Agilent HD 1-barevné zobrazení genu
AgilentG3_GX_2Color čipy Agilent G3 2-barevné zobrazení genu
AgilentG3_GX_1Color Čipy Agilent G3 1-barevné zobrazení genu
AgilentHD_CGH Čipy Agilent HD CGH/CGH+SNP/CNV/ChIP
AgilentG3_CGH Čipy Agilent G3 CGH/CGH+SNP/CNV/ChIP
AgilentHD_miRNA Čipy Agilent HD miRNA
AgilentG3_miRNA Čipy Agilent G3 miRNA
Krok 5. (Volitelný) Změna výstupní složkyMůžete změnit výstupní složku, kam program ukládá obrazové soubory vytvořené skenerem.
• Pro určení požadované složky pro každý čip v tabulce slotů klikněte na Output Folder (výstupní složka) a vyberte složku.
Společnost Agilent doporučuje vybrat lokální složku na sekundárním pevném disku.

164 SureScan Dx System User Guide
7 Basic Instructions for Use (multilingual) Návod k obsluze
Krok 6. Přidání čipu do fronty ke skenování (sekvence)1 Pro přidání všech čipů se stavem „Ready for queue“
(připraven do fronty) uvedených v tabulce slotů do sekvence klikněte na All to Queue (všechny do fronty) v hlavním okně programu Scan Control.
Objeví se potvrzovací dialogové okno. Pro přidání čipů do fronty klikněte na Yes (Ano).
NEBO
V tabulce slotů v programu Scan Control klikněte na State (stav) pro první čip, který chcete skenovat a poté klikněte na Add to Queue (přidat do fronty).
2 Pro každý další čip, který chcete skenovat,
• klikněte na State (stav) a zvolte Add to queue first (přidat na začátek fronty) pro přidání čipu na začátek fronty.
NEBO
• Klikněte na State (stav) a zvolte Add to queue last (přidat na konec fronty) pro přidání čipu na konec fronty.
Je-li potřeba odebrat všechny čipy z fronty, klikněte v hlavním okně programu Scan Control na Empty Queue (prázdná fronta).
Krok 7. Provedení skenu vašich čipů1 Je-li to nutné, klikněte v hlavním okně programu Scan
Control na Close Door (zavřít dvířka).
Počkejte než dojde k zavření dvířek a k aktivaci tlačítka Start Scan (spustit sken).
2 Pro započetí skenování čipů, které byly přidané do fronty, klikněte v hlavním okně programu Scan Control na Start Scan (spustit sken).
Krok 8. Vyjmutí čipů1 Pro otevření dvířek skeneru klikněte v hlavním okně
programu Scan Control na Open Door (otevřít dvířka).
2 Otevřete dvířka skeneru a vyjměte držáky čipů ze zásobníku.

Basic Instructions for Use (multilingual) 7 Návod k obsluze
SureScan Dx System User Guide 165
3 Vyjměte čipy z držáků následujícím způsobem:
a Uchopte držák čipů po stranách tak, aby logo Agilent směřovalo nahoru.
b Pro otevření držáku jemně zatlačte na západku a odklopte průsvitný plastový kryt.
c Zvedněte čip na straně, kde je čárový kód. Proveďte tento úkon tak, aby se zabránilo vzniku otisku prstů na vzorku.
d Uchopte čip za strany a odstraňte jej z držáku.

166 SureScan Dx System User Guide
7 Basic Instructions for Use (multilingual) Sigurnosne smjernice
Upute na hrvatskom jeziku
Sigurnosne smjerniceSkener SureScan Dx dizajniran je za sigurnu i jednostavnu upotrebu. Svakako prije korištenja skenera SureScan Dx s razumijevanjem proučite sva upozorenja i mjere opreza.
VlagaSkener SureScan Dx osjetljiv je na kondenzaciju. Uvijek pričekajte 12 sati da se proizvod termički prilagodi lokaciji prije otvaranja kutije u kojoj je isporučen.
Da biste osigurali optimalne performanse skenera SureScan Dx, koristite ga samo unutar sljedećeg raspona vlažnosti zraka.
UPOZORENJE Ne pokušavajte popraviti ili pristupati internim komponentama skenera SureScan Dx. Tako se možete izložiti visokom naponu i štetnom laserskom zračenju. Ako uklonite glavni poklopac, jamstvo se poništava.
UPOZORENJE Priključite skener SureScan Dx u uzemljenu naponsku utičnicu. Sigurnost skenera ovisi o korištenju zaštitne utičnice s uzemljenjem.
OPREZ Da biste minimizirali vibracije uslijed brzog microarray skeniranja laserskom ekscitacijom, skener instalirajte na čvrstu laboratorijsku klupu ili stol. Ne postavljajte skener blizu druge laboratorijske opreme koja može uzrokovati vibracije.
OPREZ Skener SureScan Dx osjetljiv je na kondenzaciju. Slijedite mjere opreza navedene u dokumentaciji uz proizvod. Pogledajte odjeljak “Vlaga” na stranici 166.

Basic Instructions for Use (multilingual) 7 Upute za korištenje
SureScan Dx System User Guide 167
Rad: 15% do 85% relativne vlažnosti pri 30 °C
Upute za korištenje1. korak Uključite skener SureScan Dx i pokrenite program Scan Control1 Uključite skener SureScan Dx pomoću prekidača za
uključivanje/isključivanje na prednjoj strani instrumenta.
2 Uključite računalnu radnu stanicu i pričekajte da se pokrene.
3 Dvokliknite ikonu Agilent Microarray Scan Control da biste pokrenuli program Scan Control.
slika 36 Ikona Agilent Microarray Scan Control
Kada se program pokrene, otvara se glavni prozor programa Agilent Microarray Scan Control, a skener izvršava inicijalizaciju. Po dovršetku inicijalizacije omogućen je gumb Open Door (Otvori vrata) pa možete umetati slajdove. Pogledajte odjeljak slika 37 na stranici 168.
NAPOMENA Ako su u skener umetnuta 24 slajda kada ga uključite, inicijalizacija neće uspjeti jer skener ne može izvršiti ciklus izbacivanja slajdova.

168 SureScan Dx System User Guide
7 Basic Instructions for Use (multilingual) Upute za korištenje
slika 37 Prozor programa Agilent Microarray Scan Control – spreman za dodavanje slajdova.
Status skenera vidljiv je u donjem desnom kutu prozora Scan Control u traci stanja.
2. korak Umetnite slajdove u držače slajdovaOtisci prstiju uzrokuju pogreške pri detekciji fluorescencijom. Dodirujte samo rubove slajda i uvijek slajdovima rukujte u rukavicama.
1 Prije no što umetnete slajd, držač slajda postavite na ravnu površinu tako da je prozirna strana okrenuta prema gore, a da se jezičac nalazi s desne strane. To vam olakšava ispravno poravnanje slajda kada ga umetnete u držač slajdova.

Basic Instructions for Use (multilingual) 7 Upute za korištenje
SureScan Dx System User Guide 169
2 Lagano pritisnite kraj s jezičcem na prozirnom plastičnom poklopcu i povucite ga prema gore da biste ga otvorili.
slika 38 Otvaranje držača slajdova
3 Umetnite slajd u držač slajdova kako slijedi:
a Držite slajd na kraju s bar kodom.
b Pazite da je aktivna microarray površina okrenuta prema gore, odnosno prema poklopcu slajda, tako da je bar kod s lijeve strane.
c Pažljivo stavite kraj slajda bez oznake bar koda na okvir slajda. Pogledajte odjeljak slika 39.
d Lagano spustite slajd u držač slajdova. Pogledajte odjeljak slika 40.
e Zatvorite plastični poklopac slajda tako da gurnete jezičac sve dok ne začujete "klik". Time se slaj pomiče na mjesto u držaču.
f Lagano pritisnite kraj s jezičcem na prozirnom plastičnom poklopcu i povucite ga prema gore da biste ga ponovno otvorili i provjerili je li slajd ispravno namješten.
OPREZ Nemojte pritiskati jezičac više nego što je potrebno da biste otpustili poklopac. Time biste mogli oštetiti držač slajdova i onemogućiti pravilno zatvaranje. Nemojte koristiti oštećene držače slajdova jer bi se mogli zaglaviti u skeneru.

170 SureScan Dx System User Guide
7 Basic Instructions for Use (multilingual) Upute za korištenje
Nakon umetanja slajd je postavljen ravno i poravnat s točkama poravnanja na držaču.
g Zatvorite plastični poklopac slajda tako da gurnete jezičac sve dok ne začujete "klik". Pogledajte odjeljak slika 41.
slika 39 Umetanje slajda u držač slajdova
OPREZ Ako je jezičac na plastičnom poklopcu slajda previše rastegnut, možda neće pravilno sjesti na mjesto uz "klik". Prikladno zbrinite držače slajdova koji više ne proizvode zvuk "klik" kada ih zatvorite.
OPREZ Kada je pravilno zatvoren, vrh jezičca nalazi se u ravnini s površinom baze ili niže u odnosu na površinu baze. U suprotnom nemojte koristiti držač slajdova jer je jezičac možda oštećen.
Okvir za slajdove

Basic Instructions for Use (multilingual) 7 Upute za korištenje
SureScan Dx System User Guide 171
slika 40 Slajd umetnut u držač slajdova
slika 41 Držač slajdova – zatvoren sa slajdom
Agilent slajdovi imaju dva bar koda, po jedan na svakoj strani stakla. Pogledajte odjeljak slika 42. Postavite aktivnu microarray stranu slajda tako da je okrenuta prema poklopcu držača slajdova.
OPREZ Ako nepravilno umetnete slajd, možete oštetiti skener SureScan Dx.Oštećeni ili nepravilno zatvoreni držač slajdova može se zaglaviti u skeneru.

172 SureScan Dx System User Guide
7 Basic Instructions for Use (multilingual) Upute za korištenje
slika 42 Orijentacija slajda
3. korak Umetnite držače slajdova u kasetu1 U prozoru programa Scan Control kliknite Open Door
(Otvori vrata) da biste otvorili vrata skenera.
2 Podignite držač slajdova držeći ga za hvatište za prste. Strelica na vrhu držača slajdova pokazuje ulijevo ako ste držač podignuli ispravno. Pogledajte odjeljak slika 43.
OPREZ Vrata skenera ispravno se otvaraju putem gumba Open Door (Otvori vrata) u prozoru programa Scan Control (Kontrola skeniranja). Ne pokušavajte ručno otvoriti vrata.

Basic Instructions for Use (multilingual) 7 Upute za korištenje
SureScan Dx System User Guide 173
slika 43 Držač slajdova olakšava vam ispravno umetanje slajdova
Umetnite držač slajdova u bilo koji otvoreni utor. Brojevi utora jasno su označeni na kaseti slajda. Ne gurajte na silu držač slajdova u kasetu; možete ga jednostavno umetnuti ako ga ispravno poravnate s hvatištem za prste i ako je strelica okrenuta ulijevo.
Strelica olakšava identifikacijuorijentacije skenera
Hvatište za prste
OPREZ Ako osjetite otpor prilikom postavljanja držača slajdova u kasetu, držač slajdova možda nije pravilno zatvoren ili je oštećen. Provjerite držač slajdova te ga po potrebi zatvorite ili zamijenite.

174 SureScan Dx System User Guide
7 Basic Instructions for Use (multilingual) Upute za korištenje
slika 44 Umetanje držača slajdova u kasetu
3 Provjerite je li držač slajdova namješten na dnu utora za kasetu.
Broj utora u koji je umetnut slajd trepće plavo.
4 Ponavljajte korake 2 do 3 dok ne umetnete sve držače slajdova u kasetu.
5 U programu Scan Control kliknite Close Door (Zatvori vrata).
Za slajdove kojima protokol skeniranja nije mapiran sukladno njihovom dizajnu, protokol skeniranja ostaje prazan, a stanje slajda je "Present" (Prisutan). Dodijelite protokol skeniranja kao što je opisano u odjeljku “4. korak Postavite ili promijenite postavke protokola skeniranja”.
OPREZ Nepravilno postavljanje držača slajda u kasetu može uzrokovati ozbiljno oštećenje skenera SureScan Dx.

Basic Instructions for Use (multilingual) 7 Upute za korištenje
SureScan Dx System User Guide 175
4. korak Postavite ili promijenite postavke protokola skeniranjaPostavke trenutnog protokola skeniranja prikazane su za svaki odabrani slajd u desnom oknu glavnog prozora softvera Scan Control.
Prvi put kada postavite skeniranje slajda, odaberite protokol skeniranja.
• Kliknite Scan protokol (Protokol skeniranja) za svaki slajd u tablici utora i odaberite protokol koji ćete koristiti za skeniranje slajda.
Agilent vam isporučuje osam unaprijed umetnutih protokola koje možete odabrati i koristiti s Agilent microarray visoke gustoće (HD) i Agilent microarray G3 slajdovima.
AgilentHD_GX_2Color Agilent microarray visoke gustoće za izraz gena u dvije boje
AgilentHD_GX_1Color Agilent microarray visoke gustoće za izraz gena u jednoj boji
AgilentG3_GX_2Color Agilent microarray G3 za izraz gena u dvije boje
AgilentG3_GX_1Color Agilent G3 microarray za izraz gena u jednoj boji
AgilentHD_CGH Agilent microarray visoke gustoće CGH/CGH+SNP/CNV/ChIP
AgilentG3_CGH Agilent microarray G3 CGH/CGH+SNP/CNV/ChIP
AgilentHD_miRNA Agilent microarray visoke gustoće miRNA
AgilentG3_miRNA Agilent microarray G3 miRNA
5. korak (Opcija) Promijenite izlaznu mapuMožete promijeniti navedenu izlaznu mapu u koju program sprema slikovne datoteke kreirane od strane skenera.
• Za svaki slajd u tablici utora kliknite Output Folder (Izlazna mapa) i pregledom pronađite mjesto željene mape.
Agilent preporučuje odabir lokalne mape na sekundarnom tvrdom disku.
6. korak Dodavanje slajdova u red čekanja za skeniranje1 U glavnom prozoru programa Scan Control kliknite All to
Queue (Sve u red čekanja) da biste sve slajdove u tablici utora čije je stanje "Ready for queue" (Spremno za red čekanja) dodali u red čekanja za skeniranje.
Pojavljuje se dijaloški okvir za potvrdu. Kliknite Yes (Da) da biste slajdove dodali u red čekanja.
ILI

176 SureScan Dx System User Guide
7 Basic Instructions for Use (multilingual) Upute za korištenje
U tablici utora Scan Control kliknite ćeliju State (Stanje) za prvi slajd za skeniranje i kliknite Add to Queue (Dodaj u red čekanja).
2 Za svaki dodatni slajd koji želite skenirati, učinite sljedeće:
• Kliknite ćeliju State (Stanje) i odaberite Add to queue first (Najprije dodaj u red čekanja) da biste slajd dodali na vrh reda čekanja za skeniranje.
ILI
• Kliknite ćeliju State (Stanje) i odaberite Add to queue last (Dodaj na kraj reda čekanja) da biste slajd dodali na kraj reda čekanja za skeniranje.
Ako morate ukloniti sve slajdove iz reda čekanja, kliknite Empty Queue (Isprazni red čekanja) u glavnom prozoru programa Scan Control.
7. korak Skenirajte slajdove1 Po potrebi u programu Scan Control kliknite Close Door
(Zatvori vrata).
Pričekajte dok se vrata ne zatvore te dok se ne omogući gumb Start Scan (Pokreni skeniranje).
2 U glavnom prozoru programa Scan Control kliknite Start Scan (Pokreni skeniranje) da biste počeli skenirati slajdove dodane u red čekanja.
8. korak Uklonite slajdove1 U glavnom prozoru programa Scan Control kliknite Open
Door (Otvori vrata) da biste otvorili vrata skenera.
2 Otvorite vrata skenera i uklonite držače slajdova iz kasete.
3 Uklonite slajdove iz držača slajdova kako slijedi:
a Držite držač slajdova za bočne strane tako da je logotip Agilent okrenut prema gore.
b Lagano pritisnite kraj s jezičcem na prozirnom plastičnom poklopcu i povucite ga prema gore da biste ga otvorili.
c Gurnite kraj slajda s bar kodom prema gore s donje strane držača slajda da ne biste ostavili otiske na području uzorka.
d Uhvatite slajd za bočne stranice i uklonite ga iz držača slajdova.

Basic Instructions for Use (multilingual) 7 Sikkerhedsretningslinjer
SureScan Dx System User Guide 177
Grundlæggende brugsanvisning
SikkerhedsretningslinjerSureScan Dx-scanneren er konstrueret til sikker og enkel brug. Sørg for, at du forstår og overholder alle advarsler og råd før betjening af SureScan Dx-scanneren.
Fugtige omgivelserSureScan Dx-scanneren er følsom over for omgivelser med kondensationsfugt. Vent altid 12 timer med at åbne kassen på montagestedet for at sikre termisk balance.
ADVARSEL Forsøg ikke at reparere eller at få adgang til interne komponenter i SureScan Dx-scanneren. Du risikerer at udsætte dig for højspænding eller skadelig laserstråling. Afmontering af hoveddækslet ugyldiggør garantien.
ADVARSEL Tilslut SureScan Dx-scanneren en stikkontakt med jordforbindelse. Den er afhængig af en jordforbindelse af sikkerhedshensyn.
FORSIGTIG For at minimere vibrationer som følge af den hurtige scanning af laser-exciteringen over mikroarrayet bør scanneren monteres på en solid laboratoriebænk eller på et solidt bord. Undgå at montere scanneren i nærheden af laboratorieudstyr, der kan forårsage vibrationer.
FORSIGTIG SureScan Dx-scanneren er følsom over for omgivelser med kondensationsfugt. Følg forholdsreglerne i produktdokumentationen. Se “Fugtige omgivelser” på side 177

178 SureScan Dx System User Guide
7 Basic Instructions for Use (multilingual) Betjeningsvejledning
For at sikre den optimale ydelse bør SureScan Dx kun betjenes inden for følgende fugtighedsinterval.
Betjening: 15 % til 85 % RF ved 30 °C
BetjeningsvejledningTrin 1. Tænd for SureScan Dx Microarray Scanner, og start programmet Scan Control
1 Tænd SureScan Dx-scanneren på tænd/sluk-knappen på forsiden.
2 Tænd for computeren, og vent indtil den er klar.
3 Dobbeltklik på ikonet Agilent Microarray Scan Control for at starte Scan Control-programmet.
Figur 36 Ikon for Agilent Microarray Scan Control
Når programmet starter, åbnes Agilent Microarray Scan Control-programmets hovedvindue, og scanneren udfører sin initialiseringssekvens. Efter initialiseringssekvensens afslutning, aktiveres knappen Open Door, og du kan indføre præparatglas. Se Figur 37 på side 179.
BEMÆRK Hvis der er indført 24 glas i scanneren, når du tænder for den, mislykkes initialiseringen, da glasudføringscyklussen ikke kan gennemføres.

Basic Instructions for Use (multilingual) 7 Betjeningsvejledning
SureScan Dx System User Guide 179
Figur 37 Agilent Microarray Scan Control-programmets vindue – klar til at tilføje glas.
Scannerens status angives i nederste højre hjørne af Scan Control-vinduet på statuslinjen.
Trin 2. Indfør glas i glasholderne
Fingeraftryk kan forårsage fejl i registreringen af fluorescens. Berør kun kanterne på et glas, og anvend altid handsker ved håndtering af glas.
1 Før du indfører et glas, placeres glasholderen på en plan overflade med det klare dæksel opad og tappen til højre. Dette hjælper med at sikre, at dit glas er placeret korrekt, når du indfører det i glasholderen.

180 SureScan Dx System User Guide
7 Basic Instructions for Use (multilingual) Betjeningsvejledning
2 Skub forsigtigt ind, og træk op i enden med tappen på det klare plastdæksel for at åbne det.
Figur 38 Åbning af glasholderen
3 Indfør et glas i holderen således:
a Hold fast i glasset i den ende, stregkoden sidder.
b Sørg for, at den aktive mikroarray-overflade vender opad, mod glasdækslet, med stregkoden til venstre.
c Placer forsigtigt den ende af glasset, som er uden stregkodemærkaten, på glasfremspringet. Se Figur 39.
d Sænk forsigtigt glasset ind i glasholderen. Se Figur 40.
e Luk plastdækslet ved at trykke på tappen, indtil du hører et "klik" . Dette indfører glasset i den korrekte position i holderen.
f Skub forsigtigt ind og træk op i tappen for enden af det klare plastdæksel for at åbne det igen, og kontrollér, at glasset sidder korrekt.
FORSIGTIG Skub ikke tappen længere ind end nødvendigt for at låse dækslet op. Hvis du gør det, kan diasholderen blive beskadiget, og dækslet kan muligvis ikke låses korrekt.
Anvend ikke beskadigede diasholdere, da de kan sætte sig fast i scanneren.
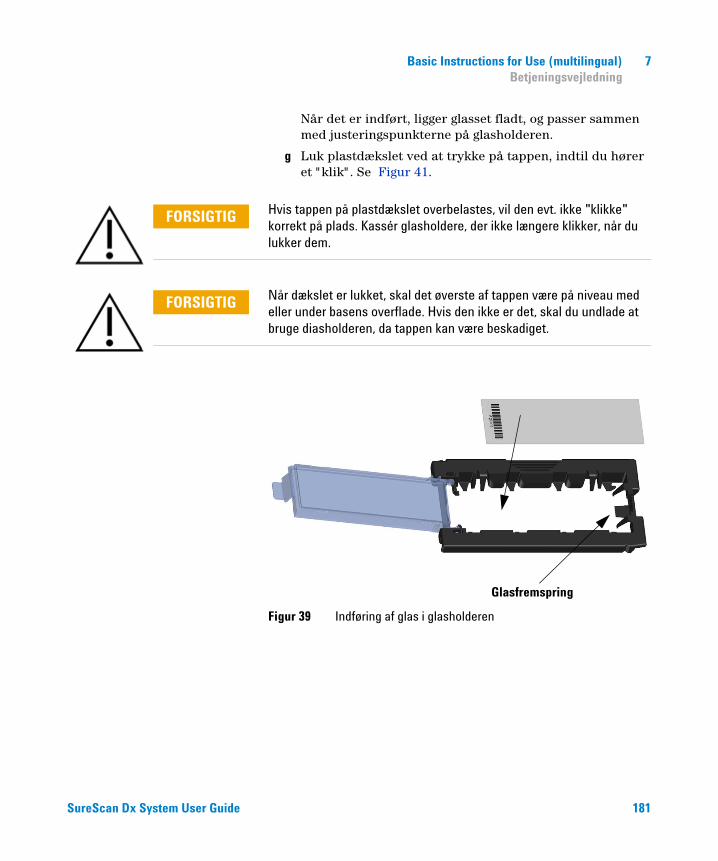
Basic Instructions for Use (multilingual) 7 Betjeningsvejledning
SureScan Dx System User Guide 181
Når det er indført, ligger glasset fladt, og passer sammen med justeringspunkterne på glasholderen.
g Luk plastdækslet ved at trykke på tappen, indtil du hører et "klik" . Se Figur 41.
Figur 39 Indføring af glas i glasholderen
FORSIGTIG Hvis tappen på plastdækslet overbelastes, vil den evt. ikke "klikke" korrekt på plads. Kassér glasholdere, der ikke længere klikker, når du lukker dem.
FORSIGTIG Når dækslet er lukket, skal det øverste af tappen være på niveau med eller under basens overflade. Hvis den ikke er det, skal du undlade at bruge diasholderen, da tappen kan være beskadiget.
Glasfremspring

182 SureScan Dx System User Guide
7 Basic Instructions for Use (multilingual) Betjeningsvejledning
Figur 40 Glas indført i glasholder
Figur 41 Glasholder – lukket med glas
Agilent-glas har to stregkoder, en på hver side af glasset. Se Figur 42 Placer siden med det aktive mikroarray mod glasholderens dæksel.
FORSIGTIG Et forkert indført glas kan beskadige SureScan Dx-scanneren.
Hvis diasholderen er beskadiget eller ikke er lukket rigtigt, kan den sætte sig fast i scanneren.

Basic Instructions for Use (multilingual) 7 Betjeningsvejledning
SureScan Dx System User Guide 183
Figur 42 Orientering af glas
Trin 3. Indfør glasholdere i kassetten
1 I Scan Control-programmets vindue skal du klikke på Open Door for at åbne scannerens dør.
2 Tag glasholderen op ved hjælp af fingergrebet. Pilen øverst på glasholderen peger mod venstre, når du tager glasholderen korrekt op. Se Figur 43.
FORSIGTIG Den korrekte måde at åbne scannerens dør på, er at anvende knappen Open Door i Scan Control-programmet. Forsøg ikke at åbne døren manuelt.

184 SureScan Dx System User Guide
7 Basic Instructions for Use (multilingual) Betjeningsvejledning
Figur 43 Glasholderen hjælper dig med at indføre glasset korrekt
Indfør en glasholder i en ledig åbning. Åbningsnumrene er tydeligt markeret på glaskassetten. Undlad at presse glasholderen ind i kassetten. Den indføres nemt, hvis den er justeret korrekt ind, med fingergrebet på toppen og pilen pegende mod venstre.
Pile hjælper med at identificerescannerens orientering
Fingergreb
FORSIGTIG Hvis der er modstand, når du anbringer diasholderen i kassetten, er diasholderen muligvis ikke lukket rigtigt, eller også kan den være beskadiget. Kontrollér diasholderen, og luk den, eller udskift den om nødvendigt.

Basic Instructions for Use (multilingual) 7 Betjeningsvejledning
SureScan Dx System User Guide 185
Figur 44 Indføring af glasholder i kassette
3 Sørg for, at glasholderen er placeret helt ned i bunden af kassetteåbningen.
Åbningsnummeret for det indførte glas blinker blåt.
4 Gentag trin 2 til 3, indtil alle glasholdere er indført i kassetten.
5 Klik på Close Door i Scan Control-programmet.
For glas, der ikke har en scanprotokol tilknyttet deres design, forbliver scanprotokollen tom, og åbningens status forbliver "Present" . Tildel en scanprotokol som beskrevet i “Trin 4. Indstil eller rediger indstillinger for scanprotokol”.
FORSIGTIG Forkert placering af glasholderen i kassetten kan resultere i alvorlige skader på SureScan Dx Microarray Scanner.

186 SureScan Dx System User Guide
7 Basic Instructions for Use (multilingual) Betjeningsvejledning
Trin 4. Indstil eller rediger indstillinger for scanprotokol
De aktuelle indstillinger for scanprotokollen vises for hvert markeret glas i den højre rude af Scan Control-softwarens hovedvindue.
Første gang du konfigurerer scanning af et glas, skal du vælge den scanprotokol, du vil anvende.
• For hvert glas i åbningstabellen skal du klikke på Scan Protocol og vælge den scanprotokol, du vil bruge til scanning af glasset.
Agilent leverer otte forud indlæste protokoller, du kan vælge imellem og bruge sammen med Agilent high density (HD) mikroarrays og Agilent G3 mikroarrays.
AgilentHD_GX_2Color Agilent HD 2-farvede mikroarrays til genudtryk
AgilentHD_GX_1Color Agilent HD 1-farvede mikroarrays til genudtryk
AgilentG3_GX_2Color Agilent G3 2-farvede mikroarrays til genudtryk
AgilentG3_GX_1Color Agilent G3 1-farvede mikroarrays til genudtryk
AgilentHD_CGH Agilent HD CGH/CGH+SNP/CNV/ChIP mikroarrays
AgilentG3_CGH Agilent G3 CGH/CGH+SNP/CNV/ChIP mikroarrays
AgilentHD_miRNA Agilent HD miRNA mikroarrays
AgilentG3_miRNA Agilent G3 miRNA mikroarrays
Trin 5. (Valgfrit) Rediger resultatmappen
Du kan ændre den angivne resultatmappe, hvor programmet gemmer billedfilerne, der er oprettet af scanneren.
• For hvert glas i åbningstabellen klikkes på Output Folder, og den ønskede mappe vælges.
Agilent anbefaler at vælge en lokal mappe på en sekundær harddisk.
Trin 6. Føj glas til scanningskøen
1 I hovedvinduet for Scan Control skal du klikke på All to Queue for at føje alle glas i åbningstabellen med tilstanden "Ready for queue" til scanningskøen.
Der vises en dialogboks for at bekræfte. Klik på Yes for at føje glassene til køen.

Basic Instructions for Use (multilingual) 7 Betjeningsvejledning
SureScan Dx System User Guide 187
ELLER
I Scan Control-åbningstabellen skal du klikke på State-cellen for det første glas, der skal scannes, og klikke på Add to Queue.
2 For hvert yderligere glas, du vil scanne:
• Klik på State-cellen og vælg Add to queue first for at føje glasset til toppen af scanningskøen.
ELLER
• Klik på State-cellen og vælg Add to queue last for at føje glasset til bunden af scanningskøen.
Hvis du vil fjerne alle glas fra køen, skal du klikke på Empty Queue i hovedvinduet for Scan Control.
Trin 7. Scan glassene
1 Klik på Close Door i hovedvinduet for Scan Control, hvis det er nødvendigt.
Vent, indtil døren lukkes, og knappen Start Scan er aktiveret.
2 I hovedvinduet for Scan Control skal du klikke på Start Scan for at begynde scanning af glas, der blev føjet til køen.
Trin 8. Fjern glassene
1 I hovedvinduet for Scan Control skal du klikke på Open Door for at åbne scannerens dør.
2 Åbn scannerens dør og fjern glasholderne fra kassetten.
3 Fjern glassene fra glasholderne således:
a Hold glasholderen på siderne med Agilent-logoet opad.
b Skub forsigtigt ind, og træk op i enden med tappen på det klare plastdæksel for at åbne det.
c Skub op på stregkodeenden af glasset fra under glasholderen for at undgå fingeraftryk på prøveområdet.
d Grib fat om glassets sider, og fjern det fra glasholderen.
188 SureScan Dx System User Guide
7 Basic Instructions for Use (multilingual) Consignes de sécurité
Les instructions de base pour l'utilisation
Consignes de sécuritéDe par sa conception, le scanner SureScan Dx permet une utilisation facile et sûre. Avant d'utiliser le scanner SureScan Dx, assurez-vous d'avoir bien compris et de respecter toutes les précautions désignées par les mentions AVERTISSEMENT et ATTENTION.
Conditions d'humiditéLe scanner SureScan Dx est sensible à l'humidité, lorsqu'elle atteint le point de condensation. Respectez toujours un temps de stabilisation thermique sur site de 12 heures avant d'ouvrir l'emballage.
AVERTISSEMENT N'essayez pas d'accéder aux composants internes du scanner SureScan Dx ni de réparer ces composants. Vous risqueriez de vous exposer à des hautes tensions ou à des rayonnements laser nocifs. L'ouverture du capot annule la garantie.
AVERTISSEMENT Branchez le scanner SureScan Dx sur une prise de courant mise à la terre. Sa sécurisation nécessite une terre de protection.
ATTENTION Afin de minimiser les vibrations dues à la numérisation rapide via l'excitation par laser sur la puce à ADN, installez le scanner sur une table ou un établi solide. N'installez pas le scanner à proximité d'autres équipements de laboratoire pouvant générer des vibrations.
ATTENTION Le scanner SureScan Dx est sensible à l'humidité, lorsqu'elle atteint le point de condensation. Respectez les prescriptions de la documentation produit. Voir la section «Conditions d'humidité» à la page 188.

Basic Instructions for Use (multilingual) 7 Instructions de fonctionnement
SureScan Dx System User Guide 189
Pour des performances optimales, n'utilisez le scanner SureScan Dx que dans la plage d'humidité ci-après.
En fonctionnement : 15 à 85 % HR à 30 °C
Instructions de fonctionnementEtape 1. Mise sous tension du scanner de puces à ADN SureScan Dx et lancement du programme Scan Control
1 Mettez le scanner SureScan Dx sous tension au moyen de l’interrupteur situé à l’avant de l’appareil.
2 Mettez l'ordinateur sous tension et patientez jusqu'au démarrage.
3 Double-cliquez sur l'icône Agilent Microarray Scan Control pour lancer le programme Scan Control.
Figure 36 Icône Agilent Microarray Scan Control
Lorsque le programme démarre, la fenêtre principale du logiciel Agilent Microarray Scan Control s'ouvre et le scanner effectue sa séquence d'initialisation. A la fin de la séquence d'initialisation, le bouton Open Door est activé ; vous pouvez alors charger des lames. Voir la section Figure 37 sur la page 190.
REMARQUE Si 24 lames ont été chargées dans le scanner lors de sa mise sous tension, l'initialisation échoue car il ne peut pas exécuter le cycle d'éjection.

190 SureScan Dx System User Guide
7 Basic Instructions for Use (multilingual) Instructions de fonctionnement
Figure 37 Fenêtre du programme Agilent Microarray Scan Control – prêt à ajouter des lames.
L'état du scanner est indiqué dans le coin inférieur droit de la fenêtre Scan Control, dans la barre d'état.
Etape 2. Insertion de lames dans les porte-diapositives
Les traces de doigt peuvent provoquer des erreurs lors de la détection de fluorescence. Tenez les lames par les bords et portez toujours des gants lorsque vous les manipulez.
1 Avant d'insérer la lame, placez le porte-lame sur une surface plane, le couvercle transparent vers le haut, et la languette à droite. Cela permet de s'assurer que vous avez aligné la lame correctement lorsque vous l'insérez dans le porte-lames.

Basic Instructions for Use (multilingual) 7 Instructions de fonctionnement
SureScan Dx System User Guide 191
2 Appuyez délicatement et tirez sur la languette du couvercle en plastique transparent pour l'ouvrir.
Figure 38 Ouverture du porte-lame
3 Insérez la diapositive dans le porte-diapositive, comme suit :
a Tenez la diapositive par l'extrémité du code-barres.
b Assurez-vous que la surface de la puce à ADN est orientée vers le haut, en direction du couvercle, le code-barres sur la gauche.
c Placez soigneusement le bord de la diapositive sans l'étiquette de code-barres contre le rebord du porte-lame. Voir la section Figure 39.
d Abaissez doucement la diapositive dans le porte-diapositive. Voir la section Figure 40.
e Fermez le couvercle en plastique, en poussant sur la languette jusqu'à entendre un «clic». La diapositive se positionne dans le porte-diapositive.
f Appuyez délicatement et tirez sur la languette du couvercle en plastique transparent pour l'ouvrir à nouveau et vérifier que la diapositive est correctement positionnée.
ATTENTION Ne poussez pas la languette plus que nécessaire pour déclencher le couvercle. Vous risqueriez d’endommager le porte-diapositive et d’empêcher un enclenchement correct.
N’utilisez pas de porte-diapositive endommagé qui pourrait rester coincé à l’intérieur du scanner.

192 SureScan Dx System User Guide
7 Basic Instructions for Use (multilingual) Instructions de fonctionnement
Une fois insérée, la diapositive est placée à plat, alignée avec les repères figurant sur le porte-diapositive.
g Fermez le couvercle en plastique, en poussant sur la languette jusqu'à entendre un «clic». Voir la section Figure 41.
Figure 39 Insertion de la lame dans le porte-lame
ATTENTION Si la languette du couvercle en plastique est trop tendue, la mise en place de la diapositive avec un «clic» peut être compromise. Eliminez les porte-diapositives qui ne s'enclenchent plus avec un «clic» lorsque vous les fermez.
ATTENTION Une fois correctement fermé, la partie supérieure de la languette est alignée à la surface de la base ou sous la surface de la base. Dans le cas contraire, n’utilisez pas le porte-diapositive car la languette risquerait d’être endommagée.
Rebord du porte-lame

Basic Instructions for Use (multilingual) 7 Instructions de fonctionnement
SureScan Dx System User Guide 193
Figure 40 Diapositive insérée dans le porte-diapositive
Figure 41 Porte-diapositive – fermé, avec une diapositive
Les diapositives Agilent comportent deux codes-barres, un sur chaque face. Voir la section Figure 42. Dirigez toujours la face active vers le couvercle du porte-diapositive.
ATTENTION Les diapositives mal insérées peuvent endommager le scanner SureScan Dx.
Un porte-diapositive endommagé ou mal enclenché peut rester coincé dans le scanner.

194 SureScan Dx System User Guide
7 Basic Instructions for Use (multilingual) Instructions de fonctionnement
Figure 42 Orientation des diapositives
Etape 3. Chargement des porte-diapositives dans le panier
1 Dans la fenêtre du programme Scan Control, cliquez sur Open Door pour ouvrir le capot du scanner.
2 Saisissez le porte-diapositive en le tenant par l'onglet. La flèche au-dessus des points du porte–diapositive est orientée vers la gauche lorsque vous soulevez correctement le porte-diapositive. Voir la section Figure 43.
ATTENTION Pour ouvrir correctement le capot du scanner, utilisez le bouton Open Door du programme Scan Control. N'essayez pas d'ouvrir manuellement le capot.

Basic Instructions for Use (multilingual) 7 Instructions de fonctionnement
SureScan Dx System User Guide 195
Figure 43 Le porte-diapositive vous aide à insérer correctement les diapositives
Insérez un porte-diapositive dans un emplacement disponible. Les numéros des emplacements sont clairement étiquetés sur le panier. N'insérez pas le porte-diapositive dans le panier avec force ; il s'insère facilement s'il est correctement aligné avec l'onglet situé surle dessus, la flèche orientée vers la gauche.
Flèche facilitant l'identificationde l'orientation du scanner
Onglet
ATTENTION Si vous êtes confronté à une certaine résistance en plaçant le porte-diapositive dans la cassette, c’est peut-être qu’il n’est pas correctement fermé ou qu’il est endommagé. Vérifiez le porte-diapositive et fermez ou remplacez-le si nécessaire.
196 SureScan Dx System User Guide
7 Basic Instructions for Use (multilingual) Instructions de fonctionnement
Figure 44 Insertion du porte-diapositive dans le panier
3 Assurez-vous que le porte-diapositive repose bien au fond de l'emplacement dans le panier. Le numéro de l'emplacement de la diapositive chargée clignote en bleu.
4 Répétez les étapes 2 à 3 jusqu'à ce que tous les porte-diapositives soient chargés dans le panier.
5 Dans le programme Scan Control, cliquez sur Close Door.
Pour les diapositives n'ayant aucun protocole de numérisation associé à leur design, le protocole de numérisation reste vide et l'emplacement conserve l'état «Present». Assignez un protocole de numérisation, comme décrit à la section «Etape 4. Définition ou modification des paramètres de numérisation».
ATTENTION Un mauvais positionnement du porte-diapositive dans le panier peut endommager gravement le scanner de puces à ADN SureScan Dx.

Basic Instructions for Use (multilingual) 7 Instructions de fonctionnement
SureScan Dx System User Guide 197
Etape 4. Définition ou modification des paramètres de numérisation
Les paramètres actuels du protocole de numérisation sont affichés pour chaque diapositive sélectionnée dans le volet droit de la fenêtre principale du logiciel Scan Control.
La première fois que vous configurez la numérisation d'une diapositive, sélectionnez un protocole de numérisation à utiliser. • Pour chaque diapositive du tableau des emplacements,
cliquez sur le protocole de numérisation et sélectionnez un protocole à utiliser pour numériser la diapositive. Agilent fournit huit protocoles préchargés, à utiliser avec les puces à ADN haute densité (HD) Agilent et les puces à ADN G3 Agilent.
AgilentHD_GX_2Color Puces d'expression de gènes à 2 couleurs haute densité Agilent
AgilentHD_GX_1Color Puces d'expression de gènes à 1 couleurs haute densité Agilent
AgilentG3_GX_2Color Puces G3 d'expression de gènes à 2 couleurs Agilent
AgilentG3_GX_1Color Puces G3 d'expression de gènes à 1 couleur Agilent
AgilentHD_CGH Puces CGH/CGH+SNP/CNV/ChIP haute densité Agilent
AgilentG3_CGH Puces G3 CGH/CGH+SNP/CNV/ChIP Agilent
AgilentHD_miRNA Puces miRNA haute densité Agilent
AgilentG3_miRNA Puces G3 miRNA Agilent
Etape 5. (Facultative) Modification du dossier de sortie
Vous pouvez modifier le dossier de sortie spécifié, dans lequel le programme enregistre les fichiers images créés par le scanner.• Pour chaque diapositive dans le tableau des emplacements,
cliquez sur le dossier de sortie et naviguez jusqu'à l'emplacement du dossier souhaité. Agilent vous recommande de sélectionner un dossier de sortie local sur un disque dur secondaire.
Etape 6. Ajout de diapositives à la file d'attente de numérisation
1 Dans la fenêtre principale Scan Control, cliquez sur All to Queue pour ajouter à la file d'attente de numérisation toutes les diapositives du tableau des emplacements affichant l'état «Ready for queue».Une boîte de dialogue de confirmation apparaît. Cliquez sur Yes pour ajouter les diapositives à la file d'attente.OU

198 SureScan Dx System User Guide
7 Basic Instructions for Use (multilingual) Instructions de fonctionnement
Dans le tableau des emplacements Scan Control, cliquez sur la cellule State de la première diapositive à numériser, puis cliquez sur Add to Queue.
2 Pour chaque diapositive supplémentaire à numériser, • cliquez sur la cellule State et sélectionnez Add to queue
first pour placer la diapositive en haut de la file d'attente de numérisation.
OU • Cliquez sur la cellule State et sélectionnez Add to queue
last pour placer la diapositive en bas de la file d'attente de numérisation.
Si vous devez supprimer toutes les diapositives de la file d'attente, cliquez sur Empty Queue dans la fenêtre principale du logiciel Scan Control.
Etape 7. Numérisation de vos diapositives
1 Si nécessaire, dans la fenêtre principale du programme Scan Control, cliquez sur Close Door.Attendez la fermeture du capot et l'activation du bouton Start Scan.
2 Dans la fenêtre principale Scan Control, cliquez sur Start Scan pour lancer la numérisation des diapositives qui ont été ajoutées à la file d'attente.
Etape 8. Retrait des diapositives
1 Dans la fenêtre principale du programme Scan Control, cliquez sur Open Door pour ouvrir le capot du scanner.
2 Ouvrez le capot du scanner et retirez le porte-diapositive du panier.3 Retirez les diapositives des porte-diapositives, comme suit :
a Tenez le porte-diapositive par les bords, logo Agilent vers le haut.
b Appuyez délicatement et tirez sur la languette du couvercle en plastique transparent pour l'ouvrir.
c Prenez le porte-diapositive par le bas, puis poussez le côté code-barres de la diapositive vers le haut pour éviter de laisser des traces de doigts dans la zone de l'échantillon.
d Prenez la diapositive par les bords et sortez-la du porte-diapositive.

Basic Instructions for Use (multilingual) 7 Οδηγίες ασφαλείας
SureScan Dx System User Guide 199
Οδηγίες στα Ελληνικά
Οδηγίες ασφαλείαςΟ σαρωτής SureScan Dx έχει σχεδιαστεί έτσι ώστε η χρήση του να είναι ασφαλής και εύκολη. Πριν αρχίσετε να χρησιμοποιείτε το σαρωτή SureScan Dx, βεβαιωθείτε ότι έχετε κατανοήσει και τηρείτε όλες τις προειδοποιήσεις και τα μέτρα προφύλαξης.
Συνθήκες υγρασίαςΟ σαρωτής SureScan Dx είναι ευαίσθητος στις συνθήκες συμπύκνωσης της υγρασίας. Προτού ανοίξετε τη συσκευασία, θα πρέπει να την αφήσετε σε θερμοκρασία δωματίου για διάστημα 12 ωρών, προκειμένου να επιτευχθεί θερμική ισορροπία.
ΠΡΟΕΙ∆ΟΠΟΙΗΣΗ Μην επιχειρήσετε να επισκευάσετε ή να αποκτήσετε πρόσβαση στα εσωτερικά εξαρτήματα του σαρωτή SureScan Dx. Υπάρχει κίνδυνος έκθεσης σε υψηλή τάση και επιβλαβή ακτινοβολία λέιζερ. Εάν αφαιρέσετε το κύριο κάλυμμα, η εγγύηση καθίσταται άκυρη.
ΠΡΟΕΙ∆ΟΠΟΙΗΣΗ Συνδέστε το σαρωτή SureScan Dx σε μια γειωμένη πρίζα ρεύματος. Η ασφαλής χρήση του σαρωτή βασίζεται στην προστατευτική γείωση.
ΠΡΟΣΟΧN Προκειμένου να ελαχιστοποιήσετε τους κραδασμούς που προκαλούνται από τη γρήγορη σάρωση της διέγερσης λέιζερ στη μικροσυστοιχία, τοποθετήστε το σαρωτή σε έναν σταθερό εργαστηριακό πάγκο ή τραπέζι. Μην τοποθετήσετε το σαρωτή κοντά σε άλλον εργαστηριακό εξοπλισμό που μπορεί να προκαλεί κραδασμούς.
ΠΡΟΣΟΧN Ο σαρωτής SureScan Dx είναι ευαίσθητος στις συνθήκες συμπύκνωσης της υγρασίας. Πρέπει να τηρείτε τα μέτρα προφύλαξης που αναφέρονται στην τεκμηρίωση του προϊόντος. Ανατρέξτε στην ενότητα “Συνθήκες υγρασίας” στη σελίδα 199.

200 SureScan Dx System User Guide
7 Basic Instructions for Use (multilingual) Οδηγίες λειτουργίας
Για να διασφαλίσετε τη βέλτιστη δυνατή απόδοση, να χρησιμοποιείτε το σαρωτή SureScan Dx μόνο στο παρακάτω εύρος τιμών υγρασίας.
Λειτουργία: Σχετική υγρασία 15% έως 85% στους 30 °C
Οδηγίες λειτουργίαςΒήμα 1. Ενεργοποίηση σαρωτή μικροσυστοιχιών SureScan Dx και άνοιγμα προγράμματος Scan Control (Έλεγχος σάρωσης)1 Ενεργοποιήστε το σαρωτή SureScan Dx χρησιμοποιώντας το
διακόπτη λειτουργίας που βρίσκεται στην μπροστινή πλευρά του οργάνου.
2 Ενεργοποιήστε το σταθμό εργασίας και περιμένετε να ολοκληρωθεί η εκκίνησή του.
3 Κάντε διπλό κλικ στο εικονίδιο Agilent Microarray Scan Control (Έλεγχος σάρωσης μικροσυστοιχιών Agilent) για να ανοίξετε το πρόγραμμα Scan Control (Έλεγχος σάρωσης).
Εικόνα 36 Εικονίδιο Agilent Microarray Scan Control (Έλεγχος σάρωσης μικροσυστοιχιών Agilent)
Όταν ανοίξει το πρόγραμμα, θα ανοίξει το κύριο παράθυρο του προγράμματος Agilent Microarray Scan Control (Έλεγχος σάρωσης μικροσυστοιχιών Agilent) και ο σαρωτής θα εκτελέσει την ακολουθία εκκίνησης. Αφού ολοκληρωθεί η ακολουθία εκκίνησης, θα ενεργοποιηθεί το κουμπί Open Door (Άνοιγμα θύρας), ώστε να μπορέσετε να τοποθετήσετε τα πλακίδια. Ανατρέξτε στην Εικόνα 37 στη σελίδα 201.
ΣΗΜΕΙΩΣΗ Εάν υπάρχουν 24 πλακίδια στο σαρωτή όταν τον ενεργοποιήσετε, η εκκίνησή του θα αποτύχει, καθώς δεν θα μπορεί να εκτελέσει τον κύκλο εξαγωγής των πλακιδίων.

Basic Instructions for Use (multilingual) 7 Οδηγίες λειτουργίας
SureScan Dx System User Guide 201
Εικόνα 37 Παράθυρο προγράμματος Agilent Microarray Scan Control (Έλεγχος σάρωσης μικροσυστοιχιών Agilent) – Έτοιμο για τοποθέτηση πλακιδίων.
Η κατάσταση του σαρωτή υποδεικνύεται στην κάτω δεξιά γωνία του παραθύρου Scan Control (Έλεγχος σάρωσης), στη γραμμή κατάστασης.

202 SureScan Dx System User Guide
7 Basic Instructions for Use (multilingual) Οδηγίες λειτουργίας
Βήμα 2. Τοποθέτηση των πλακιδίων στις θήκες πλακιδίωνΤα δακτυλικά αποτυπώματα προκαλούν σφάλματα κατά τη φθορισμομετρική ανίχνευση. Να κρατάτε τα πλακίδια μόνο από τα άκρα και να χρησιμοποιείτε πάντα γάντια κατά το χειρισμό τους.
1 Πριν τοποθετήσετε το πλακίδιο, ακουμπήστε τη θήκη πλακιδίου σε μια επίπεδη επιφάνεια, με το διαφανές κάλυμμα προς τα επάνω και τη θήκη προς τα δεξιά. Έτσι, διασφαλίζετε ότι το πλακίδιο θα είναι σωστά ευθυγραμμισμένο κατά την τοποθέτησή του στη θήκη.
2 Σπρώξτε προς τα μέσα και τραβήξτε προς τα επάνω με προσοχή το άκρο του διάφανου πλαστικού καλύμματος με την προεξοχή για να το ανοίξετε.
Εικόνα 38 Άνοιγμα της θήκης πλακιδίου
3 Τοποθετήστε το πλακίδιο στη θήκη, ως εξής:
a Κρατήστε το πλακίδιο από την πλευρά που υπάρχει ο γραμμικός κώδικας.
b Βεβαιωθείτε ότι η ενεργή επιφάνεια της μικροσυστοιχίας είναι στραμμένη προς τα επάνω, προς το κάλυμμα του
ΠΡΟΣΟΧN Μην πιέζετε την προεξοχή περισσότερο από όσο χρειάζεται για να απασφαλίσετε το κάλυμμα. Αυτή η ενέργεια ενδέχεται να προκαλέσει ζημιά στη θήκη πλακιδίου και να εμποδίσει την ορθή μανδάλωση. Μη χρησιμοποιείτε θήκες πλακιδίων που έχουν υποστεί ζημιά, διότι μπορεί να μαγκώσουν στο εσωτερικό του σαρωτή.
Basic Instructions for Use (multilingual) 7 Οδηγίες λειτουργίας
SureScan Dx System User Guide 203
πλακιδίου, και ο γραμμικός κώδικας βρίσκεται στην αριστερή πλευρά.
c Τοποθετήστε προσεκτικά το άκρο του πλακιδίου που δεν φέρει ετικέτα γραμμικού κώδικα στη γλωττίδα συγκράτησης πλακιδίου. Ανατρέξτε στην Εικόνα 39.
d Τοποθετήστε προσεκτικά το πλακίδιο στη θήκη πλακιδίου. Ανατρέξτε στην Εικόνα 40.
e Κλείστε το πλαστικό κάλυμμα του πλακιδίου πιέζοντας το άκρο με την προεξοχή μέχρι να ακούσετε το χαρακτηριστικό ήχο "κλικ". Αυτό σημαίνει ότι το πλακίδιο έχει μπει στη θέση του μέσα στη θήκη.
f Σπρώξτε προς τα μέσα και τραβήξτε προς τα επάνω προσεκτικά το άκρο του διάφανου πλαστικού καλύμματος με την προεξοχή για να το ανοίξετε ξανά και να επιβεβαιώσετε ότι το πλακίδιο έχει τοποθετηθεί σωστά.
Όταν το πλακίδιο είναι σωστά τοποθετημένο, είναι σε επίπεδη θέση και υπάρχει αντιστοιχία με τα σημεία ευθυγράμμισης της θήκης πλακιδίου.
g Κλείστε το πλαστικό κάλυμμα του πλακιδίου πιέζοντας το άκρο με την προεξοχή μέχρι να ακούσετε το χαρακτηριστικό ήχο "κλικ". Ανατρέξτε στην Εικόνα 41.
ΠΡΟΣΟΧN Εάν η προεξοχή του πλαστικού καλύμματος πλακιδίου είναι υπερβολικά χαλαρωμένη, μπορεί να μην κλείσει σωστά. Όταν η θήκη πλακιδίου δεν κάνει πλέον "κλικ" κατά το κλείσιμό της, πρέπει να την πετάξετε.
ΠΡΟΣΟΧN Όταν έχει κλείσει σωστά, το επάνω μέρος της προεξοχής βρίσκεται στο ίδιο επίπεδο με την επιφάνεια της βάσης ή κάτω από την επιφάνεια της βάσης. Εάν δεν συμβαίνει αυτό, μη χρησιμοποιήσετε τη θήκη πλακιδίου διότι η προεξοχή μπορεί να έχει υποστεί ζημιά.

204 SureScan Dx System User Guide
7 Basic Instructions for Use (multilingual) Οδηγίες λειτουργίας
Εικόνα 39 Τοποθέτηση πλακιδίου στη θήκη πλακιδίου
Εικόνα 40 Πλακίδιο τοποθετημένο στη θήκη πλακιδίου
Εικόνα 41 Θήκη πλακιδίου – κλειστή με τοποθετημένο πλακίδιο
Γλωττίδα συγκράτησης πλακιδ

Basic Instructions for Use (multilingual) 7 Οδηγίες λειτουργίας
SureScan Dx System User Guide 205
Τα πλακίδια Agilent έχουν δύο γραμμικούς κώδικες, έναν σε κάθε πλευρά της γυάλινης επιφάνειας. Ανατρέξτε στην Εικόνα 42. Τοποθετήστε το πλακίδιο έτσι ώστε η ενεργή πλευρά της μικροσυστοιχίας να είναι στραμμένη προς το κάλυμμα της θήκης πλακιδίου.
Εικόνα 42 Προσανατολισμός πλακιδίου
Βήμα 3. Τοποθέτηση των θηκών πλακιδίων στην κασέτα1 Στο παράθυρο του προγράμματος Scan Control (Έλεγχος
σάρωσης), επιλέξτε Open Door (Άνοιγμα θύρας) για να ανοίξετε τη θύρα του σαρωτή.
ΠΡΟΣΟΧN Εάν το πλακίδιο δεν τοποθετηθεί σωστά, μπορεί να προκληθεί βλάβη στο σαρωτή SureScan Dx.Μια θήκη πλακιδίου που έχει υποστεί ζημιά ή μια θήκη πλακιδίου που δεν έκλεισε σωστά μπορεί να μαγκώσει στο σαρωτή.
ΠΡΟΣΟΧN Ο σωστός τρόπος για να ανοίξετε τη θύρα του σαρωτή είναι να χρησιμοποιήσετε το κουμπί Open Door (Άνοιγμα θύρας) του προγράμματος Scan Control (Έλεγχος σάρωσης). Μην επιχειρήσετε να ανοίξετε τη θύρα χειροκίνητα.

206 SureScan Dx System User Guide
7 Basic Instructions for Use (multilingual) Οδηγίες λειτουργίας
2 Πιάστε τη θήκη πλακιδίων χρησιμοποιώντας τη λαβή. Όταν έχετε πιάσει σωστά τη θήκη πλακιδίων, το βέλος που υπάρχει στην επάνω πλευρά της δείχνει προς τα αριστερά. Ανατρέξτε στην Εικόνα 43.
Εικόνα 43 Η θήκη πλακιδίων σάς βοηθά να τοποθετήσετε τα πλακίδια σωστά
Τοποθετήσετε μια θήκη πλακιδίων σε μια ελεύθερη υποδοχή. Οι αριθμοί των υποδοχών αναγράφονται σαφώς στην κασέτα πλακιδίων. Μην ασκήσετε πίεση για να τοποθετήσετε τη θήκη πλακιδίου στην κασέτα. Εάν η θήκη είναι σωστά ευθυγραμμισμένη, με τη λαβή στην επάνω πλευρά και το βέλος να δείχνει προς τα αριστερά, θα τοποθετηθεί εύκολα.
Το βέλος σάς βοηθά να προσδιορίσετετον προσανατολισμό του σαρωτή
Λαβή
ΠΡΟΣΟΧN Εάν παρουσιαστεί αντίσταση κατά την τοποθέτηση της θήκης πλακιδίου στην κασέτα, η θήκη πλακιδίου μπορεί να μην έκλεισε σωστά ή μπορεί να έχει υποστεί ζημιά. Ελέγξτε τη θήκη πλακιδίου και κλείστε την ή αντικαταστήστε την όπως απαιτείται.

Basic Instructions for Use (multilingual) 7 Οδηγίες λειτουργίας
SureScan Dx System User Guide 207
Εικόνα 44 Τοποθέτηση θήκης πλακιδίου στην κασέτα
3 Βεβαιωθείτε ότι η θήκη πλακιδίου έχει εφαρμόσει σωστά στην κάτω πλευρά της υποδοχής της κασέτας.
Ο αριθμός της υποδοχής στην οποία έχει τοποθετηθεί το πλακίδιο αναβοσβήνει με μπλε χρώμα.
4 Επαναλάβετε τα βήματα 2 και 3 έως ότου τοποθετήσετε όλες τις θήκες πλακιδίων στην κασέτα.
5 Στο πρόγραμμα Scan Control (Έλεγχος σάρωσης), επιλέξτε Close Door (Κλείσιμο θύρας).
Για τα πλακίδια των οποίων η σχεδίαση δεν έχει αντιστοιχιστεί με κάποιο πρωτόκολλο σάρωσης, το πρωτόκολλο σάρωσης παραμένει κενό και η κατάσταση της υποδοχής παραμένει Present (Πλήρης). Αντιστοιχίστε ένα πρωτόκολλο σάρωσης, όπως περιγράφεται στο “Βήμα 4. Ορισμός ή αλλαγή ρυθμίσεων πρωτοκόλλου σάρωσης”.
ΠΡΟΣΟΧN Εάν η θήκη πλακιδίου δεν τοποθετηθεί σωστά στην κασέτα μπορεί να προκληθεί σοβαρή βλάβη στο σαρωτή μικροσυστοιχιών SureScan Dx.

208 SureScan Dx System User Guide
7 Basic Instructions for Use (multilingual) Οδηγίες λειτουργίας
Βήμα 4. Ορισμός ή αλλαγή ρυθμίσεων πρωτοκόλλου σάρωσηςΟι τρέχουσες ρυθμίσεις πρωτοκόλλου σάρωσης εμφανίζονται για κάθε επιλεγμένο πλακίδιο στο δεξί τμήμα παραθύρου του κύριου παραθύρου του λογισμικού Scan Control (Έλεγχος σάρωσης).
Την πρώτη φορά που ετοιμάζεστε να σαρώσετε ένα πλακίδιο, πρέπει να επιλέξετε ένα πρωτόκολλο σάρωσης.
• Για κάθε πλακίδιο που αναφέρεται στον πίνακα υποδοχών, επιλέξτε Scan Protocol (Πρωτόκολλο σάρωσης) και έπειτα επιλέξτε ένα πρωτόκολλο σάρωσης που θα χρησιμοποιηθεί για τη σάρωση του πλακιδίου.
Η Agilent παρέχει οκτώ προφορτωμένα πρωτόκολλα που μπορείτε να επιλέξετε και να χρησιμοποιήσετε με τις μικροσυστοιχίες υψηλής πυκνότητας (HD) και τις μικροσυστοιχίες G3 της Agilent.
AgilentHD_GX_2Color Μικροσυστοιχίες γονιδιακής έκφρασης 2 χρωμάτων υψηλής πυκνότητας Agilent
AgilentHD_GX_1Color Μικροσυστοιχίες γονιδιακής έκφρασης 1 χρώματος υψηλής πυκνότητας Agilent
AgilentG3_GX_2Color Μικροσυστοιχίες γονιδιακής έκφρασης 2 χρωμάτων G3 Agilent
AgilentG3_GX_1Color Μικροσυστοιχίες γονιδιακής έκφρασης 1 χρώματος G3 Agilent
AgilentHD_CGH Μικροσυστοιχίες CGH/CGH+SNP/CNV/ChIP υψηλής πυκνότητας Agilent
AgilentG3_CGH Μικροσυστοιχίες CGH/CGH+SNP/CNV/ChIP G3 Agilent
AgilentHD_miRNA Μικροσυστοιχίες miRNA υψηλής πυκνότητας Agilent
AgilentG3_miRNA Μικροσυστοιχίες miRNA G3 Agilent
Βήμα 5. (Προαιρετικό) Αλλαγή φακέλου εξόδουΜπορείτε να αλλάξετε τον καθορισμένο φάκελο εξόδου, όπου το πρόγραμμα αποθηκεύει τα αρχεία εικόνας που έχει δημιουργήσει ο σαρωτής.
• Για κάθε πλακίδιο του πίνακα υποδοχών, επιλέξτε Output Folder (Φάκελος εξόδου) και μεταβείτε στη θέση που βρίσκεται ο φάκελος που θέλετε.
Η Agilent συνιστά να επιλέξετε έναν τοπικό φάκελο σε μια δευτερεύουσα μονάδα σκληρού δίσκου.
Βήμα 6. Προσθήκη πλακιδίων στην ουρά σάρωσης1 Στο κύριο παράθυρο Scan Control (Έλεγχος σάρωσης),
επιλέξτε All to Queue (Όλα στην ουρά) για να προσθέσετε στην ουρά σάρωσης όλα τα πλακίδια του πίνακα υποδοχών με κατάσταση Ready for queue (Έτοιμο για την ουρά).
Θα εμφανιστεί ένα παράθυρο διαλόγου επιβεβαίωσης. Επιλέξτε Yes (Ναι) για να προσθέσετε τα πλακίδια στην ουρά.
Ή

Basic Instructions for Use (multilingual) 7 Οδηγίες λειτουργίας
SureScan Dx System User Guide 209
Στον πίνακα υποδοχών του προγράμματος Scan Control (Έλεγχος σάρωσης), κάντε κλικ στο κελί State (Κατάσταση) για το πρώτο πλακίδιο προς σάρωση και επιλέξτε Add to Queue (Προσθήκη στην ουρά).
2 Για κάθε επιπρόσθετο πλακίδιο που θέλετε να σαρώσετε: • Κάντε κλικ στο κελί State (Κατάσταση) και επιλέξτε Add to
queue first (Προσθήκη στην αρχή της ουράς) για να προσθέσετε το αντίστοιχο πλακίδιο στην αρχή της ουράς σάρωσης.
Ή • Κάντε κλικ στο κελί State (Κατάσταση) και επιλέξτε Add to
queue last (Προσθήκη στο τέλος της ουράς) για να προσθέσετε το αντίστοιχο πλακίδιο στο τέλος της ουράς σάρωσης.
Εάν θέλετε να διαγράψετε όλα τα πλακίδια από την ουρά, επιλέξτε Empty Queue (Άδειασμα ουράς) στο κύριο παράθυρο του προγράμματος Scan Control (Έλεγχος σάρωσης).
Βήμα 7. Σάρωση πλακιδίων1 Εάν είναι απαραίτητο, επιλέξτε Close Door (Κλείσιμο θύρας)
στο κύριο παράθυρο του προγράμματος Scan Control (Έλεγχος σάρωσης).Περιμένετε μέχρι να κλείσει η θύρα και να ενεργοποιηθεί το κουμπί Start Scan (Έναρξη σάρωσης).
2 Στο κύριο παράθυρο του προγράμματος Scan Control (Έλεγχος σάρωσης), επιλέξτε Start Scan (Έναρξη σάρωσης) για να ξεκινήσει η σάρωση των πλακιδίων που έχετε προσθέσει στην ουρά.
Βήμα 8. Αφαίρεση πλακιδίων1 Στο κύριο παράθυρο του προγράμματος Scan Control
(Έλεγχος σάρωσης), επιλέξτε Open Door (Άνοιγμα θύρας) για να ανοίξετε τη θύρα του σαρωτή.
2 Ανοίξτε τη θύρα του σαρωτή και αφαιρέστε τις θήκες πλακιδίων από την κασέτα.
3 Αφαιρέστε τα πλακίδια από τις θήκες πλακιδίων, ως εξής:a Κρατήστε τη θήκη πλακιδίου από τις πλαϊνές πλευρές, με το
λογότυπο της Agilent στραμμένο προς τα επάνω.b Σπρώξτε προς τα μέσα και τραβήξτε προς τα επάνω με
προσοχή το άκρο του διάφανου πλαστικού καλύμματος με την προεξοχή για να το ανοίξετε.
c Σπρώξτε προς τα επάνω το άκρο του πλακιδίου με το γραμμικό κώδικα, βάζοντας το δάχτυλό σας στην κάτω πλευρά της θήκης πλακιδίου, για να μην αφήσετε δακτυλικά αποτυπώματα στην περιοχή του δείγματος.
d Πιάστε το πλακίδιο από τις πλαϊνές πλευρές και αφαιρέστε το από τη θήκη πλακιδίου.

210 SureScan Dx System User Guide
7 Basic Instructions for Use (multilingual) Sicherheitsrichtlinien
Grundlegende Hinweise für den Einsatz
SicherheitsrichtlinienDer SureScan Dx-Scanner ist auf Sicherheit und Benutzerfreundlichkeit ausgerichtet. Lesen und beachten Sie vor der Inbetriebnahme des SureScan Dx-Scanners alle Warnungen und Hinweise.
LuftfeuchtigkeitsbedingungenDer SureScan Dx-Scanner reagiert empfindlich auf kondensierende Luftfeuchtigkeit. Vor dem Öffnen der Verpackung ist eine 12-stündige Temperaturanpassung vor Ort erforderlich.
WARNUNG Versuchen Sie nicht, die internen Teile des SureScan Dx-Scanners zu reparieren oder auf diese zuzugreifen. Andernfalls setzen Sie sich selbst Hochspannung und gefährlicher Laserstrahlung aus. Das Entfernen der Hauptabdeckung führt dazu, dass die Garantie ungültig wird.
WARNUNG Schließen Sie den SureScan Dx-Scanner an eine geerdete Steckdose an. Eine Schutzerdung ist für die Sicherheit erforderlich.
VORSICHT Stellen Sie den Scanner auf einen stabilen Labortisch, um die Vibration am Microarray zu minimieren, die durch schnelles Scannen der Laseranregung ausgelöst wird. Stellen Sie den Scanner nicht in der Nähe von Laborausrüstung auf, die Vibrationen erzeugt.
VORSICHT Der SureScan Dx-Scanner reagiert empfindlich auf kondensierende Luftfeuchtigkeit. Befolgen Sie die in der Produktdokumentation genannten Sicherheitsvorkehrungen. Siehe „Luftfeuchtigkeitsbedingungen“ auf Seite 210.

Basic Instructions for Use (multilingual) 7 Bedienungsanweisungen
SureScan Dx System User Guide 211
Um eine optimale SureScan Dx-Scannerleistung sicherzustellen, nehmen Sie den Scanner nur in Betrieb, wenn der angegebene Luftfeuchtigkeitsbereich eingehalten werden kann.
Betrieb: 15% bis 85% relative Luftfeuchtigkeit bei 30 °C.
BedienungsanweisungenSchritt 1. Einschalten des SureScan Dx-Microarray-Scanners und Starten des Scan-Steuerungsprogramms
1 Schalten Sie den SureScan Dx-Scanner am Netzschalter an der Vorderseite des Geräts ein.
2 Schalten Sie die Computer-Arbeitsstation ein und warten Sie, bis sie hochgefahren ist.
3 Doppelklicken Sie auf das Symbol Agilent Microarray Scan Control, um das Scan-Steuerungsprogramm zu starten.
Abbildung 36 „Agilent Microarray Scan Control“ Symbol
Beim Programmstart wird das Hauptfenster des Agilent Agilent Microarray-Scan-Steuerungsprogramms geöffnet und der Scanner führt seine Initialisierungssequenz aus. Nach der Initialisierungssequenz wird die Schaltfläche „Open Door“ aktiviert und Sie können Objektträger laden. Siehe Abbildung 37 auf Seite 212.
HINWEIS Wenn der Scanner beim Einschalten 24 Objektträger geladen hat, misslingt die Initialisierung, weil er den Objektträger-Auswurfzyklus nicht ausführen kann.

212 SureScan Dx System User Guide
7 Basic Instructions for Use (multilingual) Bedienungsanweisungen
Abbildung 37 Fenster des Agilent Microarray-Scan-Steuerungsprogramms – bereit zum Hinzufügen von Objektträgern.
Der Status des Scanners wird in der unteren rechten Ecke des Scan-Steuerungsfensters in der Statusleiste angezeigt.
Schritt 2. Einlegen der Objektträger in die Halter
Fingerabdrücke führen zu Fehlern bei der Fluoreszenzdetektion. Fassen Sie die Objektträger nur an den Kanten an und arbeiten Sie bei der Handhabung der Objektträger immer mit Handschuhen.
1 Legen Sie den Objektträger vor Einsetzen in den Halter auf eine flache Oberfläche, wobei die klare Abdeckung nach oben und die Nase nach rechts weist. So können Sie leichter

Basic Instructions for Use (multilingual) 7 Bedienungsanweisungen
SureScan Dx System User Guide 213
sicherstellen, dass Sie den Objektträger richtig ausgerichtet haben, wenn Sie ihn in den Halter einsetzen.
2 Drücken Sie das mit der Nase versehene Ende der klaren Kunststoffabdeckung sanft nach unten und ziehen Sie es zum Öffnen nach oben.
Abbildung 38 Öffnen des Objektträgerhalters
3 Legen Sie den Objektträger wie folgt in den Objektträgerhalter:
a Halten Sie den Objektträger am Strichcodeende.
b Achten Sie darauf, dass die aktive Microarray-Oberfläche nach oben gerichtet ist, gegen die Objektträgerabdeckung, und der Strichcode sich an der linken Seite befindet.
c Platzieren Sie das Ende des Objektträgers, an dem sich der Strichcode nicht befindet, vorsichtig auf der Objektträgerauflage. Siehe Abbildung 39.
d Senken Sie den Objektträger behutsam in den Objektträgerhalter ab. Siehe Abbildung 40.
e Schließen Sie die Objektträgerabdeckung aus Kunststoff, wobei Sie auf das Ende mit der Nase drücken, bis Sie ein
VORSICHT Drücken Sie die Nase nicht mehr als nötig ein, um die Abdeckung zu entriegeln. Ansonsten könnte der Objektträgerhalter beschädigt werden und ein korrektes Verriegeln verhindert werden.
Verwenden Sie keine beschädigten Objektträgerhalter, da sie sich im Scanner verhaken können.

214 SureScan Dx System User Guide
7 Basic Instructions for Use (multilingual) Bedienungsanweisungen
Klicken hören. So wird der Objektträger im Halter in die richtige Position gebracht.
f Drücken Sie das mit der Nase versehene Ende der klaren Kunststoffabdeckung sanft nach unten, ziehen Sie es zum erneuten Öffnen nach oben und überzeugen Sie sich von der richtigen Positionierung des Objektträgers.
Nach dem Einsetzen liegt der Objektträger plan und den Ausrichtungspunkten am Objektträgerhalter gemäß in seiner Position.
g Schließen Sie die Objektträgerabdeckung aus Kunststoff, wobei Sie auf das Ende mit der Nase drücken, bis Sie ein Klicken hören. Siehe Abbildung 41.
Abbildung 39 Einlegen des Objektträgers in den Objektträgerhalter
VORSICHT Wenn die Nase der Kunststoff-Objektträgerabdeckung überspannt ist, rastet sie möglicherweise nicht ordnungsgemäß ein. Entsorgen Sie Objektträgerhalter, die beim Verschließen nicht mehr klicken.
VORSICHT Wenn der Objektträgerhalter korrekt verschlossen ist, liegt die Oberseite der Nase bündig mit der Oberfläche des Unterteils oder unterhalb der Oberfläche des Unterteils. Wenn dies nicht der Fall ist, den Objektträgerhalter nicht mehr verwenden, da die Nase beschädigt sein könnte.
Objektträgerauflage

Basic Instructions for Use (multilingual) 7 Bedienungsanweisungen
SureScan Dx System User Guide 215
Abbildung 40 In Objektträgerhalter eingelegter Objektträger
Abbildung 41 Objektträgerhalter – geschlossen mit Objektträger
Agilent Objektträger verfügen über zwei Strichcodes, einem auf jeder Seite des Glases. Siehe Abbildung 42. Platzieren Sie die Objektträgerseite mit dem aktiven Microarray so, dass sie nach oben in Richtung des Deckels des Halters zeigt.
VORSICHT Ein nicht ordnungsgemäß eingelegter Objektträger kann zu Beschädigungen am SureScan Dx-Scanner führen.
Ein beschädigter oder nicht korrekt verschlossener Objektträgerhalter kann sich im Scanner verhaken.

216 SureScan Dx System User Guide
7 Basic Instructions for Use (multilingual) Bedienungsanweisungen
Abbildung 42 Ausrichtung des Objektträgers
Schritt 3. Laden des Halters in die Kassette
1 Klicken Sie im Scan-Steuerungsprogrammfenster auf Open Door, um die Scannertür zu öffnen.
2 Greifen Sie den Objektträgerhalter am Griffpunkt. Der Pfeil an der Oberseite des Objektträgerhalters weist nach links, wenn Sie den Objektträgerhalter richtig greifen. Siehe Abbildung 43.
VORSICHT Die richtige Methode zum Öffnen der Scannertür ist die Verwendung der Schaltfläche „Open Door“ im Scan-Steuerungsprogramm. Versuchen Sie nicht, die Tür manuell zu öffnen.

Basic Instructions for Use (multilingual) 7 Bedienungsanweisungen
SureScan Dx System User Guide 217
Abbildung 43 Der Objektträgerhalter erleichtert Ihnen das richtige Einlegen des Objektträgers
Setzen Sie einen Objektträgerhalter in einen beliebigen offenen Steckplatz ein. Die Objektträgerkassette ist deutlich mit den Steckplatznummern beschriftet. Versuchen Sie nicht, den Objektträgerhalter in die Kassette zu zwängen; er lässt sich mühelos einsetzen, wenn er richtig ausgerichtet ist, d. h. wenn der Griffpunkt oben ist und der Pfeil nach links weist.
Pfeil erleichtert das ErkennenScannerausrichtung
Griffpunkt
VORSICHT Wenn Sie beim Einsetzen des Objektträgerhalters in die Kassette Widerstand spüren, ist der Objektträgerhalter möglicherweise nicht ordnungsgemäß verschlossen oder beschädigt. Überprüfen und schließen Sie den Objektträgerhalter oder tauschen Sie ihn ggf. aus.
218 SureScan Dx System User Guide
7 Basic Instructions for Use (multilingual) Bedienungsanweisungen
Abbildung 44 Einsetzen des Objektträgerhalters in die Kassette
3 Stellen Sie sicher, dass der Halter fest am Boden des Kassettensteckplatzes sitzt.
Die Steckplatznummer des geladenen Objektträgers blinkt blau.
4 Wiederholen Sie die Schritte 2 bis 3, bis alle Objektträgerhalter in die Kassette geladen sind.
5 Klicken Sie im Scan-Steuerungsprogramm auf Close Door.
Für Objektträger, deren Konstruktion kein Scan-Protokoll zugeordnet ist, bleibt das Scan-Protokoll leer und der Steckplatzstatus „Present“. Weisen Sie wie in „Schritt 4. Festlegen oder Ändern von Einstellungen des Scan-Protokolls” beschrieben ein Scan-Protokoll zu.
VORSICHT Eine unsachgemäße Platzierung des Halters in der Kassette kann zu schweren Beschädigungen am SureScan Dx-Microarray-Scanner führen.

Basic Instructions for Use (multilingual) 7 Bedienungsanweisungen
SureScan Dx System User Guide 219
Schritt 4. Festlegen oder Ändern von Einstellungen des Scan-Protokolls
Die aktuellen Einstellungen des Scan-Protokolls werden für jeden ausgewählten Objektträger im rechten Feld des Hauptfensters der Scan-Steuerungssoftware angezeigt.
Wenn Sie zum ersten Mal die Einrichtung zum Scannen eines Objektträgers vornehmen, wählen Sie ein zu verwendendes Scan-Protokoll. • Klicken Sie für jeden Objektträger in der Steckplatztabelle
auf das Scan-Protokoll, und wählen Sie ein Scan-Protokoll aus, das zum Scannen des Objektträgers verwendet werden soll. Agilent liefert acht vorkonfigurierte Protokolle, die Ihnen zur Auswahl und Verwendung mit Agilent High-Density (HD)-Microarrays und Agilent G3 Microarrays zur Verfügung stehen.
AgilentHD_GX_2Color Agilent HD-Genexpressions-Microarrays mit 2 Farben
AgilentHD_GX_1Color Agilent HD-Genexpressions-Microarrays mit 1 Farbe
AgilentG3_GX_2Color Agilent G3-Genexpressions-Microarrays mit 2 Farben
AgilentG3_GX_1Color Agilent G3-Genexpressions-Microarrays mit 1 Farbe
AgilentHD_CGH Agilent HD-CGH/CGH+SNP/CNV/ChIP-Microarrays
AgilentG3_CGH Agilent G3-CGH/CGH+SNP/CNV/ChIP-Microarrays
AgilentHD_miRNA Agilent HD-miRNA-Microarrays
AgilentG3_miRNA Agilent G3-miRNA-Microarrays
Schritt 5. (Optional) Ändern des Ausgabeordners
Sie können den festgelegten Ausgabeordner ändern, in dem das Programm die durch den Scanner erstellten Bilddateien speichert.• Klicken Sie für jeden Objektträger auf den Ausgabeordner
und navigieren Sie zum Speicherort des gewünschten Ordners. Agilent empfiehlt, einen lokalen Ordner auf einer zweiten Festplatte auszuwählen.
Schritt 6. Hinzufügen von Objektträgern zur Scan-Warteschlange
1 Klicken Sie im Hauptfenster des Scan-Steuerungsprogramms auf All to Queue, um alle Objektträger in der

220 SureScan Dx System User Guide
7 Basic Instructions for Use (multilingual) Bedienungsanweisungen
Steckplatztabelle mit dem Status „Ready for queue“ der Scan-Warteschlange hinzuzufügen.Ein Bestätigungsdialogfenster wird geöffnet. Klicken Sie auf Yes, um die Objektträger der Warteschlange hinzuzufügen.ODERKlicken Sie in der Steckplatztabelle des Scan-Steuerungsprogramms für den ersten zu scannenden Objektträger auf die Zelle State und klicken Sie auf Add to Queue.
2 Für jeden zusätzlichen Objektträger, den Sie scannen möchten: • Klicken Sie auf die Zelle State und wählen Sie Add to
queue first, um den Objektträger am Anfang der Scan-Warteschlange hinzuzufügen.
ODER • Klicken Sie auf die Zelle State und wählen Sie Add to
queue last, um den Objektträger am Ende der Scan-Warteschlange hinzuzufügen.
Wenn Sie alle Objektträger aus der Warteschlange entfernen müssen, klicken Sie im Hauptfenster des Scan-Steuerungsprogramms auf Empty Queue.
Schritt 7. Scannen der Objektträger
1 Klicken Sie ggf. im Hauptfenster des Scan-Steuerungsprogramms auf Close Door.Warten Sie, bis die Tür schließt und die Schaltfläche Start Scan aktiviert ist.
2 Klicken Sie im Hauptfenster des Scan-Steuerungsprogramms auf Start Scan, um mit dem Scannen der Objektträger zu beginnen, die der Warteschlange hinzugefügt wurden.
Schritt 8. Entfernen der Objektträger
1 Klicken Sie im Hauptfenster des Scan-Steuerungsprogramms auf Open Door, um die Scannertür zu öffnen.
2 Öffnen Sie die Scannertür und nehmen Sie die Objektträgerhalter aus der Kassette.

Basic Instructions for Use (multilingual) 7 Bedienungsanweisungen
SureScan Dx System User Guide 221
3 Nehmen Sie die Objektträger wie folgt aus den Haltern:a Halten Sie den Halter für die Objektträger mit den Seiten
nach oben, auf denen das Agilent Logo abgebildet ist.b Drücken Sie das mit der Nase versehene Ende der klaren
Kunststoffabdeckung sanft nach unten und ziehen Sie es zum Öffnen nach oben.
c Drücken Sie das Ende des Objektträgers mit dem Strichcode von der Unterseite des Halters nach oben, um Fingerabdrücke in dem Bereich mit der Probe zu vermeiden.
d Fassen Sie den Objektträger an den Seiten an und nehmen Sie ihn aus dem Halter.

222 SureScan Dx System User Guide
7 Basic Instructions for Use (multilingual) Linee guida di sicurezza
Istruzioni di base per l'uso
Linee guida di sicurezzaLo scanner SureScan Dx è concepito per un impiego semplice e sicuro. Assicurarsi di comprendere e osservare tutte le avvertenze e gli avvisi prima di utilizzare lo scanner SureScan Dx.
Condizioni di umiditàLo scanner SureScan Dx è sensibile alle condizioni di umidità con generazione di condensa. Consentire sempre 12 ore di equilibrazione termica prima di togliere lo scanner dall'imballo dopo la consegna.
AVVERTENZA Non tentare di riparare o di accedere ai componenti interni dello scanner SureScan Dx. Sussiste il rischio di esporsi ad alta tensione e a radiazioni laser pericolose. La rimozione del coperchio principale rende nulla la garanzia.
AVVERTENZA Collegare lo scanner SureScan Dx a una presa di alimentazione dotata di messa a terra. Per la sicurezza è necessaria una messa a terra di protezione.
ATTENZIONE Al fine di ridurre al minimo le vibrazioni dovute alla rapida scansione dell'eccitazione laser nel microarray, installare lo scanner su un tavolo da laboratorio o un piano robusto. Non installare lo scanner in prossimità di altre apparecchiature di laboratorio che potrebbero produrre vibrazioni.
ATTENZIONE Lo scanner SureScan Dx è sensibile alle condizioni di umidità con generazione di condensa. Osservare le precauzioni indicate nella documentazione del prodotto. Vedere “Condizioni di umidità” a pagina 222.

Basic Instructions for Use (multilingual) 7 Istruzioni d'uso
SureScan Dx System User Guide 223
Per garantire ottime prestazioni dello scanner SureScan Dx, utilizzare lo scanner rispettando gli intervalli di umidità specificati.
In funzione: da 15% a 85% umidità relativa a 30 °C
Istruzioni d'usoOperazione 1. Accensione dello scanner per microarray SureScan Dx e avvio del programma Scan Control
1 Accendere SureScan Dx utilizzando l'interruttore posto sulla parte anteriore dello strumento.
2 Accendere la postazione di lavoro e attendere l'avvio del computer.
3 Fare doppio clic sull'icona Agilent Microarray Scan Control per avviare il programma Scan Control.
Figura 36 Icona Agilent Microarray Scan Control
Dopo l'avvio del programma, la finestra principale di Agilent Microarray Scan Control si apre e lo scanner effettua la sequenza di inizializzazione. Al termine della sequenza di inizializzazione, si attiva il pulsante Open Door ed è possibile iniziare a caricare i vetrini. Vedere Figura 37 a pagina 224.
NOTA Se all'accensione sono presenti nello scanner 24 vetrini caricati, l'inizializzazione non andrà a buon fine perché non sarà possibile eseguire il ciclo di espulsione dei vetrini.

224 SureScan Dx System User Guide
7 Basic Instructions for Use (multilingual) Istruzioni d'uso
Figura 37 Finestra del programma Agilent Microarray Scan Control – lo scanner è pronto per l'inserimento dei vetrini.
Lo stato dello scanner è indicato nell'angolo in basso a destra della finestra Scan Control, nella barra di stato.
Operazione 2. Inserimento dei vetrini nei portavetrini
Le impronte digitali causano errori nel rilevamento della fluorescenza. Usare sempre i guanti quando si maneggiano i vetrini, facendo attenzione a toccare solo i bordi.
1 Prima di inserire un vetrino, collocare il portavetrini su una superficie piana, con il coperchio trasparente rivolto verso l'alto e la linguetta a destra. Questa accortezza serve a garantire che il vetrino sia allineato correttamente durante l'inserimento nel portavetrini.

Basic Instructions for Use (multilingual) 7 Istruzioni d'uso
SureScan Dx System User Guide 225
2 Spingere e sollevare delicatamente la linguetta del coperchio di plastica trasparente per aprirlo.
Figura 38 Apertura del portavetrini
3 Inserire il vetrino nel portavetrini seguendo le indicazioni sotto riportate:a Mantenere il vetrino tenendolo dall'estremità del codice a
barre.b Verificare che la superficie attiva con il microarray sia
rivolta verso l'alto, verso il coperchio, con il codice a barre a sinistra.
c Posizionare con cautela l'estremità del vetrino senza l'etichetta del codice a barre sul supporto del vetrino. Vedere Figura 39.
d Abbassare delicatamente il vetrino nel portavetrini. Vedere Figura 40.
e Chiudere il coperchio di plastica del vetrino, spingendo sull'estremità della linguetta fino a sentire un 'clic'. Questa operazione posiziona il vetrino nel portavetrini.
f Spingere e sollevare delicatamente la linguetta del coperchio di plastica trasparente dal bordo esterno per
ATTENZIONE Non premere la linguetta più di quanto dovuto per sbloccare il coperchio. L'operazione potrebbe danneggiare il portavetrini e impedire il bloccaggio corretto.
Non utilizzare portavetrini danneggiati in quanto potrebbero bloccarsi nello scanner.

226 SureScan Dx System User Guide
7 Basic Instructions for Use (multilingual) Istruzioni d'uso
aprirlo nuovamente e verificare che il vetrino sia posizionato correttamente.Una volta inserito, il vetrino rimane piatto e allineato ai riferimenti sul portavetrini.
g Chiudere il coperchio di plastica del vetrino, spingendo sull'estremità della linguetta fino a sentire un 'clic'. Vedere Figura 41.
Figura 39 Inserimento del vetrino nel portavetrini
ATTENZIONE Se la linguetta del coperchio di plastica del vetrino è stata tirata troppo, potrebbe non chiudersi correttamente. Nel caso in cui non si avverta il 'clic' dopo diversi tentativi, sostituire il portavetrini.
ATTENZIONE Se la chiusura è avvenuta correttamente, la parte superiore della linguetta risulterà a filo con la superficie della base o sotto la superficie della base. Se la chiusura non è avvenuta correttamente, non utilizzare il portavetrini in quanto la linguetta potrebbe essere danneggiata.
Supporto del vetrino

Basic Instructions for Use (multilingual) 7 Istruzioni d'uso
SureScan Dx System User Guide 227
Figura 40 Vetrino inserito nel portavetrini
Figura 41 Portavetrini – chiuso con vetrino
I vetrini Agilent hanno due codici a barre, uno su ciascun lato del vetro. Vedere Figura 42. Posizionare il vetrino con il lato attivo, su cui è presente il microarray, rivolto verso il coperchio del portavetrini.
ATTENZIONE Un vetrino inserito in maniera impropria può danneggiare lo scanner SureScan Dx.
Un portavetrini danneggiato o chiuso non correttamente potrebbe bloccarsi nello scanner.

228 SureScan Dx System User Guide
7 Basic Instructions for Use (multilingual) Istruzioni d'uso
Figura 42 Orientamento del vetrino
Operazione 3. Caricamento dei portavetrini nel caricatore
1 Nella finestra del programma Scan Control, fare clic su Open Door per aprire lo sportello dello scanner.
2 Sollevare il portavetrini utilizzando la maniglia. Se si solleva correttamente il portavetrini, la freccia sulla parte alta del portavetrini è rivolta verso sinistra. Vedere Figura 43.
ATTENZIONE Per aprire correttamente lo sportello dello scanner è necessario utilizzare il pulsante Open Door nel programma Scan Control. Non tentare di aprire lo sportello manualmente.

Basic Instructions for Use (multilingual) 7 Istruzioni d'uso
SureScan Dx System User Guide 229
Figura 43 Il portavetrini aiuta a inserire i vetrini in modo appropriato
Inserire un portavetrini in uno slot aperto. I numeri degli slot sono chiaramente marcati sul caricatore. Non forzare il portavetrini nel caricatore: il portavetrini entra facilmente nel caricatore se adeguatamente allineato con la maniglia verso l'alto e la freccia rivolta a sinistra.
La freccia aiuta a identificarel'orientamento dello scanner
Maniglia
ATTENZIONE Se si riscontrasse resistenza nel porre il portavetrini nel caricatore, il portavetrini potrebbe non essere chiuso correttamente o potrebbe essere danneggiato. Verificare il portavetrini e chiuderlo o sostituirlo se necessario.

230 SureScan Dx System User Guide
7 Basic Instructions for Use (multilingual) Istruzioni d'uso
Figura 44 Inserimento del portavetrini nel caricatore
3 Accertarsi che il portavetrini sia ben alloggiato sul fondo dello slot del caricatore. Il numero di slot corrispondente al vetrino caricato lampeggia di colore blu.
4 Ripetere i punti da 2 a 3 finché tutti i portavetrini non saranno caricati nel caricatore.
5 Nel programma Scan Control, fare clic su Close Door.
Per i vetrini che non hanno un protocollo di scansione mappato nel relativo design, il protocollo di scansione rimane vuoto e lo stato dello slot resta impostato su "Present" . Attribuire un protocollo di scansione, come descritto in “Operazione 4. Impostazione o modifica delle impostazioni del protocollo di scansione”.
ATTENZIONE Il posizionamento improprio del portavetrini nel caricatore può causare gravi danni allo scanner per microarray SureScan Dx.

Basic Instructions for Use (multilingual) 7 Istruzioni d'uso
SureScan Dx System User Guide 231
Operazione 4. Impostazione o modifica delle impostazioni del protocollo di scansione
Le impostazioni correnti per il protocollo di scansione sono visualizzate per ciascun vetrino selezionato nel riquadro di destra della finestra principale del software Scan Control.
Se si imposta la scansione di un vetrino per la prima volta, è necessario selezionare un protocollo di scansione da utilizzare. • Per ciascun vetrino nella tabella slot, fare clic su Scan
Protocol e selezionare un protocollo di scansione da utilizzare per la scansione del vetrino. Agilent fornisce otto protocolli precaricati per la selezione e l'utilizzo con i microarray ad alta densità Agilent (HD) e i microarray Agilent G3.
AgilentHD_GX_2Color Microarray di espressione genetica Agilent HD a 2 colori
AgilentHD_GX_1Color Microarray di espressione genetica Agilent HD a 1 colore
AgilentG3_GX_2Color Microarray di espressione genetica Agilent G3 a 2 colori
AgilentG3_GX_1Color Microarray di espressione genetica Agilent G3 a 1 colore
AgilentHD_CGH Microarray Agilent HD CGH/CGH+SNP/CNV/ChIP
AgilentG3_CGH Microarray Agilent G3 CGH/CGH+SNP/CNV/ChIP
AgilentHD_miRNA Microarray Agilent HD miRNA
AgilentG3_miRNA Microarray Agilent G3 miRNA
Operazione 5. (Opzionale) Modifica della cartella di output
È possibile modificare la cartella di output specificata in cui il programma salva i file di immagine creati dallo scanner.• Per ciascun vetrino nella tabella degli slot, fare clic su Output
Folder e selezionare il percorso della cartella desiderata. Agilent consiglia di selezionare una cartella locale su un disco rigido secondario.
Operazione 6. Aggiunta di vetrini alla coda di scansione
1 Nella finestra principale di Scan Control, fare clic su All to Queue per aggiungere tutti i vetrini nella tabella degli slot con stato "Ready for queue" alla coda di scansione.Viene visualizzata una finestra di dialogo di conferma. Fare clic su Yes per aggiungere i vetrini alla coda.IN ALTERNATIVA

232 SureScan Dx System User Guide
7 Basic Instructions for Use (multilingual) Istruzioni d'uso
Nella tabella degli slot Scan Control, fare clic sulla cella State per il primo vetrino da sottoporre a scansione, quindi fare clic su Add to Queue.
2 Per ciascun vetrino aggiuntivo da sottoporre a scansione,
• Fare clic sulla cella State e selezionare Add to queue first per aggiungere il vetrino in cima alla coda di scansione.
IN ALTERNATIVA
• Fare clic sulla cella State e selezionare Add to queue last per aggiungere il vetrino in fondo alla coda di scansione.
Per rimuovere tutti i vetrini dalla coda, fare clic su Empty Queue nella finestra principale di Scan Control.
Operazione 7. Scansione dei vetrini
1 Se necessario, nella finestra principale di Scan Control, fare clic su Close Door.
Attendere che lo sportello si richiuda; il pulsante Start Scan è ora attivo.
2 Nella finestra principale di Scan Control, fare clic su Start Scan per avviare la scansione dei vetrini aggiunti alla coda.
Operazione 8. Rimozione dei vetrini
1 Nella finestra principale di Scan Control, fare clic su Open Door per aprire lo sportello dello scanner.
2 Aprire lo sportello dello scanner e rimuovere i portavetrini dal caricatore.
3 Rimuovere i vetrini dal portavetrini nel modo seguente:
a Tenere il portavetrini per i lati con il logo Agilent rivolto verso l'alto.
b Spingere e sollevare delicatamente la linguetta del coperchio di plastica trasparente per aprirlo.
c Spingere sull'estremità del codice a barre del vetrino da sotto il portavetrini per evitare di lasciare impronte sull'area del campione.
d Afferrare il vetrino dai lati e rimuoverlo dal portavetrini.

Basic Instructions for Use (multilingual) 7 Ieteikumi par drošību
SureScan Dx System User Guide 233
Norādes latviešu valodā
Ieteikumi par drošībuSureScan Dx skeneris ir paredzēts drošai un vienkāršai izmantošanai. Pirms SureScan Dx skenera lietošanas pārliecinieties, vai izprotat un ievērojat visus brīdinājumus un piesardzības pasākumus.
MitrumsSureScan Dx skeneris ir jutīgs pret kondensācijas mitruma ietekmi. Pirms pārvadāšanas iepakojuma atvēršanas vienmēr nogaidiet 12 stundas termālās stabilizēšanas nolūkā.
WARNINGBRĪDINĀJUMS Nemēģiniet veikt remontu vai piekļūt SureScan Dx skenera iekšējiem komponentiem. Šādas darbības izraisa augsta sprieguma un kaitīga lāzerstarojuma iedarbības risku. Galvenā pārsega noņemšanas gadījumā tiek anulēta garantija.
WARNINGBRĪDINĀJUMS SureScan Dx skeneri pievienojiet iezemētai elektrības rozetei. Aizsargzemējums ir nepieciešams drošības nolūkos.
UZMANĪBU Lai pēc iespējas samazinātu vibrāciju, ko izraisa ātra lāzera ieroses skenēšana mikromasīvā, uzstādiet skeneri uz izturīga laboratorijas sola vai galda. Neuzstādiet skeneri cita laboratorijas aprīkojuma, kas var izraisīt vibrāciju, tuvumā.
UZMANĪBU SureScan Dx skeneris ir jutīgs pret kondensācijas mitruma ietekmi. Ievērojiet piesardzības pasākumus, kas norādīti izstrādājuma dokumentācijā. Skatiet “Mitrums” lappusē 233.

234 SureScan Dx System User Guide
7 Basic Instructions for Use (multilingual) Darbības norādījumi
Lai nodrošinātu optimālu veiktspēju, izmantojiet SureScan Dx skeneri tikai tālāk norādītajā mitruma diapazonā.
Darbība: 15–85% relatīvā mitruma 30 °C temperatūrā
Darbības norādījumi1. solis. Ieslēdziet SureScan Dx mikromasīva skeneri un sāciet programmu Scan Control (Skenēšanas vadība)1 Ieslēdziet SureScan Dx skeneri ar barošanas slēdzi
instrumenta priekšpusē.
2 Ieslēdziet datora darbstaciju un pagaidiet, kamēr tā tiek sāknēta.
3 Veiciet dubultklikšķi uz ikonas Agilent Microarray Scan Control (Agilent mikromasīva skenēšanas vadība), lai sāktu programmu Scan Control (Skenēšanas vadība).
Fattēls 36 Agilent mikromasīva skenēšanas vadības ikona
Sākot programmu, tiek atvērts programmas Agilent Microarray Scan Control (Agilent mikromasīva skenēšanas vadība) galvenais logs un skeneris izpilda inicializācijas secību. Kad inicializācijas secība ir pabeigta, tiek iespējota poga Open Door (Atvērt durvis) un jūs varat ievietot priekšmetstikliņus. Skatiet Fattēls 37 lappusē 235.
PIEZĪME Ja, ieslēdzot skeneri, tajā ir ievietoti 24 priekšmetstikliņi, inicializācija neizdosies, jo nevar veikt priekšmetstikliņa izstumšanas ciklu.

Basic Instructions for Use (multilingual) 7 Darbības norādījumi
SureScan Dx System User Guide 235
Fattēls 37 Programmas Agilent Microarray Scan Control (Agilent mikromasīva skenēšanas vadība) logs, gatavs priekšmetstikliņu pievienošanai.
Skenera statuss ir redzams statusa joslā (loga Scan Control (Skenēšanas vadība) apakšā pa labi).
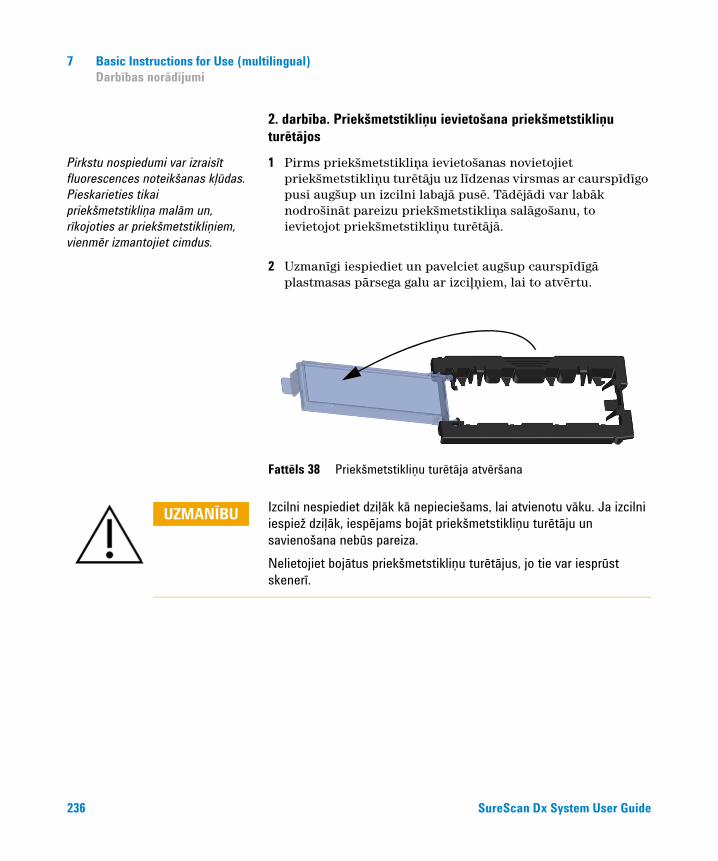
236 SureScan Dx System User Guide
7 Basic Instructions for Use (multilingual) Darbības norādījumi
2. darbība. Priekšmetstikliņu ievietošana priekšmetstikliņu turētājos
Pirkstu nospiedumi var izraisīt fluorescences noteikšanas kļūdas. Pieskarieties tikai priekšmetstikliņa malām un, rīkojoties ar priekšmetstikliņiem, vienmēr izmantojiet cimdus.
1 Pirms priekšmetstikliņa ievietošanas novietojiet priekšmetstikliņu turētāju uz līdzenas virsmas ar caurspīdīgo pusi augšup un izcilni labajā pusē. Tādējādi var labāk nodrošināt pareizu priekšmetstikliņa salāgošanu, to ievietojot priekšmetstikliņu turētājā.
2 Uzmanīgi iespiediet un pavelciet augšup caurspīdīgā plastmasas pārsega galu ar izciļņiem, lai to atvērtu.
Fattēls 38 Priekšmetstikliņu turētāja atvēršana
UZMANĪBU Izcilni nespiediet dziļāk kā nepieciešams, lai atvienotu vāku. Ja izcilni iespiež dziļāk, iespējams bojāt priekšmetstikliņu turētāju un savienošana nebūs pareiza. Nelietojiet bojātus priekšmetstikliņu turētājus, jo tie var iesprūst skenerī.

Basic Instructions for Use (multilingual) 7 Darbības norādījumi
SureScan Dx System User Guide 237
3 Priekšmetstikliņu ievietojiet turētājā šādi:
a turiet priekšmetstikliņu aiz svītrkoda gala;
b pārliecinieties, vai aktīvā mikromasīva virsma ir vērsta augšup, priekšmetstikliņu pārsega virzienā, ar svītrkodu kreisajā pusē;
c priekšmetstikliņa galu bez svītrkoda uzlīmes novietojiet uz priekšmetstikliņa malas. skatiet Fattēls 39;
d priekšmetstikliņu uzmanīgi ielaidiet priekšmetstikliņu turētājā. skatiet Fattēls 40;
e aizveriet priekšmetstikliņu plastmasas pārsegu, piespiežot izciļņa galu, līdz dzirdams klikšķis. Tādējādi priekšmetstikliņš novietojas pareizā vietā turētājā.
f Uzmanīgi iespiediet un pavelciet augšup caurspīdīgā plastmasas pārsega galu ar izciļņiem, lai to atkal atvērtu, un pārbaudiet, vai priekšmetstikliņš ir novietots pareizi.
Pēc ievietošanas priekšmetstikliņš atrodas līdzeni un ir saskaņots ar salāgojuma punktiem uz priekšmetstikliņu turētāja;
g aizveriet priekšmetstikliņu plastmasas pārsegu, piespiežot izciļņa galu, līdz dzirdams klikšķis. Skatiet Fattēls 41.
UZMANĪBU Ja izcilnis uz priekšmetstikliņu plastmasas pārsega ir pārmērīgi nostiepts, tas nevar pareizi nonākt vietā ar klikšķi. Likvidējiet priekšmetstikliņu turētājus, kas aizverot vairs neklikšķ.
UZMANĪBU Kad izcilnis ir pareizi aizvērts, tā augšmala ir vienā līmenī ar pamatnes virsmu vai zem pamatnes virsmas. Ja tā nenotiek, priekšmetstikliņu turētāju nedrīkst lietot, jo izcilnis iespējams ir bojāts.

238 SureScan Dx System User Guide
7 Basic Instructions for Use (multilingual) Darbības norādījumi
Fattēls 39 Priekšmetstikliņa ievietošana priekšmetstikliņu turētājā
Fattēls 40 Priekšmetstikliņu turētājā ievietots priekšmetstikliņš
Fattēls 41 Priekšmetstikliņu turētājs – aizvērts ar priekšmetstikliņu
Priekšmetstikliņa mala

Basic Instructions for Use (multilingual) 7 Darbības norādījumi
SureScan Dx System User Guide 239
Agilent priekšmetstikliņiem ir divi svītrkodi (pa vienam katrā stikla pusē). Skatiet Fattēls 42. Priekšmetstikliņa aktīvo mikromasīva pusi novietojiet pret priekšmetstikliņu turētāja pārsegu.
Fattēls 42 Priekšmetstikliņa orientācija
3. solis. Priekšmetstikliņu turētāju ievietošana kasetnē1 Programmas Scan Control (Skenēšanas vadība) logā
noklikšķiniet uz Open Door (Atvērt durvis), lai atvērtu skenera durvis.
2 Paņemiet priekšmetstikliņu turētāju, izmantojot pirkstiem paredzēto turētāju. Ja priekšmetstikliņu turētājs tiek
UZMANĪBU Nepareizi ievietots priekšmetstikliņš var sabojāt SureScan Dx skeneri.Ja priekšmetstikliņu turētājs ir bojāts vai nepareizi aizvērts, tas var iesprūst skenerī.
UZMANĪBU Skenera durvis pareizi jāatver ar pogu Open Door (Atvērt durvis) programmā Scan Control (Skenēšanas vadība). Nemēģiniet atvērt durvis manuāli.

240 SureScan Dx System User Guide
7 Basic Instructions for Use (multilingual) Darbības norādījumi
paņemts pareizi, bultiņa tā augšpusē ir vērsta pa kreisi. Skatiet Fattēls 43.
Fattēls 43 Slaidu turētājs palīdz pareizi ievietot priekšmetstikliņus
Ievietojiet priekšmetstikliņu turētāju jebkurā atvērtajā slotā. Slotu numuri ir skaidri marķēti uz priekšmetstikliņu kasetnes. Nespiediet priekšmetstikliņu turētāju kasetnē; tas ir viegli ievietojams, ja ir pareizi salāgots ar pirkstiem paredzēto turētāju augšpusē un bultiņa ir vērsta pa kreisi.
Bultiņa atvieglo identifikācijuskenera orientācija
Pirkstiem paredzēts turētājs
UZMANĪBU Ja priekšmetstikliņu turētāju ievietojot kasetē jūtat pretestību, priekšmetstikliņu turētājs iespējams nav pareizi aizvērts vai ir bojāts. Pārbaudiet priekšmetstikliņu turētāju un atbilstoši situācijai aizveriet to vai nomainiet.

Basic Instructions for Use (multilingual) 7 Darbības norādījumi
SureScan Dx System User Guide 241
Fattēls 44 Priekšmetstikliņu turētāja ievietošana kasetnē
3 Pārliecinieties, vai priekšmetstikliņu turētājs ir ievietots kasetnes slota apakšā.
Ievietotā priekšmetstikliņa slota numurs mirgo zilā krāsā.
4 Atkārtojiet 2.-3. soli, līdz visi priekšmetstikliņu turētāji ir ievietoti kasetnē.
5 Programmā Scan Control (Skenēšanas vadība) noklikšķiniet uz Close Door (Aizvērt durvis).
Priekšmetstikliņiem, kuriem nav skenēšanas protokola, kas kartēts atbilstoši to noformējumam, skenēšanas protokols paliek tukšs un slota stāvoklis paliek “Present” (Pašreizējais). Piešķiriet skenēšanas protokolu, kā aprakstīts šeit: “4. solis. Protokola skenēšanas iestatījumu iestatīšana vai mainīšana”.
UZMANĪBU Ja priekšmetstikliņu turētājs tiek nepareizi ievietots kasetnē, var nopietni sabojāt SureScan Dx mikromasīva skeneri.

242 SureScan Dx System User Guide
7 Basic Instructions for Use (multilingual) Darbības norādījumi
4. solis. Protokola skenēšanas iestatījumu iestatīšana vai mainīšana
Pašreizējie skenēšanas protokola iestatījumi katram atlasītajam priekšmetstikliņam tiek rādīti Scan Control (Skenēšanas vadība) programmatūras galvenajā logā.
Pirmoreiz iestatot priekšmetstikliņa skenēšanu, atlasiet izmantojamo skenēšanas protokolu.
• Katram priekšmetstikliņam slotu tabulā noklikšķiniet uz Scan Protocol (Skenēšanas protokols), lai atlasītu priekšmetstikliņa skenēšanai izmantojamo skenēšanas protokolu.
Agilent jūsu izvēlei un izmantošanai ar Agilent lielblīvuma (HD) mikromasīviem un Agilent G3 mikromasīviem piedāvā astoņus iepriekš ielādētus protokolus.
AgilentHD_GX_2Color Agilent HD 2-krāsu gēnu izteiksmes mikromasīvi
AgilentHD_GX_1Color Agilent HD 1-krāsas gēnu izteiksmes mikromasīvi
AgilentG3_GX_2Color Agilent G3 2-krāsu gēnu izteiksmes mikromasīvi
AgilentG3_GX_1Color Agilent G3 1-krāsas gēnu izteiksmes mikromasīvi
AgilentHD_CGH Agilent HD CGH/CGH+SNP/CNV/ChIP mikromasīvi
AgilentG3_CGH Agilent G3 CGH/CGH+SNP/CNV/ChIP mikromasīvi
AgilentHD_miRNA Agilent HD miRNA mikromasīvi
AgilentG3_miRNA Agilent G3 miRNA mikromasīvi
5. solis (opcija). Izvades mapes maiņaVarat mainīt norādīto izvades mapi, kur programma saglabā skenera izveidotos attēlu failus.
• Katram slotu tabulas priekšmetstikliņam noklikšķiniet uz Output Folder (Izvades mape) un pārlūkojiet līdz vēlamās mapes atrašanās vietai.
Agilent iesaka atlasīt vietēju mapi sekundārajā cietajā diskā.
6. solis. Priekšmetstikliņu pievienošana skenēšanas rindai1 Programmas Scan Control (Skenēšanas vadība) galvenajā
logā noklikšķiniet uz All to Queue (Visus uz rindu) un visus priekšmetstikliņus no slotu tabulas ar stāvokli “Ready for Queue” (Gatavs rindai) pievienojiet skenēšanas rindai.
Tiek atvērts apstiprināšanas dialoglodziņš. Noklikšķiniet uz Yes (Jā), lai priekšmetstikliņus pievienotu rindai.
VAI

Basic Instructions for Use (multilingual) 7 Darbības norādījumi
SureScan Dx System User Guide 243
Programmas Scan Control (Skenēšanas vadība) slotu tabulā noklikšķiniet uz pirmā skenējamā priekšmetstikliņa šūnas State (Stāvoklis) un noklikšķiniet uz Add to Queue (Pievienot rindai).
2 Katram papildu skenējamam priekšmetstikliņam:
• noklikšķiniet uz šūnas State (Stāvoklis) un atlasiet Add to Queue First (Pievienot rindai kā pirmo), lai priekšmetstikliņu pievienotu skenēšanas rindas sākumā,
VAI
• noklikšķiniet uz šūnas State (Stāvoklis) un atlasiet Add to Queue Last (Pievienot rindai kā pēdējo), lai priekšmetstikliņu pievienotu skenēšanas rindas beigās.
Ja no rindas jānoņem visi priekšmetstikliņi, noklikšķiniet uz Empty Queue (Iztukšot rindu) programmas Scan Control (Skenēšanas vadība) galvenajā logā.
7. solis. Priekšmetstikliņu skenēšana1 Ja nepieciešams, programmas Scan Control (Skenēšanas
vadība) galvenajā logā noklikšķiniet uz Close Door (Aizvērt durvis).
Pagaidiet, līdz durvis ir aizvērtas un ir iespējota poga Start Scan (Sākt skenēšanu).
2 Programmas Scan Control (Skenēšanas vadība) galvenajā logā noklikšķiniet uz Start Scan (Sākt skenēšanu), lai sāktu rindai pievienoto priekšmetstikliņu skenēšanu.
8. solis. Priekšmetstikliņu noņemšana1 Programmas Scan Control (Skenēšanas vadība) logā
noklikšķiniet uz Open Door (Atvērt durvis), lai atvērtu skenera durvis.
2 Atveriet skenera durvis un noņemiet priekšmetstikliņu turētājus no kasetnes.
3 Izņemiet priekšmetstikliņus no priekšmetstikliņu turētājiem, kā norādīts tālāk.
a Turiet priekšmetstikliņu turētāju aiz malām ar Agilent logotipu augšup.
b Uzmanīgi iespiediet un pavelciet augšup caurspīdīgā plastmasas pārsega galu ar izciļņiem, lai to atvērtu.
c Paspiediet augšup priekšmetstikliņa svītrkoda galu no priekšmetstikliņu turētāja apakšas, lai neatstātu pirkstu nospiedumus paraugu zonā.
d Satveriet priekšmetstikliņu no malām un izņemiet no priekšmetstikliņu turētāja.
244 SureScan Dx System User Guide
7 Basic Instructions for Use (multilingual) Saugos rekomendacijos
Instrukcijos lietuvių kalba
Saugos rekomendacijos„SureScan Dx“ skaitytuvas yra suprojektuotas saugiam ir paprastam naudojimui. Prieš pradėdami naudotis „SureScan Dx“ , įsitikinkite, kad suprantate ir laikotės visų įspėjimų ir perspėjimų.
Drėgmės sąlygos„SureScan Dx“ skaitytuvas yra jautrus besikondensuojančios drėgmės sąlygoms. Visada prieš atidarydami pakuotę montavimo vietoje, palikite įrenginį 12 valandų, kad nusistovėtų šiluminė pusiausvyra.
ĮSPĖJIMAS Nebandykite atidaryti arba taisyti „SureScan Dx“ skaitytuvo vidinių komponentų. Rizikuojate būti paveikti aukštos įtampos elektros srovės ir kenksmingo lazerio spinduliavimo. Jeigu bus nuimtas pagrindinis dangtis, garantija nebebus taikoma.
ĮSPĖJIMAS Prijunkite „SureScan Dx“ skaitytuvą prie įžeminto maitinimo lizdo. Saugumo sumetimais lizdas turi būti įžeminimas.
PERSPĖJIMAS Norint sumažinti vibracijas, atsirandančias dėl spartaus išilginio lazeriu sužadintos mikrogardelės nuskaitymo, statykite skaitytuvą ant tvirto laboratorinio suolo arba stalo. Nestatykite skaitytuvo šalia kitos laboratorinės įrangos, kuri gali sukelti vibracijas.
PERSPĖJIMAS „SureScan Dx“ skaitytuvas yra jautrus besikondensuojančios drėgmės sąlygoms. Vadovaukitės atsargumo priemonėmis, pateiktomis gaminio dokumentacijoje. Žr. „Drėgmės sąlygos” puslapyje 244.

Basic Instructions for Use (multilingual) 7 Naudojimo instrukcijos
SureScan Dx System User Guide 245
Norint užtikrinti optimalų našumą, dirbkite su „SureScan Dx“ tik žemiau pateiktose drėgnumo ribose.
Veikimas: 15-85 % santykinis drėgnumas prie 30 °C
Naudojimo instrukcijos1 žingsnis Įjunkite „SureScan Dx“ mikrogardelės skaitytuvą ir paleiskite „Scan Control“ (nuskaitymo valdymo) programą1 Įjunkite „SureScan Dx“ skenerį naudodami priekiniame
prietaisų skydelyje esantį maitinimo mygtuką.
2 Įjunkite kompiuterizuotą darbo vietą ir palaukite, kol kompiuteris pasileis.
3 Norėdami paleisti „Scan Control“ programą, dukart spustelkite „Agilent Microarray Scan Control“ piktogramą.
Paveikslas 36 „Agilent Microarray Scan Control“ piktograma
Kai paleidžiama programa, atsidaro pagrindinis „Agilent Microarray Scan Control“ programos langas ir skaitytuvas atlieka inicijavimo seką. Kai baigiama inicijavimo seka, aktyvinamas durų atidarymo mygtukas ir galite įdėti skaidres. Žr. Paveikslas 37 puslapyje 246.
PASTABA Jeigu įjungus skaitytuvą, jame yra 24 skaidrės, inicijavimas nepavyks, nes jis negali atlikti skaidrių išstūmimo ciklo.

246 SureScan Dx System User Guide
7 Basic Instructions for Use (multilingual) Naudojimo instrukcijos
Paveikslas 37 „Agilent Microarray Scan Control“ programos langas - pasiruošęs įtraukti skaidres.
Skaitytuvo būsena rodoma apatiniame dešiniame „Scan Control“ lango kampe, būsenos juostoje.

Basic Instructions for Use (multilingual) 7 Naudojimo instrukcijos
SureScan Dx System User Guide 247
2 žingsnis Įstatykite skaidres į skaidrių laikiklįPirštų antspaudai sukelia klaidas naudojant medžiagų aptikimą pagal jų fluorescencinį švytėjimą. Kai dirbate su skaidrėmis visada dėvėkite pirštines ir lieskite tik skaidrės kraštus.
1 Prieš įstatydami skaidrę, padėkite skaidrės laikiklį ant lygaus paviršiaus taip, kad skaidrus dangtelis būtų viršuje, o auselė dešinėje. Tai padės užtikrinti, kad tinkamai sulyginote skaidrę, kai įstatote ją į skaidrių laikiklį.
2 Norėdami atidaryti dangtelį švelniai spustelkite ir pakelkite plastikinio dangtelio galą su ausele.
Paveikslas 38 Skaidrių laikiklio atidarymas
PERSPĖJIMAS Nespauskite auselės daugiau, nei reikia dangteliui pakelti. Priešingu atveju sugadinsite skaidrės laikiklį ir dangtelis tinkamai nebeatsidarys. Nenaudokite pažeistų skaidrių laikiklių, nes jie gali užstrigti skaitytuve.
248 SureScan Dx System User Guide
7 Basic Instructions for Use (multilingual) Naudojimo instrukcijos
3 Įstatykite skaidrę į laikiklį kaip parodyta žemiau:
a Laikykite skaidrę už galo su brūkšniniu kodu.
b Įsitikinkite, kad aktyvus mikrogardelių paviršius būtų nukreiptas į viršų, skaidrės dangtelio kryptimi, o brūkšninis kodas būtų kairėje pusėje.
c Atsargiai padėkite skaidrės galą be brūkšninio kodo ant skaidrės laikiklio iškyšos. Žr. Paveikslas 39.
d Atsargiai nuleiskite skaidrę į skaidrių laikiklį. Žr. Paveikslas 40.
e Uždarykite plastikinį skaidrės dangtelį spausdami auselės kraštą iki išgirsite spragtelėjimą. Tai įstatys skaidrę į reikiamą padėtį laikiklyje.
f Švelniai spustelkite ir pakelkite plastikinio dangtelio galą su ausele, kad jį atidarytumėte ir įsitikinkite, kad skaidrės padėtis teisinga.
Kartą įstačius skaidrė bus horizontalioje padėtyje ir atitiks skaidrės laikiklio centravimo taškus.
g Uždarykite plastikinį skaidrės dangtelį spausdami auselės kraštą iki išgirsite spragtelėjimą. Žr. Paveikslas 41.
PERSPĖJIMAS Jeigu per daug spausite auselę, esančią ant skaidrės laikiklio dangtelio, ji gali netinkamai užsifiksuoti. Nebenaudokite skaidrių laikiklius, kurie uždarius neužsifiksuoja.
PERSPĖJIMAS Dangtelį tinkamai uždarius, auselės viršus turi būti sulig pagrindo paviršiumi arba žemiau jo. Jei taip nėra, skaidrės laikiklio nenaudokite, nes auselė gali būti sugadinta.
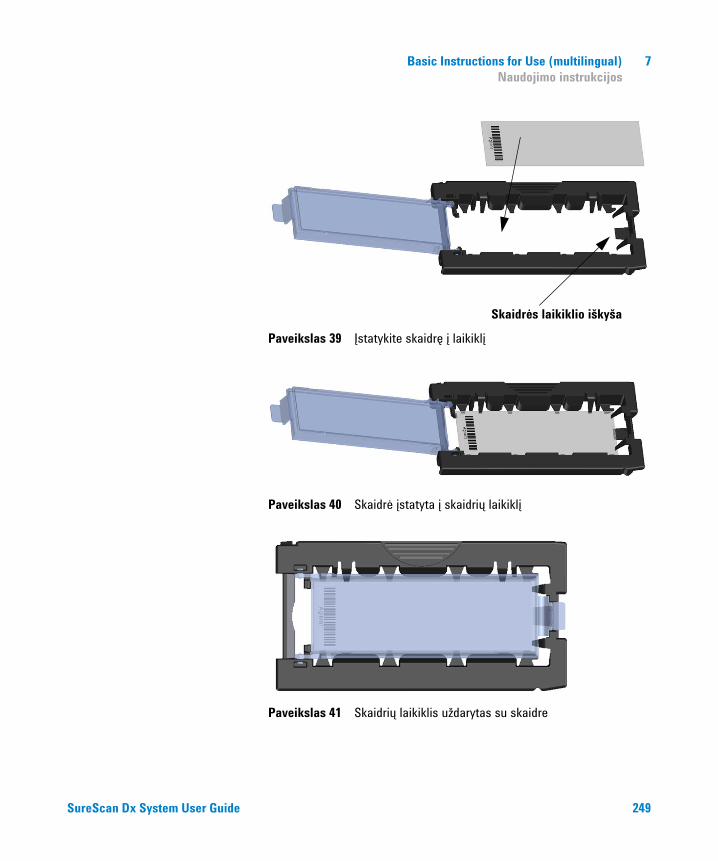
Basic Instructions for Use (multilingual) 7 Naudojimo instrukcijos
SureScan Dx System User Guide 249
Paveikslas 39 Įstatykite skaidrę į laikiklį
Paveikslas 40 Skaidrė įstatyta į skaidrių laikiklį
Paveikslas 41 Skaidrių laikiklis uždarytas su skaidre
Skaidrės laikiklio iškyša
250 SureScan Dx System User Guide
7 Basic Instructions for Use (multilingual) Naudojimo instrukcijos
„Agilent“ skaidrės turi du brūkšninius kodus, po vieną kiekvienoje stiklo pusėje. Žr. Paveikslas 42. Padėkite skaidrę taip, kad aktyvi skaidrės mikrogardelės pusė būtų nukreipta į skaidrės laikiklio dangtelį.
Paveikslas 42 Skaidrės orientavimas
3 žingsnis Įstatykite skaidrės laikiklį į kasetę1 „Scan Control“ programos lange spustelkite „Open Door“
(atidaryti duris), kad atidarytumėte skaitytuvo duris.
2 Paimkite skaidrės laikiklį už tam numatytos vietos. Jeigu teisingai paimate skaidrių laikiklį, ant jo esanti rodyklė turi būti nukreipta į kairę. Žr. Paveikslas 43.
PERSPĖJIMAS Netinkamai įstatyta skaidrė gali sugadinti „SureScan Dx“ skaitytuvą.Sugadintas arba netinkamai uždarytas skaidrės laikiklis gali užstrigti skaitytuve.
PERSPĖJIMAS Teisingas skaitytuvo durų atidarymas galimas tik naudojant „Scan Control“ programos „Open Door“ (atidaryti duris) mygtuką. Nebandykite atidaryti durų rankiniu būdu.

Basic Instructions for Use (multilingual) 7 Naudojimo instrukcijos
SureScan Dx System User Guide 251
Paveikslas 43 Skaitytuvo laikiklis padeda teisingai įstatyti skaidrę
Įstatykite skaidrių laikiklį į bet kurią atvirą angą. Angų numeriai aiškiai sužymėti skaidrių kasetėje. Nedėkite skaidrės laikiklio į kasetę naudodami jėgą; jis įsistato lengvai, jeigu yra tinkamai centruotas naudojant numatytą paėmimo vietą ir kai rodyklė nukreipta į kairę.
Rodyklė padeda identifikuotiskaitytuvo orientavimas
Numatyta paėmimo vieta
PERSPĖJIMAS Jei įstatant skaidrės laikiklį į kasetę jaučiamas pasipriešinimas, skaidrės laikiklis gali būti netinkamai uždarytas arba sugadintas. Patikrinkite skaidrės laikiklį ir uždarykite jį arba pakeiskite.

252 SureScan Dx System User Guide
7 Basic Instructions for Use (multilingual) Naudojimo instrukcijos
Paveikslas 44 Įstatykite skaidrių laikiklį į kasetę
3 Įsitikinkite, kad laikiklis įsistatė į kasetės angą iki galo.
Angos, į kurią buvo įstatyta skaidrė, numeris mirksi mėlynai.
4 Pakartokite žingsnius nuo 2 iki 3 iki visi skaidrių laikikliai bus sudėti į kasetę.
5 „Scan Control“ programoje spustelkite „Close Door“ (uždaryti duris).
Skaidrėms, kurios neturi nuskaitymo protokolo priskirto jų modeliui, nuskaitymo protokolas lieka tuščias ir angos būsena lieka „Present“ (esama). Priskirkite nuskaitymo protokolą kaip aprašyta „4 žingsnis Nuskaitymo protokolo nustatymas arba keitimas”.
PERSPĖJIMAS Netinkamas skaidrės laikiklio įstatymas į kasetę gali sugadinti „SureScan Dx“ mikrogardelės skaitytuvą.

Basic Instructions for Use (multilingual) 7 Naudojimo instrukcijos
SureScan Dx System User Guide 253
4 žingsnis Nuskaitymo protokolo nustatymas arba keitimas„Scan Control“ programinės įrangos pagrindinio lango dešinėje srityje kiekvienai pasirinktai skaidrei rodomi esami nuskaitymo protokolo nustatymai.
Kai pirmą kartą nustatote skaidrės nuskaitymą, pasirinkite nuskaitymo protokolą, kurį naudosite.
• Kiekvienai skaidrei, esančiai stalo angoje, spustelkite „Scan Protocol“ (nuskaitymo protokolas) ir pasirinkite nuskaitymo protokolą, kurį naudosite skaidrei.
„Agilent“ pateikia aštuonis iš anksto įkeltus protokolus, kuriuos galite pasirinkti ir naudoti su „Agilent“ didelės raiškos (HD) ir „Agilent“ G3 mikrogardelėmis.
AgilentHD_GX_2Color „Agilent“ HD 2 spalvų genų išraiškos mikrogardelės
AgilentHD_GX_1Color „Agilent“ HD 1 spalvos genų išraiškos mikrogardelės
AgilentG3_GX_2Color „Agilent“ G3 2 spalvų genų išraiškos mikrogardelės
AgilentG3_GX_1Color „Agilent“ G3 1 spalvos genų išraiškos mikrogardelės
AgilentHD_CGH „Agilent“ HD CGH/CGH+SNP/CNV/ChIP mikrogardelės
AgilentG3_CGH „Agilent“ G3 CGH/CGH+SNP/CNV/ChIP mikrogardelės
AgilentHD_miRNA „Agilent“ HD miRNA mikrogardelės
AgilentG3_miRNA „Agilent“ G3 miRNA mikrogardelės
5 žingsnis (Pasirenkamas papildomai) Išvesties aplanko keitimasGalite keisti nurodytą išvesties aplanką, kuriame programa įrašo vaizdo failus, sukurtus skaitytuvo.
• Kiekvienai skaidrei esančiai stalo angoje, spustelkite „Output Folder“ (išvesties aplankas) ir pereikite į aplanką, kuriame norėsite įrašyti failus.
„Agilent“ rekomenduoja pasirinkti vietinį aplankalą pagalbiniame standžiajame diske.
6 žingsnis Įtraukite skaidres į nuskaitymo eilę1 „Scan Control“ pagrindiniame lange spustelkite „All to
Queue“ (visus į eilę), kad įtrauktumėte visas skaidres į stalo angas į nuskaitymo eilę su būsena „Ready for queue“ (pasiruošęs eilei).
Atsiras patvirtinimo dialogo langas. Spustelkite „Yes“ (taip), kad įtrauktumėte skaidres į eilę.
ARBA

254 SureScan Dx System User Guide
7 Basic Instructions for Use (multilingual) Naudojimo instrukcijos
„Scan Control“ stale su angomis spustelkite „State“ (būsenos) langelį, kad nuskaitytumėte pirmąją skaidrę ir spustelkite „Add to Queue“ (įtraukti į eilę).
2 Kiekvienai papildomai skaidrei, kurią norite nuskaityti,
• Spustelkite „State“ (būsenos) langelį ir pasirinkite „Add to queue first“ (įtraukti į eilę pirmuoju), kad įtrauktumėte skaidrę į nuskaitymo eilė viršų.
ARBA
• Spustelkite „State“ (būsenos) langelį ir pasirinkite „Add to queue last“ (įtraukti į eilę paskutiniuoju), kad įtrauktumėte skaidrę į nuskaitymo eilė galą.
Jeigu reikia pašalinti visas skaidres iš eilės, „Scan Control“ pagrindiniame lange spustelkite „Empty Queue“ (išvalyti eilę).
7 žingsnis Nuskaitykite savo skaidres1 Jei reikia, „Scan Control“ pagrindiniame lange spustelkite
„Close Door“ (uždaryti duris).
Palaukite iki durys užsidarys ir įsijungs „Start Scan“ (pradėti nuskaitymą) mygtukas.
2 „Scan Control“ pagrindiniame lange spustelkite „Start Scan“ (pradėti nuskaitymą), kad pradėtumėte nuskaityti skaidres, kurios buvo įtrauktos į eilę.
8 žingsnis Išimkite skaidres1 „Scan Control“ programos pagrindiniame lange spustelkite
„Open Door“ (atidaryti duris), kad atidarytumėte skaitytuvo duris.
2 Atidarykite skaitytuvo duris ir išimkite skaidrių laikiklius iš kasetės.
3 Išimkite skaidres iš skaidrių laikiklių kaip aprašyta žemiau:
a Laikykite skaidrių laikiklį už šonų taip, kad „Agilent“ logotipas būtų viršuje.
b Švelniai spustelkite ir pakelkite plastikinio dangtelio galą su ausele, kad atidarytumėte dangtelį.
c Pro skaidrės laikiklio apačią pakelkite skaidrės galą su brūkšniniu kodu į viršų, kad pirštų antspaudai nepatektų ant mėginio.
d Suimkite skaidrę už šonų ir išimkite iš skaidrių laikiklio.
Basic Instructions for Use (multilingual) 7 Zalecenia dotyczące bezpieczeństwa
SureScan Dx System User Guide 255
Instrukcje w języku polskim
Zalecenia dotyczące bezpieczeństwaSkaner SureScan Dx został zaprojektowany w taki sposób, aby jego używanie było bezpieczne i łatwe. Przed rozpoczęciem użytkowania skanera SureScan Dx należy zapoznać się ze wszystkimi ostrzeżeniami i przestrogami oraz zastosować się do nich.
Wilgotność powietrzaSkaner SureScan Dx jest wrażliwy na warunki, w których następuje kondensacja pary wodnej. Przed otwarciem opakowania transportowego należy zawsze odczekać 12 godzin w celu ustabilizowania si temperatury urządzenia w nowym miejscu.
OSTRZEŻENIE Nie należy podejmować prób naprawy ani uzyskania dostępu do wewnętrznych elementów skanera SureScan Dx. Grozi to porażeniem prądem o wysokim napięciu oraz ekspozycją na szkodliwe promieniowanie lasera. Zdjęcie pokrywy głównej powoduje utratę gwarancji.
OSTRZEŻENIE Skaner SureScan Dx należy podłączyć do uziemionego gniazda sieciowego. Uziemienie gniazda zapewnia bezpieczeństwo.
PRZESTROGA W celu zminimalizowania wibracji powstających na skutek szybkiego skanowania mikromacierzy wiązką lasera wzbudzającego należy zamontować skaner na stabilnym blacie laboratoryjnym. Nie należy montować skanera w pobliżu innych urządzeń laboratoryjnych, które mogą powodować powstawanie wibracji.
PRZESTROGA Skaner SureScan Dx jest wrażliwy na warunki, w których następuje kondensacja pary wodnej. Należy stosować się do środków ostrożności podanych w dokumentacji produktu. Patrz: „Wilgotność powietrza” na stronie 255.

256 SureScan Dx System User Guide
7 Basic Instructions for Use (multilingual) Instrukcje dotyczące używania urządzenia
W celu zagwarantowania optymalnej pracy skanera SureScan Dx należy zapewnić poniższe warunki dotyczące wilgotności powietrza.
Warunki działania urządzenia: od 15% do 85% wilgotności względnej w temperaturze 30°C.
Instrukcje dotyczące używania urządzeniaKrok 1. Włączanie skanera mikromacierzy SureScan Dx i uruchamianie programu Scan Control1 Włączyć skaner SureScan Dx za pomocą włącznika zasilania
znajdującego się z przodu urządzenia.
2 Włączyć stację roboczą i poczekać na jej uruchomienie.
3 Kliknąć dwukrotnie ikonę Agilent Microarray Scan Control w celu uruchomienia programu Scan Control.
Rycina 36 Ikona programu Agilent Microarray Scan Control.
Po uruchomieniu programu Agilent Microarray Scan Control zostanie wyświetlone jego okno główne, a skaner przeprowadzi sekwencję inicjalizacji. Po zakończeniu sekwencji inicjalizacji przycisk Open Door (Otwórz drzwiczki) będzie aktywny i będzie można ładować slajdy. Patrz: Rycina 37 na stronie 257.
UWAGA Jeśli w momencie włączenia skanera są załadowane 24 slajdy, inicjalizacja nie powiedzie się, ponieważ przeprowadzenie cyklu wysuwania slajdu nie będzie możliwe.

Basic Instructions for Use (multilingual) 7 Instrukcje dotyczące używania urządzenia
SureScan Dx System User Guide 257
Rycina 37 Okno programu Agilent Microarray Scan Control, w którym można dodawać slajdy.
Informacja o stanie skanera jest widoczna w prawym dolnym rogu okna programu Scan Control, na pasku stanu.
Krok 2. Umieszczanie slajdów w oprawach slajdówOdciski palców powodują błędy w detekcji fluorescencji. Podczas obchodzenia się ze slajdami należy zawsze używać rękawiczek i dotykać tylko brzegów slajdów.
1 Przed umieszczeniem slajdu w oprawie slajdu umieścić oprawę slajdu na płaskiej powierzchni, tak aby przezroczysta pokrywa była skierowana do góry, a uchwyt pokrywy znajdował się po prawej stronie. Dzięki temu prawidłowe

258 SureScan Dx System User Guide
7 Basic Instructions for Use (multilingual) Instrukcje dotyczące używania urządzenia
wyrównanie slajdu podczas umieszczania w oprawie slajdu będzie łatwiejsze.
2 Delikatnie wcisnąć do środka i pociągnąć w górę uchwyt przezroczystej pokrywy, aby ją otworzyć.
Rycina 38 Otwieranie oprawy slajdu.
PRZESTROGA Nie wolno wpychać zatrzasku dalej, niż to konieczne do otwarcia pokrywy. Może to uszkodzić uchwyt na szkiełka i uniemożliwić prawidłowe zatrzaśnięcie. Nie wolno używać uszkodzonych uchwytów na szkiełka, gdyż mogą one utknąć wewnątrz skanera.

Basic Instructions for Use (multilingual) 7 Instrukcje dotyczące używania urządzenia
SureScan Dx System User Guide 259
3 Umieścić slajd w oprawie, wykonując następujące czynności:
a Chwycić slajd za koniec z kodem kreskowym.
b Upewnić się, że aktywna powierzchnia, na której znajduje się mikromacierz, jest zwrócona ku górze, w kierunku pokrywy oprawy, a kod kreskowy znajduje się z lewej strony.
c Ostrożnie umieścić koniec slajdu, na którym nie ma kodu kreskowego, na podporze slajdu. Patrz: Rycina 39.
d Delikatnie opuścić slajd do oprawy slajdu. Patrz: Rycina 40.
e Zamknąć plastikową pokrywę oprawy, naciskając uchwyt pokrywy do momentu kliknięcia. Dzięki temu slajd zostanie przesunięty na właściwe miejsce w oprawie.
f Delikatnie wcisnąć do środka i pociągnąć w górę uchwyt przezroczystej pokrywy, aby ponownie ją otworzyć, a następnie sprawdzić, czy slajd znajduje się w prawidłowym położeniu w oprawie.
Slajd po włożeniu leży płasko w oprawie i pasuje do znajdujących się w niej punktów wyrównania.
g Zamknąć plastikową pokrywę oprawy, naciskając uchwyt pokrywy do momentu kliknięcia. Patrz: Rycina 41.
PRZESTROGA Jeśli uchwyt plastikowej pokrywy jest zbyt mocno odgięty, może ona nie zatrzaskiwać się prawidłowo na swoim miejscu. Jeśli oprawa slajdu nie wydaje odgłosu kliknięcia podczas zamykania pokrywy, należy ją wyrzucić.
PRZESTROGA Gdy zatrzask jest prawidłowo zamknięty, jego wierzch znajduje się na poziomie powierzchni podstawy lub nieco głębiej. Jeśli tak nie jest, nie wolno użyć uchwytu na szkiełka, gdyż zatrzask może być uszkodzony.

260 SureScan Dx System User Guide
7 Basic Instructions for Use (multilingual) Instrukcje dotyczące używania urządzenia
Rycina 39 Umieszczanie slajdu w oprawie slajdu.
Rycina 40 Slajd umieszczony w oprawie slajdu.
Rycina 41 Zamknięta oprawa slajdu z umieszczonym w niej slajdem.
Podpora slajdu

Basic Instructions for Use (multilingual) 7 Instrukcje dotyczące używania urządzenia
SureScan Dx System User Guide 261
Slajdy firmy Agilent mają dwa kody kreskowe, po jednym na każdej z dwóch szklanych powierzchni slajdu. Patrz: Rycina 42. Umieścić aktywną stronę slajdu, na której znajduje się mikromacierz, skierowaną do pokrywy oprawy slajdu.
Rycina 42 Orientacja slajdu.
Krok 3. Ładowanie opraw slajdów do kasety1 W oknie programu Scan Control kliknąć przycisk Open Door
(Otwórz drzwiczki) w celu otwarcia drzwiczek skanera.
PRZESTROGA Nieprawidłowe umieszczenie slajdu może spowodować uszkodzenie skanera SureScan Dx.Uszkodzony lub nieprawidłowo zamknięty uchwyt na szkiełka może utknąć w skanerze.
PRZESTROGA Prawidłowe otwieranie drzwiczek skanera polega na użyciu przycisku Open Door (Otwórz drzwiczki) w programie Scan Control. Nie należy próbować ręcznie otwierać drzwiczek.

262 SureScan Dx System User Guide
7 Basic Instructions for Use (multilingual) Instrukcje dotyczące używania urządzenia
2 Chwycić oprawę slajdu za uchwyt na palce. Jeśli położenie oprawy jest prawidłowe, strzałka na jej wierzchniej części jest skierowana w lewo. Patrz: Rycina 43.
Rycina 43 Oprawy slajdów ułatwiają prawidłowe włożenie slajdów.
Umieścić oprawę slajdu w dowolnym pustym gnieździe. Numery gniazd są wyraźnie zaznaczone na kasecie na slajdy. Nie należy na siłę umieszczać oprawy slajdu w kasecie. Wprowadzenie oprawy jest łatwe, jeśli znajduje się ona w prawidłowej pozycji, tj. uchwyt na palce jest skierowany do góry, a strzałka — w lewo.
Strzałka ułatwia ustawienieoprawy w prawidłowym położeniu
Uchwyt na palce
PRZESTROGA Opór przy umieszczaniu uchwytu na szkiełka w kasecie oznacza, że uchwyt na szkiełka może być nieprawidłowo zamknięty lub uszkodzony. Sprawdzić uchwyt na szkiełka i w razie potrzeby zamknąć lub wymienić.

Basic Instructions for Use (multilingual) 7 Instrukcje dotyczące używania urządzenia
SureScan Dx System User Guide 263
Rycina 44 Umieszczanie oprawy slajdu w kasecie.
3 Upewnić się, że oprawa slajdu opiera się na dnie gniazda kasety.
Numer gniazda, do którego załadowano slajd, miga na niebiesko.
4 Powtórzyć kroki od 2 do 3 do momentu załadowania wszystkich opraw slajdów do kasety.
5 W oknie programu Scan Control kliknąć przycisk Close Door (Zamknij drzwiczki).
W przypadku slajdu, dla którego nie istnieje protokół skanowania odpowiadający jego układowi, protokół skanowania jest pusty, a w polu State (Stan) tego gniazda jest wyświetlany stan Present (Obecny). Należy przypisać protokół skanowania (patrz: „Krok 4. Konfiguracja lub zmiana ustawień protokołu skanowania”).
PRZESTROGA Nieprawidłowe umieszczenie oprawy slajdu w kasecie może spowodować poważne uszkodzenie skanera mikromacierzy SureScan Dx.

264 SureScan Dx System User Guide
7 Basic Instructions for Use (multilingual) Instrukcje dotyczące używania urządzenia
Krok 4. Konfiguracja lub zmiana ustawień protokołu skanowaniaBieżące ustawienia protokołu skanowania dla każdego wybranego slajdu są wyświetlane w prawym okienku okna głównego oprogramowania Scan Control.
Podczas pierwszej konfiguracji skanowania slajdu należy wybrać protokół skanowania, który będzie używany. • W przypadku każdego slajdu w tabeli gniazd należy kliknąć
pozycję Scan Protocol (Protokół skanowania) i wybrać protokół skanowania, który będzie używany do skanowania danego slajdu. Firma Agilent zapewnia osiem fabrycznie załadowanych protokołów, których można używać z mikromacierzami wysokiej gęstości (HD, high density) i mikromacierzami G3 firmy Agilent.
AgilentHD_GX_2Color Mikromacierze HD firmy Agilent do badań ekspresji genów przy użyciu 2 barwników
AgilentHD_GX_1Color Mikromacierze HD firmy Agilent do badań ekspresji genów przy użyciu 1 barwnika
AgilentG3_GX_2Color Mikromacierze G3 firmy Agilent do badań ekspresji genów przy użyciu 2 barwników
AgilentG3_GX_1Color Mikromacierze G3 firmy Agilent do badań ekspresji genów przy użyciu 1 barwnika
AgilentHD_CGH Mikromacierze HD do badań CGH/CGH+SNP/CNV/ChIP firmy Agilent
AgilentG3_CGH Mikromacierze G3 do badań CGH/CGH+SNP/CNV/ChIP firmy Agilent
AgilentHD_miRNA Mikromacierze HD firmy Agilent do badań miRNA
AgilentG3_miRNA Mikromacierze G3 firmy Agilent do badań miRNA
Krok 5 (opcjonalny). Zmiana folderu danych wyjściowychIstnieje możliwość zmiany folderu danych wyjściowych, w którym program zapisuje pliki obrazów utworzone przez skaner.• W przypadku każdego slajdu znajdującego się w tabeli gniazd
należy kliknąć pozycję Output Folder (Folder danych wyjściowych) i przejść do lokalizacji żądanego folderu. Firma Agilent zaleca wybór lokalnego folderu na dysku twardym określonym jako urządzenie drugorzędne.
Krok 6. Dodawanie slajdów do kolejki skanowania1 W oknie głównym programu Scan Control kliknąć przycisk
All to Queue (Wszystkie do kolejki) w celu dodania do kolejki skanowania wszystkich slajdów z tabeli gniazd, które w tabeli State (Stan) mają stan Ready for queue (Gotowy do umieszczenia w kolejce).Zostanie wyświetlone okno dialogowe z potwierdzeniem. Kliknąć przycisk Yes (Tak), aby dodać slajdy do kolejki.

Basic Instructions for Use (multilingual) 7 Instrukcje dotyczące używania urządzenia
SureScan Dx System User Guide 265
LUB
W tabeli gniazd programu Scan Control kliknąć komórkę State (Stan) odpowiadającą pierwszemu slajdowi, który ma zostać przeskanowany, a następnie kliknąć przycisk Add to Queue (Dodaj do kolejki).
2 W przypadku każdego kolejnego slajdu, który ma zostać przeskanowany:
• Kliknąć komórkę State (Stan) i wybrać pozycję Add to queue first (Dodaj na początek kolejki), aby dodać slajd jako pierwszy element kolejki skanowania.
LUB
• Kliknąć komórkę State (Stan) i wybrać pozycję Add to queue last (Dodaj na koniec kolejki), aby dodać slajd jako ostatni element kolejki skanowania.
Aby usunąć wszystkie slajdy z kolejki, należy kliknąć przycisk Empty Queue (Opróżnij kolejkę) w oknie głównym programu Scan Control.
Krok 7. Skanowanie slajdów1 Jeśli to konieczne, w oknie głównym programu Scan Control
kliknąć przycisk Close Door (Zamknij drzwiczki).
Zaczekać na zamknięcie drzwiczek i uaktywnienie przycisku Start Scan (Rozpocznij skanowanie).
2 W oknie głównym programu Scan Control kliknąć przycisk Start Scan (Rozpocznij skanowanie), aby rozpocząć skanowanie slajdów, które zostały dodane do kolejki.
Krok 8. Wyjmowanie slajdów1 W oknie programu Scan Control kliknąć przycisk Open Door
(Otwórz drzwiczki) w celu otwarcia drzwiczek skanera.
2 Otworzyć drzwiczki skanera i wyjąć oprawy slajdów z kasety.
3 Wyjąć slajdy z opraw slajdów, wykonując następujące czynności:
a Chwycić oprawę slajdu za jej boki, tak aby logo firmy Agilent było skierowane do góry.
b Delikatnie wcisnąć do środka i pociągnąć w górę uchwyt przezroczystej pokrywy, aby ją otworzyć.
c Wypchnąć koniec slajdu, na którym znajduje się kod kreskowy, od spodu oprawy, aby uniknąć powstania odcisków palców w miejscu, w którym znajdują się próbki.
d Chwycić slajd za brzegi i wyjąć z oprawy slajdu.

266 SureScan Dx System User Guide
7 Basic Instructions for Use (multilingual) Regras de segurança
Instruções em Português
Regras de segurançaO scanner SureScan Dx foi concebido para ser seguro e fácil de usar. Certifique-se de examina e compreende todos os avisos e advertências antes de usar o scanner SureScan Dx.
Condições de humidadeO scanner SureScan Dx é sensível a condições de condensação de humidade. Antes de abrir a caixa de transporte, espere 12 horas para que o equilíbrio térmico local seja atingido.
Para assegurar desempenho ideal, use o scanner SureScan Dx apenas no seguinte intervalo de humidade.
ADVERTÊNCIA Não tente reparar nem obter acesso aos componentes internos do scanner SureScan Dx. Arrisca-se a ficar exposto a tensão elétrica elevada e radiação laser nociva. Abrir a cobertura principal anula a garantia.
ADVERTÊNCIA Ligue o scanner SureScan Dx a uma tomada elétrica com ligação de terra. A utilização segura do scanner depende da existência de uma ligação à terra.
ATENÇÃO A fim de minimizar a vibração causada pela digitalização rápida da excitação do laser ao longo do microarray, instale o scanner numa bancada ou mesa firme. Não instale o scanner na proximidade de outros equipamentos de laboratório que possam causar vibrações.
ATENÇÃO O scanner SureScan Dx é sensível a condições de condensação de humidade. Siga as precauções indicadas na documentação do produto. Consulte “Condições de humidade” na página 266.

Basic Instructions for Use (multilingual) 7 Instruções de utilização
SureScan Dx System User Guide 267
Em funcionamento: 15% a 85% HR a 30 °C
Instruções de utilizaçãoPasso 1. Ligue o Scanner Microarray SureScan Dx e abra o programa Scan Control
1 Ligue o scanner SureScan Dx usando o interruptor na frente do instrumento.
2 Ligue o workstation (computador) e espere que inicialize.
3 Faça duplo-clique no ícone Agilent Microarray Scan Control para abrir o programa Scan Control.
Figura 36 Ícone do Agilent Microarray Scan Control
Quando o programa se inicia, a janela principal do programa Agilent Microarray Scan Control abre-se e o scanner executa a sua sequência de inicialização. Após o final da sequência de inicialização o botão Open Door (abrir porta) é ativado e as lâminas podem ser introduzidas na cassete. Consulte a Figura 37 na página 268.
NOTA Se ao ligar o scanner todas as ranhuras da cassete estiverem ocupadas com lâminas, a inicialização falhará pois o scanner não conseguirá efetuar o ciclo de ejeção de lâmina.

268 SureScan Dx System User Guide
7 Basic Instructions for Use (multilingual) Instruções de utilização
Figura 37 Janela do programa Agilent Microarray Scan Control – pronto para adicionar lâminas.
O estado do scanner é indicado no canto inferior direito da janela do Scan Control, na barra de estado.
Basic Instructions for Use (multilingual) 7 Instruções de utilização
SureScan Dx System User Guide 269
Passo 2. Insira lâminas nos respetivos suportes
As dedadas ou impressões digitais causam erros na deteção de fluorescência. Toque apenas nas margens da lâmina e use sempre luvas quando manusear as lâminas.
1 Antes de inserir a lâmina, coloque o suporte da lâmina numa superfície plana, com a tampa transparente virada para cima, e a aba para a direita. Isto ajuda a garantir que a lâmina fica devidamente alinhada quando a inserir no suporte de lâminas.
2 Abra a tampa plástica transparente empurrando a extremidade com a aba suavemente para dentro e puxando para cima.
Figura 38 Abrir o suporte da lâmina
ATENÇÃO Não empurre a aba mais do que necessário para desbloquear a tampa. Fazê-lo poderá danificar o suporte de lâmina e impedir o bloqueio adequado.
Não utilize suportes de lâminas danificados, uma vez que podem ficar presos no interior do scanner.
270 SureScan Dx System User Guide
7 Basic Instructions for Use (multilingual) Instruções de utilização
3 Insira a lâmina no suporte, da seguinte forma:
a Pegue na lâmina pela extremidade com o código de barras.
b Certifique-se de que a superfície com o microarray ativo fica virada para cima, na direção da tampa da lâmina, com o código de barras do lado esquerdo.
c Com cuidado introduza a extremidade da lâmina sem o código de barras no encaixe para a lâmina. Consulte a Figura 39.
d Suavemente pouse a lâmina sobre o respetivo suporte. Consulte a Figura 40.
e Feche a tampa de plástico, carregando na extremidade da aba até ouvir um clique. Isto fará deslocar a lâmina para a posição correta no suporte.
f Empurre suavemente para dentro e puxando para cima e verificando se a lâmina está posicionada corretamente.
Uma vez inserida, a lâmina deve ficar numa posição plana e coincidir com pontos de alinhamento do suporte.
g Feche a tampa de plástico, carregando na extremidade da aba até ouvir um clique. Consulte a Figura 41.
ATENÇÃO Se a aba da tampa de plástico estiver esticada em demasia, poderá não fazer o clique que indica o correto posicionamento. Elimine os suportes de lâmina que já não façam clique quando os fechar.
ATENÇÃO Quando fechada adequadamente, a parte superior da aba fica nivelada com a superfície da base ou abaixo da superfície da base. Se não estiver, não utilize o suporte de lâmina, uma vez que a aba poderá estar danificada.

Basic Instructions for Use (multilingual) 7 Instruções de utilização
SureScan Dx System User Guide 271
Figura 39 Inserir a lâmina no respetivo suporte
Figura 40 Lâmina inserida no respetivo suporte
Figura 41 Suporte de lâmina – fechado com a lâmina
Encaixe da lâmina

272 SureScan Dx System User Guide
7 Basic Instructions for Use (multilingual) Instruções de utilização
As lâminas Agilent têm dois códigos de barras, um em cada lado do vidro. Consulte a Figura 42. Coloque o lado do microarray ativo virado para a tampa do suporte da lâmina.
Figura 42 Orientação da lâmina
Passo 3. Carregue os suportes de lâmina na cassete
1 Na janela do programa Scan Control clique em Open Door (abrir porta) para abrir a porta do scanner.
2 Pegue no suporte da lâmina pela posição para os dedos. Se pegar no suporte corretamente a seta no topo do suporte de lâmina deverá apontar para a esquerda. Consulte a Figura 43.
ATENÇÃO Uma lâmina incorretamente inserida pode danificar o scanner SureScan Dx.
Um suporte de lâmina danificado ou fechado inadequadamente pode ficar preso no scanner.
ATENÇÃO A forma correta de abrir a porta do scanner consiste em usar o botão Open Door (abrir porta) no programa Scan Control. Não tente abrir a porta manualmente.

Basic Instructions for Use (multilingual) 7 Instruções de utilização
SureScan Dx System User Guide 273
Figura 43 O suporte da lâmina ajuda a inserir as lâminas corretamente
Insira um suporte de lâmina em qualquer ranhura aberta. Os números das ranhuras estão claramente assinalados na cassete de lâminas. Não force o suporte de lâminas a entrar na cassete; este entrará facilmente se estiver corretamente alinhado, com a posição dos dedos no topo e com a seta virada para a esquerda.
A seta ajuda a identificarorientação do scanner
Posição para os dedos
ATENÇÃO Se houver resistência na colocação do suporte de lâmina na cassete, o suporte de lâmina poderá não estar fechado adequadamente ou poderá estar danificado. Verifique o suporte de lâmina e feche-o ou substitua-o, conforme necessário.

274 SureScan Dx System User Guide
7 Basic Instructions for Use (multilingual) Instruções de utilização
Figura 44 Inserir um suporte de lâmina na cassete
3 Certifique-se de que o suporte de lâmina está assente na base da ranhura da cassete. O número da ranhura com a lâmina inserida pisca a azul.
4 Repita os passos 2 a 3 até todas as lâminas terem sido carregadas na cassete.
5 No programa Scan Control clique em Close Door (fechar porta).
No caso de lâminas que não tenham um protocolo de digitalização associado com o seu formato, a informação de protocolo de digitalização ficará em branco e o estado da ranhura permanece como “Present”(e). Atribua um protocolo de digitalização, conforme descrito em “Passo 4. Defina ou altere as definições do protocolo de digitalização”.
ATENÇÃO A incorreta inserção do suporte de lâmina na cassete pode resultar em danos graves no scanner SureScan Dx Microarray.

Basic Instructions for Use (multilingual) 7 Instruções de utilização
SureScan Dx System User Guide 275
Passo 4. Defina ou altere as definições do protocolo de digitalização
Para cada lâmina selecionada são mostradas as atuais definições de protocolo de digitalização, na janela principal do software Scan Control, lado direito.
A primeira vez que configurar a digitalização de uma lâmina escolha um protocolo a usar.
• Para cada lâmina na tabela de ranhuras, clique no Scan Protocol e selecione um protocolo de digitalização para digitalizar a lâmina.
A Agilent fornece oito protocolos predefinidos à sua escolha para utilização com os microarrays Agilent de elevada densidade (HD) e microarrays Agilent G3.
AgilentHD_GX_2Color Microarrays de expressão génica Agilent HD 2-cores
AgilentHD_GX_1Color Microarrays de expressão génica Agilent HD 1-cores
AgilentG3_GX_2Color Microarrays de expressão génica Agilent G3 2-cores
AgilentG3_GX_1Color Microarrays de expressão génica Agilent G3 1-cores
AgilentHD_CGH Microarrays Agilent HD CGH/CGH+SNP/CNV/ChIP
AgilentG3_CGH Microarrays Agilent G3 CGH/CGH+SNP/CNV/ChIP
AgilentHD_miRNA Microarrays Agilent HD miRNA
AgilentG3_miRNA Microarrays Agilent G3 miRNA
Passo 5. (Opcional) Altere a pasta de destino
Pode alterar a pasta de destino onde o programa grava os ficheiros de imagem criados pelo scanner.
• Para cada lâmina na tabela de ranhuras, clique na Output Folder (pasta de destino) e indique a localização da pasta desejada.
A Agilent recomenda a seleção de uma pasta local num disco rígido secundário.
Passo 6. Adicione lâminas à fila de digitalização
1 Na janela principal do Scan Control clique em All to Queue (todas para a fila) para adicionar todas as lâminas da tabela de ranhuras com o estado “Ready for queue” (pronta para a fila de digitalização).
Aparece uma janela de pedido de confirmação. Clique em Yes (sim) para adicionar as lâminas à fila.
OU

276 SureScan Dx System User Guide
7 Basic Instructions for Use (multilingual) Instruções de utilização
Na tabela de ranhuras do Scan Control clique na célula State (estado) da primeira lâmina a digitalizar e clique em Add to Queue (adicionar à fila).
2 Para cada lâmina adicional que deseje digitalizar, • Clique na célula State (estado) e selecione Add to queue
first (adicionar ao início da fila) para adicionar a lâmina ao início da fila de digitalização.
OU • Clique na célula State (estado) e selecione Add to queue
last (adicionar ao fim da fila) para adicionar a lâmina ao final da fila de digitalização.
Se precisar de remover todas as lâminas da fila clique em Empty Queue (esvaziar fila) na janela principal do Scan Control.
Passo 7. Digitalize as suas lâminas
1 Se necessário, na janela principal do Scan Control, clique em Close Door (fechar porta).Espere até a porta fechar e o botão Start Scan (iniciar digitalização) ficar disponível.
2 Na janela principal do Scan Control clique em Start Scan (iniciar digitalização) para começar a digitalizar as lâminas que foram adicionadas à fila.
Passo 8. Remova as lâminas
1 Na janela principal do programa Scan Control clique em Open Door (abrir porta) para abrir a porta do scanner.
2 Abra a porta do scanner e retire os suportes de lâminas da cassete.
3 Remova as lâminas dos suportes de lâminas, da seguinte forma:a Pegue no suporte de lâmina pelos lados, com o logotipo
Agilent virado para cima.b Abra a tampa plástica transparente empurrando a
extremidade com a aba suavemente para dentro e puxando para cima.
c Pela parte inferior do suporte de lâmina, empurre a extremidade com o código de barras para cima, para evitar impressões digitais na área da amostra.
d Pegue na lâmina pelos lados e remova-a do suporte de lâmina.

Basic Instructions for Use (multilingual) 7 Instrucţiuni de siguranţă
SureScan Dx System User Guide 277
Instrucţiuni în limba română
Instrucţiuni de siguranţăScannerul SureScan Dx este proiectat pentru a fi utilizat cu uşurinţă şi în condiţii de siguranţă. Asiguraţi-vă că înţelegeţi şi că identificaţi toate avertismentele şi atenţionările înainte de acţionarea scannerului SureScan Dx.
Condiţii de umiditateScannerul SureScan Dx este sensibil la condiţii de umiditate şi condens. Întotdeauna, lăsaţi să treacă timpul de echilibrare termică de 12 ore la locul amplasării înainte de a deschide cutia de transport.
AVERTISMEN Nu încercaţi să reparaţi sau să accesaţi componentele interne ale scannerului SureScan Dx. Riscaţi să fiţi expus la tensiuni înalte şi la radiaţii laser dăunătoare. Îndepărtarea capacului principal conduce la anularea garanţiei.
AVERTISMEN Conectaţi scannerul SureScan Dx la o priză de perete cu împământare. Aceasta asigură protecţie şi siguranţă în exploatare.
ATENŢIE Instalaţi scannerul pe un banc de lucru sau pe o masă de laborator solidă pentru a minimiza vibraţiile produse de scanarea rapidă a lamelor de micromatrice. Nu instalaţi scannerul în apropierea altor echipamente de laborator care ar putea produce vibraţii.
ATENŢIE Scannerul SureScan Dx este sensibil la condiţii de umiditate şi condens. Respectaţi măsurile de precauţie furnizate în documentaţia produsului. Consultaţi „Condiţii de umiditate” de la pagina 277.

278 SureScan Dx System User Guide
7 Basic Instructions for Use (multilingual) Instrucţiuni de operare
Pentru a asigura o performanţă optimă, acţionaţi scannerul SureScan Dx numai în următorul interval de umiditate.
Funcţionare: de la 15% la 85% RH la 30 °C
Instrucţiuni de operarePasul 1. Pornirea scannerului de micromatrice SureScan Dx şi a programului Scan Control (Control scanare)1 Se porneşte scannerul SureScan Dx cu ajutorul butonului de
pornire situat pe partea frontală a instrumentului.
2 Se porneşte unitatea centrală a computerului şi se aşteaptă ca aceasta să încarce sistemul de operare.
3 Se face dublu click pe pictograma Agilent Microarray Scan Control (Control scanare micromatrice Agilent) pentru a porni programul Scan Control (Control scanare).
Figura 36 Pictograma Agilent Microarray Scan Control (Control scanare micromatrice Agilent)
Când programul Agilent Microarray Scan Control (Control scanare micromatrice Agilent) porneşte, se deschide fereastra principală a acestuia, iar scannerul efectuează secvenţa de iniţializare. După finalizarea secvenţei de iniţializare, butonul Open Door (Deschidere uşă) se activează şi se pot încărca lamele de micromatrice. Consultaţi Figura 37 de la pagina 279.
NOTĂ Dacă sunt încărcate 24 de lame de micromatrice în scanner, atunci când acesta va fi pornit, iniţializarea nu va reuşi, deoarece scannerul nu poate efectua ciclul de scoatere a lamelor de micromatrice.

Basic Instructions for Use (multilingual) 7 Instrucţiuni de operare
SureScan Dx System User Guide 279
Figura 37 Fereastra programului Agilent Microarray Scan Control (Control scanare micromatrice Agilent) – pregătită pentru adăugarea lamelor de micromatrice.
Statusul scannerului este indicat în colţul din dreapta jos al ferestrei Scan Control (Control scanare).

280 SureScan Dx System User Guide
7 Basic Instructions for Use (multilingual) Instrucţiuni de operare
Pasul 2. Introducerea lamelor de micromatrice în suporturile destinate acestora (slide holders)
Amprentele digitale pot cauza erori în timpul scanării. Atingeţi numai marginile lamelor de micromatrice şi purtaţi întotdeauna mănuşi atunci când acestea sunt manipulate.
1 Se amplasează suportul pentru lame pe o suprafaţă netedă, cu capacul transparent orientat în sus şi cu clapeta în partea dreaptă. Acest lucru ajută la orientarea corespunzătoare a lamelor de micromatrice atunci când se introduc în suportul destinat.
2 Se apasă uşor clapeta şi se ridică capacul transparent din plastic pentru a-l deschide.
Figura 38 Deschiderea suportului pentru lamele de micromatrice
3 Lamele de micromatrice se introduc în suport astfel:
a Se ţine lama de capătul care prezintă codul de bare.
b Asiguraţi-vă că suprafaţa activă a micromatricei este orientată în sus (Consultaţi Figura 42), către capacul
ATENŢIE Nu împingeţi clapeta mai mult decât este necesar pentru a descuia capacul. Acţionând astfel, puteţi deteriora suportul pentru lame şi evitaţi încuierea adecvată. Nu utilizaţi suporturi pentru lame deteriorate, deoarece acestea se pot bloca în interiorul scannerului.

Basic Instructions for Use (multilingual) 7 Instrucţiuni de operare
SureScan Dx System User Guide 281
transparent al suportului, cu codul de bare în partea stângă.
c Se poziţionează cu atenţie capătul fără etichetă al lamei de micromatrice pe marginea suportului. Consultaţi Figura 39.
d Se coboară uşor lama în suport. Consultaţi Figura 40.
e Se închide capacul de plastic al suportului, apăsând pe clapetă până când se aude „click”. Această acţiune poziţionează corect lama de micromatrice în suport.
f Se împinge uşor şi se ridică clapeta suportului pentru a-l redeschide şi a verifica dacă lama este poziţionată corect.
După introducere, lama este poziţionată orizontal şi aliniată corespunzător cu puntele de ghidare de pe suportul pentru lame.
g Se închide capacul de plastic pentru lame, apăsând pe clapetă până când se aude „click”. Consultaţi Figura 41.
ATENŢIE În cazul în care clapeta suportului pentru lame este prea întinsă, este posibil ca fixarea să nu fie corespunzătare. Aruncaţi suporturile pentru lame care nu se mai fixează în poziţie atunci când le închideţi.
ATENŢIE Când este închisă bine, partea de sus a clapetei este aliniată cu suprafaţa bazei sau se află sub suprafaţa bazei. Dacă nu este, nu utilizaţi suportul pentru lame, deoarece clapeta poate fi deteriorată.

282 SureScan Dx System User Guide
7 Basic Instructions for Use (multilingual) Instrucţiuni de operare
Figura 39 Introducerea lamelor de micromatrice în suport
Figura 40 Lama de micromatrice poziţionată corect în suportul pentru lame (deschis)
Figura 41 Lama de micromatrice poziţionată corect în suportul pentru lame (închis)
Marginea suportului

Basic Instructions for Use (multilingual) 7 Instrucţiuni de operare
SureScan Dx System User Guide 283
Lamele de micromatrice Agilent prezintă două coduri de bare, câte unul pe fiecare parte. Consultaţi Figura 42. Poziţionaţi suprafaţa activă a lamei de micromatrice către capacul transparent al suportului pentru lame.
Figura 42 Orientarea lamei de micromatrice
Pasul 3. Încărcarea suporturilor pentru lame în caseta scannerului1 În fereastra programului Scan Control (Control scanare), se
face click pe butonul Open Door (Deschidere uşă) pentru a deschide uşa scannerului.
ATENŢIE Un suport cu lama introdusă incorect poate deteriora scannerul SureScan Dx.Un suport pentru lame deteriorat sau închis inadecvat se poate bloca în scanner.
ATENŢIE Modul corect de a deschide uşa scannerului este prin utilizarea butonului Open Door (Deschidere uşă) din programul Scan Control (Control scanare). Nu încercaţi să deschideţi uşa manual.

284 SureScan Dx System User Guide
7 Basic Instructions for Use (multilingual) Instrucţiuni de operare
2 Pentru încărcare în scanner, se apucă suportul pentru lame numai de zona marcată. Orientarea suportului pentru lame în vederea introducerii corecte în scanner este indicată de săgeata din colţul stâng al suportului. Consultaţi Figura 43.
Figura 43 Suportul pentru lame cu elementele de orientare pentru introducerea corectă a lamelor de micromatrice în scanner
Introduceţi un suport pentru lame în orice poziţie disponibilă. Numerele poziţiilor sunt etichetate clar pe caseta scannerului. Nu forţaţi suportul pentru lame la introducerea în casetă. Acesta se introduce uşor dacă este aliniat corespunzător, cu zona de prindere cu degetele în partea de sus, iar săgeata este orientată spre stânga.
Săgeată de ghidare, ajută la identificareaorientării corecte a suportului în scanner
Loc de prindere cu degetele
ATENŢIE Dacă există o rezistenţă la plasarea suportului pentru lame în casetă, suportul pentru lame poate să nu fie corect închis sau poate fi deteriorat. Verificaţi suportul pentru lame şi închideţi-l sau înlocuiţi-l dacă este necesar.
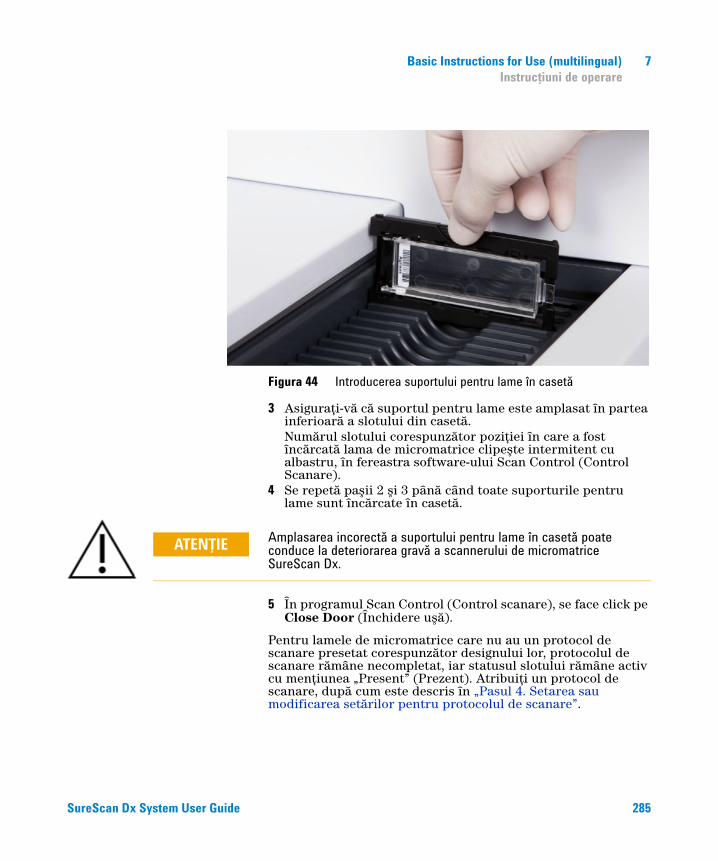
Basic Instructions for Use (multilingual) 7 Instrucţiuni de operare
SureScan Dx System User Guide 285
Figura 44 Introducerea suportului pentru lame în casetă
3 Asiguraţi-vă că suportul pentru lame este amplasat în partea inferioară a slotului din casetă. Numărul slotului corespunzător poziţiei în care a fost încărcată lama de micromatrice clipeşte intermitent cu albastru, în fereastra software-ului Scan Control (Control Scanare).
4 Se repetă paşii 2 şi 3 până când toate suporturile pentru lame sunt încărcate în casetă.
5 În programul Scan Control (Control scanare), se face click pe Close Door (Închidere uşă).
Pentru lamele de micromatrice care nu au un protocol de scanare presetat corespunzător designului lor, protocolul de scanare rămâne necompletat, iar statusul slotului rămâne activ cu menţiunea „Present” (Prezent). Atribuiţi un protocol de scanare, după cum este descris în „Pasul 4. Setarea sau modificarea setărilor pentru protocolul de scanare”.
ATENŢIE Amplasarea incorectă a suportului pentru lame în casetă poate conduce la deteriorarea gravă a scannerului de micromatrice SureScan Dx.

286 SureScan Dx System User Guide
7 Basic Instructions for Use (multilingual) Instrucţiuni de operare
Pasul 4. Setarea sau modificarea setărilor pentru protocolul de scanare
Setările curente pentru protocolul de scanare sunt afişate pentru fiecare lamă de micromatrice selectată în panoul din dreapta al ferestrei principale a software-ului Scan Control (Control scanare).
Prima dată când se configurează protocolul de scanare al unei lame de micromatrice, se selectează un protocol de scanare corespunzător. • Pentru fiecare lamă din tabelul de sloturi, se face click pe butonul
Scan Protocol (Protocol scanare) şi se selectează un protocol de scanare corespunzător pentru scanarea lamei respective. Agilent furnizează opt protocoale presetate pentru a fi utilizate cu lamele de micromatrice Agilent High Density (HD) şi cu lamele de micromatrice Agilent G3.
AgilentHD_GX_2Color Micromatrice Agilent HD pentru studiul expresiei genice, utilizând marcarea cu 2 culori
AgilentHD_GX_1Color Micromatrice Agilent HD pentru studiul expresiei genice, utilizând marcarea cu o culoare
AgilentG3_GX_2Color Micromatrice Agilent G3 pentru studiul expresiei genice, utilizând marcarea cu 2 culori
AgilentG3_GX_1Color Micromatrice Agilent G3 pentru studiul expresiei genice, utilizând marcarea cu o culoare
AgilentHD_CGH Micromatrice Agilent HD CGH/CGH+SNP/CNV/ChIP
AgilentG3_CGH Micromatrice Agilent G3 CGH/CGH+SNP/CNV/ChIP
AgilentHD_miRNA Micromatrice Agilent HD miRNA
AgilentG3_miRNA Micromatrice Agilent G3 miRNA
Pasul 5. (Opţional) Modificarea directorului pentru salvarea datelorSe poate modifica directorul specificat, în care programul salvează fişierele imagine create de scanner.• Pentru fiecare poziţie din tabelul de sloturi pentru lame, se
face click pe Output Folder (Director de salvare) şi se navighează la locaţia directorului dorit. Agilent recomandă selectarea unui Director local de pe o unitate de hard disk secundară.
Pasul 6. Adăugarea lamelor de micromatrice în lista de aşteptare a scanărilor1 În fereastra principală Scan Control (Control scanare), se face
click pe butonul All to Queue (Toate în lista de aşteptare) pentru a adăuga toate lamele de micromatrice pregătite pentru scanare, din tabelul de sloturi, în lista de aşteptare. Toate lamele de micromatrice din tabelul de sloturi pregătite pentru scanare, au menţiunea „Ready for queue”.Va apărea o fereastră de dialog de confirmare. Se face click pe butonul Yes (Da) pentru a adăuga lamele de micromatrice în lista de aşteptare.

Basic Instructions for Use (multilingual) 7 Instrucţiuni de operare
SureScan Dx System User Guide 287
SAUÎn tabelul de sloturi Scan Control (Control scanare), se selectează celula State (Status) pentru prima poziţie de scanat şi se face click pe butonul Add to Queue (Adăugare în lista de aşteptare).
2 Pentru fiecare poziţie suplimentară de scanat: • Se face click pe butonul State (Status) şi se selectează Add to
queue first (Adăugarea în prima poziţie a listei de aşteptare) pentru a adăuga lama de micromatrice respectivă în prima poziţie a listei de aşteptare pentru scanare.
SAU • Se face click pe butonul State (Status) şi se selectează Add
to queue last (Adăugarea în ultima poziţie a listei de aşteptare) pentru a adăuga lama de micromatrice respectivă în ultima poziţie a listei de aşteptare pentru scanare.
Pentru eliminarea tuturor poziţiilor din lista de aşteptare, se face click pe butonul Empty Queue (Golire listă de aşteptare) din fereastra principală a software-ului Scan Control (Control scanare).
Pasul 7. Scanarea lamelor de micromatrice1 Dacă este necesar, în fereastra principală Scan Control
(Control scanare), se face click pe Close Door (Închidere uşă).Se aşteaptă până când se închide uşa şi se activează butonul Start Scan (Pornire scanare).
2 În fereastra principală Scan Control (Control scanare), se face click pe Start Scan (Pornire scanare) pentru a începe scanarea lamelor de micromatrice adăugate în lista de aşteptare.
Pasul 8. Scoaterea lamelor de micromatrice din scannerul Sure Scan Dx1 În fereastra principală Scan Control (Control scanare), se
face click pe butonul Open Door (Deschidere uşă) pentru a deschide uşa scannerului.
2 Se deschide uşa scannerului şi se scot suporturile pentru lame din casetă.
3 Se scot lamele din suporturi astfel:a Se ţine suportul pentru lame din părţile laterale, cu sigla
Agilent orientată în sus.b Se apasă uşor şi se ridică clapeta suportului pentru a-l
deschide.c Se împinge în sus capătul lamei de micromatrice care
prezintă codul de bare, pentru a evita lăsarea de amprente digitale pe suprafaţa micromatricei.
d Se prinde lama din părţile laterale şi se scoate din suport.

288 SureScan Dx System User Guide
7 Basic Instructions for Use (multilingual) Bezpečnostné pokyny
Slovenské pokyny
Bezpečnostné pokynySkener SureScan Dx je určený na bezpečné a jednoduché používanie. Pred použitím skenera SureScan Dx musíte pochopiť a dodržiavať všetky varovania a výstrahy.
Vlhkostné podmienkySkener SureScan Dx je citlivý na vlhkostné podmienky s kondenzáciou. Pred otvorením prepravnej škatule na pracovisku vždy nechajte zariadenie nadobudnúť tepelnú rovnováhu počas 12 hodín.
VAROVANIE Nepokúšajte sa opraviť vnútorné súčasti skenera SureScan Dx ani k nim získať prístup. Hrozí riziko vystavenia sa vysokému napätiu a škodlivému laserovému žiareniu. Odobratie hlavného krytu bude mať za následok neplatnosť záruky.
VAROVANIE Skener SureScan Dx zapojte do uzemnenej elektrickej zásuvky. Ochranné uzemnenie sa využíva z dôvodu bezpečnosti.
VÝSTRAHA S cieľom minimalizovať vibrácie v dôsledku rýchleho skenovania laserovej excitácie cez microarray čipy umiestnite skener na stabilnú laboratórnu lavicu alebo stôl. Skener neumiestňujte v blízkosti iného laboratórneho zariadenia, ktoré by mohlo spôsobiť vibrácie.
VÝSTRAHA Skener SureScan Dx je citlivý na vlhkostné podmienky s kondenzáciou. Dodržiavajte bezpečnostné opatrenia uvedené v dokumentácii produktu. Pozrite si časť “Vlhkostné podmienky” na str. 288.

Basic Instructions for Use (multilingual) 7 Prevádzkové pokyny
SureScan Dx System User Guide 289
V záujme optimálneho výkonu prevádzkujte skener SureScan Dx iba v prostredí s nasledujúcim rozsahom vlhkosti.
Prevádzka: relatívna vlhkosť 15 % až 85 % pri teplote 30 °C
Prevádzkové pokynyKrok č. 1. Zapnutie skenera SureScan Dx pre microarray čipy a spustenie programu Scan Control (Riadenie skenovania)1 Skener SureScan Dx zapnite pomocou spínača na prednej
strane prístroja.
2 Zapnite počítač a počkajte na spustenie operačného systému.
3 Dvojitým kliknutím na ikonu Agilent Microarray Scan Control (Riadenie skenovania microarray čipov od spoločnosti Agilent) spustite program Scan Control (Riadenie skenovania).
Obrázok 36 Ikona Agilent Microarray Scan Control (Riadenie skenovania microarray čipov od spoločnosti Agilent)
Po spustení programu sa otvorí hlavné okno programu Agilent Microarray Scan Control (Riadenie skenovania microarray čipov od spoločnosti Agilent) a skener vykoná inicializačnú sekvenciu. Po dokončení inicializačnej sekvencie sa aktivuje tlačidlo Open Door (Otvoriť dvierka) a môžete vložiť sklíčka. Pozrite si Obrázok 37 na str. 290.
POZNÁMKA Ak je v skeneri pri zapnutí zavedených 24 sklíčok, inicializácia zlyhá, pretože nebude možné vykonať cyklus vysunutia sklíčok.

290 SureScan Dx System User Guide
7 Basic Instructions for Use (multilingual) Prevádzkové pokyny
Obrázok 37 Okno programu Agilent Microarray Scan Control (Riadenie skenovania microarray čipov od spoločnosti Agilent) – pripravené na pridávanie sklíčok.
Stav skenera sa zobrazuje v pravom dolnom rohu okna Scan Control (Riadenie skenovania) v stavovom riadku.

Basic Instructions for Use (multilingual) 7 Prevádzkové pokyny
SureScan Dx System User Guide 291
Krok č. 2. Vloženie sklíčok do držiakov sklíčokOdtlačky prstov spôsobujú chyby pri detekcii fluorescencie. Dotýkajte sa iba okrajov sklíčka a pri manipulácii so sklíčkami vždy používajte rukavice.
1 Pred vložením sklíčka položte držiak sklíčka na rovný povrch priesvitným krytom smerom nahor a západkou vpravo. To vám pomôže zabezpečiť správne zarovnanie sklíčka pri vkladaní do držiaka sklíčka.
2 Otvorte jemným zatlačením a vytiahnutím za koniec priesvitného plastového krytu so západkou.
Obrázok 38 Otvorenie držiaka sklíčka
VÝSTRAHA Západku stláčajte len v miere potrebnej na uvoľnenie krytu. V opačnom prípade sa môže poškodiť držiak sklíčok a uchytenie nebude možné. Nepoužívajte poškodené držiaky sklíčok, lebo sa môžu zachytiť vo vnútri skenera.

292 SureScan Dx System User Guide
7 Basic Instructions for Use (multilingual) Prevádzkové pokyny
3 Sklíčko vložte do držiaka nasledujúcim spôsobom:
a Sklíčko držte za koniec s čiarovým kódom.
b Uistite sa, že aktívny povrch microarray čipu smeruje hore ku krytu sklíčka s čiarovým kódom umiestneným vľavo.
c Opatrne položte koniec sklíčka bez štítku s čiarovým kódom na výstupok na zachytenie sklíčka. Pozrite si Obrázok 39.
d Jemne zasuňte sklíčko dole do držiaka sklíčka. Pozrite si Obrázok 40.
e Plastový kryt sklíčka zatvorte zatláčaním konca so západkou, kým nezačujete cvaknutie. Sklíčko sa tým posunie do správnej polohy v držiaku.
f Ak chcete držiak znova otvoriť a overiť, či je sklíčko správne umiestnené, jemne zatlačte a vytiahnite koniec priesvitného plastového krytu so západkou.
Po vložení je sklíčko umiestnené rovno a zodpovedá bodom zarovnania na držiaku sklíčka.
g Plastový kryt sklíčka zatvorte zatláčaním konca so západkou, kým nezačujete cvaknutie. Pozrite si Obrázok 41.
VÝSTRAHA Ak je západka na plastovom kryte sklíčka príliš napnutá, nemusí správne zacvaknúť na miesto. Držiaky sklíčok, ktoré pri zatváraní nezacvaknú, zlikvidujte.
VÝSTRAHA Ak je správne zatvorený, horná časť západky je zarovnaná s povrchom základne alebo je nižšie. Ak tak nie je, nepoužívajte držiak sklíčok, lebo západka môže byť poškodená.

Basic Instructions for Use (multilingual) 7 Prevádzkové pokyny
SureScan Dx System User Guide 293
Obrázok 39 Vloženie sklíčka do držiaka sklíčka
Obrázok 40 Sklíčko vložené do držiaka sklíčka
Obrázok 41 Držiak sklíčka – zatvorený, so sklíčkom
Výstupok na zachytenie sklíčk
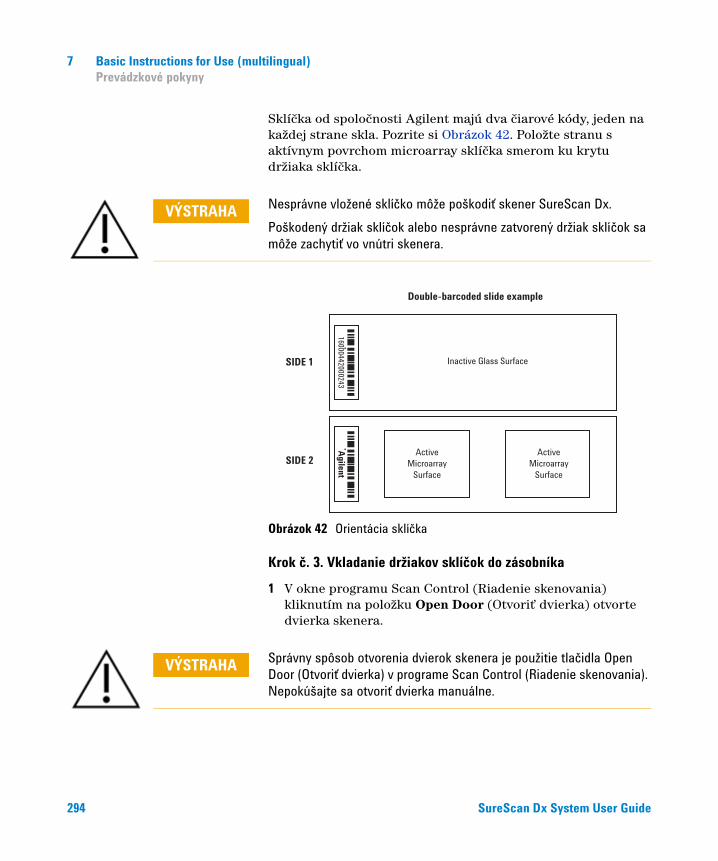
294 SureScan Dx System User Guide
7 Basic Instructions for Use (multilingual) Prevádzkové pokyny
Sklíčka od spoločnosti Agilent majú dva čiarové kódy, jeden na každej strane skla. Pozrite si Obrázok 42. Položte stranu s aktívnym povrchom microarray sklíčka smerom ku krytu držiaka sklíčka.
Obrázok 42 Orientácia sklíčka
Krok č. 3. Vkladanie držiakov sklíčok do zásobníka1 V okne programu Scan Control (Riadenie skenovania)
kliknutím na položku Open Door (Otvoriť dvierka) otvorte dvierka skenera.
VÝSTRAHA Nesprávne vložené sklíčko môže poškodiť skener SureScan Dx.Poškodený držiak sklíčok alebo nesprávne zatvorený držiak sklíčok sa môže zachytiť vo vnútri skenera.
VÝSTRAHA Správny spôsob otvorenia dvierok skenera je použitie tlačidla Open Door (Otvoriť dvierka) v programe Scan Control (Riadenie skenovania). Nepokúšajte sa otvoriť dvierka manuálne.

Basic Instructions for Use (multilingual) 7 Prevádzkové pokyny
SureScan Dx System User Guide 295
2 Uchopte a zdvihnite držiak za vyznačený výčnelok. Keď držiak sklíčka zdvihnete správne, šípka v hornej časti držiaka sklíčka smeruje doľava. Pozrite si Obrázok 43.
Obrázok 43 Držiak sklíčka vám pomôže vložiť sklíčka správne
Držiak sklíčka vložte do ktorejkoľvek otvorenej drážky. Čísla drážok sú na zásobníku pre sklíčka zreteľne označené. Držiak sklíčka nezatláčajte do zásobníka nasilu. Držiak sa vkladá ľahko, keď je správne umiestnený výčnelkom na uchopenie nahor a šípka smeruje doľava.
Šípka uľahčuje identifikáciuorientácie skenera
Výčnelok určený na uchopenie držiaka
VÝSTRAHA Ak pri vkladaní držiaka sklíčok do kazety pocítite odpor, držiak sklíčok môže byť nesprávne zatvorený alebo môže byť poškodený. Skontrolujte držiak sklíčok, zatvorte ho alebo v prípade potreby ho vymeňte.

296 SureScan Dx System User Guide
7 Basic Instructions for Use (multilingual) Prevádzkové pokyny
Obrázok 44 Vloženie držiaka sklíčka do zásobníka
3 Uistite sa, že držiak sklíčka je umiestnený v dolnej časti drážky zásobníka.
Číslo drážky so zavedeným sklíčkom bliká namodro.
4 Opakujte kroky č. 2 až 3, kým nebudú do zásobníka umiestnené všetky držiaky sklíčok.
5 V programe Scan Control (Riadenie skenovania) kliknite na položku Close Door (Zatvoriť dvierka).
V prípade sklíčok, ktoré nemajú k svojmu dizajnu priradený skenovací protokol, zostáva skenovací protokol prázdny a políčko State (Stav) drážky ostáva označené ako „Present“ (Doterajšie). Priraďte skenovací protokol podľa opisu v časti “Krok č. 4. Nastavenie alebo zmena nastavení skenovacieho protokolu”.
VÝSTRAHA Nesprávne umiestnenie držiaka sklíčka do zásobníka môže mať za následok vážne poškodenie microarray skenera SureScan Dx.
Basic Instructions for Use (multilingual) 7 Prevádzkové pokyny
SureScan Dx System User Guide 297
Krok č. 4. Nastavenie alebo zmena nastavení skenovacieho protokolu
Aktuálne nastavenia skenovacieho protokolu sú zobrazené pre každé vybrané sklíčko v pravej časti okna v hlavnom okne softvéru Scan Control (Riadenie skenovania).
Pri prvom nastavení skenovania sklíčka vyberte skenovací protokol, ktorý sa má použiť.
• Pre každé sklíčko v tabuľke s drážkami kliknite na položku Scan Protocol (Skenovací protokol) a vyberte skenovací protokol, ktorý sa má použiť na skenovanie sklíčka.
Spoločnosť Agilent dodáva osem vopred nainštalovaných protokolov, ktoré je možné zvoliť a použiť s Agilent čipmi s vysokou hustotou (HD) a s Agilent čipmi G3.
AgilentHD_GX_2Color Agilent HD 2-farebné microarray čipy na génovú expresiu
AgilentHD_GX_1Color Agilent HD 1-farebné microarray čipy na génovú expresiu
AgilentG3_GX_2Color Agilent G3 2-farebné microarray čipy na génovú expresiu
AgilentG3_GX_1Color Agilent G3 1-farebné microarray čipy na génovú expresiu
AgilentHD_CGH Agilent HD microarray čipy na CGH/CGH+SNP/CNV/ChIP
AgilentG3_CGH Agilent G3 microarray čipy na CGH/CGH+SNP/CNV/ChIP
AgilentHD_miRNA Agilent HD miRNA microarray čipy
AgilentG3_miRNA Agilent G3 miRNA microarray čipy
Krok č. 5. (Voliteľný) Zmena výstupného priečinkaZadaný výstupný priečinok, do ktorého program ukladá obrazové súbory vytvorené skenerom, môžete zmeniť.
• Pre každé sklíčko v tabuľke s drážkami kliknite na položku Output Folder (Výstupný priečinok) a vyhľadajte umiestnenie požadovaného priečinka.
Spoločnosť Agilent odporúča výber lokálneho priečinka na sekundárnom pevnom disku.
Krok č. 6. Určenie poradia skenovania sklíčok1 V hlavnom okne programu Scan Control (Riadenie
skenovania) kliknutím na položku All to Queue (Všetky do poradia) pridajte všetky sklíčka v tabuľke s drážkami, ktorých políčko State (Stav) je označené ako „Ready for queue“ (Pripravené), do poradia na skenovanie.
Zobrazí sa potvrdzovacie dialógové okno. Kliknutím na položku Yes (Áno) pridáte sklíčka do poradia.
ALEBO

298 SureScan Dx System User Guide
7 Basic Instructions for Use (multilingual) Prevádzkové pokyny
V tabuľke s drážkami programu Scan Control (Riadenie skenovania) kliknite na bunku State (Stav) sklíčka, ktoré chcete skenovať ako prvé. Potom kliknite na položku Add to Queue (Pridať do poradia).
2 Pri každom ďalšom sklíčku, ktoré chcete skenovať,
• kliknite na bunku State (Stav) a výberom položky Add to queue first (Pridať do poradia ako prvé) pridajte sklíčko na začiatok poradia skenovania.
ALEBO
• kliknite na bunku State (Stav) a výberom položky Add to queue last (Pridať do poradia ako posledné) pridajte sklíčko na koniec poradia skenovania.
Ak chcete odstrániť všetky sklíčka z poradia, kliknite na položku Empty Queue (Zrušiť poradie) v hlavnom okne programu Scan Control (Riadenie skenovania).
Krok č. 7. Skenovanie sklíčok1 V prípade potreby v hlavnom okne programu Scan Control
(Riadenie skenovania) kliknite na položku Close Door (Zatvoriť dvierka).
Počkajte, kým sa dvierka nezatvoria a neaktivuje sa tlačidlo Start Scan (Spustiť skenovanie).
2 V hlavnom okne programu Scan Control (Riadenie skenovania) kliknutím na položku Start Scan (Spustiť skenovanie) začnite skenovanie sklíčok, ktoré boli pridané do poradia.
Krok č. 8. Vybratie sklíčok1 V hlavnom okne programu Scan Control (Riadenie
skenovania) kliknutím na položku Open Door (Otvoriť dvierka) otvorte dvierka skenera.
2 Po otvorení dvierok skenera vyberte držiaky sklíčok zo zásobníka.
3 Sklíčka vyberte z držiakov sklíčok nasledujúcim spôsobom:
a Držte držiak sklíčka na bočných stranách s logom spoločnosti Agilent smerom nahor.
b Otvorte jemným zatlačením a vytiahnutím za koniec priesvitného plastového krytu so západkou.
c Sklíčko vytlačte za koniec s čiarovým kódom zospodu držiaka sklíčka, aby ste predišli odtlačkom prstov na časti so vzorkou.
d Uchopte sklíčko za bočné strany a vyberte z držiaka sklíčka.

Basic Instructions for Use (multilingual) 7 Varnostni napotki
SureScan Dx System User Guide 299
Navodila v angleščini
Varnostni napotkiOptični bralnik SureScan Dx je zasnovan za varno in preprosto uporabo. Pred uporabo optičnega bralnika SureScan DX morate razumeti in upoštevati vsa opozorila.
Vlažni pogojiOptični bralnik SureScan Dx je občutljiv na vlažne pogoje s kondenzacijo. Pred odpiranjem embalaže na mestu uporabe vedno počakajte 12 ur, da se naprava prilagodi temperaturi.
Da bi zagotovili optimalno delovanje, optični bralnik SureScan Dx uporabljajte le v naslednjem razponu vlažnosti.
OPOZORILO Ne poskušajte popravljati ali dostopati do notranjih komponent optičnega bralnika SureScan Dx. Če to naredite, tvegate izpostavljenost visoki napetosti in škodljivemu laserskemu sevanju. Z odstranjevanjem glavnega pokrova izničite garancijo.
OPOZORILO Optični bralnik SureScan DX povežite z ozemljeno vtičnico. Za varnost je potrebna zaščitna ozemljitev.
POZOR Da bi zmanjšali količino tresljajev zaradi hitrega laserskega optičnega branja, optični bralnik namestite na trdno laboratorijsko ali običajno mizo. Optičnega bralnika ne nameščajte v bliino druge laboratorijske opreme, ki lahko povzroča tresljaje.
POZOR Optični bralnik SureScan Dx je občutljiv na vlažne pogoje s kondenzacijo. Upoštevajte napotke v dokumentaciji izdelka. Glejte »Vlažni pogoji« na strani 299.

300 SureScan Dx System User Guide
7 Basic Instructions for Use (multilingual) Navodila za uporabo
Med delovanjem: od 15 do 85 % relativne vlažnosti pri 30 °C
Navodila za uporabo1. korak Vklopite optični bralnik SureScan Dx Microarray in zaženite program nadzora optičnega branja1 Vklopite optični bralnik SureScan Dx s stikalom za
vklop/izklop na sprednji strani naprave.
2 Vklopite računalniško delovno postajo in počakajte, da se zažene.
3 Za zagon programa nadzora optičnega branja dvokliknite ikono Agilent Microarray Scan Control (Nadzor optičnega branja Agilent Microarray).
Slika 36 Ikona za nadzor optičnega branja Agilent Microarray
Ko se program zažene, se odpre glavno okno programa za nadzor optičnega branja Agilent Microarray in optični bralnik opravi inicializacijsko zaporedje. Po koncu inicializacije se omogoči gumb za odpiranje vrat in lahko naložite objektna stekla. Glejte Slika 37 na strani 301.
OPOMBA Če je v optični bralnik ob vklopu naloženih 24 objektnih stekel, inicializacija ne bo uspela, ker ne more izvesti cikla izvrženja objektnega stekla.

Basic Instructions for Use (multilingual) 7 Navodila za uporabo
SureScan Dx System User Guide 301
Slika 37 Okno programa nadzora optičnega bralnika Agilent Microarray – pripravljeno za dodajanje objektnih stekel.
Stanje optičnega bralnika je prikazano v desnem spodnjem kotu okna za nadzor optičnega bralnika, v vrstici stanja.
2. korak Vstavite objektna stekla v držalaPrstni odtisi povzročajo napake v zaznavanju fluorescence. Dotikajte se le robov objektnega stekla in pri delu z objektnimi stekli vedno uporabljajte rokavice.
1 Pred vstavitvijo objektnega stekla postavite držalo na ravno površino tako, da je prozorni pokrov obrnjen navzgor, jeziček

302 SureScan Dx System User Guide
7 Basic Instructions for Use (multilingual) Navodila za uporabo
pa na desni. Tako zagotovite pravilno poravnanost objektnega stekla, ko ga vstavite v držalo.
2 Del prozornega plastičnega pokrova z jezičkom previdno potisnite in povlecite navzgor, da ga odprete.
Slika 38 Odpiranje držala za objektna stekla
POZOR Jezička ne potisnite dlje, kot je potrebno, da odprete pokrov. V nasprotnem primeru lahko poškodujete objektna stekla in preprečite ustrezno zapiranje. Ne uporabljajte poškodovanih objektnih stekel, saj se lahko zagozdijo v optičnem bralniku.
Basic Instructions for Use (multilingual) 7 Navodila za uporabo
SureScan Dx System User Guide 303
3 Vstavite objektno steklo v držalo na naslednji način:
a Držite objektno steklo na koncu s črtno kodo.
b Prepričajte se, da je površina aktivne mikromreže obrnjena navzgor, proti pokrovu za objektna stekla, črtna koda mora biti na levi strani.
c Previdno postavite konec objektnega stekla brez črtne kode na letvico za objektno steklo. Glejte Slika 39.
d Previdno spustite objektno steklo v držalo. Glejte Slika 40.
e Zaprite plastični pokrov za objektno steklo tako, da pritisnete na konec jezička, dokler ne slišite »klika«. S tem premaknete objektno steklo v pravilni položaj v držalu.
f Del prozornega plastičnega pokrova z jezičkom previdno potisnite in povlecite navzgor, da ga znova odprete in preverite, ali je objektno steklo pravilno nameščeno.
Ko je objektno steklo vstavljeno, leži plosko in se ujema s točkami poravnave na držalu.
g Zaprite plastični pokrov za objektno steklo tako, da pritisnete na konec jezička, dokler ne slišite »klika«. Glejte Slika 41.
POZOR Če jeziček na plastičnem pokrovu objektnega stekla prevleč povlečete, se morda ne bo pravilno zaskočil. Držala objektnih stekel, ki ne kliknejo, ko jih zaprete, zavrzite.
POZOR Če je objektno steklo ustrezno zaprto, je vrh jezička poravnan s površino podstavka ali pod površino podstavka. Če objektno steklo ni pravilno zaprta, ga ne uporabite, ker je jeziček morda poškodovan.

304 SureScan Dx System User Guide
7 Basic Instructions for Use (multilingual) Navodila za uporabo
Slika 39 Vstavljanje objektnega stekla v držalo
Slika 40 Objektno steklo, vstavljeno v držalo
Slika 41 Držalo za objektno steklo – zaprto z objektnim steklom
Letvica za objektno steklo

Basic Instructions for Use (multilingual) 7 Navodila za uporabo
SureScan Dx System User Guide 305
Objektna stekla Agilent imajo dve črtni kodi, po eno na vsaki strani stekla. Glejte Slika 42. Stran z aktivno mikromrežo objektnega stekla postavite tako, da bo obrnjena proti pokrovu držala objektnega stekla.
Slika 42 Usmeritev objektnega stekla
3. korak Naložite držala objektnega stekla v kaseto1 V oknu programa za nadzor optičnega branja kliknite Open
Door (Odpri vrata), da odprete vrata optičnega bralnika.
POZOR Nepravilno vstavljeno objektno steklo lahko poškoduje optični bralnik SureScan Dx.Poškodovano ali nepravilno zaprto objektno steklo se lahko zagozdi v optičnem bralniku.
POZOR Pravilen način odpiranja vrat optičnega bralnika je odpiranje z gumbom Open Door (Odpri vrata) v programu za nadzor optičnega branja. Vrat ne poskušajte odpirati ročno.

306 SureScan Dx System User Guide
7 Basic Instructions for Use (multilingual) Navodila za uporabo
2 Primite za oprimek in dvignite držalo objektnega stekla. Če držalo objektnega stekla držite pravilno, puščica na vrhu držala objektnega stekla kaže v levo. Glejte Slika 43.
Slika 43 Držalo za objektna stekla pomaga pri pravilnem vstavljanju objektnih stekel
Vstavite držalo objektnih stekel v katero koli prosto režo. Številke rež so jasno označene na kaseti objektnih stekel. Držala objektnih stekel v kaseto ne vstavljajte s silo; vstavitev je enostavna, če je držalo pravilno poravnano tako, da je oprimek na vrhu, puščica pa kaže levo.
Puščica pomaga določitiusmeritev optičnega bralnika
Oprimek
POZOR Če pri vstavljanju objektnega stekla v kaseto začutite upor, objektno steklo morda ni pravilno zaprto ali pa je poškodovano. Preverite objektno steklo in ga po potrebi zaprite ali zamenjajte.

Basic Instructions for Use (multilingual) 7 Navodila za uporabo
SureScan Dx System User Guide 307
Slika 44 Vstavljanje držala objektnih stekel v kaseto
3 Prepričajte se, da je držalo objektnih stekel nameščeno na dnu reže kasete.
Številka reže za naloženo objektno steklo utripa modro.
4 Ponovite koraka 2 in 3, dokler niso v kaseto vstavljena vsa držala objektnih stekel.
5 V programu za nadzor optičnega branja kliknite Close Door (Zapri vrata).
Pri objektnih steklih, ki nimajo pripisanega protokola optičnega branja, polje za protokol optičnega branja ostane prazno, stanje reže pa ostane »Present« (Prisotno). Dodelite protokol optičnega branja, kot je opisano v »4. korak Nastavite ali spremenite nastavitve protokola optičnega branja«.
POZOR Nepravilna postavitev držala objektnih stekel v kaseto lahko resno poškoduje optični bralnik SureScan Dx Microarray.

308 SureScan Dx System User Guide
7 Basic Instructions for Use (multilingual) Navodila za uporabo
4. korak Nastavite ali spremenite nastavitve protokola optičnega branja
Trenutne nastavitve protokola optičnega branja so za vsako izbrano objektno steklo prikazane v desnem podoknu glavnega okna programske opreme za nadzor optičnega branja.
Ob prvi nastavitvi optičnega branja objektnega stekla izberite protokol optičnega branja, ki ga želite uporabiti.
• Za vsako objektno steklo v tabeli rež kliknite protokol optičnega branja in izberite protokol, ki ga boste uporabili za optično branje objektnega stekla.
Agilent ponuja osem predhodno naloženih protokolov, ki jih lahko izberete in uporabite z mikromrežami Agilent velike gostote (HD) in mikromrežami Agilent G3.
AgilentHD_GX_2Color 2-barvne mikromreže Agilent HD za izražanje genov
AgilentHD_GX_1Color 1-barvne mikromreže Agilent HD za izražanje genov
AgilentG3_GX_2Color 2-barvne mikromreže Agilent G3 za izražanje genov
AgilentG3_GX_1Color 1-barvne mikromreže Agilent G3 za izražanje genov
AgilentHD_CGH Mikromreže Agilent HD CGH/CGH+SNP/CNV/ChIP
AgilentG3_CGH Mikromreže Agilent G3 CGH/CGH+SNP/CNV/ChIP
AgilentHD_miRNA Mikromreže Agilent HD miRNA
AgilentG3_miRNA Mikromreže Agilent G3 miRNA
5. korak (poljubno) Spremenite izhodno mapoIzhodno mapo, v katero program shrani slikovne datoteke, ki jih ustvari optični bralnik, lahko spremenite.
• Za vsako objektno steklo v tabeli rež kliknite izhodno mapo in se pomaknite do lokacije želene mape.
Agilent priporoča, da izberete lokalno mapo na sekundarnem trdem disku.
6. korak Dodajte objektna stekla v čakalno vrsto za optično branje1 V glavnem oknu nadzora optičnega branja kliknite All to
Queue (Vsi v čakalno vrsto), da v čakalno vrsto dodate vsa objektna stekla v tabeli rež s stanjem »Ready for queue« (Pripravljen na čakalno vrsto).
Odpre se pogovorno okno za potrditev. Kliknite Yes (Da), da dodate objektna stekla v čakalno vrsto.
ALI

Basic Instructions for Use (multilingual) 7 Navodila za uporabo
SureScan Dx System User Guide 309
V tabeli rež v nadzoru optičnega branja kliknite celico State (Stanje) za prvo objektno steklo, ki ga želite optično prebrati, in kliknite Add to Queue (Dodaj v čakalno vrsto).
2 Za vsako dodatno objektno steklo, ki ga želite optično prebrati:
• Kliknite celico State (Stanje) in izberite Add to queue first (Dodaj na začetek čakalne vrste), da dodate objektno steklo na začetek čakalne vrste za optično branje.
ALI
• Kliknite celico State (Stanje) in izberite Add to queue last (Dodaj na konec čakalne vrste), da dodate objektno steklo na konec čakalne vrste za optično branje.
Če morate iz čakalne vrste odstraniti vsa objektna stekla, v glavnem oknu nadzora optičnega branja kliknite Empty Queue (Izprazni čakalno vrsto).
7. korak Optično preberite objektna stekla1 V glavnem oknu nadzora optičnega branja po potrebi kliknite
Close Door (Zapri vrata).
Počakajte, da se vrata zaprejo in omogoči gumb Start Scan (Začni optično branje).
2 V glavnem oknu nadzora optičnega branja kliknite Start Scan (Začni optično branje), da začnete optično prebirati objektna stekla, dodana v čakalno vrsto.
8. korak Odstranite objektna stekla1 V glavnem oknu nadzora optičnega branja kliknite Open
Door (Odpri vrata), da odprete vrata optičnega bralnika.
2 Odprite vrata optičnega bralnika in odstranite držala objektnih stekel iz kasete.
3 Odstranite objektna stekla iz držal na naslednji način:
a Primite objektno steklo ob straneh tako, da je logotip Agilent obrnjen navzgor.
b Del prozornega plastičnega pokrova z jezičkom previdno potisnite in povlecite navzgor, da ga odprete.
c Del objektnega stekla s črtno kodo potisnite navzgor izpod držala, in pazite, da na prostoru za vzorce ne pustite prstnih odtisov.
d Primite objektno steklo ob straneh in ga odstranite iz držala.

310 SureScan Dx System User Guide
7 Basic Instructions for Use (multilingual) Instrucciones de seguridad
Instrucciones básicas para el uso
Instrucciones de seguridadEl escáner SureScan Dx está diseñado para un uso seguro y sencillo. Asegúrese de entender y respetar todas las advertencias y precauciones antes de utilizar el escáner SureScan Dx.
Condiciones de humedadEl escáner SureScan Dx es sensible a situaciones de humedad por condensación. Antes de abrir la caja de embalaje, espere siempre 12 horas para su acondicionamiento térmico en las instalaciones.
ADVERTENCIA No intente reparar ni acceder a los componentes internos del escáner SureScan Dx. Se expone a alto voltaje y a una radiación peligrosa del láser. La extracción de la cubierta principal anula la garantía.
ADVERTENCIA Conecte el escáner SureScan Dx a una toma de alimentación con toma de tierra. La toma de tierra de protección es esencial por razones de seguridad.
PRECAUCIÓN Para disminuir las vibraciones debido al rápido barrido de la excitación del láser por los microarrays, instale el escáner en un banco de laboratorio o una mesa resistente. No instale el escáner cerca de otro equipo de laboratorio que pueda causar vibraciones.
PRECAUCIÓN El escáner SureScan Dx es sensible a situaciones de humedad por condensación. Siga las precauciones que se indican en la documentación del producto. Consulte “Condiciones de humedad” en la página 310.

Basic Instructions for Use (multilingual) 7 Instrucciones de utilización
SureScan Dx System User Guide 311
Para garantizar un rendimiento óptimo del escáner SureScan Dx, utilice el escáner solo en el siguiente porcentaje de humedad.
Funcionamiento: de 15% a 85% de HR a 30 °C
Instrucciones de utilizaciónPaso 1. Encienda el escáner de microarrays SureScan Dx e inicie el programa Scan Control
1 Encienda el escáner SureScan Dx utilizando el interruptor de alimentación situado en la parte delantera del aparato.
2 Encienda la estación de trabajo del ordenador y espere que se inicie.
3 Haga doble clic en el icono Agilent Microarray Scan Control para abrir el programa Scan Control.
Figura 36 Icono de Agilent Microarray Scan Control
Cuando el programa se inicia, la ventana principal del programa Agilent Microarray Scan Control se abre y el escáner realiza la secuencia de inicialización. Una vez que finaliza la secuencia de inicialización, el botón Open Door se activa y es posible cargar las placas. Consulte Figura 37 en la página 312.
NOTA Si el escáner tiene 24 placas cargadas cuando lo enciende, se producirá un error en la inicialización porque no puede realizar el ciclo de expulsión de placas.

312 SureScan Dx System User Guide
7 Basic Instructions for Use (multilingual) Instrucciones de utilización
Figura 37 Ventana del programa Agilent Microarray Scan Control: listo para agregar placas.
El estado del escáner se indica en la esquina inferior derecha de la ventana de Scan Control, en la barra de estado.
Paso 2. Inserción de las placas en los portaplacas
Las huellas de dedos pueden causar errores en la detección de la fluorescencia. Toque solo los bordes de la placa y utilice siempre guantes al manipularla.
1 Antes de insertar la placa, coloque el portaplacas sobre una superficie plana, con la cubierta transparente hacia arriba y la lengüeta a la derecha. Esto permite garantizar que la placa

Basic Instructions for Use (multilingual) 7 Instrucciones de utilización
SureScan Dx System User Guide 313
esté correctamente alineada al momento de insertarla en el portaplacas.
2 Empuje suavemente y tire del extremo de la lengüeta de la cubierta transparente de plástico para abrirlo.
Figura 38 Abrir el portaplacas
PRECAUCIÓN No empuje la pestaña más de lo necesario para soltar la tapa. Si lo hace, podría dañar el portaplacas y evitar que la tapa se suelte correctamente.
No utilice portaplacas dañados ya que pueden quedar obstruidos dentro del escáner.

314 SureScan Dx System User Guide
7 Basic Instructions for Use (multilingual) Instrucciones de utilización
3 Inserte la placa en el portaplacas como se describe a continuación:
a Sostenga la placa por el extremo del código de barras.
b Asegúrese de que la superficie activa del microarray esté hacia arriba, hacia la cubierta de la placa y con el código de barra a la izquierda.
c Coloque con cuidado el extremo de la placa sin la etiqueta del código de barra sobre el saliente de la placa. Consulte Figura 39.
d Baje suavemente la placa en el portaplacas. Consulte Figura 40.
e Cierre la cubierta de plástico de la placa empujando el extremo de la lengüeta hasta escuchar un clic. Al hacer esto, la placa toma su posición dentro del portaplacas.
f Empuje suavemente y tire del extremo de la lengüeta de la cubierta transparente de plástico para abrirla nuevamente y verifique que la placa esté correctamente colocada.
Una vez insertada, la placa queda en una posición horizontal y coincide con los puntos de alineación del portaplacas.
g Cierre la cubierta de plástico de la placa empujando el extremo de la lengüeta hasta escuchar un clic. Consulte Figura 41.
PRECAUCIÓN Si la lengüeta de la cubierta de plástico de la placa está demasiado tensada, puede que no encaje en su sitio adecuadamente. Deshágase de los portaplacas que no hacen clic al cerrarlos.
PRECAUCIÓN Cuando se cierra correctamente, la parte superior de la pestaña estará nivelada o por debajo de la superficie de la base. Si este no es el caso, no utilice el portaplacas ya que la pestaña podría estar dañada.

Basic Instructions for Use (multilingual) 7 Instrucciones de utilización
SureScan Dx System User Guide 315
Figura 39 Insertar la placa en el portaplacas
Figura 40 Placa insertada en portaplacas
Figura 41 Portaplacas: cerrado con placa
Saliente de la placa

316 SureScan Dx System User Guide
7 Basic Instructions for Use (multilingual) Instrucciones de utilización
Las placas de Agilent tienen dos códigos de barras, una en cada lado del cristal. Consulte Figura 42. Coloque el lado de la placa con el microarray activo mirando hacia la cubierta del portaplacas.
Figura 42 Orientación de la placa
Paso 3. Cargar los portaplacas en el cassette
1 En la ventana del programa Scan Control, haga clic en Open Door para abrir la puerta del escáner.
2 Levante el portaplacas mediante el soporte para el dedo. La flecha ubicada en la parte superior del portaplacas apunta
PRECAUCIÓN Una placa insertada incorrectamente puede dañar el escáner SureScan Dx.
Un portaplacas dañado o cerrado de forma incorrecta puede quedar bloqueado en el escáner.
PRECAUCIÓN La forma correcta de abrir la puerta del escáner es mediante el botón Open Door en el programa Scan Control. No intente abrir la puerta manualmente.

Basic Instructions for Use (multilingual) 7 Instrucciones de utilización
SureScan Dx System User Guide 317
hacia la izquierda cuando levanta el portaplacas correctamente. Consulte Figura 43.
Figura 43 El portaplacas le permite insertar las placas correctamente
Inserte un portaplacas en cualquier ranura abierta. Los números de las ranuras están claramente etiquetados en el cassette de la placa. No fuerce el portaplacas en el cassette, ya que se inserta fácilmente si está correctamente alineado con el soporte para el dedo en la parte superior y la flecha hacia la izquierda.
La flecha ayuda a identificarorientación del escáner
Soporte para el dedo
PRECAUCIÓN Si observa resistencia al colocar el portaplacas en el cassette, es posible que el portaplacas no se haya cerrado correctamente o esté dañado. Compruebe el portaplacas y ciérrelo o sustitúyalo según sea necesario.
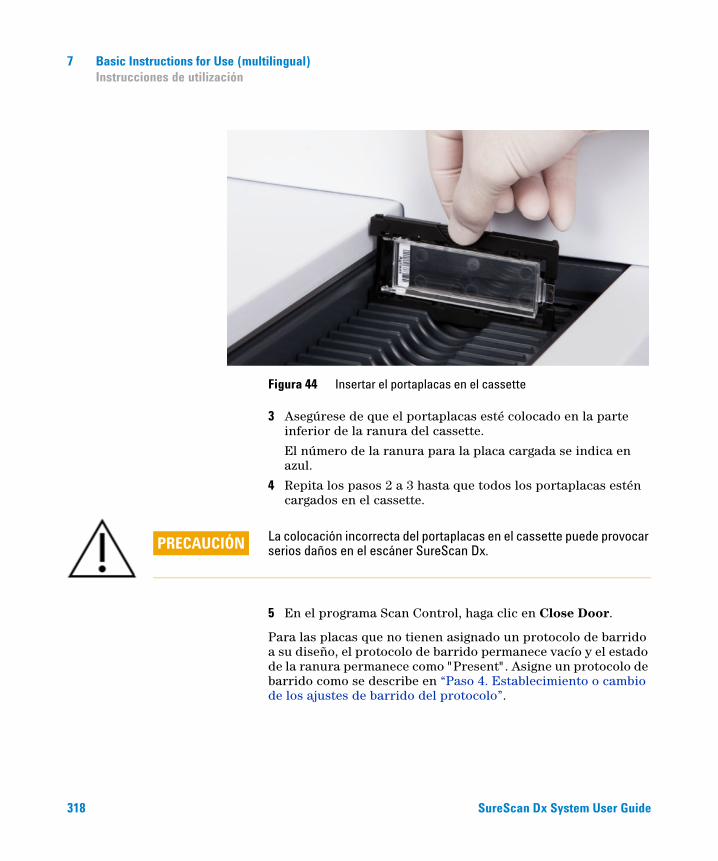
318 SureScan Dx System User Guide
7 Basic Instructions for Use (multilingual) Instrucciones de utilización
Figura 44 Insertar el portaplacas en el cassette
3 Asegúrese de que el portaplacas esté colocado en la parte inferior de la ranura del cassette.
El número de la ranura para la placa cargada se indica en azul.
4 Repita los pasos 2 a 3 hasta que todos los portaplacas estén cargados en el cassette.
5 En el programa Scan Control, haga clic en Close Door.
Para las placas que no tienen asignado un protocolo de barrido a su diseño, el protocolo de barrido permanece vacío y el estado de la ranura permanece como "Present" . Asigne un protocolo de barrido como se describe en “Paso 4. Establecimiento o cambio de los ajustes de barrido del protocolo”.
PRECAUCIÓN La colocación incorrecta del portaplacas en el cassette puede provocar serios daños en el escáner SureScan Dx.

Basic Instructions for Use (multilingual) 7 Instrucciones de utilización
SureScan Dx System User Guide 319
Paso 4. Establecimiento o cambio de los ajustes de barrido del protocolo
Los ajustes actuales del protocolo de barrido se muestran para cada placa seleccionada en el panel derecho de la ventana principal del programa Scan Control.
Cuando configure el barrido para una placa por primera vez, seleccione el protocolo de barrido que desea utilizar.
• Para cada placa de la tabla de ranuras, haga clic en el Scan Protocol y seleccione el protocolo de barrido que desea utilizar para escanear la placa.
Agilent facilita ocho protocolos precargados para su selección y uso con microarrays de alta densidad (HD) de Agilent y microarrays Agilent G3.
AgilentHD_GX_2Color Microarrays de expresión génica Agilent HD 2-color
AgilentHD_GX_1Color Microarrays de expresión génica Agilent HD 1-color
AgilentG3_GX_2Color Microarrays de expresión génica Agilent G3 2-color
AgilentG3_GX_1Color Microarrays de expresión génica Agilent G3 1-color
AgilentHD_CGH Microarrays Agilent HD CGH/CGH+SNP/CNV/ChIP
AgilentG3_CGH Microarrays Agilent G3 CGH/CGH+SNP/CNV/ChIP
AgilentHD_miRNA Microarrays Agilent HD miRNA
AgilentG3_miRNA Microarrays Agilent G3 miRNA
Paso 5. (Opcional) Cambiar la carpeta de salida
Puede cambiar la carpeta de salida especificada donde el programa guarda los archivos de imagen creados por el escáner.
• Para cada placa de la tabla de ranuras, haga clic en Output Folder y busque la ubicación de la carpeta deseada.
Agilent recomienda seleccionar una carpeta local en una unidad de disco duro secundaria.
Paso 6. Incorporación de las placas a la cola del escaneo
1 En la ventana principal de Scan Control, haga clic en All to Queue para agregar a la cola de escaneo todas las placas de la tabla de ranuras que muestren el estado "Ready for queue" .
Aparecerá un cuadro de diálogo de confirmación. Haga clic en Yes para agregar las placas a la cola.
O BIEN

320 SureScan Dx System User Guide
7 Basic Instructions for Use (multilingual) Instrucciones de utilización
En la tabla de ranuras de Scan Control, haga clic en la celdaState para la primera placa que desea escanear y haga clic en Add to Queue.
2 Para cada placa adicional que desea escanear:
• Haga clic en la celda State y seleccione Add to queue first para agregar la placa al principio de la cola de escaneo.
O BIEN
• Haga clic en la celda State y seleccione Add to queue last para agregar la placa al final de la cola de barrido.
Si tiene que extraer todas las placas de la cola, haga clic en Empty Queue en la ventana principal de Scan Control.
Paso 7. Barrido de las placas
1 En caso de ser necesario, en la ventana principal de Scan Control, haga clic en Close Door.
Espere hasta que se cierre la puerta y se active el botón Start Scan.
2 En la ventana principal de Scan Control, haga clic en Start Scan para iniciar el escanedo de las placas que se agregaron a la cola.
Paso 8. Extracción de las placas
1 En la ventana principal de Scan Control, haga clic en Open Door para abrir la puerta del escáner.
2 Abra la puerta del escáner y retire los portaplacas del cassette.
3 Retire las placas de los portaplacas del siguiente modo:
a Sostenga el portaplacas por los laterales con el logotipo de Agilent hacia arriba.
b Empuje suavemente y tire del extremo de la lengüeta de la cubierta transparente de plástico para abrirlo.
c Empuje sobre el extremo del código de barras de la placa por debajo del portaplacas para no dejar huellas en el área de la muestra.
d Sujete la placa por los laterales y retírela del portaplacas.

Basic Instructions for Use (multilingual) 7 Säkerhetsriktlinjer
SureScan Dx System User Guide 321
Grundläggande instruktioner för användning
SäkerhetsriktlinjerSureScan Dx-skannern är utformad för säkerhet och enkel användning. Innan du använder SureScan Dx-skannern ska du se till att du förstår och iakttar alla varningar och försiktighetsåtgärder.
FuktighetsförhållandenSureScan Dx-skannern är känslig för kondenserande fuktighet. Det krävs 12 timmars temperaturanpassning innan förpackningen öppnas.
VARNING Försök inte att reparera eller komma åt de inre komponenterna i SureScan Dx-skannern. Du riskerar exponering för hög spänning och skadlig laserstrålning. Om du tar bort huvudkåpan ogiltigförklarar detta garantin.
VARNING Anslut SureScan Dx-skannern till ett jordat eluttag. Det krävs skyddsjordning för säkerhet.
FÖRSIKTIGHET Ställ skannern på ett stabilt laboratoriebord för att minimera vibration på grund av snabbskanning från laserexcitation över mikromatrisen. Installera inte skannern i närheten av annan laboratorieutrustning som kan orsaka vibrationer.
FÖRSIKTIGHET SureScan Dx-skannern är känslig för kondenserande fuktighet. Följ de försiktighetsåtgärder som uppges i produktdokumentationen. Se “Fuktighetsförhållanden” på sidan 321.

322 SureScan Dx System User Guide
7 Basic Instructions for Use (multilingual) Driftanvisningar
För optimal prestanda skall SureScan Dx-skannern endast användas i följande fuktighetsintervall:
Drift: 15 % till 85 % relativ fuktighet vid 30 °C
DriftanvisningarSteg 1. Slå på strömmen till mikromatrisskannern SureScan Dx och starta programmet Scan Control
1 Slå på skannern SureScan Dx med strömknappen framtill.
2 Slå på strömmen till datorn och vänta tills den är igång.
3 Dubbelklicka på ikonen Agilent Microarray Scan Control för att starta programmet Scan Control.
Figur 36 Ikonen Agilent Microarray Scan Control
När programmet startats, öppnas huvudfönstret Agilent Microarray Scan Control och skannern utför sin initialiseringssekvens. När initialiseringssekvensen har slutförts, aktiveras knappen "Open Door" (Öppna lucka) och objektglaset kan laddas. Se Figur 37 på sidan 323.
ANM Om skannern har 24 objektglas laddade när strömmen slås på, kommer initialiseringen att misslyckas eftersom cykeln för utmatning av objektglas inte kan utföras.

Basic Instructions for Use (multilingual) 7 Driftanvisningar
SureScan Dx System User Guide 323
Figur 37 Agilent Microarray Scan Control fönstrer – redo att lägga till objektglas.
Status för skannern indikeras i det nedre högra hörnet i fönstret Scan Control, i statusfältet.
Steg 2. Sätt i objektglasen i objektglashållarna
Fingeravtryck orsakar fel vid fluorescensdetektion. Vidrör endast kanterna på objektglaset och använd alltid handskar vid hantering av objektglas.
1 Innan du sätter i objektglaset, placera objektglashållaren på en plan yta, med det klara locket vänt uppåt, och med fliken till höger. Detta säkerställer att objektsglaset är korrekt justerat när det sätts i objektglashållaren.

324 SureScan Dx System User Guide
7 Basic Instructions for Use (multilingual) Driftanvisningar
2 Tryck in och dra försiktigt upp den flikförsedda änden av det klara plasthöljet för att öppna hållaren
Figur 38 Öppna objektglashållaren
3 Sätt objektglaset i hållaren enligt följande:
a Håll objektglaset i den kortsida där streckkoden sitter.
b Se till att den aktiva mikromatrisytan är vänd uppåt, mot objektglashöljet, med streckkoden till vänster.
c Placera försiktigt objektglasets kortsida utan streckkod på objektglashyllan. Se Figur 39.
d Sänk försiktigt ner objektglaset i objektglashållaren. Se Figur 40.
e Stäng objektglashöljet av plast. Tryck på flikänden tills det "klickar" . Detta flyttar in objektglaset i position i hållaren.
f Tryck försiktigt in och dra upp den flikförsedda änden av det klara plasthöljet för att öppna hålleren igen och kontrollera att objektglaset är korrekt placerat.
När det väl har satts in ligger objektglaset plant och passar in med justeringspunkterna på objektglashållaren.
g Stäng objektglashöljet av plast. Tryck på flikänden tills det "klickar" . Se Figur 41.
FÖRSIKTIGHET Tryck inte in fliken längre än vad som behövs för att ta bort skyddet. Om du gör det kan du skada hållaren och hindra att den från att fästa ordentligt.
Använd inte skadade hållare eftersom de kan fastna i skannern.

Basic Instructions for Use (multilingual) 7 Driftanvisningar
SureScan Dx System User Guide 325
Figur 39 Sätta objektglaset i objektglashållaren
Figur 40 Objektglas isatt i objektglashållare
FÖRSIKTIGHET Om fliken på objektglashöljet av plast har töjts ut för mycket, kan det förlora sin förmåga att "klicka" glaset i rätt position. Kassera objektglashållare som inte längre klickar när de stängs.
FÖRSIKTIGHET När den är ordentligt stängd ska överdelen av fliken sitta jämnt med basens yta eller under basens yta. Om det inte är det ska du inte använda hållaren eftersom fliken kan skadas.
Objektglashylla
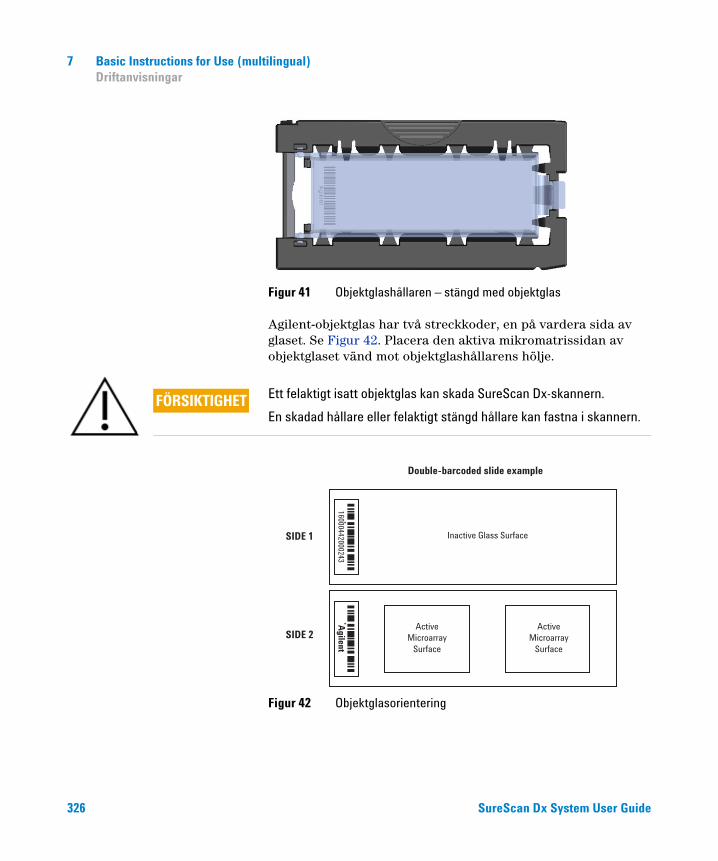
326 SureScan Dx System User Guide
7 Basic Instructions for Use (multilingual) Driftanvisningar
Figur 41 Objektglashållaren – stängd med objektglas
Agilent-objektglas har två streckkoder, en på vardera sida av glaset. Se Figur 42. Placera den aktiva mikromatrissidan av objektglaset vänd mot objektglashållarens hölje.
Figur 42 Objektglasorientering
FÖRSIKTIGHET Ett felaktigt isatt objektglas kan skada SureScan Dx-skannern.
En skadad hållare eller felaktigt stängd hållare kan fastna i skannern.

Basic Instructions for Use (multilingual) 7 Driftanvisningar
SureScan Dx System User Guide 327
Steg 3. Ladda objektglashållarna i kassetten
1 I programfönstret Scan Control, klicka på Open Door (Öppna lucka) för att öppna skannerluckan.
2 Ta upp objektglashållaren genom att hålla på " fingerhållaren" . Pilen på ovansidan av objektglashållaren pekar åt vänster när du tar upp objektglashållaren på rätt sätt. Se Figur 43.
Figur 43 Objektglashållaren hjälper dig att sätta i objektglasen på rätt sätt
FÖRSIKTIGHET Det korrekta sättet att öppna skannerluckan är att använda knappen Open Door (Öppna luckan) i programmet Scan Control. Försök inte öppna luckan manuellt.
Pilen hjälper till att identifieraskannerorientering
Fingerhållare

328 SureScan Dx System User Guide
7 Basic Instructions for Use (multilingual) Driftanvisningar
Sätt i en objektglashållare i valfritt ledigt fack. Facknumren är tydligt märkta på objektglaskassetten. Tvinga inte in objektglashållaren i kassetten. Hållaren sätts enkelt i om den är korrekt justerad med fingerhållaren överst och pilen som pekar åt vänster.
Figur 44 Sätta i objektglashållaren i kassetten
3 Se till att objektglashållaren kommer längst ner i kassettfacket.
Facknumret för det laddade objektglaset blinkar blått.
4 Upprepa steg 2 t.o.m. 3 tills alla objektglashållare är laddade i kassetten.
FÖRSIKTIGHET Om det är motstånd när du sätter i hållaren i kassetten kan det vara så att hållaren inte är ordentligt stängd eller att den är skadad. Kontrollera hållaren och stäng eller ersätt den om det behövs.
FÖRSIKTIGHET Felaktig placering av objektglashållaren i kassetten kan leda till allvarlig skada i SureScan Dx-mikromatrisskannern.

Basic Instructions for Use (multilingual) 7 Driftanvisningar
SureScan Dx System User Guide 329
5 I programmet Scan Control, klicka på Close Door (Stäng lucka).
För objektglas som inte har ett skanningsprotokoll kopplat till sin design, förblir skanningsprotokollet tomt och fackets State (Läge) förblir "Present" (Närvarande). Ange ett skanningsprotokoll enligt beskrivningen i “Steg 4. Ange eller ändra inställningar för skanningsprotokoll”.
Steg 4. Ange eller ändra inställningar för skanningsprotokoll
De nuvarande inställningarna för skanningsprotokollet visas för varje utvalt objektglas i den högra rutan i huvudfönstret för programvaran Scan Control.
Den första gången du konfigurerar för att skanna ett objektglas, välj ett skanningsprotokoll att använda. • För varje objektglas i facktabellen, klicka på Scan Protocol
(Skanningsprotokoll) och välj ett skanningsprotokoll att använda för skanning av objektglaset. Agilent tillhandahåller åtta förladdade protokoll som du kan välja mellan och använda med Agilents HD-mikromatriser (High Density) och Agilent G3-mikromatriser.
AgilentHD_GX_2Color Agilent HD genexpression-genexpression-mikromatriser med 2 färger
AgilentHD_GX_1Color Agilent HD genexpression-genexpression-mikromatriser med 1 färg
AgilentG3_GX_2Color Agilent G3 genexpression-mikromatriser med 2 färger
AgilentG3_GX_1Color Agilent G3 genexpression-mikromatriser med 1 färg
AgilentHD_CGH Agilent HD CGH/CGH+SNP/CNV/ChIP-mikromatriser
AgilentG3_CGH Agilent G3 CGH/CGH+SNP/CNV/ChIP-mikromatriser
AgilentHD_miRNA Agilent HD miRNA-mikromatriser
AgilentG3_miRNA Agilent G3 miRNA-mikromatriser
Steg 5. (Valfritt) Ändra utmatningsmapp
Du kan ändra den angivna utmatningsmapp där programmet sparar bildfilerna som skapas av skannern.• För varje objektglas i facktabellen, klicka på Output Folder
(Utmatningsmapp) och bläddra till platsen för önskad mapp. Agilent rekommenderar att du väljer en lokal mapp på en sekundär hårddisk.

330 SureScan Dx System User Guide
7 Basic Instructions for Use (multilingual) Driftanvisningar
Steg 6. Lägg till objektglas i skanningskön
1 I huvudfönstret för Scan Control, klicka på All to Queue (Alla till kön) för att lägga till alla objektglas i facktabellen med ett State (Läge) som är "Ready for queue" (Redo för kö) i skanningskön.En bekräftelseruta visas. Klicka på Yes (Ja) för att lägga till objektglasen i kön.
ELLERI facktabellen i Scan Control, klicka på cellen State (Läge) för det första objektglaset som ska skannas och klicka på Add to Queue (Lägg till i kö).
2 För varje ytterligare objektglas som du vill skanna, • Klicka på cellen State (Läge) och välj Add to queue first
(Lägg till i kön först) för att lägga till objektglaset längst upp i skanningskön.
ELLER • Klicka på cellen State (Läge) och välj Add to queue last
(Lägg till i kön sist) för att lägga till objektglaset längst ner i skanningskön.
Om du behöver ta bort alla objektglas från kön, klicka på Empty Queue (Töm kön) i huvudfönstret i Scan Control.
Steg 7. Skanna objektglasen
1 Om det behövs klickar du på Close Door (Stäng lucka) i huvudfönstret Scan Control.Vänta tills luckan stängts och knappen Start Scan (Starta skanning) aktiverats.
2 I huvudfönstret Scan Control, klicka på Start Scan (Starta skanning) för att påbörja skanning av objektglas som lagts till i kön.
Steg 8. Ta bort objektglasen
1 I huvudfönstret Scan Control, klicka på Open Door (Öppna lucka) för att öppna skannerluckan.
2 Öppna skannerluckan och ta bort objektglashållarna från kassetten.

Basic Instructions for Use (multilingual) 7 Driftanvisningar
SureScan Dx System User Guide 331
3 Ta bort objektglasen från objektglashållarna, enligt följande:a Håll objektglashållaren på sidorna med Agilent-logotypen
uppåt.b Tryck in och dra försiktigt upp den flikförsedda änden av
det klara plasthöljet för att öppna hållaren.c Tryck streckkodsänden av objektglaset uppåt genom att
trycka underifrån för att undvika fingeravtryck på provområdet.
d Ta tag i objektglaset genom att hålla i kanterna och ta bort glaset från objektglashållaren
332 SureScan Dx System User Guide
7 Basic Instructions for Use (multilingual) Güvenlik kuralları
Türk talimatlar
Güvenlik kurallarıSureScan Dx tarayıcı güvenlik ve kullanım kolaylığı gözetilerek tasarlanmıştır. SureScan Dx tarayıcıyı çalıştırmadan önce tüm uyarıları ve ikazları anladığınızdan ve bunlara uyduğunuzdan emin olun.
Nem koşullarıSureScan Dx tarayıcı yoğuşmalı nem koşullarına karşı hassastır. Nakliye kutusunu açmadan önce, ısıl dengenin kurulması için tarayıcının 12 saat süreyle yerinde beklemesine izin verin.
UYARI SureScan Dx tarayıcının iç parçalarını tamir etmeye veya bu parçalara erişmeye kalkışmayın. Aksi takdirde, yüksek voltaja ve zararlı lazer radyasyonuna maruz kalma riskine girersiniz. Ana kapağın çıkarılması garantiyi geçersiz kılar.
UYARI SureScan Dx tarayıcının fişini topraklı bir elektrik prizine takın. Güvenlik bakımından koruyucu topraklı priz gerektirir.
DİKKAT Mikrodizi boyunca lazer uyarımlarının hızlı taranmasından kaynaklanan titreşimi en aza indirmek için tarayıcıyı sağlam bir laboratuvar tezgahı veya masasının üzerine yerleştirin. Tarayıcıyı titreşime neden olabilecek diğer laboratuvar ekipmanlarının yakınına yerleştirmeyin.
DİKKAT SureScan Dx tarayıcı yoğuşmalı nem koşullarına karşı hassastır. Ürün belgelerinde belirtilen önlemlere uyun. Bkz. sayfa 332’deki “Nem koşulları”.

Basic Instructions for Use (multilingual) 7 Çalıştırma talimatları
SureScan Dx System User Guide 333
En iyi performansı elde etmek için SureScan Dx tarayıcıyı yalnızca aşağıda belirtilen nem aralığında kullanın.
Çalışma: 30 °C’de %15 - %85 RH
Çalıştırma talimatları1. Adım. SureScan Dx Mikrodizi Tarayıcı’yı açın ve Scan Control (Tarama Denetimi) programını başlatın1 Ekipmanın önündeki güç anahtarını kullanarak SureScan
Dx'i açın.
2 İş istasyonu bilgisayarı açın ve başlamasını bekleyin.
3 Scan Control (Tarama Denetimi) programını başlatmak için, Agilent Microarray Scan Control (Agilent Mikrodizi Tarama Denetimi) simgesine çift tıklayın.
Şekil 36 Agilent Microarray Scan Control (Agilent Mikrodizi Tarama Denetimi) simgesi
Program başladığında, Agilent Microarray Scan Control (Agilent Mikrodizi Tarama Denetimi) programının ana penceresi açılır ve tarayıcı başlatma işlemlerini gerçekleştirir. Başlatma işlemleri tamamlandıktan sonra, Open Door (Kapağı Aç) düğmesi etkinleşir ve slaytları yükleyebilirsiniz. Bkz. sayfa 334’deki Şekil 37.
NOT Tarayıcıyı açtığınızda 24 slayt yüklüyse, tarayıcı slayt çıkarma döngüsünü gerçekleştiremeyeceğinden, başlatma işlemi başarısız olacaktır.

334 SureScan Dx System User Guide
7 Basic Instructions for Use (multilingual) Çalıştırma talimatları
Şekil 37 Agilent Microarray Scan Control (Agilent Mikrodizi Tarama Denetimi) programı penceresi – slayt yüklemeye hazır.
Tarayıcının durumu, Scan Control (Tarama Denetimi) penceresinin sağ alt köşesindeki durum çubuğunda gösterilir.

Basic Instructions for Use (multilingual) 7 Çalıştırma talimatları
SureScan Dx System User Guide 335
2. Adım. Slaytları slayt tutucuya yerleştirinParmak izleri floresan algılamasında hatalara neden olur. Yalnızca slaydın kenarlarına dokunun ve slaytları ellerken her zaman eldiven kullanın.
1 Slaydı yerleştirmeden önce, slayt tutucuyu şeffaf yüzü yukarı ve tırnaklı ucu sağa gelecek şekilde düz bir yüzeye koyun. Bunun yapmanız, slayt tutucuya yerleştirmeden önce slaydı düzgün hizaladığınızdan emin olmanızı sağlar.
2 Şeffaf plastik kapağı açmak için tırnaklı ucunu hafifçe itip yukarı çekin.
Şekil 38 Slayt tutucunun açılması
DİKKAT Kapağı açmak için kapak çıkıntısını gerektiğinden fazla itmeyin. Aksi takdirde kızak tutacağı hasar görebilir ve düzgün şekilde tutunmaz. Tarayıcının içinde sıkışıp kalabileceği için hasarlı kızak tutucular kullanmayın.

336 SureScan Dx System User Guide
7 Basic Instructions for Use (multilingual) Çalıştırma talimatları
3 Slaydı tutucuya aşağıdaki şekilde yerleştirin:
a Slaydı barkodlu ucundan tutun.
b Aktif mikrodizi yüzeyinin, barkod sola gelecek şekilde, slayt kapağına doğru yukarı baktığından emin olun.
c Slaydın barkodsuz ucunu dikkatle slayt yuvasına yerleştirin. Bkz. Şekil 39.
d Slaydı yavaşça slayt tutucuya indirin. Bkz. Şekil 40.
e Tırnaklı ucu “tık” sesi duyana kadar iterek plastik slayt kapağını kapatın. Bu hareket slaydı tutucu içine yerleştirir.
f Şeffaf plastik kapağı tekrar açmak için tırnaklı ucunu hafifçe itip yukarı çekin ve slaydın doğru yerleştirildiğini doğrulayın.
Yerine yerleştirildikten sonra, slayt düz durmalı ve slayt tutucu üzerindeki hizalama noktalarıyla eşleşmelidir.
g Tırnaklı ucu “tık” sesi duyana kadar iterek plastik slayt kapağını kapatın. Bkz. Şekil 41.
DİKKAT Plastik slayt kapağındaki tırnak aşırı zorlanırsa, “tık” sesi çıkararak yerine düzgün oturmayabilir. Kapattığınızda tık sesi çıkarmamaya başlayan slayt tutucularını atın.
DİKKAT Düzgün şekilde kapatıldığında çıkıntının üst kısmı taban yüzeyi ile aynı hizada veya taban yüzeyinin altında kalacaktır. Aksi takdirde, çıkıntı hasar görebileceği için çıkıntı tutucuyu kullanmayın.

Basic Instructions for Use (multilingual) 7 Çalıştırma talimatları
SureScan Dx System User Guide 337
Şekil 39 Slaydın slayt tutucuya yerleştirilmesi
Şekil 40 Slayt tutucuya yerleştirilmiş slayt
Şekil 41 Slayt tutucu– slayt içinde kapatılmış
Slayt yuvası

338 SureScan Dx System User Guide
7 Basic Instructions for Use (multilingual) Çalıştırma talimatları
Agilent slaytlarında, camın her iki yüzünde olmak üzere iki barkod bulunur. Bkz. Şekil 42. Slaydı aktif mikrodizili yüzü slayt tutucunun kapağına doğru bakacak şekilde yerleştirin.
Şekil 42 Slayt yönü
3. Adım. Slayt tutucuları kasete yükleyin1 Scan Control (Tarama Denetimi) programı penceresinde
Open Door (Kapağı Aç) düğmesine tıklayın.
2 Parmakla tutma yerini kullanarak slayt tutucuyu kaldırın. Slayt tutucuyu doğru kaldırdığınızda, slayt tutucunun üst tarafındaki ok sola bakar. Bkz. Şekil 43.
DİKKAT Düzgün yerleştirilmeyen bir slayt SureScan Dx tarayıcıya hasar verebilir.Hasarlı kızak tutucu veya yanlış kapatılan kızak tutucu tarayıcının içinde sıkışabilir.
DİKKAT Tarayıcı penceresini doğru açma yöntemi, Scan Control (Tarama Denetimi) programında Open Door (Kapağı Aç) düğmesini kullanmaktır. Kapıyı elle açmaya kalkışmayın.

Basic Instructions for Use (multilingual) 7 Çalıştırma talimatları
SureScan Dx System User Guide 339
Şekil 43 Slayt tutucu, slaytları doğru yerleştirmenize yardımcı olur.
Boş yuvalardan herhangi birine bir slayt tutucu yerleştirin. Yuva numaraları slayt kasetinin üzerinde açıkça belirtilmiştir. Slayt tutucuyu kasetin üzerine zorla yerleştirmeye çalışmayın; üst tarafındaki parmak tutma yeri doğru hizalanmış ve ok sola doğru bakıyorsa, kolayca yerine oturur.
Ok tarayıcının yönünübelirlemeye yardımcı olur
Parmakla tutma yeri
DİKKAT Kızak tutucuyu kasete yerleştirirken zorlanıyorsanız, kızak tutucu düzgün kapatılmamış veya hasar görmüş olabilir. Kızak tutucuyu kontrol edin ve kapatın ya da gerekiyorsa değiştirin.

340 SureScan Dx System User Guide
7 Basic Instructions for Use (multilingual) Çalıştırma talimatları
Şekil 44 Slayt tutucunun kasete yerleştirilmesi
3 Slayt tutucunun kaset yuvasının altına oturduğundan emin olun.
Yüklenen slaydın yuva numarası mavi renkte yanıp söner.
4 Tüm slayt tutucuları kasete yüklenene kadar 2. ve 3. adımları tekrarlayın.
5 Scan Control (Tarama Denetimi) programında, Close Door (Kapağı Kapat) düğmesine tıklayın.
Tasarımlarıyla eşleştirilmiş tarama protokolü olmayan slaytlar için, tarama protokolü boş ve yuva Durumu “Present” (“Mevcut”) olarak kalır. “4. Adım. Tarama protokolü ayarlarını yapın veya değiştirin” altında açıklandığı şekilde bir tarama protokolü atayın.
DİKKAT Slayt tutucunun kasete düzgün yerleştirilmemesi, SureScan Dx Mikrodizi Tarayıcı’nın büyük hasar görmesine neden olabilir.

Basic Instructions for Use (multilingual) 7 Çalıştırma talimatları
SureScan Dx System User Guide 341
4. Adım. Tarama protokolü ayarlarını yapın veya değiştirinSeçilen her bir slayt için geçerli tarama protokolü ayarları Scan Control (Tarama Denetimi) yazılımının ana penceresinin sağ bölmesinde gösterilir.
İlk kez slayt tararken, kullanmak için bir tarama protokolü seçin.
• Yuva tablosundaki her bir slayt için, Scan Protocol (Tarama Denetimi) öğesine tıklayın ve slaydı taramak için kullanmak üzere bir tarama protokolü seçin.
Agilent, seçmeniz ve Agilent yüksek tanımlı (HD) mikrodizileri ve Agilent G3 mikrodizileri ile kullanmanız için sekiz adet önyüklenmiş protokol sağlamaktadır.
AgilentHD_GX_2Color Agilent HD 2-renk geni ifadeli mikrodiziler
AgilentHD_GX_1Color Agilent HD 1-renk geni ifadeli mikrodiziler
AgilentG3_GX_2Color Agilent G3 2-renk geni ifadeli mikrodiziler
AgilentG3_GX_1Color Agilent G3 1-renk geni ifadeli mikrodiziler
AgilentHD_CGH Agilent HD CGH/CGH+SNP/CNV/ChIP mikrodiziler
AgilentG3_CGH Agilent G3 CGH/CGH+SNP/CNV/ChIP mikrodiziler
AgilentHD_miRNA Agilent HD miRNA mikrodiziler
AgilentG3_miRNA Agilent G3 miRNA mikrodiziler
5. Adım. (İsteğe bağlı) Çıktı dosyasını değiştirinProgramın tarayıcının oluşturduğu resim dosyalarını kaydettiği çıktı dosyasını değiştirebilirsiniz.
• Her bir slayt yuvası tablosu için Output Folder (Çıktı Klasör) öğesine tıklayın ve istediğiniz klasör konumuna gidin.
Agilent, ikinci bir sabit sürücüde yerel bir klasör seçilmesini önerir.
6. Adım. Slaytları tarama kuyruğuna ekleyin1 Scan Control (Tarama Denetimi) ana penceresinde, yuva
tablosunda “Ready for queue” (“Kuyruk için hazır”) durumundaki tüm slaytları tarama kuyruğuna eklemek için, All to Queue (Tümü Kuyruğa) öğesine tıklayın.
Bir onay iletişim kutusu belirir. Slaytları kuyruğa eklemek için, Yes (Evet) seçeneğine tıklayın.
VEYA

342 SureScan Dx System User Guide
7 Basic Instructions for Use (multilingual) Çalıştırma talimatları
Scan Control (Tarama Denetimi) yuva tablosunda, taranacak ilk slayt için, State (Durum) hücresine tıklayın ve Add to Queue (Kuyruğa Ekle) öğesine tıklayın.
2 Taramak istediğiniz her bir ek slayt için,
• State (Durum) hücresine tıklayın ve slaydı tarama kuyruğunun başına eklemek için, Add to queue first (Kuyruğa ilk ekle) öğesini seçin.
VEYA
• State (Durum) hücresine tıklayın ve slaydı tarama kuyruğunun sonuna eklemek için, Add to queue last (Kuyruğa son ekle) öğesini seçin.
Tüm slaytları kuyruktan çıkarmanız gerekirse, Scan Control (Tarama Denetimi) ana penceresinde Empty Queue (Kuyruğu Boşalt) öğesine tıklayın.
7. Adım. Slaytlarınızı tarayın1 Gerekirse, Scan Control (Tarama Denetimi) ana
penceresinde Close Door (Kapağı Kapat) düğmesine tıklayın.
Kapak kapanana ve Start Scan (Taramayı Başlat) düğmesi etkinleşene kadar bekleyin.
2 Kuyruğa eklenen slaytları taramaya başlamak için, Scan Control (Tarama Denetimi) ana penceresinde Start Scan (Taramayı Başlat) düğmesine tıklayın.
8. Adım. Slaytları çıkarın1 Tarayıcı kapağını açmak için, Scan Control (Tarama
Denetimi) programı penceresinde Open Door (Kapağı Aç) düğmesine tıklayın.
2 Tarayıcı kapağını açın ve slayt tutucularını kasetten çıkarın.
3 Slaytları slayt tutuculardan aşağıdaki şekilde çıkarın:
a Slayt tutucuyu Agilent logosu yukarı gelecek şekilde kenarlarından tutun.
b Şeffaf plastik kapağı açmak için tırnaklı ucunu hafifçe itip yukarı çekin.
c Numune alanında parmak izi bırakmaktan kaçınmak için, slaydın barkodlu ucunu slayt tutucunun altından yukarı itin.
d Slaydı iki kenarından tutup slayt tutucudan çıkarın.

Basic Instructions for Use (multilingual) 7 Turvaohjeistus
SureScan Dx System User Guide 343
Suomenkieliset käyttöohjeet
TurvaohjeistusSureScan Dx -skanneri on suunniteltu turvallisuutta ja helppokäyttöisyyttä ajatellen. Varmista, että olet ymmärtänyt ja huomioinut kaikki varoitukset ja huomautukset ennen SureScan Dx -skannerin käyttöä.
KosteusSureScan Dx -skanneri on herkkä tiivistyvälle kosteudelle. Odota lämmön tasaantumista 12 tunnin ajan käyttöpaikalla ennen kuljetuslaatikon avaamista.
WARNING Älä yritä korjata tai päästä käsiksi SureScan Dx -skannerin sisäisiin osiin. Muuten voit altistua korkeajännitteelle ja haitalliselle lasersäteilylle. Pääkannen irrottaminen mitätöi laitteen takuun.
WARNING Liitä SureScan Dx -skanneri maadoitettuun pistorasiaan. Laitteen turvallisuus perustuu maadoitukseen.
CAUTIONCAUTION Minimoi sirun nopean skannaamisen synnyttämästä laserärsytyksestä johtuva tärinä asentamalla skanneri tukevalle laboratoriopenkille tai pöydälle. Älä asenna skanneria muiden mahdollisesti tärinää aiheuttavien laboratoriolaitteiden lähelle.
CAUTIONCAUTION SureScan Dx -skanneri on herkkä tiivistyvälle kosteudelle. Noudata tuotteen dokumentaatiossa annettuja varotoimia. Katso kohta “Kosteus” sivulla 343.

344 SureScan Dx System User Guide
7 Basic Instructions for Use (multilingual) Käyttöohjeistus
Varmista SureScan Dx -skannerin paras mahdollinen suorituskyky käyttämällä sitä vain seuraavalla ilmankosteusalueella.
Käyttö: suhteellinen kosteus 15–85 % 30 °C:n lämpötilassa
KäyttöohjeistusVaihe 1. Käynnistä SureScan Dx -siruskanneri ja käynnistä Scan Control -ohjelma.
1 Käynnistä SureScan Dx -skanneri sen etuosassa olevasta virtakytkimestä.
2 Käynnistä tietokone ja odota, kunnes käyttöjärjestelmä on käynnistetty.
3 Käynnistä Scan Control -ohjelma kaksoisnapsauttamalla Agilent Microarray Scan Control -kuvaketta.
Kuva 36 Agilent Microarray Scan Control -kuvake
Kun ohjelma käynnistyy, Agilent Microarray Scan Control -ohjelman pääikkuna tulee näkyviin, ja skannerin käyttöönotto alkaa. Kun käyttöönotto on valmistunut, Open Door (Avaa ovi) -painike on käytettävissä, ja laitteeseen voi lisätä dioja. Katso kohta Kuva 37 sivu 345.
NOTE Jos skanneriin on lisätty 24 diaa jo ennen sen käynnistystä, käyttöönotto epäonnistuu, koska diojen poistojaksoa ei voi suorittaa.
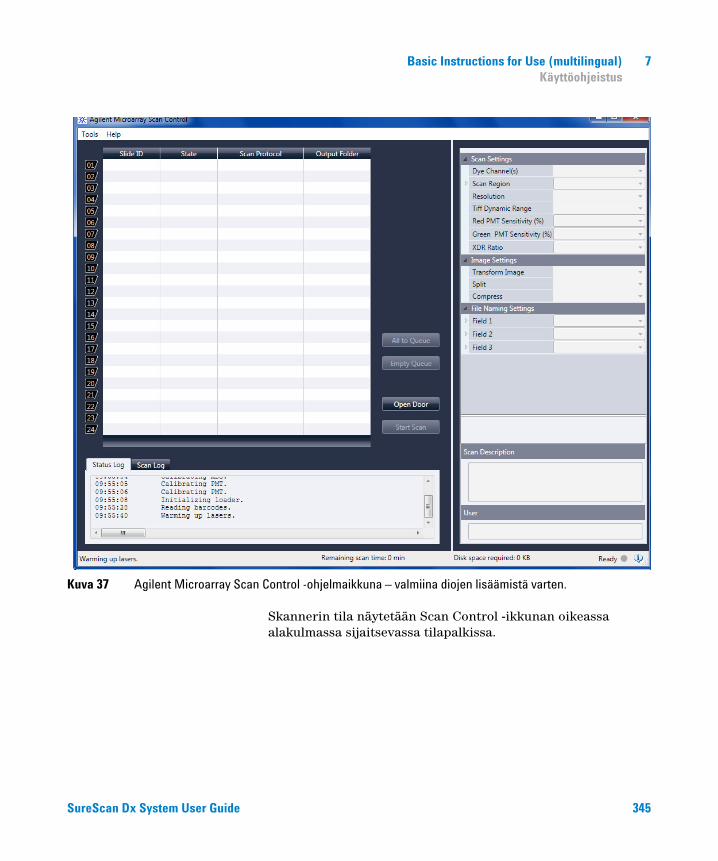
Basic Instructions for Use (multilingual) 7 Käyttöohjeistus
SureScan Dx System User Guide 345
Kuva 37 Agilent Microarray Scan Control -ohjelmaikkuna – valmiina diojen lisäämistä varten.
Skannerin tila näytetään Scan Control -ikkunan oikeassa alakulmassa sijaitsevassa tilapalkissa.

346 SureScan Dx System User Guide
7 Basic Instructions for Use (multilingual) Käyttöohjeistus
Vaihe 2. Aseta diat pidikkeisiin
Sormenjäljet aiheuttavat virheitä fluoresenssin havaitsemisessa. Käytä aina käsineitä diojen käsittelyn aikana ja kosketa dioja vain sivuilta.
1 Ennen dian lisäämistä aseta diapidike tasaiselle pinnalle kirkas puoli ylöspäin ja kieleke oikealle. Näin voit varmistaa paremmin, että pidikkeeseen asetettava dia tulee oikeaan asentoon.
2 Avaa kirkas muovikansi painamalla ja vetämällä kielekettä varovasti.
Kuva 38 Diapidikkeen avaaminen
CAUTIONCAUTION Paina kielekettä vain avaamiseen tarvittavan verran. Muussa tapauksessa diapidike voi vahingoittua, mikä estää oikeanlaisen lukitsemisen.
Älä käytä vahingoittuneita diapidikkeitä, sillä ne voivat jäädä jumiin skannerin sisälle.

Basic Instructions for Use (multilingual) 7 Käyttöohjeistus
SureScan Dx System User Guide 347
3 Aseta dia pidikkeeseen seuraavasti:
a Tartu diaan viivakoodipäästä.
b Varmista, että sirun aktiivinen pinta osoittaa ylöspäin kohti dian kantta ja että viivakoodi osoittaa vasemmalle.
c Aseta dian viivakooditon pää varovasti dian reunalle. Katso kohta Kuva 39.
d Laske dia varovasti diapidikkeeseen. Katso kohta Kuva 40.
e Sulje muovikansi painamalla kielekettä, kunnes se napsahtaa paikalleen. Tällöin dia siirtyy oikeaan asentoon pidikkeessä.
f Avaa kirkas muovikansi uudelleen painamalla ja vetämällä kielekettä varovasti. Varmista, että dia on oikeassa asennossa.
Oikein asetettu dia on pidikkeessä tasaisesti ja pidikkeen suuntauspisteiden mukaisesti.
g Sulje muovikansi painamalla kielekettä, kunnes se napsahtaa paikalleen. Katso kohta Kuva 41.
CAUTIONCAUTION Jos diapidikkeen muovikannen kielekettä venytetään liikaa, se ei välttämättä enää napsahda kunnolla kiinni. Hävitä kaikki diapidikkeet, jotka eivät enää napsahda kiinni.
CAUTIONCAUTION Kun kansi suljetaan oikein, kielekkeen yläosa asettuu alustan tai alustan alapuolella olevan pinnan myötäisesti. Jos kielekkeen asento poikkeaa tästä, hävitä diapidike, sillä kieleke voi olla vahingoittunut.

348 SureScan Dx System User Guide
7 Basic Instructions for Use (multilingual) Käyttöohjeistus
Kuva 39 Dian asettaminen diapidikkeeseen
Kuva 40 Diapidikkeeseen asetettu dia
Kuva 41 Dia on asetettu diapidikkeeseen, jonka kansi on suljettu
Dian reuna

Basic Instructions for Use (multilingual) 7 Käyttöohjeistus
SureScan Dx System User Guide 349
Agilent-dioissa on kaksi viivakoodia lasin molemmilla puolilla. Katso kohta Kuva 42. Aseta dia pidikkeeseen niin, että sirun aktiivinen puoli osoittaa kantta kohti.
Kuva 42 Dian suunta
Vaihe 3. Aseta diapidikkeet kasettiin
1 Avaa skannerin ovi napsauttamalla Scan Control -ohjelmaikkunan Open Door -painiketta.
2 Nosta diapidikettä tarttumalla sen otepintaan. Kun diapidike nostetaan oikeassa asennossa, sen yläosan nuoli osoittaa vasemmalle. Katso kohta Kuva 43.
CAUTIONCAUTION Väärin asetettu dia voi vahingoittaa SureScan Dx -skanneria.
Vahingoittunut tai väärin suljettu diapidike voi jäädä jumiin skanneriin.
CAUTIONCAUTION Skannerin ovi tulee avata Scan Control -ohjelman Open Door -painiketta. Älä yritä avata ovea manuaalisesti.

350 SureScan Dx System User Guide
7 Basic Instructions for Use (multilingual) Käyttöohjeistus
Kuva 43 Diapidike helpottaa diojen asettamista oikein
Aseta diapidike mille tahansa tyhjälle paikalle. Paikkanumerot on merkitty diakasettiin. Älä paina diapidikettä kasettiin väkisin: oikeassa suunnassa (otepinta ylhäällä, nuoli osoittaa vasemmalle) pidike asettuu kasettiin helposti.
Nuoli helpottaaskannerin suunnan tunnistamista
Otepintaan
CAUTIONCAUTION Jos diapidike ei mene kasettiin helposti, sitä ei ehkä ole suljettu oikein tai se on vahingoittunut. Tarkista diapidike ja sulje tai vaihda se tarvittaessa.

Basic Instructions for Use (multilingual) 7 Käyttöohjeistus
SureScan Dx System User Guide 351
Kuva 44 Diapidikkeen asettaminen kasettiin
3 Varmista, että diapidike asettuu kasetin paikan alaosaan.
Käyttöön otetun diapaikan numero vilkkuu sinisenä.
4 Toista vaiheita 2–3, kunnes kaikki diapidikkeet on lisätty kasettiin.
5 Paina Scan Control -ohjelman Close Door(Sulje ovi) -painiketta.
Jos dialle ei ole määritetty skannausprotokollaa, protokolla pysyy tyhjänä ja paikan tiedon State (Tila) arvona pysyy ”Present” (”Asetettu”). Määritä skannausprotokolla kohdan “Vaihe 4. Määritä tai muuta skannausprotokollan asetuksia” ohjeiden mukaisesti.
CAUTIONCAUTION Diapidikkeen virheellinen lisääminen kasettiin voi aiheuttaa vakavia vaurioita SureScan Dx -siruskannerille.

352 SureScan Dx System User Guide
7 Basic Instructions for Use (multilingual) Käyttöohjeistus
Vaihe 4. Määritä tai muuta skannausprotokollan asetuksia
Jokaisella valitulle dialle käytettävät skannausprotokolla-asetukset näkyvät Scan Control -ohjelman pääikkunan oikeanpuoleisessa ruudussa.
Ensimmäistä kertaa skannattavalle dialle täytyy määrittää protokolla.
• Valitse dia taulusta, valitse Scan Protocol (Skannausprotokolla) ja valitse skannauksessa käytettävä protokolla. Toista toimet kaikille taulun dioille.
Agilent toimittaa valmiina kahdeksan eri protokollaa, joita voi käyttää Agilentin suuritiheyksisten (HD-) sirujen ja Agilent G3 -sirujen skannaamiseen.
AgilentHD_GX_2Color Agilent HD -geenisirut, kaksiväriset
AgilentHD_GX_1Color Agilent HD -geenisirut, yksiväriset
AgilentG3_GX_2Color Agilent G3 -geenisirut, kaksiväriset
AgilentG3_GX_1Color Agilent G3 -geenisirut, yksiväriset
AgilentHD_CGH Agilent HD CGH/CGH+SNP/CNV/ChIP -sirut
AgilentG3_CGH Agilent G3 CGH/CGH+SNP/CNV/ChIP -sirut
AgilentHD_miRNA Agilent HD miRNA -sirut
AgilentG3_miRNA Agilent G3 miRNA -sirut
Vaihe 5. (Valinnainen) Vaihda kohdekansio
Voit vaihtaa skannerin luomien kuvatiedostojen tallennuksen kohdekansion.
• Valitse kohdekansio jokaiselle diataululle napsauttamalla Output Folder (Kohdekansio) -painiketta ja selaamalla haluamaasi kansioon.
Agilent suosittelee valitsemaan paikallisella tai toissijaisella kiintolevyllä sijaitsevan kansion.

Basic Instructions for Use (multilingual) 7 Käyttöohjeistus
SureScan Dx System User Guide 353
Vaihe 6. Lisää diat skannausjonoon
1 Valitse Scan Control -pääikkunasta All to Queue (Lisää kaikki jonoon), jolloin taulun kaikki tilaan ”Ready for queue” (Valmis jonoon) asetetut diat siirretään skannausjonoon.
Vahvistusikkuna tulee näkyviin. Lisää diat jonoon valitsemalla Yes (Kyllä).
TAI
Napsauta Scan Controlin diataulussa ensimmäisen skannattavan dian solua State(Tila) ja valitse Add to Queue (Lisää jonoon).
2 Lisää muut skannattavat diat
• jonoon napsauttamalla niin ikään State-solua. Valitse Add to queue first (Lisää jonon ensimmäiseksi), jolloin valittu dia lisätään skannausjonon ensimmäiseksi.
TAI
• Napsauta State-solua ja valitse Add to queue last (Lisää jonon viimeiseksi), jolloin valittu dia lisätään skannausjonon viimeiseksi.
Jos haluat poistaa kaikki diat jonosta, valitse Scan Control -pääikkunasta Empty Queue (Tyhjennä jono).
Vaihe 7. Skannaa diat
1 Tarvittaessa valitse Scan Control -pääikkunasta Close Door.
Odota, kunnes ovi on sulkeutunut ja kunnes Start Scan -painike tulee käyttöön.
2 Aloita jonoon lisättyjen diojen skannaaminen valitsemalla Scan Control -pääikkunasta Start Scan.
Vaihe 8. Poista diat
1 Avaa skannerin ovi valitsemalla Scan Control -pääikkunasta Open Door.
2 Avaa skannerin ovi ja poista diapidikkeet kasetista.

354 SureScan Dx System User Guide
7 Basic Instructions for Use (multilingual) Käyttöohjeistus
3 Poista diat pidikkeistä seuraavasti:
a Tartu diapidikkeeseen sivuilta niin, että Agilent-logo osoittaa ylöspäin.
b Avaa kirkas muovikansi painamalla ja vetämällä kielekettä varovasti.
c Paina viivakoodipäätä diapidikkeen alta, niin vältät sormenjälkien jäämisen näytealueelle.
d Tartu diaan sivuilta ja irrota se diapidikkeestä.

Index
AAll to Queue, 97archiving data, 37automatic file naming, 111Bbarcodes
specifications, 129
Ccarousel
loading slide holders into, 32Close Door, 97create scan region, non-Agilent slides, 53
Ddye channel setting, 107dynamic range
16-bit or 20-bit, 108TIFF file, 108
EEmpty Queue, 97error messages, 76
not appearing in table, 81table in alphabetical order, 77where and when they appear, 76
FFAQs (frequently asked questions), 71Feature Extraction, 122file naming, automatic, 111firmware update, 85fluorescence detection, 22frequently asked questions (FAQs), 71front view of scanner, 19
SureScan Dx System User Guide
fusespower supply, 73
Gglass slide, specifications, 128
Hhumidity, 67
Iindicator lights, 19initialization process, 28installation qualification tool (IQT), 86
Llaser excitation, 22lasers
turning off automatically, 40Licensing, 26
Mmapping design to scan protocol, 63, 119moving scanner, cautions, 68
Nnaming files, automatic, 111network drive, 71, 96non-Agilent slides
creating scan region, 53
OOpen Door, 97operating principles, 22operating scanner, 26output folder, selecting, 96
output path setting, 96
Pparts, list of, 17power supply fuses, 73preparation of site, 20principles of operation, 22
fluorescence detection, 22laser excitation, 22scanning, 22slide positioning, 22
Rrear view of scanner, 20recycling and disposal, 130regulatory information
acoustic noise, 130electromagnetic interference, 130recycling and disposal, 130
removing scanner covers, 68removing slides, 37
Ssafety
guidelines, 20regulations, 131
scan dimensions, 128scan region
area, 107changing for non-Agilent slides, 53creating for non-Agilent slides, 53definition, 53
Scan Region Editor, 53editing existing scan regions, 53
scan regionsediting, 53
scan settingsautomatic file naming, 111
scan settings table, 98
355

Index
scan table settingsdye channels, 107red and green PMT gain, 109scan region, 107sensitivity level (PMT), 109TIFF file dynamic range, 108XDR ratio, 109
scan time, 123scan, definition, 36scanner
electromagnetic interference, 130moving, 68specifications, 122turning on, 26warning on removing covers, 68
scanning, 22scanning slides, 36scans
storage space and scan time table, 108sensitivity level (PMT) setting, 109serial number, scanner, 69, 70shortcuts menu for Log tabs, 100site preparation, 20Slide ID, 93slide positioning, 22slide specifications
glass slide, 128scan dimensions, 128
slidesinserting into slide holders, 28removing, 37scanning, 36specifications, 128
slot state, 94slot status indicator, 93slot table settings
output path, 96software
icon, 26starting, 26
specificationsbarcodes, 129Microarray Scanner, 122
startingsoftware, 26
status indicator lights, 19support, technical, 69system requirements, 18
356
Ttechnical support, 69technical support, calling, 69temperature considerations, 67The, 71TIFF file dynamic range, 108Troubleshooting
indicator lights, 72troubleshooting
error messages, 76 to 81hardware, 72replacing fuses, 73technical support, 69
Uupdate firmware, 85
Vversion information, finding, 70
XXDR ratio, 109
SureScan Dx System User Guide

Index
SureScan Dx System User Guide
357
www.agilent.com
Information, descriptions and specifications are subject to change without notice. For updated information on Agilent products, please go to http://genomics.agilent.com.
© Agilent Technologies, Inc. 2012–2018
October 2018
*G5761-90000*
G5761-90000Revision D0
Agilent Technologies