adobe® preludetm cc help · such as version history and smart conflict resolution. ... allowing...
TRANSCRIPT

Adobe® PreludeTM CC Help

Last updated 3/8/2018
Legal notices
Legal noticesFor legal notices, see http://help.adobe.com/en_US/legalnotices/index.html.

iii
Last updated 3/8/2018
Contents
Chapter 1: IntroductionNew features summary . . . . . . . . . . . . . . . . . . . . . . . . . . . . . . . . . . . . . . . . . . . . . . . . . . . . . . . . . . . . . . . . . . . . . . . . . . . . . . . . . . . . . . . . . . . . . . . . .1
Keyboard shortcuts . . . . . . . . . . . . . . . . . . . . . . . . . . . . . . . . . . . . . . . . . . . . . . . . . . . . . . . . . . . . . . . . . . . . . . . . . . . . . . . . . . . . . . . . . . . . . . . . . . . . .4
System requirements for Prelude . . . . . . . . . . . . . . . . . . . . . . . . . . . . . . . . . . . . . . . . . . . . . . . . . . . . . . . . . . . . . . . . . . . . . . . . . . . . . . . . . . . . . . . .9
Chapter 2: Workspace and workflowRough cuts . . . . . . . . . . . . . . . . . . . . . . . . . . . . . . . . . . . . . . . . . . . . . . . . . . . . . . . . . . . . . . . . . . . . . . . . . . . . . . . . . . . . . . . . . . . . . . . . . . . . . . . . . . . 14
One-minute overview: Assemble a Rough Cut . . . . . . . . . . . . . . . . . . . . . . . . . . . . . . . . . . . . . . . . . . . . . . . . . . . . . . . . . . . . . . . . . . . . . . . . . 14
Logging movie clips . . . . . . . . . . . . . . . . . . . . . . . . . . . . . . . . . . . . . . . . . . . . . . . . . . . . . . . . . . . . . . . . . . . . . . . . . . . . . . . . . . . . . . . . . . . . . . . . . . 17
Setting Prelude preferences . . . . . . . . . . . . . . . . . . . . . . . . . . . . . . . . . . . . . . . . . . . . . . . . . . . . . . . . . . . . . . . . . . . . . . . . . . . . . . . . . . . . . . . . . . 21
How to ingest media clips with Adobe Prelude . . . . . . . . . . . . . . . . . . . . . . . . . . . . . . . . . . . . . . . . . . . . . . . . . . . . . . . . . . . . . . . . . . . . . . . . 25
Video | Organize clips, subclips, and sequences in Prelude . . . . . . . . . . . . . . . . . . . . . . . . . . . . . . . . . . . . . . . . . . . . . . . . . . . . . . . . . . . . . 25
The Prelude workspace . . . . . . . . . . . . . . . . . . . . . . . . . . . . . . . . . . . . . . . . . . . . . . . . . . . . . . . . . . . . . . . . . . . . . . . . . . . . . . . . . . . . . . . . . . . . . . . 30
Tag panel and Tag templates . . . . . . . . . . . . . . . . . . . . . . . . . . . . . . . . . . . . . . . . . . . . . . . . . . . . . . . . . . . . . . . . . . . . . . . . . . . . . . . . . . . . . . . . . . 36
Chapter 3: Audio and videoUsing Audio Channel Mapping with Prelude . . . . . . . . . . . . . . . . . . . . . . . . . . . . . . . . . . . . . . . . . . . . . . . . . . . . . . . . . . . . . . . . . . . . . . . . . . 39
Learn how to work with video clips in Adobe Prelude . . . . . . . . . . . . . . . . . . . . . . . . . . . . . . . . . . . . . . . . . . . . . . . . . . . . . . . . . . . . . . . . . . 42
Introduction to Adobe Prelude . . . . . . . . . . . . . . . . . . . . . . . . . . . . . . . . . . . . . . . . . . . . . . . . . . . . . . . . . . . . . . . . . . . . . . . . . . . . . . . . . . . . . . . . 42
Chapter 4: Collaboration with PreludeRough cut and Edit using Team Projects . . . . . . . . . . . . . . . . . . . . . . . . . . . . . . . . . . . . . . . . . . . . . . . . . . . . . . . . . . . . . . . . . . . . . . . . . . . . . . . 44
Linking Adobe Story scripts with movie clips in Prelude . . . . . . . . . . . . . . . . . . . . . . . . . . . . . . . . . . . . . . . . . . . . . . . . . . . . . . . . . . . . . . . . 45

1
Last updated 3/8/2018
Chapter 1: Introduction
New features summary
New features in the January 2018 release (version 7.0.1)This update of Adobe Prelude has fixed the issue in marker display in the Marker panel. In the ealier versions, you could be unable to view markers in the Marker panel in the List/Logging workspace when you switch from Rough Cut workspace. This update works fine if you open a single media (not a rough cut) in the Rough Cut workspace. If you open a rough cut media and switch from Rough Cut workspace to List/Logging workspace, refresh the Marker panel.
The earlier versions of Adobe Prelude have introduced several bug fixes. For more information, see Adobe Prelude fixed issues .
New features in the October 2017 release (version 7.0.0)
Visual Keyboard Shortcut EditorNew in this release of Prelude CC October 2017
The visual keyboard shortcut is here to enhance your editing experience. Use the Visual Keyboard Shortcut Editor to see which keys have been assigned shortcuts and which are available for assignment.
For more information, see Keyboard shortcuts .
Read on for detailed information about the new features and enhancements in Prelude CC releases.

2Introduction
Last updated 3/8/2018
Visual keyboard shortcut
Audio channel mapping enhancementsNew in this release of Prelude CC October 2017
The Export Media pop-up now has a Separate Mono Tracks checkbox. You can enable this check box to export the audio in the media as a one-to-one mapping. When the checkbox is left unchecked, the audio output will be Stereo.
Adobe Prelude CC 2017.1.1 Release | May 2017This release of Adobe Prelude offers minor enhancements and bug fixes. The update has fixed issues including loss of data while using auto delete preference and loss of tag colors when adding tags using unassociated metadata panel. Errors related to comment markers not displaying description by default are also fixed.
The May 2017, April 2016, January 2016 and November 2016 release of Adobe Prelude introduced several fixes. For more information, see Fixed issues in Adobe Prelude.
New features in the November 2016 release
Collaborating using Team ProjectsNew in this release of Prelude CC
This release introduces Team Projects, a hosted service that lets editors and motion graphics artists work collaboratively in projects within Prelude CC, Premiere Pro CC, and After Effects CC. This service adds deep collaboration features such as version history and smart conflict resolution. Post-production professionals can share their edits and get the latest changes from collaborators, allowing concurrent changes to happen on a single project – which is powerful for workflows where you can ingest clips in Prelude at the same time when visual effects and motion graphics are being done in After Effects and the edit is being refined in Premiere Pro.

3Introduction
Last updated 3/8/2018
Collaborating using Team Projects
To learn more, see Working simultaneously in shared video projects.
New features in the June 2016 release
AVC LongG performance improvementNew in Adobe Prelude CC 2015.4 | June 2016
This release of Adobe Prelude delivers optimized performance of AVC LongG format in the following workflows:
• Media ingestion
• Smoother playback
• Improved logging workflow
Note: This enhancement is also extended to other miscellaneous workflows.
Event panel filtering optionsNew in Adobe Prelude CC 2015.4 | June 2016
This release of Prelude introduces options to filter the various categories of Events such as information, warnings, and errors through an Event dialog box.
For more information, see Prelude workspace.
New features in the March 2016 release
Capability to use audio channel mappingNew in Adobe Prelude CC 2015.3 | March 2016

4Introduction
Last updated 3/8/2018
Prelude now supports the ability to use multi-channel audio mapping.
For more information, see Using Audio Channel Mapping with Prelude
New features in the November 2015 release
Exporting markers to text fileNew in Adobe Prelude CC 2015 | November 2015
You can now export markers of a selected clip in text files (.txt) in addition to CSV files (.csv) and well-formatted HTML pages (.html) through the Export Markers dialog box (File > Export > Markers).
For more information, see Exporting markers .
Support for HEVC formatNew in Adobe Prelude CC 2015 | November 2015
Prelude now supports the HEVC (High Efficiency Video Coding) file format.
For more information on file formats supported in Prelude, see Supported file formats for ingest.
New features in the June 2015 release
Voice-over in Rough CutsNew in Adobe Prelude CC 2015 | June 2015
Adobe Prelude CC now lets you add voice-over to Rough Cuts. Although Prelude lets you add Audio clips separately, you can use the voice-over feature to record audio clips on the fly, without the need for a separate recording software.
You can record and overlay voiceovers video footages during the basic editing process, before the final sequence is complete. Adobe Prelude lets you add multiple voiceovers to a Rough Cut, as well.
For more information, see Add Voice-over to Rough Cuts .
New API to ingest mediaNew in Adobe Prelude CC 2015 | June 2015
You can now use the new API to ingest media in to a Project directly. Previously, on using the Ingest API, the Ingest dialog was displayed as an extra step before you could select and eventually ingest media (video and audio clips).
Now, you can simply use the new Ingest Media API to select media files you want to ingest, and the selected files are added to the Project at the click of a button. The new API, not only ingests the media, but all related data files (.xmp) that contain markers and other meta-data.
Keyboard shortcuts

5Introduction
Last updated 3/8/2018
Visual Keyboard Shortcut EditorYou can use the Visual Keyboard Shortcut editor to view the keys with their assigned shortcuts, assign new shortcuts, and delete existing ones. The feature also lets you easily navigate and provides maximum workflow efficiency.
When you select a key on the Keyboard Layout, you can view all the commands that are assigned to that key and all other modifier combinations.
• Prelude detects the keyboard hardware and the appropriate keyboard layout is displayed accordingly.
• When Prelude detects a non-supported keyboard, the default view is to display the U.S. English keyboard. By default, the Adobe Prelude Default preset is displayed.
• When you change a shortcut, the preset pop-up menu changes to Custom. After you make the required changes, use the Save Asoption to save the customized shortcut set as a preset.
Using and customizing the Visual Keyboard Shortcut• To view the Visual Keyboard Shortcuts, select Edit > Keyboard Shortcuts (Windows) or Prelude CC > Keyboard
Shortcuts (macOS).
The Keyboard Shortcut window appears which shows you the layout of a keyboard. All the application level shortcuts are marked in purple while all panel wide shortcuts appear in green. For keyboard shortcuts that are applicable in both the levels, the color will depend on whether the panel is open or not. If the Panel is selected, it would appear in green otherwise in purple.
Visual keyboard
Shortcut assignment using drag-and-dropYou can assign shortcuts by dragging a command from the Command list to a key in the Keyboard Layout. You can also apply shortcuts using the modifier combination for the currently selected key displayed in the Key Modifier List. The Command List and the Modifier list appear below the keyboard.
• To assign a command to a key along with a modifier, hold down the modifiers during drag-and-drop.
• To remove the last assigned shortcut command, select the key and click Undo.
6Introduction
Last updated 3/8/2018
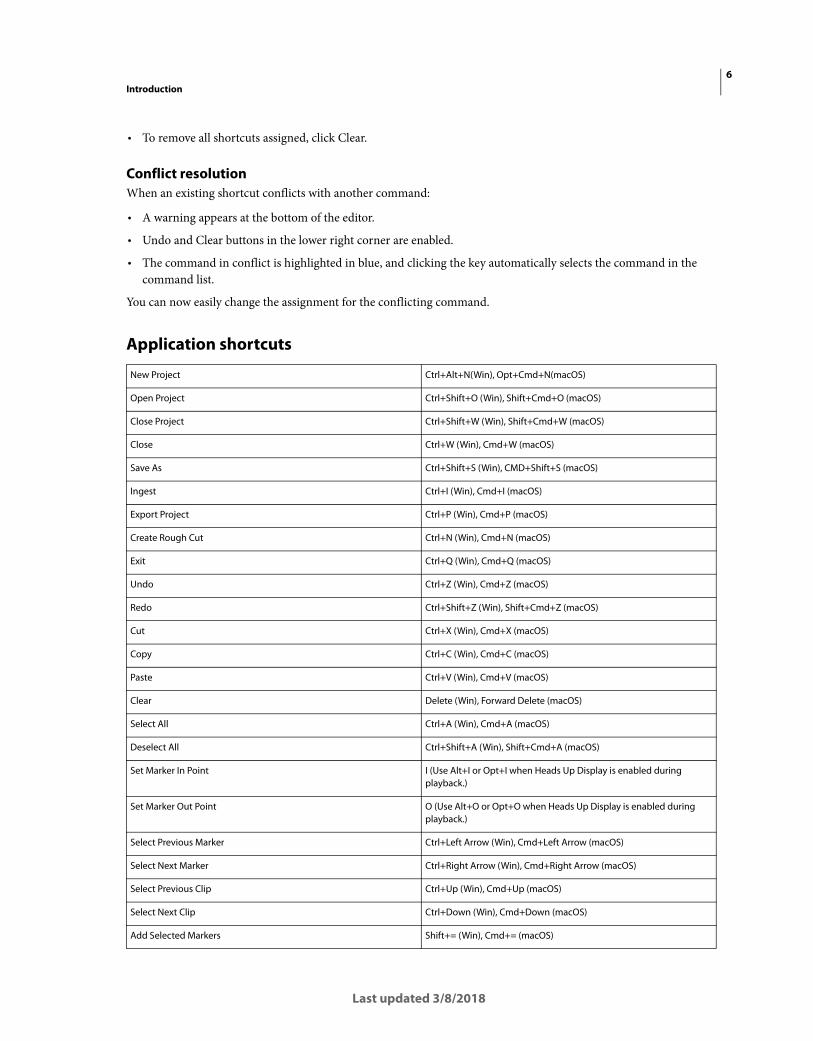
• To remove all shortcuts assigned, click Clear.
Conflict resolutionWhen an existing shortcut conflicts with another command:
• A warning appears at the bottom of the editor.
• Undo and Clear buttons in the lower right corner are enabled.
• The command in conflict is highlighted in blue, and clicking the key automatically selects the command in the command list.
You can now easily change the assignment for the conflicting command.
Application shortcuts
New Project Ctrl+Alt+N(Win), Opt+Cmd+N(macOS)
Open Project Ctrl+Shift+O (Win), Shift+Cmd+O (macOS)
Close Project Ctrl+Shift+W (Win), Shift+Cmd+W (macOS)
Close Ctrl+W (Win), Cmd+W (macOS)
Save As Ctrl+Shift+S (Win), CMD+Shift+S (macOS)
Ingest Ctrl+I (Win), Cmd+I (macOS)
Export Project Ctrl+P (Win), Cmd+P (macOS)
Create Rough Cut Ctrl+N (Win), Cmd+N (macOS)
Exit Ctrl+Q (Win), Cmd+Q (macOS)
Undo Ctrl+Z (Win), Cmd+Z (macOS)
Redo Ctrl+Shift+Z (Win), Shift+Cmd+Z (macOS)
Cut Ctrl+X (Win), Cmd+X (macOS)
Copy Ctrl+C (Win), Cmd+C (macOS)
Paste Ctrl+V (Win), Cmd+V (macOS)
Clear Delete (Win), Forward Delete (macOS)
Select All Ctrl+A (Win), Cmd+A (macOS)
Deselect All Ctrl+Shift+A (Win), Shift+Cmd+A (macOS)
Set Marker In Point I (Use Alt+I or Opt+I when Heads Up Display is enabled during playback.)
Set Marker Out Point O (Use Alt+O or Opt+O when Heads Up Display is enabled during playback.)
Select Previous Marker Ctrl+Left Arrow (Win), Cmd+Left Arrow (macOS)
Select Next Marker Ctrl+Right Arrow (Win), Cmd+Right Arrow (macOS)
Select Previous Clip Ctrl+Up (Win), Cmd+Up (macOS)
Select Next Clip Ctrl+Down (Win), Cmd+Down (macOS)
Add Selected Markers Shift+= (Win), Cmd+= (macOS)

7Introduction
Last updated 3/8/2018
Add Subclip Marker 1 (Main keyboard)
Add Comment Marker 2 (Main keyboard)
Marker Inspector Shift+5 (Win), Cmd+5 (macOS)
Marker List Shift+6 (Win), Cmd+6 (macOS)
Marker Type Shift+4 (Win), Cmd+4 (macOS)
Metadata Shift+7 (Win), Cmd+7 (macOS)
Monitor Shift+2 (Win), Cmd+2 (macOS)
Project Shift+1 (Win), Cmd+1 (macOS)
Timeline Shift+3 (Win), Cmd+3 (macOS)
Adobe Prelude Help F1
Go To Selected Clip End Shift+End
Go To Selected Clip Start Shift+Home
Go To Time View End End (Win), End or Function+Right Arrow (macOS)
Go To Time View Start Home (Win), Home or Function+Left Arrow (macOS)
Maximize or Restore Frame ' (accent under tilde)
Play In-out Ctrl+Shift+Space (Win), Opt+K (macOS)
Play Stop Toggle Space
Select Find Box Shift+F
Select Next Panel Ctrl+Shift+. (period)
Select Previous Panel Ctrl+Shift+, (comma)
Shuttle Left J
Shuttle Right L
Shuttle Slow Left Shift+J
Shuttle Slow Right Shift+L
Shuttle Stop K
Step Back Left Arrow
Step Back many Frames - Units Shift+Left Arrow
Step Forward Right Arrow
Step Forward many Frames - Units Shift+Right Arrow
Workspace 1 Alt+Shift+1 (Win), Opt+Shift+1 (macOS)
Workspace 2 Alt+Shift+2 (Win), Opt+Shift+2 (macOS)
Workspace 3 Alt+Shift+3 (Win), Opt+Shift+3 (macOS)
Workspace 4 Alt+Shift+4 (Win), Opt+Shift+4 (macOS)
Workspace 5 Alt+Shift+5 (Win), Opt+Shift+5 (macOS)
Workspace 6 Alt+Shift+6 (Win), Opt+Shift+6 (macOS)

8Introduction
Last updated 3/8/2018
Panel shortcuts
New shortcuts in Prelude CC
Workspace 7 Alt+Shift+7 (Win), Opt+Shift+7 (macOS)
Workspace 8 Alt+Shift+8 (Win), Opt+Shift+8 (macOS)
Workspace 9 Alt+Shift+9 (Win), Opt+Shift+9 (macOS)
Zoom In =
Zoom Out - (hyphen)
Zoom To Clip \
Project
New Bin (Prelude CC) Ctrl+B (Windows), Cmd+B (macOS)
History Panel Menu
Step Backward Left Arrow
Step Forward Right Arrow
Ingest Dialog
Check All Shift+V
Uncheck All Ctrl+Shift+V
Check Selected Item(s) V
Clear In Out Points C
Select Directory List Ctrl+Left Arrow (Win), Cmd+Left Arrow (macOS)
Select Media List Ctrl+Right Arrow (Win), Cmd+Right Arrow (macOS)
Set In Point I
Set Out Point O
Timeline Panel Menu
Ripple Delete Alt+Backspace (Win), Opt+Delete (macOS)
Show Next Screen Down Arrow
Show Previous Screen Up
Trim In Point of Selected Clip to CTI Q
Trim Out Point of Selected Clip to CTI W
Insert Clip(s) at the previous edit point , (Comma)
Insert Clip(s) at the next edit point . (period)
Select clip at Playhead D
Move clips left [ (Left angle bracket)
Move clips right ] (Right angle bracket)
9Introduction
Last updated 3/8/2018
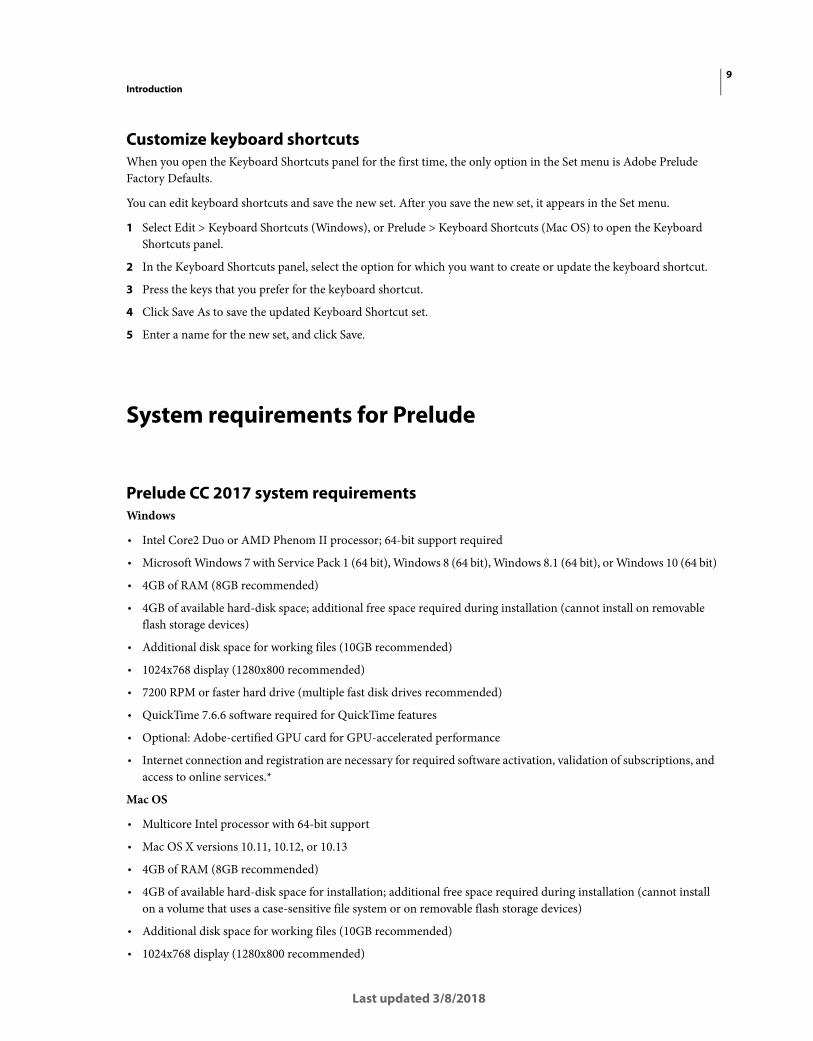
Customize keyboard shortcutsWhen you open the Keyboard Shortcuts panel for the first time, the only option in the Set menu is Adobe Prelude Factory Defaults.
You can edit keyboard shortcuts and save the new set. After you save the new set, it appears in the Set menu.
1 Select Edit > Keyboard Shortcuts (Windows), or Prelude > Keyboard Shortcuts (Mac OS) to open the Keyboard Shortcuts panel.
2 In the Keyboard Shortcuts panel, select the option for which you want to create or update the keyboard shortcut.
3 Press the keys that you prefer for the keyboard shortcut.
4 Click Save As to save the updated Keyboard Shortcut set.
5 Enter a name for the new set, and click Save.
System requirements for Prelude
Prelude CC 2017 system requirementsWindows
• Intel Core2 Duo or AMD Phenom II processor; 64-bit support required
• Microsoft Windows 7 with Service Pack 1 (64 bit), Windows 8 (64 bit), Windows 8.1 (64 bit), or Windows 10 (64 bit)
• 4GB of RAM (8GB recommended)
• 4GB of available hard-disk space; additional free space required during installation (cannot install on removable flash storage devices)
• Additional disk space for working files (10GB recommended)
• 1024x768 display (1280x800 recommended)
• 7200 RPM or faster hard drive (multiple fast disk drives recommended)
• QuickTime 7.6.6 software required for QuickTime features
• Optional: Adobe-certified GPU card for GPU-accelerated performance
• Internet connection and registration are necessary for required software activation, validation of subscriptions, and access to online services.*
Mac OS
• Multicore Intel processor with 64-bit support
• Mac OS X versions 10.11, 10.12, or 10.13
• 4GB of RAM (8GB recommended)
• 4GB of available hard-disk space for installation; additional free space required during installation (cannot install on a volume that uses a case-sensitive file system or on removable flash storage devices)
• Additional disk space for working files (10GB recommended)
• 1024x768 display (1280x800 recommended)

10Introduction
Last updated 3/8/2018
• 7200 RPM or faster hard drive (multiple fast disk drives recommended)
• QuickTime 7.6.6 software required for QuickTime features
• Optional: Adobe-certified GPU card for GPU-accelerated performance
• Internet connection and registration are necessary for required software activation, validation of subscriptions, and access to online services.*
Prelude CC 2016 system requirementsWindows
• Intel Core2 Duo or AMD Phenom II processor; 64-bit support required
• Microsoft Windows 7 with Service Pack 1 (64 bit), Windows 8 (64 bit), Windows 8.1 (64 bit), or Windows 10 (64 bit)
• 4GB of RAM (8GB recommended)
• 4GB of available hard-disk space; additional free space required during installation (cannot install on removable flash storage devices)
• Additional disk space for working files (10GB recommended)
• 1024x768 display (1280x800 recommended)
• 7200 RPM or faster hard drive (multiple fast disk drives recommended)
• QuickTime 7.6.6 software required for QuickTime features
• Optional: Adobe-certified GPU card for GPU-accelerated performance
• Internet connection and registration are necessary for required software activation, validation of subscriptions, and access to online services.*
Mac OS
• Multicore Intel processor with 64-bit support
• Mac OS X versions 10.10, 10.11, or 10.12
• 4GB of RAM (8GB recommended)
• 4GB of available hard-disk space for installation; additional free space required during installation (cannot install on a volume that uses a case-sensitive file system or on removable flash storage devices)
• Additional disk space for working files (10GB recommended)
• 1024x768 display (1280x800 recommended)
• 7200 RPM or faster hard drive (multiple fast disk drives recommended)
• QuickTime 7.6.6 software required for QuickTime features
• Optional: Adobe-certified GPU card for GPU-accelerated performance
• Internet connection and registration are necessary for required software activation, validation of subscriptions, and access to online services.*
*NOTICE TO USERS: Internet connection, Adobe ID, and acceptance of license agreement required to activate and use this product. This product may integrate with or allow access to certain Adobe or third-party hosted online services. Adobe services are available only to users 13 and older and require agreement to additional terms of use and the Adobe Privacy Policy. (see http://www.adobe.com/legal.html). Applications and services may not be available in all countries or languages and may be subject to change or discontinuation without notice. Additional fees or membership charges may apply.

11Introduction
Last updated 3/8/2018
Prelude CC 2015.x system requirementsWindows
• Intel Core2 Duo or AMD Phenom II processor; 64-bit support required
• Microsoft Windows 7 with Service Pack 1 (64 bit), Windows 8 (64 bit), Windows 8.1 (64 bit), or Windows 10 (64 bit)
• 4GB of RAM (8GB recommended)
• 4GB of available hard-disk space; additional free space required during installation (cannot install on removable flash storage devices)
• Additional disk space for working files (10GB recommended)
• 1024x768 display (1280x800 recommended)
• 7200 RPM or faster hard drive (multiple fast disk drives recommended)
• QuickTime 7.6.6 software required for QuickTime features
• Optional: Adobe-certified GPU card for GPU-accelerated performance
• Internet connection and registration are necessary for required software activation, validation of subscriptions, and access to online services.*
Mac OS
• Multicore Intel processor with 64-bit support
• Mac OS X versions 10.9, 10.10, or 10.11
• 4GB of RAM (8GB recommended)
• 4GB of available hard-disk space for installation; additional free space required during installation (cannot install on a volume that uses a case-sensitive file system or on removable flash storage devices)
• Additional disk space for working files (10GB recommended)
• 1024x768 display (1280x800 recommended)
• 7200 RPM or faster hard drive (multiple fast disk drives recommended)
• QuickTime 7.6.6 software required for QuickTime features
• Optional: Adobe-certified GPU card for GPU-accelerated performance
• Internet connection and registration are necessary for required software activation, validation of subscriptions, and access to online services.*
*NOTICE TO USERS: Internet connection, Adobe ID, and acceptance of license agreement required to activate and use this product. This product may integrate with or allow access to certain Adobe or third-party hosted online services. Adobe services are available only to users 13 and older and require agreement to additional terms of use and the Adobe Privacy Policy. (see http://www.adobe.com/legal.html). Applications and services may not be available in all countries or languages and may be subject to change or discontinuation without notice. Additional fees or membership charges may apply.
Prelude CC system requirementsWindows
• Intel® Core™2 Duo or AMD Phenom® II processor; 64-bit support required

12Introduction
Last updated 3/8/2018
• Microsoft® Windows® 7 with Service Pack 1 (64 bit), Windows 8 (64-bit), Windows 8 Pro (64-bit), Windows 8.1 (64-bit), or Windows 8.1 Pro (64-bit)
• 4GB of RAM (8GB recommended)
• 4GB of available hard-disk space for installation; additional free space required during installation (cannot install on removable flash storage devices)
• 1280x800 display
• OpenGL 2.0-capable system
• Sound card compatible with ASIO protocol or Microsoft Windows Driver Model
• QuickTime 7.6.6 software required for QuickTime features
• Internet connection and registration are necessary for required software activation, validation of subscriptions, and access to online services.
Mac OS
• Multicore Intel processor with 64-bit support
• Mac OS X v10.7, v10.8, or v10.9
• 4GB of RAM (8GB recommended)
• 4GB of available hard-disk space for installation; additional free space required during installation (cannot install on a volume that uses a case-sensitive file system or on removable flash storage devices)
• 1280x800 display
• OpenGL 2.0-capable system
• QuickTime 7.6.6 software required for QuickTime features
• Internet connection and registration are necessary for required software activation, validation of subscriptions, and access to online services.
Note: This product may integrate with or allow access to certain Adobe or third-party hosted online services. Adobe online services, including the Adobe Creative Cloud service, are available only to users 13 and older and require agreement to additional terms and Adobe's online privacy policy. The applications and online services are not available in all countries or languages, may require user registration, and may be subject to change or discontinuation without notice. Additional fees or membership charges may apply.
Prelude CS6 system requirementsWindows
• Intel® Core™2 Duo or AMD Phenom® II processor
• Microsoft® Windows® XP with Service Pack 3 or Windows 7 with Service Pack 1. Adobe® Creative Suite® 5.5 and CS6 applications also support Windows 8 and Windows 8.1. See the CS6 FAQ for more information about Windows 8 support.*
• 4 GB of RAM (8 GB recommended)
• 4 GB of available hard-disk space for installation; additional free space required during installation (cannot install on removable flash storage devices)
• 1280 x 800 display
• OpenGL 2.0–capable system
• Sound card compatible with ASIO protocol or Microsoft Windows Driver Model

13Introduction
Last updated 3/8/2018
• QuickTime 7.6.6 software required for QuickTime features
• This software does not operate without activation. Broadband Internet connection and registration are required for software activation, validation of subscriptions, and access to online services.* Phone activation is not available.
* Learn more about Windows Support
Mac OS
• Multicore Intel processor with 64-bit support
• Mac OS X v10.6.8 or v10.7. Adobe Creative Suite 5, CS5.5, and CS6 applications support Mac OS X v10.8 or v10.9 when installed on Intel-based systems.**
• 4 GB of RAM (8 GB recommended)
• 4 GB of available hard-disk space for installation; additional free space required during installation (cannot install on a volume that uses a case-sensitive file system or on removable flash storage devices)
• 1280 x 800 display
• OpenGL 2.0–capable system
• QuickTime 7.6.6 software required for QuickTime features
• This software does not operate without activation. Broadband Internet connection and registration are required for software activation, validation of subscriptions, and access to online services.* Phone activation is not available.
* This product may integrate with or allow access to certain Adobe or third-party hosted online services ("Online Services"). Online Services are available only to users 13 and older and require agreement to additional terms of use and Adobe's online privacy policy. Online Services are not available in all countries or languages, may require user registration, and may be discontinued or modified in whole or in part without notice. Additional fees or subscription charges may apply.
** Learn more about Mac OS X Mavericks Support

14
Last updated 3/8/2018
Chapter 2: Workspace and workflow
Rough cuts
One-minute overview: Assemble a Rough CutOne-minute overview: Assemble a Rough Cut
A rough cut is a timeline-based sequence of video and audio clips that is used as a basic editing process of the various clips before the final sequence is completed. Editing processes include trimming, clips selection, and sorting and ordering the clips.
Create a rough cut1 Select File > Create Rough Cut.
2 Enter a name for the rough cut (.arcutx) file, and click Save.
3 Double-click the rough cut in the Project panel to open it in the Timeline and Monitor panels.
4 Select the movie clips or subclips to add to the rough cut.
5 Select File > Append To Rough Cut. The movie clips are added to the Timeline in the order in of their selection. Alternatively, drag the movie clips to the Timeline.
6 Use the options in the Rough Cut menu to select or reorder movie clips in the rough cut.
7 Save the project to save changes to the rough cut file.
To create a copy of your rough cut, select File > Save Rough Cut As, and save the rough cut file using a different name.
Note: Prelude CC October 2014.1 and later versions save rough cut files with .arcutx extension. Previous versions of Prelude CC saved rough cut files with .arcut extension.
Add markers to a rough cut1 Open a clip containing markers in the timeline. Open the rough cut in the background.
2 Select the markers that you want to add to the rough cut.
3 Select Rough Cut > Add Selected Markers.
The markers are added to the rough cut currently open in the timeline. The clip from which user is adding the marker is also added to Rough Cut.
When a rough cut, and a clip containing subclip markers are open in the Timeline panel, you can select subclip markers in the clip and add them to the rough cut.

15Workspace and workflow
Last updated 3/8/2018
Add Voice-over to Rough CutsYou can record and add voice-overs to Rough Cuts. Although Prelude lets you add Audio clips separately, you can use the voice-over feature to record audio clips on the fly.
You can record and overlay voice-overs over video footages during the basic editing process, before the final sequence is complete. Adobe Prelude lets you add multiple voice-overs to a rough cut, as well.
To record voice-overs for a rough cut, do the following steps:
Add an audio track1 Select Roughcut > Create A Roughcut to create a roughcut, and open it on timeline.
2 In the Timeline, right-click > select Add Audio Track from the context menu.
3 You can choose to add a Mono, Stereo, or 5.1 track.
Specify Voice-over Record Settings1 Right-click on an Audio Track, and select Voice-over Record Settings from the context menu.
2 Enter or modify the following settings:
Name Name of the Audio Track.
Source Choose the right audio hardware for the voice-over. Choose the right audio hardware for the voice-over. Source Option automatically detects all audio hardware connected to the system.
Countdown Sound Cues Allow Prelude to provide sound cues before recording the voice over audio track.
Input Audio channels available for the audio hardware selected in the Source option.
Preroll Enable and specify preroll for the voice over. The pre-roll countdown is a visual cue to give you time to prepare and begin the recording. Recording begins after the countdown reaches zero.
Postroll Enable and specify postroll for the voice over. The post-roll countdown is a visual cue indicating the end of recording.
Captured Audio Specify or browse to a location where you want to save recorded audio files.
Audiometer Use the Audiometer to test the microphone and other audio devices connected to the computer. Fluctuations in the Audiometer confirm that the audio device is functioning correctly.
3 Click Close to exit Voice-Over Record Settings dialog.

16Workspace and workflow
Last updated 3/8/2018
Set the location for captured audio1 Right-click on the audio track, and select Voice-Over Record Settings.
2 Use the Captured Audio field to either specify or browse-to a location on your computer, where you want to save recorded audio files.
3 Click Close.
Record a Voice-overYou can record a voice-over on an audio track directly in the Timeline by following these steps:
1 Add an audio track (see Add Audio Track ) or select an existing one on to which you want to record the voice-over.
2 Start a voice-over recording workflow by positioning the playhead at a point where you want to insert the voice-over.
3 Enable pre-roll countdown. When you position the playhead, the voice-over recording workflow starts. A pre-roll countdown appears as an overlay on the Monitor. You can specify pre-roll and post-roll countdowns in the Voice-over Record Settings dialog.
Access Voice-Over settings from Timeline
4 Click the button in the audio track's header to begin recording. Use the play-back controls on the monitor to pause/continue the recording.
Note: When using a predefined In/Out range, you don't have to click the Voice-over Record button. Recording automatically starts when the playhead reaches the In point in the Timeline.
5 Click the button to end recording.
Once recording is complete, an audio file of the recording is created. The audio file is imported as a new project item into the Project panel.
Open rough cut in other applicationsIf you have Adobe Premiere Pro installed on the same computer as Prelude, you can send the rough cut directly to Premiere Pro.
To create a file for use in applications such as Premiere Pro or Final Cut Pro running on a different computer, use the Export option.
Open rough cut, clip, or subclip in Premiere Pro
1 In the Project panel, select the rough cut and other clips or bins you want to send to Adobe Premiere Pro.
2 Select File > Send To Premiere Pro.

17Workspace and workflow
Last updated 3/8/2018
Adobe Premiere Pro launches and prompts you to save the new project. If Adobe Premiere Pro is already open on your computer, the items from Prelude appear in the open project.
3 The rough cut is displayed in the Project panel. Double-click the rough cut in the Project panel.
All the markers added in Prelude are available in Premiere Pro. You can edit markers added in Prelude in Premiere Pro.
Export to other applications1 In the Project panel, select the rough cut and other clips or bins you want to export.
2 Select File > Export > Project.
3 In the Destination menu, do one of the following:
• Select Local Disk to save the exported project on your computer.
• Select FTP Server to upload the exported files to an FTP server.
4 Enter a name for the exported project.
5 From the Type menu, select either Premiere Pro or Final Cut Pro XML for final editing.
6 Select Media to export the project file along with its associated media. Prelude will copy the associated media to a subfolder at the specified location. You can edit the default name Prelude assigns to the subfolder.
7 Click OK. Do one of the following based on whether you previously chose to save to a local disk or to the FTP server.
• Select a location on your computer to save the exported file.
• Enter details for the FTP server for hosting the exported file.
Navigate to the folder or directory to which you exported the project. Open the Adobe Premiere Pro project or the Final Cut Pro XML file.
Logging movie clipsUse the logging features in Adobe Prelude to create subclips, and add temporal markers. Temporal markers contain data about a specific portion of the movie clip. To add static metadata to the clip, use the Metadata panel.
The logging information and the added metadata are captured in an XMP file. For some formats such as QuickTime (.mov) the XMP information is written into the media file. For formats that don't support writing to the media file, like MXF, the XMP is written into a sidecar file. The sidecar file is stored at the same location as the media file.
Marker types
Exporting markersYou can export markers from selected assets as a CSV file (.csv), text file (.txt) or a well-formatted HTML (.html) page.
1 Select the media files in the Project panel.
Marker Type Description
Subclip For creating In and Out points for subclips. When you save the project, the subclips appear in the Project view.
Comment A comment or note about the selected part of the movie clip.

18Workspace and workflow
Last updated 3/8/2018
2 Choose File > Export > Markers.
Export Markers
3 On the Export Markers dialog:
a File Type: Specify the marker file type. There are three options - .txt, .csv, and .html.
b Output Destination: Browse to a location on your computer where you want to save the file.
c Output File Name: Provide a meaningful name for the output file.
4 Click OK.
Note: Only three fields display on the output file when exporting markers as a text (.txt) file. They are:
a. Asset Name
b. In Point
c. Description
Using the timeline
The Timeline panelA Option to mute audio B Audio track C Video track D Marker E Current Time Indicator (CTI) F Option to find markers

19Workspace and workflow
Last updated 3/8/2018
The markers in a movie clip appear in tracks above the timeline. Move the cursor above a movie clip to display information about the clip.
• Use the Current Time Indicator / Playhead to scrub the movie clip, or to move quickly to a specific point in the movie clip.
• Use the options in the Show menu to view specific markers added to the movie clip.
• Enter marker information in the Search field to search for a marker.
• Use the Zoom option to zoom in or zoom out of tracks in the timeline view.
• Use the keyboard shortcuts I and O to set In and Out points for markers.
Log movie clips (keyboard driven workflow)1 To quickly open the default Logging workspace, Press Alt+Shift+2 (Windows) or Opt+Shift+2 (Mac OS).
2 Drag a movie clip from the Project panel to the timeline, or double-click a clip in the Project panel. The movie icon changes to green color when selected.
3 Play the movie. Use the JKL keyboard shortcuts to move among frames.
4 Using the main keyboard, press the following keys to add the corresponding markers:
• To add a subclip marker, press 1.
• To add a comment marker, press 2.
Note: If you have customized the list of markers or marker templates, the Marker Type panel displays the appropriate keyboard number beside each marker button.
5 Enter information in the Marker Inspector panel.
For example, you can change the default names assigned to subclips. Names and Descriptions of markers can also be edited in the text field, also called the Heads Up Display (HUD), that appears above the timeline.
Note: To set marker In and Out points when the Heads Up Display is enabled use Alt+I / Alt+O (Windows) or Opt+I / Opt+O (Mac OS).
Use the Alt/Opt key with the JKL keys to control playback, or with H to move back the number of seconds set in Preferences. Release Alt/Opt to continue typing into the HUD. Press Enter/Return key to close the HUD.
If you have added markers for subclips, the subclips appear in the Project panel after you save the clip.
To mute an audio channel during playback, right-click/ctrl-click the audio channel in the timeline and select Mute Audio Channel. Alternatively, click the mute button to the left of the audio channel.
Log movie clips (menu driven workflow)1 Select Window > Workspace > Logging.
2 Drag a movie clip from the Project panel to the timeline, or double-click a clip in the Project panel. Movie icon changes to green color upon selection.
In the Marker Type panel, click the marker that you want to add. The marker appears on the track above the movie clip. Its position is set based on the preferences set for marker duration.
3 Do one of the following:
• Use the Set In Point and Set Out Point buttons to set the time frame for the added marker.

20Workspace and workflow
Last updated 3/8/2018
• Use the Timecode in the Marker Inspector panel to set the In and Out points for the marker. Drag your cursor over the Timecode to change the value, or click to enter a value.
• Move the Current Time Indicator / Playhead to a position where you want to set the In or Out marker. Press I to set the In point, and O to set the Out point.
4 Enter information in the Marker Inspector panel. For example, you can change the default names assigned to subclips. Names and Descriptions of markers can also be edited in the Heads Up Display (HUD) that appears above the timeline.
Drag to move markers added to the timeline. To select and navigate among markers, use the options in the Marker menu.
If you have added markers for subclips, the subclips appear in the Project panel after you save the clip.
Create a marker templateA marker template is like a preset for a type of marker, it is not a new custom marker type.
For example, to identify usable portions of a movie clip, you use the comment marker with the label Good Take frequently. When you save such a comment marker as a template, Prelude creates a button in the Marker Type panel. When you click this button, a comment marker labeled Good Take is added to the movie clip.
The keyboard shortcuts for new markers depend on their sequence in the Marker Type panel. For a button that is placed sixth in the sequence, use 6 as the keyboard shortcut.
1 Select a marker in the Timeline panel that you want to save as a template.
2 Select Marker > Save Marker as Template.
3 Enter a name for the marker template. This name is used for the label of the button.
Add metadata to a movie clip1 Select a clip to which you want to add metadata.
2 Select Window > Metadata.
3 In the Metadata panel, enter the required information for the selected movie clip.
Note: Metadata panel has no Save button. All information that you add is automatically saved.
Import and export metadataThe exported XMP file contains all the metadata in the open movie clip, including logging information. You can import and apply the metadata and timecode in the XMP file to a movie clip open in Prelude.
Import metadata1 Select Window > Unassociated Metadata.
2 Click Import, and open the XMP file. You can also open more than one XMP file. The markers in the file are displayed.
3 Do one of the following:
• Select Current Player Position to insert markers imported from the XMP file at the location of the Current Time Indicator.
• Select Marker Start Time to specify the location of markers based on the start time assigned to them.

21Workspace and workflow
Last updated 3/8/2018
Export metadataTo save the metadata information in the file, select File > Save metadata as. The file is saved as an XMP file.
Setting Prelude preferencesUse the options in the Preferences dialog (Edit > Preferences) to change the default settings in Prelude.
General settings
Appearance settingsThe appearance settings allow you to change the overall appearance of the Prelude application.
Option Description
Start Mode The default option is Start Native Mode. The Library Panel gives you the ability to view clips on your media management system. If you have a created a Library panel using Prelude APIs that is displayed on startup, choose Start Library Mode.
At Startup • Show Welcome Screen: Displays the Welcome screen at startup.
• Load Most Recent: Loads the project that you worked on before you closed Prelude.
Timeline Playback Auto-Scrolling • No Scroll: The focus of the timeline does not change when the Current Time Indicator moves offscreen.
• Page Scroll: Displays a new view of the timeline after the Current Time Indicator moves offscreen.
• Smooth Scroll: The Current Time Indicator remains in the middle of the screen, while the clips and time ruler move by.
Double clicking a clip or rough cut opens Marker List and Monitor Panel
Enables or disables the opening of the Monitor panels if those panels are closed in the workspace. If you use custom panels, and do not want the Monitor panels displayed when you open a clip or rough cut, disable this setting.
Project Loading Cache Cache files help improve the opening time of Prelude. After you enable project cache, you can set preferences for cache files using the options. You can specify a limit for the cache files and the folder in which the Project cache files are stored using the options.
Option Description
Brightness Set the brightness by dragging the slider.
Highlight Color Set interactive controls and focus indicators by dragging the slider.

22Workspace and workflow
Last updated 3/8/2018
Audio settings
Audio HardwareUse this option to specify the default audio output device. When you click ASIO Settings, the Audio Hardware Settings dialog box is displayed.
Audio Output MappingThe audio output devices available in your computer appear in the Map Output For menu. To map to a different device on your computer, select the corresponding option from the menu.
The Cloud Cache Files are located under C:\Users\<username>\Documents\Adobe\Prelude\<version-number>\CreativeCloudCache (Windows). Click Browse to save the files in a different location.
MediaWhen Prelude ingests video and audio in some formats, it processes and caches versions of these items that it can readily access when generating previews.
Option Description
Play Audio While Scrubbing Deselect this option to disable audio when scrubbing a movie on the timeline.
Automatically Conform Audio On Ingest Set this preference to automatically conform audio during ingest. With this enhancement, all audio is available when required. Audio during playback is now available from the Project panel's thumbnail view.
Option Description
Enable Devices (Windows) Determines the connected audio device that is routed into and out of Prelude. If the device is an ASIO device, select the ASIO drivers for the device.
If the sound card does not have manufacturer-supplied ASIO drivers, choose SoundMAX Integrated Digital High Definition Audio. To enable a device, be sure to install an up-to-date driver for the device (Windows.)
To input more than two stereo channels or monitor 5.1 surround audio, the device driver must comply with the ASIO (Audio Stream Input Output) specification. If it does not comply, only stereo inputs and outputs are available regardless of the number of hardware inputs and outputs that are connected.
Default Device (Mac OS) Select an input and output device from the Default Device menu.
Buffersize Specifies the size of the buffer, in kilobytes, that Prelude uses for playing audio.
Device 32-bit Playback (Windows Only) On the Output tab, check Device 32-bit Playback to enable 32-bit playback.

23Workspace and workflow
Last updated 3/8/2018
Set memory preferencesYou can specify the amount of RAM reserved for Prelude and other applications under EditPreferencesMemory. For example, as you reduce the amount of RAM reserved for other applications, the amount of RAM available for Prelude increases.
To maximize available memory, change the Optimize Playback For preference from Performance to Memory. Change this preference back to Performance when processes in Prelude no longer require memory optimization.
Option Description
Save Media Cache Files Next To Originals When Possible To store cache files with source files rather than in the media cache folder, select Save Media Cache Files Next To Originals When Possible. Click Browse to specify a location for the files.
Media cache database A database retains links to each of the cached media files. This media cache database is shared with other applications. Each of these applications can read from and write to the same set of cached media files.
If you change the location of the database in any of these applications, the location is updated for the other applications too. Each application can use its own cache folder, but the same database tracks them.
Indeterminate Media Timebase Specifies the frame rate for sources.
Timecode Select Start at 00:00:00:00 if you want to reset the timecode in the original clip. Select Media Source if you want to retain the original timecode of the clip.
Frame Count • Start At 0: Numbers every frame sequentially, with the first frame numbered 0.
• Start At 1: Numbers every frame sequentially, with the first frame numbered 1.
• Timecode Conversion: Generates frame number equivalents of the source timecode numbers.
Write XMP ID To Files On Import The ID number is a unique value associated with an asset. It enables the application to recognize a file even if the filename has changed. Each application can use this information to manage cached previews and conformed audio files, preventing additional rendering and conforming.
When this option is selected, XMP ID values are written to source files when they are imported into Prelude. If a file already has an XMP ID, then Prelude doesn’t write a new one, and no change is made. Files from recent versions of Adobe applications will, in general, already have an XMP ID.
Important: The Write XMP IDs To Files On Import preference only controls whether unique ID values are automatically written to files during import. This preference does not control whether XMP metadata is written to a file under other circumstances, such as when you edit metadata in the Metadata panel.
Growing Files Growing files, in this context, are files that are edited as they are still being recorded. You can specify the refresh rate for such files using the Refresh Growing Files option.

24Workspace and workflow
Last updated 3/8/2018
Set playback preferences
Set Marker preferences
Set Ingest preferencesPrevious versions of Prelude remembered the last state of the Transcode option. This sometimes led to unwanted transcodes on subsequent ingests. With the Edit > Preferences > Ingest > Keep Transcode checkbox sticky option, you can choose whether the Transcode state is sticky or not between Prelude launches.
Set Rough Cut preferencesYou can apply Video and Audio transitions to rough cuts, specifying both the type and duration of transitions. You can also specify the default duration for still images.
Option Description
Audio device The default audio device that is used for playback.
Video device A video monitor other than your computer monitor, such as a broadcast monitor.
Disable video output when in the background Disables video when Prelude is not the active application on your computer.
Step forward/Back many Use Shift+Left Arrow and Shift+Right Arrow to step back many frames
Option Description
Preroll When you add markers during playback, you sometimes miss adding the marker at the exact time. For example, if you want to add the marker at 00:20:41:02 during playback, the delay in pressing the key can result in the marker getting added after the required time.
Adding a New Marker sets out point of previous marker By default Prelude sets the Out point of a new marker to be the end of the clip. Enable this option to set the Out point of the previously added marker to the frame before the In point of the new marker. When this option is disabled, the new marker is added to a layer above the current layer in the timeline.
Stop Playback When a New Marker Is Added Stops the playback of the movie in the Monitor panel when you add a marker.
Double-clicking a Marker Switches to the Marker Panel Shifts the focus to the Marker panel when you double-click a marker.
Marker Type In the Marker section, you can change the default colors for the various kinds of markers and specify a time interval for the markers. For example, if you want the comment markers to have a default time of 5 seconds, you specify the time in Duration.
Default Video Transition Type Default Audio Transition Type
Cross Dissolve Constant Power
Dip to Black Constant Gain
Dip to White

25Workspace and workflow
Last updated 3/8/2018
How to ingest media clips with Adobe Prelude
Video | Organize clips, subclips, and sequences in PreludeVideo | Organize clips, subclips, and sequences in Prelude
The video and audio from a file-based camcorder are contained in digital files. Ingest is the process of transferring data from the recording media and optionally transcoding to other formats.
You create a project before you ingest movie clips into Adobe Prelude. Prelude creates a project (.plproj) file for every project that you create.
A project file stores only references to the source files that you ingest. For this reason, project files remain fairly small.
Supported file formats for ingestYou can ingest video, audio-only (AIFF, mp3, and WAV), and still files (Adobe Illustrator, Adobe Photoshop, Bitmap, GIF, JPEG, PNG, TIFF, and icon files) into Prelude.
Note: Only static metadata is associated with still images in Prelude. For inclusion into rough cuts, still images are assigned a default duration of 150 frames. You can adjust this default duration in your preferences (Preferences > General). No markers are associated with still images in Prelude.
The Panasonic P2 format Prelude supports the Panasonic Op-Atom variant of MXF, with video in DV, DVCPRO, DVCPRO 50, DVCPRO HD, or AVC-I formats.
The root of the P2 file structure is a CONTENTS folder. Each essence item (an item of video or audio) is contained in a separate MXF wrapper file. The video MXF files are in the VIDEO subfolder, and the audio MXF files are in the AUDIO subfolder. XML files in the CLIP subfolder contain the associations between essence files and the metadata associated with them.
For your computer to read P2 cards, it needs the appropriate driver, which you can download from the Panasonic website. Panasonic also provides the P2 Viewer application, with which you can browse and play media stored on a P2 card.
Note: To use certain features with P2 files, you first change the file properties from read only to read and write. For example, to change the timecode metadata of a clip using the Timecode dialog box, you first set the file properties to read and write. Use the operating system file explorer to change file properties.
XDCAM and AVCHD formats You can find the video files from XDCAM HD camcorders in the CLIP folder, written in the MXF format. XDCAM EX camcorders write MP4 files into a folder named BPAV.
XMPilot is an optional add-on from Sony for some of their XDCAM HD cameras. Prelude translates Planning metadata in XMPilot to static metadata. Essence markers are converted to comment markers. Metadata collected and added to the XMPilot system during production is now maintained through post-production.
When using AVCHD files, ensure that you maintain the folder structure. Raw MTS files cannot be logged in Prelude.
HEVC format Prelude CC supports HEVC file formats.
High Efficiency Video Coding (HEVC) is a video codec that compresses video files using the H.265 format.

26Workspace and workflow
Last updated 3/8/2018
Create a project / Open an existing projectUse the options on the Welcome screen to create a project, or open an existing project.
If your project is already open in Prelude, choose from the following options:
• To create a project, select File > New Project. Alternatively, press Ctrl+Alt+N (Windows), or Cmd+Opt+N (Mac OS). Specify a name and location for the project file.
• To open an existing project, select File > Open Project. Alternatively, press Ctrl+Shift+O (Windows) or Cmd+Shift+O (Mac OS). Navigate to the location of the project file, and open it.
Ingest movie clipsYou can ingest entire movie clips or a selected portion of the movie clips (partial ingest). You can also transcode the selected movie clips using more than one encoding option.
1 Select File > Ingest. Alternatively, press Ctrl+I (Win) or Cmd+I (Mac OS).
To ingest the files to a specified bin, select the bin in the Project panel before you click Ingest.
2 Navigate to the folder containing media, and click the folder. The contents of the folder are displayed in the center panel.
Tip: To access folders from which you previously ingested content, use the menu above the panel.
3 Do the following based on your requirements:
• To view content as Thumbnails, click the Icon View button.
• To view content as a list, click the List View button.
• To quickly preview the contents of a movie clip, drag the cursor across the thumbnail. You can also click the thumbnail and use the playhead to scrub the movie. Alternatively, use the JKL keys to control playback of the selected thumbnail.
• To change the thumbnail size of movie clips in the panel, use the Zoom slide bar.
• To view files of a specific file type, select an option from the Files Of Type menu. Repeat the procedure to choose more than one option. By default, all file types that Prelude supports are displayed.
• To view files from a specific source, select an option from the View As menu. If ingesting from a device, ensure that it is connected to your computer.
• To select clips for ingest, click the corresponding check box. Click Check All to select all clips for ingest.
4 To ingest a specific portion of a clip (partial ingest), click its thumbnail. Use the JKL keyboard shortcuts, or drag the playhead to navigate through the clip. Press I and O at the desired positions to set the In and Out points.
When using this feature, ensure that you enable the Transcode option. Transcoding is required for partial ingest.
5 To specify a location for the ingested files, select Transfer Clips to Destination, and do the following:
a To change the folder for the transferred files, select Browse For Location in the Primary Destination menu, and select a destination folder.
b (Optional) To create a subfolder for the transferred files in the selected folder, click Add Subfolder. Specify a name for the subfolder. Creating a subfolder helps accidental overwriting of files with the same name.
To transfer media files without transcoding, leave the Transcode option deselected.

27Workspace and workflow
Last updated 3/8/2018
To ensure that the copied files match the original, select Verify. This option is available only for the Primary Destination, and when the Transcode option is disabled.
MD5 Comparison: Performs an MD5 check and ensures that the source file is the same as the ingested file. File Size Comparison: Checks whether the file size of the ingested file is the same as the size of the original movie clip. Bit by Bit Comparison: Does a CRC check and verifies whether the checksum of the source file is the same as the ingested file. If the files are different, the checksums don't match, and the test fails.
MD5 verification for ingested files
6 To specify transcoding settings for the ingested files, select Transcode. Use the submenus to specify presets for transcoding the files. To specify more presets, add presets in Adobe Media Encoder. The presets are reflected in Prelude.
If you have Adobe Premiere Pro installed on your computer, select Stitch Clips Together to combine several selected clips into a single movie clip. Specify a name for the movie clip. After ingest, the newly stitched clip is displayed in the Project panel.
7 To transcode the selected files in more than one format or to transfer files to multiple locations, click Add Destination. Repeat the procedure.
Note: Only files transferred to the primary destination appear in the Prelude project panel when ingesting is complete.
8 Click Ingest.
Files are transcoded using Adobe Media Encoder. The transcoded files are displayed in the destination folder after the transcoding process is complete.
To pause or cancel transcoding, use the corresponding buttons in the progress bar.
Renaming files during ingestBefore you rename files, you create a preset based on various parameters provided by Prelude. You then use the preset to rename selected files during ingest.
Renaming of files on disk works as intended with simple files like QuickTime, and when Transfer Clips to Destination is enabled.
Files that are a part of a complex folder structure (like P2) are not renamed. In such cases, the new name appears in the Prelude project because the new name is saved in metadata (Dublin Core > Title) and displayed as the clip name.
1 In the File Rename panel of the Ingest dialog, select Rename Files.
2 Do one of the following:
• To apply the new renaming preset to the movie clips copied to the primary destination and copies in more destinations, select Apply to All Destinations.
• To apply the new renaming preset to only the clips ingested to the primary destination, select Apply to Primary Destination Only.

28Workspace and workflow
Last updated 3/8/2018
3 To create a preset for naming files, do the following:
a Click the downward arrow icon next to the list of renaming presets, and choose New Preset.
b Click "+" to add an element to your custom naming preset. Select one of the following:
• Autoincrement increments the number associated with the name as files are named. You can choose to increment names by increments of 1, 01, 001, or 0001.
• In Custom Text, enter text based on your requirement. For example, the text can correspond to a project name or a separator between two elements.
• Date uses the timestamp associated with the files to name the files.
• File Name uses the original file name (without the extension), as an element in the new name.
c Click Save to save the preset. Enter a name for the preset. Ensure that the name doesn't contain spaces.
d To add other elements, click the "+" button again.
4 To go back to the File Rename panel without saving changes, click "x". To delete a preset, click the Trash icon.
Edit file naming presets1 Select the preset in the menu.
2 Click the downward icon next to the menu, and select Edit.
3 Edit the values as required, and click Save.
4 To save the preset with a different name, select Save As. Enter a new name for the preset.
You can store your File Metadata preset in a system-wide location that prevents other users from modifying the preset. The shared location is C:\Users\Public\Documents\Adobe\Prelude\3.0\Presets\Metadata (Windows) and
/Users/Shared/Adobe/Prelude/3.0/Presets/Metadata. (Mac OS) .
Share file naming presetsConsistent naming conventions can be useful in collaborative workflows. After creating a preset at a specified location, you can share it with multiple users. The people you shared the preset with can import the preset file into Prelude. After import, Prelude copies the preset to an appropriate location on the computer.
To import a preset, click the downward arrow next to the Preset menu, and select Import Preset. Select the presets that you want to import and click Open.
All the presets are stored at a specific location on your computer. To locate the presets on your computer, click the downward icon next to the Preset menu, and select Show in Explorer or Show in Finder.
Add metadata to the files being ingestedYou can add metadata to movie clips before ingesting them in Prelude. The metadata is reflected in the Metadata panel.
Similar to renaming files during ingest, you create a custom form (or schema) to be applied to each ingested clip as XMP metadata. The metadata presets can be shared and imported. Sharing metadata helps establish consistent sets of metadata your teams can use when organizing assets and content.
1 In the File Metadata panel of the Ingest dialog, select Add File Metadata.
2 Do one of the following:
• To apply the new preset to movie clips copied to the primary destination and copies saved to other destinations, select Apply to All Destinations.

29Workspace and workflow
Last updated 3/8/2018
• To apply the new preset to only the clips ingested to the primary destination, select Apply to Primary Destination Only.
3 To create a preset, do the following:
a Click the downward arrow icon next to the list of metadata presets, and choose "New Preset".
b Click "+" to add a metadata field.
c Enter a name for the metadata field. Ensure that the name doesn't contain spaces.
d For mandatory fields, click the check box next to the asterisk (*).
e Optionally, in Input Metadata Value, enter the value for the preset.
f Click Save to save the preset.
g To add more fields, click the "+" button again.
Note: The metadata name and the metadata value together are called the metadata pair or key-value pair. You can choose to provide a default value to the name or add the value dynamically during ingest.
4 To edit a preset, do the following:
a Select a preset in the menu.
b Click the downward icon next to the menu, and select Edit.
c Edit the values as required, and click Save.
d To save the preset with a different name, select Save As. Enter a new name for the preset.
5 To import a preset, click the downward arrow next to the Preset menu, and select Import Preset. Select the presets that you want to import and click Open.
All the presets are stored at a specific location on your computer. To locate the presets on your computer, click the downward icon next to the Preset menu, and select Show in Explorer or Show in Finder.
When collaborating, you can share presets with other editors.
6 To go back to the Metadata panel without saving changes, click "x". To delete a preset, click the Trash icon.
You can store your File Metadata preset in a system-wide location that prevents other users from modifying the preset. The shared location is C:\Users\Public\Documents\Adobe\Prelude\3.0\Presets\Metadata (Windows) and
/Users/Shared/Adobe/Prelude/3.0/Presets/Metadata (Mac OS).
Relinking files moved to another locationThe project file contains references to the location of ingested files. If you move these files to a different location on your computer, they are no longer available to your project. To continue using the moved files in your project, relink them using the options in Prelude.
When you open a project containing files that have moved since you last opened the project, a list of such files is displayed. Click Yes to relink the files by specifying their current location. If you choose to not relink the files, you can manually relink the files later.
1 In the Project panel, right-click the file with the offline icon , and select Relink. To select multiple files that exist at the same location, use Ctrl-click/Cmd-click or Shift-click.
2 Navigate to the folder containing the files and select a file. Prelude uses this location to relink all the other files in your selection.
3 Click Open.
30Workspace and workflow
Last updated 3/8/2018
The Prelude workspace
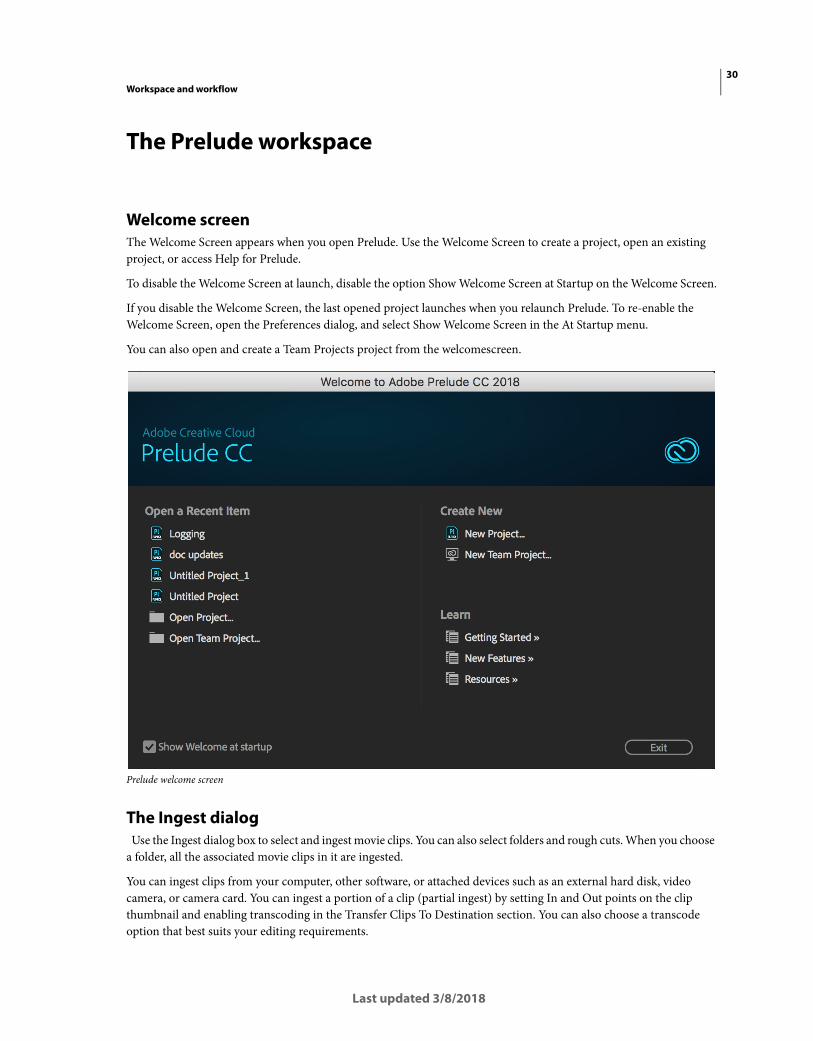
Welcome screenThe Welcome Screen appears when you open Prelude. Use the Welcome Screen to create a project, open an existing project, or access Help for Prelude.
To disable the Welcome Screen at launch, disable the option Show Welcome Screen at Startup on the Welcome Screen.
If you disable the Welcome Screen, the last opened project launches when you relaunch Prelude. To re-enable the Welcome Screen, open the Preferences dialog, and select Show Welcome Screen in the At Startup menu.
You can also open and create a Team Projects project from the welcomescreen.
Prelude welcome screen
The Ingest dialog Use the Ingest dialog box to select and ingest movie clips. You can also select folders and rough cuts. When you choose a folder, all the associated movie clips in it are ingested.
You can ingest clips from your computer, other software, or attached devices such as an external hard disk, video camera, or camera card. You can ingest a portion of a clip (partial ingest) by setting In and Out points on the clip thumbnail and enabling transcoding in the Transfer Clips To Destination section. You can also choose a transcode option that best suits your editing requirements.

31Workspace and workflow
Last updated 3/8/2018
Transfer, Transcode and Stich Clips options are also availablein Ingest window. Prelude allows you to add metadata and rename files before ingesting them.
To view the location of the clips on your computer, right-click the clip in the list or thumbnail view. Select Reveal in Explorer (Windows), or Reveal in Finder (Mac OS).
Ingest dialog
Logging, List, and Rough Cut workspacesThe default workspaces available in Prelude are designed to show panel arrangements optimized for tasks like logging or working with rough cuts.

32Workspace and workflow
Last updated 3/8/2018
The Logging workspace
The Marker Type panelA Metadata marker panel B Marker buttons C Current time indicator D Search option for markers
The Logging workspace is optimized for quickly adding metadata and creating subclips. Add markers and other metadata to quickly organize and search clips. You can use the metadata when you export to Adobe Premiere Pro or other applications.
The List workspace
List workspaceA Bin B Movie clip C Subclip D Create rough cut E Create bin

33Workspace and workflow
Last updated 3/8/2018
List workspace
In the Project panel, you organize project contents much as you use folders to organize files. Bins can contain clips, subclips, and rough cuts. Use the Project panel to create a rough cut, and then add subclips to the rough cut.
Reorder content in the Project panel by dragging it to a new location.
The Rough Cut workspace
Rough cut workspace
Open the rough cut that you created and add clips and subclips to the timeline. When you export the rough cuts to Adobe Premiere Pro or other applications, all the organizational and metadata information of the clips is retained.

34Workspace and workflow
Last updated 3/8/2018
Use the options in the Show menu to selectively display markers in the timeline.
Creating custom workspacesUse the Window menu to access panels in Prelude. As in other Adobe applications, you can float and dock panels and frames. You can also create custom workspaces. To access custom Workspaces, select Window > Workspace, and choose from the options.
If you have a customized workspace that you use frequently, you can create a custom workspace using Window > Workspace > New Workspace. The custom workspace is added to the Window > Workspace menu. To go back to the default workspace, select Window > Workspace > Reset Current Workspace.
Note: A frame is a set of grouped panels.
Reorder contents in a panel and across panels by dragging them to their new location.
Panels in PreludeHere is a partial list of panels in Prelude:
Event panel filtering optionsUse the Events Panel to view and filter the warnings, error messages, and other information to identify and troubleshoot problems. You can also access and filter the events based on Information, Warning, and Error.
1 Select Window> Events or select any of the icons , , or displayed at the lower right corner of the screen.
Note: The icon is displayed based on the stored Events: Information , Warning or Error .
Panel Description
Extensions Contains extensions or plug-ins for extending the functionality of Prelude. If no Extensions or plug-ins are available, this option is disabled. Flash Panel is not supported. Prelude extentions only support html format.
Displays the audio level for the movie being played in the timeline.
Events Lists warnings, error messages, and other information for identifying and troubleshooting problems. You can also access and filter the events based on Information, Warning, and Error.
History Use the History panel to jump to any state of the project created during the current working session. Every time you apply a change to some part of the project, the new state of that project is added to the panel. You can modify the project from the state you select.
Right-click a state in the History panel to view the available options.
The History panel is cleared when you switch between an open clip and a rough cut. It is also cleared when you save the open clip or rough cut.
Markers Displays all the markers in the movie that is currently open. This panel also allows you to change the timecode of the In and Out points, or edit the marker description. You can also edit the name of the markers.

35Workspace and workflow
Last updated 3/8/2018
Events panel
2 In the Events dialog box, select the drop-down arrow next to the Show Event Type to filter the events based on Information, Warning, and Error.
3 Select Show All to display all the events.
4 Select Events> Close to close the Events panel.
5 To close the panel group, select Events> Panel Group Settings> Close Panel Group.
Program Monitor
Program Monitor workspace

36Workspace and workflow
Last updated 3/8/2018
Double-click a movie clip in the Project panel to open it for playback in the Program Monitor panel. The Program Monitor gives you access to the standard play and navigation options. You can use the timecode, playback buttons, or the playhead to navigate the movie.
The Play In-Out option allows play back of a movie for the duration of a selected marker.
Use the keyboard shortcuts J, K, and L to preview the movie clip. For greater control, use a combination of J and K keys to move backward slowly, and K and L keys to move forward slowly.
Set display qualitySome formats are difficult to display in full-motion playback because of their high compression or high data rate. A lower resolution permits faster motion playback but at the expense of image quality. This tradeoff is most noticeable when you view AVCHD and other H.264 -codec based media. Below full resolution these formats have error correction turned off, and artifacts are common during playback. These artifacts, however, do not show up in exported media.
Use separate playback and pause resolutions to gain more control over the monitoring experience. With high-resolution footage, set playback resolution to a lower value (for example, 1/4) for smooth playback, and set the Pause resolution to Full. These settings allow you to check the quality of focus or edge details when you pause playback. Scrubbing puts the monitor in playback resolution, not pause resolution.
1 Click the Output button.
2 Select an option for Playback Resolution and Paused Resolution.
Zoom Bar
Zoom Bar
To zoom into the timeline, drag the Zoom Bar located below the current time indicator.
Tag panel and Tag templates
About Tag templatesA tag template is a shareable collection of buttons and associated metadata. When reviewing media, the tag template is loaded and supplies the tags that are used to log the assets. The buttons are created and arranged using the tag template editor in Prelude.
Creating and using a Tag templateFollow the steps below to create, save, and apply a Tag template.
1 Choose Window > Tag from the main menu.

37Workspace and workflow
Last updated 3/8/2018
Tag template windowA Edit template B Save template C Create template D Import template
2 Click to create a new tag template.
3 Save the template as a JSON file. Tag templates are stored as JSON files for easy interchange and compatibility with other applications and web services.
Templates are stored by default in the Adobe\Prelude\<version-number>\TagTemplates folder. You can change the location of your saved templates to a different folder.
4 You can create your tags in the Tag Template window.The default size of the grid is six rows and five columns. You can customize your tag with the following settings:
• Tag Dimension - Select a cell in the grid. Then select the size and shape of the button to represent your tag from the four available options. The button options are dynamic, and if you select a cell in the grid where the one of the button sizes do not fit, that button size is shown as disabled.
• Tag Button Information - Customize each Tag Button with the following settings:
• Tag Name: Name (label) of each Tag Button
• Description: Specifies metadata payload description
• Duration: Duration of a new marker created in the Timeline with the tag included
• Color: Prelude keeps track of the last seven recent colors used for the Tag Buttons.
• Grid Size - Adjust the template dimensions using the GRID SIZE controls at the bottom of the dialog.
Tag template editor
5 Click OK to save your tag template settings. The Tag panel gets populated with the templates that were created.

38Workspace and workflow
Last updated 3/8/2018
6 You can now use the tag template to tag your media.
• A new marker is added everytime you add a tag, whether or not marker is selected in Timeline.
a Ingest your media into Prelude.
b Open a clip.
c Play your clip. As the clip is played, click the Tag Button you want to add to your clip. Tags appear as COMMENT MARKERS in both the Timeline and in the Marker List Panel. The Tag Name appears as the Marker Name in the Marker List Panel.
Other actions with tag templates
Switch to a different templateYou can load multiple tag templates at once. All tag templates that are loaded are displayed in the drop-down menu at the top of the panel. You can switch between the different tag templates at any time.
Import templatesClick the Import button on the upper left corner of the Tag panel. Navigate to the location where the tag template is stored. Select the desired template and click OK to load it into Prelude.
Edit templatesYou can edit your tag templates at any time to add, remove, or modify your Tag Buttons. To edit a tag template, first load and select the tag Template as the current template. Click Edit to open the Tag Template editor dialog box. Make your changes and click OK to save the changes.
Assign shortcutsYou can assign a keyboard shortcut for each template in the Tag panel.
1 Import the Tag.
2 Click the Edit icon to open the Tag panel.
3 Assign a shortcut in the Shortcut field.
4 Click OK to save the changes..
Select the Tag before using the assigned keyboard shortcut.
To switch quickly between different panels, use the keyboard shortcuts Ctrl+Shift+. to select the next panel and Ctrl+Shift+, to select the previous panel.

39
Last updated 3/8/2018
Chapter 3: Audio and video
Using Audio Channel Mapping with PreludeNew in Adobe Prelude CC 2015.3 | March 2016
Multichannel Audio tracks in Rough Cut
Multichannel Audio tracks
To output multichannel audio, you would use a multichannel master track. This enables you to output up to 32 channels of audio. Using the multichannel master track, the multichannel master can be set to one channel for output and any other number of channels up to 32 channels.
To set the number of channels in rough cut, use the following steps:
• For Windows, select Edit > Preferences > rough cut > Master: Multichannel.
• For Mac, select Prelude > Preferences > rough cut > Master: Multichannel

40Audio and video
Last updated 3/8/2018
Output Channel MappingYou can specify the channel in an output audio device for each track in a rough cut with multiple audio tracks. To map channels, use the Track Output Channel Assignment pane. Prelude provides you the functionality to play each rough cut track through the specified output channel. For example, your project may have a six track rough cut. However, your system hardware may support only two channels. You can now specify which of the two hardware channels carries each of the six rough cut tracks.
16-channel rough cuts, however, remain mapped to 16 output channels if the selected hardware device has fewer than 16 channels. For example, the selected device may have only two channels. You can then map only the first two channels of a 16-channel rough cut to the two hardware channels.
Use the Track Output Channel Assignment pane to set channel mapping for each audio track in rough cut.
• Right click Left pane of the audio track in Rough Cut timeline
• Select the Set Track Output Channel
• Select the Track Output Channel Assignment pane
Note: The Set Track Output Channel pane is disabled for mono, stereo and 5.1 types of rough cut.
Output Channel Mapping
Default Channel assignment and Panning for multichannel master track rough cut
Audio Track Channel Panning
1 1-2 -100
2 1-2 100
3 3-4 -100
4 3-4 100
5 5-6 -100
6 5-6 100

41Audio and video
Last updated 3/8/2018
Default channel assignment for 5.1 tracks
7 7-8 -100
8 7-8 100
9 9-10 -100
10 9-10 100
11 11-12 -100
12 11-12 100
13 13-14 -100
14 13-14 100
15 15-16 -100
16 15-16 100
17 17-18 -100
18 17-18 100
19 19-20 -100
20 19-20 100
21 21-22 -100
22 21-22 100
23 23-24 -100
24 23-24 100
25 25-26 -100
26 25-26 100
27 27-28 -100
28 27-28 100
29 29-30 -100
30 29-30 100
31 31-32 -100
31 31-32 100
Audio track Channel L Channel 1
Audio track Channel R Channel 2
Audio track Channel C Channel 3
Audio track Channel LFE Channel 4
Audio track Channel Ls Channel 5
Audio track Channel Rs Channel 6

42Audio and video
Last updated 3/8/2018
Default channel assignment for Voice over Tracks
Note: Panning gets disabled if there's a 5.1 audio track and multi-channel Rough cut with 1 channel.
Default Channel assignment for Voice over Tracks
Learn how to work with video clips in Adobe PreludeAdobe Prelude software is a video ingest and logging tool that helps you quickly tag and transcode raw footage from file-based cameras. It is an open platform that supports customized integration with third-party technologies and management systems.
Introduction to Adobe PreludeIntroduction to Adobe Prelude
You could also check out this video from Video2Brain. http://www.video2brain.com/en/videos-13357.htm
Channel : 1-2 Panning : 0

43Audio and video
Last updated 3/8/2018
Workflow
1. Create a project / Open an existing projectAdobe Prelude creates a project (.plproj) file for every project that you create in Prelude. The project file contains references to the media you add to your project.
A project file stores only references to the source files that you ingest. For this reason, project files remain fairly small. Because only references to the source files are stored, you don't need to worry about moving, renaming, or deleting your source files. If media files are moved or renamed, you can reconnect such media to your project using the Relink command available in the File menu.
2. Ingest raw footageIngest entire movie clips, or only portions of a clip (partial ingest). Choose a codec that best suits your editing requirements.
File-size and byte-level checks help you immediately identify whether the footage was ingested successfully.
3. Organize ingested footageYou can reorder the sequence of clips by moving them in the project view. Use bins to organize project contents much as you use folders to organize files. Bins can contain clips, subclips, and rough cuts.
4. Log video clipsUse interface options or keyboard shortcuts to add temporal metadata to clips, and create subclips. Markers and other temporal metadata help you quickly organize and search clips. You can leverage the metadata information when you export to other software such as Adobe Premiere Pro.
5. Create rough cutsCreate rough cuts from clips and subclips before sending them to other software such as Adobe Premiere Pro for final editing.
6. Export to Adobe Premiere Pro/Final Cut ProYou can export rough cuts, clips, subclips, and bins to an Adobe Premiere Pro project or FCP XML file. Alternatively, you can send the rough cut to Adobe Premiere Pro directly for editing.
The organization and metadata information from Prelude is carried over to Adobe Premiere Pro. This seamless workflow reduces post-production time and effort when you create the final cut of a movie.
Extending PreludeAdobe technical partners can use the Prelude SDK to customize Prelude.
• Leverage XMP-based open platform capabilities of Adobe Prelude to integrate with third-party technologies and asset management systems.
• Create searchable, custom, temporal-based markers through ActionScript® panels that capture information for your project or organization.
• Import event metadata from other workflow-specific sources. Then add it to your footage in Prelude by importing it as an XMP stream or file.

44
Last updated 3/8/2018
Chapter 4: Collaboration with Prelude
Rough cut and Edit using Team ProjectsPrelude CC allows you to create and edit a rough cut in Team Projects Beta and share your rough cuts with other users. Previously, you could only open the clip and add markers and metadata to organize and search subclips.
The Team Projects Rough Cut feature also enables you to share your rough cuts with other Adobe applications such as Premiere Pro and After Effects.
Logging in to the Team Projects server1 Click File > Team Projects > Sign In... to log in to the Team Projects server.
2 Enter the server name, user name, and password.
Adding and deleting clips from rough cutsKeep the following points in mind when adding and deleting clips from rough cuts:
• The frame rate of the rough cut sequence should be the same as that of the first subclip.
• The frame rate of the rough cut sequence does not change if subclips are reordered in the rough cut.
• The frame rate of the rough cut sequence does not change if the first subclip is deleted.
• The frame rate of the rough cut sequence can be changed if all subclips are deleted and a new one is added.
• Audio only clips, images, and hard subclips can be added or deleted from a rough cut.
• An offline clip or subclip cannot be added to a rough cut.
Using rough cuts with Premiere Pro• A rough cut that is created in Prelude can be opened in Premiere Pro directly. A sequence created in Premiere Pro
can be opened and edited in Prelude only when the sequence meets the rough cut bar.
• If a rough cut created in Prelude contains an audio-only clip, it is placed at the audio track in Premiere Pro.
• If a rough cut created in Prelude is edited in Premiere Pro, it cannot be opened again in Prelude if the rough cut does not meet the rough cut bar.
For additional information, see Exporting files from Prelude section in Premiere Pro.
Previewing rough cutsYou can preview a rough cut in the production panel; thumbnail view is also available.
You can play a rough cut in the monitor panel as a sequence.

45Collaboration with Prelude
Last updated 3/8/2018
Linking Adobe Story scripts with movie clips in PreludeYou can link movie clips in Prelude with Adobe Story scripts to work on it further by following these steps.
1 Select Window > Adobe Story.
2 Log in to Adobe Story using your Adobe ID credentials.
3 Open the script containing scenes to be associated with the movie clips in Prelude.
4 Select a scene from the script and drag it to the movie clip in Prelude. After the script is linked, the badge for attached script appears on the clip.
Clear script metadata from clips
• Right click the movie clip and select Clear Script Data.