adobe photoshop cs4 introduction workshops/file/photoshop3.pdf · university of sheffield digital...
TRANSCRIPT

Digital Design and Communication Teaching (DiDACT)University of SheffieldDepartment of Landscape
Phot
osho
p CS4
Adobe Photoshop CS4 INTRODUCTION WORKSHOPS
WORKSHOP 3 - Creating a Panorama
Outcomes:
y Taking the correct photographs needed to create a panorama.
y Using photomerge to create a panorama.
y Solutions to common stiching problems.

Digital Design and Communication Teaching (DiDACT)University of SheffieldDepartment of Landscape
Phot
osho
p CS4
WHY CREATE A PANORAMA?
In recent years, shooting multiple pictures of a scene and then stitching them to form a panoramic picturehas become a popular project with digital photographers. Adobe Photoshop includes a technique for simplifying the process called Photomerge. The stitching program has been a popular feature within Photoshop since the CS2 version and has been carefully tweaked and improved over the years. This tool combines a number of photographs into a single panoramic picture by ensuring that the edge details of each successive image are stiched and blended to result in an undetectable join. Once all the photographs have been stiched the result is a picture that represents a scene of any angle up to a full 360°. This can be useful when representing features of a site visit, creating dramatic scenes to express design ideas as well as a becoming a baseline image for creating visualizations i.e. Wind Turbine Development.
TAKING THE RIGHT PHOTOS
The photos you take play a large role in composing your panoramic image. Follow these tips when taking pictures to avoid problems:
1. Images should overlap by approximately 25% to 35%. If the overlap is less, Photomerge may not be able to automatically assemble the panorama. However, keep in mind that the images shouldn’t overlap too much.
2. Use one focal length If you use a zoom lens. Do not zoom in or out between photographs.3. Photomerge can process slight rotations between pictures, greater degrees can result in errors when the panorama is assembled. Using a tripod with a rotating head is
prefered.4. Try not to change your position as you take a series of photographs.
Digital Design and Communication Teaching (DiDACT)University of SheffieldDepartment of Landscape
Phot
osho
p CS4
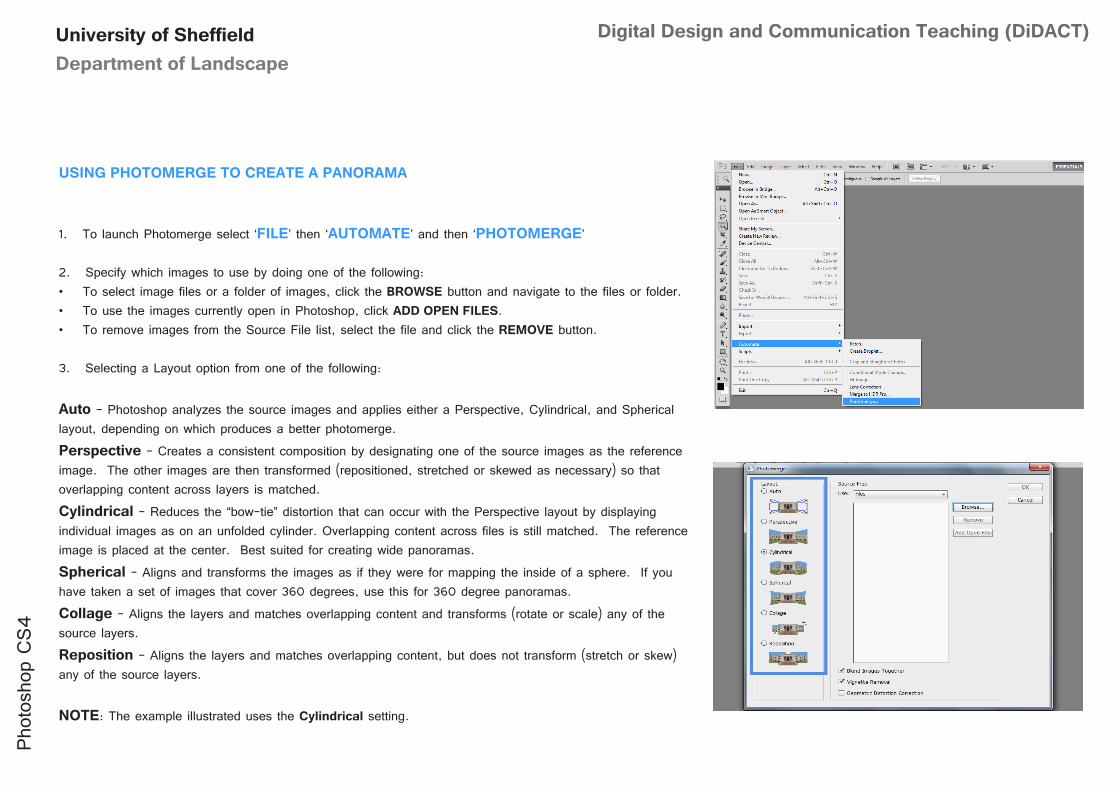
USING PHOTOMERGE TO CREATE A PANORAMA
1. To launch Photomerge select ‘FILE’ then ‘AUTOMATE’ and then ‘PHOTOMERGE’
2. Specify which images to use by doing one of the following:• To select image files or a folder of images, click the BROWSE button and navigate to the files or folder.• To use the images currently open in Photoshop, click ADD OPEN FILES.• To remove images from the Source File list, select the file and click the REMOVE button.
3. Selecting a Layout option from one of the following:
Auto - Photoshop analyzes the source images and applies either a Perspective, Cylindrical, and Spherical layout, depending on which produces a better photomerge.
Perspective - Creates a consistent composition by designating one of the source images as the reference image. The other images are then transformed (repositioned, stretched or skewed as necessary) so that overlapping content across layers is matched.
Cylindrical - Reduces the “bow-tie” distortion that can occur with the Perspective layout by displaying individual images as on an unfolded cylinder. Overlapping content across files is still matched. The reference image is placed at the center. Best suited for creating wide panoramas.
Spherical - Aligns and transforms the images as if they were for mapping the inside of a sphere. If you have taken a set of images that cover 360 degrees, use this for 360 degree panoramas.
Collage - Aligns the layers and matches overlapping content and transforms (rotate or scale) any of the source layers.
Reposition - Aligns the layers and matches overlapping content, but does not transform (stretch or skew) any of the source layers.
NOTE: The example illustrated uses the Cylindrical setting.

Digital Design and Communication Teaching (DiDACT)University of SheffieldDepartment of Landscape
Phot
osho
p CS4
4. Select any of the following options:
Blend Images Together - Finds the optimal borders between the images and creates seams based on those borders, and to colour match the images. With ‘Blend Images Together’ turned off, a simple rectangular blend is performed. This may be preferable if you intend to retouch the blending masks by hand.
Vignette Removal - Removes and performs exposure compensation in images that have darkened edges caused by lens flaws or improper lens shading.
Geometric Distortion Correction - Compensates for barrel, pincushion, or fisheye distortion.
5. When you are happy with the selected images and settings, click ‘OK’.

Digital Design and Communication Teaching (DiDACT)University of SheffieldDepartment of Landscape
Phot
osho
p CS4
SOLUTIONS TO STICHING PROBLEMS
One of the banes of the panoramic photographer’s life is the subject that moves during a shooting sequence. These problems can be fixed in one of two ways: Either remove or repair the problem area.
Remove
To remove the problem, you can use the Healing Brush, Patch, or Clone Stamp tools to sample backgroundparts of the scene and paint over stitching errors. The success of this type of work is largely based on how well you can select suitable areas to sample. Be careful, though, as repeated application of thesetools can cause noticeable patterns or smoothing in the final picture.
Using the Clone Stamp Tool to Remove Problems
The Clone Stamp tool paints one part of an image over another part of the same image or over another part of any open document that has the same color mode. You can also paint part of one layer over another layer. The Clone Stamp tool is useful for duplicating objects or removing a defect in an image.
1. Select the Clone Stamp tool.2. To specify how you want to align the sampled pixels set any of the following in the options bar:
Aligned - Samples pixels continuously, without losing the current sampling point, even if you release the mouse button. Deselect Aligned to continue to use the sampled pixels from the initial sampling point each time you stop and resume painting.
Sample - Samples data from the layers you specify. To sample from the active layer and visible layers below it, choose Current And Below. To sample only from the active layer, choose Current Layer. To sample from all visible layers, choose All Layers.
3. Set the sampling point by positioning the pointer over an image and holding down the ‘Alt’ key and ‘Left Click’
4. Click and drag over the area of the image you want to correct.
Removing objects with the Clone Stamp tool
Change the sampling point often to reduce risk of patterns occuring