adobe connect instructions - studio.eku.edu · 7 f. success | finish 8. at the top of the screen,...
TRANSCRIPT

1
Adobe Connect Instructions
Modified
12/10/2012 adapted
from EKU Online
2
Contents Connecting with Adobe Connect .................................................................................................... 3
Recording a Consultation................................................................................................................ 9
Adobe Flash Player Settings ......................................................................................................... 13
Hardware Acceleration ............................................................................................................. 13
Privacy ...................................................................................................................................... 14
Microphone ............................................................................................................................... 14
Camera ...................................................................................................................................... 15
Sharing Documents ....................................................................................................................... 16
Changing Student RolesPresenterParticipant........................................................................ 18

3
Connecting with Adobe Connect
1. https://eku-e-campus.adobeconnect.com
a. Getting started guide
i. https://na3cps.adobeconnect.com/common/help/en/support/startmain.htm
2. Click on Create New: Meeting
3. Under the Meeting Information Header:
a. Type in name of consultation &/or meetingi.e., “demo1.”
b. Access: Check the button, “Anyone who has the URL for the meeting can enter
the room.
4. At the bottom of the page, click “Next.”
5. Click “Finish”
6. Meeting Information
a. Copy the URL (web address) in an email | add participants in the “To” field of
email.
i. **OPTIONAL: Enter Meeting Room if applicable.

4
--
7. Meeting | Audio Setup Wizard

5
a. Welcome | Next
b. Play Sound | Next

6
c. Select Microphone If you are NOT sure which device to choose, Adobe WILL
choose for you. | Next
d. Tune Microphone Volume | Record | Play recording | Next
e. Tune Silence Level | Next

7
f. Success | Finish
8. At the top of the screen, click the Microphone & Webcam icons. NOTE: They will turn
green once you clicked on them.
9. You will see a video image of yourself, with the words “Start Sharing” below. Click on it
to begin sharing the video feed of yourself.
10. As attendees login, click on their names to enable audio and once again for video. Hover
mouse over the name and click “Enable Audio.” Once enabled a microphone icon will
appear to the right of their name.

8
11. Hover mouse over the name (again) and click “Enable Video.” There are NO visual cues
as in the Enable Audio in step 11.
12. To change the layout of how your online consultation is displayed, look to the right and
click on the configuration of your choice. Sharing | Discussion | Collaboration
13. When finished, click on the “X” in the upper right hand corner of the screen.

9
Recording a Meeting
1. Meeting | Record Meeting…
2. Label the Recording to your specifications or use what was automatically generated.
Provide any Summary information if needed.
3. The recording takes place when you see a Red Circle (in the upper right). Press the “X”
inside the Record Meeting caption box to hide.
10
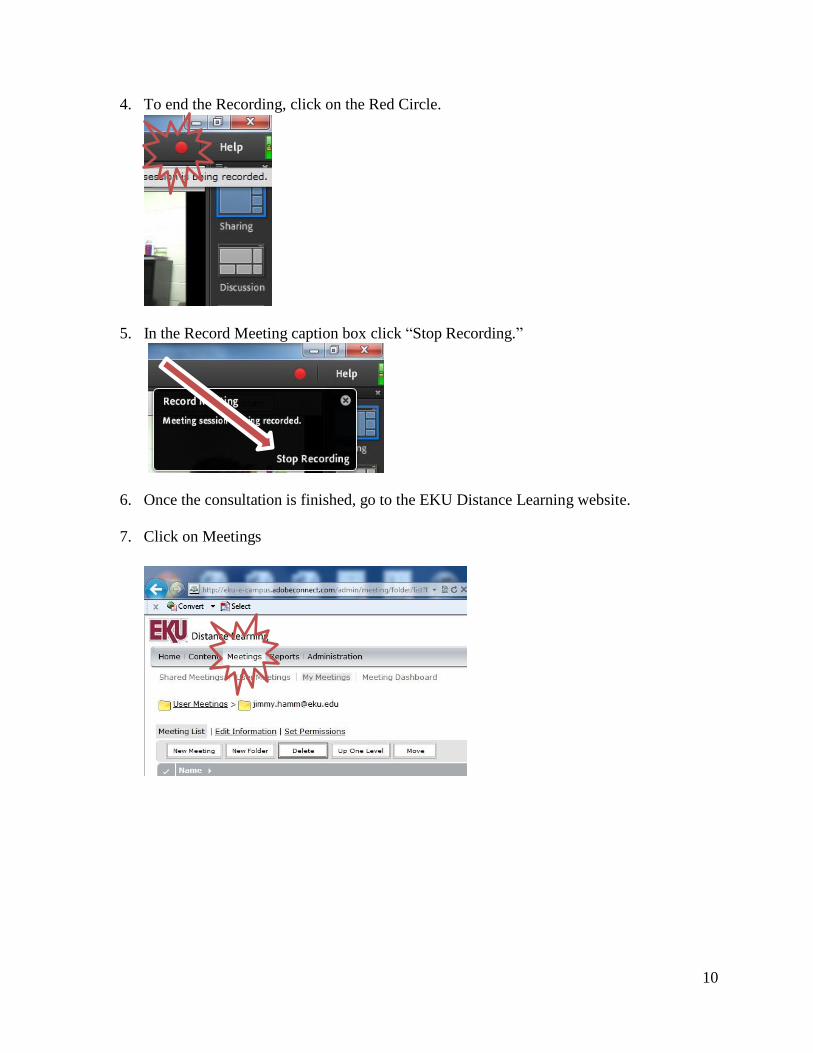
4. To end the Recording, click on the Red Circle.
5. In the Record Meeting caption box click “Stop Recording.”
6. Once the consultation is finished, go to the EKU Distance Learning website.
7. Click on Meetings
11
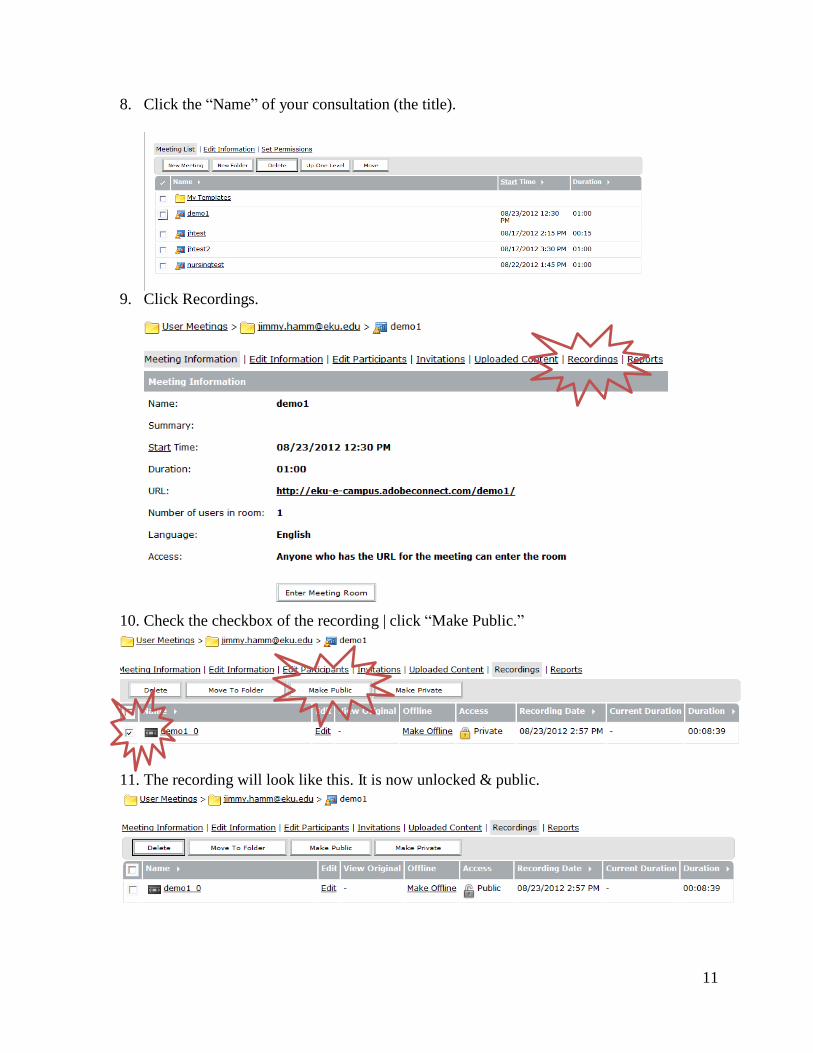
8. Click the “Name” of your consultation (the title).
9. Click Recordings.
10. Check the checkbox of the recording | click “Make Public.”
11. The recording will look like this. It is now unlocked & public.

12
12. Click on the “Tape” of the Recording to get the URL (web address) of the recording.
13. Copy the URL (web address) and share as needed

13
Adobe Flash Player Settings Hardware Acceleration
NOTE: It is assumed you are logged in.
1. PLACE arrow over name | Right Click
2. Click on Settings boxAdobe Flash Player Settings box appears.
3. Click on Display Tab (bottom row of tabbed icons).
4. Check the Enable hardware acceleration
5. Click Close if no other changes are needed.

14
Privacy
1. Click on the Privacy Icon (bottom row of tabbed icons).
2. Check Allow & Remember.
3. Click Close if no other changes are needed.
Microphone
1. Click on Microphone icon (bottom row of tabbed icons).
2. Check the ‘Reduce Echo’ box
3. If the echo is still occurring adjust the slider.
4. Click Close if no other changes are needed.

15
Camera
1. Click on the Camera icon (bottom row of tabbed icons).
2. Useful if you have TWO cameras and you are trying to designate a particularly one to
use.
3. Click Close if no other changes are needed.

16
Sharing Documents NOTE: This is highly recommended for those consultations needing to show a presentation(s)
during the session. This will help maintain the audio & video quality of the session.
1. Verify that your screen is in the Sharing layout | Click on Sharing (upper right hand
corner of screen).
2. Click on the Drop-Down menu of the Share My Screen button
3. Click on Browse My Computer button | Find & Select your file.

17
4. The screen will look similar to the one shown here as it is being uploaded.
5. Your title slide will appear in the center.
6. Previous & Next buttons are in the bottom left hand corner.
7. You can draw or highlight elements of the presentation by using the toolbar within the
presentation window.
8. When you are done presenting, click on Stop Sharing button.
9. Emphasis between you and your presentation can be accomplished by toggling the screen
layout buttons. It will keep your place during the presentation.

18
Changing Student RolesPresenterParticipant NOTE: WARNING!! NEVER change your status as HostThe ONLY FIX is to leave the
consultation and then come back.
1. Place Arrow over Participant’s name | Make Presenter
2. Student’s name now appears under Presenters column.
3. Student presentations should be done as noted in the Sharing Documents Section.
4. To make the Presenter a Particiapnt-Place arrow over Presenters name | Make Participant.