adapter installation guide 10g release 3 (10.1.3.4.0) · oracleas adapter for sap r3 exchanges...
TRANSCRIPT

Oracle® Application ServerAdapter Installation Guide
10g Release 3 (10.1.3.4.0)
E14201-01
January 2009

Oracle Application Server Adapter Installation Guide, 10g Release 3 (10.1.3.4.0)
E14201-01
Copyright © 2008, 2009, Oracle and/or its affiliates. All rights reserved.
Primary Author: Sheela Vasudevan
Contributors: Vikas Anand, Marian Jones, Sunil Gopal, Bo Stern
This software and related documentation are provided under a license agreement containing restrictions on use and disclosure and are protected by intellectual property laws. Except as expressly permitted in your license agreement or allowed by law, you may not use, copy, reproduce, translate, broadcast, modify, license, transmit, distribute, exhibit, perform, publish, or display any part, in any form, or by any means. Reverse engineering, disassembly, or decompilation of this software, unless required by law for interoperability, is prohibited.
The information contained herein is subject to change without notice and is not warranted to be error-free. If you find any errors, please report them to us in writing.
If this software or related documentation is delivered to the U.S. Government or anyone licensing it on behalf of the U.S. Government, the following notice is applicable:
U.S. GOVERNMENT RIGHTS Programs, software, databases, and related documentation and technical data delivered to U.S. Government customers are "commercial computer software" or "commercial technical data" pursuant to the applicable Federal Acquisition Regulation and agency-specific supplemental regulations. As such, the use, duplication, disclosure, modification, and adaptation shall be subject to the restrictions and license terms set forth in the applicable Government contract, and, to the extent applicable by the terms of the Government contract, the additional rights set forth in FAR 52.227-19, Commercial Computer Software License (December 2007). Oracle USA, Inc., 500 Oracle Parkway, Redwood City, CA 94065.
This software is developed for general use in a variety of information management applications. It is not developed or intended for use in any inherently dangerous applications, including applications which may create a risk of personal injury. If you use this software in dangerous applications, then you shall be responsible to take all appropriate fail-safe, backup, redundancy, and other measures to ensure the safe use of this software. Oracle Corporation and its affiliates disclaim any liability for any damages caused by use of this software in dangerous applications.
Oracle is a registered trademark of Oracle Corporation and/or its affiliates. Other names may be trademarks of their respective owners.
This software and documentation may provide access to or information on content, products, and services from third parties. Oracle Corporation and its affiliates are not responsible for and expressly disclaim all warranties of any kind with respect to third-party content, products, and services. Oracle Corporation and its affiliates will not be responsible for any loss, costs, or damages incurred due to your access to or use of third-party content, products, or services.

iii
Contents
Preface ................................................................................................................................................................. v
Audience....................................................................................................................................................... vDocumentation Accessibility ..................................................................................................................... vRelated Documents ..................................................................................................................................... viConventions ................................................................................................................................................. vi
1 Introduction
Oracle Application Server Adapter Overview ................................................................................... 1-1Packaged-Application Adapters...................................................................................................... 1-1Legacy Adapters................................................................................................................................. 1-2Oracle Application Server Components Integration with Adapters.......................................... 1-3Types of Installation .......................................................................................................................... 1-4
Oracle Application Server Adapter System Requirements ............................................................. 1-6Hardware Requirements................................................................................................................... 1-6Software Requirements ..................................................................................................................... 1-6
2 Installation and Configuration
Installation Tasks...................................................................................................................................... 2-1Installing Oracle Application Server 10.1.3.1 ................................................................................ 2-1Applying Oracle Application Server 10g Release 3 (10.1.3) Patch Set 4 (10.1.3.4.0)................. 2-5
Postinstallation Tasks for Packaged-Application Adapters.......................................................... 2-10Installing Patches............................................................................................................................. 2-11Copying the Library Files .............................................................................................................. 2-11Verifying BSE deployment ............................................................................................................ 2-14Configuring the J2CA deployment............................................................................................... 2-15Verifying the J2CA Installation ..................................................................................................... 2-16Directory Structure ......................................................................................................................... 2-16Starting Application Explorer ....................................................................................................... 2-17Configuring the Database Repository for J2CA ......................................................................... 2-17Modifying server.xml ..................................................................................................................... 2-18Modifying oc4j-ra.xml .................................................................................................................... 2-18Configuring HP Itanium 64 Machine for mySAP ERP Adapter .............................................. 2-19
Postinstallation Tasks for Legacy Adapters ..................................................................................... 2-20Installing OPatch 7408494 .............................................................................................................. 2-21
Preinstallation Tasks for OPatch 7408494............................................................................. 2-21

iv
Installation Tasks for OPatch 7408494 .................................................................................. 2-21Postinstallation Tasks for OPatch 7408494 ........................................................................... 2-21Deinstallation Task for OPatch 7408494 ............................................................................... 2-22
Configuring Run-Time Connections ............................................................................................ 2-22Configuring Design-Time Connections ....................................................................................... 2-24
Deinstallation Tasks ............................................................................................................................. 2-26Globalization Support.......................................................................................................................... 2-27
A Configuring OracleAS Adapter for PeopleSoft
Specifying the PeopleSoft Version ...................................................................................................... A-1Installing the Adapter Component Interfaces ................................................................................... A-1
Importing and Building the Component Interfaces..................................................................... A-2Configuring Component Interface Security.................................................................................. A-4Installing the TCP/IP Message Router for OracleAS Adapter for PeopleSoft......................... A-8Copying PeopleSoft Files into the Lib Directory ........................................................................ A-10
Index

v
Preface
This Preface contains the following topics:
■ Audience
■ Documentation Accessibility
■ Related Documents
■ Conventions
AudienceThe Oracle Application Server Adapter Installation Guide is intended for is intended for system administrators who perform the following tasks:
■ Install and configure Oracle Application Server adapters
■ Use adapters with Oracle BPEL Process Manager
■ Use adapters with Oracle Enterprise Service Bus
Documentation AccessibilityOur goal is to make Oracle products, services, and supporting documentation accessible to all users, including users that are disabled. To that end, our documentation includes features that make information available to users of assistive technology. This documentation is available in HTML format, and contains markup to facilitate access by the disabled community. Accessibility standards will continue to evolve over time, and Oracle is actively engaged with other market-leading technology vendors to address technical obstacles so that our documentation can be accessible to all of our customers. For more information, visit the Oracle Accessibility Program Web site at http://www.oracle.com/accessibility/.
Accessibility of Code Examples in DocumentationScreen readers may not always correctly read the code examples in this document. The conventions for writing code require that closing braces should appear on an otherwise empty line; however, some screen readers may not always read a line of text that consists solely of a bracket or brace.
Accessibility of Links to External Web Sites in DocumentationThis documentation may contain links to Web sites of other companies or organizations that Oracle does not own or control. Oracle neither evaluates nor makes any representations regarding the accessibility of these Web sites.

vi
TTY Access to Oracle Support ServicesTo reach AT&T Customer Assistants, dial 711 or 1.800.855.2880. An AT&T Customer Assistant will relay information between the customer and Oracle Support Services at 1.800.223.1711. Complete instructions for using the AT&T relay services are available at http://www.consumer.att.com/relay/tty/standard2.html. After the AT&T Customer Assistant contacts Oracle Support Services, an Oracle Support Services engineer will handle technical issues and provide customer support according to the Oracle service request process.
Related DocumentsFor more information, see the following documents in the Oracle Other Product One Release 7.0 documentation set or in the Oracle Other Product Two Release 6.1 documentation set:
■ Oracle BPEL Process Manager User's Guide
■ Oracle BPEL Process Manager Installation Guide
ConventionsThe following text conventions are used in this document:
Convention Meaning
boldface Boldface type indicates graphical user interface elements associated with an action, or terms defined in text or the glossary.
italic Italic type indicates book titles, emphasis, or placeholder variables for which you supply particular values.
monospace Monospace type indicates commands within a paragraph, URLs, code in examples, text that appears on the screen, or text that you enter.

Introduction 1-1
1Introduction
This chapter provides an overview of Oracle Application Server adapters. It contains the following topics:
■ Oracle Application Server Adapter Overview
■ Oracle Application Server Adapter System Requirements
Oracle Application Server Adapter OverviewThe OracleAS Adapters CD enables you to install the following types of adapters:
■ Packaged-Application Adapters
■ Legacy Adapters
■ Oracle Application Server Components Integration with Adapters
■ Types of Installation
Packaged-Application AdaptersPackaged-application adapters integrate Oracle Application Server with various packaged applications, such as SAP and Siebel. These adapters include OracleAS Adapter for PeopleSoft, OracleAS Adapter for SAP R3, OracleAS Adapter for mySAP ERP, OracleAS Adapter for Siebel, and OracleAS Adapter for J.D. Edwards.
Table 1–1 describes the packaged-application adapters.
Note: In the current release, OracleAS Adapter for mySAP ERP adapter would be preferred over OracleAS Adapter for SAP R3, if you are installing adapters from scratch because of it’s backward compatibility
Table 1–1 Oracle Application Server Adapters for Packaged Applications
Adapter Description
OracleAS Adapter for J.D. Edwards Provides comprehensive, bidirectional, and standards-based connectivity to J.D.Edwards applications
OracleAS Adapter for PeopleSoft Provides unique features, such as the support for J2CA and Web Service standards, for creating an open and reusable service-oriented architecture that offers a complete connectivity solution for PeopleSoft applications

Oracle Application Server Adapter Overview
1-2 Oracle Application Server Adapter Installation Guide
Legacy AdaptersLegacy adapters integrate Oracle Application Server with legacy and mainframe applications. These adapters include OracleAS Adapter for Tuxedo, OracleAS Adapter for CICS, OracleAS Adapter for VSAM, OracleAS Adapter for IMS/TM, and OracleAS Adapter for IMS/DB.
Table 1–2 describes legacy adapters. These adapters are deployed as J2CA resource adapters within the OC4J container during installation.
OracleAS Adapter for SAP R3 Exchanges real-time business data between SAP systems and other applications, databases, or external business partner systems.
OracleAS Adapter for Siebel Connects Oracle Application Server to a Siebel system by providing unique features that minimize the implementation effort.
OracleAS Adapter for mySAP ERP Connects Oracle Application Server to an SAP system through OracleAS Adapter for mySAP ERP (OracleAS Adapter for mySAP) to provide connectivity and carry out interactions on an SAP system.
OracleAS Adapter for mySAP ERP is a part of the same installation as that of the SAP adapter. In addition, mySAP ERP adapter is backward compatible to all versions supported by the SAP adapter.
Note: Verify the certification matrix and the Statement of direction (SOD) for both mySAP ERP and SAP R/3 before installing.
Table 1–2 Oracle Application Server Adapters for Legacy Applications
Adapter Description
OracleAS Adapter for Tuxedo Models services running on the BEA Tuxedo application server. Captures and maintains a metadata schema for the Tuxedo system by importing Tuxedo metadata and transforming this metadata into mapping definitions for Oracle Connect.
OracleAS Adapter for CICS Connects Oracle Application Server with CICS. This adapter supports two-phase commit and can fully participate in a distributed transaction.
OracleAS Adapter for VSAM Enables access to VSAM data managed by CICS or directly. This adapter implements interactions as parameterized SQL with the parameters forming the input record, and with the output (in cases where there is an output) aggregated into an XML document forming the output record.
OracleAS Adapter for IMS/TM Provides access to MPP based IMS/TM transactions. Each OracleAS Adapter for IMS/TM outbound interaction is mapped to a specific IMS/TM transaction.
OracleAS Adapter for IMS/DB Captures and maintains a metadata schema for IMS/DB by importing various IMS definition files such as a PSB file, DBD files, and COBOL copybooks.
Table 1–1 (Cont.) Oracle Application Server Adapters for Packaged Applications
Adapter Description

Oracle Application Server Adapter Overview
Introduction 1-3
Oracle Application Server Components Integration with AdaptersThe Oracle Application Server adapters enable you to integrate packaged, legacy, and mainframe applications with various Oracle Application Server components, such as Oracle BPEL Process Manager and Oracle Enterprise Service Bus. The Oracle Application Server adapters for technology applications and Oracle AS Adapter for Oracle Applications are packaged with the BPEL Process Manager installation.
Table 1–3 describes the Oracle Application Server components that can be integrated with adapters. Adapters are certified to work with the SOA Suite, Oracle Enterprise Service Bus, and Oracle BPEL Process Manager.
OracleAS CDC Adapter for Adabas
Captures and delivers changes (such as insert, update, and delete operations) made to data in Adabas data sources.
OracleAS CDC Adapter for DB2 Captures and delivers changes (such as insert, update, and delete operations) made to data in DB2 data sources.
OracleAS CDC Adapter for IMS/DB
Captures and delivers changes (such as insert, update, and delete operations) made to data in IMS/DB data sources.
OracleAS CDC Adapter for SQL Server
Captures and delivers changes (such as insert, update, and delete operations) made to tables in SQL Server 2000 and 2005.
OracleAS CDC Adapter for VSAM Captures and delivers changes (such as insert, update, and delete operations) made to data in VSAM data sources.
Table 1–3 Oracle Application Server Component Integration with Adapters
Component Description
Oracle Application Server Portal
Combines a declarative environment for creating a portal Web interface, publishing and managing information, accessing dynamic data, and customizing the portal experience, with an extensible framework for J2EE-based application access. Using OracleAS Portal, organizations can provide employees, partners, and suppliers with the information they need and the flexibility to create views tailored to each community.
Oracle Containers for J2EE (OC4J)
The J2EE server component of Oracle Application Server written entirely in Java that runs on the standard Java Development Kit (JDK) Java Virtual Machine (JVM). OC4J includes a JSP Translator, a Java servlet container, and an Enterprise JavaBeans container.
Oracle BPEL Process Manager Enables organizations to model and deploy business processes based on the Business Process Execution Language for Web Services (BPEL) standard. Using Oracle BPEL Process Manager, organizations can reduce the cost and complexity of integration projects and increase their strategic value.
Table 1–2 (Cont.) Oracle Application Server Adapters for Legacy Applications
Adapter Description

Oracle Application Server Adapter Overview
1-4 Oracle Application Server Adapter Installation Guide
Types of InstallationYou can use the following two types of installation for Oracle Application Server adapters:
■ Design time and Run time
■ Design time
After selecting an installation type during installation, select the type of adapter you want to install. Table 1–4 describes the types of installation.
Packaged-application adapters can be deployed as a:
■ J2CA 1.0 resource adapter and test servlet for J2CA deployments
Oracle Enterprise Service Bus An enterprise service bus moves data among multiple endpoints, both within and outside of an enterprise. It uses open standards to connect, transform, and route business documents (as Extensible Markup Language (XML) messages), among disparate applications. It enables monitoring and management of business data, with minimal impact on existing applications. An enterprise service bus is the underlying infrastructure for delivering a service-oriented architecture (SOA) and event-driven architecture (EDA).
Table 1–4 Types of Installation
Installation Type Description
Design time and Run time
Installs the following design time and run time components:
■ Design time components
Installs Application Explorer.
Note: For legacy applications, the design-time components are not installed.
■ Run-time components
Deploys the following runtime components automatically:
– J2CA deployment for packaged applications
– BSE deployment for packaged applications
– J2CA legacy adapter for connecting with Oracle Connect engine running on legacy platforms
Note: You need to install Oracle Studio on Windows and Oracle Connect on the required legacy platform. These are not components of Oracle Universal Installer, but part of the Adapters CD.
Design time Installs only the Application Explorer design time component. None of the run-time components are deployed.
Note: This installation type does not require J2EE and Web Cache or any other Middle Tier installation type.
Table 1–3 (Cont.) Oracle Application Server Component Integration with Adapters
Component Description

Oracle Application Server Adapter Overview
Introduction 1-5
■ Web services servlet within the OC4J container, which is known as OracleAS Adapter Business Services Engine (BSE)
The OracleAS Adapter Application Explorer tool is also provided for configuring OracleAS adapters for packaged applications (for both J2CA and BSE deployments).
Legacy adapters can be deployed as a J2CA 1.0 resource adapter. To install Oracle Connect for legacy adapters, refer to the sections described in Table 1–5. These sections describe how to install Oracle Connect and Oracle Studio from the CD-ROM and how to configure Oracle Connect using Oracle Studio.
Table 1–5 Installing Oracle Connect
Legacy Adapter Refer to
OracleAS Adapter for Tuxedo The Installing and Configuring OracleAS Adapter for Tuxedo chapter in Oracle Application Server Adapter for Tuxedo User’s Guide
OracleAS Adapter for CICS The Installing and Configuring OracleAS Adapter for CICS chapter in Oracle Application Server Adapter for CICS User’s Guide
OracleAS Adapter for VSAM The Installing and Configuring OracleAS Adapter for VSAM chapter in Oracle Application Server Adapter for VSAM User’s Guide
OracleAS Adapter for IMS/TM The Installing and Configuring OracleAS Adapter for IMS/TM chapter in Oracle Application Server Adapter for IMS/TM User’s Guide
OracleAS Adapter for IMS/DB The Installing and Configuring the OracleAS Adapter for IMS/DB chapter in Oracle Application Server Adapter for IMS/DB User’s Guide
OracleAS CDC Adapter for Adabas Captures and delivers changes (such as insert, update, and delete operations) made to data in Adabas data sources.
OracleAS CDC Adapter for DB2 Captures and delivers changes (such as insert, update, and delete operations) made to data in DB2 data sources.
OracleAS CDC Adapter for IMS/DB Captures and delivers changes (such as insert, update, and delete operations) made to data in IMS/DB data sources.
OracleAS CDC Adapter for SQL Server
Captures and delivers changes (such as insert, update, and delete operations) made to tables in SQL Server 2000 and 2005.
OracleAS CDC Adapter for VSAM Captures and delivers changes (such as insert, update, and delete operations) made to data in VSAM data sources.
Oracle Application Server Adapter System Requirements
1-6 Oracle Application Server Adapter Installation Guide
Oracle Application Server Adapter System RequirementsThe following sections describe the system requirements for installing Oracle Application Server adapters:
■ Hardware Requirements
■ Software Requirements
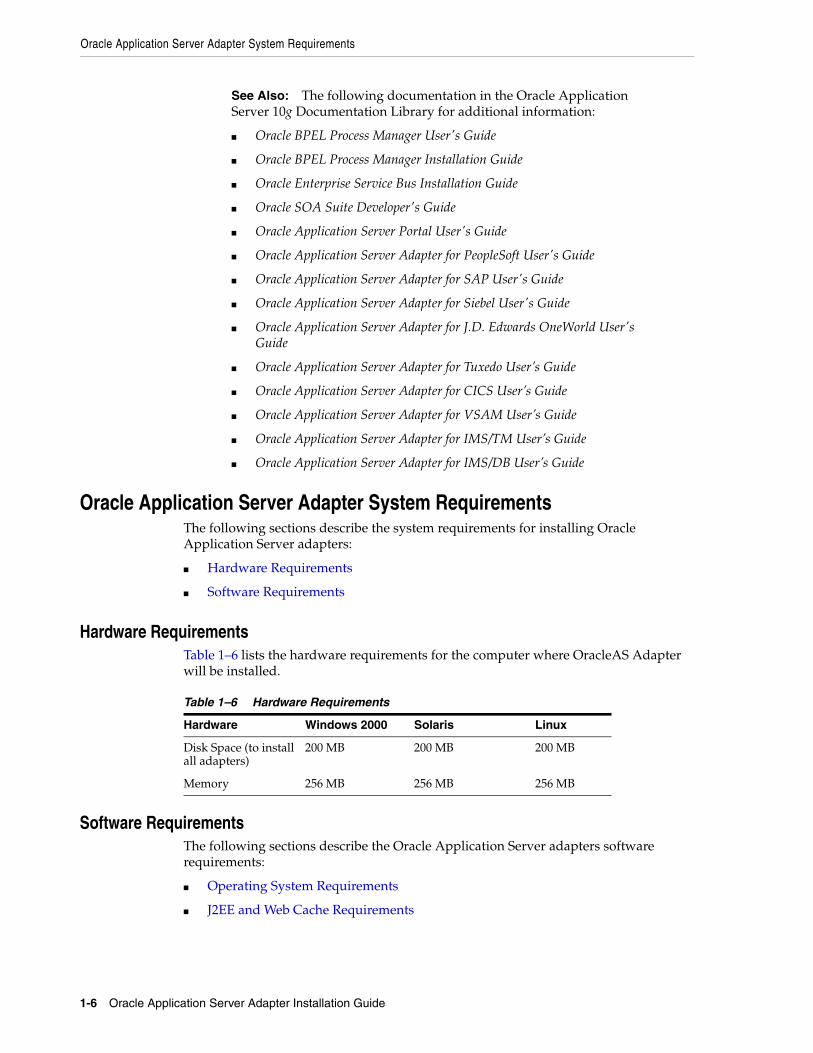
Hardware RequirementsTable 1–6 lists the hardware requirements for the computer where OracleAS Adapter will be installed.
Software RequirementsThe following sections describe the Oracle Application Server adapters software requirements:
■ Operating System Requirements
■ J2EE and Web Cache Requirements
See Also: The following documentation in the Oracle Application Server 10g Documentation Library for additional information:
■ Oracle BPEL Process Manager User's Guide
■ Oracle BPEL Process Manager Installation Guide
■ Oracle Enterprise Service Bus Installation Guide
■ Oracle SOA Suite Developer's Guide
■ Oracle Application Server Portal User's Guide
■ Oracle Application Server Adapter for PeopleSoft User's Guide
■ Oracle Application Server Adapter for SAP User's Guide
■ Oracle Application Server Adapter for Siebel User's Guide
■ Oracle Application Server Adapter for J.D. Edwards OneWorld User's Guide
■ Oracle Application Server Adapter for Tuxedo User’s Guide
■ Oracle Application Server Adapter for CICS User’s Guide
■ Oracle Application Server Adapter for VSAM User’s Guide
■ Oracle Application Server Adapter for IMS/TM User’s Guide
■ Oracle Application Server Adapter for IMS/DB User’s Guide
Table 1–6 Hardware Requirements
Hardware Windows 2000 Solaris Linux
Disk Space (to install all adapters)
200 MB 200 MB 200 MB
Memory 256 MB 256 MB 256 MB

Oracle Application Server Adapter System Requirements
Introduction 1-7
Operating System RequirementsTable 1–7 lists the operating system requirements for the computer where Oracle Application Server adapters will be installed.
J2EE and Web Cache RequirementsIf you want to use the Complete installation type, then the J2EE and Web Cache installation type of Oracle Application Server must first be installed. You then install the Complete installation type of Oracle Application Server adapters into the same Oracle home.
The design time installation type does not require J2EE and Web Cache or any other Middle Tier installation type.
Table 1–7 Operating System Requirements
Operating System Version
HP Tru64 HP Tru64 UNIX (Alpha) 5.1b
HP-UX HP-UX (PA-RISC) 11.11, 11.23; HP-UX (Itanium-2)11.11, 11.23
IBM AIX AIX (POWER) version 5.2
Linux (x86) Red Hat Enterprise Linux 2.1, 3.0
SuSE SLES8, SLES9
See Also: Oracle Application Server Installation Guide for Microsoft Windows for Linux x86 for information about any required operating system patches and packages and kernel parameter settings
Sun SPARC Solaris Sun SPARC Solaris 8 and 9
See Also: Oracle Application Server Installation Guide for Microsoft Windows for Solaris for information about any required operating system patches and packages, swap space requirements, and kernel parameter settings
Microsoft Windows Windows XP Professional, Windows 2000 (SP3 or later)
See Also: Oracle Application Server Installation Guide for Microsoft Windows for Windows for information on processor, TEMP directory, virtual memory, and swap space requirements
Note: To install Oracle Application Server adapters with Oracle BPEL Process Manager, you need to use the BPEL Process Manager patch 1.

Oracle Application Server Adapter System Requirements
1-8 Oracle Application Server Adapter Installation Guide
Installation and Configuration 2-1
2Installation and Configuration
This chapter describes how to install and configure Oracle Application Server adapters. It contains the following topics:
■ Installation Tasks
■ Postinstallation Tasks for Packaged-Application Adapters
■ Postinstallation Tasks for Legacy Adapters
■ Deinstallation Tasks
Installation TasksTo install Oracle Application Server 10.1.3.4, you must first install Oracle Application Server 10.1.3.1, and then apply Oracle Application Server 10g Release 3 (10.1.3) Patch Set 4 (10.1.3.4.0).
This section includes the following topics:
■ Installing Oracle Application Server 10.1.3.1
■ Applying Oracle Application Server 10g Release 3 (10.1.3) Patch Set 4 (10.1.3.4.0)
Installing Oracle Application Server 10.1.3.1 Oracle Application Server can be installed with the following:
■ Oracle Application Server SOA Suite
■ Oracle BPEL Process Manager
■ Oracle Enterprise Service Bus
■ J2EE and Web Cache
To install Oracle Application Server adapters, perform the following steps:
1. If you have already installed Oracle BPEL Process Manager (BPEL) and Oracle Enterprise Service Bus (ESB) as part of the SOA suite, skip this step and move to Step 3.
However, if you have installed the J2EE and Web Cache installation type of Oracle Application Server, then you must modify the {J2EE_HOME}/config/server.xml:
<shared-library name="oracle.bpel.common" version="10.1.3"> <code-source path="/temp/dummy/"/></shared-library>

Installation Tasks
2-2 Oracle Application Server Adapter Installation Guide
If you do not modify server.xml, then you may encounter an error with the JCA-APP-Adapter not deploying during installation.
2. If you are installing on Solaris or Linux, then refer to Oracle Application Server Installation Guide 10g for Solaris Operating System and Oracle Application Server Installation Guide for hp HP-UX PA-RISC, and Linux x86 for specific operating system for instructions to:
■ Set the mount point for the CD-ROM
If you are installing on Microsoft Windows, then refer to Oracle Application Server Installation Guide for Microsoft Windows for instructions to:
■ Start Oracle Universal Installer
3. Insert the OracleAS Adapter CD-ROM.
4. Navigate to the software directory of the OracleAS Adapter CD-ROM.
5. Start Oracle Universal Installer. The following table describes the step for starting Oracle Universal Installer.
The Welcome screen is displayed.
6. Click Next. The Specify File Locations screen is displayed as shown in Figure 2–1.
Figure 2–1 Specify File Locations
Platform Step
Solaris or Linux Enter the following command at the operating system prompt:
./runInstaller
Windows Click setup.exe.

Installation Tasks
Installation and Configuration 2-3
7. Enter the Oracle Home name, where you want to install OracleAS Adapter in the Destination fields. Do not change the directory path in the Source field. This is the location of the OracleAS Adapter installation files.
8. Click Next. The Select Installation Type screen is displayed.
9. Select one of the following types of installation type:
■ Design time and Run time
■ Design time
10. Click Next. The Available Product Components screen is displayed, as shown in Figure 2–2.
Figure 2–2 Available Products Components
11. Select the adapters you want to install from the following list:
■ OracleAS Adapter for J.D. Edwards OneWorld XE 10.1.3.1.0
■ OracleAS Adapter for PeopleSoft 10.1.3.1.0
■ OracleAS Adapter for SAP R/3 10.1.3.1.0
■ OracleAS Adapter for Siebel 10.1.3.1.0
■ OracleAS Adapter for CICS 10.1.3.1.0
■ OracleAS Adapter for IMS/DB 10.1.3.1.0
■ OracleAS Adapter for IMS/TM 10.1.3.1.0
■ OracleAS Adapter for Tuxedo 10.1.3.1.0
■ OracleAS Adapter for VSAM 10.1.3.1.0
12. Click Next.
Installation Tasks
2-4 Oracle Application Server Adapter Installation Guide
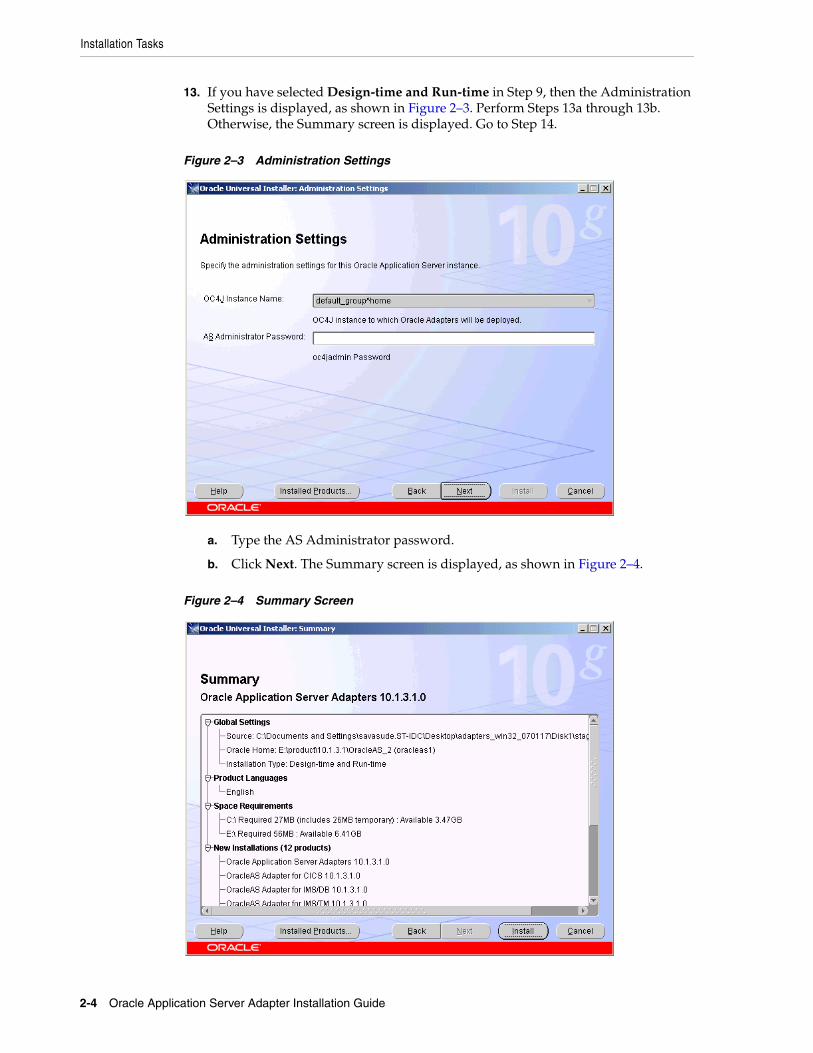
13. If you have selected Design-time and Run-time in Step 9, then the Administration Settings is displayed, as shown in Figure 2–3. Perform Steps 13a through 13b. Otherwise, the Summary screen is displayed. Go to Step 14.
Figure 2–3 Administration Settings
a. Type the AS Administrator password.
b. Click Next. The Summary screen is displayed, as shown in Figure 2–4.
Figure 2–4 Summary Screen

Installation Tasks
Installation and Configuration 2-5
14. Review specific details on the Summary screen, including the disk requirements to ensure that you have sufficient disk space.
15. Click Install.
After the installation is complete, the following postinstallation configuration assistants are started to automatically configure OracleAS Adapter, as shown in Figure 2–5:
■ Deploy JCA Legacy Adapters
■ Deploy JCA Application Adapters
■ Deploy JCA Application Adapters Test
■ Deploy Web Services Application Adapters
Figure 2–5 Configuration Assistants Screen
16. If installation and configuration are successful, then the End of Installation screen is displayed. The selected adapters are installed in the adapters/application directory of your Oracle home for packaged application adapters.
For details about the installation, refer to the latest installActionsYEAR_MM_DD_TIME.log file located in the oraInventory_location/logs directory on UNIX or the Program Files\Oracle\Inventory\logs directory on Windows.
Applying Oracle Application Server 10g Release 3 (10.1.3) Patch Set 4 (10.1.3.4.0)The next task is to apply Oracle Application Server 10g Release 3 (10.1.3) Patch Set 4 (10.1.3.4.0).
This section describes the procedure for Oracle Application Server 10g Release 3 (10.1.3) Patch Set 4 (10.1.3.4.0). It includes the following steps:
Installation Tasks
2-6 Oracle Application Server Adapter Installation Guide
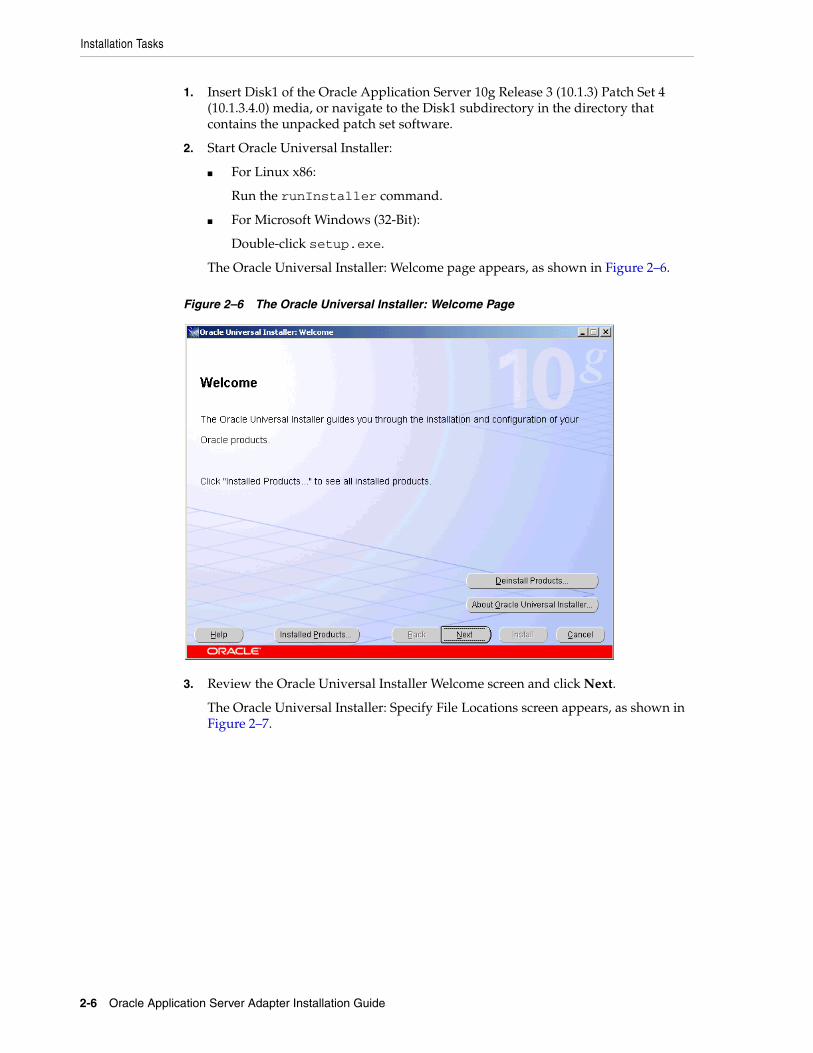
1. Insert Disk1 of the Oracle Application Server 10g Release 3 (10.1.3) Patch Set 4 (10.1.3.4.0) media, or navigate to the Disk1 subdirectory in the directory that contains the unpacked patch set software.
2. Start Oracle Universal Installer:
■ For Linux x86:
Run the runInstaller command.
■ For Microsoft Windows (32-Bit):
Double-click setup.exe.
The Oracle Universal Installer: Welcome page appears, as shown in Figure 2–6.
Figure 2–6 The Oracle Universal Installer: Welcome Page
3. Review the Oracle Universal Installer Welcome screen and click Next.
The Oracle Universal Installer: Specify File Locations screen appears, as shown in Figure 2–7.

Installation Tasks
Installation and Configuration 2-7
Figure 2–7 The Oracle Universal Installer: Specify File Locations Page
4. Enter the following details in the Specify File Locations page.
■ Source: This is the full path to the products.xml file from which the product will be installed. If you started the installer by using the runInstaller command or the setup.exe file, then the installer detects and uses the default values of the products.xml file. Do not change the path.
■ Name: Select the name of the Oracle home you want to patch from the drop-down menu.
■ Path: This field is filled in automatically when you select an existing Oracle home from the Name drop-down menu.
■ Browse: Use this button to navigate the file system and select the source or destination locations.
5. Click Next after specifying the file location.
The Administrator (oc4jadmin) Password page appears, as shown in Figure 2–8.

Installation Tasks
2-8 Oracle Application Server Adapter Installation Guide
Figure 2–8 The Administrator (oc4jadmin) Password Page
6. Enter the oc4jadmin user password for the Oracle Application Server instance that is being patched, and then click Next.
A warning informing that the middle tier will be shutdown appears, as shown in Figure 2–9.
Figure 2–9 The Warning Page
7. Click OK.
The Summary page appears, as shown in Figure 2–10.

Installation Tasks
Installation and Configuration 2-9
Figure 2–10 The Oracle Universal Installer: Summary Page
8. Verify your selections and click Install.
The Install page appears showing the progress of the patch set installation appears, as shown in Figure 2–11.
Figure 2–11 The Oracle Universal Installer: Install Page
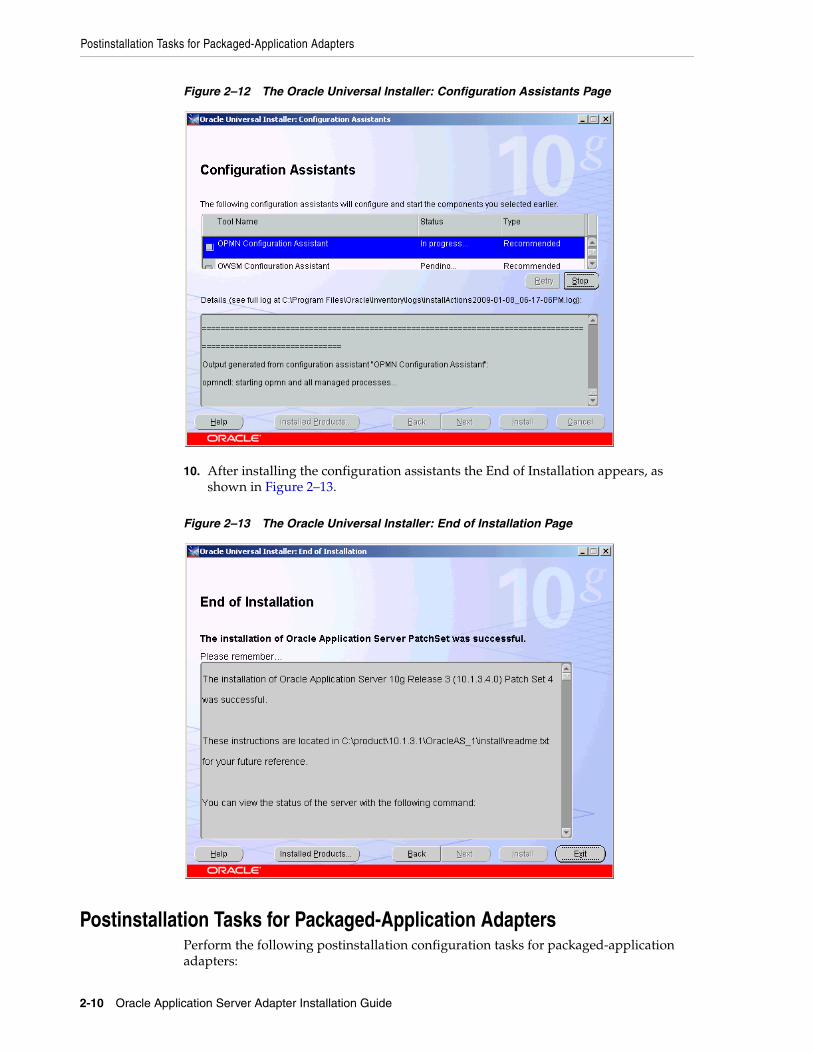
9. After the patch set is installed, the configuration Assistants configure components automatically. The Configuration Assistants page appears, as shown in Figure 2–12.
Postinstallation Tasks for Packaged-Application Adapters
2-10 Oracle Application Server Adapter Installation Guide
Figure 2–12 The Oracle Universal Installer: Configuration Assistants Page
10. After installing the configuration assistants the End of Installation appears, as shown in Figure 2–13.
Figure 2–13 The Oracle Universal Installer: End of Installation Page
Postinstallation Tasks for Packaged-Application AdaptersPerform the following postinstallation configuration tasks for packaged-application adapters:

Postinstallation Tasks for Packaged-Application Adapters
Installation and Configuration 2-11
■ Installing Patches
■ Copying the Library Files
■ Verifying BSE deployment
■ Configuring the J2CA deployment
■ Verifying the J2CA Installation
■ Directory Structure
■ Starting Application Explorer
■ Configuring the Database Repository for J2CA
■ Modifying server.xml
■ Modifying oc4j-ra.xml
■ Configuring HP Itanium 64 Machine for mySAP ERP Adapter
Installing PatchesThe first postinstallation step is to install the following mandatory patches available on metalink:
■ Patch 5717193 for Tuxedo adapters.
■ Patch 5895585 for Application Adapters: mySAP, Siebel, Peoplesoft and J.D. Edwards OneWorld XE.
■ Patch 5895598 for Legacy Adapters: Tuxedo, CICS, VSAM, IMS/TM and IMS/DB.
Copying the Library FilesPackaged-application adapters require you to copy library files to directories.
1. Copy the library files for these adapters into the ORACLE_HOME/adapter/application/lib directory.
Note: The directory paths mentioned in this guide follow UNIX conventions. For example, forward slashes (/) are used.
If you are using OracleAS Adapter on Windows, then modify the directory paths as required.
Adapter Library Files
OracleAS Adapter for J.D. Edwards OneWorld XE
J.D. Edwards OneWorld Java-based ThinNet API
This API is distributed as .jar files on the J.D. Edwards OneWorld installation media. These libraries can vary based on the J.D. Edwards OneWorld release and include the following files:
■ Kernel.jar
■ Connector.jar
Refer to Oracle Application Server Adapter for J.D. Edwards OneWorld User's Guide for any additional steps required for the J.D. Edwards OneWorld XE system.
Postinstallation Tasks for Packaged-Application Adapters
2-12 Oracle Application Server Adapter Installation Guide
OracleAS Adapter for PeopleSoft
■ PeopleSoft Java Object Adapter file (psjoa.jar)
This file provides a low-level interface between client applications and PeopleSoft. This file is provided with PeopleSoft in the PeopleSoft_home_directory/web/PSJOA directory.
The psjoa.jar file is different for every version of PeopleSoft. When you upgrade your Peopletools release, ensure that you copy the psjoa.jar file for the new release into the lib directory and restart all components.
■ pstools.properties
This file is required for PeopleSoft 8.1x. This file belongs in the PeopleSoft_home_directory/web/jmac directory.
Refer to Oracle Application Server Adapter for PeopleSoft User's Guide for any additional steps required for PeopleSoft.
Adapter Library Files

Postinstallation Tasks for Packaged-Application Adapters
Installation and Configuration 2-13
OracleAS Adapter for SAP (R/3 and mySAP ERP)
The SAP Java connector (typically named sapjco.jar)
Information on the current set of SAP connectors is available at http://service.sap.com/connectors.
A valid SAP service ID is required to access this file. Follow the instructions provided on the SAP Java Connector (SAP JCo) overview page to download the current version. For more information, contact your SAP BASIS Administrator.
Using the archive tool, open the archive containing the SAP JCo and extract the runtime files. The file names can vary by operating system, but typically are contained in the root of the archive.
Note: All operating systems: You must place the sapjco.jar file in the ORACLE_HOME\adapters\application\lib directory. Then, you must add the sapjco.jar to the Oracle Application Server classpath.
On Windows, librfc32.dll should be placed in the %WINDIR%\system32 directory and sapjcorfc.dll should be placed in the same directory as sapjco.jar (ORACLE_HOME\adapters\application\lib). On other platforms, use the corresponding location. These library files vary by operating system. For example:
Linux/Solaris/OS400:
■ libsapjcorfc.so
■ librfccm.so
HP-UX:
■ librfccm.sl
■ libsapjcorfc.sl
AIX:
■ librfccm.so
■ libsapjcorfc.so
On UNIX platforms, the directory in which the shared library files are located must be added to the shared library variable applicable to the operating system. The following is a list of platforms and associated variables:
AIX:
■ LIBPATH
HP-UX:
■ SHLIB_PATH
Other UNIX Platforms
■ LD_LIBRARY_PATH
Solaris: The following are the two supported methods for specifying the SAP library files:
■ Copy the SAP JCO files (sapjco.jar, librfccm.so, and libsapjcorfc.so) to ORACLE_HOME/jdk/jre/lib/sparc/server
■ Copy the SAP JCO files to /usr/j2sdk1.4.2_09/jre/lib/sparcv9/server
Alternatively, you may add the path to these files to your environment variable definition using the Application Server Control console. For details on application server administration options, see Oracle Application Server Administrator's Guide.
Refer to Oracle Application Server Adapter for SAP User's Guide for any additional steps required for SAP R/3 and mySAP ERP.
Adapter Library Files
Postinstallation Tasks for Packaged-Application Adapters
2-14 Oracle Application Server Adapter Installation Guide
Verifying BSE deploymentTo verify the OracleAS Adapter Business Services Engine installation:
1. Open the following page in your Web browser:
http://hostname:port/ibse/IBSEServlet/
where hostname is the name of the Oracle Application Server host and port is the HTTP port of the Oracle Application Server. For example:
http://localhost:80/ibse/IBSEServlet
The OracleAS Adapter Business Services Engine home page opens, as shown in Figure 2–14. This page enables you to test the sample Web server installed with the OracleAS Adapter Business Services Engine.
OracleAS Adapter for Siebel
For Siebel 6.3.x and later, the Siebel Java Data Bean API, which is distributed as .jar files with the Siebel Thin Client
These libraries vary by Siebel release in both content and name. Therefore, the Siebel Thin Client that comes with the target Siebel system must always be used with the adapter. For example:
For Siebel 6.3.x:
■ SiebelTcOM.jar
■ SiebelTcCommon.jar
■ SiebelTC_enu.jar
■ SiebelDataBean.jar
For Siebel 7.0.3:
■ SiebelJI_Common.jar
■ SiebelJI_enu.jar
For Siebel 7.5.2:
■ SiebelJI_Common.jar
■ SiebelJI_enu.jar
■ SiebelJI.jar
For Siebel 7.7:
■ SiebelJI_enu.jar
■ Siebel.jar
For Siebel 7.8:
■ SiebelJI_enu.jar
■ Siebel.jar
The Siebel COM-based API (Windows only) requires the Siebel Thin Client to be installed and accessible to the Siebel adapter.
Note: The following previously listed files are for English language installations:
■ SiebelTC_enu.jar
■ SiebelJI_enu.jar
For non-English installations, the last three letters (_enu) vary.
If you are using the MQ Series as a transport, then you also need to use com.ibm.mq.jar file.
Refer to Oracle Application Server Adapter for Siebel User's Guide for any additional steps required for Siebel.
Adapter Library Files

Postinstallation Tasks for Packaged-Application Adapters
Installation and Configuration 2-15
Figure 2–14 OracleAS Adapter Business Services Engine Home Page
2. Click IVP, iwayivp, ivp, and Invoke.
An XML response similar to the following is displayed in your browser:
<?xml version="1.0" encoding="UTF-8" ?>- <SOAP-ENV:Envelope xmlns:xsd="http://www.w3.org/2001/XMLSchema" xmlns:SOAPENV="http://schemas.xmlsoap.org/soap/envelope/"xmlns:xsi="http://www.w3.org/2001/XMLSchema-instance">- <SOAP-ENV:Body>- <ivpResponse xmlns="urn:oraclesoftware:ibse:jul2003:ivp:response"cid="A0328ED84ABFA055C4F64B8039C991AA"><CurrentTime>2004-01-05T19:15:48Z</CurrentTime><Version>IWAY5.5</Version></ivpResponse></SOAP-ENV:Body></SOAP-ENV:Envelope>
Configuring the J2CA deploymentOracleAS Adapter JCA supports file and database repository. The default repository is a file repository. You can create the database repository by running the iwse.ora SQL script in the adapters/application/etc directory.
If you selected the Design-time and Run-time installation type, then Oracle Universal Installer automatically deploys OracleAS Adapter JCA version 1.0 and provides a default oc4j-ra.xml configuration file. This file contains a default ManagedConnectionFactory with eis/Oracle JCAAdapter/DefaultConnection as the JNDI name:
<connector-factory location="eis/OracleJCAAdapter/DefaultConnection" connector-name="IWAFJCA10">
Postinstallation Tasks for Packaged-Application Adapters
2-16 Oracle Application Server Adapter Installation Guide
<config-property name="IWayHome" value="../../adapters/application"/> <config-property name="IWayConfig" value="jca_sample"/> <config-property name="IWayRepoURL" value=""/> <config-property name="IWayRepoUser" value=""/> <config-property name="IWayRepoPassword" value=""/> <config-property name="logLevel" value="debug"/></connector-factory>
You can create a different ManagedConnectionFactory by editing the oc4j-ra.xml configuration file. To do this:
1. Open the ORACLE_HOME/j2ee/OC4J_BPEL/application-deployments/default/jca-app-adapter/oc4j-ra.xml file.
2. Change the iWayConfig parameter to point to the corresponding OracleAS Adapter JCA version 1.0 repository project.
3. Set the JNDI location to the correct value. For example:
<connector-factory location="eis/OracleJCAAdapter/MyConnection" connector-name="IWAFJCA10"> <config-property name="IWayHome" value="../../adapters/application"/> <config-property name="IWayConfig" value="My_jca_config"/> <config-property name="IWayRepoURL" value=""/> <config-property name="IWayRepoUser" value=""/> <config-property name="IWayRepoPassword" value=""/> <config-property name="logLevel" value="debug"/> </connector-factory>
Verifying the J2CA InstallationTo verify the J2CA version 1.0 installation:
1. Open the ORACLE_HOME/j2ee/OC4J_BPEL/applications/jca-app-adapter-test /iwafjca/WEB-INF/web.xml file.
2. Modify the deployment descriptor web.xml file to point to the JNDI location of the ManagedConnectionFactory defined in Step 2 of "Configuring the J2CA deployment" on page 2-15.
You can access the OracleAS Adapter JCA test servlet using the following URL:
http://hostname:port/iwafjca
where hostname is the name of the Oracle Application Server host and port is the HTTP port of the Oracle Application Server.
Directory StructureThe packaged application adapters are installed into the adapters/application subdirectory of your Oracle home directory. Table 2–1 shows the directory structure. The license.xml file is also installed in the application directory.
Note: The IWayRepoURL, IWayRepoUser, and IWayRepoPassword parameters are used for a database repository only.

Postinstallation Tasks for Packaged-Application Adapters
Installation and Configuration 2-17
The directory\legacy folder contains the .rar file for legacy adapters. In addition, the adapters\lib folder contains the orabpel-adapters.jar file.
Starting Application ExplorerUse Application Explorer to configure the OracleAS Adapter J2CA version 1.0 and OracleAS Adapter Business Services Engine repository projects. To start Application Explorer on Windows, From the Start menu, select Programs, OracleAS_home Adapters, and then select Application Explorer.
In addition, on Windows, iaexplorer.bat is found under OracleAS_home\adapters\application\tools
Where OracleAS_home is the directory where Oracle Application Server is installed.
On UNIX, load the iwae.sh script, found under OracleAS_home/adapters/application/tools
Where OracleAS_home is the directory where Oracle Application Server is installed.
Configuring the Database Repository for J2CA1. Execute the iwse.ora SQL statement on the machine where database is
installed.
2. Create the jcatransport.properties file and save it in the following directory:
Oracle_Home\adapters\application\config\jca_sample
3. Enter values for iwafjca.repo.url, iwafjca.repo.user and iwafjca.repo.password fields in the newly created jcatransport.properties file, as shown in the following example:
iwafjca.repo.url=jdbc:oracle:thin:@90.0.0.51:1521:orcl
iwafjca.repo.user=scott
iwafjca.repo.password=scott1
4. Open the oc4j-ra.xml file in a text editor.
Table 2–1 Packaged Application Adapter Directory Structure
Subdirectory Description
bin Contains the install.xml file
config Contains the jca_sample subdirectory and the XML-file-based repository for the OracleAS Adapter J2CA
etc Contains the ibse.ear, iwafjca.ear, iwafjca.rar, and iwse.ora files
lib Contains library files
tools Contains the OracleAS Adapter Application Explorer graphical user interface
wsdl Contains the WSDL files generated by the user
Note: A user can create additional directories under the WSDL directory to organize the generated WSDL files.

Postinstallation Tasks for Packaged-Application Adapters
2-18 Oracle Application Server Adapter Installation Guide
5. Provide the JDBC connection information as a value for the IWAYRepo_URL property.
6. Provide a valid user name for the IWAYRepo_User property.
7. Provide a valid password for the IWAYRepo_Password property.
8. Save your changes to the oc4j-ra.xml file.
9. Alter the JDBC driver path in Application Explorer. Change the path shown in example1 to the path listed in example2:
Example1:
lcp=..\lib\orabpel-adapters.jar;C:\jdev\jdbc\lib\classes12.jar;C:\jdev\jdbc\lib\nls_charset12.jar;%lcp%
Example2:
lcp=..\lib\orabpel-adapters.jar;..\..\..\jdbc\lib\ojdbc14.jar;..\..\..\jdbc\lib\nls_charset12.jar;%lcp%
Modifying server.xmlYou must edit $ORACLE_HOME/j2ee/(container)/config/server.xml, where the container could be either home or oc4j_soa based on your installation. Typically, SOA Basic installation uses the home container while the SOA advanced installation uses the oc4j_soa container.
Perform the following steps to modify server.xml:
1. Create an entry for jca.app.adapter.libraries in server.xml. The required jar files should be added to this new library section. Typically these jar files are EIS library files delivered by respective EIS vendors.
The following is a sample entry into server.xml for jca.app.adapter.libraries:
<shared-library name="jca.app.adapter.libraries" version="1.0"library-compatible="true"><code-source path="C:\soadp1\adapters\application\lib\psjoa.jar"/><code-source path="C:\soadp1\adapters\application\lib\psGenCompF840Mi14.jar"/><code-source path="C:\soadp1\adapters\application\lib\sapjco.jar"/></shared-library>
2. You should import jca.app.adapter.library in the oracle.bpel.common section in the shared library of server.xml, as shown in the following example:
<import-shared-library name="jca.app.adapter.libraries"/>
Modifying oc4j-ra.xmlThe following are the steps to modify oc4j-ra.xml:
Note: In the preceding example substitute your oracle home in the path. Only jar files should be added in the preceding example. Additionally, *.so or *.dll files should be mentioned in PATH.
Postinstallation Tasks for Packaged-Application Adapters
Installation and Configuration 2-19
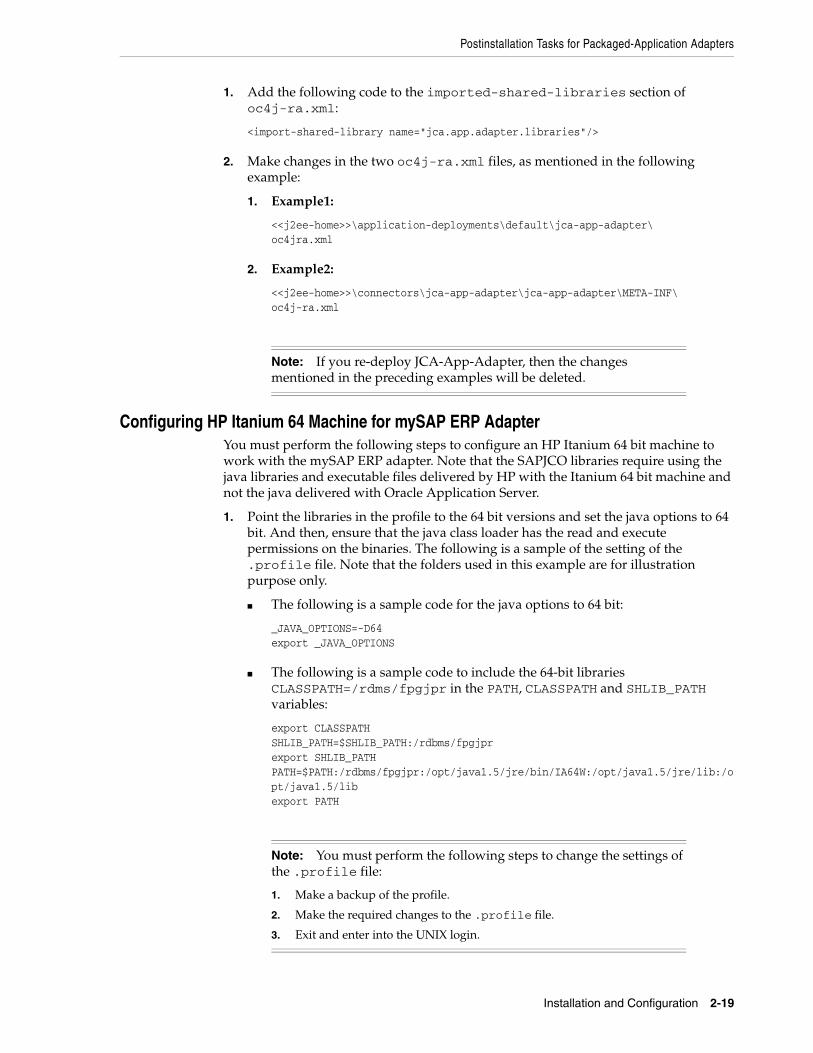
1. Add the following code to the imported-shared-libraries section of oc4j-ra.xml:
<import-shared-library name="jca.app.adapter.libraries"/>
2. Make changes in the two oc4j-ra.xml files, as mentioned in the following example:
1. Example1:
<<j2ee-home>>\application-deployments\default\jca-app-adapter\oc4jra.xml
2. Example2:
<<j2ee-home>>\connectors\jca-app-adapter\jca-app-adapter\META-INF\oc4j-ra.xml
Configuring HP Itanium 64 Machine for mySAP ERP AdapterYou must perform the following steps to configure an HP Itanium 64 bit machine to work with the mySAP ERP adapter. Note that the SAPJCO libraries require using the java libraries and executable files delivered by HP with the Itanium 64 bit machine and not the java delivered with Oracle Application Server.
1. Point the libraries in the profile to the 64 bit versions and set the java options to 64 bit. And then, ensure that the java class loader has the read and execute permissions on the binaries. The following is a sample of the setting of the .profile file. Note that the folders used in this example are for illustration purpose only.
■ The following is a sample code for the java options to 64 bit:
_JAVA_OPTIONS=-D64export _JAVA_OPTIONS
■ The following is a sample code to include the 64-bit libraries CLASSPATH=/rdms/fpgjpr in the PATH, CLASSPATH and SHLIB_PATH variables:
export CLASSPATHSHLIB_PATH=$SHLIB_PATH:/rdbms/fpgjprexport SHLIB_PATHPATH=$PATH:/rdbms/fpgjpr:/opt/java1.5/jre/bin/IA64W:/opt/java1.5/jre/lib:/opt/java1.5/libexport PATH
Note: If you re-deploy JCA-App-Adapter, then the changes mentioned in the preceding examples will be deleted.
Note: You must perform the following steps to change the settings of the .profile file:
1. Make a backup of the profile.
2. Make the required changes to the .profile file.
3. Exit and enter into the UNIX login.

Postinstallation Tasks for Legacy Adapters
2-20 Oracle Application Server Adapter Installation Guide
2. Set the permissions on the three files; sapjco.jar, libsapjcorfc.so, and librfccm.so to read and execute.
3. Point Oracle Application Server to the java file that was delivered with HP Itanium. It should not point to the java that was delivered with Oracle Application Server. To do this, you must modify the data id(<data id="java-bin" value="/opt/java1.5/jre/bin/IA64W/java"/>) in the oc4j_soa process type. You must set the new java home, as shown in the following example:
<process-type id="oc4j_soa" module-id="OC4J" status="enabled"> <module-data> <category id="start-parameters"> <data id="java-options" value="-server-XX:MaxPermSize=192M -ms512M -mx1024M -XX:AppendRatio=3-Djava.security.policy=$ORACLE_HOME/j2ee/oc4j_soa/config/java2.policy-Djava.awt.headless=true -Dhttp.webdir.enable=false-Doraesb.home=/rdbms/ora102/product/10.1.3.1/OracleAS_1/integration/esb-Dhttp.proxySet=false -Doc4j.userThreads=true -Doracle.mdb.fastUndeploy=60-Dorabpel.home=/rdbms/ora102/product/10.1.3.1/OracleAS_1/bpel-Xbootclasspath^/p:/rdbms/ora102/product/10.1.3.1/OracleAS_1/bpel/lib/orabpel-boot.jar -Dhttp.proxySet=false -Dfile.encoding=ISO8859_1-DAF_DEBUG_REC_CONV=true"/> <data id="java-bin" value="/opt/java1.5/jre/bin/IA64W/java"/> </category> <category id="stop-parameters"> <data id="java-options" value="-Djava.security.policy=$ORACLE_HOME/j2ee/oc4j_soa/config/java2.policy -Djava.awt.headless=true -Dhttp.webdir.enable=false"/> </category> </module-data> <start timeout="600" retry="2"/> <stop timeout="120"/> <restart timeout="720" retry="2"/> <port id="default-web-site" range="12501-12600" protocol="ajp"/> <port id="rmi" range="12401-12500"/> <port id="rmis" range="12701-12800"/> <port id="jms" range="12601-12700"/> <process-set id="default_group" numprocs="1"/> </process-type>
Postinstallation Tasks for Legacy AdaptersThis section describes the following postinstallation tasks for legacy adapters:
■ Installing OPatch 7408494
■ Configuring Run-Time Connections
■ Configuring Design-Time Connections
Note: The following are the steps to make changes to the opmn.xml file:
1. Shutdown Oracle Application Server.
2. Take a backup of the opmn.xml file.
3. Make the required changes to the opmn.xml file.
4. Restart Oracle Application Server.
Postinstallation Tasks for Legacy Adapters
Installation and Configuration 2-21
Installing OPatch 7408494This section describes how to install the OPatch 7408494 for legacy adapters. This section includes the following topics:
■ Preinstallation Tasks for OPatch 7408494
■ Installation Tasks for OPatch 7408494
■ Postinstallation Tasks for OPatch 7408494
■ Deinstallation Task for OPatch 7408494
Preinstallation Tasks for OPatch 7408494The following are the preinstallation tasks for OPatch 7408494:
1. Ensure that you have installed Adapter 10.1.3.1.
2. Ensure that your SOA installation is upgraded to 10.1.3.4.
3. If you are on standalone installation, then stop orabpel. Otherwise if you are on a mid-tier installation, then stop all processes running from your ORACLE_HOME including ASControl by running the following command:
$ORACLE_HOME/opmn/opmnctl stopall
4. Install SOA Patch 6325749, which is, available on metalink.oracle.com to update to Glue classes in Oracle BPEL Process Manager.
5. Backup the existing brand.bin file, if present, from $NAV_ROOT/bin/brand.bin because this file will be overwritten when this OPatch is installed. NAV_ROOT is the directory where Oracle Connect is installed.
Installation Tasks for OPatch 7408494The following are the steps to install OPatch 7408494:
1. Unzip the PSE container file by using the following command:
% unzip p7408494_101340_GENERIC.zip
2. Set your current directory to the directory where the patch is located by using the following command:
% cd 7408494
3. Ensure that the directory containing the OPatch script appears in your $PATH, and then run the following command:
% opatch apply
Postinstallation Tasks for OPatch 7408494The following are the postinstallation tasks for OPatch 7408494:
1. Restart orabpel if you are on standalone installation. Otherwise, restart all managed components if you are on mid-tier installation by using the following command:
$ORACLE_HOME/bin/opmn/opmnctl startall
2. Re-deploy the legacy adapters as this patch contains a new attunityResourceAdapter.rar file.
Postinstallation Tasks for Legacy Adapters
2-22 Oracle Application Server Adapter Installation Guide
3. Install the adapter components that you require, such as Oracle Studio and Oracle Connector. Refer to chapter, Installing Oracle Connect and Oracle Studio in the Oracle Application Server CDC Adapter for IMS/DB User’s Guide.
Deinstallation Task for OPatch 7408494Use the following command to deinstall OPatch 7408494:
% cd 7408494% opatch rollback -id 7408494
Configuring Run-Time ConnectionsPerform the following steps to configure run-time connections:
1. Edit the oc4j-ra.xml file present at the following location:
ORACLE_HOME\j2ee\OC4J_BPEL\application-deployments\default\jca-legacy-adapter
2. Set the following settings for each connection:
<oc4j-connector-factories> <connector-factory location=" " connector-name="Oracle Legacy Adapter"> <config-property name="userName" value=" "/> <config-property name="password" value=" "/> <config-property name="eisName" value=" "/> <config-property name="serverName" value=" "/> <config-property name="workspace" value=" "/> <config-property name="portNumber" value=" "/> <config-property name="persistentConnection" value=" "/> <config-property name="keepAlive" value=" "/> <config-property name="firewallProtocol" value=""/> <config-property name="connectTimeout" value=""/> <config-property name="encryptionProtocol" value=""/> <config-property name="encryptionKeyName" value=""/> <config-property name="encryptionKeyValue" value=""/> <config-property name="fakeXa" value="false"/> <config-property name="useNamespace" value="true"/> </connector-factory></oc4j-connector-factories>
The following table lists the properties that must be specified:
Note: If the Oracle inventory is not setup correctly this utility will fail. To check accessibility to the inventory use the command
% opatch lsinventory

Postinstallation Tasks for Legacy Adapters
Installation and Configuration 2-23
The following table lists the optional properties:
Property Description
location Specifies the JNDI location where Oracle Application Server should bind the connection factory instance for application components. It is mandatory that you specify the location as eis/legacy/eisName.
This convention is used by the design-time WSIL browser when it generates the legacy adapter service WSDLs containing the JNDI location (specifically for the adapterInstanceJndi attribute on the jca:address element); this is the same JNDI location that the runtime uses to acquire a connection. For example, if the eisName is DEMOEvent, then the location should be specified as eis/legacy/DEMOEvent.
In this example, the given eisName is DEMOEvent, therefore the WSIL design time sets adapterInstanceJndi=eis/legacy/DEMOEvent in the WSDL, and the runtime automatically will use eis/legacy/DEMOEvent JNDI location to acquire a run-time connection. Therefore, you need to set this same value for the location attribute, otherwise, the run-time resolution is going to fail and error out.
eisName Sets the name of the adapter to use.
serverName Sets the TCP/IP address or host name where the Oracle Connect daemon is running.
workspace Specifies the name of an Oracle Connect server workspace to use. The default workspace is Navigator.
portNumber Specifies the TCP/IP port where the Oracle Connect daemon is running on the server. The default port is 2552.
fakeXa Values can be set to true or false. When set to true, The XA APIs are converted internally to local transaction APIs.
useNamespace Values can be set to true or false. When set to true, XSD metadata are provided with namespace and payload nodes are built using this namespace.
Note: It is recommended that you set this property to true.
Property Description
userName Specifies a user who can access the Oracle Connect server. The user is defined in the Oracle Connect daemon configuration.
password Specifies a valid password for the user.
persistentConnection Set to true or false. When set to true, connections can persist across multiple requests or connection context changes. It is recommended to set this property to true.
keepAlive Set to true or false. When set to true, the socket used for the connection is always kept open. It is recommended to set this property to true.
firewallProtocol Specifies the firewall protocol used: either none or fixedNat (the Nat protocol using a fixed address for the daemon). The default is none.
connectTimeout Specifies the connection timeout in seconds. The default is 0, meaning that there is no connection timeout
Postinstallation Tasks for Legacy Adapters
2-24 Oracle Application Server Adapter Installation Guide
Configuring Design-Time ConnectionsIf you need to browse legacy interactions using WSIL browser in Oracle JDeveloper, then update the collaxa-config.xml file. This enables the BPEL Process Manager to communicate with the legacy server. The collaxa-config.xml file is available at the following location:
$Oracle_Home/integration/orabpel/system/config
Perform the following steps to configure design-time connections:
1. From the Start menu, select Programs, Oracle BPEL PM, and then select Developer Prompt.
2. Type encrypt <passwd>.
3. In the collaxa-config.xml file, update the parameters listed in the following table:
Example 2–1 Updating the collaxa-config.xml File
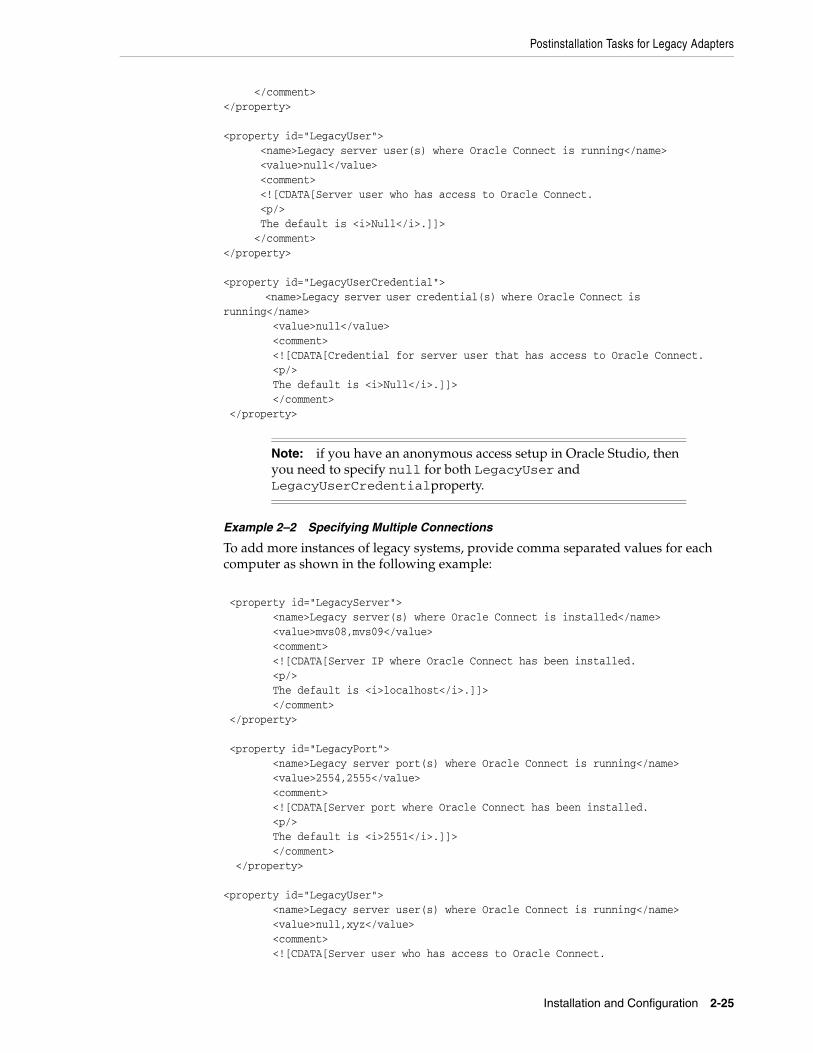
In the following example, the collaxa-config.xml file is updated with the required parameters.
<property id="LegacyServer"> <name>Legacy server(s) where Oracle Connect is installed</name> <value>mvs08</value> <comment> <![CDATA[Server IP where Oracle Connect has been installed. <p/> The default fault is value <i>localhost</i>.]]> </comment> </property>
<property id="LegacyPort"> <name>Legacy server port(s) where Oracle Connect is running</name> <value>2554</value> <comment> <![CDATA[Server port where Oracle Connect has been installed. <p/> The default is <i>2551</i>.]]>
encryptionProtocol Specifies the name of encryption protocol to use. The default is null. The RC4 protocol is supported.
encryptionKeyName Specifies the name of the symmetric encryption key to use.
encryptionKeyValue Specifies the value of the symmetric encryption key to use.
Parameter Description
LegacyServer Specifies the legacy server(s) where attunity connect is running
LegacyPort Specifies the port(s) where attunity connect is listening
LegacyUser Specifies the user ID(s) that can access mainframe system
LegacyUserCredential Specifies the encrypted password(s) for the user
Property Description
Postinstallation Tasks for Legacy Adapters
Installation and Configuration 2-25
</comment></property>
<property id="LegacyUser"> <name>Legacy server user(s) where Oracle Connect is running</name> <value>null</value> <comment> <![CDATA[Server user who has access to Oracle Connect. <p/> The default is <i>Null</i>.]]> </comment></property>
<property id="LegacyUserCredential"> <name>Legacy server user credential(s) where Oracle Connect is running</name> <value>null</value> <comment> <![CDATA[Credential for server user that has access to Oracle Connect. <p/> The default is <i>Null</i>.]]> </comment> </property>
Example 2–2 Specifying Multiple Connections
To add more instances of legacy systems, provide comma separated values for each computer as shown in the following example:
<property id="LegacyServer"> <name>Legacy server(s) where Oracle Connect is installed</name> <value>mvs08,mvs09</value> <comment> <![CDATA[Server IP where Oracle Connect has been installed. <p/> The default is <i>localhost</i>.]]> </comment> </property>
<property id="LegacyPort"> <name>Legacy server port(s) where Oracle Connect is running</name> <value>2554,2555</value> <comment> <![CDATA[Server port where Oracle Connect has been installed. <p/> The default is <i>2551</i>.]]> </comment> </property>
<property id="LegacyUser"> <name>Legacy server user(s) where Oracle Connect is running</name> <value>null,xyz</value> <comment> <
Deinstallation Tasks
2-26 Oracle Application Server Adapter Installation Guide
<p/> The default is <i>Null</i>.]]> </comment> </property>
<property id="LegacyUserCredential"> <name>Legacy server user credential(s) where Oracle Connect is running</name> <value>null,AVCGS80JK9J08M9MLYJM90U</value> <comment> <![CDATA[Credential for server user that has access to Oracle Connect. <p/> The default is <i>Null</i>.]]> </comment> </property>
Deinstallation TasksTo deinstall Oracle Application Server adapters:
1. Cleanup any previous 10.1.3.1 Adapter installations by running the following commands:
On Unix:
cd $ORACLE_HOME/j2ee/home
$ORACLE_HOME/jdk/bin/java -jar admin_client.jardeployer:oc4j:opmn://localhost:6003/home oc4jadmin welcome1 -undeployjca-legacy-adapter -isConnector
$ORACLE_HOME/jdk/bin/java -jar admin_client.jardeployer:oc4j:opmn://localhost:6003/home oc4jadmin welcome1 -undeployjca-app-adapter -isConnector
$ORACLE_HOME/jdk/bin/java -jar admin_client.jardeployer:oc4j:opmn://localhost:6003/home oc4jadmin welcome1 -undeployjca-app-adapter-test
$ORACLE_HOME/jdk/bin/java -jar admin_client.jardeployer:oc4j:opmn://localhost:6003/home oc4jadmin welcome1 -undeployws-app-adapter
On Windows:
cd %ORACLE_HOME%/j2ee/home
%ORACLE_HOME%/jdk/bin/java -jar admin_client.jardeployer:oc4j:opmn://localhost:6003/home oc4jadmin welcome1 -undeployjca-legacy-adapter -isConnector
%ORACLE_HOME%/jdk/bin/java -jar admin_client.jardeployer:oc4j:opmn://localhost:6003/home oc4jadmin welcome1 -undeployjca-app-adapter -isConnector
%ORACLE_HOME%/jdk/bin/java -jar admin_client.jardeployer:oc4j:opmn://localhost:6003/home oc4jadmin welcome1 -undeployjca-app-adapter-test
%ORACLE_HOME%/jdk/bin/java -jar admin_client.jar
Globalization Support
Installation and Configuration 2-27
deployer:oc4j:opmn://localhost:6003/home oc4jadmin welcome1 -undeployws-app-adapter
2. Start Oracle Universal Installer, which is installed on your host.
3. Click Deinstall Products.
4. Expand the Oracle home directory that contains the products that you want to deinstall.
5. Select the specific OracleAS Adapter that you want to deinstall.
6. Click Remove.
7. Click Yes when prompted. The selected products are deinstalled.
8. Click Close.
Globalization SupportThe Oracle Application Server adapters for packaged applications and legacy applications support a wide variety of encoding and can accept non-ASCII data during runtime. In addition, Application Explorer supports localization, while Oracle Studio does not support localization.
Note: Ensure that the ORACLE_HOME environment variable is set to the location of your SOA installation.
In each of the commands specified in the preceding examples, ensure that the hostname and OPMN request port number are specified correctly. This example uses, localhost and 6004 respectively.
Ignore any error message you get indicating that a certain application/resource adapter is not present.
Note: The legacy J2CA resource adapter must be undeployed only if you choose to undeploy the entire set of legacy adapters.
Note: Application Explorer supports ADA compliance, while Oracle Studio does not support ADA compliance.

Globalization Support
2-28 Oracle Application Server Adapter Installation Guide

Configuring OracleAS Adapter for PeopleSoft A-1
AConfiguring OracleAS Adapter for PeopleSoft
This appendix describes how to configure OracleAS Adapter for PeopleSoft. To configure:
■ Specify the version of PeopleSoft you are using.
■ Install the Component Interfaces of the adapter.
■ Install the TCP/IP message router adapter.
■ Copy the psjoa.jar file (and, for PeopleSoft release 8.1, the pstools.properties file) into the OracleAS_home\adapters\application\lib directory.
This appendix contains the following topics:
■ Specifying the PeopleSoft Version
■ Installing the Adapter Component Interfaces
Specifying the PeopleSoft VersionOracleAS Adapter for PeopleSoft supports multiple versions of PeopleSoft. However, certain versions are incompatible with each other, and the adapter must recognize the version you are using.
After installation, files for both PeopleSoft versions appear in the default location, OracleAS_home\adapters\application\lib.
Use the corresponding location on non-Windows systems.
To ensure that the adapter functions properly, remove the file that does not correspond to your release:
■ For PeopleSoft 8.4x releases, remove iwpsci81.jar.
■ For PeopleSoft 8.1x releases, remove iwpsci84.jar.
After changing the contents of the lib directory, restart all components.
Installing the Adapter Component InterfacesOracleAS Adapter for PeopleSoft includes two custom Component Interfaces. Application Explorer uses these Component Interfaces to create schemas for events and services.
To configure Component Interfaces for OracleAS Adapter for PeopleSoft, you must:
1. Import and build the Component Interfaces.
Installing the Adapter Component Interfaces
A-2 Oracle Application Server Adapter Installation Guide
2. Configure Component Interface security.
3. Test the Component Interfaces.
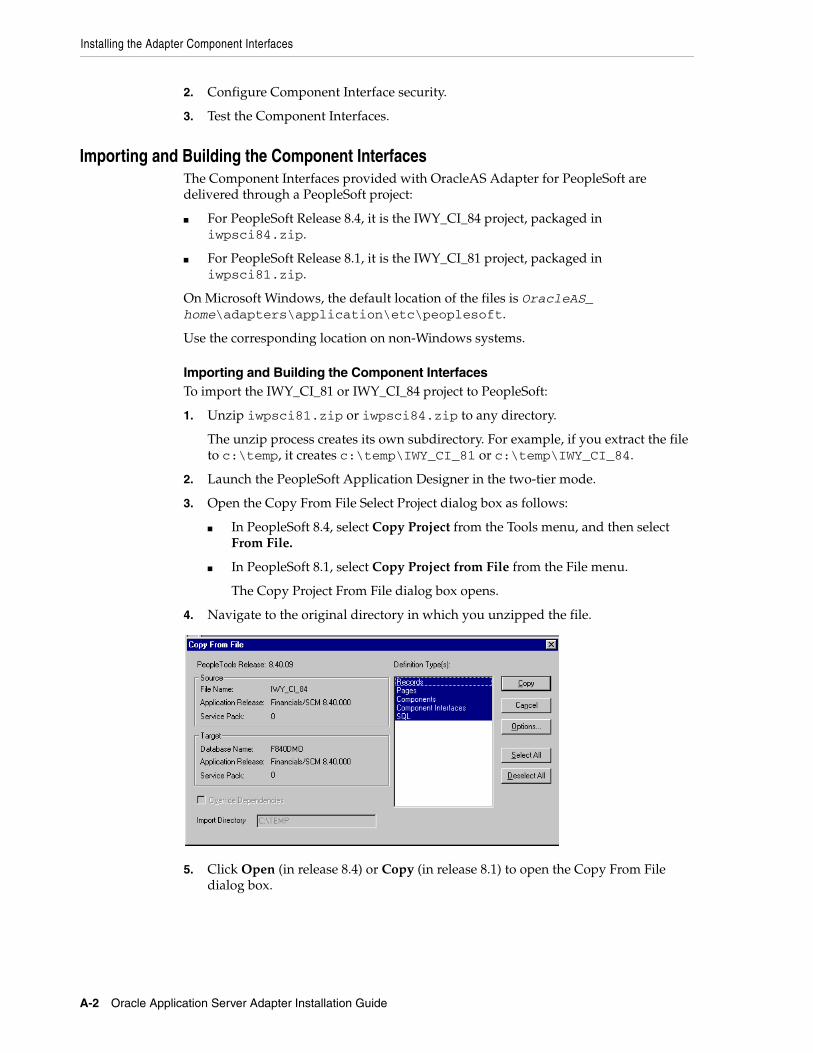
Importing and Building the Component InterfacesThe Component Interfaces provided with OracleAS Adapter for PeopleSoft are delivered through a PeopleSoft project:
■ For PeopleSoft Release 8.4, it is the IWY_CI_84 project, packaged in iwpsci84.zip.
■ For PeopleSoft Release 8.1, it is the IWY_CI_81 project, packaged in iwpsci81.zip.
On Microsoft Windows, the default location of the files is OracleAS_home\adapters\application\etc\peoplesoft.
Use the corresponding location on non-Windows systems.
Importing and Building the Component InterfacesTo import the IWY_CI_81 or IWY_CI_84 project to PeopleSoft:
1. Unzip iwpsci81.zip or iwpsci84.zip to any directory.
The unzip process creates its own subdirectory. For example, if you extract the file to c:\temp, it creates c:\temp\IWY_CI_81 or c:\temp\IWY_CI_84.
2. Launch the PeopleSoft Application Designer in the two-tier mode.
3. Open the Copy From File Select Project dialog box as follows:
■ In PeopleSoft 8.4, select Copy Project from the Tools menu, and then select From File.
■ In PeopleSoft 8.1, select Copy Project from File from the File menu.
The Copy Project From File dialog box opens.
4. Navigate to the original directory in which you unzipped the file.
5. Click Open (in release 8.4) or Copy (in release 8.1) to open the Copy From File dialog box.
Installing the Adapter Component Interfaces
Configuring OracleAS Adapter for PeopleSoft A-3
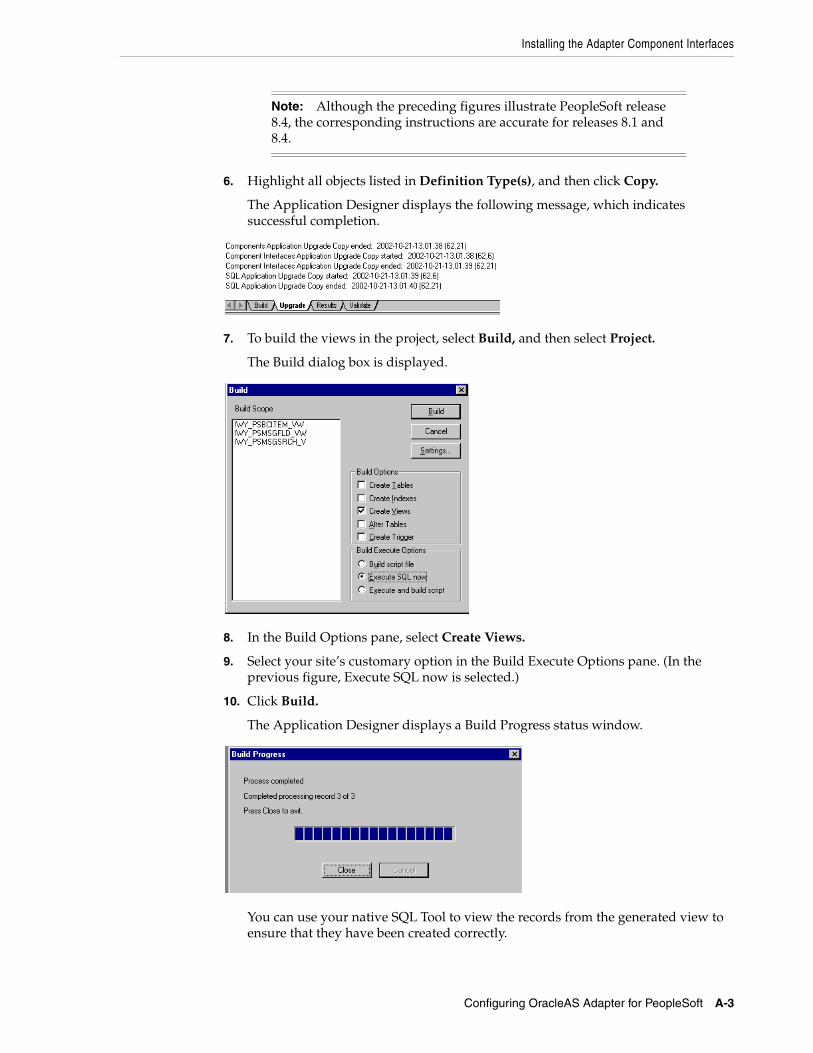
6. Highlight all objects listed in Definition Type(s), and then click Copy.
The Application Designer displays the following message, which indicates successful completion.
7. To build the views in the project, select Build, and then select Project.
The Build dialog box is displayed.
8. In the Build Options pane, select Create Views.
9. Select your site’s customary option in the Build Execute Options pane. (In the previous figure, Execute SQL now is selected.)
10. Click Build.
The Application Designer displays a Build Progress status window.
You can use your native SQL Tool to view the records from the generated view to ensure that they have been created correctly.
Note: Although the preceding figures illustrate PeopleSoft release 8.4, the corresponding instructions are accurate for releases 8.1 and 8.4.

Installing the Adapter Component Interfaces
A-4 Oracle Application Server Adapter Installation Guide
11. If the view has not been generated correctly, click Close, and double-click the SQL Build log statement.
The PSBUILD log file appears.
12. If you encounter problems, check the Build settings options by selecting Build, and then Settings.
The Build Settings dialog box is displayed.
Depending on the application server database for PeopleSoft, some databases may require the Tablespace name. Consult your PeopleSoft database administrator for more information regarding this function.
You have now finished importing and building the Component Interfaces. To configure security for Component Interfaces, refer to "Configuring Component Interface Security" on page A-4.
Configuring Component Interface SecurityApplication Explorer requires the custom Component Interfaces that you imported and built in the previous step, so you need to ensure that all Application Explorer users have access to these Component Interfaces. As with all PeopleSoft objects, security is assigned at the Permission List level. Review your site security requirements to determine which users are going to work with Application Explorer, and then set Component Interface security for each distinct Permission List belonging to those users.

Installing the Adapter Component Interfaces
Configuring OracleAS Adapter for PeopleSoft A-5
The following steps describe how to configure security for all supported releases of PeopleSoft in all supported modes. The figures shown in the steps reflect PeopleSoft release 8.4 in 4-tier mode.
1. Select PeopleTools, Security, User Profiles, Permissions & Roles, and then Permission Lists.
2. Click Search and select the relevant Permission List.
The Permission List pane opens on the right.
3. Click the right arrow next to the Sign-on Times tab to display the Component Interfaces tab.
Note: These Component Interfaces are required for creating schemas and business services, and they are used at runtime for using the Find method. They have only Get and Find access and cannot be used to update your PeopleSoft database. This minimizes any possible security exposure.
In PeopleSoft release 8.1, you can set security in 2, 3, or 4-tier mode, whereas in release 8.4 and higher, you can set security 4-tier mode only.

Installing the Adapter Component Interfaces
A-6 Oracle Application Server Adapter Installation Guide
4. Click the Component Interfaces tab.
5. To add a new row to the Component Interfaces list, select the plus sign (+).
6. Enter or select IWY_CI_ATTRIBUTES Component Interface and click Edit.
7. To set the Get and Find methods to Full Access, click Full Access (All).
8. Click OK.
9. Repeat steps 5 through 8 for the IWY_CI_MESSAGES Component Interface.
10. Scroll down to the bottom of the Component Interfaces window, and click Save.
You have finished configuring security for the Component Interfaces delivered with OracleAS Adapter for PeopleSoft. To test these Component Interfaces, refer to "Testing the Component Interfaces" on page A-6.
Testing the Component InterfacesYou must test each of the OracleAS Adapter for PeopleSoft Component Interfaces before using them.
To test the Component Interfaces:
1. In PeopleSoft Application Designer, open the IWY_CI_ATTRIBUTES Component Interface.
2. Select Tools, and then Test Component Interface.
The Component Interface Tester dialog box is displayed.
3. Click Find. Entries for the underlying component appear.
A message may appear stating that display is limited to a certain number of entries. This is not a problem.
Note: The Create New option is disabled because the Add method is not applicable to this Component Interface.
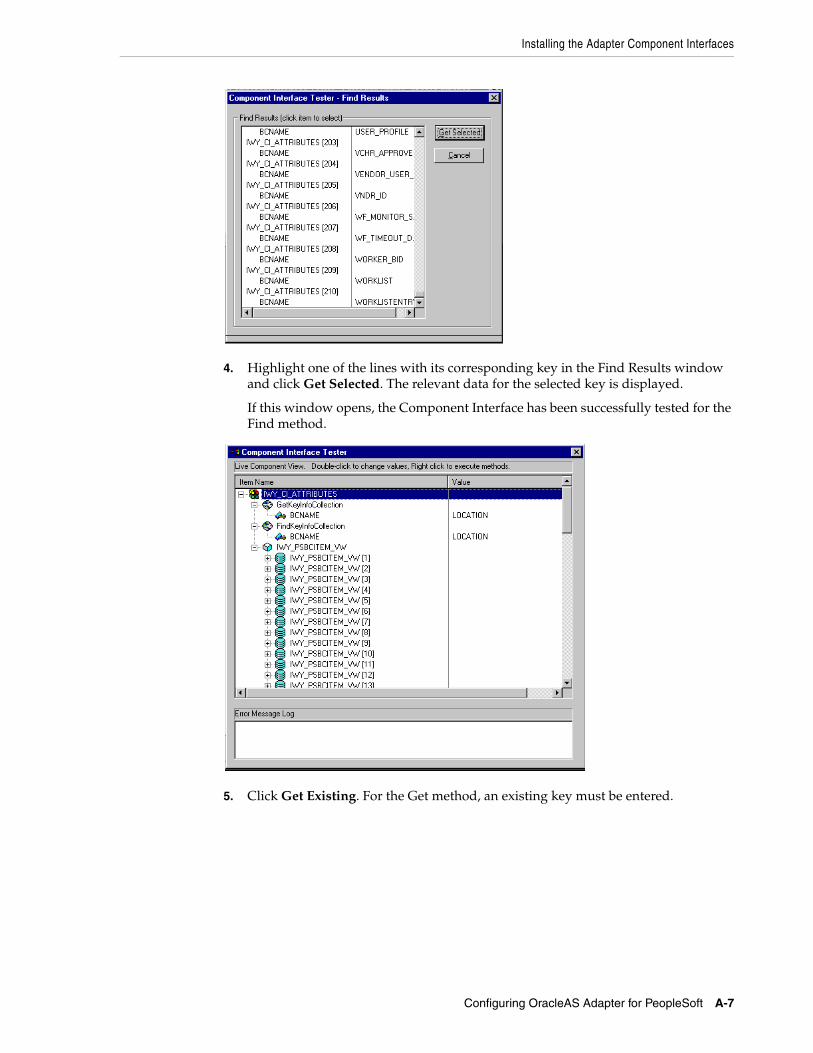
Installing the Adapter Component Interfaces
Configuring OracleAS Adapter for PeopleSoft A-7
4. Highlight one of the lines with its corresponding key in the Find Results window and click Get Selected. The relevant data for the selected key is displayed.
If this window opens, the Component Interface has been successfully tested for the Find method.
5. Click Get Existing. For the Get method, an existing key must be entered.
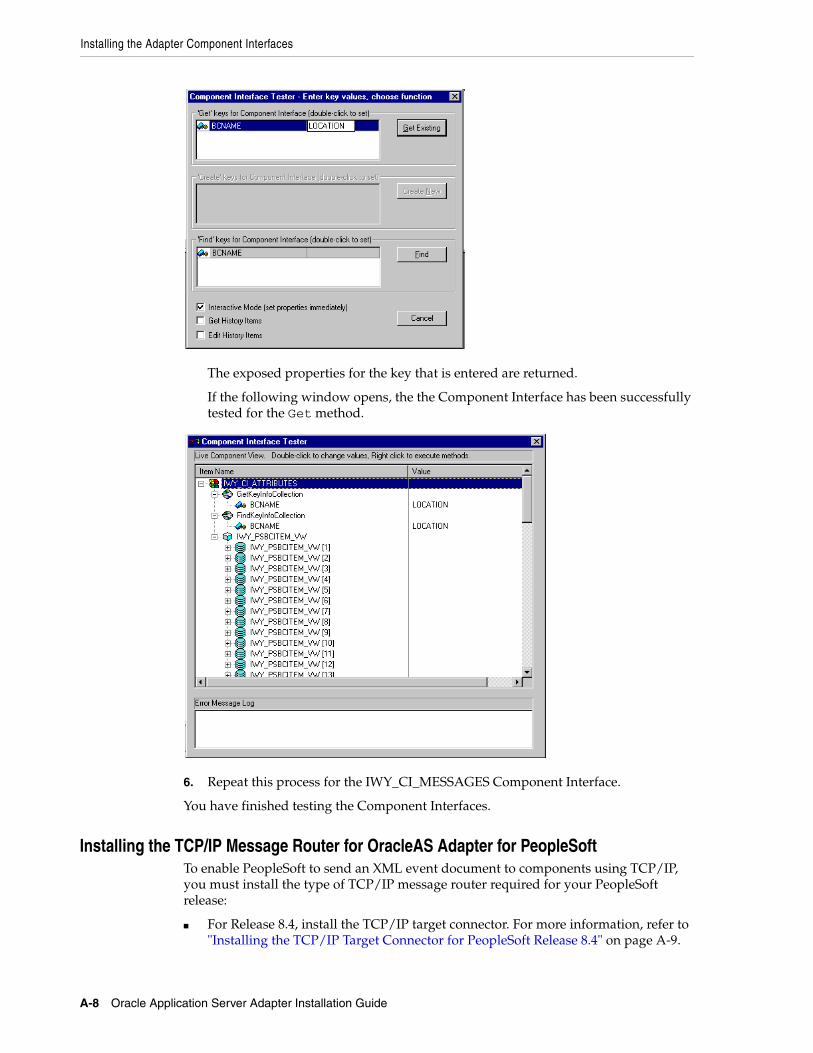
Installing the Adapter Component Interfaces
A-8 Oracle Application Server Adapter Installation Guide
The exposed properties for the key that is entered are returned.
If the following window opens, the the Component Interface has been successfully tested for the Get method.
6. Repeat this process for the IWY_CI_MESSAGES Component Interface.
You have finished testing the Component Interfaces.
Installing the TCP/IP Message Router for OracleAS Adapter for PeopleSoftTo enable PeopleSoft to send an XML event document to components using TCP/IP, you must install the type of TCP/IP message router required for your PeopleSoft release:
■ For Release 8.4, install the TCP/IP target connector. For more information, refer to "Installing the TCP/IP Target Connector for PeopleSoft Release 8.4" on page A-9.
Installing the Adapter Component Interfaces
Configuring OracleAS Adapter for PeopleSoft A-9
■ For Release 8.1, install the TCP/IP handler. For more information, refer to "Installing the TCP/IP Handler for PeopleSoft Release 8.1" on page A-9.
Installing the TCP/IP Target Connector for PeopleSoft Release 8.4The TCP/IP target connector for PeopleSoft release 8.4 is installed with OracleAS Adapter for PeopleSoft. The default location on Microsoft Windows is OracleAS_home\adapters\application\etc\peoplesoft\iwpsevent84.jar.
Use the corresponding location on non-Windows systems.
To install the TCP/IP target connector for PeopleSoft Release 8.4:
1. Extract TCPIPTARGET84.class from iwpsevent84.jar. Use any extraction utility for your platform.
2. Port TCPIPTARGET84.class to the platform where the PeopleSoft gateway Web server is located.
3. Place TCPIPTARGET84.class in the PeopleSoft server target connector directory.
Installing the TCP/IP Handler for PeopleSoft Release 8.1The TCP/IP target connector for PeopleSoft release 8.1 is installed with OracleAS Adapter for PeopleSoft. The default location on Microsoft Windows is OracleAS_home\adapters\application\etc\peoplesoft\iwpsevent81.jar.
Use the corresponding location on non-Windows systems. If this location does not exist, contact your distributor for copies of the relevant files.
To install the TCP/IP Handler for PeopleSoft release 8.1:
1. Port iwpsevent81.jar to the platform on which the PeopleSoft gateway Web server is located.
2. Place iwpsevent81.jar in the servletclasses directory under the PeopleSoft Web server.
3. Extract the embedded class files.
Installing the TCP/IP Handler on a UNIX SystemTo install the TCP/IP handler for PeopleSoft release 8.1 on a UNIX system:
1. Log on to the UNIX system with the proper PeopleSoft ID and permissions.
2. Navigate to the PeopleSoft Web servlets directory. This may vary by release and by Web server, but is usually:
$PS_HOME/webserv/servletclasses
3. Issue the jar command to extract the class files required by PeopleSoft.
This is a sample command:
jar -xvf /tmp/iwpsevent81.jarIt displays the following output on a Sun or Solaris system:
$ jar -xvf /tmp/iwpsevent81.jarcreated: META-INF/extracted: META-INF/MANIFEST.MFextracted: psft/pt8/tcphandler/TCPIPHandler81$Entry.class
Note: If you are not using PeopleSoft messages for event handling, you may skip this topic.

Installing the Adapter Component Interfaces
A-10 Oracle Application Server Adapter Installation Guide
extracted:psft/pt8/tcphandler/TCPIPHandler81$HandlerEntry.classextracted:psft/pt8/tcphandler/TCPIPHandler81$PublicationHandler.classextracted: psft/pt8/tcphandler/TCPIPHandler81.class$
Copying PeopleSoft Files into the Lib DirectoryApplication Explorer creates XSD schemas and business services from PeopleSoft Component Interfaces, and creates XSD schemas from PeopleSoft messages. To do this, the following files must be in the OracleAS_home\adapters\application\lib directory.:
Ensure the following is in the lib directory:
■ PeopleSoft Java Object Adapter (psjoa.jar)
This file provides a low level interface between client applications and PeopleSoft. This file is provided with PeopleSoft and can be found in the following directory:
PS_HOME\web\PSJOA
The psjoa.jar file is different for every version of PeopleSoft. When you upgrade your Peopletools release, be sure to copy the new release's psjoa.jar file into the OracleAS_home\adapters\application\lib directory and restart all components.
■ pstools.properties (for PeopleSoft 8.1.x)
PeopleSoft release 8.1x requires an additional file, pstools.properties, found in the following directory:
PS_HOME\web\jmac
■ psoftcrmci.jar
This is a set of Java classes generated from PeopleSoft Component Interfaces.
Note: The files are placed in a new directory, tcphandler, under psft/pt8.

Index-i
Index
CConfiguring OracleAS Adapter JCA Version 1.0 after
Deployment, 2-15Configuring the OracleAS Adapter Application
Explorer, 2-17Copying Library Files, 2-11
DDeinstallation Tasks, 2-26Design time components, 1-4
HHardware Requirements, 1-6
Iinstallation log files
location of, 2-5Installation Tasks, 2-1
JJ2EE and Web Cache
installed in same Oracle home as Oracle Application Server Integration B2B, 2-3
required for using Oracle Application Server Integration B2B, 2-3
J2EE and Web Cache Requirements, 1-7
Llog files
location of, 2-5
OOperating System Requirements, 1-7Oracle Application Server Containers for J2EE
(OC4J), 1-3Oracle Application Server Integration B2B
J2EE and Web Cache requirement, 2-3Oracle Application Server Portal, 1-3Oracle AS Adapter Business Services Engine, 1-5OracleAS Adapter for J.D. Edwards OneWorld
XE, 2-11OracleAS Adapter for PeopleSoft, 2-12OracleAS Adapter for SAP R/3, 2-13OracleAS Adapter for Siebel, 2-14OracleAS Adapters, 1-3
PPackaged Application Adapter Directory
Structure, 2-16
RRuntime components, 1-4
SSoftware Requirements, 1-6
VVerifying OracleAS Adapter Business Services Engine
Installation, 2-14Verifying OracleAS Adapter JCA Version 1.0
Installation, 2-16

Index-ii