adaptable interface board (aib) plug-in modules user's guide€¦ · aib plug-in modules are...
TRANSCRIPT

Moog Components Group, Halifax Operations Focal Technologies Corporation 77 Frazee Avenue Dartmouth, Nova Scotia, Canada B3B 1Z4 Tel: 902-468-2263 • Fax: 902-468-2249 Email: [email protected] Web: www.moog.com/marine
Adaptable Interface Board (AIB) Plug-In Modules User's Guide
Document No.: 700-0271-00
Revision: 5
Author: Ian MacKay
Date of Issue: January 16, 2014
MOOG PROPRIETARY AND CONFIDENTIAL INFORMATION THIS TECHNICAL DATA/DRAWING/DOCUMENT CONTAINS INFORMATION THAT IS PROPRIETARY TO, AND IS THE EXPRESS PROPERTY OF MOOG INC., OR MOOG INC. SUBSIDIARIES EXCEPT AS EXPRESSLY GRANTED BY CONTRACT OR BY OPERATION OF LAW AND IS RESTRICTED TO USE BY ONLY MOOG EMPLOYEES AND OTHER PERSONS AUTHORIZED IN WRITING BY MOOG OR AS EXPRESSLY GRANTED BY CONTRACT OR BY OPERATION OF LAW. NO PORTION OF THIS DATA/DRAWING/DOCUMENT SHALL BE REPRODUCED OR DISCLOSED OR COPIED OR FURNISHED IN WHOLE OR IN PART TO OTHERS OR USED BY OTHERS FOR ANY PURPOSE WHATSOEVER EXCEPT AS SPECIFICALLY AUTHORIZED IN WRITING BY MOOG INC. OR MOOG INC. SUBSIDIARY.

700-0271-00, Rev. 5 AIB Plug-In Modules, User's Guide
Focal Technologies Corp. Page i
Document Revision History
Document Revision
Details of Revision Author Date
Rev 1 Initial Release IBM Oct 7, 2005 Rev 2 - Added CANBUS Card IBM March 7, 2006
Rev 3 - Updated ARCNET description of long versus short links.
SST July 4, 2008
Rev 4
- Format updated - Corrected table 4-6 - Added AIB-TRIG section to 4.1 - Added ISOGND for RS-485, section 4.2 - Added hydrophone options, section 4.4 - Updated AIB-CANBUS section 4.6
IBM April 11, 2013
Rev 5
- Minor text corrections - Added data indicator LED comments; - Updated AIB-ARCNET section: added LAN A/LAN B labels to table 4-5, updated recommended terminations, - Added Tritech troubleshooting comments - Updated AIB-CANBUS figure and bridge mode details- - Updated AIB-TRIG output voltages, section 4.1
IBM Jan. 16, 2014

700-0271-00, Rev. 5 AIB Plug-In Modules, User's Guide
Focal Technologies Corp. Page 1 of 17
1.0 Introduction Adaptable Interface Board (AIB) plug-in modules are small, single channel cards used to translate a wide range of analog and digital interface signals to the TTL format required for multiplexing. These flexible modules may be quickly changed to allow easy upgrades or reconfigurations to existing multiplexer systems. Moreover, individual data channels may be changed for efficient use of data channel capacity. AIB plug-in modules are individually installed in sockets on adapter cards or motherboards. 2.0 AIB Adapter Cards AIB plug-in modules are compatible with the Model 903, the Model 907, and the Model 914 product lines. The AIB-4 motherboard for the Model 903 has sockets for four AIB plug-in modules, the 907-AIB adapter card has sockets for two AIB plug-ins, and the 914-AIB adapter card has one socket available. Figure 2-1 below shows the front panel view of the Model 903 AIB-4 card, including the location of pin 1 on the WAGO connectors. Channel 1 is at the top of the column of connectors, as marked by the black dot along the left-hand side of the panel. Two data indicator LEDs for each channel are located immediately above the corresponding WAGO connectors.
Figure 2-1: Model 903 AIB-4 Front Panel

700-0271-00, Rev. 5 AIB Plug-In Modules, User's Guide
Focal Technologies Corp. Page 2 of 17
Figure 2-2 shows the PCB top view for the AIB-4 motherboard. Note that the AIB plug-ins must be installed with their white alignment dots in the same orientation as the alignment dots on the AIB motherboard PCB. A similar socket arrangement is used on the HDB-TX cards. (Refer to the applicable 903 user's guide for more information on the HDB-TX.) WAGO header J2, in the top right corner of the PCB figure, corresponds to channel 1.
Figure 2-2: Model 903 AIB-4 Motherboard (AIB-4M)
J17 J12 J10
J9J16 J11J14
ALIGNMENTDOTS (X4)

700-0271-00, Rev. 5 AIB Plug-In Modules, User's Guide
Focal Technologies Corp. Page 3 of 17
Installation Note: Headers for the external connections are all four-pin, right-angled 733 series WAGO connectors (mating WAGO connectors are P/N 733-104). Pin locations of the WAGO headers are shown the figure below. Corresponding pins of the mating connector, shown at left, use cage clamps rather than screw terminals to hold wires in place. External wires should be 20-28 AWG stranded conductors with 0.22” - 0.24” stripped ends. The clamp for each pin can be opened up by inserting either a WAGO tool or a small screwdriver in the hole immediately above the wire hole.
4-Pin WAGO Connector (733-104)
4-Pin WAGO Header
4
3
2
1

700-0271-00, Rev. 5 AIB Plug-In Modules, User's Guide
Focal Technologies Corp. Page 4 of 17
Figures 2-3 and 2-4 show the 907 and 914 AIB adapter cards respectively. As with the Model 903 AIB-4, the alignment dots on the plug-ins must be oriented to match the dots on the adapter cards. Data indicator LEDs function the same as for the 903 AIB-4 card. Access to the plug-in modules is via the WAGO connectors shown (J1 and J2 on 907-AIB and J2 on 914-AIB).
Figure 2-3: 907-AIB Adapter Card
Figure 2-4: 914-AIB Adapter Card
Switch bank S1 on the 907-AIB or 914-AIB adapter card is used to select which data channel on the corresponding motherboard is assigned to each AIB plug-in module. Refer to the configuration drawings for details on S1 settings: 907-2004-00 for the 907-AIB card and 914-2004-00 for the 914-AIB card.
PIN 1
J2
J1FUSE
J7
S1
ALIGNMENTDOTS
DATA INDICATORLEDS
CHANNEL B WAGO
CHANNEL A WAGO
CHANNEL A PLUG-IN
CHANNEL B PLUG-IN
PIN 1
ALIGNMENTDOT
DATA INDICATORLEDS
CHANNEL A WAGO
CHANNEL A PLUG-IN
J2

700-0271-00, Rev. 5 AIB Plug-In Modules, User's Guide
Focal Technologies Corp. Page 5 of 17
3.0 Diagnostics LEDs indicate the presence of data on the transmit and receive line for each channel. The green LEDs are typically marked "TX" on the adapter cards or line up under the "T" column on the AIB-4 front panel. These transmit LEDs are on when data is being transmitted from the AIB card to the external devices. The red LEDs are typically marked "RX" on the adapter card or line up under the "R" column on the AIB-4 front panel. These receive LEDs are on when data is being received into the AIB card from external devices. The exact behaviour of the diagnostics LEDs depend on the type of AIB plug-in module installed. For serial data interfaces, LEDs are on when the corresponding line is in a "space" state (TTL = low) and off when the line is in a "mark" state (TTL = high). Idle lines are typically in the "mark" or off state. If an AIB socket is not populated or the AIB does not use the LEDs, the red LEDs will be on. Occasional bursts of data appear as a flashing LED, whereas continuous data or rapid bursts of data appear as a dim to bright solid LED. During unidirectional data transfer, an active red LED at one end of the system should be matched by an active green LED at the other end of the system. Very short bursts of data may not result in a visible flash from the LEDs. AIB motherboard serial number information is available through the Model 903 FMB-X-2.5 cards in some systems, and diagnostic information is continually being updated. Please contact the factory for the most current information available through diagnostics. 4.0 Plug-In Modules Plug-in modules are available for use with the AIB adapter cards. When installing the modules, ensure the connector marked by the white alignment dot on the module PCB is oriented to match the corresponding header marked with a white dot on the AIB motherboard or AIB adapter card. When removing a module, carefully extract the plug-in board by pulling both connectors straight out to minimize flexing of the PCB. Uninstalled AIB modules should be handled like integrated circuits: observe ESD handling precautions and store in static dissipating bags or conductive foam. Interface pins for the AIB plug-in modules are typically accessed at 4-pin WAGO headers on the motherboard or adapter card. (In the case of the HDB-TX cards, the WAGO interface connectors are located remotely on a small I/O board.) WAGO pin configurations for the plug-in modules are the same regardless of where they are mounted. Plug-in modules with separate pins for transmit and receive lines are identical. Signals coming into the receive pins at one end of the multiplexer are sent out of the transmit pins at the other. With the AIB-232 module, for example, a data stream coming into the receive pin (pin 2, RXD) at the remote end is multiplexed, passed through the optical link, demultiplexed, and sent out of the transmit pin (pin 3, TXD) at the console end of the multiplexer system. Refer to figures in Section 2 for the location of pin 1 on the WAGO headers.

700-0271-00, Rev. 5 AIB Plug-In Modules, User's Guide
Focal Technologies Corp. Page 6 of 17
4.1 RS-232 and Trigger Plug-In AIB-232 P/N 903-0251-00 AIB-TRIG P/N 903-0251-01
The AIB-232 plug-in module, which supports RS-232, is shown below in Figure 4-1. No jumper or switch settings are required since the board is used solely for RS-232 data at rates up to 120 kbaud. In addition to the ultra-fast fuses on the AIB-4 motherboard, protection for RS-232 inputs and outputs includes transient voltage suppressors and opto-isolators.
Figure 4-1: AIB RS-232 Plug-In Module
Connector pin designations for the front panel WAGO connector are given in the table below. ISOGND is the common isolated signal ground for both receive and transmit data. LEDs on the motherboard or adapter cards can be used to identify the presence and direction of serial data.
Table 4-1: AIB-232, AIB-TRIG Pin Designations
Pin Designation
1 ISOGND
2 Receive (RXD)
3 Transmit (TXD)
4 Chassis* (optional)
*The chassis pin is normally left open on the mating connector. The AIB-TRIG plug-in module is a modified version of the AIB-232 that supports trigger signals for responders and sonars that require trigger voltages between +5 and +25 V. For triggers that require 5 V or less, the AIB-485 card should be used with the TTL configuration. The RS-232 receiver circuit is unmodified, allowing input signals from -25 V to +25 V but typically configured for positive trigger voltages from the triggering device of up to +25 V. The RS-232 transmit circuit is modified to prevent excessive negative voltage excursions, i.e. a diode clamp limits the voltage to no lower than -0.5 V for connection to the subsea responder. When the trigger input voltage is above +1.5 V at the surface AIB-TRIG, the RS-232 driver output is held high at the subsea AIB-TRIG, typically +8 V with a 3 kΩ load (+5 V min.). Please consult the factory on recommended interfaces for specific responder triggers.

700-0271-00, Rev. 5 AIB Plug-In Modules, User's Guide
Focal Technologies Corp. Page 7 of 17
4.2 RS-485/422/TTL Plug-In AIB-485 P/N 903-0252-00
The AIB-485 plug-in module, which supports RS-485, RS-422, and TTL, is shown below in Figure 4-2. In addition to the ultra-fast fuses on the AIB-4 motherboard, protection for RS-485/422/TTL inputs and outputs includes transient voltage suppressors and opto-isolators.
SW3 SW1
SW4
SW5 SW2
Figure 4-2: AIB RS-485 Plug-In Module
Each channel has the following possible settings: RS-485 autosense (half duplex), RS-485 unidirectional transmitter (simplex Tx), RS-485 unidirectional receiver (simplex Rx), RS-422 four-wire connection (full duplex), or TTL (full duplex). The equivalent input/output schematic for an RS-422 configuration is shown in Figure 4-3, based on default switch settings. The switches are not shown for clarity. AIB-485 plug-in modules are default configured for RS-485, in which case the transmit and receive circuits of the RS-422 driver IC are connected together. The RS-485 autosense mode uses a timer circuit to automatically switch from transmit to receive mode. By default, a channel in autosense mode is a receiver waiting for data to come in through the front panel and switches to a transmitter only when it receives data from the backplane. Once the RS-485 channel is in transmitter mode, it will wait ten bit times (one start bit, eight data bits and one stop bit) from the last positive data edge before reverting back to its default receiver state. This half-duplex mode operates in a ping-pong fashion that must be supported by the end equipment. Although the circuit can act as either a receiver or a transmitter, the data being passed must be sent or received under timing conditions that allow for collision-free data transmission. (If a data collision does occur, transmission out of the front panel connector will override incoming data.) Autosense settings only affect half-duplex operation. Default settings for the autosense timer (9600 baud) are appropriate for most sonars, even when the sonar is operating at higher baud rates, since delays between sonar send and receive are generally many milliseconds. In some cases, though, the autosense timer needs to be adjusted based on the absolute turnaround time of the external device. A channel configured in simplex Tx or simplex Rx is a two-wire interface that is only designated to transmit or receive data. Tx is defined as Model 903 transmitting data out the front panel whereas Rx is defined as the Model 903 channel receiving data from an external device.

700-0271-00, Rev. 5 AIB Plug-In Modules, User's Guide
Focal Technologies Corp. Page 8 of 17
Figure 4-3: AIB RS-422 Interface Schematic
Full duplex communication runs transmit and receive on separate conductors, thus autosense is not required. The AIB modules support full duplex transmission as either RS-422 or TTL data. Connector pin designations for the WAGO connectors are given in the table below with default configuration shaded.
Table 4-2: AIB-485 Pin Designations
Pin RS-485 Designation RS-422 Designation TTL Designation
1 TX+/RX+ RX+ TTL IN
2 TX-/RX- RX- N/C
3 N/C TX+ TTL OUT
4 N/C (or ISOGND) TX- ISOGND
Switch settings for the various configurations are given in Table 4-3. When using the module in RS-422 or TTL input configuration, the autosense mode (SW3, SW4) should be set for full-duplex operation. Autosense baud rate settings (SW5) are ignored when the module is in full-duplex or simplex modes. As shown in Table 4-2 and 4-3, ISOGND for RS-485 configuration can be made available on pin 4 of the WAGO connector by setting switch SW2 circuit #6 to “ON” (=1). This can be used as a 0 V reference for external equipment. (The default setting for pin 4 is N/C.)

700-0271-00, Rev. 5 AIB Plug-In Modules, User's Guide
Focal Technologies Corp. Page 9 of 17
Table 4-3: Configuration Settings for AIB RS-485 Module (Defaults Shaded)
AUTOSENSE MODE CONFIGURATION
FUNCTION SW3:1 SW3:2 SW4:1 SW4:2
Full Duplex 0 0 1 0
Simplex Tx 1 0 1 0
Half Duplex (Autosense)
0 1 0 1
Simplex Rx 0 0 0 0
AUTOSENSE BAUD RATE FOR SW5 DIP SWITCH
BAUD RATE CCT# 1 2 3 4 5 6 7 8
9600 1 0 0 0 0 0 1 0
19200 0 1 0 0 0 0 1 0
28800 0 0 1 0 0 0 1 0
57600 0 0 0 1 0 0 1 0
115.2K 0 0 0 0 1 0 0 1
230.4K 0 0 0 0 0 1 0 1
KRAFT* 0 0 0 1 0 0 0 1
INPUT CONFIGURATION FOR SW1 DIP SWITCH
FORMAT CCT# 1 2 3 4 5 6 7 8
RS-485 1 0 1 0 1 1 0 0
RS-422 1 1 0 0 1 0 0 0
TTL 1 0 0 0 0 0 1 0
KRAFT* 0 0 1 1 0 1 0 1
INPUT CONFIGURATION FOR SW2 DIP SWITCH
FORMAT CCT# 1 2 3 4 5 6 7 8
RS-485 0 0 0 0 0 0** 0 0
RS-422 0 0 0 0 1 0 0 1
TTL 0 0 0 0 0 1 0 1
KRAFT* 0 0 0 0 0 0 0 0
*KRAFT manipulators use an AC-coupled RS-485 format with short turnaround time **Set to ‘1’ to make ISOGND for RS-485 available on WAGO pin 4.

700-0271-00, Rev. 5 AIB Plug-In Modules, User's Guide
Focal Technologies Corp. Page 10 of 17
4.3 Tritech Sonar ARCNET Plug-In AIB-ARCNET P/N 903-0261-00
The AIB-ARCNET plug-in module, which supports the version of ARCNET used by sonars manufactured by Tritech International Ltd., is shown below in Figure 4-4. In addition to the ultra-fast fuses on the AIB-4 motherboard, protection for Tritech inputs and outputs includes transient voltage suppressors and AC-coupled isolation through capacitors and transformers.
Figure 4-4: AIB Tritech ARCNET Plug-In Module
The Tritech sonar interface may be configured for +5 V (default) or +12 V drive levels and a data rate of 156.2 kbps (default) or 78.1 kbps, as shown in Table 4-4. The +12 V drive setting may be needed for long cable runs to the sonar equipment, but is typically not required. The lower data rate setting is available for compatibility with existing sonars configured for 78.1 kbps operation.
Table 4-4: Configuration Settings for AIB Tritech Module (Defaults Shaded)
OUTPUT DRIVE LEVEL
VALUE JP1 JP3 JP5 JP4
+5 V Output 1-2 * * *
+12 V Output 2-3 * * *
BAUD RATE
78.1 kbps * 1-2 1-2 *
156.2 kbps * 2-3 2-3 *
TERMINATION
68 Ohms * * * 1-2
Unterminated * * * 2-3
*setting does not affect given parameter The Tritech interface lines may be terminated with jumper JP4: for an internal 68 ohm terminator, pins 1 and 2 of jumper JP4 should be shorted (default); for no internal terminator, pins 1 and 2 of jumper JP4 should be left open (short pin 2 to pin 3, which is open, to store the shunt). In most applications, the 68 ohm terminators on the AIB cards should be enabled. One exception is when the sonar head has a 39 ohm terminator installed with a “short” cable connection to the multiplexer. In this case, the 68 ohm terminator on the AIB card should be disabled. (But the preferred configuration is with no terminator on the sonar head and the 68 ohm terminator on the AIB card.)
JP3 JP1 JP4
JP5

700-0271-00, Rev. 5 AIB Plug-In Modules, User's Guide
Focal Technologies Corp. Page 11 of 17
The default settings illustrated in the shaded rows of Table 4-4 are typically used for systems with short cables, i.e. a few meters, between the sonar components and the multiplexer modules: Short Cables (default) Sonar Head No terminator Remote Mux 68 ohm terminator, +5V drive Console Mux 68 ohm terminator, +5V drive Sonar Processor No terminator or 270 ohm terminator For systems with a long run of cable between the sonar head and remote module, the recommended configuration is the following: Long Cables Sonar Head 39 ohm terminator Remote Mux 68 ohm terminator, +12V drive Console Mux 68 ohm terminator, +12V drive Sonar Processor 270 ohm terminator The definition of a short versus long cable is dependent on the data rate and the cable type, but typically < 5 m is short, and > 100m would be considered long. If the cable length is in between these, the user may need to try both configurations. There is not a definitive configuration of termination resistors and drive voltages that is guaranteed to work for all cable types and lengths and it may be necessary to optimize the signals. Tritech recommends the signal voltages to operate in the 7-15 Vpp range. Be aware that many Tritech sonars are by default configured for +12V drive voltages and may need to be adjusted for short cable operation. Note that the AC coupling of the ARCNET interface circuits and pulse nature of the signal makes it impossible to verify termination resistance or signal level with a standard multimeter. To measure signals, a suitable oscilloscope and probe should be used with input set for 1 MΩ and AC coupling. Pin designations for the AIB-ARCNET plug-in modules are given in the table below. Corresponding connections to Tritech sonar heads and surface equipment should be to the LAN A and LAN B pins indicated by Tritech documentation. Note that the correct polarity of the wiring must be used at both ends of the multiplexer. Crossing the wires at either end, or both ends, will cause the ARCNET link to fail. Furthermore, lack of terminators on any of the connections can also cause the link to fail.
Table 4-5: AIB-ARCNET Pin Designations
Pin Designation
1 Chassis* (optional)
2 LAN A
3 LAN B
4 N/C
*The chassis pin is normally left open on the mating connector. Data indicator LEDS, as shown in figures 2-1 and 2-3, may be used for troubleshooting. Red LEDs indicate a signal coming into the multiplexer and green LEDs indicate a signal being transmitted from the multiplexer to the external sonar device. Only the presence of green LEDs verifies that signals are being carried through the multiplexer. Lack of a red LED at either end indicates no external signal is coming from the local sonar equipment, implying an error with wiring or other fault condition external to the multiplexer.

700-0271-00, Rev. 5 AIB Plug-In Modules, User's Guide
Focal Technologies Corp. Page 12 of 17
4.4 Hydrophone/Analog Plug-In AIB-HYDRO P/N 903-0244-00 AIB-IRIG P/N 903-0244-01 Modified for IRIG-B AIB-HYDRO P/N 903-0244-02 Modified for +12V supply
The AIB-HYDRO hydrophone plug-in module, shown below in Figure 4-5, is suitable for use with many hydrophones and other types of low-level analog signals. The board is used at both ends of the system and must be jumper configured, typically, as an input for the remote (subsea) module or as an output for the console (surface) module per the settings in Table 4-6
Figure 4-5: AIB Hydrophone Plug-In Module
Table 4-6: Configuration Settings for AIB Hydrophone Module
BOARD SET UP
JUMPER CONFIGURATION*
J11 J12 J13 J14
Input Board (Remote) 2-3 2-3 2-3 2-3
Output Board (Console) 1-2 1-2 1-2 1-2
* place shunts across the indicated pins of each jumper The hydrophone board input circuits include a front-end preamplifier with a fixed 36 dB gain and additional gain supplied by switch bank S1. Inputs are protected with diode clamps and current limiting resistors as well as ultra-fast fuses on the AIB motherboard. Table 4-7 shows the switch S1 gain settings and corresponding maximum input voltage.
Table 4-7: Hydrophone Gain Settings (Defaults Shaded)
S1 Gain
Av (dB)
S1 Settings Total Gain
With Preamp
Maximum Input
Voltage (mVpp) 1 2 3 4
30 1 0 0 0 66 1
20 0 1 0 0 56 3.2
10 0 0 1 0 46 10
0 0 0 0 1 36 32
-3 1 1 1 1 33 45
1 = ON = CLOSED SWITCH, 0 = OFF = OPEN SWITCH
J14 S1 J12 J11J13

700-0271-00, Rev. 5 AIB Plug-In Modules, User's Guide
Focal Technologies Corp. Page 13 of 17
Although the card is configured to operate with two-wire, un-amplified hydrophone inputs, the hydrophone plug-in may be factory modified to provide +12V to an external hydrophone pre-amplifier on a third conductor and bypass the gain of the internal pre-amplifier. Pin designations for the AIB-HYDRO plug-in modules are given in the table below.
Table 4-8: AIB-HYDRO Pin Designations
Pin Designation
1 Chassis* (optional)
2 N/C (+12 VDC optional)
3 - Signal (GND on output)
4 + Signal
*The chassis pin is normally left open on the mating connector. Frequencies from 16 Hz to 28 kHz (-3 dB points) are passed through the system, though frequencies slightly outside this range may be transmitted if the added loss can be compensated by additional S1 gain. If low frequency noise pick up (typically 50 or 60 Hz) is introduced by improper shielding, the lower cutoff frequency may be raised by adding a shunt resistor across pins 3 and 4 to attenuate the lower frequencies. The chassis pin on the WAGO connector should be connected to the shield of the hydrophone cable. The analog signal on the input board (remote end) is digitized at 73 kilosamples per second with a 12-bit resolution after amplification and reconstructed at the output board (console end) with no additional gain. (Switch bank S1 is not active when the hydrophone board is configured for output.) Output impedance is approximately 34 ohms, which is suitable for high impedance loads and is even capable of directly driving 8-ohm speakers, although with a corresponding loss in output power. Maximum output level is limited to 2 Vpp, yielding a dynamic range of roughly 66 dB. AIB-HYDRO cards may be modified for compatibility with different input voltage levels, such as IRIG-B or outputs from pre-amps. For large input signals (> 45 mVpp) the on-board pre-amp is typically bypassed. Modified AIB-HYDRO cards will have different variants in the part numbers (-XX). For example, AIB-HYDRO with P/N 903-0244-02 is modified to provide +12 VDC supply at the WAGO connector on pin 2, and the input pre-amp is bypassed. (The 903-0244-02 is only used subsea for connection to the hydrophone; the standard 903-0244-00 should be used at the surface.)

700-0271-00, Rev. 5 AIB Plug-In Modules, User's Guide
Focal Technologies Corp. Page 14 of 17
4.5 MS900 Analog Sonar Plug-In AIB-MS900 P/N 903-0250-00 AIB-MS900L P/N 903-0250-01 modified for low frequency (LF)
The MS900 Analog Sonar Interface AIB plug-in (AIB-MS900) is compatible with the analog telemetry used by the Mesotech MS900 sonar system. The AIB uses only one configuration jumper, J11, shown below in Figure 4-6. Pin 1 of J11 is the square pin, which is also marked with a silk-screened "C". If the jumper is placed across pins 1 - 2, the board is configured for the console module, which interfaces with the MS900 controller. With the jumper across pins 2 - 3 of J11, the board is configured for the remote module, which interfaces with the Model 971 sonar head. No other jumper settings are required.
Figure 4-6: AIB MS-900 Plug-In Module (Top View)
The MS900 interface must be installed on a motherboard or adapter card supporting AIB plug-ins, such as the AIB-4 or the HDB-TX. Because of the high-speed sampling required, the MS900 plug-in cannot be used in the medium-speed data slots on the Model 903. The MS900 plug-in can be used with the GLINK-based Model 903 high-speed data slot (typically adjacent the FMB) or with the Model 907 or Model 914 adapter cards. The 2.5G Model 903 systems (with FMB-X-2.5) support the MS900 module in any data slot. Pin designations for the AIB-MS900 plug-in modules are given in the table below. The polarity of the signal lines does not matter.
Table 4-9: AIB-MS900 Pin Designations
Pin Designation
1 Chassis * (optional)
2 N/C
3 Sonar Signal/Data
4 Sonar Signal/Data
*The chassis pin is normally left open on the mating connector. The standard AIB-MS900 plug-in is designed for compatibility with the high frequency (HF) telemetry system used by the MS900 system. The card may be modified to the AIB-MS900L version for compatibility with the less common low frequency (LF) analog telemetry system, used mainly for commercial fishing applications. Sonars with digital telemetry, such as the MS900D and MS1000, should be used with a digital serial interface AIB plug-in, such as the AIB-485 or AIB-232.
J11

700-0271-00, Rev. 5 AIB Plug-In Modules, User's Guide
Focal Technologies Corp. Page 15 of 17
4.6 CANBUS Plug-In AIB-CANBUS P/N 903-0297-00
The CAN bus interface AIB plug-in (AIB-CANBUS), as shown in Figure 4-7, provides transparent extension of CAN 2.0A and 2.0B over the fiber optic multiplexer system. Each AIB card acts as a node on the local CAN bus, handling media access and packet acknowledgements. The AIB cards at either end of the multiplexer system are connected through the fiber optic link as a bridge between two separate CAN bus networks. Packets relayed through the optical bridge are regenerated as CAN format packets at the other end and placed on the local bus. This CAN bus bridge configuration is particularly well suited to sensor networks where all of the sensors are at one end of the system, e.g. an ROV, and the bus master controller, typically a PC, is at the opposite end. Due to the latency inherent in the optical bridge -- typically 200 us at 1 Mbps and 1 ms at 125 kbps -- this link may not be suitable for more complex CAN bus configurations or systems requiring fast responses, such as TTCAN. The optical fiber itself adds 5 us/km of latency in each direction.
Figure 4-7: AIB-CANBUS Plug-In Module (Top View)
The optical bridge maintains the full 1 Mbps maximum data rate of CAN when used with the Model 914, Model 907, or in the high speed data slot of a GLINK-based Model 903 system. In a low speed data slot on a GLINK-based Model 903 system, the optical link supports up to 250 kbps CAN traffic. The 2.5G Model 903 systems (with FMB-X-2.5) support the full 1 Mbps rate of the AIB-CANBUS in any data slot. Maximum sustained CAN throughput is typically limited by the bus master, not the AIB-CANBUS cards. Messages are transmitted through the optical link in a proprietary frame supported by 32-bit CRC to ensure data reliability. Time-outs in applications or higher layer protocols may need to be adjusted to account for the latency through the fiber link. The maximum unidirectional throughput is 75% at 1 Mbps and 100% at all other speeds.
700-0271-00, Rev. 5 AIB Plug-In Modules, User's Guide
Focal Technologies Corp. Page 16 of 17
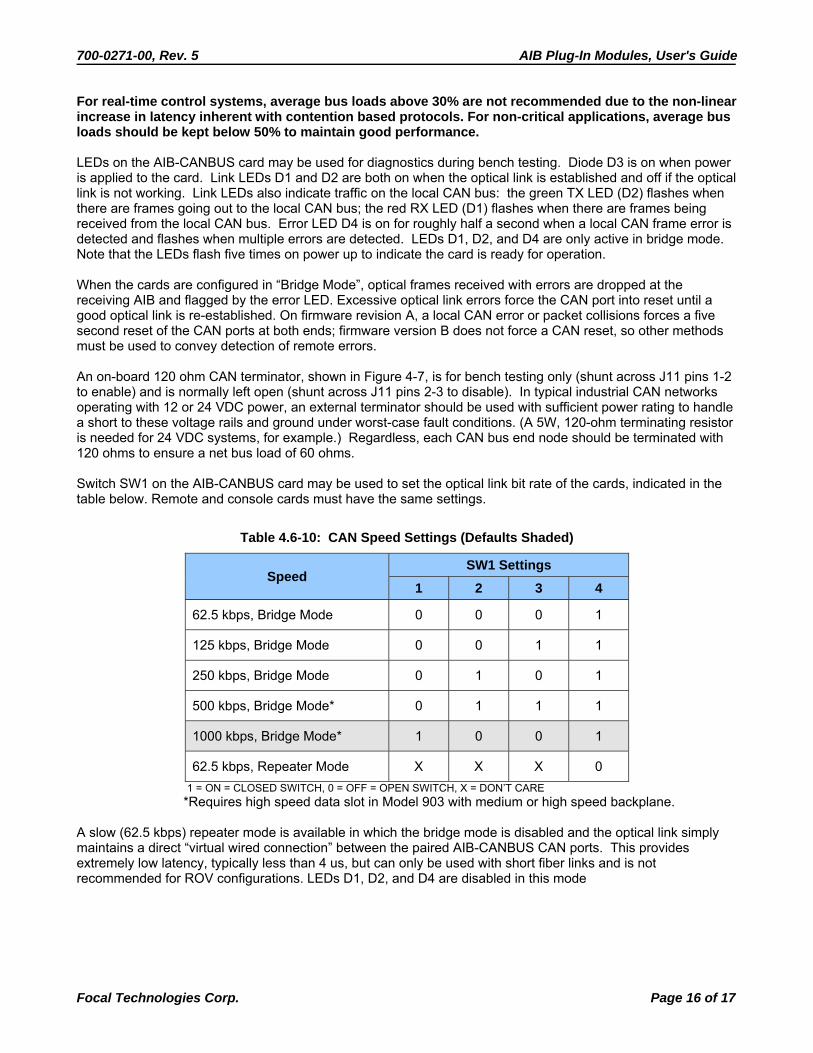
For real-time control systems, average bus loads above 30% are not recommended due to the non-linear increase in latency inherent with contention based protocols. For non-critical applications, average bus loads should be kept below 50% to maintain good performance. LEDs on the AIB-CANBUS card may be used for diagnostics during bench testing. Diode D3 is on when power is applied to the card. Link LEDs D1 and D2 are both on when the optical link is established and off if the optical link is not working. Link LEDs also indicate traffic on the local CAN bus: the green TX LED (D2) flashes when there are frames going out to the local CAN bus; the red RX LED (D1) flashes when there are frames being received from the local CAN bus. Error LED D4 is on for roughly half a second when a local CAN frame error is detected and flashes when multiple errors are detected. LEDs D1, D2, and D4 are only active in bridge mode. Note that the LEDs flash five times on power up to indicate the card is ready for operation. When the cards are configured in “Bridge Mode”, optical frames received with errors are dropped at the receiving AIB and flagged by the error LED. Excessive optical link errors force the CAN port into reset until a good optical link is re-established. On firmware revision A, a local CAN error or packet collisions forces a five second reset of the CAN ports at both ends; firmware version B does not force a CAN reset, so other methods must be used to convey detection of remote errors. An on-board 120 ohm CAN terminator, shown in Figure 4-7, is for bench testing only (shunt across J11 pins 1-2 to enable) and is normally left open (shunt across J11 pins 2-3 to disable). In typical industrial CAN networks operating with 12 or 24 VDC power, an external terminator should be used with sufficient power rating to handle a short to these voltage rails and ground under worst-case fault conditions. (A 5W, 120-ohm terminating resistor is needed for 24 VDC systems, for example.) Regardless, each CAN bus end node should be terminated with 120 ohms to ensure a net bus load of 60 ohms. Switch SW1 on the AIB-CANBUS card may be used to set the optical link bit rate of the cards, indicated in the table below. Remote and console cards must have the same settings.
Table 4.6-10: CAN Speed Settings (Defaults Shaded)
Speed SW1 Settings
1 2 3 4
62.5 kbps, Bridge Mode 0 0 0 1
125 kbps, Bridge Mode 0 0 1 1
250 kbps, Bridge Mode 0 1 0 1
500 kbps, Bridge Mode* 0 1 1 1
1000 kbps, Bridge Mode* 1 0 0 1
62.5 kbps, Repeater Mode X X X 0
1 = ON = CLOSED SWITCH, 0 = OFF = OPEN SWITCH, X = DON’T CARE *Requires high speed data slot in Model 903 with medium or high speed backplane.
A slow (62.5 kbps) repeater mode is available in which the bridge mode is disabled and the optical link simply maintains a direct “virtual wired connection” between the paired AIB-CANBUS CAN ports. This provides extremely low latency, typically less than 4 us, but can only be used with short fiber links and is not recommended for ROV configurations. LEDs D1, D2, and D4 are disabled in this mode

700-0271-00, Rev. 5 AIB Plug-In Modules, User's Guide
Focal Technologies Corp. Page 17 of 17
Pin connections for the WAGO connector used with the plug-in are shown in Table 4-11. Typically shielded, impedance controlled (120 ohm) twisted pair cabling is required to maintain signal quality.
Table 4-11: AIB-CANBUS Pin Designations
Pin Designation
1 CAN H
2 CAN L
3 BUS - (Ground)
4 Shield
Refer to drawing 903-2020-00 for additional configuration details on the AIB-CANBUS card.