adam-5510 startup ed.1 -...
TRANSCRIPT

ADAM-5510 SeriesPC Based ProgrammableController
Startup Manual

Table of Contents
1 System Requirements...................................... 11.1 Host Computer Requirements ..................................... 11.2 ADAM-5510 Series Requirements ............................. 11.3 I/O Module Requirements........................................... 2
2 Hardware Installation..................................... 32.1 Power Wiring .............................................................. 32.2 Programming Port Wiring........................................... 42.3 Jumper Settings ........................................................... 5
3 I/O Module Configuration.............................. 63.1 Install ADAM-5510 Series Utility .............................. 63.2 Config. I/O Modules by ADAM-5510 Series Utility.. 7
4 Application Execution at Bootup................. 13
Part No. 2003551010 1st EditionPrinted in Taiwan August 2004
ADAM-5510 Series Startup Manual ii

1 System Requirements1.1 Host Computer Requirements
� IBM PC compatible computer with 486 CPU (Pentium is recom-mended).
� Microsoft Windows 95/98/NT4.0 SP4/2000 or higher versions.� Borland C++ 3.0 for DOS� At least 32 MB RAM.� 20 MB of hard disk space available� VGA color monitor.� CD-ROM.� Mouse or other pointing devices.� At least one standard RS-232 port (e.g. COM1, COM2).
1.2 ADAM-5510 Series Requirements
� One ADAM-5510 Series main unit, i.e., ADAM-5510M, ADAM-5510E, ADAM-5510/TCP or ADAM-5510E/TCP.
� One ADAM-5510 Series Startup Manual� One core clamp for power supply connection.� One ADAM Products Utilities CD.� Power supply for ADAM-5510 Series (+10 to +30 VDC unregulated)� One RS-232 straight through DB-9 cable� One null modem adaptor or cable with DB-9 connectors
1 ADAM-5510 Series Startup Manual

1.3 I/O Module Requirements
At least one I/O module is needed to use the system. A variety of I/O modules are available to meet different application requirements. Table 1.1 gives a current listing of these modules for your reference.
Table 1.1: I/O Module Support List Module Name Specification Reference
ADAM-5013 3-ch. RTD input Isolated
ADAM-5017 8-ch. AI Isolated
ADAM-5017H 8-ch. High speed AI Isolated
ADAM-5018 7-ch. Thermocouple input Isolated
Analog I/O
ADAM-5024 4-ch. AO Isolated
ADAM-5050 7-ch. D I/O Non-isolated
ADAM-5051 16-ch. DI Non-isolated
ADAM-5051D 16-ch. DI w/LED Non-isolated
ADAM-5051S 16-ch. Isolated DI w/LED Isolated
ADAM-5052 8-ch. DI Isolated
ADAM-5055S 16-ch. Isolated DI/O w/LED Isolated
ADAM-5056 16-ch. DO Non-isolated
ADAM-5056D 16-ch. DO w/LED Non-isolated
ADAM-5056S 16-ch. Isolated DO w/LED Isolated
Digital I/O
ADAM-5056SO 16-ch. Iso. DO w/LED (source) Isolated
ADAM-5060 6-ch. Relay output Isolated
ADAM-5068 8-ch. Relay output Isolated Relay Output
ADAM-5069 8-ch. Power Relay output Isolated
Counter/FrequencADAM-5080 4-ch. Counter/Frequency Isolated
Serial I/O ADAM-5090 4-port RS232 Non-isolated
ADAM-5510 Series Startup Manual 2

2 Hardware Installation2.1 Power Wiring
Power Supply ++10~+30 Vdc -
3 ADAM-5510 Series Startup Manual
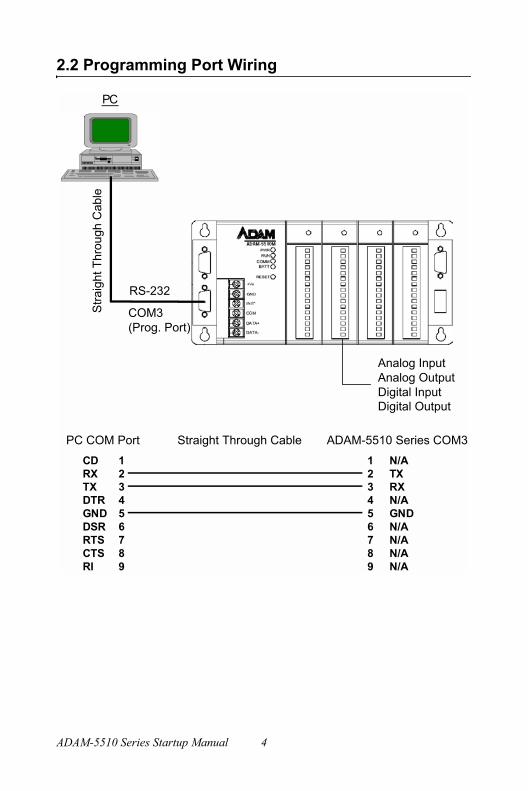
2.2 Programming Port Wiring
CDRXTXDTRGNDDSRRTSCTSRI
123456789
N/ATXRXN/AGNDN/AN/AN/AN/A
123456789
PCS
traig
ht T
hrou
gh C
able
RS-232
COM3(Prog. Port)
PC COM Port Straight Through Cable ADAM-5510 Series COM3
Analog InputAnalog OutputDigital InputDigital Output
ADAM-5510 Series Startup Manual 4

2.3 Jumper Settings
DIP Switch of ID Address:
ID Address = Value of (SW1+SW2+SW3+SW4+SW5)
COM Port Selection for Configuration Tool:
SW7 and SW8 are reserved for future use.
DIP SW1 SW2 SW3 SW4 SW5
ON 1 2 4 8 16
OFF 0 0 0 0 0
DIP SW6
ON COM1/RS-232
OFF COM2/RS-485
5 ADAM-5510 Series Startup Manual

3 I/O Module Configuration3.1 Install ADAM-5510 Series Utility
1. Insert the ADAM Products CD and setup the ADAM-5510 Series Utility.
2. After the ADAM-5510 Series Utility has been installed, you will find two directories under �C:\Program Files\Advantech\� direc-tory. They are named �ADAM-5510M-5510E Utility� and �ADAM-5510TCP-5510ETCP�.
If you are using ADAM-5510M or ADAM-5510E, you have to use the files under the �ADAM-5510M-5510E Utility� directory.
If you are using ADAM-5510/TCP or ADAM-5510E/TCP, you have to use the files under the �ADAM-5510TCP-5510ETCP Util-ity� directory.
The directory structure is shown below:.
ADAM-5510 Series Startup Manual 6
3.2 Configure I/O Modules by ADAM-5510 Series Utility
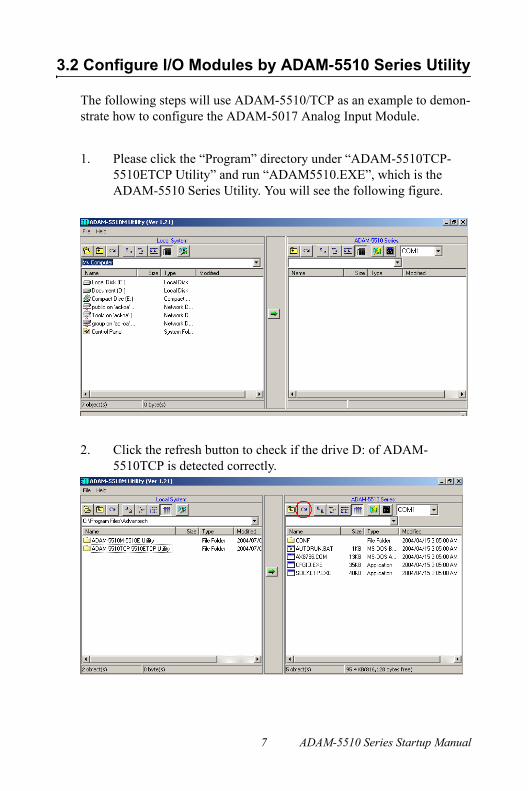
The following steps will use ADAM-5510/TCP as an example to demon-strate how to configure the ADAM-5017 Analog Input Module.
1. Please click the �Program� directory under �ADAM-5510TCP-5510ETCP Utility� and run �ADAM5510.EXE�, which is the ADAM-5510 Series Utility. You will see the following figure.
2. Click the refresh button to check if the drive D: of ADAM-5510TCP is detected correctly.
7 ADAM-5510 Series Startup Manual

3. Click the refresh button to check if the D drive of ADAM-5510TCP is detected correctly.
4. Download the I/O Module Configuration Tool �SIMU5KE.EXE� under the �Config� directory onto drive D: of ADAM-5510/TCP.
ADAM-5510 Series Startup Manual 8

5. Set DIP SW6 as ON.
COM Port Selection for Configuration Tool:
6. Set DIP SW1 to SW5 as OFF.ID Address = 0
7. Run �SIMU5KE.EXE� and check the Communication Tool does use COM1/RS-232 port.
DIP SW6
ON COM1/RS-232
DIP SW1 SW2 SW3 SW4 SW5
OFF 0 0 0 0 0
9 ADAM-5510 Series Startup Manual

8. Connect the Host PC to COM1/RS-232 on ADAM-5510/TCP by a null modem cable.
Analog InputAnalog OutputDigital InputDigital Output
CDRXTXDTRGNDDSRRTSCTSRI
123456789
CDRXTXDTRGNDDSRRTSCTSRI
123456789
PC COM port ADAM-5510 Series COM1Null modem cable
RS-232
PC
Null modem cable
COM1 RS 232
ADAM-5510 Series Startup Manual 10

9. Insert the ADAM Products CD and setup the ADAM-4000-5000 Utility.
10. Close the ADAM-5510 Series Utility and run ADAM-4000-5000 Utility �ADAM40005000.EXE�.
11 ADAM-5510 Series Startup Manual

11. Search the ADAM-5510/TCP Module and configure the input range of the ADAM-5017 Analog Input Module.
12. Close the ADAM-4000-5000 Utility and reset the ADAM-5510/TCP.
ADAM-5510 Series Startup Manual 12

4 Application Execution at BootupThe following steps will demonstrate how to automatically execute an application after bootup. All that needs to be done is to update �AUTO-RUN.BAT� and run �DHCPSTAT.EXE� automatically after boot up.
1. Download the �DHCPSTAT.EXE� onto ADAM-5510/TCP.
2. Edit �AUTORUN.BAT� under �Source\Drive_D\Default_Files� directory.
13 ADAM-5510 Series Startup Manual

3. Update �AUTORUN.BAT� to ADAM-5510/TCP in the utility.
4. Reset ADAM-5510/TCP and check if the �DHCPSTAT.EXE� has been executed correctly.
5. You are finished!
ADAM-5510 Series Startup Manual 14