ach record manager - rbc royal bank...ach record manager training job aid june 2019 6 2.1 payment...
TRANSCRIPT

ACH Record Manager
ACH Record Manager Training Job Aid June 2019 1
Save records of account details for sending or receiving funds ACH Record Manager is the tool within your ACH Direct Payments and Deposits service to prepare and process your payment instructions. Whether you are sending out or collecting funds, the steps in ACH Record Manager are the same in that it allows you to save your payees’ or payers’ account details into payment groups that can then be used to create files – a file being a batch of payment instructions. Whenever we do a transaction, whether it is online or offline, we always follow three steps: prepare, process, and get proof. In the context of ACH Record Manager:
1. Prepare
Payment Groups – Groups are the first step to creating payments; they organize your payees’/payers’ account details like an online file folder. Payees/payers stored in a group can be paid/debited in a batch “file.”
Payment Records – Records contain the payees’/payers’ details: name, and bank, branch and account numbers. Once a record has been added, it can later be edited or deleted and the amounts can be changed at any time.
2. Process
Payment Files – A file is a batch of payment instructions that is produced in RBC Express using the records you have saved in your groups. The file content may vary: it could be one payment or multiple
3. Proof
Reports – On the Service Reports/Data Files page, RBC will confirm the status of your files in the Input Verification and Edit Report
What is a Client Number? The RBC Express menu will display your organization’s 10-digit client number. That client number represents your account with RBC, its currency (CAD or USD), and whether funds are outgoing or incoming:
PDB / PDS - Direct Deposits o Outgoing payments: payroll, vendors/suppliers, expense reimbursements
PAP (PAD) - Pre-authorized Payments o Incoming payments: rent, leases, fees/dues
NOTE for PAP clients: You have two ways to use the ACH Record Manager. This document demonstrates the “regular” method. The other way is the “contract” method (refer to our ACH Contracts document). Payments to USA: Sending ACH Direct Deposits across the border to the USA requires special cross-border permission. Speak with your RBC Representative to learn more.
Administrative work may be required:
Before you begin: Administrative work may be required Before payments can be sent, administrators must input settings that reflect your organization’s payment approval process. There are 3 steps in RBC Express to complete a payment:
1. Create 2. Approve 3. Release Through a combination of user permissions and approval rules, your profile settings could allow one person to complete all three actions independently, or it could outline a segregation of duties among multiple users. Any user who can approve will need an RSA Secure ID Token. To learn more about tokens, permissions, and approval rules, please refer to the Administration document.

ACH Record Manager
ACH Record Manager Training Job Aid June 2019 2
1. Payment Groups - Finding ACH Record Manager ACH Record Manager is an integrated part of your ACH Direct Payments and Deposits service and is found in the Payments, Transactions & Deposits tab in the blue band toward the top of every page within RBC Express.
Within the Payments, Transfers & Deposits tab, choose “More” under the ACH Direct Payment and Deposits heading to arrive at the module’s “Summary” page.
If you do not have “More,” choose any of the links, then select “Summary” on the left-hand menu.
Although not named explicitly, ACH Record Manager is the top part of the menu of the left, as shown here.

ACH Record Manager
ACH Record Manager Training Job Aid June 2019 3
1.1 Payment Groups - Your first time? Start by creating payment groups There will be no group the first time you use ACH Record Manager. You will need to create at least one group into which you will add your payees or payers. If you already have groups, skip to 1.2 Payment Records. The purpose of the group is that any payee/payers within it can be paid/debited together in a batch file. However, you do not need to pay everyone every time, and each can have different due dates or amounts.
You can have as many groups as you want, but it is better to have only one or two per client number.
Example for outgoing funds: one group for payroll and one for payables might do.
Example for incoming funds: a single group might suffice or perhaps two if you want to separate those paying on the first of the month from those paying on the fifteenth of the month.
Click “Create Group” to begin creating a group.
Select the right client number if you have more than one.
Give your group a simple name (your payees/payers will not see it).
Leave Payment Group Type on “Regular.” (Note to PAP clients: See the ACH Contracts document to determine if they would suit you better).
Click on Continue.
ACH Record Manager
ACH Record Manager Training Job Aid June 2019 4
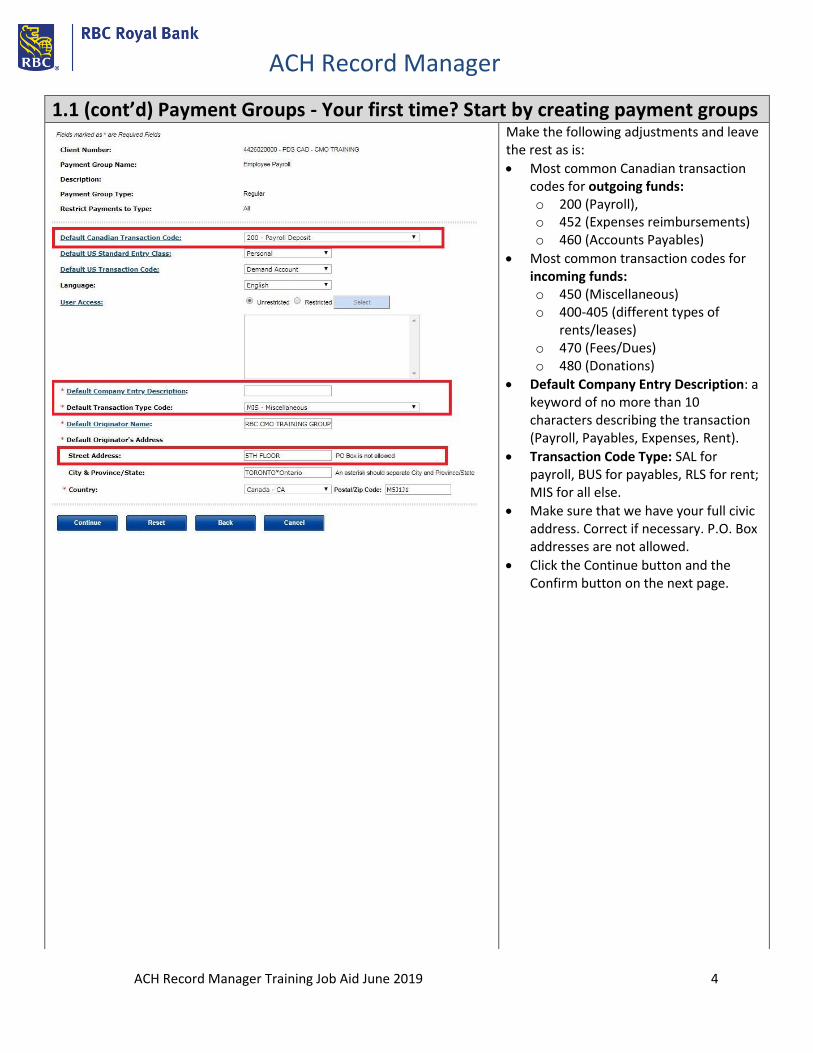
1.1 (cont’d) Payment Groups - Your first time? Start by creating payment groups
Make the following adjustments and leave the rest as is:
Most common Canadian transaction codes for outgoing funds: o 200 (Payroll), o 452 (Expenses reimbursements) o 460 (Accounts Payables)
Most common transaction codes for incoming funds: o 450 (Miscellaneous) o 400-405 (different types of
rents/leases) o 470 (Fees/Dues) o 480 (Donations)
Default Company Entry Description: a keyword of no more than 10 characters describing the transaction (Payroll, Payables, Expenses, Rent).
Transaction Code Type: SAL for payroll, BUS for payables, RLS for rent; MIS for all else.
Make sure that we have your full civic address. Correct if necessary. P.O. Box addresses are not allowed.
Click the Continue button and the Confirm button on the next page.

ACH Record Manager
ACH Record Manager Training Job Aid June 2019 5
2. Payment Records - Adding someone new into a group Here is how to add someone that does not yet exist in a group.
Select the “Create” link under the Payment Records heading of the left-side menu.
Select the group in which you are adding.
Note: If you have client numbers for outgoing and incoming funds, change the Payment Type to “Direct Deposit” if the group in based on a PDS or PDB client number type.
Click the “Continue” button.
Customer number is for your own reference and it does not have to be numeric. If you do not already have such a reference, enter a short name. In this example, it is based on the “customer’s name” which is John Smith (i.e. SMIJOH).
Customer Name: Enter the name of the payee/payer.
Amount: Enter 0.00 for the amount (unless you will be collecting a known fixed amount, in which case you can enter that amount).
Account number details
Bank number: Financial institution number, 4 digits (click Verify after entering that number)
Branch (also called transit): 5 digits
Account: 7-12 digits, no space or hyphen
Normally leave the payment number to its default, which is 00.
Click the Continue button, then the Confirm button on the next page.

ACH Record Manager
ACH Record Manager Training Job Aid June 2019 6
2.1 Payment Records - Inquire / Modify - Editing or deleting an existing record Here is how to make major edits or to delete an existing record. If you are only updating the amounts, skip to 2.2 Updating amounts.
Select the “Inquire/Modify” link under the Payment Records heading of the left-side menu.
Select the payment group in which the record is to be found.
Provide one bit of information to identify the record within the group (Hint: the customer number is often the easiest bit of info to enter).
Click the Search button.
Once the record has been found, check the box in front of it.
If you choose Modify, the next screen will show you the record in a screen similar to when you created it. Make the necessary changes, click the Continue button, then the Confirm button on the following page.
If you choose Delete, the next page will show you the information in the record you are about to delete. Click the Confirm button on that page to complete the deletion of the record.
ACH Record Manager
ACH Record Manager Training Job Aid June 2019 7
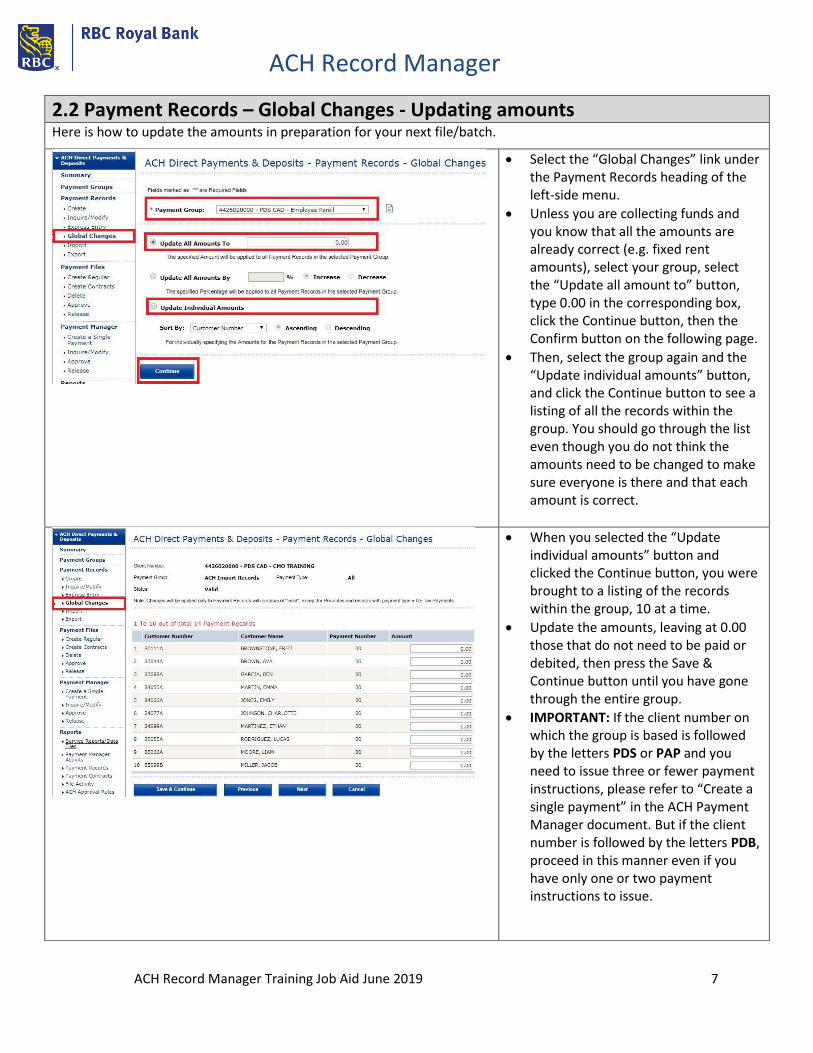
2.2 Payment Records – Global Changes - Updating amounts Here is how to update the amounts in preparation for your next file/batch.
Select the “Global Changes” link under the Payment Records heading of the left-side menu.
Unless you are collecting funds and you know that all the amounts are already correct (e.g. fixed rent amounts), select your group, select the “Update all amount to” button, type 0.00 in the corresponding box, click the Continue button, then the Confirm button on the following page.
Then, select the group again and the “Update individual amounts” button, and click the Continue button to see a listing of all the records within the group. You should go through the list even though you do not think the amounts need to be changed to make sure everyone is there and that each amount is correct.
When you selected the “Update individual amounts” button and clicked the Continue button, you were brought to a listing of the records within the group, 10 at a time.
Update the amounts, leaving at 0.00 those that do not need to be paid or debited, then press the Save & Continue button until you have gone through the entire group.
IMPORTANT: If the client number on which the group is based is followed by the letters PDS or PAP and you need to issue three or fewer payment instructions, please refer to “Create a single payment” in the ACH Payment Manager document. But if the client number is followed by the letters PDB, proceed in this manner even if you have only one or two payment instructions to issue.

ACH Record Manager
ACH Record Manager Training Job Aid June 2019 8
3. Payment Files - Create, approve and release payment instructions Please note that the number of steps to process the amounts that have been updated may vary based on your permissions in ACH Record Manager and the approval rules the administrators have set.
Select the “Create Regular” link under the Payment Files heading of the left-side menu.
Client Number: Select the client number.
Click the Filter button next to it.
Payment Group: Select the group with which you are working.
Same Due Date: if you choose your due date form this calendar, all payments in the file will be paid/collected on the same due date. (It cannot be the current day, but perhaps the next business day or later)
Click the Continue button.

ACH Record Manager
ACH Record Manager Training Job Aid June 2019 9
3. (cont’d) Payment Files - Create, approve and release payment instructions
IMPORTANT: On this page, never forget to click on the “View Detail” link and save the report, as this is the ONLY time you will have a report of the breakdown of the individual payments within this file. On your bank statement, you will only see the aggregate amount of the client number’s activity for the due date.
This screenshot shows the view for a user who can approve and release at the same time. The administrators decide who has approval ability and how many approvers are required. You could be asked to approve but the button would be “Submit for Approval,” meaning someone else has to approve and release after you.
If you cannot approve, you will not be asked for a token you will simply click on “Submit for Approval.”
If you are being asked for a token that you do not have, speak with your administrators.
When the approval is done the Summary will show “Completed Today.”
If your file requires further approval and releasing – the approvers can rely on the Summary page to complete those steps.
The words “Pending Approval” are hypertext that will lead them where they need to go to approve.
After examining and approving, they should come back to this summary page, as the words “Pending Release” might be hypertext.

ACH Record Manager
ACH Record Manager Training Job Aid June 2019 10
4. Reports - Getting the Input Verification and Edit Report After the file has been fully approved and released, get the Input Verification and Edit Report within minutes following release to ensure that the payment instructions will go through as expected.
Select the “Service Report/Data Files” link under the Reports heading on the left-side menu.
Upon arriving on this page, always click the “Refresh Reports List” button at the bottom of the page.
If no new report appears yet, wait about a minute and click again the “Refresh Reports List” button. The Input Verification and Edit Report can take up to 15 minutes before it is ready, but it is normally ready within a few minutes from the release of a file.
Your most recent Input Verification and Edit Report should appear toward the top of the list upon refreshing the reports list. Click on its name to view it.
NOTE: If you have more than one client number, you might find it useful to use one of the filters toward the top of this page to ensure that the most recent report appears toward to the top of the list.
Print or save this report, whether there are errors or not. It is the proof of completion of the file you just released.
In the unlikely event that the report indicates that there are any “Transactions held for correction (T-Errors),” please refer to the ACH Payment Manager document to see how you would handle such errors.