aces policy and procedure review and sessions
TRANSCRIPT
1
Spring 2010
ACES Policy and Procedure Review and Sessions Week 2—Safety / Infection Control / Injections
1. Safety Behaviors for Staff - Handout
2. 2010 Patient Safety Goals - Handout
3. Time Out/Universal Protocol - Key Points
4. Report/Patient Hand Off (see “hand off” handout)*
5. SBAR Key Points/Policy / Format Handout
6. Transfer (yellow) Form—Example
7. Joint Commission “DO NOT use list” - Handout
8. Obtaining and Transcribing Physician Orders—Policy
9. EMTALA Screening and Transfer Policy / Authorization for Transfer Form
10. Infection Control :
• Standard Precaution-Contact, Droplet, Airborne Precautions Policy and Key points
• Type and Duration of Precautions—Policy and Worksheet
• Preventing Transmission of Resistant Microorganisms (VRE, MRSA) -Reference only
• MRSA Algorithm
• Resistant Microorganisms Patient Education Forms -Memorial Forms Catalog MFC*
• Infection Control Patient Information Page
• Infection Control Employee Work Restrictions Protocol
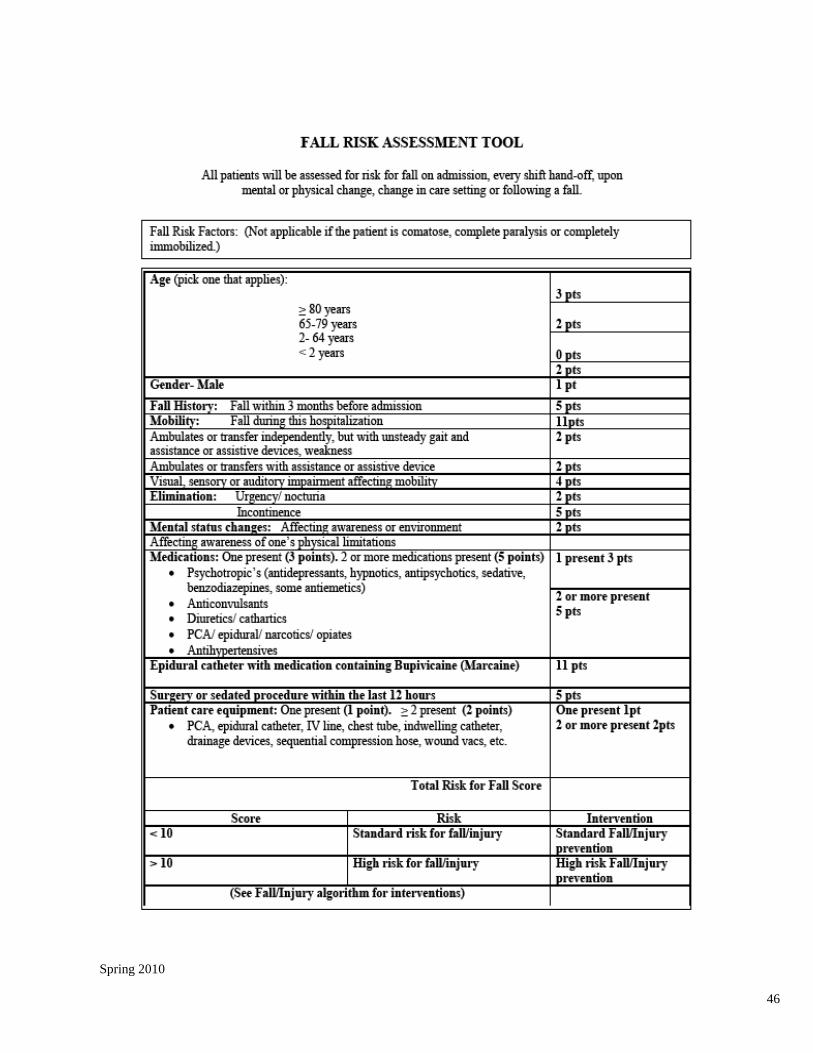
11. Falls Prevention and Management (Fall Assessment forms—Memorial Forms)
12. Restraint—Non-violent/Violent Policies and Algorithims
13. Blood Glucose Testing using Sure Step Flexx Meter—Key Points
14. Initiating a Quantros Memo—Key Points
15. Chain of Command - Key Points
A.M. Session - See Matrix
Team Presentations on Worksheets:
1-Patient Transfers: Inpatient/EMTALA/LTC/POLST
2-Safety Goals
3-Infection Control
4-Injections-CBGs
5-Falls
P.M. Session
Falls Scenario
Chain of Command Scenario
Diabetic/MRSA Scenario

2
Spring 2010
WEEK 2
SKILLS STATION MATRIX AND SIMULATION MATRIX
Time All Groups Together
0800-0830 Debriefing/Ice Breaker
0830-0900 Pretest
0900-0915 Break
0915-0945 Team Assignments/Worksheets
TEAM Presentations
Group
1
0945-1015
Group
2
1015-1045
Group
3
1045-1115
Group
4
1115-1145
Group
5
1145-1215
Pt Transfers:
Inpatient
EMTALA
LTC/POLST
Safety Goals:
Worksheet
Infection
Control:
Worksheets
Injections
CBG
Worksheets
Falls
Worksheets
1215-1300 Lunch on your own
1315-1345 Group Review— Restraints / One to One - Key Points
1345-1430 Group 1 Group 2 Group 3
1430-1515 Group 2 Group 3 Group 1
1515-1600 Group 3 Group 1 Group2
Scenarios Falls Chain of Command Diabetic/MRSA
1600 –1620 Quiz
1620 –1630 Evaluations

3
Spring 2010

4
Spring 2010

5
Spring 2010

6
Spring 2010

7
Spring 2010
Policy: Time Out/Universal Protocol For complete policy, go to Policies and Procedures (Administrative) on Memorial’s Intranet
Purpose: To correctly identify the patient and procedure. Using the Time Out/
Universal Protocol prevents wrong site, wrong procedure and wrong person sur-
gery OR procedure.
Key Points: • The Universal Protocol applies to all operative and other invasive procedures that expose
patients to more than minimal risk, including procedures done in settings other than the
operating room such as specials, endoscopy, patient room, or other interventional radiol-
ogy procedures.
• Certain routine “minor” procedures such as venipuncture, peripheral IV line placement,
insertion of NG tube or Foley catheter do NOT fall within the scope of this protocol, and
therefore do NOT require a team Time Out. However, correct patient identification using
two patient identifiers/procedure identification is ALWAYS required.
• Pre-procedurally VERIFY the correct person, procedure and site.
• MARK the operative site for procedures involving right/left distinction, multiple structures
(ie. fingers or toes), or multiple levels (ie. spinal procedures). The mark must be visible af-
ter the patient has been prepped and draped. The Licensed Independent Practitioner (LIP)
must mark an “X” or initial the operative site. Do NOT mark a non-operative site(s) unless
necessary for some other aspect of care.
• Conduct and Document a “time out” immediately before starting the procedure. STOP
and do not proceed if any discrepancy. All members of the surgical/procedural team must
be present and participate in the time out process.
ACES Policy and Procedure Review

8
Spring 2010
Policy: Report/Patient Hand Off For complete policy, go to Policies and Procedures (Documentation & Communication) on Memorial’s
Intranet
Purpose: To improve communication between the health care team at the time
of report/hand off, to ensure standardization and to allow for the opportunity of
asking questions and responding.
Key Points: • The oncoming staff shall be provided with a brief report of necessary information concern-
ing patients with the SBAR format: Situation, Background, Assessment, Recommendation.
• If the department chooses to tape the hand off (report), a face to face conversation is re-
quired at the end of the report. The off-going provider must communicate any updates
directly with the on-coming provider. This process will allow for questions to be ad-
dressed.
General Nursing Units Bedside report and neuro assessment shall occur on all patients with a neuro-logical focus problem who are fragile and at high risk for deterioration (GCS) or if has had previous changes in their neuro status. Critical Care Unit In the Critical Care Unit the handing off and accepting RNs will do a focused neuro assessment together on all patients with a neurologic focus problem fol-lowing hand off report.
• Neuro assessment may include: Level of Consciousness (LOC), ie. Awake,alert or not and
what they are responding to. As reminders of what patients respond to staff may use the
nemonic AVPU = A( awake, alert) -Alert, V (verbal) -how they respond to Verbal stimuli
(ex. opens eyes to name), P (pain) -how they respond to Painful stimuli—”pt. pulls right
hand away when pressure applied to rt. thumbnail”, or U (unresponsive)-Pt. has no move-
ment to voice or when pressure applied to rt. thumbnail”; and/or Glascow Coma Scale—
GCS which evaluates: Eye Opening, Motor, and Verbal responses. For complete GCS scale
see Adult/ Neuro Assessment section under assessments in electronic charting and/or on
Memorial Forms. Neuro status should be documented in DAR if considered a focus prob-
lem.
ACES Policy and Procedure Review

9
Spring 2010
PROCEDURE:PROCEDURE:PROCEDURE:PROCEDURE:
All staff will make every effort to have their charting completed prior to report. S.B.A.R. (Situation-Background-Assessment-Recommendation) is a framework for communication between members of the health care team. This communication tool is used to set expectations of communication during hand off (report) and foster a cul-ture of safety. Situation: Data based on current situation of patient including but not limited to: name, diagnosis and secondary diagnosis, covering physician, vital signs, code status, diag-nosis, IV fluids, significant lab values. Background: Patient focus problems, to include mental status, skin integrity, fall as-sessment, use of oxygen, mobility status, tolerance to activity, psychosocial issues/concerns, etc. Physician and ancillary staff consults, previous tests, allergies, and cur-rent code status. Assessment: Head to toe physical assessment, vital signs, IV�s, drip line assessment, oxygen, vent settings, current lung status, diagnosis specific assessment (i.e. bowel tones present for s/p abdominal surgery), wound status if present, MI, etc. pain assess-ment, drains, tubes, wound assessment and care, ADL's diet, activity, restrictions, iso-lation, fall, bleeding precautions, fluids etc, lab, diagnostics, responses to treatment, care partner, family updates. Recommendation: Follow up with physician, any communication needs with health care team or family, potential lab work, PT/OT, special programs, plan of care, needs to be addressed, orders pending completion, treatments, tests, discharge planning, Is-sues and barriers. Reference: Institute for Healthcare Improvement: SBAR Technique for Communication Healthcare Risk Management; August 2005 JCAHO NPSG 2006: Improve Effectiveness of Communications Among Caregivers
Additional Excerpts from Patient Handoff Policy

10
Spring 2010

11
Spring 2010

12
Spring 2010
It is just like me to use the Pt Handoff form
• Every pt transfer
• Every time

13
Spring 2010

14
Spring 2010

15
Spring 2010

16
Spring 2010

17
Spring 2010

18
Spring 2010
MUST BE SIGNED BY NURSE SUPERVISOR !!

19
Spring 2010

20
Spring 2010
Policy: Infection Control
For complete policies, go to Policies and Procedures (Infection Control Plan) on Memorial’s Intranet
Purpose: To prevent healthcare workers from transferring infections to patients and to pre-
vent healthcare workers from acquiring infections themselves.
Key Points:
• Standard Precautions are used on all patients, not just the infected patient. The standard
method considers all patients and laboratory specimens as potentially infected. It provides
protection from not only the known infected cases, but the unrecognized cases as well,
and therefore protects patients and healthcare workers alike.
• Contact Precautions: microorganisms can be transmitted by direct contact with the pt or
indirect contact with the pts environment or belongings (ie. MRSA, C. Diff, VRE, Draining
wounds).
Perform Hand Hygiene before and after patient contact! Use soap and water if C.diff
* place pt in a private room (cohort if necessary with pt who has same infection)
* wear gloves and gown
* wear a yellow surgical mask if in close contact with pts who have RSV, parainfluenza
virus, or multi-resistant organisms in the sputum
* limit pt transport to essential purposes only
* removal of barriers (gown, gloves, mask) are to be done before leaving the pt room
• Droplet Precautions: microorganisms are transmitted by contact w/ large droplet particles
(ie. Pneumonia, Pertussis)
Perform Hand Hygiene before and after patient contact!
* place patient in private room (cohort if necessary with pt who has same infection)
* wear yellow surgical mask when within 3 ft. of pt or upon entering room
• place a yellow surgical mask on pt during transport. Limit transport to essential
purposes only
• Airborne Precautions: microorganisms are spread by small particle droplets that enter
through the nose and mouth (ie. TB, Chicken Pox, Small Pox)
Perform Hand Hygiene before and after patient contact!
* Place pt in private room with Negative Airflow
* Healthcare providers that are immune to chicken pox and measles do NOT need to
wear a mask. Chicken Pox (including Shingles) should also have a CONTACT sign on
door. If pt has known or suspected TB, Particulate Respirator Mark must ALWAYS be
worn.
* Place yellow surgical mask on patient during transport
DO NOT REMOVE PRECAUTIONS SIGNS PRIOR TO ROOM CLEANING!
ACES Policy and Procedure Review

21
Spring 2010

22
Spring 2010

23
Spring 2010

24
Spring 2010

25
Spring 2010

26
Spring 2010
27
Spring 2010

28
Spring 2010

29
Spring 2010

30
Spring 2010

31
Spring 2010
32
Spring 2010

33
Spring 2010

34
Spring 2010

35
Spring 2010

36
Spring 2010

37
Spring 2010

38
Spring 2010

39
Spring 2010

40
Spring 2010

41
Spring 2010

42
Spring 2010
Employee Health
Employee Health
Work Restrictions Protocol
PROTOCOL:
From the Department of Infection Control at YVMH
February 15 , 2008
WORK RESTRICTION POLICIES FOR EMPLOYEES
Infection Restriction Length of Restriction
Conjunctivitis
(Pinkeye)
Restrict from patient care Until discharge resolves
Gastroenteritis Restrict from direct patient care and
food preparation
Until symptoms resolve or person is
deemed non-contagious
Hepatitis A Restrict from direct patient care Until 1 wk after onset of jaundice
Hepatitis B None
Hepatitis C None
Herpes simplex,
Orofacial
Restrict from direct care of newborn
infants
Until lesions are dry
Herpes
whitlow (hands)
Restrict from direct patient care Until lesions are crusted over
Infectious diarrhea Restrict from patient care Until 48 hr. cessation of diarrhea
HIV None
Influenza Remain off work Until 5 days after onset of fever
Measles Remain off work Until 7 days after onset of rash
MRSA Remain off work Until cleared to return by
Infection Control
Mumps Remain off work Until 9 days after onset of parotitis
Pediculosis
(Head lice)
Restrict from direct patient contact Until treated
Pertussis
(Whooping cough)
Remain off work Until treated for 5 days with
appropriate antibiotic
Rubella
(German measles)
Remain off work Until 5 days after onset of rash

43
Spring 2010
Infection Restriction Length of Restriction
Staphylococcal skin
infection
Restrict from direct patient care Until treated for 24 hours with
appropriate antibiotic
Streptococcal
infection, gr A
Restrict from direct patient care Until treated for 24 hours with
appropriate antibiotic
Tuberculosis Remain off work Until proven noninfectious
Varicella
(Chicken Pox)
Remain off work Until lesions are crusted
Shingles
(Herpes zoster)
If covered, restrict from care of
immunocompromised patients.
If cannot be covered, restrict from
patient care.
Until lesions are crusted
Effective Date: 03/13/2008
Prepared by: Gay Scott/Infection Control Nurse Manager/Memorial
Approved by: Policy and Procedure Commiittee Date: 03/13/2008
Reviewd by: Policy and Procedure Commiittee Date: 03/13/2008
Revised by: Date:
Approved by: Policy and Procedure Commiittee Date: 03/13/2008

44
Spring 2010
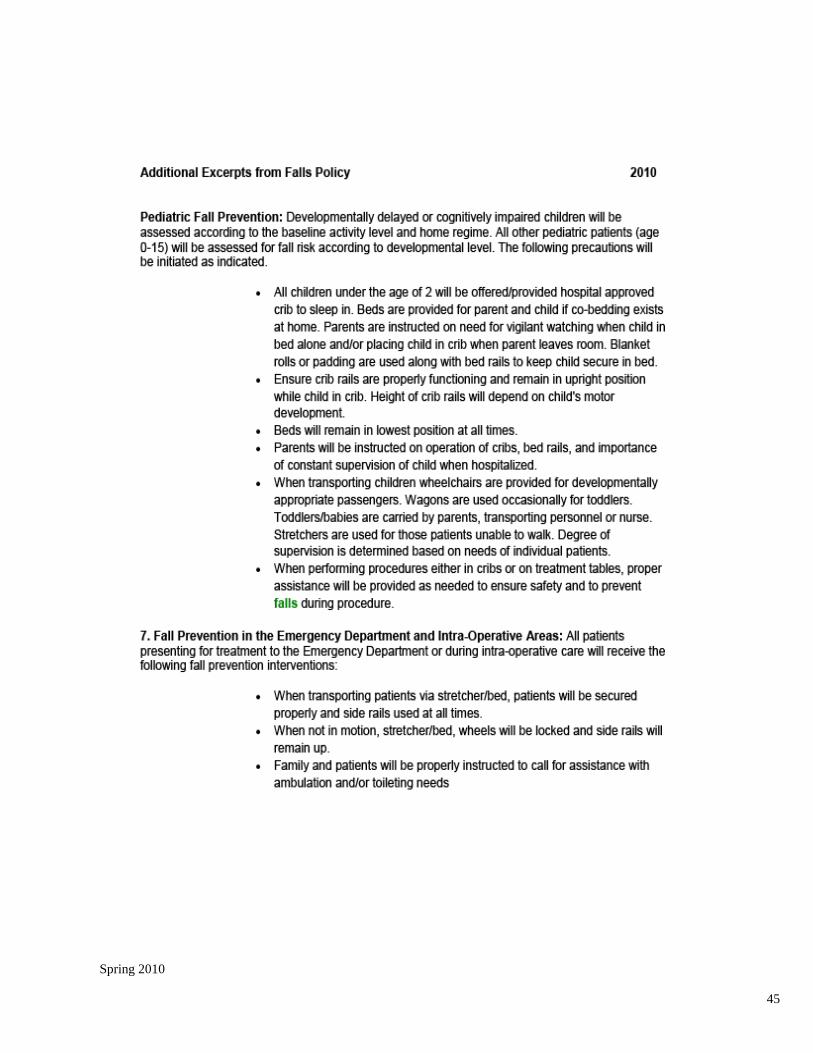
Policy: Falls Prevention and Management For complete policy, go to Policies and Procedures (General Nursing) on Memorial’s Intranet
Purpose: To promote patient safety by identifying patients at risk for falls. To im-
plement a fall prevention plan of care for patients identified at risk for
falls.
Key Points: • Registered Nurses are responsible for completing an initial fall risk screening during each
patient’s initial admission assessment. Nursing staff is responsible for reassessing patients.
• Each patient will be reassessed once a day, upon transfer, and with any change in status. A
change in status can be defined as surgery, a fall, change in mental or physical condition,
and any procedure requiring moderate sedation. With a change in status, the reassess-
ment must be completed by an RN.
• Fall Protocol: *Yellow arrows will be placed on the door jam of the room of any patient
assessed at risk to fall. Every Memorial employee is responsible to look into the room as
they pass by and report to the nursing staff is the patient is trying to climb out of bed or
ambulating in the room without assistance.
*Yellow armbands, footies will be placed on patients, Yellow Arrows are placed on the pa-
tient’s door jam and Yellow laminated signs at the head of the bed and door entrance as a
“Caution” for patients at risk for falls.
Fall Management
• In the event of a fall, the family and the patient’s physician will be notified as soon as possible.
Document the event and patient condition in the nurse’s notes and complete a Quantros Memo.
For complete Fall Management information see the current policy.
• If suspected or obvious injury, call physician, family and Nursing Supervisor. (Supervisor
should be notified of all falls.)
• Implement C-Spine precautions if patient has obvious, or patient-reported head and/or neck
injury. (C-Spine precautions require 2 staff, head and neck stabilization by one staff person
and second staff person will log-roll patient on to their back and apply neck collar)
• On any unwitnessed fall or suspected head or neck injury vital signs and neuro checks will be
taken every 15 minutes for one hour then hourly for four hours and documented in neuro as-
sessment section in Soarian.
• For suspected head, neck, spine injuries or obvious deformities, do not move patient. Call the
Rapid Response Team immediately. Off-site clinics call 911.
• After you have assessed for any injury and determined that patient is safe to move, move pa-
tient to comfortable location (bed, chair, exam table).
ACES Policy and Procedure Review
45
Spring 2010
46
Spring 2010

47
Spring 2010

48
Spring 2010
Policy: Restraints/Seclusion For complete policy, go to Policies and Procedures (General Nursing) on Memorial’s Intranet
Purpose: To define the types of restraints including seclusion and for the safe
and correct application and utilization after ALL possible and appropri-
ate least restrictive measures have failed.
Key Points:
• Patients have the right to be free of restraints
• The RN will consider risk vs. benefit with each application of restraint or seclusion
• The use of restraints/seclusion is only to be used when less restrictive measures fail. All
efforts up to and including using restraints/seclusion needs to be carefully documented.
• There are 2 main categories of restraints; Non– Violent (Medical-Surgical) and Violent/Self
Destructive (Behavioral) Restraint. See algorithims.
• Restraints are used only for emergencies in which there is an imminent risk of patient
physically harming self, or harming others. Patient who is at risk for harm due to un-
planned removal of tubes or devises that are of a critical nature. Patient is a risk for harm
to self or others due to impaired mental status or LOC that prevents compliance with
safety measures.
• The type of restraint used should be the least restrictive that will be effective to protect
the patient from harm.
• All orders for restraints/seclusion are time limited – refer to policy
• As needed (prn) orders are NOT allowed
• Clinical Justification for restraint should be documented on the Dr. order and in the chart-
ing. This assessment includes: Neurological and cognitive status; evaluation of appropriate
alternatives; evaluation of medical equipment and tubes for managing medical condition.
• The policy covers devices that are considered a restraint : 4 siderails (except on air beds/Ed
gurneys), belts, hand mitts, vests, wrist/foot restraints, Geri chairs, net/closure beds.
• Please see policy for items not considered a restraint.
• The patient and family are educated about restraints and given the Restraint Education
Form.
• The Restraint is listed as a focus problem on the Kardex and updated as changes occur.
• There are 6 exclusions from restraints noted as follows; (1)Forensic,(2) Voluntary mechani-
cal support and protective devices, (3) Positioning or securing devices, (4) Therapeutic
holding, (5) Protective (therapeutic) mattress, (6) Protocols
ACES Policy and Procedure Review

49
Spring 2010

50
Spring 2010

51
Spring 2010

52
Spring 2010

53
Spring 2010
54
Spring 2010

55
Spring 2010

56
Spring 2010

57
Spring 2010

58
Spring 2010

59
Spring 2010
Policy: Blood Glucose Testing - Sure Step Flexx Meter For complete policy, go to Policies and Procedures (General Nursing) on Memorial’s Intranet
Purpose: To determine blood glucose levels by rapid, on unit testing, using finger
stick or heel stick method
Key Points: • Quality control needs to be completed every 24 hours or the meter won’t respond
• Make sure the pink square is saturated with enough blood so the circle on the back is a
solid blue.
• The meter needs to be docked in the docking station as soon as you have finished with
your patient. so uploads to the Lab can occur. It is recommend to dock every 24-48 hours.
If not docked every 7 days it will lock the user out.
• RN, LPN, and NT II must demonstrate annual competency with the blood glucose meter.
• NACs who have been trained and certified may also perform CBG’s with the blood glu-
cose meter.
• For Critical High Protocol (blood sugar > 350, or > 150 in NICU): RN must order a lab draw
to confirm result and notify the MD
• For Critical Low Protocol (blood sugar < 50, or < 40 in NICU): RN must initiate treatment
for hypoglycemia, order a lab draw to confirm test and notify MD.
• Procedure for performing patient test: 1. Gather supplies
2. Wash and dry patients hand (heel if infant) with soap and water
3. Put on gloves
4. Turn on the unit (press blue button)
5. Press “Cont.” at the status screen
6. Select “Patient Test”
7. Enter operator ID: Scan the barcode on your name badge
8. Press “OK”
9. Enter Patient ID: Scan the barcode on patient's arm band or enter the six digit Medical
Record number
10. Press “OK”
11. Select the test strip lot number and corresponding code from the list. Make sure it matches
the lot number and code on the bottle of strips.
• If the lot number or code number is not on the screen menu they must be scanned into the meter.
To scan a bar code, hold the bar code label parallel to and approximately 6-8 inches from the unit’s
scanner. Press and release the “Scan” button on the screen. Scanning begins when your finger is
lifted from the screen. After a successful scan, the information appears in the display field and the
bedside unit beeps. Press “OK” to confirm entry.
ACES Policy and Procedure Review

60
Spring 2010
12.Using lancet device, obtain blood sample
13. Apply the patient’s blood sample to the pink square of the test strip
a. Finger Stick: Carefully touch the pink test square to the drop of blood on the patient’s
finger. Test area will quickly absorb the blood. Heel Stick: Carefully touch the pink test
square to the drop of blood on the heel.
b. Syringe or Pipette: Touch the tip of the syringe or pipette to the pink test square.
Gently apply pressure to the plunger or bulb. As the blood emerges from the tip of the
syringe or pipette it will be quickly absorbed by the test square.
c. Turn strip over to confirm adequate coverage. The dot should be a solid blue. Reapply
blood to pink square until confirmation dot is solid blue.
14. Insert the strip, blood application side up, into the test strip holder within two minutes
after blood is applied. Push firmly until the strip comes to a stop. The result appears in
approximately 30 seconds.
15. Record results
16. Remove strip and discard
17. Press “Menu” and continue testing additional patients or turn unit off.
Performing Quality Control Test
1. Quality control test using high and low control solutions must be done every 24 hours or
meter will not operate.
2. Turn on the unit
3. Press “Cont.” at the Status screen
4. Select “QC Test”
5. Enter operator ID: Scan the barcode on your name badge
6. Select the appropriate control level from the list. Select "High Control" = red top bottle or
"Low Control" = green top bottle
7. Select the appropriate control lot number from the list, match the lot # on the control bot-
tle to the list of lot #s in the meter and select the correct one by pressing on the touch
screen.
8. Select the test strip lot number and corresponding code from the list
9. Shake High Control solution and remove cap
10. Squeeze drop of solution onto paper towel
11. Squeeze a second drop of solution to the pink square of the test strip
12. Insert the strip, pink square up, into the test strip holder within two minutes after control
solution is applied. Push firmly until the strip comes to a stop.
13. The result appears in approximately 30 seconds
• PASSED: Press “OK,” remove strip and continue procedure steps using steps 6-13 with
LO Control solution.
• Failed: Press “Enter Notes” and choose at least one comment. Press “OK” and repeat
test. If FAILED result occurs again refer to Problem Solving Steps below:
Problem Solving
• Read the “Bedside Unit Quick Reference Guide” booklet in the carrying case.
• Call the 1-800 number on the back of the meter.
• Read the “Bedside Operators Manual” located on each nursing unit
• Call Lab Manager at extension 8044
61
Spring 2010
Policy: Initiating the Quality Management Memo (Quantros) For complete policy, go to Policies and Procedures (Documentation & Communication) on Memorial’s
Intranet
Purpose: To furnish a timely electronic communication from the staff member to
the persons who need to know. To provide an internal tool of communication by
which hospital employees can report deviations from desired results, procedures
or conditions. To gather information to prevent recurrences.
Key Points: • Procedure:
1) Notify Department Manager or Nursing Supervisor of incident, if appropriate
2) Complete Quality Management event report in Quantros
3) Notify physician as indicated
4) The department leader (manager/director) or backup will review and document the
plan for improvement in practice and complete the report within 5 working days.
5) Document any patient incident on the medical record.
• The Supervisor must be made aware of unusual in-house situations. Notify Vice President
or the Risk Manager immediately if a sentinel event has occurred. Examples include pa-
tient, visitor, staff or physician incidents:
1) A staff member having knowledge of the occurrence of a sentinel event, or
potential sentinel event, should report that occurrence to the departmental Manager
or Nurse Supervisor on the shift that it occurs.
2) The departmental Manager or Nurse Supervisor should then immediately notify the
Risk Manager or the Administrator on Call.
• Input information objectively, including the facts and all pertinent details.
• When the event involves a patient, the Quantros Memo is not considered part of the
medical record and completion of a Quantros memo is not recorded there.
ACES Policy and Procedure Review

62
Spring 2010
2009 - Quantros Information Sheet
QUANTROS? WHAT IS IT?
Quantros is Memorial Hospital’s online reporting tool for safety related events that occur at Memorial
or its family of services. This online tool has replaced our previous paper QA system that was ineffec-
tive for tracking trends or repeat events.
WHY SHOULD I USE QUANTROS?
Quantros is a way for the hospital to gather information about safety related events that have occurred
or have the potential of occurring. Safety is everyone’s responsibility as an employee of Memorial Hos-
pital or its family of services.
IS QUANTROS ANONYMOUS?
YES! Quantros can be anonymous. But there is a place that you can put in your name. The only per-
sons that have access to your name are the Quantros Event manager and the follow up managers that
are assigned the event. Your name does not appear in any reports generated from Quantros. A name
is important if your event reporting is complex or your written description does not contain enough
information. It is vital to the organization that when you take the responsibility to report a safety
event that we take the time to thoroughly analyze and investigate the event. This means that every
department and every service at Memorial has a Quantros follow-up manager. This manager is as-
signed the event and will conduct follow up. This manager may contact you for more information or
clarification or sometimes to let you know the results of the follow up.
IS QUANTROS PUNITIVE IN ANYWAY?
Quantros is never punitive. Everyone makes mistakes. Safety events happen whether or not we want
them to happen. Quantros is only a tool that helps to identify, prevent, and analyze safety related
events.
WHERE TO FIND QUANTROS?
To access Quantros go to the Applications menu on the home page and scroll down until you see Quan-
tros and click on it. You must decide who the event affected: Patient, Employee or Visitor. Then you
will be prompted to answer questions about and describe the event. It should not take more than a
few minutes to complete. Sometimes the questions or answers do not exactly fit your event. In this
case, it is best to be the most accurate when writing a description of the event.
WHAT TYPES OF EVENTS ARE REPORTABLE?
This is a tough question. But the key to remember is that if an event has the potential to harm or did
harm a patient than it is reportable. For example: medication errors, adverse drug reactions, patient or
visitor falls, disruptive practitioners, significant delays in patient care, or inappropriate transfers are all
very common reportable events. Staffing issues or personal complaints are not reportable events.
March 25, 2009

63
Spring 2010
Policy: Chain of Command For complete policy, go to Policies and Procedures (General Nursing) on Memorial’s Intranet
Purpose: Assuring therapeutic, timely physician intervention when a patient’s
status/condition changes.
Key Points: • The chain of command will be initiated when there is a question/concern about the medi-
cal care of a patient and the need for immediate medical staff intervention.
• Medical staff concerns include but are not limited to the following types of situations: The
attending physician cannot be reach or does not arrive in a reasonable time period in re-
sponse to an urgent situation. The employee perceives that the physician is not appropri-
ately managing a patient related situation. The medical orders may jeopardize patient
care or safety.
• Chain of Command Procedure:
1) The Unit Manager and/or Nursing Supervisor should be made aware when concerns
arise regarding patient care, safety, or status/condition change.
2) The nurse should have pertinent info available to provide to the physician and
stress the urgency of the situation.
3) Once the physician has been contacted, the nurse is to obtain a confirmed time
when the physician will be in to see the patient. This should be no more than 30
minutes. If physician does not arrive within this time, the chain of command will be
initiated.
4) In situations where attempts to contact the attending or the alternate physician are
unsuccessful, follow the chain of command process.
• In instances where there are concerns for patient care related to physician orders or medi-
cal management of the patient, the nurse should initiate the chain of command process
for obtaining medical intervention in care.
ACES Policy and Procedure Review