acer iconia tab w500 quick start guide - the informr iconia tab quick guide acer recommends... ......
TRANSCRIPT

Acer ICONIA TABQuick Guide
Acer recommends...
Productivity Software
Work Great with Microsoft® Office 2010 - Express your ideas, solve problems and simplify everyday projects with Office 2010.
Photo editing - Easily edit and print your photos with Windows Live Photo Gallery. Then share them on Facebook, YouTube or Windows Live.
Search & Decide with Bing -- Find and organize the answers you need using Bing™, so you can make faster, more informed decisions.

Model number: __________________________________
Serial number: ___________________________________
Date of purchase: ________________________________
Place of purchase: ________________________________
© 2011 All Rights Reserved.
Acer ICONIA TAB Quick GuideOriginal Issue: 03/2011

iii
First things firstWe would like to thank you for making an Acer computer your choice for meeting your mobile computing needs.
Your guidesTo help you use your Acer computer, we have designed a set of guides:
First off, the setup poster helps you get started with setting up your computer.
The ICONIA TAB Generic User Guide contains useful information applying to all models in the ICONIA TAB product series. It covers basic topics such as using the keyboard and audio, etc. Please understand that due to its nature, the Generic User Guide will occasionally refer to functions or features which are only contained in certain models of the series, but not necessarily in the model you purchased. Such instances are marked in the text with language such as "only for certain models".
The Quick Guide introduces you to the basic features and functions of your new computer. For more on how your computer can help you to be more productive, please refer to the ICONIA TAB Generic User Guide. This guide contains detailed information on such subjects as system utilities, data recovery, expansion options and troubleshooting. In addition it contains warranty information and the general regulations and safety notices for your computer. It is available in Portable Document Format (PDF) and comes preloaded on your computer. Follow these steps to access it:
1 Click on Start > All Programs > Documentation.
2 Click on ICONIA TAB Generic User Guide.
Note: Viewing the file requires Adobe Reader. If Adobe Reader is not installed on your computer, clicking on ICONIA TAB Generic User Guide will run the Adobe Reader setup program first. Follow the instructions on the screen to complete the installation. For instructions on how to use Adobe Reader, access the Help and Support menu.

First things first iiiYour guides iii
Your Acer tablet PC tour 1Tablet PC 1
Front view 1Back view 2Top view 3Bottom view 3Left view 4Right view 4
Booting your tablet 5Key functions for boot menus 5
Connect the tablet to the keyboard dock 5Secure the tablet to the keyboard dock 6
Keyboard dock 6Top view 6Front view 7Left view 7Right view 8
Environment 8Acer Ring 9
Sync function 10Clean Disk function 10
TouchBrowser 11Adding a page to your Favorites 13
My Journal 14Editing pages 15Web Clip 15
Acer clear.fi 18Media content types 18DMS (Digital Media Server) devices 18
Display media content 18Save media content 19Search media 19
Media sharing settings 19Device Control 20Using the virtual keyboard 22SocialJogger 23
Sharing content 25Settings 26
Acer Backup Manager 27
Co
nte
nts

Eng
lish
Tablet PC 1
Your Acer tablet PC tourAfter setting up your computer as illustrated in the setup poster, let us show you around your new Acer computer.
You can enter information into you new computer via the touchscreen or with the keyboard dock.
Note: The keyboard dock is optional.
Tablet PCYour new computer has two components, the tablet and the keyboard dock. The following set of images will show you the Tablet PC. The views are labeled as if you are holding the Tablet with the screen towards you and the cameras at the top.
Front view
No. Item Description
1 Latch Secures the tablet to the keyboard dock when closed.
2 Microphones Two internal microphones for stereo sound recording.
3 Integrated webcam
Web camera for video communication.
123
4

Your Acer tablet PC tour 2
Eng
lish
Back view
4 Windows key / power status indicator
Press once to open the Start menu or wake tablet from Sleep mode.
Press the power button while holding the Windows key to perform the <Ctrl> + < Alt> +<Del> function (this is referred to as the "Windows Security Button" in the operating system).
Status indicator color Power status
Blue System turned on.
Slow flash: Orange System in Standby mode.
Flashing: Orange System entering Hibernate mode.
Off System in Hibernate mode or turned off.
No. Item Description
1 Integrated webcam Web camera for video communication.
2 SIM card slot Accepts a 3G SIM card (configuration may vary depending on model).
3 Speaker Delivers audio output.
No. Item Description
1
2 3

Eng
lish
Tablet PC 3
Top view
Bottom view
Note: Display orientation may be fixed when applications designed for a specific orientation are running. These include games and other full-screen applications.When making video calls, you should always hold the tablet in landscape orientation.
No. Item Description
1 Ventilation slot Provides adequate air flow to maintain a safe operating temperature.
No. Icon Item Description
1 USB 2.0 port Connect to USB 2.0 devices (e.g., USB mouse, USB camera).
2 Lock switch Locks the screen orientation.
3 Dock connector Connects to the supplied keyboard dock. USB port may also be used as a standard USB port.
4 SIM card slot Accepts a 3G SIM card (configuration may vary depending on model).
1
1 2 3 4

Your Acer tablet PC tour 4
Eng
lish
Left viewRight view
No. Icon Item Description
1 Headphone jack Connects to audio devices (e.g., speakers, headphones).
Supports compatible 3.5 mm headsets with built-in microphone (e.g. Acer smart handheld headsets).
2 Battery LED Indicates the computer's battery status.1. Charging: Amber. 2. Fully charged: Blue when plugged in.
3 Power button Press to turn the tablet on; press again to place the tablet in Sleep mode. Press and hold to turn the tablet off.
4 + / - Volume key Press to increase or decrease volume.
5 Ventilation slot Provides adequate air flow to maintain a safe operating temperature.
6 2-in-1 card reader Accepts Secure Digital (SD), MultiMediaCard (MMC).
Note: Push to remove/install the card. Only one card can operate at any time.
7 HDMI port Supports high-definition digital video connections.
No. Icon Item Description
1 DC-in jack Connects to an AC adapter.
1 2 43 5 6 7
1

Eng
lish
Booting your tablet 5
Booting your tabletThere are three ways to boot your tablet:
1 Quick boot: Press the power button; no external USB keyboard support before Windows boots; always boots from the SSD; overrides BIOS settings.
2 Normal boot: Simultaneously press the power button and the Windows key; supports USB keyboard, <F2> and <F12> hotkeys; this boot sequence is used if Windows shuts down abnormally or after making changes to BIOS.
3 Boot from recovery discs: Press the power button, Windows key and volume up key simultaneously. Use this if you need to restore your operating system to factory defaults from the supplied recovery discs. Please refer to Recovering your system in the User Guide.
Key functions for boot menusFor menus displayed before Windows boots:
Windows key: Select the highlighted menu option.
Volume up/down: Move the cursor up or down.
Connect the tablet to the keyboard dockAlign the two arrows printed beneath the screen with the two pins on the keyboard dock. Press the tablet down.

Your Acer tablet PC tour 6
Eng
lish
Secure the tablet to the keyboard dockPlace the tablet on the dock, ensuring you hear two clicks. Use the latch to secure the tablet.
Note: Remove the tablet by releasing the latch and lifting the tablet from the camera side.
Warning: Do not lift the tablet from the speaker side.
Keyboard dockThe following set of images show you the optional keyboard dock.
Top view
No. Item Description
1 Dock connector Connects to the tablet.
2 Keyboard A standard keyboard with full-size keys.
1
3
2
4
5

Eng
lish
Keyboard dock 7
Front view
Left view
3 Acer FineTrack pointing device
Pointing device to control cursor movement.
4 Latch Secures the tablet to the keyboard dock when closed.
5 Left and right buttons Function like the left and right mouse buttons.
No. Item Description
1 Latch Secures the tablet to the keyboard dock when closed.
No. Icon Item Description
1 Ethernet (RJ-45) port
Connects to an Ethernet 10/100/1000-based network.
2 USB 2.0 port Connect to USB 2.0 devices (e.g., USB mouse, USB camera).
No. Item Description
1
1 2

Your Acer tablet PC tour 8
Eng
lish
Right viewEnvironment
No. Icon Item Description
1 USB 2.0 port Connect to USB 2.0 devices (e.g., USB mouse, USB camera).
• Temperature:
• Operating: 5 °C to 35 °C• Non-operating: -20 °C to 65 °C
• Humidity (non-condensing):
• Operating: 20% to 80%• Non-operating: 20% to 80%
1
Eng
lish
9
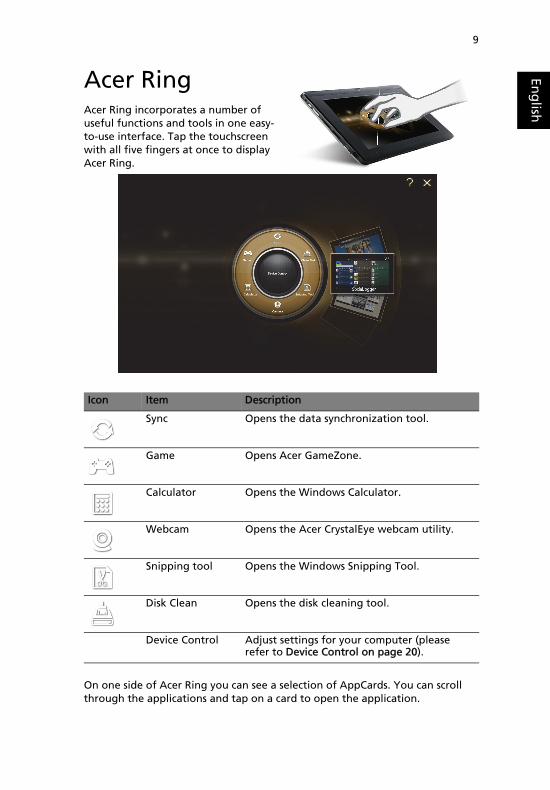
Acer RingAcer Ring incorporates a number of useful functions and tools in one easy-to-use interface. Tap the touchscreen with all five fingers at once to display Acer Ring.
On one side of Acer Ring you can see a selection of AppCards. You can scroll through the applications and tap on a card to open the application.
Icon Item Description
Sync Opens the data synchronization tool.
Game Opens Acer GameZone.
Calculator Opens the Windows Calculator.
Webcam Opens the Acer CrystalEye webcam utility.
Snipping tool Opens the Windows Snipping Tool.
Disk Clean Opens the disk cleaning tool.
Device Control Adjust settings for your computer (please refer to Device Control on page 20).

Acer Ring 10
Eng
lish
Sync functionPress to run all existing sync/backup jobs, including sync jobs created in the Migration and Synchronization Wizard. Please refer to Acer Backup Manager on page 27.
Clean Disk functionThe Clean Disk functions lists files that have not been used recently and have been successfully backed up. You can delete the files on that list, knowing you can restore these files from backup copies at a later date if required.
Eng
lish
11
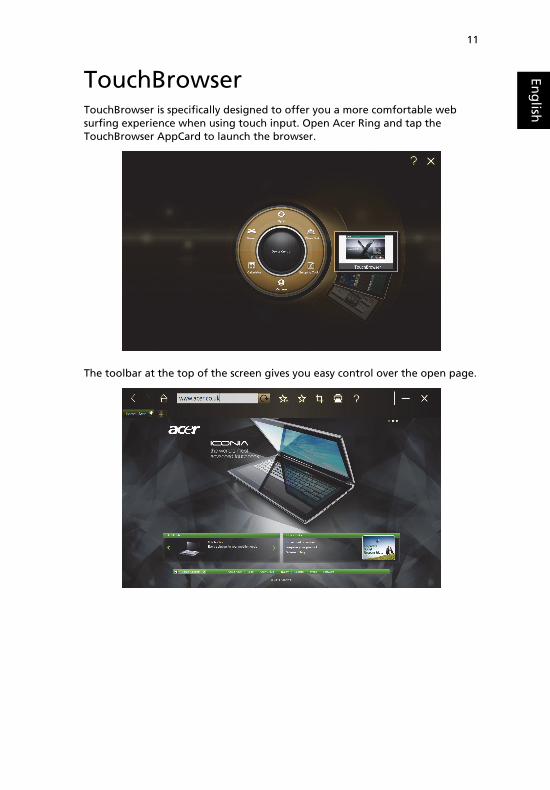
TouchBrowserTouchBrowser is specifically designed to offer you a more comfortable web surfing experience when using touch input. Open Acer Ring and tap the TouchBrowser AppCard to launch the browser.
The toolbar at the top of the screen gives you easy control over the open page.

TouchBrowser 12
Eng
lish
To enter a website address, tap the URL bar. A keyboard icon will display,allowing you to open a virtual keyboard and enter text, or use handwriting to enter the URL.
You can use a pinch action to zoom in to content on the page.
No. Item Description
1 Back Go back one page.
2 Forward Go forward to the next page in the browsing history.
3 Home Open the defined home page.
4 Tabs Shows the pages currently open.
5 Open new tab Tap to open a new tab.
6 URL bar Shows the address of the current page.
7 Refresh Refreshes the current tab content.
8 Add to favorites Add the current page to your favorites.
9 Favorites Open the list of your favorites / history.
10 Web Clip Crop a part of the web page for use in My Journal or Scrapbook.
11 Print Print the page.
12 Help View the Help file.
13 Minimize Minimizes the browser.
14 Close Closes the browser.
1 2 3
4 5 6 7 8 9 10 12 13 1411

Eng
lish
13
Adding a page to your FavoritesTo add a page to your Favorites, tap the Add to Favorites icon, give the page a name (the page title will be used by default) and select a folder to save the URL to.

My Journal 14
Eng
lish
My JournalMy Journal is a handy place for you to keep clippings of websites and other information you may want to refer to later. You can organize the information you wish to view from a number of sources on a single, easy-to-view page.
Open Acer Ring and scroll through the AppCards to My Journal. Tap the AppCard to open the application.
Website content is automatically updated each time you open the journal page.
Use the tabs along the top of the screen to switch between your journal pages, or tap the icons on the toolbar to perform various functions.
No. Item Description
1 Web clip Crop a part of the web page for use in My Journal.
2 Edit Edit the content on the journal pages.
3 Help View the help file.
4 Minimize Minimizes My Journal.
5 Close Closes My Journal.
6 Tabs Shows the pages in your journal.
1 2 3 4 5
6

Eng
lish
Editing pages 15
Note: When you have finished editing your clips, tap to
return to viewing mode. If you want to edit a web clip at a later
time, tap the edit icon to enter edit mode.
Editing pagesIn edit mode, you can resize web clips by dragging the corners of the web clip to the size you want.
You can also move web clips to other pages by dragging the web clip to the tab for the page you want to move the clip to.
Tap the name of a tab to rename the tab. You can use either the virtual
keyboard or the keyboard on the dock. When you have finished, tap .
Web ClipThe web clip tool allows you to clip parts of web pages to save them to My Journal. Once you have a page open in your browser, tap the Web clip icon.

My Journal 16
Eng
lish
Tap the browser screen to select the area you want to crop; tap and drag on anyof the circles on the corner of the crop window to expand it to include all the information you want to capture.
When you have finished selecting the area you want to crop, tap the area to open a menu that will allow you to paste the content into My Journal or Copy it to the clipboard. You can also Save bitmap as... or Discard the web clip.

Eng
lish
Web Clip 17
In My Journal, tap a clip to select it, then you can position it on the page and stretch it by dragging the corners to the desired size.
To delete a web clip, tap the clip in My Journal and tap the trash can icon.
Note: If the web clip comes from a site that requires a login, the clip will be grayed out and a key icon will show to indicate that it requires a login. Tap the clip to open the login page in My Journal.
Note: If an Internet connection to the website is unavailable, the clip will indicate that the connection is unavailable. Tap the clip to refresh the data.

Acer clear.fi 18
Eng
lish
Acer clear.fiAcer clear.fi is a home media database viewer and controller. It allows you to browse media content, such as music, photos, or videos, on devices that are on the same network.
Media content typesWhen you launch Acer clear.fi, you can choose the media content type. There are three types defined: Video, Music, and Photo.
DMS (Digital Media Server) devicesDMS devices include DLNA-compliant personal computers and NAS (Network Attached Storage) devices. These devices store content and make it available to DMP (Digital Media Player) and DMR (Digital Media Renderer) devices. Acer clear.fi will list DMS devices on the main screen, and you can choose ALL DEVICES or a specific device to browse the media stored.
Display media contentIf you want to display media content on your computer, you just need to double-click the media content. If you want to display the media content on a remote device, you need to do the following:
1 Choose the media content.
2 Select Play To.
3 Select the files you wish to play, then send them to the remote device. The target icon will change to display the status. You can view playback controls and progress on the target.
Eng
lish
Media sharing settings 19
Save media contentIf you want to save media content to a remote device, you need to do the following:
1 Choose the media content.
2 Select Save To.
3 Select the files you wish to save, then send them to the remote device. The target icon will change to display the status. You can view the save status progress bar on the target. Click the target to display a dialog box that allows you to cancel the process.
Search mediaIf you want to search your media content, you need to choose the media type first; then enter a keyword in the search bar. Acer clear.fi will list the media content that matches the keyword.
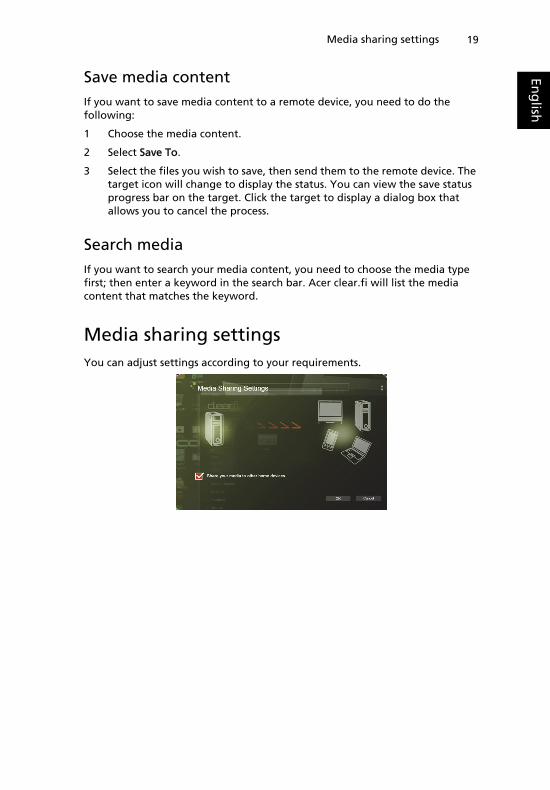
Media sharing settingsYou can adjust settings according to your requirements.
Device Control 20
Eng
lish
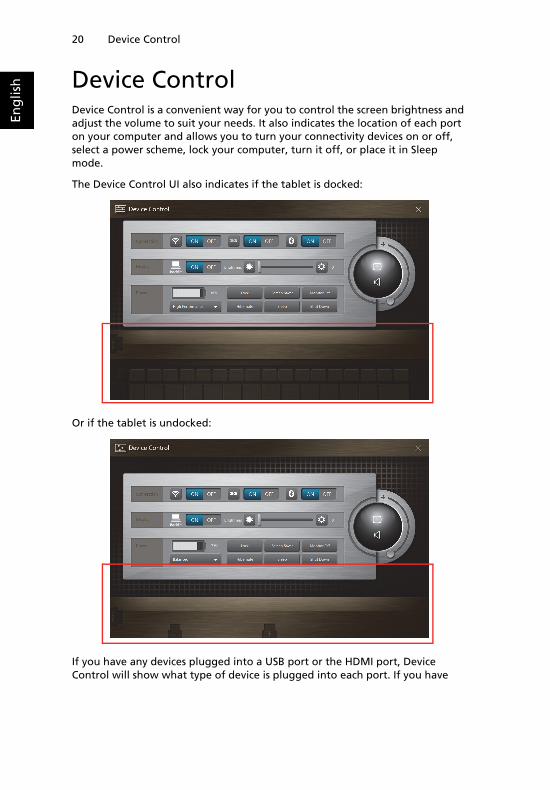
Device ControlDevice Control is a convenient way for you to control the screen brightness and adjust the volume to suit your needs. It also indicates the location of each port on your computer and allows you to turn your connectivity devices on or off, select a power scheme, lock your computer, turn it off, or place it in Sleep mode.
The Device Control UI also indicates if the tablet is docked:
Or if the tablet is undocked:
If you have any devices plugged into a USB port or the HDMI port, Device Control will show what type of device is plugged into each port. If you have

Eng
lish
21
inserted a storage device into a USB port, you may tap the USB icon to open a context menu. Tap Open to view the files in Windows Explorer.
To safely remove the device, select Eject from the menu.
There is also a context menu available for the HDMI connector.

Using the virtual keyboard 22
Eng
lish Using the virtual keyboard
Microsoft Windows provides a convenient virtual keyboard for entering data. To use the keyboard, tap a text box to display the keyboard icon. Tap the icon to open the keyboard. Alternatively, tap and drag the keyboard tab displayed on the left-hand side of the screen.

Eng
lish
23
SocialJoggerOpen Acer Ring and tap the SocialJogger AppCard.
SocialJogger gives you one-touch access to popular social networking sites: Facebook, YouTube and Flickr.

SocialJogger 24
Eng
lish
Tap Log In to open the login wizard. You can log into all three supportedservices from a single login wizard. If you don’t already have an account with the supported services, you can create an account from the wizard.
Tap Continue to log into your account(s):

Eng
lish
Sharing content 25
YouTube
Flickr
Sharing content
You can upload content to each service by tapping the Share on icon in the upper right-hand corner of the page. This will open a file browser above the

SocialJogger 26
Eng
lish
three service pages. Drag and drop the content you want to share to the desiredservice.
SettingsYou can adjust the settings for each service by tapping the Settings icon. This opens the settings window with a tab for each service.

Eng
lish
27
Acer Backup ManagerAcer Backup Manager includes a Migration and Synchronization Wizard which runs after Windows 7 setup is complete. Additionally, you can launch it by double-clicking the desktop shortcut.
It helps you migrate system settings (e.g., email settings and Internet Explorer Favorites) from an existing computer to your new tablet PC.
It also establishes a synchronization relationship between the two computers, so that all files in the Documents, Pictures, Music, and Videos libraries on the tablet PC will be kept synchronized with their shadows on the other PC.
Acer Backup Manager also includes the Disk Clean function (please refer to Clean Disk function on page 10.)

Acer Backup Manager 28
Eng
lish