ace corporate documentation - yudlee themes€¦ · posts creating posts step 1: navigate to posts...
TRANSCRIPT

Ace Corporate Documentation
Introduction
Welcome To Ace Corporate!
We would like to thank you for donwloading Ace Corporate, Business WordPress theme. It is
the lite version of Ace Corporate Pro. Before you get started, please invest some time to go
through the documentation. Ace Corporate can only be used with WordPress and we assume
that you already have WordPress installed and ready to go.
Installation
● Manage your theme
To install this theme you must have a working version of WordPress
already installed. For information in regard to installing the WordPress
platform, please see the WordPress Codex article on installation.
● Installation
The theme files can be uploaded in two ways:
● FTP Upload: Using your FTP program, upload the unzipped theme
folder into the /wp-content/themes/ folder on your server.
● WordPress Upload: Navigate to Appearance > Add New Themes >
Upload. Go to browse, and select the zipped theme folder. Hit
“Install Now” and the theme will be uploaded and installed.
● Once the theme is uploaded, you need to activate it. Go to
Appearance> Themes and activate your chosen theme.
Installing recommended plugins
After Installing and activating the theme you will see the following message at the top of the
admin dashboard page. This theme recommends few following plugins. Click, begin installing
plugins link which will redirect to Install Recommend Plugins page.
Bulk install recommend plugins:
Contact Form 7
Jetpack

Setup Home Page as Demo site:
To make your site’s homepage look like exactly like our demo,
Step 1: Open Backend. Go to Page, Click on Add New.
Step 2: Enter the title (example: “Homepage”).On right sidebar, you can find Page
Attributes, On Template please Select on Homepage – Template.
Step 3: Click on Publish and continue other steps described below.
Below are the screenshots.
Customizing the homepage as the demo image,
After Successful creation of the page, Click on View Page Located at the top bar.

Now you may have the homepage as below screenshot. If not then don’t worry there may be
other settings to configure. You can surely find in the documentation.

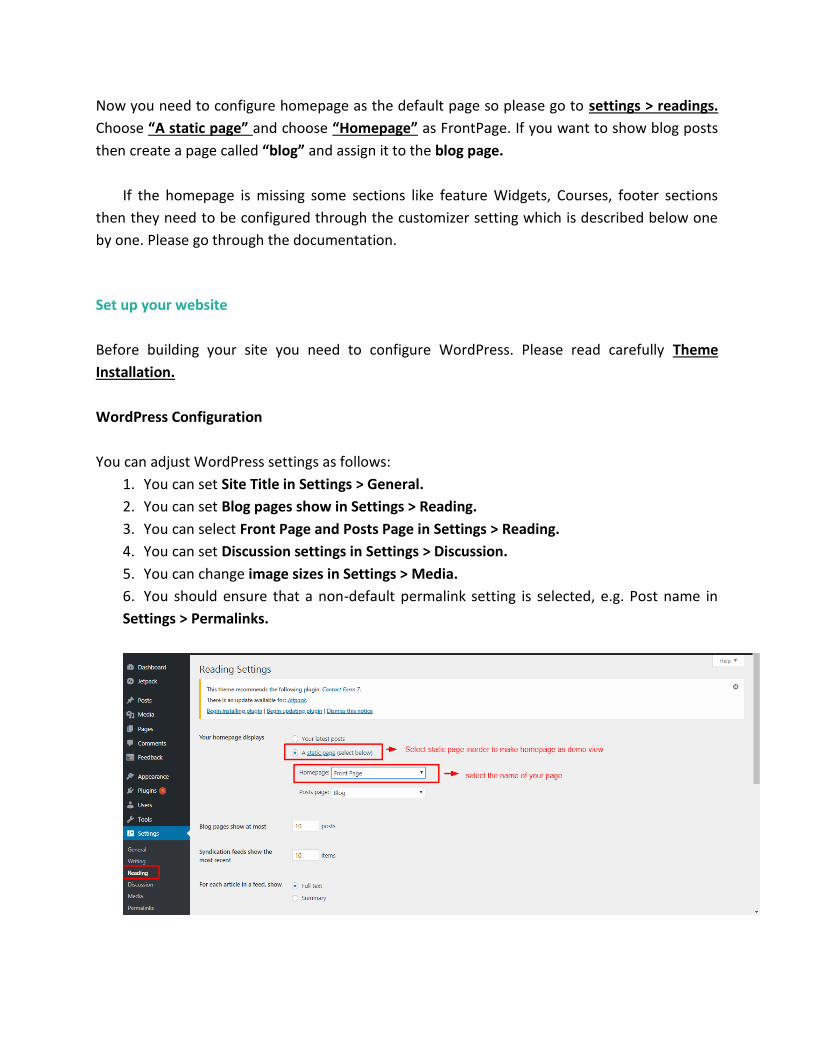
Now you need to configure homepage as the default page so please go to settings > readings.
Choose “A static page” and choose “Homepage” as FrontPage. If you want to show blog posts
then create a page called “blog” and assign it to the blog page.
If the homepage is missing some sections like feature Widgets, Courses, footer sections
then they need to be configured through the customizer setting which is described below one
by one. Please go through the documentation.
Set up your website
Before building your site you need to configure WordPress. Please read carefully Theme
Installation.
WordPress Configuration
You can adjust WordPress settings as follows:
1. You can set Site Title in Settings > General.
2. You can set Blog pages show in Settings > Reading.
3. You can select Front Page and Posts Page in Settings > Reading.
4. You can set Discussion settings in Settings > Discussion.
5. You can change image sizes in Settings > Media.
6. You should ensure that a non-default permalink setting is selected, e.g. Post name in
Settings > Permalinks.

Posts
Creating posts
Step 1: Navigate to Posts in your WordPress admin sidebar.
Step 2: Click on the Add New Option to make a new post. Create a title, and insert your post
content in the editing field.
Step 3: Select Post Format from the right side.
Step 4: Add categories from the right side. To assign it to the post, check the box next to the
category name.
Step 5: Add tags from the right side. Type the name of the tag in the field, separate multiple
tags with commas.
Step 6: You can add featured image. To do so, first click the featured image box, select an
image and click the set featured image button.

Pages
New pages can be added by clicking pages on admin dashboard and can be assigned to various
templates on the right side.
Page Templates
There are various page templates that you can choose.
Default Template (default page template)
Contact Page Template (Template to be used to assign contact page)
FrontPage Template (Same as Demo)
Full Width – Blank Container Template (Template to Be Used With Visual Editor Plugins)
How to set up FrontPage as shown in demo?
To make your site’s homepage look exactly like our demo,
Step 1: Go to Page, Click on Add New.
Step 2: Enter the title (example: “Homepage”).On right sidebar there you can find Page
Attributes, On Template please Select on FrontPage – Template.
Step 3: Click on Publish and continue other steps described below.

Customizing the homepage as the demo image,
After Successful creation of the page, Click on View Page Located at the top bar.
Now you may have the homepage as below screenshot. If not then don’t worry there may be
other settings to configure. You can surely find in the documentation.


Now you need to configure homepage as the default page. So, please go to settings > readings.
Choose “A static page” and choose “Homepage” as FrontPage. If you want to show blog posts
then create a page called “blog” and assign it to the blog page.
The demo of the front page can be further divided into following sections. You should navigate
to Appearance > Customizer > Theme Options and find the similar settings for the sections
listed below.
1.1
Theme Options
Theme options is the essential option for the theme. Further it has 8 Options.
And the theme options are:
Layout and Design
Slider Options
Call Out Options
Portfolio Options
Call to Action

Homepage Content Options
Blog Options
Testimonials
The screenshot for theme options:
Theme options contain 8 settings for the theme which need to be adjusted in order to make a
demo website. It is explained below one by one.
1.1.1
Layout and Design
First go to Theme Options. Then you will see Layout and Design on very first. Click it and you
will find 2 options followed by 2 and 3 sub-options respectively. . Listed as:-
Choose layout :- Boxed or Full Width
Layout picker:- Right Side bar, No sidebar and Left Sidebar

1.1.2
Slider Options:
For Slider option first go Theme options. Click on Slider options.
You can select as much as slider you want to add in your homepage.

To create new slider Page
Go to dashboard
Select page> Add new page
Then slider title>Slider Description
Publish
1.1.3
Call Out Options

To set Call out Options, go to Theme options and enter title.
Remember that you can only show 3 Pages in the Call out Options.
1.1.4
Portfolio Options
From the Portfolio Options in the Theme Options you can only add Section Title.
So, you have go to Dashboard, Portfolio then Add New.
After that, Enter Title, Description, Image and Click Publish.

1.1.5
Call to action Options
Click Theme options and then go to Call to action options and enter detail as shown in figure.
Step 1: Add Call to Action Title
Step 2: Add content to Call to Action Section
Step 3: Add URL and button text
Step 4: Set Background Image if you like.

1.1.6
Home Content Options
This options lets you to see the content in the front page that you have assigned earlier.
Step 1:- First Go to Dashboard, Click Pages and Add New
Step2:- Enter the title, description, featured image
Step3:- Set Frontpage as Template
Step 4:- Click publish.

Now Go to Appearance, then Customization, Theme Options and Home Content Options.
There you can Hide/Show HomePage Title and Content in the Frontpage.
1.1.7
Blog Options
With the help of Blog options, you can Add Blog Post in the Front Page.
Step1:- Go to Dashboard, Posts and then Add New
Step 2:- Enter the Title, Description, and Feartured Image and Categories.

Step 3:- Click publish
Now Go to Customization, then Theme Options and Blog Options. There you can select the
Excerpt Length which shows the words from the description in the blog post.
If you select 20.
If you select 300,

Similarly, you can Hide and Show Meta in the blog.
1.1.8
Testimonial Sections
From the Testimonial Sections in the Theme Options you can only Add Section Title.
In order to set the Testomonials, Go to Dashborad, then Testimonial, Add New.
Step1:- Enter the Client’s Full Name and saying
Step 2 Add Featured Image and Click Publish.

Widget Setting
Go to Appearances>Customize>Widgets>Footer 1, 2 and 3.
You can easily Add Widgets from the Footer Area 1, 2 and 3.

Go to Dashboard then Appearance then Customization and finally Widgets.
Step 1:- Click any Footer i.e. 1, 2 and 3
Step 2:- Add a Widget
After Clicking Add a Widget, it gives you Search Options, Select as per your need.

Note: You can repeat the following steps for Footer 2 and Footer 3.
Manage site title, logo and site icon
Go to homepage>customize>Site Identity.
Logo: It changes the main logo of the site.
Site Title: It changes the main site title of the site.

Tagline: It changes the tagline (i.e. Description) of the site. Just below site title.
Site Icon: The Site Icon is used as a browser and app icon for your site. Icon must be square, and
at least 512px wide and tall.
Set your site’s title, description and add logo by navigating to Customizer > Site Identity.
>>After not selecting Display Site Title and Tagline

Header Image
Go to Customize>Header Image
Background Image
Select Customize>Theme options and Header Image

Menu setup
If you are new to WordPress, please visit WordPress Menu User Guide
Create menu
Go to Appearance > Customize >Menus.
From Menus, click “Add a Menu” button and you will be able to create a menu.
Now, click Add Items and you will be able to Add or Remove Menu Items according to your
requirement.
Select the Menu locations.
Click Save and publish button.
You can also Set Menu from Backend

Step 1: Go to Backend>Dashboard>Appearances>Menu
Step 2: Create a menu
Step 3: Manage Location

How to Manage Sidebar in the Posts?
You can set Sidebar from backend. Follow following steps:
Step 1: Go to Dashboard>Appearances> Widgets
Step 1: Click Sidebar then you can see Sidebar categories.
Step 2: Click any particular sidebar category and set the title.
Step 3: Click Save.


Step 4: Go to Blog Section and there you can see Sidebar that you have just created.
Homepage Settings
To Create Static Front Page
Go to Dashboard>Pages>Add New
Enter the title “About our Company” select “FrontPage” then click Publish
You can also create Static FrontPage from Customization

Go to Appearances>customizer>Homepage Setting
Step 1:- Select About Our Company in Home
Step 2: Select Post Type
Step3: Select “A Static Page” in Homepage Displays
How to manage additional CSS?
Go to Appearance > Customize >Additional CSS, you can add extra CSS to tweak your website’s
design.

-------------------- EoF ---------------------
Shop: http://yudleethemes.com/
Support: http://yudleethemes.com/support/
Customization Request: http://yudleethemes.com/support/#customization_support
Tickets: http://yudleethemes.com/my-tickets/