account tracking and user authentication how to guide · pdf fileprinting with pop up...
TRANSCRIPT
Account Tracking and
User Authentication
How To Guide
For Konica Minolta bizhub Devices
For the bizhub Colour Series

2
Table of Contents
When to use Account Tracking and/or User Authentication .............................................................. 3
Account Track / User Authentication Common Settings
Deleting Other User’s Jobs .................................................................................................. 4
Log Off Confirmation Screen ............................................................................................... 4
Turning on Account Tracking from the Device Panel ........................................................................ 5
Turning on User Authentication with Public User Mode from the Device Panel ................................ 6
Turning on Account Tracking using the Web Connection ................................................................. 7
Turning on User Authentication with Public User Mode using the Web Connection ......................... 8
Adding, Editing, and Deleting User Accounts from the Device Panel .............................................. 9
Adding, Editing, and Deleting User Accounts using the Web Connection ...................................... 10
Entering User Codes into Printer Drivers (PC’s) ............................................................................. 11
Printing with Pop Up Authentication (PC’s) ..................................................................................... 11
Entering User Codes into Printer Drivers (Mac’s) ........................................................................... 12
Printing with Pop Up Authentication (Mac’s) ................................................................................... 12
Generating Reports for Account Tracking and User Authentication from the Device Panel ........... 13
Generating Reports for Account Tracking and user Authentication using the Web Connection .... 14
Resetting Counters ......................................................................................................................... 15

3
When to use Account Tracking
Account tracking can be used when everyone must enter a code to
use the device to keep track of copying and printing. Codes can be
assigned to each individual, or by department, or by client files, etc.
When a code must be entered to track all copying and printing,
Account Tracking is the easiest to use because it can be set to
require only a password to authenticate at the device for copying or
at the printer driver for printing. This saves users time. Passwords
should therefore be kept numeric to make authenticating as quick
and easy as possible, though alphanumeric passwords are also
possible.
When to use User Authentication
User Authentication is the only feature that will allow the use of
the biometric scanner or card reader to authenticate. User
Authentication can also be used on Colour devices when clients
only wish to manage colour copying and printing, but allow black
& white copying and printing without tracking the number of
prints, and requiring authentication only to copy or print in colour
(Public User mode).
** Please Note: If you currently have to enter a code at the device to make a
copy, then Account Tracking or User Authentication is already turned on. You
can then skip the section on Turning On Account Track / User Authentication
and go straight to the section on Adding Editing Or Deleting Accounts starting
on page 9.

4
Account Track/User Authentication Common Settings
Deleting Other Users Jobs
When any form of authentication is turned on the default security setting is to prohibit users from
deleting anyone else’s jobs. The only way to delete jobs in the queue would be to have the user
who sent the jobs to the device log in, then delete the jobs from the queue. To change the default
setting to allow any user to delete jobs from the queue follow these steps after you have turned on
your authentication settings:
1. At the device panel select the Menu
button.
2. On the screen select Utility.
3. Select Administrator Settings and enter
the admin password when prompted.
4. Select System Settings.
5. Select Restrict User Access.
6. Select Restrict Access to Job Settings.
7. Select Delete Other User Jobs and
select Allow. Select OK to save the
settings.
Logout Confirmation Screen
When any form of authentication is turned on the default setting is to ask users to confirm if they
want to log out when they select the Access key once they are finished their tasks. You can turn off
this confirmation screen to make it quicker for users to log out of their account when finished at the
device. Follow the steps below to turn off the confirmation screen from the device panel. You can
also turn off the confirmation screen using the web connection (see instructions at the end of pages
7 or 8).
1. At the device panel select the Menu
button.
2. On the screen select Utility.
3. Select Administrator Settings and enter
the admin password when prompted.
4. Select User Authentication/Account
Track.
5. Select User/Account Common Settings
6. Select Logout Confirmation Screen
Display Setting and select OFF. Select
OK to save the settings.

5
Turning On Account Tracking From the Device Panel
1. Select the Menu button.
2. On the screen touch Utility.
3. Select Administrator Settings. (See your
administrator for the device’s admin
password).
4. Select option #4: User Authentication/
Account Track.
5. Select option #1: General Settings
6. Select the Account Tracking feature and
turn it ON.
7. Select Authentication Method and choose
Password Only.
8. Press OK and confirm to proceed
when prompted.
9. Go to page 9 of this guide for instructions
on adding new accounts from the Device
Panel.
10. Enter the codes into the print drivers.
Printing will not be allowed without this.
(See instructions starting on page 11).

6
Turning on User Authentication with Public User Mode
from the Device Panel
1. Select the Menu button.
2. On the screen select Utility.
3. Select Administrator Settings. (See your
administrator for the device’s admin
password).
4. Select option #4: User Authentication/
Account Track.
5. Select option #1: General Settings
6. Select User Authentication and select ON
(MFP).
7. Select Public User Access and choose
the 3rd option ON (Without Login).
8. Select OK and confirm to proceed when
prompted.
9. From the User Authentication/Account
Track menu select option #2 User
Authentication Settings.
10. Select User Registration.
11. Screen 1 of 50 of accounts will be
displayed. Scroll up to the last page
to find the Public User account. Select
it and touch Edit.
12. Select Output Permissions and
choose Restrict for Colour Output.
Press OK. This will require users to
enter a password in order to copy or
print in colour, but allow black & white
copying and printing with no
restrictions.
13. Go to page 9 of this guide for
instructions on adding new user accounts
from the Device Panel.
14. Enter the codes into the print
drivers. Printing will not be allowed
without this. (See instructions starting
on page 11).
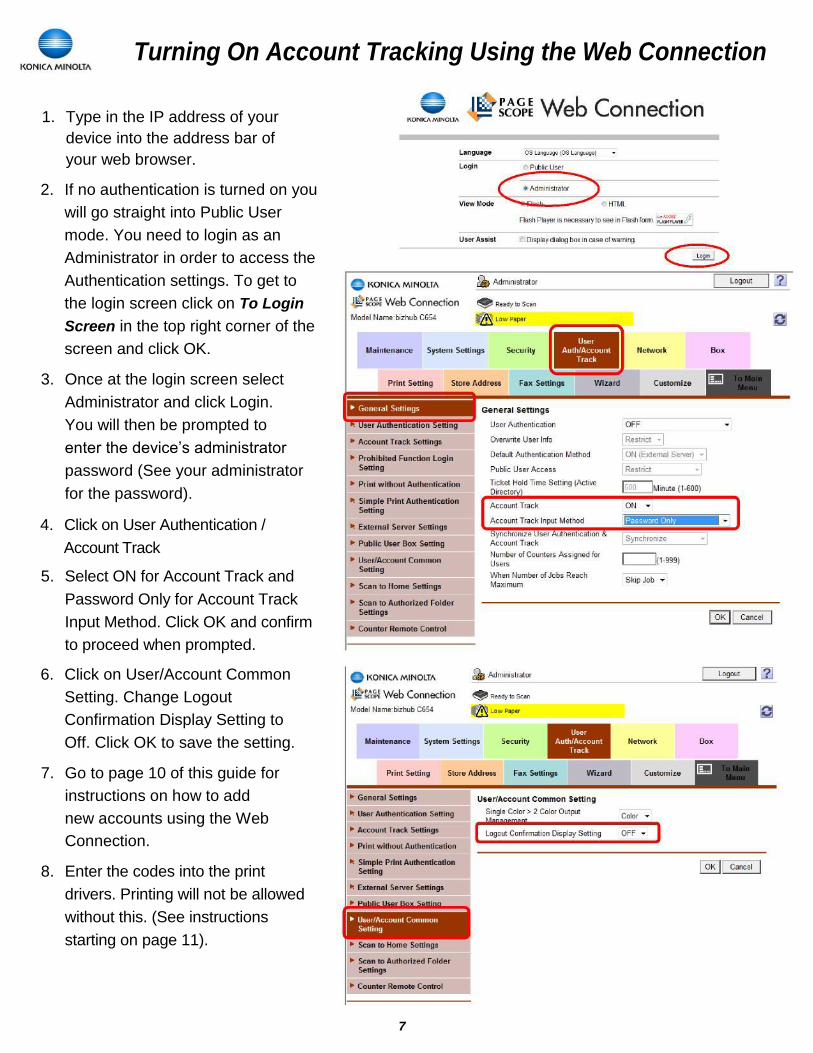
1. Type in the IP address of your
device into the address bar of
your web browser.
2. If no authentication is turned on you
will go straight into Public User
mode. You need to login as an
Administrator in order to access the
Authentication settings. To get to
the login screen click on To Login
Screen in the top right corner of the
screen and click OK.
3. Once at the login screen select
Administrator and click Login.
You will then be prompted to
enter the device’s administrator
password (See your administrator
for the password).
4. Click on User Authentication /
Account Track
5. Select ON for Account Track and
Password Only for Account Track
Input Method. Click OK and confirm
to proceed when prompted.
6. Click on User/Account Common
Setting. Change Logout
Confirmation Display Setting to
Off. Click OK to save the setting.
7. Go to page 10 of this guide for
instructions on how to add
new accounts using the Web
Connection.
8. Enter the codes into the print
drivers. Printing will not be allowed
without this. (See instructions
starting on page 11).
7
Turning On Account Tracking Using the Web Connection

Turning on User Authentication with Public User Mode
Using the Web Connection
1. Type in the IP address of your device into the
address bar of your web browser.
2. If no authentication is turned on you will go
straight into Public User mode. You need to
login as an Administrator in order to access the
Authentication settings. To get to the login
screen click on To Login Screen in the top right
corner of the screen and click OK.
3. Once on the login screen select Administrator
and click Login. (See your administrator for
the device’s admin password).
4. Select User Auth / Account Track.
5. Select ON (MFP) for User Authentication and ON
(Without Login) for Public User Access. Click OK
and confirm to proceed when prompted.
6. Select User Authentication Settings and then
Public User.
7. Select Restrict for Colour Output Permission
(Print). NOTE: Colour Output Permission
(TX) refers to colour scanning.
8. Click OK at the bottom of the screen.
9. Click on User/Account Common Settings.
Change Logout Confirmation Display Setting
to Off. Click OK to save the setting.
10. Enter the codes into the print drivers. Printing will not be allowed without this. (See instructions starting on page 11).
8

9
Adding, Editing, & Deleting User Accounts from the Device Panel
1. Select the Menu button.
2. On the screen select Utility.
3. Select Administrator Settings. Enter the device admin password. Press OK.
4. Select the 4th option, User Authentication / Account Track.
5. If you have User Authentication turned on select the 2nd option: User Authentication Settings. If Account Track is turned on select the 3rd option: Account Track Settings.
6. If using User Authentication select User Registration. If using Account Track select Account Track Registration.
7. Select a free space to register the account and press the Edit button.
8. Enter the name of the account and the password to be used (password must be entered twice). To ensure greatest ease of use, it is recommended you keep passwords numeric so users can use just the keypad at the device to enter their passwords to log on.
9. Setting a Maximum Allowance will limit the number of copies and prints that can be made on that account. When an account reaches its limit the user can no longer print or copy until the limit is raised or the counter is reset. The default setting is no limit.
10. If you have a colour device selecting Output Permission will allow you to block colour all together on that account. Default setting allows colour output.
11. Press OK when finished entering account name, password, and if desired, maximum allowance and output permission.
To edit an account: follow steps 1-6 above and make the desired changes.
To delete an account: follow steps 1-5 above, select the account to be deleted, and press the Delete button at the bottom of the screen. Confirm when prompted.

10
Adding, Editing, or Deleting User Accounts Using the
Web Connection
1. Type in the IP address of your device into the address bar of your web browser.
2. Select Administrator and click Login.
3. Enter the admin password (see your administrator
for the device’s admin password).
4. Click on User Auth / Account Track.
5. Click Account Track Settings. (If using User
Authentication click on User Registration.
6. Click New Registration.
7. Leave Use Opening Number option selected,
then enter the password twice.
8. Enter the name of the account.
9. Select whether or not to block colour output if
registering the account on a colour device. Note:
Output Permission (TX) refers to scanning and
faxing. The colour permission for this function
should be left on Allow.
10. Select a maximum allowance on the account if
desired. If no limit is required then leave the Total
Allowance option unchecked.
11. Click OK at the bottom of the screen.
12. Click New Registration to add the next account.
13. When finished adding new accounts click
Logout at the top of the screen, then OK, to
release the machine from Admin Mode (which
locks out all users.).
To Edit an existing account click on the Edit button next
to that account. You can change the password on the
account, change restrictions on colour output, and
change the limits (if any) on colour or black & white
printing/copying.
To Delete an account click the Delete button next
to that account and confirm when prompted.

If printing from a general use computer where multiple users use different codes, then do not enter a code in the driver (as above). You can use Pop Up Authentication that prompts users to enter their codes every time they click Print.
1. Repeat steps 1-3 above.
2. Click on Properties (or if using Windows 7: Printer Properties)
3. Click on the Settings tab.
4. Click on Authentication Settings.
5. Click the checkbox for Popup Authentication Dialogue when Printing. Click OK to close the pop up.
6. Click Apply to save all your settings, then OK to close the screen.
11
Entering Account Codes into Print Drivers (PC’s)
1. Click on the Windows Start button.
2. Click on Printers and Faxes (or in Windows 7: Devices and Printers).
3. Right click on the icon for the Konica Minolta printer.
4. Click on Printing Preferences.
5. Click on the Basic Tab.
6. Click on Authentication/Account Track.
7. If using Account Tracking with Password Only authentication then you only enter the password. Leave the Account field blank. Click OK, then click Apply to save your settings.
If using User Authentication change the option from Public User to Recipient User and enter the User Name and Password. Click OK, then click Apply to save the settings.
Pop Up Authentication (PC’s)
NOTE: If this option is grayed out you do not have permission to select the Pop Up option. Contact your network administrator to select the option for you.
12
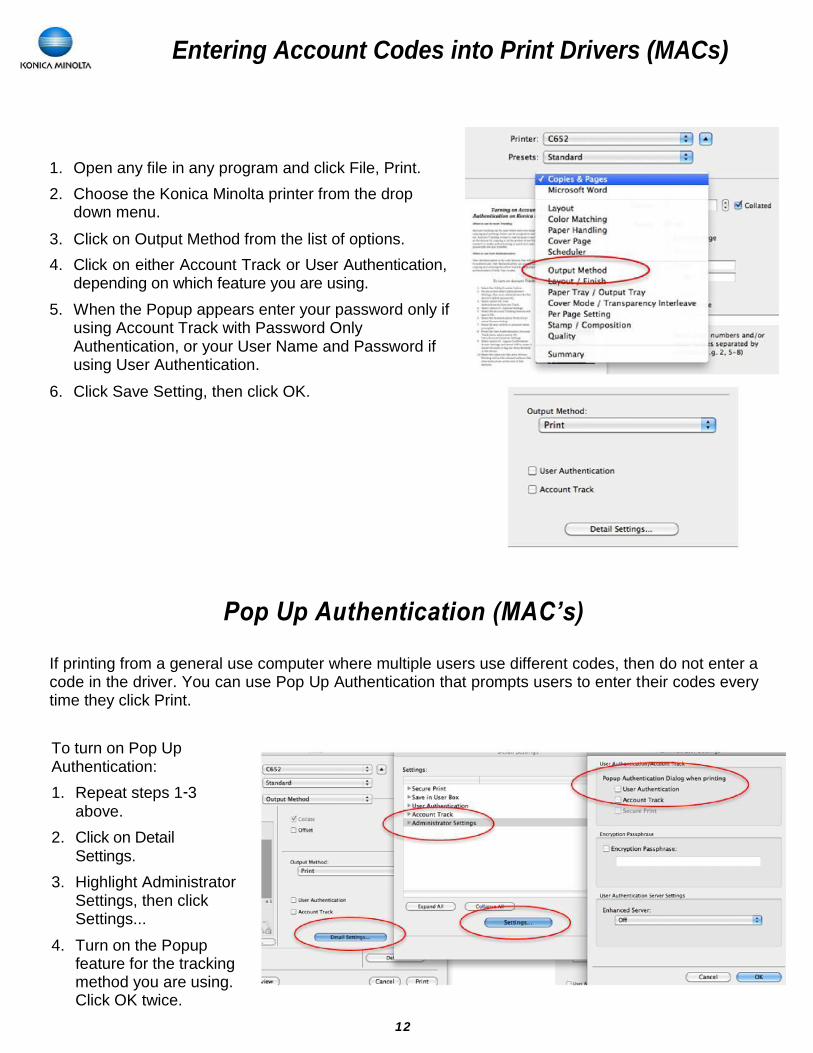
Entering Account Codes into Print Drivers (MACs)
1. Open any file in any program and click File, Print.
2. Choose the Konica Minolta printer from the drop down menu.
3. Click on Output Method from the list of options.
4. Click on either Account Track or User Authentication, depending on which feature you are using.
5. When the Popup appears enter your password only if using Account Track with Password Only Authentication, or your User Name and Password if using User Authentication.
6. Click Save Setting, then click OK.
Pop Up Authentication (MAC’s)
If printing from a general use computer where multiple users use different codes, then do not enter a code in the driver. You can use Pop Up Authentication that prompts users to enter their codes every time they click Print.
To turn on Pop Up Authentication:
1. Repeat steps 1-3
above.
2. Click on Detail Settings.
3. Highlight Administrator Settings, then click Settings...
4. Turn on the Popup feature for the tracking method you are using. Click OK twice.
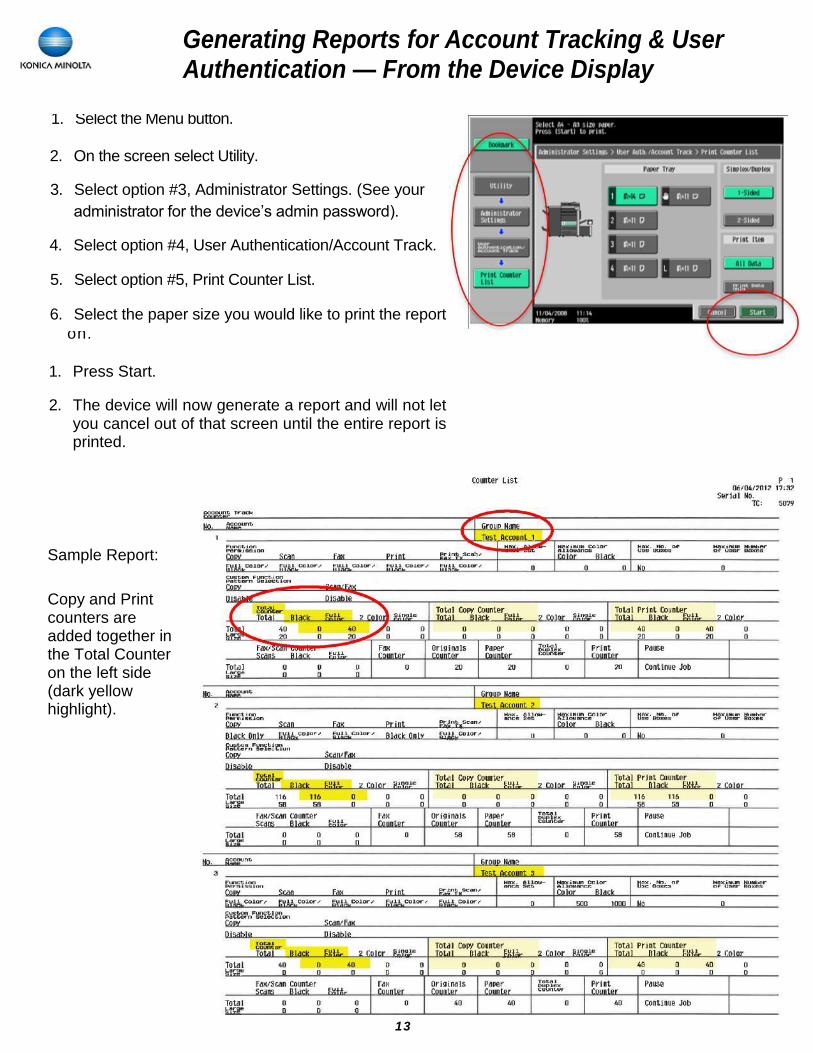
1. Select the Menu button.
2. On the screen select Utility.
3. Select option #3, Administrator Settings. (See your
administrator for the device’s admin password).
4. Select option #4, User Authentication/Account Track.
5. Select option #5, Print Counter List.
6. Select the paper size you would like to print the report
on.
13
Generating Reports for Account Tracking & User Authentication — From the Device Display
1. Press Start.
2. The device will now generate a report and will not let you cancel out of that screen until the entire report is printed.
Sample Report:
Copy and Print counters are added together in the Total Counter on the left side (dark yellow highlight).

14
Generating Reports for Account Tracking & User Authentication — From the Web Connection
1. Type in the IP address of your device into the
address bar of your web browser.
2. Select Administrator and click Login.
3. Enter the admin password (see your
administrator for the device’s admin
password).
4. From the colour coded menu on the
left side choose Import/Export
5. Choose Counter and click on Export.
6. Choose Account Track Counter and
click OK.
7. When prompted click Download.
8. Choose Save File and select a
location on your computer to save
the file. It will save as a Tab Text file.
9. When saving is complete click on
Back to go back to the main screen.
10. Click Logout at the top of the screen
to release the device from
Administrator mode (which locks out
all users)
11. Import the Tab Text file into Excel to make it easy to
read. (Do not change any of the default import settings
Excel chooses. Simply click Next or Finish when
prompted).

15
Resetting Counters For Account Tracking on
Konica Minolta bizhub Devices
This function can only be done using the PageScope Data Administrator utility, an installable program, or from the display panel of the device. It cannot be done from the Web Connection.
Resetting All Accounts to Zero from the Display Panel:
1. Select the Menu button.
2. On the screen select Utility.
3. Select Administrator Settings.
(See your administrator for the
device’s admin password)
4. Select option #4, Account Track/
User Authentication.
5. Select the third option Account
Track Settings (or the second option, User Authentication Settings if using that feature).
6. Select the second option, Account Track Counter (or User Counter if using User Authentication).
7. Select the Reset All Counters button at the bottom of the screen. Confirm when prompted.
Resetting A Single, Specific Account to Zero from the Display
Panel: See steps 1-5 above.
6. Select the individual account on the screen and click Counter Details.
7. Select the Reset Counter button in the top corner of the page.
8. Press OK. Confirm you wish to reset the counter.