accessing i2c devices with digi embedded linux...
TRANSCRIPT
Accessing I2C devices with
Digi Embedded Linux 5.2
example on Digi Connect ME 9210
Document History
Date Version Change Description
17/09/2010 V1.0 Initial entry/outline
24/02/2011 V1.1 Retested with latest patches
10/03/2011 V1.2 Need to add kernel config and Linux tests, pics of test setup
I2C devices with Digi Embedded Linux
Copyright 2011 Digi International Page 2/18
V1.0
Table of Contents Document History ............................................................................................................... 1
Table of Contents ................................................................................................................ 2
1 Problem Description ................................................................................................... 2
2 Requirements .............................................................................................................. 3
3 Hardware pin considerations....................................................................................... 3
4 Software Setup ............................................................................................................ 4
4.1 Configure U-Boot to include I2C commands ...................................................... 4
4.1.1 Create U-Boot project for Digi Connect ME 9210 ....................................... 4
4.1.2 Configure and build the U-Boot to include I2C support ............................... 6
4.1.3 Program this U-Boot onto the module .......................................................... 8
4.1.4 Testing I2C bus from U-Boot ....................................................................... 9
4.2 Create a new Digi EL Kernel/Rootfs/U-Boot Project ........................................ 11
4.3 Patch support for your I2C device into the mach file ........................................ 13
4.4 Configure the kernel for I2C .............................................................................. 14
4.5 Built the kernel/rootfs project ............................................................................ 16
5 Hardware Setup ......................................................................................................... 17
6 Testing from Linux ................................................................................................... 18
1 Problem Description
Most Digi embedded ConnectCore modules or Digi Connect ME 9210 modules have
integrated on chip I2C bus hardware. Typically these micro processors are used as I2C
bus master, to access one or several external (or on module, or on development board)
I2C devices.
I2C (also referred as two wire interface) is a bus with two signal lines:
SCL serial clock line
SDA serial data line
The master is driving the clock line, which can be stretched by slower slaves.
On the data line, the master addresses individual slaves by a 7-Bit (optional 10 bit)
address. An additional bit is used to decide for read or write access to the connected I2C
device. Talking about an 8- or 11 Bit address, it means device ID including read/write
information. Specific I2C devices have pre-defined device ID = bus address. Equal
devices can be hardware strapped to have a different ID.
The Linux kernel provides basic I2C bus driver and the interface to integrate hardware
specific drivers for the local master. In order to communicate with remote I2C devices
I2C devices with Digi Embedded Linux
Copyright 2011 Digi International Page 3/18
V1.0
you need to register chip specific drivers for those devices. E.g. you register an EEPROM
chip driver with device ID = 17 or an external RTC with ID=0x68.
2 Requirements
To try the example in this document you need:
Digi Connect ME 9210 mounted on Digi development board.
Digi Embedded Linux (DEL) 5.2 or above development environment.
You can get everything together in a Digi Linux JumpStart Kit
You also need a I2C sample device, e.g. Dallas DS1307 I2C RTC
(Alternatively use a Digi development board for 9P9360 or 9M2443, both have
Dallas DS1307 RTC on board).
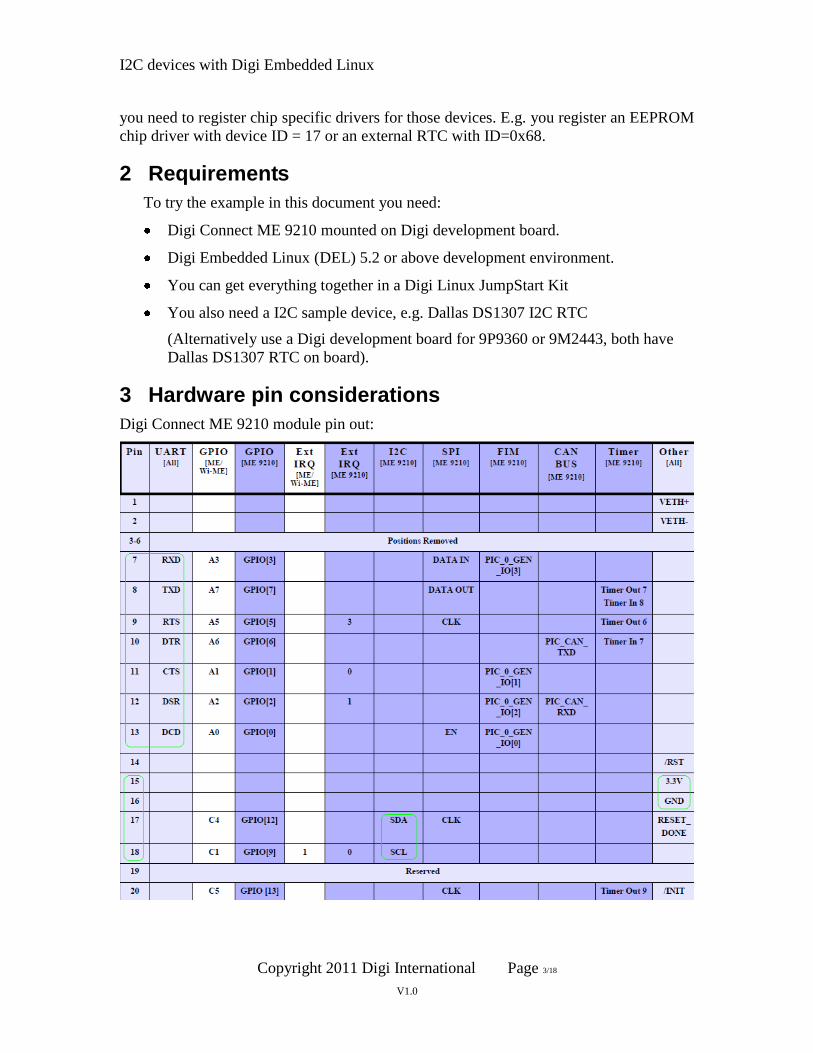
3 Hardware pin considerations
Digi Connect ME 9210 module pin out:
I2C devices with Digi Embedded Linux
Copyright 2011 Digi International Page 4/18
V1.0
We will use the standard UART for U-Boot and Linux console on serial Port P1, and use
I2C from the signal rail P3:
Pin 15 3,3V <- connect to your I2C device 3,3V input pin ->
Pin 16 GND <- connect to your I2C device GND pin ->
Pin 17 I2C SDA (GPIO[12]) <- connect to your I2C device SDA pin ->
Pin 18 I2C SCL (GPIO[9]) <- connect to your I2C device SCL pin ->
This should work with the I/O selection switch SW3 to either GPIO or RS232.
4 Software Setup
For your convenience find all files and images compiled into the archive these
instructions came with, you might want to skip this section. Find Archive Here.
Install Digi Embedded Linux (DEL) 5.2 or higher, apply latest patches with the
Package Manager.
4.1 Configure U-Boot to include I2C commands
If you just want to access your I2C from Linux, you can skip this section. For testing your
initial hardware connection to the I2C device and to check its ID or to modify the content
of an I2C EEPROM having I2C features enabled in U-Boot might be useful.
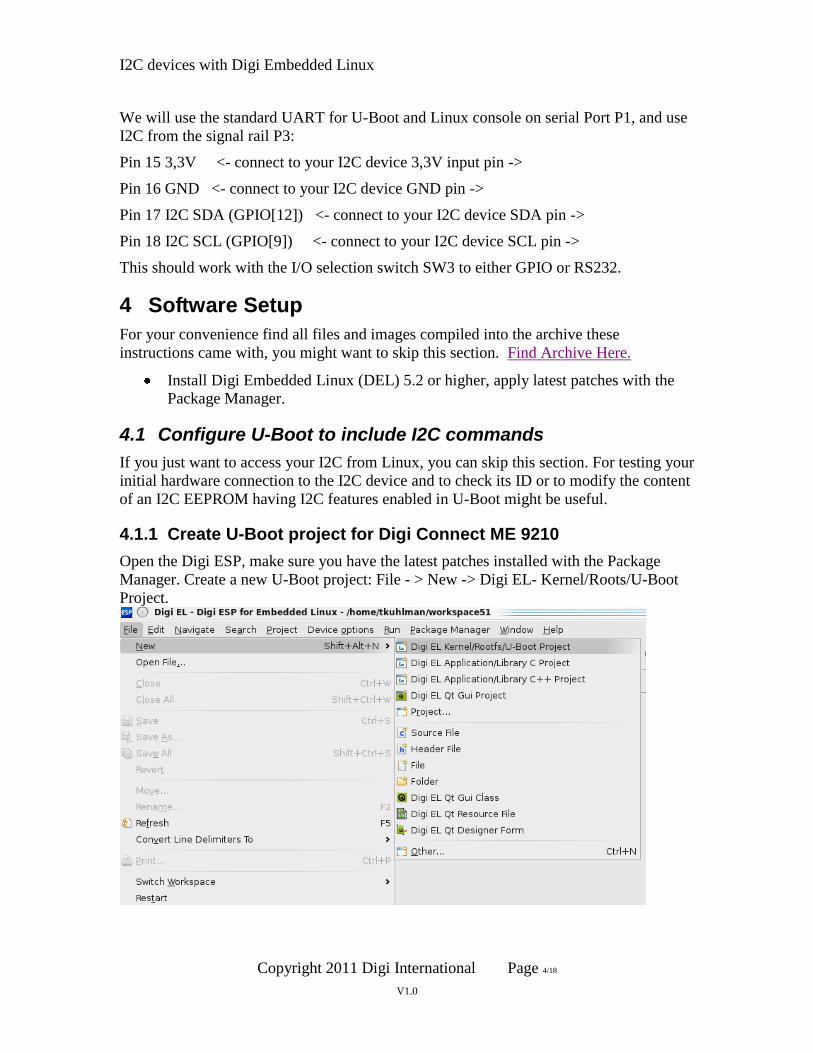
4.1.1 Create U-Boot project for Digi Connect ME 9210
Open the Digi ESP, make sure you have the latest patches installed with the Package
Manager. Create a new U-Boot project: File - > New -> Digi EL- Kernel/Roots/U-Boot
Project.
I2C devices with Digi Embedded Linux
Copyright 2011 Digi International Page 5/18
V1.0
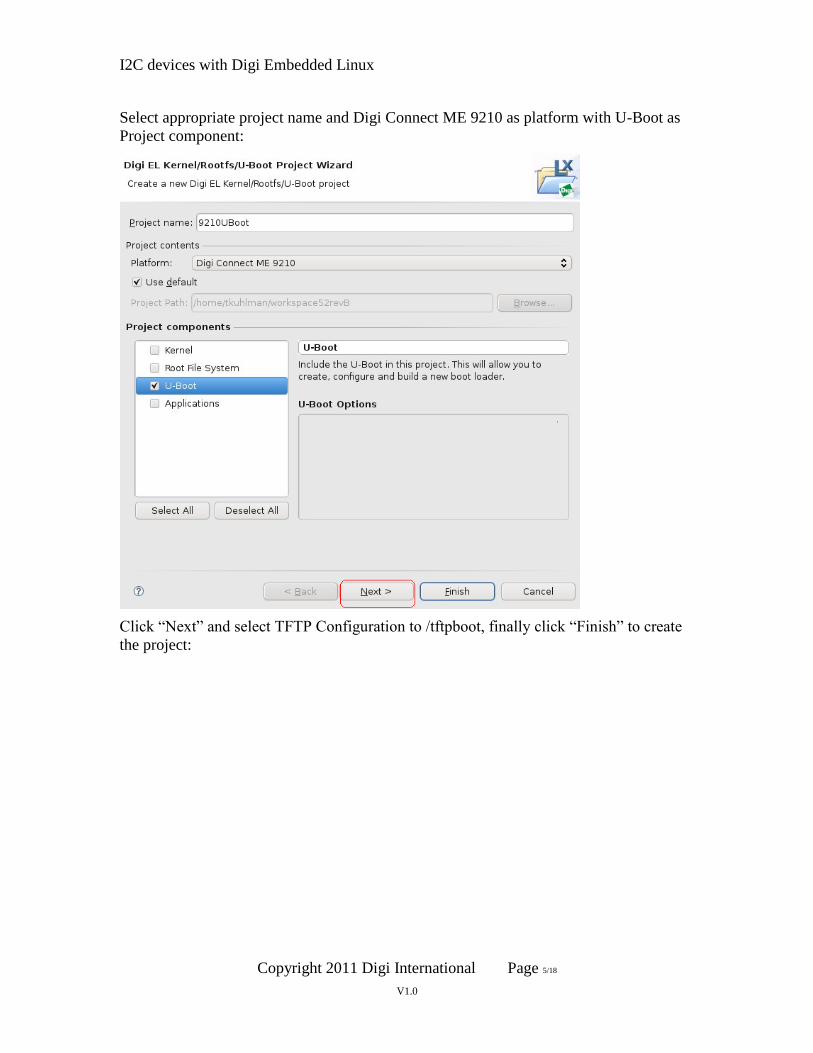
Select appropriate project name and Digi Connect ME 9210 as platform with U-Boot as
Project component:
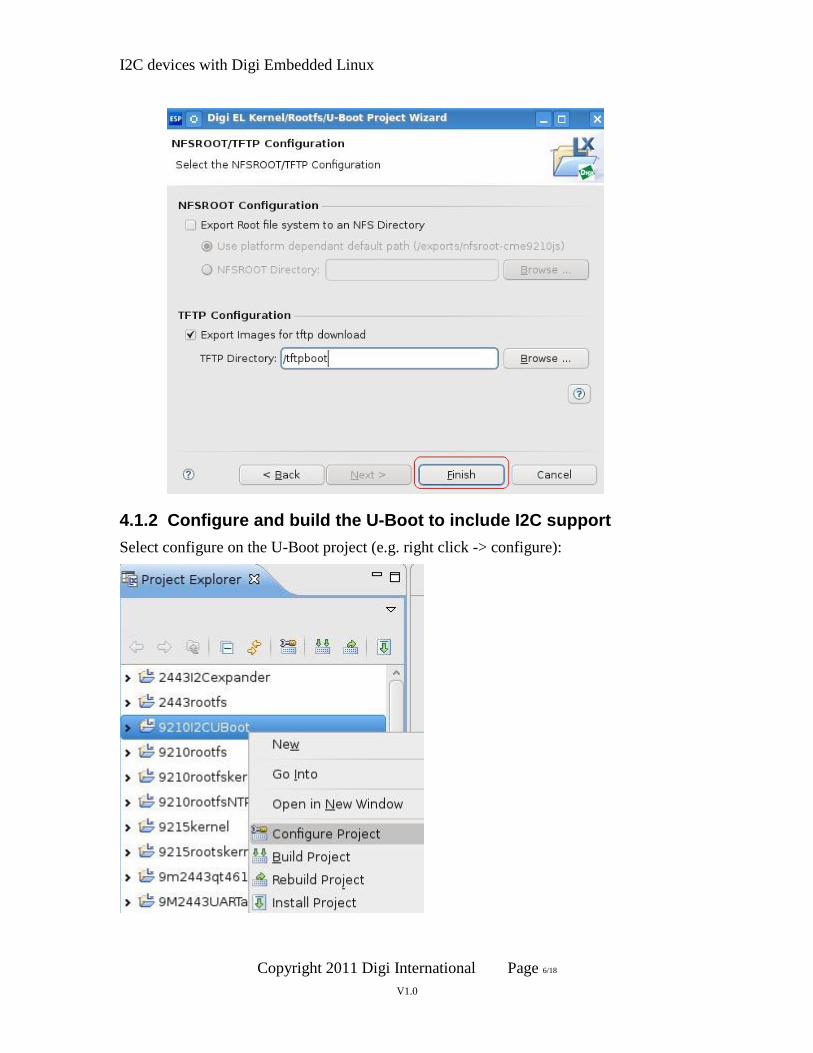
Click “Next” and select TFTP Configuration to /tftpboot, finally click “Finish” to create
the project:
I2C devices with Digi Embedded Linux
Copyright 2011 Digi International Page 6/18
V1.0
4.1.2 Configure and build the U-Boot to include I2C support
Select configure on the U-Boot project (e.g. right click -> configure):

I2C devices with Digi Embedded Linux
Copyright 2011 Digi International Page 7/18
V1.0
In Commands, select Data bus -> I2C to enable CONFIG_CMD_I2C:
Save and Quit the configuration and build the U-Boot:
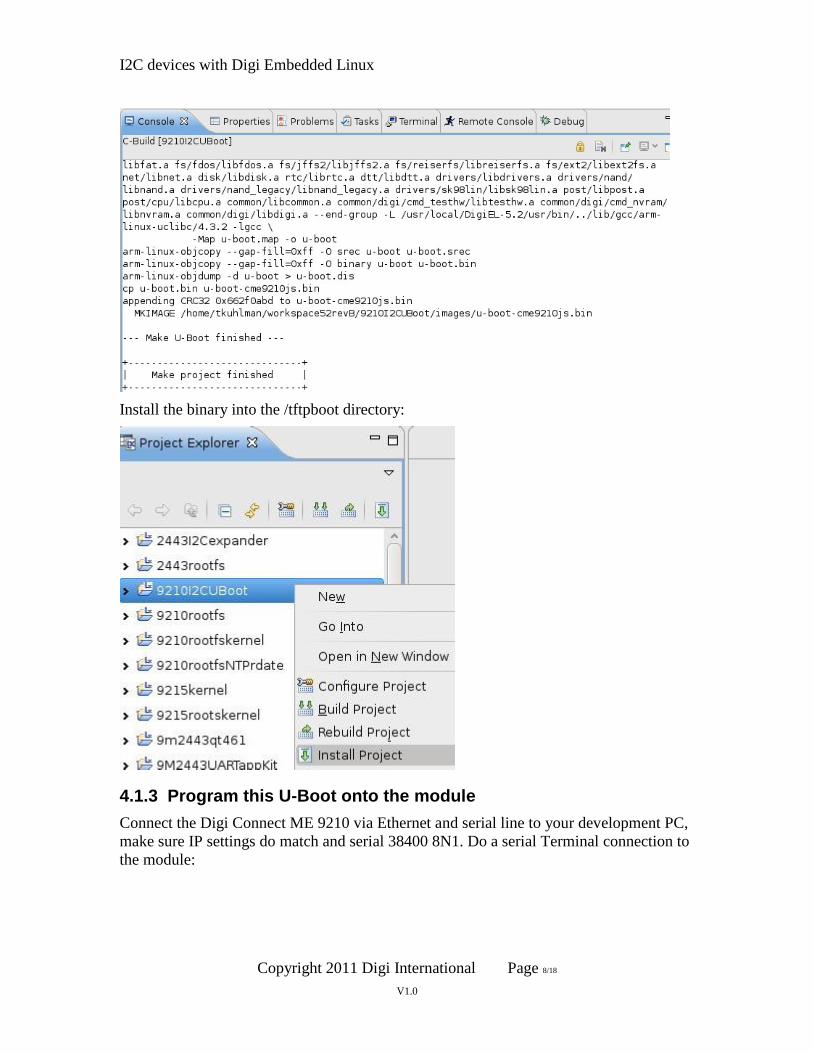
After the build finished:
I2C devices with Digi Embedded Linux
Copyright 2011 Digi International Page 8/18
V1.0
Install the binary into the /tftpboot directory:
4.1.3 Program this U-Boot onto the module
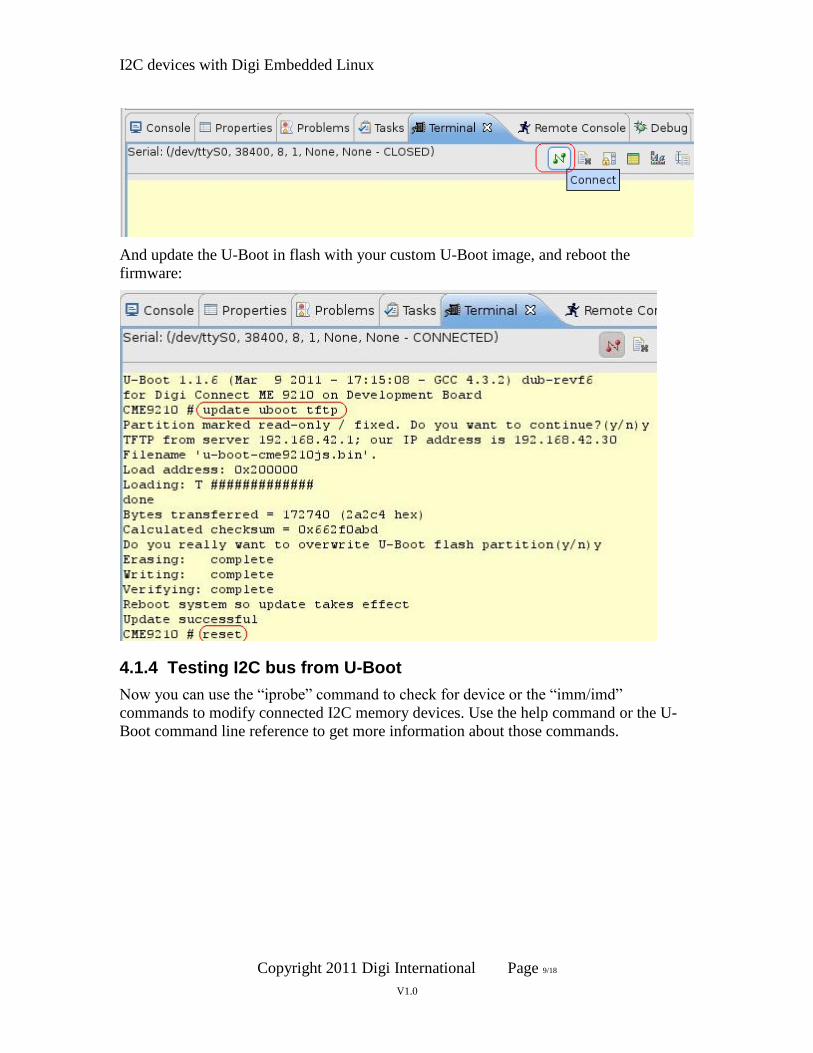
Connect the Digi Connect ME 9210 via Ethernet and serial line to your development PC,
make sure IP settings do match and serial 38400 8N1. Do a serial Terminal connection to
the module:
I2C devices with Digi Embedded Linux
Copyright 2011 Digi International Page 9/18
V1.0
And update the U-Boot in flash with your custom U-Boot image, and reboot the
firmware:
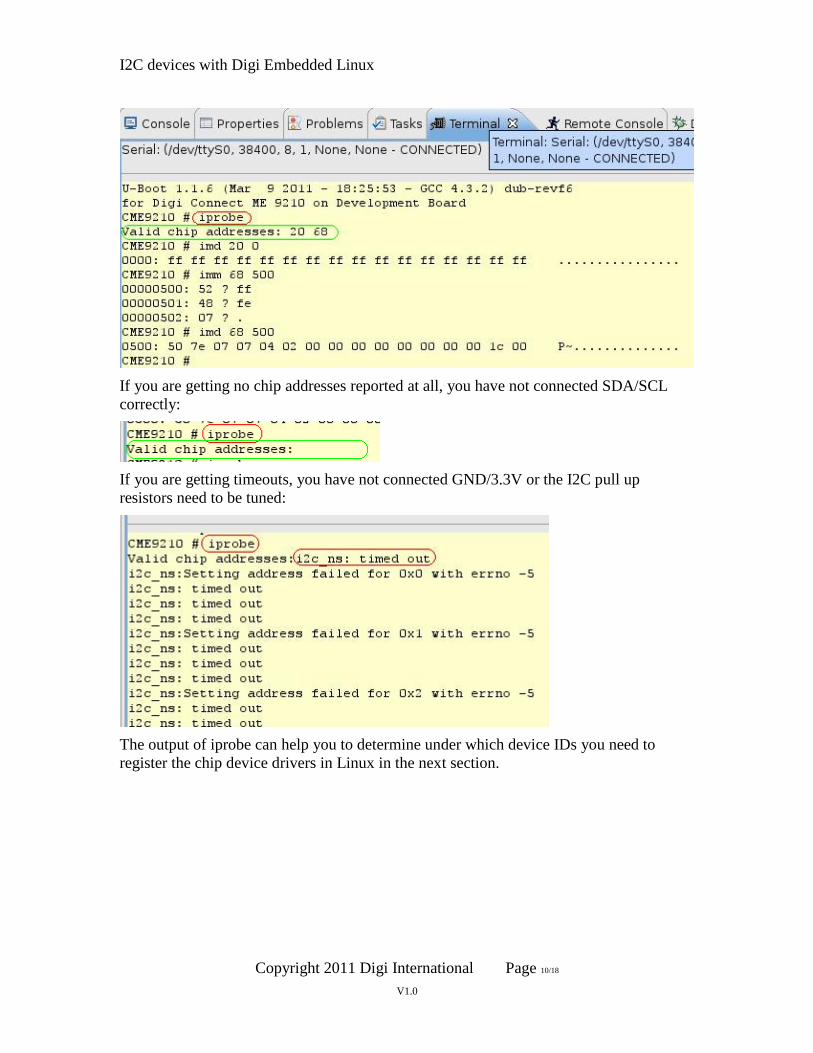
4.1.4 Testing I2C bus from U-Boot
Now you can use the “iprobe” command to check for device or the “imm/imd”
commands to modify connected I2C memory devices. Use the help command or the U-
Boot command line reference to get more information about those commands.
I2C devices with Digi Embedded Linux
Copyright 2011 Digi International Page 10/18
V1.0
If you are getting no chip addresses reported at all, you have not connected SDA/SCL
correctly:
If you are getting timeouts, you have not connected GND/3.3V or the I2C pull up
resistors need to be tuned:
The output of iprobe can help you to determine under which device IDs you need to
register the chip device drivers in Linux in the next section.
I2C devices with Digi Embedded Linux
Copyright 2011 Digi International Page 11/18
V1.0
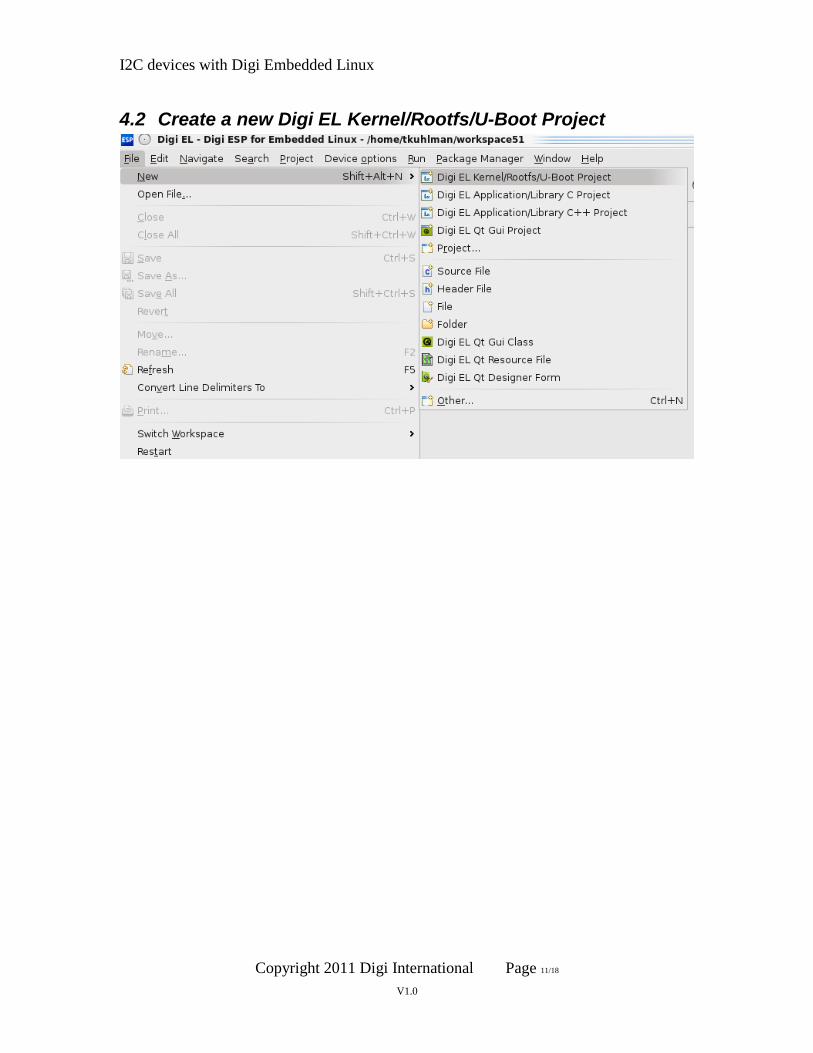
4.2 Create a new Digi EL Kernel/Rootfs/U-Boot Project
I2C devices with Digi Embedded Linux
Copyright 2011 Digi International Page 12/18
V1.0
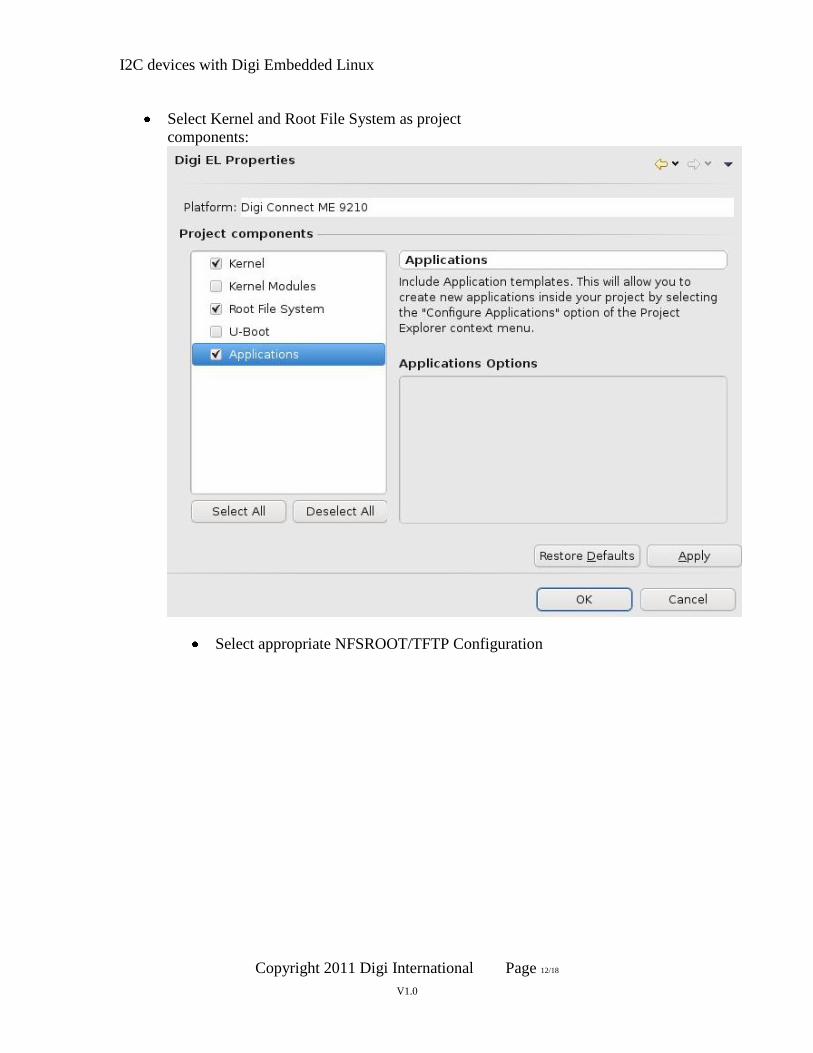
Select Kernel and Root File System as project
components:
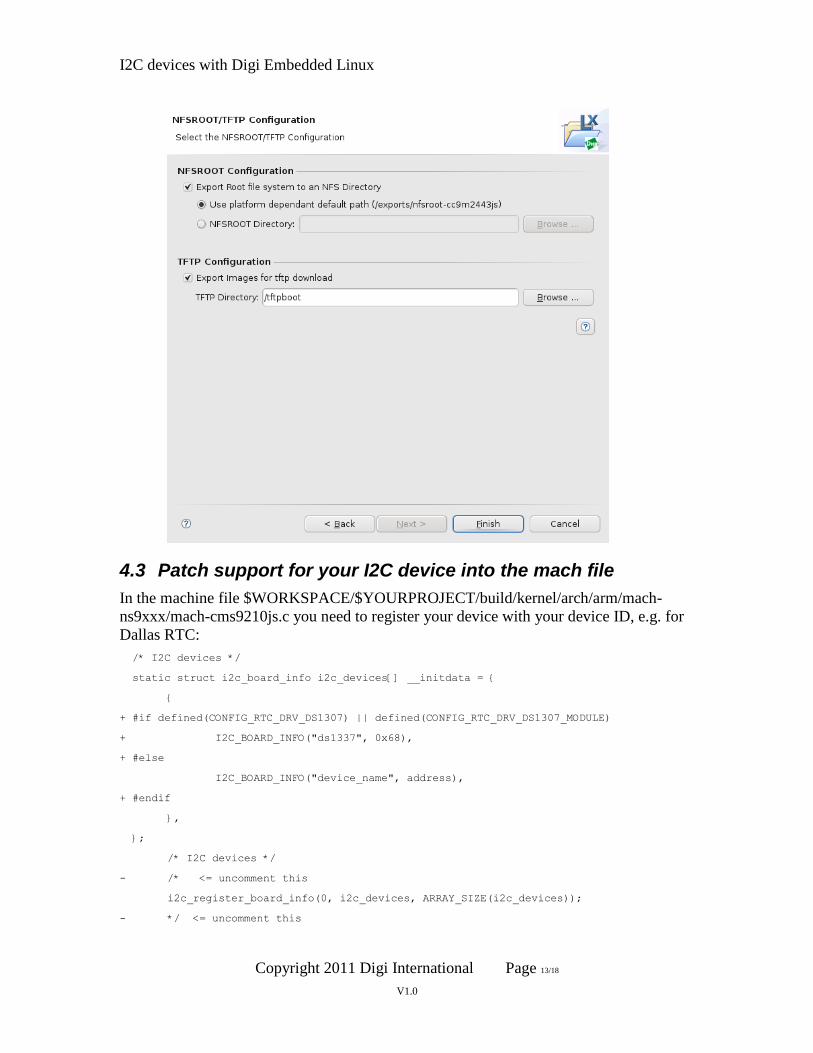
Select appropriate NFSROOT/TFTP Configuration
I2C devices with Digi Embedded Linux
Copyright 2011 Digi International Page 13/18
V1.0
4.3 Patch support for your I2C device into the mach file
In the machine file $WORKSPACE/$YOURPROJECT/build/kernel/arch/arm/mach-
ns9xxx/mach-cms9210js.c you need to register your device with your device ID, e.g. for
Dallas RTC:
/* I2C devices */
static struct i2c_board_info i2c_devices[] __initdata = {
{
+ #if defined(CONFIG_RTC_DRV_DS1307) || defined(CONFIG_RTC_DRV_DS1307_MODULE)
+ I2C_BOARD_INFO("ds1337", 0x68),
+ #else
I2C_BOARD_INFO("device_name", address),
+ #endif
},
};
/* I2C devices */
- /* <= uncomment this
i2c_register_board_info(0, i2c_devices, ARRAY_SIZE(i2c_devices));
- */ <= uncomment this
I2C devices with Digi Embedded Linux
Copyright 2011 Digi International Page 14/18
V1.0
For the RTC example you can also use the patch attached with:
cd /usr/local/DigiEL-5.2/kernel/linux/arch/arm/mach-ns9xxx
patch -p0 <mach-cme9210js.patch
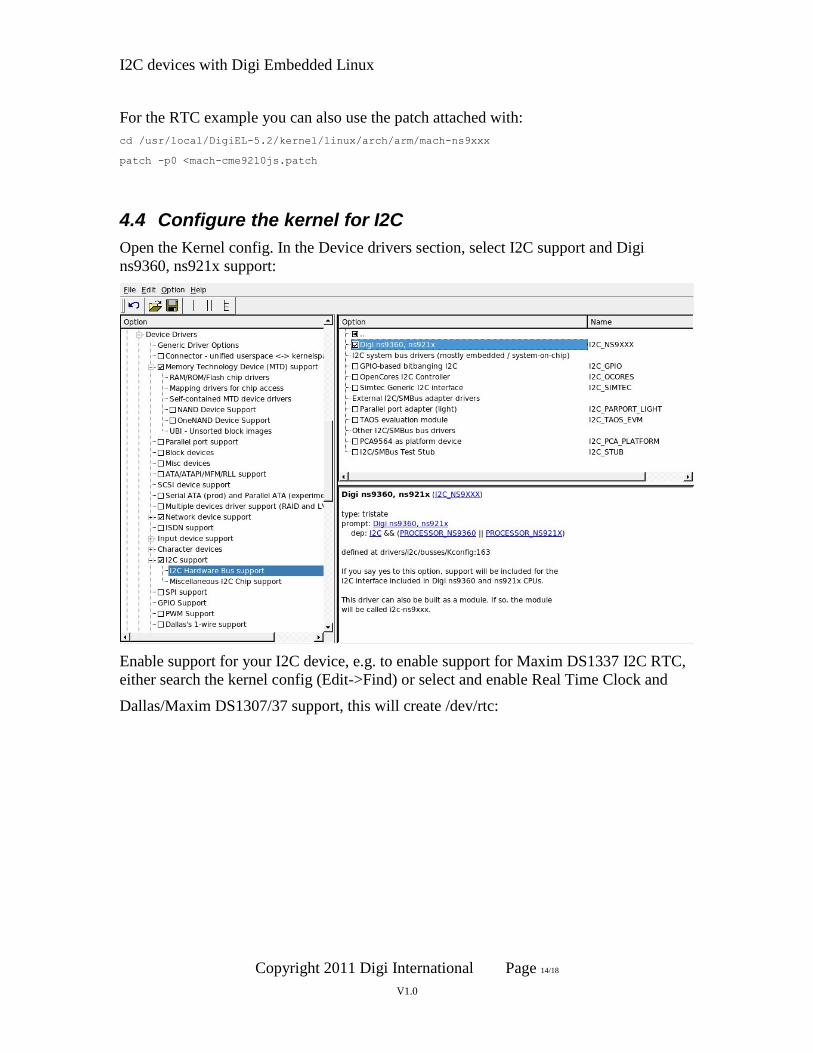
4.4 Configure the kernel for I2C
Open the Kernel config. In the Device drivers section, select I2C support and Digi
ns9360, ns921x support:
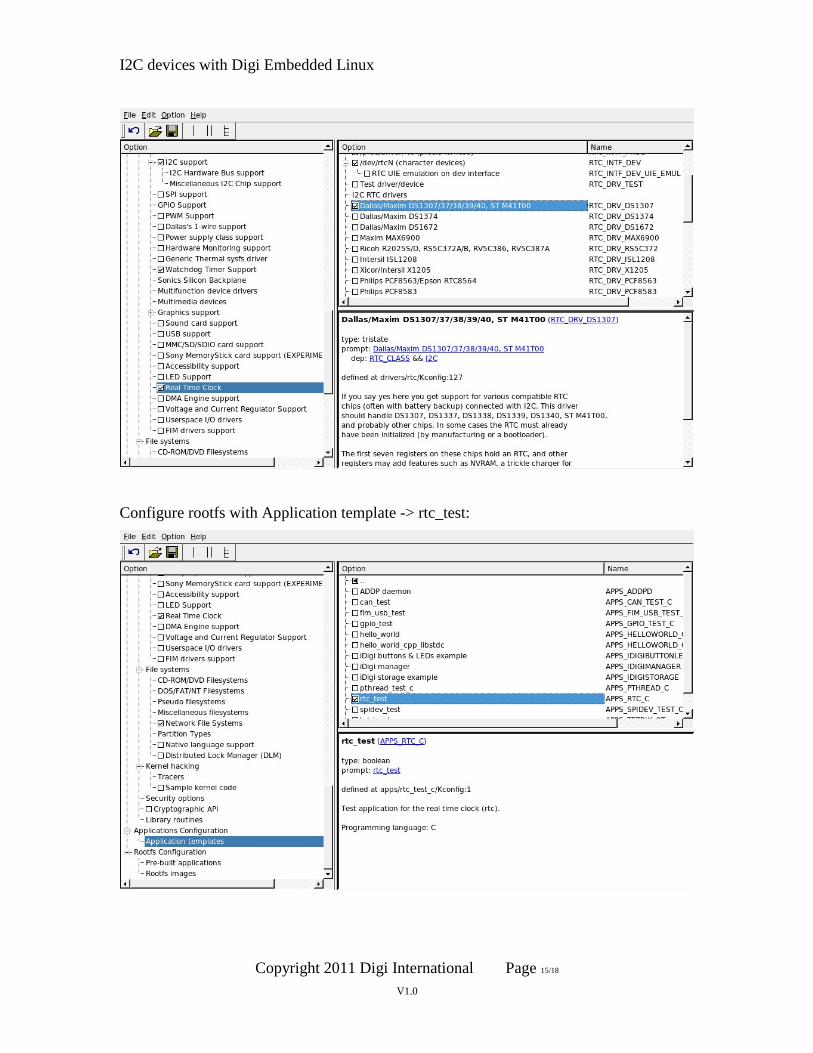
Enable support for your I2C device, e.g. to enable support for Maxim DS1337 I2C RTC,
either search the kernel config (Edit->Find) or select and enable Real Time Clock and
Dallas/Maxim DS1307/37 support, this will create /dev/rtc:
I2C devices with Digi Embedded Linux
Copyright 2011 Digi International Page 15/18
V1.0
Configure rootfs with Application template -> rtc_test:
I2C devices with Digi Embedded Linux
Copyright 2011 Digi International Page 16/18
V1.0
So rtc_test will work, as well as hwclock. However if clock is not detected, system might
not boot sometimes, if the driver is statically linked in.
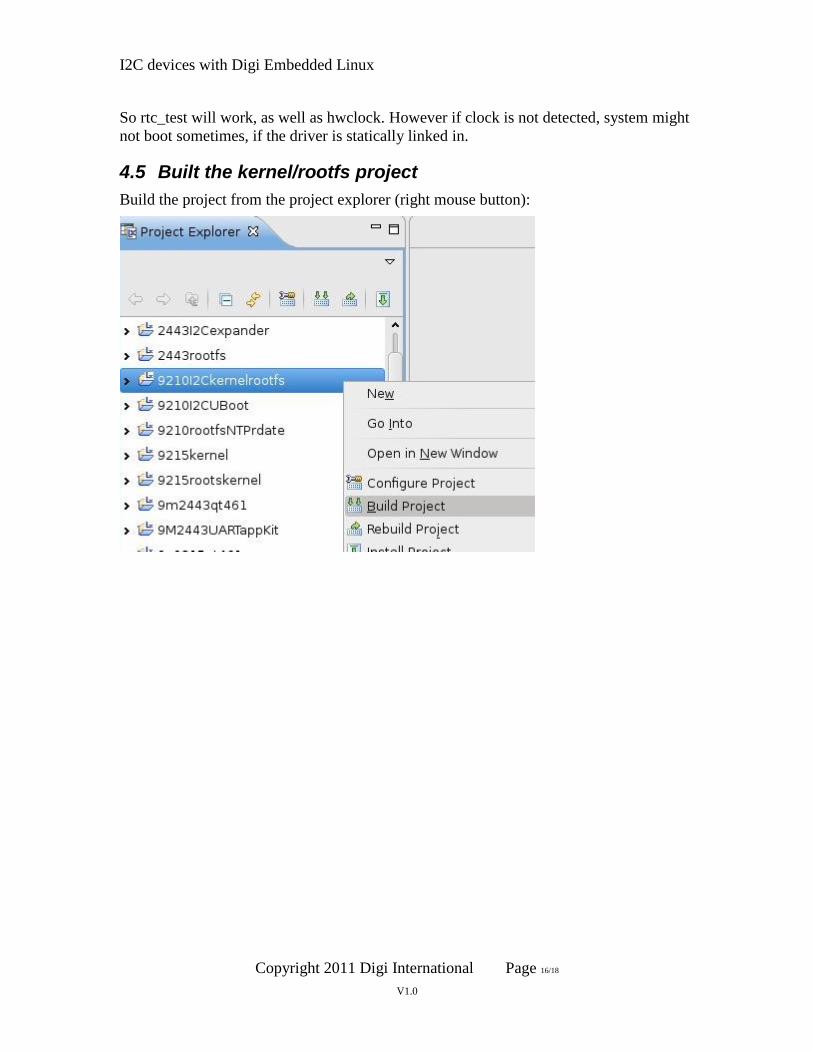
4.5 Built the kernel/rootfs project
Build the project from the project explorer (right mouse button):

I2C devices with Digi Embedded Linux
Copyright 2011 Digi International Page 17/18
V1.0
Install the project from the project explorer:
5 Hardware Setup
Turn off the development board.
Connect the power cable.
Plug the Connect ME 9210 or ConnectCore module to the development board.
Connect Ethernet between development board and your development PC or
switch (for updating firmware).
Connect a serial null modem cable (pins 2 and 3 crossed) to your host computer
(e.g. COMA is the CONSOLE). Plug the cable into Serial Port 1 (P1) of the Digi
development board.
Connect your external I2C device with SDC/SLA/GND/3.3V as indicated in
section 3.
Power on the Connect ME 9210 dev board
I2C devices with Digi Embedded Linux
Copyright 2011 Digi International Page 18/18
V1.0
6 Testing from Linux
Run the new built kernel and rootfs on module (e.g. update the images into flash built in
section 4.5 “update linux tftp; update rootfs tftp;dboot linux flash”, or boot with NFS-
root: “dboot linux tftp”).
During boot up you should notice message from your selected I2C device driver, e.g.:
rtc-ds1307 0-0068: rtc core: registered ds1337 as rtc0
And from the I2C bus driver:
i2c-ns9xxx i2c-ns9xxx: NS9XXX I2C adapter
Run the I2C device test applications specific to your device, or access the device file
directly, e.g. for the Dallas RTC:
# hwclock
# rtc_test
# rtc_test --help