access point point d'accès bluetooth - belkin · point d'accès bluetooth ... in order...
TRANSCRIPT

Bluetooth™ Access Point with USB Print ServerAccess your network and USB printers through Bluetooth devices
Point d'accès Bluetooth™
avec serveur d'impression USBAccédez au réseau et aux imprimantes USB via des périphériques Bluetooth
Bluetooth™ Acces Point mit USB-DruckserverZugriff auf Netzwerke und USB-Drucker mit Bluetooth-Geräten
Bluetooth™ Accesspoint met USB PrintserverToegang tot uw netwerk en USB printers via Bluetooth apparaten
Punto de Acceso Bluetooth™
con servidor de impresión USB Acceda a su red y a sus impresoras USB a través de dispositivos Bluetooth
Punto di accesso Bluetooth™
con print server USBOffre la possibilità di accedere alle proprie stampanti in rete con interfaccia USB attraverso le periferiche Bluetooth
Quick Installation GuideGuide d’installation rapide
InstallationsanleitungInstallatiegids
Guía de instalación rápidaGuida di installazione rapida
F8T030
P74186ea_F8T030_QIG.qxd 11-04-2003 08:51 Page 1

Bluetooth™ Access Pointwith USB Print Server Access your network and USBprinters through Bluetooth devices
Quick Installation GuideF8T030
P74186ea_F8T030_QIG.qxd 11-04-2003 08:51 Page 2

Congratulations and thank you for purchasing the Bluetooth Access Point with USBPrint Server (the AP) from Belkin. This guide will lead you through the basic stepsneeded for installation. For further information, please refer to the Belkin User Manualincluded with your packaging.
Package Contents• Bluetooth Access Point with USB Print Server• Print Server Utility CD-ROM• 5V DC, 1A Power Supply• User Manual• Quick Installation Guide• Registration Card
System Requirements• A computing device equipped with Bluetooth wireless technology• TCP/IP networking protocol installed in each wired computer connected to the LAN
Hardware InstallationIntroduction
Connecting Network Cables and Powering On1. Connect one end of a standard CAT5 twisted-pair cable to the RJ45 connector on
the AP and connect the other end to a 10Base-T or 100Base-T Ethernet router,switch, or wall jack.
wall jack
P74186ea_F8T030_QIG.qxd 11-04-2003 08:51 Page 4

Hardware Installation
Connecting USB Printers (optional)
The AP supports up to two USB printers. Please do not connect any devices other thana USB printer directly to these ports.
1. Attach one end of a USB cable to one of the USB ports on the AP.
2. Connect the other end to an available USB printer.
3. Repeat steps 1 and 2 above for a second printer.
Note: You must have the printer driver installedin each computer you wish to print from priorto use.
Hardware Installation
2. Connect the included power adapter into an available power outlet. Attach thebarrel plug into the power jack of the AP. You should see the power LED light turnon, the system light blink a few times, and then the system, LAN, USB 1, USB 2,and Bluetooth lights will blink repeatedly as the AP initiates itself. The initiationprocess will take approximately 20 seconds.
TIP: The system LED blinks once per second indicating that the AP is functioning properly. The system lightwill blink three times per second if the IP address has not been set. If any lights other than the power lightremain solid, consult the Troubleshooting guide at the end of your User Manual. If the problem persists,contact Belkin Technical Support at 00-800-223-55460.
P74186ea_F8T030_QIG.qxd 11-04-2003 08:51 Page 6

Software Setup
Installing the Software
1. Insert the USB Print Server Utility CD-ROM in the computer you wish to print from.
2. Click on the “Setup.exe” file.
3. You should see the following appear on your screen. Click on the “Next” button tobegin the installation process.
Software Setup
Configuring your Network Settings
In order to connect to the Internet, your AP needs an IP address. Typically, these areprovided to the AP by a DHCP server.
The AP is set to obtain an IP address from the Ethernet via DHCP. However, it is possible for you to pre-configure a fixed IP address into the AP. This can be done via the web manager using the Bluetooth interface (refer to your User Manual for more information).
Software InstallationRequirements:
• Windows® 98 SE, Me, 2000, XP
• Computer must be connected to the same Local Area Network as the AP
• Computer must have the appropriate printer driver installed
P74186ea_F8T030_QIG.qxd 11-04-2003 08:51 Page 8

Software SetupSoftware Setup
4. Once the software installation is complete, you will receive a message confirmingthe installation process.
Configuring your PrinterNote: You must add a printer as a “local” printer (not as a “network” printer), and select the printer portnamed “Belkin” (see step 4). To set up the printer:
1. Go to the Control Panel and open the “Printers” folder.
2. Select the printer that is connected to the AP.
3. Select “File” then “Properties” from the menu. (You may also right-click on theprinter and select “Properties”.)
4. Under the “Ports” tab, you will see a list of ports that are installed on your computer. Highlight the port named “Belkin” and click on “Configure Port”.
P74186ea_F8T030_QIG.qxd 11-04-2003 08:51 Page 10

Software Setup
5. Click on “Locate Servers”.
6. You will see the server “BELKIN_xxx”. Select it by clicking on it.
7. Click “OK” and then close the “Print Server Properties” window.
8. Your networked computer is now ready to print.
P74186ea_F8T030_QIG.qxd 11-04-2003 08:51 Page 12

Point d’accès Bluetooth™
avec serveur d'impression USBAccédez au réseau et aux imprimantesUSB via des périphériques Bluetooth
Guide d’installation rapideF8T030
Belkin Corporation501 West Walnut Street
Compton • CA • 90220 • USATel: +1 310.898.1100Fax: +1 310.898.1111
Belkin Components, Ltd.Express Business Park • Shipton Way • Rushden
NN10 6GL • United KingdomTel: +44 (0) 1933 35 2000Fax: +44 (0) 1933 31 2000
Belkin Components B.V.Starparc Building • Boeing Avenue 333
1119 PH Schiphol-Rijk • The NetherlandsTel: +31 (0) 20 654 7300Fax: +31 (0) 20 654 7349
Belkin GmbHHanebergstrasse 2
80637 München • GermanyTel.: +49 (0) 89 143405 0
Fax: +49 (0) 89 143405 100
Belkin Tech SupportUS: +1 310.898.1100 ext. 2263
+1 800.223.5546 ext. 2263Europe: 00 800 223 55 460
Australia: 1800 666 040
P74186© 2003 Belkin Corporation. All rights reserved. All trade names are registered trademarks of respective manufacturers listed.
The Bluetooth name and the Bluetooth trademarks are owned by Bluetooth SIG, Inc., and are used by Belkin Corporation under license.
belkin.com
P74186ea_F8T030_QIG.qxd 11-04-2003 08:51 Page 14

Installation du matériel
Branchement des câbles réseau et mise sous tension1. Branchez une extrémité d’un câble à paires torsadées CAT5 standard sur le
connecteur RJ45 du point d’accès et l’autre extrémité à un routeur, à un Switch ouà une prise muraleEthernet 10Base-T ou100Base-T.
prise murale
Félicitations ! Merci d'avoir choisi le point d'accès Bluetooth avec serveur d'impressionUSB (le point d'accès) de Belkin Ce guide vous indiquera les étapes élémentaires àsuivre pour l'installation. Pour plus d'informations, reportez-vous au manuel del'utilisateur Belkin livré avec l'appareil.
Contenu de la boîte • Point d’accès Bluetooth avec serveur
d’impression USB• CD-ROM contenant le pilote du serveur d'impression• Bloc d’alimentation 5 V CC 1 A• Manuel de l’utilisateur• Guide d’installation rapide• Carte d’enregistrement
Configuration requise• Périphérique informatique équipé de la technologie sans fil Bluetooth• Protocole réseau TCP/IP installé sur chaque ordinateur relié au LAN par un câble
Introduction
P74186ea_F8T030_QIG.qxd 11-04-2003 08:51 Page 2

Installation du matériel
Branchement d’imprimantes USB (facultatif)
Le point d’accès prend en charge jusqu’à deux imprimantes USB. Ne branchez pasdirectement d’autres périphériques qu’une imprimante USB sur ces ports.
1. Reliez une extrémité du câble USB à l’un des ports USB du point d’accès.
2. Branchez l’autre extrémité sur uneimprimante USB disponible.
3. Répétez les étapes 1 et 2 ci-dessus pourinstaller une seconde imprimante.
Remarque : Avant toute utilisation, le pilote d’imprimantedoit être installé sur les ordinateurs à partir desquels voussouhaitez imprimer.
Installation du matériel
2. Branchez l'adaptateur de courant fourni sur une prise secteur disponible. Raccordezla fiche cylindrique à la prise d'alimentation du point d'accès. Le témoind'alimentation doit s'allumer, celui du système doit clignoter plusieurs fois, puis lestémoins du système, LAN, USB 1, USB 2 et Bluetooth doivent clignoter plusieurs foispendant l'initialisation du point d'accès. Le processus dure environ 20 secondes.
ASTUCE : Le témoin du système clignote une fois par seconde pour indiquer que le point d’accès fonctionnecorrectement. Il clignote trois fois par seconde si l’adresse IP n’est pas définie. Si d’autres témoins restentallumés en permanence, consultez le guide Dépannage à la fin de ce manuel. Si le problème persiste,contactez l’assistance Belkin au 00-800-223-55460.
P74186ea_F8T030_QIG.qxd 11-04-2003 08:51 Page 4

Installation du logiciel
Installation du logiciel1. Insérez le CD-ROM contenant l’utilitaire de serveur d’impression USB dans
l’ordinateur à partir duquel vous souhaitez imprimer.2. Cliquez sur le fichier « Setup.exe ». 3. 3. La fenêtre suivante apparaît à l'écran. Cliquez sur le bouton « Next » (Suivant)
pour commencer l'installation.
Installation du logiciel
Configuration des paramètres réseau
Pour pouvoir accéder à Internet, votre point d’accès doit avoir une adresse IP.Habituellement, elle lui est fournie par un serveur DHCP.
Le point d’accès est défini de manière à obtenir une adresse IP pour Ethernet via DHCP.Toutefois, il vous est possible de configurer une adresse IP fixe sur le point d’accès.Vous pouvez le faire par l’intermédiaire du gestionnaire Web en utilisant l’interfaceBluetooth (reportez-vous au manuel de l’utilisateur pour plus d’informations).
Installation du logicielConfiguration requise :
• Windows® 98 SE, Me, 2000, XP• L’ordinateur doit être connecté au même réseau local que le point d’accès.• Le pilote d’imprimante approprié doit être installé sur l’ordinateur.
P74186ea_F8T030_QIG.qxd 11-04-2003 08:51 Page 6

Installation du logiciel
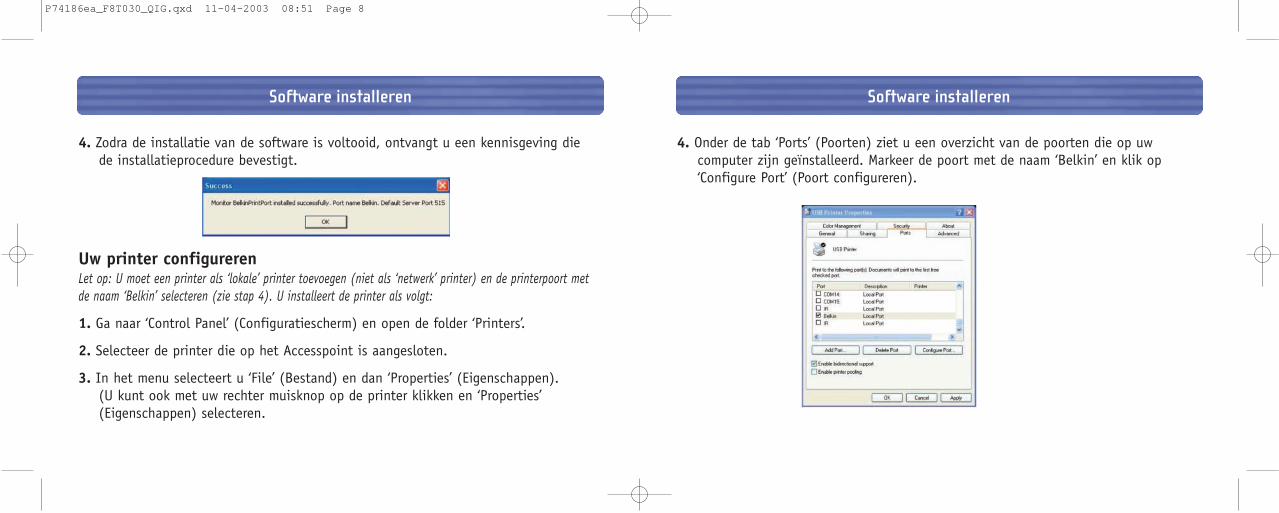
4. Dans l’onglet « Ports » figure la liste des ports installés sur l’ordinateur. Mettez leport « Belkin » en surbrillance, puis cliquez sur « Configurer le port ».
Installation du logiciel
4. Une fois le logiciel installé, un message vous confirme la fin du processusd’installation.
Configuration de l’imprimanteRemarque : Vous devez ajouter une imprimante en tant qu’imprimante « locale » et non en tantqu’imprimante « réseau ». Ensuite, sélectionnez le port d’imprimante « Belkin » (voir étape 4). Pour installer l’imprimante :1. Ouvrez le Panneau de configuration, puis le dossier « Imprimantes ».2. Choisissez celle qui est connectée au point d’accès.3. Dans le menu « Fichier », cliquez sur « Propriétés ». (Vous pouvez également cliquer
sur l’imprimante avec le bouton droit de la souris et choisir « Propriétés ».)
P74186ea_F8T030_QIG.qxd 11-04-2003 08:51 Page 8

Installation du logiciel
5. Cliquez sur « Locate Servers » (Rechercher les serveurs).
6. Vous verrez le serveur « BELKIN_xxx ». Pour le sélectionner, cliquez dessus.
7. Cliquez sur « OK », puis fermez la fenêtre « Propriétés du serveur d’impression ».
8. L’ordinateur en réseau est maintenant prêt à imprimer.
P74186ea_F8T030_QIG.qxd 11-04-2003 08:51 Page 10

Bluetooth™ Access pointmit USB-DruckserverZugriff auf Netzwerke und USB-Drucker mit Bluetooth-Geräten
InstallationsanleitungF8T030
Belkin Corporation501 West Walnut Street
Compton • CA • 90220 • États-UnisTél.: +1 310.898.1100Fax : +1 310.898.1111
Belkin Components, Ltd.Express Business Park • Shipton Way • Rushden
NN10 6GL • Royaume-UniTél.: +44 (0) 1933 35 2000Fax : +44 (0) 1933 31 2000
Belkin Components B.V.Starparc Building • Boeing Avenue 333
1119 PH Schiphol-Rijk • Pays-BasTél.: +31 (0) 20 654 7300Fax : +31 (0) 20 654 7349
Belkin GmbHHanebergstrasse 2
80637 München • AllemagneTél.: +49 (0) 89 143405 0
Fax : +49 (0) 89 143405 100
Support technique BelkinÉtats-Unis : +1 310.898.1100 poste 2263
+1 800.223.5546 poste 2263Europe : 00 800 223 55 460
Australie : 1800 666 040
P74186© 2003 Belkin Corporation. Tous droits réservés. Toutes les raisons commerciales sont des marques déposées de leurs fabricants respectifs.
Le nom Bluetooth et les marques de commerce Bluetooth sont la propriété de Bluetooth SIG, Inc. et sont utilisés sous licence par Belkin Corporation.
belkin.com
P74186ea_F8T030_QIG.qxd 11-04-2003 08:51 Page 12

Hardwareinstallation
Anschließen der Netzwerkkabel, Inbetriebnahme1. Schließen Sie ein standardmäßiges CAT5-Kabel mit verdrilltem Leitungspaar an die
RJ45-Buchse des Zugangspunkts und an einen 10Base-T oder 100Base-T Ethernet-Router, -Switch oder eineNetzwerksteckdose an.
Netzwerk-Anschlussbuchse
Wir beglückwünschen Sie zum Kauf des Bluetooth Netzzugangspunkts mit USB-Druckserver von Belkin. Diese Kurzanleitung zeigt Ihnen, wie Sie Ihr Belkin Gerätinstallieren. Weitere Informationen finden Sie im mitgelieferten BelkinBenutzerhandbuch.
Packungsinhalt• Bluetooth Access Point mit USB-Druckserver• CD-ROM mit Dienstprogrammen für den Druckserver• Netzteil (5 V DC / 1 A)• Benutzerhandbuch• Installationsanleitung• Registrierungskarte
Systemanforderungen• Computer mit Bluetooth Funkschnittstelle• TCP/IP Netzwerkprotokoll auf allen Computern, die über Kabel mit dem LAN
verbunden sind.
Einführung
P74186ea_F8T030_QIG.qxd 11-04-2003 08:51 Page 2

Hardwareinstallation
Anschließen von USB-Druckern (optional)
Der Zugangspunkt unterstützt bis zu zwei USB–Drucker. Bitte beachten Sie, dass an dieentsprechenden Schnittstellen ausschließlich USB-Drucker angeschlossen werdendürfen.
1. Schließen Sie ein USB-Kabel an eine USB-Schnittstelle des Zugangspunkts an.
2. Verbinden Sie das andere Kabelende miteinem USB-Drucker.
3. Wiederholen Sie Schritt 1 und 2, wenn Sieeinen zweiten Drucker anschließenmöchten.
Hinweis: Der Druckertreiber muss auf jedem Computerinstalliert sein, von dem aus Sie drucken möchten.
Hardwareinstallation
2. Schließen Sie das enthaltene Netzteil an eine freie Netzsteckdose an. Stecken Sieden Ausgangsstecker des Netzteils in die Netzbuchse des Zugangspunkts. Jetztmüsste die Betriebsanzeige aufleuchten, wobei die Systemanzeige mehrmalsaufblinkt. Danach blinken die System-, LAN-, USB 1-, USB 2- und die Bluetooth-Anzeige wiederholt auf, während der Zugangspunkt initialisiert wird. DieInitialisierung nimmt ca. 20 Sekunden in Anspruch.
TIPP: Die Systemanzeige blinkt einmal pro Sekunde auf und zeigt damit an, dass der Zugangspunktordnungsgemäß funktioniert. Die Systemanzeige blinkt dreimal pro Sekunde auf, wenn die IP-Adresse noch nicht eingestellt wurde. Wenn neben der Betriebsanzeige weitere LEDs permanent aufleuchten, finden Sie im Benutzerhandbuch im Abschnitt „Fehlerbehebung“ weitere Informationen. Bleibt das Problem weiterhinbestehen, wenden Sie sich unter der Nummer 00-800-223-55460. an den technischen Kundendienst von Belkin.
P74186ea_F8T030_QIG.qxd 11-04-2003 08:51 Page 4

Softwareinstallation
Installieren der Software1. Legen Sie die Druckerdienstprogramm-CD in den Computer ein, mit dem Sie drucken
möchten.2. Klicken Sie auf die Datei setup.exe. 3. Jetzt müsste das folgende Dialogfeld angezeigt werden. Klicken Sie auf “Weiter”, um
die Installation zu starten.
Softwareinstallation
Konfigurieren der Netzwerkeinstellungen
Damit Sie eine Verbindung zum Internet herstellen können, benötigt IhreZugangspunkt eine IP-Adresse. Normalerweise werden Internet-Adressen durch einenDHCP-Server zugewiesen.
Der Zugangspunkt ist so konfiguriert, dass er über DHCP eine IP-Adresse aus demEthernet anfordert. Sie können auf dem Zugangspunkt aber auch manuell eine feste IP-Adresse einstellen. Hierzu nutzen Sie den Webmanager und die Bluetooth-Schnittstelle.(Weitere Informationen hierzu finden Sie im Benutzerhandbuch.)
SoftwareinstallationSystemanforderungen:
• Windows® 98 SE, ME, 2000 oder XP• Computer und Access Point müssen an dasselbe LAN angeschlossen werden• Auf dem Computer muss der Treiber für das genutzte Druckermodell installiert sein
P74186ea_F8T030_QIG.qxd 11-04-2003 08:51 Page 6

Softwareinstallation
4. Auf der Registerkarte “Anschlüsse” werden die Schnittstellen aufgelistet, die imComputer installiert sind. Markieren Sie die Schnittstelle “Belkin”, und klicken Sieauf “Konfigurieren”.
Softwareinstallation
4. Nach dem Installieren der Software erhalten Sie eine Bestätigungsmeldung.
Konfigurieren des DruckersHinweis: Sie müssen einen Drucker als “lokalen” Drucker (und nicht als “Netzwerkdrucker”) hinzufügen unddie Druckerschnittstelle “Belkin” auswählen (siehe Schritt 4). So richten Sie den Drucker ein:
1. Öffnen Sie die Systemsteuerung, und doppelklicken Sie auf die Option “Drucker”.
2. Wählen Sie den Drucker aus, der am Access Point angeschlossen ist.
3. Wählen Sie im Menü “Datei” die Option “Eigenschaften”. (Sie können auch mit derrechten Maustaste auf den Drucker klicken und “Eigenschaften” wählen.)
P74186ea_F8T030_QIG.qxd 11-04-2003 08:51 Page 8
Softwareinstallation
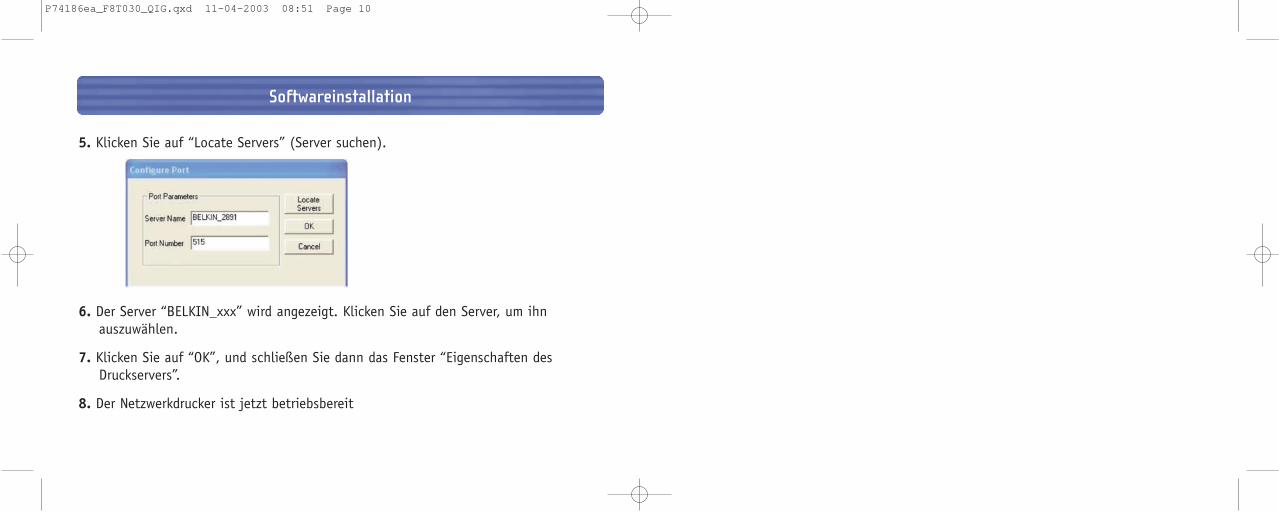
5. Klicken Sie auf “Locate Servers” (Server suchen).
6. Der Server “BELKIN_xxx” wird angezeigt. Klicken Sie auf den Server, um ihnauszuwählen.
7. Klicken Sie auf “OK”, und schließen Sie dann das Fenster “Eigenschaften desDruckservers”.
8. Der Netzwerkdrucker ist jetzt betriebsbereit
P74186ea_F8T030_QIG.qxd 11-04-2003 08:51 Page 10

Bluetooth™ Accesspointmet USB PrintserverToegang tot uw netwerk en USBprinters via Bluetooth apparaten
Beknopte installatiegidsF8T030
Belkin Corporation501 West Walnut Street
Compton • CA • 90220 • USATel: +1 310.898.1100Fax: +1 310.898.1111
Belkin Components, Ltd.Express Business Park • Shipton Way • Rushden
NN10 6GL • GroßbritannienTel: +44 (0) 1933 35 2000Fax: +44 (0) 1933 31 2000
Belkin Components B.V.Starparc Building • Boeing Avenue 3331119 PH Schiphol-Rijk • Niederlande
Tel: +31 (0) 20 654 7300Fax: +31 (0) 20 654 7349
Belkin GmbHHanebergstrasse 2
80637 München • DeutschlandTel: +49 (0) 89 143405 0
Fax: +49 (0) 89 143405 100
Belkin KundendienstUSA +1 310.898.1100, Durchwahl: 2263
+1 800.223.5546, Durchwahl: 2263Europa: 00 800 223 55 460Australien: 1800 666 040
P74186© 2003 Belkin Corporation. Alle Rechte vorbehalten. Alle Produktnamen sind eingetragene Marken der angegebenen Hersteller.
Die Bezeichnung Bluetooth und die anderweitigen Bluetooth Marken sind Eigentum der Bluetooth SIG, Inc. Verwendung durch die Belkin Corporation unter Lizenz.
belkin.com
P74186ea_F8T030_QIG.qxd 11-04-2003 08:51 Page 12

Hardware installeren
Netwerkkabels aansluiten en voeding inschakelen1. Sluit het ene einde van een standaard CAT5 twisted-pair kabel aan op de RJ45
connector op het Accesspoint en het andere einde op een 10Base-T of 100Base-TEthernet router,switch ofwandcontactdoos.
wandcontactdoos met contrasteker
Wij danken u hartelijk voor uw aankoop van dit Belkin Bluetooth® Accesspoint metUSB printserver (het Accesspoint) waarvan u veel plezier zult hebben. Dezeinstallatiegids helpt u bij de belangrijkste stappen die voor de installatie nodig zijn.Zie voor meer informatie de Belkin handleiding die in de verpakking is bijgesloten.
Inhoud verpakking• Bluetooth accesspoint met USB printserver• Cd-rom met printserver utility• 5 VDC, 1 A voedingsadapter• Handleiding• Beknopte installatiegids• Registratiekaart
Systeemvereisten• Computerapparaat met Bluetooth technologie voor draadloze communicatie• TCP/IP netwerkprotocol geïnstalleerd in elke met een kabel op het lokale netwerk
(LAN) aangesloten computer
Inleiding
P74186ea_F8T030_QIG.qxd 11-04-2003 08:51 Page 2

Hardware installeren
USB printers aansluiten (optie)
Het Accesspoint ondersteunt totaal twee USB printers. Sluit geen andere apparaten danUSB printers rechtstreeks op deze poorten aan.1. Bevestig het ene einde van een USB kabel in een van de USB poorten van het
accesspoint.2. Sluit het andere einde aan op een
beschikbare USB printer.3. Herhaal de bovenstaande stappen 1 en 2
voor een tweede printer.
Let op: Vóór gebruik moet op elke computer waarmee uwilt printen de printerdriver zijn geïnstalleerd.
Hardware installeren
2. Sluit de bijgeleverde voedingsadapter aan op een stopcontact voor netvoeding en bevestig de plug in de voedingsingang van het accesspoint. Als het accesspointopstart moet u zien dat de statusled voor voeding oplicht en de systeem status led een paar keer knippert waarna de systeem status led en de statusleds voor LAN,USB 1, USB 2 en Bluetooth herhaaldelijk knipperen. Deze initiatieprocedure neemtongeveer 20 seconden in beslag.
TIP: De systeem status led knippert eenmaal per seconde om aan te geven dat het Accesspoint correctfunctioneert. De systeemstatusled knippert drie maal per seconde als het IP adres niet is ingesteld. Alsandere led’s dan de status voedingsled continu blijven branden, zie dan de aanwijzingen voorprobleemoplossing achter in uw handleiding. Als u het probleem niet zelf kunt oplossen, neem dan contactop met Belkin, afdeling Technische Ondersteuning, telefoon: 00 800-223-55460.
P74186ea_F8T030_QIG.qxd 11-04-2003 08:51 Page 4

Software installeren
Software installeren1. Plaats de cd-rom met de USB printerserver utility in het optisch station van de
computer waarvan u wilt printen.2. Klik op het bestand ‘Setup.exe’. 3. Op uw beeldscherm moet u nu het volgende zien. Klik op ‘Next’ (Volgende) om de
installatieprocedure te starten.
Software installeren
Uw netwerkinstellingen configureren
Uw Accesspoint moet een IP adres hebben om verbinding te kunnen maken met hetinternet. Meestal worden IP adressen aan het Accesspoint geleverd door een DHCP server.
Het Accesspoint is zo ingesteld dat het via DHCP een IP adres van het Ethernet kankrijgen. U kunt echter ook vooraf een vast IP-adres in het Accesspoint invoeren. Dit ismogelijk via de webmanager met behulp van de Bluetooth interface (zie voor meerinformatie uw gebruikershandleiding).
Software installerenVereisten:• Windows® 98 SE, Me, 2000 of XP• De computer moet op hetzelfde lokale netwerk (LAN) zijn aangesloten als het
Accesspoint• Op de computer moet de geschikte printerdriver zijn geïnstalleerd
P74186ea_F8T030_QIG.qxd 11-04-2003 08:51 Page 6
Software installeren
4. Onder de tab ‘Ports’ (Poorten) ziet u een overzicht van de poorten die op uwcomputer zijn geïnstalleerd. Markeer de poort met de naam ‘Belkin’ en klik op‘Configure Port’ (Poort configureren).
Software installeren
4. Zodra de installatie van de software is voltooid, ontvangt u een kennisgeving die de installatieprocedure bevestigt.
Uw printer configurerenLet op: U moet een printer als ‘lokale’ printer toevoegen (niet als ‘netwerk’ printer) en de printerpoort met de naam ‘Belkin’ selecteren (zie stap 4). U installeert de printer als volgt:
1. Ga naar ‘Control Panel’ (Configuratiescherm) en open de folder ‘Printers’.
2. Selecteer de printer die op het Accesspoint is aangesloten.
3. In het menu selecteert u ‘File’ (Bestand) en dan ‘Properties’ (Eigenschappen). (U kunt ook met uw rechter muisknop op de printer klikken en ‘Properties’(Eigenschappen) selecteren.
P74186ea_F8T030_QIG.qxd 11-04-2003 08:51 Page 8

Software installeren
5. Klik op ‘Locate Servers’ (Servers opzoeken).
6. U ziet de server met de naam ‘BELKIN_xxx’. Selecteer deze door erop te klikken.
7. Klik op ‘OK’ en sluit dan het venster ‘Print Server Properties’ (Eigenschappen vanprintserver).
8. Uw printer is nu aangesloten op het netwerk en klaar om te printen.
P74186ea_F8T030_QIG.qxd 11-04-2003 08:51 Page 10

Punto de Acceso Bluetooth™
con servidor de impresión USB Acceda a su red y a sus impresoras USBa través de dispositivos Bluetooth
Guía de instalación rápidaF8T030
Belkin Corporation501 West Walnut Street
Compton • CA • 90220 • USATel: +1 310.898.1100Fax: +1 310.898.1111
Belkin Components, Ltd.Express Business Park • Shipton Way • Rushden
NN10 6GL • Verenigd KoninkrijkTel: +44 (0) 1933 35 2000Fax: +44 (0) 1933 31 2000
Belkin Components B.V.Starparc Building • Boeing Avenue 333
1119 PH Schiphol-Rijk • NederlandTel: +31 (0) 20 654 7300Fax: +31 (0) 20 654 7349
Belkin GmbHHanebergstrasse 2
80637 München • DuitslandTel: +49 (0) 89 143405 0
Fax: +49 (0) 89 143405 100
Belkin technische helpdeskUSA: +1-310.898.1100 toestel 2263
+1 800.223.5546 toestel 2263Europa: 00 800 223 55 460
Australië: 1800 666 040
P74186© 2003 Belkin Corporation. Alle rechten voorbehouden. Alle handelsnamen zijn gedeponeerde handelsmerken van de betreffende rechthebbenden.
De naam Bluetooth en de Bluetooth handelsmerken zijn eigendom van Bluetooth SIG, Inc. En deze worden door Belkin Corporation in licentie gebruikt.
belkin.com
P74186ea_F8T030_QIG.qxd 11-04-2003 08:52 Page 12

Instalación del hardware
Conexión de los cables de red y encendido1. Conecte un extremo de un cable estándar de pares trenzados CAT5 al conector RJ45
del PA y conecte el otro extremo a un enrutador de 10Base-T o 100Base-T,Ethernet, alconmutador o a unatoma de pared.
toma de pared
Felicidades y gracias por adquirir de este punto de acceso Bluetooth con servidor de impresión USB (el PA) de Belkin. La presente guía le conducirá por los pasosbásicos necesarios para la instalación. Para más información, consulte el manual del usuario de Belkin incluido en el paquete.
Contenido del paquete• Punto de acceso Bluetooth con servidor
de impresión USB • CD-ROM con la utilidad del servidor de impresión• Fuente de alimentación de 5V CC, 1A• Manual del usuario• Guía de instalación rápida• Tarjeta de registro
Requisitos del sistema• Un dispositivo informático equipado con tecnología inalámbrica Bluetooth• Protocolo de interconexión en red TCP/IP instalado en todos los ordenadores
conectados a la LAN
Introducción
P74186ea_F8T030_QIG.qxd 11-04-2003 08:52 Page 2

Instalación del hardware
Conexión de impresoras USB (opcional)
El PA soporta hasta dos impresoras USB. No conecte directamente a estos puertosningún dispositivo que no sea una impresora USB.
1. Conecte un extremo de un cable USB a uno de los puertos USB del PA.
2. Conecte el otro extremo a una impresoraUSB disponible.
3. Repita los pasos 1 y 2 anteriores para unasegunda impresora.
Atención: el controlador de la impresora deberáencontrarse instalado en todos los ordenadores desde losque desee imprimir antes de su utilización.
Instalación del hardware
2. Conecte el adaptador de alimentación adjunto a una salida de corriente disponible.Inserte el enchufe cilíndrico en la toma de alimentación del PA. Se encenderá la luz delLED de alimentación, la luz de sistema parpadeará una serie de veces y después las lucesde sistema, LAN, USB 1, USB 2 y Bluetooth parpadearán repetidamente mientras el PA seinicia por sí solo. El proceso de inicio conllevará aproximadamente 20 segundos.
CONSEJO: El LED de sistema parpadeará una vez por segundo indicando que el PA está funcionandocorrectamente. La luz de sistema parpadeará tres veces por segundo si la dirección IP no ha sido establecida.Si cualquier otra luz, además de la luz de encendido, permanece iluminada, consulte la guía de resoluciónde problemas al final de su manual del usuario. Si el problema persiste, póngase en contacto con el serviciode asistencia técnica de Belkin en el teléfono 00-800-223-55460.
P74186ea_F8T030_QIG.qxd 11-04-2003 08:52 Page 4

Instalación del software
Instalación del software 1. Inserte el CD-ROM con la utilidad del servidor de impresión USB en el ordenador
desde el que desee imprimir.
2. Haga clic en el archivo “Setup.exe”. 3. En su pantalla deberá aparecer el siguiente recuadro. Haga clic en el botón “Next”
(Siguiente) para comenzar el proceso de instalación.
Instalación del software
Configuración de sus ajustes de red
Para poder conectarse a Internet, su PA precisará de una dirección IP. Habitualmente,ésta es suministrada al PA por parte de un servidor DHCP.
El PA está configurado para obtener una dirección IP desde Ethernet a través del DHCP.No obstante, usted también puede establecer previamente una dirección IP fija en elPA. Esta acción puede ser ejecutada a través del administrador de Internet utilizandola interfaz Bluetooth (consulte el Manual del Usuario para más información).
Instalación del software Requisitos:
• Windows® 98 SE, Me, 2000, XP • El ordenador deberá estar conectado a la misma Red de Área Local (LAN) que el PA• El ordenador deberá tener instalado el controlador apropiado para la impresora
P74186ea_F8T030_QIG.qxd 11-04-2003 08:52 Page 6

Instalación del software
4. En la pestaña “Ports” (puertos), verá una lista de los puertos instalados en suordenador. Marque el puerto llamado "Belkin" y haga clic en "Configure Port"(Configurar puerto).
Instalación del software
4. Una vez completada la instalación del software, recibirá un mensaje confirmando elproceso de instalación.
Configuración de su impresoraAtención: Deberá añadir una impresora como impresora “local” (no como impresora de red [“network”]), y seleccionar el puerto de impresora llamado “Belkin” (véase el paso 4). Para configurar la impresora:
1. Vaya a “Control Panel” (Panel de control) y abra la carpeta “Printers” (Impresoras).
2. Seleccione la impresora que está conectada al PA.
3. Seleccione “File” (Archivo) y después “Properties” (Propiedades) del menú.(asimismo, puede hacer clic con el botón derecho del ratón sobre la impresora yseleccionar “Properties” [Propiedades]).
P74186ea_F8T030_QIG.qxd 11-04-2003 08:52 Page 8

Instalación del software
5. Haga clic en “Locate Servers” (Buscar servidores).
6. Verá el servidor "BELKIN_xxx". Selecciónelo haciendo clic sobre él.
7. Haga clic en “OK” (Aceptar) y después cierre la ventana de “Print Server Properties”(Propiedades del servidor de impresión).
8. Su ordenador conectado en red estará ahora listo para imprimir.
P74186ea_F8T030_QIG.qxd 11-04-2003 08:52 Page 10

Punto di accesso Bluetooth™
con print server USBOffre la possibilità di accedere alleproprie stampanti di rete coninterfaccia USB attraverso leperiferiche Bluetooth
Guida di installazione rapidaF8T030
Belkin Corporation501 West Walnut Street
Compton • CA • 90220 • EE.UU.Tel.: +1 310.898.1100Fax: +1 310.898.1111
Belkin Components, Ltd.Express Business Park • Shipton Way • Rushden
NN10 6GL • Reino UnidoTel.: +44 (0) 1933 35 2000Fax: +44 (0) 1933 31 2000
Belkin Components B.V.Starparc Building • Boeing Avenue 333
1119 PH Schiphol-Rijk • HolandaTel.: +31 (0) 20 654 7300Fax: +31 (0) 20 654 7349
Belkin GmbHHanebergstrasse 2
80637 München • AlemaniaTel.: +49 (0) 89 143405 0
Fax: +49 (0) 89 143405 100
Asistencia técnica de BelkinEE.UU.: +1 310.898.1100 ext. 2263
+1 800.223.5546 ext. 2263Europa: 00 800 223 55 460
Australia: 1800 666 040
P74186©2003 Belkin Corporation. Todos los derechos reservados. Todos los nombres comerciales son marcas registradas de los respectivos fabricantes enumerados.
El nombre de Bluetooth y las marcas registradas de Bluetooth son propiedad de Bluetooth SIG, Inc., y son empleadas con licencia por parte de Belkin Corporation
belkin.com
P74186ea_F8T030_QIG.qxd 11-04-2003 08:52 Page 12

Installazione dell’hardware
Collegamento dei cavi di rete e accensione1. Collegare un’estremità del cavo a doppino ritorto standard CAT5 al connettore RJ45
previsto sul punto di accesso e l’altra estremità ad un router, uno switch o unapresa a muro 10Base-T o 100Base-TEthernet.
presa a muro
Congratulazioni e grazie per aver acquistato il punto di accesso Bluetooth con printserver USB di Belkin. Questa guida ha lo scopo di fornirvi le informazioni fondamentaliper eseguire l’installazione. Per maggiori informazioni, vi rimandiamo al ManualeUtente fornito nella confezione.
Contenuto della confezione• Punto di accesso Bluetooth con print server USB• CD con utility per print server• Alimentazione 5V DC, 1°• Manuale utente• Guida di installazione rapida• Cartolina di registrazione
Requisiti del sistema• Una periferica dotata di tecnologia wireless Bluetooth.• Protocollo di rete TCP/IP installato su ogni computer collegato via cavo alla rete LAN
Introduzione
P74186ea_F8T030_QIG.qxd 11-04-2003 08:52 Page 2

Installazione dell’hardware
Connessione delle stampanti USB (opzionale)Il punto di accesso è in grado di gestire due diverse stampanti USB. Non collegaredirettamente a queste porte altre periferiche che non abbiano l’interfaccia USB.
1. Collegare un’estremità del cavo USB ad una delle porte USB previste nel punto diaccesso.
2. Collegare l’altra estremità ad unastampante disponibile con interfaccia USB.
3. Ripetere le fasi 1 e 2 descritte inprecedenza anche per la secondastampante.
Nota: in ogni computer dal quale si desidera lanciare lastampa, prima di procedere con il suo utilizzo, dovràessere installato il driver per la stampante.
Installazione dell’hardware
2. Collegare l’adattatore di corrente ad una presa di alimentazione disponibile. Inserire laspina nella presa di alimentazione del punto di accesso. Il LED di segnalazionealimentazione dovrebbe accendersi, la spia di sistema lampeggiare un paio di volte,seguita dal lampeggio ripetuto del sistema, della rete LAN, delle prese USB 1 e USB edella connessione Bluetooth mentre il punto di accesso si avvia. Il processo diiniziazione dura circa 20 secondi.
SUGGERIMENTO: il LED di sistema lampeggia una volta al secondo per indicare il corretto funzionamento delpunto di accesso. La spia di sistema lampeggia tre volte al secondo nel caso l’indirizzo IP non sia statoimpostato. Nel caso altre spie, oltre a quelle dell’alimentazione, dovessero rimanere fisse, consultare la guidadi Rilevazione e risoluzione delle anomalie in fondo al Manuale Utente. Se il problema persiste, rivolgersiall’Assistenza Tecnica Belkin al numero 00-800-223-55460.
P74186ea_F8T030_QIG.qxd 11-04-2003 08:52 Page 4

Software Setup
Installazione del software1. Inserire il CD-ROM contenente la utility per il print server USB nell’apposito drive
computer dal quale si desidera lanciare il comando di stampa.2. Fare clic sul file “Setup.exe”. 3. Sullo schermo dovrebbe apparire la seguente immagine. Fare clic su “Next” (Avanti)
per avviare il processo di installazione.
Software Setup
Configurazione delle impostazioni di retePer collegarsi ad Internet, il punto di accesso richiede un indirizzo IP. Generalmente,gli indirizzi sono forniti al punto di accesso dal server DHCP.
Il punto di accesso viene impostato in modo da poter ricevere un indirizzo IP daEthernet attraverso il protocollo DHCP. Tuttavia, è anche possibile eseguire unaconfigurazione preliminare di un indirizzo IP fisso all’interno del punto di accesso.Questa operazione può essere eseguita attraverso il web manager utilizzandol’interfaccia Bluetooth (per maggiori informazioni vedere il Manuale Utente).
Software d’installazioneRequisiti:
• Windows® 98 SE, Me, 2000, XP• Il computer deve essere collegato alla stessa rete locale (LAN) del punto di accesso• Nel computer deve essere stato installato il driver adatto alla stampante utilizzata
P74186ea_F8T030_QIG.qxd 11-04-2003 08:52 Page 6

Software Setup
4. Nella tabella “Ports” (Porte) compare l’elenco delle porte presenti nel computer.Evidenziare la porta “Belkin” e fare clic sul comando “Configure Port” (Configuraporta).
Software Setup
4. Una volta terminato il processo di installazione, un messaggio conferma che ilprocesso di installazione è andato a buon fine.
Configurazione della stampanteNota: la stampante deve essere aggiunta come stampante “locale” (non come stampante di “rete”),selezionando la porta della stampante “Belkin” (vedi fase 4). Per impostare la stampante:
1. Andare in “Control Panel” (Pannello di Controllo) e aprire la cartella “Printers”(Stampanti).
2. Selezionare la stampante collegata al punto di accesso.
3. Selezionare “File” e “Properties” (Proprietà) dal menu. (Oppure fare clic con il tastodestro del mouse sulla stampante e selezionare “Properties” (Proprietà)).
P74186ea_F8T030_QIG.qxd 11-04-2003 08:52 Page 8

Software Setup
5. Fare clic su “Locate Servers” (Posiziona server).
6. Compare il server “BELKIN_xxx”. Selezionarlo con un clic.
7. Fare clic su "OK" e chiudere la finestra “Print Server Properties” (Proprietà del print server).
8. Il computer in rete è pronto a stampare.
P74186ea_F8T030_QIG.qxd 11-04-2003 08:52 Page 10

Ponto de acesso Bluetooth™
com servidor de impressão USBAceda à sua rede e impressoras USBatravés de dispositivos Bluetooth
Guia de instalação rápidaF8T030
Belkin Corporation501 West Walnut Street
Compton • CA • 90220 • USATel: +1 310.898.1100Fax: +1 310.898.1111
Belkin Components, Ltd.Express Business Park • Shipton Way • Rushden
NN10 6GL • Regno UnitoTel: +44 (0) 1933 35 2000Fax: +44 (0) 1933 31 2000
Belkin Components B.V.Starparc Building • Boeing Avenue 333
1119 PH Schiphol-Rijk • Paesi BassiTel: +31 (0) 20 654 7300Fax: +31 (0) 20 654 7349
Belkin GmbHHanebergstrasse 2
80637 München • GermaniaTel: +49 (0) 89 143405 0
Fax: +49 (0) 89 143405 100
Assistenza tecnica BelkinUSA: +1 310.898.1100 est. 2263
+1 800.223.5546 est. 2263Europa: 00 800 223 55 460
Australia: 1800 666 040
P74186© 2003 Belkin Corporation. Tutti i diritti riservati. Tutti i nomi commerciali sono marchi registrati dai rispettivi produttori elencati.
Il nome Bluetooth ed i marchi commerciali Bluetooth sono di proprietà della Bluetooth SIG, Inc. e sono utilizzati da Belkin Corporation su concessione di licenza.
belkin.com
P74186ea_F8T030_QIG.qxd 11-04-2003 08:52 Page 12

Instalação do hardware
Ligação dos cabos de rede e ligação do sistema1. Ligue uma das pontas do cabo standard CAT5 de pares trançados ao conector RJ45
do PA e ligue a outra ponta ao router, switch ou tomada de parede Ethernet10Base-T ou100Base-T.
Tomada de parede
Parabéns e obrigado pela aquisição do ponto de acesso Bluetooth com servidor deimpressão USB (o PA) da Belkin. Este guia irá auxiliá-lo nos passos necessários paracompletar a instalação. Para mais informações, consulte o Manual do utilizador daBelkin incluído na embalagem.
Conteúdo do pacote• Ponto de acesso Bluetooth com servidor
de impressão USB • CD-ROM Utilitário do servidor de impressão• Fonte de alimentação de 5V DC, 1A• Manual do utilizador• Guia de instalação rápida • Formulário de registo
Requisitos do sistema• Um dispositivo electrónico equipado com a tecnologia Bluetooth sem fio• Protocolo de ligação em rede TCP/IP instalado em cada um dos computadores
ligados à rede LAN
Introdução
P74186ea_F8T030_QIG.qxd 11-04-2003 08:52 Page 2
Instalação do hardware
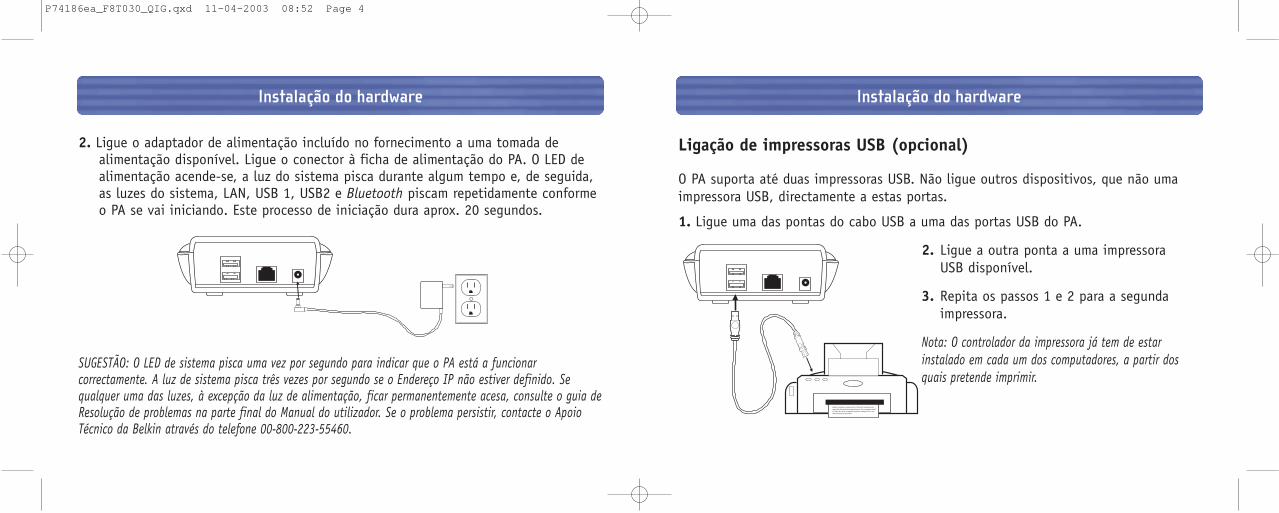
Ligação de impressoras USB (opcional)
O PA suporta até duas impressoras USB. Não ligue outros dispositivos, que não umaimpressora USB, directamente a estas portas.
1. Ligue uma das pontas do cabo USB a uma das portas USB do PA.
2. Ligue a outra ponta a uma impressora USB disponível.
3. Repita os passos 1 e 2 para a segundaimpressora.
Nota: O controlador da impressora já tem de estarinstalado em cada um dos computadores, a partir dosquais pretende imprimir.
Instalação do hardware
2. Ligue o adaptador de alimentação incluído no fornecimento a uma tomada dealimentação disponível. Ligue o conector à ficha de alimentação do PA. O LED dealimentação acende-se, a luz do sistema pisca durante algum tempo e, de seguida,as luzes do sistema, LAN, USB 1, USB2 e Bluetooth piscam repetidamente conformeo PA se vai iniciando. Este processo de iniciação dura aprox. 20 segundos.
SUGESTÃO: O LED de sistema pisca uma vez por segundo para indicar que o PA está a funcionarcorrectamente. A luz de sistema pisca três vezes por segundo se o Endereço IP não estiver definido. Sequalquer uma das luzes, à excepção da luz de alimentação, ficar permanentemente acesa, consulte o guia deResolução de problemas na parte final do Manual do utilizador. Se o problema persistir, contacte o ApoioTécnico da Belkin através do telefone 00-800-223-55460.
P74186ea_F8T030_QIG.qxd 11-04-2003 08:52 Page 4

Configurar o software
Instalação do software 1. Coloque o CD-ROM do Utilitário Servidor de impressão USB no computador a partir
do qual pretende fazer impressões.2. Faça clique sobre o ficheiro “Setup.exe”. 3. O seguinte ecrã deverá aparecer no monitor. Faça clique sobre o botão “Seguinte”
para iniciar o processo de instalação.
Configurar o software
Configurar as definições de rede
O seu PA precisa de um endereço IP para poder ligar à Internet. Normalmente osendereços são fornecidos ao PA por um servidor DHCP.
O PA está configurado para obter um endereço IP da Ethernet via DHCP. No entanto,poderá pré-configurar um endereço IP fixo para o PA, nomeadamente através do gestorda web usando o interface Bluetooth (consulte o seu Manual do utilizador para maisinformações).
Instalação do software
Requisitos:• Windows® 98 SE, Me, 2000, XP• O computador tem de estar ligado à mesma rede local do PA• O controlador da respectiva impressora tem de estar instalado no computador.
P74186ea_F8T030_QIG.qxd 11-04-2003 08:52 Page 6

Configurar o software
4. Por baixo do separador “Portas” aparece uma lista das portas que estão instaladasno seu computador. Opte pela porta com o nome “Belkin” e faça clique sobre“Configurar Porta”.
Configurar o software
4. Depois de concluir a instalação do software verá uma mensagem a confirmar que oprocesso de instalação está completo.
Configurar a impressora
Nota: Tem de adicionar uma impressora como impressora “local” (não como impressora de “rede”) eseleccionar a porta com o nome “Belkin” (ver passo 4). Para configurar a impressora:
1. Vá até ao Painel de controlo e abra a pasta “Impressoras”.
2. Seleccione a impressora que está ligada ao PA.
3. No menu, seleccione “Ficheiro” e de seguida “Propriedades” (também pode optar porpremir a tecla direita do rato sobre a impressora e seleccionar “Propriedades”).
P74186ea_F8T030_QIG.qxd 11-04-2003 08:52 Page 8
Configurar o software
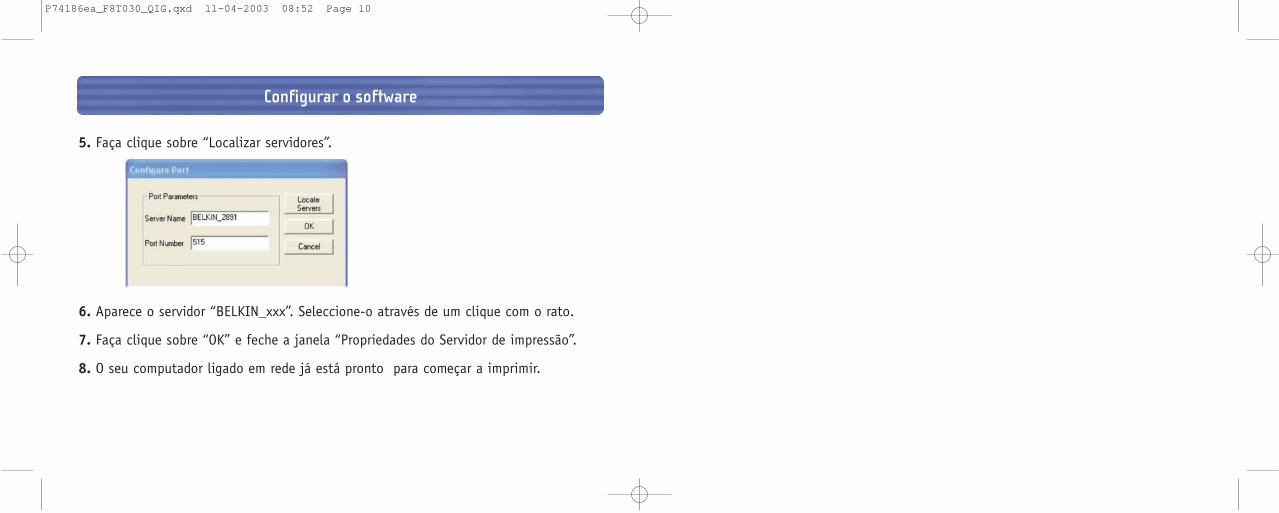
5. Faça clique sobre “Localizar servidores”.
6. Aparece o servidor “BELKIN_xxx”. Seleccione-o através de um clique com o rato.
7. Faça clique sobre “OK” e feche a janela “Propriedades do Servidor de impressão”.
8. O seu computador ligado em rede já está pronto para começar a imprimir.
P74186ea_F8T030_QIG.qxd 11-04-2003 08:52 Page 10

Belkin Corporation501 West Walnut Street
Compton • CA • 90220 • EUATel: +1 310.898.1100Fax: +1 310.898.1111
Belkin Components, Ltd.Express Business Park • Shipton Way • Rushden
NN10 6GL • Reino UnidoTel: +44 (0) 1933 35 2000Fax: +44 (0) 1933 31 2000
Belkin Components B.V.Starparc Building • Boeing Avenue 333
1119 PH Schiphol-Rijk • HolandaTel: +31 (0) 20 654 7300Fax: +31 (0) 20 654 7349
Belkin GmbHHanebergstrasse 2
80637 München • AlemanhaTel: +49 (0) 89 143405 0
Fax: +49 (0) 89 143405 100
Apoio técnico da BelkinEUA: +1 310.898.1100 ext. 2263
+1 800.223.5546 ext. 2263Europa: 00 800 223 55 460
Austrália: 1800 666 040
P74186© 2003 Belkin Corporation. Todos os direitos reservados. Todos os nomes de marcas são marcas registadas dos respectivos fabricantes enunciados no texto.
O nome Bluetooth e as marcas Bluetooth são propriedade da Bluetooth SIG, Inc., sendo utilizados pela Belkin Corporation sob licença.
belkin.com
P74186ea_F8T030_QIG.qxd 11-04-2003 08:52 Page 12

Belkin Corporation501 West Walnut Street
Compton • CA • 90220 • USATel: +1 310.898.1100Fax: +1 310.898.1111
Belkin Components, Ltd.Express Business Park • Shipton Way • Rushden
NN10 6GL • United KingdomTel: +44 (0) 1933 35 2000Fax: +44 (0) 1933 31 2000
Belkin Components B.V.Starparc Building • Boeing Avenue 333
1119 PH Schiphol-Rijk • The NetherlandsTel: +31 (0) 20 654 7300Fax: +31 (0) 20 654 7349
Belkin GmbHHanebergstrasse 2
80637 München • GermanyTel.: +49 (0) 89 143405 0
Fax: +49 (0) 89 143405 100
Belkin Tech SupportUS: +1 310.898.1100 ext. 2263
+1 800.223.5546 ext. 2263Europe: 00 800 223 55 460
Australia: 1800 666 040
P74186ea© 2003 Belkin Corporation. All rights reserved. All trade names are registered trademarks of respective manufacturers listed.
The Bluetooth name and the Bluetooth trademarks are owned by Bluetooth SIG, Inc., and are used by Belkin Corporation under license.
belkin.com
P74186ea_F8T030_QIG.qxd 11-04-2003 08:52 Page 14