accelerating xendesktop 7 for road users -...
TRANSCRIPT
Accelerating XenDesktop 7 for Road Users
This article contains information about accelerating XenDesktop 7 for Road Users.
Page 1
Summary This article contains information about accelerating XenDesktop 7 for Road Users.
Note: The purpose of this article is to describe how to configure the various parts of an integrated solution that supports this acceleration and includes a case study for XenDesktop 7, CloudBridge Plugin, and NetScaler Gateway.
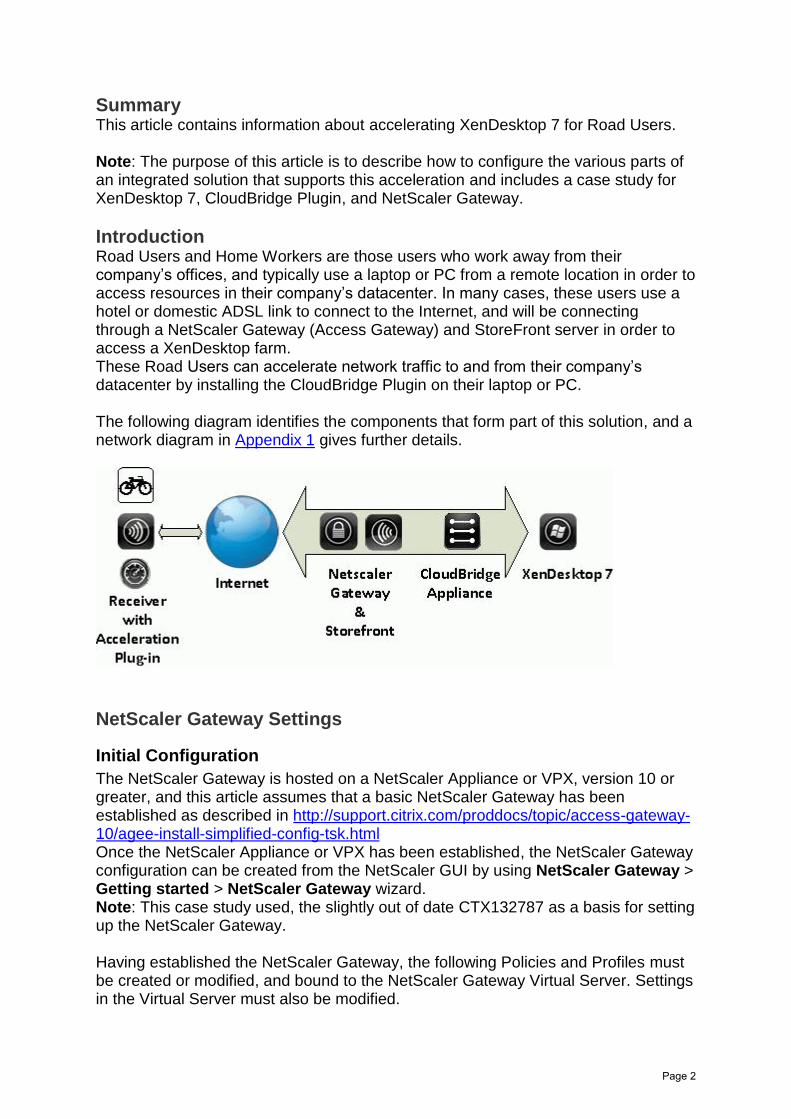
Introduction Road Users and Home Workers are those users who work away from their company’s offices, and typically use a laptop or PC from a remote location in order to access resources in their company’s datacenter. In many cases, these users use a hotel or domestic ADSL link to connect to the Internet, and will be connecting through a NetScaler Gateway (Access Gateway) and StoreFront server in order to access a XenDesktop farm. These Road Users can accelerate network traffic to and from their company’s datacenter by installing the CloudBridge Plugin on their laptop or PC.
The following diagram identifies the components that form part of this solution, and a network diagram in Appendix 1 gives further details.
NetScaler Gateway Settings
Initial Configuration
The NetScaler Gateway is hosted on a NetScaler Appliance or VPX, version 10 or greater, and this article assumes that a basic NetScaler Gateway has been established as described in http://support.citrix.com/proddocs/topic/access-gateway-10/agee-install-simplified-config-tsk.html Once the NetScaler Appliance or VPX has been established, the NetScaler Gateway configuration can be created from the NetScaler GUI by using NetScaler Gateway > Getting started > NetScaler Gateway wizard. Note: This case study used, the slightly out of date CTX132787 as a basis for setting up the NetScaler Gateway.
Having established the NetScaler Gateway, the following Policies and Profiles must be created or modified, and bound to the NetScaler Gateway Virtual Server. Settings in the Virtual Server must also be modified.
Page 2
NetScaler Gateway Virtual Server > Intranet IPs Currently Web Receiver in Full VPN mode does not support Single Sign-On (SSO). However, where StoreFront sees a client connecting through NetScaler Gateway, it will generally attempt to use passed-through credentials and might fail. By defining Intranet IPs in the NetScaler Gateway Virtual Server, the StoreFront server can be persuaded that the connection did not come through Netscaler Gateway, and will display a login screen rather than attempt SSO.
The use of Intranet IPs might mean that corporate firewall rules must be modified. Each client that connects through Full VPN will appear to have one of the Intranet IPs, so firewall rules must be extended to allow access from these apparent client addresses. A side effect of using Intranet IPs is that for WebReceiver, the Netscaler Gateway will be unable to pass SmartAccess tags through to StoreFront or XenApp or XenDesktop. A Clientless VPN policy and profile have been included to allow users to download account information to Receiver on a Client System outside of the corporate LAN (First Time Use)
Appendix 2 describes the settings that were used in this case study
CloudBridge Appliance Settings
Description
The CloudBridge Appliance or VPX is placed on the network so that all traffic must pass through it in order to get from the Internet to the server LAN (LAN 1) and vice-versa. CloudBridge documentation refers to this as Inline mode In this case study:
The WAN link of the CloudBridge Appliance is connected to the same networksegment as the Firewall Router
The LAN link is connected to a network switch that connects to the rest of theserver LAN (LAN 1).
The initial setup of the CloudBridge appliance is most easily done by using the Wizard that will be seen the first time that that CloudBridge GUI/Console is entered.
Appendix 3 describes the settings that were used in this case study.
StoreFront
Introduction
Where StoreFront detects that a user has connected through a NetScaler Gateway, it will always arrange for XenApp/XenDesktop sessions to be established using a Secure Ticket Authority (STA) address, rather than the direct IP address. This is also true even where the user has established a Full VPN connection to the server LAN. This default behavior prevents CloudBridge acceleration, and it is therefore necessary to modify StoreFront using the following PowerShell commands.
Page 3

The following commands inform StoreFront that, for a given Store, it should always arrange for direct IP addresses to be used instead of STA addresses.
Force Direct IP Addressing 1. From a StoreFront Console, identify the name of the Store that you wish to
modify.2. Close all StoreFront Consoles before running the following PowerShell script as
Administrator.3. Run the following three commands from a PowerShell prompt.
Note that the second command begins dot space.a. Set-ExecutionPolicy RemoteSignedb. 'C:\Program Files\Citrix\Receiver StoreFront\Scripts\ImportModules.ps1'c. Set-DSFarmsWithNullOptimalGateway -SiteId 1 -ResourcesVirtualPath
/Citrix/Store –AllFarmsWhere:
o SiteId: The IIS Site Id, typically 1 unless IIS has been explicitly reconfiguredby the administrator.
o ResourcesVirtualPath: The virtual path of the store to be modified. Thepreceding example modifies a store with the default name “Store”.
4. Exit from the PowerShell console before restarting any StoreFront Consoles.
Require Full VPN for Connections StoreFront must know what sort of connection is required between the Client PC and the NetScaler Gateway. It must know this so that it can tell Receiver how to connect. In this case, a full VPN is required, and this is configured in the StoreFront Console in the following way:
Stores > Store > Enable Remote Access Remote access = Full VPN tunnel Access Gateway appliances = Check appropriate appliance
Manage Citrix Receiver Updates Use Citrix StoreFront > Stores > Store > Manage Citrix Receiver Updates to enable updating of the NetScaler Gateway VPN Plug-in. In this case study, Citrix (citrix.com) was used to obtain Receiver updates. Alternatively, a Merchandising Server might be used, if available.
Client Systems
Introduction
In this case study, the Citrix Receiver and the CloudBridge Plugin were manually installed on a Windows 7 x64 client PC. These can be obtained from www.citrix.com, or from XenDesktop product media.
The NetScaler Gateway Plugin will be automatically downloaded and installed on the client PC when a user first connects to the NetScaler Gateway.
It is also possible to automatically deploy the CloudBridge Plugin, although this was not attempted during this case study.
Page 4
Once installed, it is necessary to configure the CloudBridge Plugin by entering the Signaling IP address of the CloudBridge Appliance. This is achieved in the following way: Load the CloudBridge Plugin from the Start Menu. This should cause the Citrix Receiver icon to be visible in the Taskbar. Right-click on the Citrix Receiver icon on the Taskbar and select About. Click on Advanced > CloudBridge Settings (or Accelerator Settings) > Manage Acceleration. Enter the Signaling IP of the CloudBridge Appliance and click Apply. Note: In this case study, the Signaling IP is 192.168.1.132.
Certificates A CA certificate must be installed on the client PC. This CA certificate should match the issuing authority of the server certificate installed on the NetScaler Gateway. This CA certificate is required to establish the SSL VPN. For this case study, there was no requirement to install any certificates into the CloudBridge Plugin.
Usage and Expected Behavior - WebReceiver
Connecting
On the client PC, a user does the following:- 1. If not already installed, install Receiver. When the installation completes, click
Finish. Do not Add Account to use WebReceiver.2. Browse to the company’s NetScaler Gateway. A logon screen will appear.3. Authenticate with username and password.4. If this is the first time that the client PC has connected to the NetScaler Gateway:
o The user might be invited to download and install a NetScaler Plugin. This isrequired to run End Point Analysis checks if defined. Allow this.
o The user will be invited to download and install a NetScaler Gateway Plug-in.This is required to run and to establish the SSL VPN to the NetScalerGateway. Allow this.
5. The user will see a message indicating that an SSL VPN is being established.6. The StoreFront logon page is displayed.7. The user authenticates with domain\username and password.8. The StoreFront page is displayed.9. The user starts Desktops and Apps in the normal way.10. If not already installed, install the Acceleration Plug-in, and configure it as
described earlier in this section.11. Acceleration might subsequently be enabled by loading the CloudBridge Plugin
from the Start Menu.
Disconnecting
Once the user has closed or disconnected from all Desktops and Apps, they should also close the SSL VPN. 1. On the client PC, right-click on the Citrix Receiver icon on the Taskbar, and click
Exit.2. The SSL VPN will close
Page 5
Usage and Expected Behavior - Receiver
First Time Use from an internal LAN
While there are a number of First Time Use options for Receiver, the following was used in this case study: 1. Connect the client PC to the corporate internal LAN.2. If not already installed, install Citrix Receiver.3. Once the installation of Receiver is complete, Receiver will load and it will allow
the user to Add Account.4. The user clicks Add Account.5. Enter the FQDN of the StoreFront server: storefront89.xen8.xenctx.com6. Click Next.7. A logon box appears.8. The user authenticates with domain\username and password.9. The user is asked whether they want to allow Citrix Receiver to make changes to
the client PC.10. Click Yes.11. Because the StoreFront is configured to Manage Citrix Receiver Updates,
including the Secure Access Plug-in, the Secure Access Plug-in is downloadedand installed.
12. A success message is displayed.13. Click Finish.14. The Citrix Receiver page is displayed.If not already installed, install the Acceleration Plug-in, and configure it as described earlier in this section. Note: Acceleration might be enabled by loading the CloudBridge Plugin from the Start Menu.
First Time Use from an external LAN
While there are a number of First Time Use options for Receiver, the following was used in this case study: 1. Connect the client PC to a LAN outside the corporate LAN, but with access to the
Internet.2. If not already installed, install Citrix Receiver.3. Once the installation of Receiver is complete, Receiver will load and it will allow
the user to Add Account.4. The user clicks Add Account.5. Enter the FQDN of the NetScaler Gateway: mygateway.mycompany.com6. Click Next.
A logon box appears.7. The user authenticates with username and password.8. The user is asked whether they want to allow Citrix Receiver to make changes to
the client PC.9. Click Yes.
Because the StoreFront is configured to Manage Citrix Receiver Updates,including the Secure Access Plug-in, the Secure Access Plug-in is downloadedand installed. A success message is displayed.
10. Click Finish11. The Citrix Receiver page is displayed.
Page 6
12. If not already installed, install the Acceleration Plug-in, and configure it asdescribed earlier in this section.Note: Acceleration might be enabled by loading the CloudBridge Plugin from theStart Menu.
Connecting
1. From the client PC, start Receiver, or right-click on the Receiver icon on theStart Bar and selects Logon.A message box pops up saying that Citrix Receiver is connecting, and a logonbox appears.
2. The user authenticates as domain\user and password.A message indicating that Citrix Receiver has connected appears.
3. Citrix Receiver page is displayed.Acceleration might be enabled by loading the CloudBridge Plugin from the StartMenu.
4. Start Desktops and Apps in the normal way.
Disconnecting
Once the user has closed or disconnected from all Desktops and Apps, they should also close the Citrix Receiver page, and the SSL VPN. On the top of the Receiver Store page, click on the down arrow next to the username, and select Log Off. The SSL VPN will close.
Note The preceding approach shows the Acceleration Plug-in being loaded manually, when required. An advantage of this approach is that, the user is not expected to remember to unload the Acceleration Plug-in when visiting a branch office where network traffic is already being accelerated by a CloudBridge appliance or VPX. The Acceleration Plug-in should not be used in this situation.
Confirming CloudBridge Acceleration While the user is running a XenDesktop App or Desktop session, they can confirm acceleration in the following way: 1. On the client PC, right-click on the Citrix Receiver icon on the Taskbar and
select About.2. Click on Advanced > CloudBridge Settings (or Accelerator Settings) >
Manage Acceleration.Note: The Bandwidth Gain bar and the Traffic Graph should confirm acceleration.
A network administrator can confirm acceleration by connecting to the CloudBridge Appliance Console and monitoring the Connections, Compression, and Multistream ICA pages.
Note. Because CloudBridge acceleration works by reducing the amount of duplicate data transmitted across the network, initial gains are likely to be modest. However, the bandwidth gain should improve with time and usage.
Page 7
Session Reliability / Automatic Client Reconnection
Session Reliability
When CloudBridge technology is in use, Session Reliability is disabled, and Automatic Client Reconnection (ACR) handles all client reconnection.
Automatic Client Reconnection (ACR)
The Automatic Client Reconnect feature allows Citrix Receiver to detect broken network connections and automatically reconnect users to disconnected sessions. When Receiver detects an involuntary disconnection of a session, it attempts to reconnect the user to the session until there is a successful reconnection or the user cancels the reconnection attempts.
When a NetScaler Gateway is in use, the Automatic Client Reconnect feature will only work if a Full VPN connection has been established. See Citrix product documentation XenDesktop 7 > Manage > Maintain session activity.
Expected Behavior Where the network link from a client PC is disrupted, ACR attempts to reconnect the VPN once the network is restored. ACR attempts VPN reconnection indefinitely, or until the user cancels reconnection attempts.
Where the VPN is disrupted for a period of less than 180 seconds, the user should expect any XenDesktop desktops or applications to be available once the VPN is restored.
SmartAccess Administrators can control access to XenDesktop applications, desktops, and features (such as client drive mapping) by using Smart Access information, passed down from the NetScaler Gateway to the XenDesktop policy engine.
See Citrix product documentation Access Gateway > Access Gateway 10 > Integrate > Providing Access to Published Applications and Virtual Desktops > Configuring SmartAccess on Access Gateway Enterprise Edition
As part of this case study and when using Receiver, XenDesktop policies based on SmartAccess information were seen to be working correctly. However, in order for the XenDesktop policy engine to see SmartAccess information the following action is required: 1. On a XenDesktop Delivery Controller, start Citrix Studio.2. Navigate to Citrix Studio (farm name) > PowerShell3. Use the Launch PowerShell button to issue the following PowerShell command:
set-brokersite -trustrequestssenttothexmlserviceport $true
Note . When using WebReceiver with Full VPN, the use of Intranet IPs in the NetScaler Gateway Virtual Server prevents the NetScaler Gateway from passing SmartAccess tags to StoreFront and XenDesktop or XenApp. For this reason, the
Page 8

use of Receiver is recommended when policy decisions based on SmartAccess tags are required.
Appendix 1 - Environment
Network Diagram
Hosts (partial) 192.168.1.87 XenApp87 # XenApp server 192.168.1.86 XtraDDC86 # XenDesktop controller
Page 9
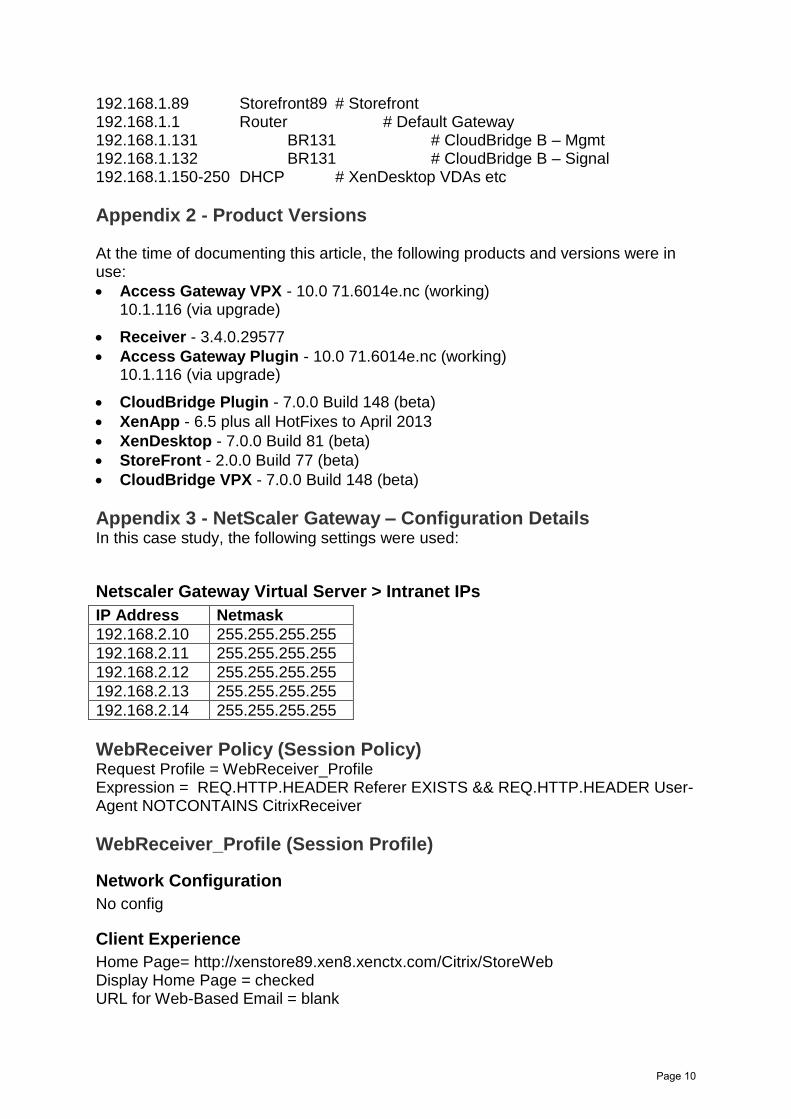
192.168.1.89 Storefront89 # Storefront 192.168.1.1 Router # Default Gateway 192.168.1.131 BR131 # CloudBridge B – Mgmt 192.168.1.132 BR131 # CloudBridge B – Signal 192.168.1.150-250 DHCP # XenDesktop VDAs etc
Appendix 2 - Product Versions
At the time of documenting this article, the following products and versions were in use:
Access Gateway VPX - 10.0 71.6014e.nc (working)10.1.116 (via upgrade)
Receiver - 3.4.0.29577
Access Gateway Plugin - 10.0 71.6014e.nc (working)10.1.116 (via upgrade)
CloudBridge Plugin - 7.0.0 Build 148 (beta)
XenApp - 6.5 plus all HotFixes to April 2013
XenDesktop - 7.0.0 Build 81 (beta)
StoreFront - 2.0.0 Build 77 (beta)
CloudBridge VPX - 7.0.0 Build 148 (beta)
Appendix 3 - NetScaler Gateway – Configuration Details In this case study, the following settings were used:
Netscaler Gateway Virtual Server > Intranet IPs
IP Address Netmask
192.168.2.10 255.255.255.255
192.168.2.11 255.255.255.255
192.168.2.12 255.255.255.255
192.168.2.13 255.255.255.255
192.168.2.14 255.255.255.255
WebReceiver Policy (Session Policy) Request Profile = WebReceiver_Profile Expression = REQ.HTTP.HEADER Referer EXISTS && REQ.HTTP.HEADER User-Agent NOTCONTAINS CitrixReceiver
WebReceiver_Profile (Session Profile)
Network Configuration
No config
Client Experience
Home Page= http://xenstore89.xen8.xenctx.com/Citrix/StoreWeb Display Home Page = checked URL for Web-Based Email = blank
Page 10
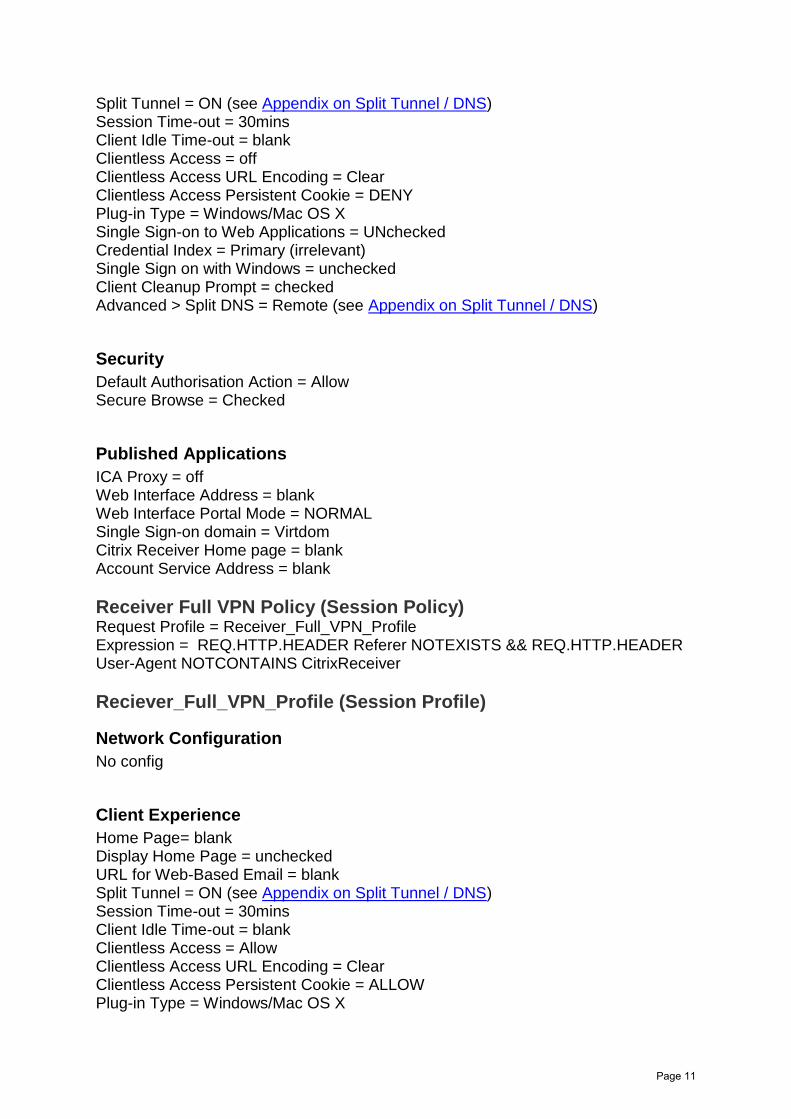
Split Tunnel = ON (see Appendix on Split Tunnel / DNS) Session Time-out = 30mins Client Idle Time-out = blank Clientless Access = off Clientless Access URL Encoding = Clear Clientless Access Persistent Cookie = DENY Plug-in Type = Windows/Mac OS X Single Sign-on to Web Applications = UNchecked Credential Index = Primary (irrelevant) Single Sign on with Windows = unchecked Client Cleanup Prompt = checked Advanced > Split DNS = Remote (see Appendix on Split Tunnel / DNS)
Security
Default Authorisation Action = Allow Secure Browse = Checked
Published Applications
ICA Proxy = off Web Interface Address = blank Web Interface Portal Mode = NORMAL Single Sign-on domain = Virtdom Citrix Receiver Home page = blank Account Service Address = blank
Receiver Full VPN Policy (Session Policy) Request Profile = Receiver_Full_VPN_Profile Expression = REQ.HTTP.HEADER Referer NOTEXISTS && REQ.HTTP.HEADER User-Agent NOTCONTAINS CitrixReceiver
Reciever_Full_VPN_Profile (Session Profile)
Network Configuration
No config
Client Experience
Home Page= blank Display Home Page = unchecked URL for Web-Based Email = blank Split Tunnel = ON (see Appendix on Split Tunnel / DNS) Session Time-out = 30mins Client Idle Time-out = blank Clientless Access = Allow Clientless Access URL Encoding = Clear Clientless Access Persistent Cookie = ALLOW Plug-in Type = Windows/Mac OS X
Page 11
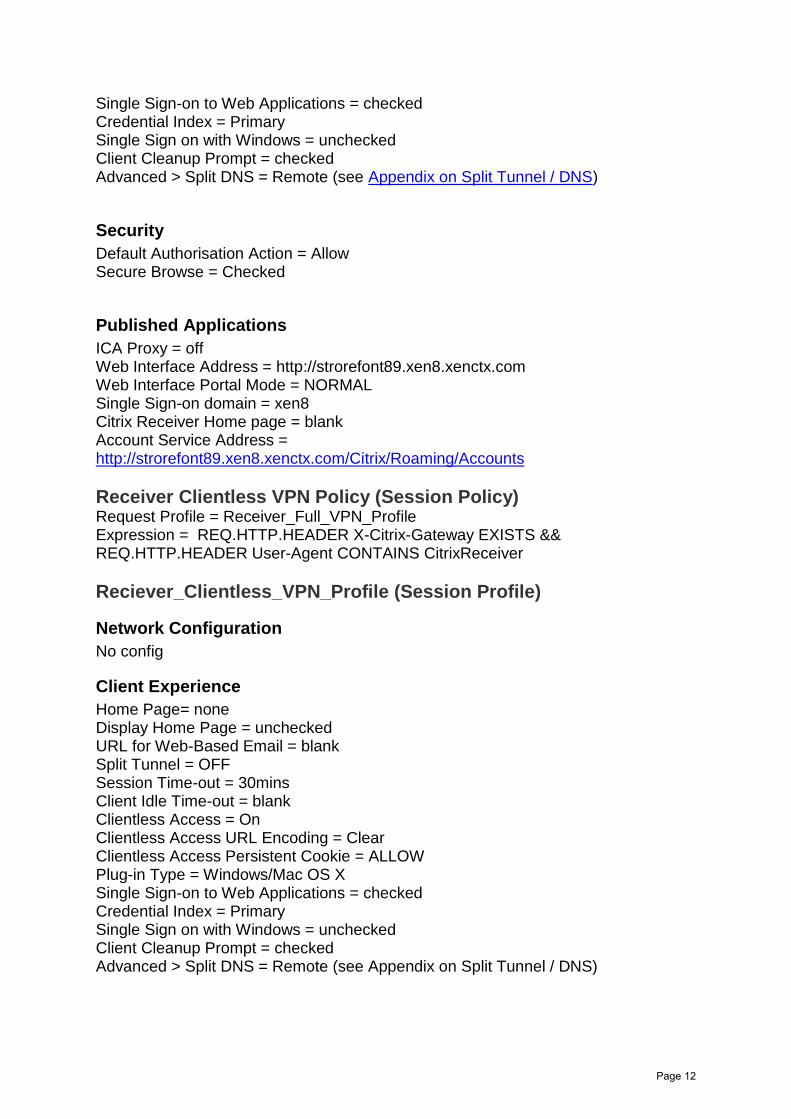
Single Sign-on to Web Applications = checked Credential Index = Primary Single Sign on with Windows = unchecked Client Cleanup Prompt = checked Advanced > Split DNS = Remote (see Appendix on Split Tunnel / DNS)
Security
Default Authorisation Action = Allow Secure Browse = Checked
Published Applications
ICA Proxy = off Web Interface Address = http://strorefont89.xen8.xenctx.com Web Interface Portal Mode = NORMAL Single Sign-on domain = xen8 Citrix Receiver Home page = blank Account Service Address = http://strorefont89.xen8.xenctx.com/Citrix/Roaming/Accounts
Receiver Clientless VPN Policy (Session Policy) Request Profile = Receiver_Full_VPN_Profile Expression = REQ.HTTP.HEADER X-Citrix-Gateway EXISTS && REQ.HTTP.HEADER User-Agent CONTAINS CitrixReceiver
Reciever_Clientless_VPN_Profile (Session Profile)
Network Configuration
No config
Client Experience
Home Page= none Display Home Page = unchecked URL for Web-Based Email = blank Split Tunnel = OFF Session Time-out = 30mins Client Idle Time-out = blank Clientless Access = On Clientless Access URL Encoding = Clear Clientless Access Persistent Cookie = ALLOW Plug-in Type = Windows/Mac OS X Single Sign-on to Web Applications = checked Credential Index = Primary Single Sign on with Windows = unchecked Client Cleanup Prompt = checked Advanced > Split DNS = Remote (see Appendix on Split Tunnel / DNS)
Page 12

Security
Default Authorisation Action = Allow Secure Browse = Checked
Published Applications
ICA Proxy = off Web Interface Address = http://strorefont89.xen8.xenctx.com Web Interface Portal Mode = NORMAL Single Sign-on domain = xen8 Citrix Receiver Home page = blank Account Service Address = http://strorefont89.xen8.xenctx.com/Citrix/Roaming/Accounts
cVPN_Profile (Clientless Profile) The creation of a Clientless Access Policy and Profile is described in Citrix eDocs > NetScaler Gateway > Access Gateway 10 > Integrate > Integrate Access Gateway with CloudGateway > Configuring Custom Clientless Access Policies for Receiver for Web
With NetScaler Gateway 10.1, Clientless Profiles and Policies might be created by using the NetScaler Gateway > Getting started > Netscaler Gateway wizard.
Appendix 4 - CloudBridge – Configuration Details In this case study, the following licenses and settings were used.
Licenses CTX119927 - describes CloudBridge licensing.
In this case study, the following licenses were used:
Base License – CBR_V45_SSERVER
Concurrent client count – CWS_STD_SCCU
Features Traffic Processing Enabled
Traffic Acceleration Enabled
Traffic Shaping Enabled
Traffic Bridging Enabled
CIFFS Protocol Optimisation Enabled for All CIFS
ICA Multi-stream Enabled
MAPI Cross Protocol Optimisation Disabled
Repeater Plug-in Enabled
SCPS Disabled
SSH Access Enabled
SSL Optimization Unavailable – requires a license
Syslog Disabled
Page 13
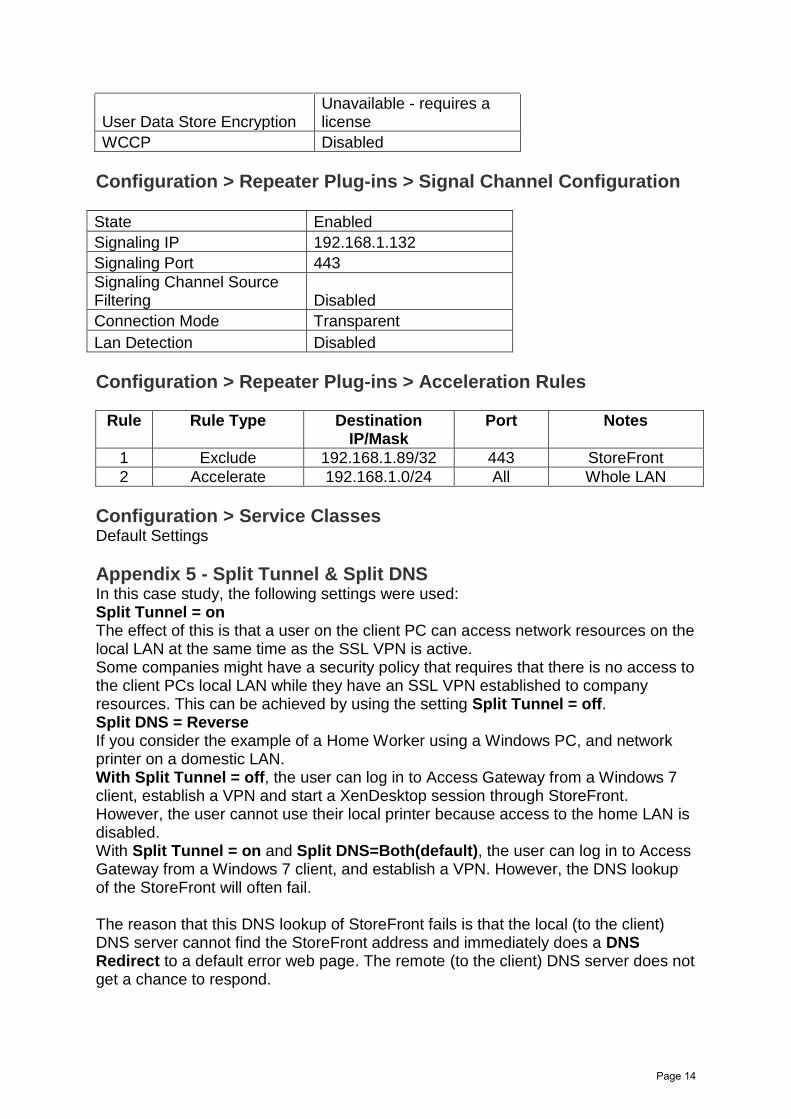
User Data Store Encryption Unavailable - requires a license
WCCP Disabled
Configuration > Repeater Plug-ins > Signal Channel Configuration
State Enabled
Signaling IP 192.168.1.132
Signaling Port 443
Signaling Channel Source Filtering Disabled
Connection Mode Transparent
Lan Detection Disabled
Configuration > Repeater Plug-ins > Acceleration Rules
Rule Rule Type Destination IP/Mask
Port Notes
1 Exclude 192.168.1.89/32 443 StoreFront
2 Accelerate 192.168.1.0/24 All Whole LAN
Configuration > Service Classes Default Settings
Appendix 5 - Split Tunnel & Split DNS In this case study, the following settings were used: Split Tunnel = on The effect of this is that a user on the client PC can access network resources on the local LAN at the same time as the SSL VPN is active. Some companies might have a security policy that requires that there is no access to the client PCs local LAN while they have an SSL VPN established to company resources. This can be achieved by using the setting Split Tunnel = off. Split DNS = Reverse If you consider the example of a Home Worker using a Windows PC, and network printer on a domestic LAN. With Split Tunnel = off, the user can log in to Access Gateway from a Windows 7 client, establish a VPN and start a XenDesktop session through StoreFront. However, the user cannot use their local printer because access to the home LAN is disabled. With Split Tunnel = on and Split DNS=Both(default), the user can log in to Access Gateway from a Windows 7 client, and establish a VPN. However, the DNS lookup of the StoreFront will often fail.
The reason that this DNS lookup of StoreFront fails is that the local (to the client) DNS server cannot find the StoreFront address and immediately does a DNS Redirect to a default error web page. The remote (to the client) DNS server does not get a chance to respond.
Page 14

This DNS Redirect is a common feature of many domestic ISPs, including BT (in the UK). A workaround for this problem is to access the local printer by its IP address, and use the settings Spilt Tunnel = on and Split DNS = Remote. For BT users, an alternative workaround can be found under Can I opt out of the service? at http://bt.custhelp.com/app/answers/detail/a_id/14244/~/about-bt-web-address-help
Appendix 6 - Branch Office Users (not covered in this document) These users probably use (desktop) PCs, connected to a LAN in a branch office, to access XenDesktop resources in their company’s datacentre. In order to optimize performance, the remote office uses a CloudBridge appliance to accelerate network traffic along a private wire to the company datacentre. For details of how to implement this solution there are a number of useful guides including: CTX120455 CTX129473
Disclaimer This Web site might contain links to Web sites controlled by parties other than Citrix. Citrix is not responsible for and does not endorse or accept any responsibility for the contents or use of these third party Web sites. Citrix is providing these links to you only as a convenience, and the inclusion of any link does not imply endorsement by Citrix of the linked Web site. It is your responsibility to take precautions to ensure that whatever you select for your use is free of viruses or other items of a destructive nature.
Page 15