physics · · 2016-03-30study about the theory and procedure of the experiment before actually...
TRANSCRIPT

Introduction 1
Introduction
Science is a systematized knowledge gained by mankind through observations and experimentations. Scienceis concerned with the study of nature and the various phenomena taking place in nature. Due to its enormousexpansion and diversified fields, it is classified into various branches such as physics, chemistry, biology,geology, etc.
PHYSICS
Physics is a branch of science that deals with the study of natural phenomena involving matter and energy,and their interconversion.
Any quantity which can be measured is called a physical quantity. The measurement of a physical quantityis done by comparing it with a standard unit. In S.I. (System International) system, the units for the sevenfundamental quantities are given below:
Table A-1 S.I. Base Units
S.No. Quantity Unit Symbol
1. Length metre m
2. Mass kilogram kg
3. Time second s
4. Electric current ampere A
5. Temperature kelvin K
6. Luminous intensity candela cd
7. Amount of substance mole mol
The quantities which are based on fundamental quantities are known as derived quantities and their unitsare called derived units. For example, S.I. derived unit for volume is cubic metre, m3. S.I. derived units of somecommon quantities are given as follows:
1

2 Practical Science-Class-X
Table A-2 S.I. Derived Units of Some Common Quantities
S.No. Quantity Unit Symbol In terms of base units
1. Force newton N kg ms2
2. Pressure pascal Pa kg m1 s2
3. Work joule J kg m2 s2
4. Power watt W kg m2 s3 or Js1
5. Charge coulomb C A s
6. Potential difference volt V JA1 s1
7. Resistance ohm JA2 s1
GENERAL INSTRUCTIONS
While working in a physics laboratory students must follow the important instructions given below:1. Study about the theory and procedure of the experiment before actually performing the experiment in
the laboratory.2. Listen carefully to the instructions given by your teacher and note down the important points in the
notebook. If you do not understand the use of the measuring instrument you are going to use, do nothesitate to consult your teacher.
3. Handle the apparatus and instruments carefully.4. Keep your working table neat and clean. The apparatus should be arranged in an orderly manner. The
apparatus which requires frequent manipulation or reading should be easily accessible.5. Make careful observations and make a neat record of your observations and readings. While recording
the observations, write the units in which the measurement is made. Each quantity measured should berecorded in decimals and not in fractions.
6. Do your work honestly and never record false observations to arrive at a result.7. Before leaving the laboratory, the apparatus should be returned to the laboratory assistant. You should
also get an experiment assigned for the next turn.
PLOTTING A GRAPH
A graph is a line, straight or curved, which represents the interdependence of two physical quantities. Thequantity which is made to alter at will is called the independent variable, whereas the other which varies as aresult of the change is called the dependent variable.
A graph gives the relation between the two variable quantities in a pictorial form. It also helps us incalculating the probable values of variables, even beyond the observed range by extrapolation.
Graphs are generally plotted on a paper ruled in millimetre or squares. In order to plot a good graph, thefollowing steps may be followed:
(i) The first step in making a graph is to tabulate the data that are to be graphed.(ii) If all the data to be plotted are positive, draw two thick lines, at right angle to each other, at the bottom
and the left hand edge of the graph paper.(iii) Mark the horizontal line as X-axis and the vertical line as the Y-axis.(iv) Represent the independent variable along X-axis and the dependent variable along Y-axis.(v) Choose a suitable scale so that the graph is well spread out on the whole of the graph paper.
(vi) Mark the points of intersection for pairs of corresponding values of the variables and put a small circlearound the point.

Introduction 3
(vii) If the points appear to be nearly in a straight line, then draw a line passing through most of the pointswith the help of a scale.If the points are not in a straight line, draw a free hand smooth curve passing through a maximumnumber of points such that the remaining points are equally distributed on either side of the line.
(viii) Note down title of the graph at the top of the graph paper.(ix) Write the scale chosen for both the axes under the title of the graph as illustrated below:
Graph between temperature and time for cooling of hot water
Scale alongX-axis:Y-axis:
1 division = 10 s1 division = 0.2°C
40.0
38.0
36.0
34.0
32.0
30.0
0 100 200 300 400 500 600 700
Time (s)
Tem
pera
ture
(°C
)
Y
X
Fig. A-1 Time required for a sample of hot water to cool
LEAST COUNT AND ACCURACY OF AN INSTRUMENT
The least amount of a physical quantity that can be correctly measured by a measuring instrument is called theleast count (L.C.) of the instrument.
The least count puts limit on the accuracy of the measuring instrument. The accuracy of a measuringinstrument is equal to half the least count. Suppose the least count of a measuring scale is 0.1 cm, then itsaccuracy would be 0.05 cm.
Table A-3 Accuracy of Common Instruments Used in Laboratory
S.No. Measuring instrument Least count Accuracy
1. Metre scale 0.1 cm 0.05 cm
2. Ammeter 0.1 A 0.05 A
3. Voltmeter 0.1 V 0.05 V
4. Stop-watch 0.2 s 0.1 s

4 Practical Science-Class-X
ZERO ERROR
It is the error which arises when the pointer of the measuring instrument, at its resting stage, does not coincidewith the zero mark on the scale. In order to obtain the correct value, the zero error has to be substracted fromor added to the observed value of the reading of the instrument.
RECORD BOOK
The record book for making a record of chemistry as well as physics experiments has blank page on the lefthand side and ruled page on the right hand side. Record the experiments in your record book as suggested byyour teacher. The content on the left hand page is generally written with a pencil, whereas that on the righthand page is written with a pen. A sample of contents of the left hand page and that of right hand page is givenbelow:
Table A-4
Left Hand Page Right Hand Page(Blank page) (Ruled page)
Date Experiment No. Page No. Date Experiment No. Page No.
Aim/Objective Aim/Objective
Diagram Apparatus/Materials required
Observations Theory
Calculations Procedure
Result Precautions
Sources of Error
Result
CHEMISTRY
Chemistry is the branch of science which deals with the study of matter, its composition and the changes itundergoes in composition and energy during various processes.
Chemistry is an experimental science. The concepts learnt in the theory classes are better understoodthrough experimentation. Laboratory work provides you an opportunity to become a keen observer and todraw inferences and explain results. The laboratory work helps to develop skills for handling apparatus andcarry out experiments.
Before you start working in the laboratory, you should become familiar with the facilities provided in thelaboratory and on your working table.
Your working table is provided with a water-tap, a gas-tap, a Bunsen burner, a reagent shelf and a bin fordisposing waste material.
Commonly used reagents are kept on the shelf fixed on the table, while less commonly used reagents arekept on the shelves fixed on sidewalls. There are exhaust fans fitted on the upper portion of the wall, close tothe level of the ceiling, for the removal of harmful fumes and circulation of fresh air in the laboratory. A fumecupboard is provided in the laboratory for performing those experiments in which harmful fumes are produced.
It is strongly advised that you should become fully familiar with laboratory practices and the precautionsto be taken while working in the laboratory.

Introduction 5
GENERAL INSTRUCTIONS
1. Always come prepared for the experiment. You should be aware of the theory and the experimentalprocedure before entering into the laboratory.
2. Listen to the instructions given by your teacher. Perform only those experiments which are assigned toyou by your teacher.
3. If you have any doubts about the experiment you can use books or consult your teacher.4. Thoroughly clean the apparatus to be used in the experiment.5. The label on the reagent bottle should be read carefully before using any reagent.6. Use only small quantities of the reagents to avoid wastage.7. Handle the glass apparatus carefully.8. Clean your apparatus after the experiment and return it to the laboratory assistant.9. Wash your hands with soap after the experiment.
10. Prepare report of the experiment in the laboratory notebook.11. Don’t taste anything in the laboratory and never use laboratory as an eating place.12. Never work in the laboratory alone.13. Follow the safety rules and be aware of the location of the items such as first-aid box and fire extinguisher.
SOME IMPORTANT PRECAUTIONS
1. Wear safety glasses, lab coat and shoes while working in the laboratory.2. Read procedure and precautions carefully and follow them.3. Check and read the label of the reagent bottle carefully before using the reagent. Return the reagent
bottle to its proper place immediately after the use. Do not take the reagent bottle to your seat.4. Never return unused chemicals to the stock bottles.
International Hazard Symbols
Harmful
Inflammable
Corrosive
Toxic
Explosive
Oxidizing
Fan vapours towards the nose
Testing odours of vapours
Fig. A-2

6 Practical Science-Class-X
Beaker
Test tube Boiling tubeTest tube brush
Gas detector
Funnel stand
FunnelWash bottle
Tripod stand
Wire gauzeWatch glass
Glass rod
China dishPestle and mortar
Bunsen burner Round bottom flask Flat bottom flask Conical flask
Fig. A-3 Some common laboratory apparatus

Introduction 7
5. Never mix the chemicals, unless it is required in the experiment.6. Do not throw used match sticks, filter papers, broken glass apparatus, etc. into the sink. Dispose them
off in the waste bin. Only waste liquids should be thrown in the sink while keeping the tap waterrunning.
7. Do not heat the test tube containing solution with its mouth towards yourself on your neighbour as thespurting of content may harm you or your neighbour.
8. Keep the doors and windows open and exhaust fan on while working in the laboratory.9. For smelling the vapours, fan the vapours gently with your hands towards the nose. Do not smell the
chemicals or vapours directly.10. Acids are diluted by adding acids to water. Never add water to acid for diluting concentrated acids.
BIOLOGY
Biology is the study of living organisms. Both plants and animals are living organisms. They have definitesize, shape and organisation, life cycles, protoplasm and show growth and metabolism. Study of plants iscalled Botany and study of animals is called Zoology. Presently the term life sciences or biological sciences isused in place of Biology. Practical Biology is an extension of the text of the subject. Specimens of the topicrequired are brought in the laboratory to do complete study depending on the aim of the experiment. A completerecord of experimental work is maintained.
Biology laboratory is specially designed, spacious, well lighted, well ventilated and well equipped withdifferent apparatus and instruments, water taps, sinks, reagent racks, etc. which are required while doingbiology experiments.
GENERAL INSTRUCTIONS
In order to perform practicals in the biology laboratory efficiently and smoothly, students must follow importantinstructions:
1. A student should always reach laboratory on time.
2. He/she should wear lab-coat and should have 2 needles,forceps, brush, blade, sharpened pencil, eraser, scale, a smallcotton cloth, practical notebook and laboratory manual.
3. Note down the instructions given by the teacher regardingpracticals before the start of the practical.
4. Follow instructions precisely and try to complete the workin the given time.
5. Slides focussed under microscope should not be disturbed.
6. Stains, chemicals and other reagents should be usedcarefully and replaced back to the reagent shelf after use.
7. Use filter paper while keeping slide on the slab.
8. Maintain discipline in the laboratory.
9. Studies on morphology are done from living materials orpreserved specimens or charts or models. Draw neat andwell labelled diagrams after observing them.
Needle Forceps(0 No.)
Brush(0 No.)
Fig. A-4
8 Practical Science-Class-X
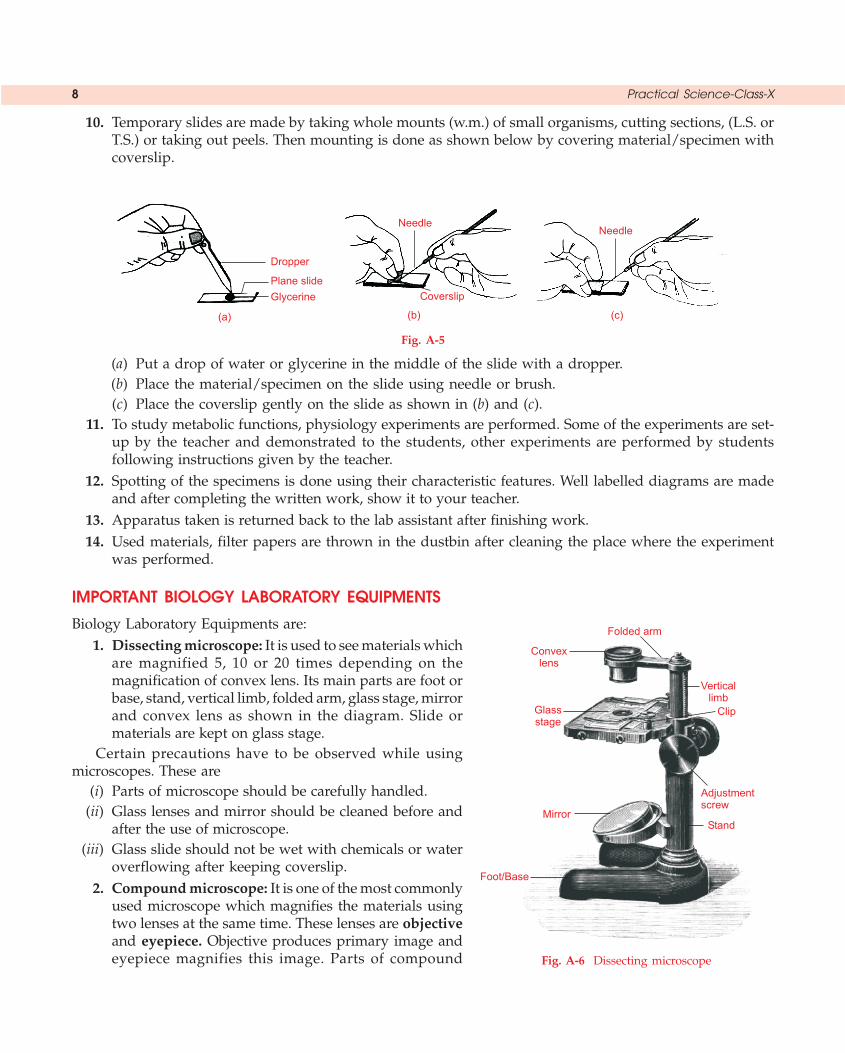
10. Temporary slides are made by taking whole mounts (w.m.) of small organisms, cutting sections, (L.S. orT.S.) or taking out peels. Then mounting is done as shown below by covering material/specimen withcoverslip.
Dropper
Plane slide
Glycerine
(a)
Needle
Coverslip
(b)
Needle
(c)
Fig. A-5
(a) Put a drop of water or glycerine in the middle of the slide with a dropper.(b) Place the material/specimen on the slide using needle or brush.(c) Place the coverslip gently on the slide as shown in (b) and (c).
11. To study metabolic functions, physiology experiments are performed. Some of the experiments are set-up by the teacher and demonstrated to the students, other experiments are performed by studentsfollowing instructions given by the teacher.
12. Spotting of the specimens is done using their characteristic features. Well labelled diagrams are madeand after completing the written work, show it to your teacher.
13. Apparatus taken is returned back to the lab assistant after finishing work.14. Used materials, filter papers are thrown in the dustbin after cleaning the place where the experiment
was performed.
IMPORTANT BIOLOGY LABORATORY EQUIPMENTS
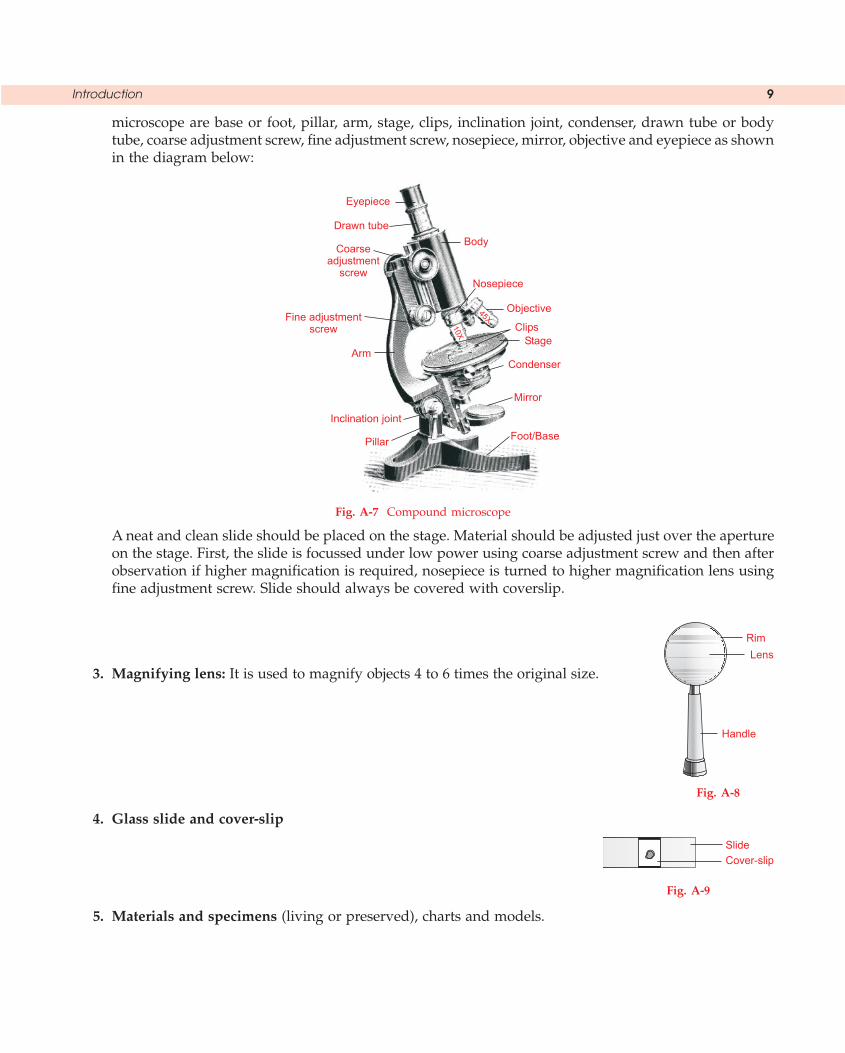
Biology Laboratory Equipments are:1. Dissecting microscope: It is used to see materials which
are magnified 5, 10 or 20 times depending on themagnification of convex lens. Its main parts are foot orbase, stand, vertical limb, folded arm, glass stage, mirrorand convex lens as shown in the diagram. Slide ormaterials are kept on glass stage.
Certain precautions have to be observed while usingmicroscopes. These are
(i) Parts of microscope should be carefully handled.(ii) Glass lenses and mirror should be cleaned before and
after the use of microscope.(iii) Glass slide should not be wet with chemicals or water
overflowing after keeping coverslip.2. Compound microscope: It is one of the most commonly
used microscope which magnifies the materials usingtwo lenses at the same time. These lenses are objectiveand eyepiece. Objective produces primary image andeyepiece magnifies this image. Parts of compound
Folded arm
Convexlens
Glassstage
Mirror
Foot/Base
Stand
Adjustmentscrew
Clip
Verticallimb
Fig. A-6 Dissecting microscope
Introduction 9
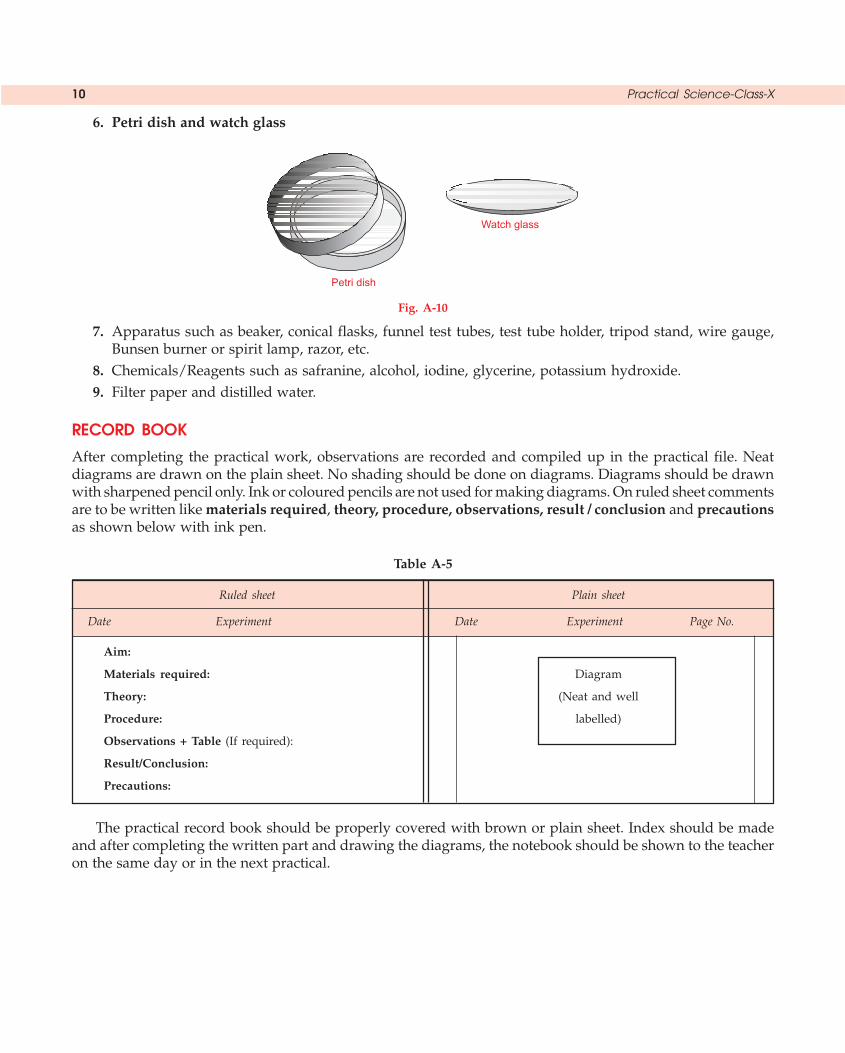
microscope are base or foot, pillar, arm, stage, clips, inclination joint, condenser, drawn tube or bodytube, coarse adjustment screw, fine adjustment screw, nosepiece, mirror, objective and eyepiece as shownin the diagram below:
Eyepiece
Drawn tube
Coarseadjustment
screw
Arm
Inclination joint
Pillar
Body
Nosepiece
Fine adjustmentscrew
Objective45X
10X
Clips
Mirror
Condenser
Stage
Foot/Base
Fig. A-7 Compound microscope
A neat and clean slide should be placed on the stage. Material should be adjusted just over the apertureon the stage. First, the slide is focussed under low power using coarse adjustment screw and then afterobservation if higher magnification is required, nosepiece is turned to higher magnification lens usingfine adjustment screw. Slide should always be covered with coverslip.
3. Magnifying lens: It is used to magnify objects 4 to 6 times the original size.
4. Glass slide and cover-slip
5. Materials and specimens (living or preserved), charts and models.
Rim
Lens
Handle
Slide
Cover-slip
Fig. A-8
Fig. A-9
10 Practical Science-Class-X
6. Petri dish and watch glass
Watch glass
Petri dish
Fig. A-10
7. Apparatus such as beaker, conical flasks, funnel test tubes, test tube holder, tripod stand, wire gauge,Bunsen burner or spirit lamp, razor, etc.
8. Chemicals/Reagents such as safranine, alcohol, iodine, glycerine, potassium hydroxide.9. Filter paper and distilled water.
RECORD BOOK
After completing the practical work, observations are recorded and compiled up in the practical file. Neatdiagrams are drawn on the plain sheet. No shading should be done on diagrams. Diagrams should be drawnwith sharpened pencil only. Ink or coloured pencils are not used for making diagrams. On ruled sheet commentsare to be written like materials required, theory, procedure, observations, result / conclusion and precautionsas shown below with ink pen.
Table A-5
Ruled sheet Plain sheet
Date Experiment Date Experiment Page No.
Aim:
Materials required: Diagram
Theory: (Neat and well
Procedure: labelled)
Observations + Table (If required):
Result/Conclusion:
Precautions:
The practical record book should be properly covered with brown or plain sheet. Index should be madeand after completing the written part and drawing the diagrams, the notebook should be shown to the teacheron the same day or in the next practical.