a04 fabia dx navigationsystem
DESCRIPTION
dxTRANSCRIPT

SIMPLY CLEVER
ŠkodaAutoRADIO NAVIGATION SYSTEM DX
www.skoda-auto.com Radionavigační systém DXŠkoda Auto anglicky 05.06
S00.5610.43.206Y0 012 151 F
DX_22-06.indd 1DX_22-06.indd 1 12.4.2006 11:56:3812.4.2006 11:56:38

IntroductionYou have opted for a Škoda vehicle, which is fitted with a radio navigation system DX, (designated in the following as RNS DX ) - we thank you for your confidence in us.
We recommend that you read this Owner's Manual attentively to enable you to become familiar with your RNS DX and all that it offers as quickly as possible.
Please do not hesitate to contact your Škoda Service Partner or importer should you have any further ques-tions regarding any problems with your RNS DX which may arise.
Any national legal provisions which vary from the information contained in this Owner's Manual take prec-edence over the information contained herein.
We wish you much pleasure with your RNS DX and pleasant motoring at all times.
Your Škoda Auto
20.book Page 1 Tuesday, December 6, 2005 2:26 PM

Contents2
Contents
Layout of this Owner's Manual (explanations) . . . . . . . . . . . . . . . . . . .
General comments . . . . . . . . . . . . .
General view . . . . . . . . . . . . . . . . . . . . . . . . . .
Radio navigation system DX . . . . . . . . . . . .
Important information . . . . . . . . . . . . . . . . . .
Changing the navigation CD . . . . . . . . . . . .
Map and symbol displays . . . . . . . . . . . . . . .
Audio . . . . . . . . . . . . . . . . . . . . . . . . . . . . . .
Overview of audio menu . . . . . . . . . . . . . . . .
Overview of sound menu . . . . . . . . . . . . . . .
Radio mode . . . . . . . . . . . . . . . . . . . . . . . . . . .
Navigation . . . . . . . . . . . . . . . . . . . . . . . .
Overview of navigation basic menu . . . . . .
Enter destination . . . . . . . . . . . . . . . . . . . . . .
Enter destination - Town . . . . . . . . . . . . . . . .
Enter destination - Street and IntersectionEnter destination - Town centre . . . . . . . . .
Enter destination - Special destination . . .
Select supraregional destinations . . . . . . .
Enter destination - Destination memory . .
Enter destination - To the flagged destination . . . . . . . . . . . . . . . . . . . . . . . . . . . .
Enter destination - Select destination from the map . . . . . . . . . . . . . . . . . . . . . . . . . . . . . .
Route options . . . . . . . . . . . . . . . . . . . . . . . . .
Start guidance . . . . . . . . . . . . . . . . . . . . . . . . .
Carry out the settings in the map menu . .
Select menu field “Map detail” . . . . . . . . . .
Info mode . . . . . . . . . . . . . . . . . . . . . . . . . . . . .
Destination memory . . . . . . . . . . . . . . . . . . .
Automatic tailback function (for units with dynamic navigation) . . . . . . . . . . . . . . . . . . .
Manual tailback function (for units with dynamic navigation) . . . . . . . . . . . . . . . . . . .
Travel guide . . . . . . . . . . . . . . . . . . . . . . . . . .
Carry out the settings . . . . . . . . . . . . . . . . . .
Anti-theft coding . . . . . . . . . . . . . . . . . . . . . . .
TV Tuner * . . . . . . . . . . . . . . . . . . . . . . . .
. . . . . . . . . . . . . . . . . . . . . . . . . . . . . . . . . . . . . .
Index . . . . . . . . . . . . . . . . . . . . . . . . . . . . . . .
4
5
5
7
8
9
11
13
13
15
17
24
24
25
27
28
29
30
31
33
34
36
38
39
41
42
44
45
48
51
52
52
54
56
56
59
20.book Page 2 Tuesday, December 6, 2005 2:26 PM

3
20.book Page 3 Tuesday, December 6, 2005 2:26 PM

Layout of this Owner's Manual (explanations)4
Layout of this Owner's Manual (explanations)The Owner's Manual has been systematically designed, in order to make it easy for you to find and absorb the information you require.
Chapters, table of contents and subject indexThe text of the booklet are divided into short sections which are combined into easy-to-read chapters.
The Table of contents is arranged according to the chapters and the detailed Subject index at the end of this booklet helps you to rapidly find the information you are looking for.
Brief information and instructionsEach section has a Heading.
Most of the illustrations are accompanied by an Instruction (in large letters) which explains to you in a straightforward way the action you have to take. Work steps which have to be carried out begin with a hyphen.
Special equipmentEquipment which is marked * is only standard on certain vehicle model versions or only suppliable as special equipment for certain models.
NotesAll three kinds of notes, which are contained in the text, are stated at the end of the respective section.
WARNINGThe most important notes are marked with the heading Warning!. These Warning notes draw your attention to a serious risk of acci-dent or injury. While reading the text you will frequently encounter a double arrow followed by a small warning symbol. This symbol is intended to draw your attention to a Warning note at the end of the section to which you must pay careful attention.
CautionA Caution note draws your attention to the possibility of damage to your vehicle or points out general risks of an accident .
NoteA normal Note draws your attention in a general way to important informa-tion for the operation of your vehicle.
20.book Page 4 Tuesday, December 6, 2005 2:26 PM

General comments 5
General comments
General view
The button is designed to retrieve from upto nine automatically stored traffic announcements with maximum four minutes and total
recording period and for activating the recording function as well as aborting a traffic information.Radio mode:
Fig. 1 Functional description of the buttons for the operation of audio and navigation functions
A1 TIM
A2
20.book Page 5 Tuesday, December 6, 2005 2:26 PM

General comments6
− Rocker button for automatic and manual station finding− Rocker button for selecting and repeating recorded radio traffic
reportsButton displays the complete destination address and repeats the last current voice response if the route guidance function is active.CD - eject button.ScreenCD-caseButton calls up the navigation basic menu and cancels the route guidanceDisplay button for manual switch over between day and night displayButton calls up the previous or basic menu and aborts the oper-ating steps.Rotary/push knob for switching on and off the system (press), volume control (turn)Button AS automatically stores and retrieves the respective six powerful stations TP, FM und AM on memory level two. Station buttons - for storing and retrieving each twelve TP, FM und AM stations in each two memory levelsButton for storing a flagged destination (current vehicle position)Button for a brief playing (ten seconds) of all stored stations (TP,FM and AM)Button calls up the menu “Select source” (select sound source - TP, FM, AM, CD, TV) or switch over to the audio screenButton calls up the tailback function, alternative route calculationButton Sound :− calls up the menu "adjust sound " (adjust bass, treble, balance und
fader) and volume setup− Adjust additional sound ranges for a system equipment with digital
sound package (DSP)Menu button
− for marking (turn) and confirming (press) the respective menu fields
− Perform basic settings of sound, sound field and volumes in the sound menu.A3 INFO
A4
A5
A6
A7 NAVI
A8
A9
A10
A11
A12 1 6
A13
A14 SCAN
A15 AUDIO
A16
A17
A18
20.book Page 6 Tuesday, December 6, 2005 2:26 PM

General comments 7
Radio navigation system DX
Special equipment
The radio navigation system DX offers you an easy handling of the convenience equipment radio and navigation in the vehicle. Additionally the system can be equipped with an original 6-compartment CD changer, a digital sound package, a package for dynamic navigation and a TV/Video module.
Fig. 2 Special equipment
20.book Page 7 Tuesday, December 6, 2005 2:26 PM

General comments8
Navigation
The navigation system is your “intelligent front passenger”. You can reach the desired destination quickly, easily and reliably without time-consuming map searching from the starting point of your trip. In unknown locations it saves you time by guiding you to the next filling station. You can make an intermittent stop on the road, in order e.g. to go and eat in a restaurant or to visit a sight. The system uses the data stored on the navi-gation CD for the calculation of the trip destination. During the guidance you will receive via different screen displays information about vehicle position; notes regarding turns (direction and distance until the turn) and the arrival time at the trip destination.
Announcement of the ŠkodaAuto radio navigation systemUnder certain requirements the system must be announced, as it is equipped with a radio unit.
How does the radio navigation system function?The current vehicle position is determined using satellites. The distance travelled is measured by the ABS. The direction of travel is determined using a gyroscope. The navigation system is provided with this informa-tion and compared with the stored data.
Outside the densely populated areas it is possible that this type of locating does not permit exact position definition. In this case the locating is performed via satellites. This type of locating is referred to as Global Posi-tioning System (GPS ) - global satellite locating system.
Important information
Warranty
The same warranty terms apply for the equipment as for new vehicles.
NoteA damage in the sense of the warranty must not be the result from improper handling of the system or from unprofessional repair attempts. In addition, no external damage must be present.
Replacement possibility
After the expiration of the warranty, a unit in need of repair will be replaced inexpensively with a reconditioned, original unit with spare part warranty. However it is required that there is no housing damage and no unauthor-ised repair attempts have been made.
NoteIn the case of a warranty or a replacement service, the Škoda Service Partner must be presented with the unit card with code number and serial number!
Audio/Video units
Other audio units can be connected with an adapter cable to your naviga-tion system, which then can be activated in the menu “Select source” with
20.book Page 8 Tuesday, December 6, 2005 2:26 PM

General comments 9
“AUX”. More detailed information is available from your Škoda Service Partner.
Operating the radio navigation system when the vehicle is moving.
The requirements of today's street traffic demand from the driver that he always concentrates fully when driving.
The extensive and fastidious equipment details of this system offer - besides the possibilites of entertainment - also a wide range of information which will help you reach the trip destination quickly and reliably.
Only if the traffic situation allows it, should you operate the radio navigation system with its wide range of possibilites.
The volume settings must be selected in such a way that acoustic signals from the outside, such as e.g. a Martins horn from utility vehicles (police cars, ambulances and fire brigade), can be heard at any time.
WARNINGPlease always pay full attention to the traffic situation around you! As the driver you are fully responsible for the traffic safety. Only use the functions in such a way that you always maintain the control over your vehicle in all traffic situations!
Anti-theft coding
After removing the unit, the anti-theft coding prevents electronically the use of the unit by an unauthorised person.
If the information “SAFE” appears in the display after switching on the unit, it can only be operated again by entering the correct code.
Before using the navigation system and the map display
• Please observe the respective traffic regulations when driving.• Street and location names can be changed. There are exceptional cases in which the names stored on the CD might not correspond to the changed names.• The route calculated by the navigation system is a recommendation for reaching the trip destination. While driving please pay attention to stop-ping restrictions, traffic lights, one-way streets, toe change restrictions, channels and ferries.
WARNINGThe road traffic legislation (StVO) is always applicable, also if a driving recommendation does not comply with the StVO.
Changing the navigation CD
Description
Press the CD eject button to change the CD. The navigation CD is ejected.
A4
20.book Page 9 Tuesday, December 6, 2005 2:26 PM

General comments10
Carefully insert the new navigation CD with the inscription upwards as far as possible into the CD case until it can be drawn in automatically by the unit.
CautionOnly clean CDs without scratches and damages should be used, in order to guarantee a proper functioning of the navigation system.• Always store non-used CDs in the original folding box provided for this.• Never expose CDs to direct sun rays!• Please never write or affix the CDs!
Screen
Information displays (here radio-information display), menus or the map (navigation) are shown on the screen. The station buttons with the stored stations are illustrated in the radio information display. Also the current station will be shown.
Switch over to night displayThe display switch over is performed either manually by pressing the display button or automatically when switching on the car lights.
Using the screenCarefully handle the screen because dents and scratches can occur through pressure of the finger or contact with sharp objects.
Cleaning the screenThe screen can be cleaned with a soft cloth and finger marks can be wiped away with alcohol.
CautionDo not use solvent such as turpentine or petrol as they will corrode the material.
Layout of the menu
Fig. 3 Screen
A8
Fig. 4 Layout of the menu
20.book Page 10 Tuesday, December 6, 2005 2:26 PM

General comments 11
The menus displayed on the screen result from the following standard fields:
• If the navigation is active the status of the functions radio or CD changer is displayed in the status bar . In radio or CD mode, the active function of the navigation is shown here (e. g. “Destination entry is active”).• The destination field is designed for four-digit display of the current destination if the navigation is active. The radio information display shows the info field in this area. It indicates the name of the set station (including the identification “TP” for a radio station) and the tone source.• Menu fields are intended for calling up the sub-menu or selecting the displayed functions.
Selecting and confirming the menu fieldsCall up and operate the menu functions by using the menu knob :
• Select menu fields: Turn the knob• Confirm menu fields: Press the knob
Map and symbol displays
Map display
The map display can be used for Enter destination and during the Guid-ance.
A crosshair with selection window and the menu fields assist in selecting a destination with the aid of the map.
The Map shows the length of the trip or arrival time , the distance to the destination , the North , the status of the tailback function , the current map scale , the current vehicle position , symbols and the map contents .
Symbols are indicated in the map automatically for motorway filling stations, stations, Škoda Service Partner and local centers. In addition, other symbols for car parks etc... can be selected.
During the guidance the map menu can be called up from the map display by pressing the menu knob . This menu enables the automatic alignment of the map in the direction of travel, the north and the destina-
AA
AB
AC
A18
Fig. 5 Map
AAAB AC AD
AE AF AGAH
A18
20.book Page 11 Tuesday, December 6, 2005 2:26 PM

General comments12
tion. You can select via the map type if e.g. the current vehicle position should be shown together with the destination. The move mode makes it possible to view the neighbouring map details. Other symbols can be selected via the map content. The segment fields change the map scale. You can change from the map display to the symbol display with menu field “Symbol”.
Symbol display
If the guidance is active, you are being offered the option of a symbol display with turn information or map display.
The show depends on which display was active during the last guidance.
The symbol display shows the number of GPS satellite receptions and the status of the tailback function, the estimated arrival time or the length of the trip and the distance to the destination, the display of the direction of travel, the distance markings to the intersection/junction with the distance information and the name of the currently driven road. Before a turn proce-dure, the display of the direction of travel points in the direction you are turning into. In addition the name of the street you are turning into is indicated.
You can switch back and forth at any time between both types of display. The map is called up from the symbol display by pressing the menu knob . You can then can change back in the symbol display by pressing the button .
Switching the unit on and off
– The system is switched on or off by pressing the rotary/push knob .
– If the key is pulled out of the ignition lock when the system is switched on, the system switches off autmatically.
If the ignition key is withdrawn the system can be switched on for approx. one hour via the rotary/push knob . Then the unit switches off automatically. This process can be repeated as often as desired.
If the unit is switched off and the ignition key is withdrawn, a flashing LED indicates (below the display button ) that this is a unit with an active anti-theft coding.
First of all the start screen is indicated with the Škoda logo.
After this, a menu or a display (here radio information display) is indicated on the screen, which was active at the last switching off of the system.
In addition a message appears on the screen: “The navigation system is activated. Please follow the StVO!”
Note• If the unit remains mute after switching on and “SAFE” appears in the display, please pay attention to the instructions for use.• A non-conclusive entry is not stored when switching off the unit.
A18 A9
A10
A10
A8
20.book Page 12 Tuesday, December 6, 2005 2:26 PM

Audio 13
Audio
Overview of audio menu
Display of audio functions
– Change from the navigation display to the audio display with the button .
– When the audio display is indicated press the button , in order to call up the menu “Select source ”. The selec-
tion column indicates the current source of tone.
Menu “Select source ”
The following tone sources are available for selecting:
• TP1 and TP2 - radio station in two memory levels• CD• TV/VIDEO - vehicles with TV Tuner or• AUX (off) - vehicles without TV Tuner ⇒ page 13• Wavebands of the radio• Radio off - switch off radio
NoteIf you confirm the menu field “Radio off”, the radio play function is switched to mute. A corresponding message is indicated.
Menu “Audio Settings”
Further settings can be performed in this menu ⇒ fig. 7.
AUDIO A15
AUDIOA15
Fig. 6 Menu - Select source Fig. 7 Menu - Audio
Settings
20.book Page 13 Tuesday, December 6, 2005 2:26 PM

Audio14
RDS NameSetting the RDS station name to “fixed” or “variable” (changes in the displays are indicated on the screen, e.g. weather reports or advertise-ments).
RDS REGCertain programs of the broadcasting companies are divided into regional programs at specific times. That is why in individual regions the regional programs of a station can broadcast different contents.
The selection possibilities are: “auto” for automatic reception and “off” for the deactivation of the function.
It is meaningful to deactivate this function if you are on the road in the regions in which ranges of several regional stations override each other and the set regional station is poorly received.
Music/speechCertain RDS broadcasting companies differ between music and language broadcasting.
The selection possibilities are: “auto” for automatic optimization of the play function and “off” for the deactivation of the function.
CD ShufflePlaying the tracks on a CD or CDs in the magazine in random order.
AUX SourceSelection of the connected audio/video units.
Mark and confirm the menu field “AUX Source”.
By pressing the menu knob you can switch over between the following functions: Off, audio, video and video + audio, depending on which signals the connected unit delivers.
Volume setupCall up the menu for adjusting the volume basic settings ⇒ page 16.
TIM standbySetting the TIM standby time
Mark and confirm the menu field “TIM standby”.
By pressing the menu knob you can switch over between the following standby times: Off, 30, 60, 90 and 120 minutes. Further information ⇒ page 20.
A18
A18
20.book Page 14 Tuesday, December 6, 2005 2:26 PM
Audio 15
Overview of sound menu
System equipment without digital sound package (DSP)
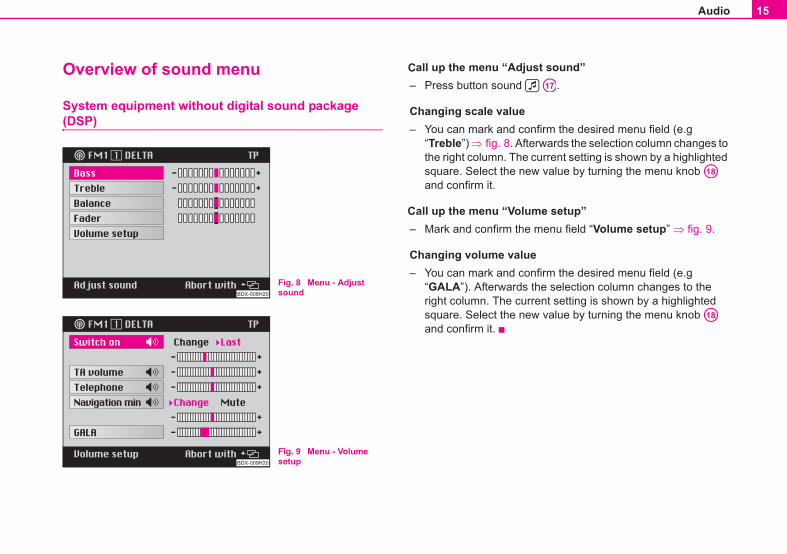
all up the menu “Adjust sound”– Press button sound .
Changing scale value– You can mark and confirm the desired menu field (e.g
“Treble”) ⇒ fig. 8. Afterwards the selection column changes to the right column. The current setting is shown by a highlighted square. Select the new value by turning the menu knob and confirm it.
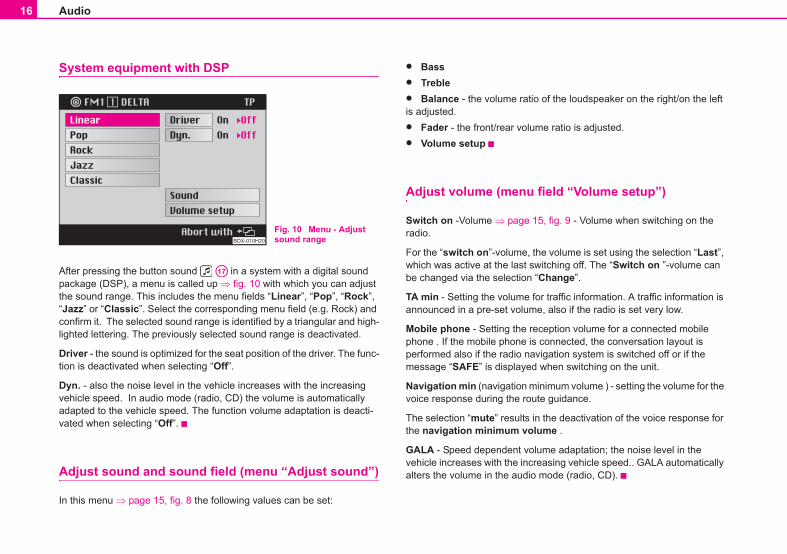
all up the menu “Volume setup”– Mark and confirm the menu field “Volume setup” ⇒ fig. 9.
Changing volume value– You can mark and confirm the desired menu field (e.g
“GALA”). Afterwards the selection column changes to the right column. The current setting is shown by a highlighted square. Select the new value by turning the menu knob and confirm it.
Fig. 8 Menu - Adjust sound
Fig. 9 Menu - Volume setup
A17
A18
A18
20.book Page 15 Tuesday, December 6, 2005 2:26 PM
C
C
Audio16
System equipment with DSP
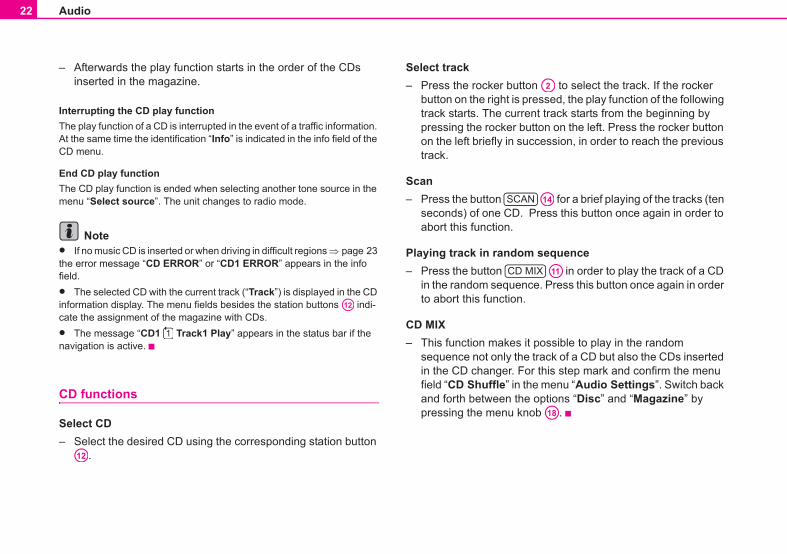
After pressing the button sound in a system with a digital sound package (DSP), a menu is called up ⇒ fig. 10 with which you can adjust the sound range. This includes the menu fields “Linear”, “Pop”, “Rock”, “Jazz” or “Classic”. Select the corresponding menu field (e.g. Rock) and confirm it. The selected sound range is identified by a triangular and high-lighted lettering. The previously selected sound range is deactivated.
Driver - the sound is optimized for the seat position of the driver. The func-tion is deactivated when selecting “Off”.
Dyn. - also the noise level in the vehicle increases with the increasing vehicle speed. In audio mode (radio, CD) the volume is automatically adapted to the vehicle speed. The function volume adaptation is deacti-vated when selecting “Off”.
Adjust sound and sound field (menu “Adjust sound”)
In this menu ⇒ page 15, fig. 8 the following values can be set:
• Bass• Treble• Balance - the volume ratio of the loudspeaker on the right/on the left is adjusted.• Fader - the front/rear volume ratio is adjusted.• Volume setup
Adjust volume (menu field “Volume setup”)
Switch on -Volume ⇒ page 15, fig. 9 - Volume when switching on the radio.
For the “switch on”-volume, the volume is set using the selection “Last”, which was active at the last switching off. The “Switch on ”-volume can be changed via the selection “Change”.
TA min - Setting the volume for traffic information. A traffic information is announced in a pre-set volume, also if the radio is set very low.
Mobile phone - Setting the reception volume for a connected mobile phone . If the mobile phone is connected, the conversation layout is performed also if the radio navigation system is switched off or if the message “SAFE” is displayed when switching on the unit.
Navigation min (navigation minimum volume ) - setting the volume for the voice response during the route guidance.
The selection “mute” results in the deactivation of the voice response for the navigation minimum volume .
GALA - Speed dependent volume adaptation; the noise level in the vehicle increases with the increasing vehicle speed.. GALA automatically alters the volume in the audio mode (radio, CD).
Fig. 10 Menu - Adjust sound range
A17
20.book Page 16 Tuesday, December 6, 2005 2:26 PM

Audio 17
Radio mode
Station finding
Automatic station finding– Touch the rocker button , the station finding starts in the
selected direction, select the first station with a good reception and play it.
Manual station finding– Also stations with a weak reception, which are not taken into
account by the automatic station finding, can be set with the manual station finding.
Call up function– Press the rocker button for more than 2 seconds - a signal
tone sounds and “manual” appears in the info field.
– If the rocker button is held pressed, the automatic station finding starts; this means the frequency changes quickly while the tone switches to mute. The automatic station finding stops if the rocker button is released. For fine tuning briefly press the rocker button (see following point).
– Briefly press the rocker button - the displayed frequency changes in individual steps (FM: 0.1 MHz, AM: 9 kHz).
If the identification “Manual” is no longer shown in the info field, the func-tion is switched off again.
utomatic storing of radio stations (AS function )
The six best RDS stations can be automatically stored from the respective service area (radio data system, which makes it possible together with the radio program to transfer additionally more information). They are stored on the station buttons . This function is particularly useful on journeys.
If FM mode is set– Press the button AS for more than two seconds - the
system searches the six most powerful RDS stations and stores them. “Autostore” is displayed on the screen. After ending the processs the most powerful station is set.
– You can call up the stored station with the station buttons .
NoteIf there are less than six RDS stations, the stations without RDS are stored and classified according to the field power on the remaining station buttons. If there are less than six radio stations (TP) the remaining station buttons are not changed.
Storing radio stations
You can store on the station buttons - three ranges - FM (UKW), TP (Traffic Program = radio station ) and AM (MW) - each six stations on two memory levels (e.g. memory levels FM1 and FM2)
– Set the desired station with the rocker button .
A2
A2
A2
A2
A12
A11
A12
1 6 A12
A2
20.book Page 17 Tuesday, December 6, 2005 2:26 PM
A

Audio18
– While the station to be stored is being listened to, the desired station button must be held as long as possible until a short signal tone confirms the storing.
– The program name (RDS station) or the station frequency is shown in the info field after the successful storing.
Note• In the case of RDS stations, besides the program name also the regional frequency is stored.• The memory is also available after disconnecting the battery.• The field for the selected station buttons is marked in the radio infor-mation display.
Retrieve radio station
To retrieve the stored station only briefly press the respective station button . The program name or the frequency belonging to this is displayed in the info field. If the stored frequency has no high quality reception, the unit automatically selects a suitable alternative frequency (Best-Station-Function) of the stored station.
NoteOnly touch the button , otherwise the already displayed frequency is stored.
Playing radio station (Scan)
Stations of a waveband (TP, FM and AM) can be played briefly one after the other (for ten seconds).
– Select the desired waveband via “Select source”.
– Press the button ; the function Scan and the station name (or the frequency) is indicated in the infor field.
– If you wish to select the scanned station, press again the button . Thus the scan function is ended.
NoteIf you have selected no station, the scan function is repeated after a frequency process.
Radio mode with RDS and RDS regional
How does RDS function?
The function RDS (Radio Data System) is always active on the radio navi-gation system. The broadcasting companies emit RDS information in addition to the program, which is received by the RDS receiver in the coded form.
The following functions are controlled by the transmitted code.
Program Identification (PI-Code); The radio detects the already received station through the PI code.
Program Service Name (PS-Code); The PS-Code transmits the RDS station name, which is displayed in the radio information display, e.g. radio 21. As some station companies modify the RDS station name via the
A12
A12
A12
SCAN A14
SCAN
20.book Page 18 Tuesday, December 6, 2005 2:26 PM

Audio 19
PS-Code (e.g for advertisement purpose ), there is the possibility to change the RDS station name in the menu “Audio Settings ” (call up via menu field “Settings”).
Alternative frequencies (AF-Code); The program of a station , e.g. radio 21 emits different frequencies based on the limited range of the ultra short wavebands of several broadcasting stations. The AF-Code commu-nicates to the unit all possible frequencies for the corresponding station. RDS ensures that the best receivable frequency of the selected station is automatically and precisely set not to be heard.
Traffic radio identification (TP-Code = Traffic Program); This informa-tion communicates to the receiver that a traffic radio station is just being received.
Traffic information identification (TA-Code = Traffic Announcement); The unit detects a traffic information by the TA-Code. If the radio is set very low or in the CD mode, the unit switches automatically to the traffic information in the programmed volume. Simultaneously the unit switches to mono play function.
EON (Enhanced Information Concerning Other Networks); EON is a RDS function, which ensures that all traffic information of a broadcasting company is transmitted in the TP mode. Large broadcasting companies (e.g. NDR) emit simultaneously and frequently various stations, e.g. NDR 1, NDR 2, NDR 3 etc.... Independent of the already set station of a broadcasting company, traffic information of other stations of this broad-casting company can also be transmitted.
Catastrophy announcements; Catastrophy announcements always take priority over all other functions. The message “Alarm” is displayed on the screen.
RDS regional
Certain programs of the broadcasting companies are divided into regional programs at specific times. Examplewise NDR 1 transmits at certain times regional programs with different content e.g. for Schleswig-Holstein and Hamburg.
First of all the unit attempts to set only alternative frequencies of the selected station.
If the quality is however so low, that there is a risk of a “program loss”, the unit accepts also frequencies, which are “related” to the station NDR 1. As these stations emit temporarily different programs and due to such a change in frequency also the program from one of the related stations can be heard.
Basically the station change is only intended for stations with exact PI-Code. In case of poor reception, however an automatic switch over to a regional “related” station family can be performed.
In the menu “Audio Settings” the function RDS regional can be set via the menu field “RDS REG” to “auto” or “off”. When opting for “auto” the change to a regional “related” station can only be performed if there is a risk of losing the station.
Anchoring the RDS station nameAs some station companies modify the RDS station name via the PS-Code (e.g. for advertisement purposes) there is the possibility to anchor the RDS station name in the menu “Audio Settings”:
• fixed - the RDS station name is anchored as fixed, i.e. the FM and TP station stored on the station buttons are shown with their RDS station names (e.g. radio 21).• variable- allows the display of advertisement texts and weather reports in the info field.
Note• After switching on, the unit searches the highest quality receiveable frequency for the location of the selected station. The unit can remain mute for several seconds depending on the reception position and the number of alternative frequencies.• The evalutation of the RDS information can last several minutes depending on the power of the receivable signal.
A12
20.book Page 19 Tuesday, December 6, 2005 2:26 PM

Audio20
• RDS evaluation is not possible if the signal is too weak. In this case it is the frequncy which appears in the status bar or in the info field instead of the RDS station name.• If there are unfavourable reception conditions (e.g. in the mountains) the unit checks very often the alternative frequencies. This can cause brief mutings.• If this causes mutings and tone distortions in extremely poor reception locations, the RDS function is temporarily switched off.
Traffic radio reception
Many stations in the FM range regularly transmit the current traffic reports within their transmitting range.
After selecting a station, check if the set station has traffic reports.
If the set station is a TP station (station with traffic radio reception), the identification “TP” appears in addition to the station name in the info field of the radio basic menu. The station remains set. The functions “traffic information standby” and “EON” are active.
If the set station has no traffic radio station or cannot be received, the unit searches automatically for another traffic radio station in the reception area (start station finding). The message “TP SEEK” (searching traffic radio station) appears in the radio information display.
Listening to traffic informationA traffic information is detected by the unit using the traffic information identification. Even if the radio is set very low or in the CD mode you can listen to a traffic information. The play function is performed in Mono. The message “Info” appears in the radio information display. Simultaneously the traffic information is recorded in the traffic information memory (TIM) ⇒ page 20.
Interrupting a traffic informationIf a traffic information was interrupted, press the button . A new traffic information can be emitted.
Cancel traffic information standbyThe traffic information standby is cancelled in the menu “Select source” when switching over to FM or AM level.
Traffic information memory - Traffic Memo (TIM)
The radio navigation system has a digital voice memory with which upto nine traffic reports with a total duration of maximum four minutes can be automatically recorded.
If the radio is switched on each traffic report of the set station is recorded, if the show “TP” is present in the info field.
If the unit is switched off traffic reports are recorded for as long as they were selected in the menu “Audio Settings” under “TIM-Standby” ⇒ page 14. This function can also be switched off.
Replaying the traffic reportsIf you press the button , the replay of the traffic reports starts with the last recorded traffic information and continues to the oldest traffic infor-mation. The show “TIM Track 4 Time 14:10 TP” appears in the info field:
TIM - Play function of a recorded traffic information
Track 4 - There are four traffic information. The play function begins with the latest information.
Time 14:10 - Recording time
TP - TP station
TIM A1
TIM A1
20.book Page 20 Tuesday, December 6, 2005 2:26 PM

Audio 21
Replaying the random traffic reportThe traffic reports can also be replayed in the random order.
• replaying older traffic report - press the rocker button on the left for two seconds.• replaying latest traffic report - press the rocker button on the right for two seconds.
Fast replay of the traffic reportsIf the rocker button on the right is held pressed, the reports are quickly replayed with time details ( 3 - 5 times faster).
Repeating the traffic reportA traffic report is repeated, if the rocker button on the left is pressed again (last pressing was carried out more than two seconds ago).
Ending TIM functionThe function is ended by pressing again the button and the radio basic menu is called up.
Erasing the traffic reportsThe traffic reports are automatically erased six seconds after ending the memory standby, which is 24 hours.
Note• Select a radio station before switching off the unit, otherwise no traffic reports can be stored.• The storing can be activated for 24 hours or until the next switching on by pressing the button if the unit is switched off. In the process and if it is necessary a radio station is automatically set.• The oldest announcement will be overwritten if the traffic information memory is full.
• The beginning is overwritten, if a report lasts more than four minutes. A signal tone sounds as information that the entire report could not be stored.• If a traffic report is stored when the unit is switched on, this action continues until the end. Then the last selected setting is effective.• If no traffic reports were stored, the message “No Messages” appears in the radio information display after pressing the button and a signal tone sounds.
CD mode
Switching over to CD mode– Call up the menu “Select source ” ⇒ fig. 11 with the button
.
– Mark and confirm the menu field “CD”. The CD changer checks the magazine; thus the message “Check Magazine” appears.
A2
A2
A2
A2
TIM A1
TIM A1
TIM A1
Fig. 11 Menu - Select source
AUDIO A15
20.book Page 21 Tuesday, December 6, 2005 2:26 PM
Audio22
– Afterwards the play function starts in the order of the CDs inserted in the magazine.
Interrupting the CD play functionThe play function of a CD is interrupted in the event of a traffic information. At the same time the identification “Info” is indicated in the info field of the CD menu.
End CD play functionThe CD play function is ended when selecting another tone source in the menu “Select source”. The unit changes to radio mode.
Note• If no music CD is inserted or when driving in difficult regions ⇒ page 23 the error message “CD ERROR” or “CD1 ERROR” appears in the info field.• The selected CD with the current track (“Track”) is displayed in the CD information display. The menu fields besides the station buttons indi-cate the assignment of the magazine with CDs.• The message “CD1 Track1 Play” appears in the status bar if the navigation is active.
CD functions
Select CD – Select the desired CD using the corresponding station button
.
Select track– Press the rocker button to select the track. If the rocker
button on the right is pressed, the play function of the following track starts. The current track starts from the beginning by pressing the rocker button on the left. Press the rocker button on the left briefly in succession, in order to reach the previous track.
Scan– Press the button for a brief playing of the tracks (ten
seconds) of one CD. Press this button once again in order to abort this function.
Playing track in random sequence– Press the button in order to play the track of a CD
in the random sequence. Press this button once again in order to abort this function.
CD MIX– This function makes it possible to play in the random
sequence not only the track of a CD but also the CDs inserted in the CD changer. For this step mark and confirm the menu field “CD Shuffle” in the menu “Audio Settings”. Switch back and forth between the options “Disc” and “Magazine” by pressing the menu knob .
A12
1
A12
A2
SCAN A14
CD MIX A11
A18
20.book Page 22 Tuesday, December 6, 2005 2:26 PM
Audio 23
Information on how to use a CD changer
CD to jumpUneven road surfaces and strong vibrations may cause the CD to jump. In such cases wait with the CD mode until there is a better road surface to drive on.
Formation of condensationWhen it is cold and after rain showers, moisture can deposit in the CD changer housing (condensation). This can effect the CD jump or impair the play function. In such cases wait until the moisture has dissipated.
Notes for the care of the CDsIf a CD is soiled, please never clean the CD in the direction of a circle but rather with a soft fluffly cloth from inside to outside. In case of severe layers of dirt we recommend to clean the CD with a commercially available CD cleaner. Also in this case do not clean the CD in the direction of a circle but rather from inside to outside and then let it dry off.
Caution• Never use liquids such as gasoline, paint thinner or disk cleaner, other-wise the surface of the CD could get damaged.• Never expose CDs to direct sun rays!• Please never write or affix the CD!
NoteDirt or damage of a CD can lead to difficulties when “reading” the infor-mation. The difficulty in reading the error depends on the dirt or on the severity of the mechanical damage. Severe scratches cause reading errors which can make the CD jump or “get stuck”. All CDs must be treated carefully and always be stored in a protective case.
20.book Page 23 Tuesday, December 6, 2005 2:26 PM

Navigation24
Navigation
Overview of navigation basic menu
Call up navigation basic menu
Change the navigation display with the button .
– When the navigation display is indicated press the button , in order to call up the navigation basic menu. At the
same time non-conclusive operating steps or an active guid-ance are aborted.
You can call up the following menu:• Start guidance ⇒ page 39• Enter destination ⇒ page 25• Destination memory ⇒ page 45
• Info mode ⇒ page 44• Route options ⇒ page 38• Settings ⇒ page 41• Travel guide ⇒ page 52
Note• If the button is pressed during the guidance, the menu field “Start guidance” appears in the navigation basic menu..• If the inserted navigation CD does not feature this information, the functions of a travel guide are not offered.
Fig. 12 Navigation basic menu
NAVI A7
NAVI A7
NAVI A7
20.book Page 24 Tuesday, December 6, 2005 2:26 PM

Navigation 25
Enter destination
Overview
Call up the menu “Enter destination” directly in the navigation menu via the menu field “Enter destination” ⇒ fig. 13.
Now you can select via the menu fields between the following possibilities of the “Enter destination”:
• Destination memory ⇒ fig. 14• Destination on the map ⇒ page 36• Special destinations ⇒ page 30• To the flagged destination ⇒ page 34• Town (and town sub-menu) ⇒ page 27• Street ⇒ page 28• Town centre ⇒ page 29
Destination on map
You can call up the function “Destination on map” from the following menus:
• Menu - Enter destination• Sub-menu - town• Sub-menu - street
The illustration scale (zoom) can be changed, the map content can be shifted horizontally or vertically and the desired destination can be selected with the map function.
The destination entry can be made in a minimum scale of 1 : 10 000 (100 m is shown). Then a short name is assigned to the destination in the editing menu.
NoteBefore a point on the map is selected (e.g. service area) make sure that something is displayed below on the screen (e.g. a street designation).
Fig. 13 Destination entry
Fig. 14 Destination memory
20.book Page 25 Tuesday, December 6, 2005 2:26 PM

Navigation26
Therefore ensure that the destination is detected by the navigation system and a route is calculated.
Editing menu
All alphanumerical entries (containing letters and digits) can be made with the aid of this menu, which is required for the navigation.
To this belong:
• Destination entry of e.g. town and street names• Entry of a short name when storing a destination in the destination memory• Use entry of a position name for a flagged destination
The editing menu consists of:• a register with letters, characters and digits • five control fields
• Editing field with standard names (highlighted) or the entry marking (still no destination is selected) • List range with four destination entries
Symbols of control field : - Symbol for blank spaces und for erasing the marked characters
- Switching over of register (for language-specific special characters)
- Shift entry marking to the left
- Shift entry marking to the right
- List call-up
NoteThe marking in the register is first of all under the letter “M”. The standard name is in the editing field (highlighted).
Intelligent Register ASF
(Automatic Speller Function)
The intelligent register offers only as selection the letters, which with the already entered letters result in a name which is stored on the navigation CD.
Fig. 15 Editing menu
AA
AB
AC
AD
AB
20.book Page 26 Tuesday, December 6, 2005 2:26 PM

Navigation 27
Enter destination - Town
Select a town as destination
You can first of all select the desired town or part of the town and then determine the destination with the menu field “Town” ⇒ fig. 16 .
For this step use the following possibilites in the sub-menu “Town”:
• Enter destination via menu field “Street”• Enter destination via menu field “Town centre”• Enter destination via menu field “Close to address”• Enter destination via menu field “Destination on map”
Enter town name
– Enter the desired town completely in the editing field or only its initial letters. An existing entry is deleted when entering the first characters. Simultaneously a new line is stamped into the editing list.
– To do so mark the desired characters with the menu knob .
– Confirm the character by briefly pressing the menu knob . The character is entered into the editing field. Simultaneously the entry mark moves to a point towards the right.
Selecting last destinations
You can select the last ten destinations using this function, for which a route was already calculated.
Selecting destination– Mark and confirm the menu field “Enter destination” in the
navigation basic menu. The sub-menu “Destination memory” appears.
– Mark and confirm the menu field “Destination memory”. The sub-menu “Destination memory” appears.
Sub-menu “Destination memory”:– Mark and confirm the menu field “Last”. A list of the last ten
destinations appears.
Fig. 16 Menu field - Town
A18
A18
20.book Page 27 Tuesday, December 6, 2005 2:26 PM

Navigation28
Enter destination - Street and Intersection
Select a street as destination
Select menu field “Street” – Mark and confirm in the destination entry menu the menu field
“Street” ⇒ fig. 17.
Enter the street name in the editing menu– In the editing menu enter the street name in the editing field.
– Then call up the list by pressing the menu knob (more than two seconds).
Select street name from the list– Mark and confirm the desired entry. The street sub-menu is
called up.
– Scroll through the list by moving the the selection bar over the last entry (scrolling forwards) or the first entry (scrolling back-wards).
You can select the desired street in the menu “Street” with the aid of this possibility and then precisely determine the destination address in the street sub-menu. For this step use the following possibilites in the street sub-menu:• Enter destination using the menu “Intersection”• Enter destination using the menu “House number”• Enter destination using the menu “Destination on map”
Note• If the selected street name exists several times in a town, then a sub-menu is called up, from which the desired entry can be selected.• A long street name can be stored several times, in order to make it easy to search for.
Fig. 17 Select a street as destination
A18
20.book Page 28 Tuesday, December 6, 2005 2:26 PM

Navigation 29
Select an intersection as destination
The destination address can be precisely determined in the street sub-menu:
• Possibility “Intersection” - calls up the editing menu/the list for selecting an intersection• Possibility “House number” - calls up the editing menu/the list for selecting a house number• Possibility “Destination on map” - calls up the map. Further determi-nation of the destination is performed using the map ⇒ page 36.• Possibility “Continue” - the menu ends and the navigation basic menu is called up.
The guidance can begin after entering the full destination ⇒ page 39.
NoteIf this menu field is not selectable, no corresponding data exists on the navigation CD.
Enter destination - Town centre
Select a town centre (part of the town) as destination
For large towns you can enter the town centre of part of a town as destination using the menu field “Town centre” ⇒ fig. 19. For small towns and villages this menu field is used for the entry of the town centre, as it is only possible to restrictively enter the destination via the menu field “Street”.
Select menu field “Town centre” – Mark and confirm in the destination entry menu the menu field
“Town centre”. Then a list (with maximum 14 entries) or the editing menu (with more than 14 entries) is called up.
Selecting town centre– Enter the name of the desired town centre in the editing field
or confirm an existing entry.
Fig. 18 Precise definition of the destination address
Fig. 19 Menu field - Town centre
20.book Page 29 Tuesday, December 6, 2005 2:26 PM

Navigation30
– Select a list.
– Mark and confirm the desired town centre in the list. Then the navigation basic menu is called up.
– The guidance can begin ⇒ page 39.
Note• For large towns also parts of the town are displayed in the list.• If the selected town name (or name for part of the town) exists several times, then a sub-menu is called up, from which the desired entry can be selected.
Enter destination - Special destination
Enter special destinations
Other destinations can be entered when selecting the menu field “Special destinations” in the destination entry menu.
Select menu field “Special destinations” – Mark and confirm in the destination entry menu the menu field
“Special destinations”. The menu “Special destinations” is called up.
Special destinations are:• Close to address - Destinations close to the selected destination address (e. g. Car parks, Filling stations, Škoda Service Partner etc.)• Supraregional Destinations - Destinations which have not been assigned to any specific location (e.g. border crossings, airports etc.)• Close to location - Destinations close to the current vehicle position (this function is particulary pratical when searching for e.g. filling stations or a Škoda Service Partner)
The destination entry is made via columns which are stored in alphabet-ical order. Partially different columns as a selection are offered for the indi-vidual “Special destinations”.
Columns are e.g.:
• Exhibition regions• Motorway service• Car park/multi-storey car park• Škoda Service Partner
If no data exists in a column, the selection column goes to the next marked column.
After selecting the column you can determine the desired address via the editing menu and the list.Fig. 20 Menu field -
special destinations
20.book Page 30 Tuesday, December 6, 2005 2:26 PM

Navigation 31
Select destination in the address surroundings
– Mark and confirm the menu field “Close to address” in the menu “Special destinations”. Then the column list is called up.
– Mark and confirm the desired entry. Call up the surrounding address list for each selected column (e.g. “Car park/multi-storey car park”).
– Mark and confirm the desired entry. The navigation basic menu is called up and the selected destination is in the desti-nation field.
– The guidance can begin ⇒ page 39.
This special destination relates to a previously selected trip destination (exists in the destination field). This function can be used e.g. to make it easy to find the car park in an unknown large town. First select the desti-nation via the columns. Confirm a column, in order to reach a list
containing the information for the corresponding destination addresses and destination distances.
The destinations in the surroundings of the current address for the selected column are entered in this list. In addition, the distance between the address and the destination is given. The destination entries in the list are sorted according to the distance.
Select supraregional destinations
Select menu field “Supraregional destinations”
This special destination has not been assigned to any previously calculated destination. It relates to the current vehicle position. This function e.g. makes it possible to drive to the next motorway service or the next airport.
Fig. 21 Select destina-tion in the address surroundings
Fig. 22 Supraregional destinations
20.book Page 31 Tuesday, December 6, 2005 2:26 PM

Navigation32
– Mark and confirm the menu field “Supraregional destina-tions” ⇒ page 31, fig. 22. The column list is called up.
– Mark and confirm the desired entry in the column list. The navigation basic menu is called up and the selected destina-tion is in the destination field.
– The guidance can begin ⇒ page 39.
NoteIn case of more than 14 entries for one column, first of all the editing menu is called up. Enter here the desired name or its initial letter and then call up the list.
Select destination in the surroundings of the current vehicle position
This special destination has not been assigned to any previously selected destination. It relates to the immediate surrounding of the current vehicle position. Therefore the function is particularly effective in planning a suitable intermediate stop, in order e.g. to go and eat in a restaurant or to drive to the next filling station.
– Mark and confirm the menu field “Close to location” ⇒ fig. 23. The column list is called up.
– Mark and confirm the desired entry in the column list. The surrounding destination list is called up for selecting the column.
– Mark and confirm the desired destination. The navigation basic menu is called up and the selected destination is in the destination field.
– The guidance can begin ⇒ page 39.
The surrounding destination list is displayed. It contains destinations in the surroundings of the current vehicle position for the selected column. In addition, the distance between the vehicle position and the destination is given. The destination entries in the list are sorted according to the distance.
Fig. 23 Select close to location
20.book Page 32 Tuesday, December 6, 2005 2:26 PM

Navigation 33
Enter destination - Destination memory
Store a destination in the destination memory
Select menu field “Store destination”– Confirm the menu field (in case of menu call up, the menu field
“Store destination” is already marked) ⇒ fig. 24. Then the editing menu is called up for the entry of a short name.
Enter short name– Enter the short name into the editing field (e.g. MEETING
POINT 1 ⇒ fig. 25), in which first of all the character is marked and confirmed one after the other using the menu knob .
– Press the menu knob for more than two seconds, in order to confirm the entered short name.
– A triangular in front of the short name is displayed as confir-mation.
First of all a destination must be stored in the destination memory, in order to be able to use it to enter the destination.
First of all a destination is stored in the alphabetical destination memory. Here the destination entries are alphabetically classified according to the short name (if you have given them a name); town name, street name, intersection etc... house number are stored.
Then the destination can be stored in the Top 10 memory. Here the desti-nation entries are stored in sequence by the user. Maximum ten entries can be stored. This memory is used for calling up frequenty used destina-tions.
You can assign a short name (e.g. first name) to a destination. This makes it easier for you to later on fetch out the destination entry from the desti-nation memory.
Fig. 24 Menu - Store destination
Fig. 25 Enter short name
A18
A18
20.book Page 33 Tuesday, December 6, 2005 2:26 PM

Navigation34
Note• If an already existing short name is changed (highlighted) it is deleted when entering the first characters.• If the destination memory is full, one or several destinations must be overwritten. In this case a menu is called up after entering the short name, which contains the menu field “Overwrite destination” . The alphabetical destination memory is displayed after confirming the menu field. The destination to be overwritten can be selected using the menu knob .• If part of a location/town is stored in the memory as a destination, then the respective town is also stored.
Read a destination out of the destination memory
– Call up the destination entry menu, mark and confirm the menu field “Enter destination” in the navigation basic menu.
– As standard the selection bar is on the menu field “Destina-tion memory”. Confirm the menu field. A sub-menu is called up
– Mark and confirm the desired memory in the sub-menu.
– In the menu bar there is the name of the selected memory (here: Top 10). The designation “Alphabet. Memory” appears when selecting the alphabetical destination memory.
– Confirm your selection; then call up the navigation basic menu.
– The guidance can begin ⇒ page 39.
Note• Non-assigned memory spaces are designated in the Top 10 memory with “free”.• The guidance can also be started directly from the memory.• Mark the desired entry and confirm it by pressing the menu knob for more than two seconds. The system guides you to selected destination.
Enter destination - To the flagged destination
Set current vehicle position as flagged destination
The current vehicle position can be kept as the so-called flagged destina-tion using the button and then store it in the destination memory. This destination can be e.g. an interesting location, which you wish to visit at a later time.
Keeping a flagged destination is confirmed with a brief signal tone.
If several flagged destinations are kept in succession, then only the last one in the memory is kept.
If a flagged destination is stored in the destination memory, then it can be used for the destination entry.
NoteMake sure that the system shows the street name. Otherwise it is possible that one cannot drive to the destination because it is not found under a known street.
A18
A18
A13
20.book Page 34 Tuesday, December 6, 2005 2:26 PM

Navigation 35
Store flagged destination
At the next stop the established flagged destination can be permanently stored in the destination memory.
– Call up the destination memory menu, mark and confirm the menu field “Destination memory” in the navigation basic menu.
– Mark and confirm the menu field “Store flag” ⇒ fig. 26. The editing menu is called up for the entry of a position name.
Give a name to the flagged destination
In the editing menu either take over the standard name “Flagged destination (hh:mm)” or give your own position name.
Take over standard name – Confirm the entry “Flagged destination (hh:mm)” by
pressing the menu knob for more than two seconds.
Enter your own position name – Enter a position name with the aid of the register. The
standard name is deleted when entering the first characters.
– Confirm the entry by pressing the menu knob for more than two seconds.
Select the flagged destination as the destination
– Call up the destination entry menu, mark and confirm the menu field “Enter destination” in the navigation basic menu.
Fig. 26 Store flagged destination
A18
A18
Fig. 27 Destination entry
20.book Page 35 Tuesday, December 6, 2005 2:26 PM
Navigation36
– Mark and confirm in the destination entry menu the menu field “To flagged destination”⇒ page 35, fig. 27. The navigation basic menu is called up. In the destination field there is the name “Flagged destination (hh:mm)”.
– The guidance can begin ⇒ page 39.
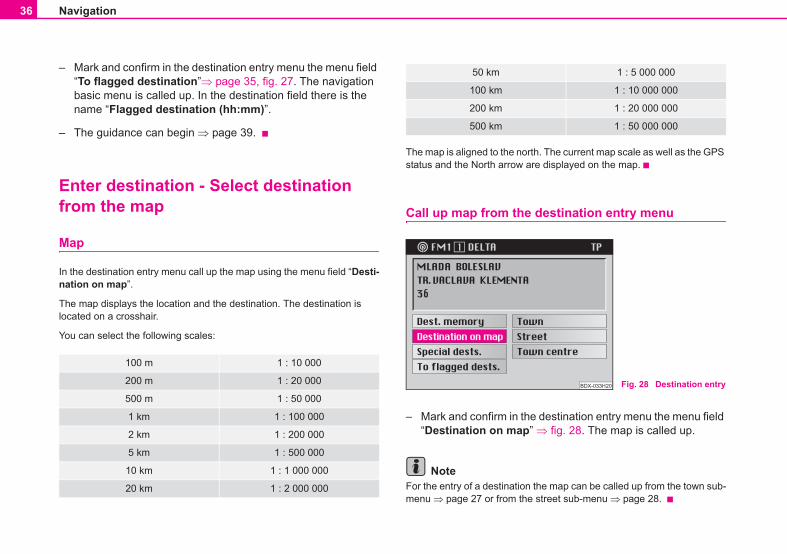
Enter destination - Select destination from the map
Map
In the destination entry menu call up the map using the menu field “Desti-nation on map”.
The map displays the location and the destination. The destination is located on a crosshair.
You can select the following scales:
The map is aligned to the north. The current map scale as well as the GPS status and the North arrow are displayed on the map.
Call up map from the destination entry menu
– Mark and confirm in the destination entry menu the menu field “Destination on map” ⇒ fig. 28. The map is called up.
NoteFor the entry of a destination the map can be called up from the town sub-menu ⇒ page 27 or from the street sub-menu ⇒ page 28.
100 m 1 : 10 000
200 m 1 : 20 000
500 m 1 : 50 000
1 km 1 : 100 000
2 km 1 : 200 000
5 km 1 : 500 000
10 km 1 : 1 000 000
20 km 1 : 2 000 000
50 km 1 : 5 000 000
100 km 1 : 10 000 000
200 km 1 : 20 000 000
500 km 1 : 50 000 000
Fig. 28 Destination entry
20.book Page 36 Tuesday, December 6, 2005 2:26 PM

Navigation 37
Select functions
The map is shown with a crosshair and a selection window. The selection window shows that the current scale is not yet suitable for the destination entry. Simultaneously it shows the map detail which you can zoom into.
Change zoom scale (reduce/enlarge)– Mark one of the segments in the menu field “Zoom”, in order
to call up the map with the desired zoom scale.
Move crosshair– Confirm the menu field “Move”.
– Move the crosshair and thus the selected map detail by turning the menu knob .
– Briefly press the menu knob , in order to switch back and forth between vertical and horizontal movement. At the same time the highlighted line in the crosshair indicates the respec-tively active movement direction.
– To end the movement function press the menu knob .
Confirm destination– Confirm the destination on the smallest zoom scale 1 : 10 000
(in the display 100 m) by marking and confirming the menu field “OK” with the menu knob . If another scale is set, then there is a maximum of three zoom steps in order to change to the smallest scale.
– Press the menu knob as often as it is necessary. After the destination confirmation, the navigation basic menu is called up and the name “Map destination (hh:mm)” appears in the destination field.
– The guidance can begin ⇒ page 39.
Note• If the smallest selectable scale 1 : 10 000 (in the display 100 m) is set, then the map is shown without a selection window. • If a crosshair can be assigned to a town, a street or a symbol, then the corresponding information is indicated in the menu bar.• Symbols for Škoda Service Partner are shown on the map.• If town and street names are available, the destination with this infor-mation is stored in the alphabetical destination memory.A18
A18
A18
A18
A18
20.book Page 37 Tuesday, December 6, 2005 2:26 PM

Navigation38
Route options
Plan route guidance and calculate route list
In the navigation basic menu the route guidance can be planned and/or a route list can be calculated via the menu field “Route option”.
– Mark and confirm the menu field “Route option” in the navi-gation basic menu. The menu for the route option is called up.
– Select another setting in which first of all the desired menu field is marked and confirmed. The respective current setting is shown by a highlighted triangular with highlighted lettering ⇒ fig. 29.
– Select if the received traffic reports should be taken into account for the route calculation and the guidance ⇒ fig. 30.
– Mark and confirm the menu field “Route list”.
The message “The route list is calculated. Please wait” is indicated. The calculation process can last several seconds depending on the length of the route. Afterwards the route list is made.
The list of the respective stretches of the journey is shown permanently on the screen. The respective stretches of the journey are shown with the corresponding length indication. The route list is updated if there is a change in the route. In the list the stretches of the journey to be driven are shown upto the destination with the corresponding length indication.
If the dynamisation function was activated, the route option can be changed. A corresponding note appears in the display.
• Menu field “Route” - here you can select if the calculation of the route should be optimized according to the driving time or according to the distance driven• Menu fields “Motorways”, “Ferries” and “Toll roads” - here you can select if the route with the named traffic path should be calculated or if it should be avoided.• Menu field “Route option” - this menu field makes it possible to store the set route option as standard setting.
Fig. 29 Route options
Fig. 30 Menu field - Dynamisation
20.book Page 38 Tuesday, December 6, 2005 2:26 PM

Navigation 39
Scroll the route list:• to below - turn menu knob to the left • to above - turn menu knob to the right
To exit the route list:Button calls up again the menu “Route option”.
Note• The function “Dynamisation” is at your disposal if your navigation system is prepared for dynamic navigation. Please do not hesitate to contact your Škoda Service Partner should you have any further ques-tions regarding this matter.• If there is no logical route to the destination, then despite the function being deactivated there is a route calculation with the motorways, ferries or toll roads.• If the set route options are not stored, then they are only valid for the current guidance.• As soon as the unit is switched off for more than 30 minutes, the last stored settings are applicable.• Street names, which are not digitalized, have the street category designation (e.g. street category 1 - national highway).• If no route list can be calculated, then a corresponding message is indicated.
Start guidance
Begin guidance
After selecting a destination and determining the route options, the guid-ance can begin by confirming the menu field “Start guidance” in the navi-gation basic menu.
Afterwards either the map display or the symbol display is called up.
A18
A18
A9
Fig. 31 Begin guidance
20.book Page 39 Tuesday, December 6, 2005 2:26 PM

Navigation40
Route calculation
After the guidance was activated, the system begins to calculate the route. This procedure can take some seconds. During this period the display of the direction of travel in the direction of the destination indicates the infor-mation “Calc. route” and the voice response answers “The route is being calculated”. In addition the distance of the air traffic line to the destination is shown.
• If the vehicle is located on a digitalized street, the guidance is performed via acoustic and optical driving recommendations after ending the route calculation.• If the vehicle is not located on a digitalized street (e.g. car park, garage, multi-storey car park), the information “Off road” is shown on the left of the screen.• If you are located outside the ares stored on the navigation CD (e.g. abroad) the information “Off map” is shown on the left of the screen.• If the system cannot calculate a route for the selected destination, the information “No route” is shown on the left of the screen.
In this case follow the display of the direction of travel which points in the direction of the destination. You will obtain acoustic and optical driving recommendations as soon as you are driving on a digitalized street.
WARNINGFor the guidance these are only driving recommendations. The road traffic legislation (StVO) is always applicable, also if a driving recommendation does not comply with the StVO.
Note• The navigation system gives the driving recommendations as spoken driving instructions and through guiding symbols in the symbol display on the screen.• The recommendations are carried out in good time so that there is always enough time to prepare a turn process.
Symbol display
Fig. 32 Route calculation
Fig. 33 Symbol display
20.book Page 40 Tuesday, December 6, 2005 2:26 PM

Navigation 41
The symbol display ⇒ page 40, fig. 33 shows the number of GPS satellites to be received and the status of the tailback function, the estimated arrival time or the length of the trip and the distance to the destination, the display of the direction of travel, the distance markings to the intersection/junction with the distance information and the name of the currently driven road. Before a turn procedure, the display of the direction of travel points in the direction you are turning into. In addition the name of the street you are turning into is indicated.
Changing to map display – Press the menu knob .
Indicate complete destination address– Press the button in order to briefly indicate the
current vehicle position, the current destination, the arrival time or the length of the drive and the destination to the driving destination. The current driving recommendations are given simultaneously.
Aborting the guidance– Press the button to abort an active guidance. The navi-
gation basic menu is called up.
– Mark and confirm the menu field “Stop guidance”, in order to abort the guidance.
If you do not wish to abort the guidance, then mark and confirm the menu field “Back to guidance” and the active guidance is continued.
Carry out the settings in the map menu
Call up map menu
Call up the map menu in the map display by pressing the menu knob .
Change the scale of the map (zooming)– The desired map scale can be selected manually by turning
the menu knob . The selected scale is shown on the left of the screen.
– Confirm the selection by pressing the menu knob .
Supplementing the map content (“map content”)– This menu field calls up a sub-menu which can select other
symbols besides the symbols (filling stations, stations, car parks) automatically indicated by the system.
– Mark and confirm the menu fields “Filling station”, “Station” or “Car park” in the sub-menu. During the guidance the selected symbols are displayed for the correspondingly selected scale on the map.
– With the menu field “End” the sub-menu fades out:
Call up symbol display from the map display– Mark and confirm the menu field “Symbol”. The symbol
display appears. You can change back to map display by pressing the menu knob .
A18
INFO A3
A9
A18
A18
A18
A18
20.book Page 41 Tuesday, December 6, 2005 2:26 PM

Navigation42
Note• If the segment A has been marked and confirmed, the map is displayed in the auto zoom mode. This means that the map is shown auto-matically in the correct scale. The correct scale depends on the distance to the next decision point (e.g. turn point) and the driven road category (e.g. motorway). The scale changes depending on the distance to the next decision point ⇒ page 43.• The selected menu fields are marked with a tick.• Pressing the menu knob deletes the tick again.
Select menu field “Map detail”
Possibilities of the map setting
Alignment of the map:• in direction of travel• in direction of destination• automatic• to the north
Selection of map type:• Location map (shows the current vehicle position)• Overview map (shows the current vehicle position and the destination)• Destination map (shows the destination)
Move:• Moving mode for moving the map, in order to view the map details
Zoom setting (reduce/enlarge):• Call up the sub-menu auto zoom for setting the scale on auto zoom
Select menu field “Alignment”
– Confirm the menu field “Alignment”.
– Mark and confirm the desired alignment in the called up sub-menu. After this the map is shown; the marking of the vehicle position is placed in the middle of the map.
In Direction of travel - the map is shown in the direction of travel on all scales and can be altered according to the changes in the direction of travel.
In direction of destination - the map is aligned in the direction of the destination.
Automatic - the map is aligned depending on the selected scale:
• 1 : 10 000 - 1 : 200 000: in direction of travel (in the display 100 m - 2km)• 1 : 500 000 - 1 : 50 000 000: to the north (in the display 5 km - 500 km)
To the north - the map is aligned to the north.
NoteThe selection bar is on the last selected setting when calling up the sub-menu.
A18
20.book Page 42 Tuesday, December 6, 2005 2:26 PM

Navigation 43
Select menu field “Map type”
– Mark and confirm the menu field “Map type”.
– Mark and confirm the desired map type in the sub-menu called up below. Then the map is displayed.
Location map - Display of the map detail with the current vehicle position. Scale and alignment of the map are not changed.
Overview map - Display of the current vehicle position and the destina-tion.
Destination map - Display of the destination. Scale and alignment of the map are not changed.
Note• If the overview map is called up in the auto zoom mode, the scale is constantly adapted when approaching the destination. • The selection bar is on the last selected setting when calling up the sub-menu.
Select menu field “Move”
This function is intended for viewing the neighbouring map detail.
– Mark and confirm the menu field “Move”. Then the map with the crosshair is displayed.
If the crosshair is moved to the edge of the screen by turning the menu knob , a neighbouring map detail is called up (see move crosshair ⇒ page 37).
Select menu field“Zoom setting”
– Mark and confirm the menu field “Zoom setting” ⇒ fig. 34.
– Press the menu knob in order to switch over between a precise or a less precise detail stage.
The active function is highlighted and marked with a triangular.
A18
Fig. 34 Zoom setting
Fig. 35 Auto zoom
A18
20.book Page 43 Tuesday, December 6, 2005 2:26 PM

Navigation44
The distance information (after the road category) gives the scale in which the map was shown during auto zoom.
NoteThe distance information for the individual road categories is fixed and cannot be changed.
Info mode
Select menu field “Info mode”– Mark and confirm the menu field “Info mode” in the navigation
basic menu ⇒ fig. 36.
– Then the symbol display is shown ⇒ fig. 37. In order to change in the map display, press the menu knob .
In the symbol display the direction arrow points to the north. Below the arrow is indicated the name of the street on which the vehicle is located.
In the map display the current location map is shown in the selected scale. The same settings apply as for the map display during a guidance.
Fig. 36 Info mode
Fig. 37 Symbol display
A18
20.book Page 44 Tuesday, December 6, 2005 2:26 PM

Navigation 45
Destination memory
Overview
The destination menu calls up directly from the navigation basic menu via the menu field “Destination memory”. The destination memories are the alphabetical destination memory and the Top 10 memory.
The alphabetical destination memory contains all destination memory entries. They are alphabetically classified. Here the destinations can be stored; edited and selected for the destination entry.
A special memory is the Top 10 memory. Here up to ten frequently used destination addresses can be stored, edited and selected for the destina-tion entry.
Select the following destination memory possibilites via the menu fields:
• Store destination in the alphabetical destination memory and in the Top 10 memory ⇒ page 33• Enter/change short name in the destination memory ⇒ page 45• Edit Top 10 memory ⇒ page 46, e. g.: Classify destinations, copy desti-nations• Store flagged destination• Delete destinations from the destination memory ⇒ page 48
Destination memory - Enter/change short name
You can assign a short name to the destination entries in the alphabetical destination memory and in the Top 10 memory. This helps you read a destination faster out of the respective destina-tion memory for the destination entry. Short names can be e.g. first names. These short names can also be changed later on. The short name is always in front of the final destination name. The entry of the short name is performed in the editing menu.
Call up the alphabetical destination memory– Mark and confirm the menu field “Change short name”
⇒ fig. 38. The alphabetical destination memory is called up.
Call up the Top 10 memory– Mark and confirm the menu field “Edit the Top 10 memory”.
A sub-menu is called up
Fig. 38 Change short name
20.book Page 45 Tuesday, December 6, 2005 2:26 PM

Navigation46
– Mark and confirm the menu field “Change short name” in the sub-menu.
Select list entry– Mark and confirm the desired entry in the respective destina-
tion memory list. The editing menu is called up.
– Enter the desired short name into the editing menu. An already existing short name is deleted when entering the first characters.
– Confirm the short name by pressing the menu knob for more than two seconds; a triangular appears - the new short name was stored.
After confirmation of the short name appears either the destination memory menu or the menu “Edit Top 10”.
From here you can return to the navigation basic menu by pressing the menu field “End”.
NoteYou will find further information concerning the entering and correction of a short name in the editing field under ⇒ page 26.
Edit the Top 10 memory
– Mark and confirm in the destination memory menu the menu field “Edit Top 10” ⇒ fig. 39.
In the destination memory menu you can call up the following functions with the menu field “Edit Top 10”:
• Sort Top 10 destination entries ⇒ page 47• Change short name ⇒ page 45• Destination memory ⇒ page 34• Delete Top 10
A18
Fig. 39 Edit Top 10
20.book Page 46 Tuesday, December 6, 2005 2:26 PM

Navigation 47
Sort Top 10 destination entries
The menu field “Sort Top 10” ⇒ fig. 40is marked with the selec-tion bar.
– Confirm the menu field “Sort Top 10”. The List Top 10 is called up.
– Mark and confirm an entry to be moved with the menu knob . A white triangular is shown. The other entries are only
shown in grey.
– Move the marked entry to the desired space with menu knob . You will reach above/below by turning the menu knob to
the right/left. The other entry changes the position in the Top 10 memory with the entry to be sorted.
– Confirm the change by pressing the menu knob until a white triangular appears in front of the entry. The other entries are now shown again in black.
– The menu “Edit Top 10” is called up again by pressing the button .
NoteThe white triangular below the last entry on the first page of the Top 10 list refers to the following page.
Copy destination from the destination memory in the Top 10 memory
– Mark and confirm in the menu “Edit Top 10” the menu field“Dest. memory”. The alphabetical destination memory is called up.
– Mark and confirm the desired destination in the alphabetical destination memory. The Top 10 memory is called up.
– Move the marked destination to the desired memory space by turning the menu knob .
– Confirm the operating step.
– Confirm the menu field “Overwrite menu” in the sub-menu, if you no longer need the existing destination. The menu “Edit Top 10” is called up again.
Fig. 40 Sort Top 10 desti-nation entries
A18
A18
A18
A9
A18
20.book Page 47 Tuesday, December 6, 2005 2:26 PM

Navigation48
Delete a destination from the destination memory
You can remove the destinations which are no longer needed from the alphabetical destination memory and the Top 10 memory. First of all call up the respective memory from the desti-nation memory menu. Then the entry to be deleted is selected in the memory. In order to prevent a destination being deleted inad-vertently, a confimation is asked for.
– Mark and confirm the menu field “Delete destinations”.
– Mark and confirm in the destination memory menu the menu field “Edit Top 10”. A sub-menu is called up
– Mark and confirm the menu field “Delete Top 10” in the sub-menu. The Top 10 memory is called up.
– Mark and confirm the entry to be deleted in the respective destination memory list.
– Confirm the menu field “Delete destination”, in order to delete the entry from the alphabetical destination memory. The destination memory list is called up again. If required other destinations can be deleted. Menu field “Abort” - aborts the deletion process and calls up again the destination memory list.
– Confirm the menu field “Delete from Top 10”. The destination is deleted from the Top 10 memory and the menu “Edit Top 10” is called up. Menu field “ Delete all” - also deletes the destination from the alphabetical destination memory.
NoteIf the destination to be deleted is also entered in the TOP 10 memory, the message “N.B. Top 10 destination” appears in the menu bar. When confirming the menu field “Del. Destination” the destination is also removed from the Top 10 memory.
Automatic tailback function (for units with dynamic navigation)
Important information
The unit is prepared technically for dynamic navigation. For the availability of this function, the following requirements apply:
• Navigation CD must assist the dynamic navigation• at least one TMC station must be receiveable
Please do not hesitate to contact your Škoda Service Partner should you have any further questions regarding this matter.
What is dynamic navigation?
The dynamic navigation enables an automatic adaptation of the calcu-lated route on the basis of the receiveable traffic reports.
The traffic reports are not audibly emitted by different broadcasting stations in addition to the radio program via a TMC (Traffic Message Channel).
The navigation system receives this data via a separate TMC box and evaluates it. If a traffic report is received, which is of great importance for the calculated route, the route is automatically recalculated.
20.book Page 48 Tuesday, December 6, 2005 2:26 PM

Navigation 49
The traffic reports are shown in the map display by means of symbols:
• slow-moving traffic • traffic jam • closed road
The corresponding stretch of the journey is shown in the map display by a dotted line.
So that you can use the dynamic navigation, a radio station must be able to receive the traffic reports emitted via TMC. The TMC box selects auto-matically a TMC station; you can also manually select another station.
NoteThe proper functioning of the automatic route influence depends on the transmitted traffic reports. The radio stations broadcasting the traffic reports are responsible for its content.
Select TMC station
– Press the button tailback function . The tailback menu appears.
– Mark and confirm the menu field “RDS station” ⇒ fig. 41. A list with the available TMC stations appears.
– Mark and confirm the desired station ⇒ fig. 42.
An aerial symbol in the symbol and map display indicates that a TMC Station can be received.
NoteThe audible station is not changed as a result of this. If the selected station cannot be received, automatically the next TMC to be received is set.
Fig. 41 Select TMC station
Fig. 42 TMC station
A16
20.book Page 49 Tuesday, December 6, 2005 2:26 PM
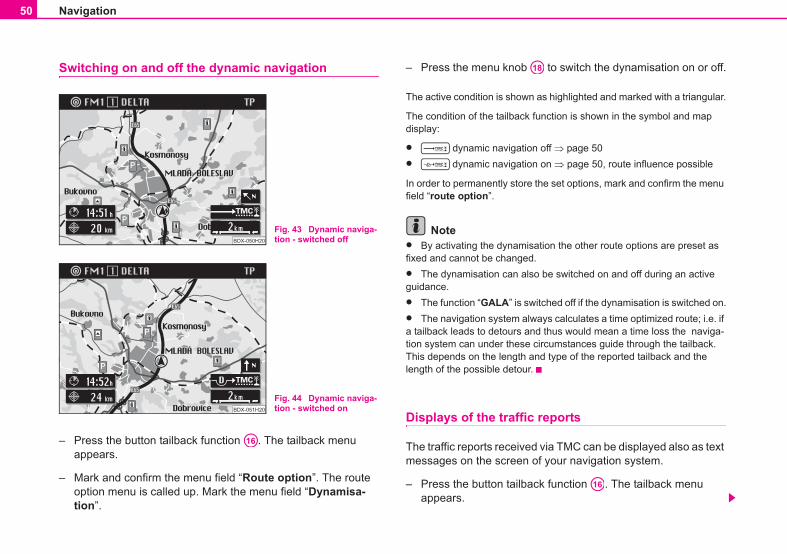
Navigation50
Switching on and off the dynamic navigation
– Press the button tailback function . The tailback menu appears.
– Mark and confirm the menu field “Route option”. The route option menu is called up. Mark the menu field “Dynamisa-tion”.
– Press the menu knob to switch the dynamisation on or off.
The active condition is shown as highlighted and marked with a triangular.
The condition of the tailback function is shown in the symbol and map display:
• dynamic navigation off ⇒ page 50• dynamic navigation on ⇒ page 50, route influence possible
In order to permanently store the set options, mark and confirm the menu field “route option”.
Note• By activating the dynamisation the other route options are preset as fixed and cannot be changed.• The dynamisation can also be switched on and off during an active guidance.• The function “GALA” is switched off if the dynamisation is switched on.• The navigation system always calculates a time optimized route; i.e. if a tailback leads to detours and thus would mean a time loss the naviga-tion system can under these circumstances guide through the tailback. This depends on the length and type of the reported tailback and the length of the possible detour.
Displays of the traffic reports
The traffic reports received via TMC can be displayed also as text messages on the screen of your navigation system.
– Press the button tailback function . The tailback menu appears.
Fig. 43 Dynamic naviga-tion - switched off
Fig. 44 Dynamic naviga-tion - switched on
A16
A18
A16
20.book Page 50 Tuesday, December 6, 2005 2:26 PM

Navigation 51
– Mark and confirm the menu field “Text messages”.
– The first traffic report is indicated. Other reports can be retrieved by pressing the menu knob .
The number of received messages is shown in the top bar, e.g. “Traffic info 5/12” means that five of a total of twelve traffic reports are displayed.
NoteThe number of received traffic reports is shown in the tailback symbol through points:• All points are activated if there are more than six reports.
Manual tailback function (for units with dynamic navigation)
Description
With the manual tailback function you can block in addition to the dynamic navigation a stretch of the momentary route ahead. The navigation system calculates an alternative route to the destination, in order to bypass as far as possible the blocked stretch of the road. The guidance continues with the new route.
The condition of the tailback function is displayed in the symbol and map display:
• No blockage• Manually blocked stretch of the road
In addition the blocked stretch of the road is shown as dotted in the map display.
Call up tailback function
– Press the button tailback function if the guidance is active. The tailback menu appears. If there is still no route, the menu field “Tailback ahead” is not active.
– The previous menu reappears when pressing the button or automatically after the expiration of a waiting time.
Select alternative route
– Mark and confirm the menu field “Diversion”. Depending on the surroundings the system suggests a stretch of the road to be bypassed.
– Turn the menu knob , in order to add or remove other stretches of road.
– If you have set the desired length, press the menu knob . The menu field “Activate excl.” is automatically marked.
– Press again the menu knob .
The alternative route is calculated and the guidance continues.
A18
A16
A9
A18
A18
A18
20.book Page 51 Tuesday, December 6, 2005 2:26 PM

Navigation52
Exclude alternative route
– Press the button tailback function . The tailback menu appears.
– Mark and confirm the menu field “Delete bypass”.
The bypass is excluded and the route is newly calculated.
Note• Entered bypass remarks remain stored until the end of the drive or until deletion.• In case of repetitive use of the tailback function, the old bypass is deleted and the new bypass relates to the stored block of the mometary route.
Travel guide
Description
You can call up first of all the travel information for the other destinations with a digital travel guide and then select as destination. The travel infor-mation is stored under columns.
Columns are e.g.:
• Overnight• Eating and drinking• Tourist info
Travel information can be price information, equipment and telephone/fax numbers for hotel arrivals.
If your navigation CD contains several travel guides, a sub-menu is called up via the menu field “Travel guide”, in which the desired travel guide can be selected.
If only one travel guide exists on the CD, the name of the travel guide (e.g. MERIAN scout) is displayed in the menu field.
NoteIf your CD contains no travel guide, the menu field “Travel guide” is not displayed.
Carry out the settings
Overview
A16
Fig. 45 Carry out the settings
20.book Page 52 Tuesday, December 6, 2005 2:26 PM

Navigation 53
In the navigation basic menu you can select various basic settings for the navigation system via the menu field “Settings” ⇒ page 52, fig. 45.
Select between the following possibilties:
Select language- for the voice response:
• Czech• German• English (Imperial; distances are in miles and yards; speed is given in miles per hour)• English (Metrical; distances are in kilometres and meters; speed is given in kilometres per hour)• Spanish• French• Italian
Manual location• You can manually enter the vehicle position with this function. This is only necessary if the system cannot be positioned automatically, e.g. when transporting the vehicle on a ferry or in a car sleeper rail. Perform the entry via the menu sequence: Town - Street - Intersection.
Volume setup• in this menu the volume for the voice response can be set during the guidance.
Show• here you can select if the arrival time or the length of the trip to the destination should be displayed in the map or symbol display.
Contrast• You can set different contrast values for the day and night display.
Setting clock• the clock is automatically set via the GPS. The GPS system transmits the universal time UTC This results in a time lag of two hours compared to the middle european summer time and of one hour compared to the winter time, which must be manually rectified. This is e.g. important for a precise information about the arrival time at the destination.
Illumination• You can select if the illumination of the screen should be performed manually via the button or automatically when switching on the car lights.
GPS viewer• GPS (Global Positioning System, i.e. Global Positioning System) is a navigation system of the Pentagon. It consists of 25 satellites, which circle around the earth at an altitude of 21 000 km. Signals from at least three satellites are received so that the system can determine the current vehicle position.
The called up information screen gives information about:
• Number of available satellites• Number of receiveable satellites• current geographic vehicle position
NoteIf less than three satellites are received, then appears the note “The geographic position cannot be determined at this moment in time”.
A8
20.book Page 53 Tuesday, December 6, 2005 2:26 PM

Navigation54
Anti-theft coding
Description
Each time when:
• the unit is disconnected from the power supply of the vehicle• the battery is disconnected• the electrical fuse for the radio was blown
The information “SAFE” appears in the display after switching on the unit. Then the unit can only be operated again by entering the correct code.
Caution• This code number is affixed together with the serial number behind the instructions on the “Unit map”.• The “unit map” must absolutely be disconnected and safe - never store in the vehicle.
Enter code - Cancel electronic lock
The electronical lock is cancelled by entering the correct code. The order of the operating steps must be maintained:
– Switch on the system. After the start screen with the Škoda logo appears the menu for entering the code with the informa-tion “Please enter your numerical code.” ⇒ fig. 46.
– Enter the numerical code by marking the corresponding digits in the digit register one after the other using the menu knob and confim each digit by pressing the menu knob . The digits are entered into four lower numerical fields.
– Mark and confirm the field “OK” with the menu knob .
The unit is again ready for operation!
Fig. 46 Enter safety code
A18A18
A18
20.book Page 54 Tuesday, December 6, 2005 2:26 PM

Navigation 55
Note• You can also confirm the code by pressing the menu knob more than two seconds.
Entry of an incorrect code number
After confirmation of the incorrect code number, the logo “SAFE” flashes in the numerical fields and then indicates also the entered code. The message “1st code entered is wrong!” is below the numerical fields.
Now the entire process can be repeated once again.
If once again an incorrect code number has been entered, the logo “SAFE” is displayed in the numerical fields. The message “Unit locked!” is below the numerical fields. The unit is locked for approx. one hour, i.e. it cannot be operated. After the elapse of one hour - the unit must remain on and the key put into the ignition lock - the display lights up and the elec-tronic lock can be cancelled as described beforehand.
The cycle - two attempts, blocked for an hour - furthermore applies.
NoteIf the unit map gets lost with the code number, please contact your Škoda Service Partner.
A18
20.book Page 55 Tuesday, December 6, 2005 2:26 PM

TV Tuner *56
TV Tuner *
Introduction
If the vehicle is stationary you have the possibility with the TV Tuner to receive television programs. The TV picture appears on the screen of the navigation unit. The sound reproduction is performed via the vehicle loudspeakers.
TV mode
– Press the button . The menu for select source appears ⇒ fig. 47.
– If you are in the navigation mode, the button must be pressed twice.
– Select and confirm the menu field “TV/VIDEO”.
The last selected TV station appears on the screen and the logo “AUX” appears in the display of the combi instrument.
Note• When driving, the TV picture turns dark, the TV sound can still be heard. • The message “For your own personal safety the TV picture will not be shown” is indicated.• If the quality of the TV signal is not sufficient (e.g. in valleys, by atmos-pheric influences etc...) this can lead to a poor TV reception.• If you wish to switch off the TV mode, press the button and select the desired audio source.• If you wish to indicate the program info (e.g. channel etc...) press the button .
Station finding
You have two possibilities to set a channel.
1st possibility:– Press the button for station finding right (or left) - it sets
the next (or the previous) channel.
Fig. 47 Select source - TV mode
AUDIO A15
AUDIO A15
AUDIO
A9
A2
20.book Page 56 Tuesday, December 6, 2005 2:26 PM

TV Tuner * 57
2nd possibility:– Turn the menu knob to the right (or left), in order to set the
next (or the previous) channel.
For information the station and the belonging channel is indicated.
Store station
The six TV stations can be stored on the station buttons - .
– Set the desired station with the button or the menu knob .
– If the desired station has to be displayed, the desired station button - must be pressed until there is a brief muting and a signal tone cancels the storing.
You only have to touch the corresponding station button to call up the stored station. The TV station belonging to it appears as long as it is in its reception range.
Call up operator menu
TV operator menu:• SCREEN - calls up a sub-menu, in which the brightness, contrast and colour can be set.• TELETEXT - here the video text pages can be called up.• VIDEOSOURCE - switches from TV mode to video and vice versa.
• SETTINGS - calls up a sub-menu, in which the TV standard (video) is selected.
Set screen
– Confirm the menu point “SCREEN” in the operator menu by pressing the menu knob . Following settings are possible: Brightness, contrast, colour.
– To change to the setting mode press again the menu knob . Instead of the previous symbol appears an arrow , the entry is highlighted in colour.
– Select the desired value.
– Press the button , in order to take over the setting and to exit the menu.
Select Autosearch
If the Autosearch function is activated, the TV tuner always tries to establish the best frequency of the selected TV station.
– Press the menu knob . The operator menu is indicated in the TV picture.
– Select and confirm the menu point “SETTINGS”.
– Select the menu point “AutoSearch” and press the menu knob . The AutoSearch function is switched on (or switched off).
A18
1 6A12
A2A18
1 6
A18
A18
A9
A18
A18
20.book Page 57 Tuesday, December 6, 2005 2:26 PM

TV Tuner *58
– Press the button , in order to take over the new setting.
Select TV standard
– Press the menu knob . The operator menu is indicated in the TV picture.
– Select and confirm the menu point “SETTINGS”. The current standard is displayed in the highlighted lettering.
– Select and confirm the menu point “Standard”. Now carry out the settings.
– Turn the menu button , in order to set the desired TV standard.
– Press the button , in order to take over the new setting.
NoteAn incorrect setting of the TV standard can lead to a distortion of the TV picture.
Call up video text
– Press the menu knob in the TV mode. The menu SELECT appears.
– Select and confirm the menu point “VIDEOTEXT” in the oper-ator menu. If the current station transmits video text data, the panel 100 appears in the full picture mode.
– Press the button , in order to exit the video text mode.
Note• The display of the video text panel can be changed with the button for automatic station finding .• The text panel is shown in the following order - full picture - upper half picture - lower half picture - full picture by repetitively pressing the button.
Call up video text panel
– Turn the menu knob to the left or right, in order to reach the desired video text panel in stages.
– The panel number can be changed by turning the menu knob .
– Press the menu knob in order to confirm the selection, the marking changes to the next digit. Continue with the entry as described. If the last digit was confirmed, the panel is being searched and displayed.
NoteIf you wish to call up a specific board, press the menu knob in order to change to the entry mode. An entry bar appears, the first digit of the three-digit number is 1.
A9
A18
A18
A9
A18
A9
A18
A18
A18
A18
20.book Page 58 Tuesday, December 6, 2005 2:26 PM

Index 59
Index
AAnti-theft coding . . . . . . . . . . . . . . . . . . . . . . 54Audio . . . . . . . . . . . . . . . . . . . . . . . . . . . . . . . . 8
Function . . . . . . . . . . . . . . . . . . . . . . . . . . 13Settings . . . . . . . . . . . . . . . . . . . . . . . . . . 13
Auto zoom . . . . . . . . . . . . . . . . . . . . . . . . . . . 43AUX Source . . . . . . . . . . . . . . . . . . . . . . . . . . 14
BButtons . . . . . . . . . . . . . . . . . . . . . . . . . . . . . . 5
CCare
CD . . . . . . . . . . . . . . . . . . . . . . . . . . . . . . 23CD . . . . . . . . . . . . . . . . . . . . . . . . . . . . . . 14, 21
Care . . . . . . . . . . . . . . . . . . . . . . . . . . . . . 23End . . . . . . . . . . . . . . . . . . . . . . . . . . . . . . 22Functions . . . . . . . . . . . . . . . . . . . . . . . . . 22MIX . . . . . . . . . . . . . . . . . . . . . . . . . . . . . . 22Navigation . . . . . . . . . . . . . . . . . . . . . . . . . 9Play function . . . . . . . . . . . . . . . . . . . . . . 22Playing track in random sequence . . . . . . 22select . . . . . . . . . . . . . . . . . . . . . . . . . . . . 22Select track . . . . . . . . . . . . . . . . . . . . . . . 22switch over . . . . . . . . . . . . . . . . . . . . . . . . 21
Code . . . . . . . . . . . . . . . . . . . . . . . . . . . . . 9, 54incorrect . . . . . . . . . . . . . . . . . . . . . . . . . . 55
Copy destination . . . . . . . . . . . . . . . . . . . . . . 47
DDelete
Delete . . . . . . . . . . . . . . . . . . . . . . . . . . . . 48Destination
Address surroundings . . . . . . . . . . . . . . . 31delete . . . . . . . . . . . . . . . . . . . . . . . . . . . . 48Enter destination . . . . . . . . . . . . . . . . . . . 25from the map . . . . . . . . . . . . . . . . . . . . . . 36Intersection . . . . . . . . . . . . . . . . . . . . . . . . 28Memory . . . . . . . . . . . . . . . . . . . . . . . 33, 45on map . . . . . . . . . . . . . . . . . . . . . . . . . . . 25Read out . . . . . . . . . . . . . . . . . . . . . . . . . . 34Special - . . . . . . . . . . . . . . . . . . . . . . . . . . 30Supraregional . . . . . . . . . . . . . . . . . . . . . . 31Town . . . . . . . . . . . . . . . . . . . . . . . . . . . . 27Town centre . . . . . . . . . . . . . . . . . . . . . . . 29Vehicle position . . . . . . . . . . . . . . . . . . . . 32with flag . . . . . . . . . . . . . . . . . . . . . . . 34, 35
Dynamic navigation . . . . . . . . . . . . . . . . . . . . 50
EEditing menu . . . . . . . . . . . . . . . . . . . . . . . . . 26Explanations . . . . . . . . . . . . . . . . . . . . . . . . . . 4
FFlagged destination . . . . . . . . . . . . . . . . . . . . 35Functions of the map . . . . . . . . . . . . . . . . . . . 37
GGuidance . . . . . . . . . . . . . . . . . . . . . . . . . . . . 39Guide . . . . . . . . . . . . . . . . . . . . . . . . . . . . . . . 52
IInfo mode . . . . . . . . . . . . . . . . . . . . . . . . . . . . 44Intersection . . . . . . . . . . . . . . . . . . . . . . . 28, 29
LLanguage broadcasting . . . . . . . . . . . . . . . . . 14
MMap . . . . . . . . . . . . . . . . . . . . . . . . . . 11, 25, 36
Alignment . . . . . . . . . . . . . . . . . . . . . . . . . 42Detail . . . . . . . . . . . . . . . . . . . . . . . . . . . . 42Selection . . . . . . . . . . . . . . . . . . . . . . . . . . 36Settings . . . . . . . . . . . . . . . . . . . . . . . . 41, 42Typel . . . . . . . . . . . . . . . . . . . . . . . . . . . . . 43
Map alignment . . . . . . . . . . . . . . . . . . . . . . . . 42
20.book Page 59 Tuesday, December 6, 2005 2:26 PM

Index60
MemoryDestination . . . . . . . . . . . . . . . . . . . . . . . 45Destination- . . . . . . . . . . . . . . . . . . . . 33, 45Top 10 . . . . . . . . . . . . . . . . . . . . . . . . . . . 46Traffic information . . . . . . . . . . . . . . . . . . 20
Menufor editing . . . . . . . . . . . . . . . . . . . . . . . . 26
Moving -Operating . . . . . . . . . . . . . . . . . . . . . 9Music braodcasting . . . . . . . . . . . . . . . . . . . . 14
NNavigation . . . . . . . . . . . . . . . . . . . . . . . . . . . . 8
Basic menu . . . . . . . . . . . . . . . . . . . . . . . 24dynamic . . . . . . . . . . . . . . . . . . . . . . . . . . 50
Navigation CD . . . . . . . . . . . . . . . . . . . . . . . . . 9
RRadio station
Playing . . . . . . . . . . . . . . . . . . . . . . . . . . 18Retrieve . . . . . . . . . . . . . . . . . . . . . . . . . . 18
radio stations . . . . . . . . . . . . . . . . . . . . . . . . 17RDS . . . . . . . . . . . . . . . . . . . . . . . . . . . . . . . 18Read out
Destination . . . . . . . . . . . . . . . . . . . . . . . 34Regional programs . . . . . . . . . . . . . . . . . . . . 14Register ASF . . . . . . . . . . . . . . . . . . . . . . . . 26Replacement service . . . . . . . . . . . . . . . . . . . 8
Route . . . . . . . . . . . . . . . . . . . . . . . . . . . . . . 38Alternative . . . . . . . . . . . . . . . . . . . . . . . . 51calculate . . . . . . . . . . . . . . . . . . . . . . . . . 40
SScale . . . . . . . . . . . . . . . . . . . . . . . . . . . . 37, 43Select
Functions . . . . . . . . . . . . . . . . . . . . . . . . . 37Selection
Last destination . . . . . . . . . . . . . . . . . . . . 27Sound . . . . . . . . . . . . . . . . . . . . . . . . . . . 15, 16Station . . . . . . . . . . . . . . . . . . . . . . . . . . . . . . 14
find . . . . . . . . . . . . . . . . . . . . . . . . . . . . . . 56store . . . . . . . . . . . . . . . . . . . . . . . . . . . . . 57TMC . . . . . . . . . . . . . . . . . . . . . . . . . . . . . 49
Station findingautomatic . . . . . . . . . . . . . . . . . . . . . . . . . 17
station findingmanual . . . . . . . . . . . . . . . . . . . . . . . . . . . 17
StoreFlagged destination . . . . . . . . . . . . . . . . . 35
Storing . . . . . . . . . . . . . . . . . . . . . . . . . . . . . . 17Destination in the destination memory . . 33
Street . . . . . . . . . . . . . . . . . . . . . . . . . . . . . . 28Symbols . . . . . . . . . . . . . . . . . . . . . . . . . 12, 40System
with DSP . . . . . . . . . . . . . . . . . . . . . . . . . 16without DSP . . . . . . . . . . . . . . . . . . . . . . . 15
TTailback . . . . . . . . . . . . . . . . . . . . . . . . . . . . . 51Tailback funcion . . . . . . . . . . . . . . . . . . . . . . 48Television . . . . . . . . . . . . . . . . . . . . . . . . . . . 56
switch on . . . . . . . . . . . . . . . . . . . . . . . . . 56Tone
Source . . . . . . . . . . . . . . . . . . . . . . . . . . . 13Town . . . . . . . . . . . . . . . . . . . . . . . . . . . . . . . 27
Town centre . . . . . . . . . . . . . . . . . . . . . . . 29Town centre . . . . . . . . . . . . . . . . . . . . . . . . . . 29Traffic information . . . . . . . . . . . . . . . 20, 21, 50Traffic information memory . . . . . . . . . . . . . . 20Traffic radio information . . . . . . . . . . . . . . . . . 20Traffic report . . . . . . . . . . . . . . . . 20, 21, 48, 50Traffic report memory . . . . . . . . . . . . . . . . . . 14TV
Operation . . . . . . . . . . . . . . . . . . . . . . . . . 57Screen . . . . . . . . . . . . . . . . . . . . . . . . . . . 57Station finding . . . . . . . . . . . . . . . . . . . . . 56
TV standard . . . . . . . . . . . . . . . . . . . . . . . . . . 58TV Tuner . . . . . . . . . . . . . . . . . . . . . . . . . . . . 56
VVehicle position
current . . . . . . . . . . . . . . . . . . . . . . . . . . . 32Flagged destination . . . . . . . . . . . . . . . . . 34
Video . . . . . . . . . . . . . . . . . . . . . . . . . . . . . . . . 8Video text . . . . . . . . . . . . . . . . . . . . . . . . . . . 58Volume . . . . . . . . . . . . . . . . . . . . . . . 14, 15, 16
20.book Page 60 Tuesday, December 6, 2005 2:26 PM

Index 61
WWarranty . . . . . . . . . . . . . . . . . . . . . . . . . . . . . 8
ZZoom . . . . . . . . . . . . . . . . . . . . . . . . . . . . 37, 43
20.book Page 61 Tuesday, December 6, 2005 2:26 PM

Unit name
Radio navigation system DX
Please affi x serial no. and code no.
Code no.
Serial no.
Unit name
Information
The unit map must be discon-nected and safe - never store in the vehicle.If the unit map with the code num-ber may get lost, please contact your Škoda Service Partner or importer. There one will be glad to assist you without any cost.
DX-průkaz.indd 1DX-průkaz.indd 1 6.12.2005 14:21:156.12.2005 14:21:15

Information
The unit map must be disconnected and safe - never store in the vehicle.If the unit map with the code number may get lost, please contact your Škoda Service Partner or importer. There one will be glad to assist you without any cost.
DX-průkaz.indd 2DX-průkaz.indd 2 6.12.2005 14:21:266.12.2005 14:21:26

Škoda Auto is constantly working on the further development of all types and models. Please understand that, for this reason, changes
to the scope of supply in terms of shape, equipment and engineering may be introduced at any time. It is therefore not possible to derive
any claims from the information, illustrations and descriptions contained in this Owner ´s Manual .
Reprinting, reproduction, translation or any other use of this document, in whole or in parts, is not permitted without the written consent
of Škoda Auto.
Škoda Auto expressly reserves all rights in respect of copyright.
Subject to modifi cation.
Published by ŠKODA AUTO a.s.
© ŠKODA AUTO a.s. 2005
DX_22-06.indd 2DX_22-06.indd 2 12.4.2006 11:57:3212.4.2006 11:57:32

SIMPLY CLEVER
ŠkodaAutoRADIO NAVIGATION SYSTEM DX
www.skoda-auto.com Radionavigační systém DXŠkoda Auto anglicky 05.06
S00.5610.43.206Y0 012 151 F
DX_22-06.indd 1DX_22-06.indd 1 12.4.2006 11:56:3812.4.2006 11:56:38