a short introduction to transcribing with elanwlabov/l560/elan_introduction.pdf · 3.1.4 subtitle...
TRANSCRIPT

A Short Introductionto Transcribing with ELAN
Ingrid RosenfelderLinguistics Lab
University of Pennsylvania
January 2011

Contents
1 Source 2
2 Opening files for annotation 22.1 Starting a new transcription . . . . . . . . . . . . . . . . . . . . . 22.2 File organization . . . . . . . . . . . . . . . . . . . . . . . . . . . 22.3 Opening an existing transcription . . . . . . . . . . . . . . . . . . 32.4 Saving files . . . . . . . . . . . . . . . . . . . . . . . . . . . . . . 3
3 An overview of ELAN’s main functions 33.1 Viewers and controls . . . . . . . . . . . . . . . . . . . . . . . . . 4
3.1.1 Controls . . . . . . . . . . . . . . . . . . . . . . . . . . . . 63.1.2 Grid Viewer . . . . . . . . . . . . . . . . . . . . . . . . . . 63.1.3 Text Viewer . . . . . . . . . . . . . . . . . . . . . . . . . . 73.1.4 Subtitle Viewer . . . . . . . . . . . . . . . . . . . . . . . . 83.1.5 Control buttons . . . . . . . . . . . . . . . . . . . . . . . . 8
3.2 Annotation density viewer . . . . . . . . . . . . . . . . . . . . . . 93.3 Waveform window . . . . . . . . . . . . . . . . . . . . . . . . . . 93.4 Annotation tiers . . . . . . . . . . . . . . . . . . . . . . . . . . . 10
4 Tiers and annotations 114.1 General concepts . . . . . . . . . . . . . . . . . . . . . . . . . . . 114.2 Creating new tiers . . . . . . . . . . . . . . . . . . . . . . . . . . 114.3 Creating and modifying annotations . . . . . . . . . . . . . . . . 12
5 Transcription procedures 135.1 Key shortcuts . . . . . . . . . . . . . . . . . . . . . . . . . . . . . 13
5.1.1 Changing the default key bindings . . . . . . . . . . . . . 155.1.2 Suggested key bindings . . . . . . . . . . . . . . . . . . . 165.1.3 Changing the editing preferences . . . . . . . . . . . . . . 16
5.2 Transcription workflow . . . . . . . . . . . . . . . . . . . . . . . . 175.2.1 New annotations . . . . . . . . . . . . . . . . . . . . . . . 175.2.2 Editing Transcriptions . . . . . . . . . . . . . . . . . . . . 185.2.3 Editing annotation times . . . . . . . . . . . . . . . . . . 19
A Exporting transcriptions 20
B Coding the style tier 22
1
1 Source
ELAN is a computer program for annotating sound or video files developed atthe Max Planck Institute for Psycholinguistics in Nijmegen, The Netherlands.Its name is an abbreviation for EUDICO Linguistic Annotator (where EUDICOstands for European Distributed Corpora Project).
ELAN runs on all major operating systems (Windows, Mac OS, Linux) and isavailable in a number of different interface languages (to date, Catalan, Dutch,English, French, German, Japanese, Portuguese, Spanish and Swedish). Youcan download its latest version at
http://www.lat-mpi.eu/tools/elan/
Additionally, you can also find a detailed manual and various support options(mailing list, discussion forum) on this web site.
2 Opening files for annotation
2.1 Starting a new transcription
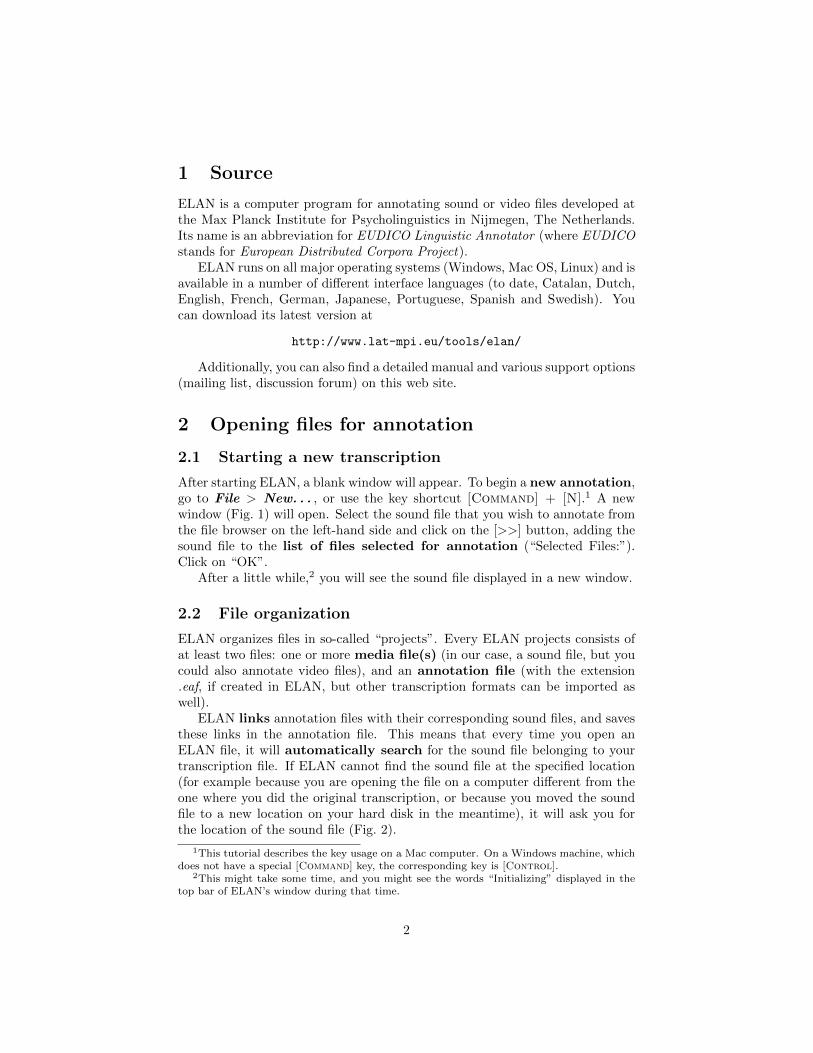
After starting ELAN, a blank window will appear. To begin a new annotation,go to File > New. . . , or use the key shortcut [Command] + [N].1 A newwindow (Fig. 1) will open. Select the sound file that you wish to annotate fromthe file browser on the left-hand side and click on the [>>] button, adding thesound file to the list of files selected for annotation (“Selected Files:”).Click on “OK”.
After a little while,2 you will see the sound file displayed in a new window.
2.2 File organization
ELAN organizes files in so-called “projects”. Every ELAN projects consists ofat least two files: one or more media file(s) (in our case, a sound file, but youcould also annotate video files), and an annotation file (with the extension.eaf, if created in ELAN, but other transcription formats can be imported aswell).
ELAN links annotation files with their corresponding sound files, and savesthese links in the annotation file. This means that every time you open anELAN file, it will automatically search for the sound file belonging to yourtranscription file. If ELAN cannot find the sound file at the specified location(for example because you are opening the file on a computer different from theone where you did the original transcription, or because you moved the soundfile to a new location on your hard disk in the meantime), it will ask you forthe location of the sound file (Fig. 2).
1This tutorial describes the key usage on a Mac computer. On a Windows machine, whichdoes not have a special [Command] key, the corresponding key is [Control].
2This might take some time, and you might see the words “Initializing” displayed in thetop bar of ELAN’s window during that time.
2

Figure 1: Selecting new media file(s) for annotation.
2.3 Opening an existing transcription
To open an existing annotation, select File > Open. . . , or use the keyshortcut [Command] + [O]. Specify the .eaf file that you wish to open. IfELAN can locate the corresponding sound file, it will be opened in a new win-dow, together with the transcription saved in the .eaf file. Otherwise, ELANwill prompt you for the location of the media file first.
2.4 Saving files
To save your work, go to File > Save. . . , or press [Command] + [S]. Youshould save the transcription file under the same name as the sound file, butwith the extension .eaf instead of .wav.
3 An overview of ELAN’s main functions
After opening a sound file for transcription, you will see it displayed in ELAN’smain window (Fig. 3), which contains:
• a menu bar with drop-down menus (at the very top of the window)
• various viewers and controls, which can be selected by clicking on thecorresponding tabs (in the upper half of window)
3

Figure 2: Locating a media file.
• controls for playing and selecting (parts of) the sound file, togetherwith the Annotation Density Viewer (in the middle, above the wave-form display)
• a display of the sound waveform (the Waveform Viewer, in the lowerhalf of the window)
• annotation tiers for different speakers (at the bottom of the window,below the sound waveform)
3.1 Viewers and controls
This section gives a short overview of the functions of the “Controls”, “Grid”,“Text” and “Subtitles” tabs in the upper half of ELAN’s main window. The“Audio Recognizer” and “Metadata” tabs are not explained, as they are notrelevant for our purposes here.
4

Figure 3: ELAN’s main window. In the upper half of the window, the TextViewer is displayed. The lower half of the window contains the control buttonsfor playing, selecting and navigating (parts of) the sound file, the AnnotationDensity Viewer, a display of the sound waveform, as well as three annotationtiers.
5

3.1.1 Controls
The tab “Controls” displays two sliders, which allow you to set playback vol-ume and playback rate (Fig. 4).
Figure 4: ELAN’s main window - volume and playback rate controls.
The default settings for both sliders are 100%. This can be a useful featurewhen trying to transcribe extremely rapid speech.
3.1.2 Grid Viewer
Clicking on the tab “Grid” opens the Grid Viewer, which displays a tabularlist of all annotation units on a selected tier, with time information for eachinterval (Fig. 5).
Figure 5: ELAN’s main window - Grid Viewer.
Annotations can be selected by clicking on them, and edited, by double-clicking on them. The currently selected annotation is highlighted in light bluewith a dark blue box around it and indicated by a red triangle in front of it.
The Grid Viewer is synchronized with the sound waveform display, so thatclicking on/selecting an annotation automatically displays the correspondingportion of the sound file in the Waveform Viewer in the bottom half of thewindow. Conversely, selecting a portion of the sound file in the WaveformViewer highlights the corresponding intervals in the Grid Viewer with a lightblue. The red triangle indicated the current cursor position, and the activeannotation unit (i.e. the annotation unit last selected on the active tier) issurrounded by a dark blue box.
6

3.1.3 Text Viewer
The Text Viewer, opened by selecting the “Text” tab in the upper half of thewindow, displays a running text of all transcriptions on a selected tier(Fig. 6).
Figure 6: ELAN’s main window - Text Viewer.
Boundaries between annotation units are indicated by dots, and individualannotation units can be selected by clicking on them. Double-clicking on anannotation units opens an editing window (Fig. 7) in which the transcriptioncan be modified.
Figure 7: Editing window for editing annotations.
As in the Grid Viewer, waveform and text display are synchronized, andthe selected portion of a sound file is highlighted in light blue, with a darkblue box surrounding the active annotation unit, and a red box surrounding theannotation unit spanning the current cursor position.
7

3.1.4 Subtitle Viewer
The “Subtitle” tab opens the Subtitle Viewer, which displays movie-like sub-titles for up to four selected tiers.
3.1.5 Control buttons
Various controls buttons in the middle of the window allow you to play or pausethe sound file, navigate through the recording, select parts of the sound file, andnavigate back and forth between annotations (Fig. 8).
Figure 8: ELAN’s main window - control buttons and Annotation Den-sity Viewer.
The first set of buttons governs playing or pausing the recording, and nav-igating through the sound file. From left to right, the functions of the buttonsare:
• Go to the beginning of the sound file.
• Go back one scroll view.
• Go back one second.
• Go back one frame.3
• Go back one pixel.
• Play or pause the recording.
• Go to the next pixel.
• Go to the next frame.
• Go ahead one second.
• Go to the next scroll view.
• Go to the end of the sound file.
The second set of buttons governs selections. From left to right:
• Play the selected interval.
• Clear selection.
3Frame length refers to the video standard for video files and is either 40 ms (PAL) or33.4 ms (NTSC). The frame length can be set via Options > Set Frame Length. For ourpurposes, it is just another interval intermediate in size between one full second and one pixel.
8

• Go to the left/right edge of the selection.
The third set of buttons allows you to navigate back and forth betweenannotation units on the annotation tiers. From left to right:
• Go to the previous annotation.
• Go to the next annotation.
• Go up one tier.
• Go down one tier.
Finally, there are two check boxes:
• If “Selection Mode” is checked, playing the sound file will also auto-matically select that portion.
• If “Loop Mode” is checked, the “Play selection” button will repeatplaying the selected part of the sound file.
3.2 Annotation density viewer
The Annotation Density Viewer is located below the control buttons (Fig. 8) andgives you a quick overview of how much of the sound file has been transcribedalready. Small dark grey rectangles in the lower half of the bar indicate regionsof the sound file that contain annotations units, so that you can see at one glancewhich parts of the recordings have already been transcribed.
The Annotation Density Viewer also offers an easy way of navigatingthrough the sound file, as the length of its bar always corresponds to thelength of the complete recording, independent of which zoom factor you areusing in the Waveform Viewer. A red cross hair indicates the current cursorposition, and selected regions of the sound file are shaded in grey. Dragging thecross hair allows you to navigate through the file easily.
3.3 Waveform window
In the lower half of ELAN’s main window, the Waveform Viewer (Fig. 9) displaysthe waveform of the recorded sound, i.e. amplitude/loudness (horizontal axis)over time (vertical axis). It also shows the current position of the cursor (red),time information, and which parts of sound file are selected (highlighted in lightblue).
You can zoom in and out of the speech signal (i.e. change the time scale onwhich the amplitude of the recorded sound is displayed) by holding down the[Control] button and using the scroll wheel on your mouse. You can alsodrag the sound waveform to your left or right by pressing the [Alt/Option]key, clicking on the time stamps directly above and below the waveform windowand moving the mouse in the desired direction.
9

Figure 9: ELAN’s main window - Waveform Viewer and annotationtiers.
3.4 Annotation tiers
Below the Waveform Viewer, annotation tiers containing the annotation infor-mation are displayed, typically one tier per speaker. Each tier contains individ-ual annotation units, which in turn contain the transcription text.
On the left hand side of the tier panel, the tier names are displayed, withthe currently selected/“active” tier name in red. Hovering the mouse over thetier names will display a window with more specific information on the tier inquestion, listing the name of the tier, participant, annotator etc.
Figure 10: Tier information.
10

4 Tiers and annotations
4.1 General concepts
Generally speaking, an annotation tier in ELAN contains transcription texttogether with time stamps. These time stamps can be used by the programto synchronize the display of the sound waveform and the annotation text.
Tiers in ELAN can be of many different types - for example, for a speakerrecorded in a foreign language, you could use one tier for the orthographictranscription of whole sentences, one tier for individual words, another tier forphonetic units, one tier that contains the translation, etc.
For our project, we will use one tier for each speaker present in the recordings,plus one tier for background noises.
4.2 Creating new tiers
To create a new tier, go to “Tier” > “Add new tier. . . ”. A new windowwill open up, with a list of tiers in its upper half, and various control tabs andfields in its lower half (Fig. 11). The “Add” tab will be highlighted.
In the “Add tier” window, enter the following information for the new tierthat you wish to create:
• “Tier name”:This should be the speaker’s initials, e.g. “VJ” for somebody called“Vanessa Johnson”. For the interviewer, use “IV”.4 For the noise tier, use“Noise”. For a possible style tier, use “S”.
• “Participant”:This is the speaker’s full name (if known), e.g. “Vanessa Johnson”. Forthe interviewer, enter “Interviewer”.5 For the noise tier, use “Noise”. Forthe style tier, use “Style”.
• “Transcriber”:Enter your own name.
Leave all other settings (“Parent Tier”, “Linguistic Type”, “Default Lan-guage”) on their default values and click on “Add”.
After you have added the tiers for all speakers, the interviewer, and thebackground noise tier,6 click on the “Delete” tab to delete the “default” tier.In the list of tiers, select the “default” tier, then click on the “Delete” buttonat the bottom of the window. Finally, click on “Close” to exit the window.
4If there are two interviewers present, use “IV 2” for the second interviewer. If a partici-pant’s first name is not known, use “Mr.” or “Mrs.”/“Ms.” (e.g. “MrC” for “Mr. Costa”).
5If there are two interviewers present, use “Interviewer 2” for the second interviewer. Inthis case, re-label “IV”, “Interviewer” as “IV 1”, “Interviewer 1”, so that each intervieweris identified by a number. If a participant’s first name is not known, transcribe the person’sname as “Mr.” or “Mrs.”/“Ms.” (e.g. “Mr. Costa”).
6If you do not know at the beginning of your transcription how many speakers are presentin the recording, just create one tier for the main speaker, the interviewer, and the noise tier- additional tiers can still be added later on.
11

Figure 11: Adding new tiers.
4.3 Creating and modifying annotations
To create a new annotation on a tier, first select that tier and make it the“active” tier by double-clicking on the tier name at the left hand side ofthe window, or use [Control] and the up and down arrow keys (see Section5.1.2).
Select the part of the sound file that you wish to annotate. Go to “Anno-tation” > “New annotation here”, or use the key shortcut recommendedin Section 5.1.1 ([Shift] + [Enter]). A small box, the “inline edit box”,will open up on the active tier, into which you can enter your transcription(Fig. 12).7 Hit [Enter]8 to save your changes and exit the inline edit box. You
7ELAN seems to have a bug in that it sometimes happens that you are typing text intothe inline edit box, but cannot see it while you are typing. However, once you have exited theinline edit box by hitting [Enter], you will be able to see the text that you have entered.
8By default, [Command] + [Enter], but see Section 5.1.1.
12

will now see the new annotation unit on the selected tier, with as much of theannotation text displayed as there is space for it.
Figure 12: Creating a new annotation - entering text into the inlineedit box.
To modify the text of an existing annotation unit, select the unit by clickingon it, or by navigating to it using the [Alt/Option] and arrow keys (seeSection 5.1.2). Go to “Annotation” > “Modify Annotation Value” (oruse [Shift] + [ / ] - see Section 5.1.2). An editing window (see Fig. 7) willopen, in which you can modify the text of your transcription.
To delete the text entered in an annotation unit, go to “Annotation”> “Remove Annotation Value” (or use [Shift] + [Delete] - see Section5.1.2).
To delete the entire annotation unit, go to “Annotation” > “DeleteAnnotation” (or use [Command] + [Delete] - see Section 5.1.2).
To modify the beginning and/or end times of an existing annotation unit,see Section 5.2.3.
5 Transcription procedures
5.1 Key shortcuts
It is generally useful to work with the keyboard as much as possible, as thisallows for much faster work than switching back and forth between the keyboardand the mouse. To this purpose, you can use key shortcuts for most of ELAN’scommands. These shortcuts are usually displayed on the right hand side of thecommand in the drop down menus, or you can view (and print) a list of themvia View > Shortcuts. . . (see Fig. 13).
13

Figure 13: Overview of key shortcuts.
14

5.1.1 Changing the default key bindings
ELAN comes with a plethora of key bindings, some of which are not too intu-itive. However, you can change any of the key bindings yourself to whichevercombinations you find most suitable for you:
Figure 14: Changing the key bindings.
Go to Edit > Preferences > Edit Shortcuts. . . . A new window willopen (see Fig. 14). Select “Category” from the drop down menu at the bottomof the window to order the different shortcuts according to function. Select ashortcut to edit by clicking on it, then click on “Edit Shortcut” (see Fig. 15).Enter the key combination you want to change the shortcut to in the newwindow, then hit “OK”. Once you’ve made all the changes you want to, hit“Save” in the shortcuts window.
Figure 15: Changing a key shortcut.
15

5.1.2 Suggested key bindings
The following key bindings are suggested to facilitate transcribing with ELAN:9
Annotation editingDelete annotation [Command] + [Delete]Modify active annotation value [Shift] + [ / ]Modify annotation time [Command] + [Enter]New annotation here [Shift] + [Enter]Remove annotation value [Shift] + [Delete]
Annotation navigationGo to next annotation [Alt/Option] + [→]Go to previous annotation [Alt/Option] + [←]Go annotation upward [Alt/Option] + [ ↑ ]Go annotation downward [Alt/Option] + [ ↓ ]
Media navigationPlay/pause the media [Shift] + [Space]Play selection [Control] + [Space]Go to next pixel [→]Go to previous pixel [←]Set time 1 second ahead [Control] + [→]Set time 1 second back [Control] + [←]
SelectionClear selection [Escape]Move cross hair to beginning/end of selection [Command] + [ / ]
Tier and typeSet previous tier active [Control] + [ ↑ ]Set next tier active [Control] + [ ↓ ]
(The key bindings in this section are recommended for use on a Macintoshmachine. If you are working under Windows, substitute [Control] for the[Command] key.)
5.1.3 Changing the editing preferences
It is also recommended that you change the editing preferences so that simplyhitting [Enter] saves any changes that you have made in the annotation box.(The default setting is that you need to hit both [Command] and [Enter].) Todo this, go to Preferences > Edit Preferences. . . . Click on the “Editing”tab and select “Enter key commits changes in the inline edit box” (see Fig. 16).
You can also place a check mark next to “Deselecting the inline text edit boxcommits the changes”, if you wish. Selecting this option means that wheneveryou you leave the inline edit box (e.g. clicking somewhere outside of it), whateveryou have typed into it will be saved. (By default, ELAN discards these changes.)
9Feel free to change the the key bindings to whatever your preferences are if you wouldprefer to work with other settings.
16

Figure 16: Changing the editing preferences.
5.2 Transcription workflow10
The following procedures are suggested for a smooth workflow in transcribingthe sound files:
5.2.1 New annotations
1. Turn on both Selection Mode (and Loop Mode, if you wish) by clickingon the respective check boxes above the waveform.
2. The cursor will be at the beginning of the file. Hit [Shift] + [Space] tobegin playback. As the cursor moves, it will span out a selection.
3. Allow the cursor to play up until just before the first breath group.Hit [Shift] + [Space] to pause playback.
4. Use the media navigation controls to move the cursor exactly where youwant to begin the new annotation. [Control] + [→] and [Control]+ [←] will move the cursor in 1 second increments. [→] and [←] will movethe cursor by 1 pixel.
5. Clear the current selection with [Escape]
10The following sections are based on Josef Fruehwald’s notes for LING 562.
17

6. Begin playback again with [Shift] + [Space]. The cursor should nowspan out a selection the size of the breath group.
7. Pause the playback just after the end of the breath group with [Shift]+ [Space].
8. (If necessary, use the media navigation controls again to move the cursorto the exact end point of the new annotation.)
9. Make the tier that you want the new annotation on the active tier byusing [Control] + [ ↑ ]/[ ↓ ].
10. If you have switched on Loop Mode, hit [Control] + [Space] to beginlooping playback of the breathgroup.
11. Hit [Shift] + [Enter] to create a new annotation on the active tier.
12. After transcribing the breathgroup, hit [Enter] to save the transcription.
13. (Hit [Control] + [Space] to stop looping playback of the current selec-tion.)
14. Hit [Shift] + [Space] to resume playback from current crosshair lo-cation.
15. Repeat steps (3) thru (14).
5.2.2 Editing Transcriptions
To edit the content of a transcription, follow these steps:
1. Turn on Selection Mode.
2. Navigate to the annotation of interest with [Alt/Option] + [→] and[Alt/Option] + [←] . This will move the current selection annotationforward and backwards.
3. Once you have selected the annotation you want to edit, if you wantlooping play-back while you edit, hit [Control] + [Space].
4. Hit [Shift] + [ / ]. An editing window will open.
5. After making the desired edits, hit [Enter] to save the changes and closethe editing window.
18

5.2.3 Editing annotation times
To change the timespan of annotation segments, proceed as follows:
1. Make sure Selection Mode is turned on.
2. Navigate to the annotation of interest with [Alt/Option] + [→] and[Alt/Option] + [←] .
3. Use [Command] + [ / ] to jump the cursor to the side of the selectionyou would like to change.
4. Use the media navigation commands to change the span of theselection ([Control] + [→] and [Control] + [←] to move by 1 second,[→] and [←] to move by 1 pixel).
5. After adjusting the selection as desired, hit [Command] + [Enter] tomake the annotation fit to the current selection.
19

A Exporting transcriptions
In order to feed your transcriptions into the forced alignment program, you willneed to export your transcriptions as a tab-delimited .txt file.
To do this in ELAN, go to File > Export As > Tab-delimited Text. . . .A new window will open up, prompting you to specify the tiers that you wantto export (Fig. 17).
Select the tiers of all transcribed speakers, including the tier for back-ground noises. You can change the order in which the tiers are written tofile by moving them up and down in the list using the two arrow buttons be-low. Begin with the main speaker(s) at the top of your list, then include theinterviewer tier, and finally, the noise tier.
Figure 17: Exporting transcriptions as tab-delimited .txt files.
In the lower half of the window, you can specify various output options.Here, you should check the following boxes (see Fig. 17):
• “Include time column for”:Check “Begin Time” and “End Time”, but uncheck “Duration”.
• “Include time format”:Check “ss.msec” but uncheck “hh:mm:ss.ms”.
20

Finally, click on “OK” and enter the name and location under which youwish to save the file. You should save the exported file under the same nameas that of the original sound file, but with a .txt extension instead of .wav.
Click on “Save” to save the export file.To double-check that your export file has the right format, you can open
it with any text-editing program, such as TextEdit. The data file now shouldcontain five columns (see Fig. 18):
1. speaker ID (such as AN, MJ, IV etc.)
2. speaker name
3. beginning of breath group interval (in sec)
4. end of breath group interval (in sec)
5. transcribed text
Figure 18: Format of exported tab-delimited .txt transcription file.Each row corresponds to one transcribed breath group. Columns consist ofspeaker ID, speaker name, beginning and end of breath group in seconds, andtranscription text.
21

B Coding the style tier
1. Create a new tier for the style coding (see section 4.2). Enter “S” as thetier name, “Style” for the participant.
2. Make the newly created style tier the active tier. (It should be highlightedin red.)
3. In the upper half of the ELAN window, select the Grid Viewer (seesection 3.1.2), and use it to display all annotation units for the mainspeaker (see Fig. 19).
4. Locate the first annotation unit of the style you are coding (Fig. 19).(In this example, the speaker is reading a word list.) In the Grid Viewer,click on the annotation unit.
Figure 19: Style coding, steps 3 and 4: Selecting the annotation unit thatmarks the beginning of a particular style.
5. Scroll down through the annotation units in the Grid Viewer until youreach the last annotation unit for the style in question.
6. Holding down the [Shift] key, click on the last annotation unit. Youshould now have a selection spanning all adjacent annotation units in thisparticular style (see Fig. 20).
7. Make a new annotation unit on the style tier, and enter the coding forthe style in question (Fig. 21).
8. Repeat as necessary.
22

Figure 20: Style coding, steps 5 and 6: Selecting the annotation unit corre-sponding to the end of the new style unit.
Figure 21: Style coding, step 7: Making a new annotation unit on the styletier.
23