a practical guide to correct application of polimer-modified bitumen ... · a practical guide to...
TRANSCRIPT

APPLICATION MANNUAL
A PRACTICAL GUIDE TO
CORRECT APPLICATION OF
POLIMER-MODIFIED
BITUMEN MEMBRANES
Introduction • Equipment • Transport • Loading/unloading • Storage and warehousing • Handlig on site • Conservation • Periods of use and climatic conditions for application • Smoothing • Water, ice • Concrete laying surface • Laying on ridged sheeting • Timber laying surface • laying on the top of old application •Laying on heat resistant panels • Laying on concrete surfaces for bridges and viaducts • Alignment of membrane sheets • Unrolling membrane sheets at low temperatures • Types of membrane surface • Flame bonding • Sealing of overlaps, what not to do • Partially (slot) flame bonding • Two or more layer covering • Flame bonding on vertical surfaces • Membrane fixing with metal runners • Membrane fixing by plaster • Fixing with flashing • Skylights • Drainage outlets • Vent outlets • Internal angles • External angles • Painting • Additional information
Waterproofing materials and bitumen shingles

2
TABLE OF CONTENTS Introduction 4
The 6 golden rules 5
1. Arrangements of the sheets
2. Side and head overlaps of the membranes
3. Fully-bonded application
4. 45 cut on the head overlap
5. Double layer systems
6. Head overlaps of membranes with mineral granules
Equipment 7 Transport 8 Loading-unloading 8 Storage and warehousing 8 Handling on site 9 Conservation 9 Period of use and climatic conditions for application 10 Smoothing 11 Water,ice 11 Concrete laying surface 11 Laying on redged sheeting 12 Timber laying surface 12 Laying on the top of old application 12
Laying on heat resistant panels 13 Laying on concrete surfaces for bridges and viaducts 13 Alingment of membrane sheets 14 Unrolling membrane sheets at low temperatures 14 Types of membrane surface 14 Flame bonding 15 Sealing of overlaps, what not to do 15 Partially (slot) flame bonding 16 Two or more layer covering 16 Flame bonding on vertical surfaces 16 Membrane fixing with metal runners 17 Membrane fixing by plaster 17 Fixing with flashing 17 Skylights 18 Drainage outlets 18 Vent outlets (air vents, chimneys) 18 Internal angles 19 External angles 20 Painting 21 Additional information 22
3

4
INTRODUCTION
WATERPROOFING MATERIALS PROPER APPLICATION IS THE-MOST IMPORTANT AND ESSENTIAL PART FOR GOOD ROOF PROTECTION. THAT GUIDE CONTAINS SOME INSTRUCTIONS FOR PROPER USAGE OF WATERPROOFING MATERIALS AND METHODS OF APPLICATION. THE EXAMPLES CONTAINED IN THIS GUIDE CAN ONLY BE INTERPRETED INTO GOOD PRACTICE, IF THE OPERATOR HAS ALREADY AQUIRED AND STUDIED THE CORRECT BASIC TECHNOLOGY FOR WATERPROOFING MEMBRANES APPLICATION. FOR THAT REASON THE BASIC PRINCIPLES FOR CORRECT APPLICATION AND USAGE HAVE BEEN SUMMARIZED IN THE 6 POINTS CALLED “GOLDEN RULES”

5
THE 6 GOLDEN RULES FOR CORRECT APPLICATION 1. Arrangement of the sheets
The sheets must be arranged
overlapping each other starting from
the water outlet or roof valleys (see
the picture – water outlet).
2. Side and head overlaps of the membranes
Side overlap – it creates longitudinal
overlap between two sheets. The
sheets must be carefully bonded until
a bead of compound wide about 1 cm
is squeezed out along the join
overlaps. Side overlap width must not
be less than 10 cm. Head overlap –
it creates a join between shorter
sides of the sheets. They also must
be treated very carefully. The
membrane shall be heated enough
until a bead of material 1 cm wide is
squeezed out. Head overlapped
sections wide should not be less than
15 cm. Where semi-bonded bitumen
sheets are laid, membranes must be
bonded completely on the head
overlap surface at least 1 m on the
both sides.
3. Fully-bonded application
Both the membrane and base
substrate must be heated with
emphasis on the membrane. The
membrane sheet already laid must
be also treated with a direct flame
on the overlapped surfaces. (see
the picture – heated area).

6
OF POLYMER- MODIFIED BITUMEN MEMBRANES
4. 45 cut on the head overlap
The corners of the top and lower
membrane head overlap must be cut
at 45°, 10 cm overlap must be
removed from the edge for better
contact with the laying surface.
5. Double layer systems
If second layer is required it must be
arranged across the overlaps of the
first layer and heat-bonded onto the
whole surface and overlaps.
6. Head overlaps of membranes with mineral granules
The bonding areas at side overlap
are free from mineral granules, but for
head overlap between top and lower
parts of membranes with mineral
granules the underlying membrane
needs to be heated in order to draw the
bitumen compound to the surface. This
is done by long time heating and will
give perfect bonding of the two edges.
The bitumen compound of the top
membrane sheet must be also heated.

7
EQUIPMENT
TORCH It is a tool for membrane application. The hose length depends on the type of work to be carried out. The torch is connected to propane-butane gas cylinder through 20 m rubber hose equipped with a pressure regulator.
Balloon with LPG. Use LPG only!
Connecting the hose with the reducing valve for preasure regulation
Knife

8
TRANSPORT
Rolls of waterproofing material are grouped on pallets
and covered with thick, shrink-wrap polyethylene film. In
spite of that long journeys on bumpy roads with frequent
road shocks and also sharp braking especially during the
summer months or loaded on a long trailer can cause the
rolls to tip over. To avoid such consequences a rope tied
between the rolls and across the sides of the trailer is
required. The ropes must be pulled tight and padded in
that way to avoid imprints on the rolls.
LOADING-UNLOADING
IZOLA PETROV membranes and heat insulation materials
are made to resist the mechanical stress during the work.
However, handling operations with then must be carried out
carefully to avoid any direct contact with sharp or pointed
surfaces. At low temperatures sharp jerks must be
avoided which can cause cracking or detachment of the
waterproofing membrane from the thermal insulation.
STORAGE AND WAREHOUSING
That material is always stored at dry and covered place.
The rolls must always be stored vertically on a smooth,
flat place with exception for those supplied with firm,
rigid internal reinforcing roll or support, which can be
placed horizontally for a short time in dry premises. Also
under cover the pallets can be stacked one another on
wooden planks to ensure weight distribution evenly.
Thermo insulation rolls are stored vertically in the same
way as the membranes except for flat rolls with selvedge
which can laid flat.

9
HANDLING ON SITE
Keep on the site the number of rolls necessary for the day’s
work and place them vertically on a smooth and flat
surface. By the means of a crane or suitable tools for lifting
move the rolls onto the roof and place them on the pallet.
Open the roll packing and lift the rolls onto the roof
separately using the suitable crane accessories then stand
the rolls vertically. Do not use a rope to tie and lift the rolls.
CONSERVATION
Pallets should be stored at dry places out of direct
sunlight.. During the summer the shrink-wrap
polyethylene film packed pallets left long time in the sun
can quickly heat and reach temperatures of 79 ⁰C which
can cause progressive blackening of the talk or mineral
granules on the rolls, from the top to the bottom until the
membrane starts to stick to itself or damage. In the case of
polyester reinforced membranes heat can cause teraing of
the membrane.
In case of bitumen membranes heat can cause progressive
losing of their flexibility. If that naturally happens during the
works while the material is still in rolls, then difficults in
unrolling and cracking can occurs during the application.
When the pallets must stay in sun even for a short time, it
is better to remove the cover complitelly or make
ventilation slits to protect the material placing wooden
planks or laths on the top. During the winter the pallets are
stored in temperatures of + 5⁰C 24 hours before laying but
should not be left in open air overnight.
Only rolls necessary for day’s work should be taken to the
site. A good practice is to take and use the oldest rolls from
the store and it is not recommended to store rolls more
than 12 months.

10
PERIOD OF USE AND CLIMATIC CONDITIONS FOR APPLICATION
RAIN SNOW
HUMIDITY
Various types of products have a symbol, which shows the
periodes when and in what climate conditions the products
should be applied. Membranes marked with the sun symbol
should preferebly be laid during the summer while those
marked with a pine tree symbol during the winter.
Not to follow these recommendations will not decrease the
covering efficiency but will create unnecessary problems
during the laying of the membranes, for example exsessive
softness and flexibility of the winter membrane laid in the
sumer and exsessive rigidity of the summer membnranes
laid in the winter.
In that reason the products must be laid in the seasons the are
designed.
Rain, frost, snow and high humidity can damage the
adhesion ability of the membrane to the laying surface or
overlaps.
At temperatures lower than 5C it is very possible ice
presence on the surfaces which have to be covered and
that will cause difficult in roll unroling.
Also the humidity trapped between the surface and membrane
can cause blisters forming. In that cases it is better not to lay
the material. During the summer in countries with really hot
climate and especially when the roll are intended to be laid on
thermal insulation, it is better to apply the material during the
cooler parts of the day avoiding the midday time.

11
SMOOTHING
The laying surface must be smooth and flat. A concrete
surface is available if the roughness and bumps are no
greater than 10 mm found under 2 m in any directions
and no greater than 3 mm found under 0.20 m in any
directions..
The surface must be trowelled and all cracks must be filled
with mortar. All roughnesses, material residues, nails, bits of
wooden etc. Must be removed from the site.
WATER, ICE
Before material laying the surface must be cleaned and
dry. Laying surface made of concrete or concrete tiles must
be left for dry from 8 days to 3 weeks depends on the season.
CONCRETE LAYING SURFACE
Once the above steps have been carried out on the area
where the membranes must be laid bitumen primer is
spread. The primer is especially applied on the areas
where the membranes will be anchored (see technical
specifications).the primer has very important role preparing
the surface and increasing the material adhesion. The
primer is left to dry for between 2 and 24 hours.

12
LAYING ON RIDGED SHEETING
If the membrane should be laid directly on a ridgid
sheeting (see technical specifications number 6),
spread bitumen primer and left to dry before membrane
laying.
TIMBER LAYING SURFACE
Sheets of bituminised paper or Delta Base membrane are
fixed to the timber surface with large head nails to protect
the wooden planks from the torch flame. Then the
membrane ashould be bonded using fully-bonded
application.
LAYING ON THE TOP OF OLD APPLICATION

13
LAYING ON HEAT RESISTANT PANELS
Two possibilities exsist:: •
The membranes are bonded to the thermal heating directly
on the upper surface of the panel. The other is to lay the
bitumen waterproofing membrane asphalt-bonded to the
panel.
LAYING ON CONCRETE SURFACES FOR BRIDGES AND VIADUCTS
Difficult membrane application is associated with the
fobservation of the process sequence, as well as usage
of reinforced nonwoven polyester 4-5 mm thick with
weight over 200 gr/m2. Fully-bonded application risks the
formation of blisters which raise the membrane if laid on
damp surfacecs or if applied in unfavourable climate
conditions. For that reason it is very important to ensure
concrete surface is completely dry and smooth for material
application, dampness insulation of the material, pre-
application of bitumen primer (for bridges) across the
whole surface, flame-bond of the material without
leaving any areas unstuck which can cause blisters
especially on the sheets overlaps.
Some experts think that the usage of light white
membranes or painting of the covering with lime reduces
the flowing of the material during the heating.
If at asphalt laying blisters have been found they must
be pre-treated and smoothed.
Caution – be careful for tracks of material used for
concrete treatment which can interact with the primer
and the membrane to reduse the adhesion.

14
ALIGNMENT OF MEMBRANE SHEETS
Unroll the membrane and align it by overlapping of the
edges atarting from the nearest sheet. Then roll the both
halves again and start flame bonding.
UNROLLING MEMBRANE SHEETS AT LOW TEMPERATURES
At low temeprature do not bang the rolls or unroll them in a
way to damage them. Unroll membranes carefully without
kicking them.
TYPES OF MEMBRANE SURFACE
The underside of the membrane sheet is the surface to be
treated. It is embossed with squares and covered with thin
polyethilene film. When heated that layer melts and shows
when the material is ready to be bonded. The upperside of
the membrane can also be covered with a polyethilene film
or perhaps with a layer of talc or sand. That helps the
wrapping to be detached even at high temperatures. As a
finished layer the membrane can be covered with
mineral slates which protect from UV rays. The mineral
slates covering eliminates the needs for further protection
from UV rays.
15
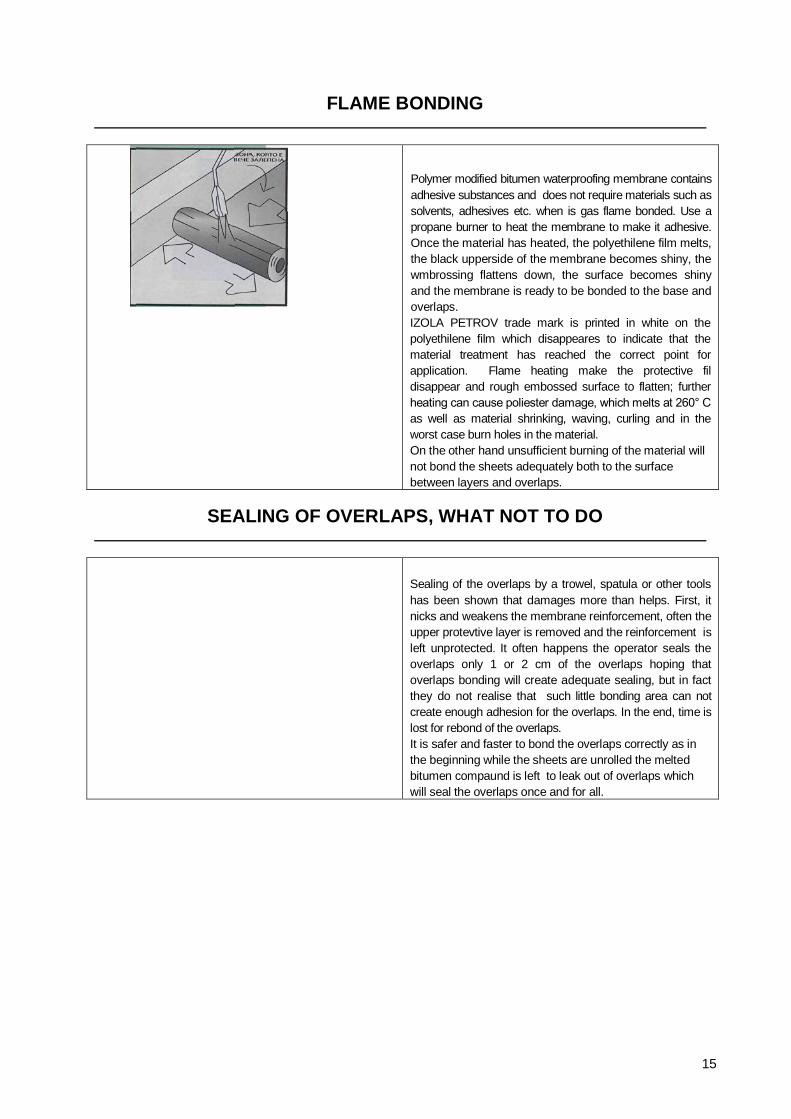
FLAME BONDING
Polymer modified bitumen waterproofing membrane contains
adhesive substances and does not require materials such as
solvents, adhesives etc. when is gas flame bonded. Use a
propane burner to heat the membrane to make it adhesive.
Once the material has heated, the polyethilene film melts,
the black upperside of the membrane becomes shiny, the
wmbrossing flattens down, the surface becomes shiny
and the membrane is ready to be bonded to the base and
overlaps.
IZOLA PETROV trade mark is printed in white on the
polyethilene film which disappeares to indicate that the
material treatment has reached the correct point for
application. Flame heating make the protective fil
disappear and rough embossed surface to flatten; further
heating can cause poliester damage, which melts at 260° С
as well as material shrinking, waving, curling and in the
worst case burn holes in the material.
On the other hand unsufficient burning of the material will
not bond the sheets adequately both to the surface
between layers and overlaps.
SEALING OF OVERLAPS, WHAT NOT TO DO
Sealing of the overlaps by a trowel, spatula or other tools
has been shown that damages more than helps. First, it
nicks and weakens the membrane reinforcement, often the
upper protevtive layer is removed and the reinforcement is
left unprotected. It often happens the operator seals the
overlaps only 1 or 2 cm of the overlaps hoping that
overlaps bonding will create adequate sealing, but in fact
they do not realise that such little bonding area can not
create enough adhesion for the overlaps. In the end, time is
lost for rebond of the overlaps.
It is safer and faster to bond the overlaps correctly as in
the beginning while the sheets are unrolled the melted
bitumen compaund is left to leak out of overlaps which
will seal the overlaps once and for all.

16
PARTIALLY (SLOT) FLAME BONDING
VOALIT PERFOR is a membrane with perforated sheets
which is laid dry on the laying surface pretreated with
bitumen primer. It allows the covering membrane to be
spot bonded through the holes.
Alternatively the membrane can be partially (spot) bonded
during the unrolling locating it precisely and evenly. Special
care should be taken for head bonding of the sheets.
TWO OR MORE LAYER COVERINGS
When two or more layer covering is required it is essential
that they adhere good each other. There is no precise
definition for high care at more layer covering application. The
risks are the same as for a single layer. If the sheets are not
bonded well to each other it is possible water leaking, the
water will find its way through the channels between the
layers until it finds a weak spot in the join between the layers
and will form a leak.. Multi layer covering efficiency is
quaranteed only by complete adhesion between all the
layers.
FLAME BONDING ON VERTICAL SURFACES
IZOLA PETROV membranes have excellent resistance to
creep and do not slip at application on vertical surfaces. By
flame heating both the membrane and the surface they will
hold firmly without usage of any mechanical fixing
materials. The sheets „take” while cool, i.e the molten
adhesive turns solid again.
In the summer the membrane and bonding surface can be
very hot and sometimes a very long time is required while
they cool and the material becomes solid. If it happens, the
operator is obliged to hold the material with hands until cools,
if he does not the material will fall.
Detached sheets schould not be reheated immediately in
attempts to be attached again.
Instead the operator should wait for them to cool. If not, the
sheet will never cool and therefore it can not be used again.
Summary: Both the membrane and the surface are
heated for vertical application as the material is held in
place until cool enough for adhesion.

17
MEMBRANE FIXING WITH METAL RUNNERS
If at vertical application thesheets are not fixed and
detached , a metal runner has to be nailed and sealed to
the upper edge of the sheets. The membrane must be
completly bonded to the laying surface on both horizontal
and vertical places.
MEMBRANE FIXING BY PLASTER
If the sheets have been created a seating, the material is
applied there, bonded and then covered with a metal
mash to which the mortar anchors. (see technical
specifications pos. 1 and 2).
FIXING WITH FLASHING
If the membrane must be bonded and laid on the walls they must be covered with flashing.

18
SKYLIGHTS
DRAINAGE OUTLETS
Do the following:
1. Paint the seating with bitumen primer.
2. Bond a piece of the membrane in the place where
the outlet is.
3. Bond the lower part of the drainage outlet to the
heated membrane
4. Bond the finishing layer both to the mambrane and
the flat part of the drainage outlet.
VENT OUTLETS (AIR VENTS, CHIMNEYS)

19
INTERNAL ANGLES
Cutting is similar as for head bonding, cut the membrane
correctly and bond the edges carefully.

20
EXTERNAL ANGLES
Particular care should be taken for the overlaps being careful
not to leave holes or uncovered angle parts.

21
PAINTING
Protective paint should be spread with a brush (roller)
along the entire length. Apply crossways in two layers a
brush can be used foir painting of smaller details. Where
on the roofs there are depressions, they can cause pools
where the water holds. This can cause leak at unpainted
places. Do not paint areas which are permanently in
contact with water. (see pos. 3 from the guide).

22
ADDITIONAL INFORMATION
Problems which affect the integrity of the waterproofing
covering and system are very often caused by incorrect,
poor treatment of the material by non-trained personnel
or personnel who has carried out repairs on the roof after
the waterproofing covering has been finished
(assembling works, channels and gutters fixing etc.).
It is recommended that the attention of the client is drawn to
that particular situation and the presence and advice of
specialists on insulations is provided and required
whenever alterations, extraordinary maintenance,
installation of aerials, antennas, air conditioning systems
etc., which are to be mounted on the roof.
MAINTENANCE
The long life of the waterproofing covering is relatde and
directly depends on the maintenance and care it receives.
Regular inspections are recommended with particular
attention to the steel gutters, drainage outlets etc.
removal of leaves, moss and any other plants which can
obstruct th4e water drainage system.
TECHNICAL PUBLICATIONS
IZOLA PETROV has published a series of TECHNICAL
SPECIFICATIONS aimed to help the work of roof designers
and constructors. The specifications can help to resolve the
problems related to the application of the membranes,
taking account of the various situations, which can arise in
different circumstances.

23

24

25
Waterproofing materials and bitumen shingles
0700 17 254 – national phone number
Sofia, Chepinci, 64 Stara planina str., tel: 00359 2 996 25 22, 996 25 20; fax: 00359 2 996 25 50;
e-mail: [email protected] Internet; www.izola-petrov.eu