a photo novel - unescounesdoc.unesco.org/images/0018/001821/182121e.pdf · for the sake of...
TRANSCRIPT
CLT/CEI/CID/2008/PI/H/I
Sylvia DoranceHow to create and publish
A photo NOVEL
Acknowledgements
For the sake of simplicity we have taken our examples from mate-
rial produced during the creation of a photo novel which was
commissioned by UNESCO (Division of Cultural Expressions and
Creative Industries/Mauro Rosi) and organized by us in Bamako (Mali)
with support from Editions Donniya; François Géhant, a writing workshop
specialist; and Paolo Andreotti, a producer at Lancio Publications
(Rome, Italy). We are also grateful to the writer, Fanta Coulibaly, and
the photographer, Samba N’Diaye.
© UNESCO 2008
The ideas and opinions expressed in this work are those of the author
and do not necessarily reflect the views of UNESCO.
Document UNESCO CLT/CEI/CID/2008/PI/H/I
For information contact:
UNESCO
Culture Sector
Division of Cultural Expressions and Creative Industries
Section of Creative Industries for Development
1, rue Miollis
75732 Paris Cedex 15
France
Tel + 33 1 45 68 46 33
Fax + 33 1 45 68 55 95
Lay-out by
Pack 2 Agence éditoriale ([email protected])
CLT/CEI/CID/2008/PI/H/I
How to create and publish
A photo NOVELSylvia Dorance
By Georges Poussin
Chief of the Section of Creative Industries for
Development
Division of Cultural Expressions and Creative Industries
Culture Sector
UNESCO’s current six-year strategy1 assigns the Organization five
fundamental functions or methods of work: a laboratory of ideas,
a standard-setter, an information clearing-house, a capacity-builder
in the Member States and a catalyst for international cooperation.
Developing such original educational tools as this handbook relates
to all these functions. On the one hand, it seeks to catalyse inter-
national best practice and to promote debate and sharing of ideas
about it. On the other hand, it is a practical resource for capacity-
building programmes and points to the way ahead, as does a frame-
work of standards in the wider sense.
Through its Culture Sector, and in particular through its Section of
Creative Industries for Development, UNESCO has long been
engaged in developing advisory literature, handbooks and guides for
professionals in the creative industries.
In the specific field of the book alone, it has produced – to cite just
two well-received publications – a work entitled National Book Policy2
and one on Book Donations for Development.3 How to Create and
Publish a Photo Novel is part of a long tradition relating directly to
field work by UNESCO specialists and to the experience that the
Organization has acquired at international level.
This new tool concerns a specific area of publication, the photo novel,
which is sometimes underestimated and even disdained, but which
lies at the heart of a number of strategic educational and training
projects in the campaign for sustainable development.
A fascinating blend of photographs and text, accessible and enter-
taining alike, the photo novel can be a valuable vehicle for well-desi-
gned texts and important topical messages that could not otherwise
be delivered to some sectors of the public. It can play a capital role
1How to create and publish a photo novel © UNESCO 2008
CLT/CEI/CID/2008/PI/H/I
Preface

in the fight against illiteracy and in publicity campaigns surrounding
major social problems such as endemic diseases. Consequently, it
is altogether desirable to facilitate its growth by training professio-
nals capable of feeding local markets with high-quality products that
are culturally and linguistically appropriate.
This document is based on field experience and gives trainers a compre-
hensive step-by-step summary of this kind of project, from the
budget to the human resources, from the photo shoot to the
production and including the script.
Since the approach we have taken to designing our previous infor-
mation and training publications has proved popular among profes-
sionals, we decided to retain that method whilst aiming to improve
it further and so to speed up the spread of the necessary knowledge
and skills.
This handbook will, or so we hope, support our ambition. In the
always vibrant context of the creative industries and of vocational
training, UNESCO welcomes criticism and suggestions that would
enable it to improve the content and the form of this initiative.
1. UNESCO, Medium-Term Strategy for 2008-2013 (34 C/4) –
http://unesdoc.unesco.org/images/0015/001536/153606e.pdf
2. Alvaro Garzon, National Book Policy: a guide for users in the field,
second edition, UNESCO, 2005.
3. Mauro Rosi, Book Donations for Development, second edition,
UNESCO/Culture and Development, 2006: online version
http://www.asfored.org/elearning/lms_hmi/FTP/modules/63/index.htm
2How to create and publish a photo novel © UNESCO 2008
CLT/CEI/CID/2008/PI/H/I

Introduction . . . . . . . . . . . . . . . . . . . . . . . . . . . . . . . .04What do we mean by a photo novel? . . . . . . . . . . . . . . . . . . . . .04
A popular and useful genre . . . . . . . . . . . . . . . . . . . . . . . . . . . . .04
Knowing your readership . . . . . . . . . . . . . . . . . . . . . . . . . . . . . .05
The challenge of quality . . . . . . . . . . . . . . . . . . . . . . . . . . . . . . .05
Budgetary questions . . . . . . . . . . . . . . . . . . . . . . . . . . . . . . . . . .05
I. The team needed . . . . . . . . . . . . . . . . . . . . . . . . . .07The publication team . . . . . . . . . . . . . . . . . . . . . . . . . . . . . . . . .07
The writer . . . . . . . . . . . . . . . . . . . . . . . . . . . . . . . . . . . . . . . . . .08
The actors . . . . . . . . . . . . . . . . . . . . . . . . . . . . . . . . . . . . . . . . . .09
The producer . . . . . . . . . . . . . . . . . . . . . . . . . . . . . . . . . . . . . . .10
The photographer . . . . . . . . . . . . . . . . . . . . . . . . . . . . . . . . . . . .11
The support crew . . . . . . . . . . . . . . . . . . . . . . . . . . . . . . . . . . . .12
The printer . . . . . . . . . . . . . . . . . . . . . . . . . . . . . . . . . . . . . . . . .13
II. The script . . . . . . . . . . . . . . . . . . . . . . . . . . . . . . . .14A particular form of story-telling . . . . . . . . . . . . . . . . . . . . . . . .14
The qualities of a good script . . . . . . . . . . . . . . . . . . . . . . . . . . .16
The script as a complete working document . . . . . . . . . . . . . . .17
III. How to organize a script-writing workshop . . .22One solution among many . . . . . . . . . . . . . . . . . . . . . . . . . . . . .22
The workshop members . . . . . . . . . . . . . . . . . . . . . . . . . . . . . . .22
Facilitating the workshop . . . . . . . . . . . . . . . . . . . . . . . . . . . . . .23
The process . . . . . . . . . . . . . . . . . . . . . . . . . . . . . . . . . . . . . . . . .23
Selecting the script to be published . . . . . . . . . . . . . . . . . . . . . .27
IV. The photo shoot . . . . . . . . . . . . . . . . . . . . . . . . . .29Organizing the shoot . . . . . . . . . . . . . . . . . . . . . . . . . . . . . . . . .29
Preparing the basic design . . . . . . . . . . . . . . . . . . . . . . . . . . . . . .29
Selecting the order of shooting . . . . . . . . . . . . . . . . . . . . . . . . .31
Scenery and costumes . . . . . . . . . . . . . . . . . . . . . . . . . . . . . . . .33
Lighting . . . . . . . . . . . . . . . . . . . . . . . . . . . . . . . . . . . . . . . . . . . .33
Taking the photos . . . . . . . . . . . . . . . . . . . . . . . . . . . . . . . . . . . .33
Selecting the photos . . . . . . . . . . . . . . . . . . . . . . . . . . . . . . . . . .34
V. The design and the production . . . . . . . . . . . . . .35Picture format and digital processing . . . . . . . . . . . . . . . . . . . . .35
Starting the page composition . . . . . . . . . . . . . . . . . . . . . . . . . .35
The balloons . . . . . . . . . . . . . . . . . . . . . . . . . . . . . . . . . . . . . . . .36
Tricks of composition . . . . . . . . . . . . . . . . . . . . . . . . . . . . . . . . .38
The final file . . . . . . . . . . . . . . . . . . . . . . . . . . . . . . . . . . . . . . . . .39
Printing and binding . . . . . . . . . . . . . . . . . . . . . . . . . . . . . . . . . . .39
By way of conclusion . . . . . . . . . . . . . . . . . . . . . . . . . . . . . . . . . .41
Conditions for success . . . . . . . . . . . . . . . . . . . . . . . . . . . . . . . .41
Distribution ideas . . . . . . . . . . . . . . . . . . . . . . . . . . . . . . . . . . . .41
Annexes: contracts, etc. . . . . . . . . . . . . . . . . . . . . . .43
CLT/CEI/CID/2008/PI/H/I
Table of contents
3Créer et publier un roman-photo © UNESCO 2008
What do we mean by a photo novel?
The photo novel is quite a well-known genre in Europe where it
appeals chiefly to a female and popular audience, particularly because
it usually tells love stories. Its essential feature is that it is a story
in photographs, just as the strip cartoon is a story told in drawings.
Graphically and structurally, it is very close to the strip cartoon, as
we shall see later: the page is divided into boxes, dialogue is presented
in balloons, etc.
Its relationship to the cinema is equally important, especially in the
case of those publications that lay claim to a certain editorial quality,
through its use of techniques designed to make the story more vivid
and modern: switching angles, reversing shots, day for night, etc. We
shall return later to these borrowings from cinema techniques.
Like the film and the strip cartoon, the photo novel is based on a
script, which contains the story’s plot, and uses pictures, dialogues
and voice-off commentaries. Consequently, producing a photo novel
calls for skills both in writing scripts and dialogues and in
photography, as well as the usual publishing skills – project mana-
gement, working with various team members, page composition and
digital processing of pictures, printing. Since photographs are used
rather than drawings, actors must also be involved.
A popular and useful genre
We have emphasized that the photo novel is a “popular” literary
genre. The term is in no sense pejorative, especially if we look to
see the reading population grow. Remember, too, that the word “popular”
can simply mean “very successful”. In this regard, we believe that
the photo novel is an excellent way of giving new readers a taste
for reading. Its greater accessibility and less forbidding format as comp-
ared with the pure and dense prose of the novel, the brevity of the
texts, the help given by the pictures and the “cinematographical”
4How to create and publish a photo novel © UNESCO 2008
CLT/CEI/CID/2008/PI/H/I
Introduction
attraction … everything conspires to take the drama and the ritual
out of reading, to attract a public that is disinclined or unused to
reading and to make them wish to persevere.
Additionally, the content must be close to the target readership and
should give them pleasure, by presenting characters who achieve
the readers’ unattainable secret ambitions, by making them dream
(without appealing to their baser instincts!), giving them hope, in
short, by telling them stories which, at least for the time they are
reading, allow them to sublimate their everyday lives. Is that not the
role of all literature?
Knowing your readership
To satisfy a readership you have to know them in depth. That requires
knowledge of their sociocultural environment, their gender, their
age, their educational standard, their habits and their lifestyle, as well
as their problems, their anxieties, their daily worries, etc. Almost
universal stories do indeed exist, but most frequently the subject
and style should be adapted to the target readership. With that in
view, the publisher or at least the writer should themselves be
members of the target community or should have as close as
possible a link with it. Should that not be the case, we cannot recom-
mend too strongly that publishers and writers wishing to start
producing photo novels should research thoroughly and test out
the target readership.
The challenge of quality
In photo novels as in strip cartoons or indeed in novels, quality varies
greatly. The biggest danger as regards the photo novel is that of purveying
“rose-tinted” stories, stereotyped, conveying dubious values, seeking
so much to prettify reality that they end up lying about it. Rather
than making the readers dream, this sends their minds to sleep. The
characters become stereotypes (rich, handsome hero, submissive,
timorous woman – or, conversely, dangerous, treacherous woman,
etc.), the stories spread illusions rather than hopes; they stupefy instead
of energizing.
This trap is not easy to avoid. Among the chief challenges for publis-
hers and writers must therefore be to create rich, intelligent, plea-
sing and amusing stories that are far from being off-the-peg plots.
That requires thought, work and talent. Writing and publishing a photo
novel is a difficult task that should not be undertaken lightly.
Budgetary questions
Proper evaluation and control of the budget required are essential
in any publishing enterprise. The requirement is the stronger in the
case of photo novels in that the use of photographs firstly means
that there are more team members to pay and secondly calls for a
higher quality of digital processing, printing and paper than is needed
when publishing text alone.
We think it important to stipulate right now that the cost of crea-
ting a photo novel is too high for an African-language publication,
5How to create and publish a photo novel © UNESCO 2008
CLT/CEI/CID/2008/PI/H/I

for instance, unless it is funded by a development aid programme.
The public’s low purchasing power and the restricted readership
mean that there is not really a market that can cover the cost of
the project and still less make it commercially viable. That does not
mean that the undertaking is not greatly to be recommended, for
all the reasons we have given above. The benefits of the project are
ample justification for the publisher’s quest for funds and for the
funder’s investment.
That said, we shall seek throughout this book to reduce the impact
of budgetary issues on the feasibility of the project by describing
various ways of cutting costs without affecting quality, wherever possible.
6How to create and publish a photo novel © UNESCO 2008
CLT/CEI/CID/2008/PI/H/I

The publication team
The project manager
In any project involving several people, there has to be someone to
coordinate and take responsibility for the project. In the case of a
photo novel, the coordinator is responsible for raising the finance,
selecting the participants, supervising and remunerating everyone’s
work, managing quality, keeping within timescale and budget and lastly
seeking distribution channels for the finished work. This is usually
the publisher in person, but it might equally well be the writer if the
latter has the requisite skills and dependability – organizational
sense, rigour and ability to lead a team.
The publication secretary (editor)
The publication secretary’s role begins as soon as the text has been
written and the photographs have been taken. It is to check the quality
of the style, grammar and spelling of the text, to ensure it is cohe-
rent and intelligible, to help to select the photographs, to pass the
chosen elements to the DTP designer, to read the proofs and to
pass the complete file to the printer. In smaller publication teams,
the publisher acts as publication secretary and also checks the
quality of the printing.
The DTP designer
The DTP designer devises the page composition together with the publisher
and/or the producer and/or the photographer, integrates the text and
the digital pictures using a DTP package (Pagemaker, XPress or InDesign),
makes the corrections requested by the publication secretary and
prepares the complete file to be passed to the printer. This is a difficult
role in respect of the photo novel because the text, enclosed in balloons
or text boxes, must not spoil the photographs or hide important
elements. Consequently, it calls not only for complete mastery of the
design software but also for artistry and resourcefulness.
7How to create and publish a photo novel © UNESCO 2008
CLT/CEI/CID/2008/PI/H/I
I. the team needed
The writer
Required qualities
Not every writer can write a script or appeal to every readership.
A photo novel writer must be able to invent and narrate fiction in
a vivid and captivating way, but must also be concise and to the point,
one of the chief problems of the photo novel being lack of space.
Depending on the kind of story to be brought to the public, the
writer must have a sense of humour or of drama, suspense, emotion,
etc., and must know the target readership.
Where can you find one?
All this calls for a talented writer, popular in the best sense of the
term. In Africa such writers can be found broadcasting in national
languages on radio or TV stations. They are the ones who make the
listeners and viewers laugh or cry uncontrollably: you cannot miss
them! Some storytellers can also be trained to write scripts, as we
shall see later in the chapter on organizing writing workshops.
Some novelists writing for adults can benefit from such training or
creativity workshops, provided they do not think they are “on a pedestal”
– they must be flexible and adapt to their readership and to the
concision of the genre, avoiding difficult terms, long sentences and
over-complicated plots.
How do you choose a writer?
An interview and an essay seem the best way of choosing a poten-
tial photo novel writer. During the interview the publisher can judge
the writer’s appetite and adaptability. Some are visibly amused and
intrigued by the change and the challenge. Others feel a degree of
contempt for a literary genre that they view as minor and are
neither inclined nor necessarily able to adapt.
The essay would appear essential in every case. It should be presented
as the basis for agreement between the publisher and the writer:
the photo novel is a genre that imposes many constraints, and
before any contract is signed it is important to be sure that the writer
can and will work within those constraints and that the publisher
can use the work in a high-quality publication. The essay might take
the shape of a short scene from a novel to be changed into an episode
for a photo novel.
Rather than choosing the writer, you could select the script, which
is safer but more complicated. It involves organizing either a writing
workshop (see the chapter on this below) or a competition through
the press. Organizing a writing workshop is more onerous, even if
the publisher runs it in person. However, it can be viewed as a trai-
ning event in return for which the writers freely relinquish their
rights to the text produced during the workshop. In this case the
training must be of a quality to justify that surrender.
In the case of a competition the prize is publication, with or without
copyright royalties depending on the available budget. If it is without
8How to create and publish a photo novel © UNESCO 2008
CLT/CEI/CID/2008/PI/H/I
royalties, a number of copies could be kept back for the writer to
sell privately for profit or to distribute to acquaintances.
The actors
Required qualities
The job of the producer and the photographer will of course be
easier and the result will be better with professional actors than
with amateurs. They will position themselves better, instinctively strike
natural poses and avoid the trap of “over-acting” as in the old silent
movies. However, good actors are not as important for a photo novel
as they are for a film. If an actor declaims, moves badly or has too
weak a voice, etc., it will scarcely be noticed in a still photograph.
Conversely, each actor must exactly match the role (age, physical
appearance, poses...). Just as in the cinema or the theatre, there will
be the juvenile lead, secondary roles, comics, dramatic roles, etc.
Where can you find them?
If the budget is too small to employ professional actors, some
members of the publication team or their families or friends may
take roles. You can also advertise for actors in the press.
If resources are available to employ professional actors, it is advisable
to use well-known actors, which will make the photo novel more popular
and easier to distribute. Television or production houses are the best
places to make contact with such actors. You can sometimes nego-
tiate a reasonable fee with them by pointing out that the work is less
restrictive and less difficult than the cinema or the theatre and that
the commercial aspect of the venture in its entirety is incomparably
smaller than the budget and income of a film.
A middle path between celebrity and unprofessionalism can also be
found by looking for actors in amateur theatre groups or drama
schools, if there are any in the country.
How do you choose them?
First the project manager chooses the ideal cast. If everyone selected
is available and willing to take part, a discussion suffices to define
expectations and ensure that everyone knows what is involved, feels
able to adapt to the specific context and accepts the terms of
production and distribution. Should there be any doubts, auditions
should be organized for potential actors with the producer and if
required the photographer in attendance.
If some roles have not been filled, a casting procedure is organized
with auditions, as for a film, to select the most suitable actors.
The producer
Required qualities
To define the qualities that are important in the producer we must
first explain this fundamental role. It starts before the photo shoot,
continues during it and ends after the photographs have been selected.
Before the shoot the producer may take part in selecting the actors,
going on to check the feasibility of the script and to organize the
9How to create and publish a photo novel © UNESCO 2008
CLT/CEI/CID/2008/PI/H/I
schedule for the shoot – the scenes are not necessarily acted in the
story’s chronological order, as we shall see. Together with the project
manager, the producer supervises the organization in respect of the
choice of locations, scenery, props and costumes. Another task is
to create a basic design of the photo novel which can be remodelled
to some extent as the shoot progresses, but which provides working
instructions such as, for instance, whether individual photographs
should be in portrait or landscape, wide-angle or close-up, etc. For
more details on this part of the producer’s work, see the beginning
of Chapter IV, “The photo shoot”.
During the shoot the producer ensures that no scene is over-
looked, positions the actors and gives them acting instructions. He
or she works with the photographer to select the best sight lines,
etc. They also have to check for discrepancies between scenes, such
as an unfortunate change in dress or an unintended change in the
scenery.
After the shoot the producer works with the photographer and
the project manager to select the best photographs for passing to
the DTP designer.
This long list of sometimes complex tasks clearly shows that the
producer has a central role, calling for competence, observation,
rigour and even meticulousness. It also requires a degree of natural
authority for everything to work well, in as little time as possible,
during the shoot. Finally, artistic sensitivity is essential.
In short, this is probably the most difficult person to find, especially
if the project has a limited budget.
Where can you find a producer?
A film director is of course the most suitable person. Everything
depends on the budget, the conditions in the country (in several
African countries, for example, you cannot necessarily earn your
living just by making films) and the intuition of the project manager.
Here too, you may be able to negotiate by pointing out that this is
an opportunity to gain different experience.
In a descending order of competence, you can look in production
houses or in television, in drama schools, as for actors and, if there
is really no other option, in the publication team, since publishers
are famously “one-man bands”! The chapter on the photo shoot is
designed to help non-specialists if necessary to undertake to best
effect the producer’s activities.
The photographer
Required qualities
Professional photographers are more numerous and easier to find
than producers. That does not mean that any photographer can work
on a photo novel. Given equal technical skills, an events photogra-
pher (weddings, celebrations, concerts, etc.) will be preferable to
an art photographer. The former is used to photographing people
on the move, snapping live action, adapting to less than ideal ligh-
ting conditions. This flexibility and adaptability are exactly what is
needed for the photo novel.
10How to create and publish a photo novel © UNESCO 2008
CLT/CEI/CID/2008/PI/H/I
Where can you find him and how do you choose him?
Photographers working to commission sometimes have a studio or
shop. Otherwise, they usually leave small advertisements in film or
photography shops and they can also be contacted through the press.
The right choice will be made by reviewing the candidate’s photo-
graph portfolio or “book” and through an interview. You need to
feel that this is a person who understands a situation quickly and
can invent lighting or technical solutions for all kinds of minor
problems arising from the location, the actors’ movements, the avai-
lable light sources, etc.
Equipment
The chosen photographer must have a good digital camera with a
minimum range of various or zoom lenses so that wide-angle and
close-up shots can be alternated. A photographer with that kind of
camera will probably also have a computer with enough memory
to operate picture editing software (usually Photoshop) and to
open and store large files. If not, such a computer must be available
in the publishing house.
The photographer must also have one or two flood lights for interior
shots if required, and light reflectors. Light reflectors can be made
up cheaply by using plywood sheets covered with tin foil.
The support crew
The people we discuss in this section do not have to be professio-
nals, but they are essential members of the team.
The props person
First and foremost this person is the “finder” – of clothes, special
props, furniture, pieces of scenery and so on. The props person reads
the script and lists everything needed at every point. His or her job
is to find everything, within the budget allocated, and to remember
to keep the receipts!
During the photo shoot, the role is to provide the actors with the
right costumes and supply the props and scenery when they are
needed for photographs. The props person must therefore know
exactly what is happening and when with regard to the scenes on
the photo shoot schedule. They will also need to number each
actor’s various costumes: e.g. the leading man wears a red T-shirt
for the first 10 shots, then a suit and shirt for the next 12 shots
because the action takes place the following day, then the red T-shirt
again because there is a flash-back in the story, and so on.
As a reminder, matters are complicated by the fact that scenes are
rarely shot in the order of the story.
11How to create and publish a photo novel © UNESCO 2008
CLT/CEI/CID/2008/PI/H/I
The make-up artist
The actors usually have to be made up if only to avoid light reflec-
tions and signs of sweating under the flood-lights or reflectors
trained on the face. Some actors can make themselves up, but by
no means all can. It may not be at all possible or necessary to call
on a professional make-up artist, but as in everything, self-reliance
and resourcefulness should get the right result. Of course, the make-
up artist or the person acting as such must at least have make-up
and tissues.
The extras
Rarely does the script call for no extras at all. It may not be a crowd,
perhaps just a shopkeeper, a civil servant, one or more children …
and they may only be needed for a couple of shots, but they are still
essential. If they are of the right gender and age, that will usually be
enough because their role is not important. Sometimes they are just
there in the background.
The printer
Equipment
We are discussing the printer’s equipment before the qualities
required in the printer because, unfortunately, a good printer who
is badly equipped can get nothing right. Even a black-and-white
photo novel needs:
• good quality plotting for producing the films: the tracings used for
plain text in some African countries are unsuitable for photography,
especially in colour;
• good paper: even with good films, if the paper is too transparent
the photograph on the back of the page can be seen as well as the
one on the front, and it becomes incomprehensible. If the paper absorbs
too much ink the photographs will be blurred;
• a good press: the setting must enable the four films to be perfectly
aligned in the case of four-colour printing and the paper to be well
positioned even for black-and-white. The inking must also be perfect
or there will be stains and leaks;
• a good guillotine: if the brochure doesn’t sit well at the point of
cutting, or if the blade has too much play – which happens with old
machines – the margins will be irregular and the cuts will be slanted;
• a good stapler: if the staples are not positioned exactly in the middle
of the fold, the brochure will be hard to open.
We shall return later, in the chapter on production, to the detail to
be checked in plotting, printing and binding.
The printer’s qualities
Machines are not enough. The printer must above all be reliable: if
your agreement stipulates paper of a certain grammage, you should
not find yourself later with a book made of too light a paper on the
pretext that the stock was exhausted. The same applies to the
timescales and the quality of the overall job.
12How to create and publish a photo novel © UNESCO 2008
CLT/CEI/CID/2008/PI/H/I

The printer must also be rigorous and careful. A book that has been
well printed but not had enough drying time will be full of blots.
Books stored in inadequate premises may be damaged by humidity
or rodents, etc.
Consequently, a good standard of printer is needed if you want to
get a job of acceptable quality. It is better to have known one for a
long time, or to have very good testimonials, rather than to discover
the truth when the photo novel is issued. It is also a good idea to
visit the print-shop and inspect some previous work before signing
off the estimate.
13How to create and publish a photo novel © UNESCO 2008
CLT/CEI/CID/2008/PI/H/I
A particular form of story-telling
Unlike the conventional novel which relies on words alone to tell
a story, the photo novel relies primarily on photographs supplemented
by dialogues. The story is then told through the interaction between
these two powerful elements, the characteristics and role of which
we now propose to study.
The photographs and their role in telling the story
The photographs contain the most important and greatest quan-
tity of information:
• they set the scene, which does not need to be described in words;
• they show the various characters, relieving the writer of the need
to describe their appearance, gender, age or even their social status
which can be suggested through their clothes and poses;
• they can express relationships of family, dependency or employ-
ment between the characters: a woman and her child, a teacher and
class, an employer and an employee, etc., are easily recognized;
• they show gestures, actions and relationships between the charac-
ters, and sometimes emotions (gestures of tenderness, distrustful
looks, an irritated expression etc.).
In short, a large part of the story is told primarily through the photos.
That does not mean that the writer should expect to be able to say
everything through pictures, and this relates especially to expressions.
Some, such as anger or surprise, are easy to detect and understand,
but although an amused expression is obvious, the finer differences
between the sickly smile, the open laugh or the concealed chuckle, for
instance, are far more difficult to portray and there is a risk of misun-
derstanding unless dialogue is used to supplement the pictures. Similarly,
it would be pointless to ask a photographer to capture the expres-
sion on the face of someone coming up from a distance.
On the other hand, some photographic tricks can help to convey
the story or to create a special atmosphere. A low-angle shot makes
a person look imposing and even frightening. A high-angle shot, looking
14How to create and publish a photo novel © UNESCO 2008
CLT/CEI/CID/2008/PI/H/I
II. The script
down from above, tends to make the character look vulnerable and
create an impression of fragility. Close-ups dramatize facial expres-
sions. And so on. The writer can play on this to enrich the story
without resorting to text, which takes up space and is always less
vivid than pictures.
The dialogues
Consequently, the dialogues are there not just to transcribe what
the characters say, but also to fill out essential elements of the story
that cannot be seen in the pictures. An example: in the initial photos
of a story, we see two people greeting each other. We can see their
gender, their age and perhaps their social status and/or their occu-
pation, but their names, civil status, number of children and rela-
tionships, etc., are not written on their foreheads. Therefore we have
to obtain that information from the dialogue if it is essential to the
story, and it must be conveyed as naturally as possible.
The ridiculous aspect of the following dialogue is plain:
“Good morning, Amadou, you are married and you have two children!
– Good morning, Boureïma, you have been my friend for a long time.”
The “scene setting” of the photo novel, when we learn the most
important information about the characters, should rather be
written like this:
“Hello, Amadou, it’s good to see you, my friend. How are your
children?
– Boureïma! OK thanks, how about you?”
Generally speaking, the more natural the dialogues sound the better
the photo novel will be. Firstly they must “fit” the characters, sound
natural in their mouths both with regard to vocabulary – familiar or
more formal, sophisticated or plain – and in relation to matters of age,
status, mood and relations. They must not feel “literary”. People do,
not talk as they write: dialogues in a photo novel can therefore consist
of incomplete sentences, interjections or exclamations.To check the
quality of the dialogues, you should read them aloud and act them out.
Ellipses and transitions
So photos and dialogue can work together to tell us the key points
of the story. But the space problem in the photo novel and the need
to tell a story that never bores the reader compel the writer to
dwell on the highlights and to cut out the unnecessary. For example
there is no need to show all the intermediary steps between a photo
of a child getting out of bed and one of the child sitting in class: they
are well known and of no interest. So the story is elided, to change
the location or to allow time to pass. Often the transition is obvious.
Sometimes, however, things have to be spelled out by, for instance,
using a little commentary such as “The next day” or “An hour later
at Awa’s home” inset at the top or in a corner of the picture.
Additional commentaries
Commentaries set in at the top of a photo can also be used to give
information that cannot be conveyed by the picture or the dialogue.
15How to create and publish a photo novel © UNESCO 2008
CLT/CEI/CID/2008/PI/H/I
One example is a person’s inner feelings: “Bakou is unconvinced”
or “But Aliou is still angry with him”.
The qualities of a good script
A strong story line
As with any story, the theme selected and the way it is narrated
must stand out. Even if the characters and the action are set in everyday
circumstances, the reader must be moved: the story must take place
at a time of crisis and present strong emotions (love, distress, fear,
hatred, doubt, etc.), or else it must make the reader laugh.
The characters must not be simply dull stereotypes but should be
psychologically rounded and possess a past and a personality. Finally,
the important points and the highlights must be selected and only
they must be narrated.
A living story
We wrote above of the need to create dialogues that sound right.
That is the surest way of bringing the story to life. The reader
must be plunged into a coherent universe which seems true.
Over-long scenes and drawn-out dialogues should also be avoided.
Concision must be sought systematically and throughout. Once
the story has been written, the writer must review it and weed
out any redundancies.
The interplay between photos and dialogue assists that concision
and lends the story dynamism by avoiding monotony of tone and
device. To optimize that interplay, the writer should always proceed
in the following order:
• first decide what can be told through pictures;
• then complement it with dialogue;
• only use commentaries as a last resort, if they are unavoidable
and if the story cannot be understood without them. Beware of slip-
ping to the opposite extreme, which leads to an unintelligible text
in which ellipses make the story line confused.
The “feasibility” of the script
It must be made clear to the writer or writers that some of their
choices have significant consequences for feasibility, as regards both
the budget and the casting, the choice of locations, the props used,
etc. If, for instance, the script has the characters changing location 20
times in the novel, the project manager’s work will be quite difficult
and the cost may rise. The same is true if the script calls for a scene
on top of a New York skyscraper. Another complication and cost to
be avoided is the use of animals. A dog at most, but no horses and
absolutely no leopards! Finding people with really unusual physiques
is also challenging for the person responsible for casting.
Page composition and photo format constraints should also be kept
in mind when the script is written. For instance, there is no point in
wanting to fit an entire procession into a 10 x 10 cm box or in thin-
king that the expression on someone’s face can be seen in a long shot.
16How to create and publish a photo novel © UNESCO 2008
CLT/CEI/CID/2008/PI/H/I

So the writer should avoid off-beat requirements and ensure that
everything asked for is reasonable. Here are a few examples of infea-
sible or difficult photos:
• exterior night scenes;
• crowd scenes;
• scenes that take place in more or less unusual locations (e.g. a
palace, a mountain top or an aircraft cabin).
And here are a few examples of scenes that are too expensive:
• scenes involving expensive props or props that are hard to find
without purchasing them;
• scenes in which the characters have to wear luxury clothing;
• scenes set in a far-off country or region that is easily identifiable
(a desert or a Western city);
• scenes that call for complex staging (an election meeting or a rock
concert).
The project manager, the producer and the props person will call
for any changes that are needed, but it is best to take account of
budgetary and technical imperatives from the outset.
The script as a complete working document
Its role
The script is not intended for publication. Only the dialogues and
commentaries are written down, and they will in principle only be
subject to minor changes during the production phase. Everything
else is a list of technical instructions to the various team members.
The entire project with all its elements is in the script:
the list and characteristics of the characters;
the list and characteristics of the locations and scenery;
the list of props, etc.;
the complete story, broken down into scenes and boxes and narrated
in dialogues and in descriptions of the photographs to be taken, with
the space and time frame required and the actors involved, their
poses and gestures.
Producers should be able to organize all of their work on the basis
of the script alone, the props person should be able to work out
everything he or she needs to provide, and the actors should
discover their roles in it and the poses they have to take for each
shot, etc.
The script, then, is a working document that is both very full and
very precise.
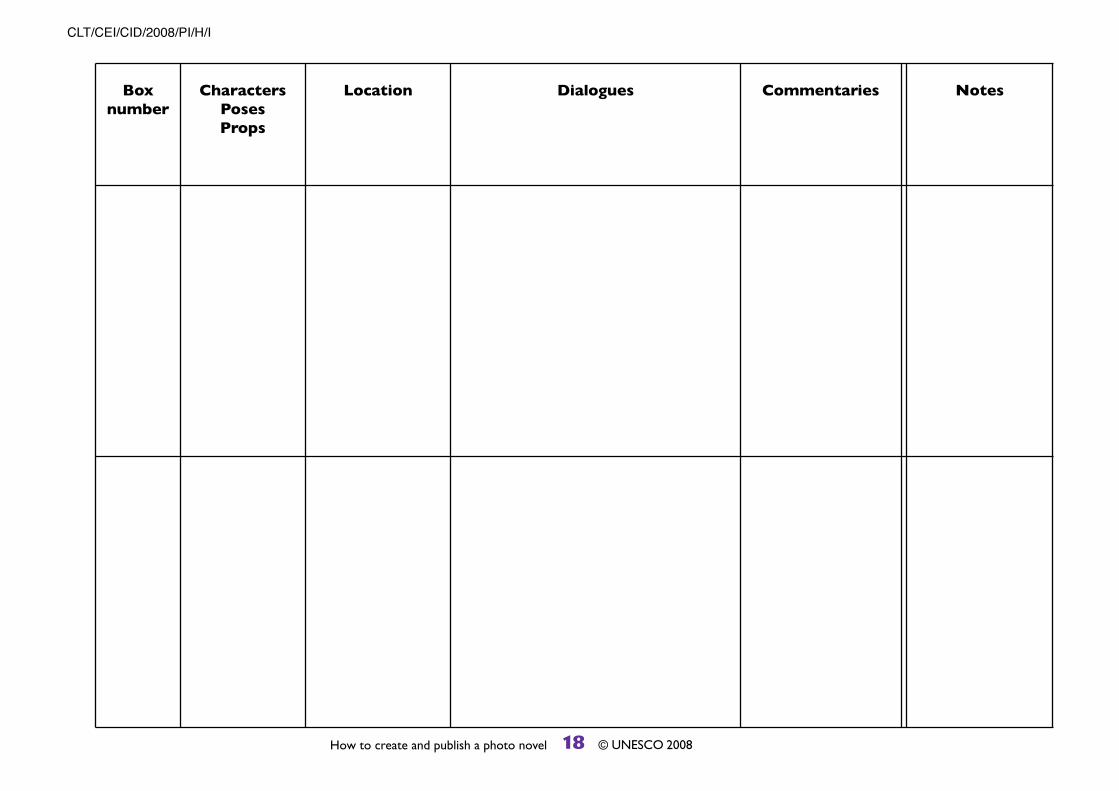
Its presentation
Consequently, to be useful and effective the script should set out
the elements listed and commented below. The easiest way is to
present it as a table (see p. 18). You only need to make a template
of the table and to make a lot of photocopies before filling in the
columns, preferably in pencil for ease of correction.
17How to create and publish a photo novel © UNESCO 2008
CLT/CEI/CID/2008/PI/H/I
18How to create and publish a photo novel © UNESCO 2008
CLT/CEI/CID/2008/PI/H/I
Boxnumber
CharactersPosesProps
Location Dialogues Commentaries Notes
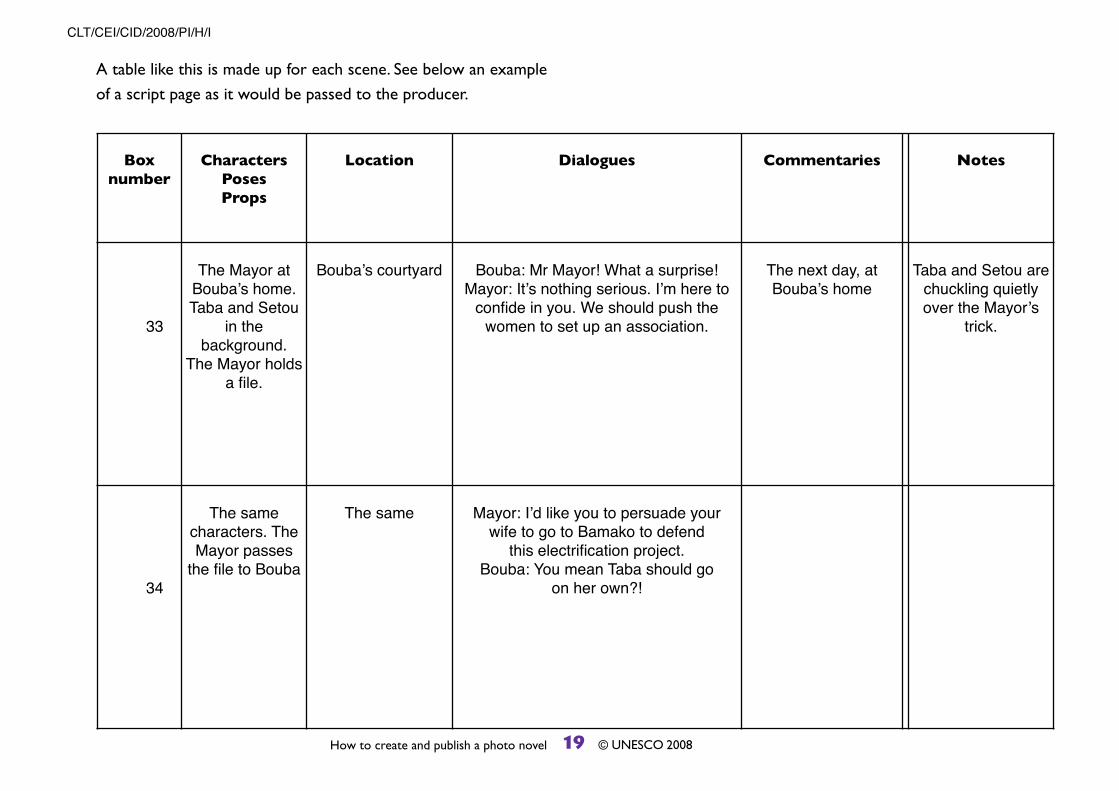
A table like this is made up for each scene. See below an example
of a script page as it would be passed to the producer.
19How to create and publish a photo novel © UNESCO 2008
CLT/CEI/CID/2008/PI/H/I
Boxnumber
CharactersPosesProps
Location Dialogues Commentaries Notes
33
The Mayor at
Bouba!s home.
Taba and Setou
in the
background.
The Mayor holds
a file.
Bouba!s courtyard Bouba: Mr Mayor! What a surprise!
Mayor: It!s nothing serious. I!m here to
confide in you. We should push the
women to set up an association.
The next day, at
Bouba!s home
Taba and Setou are
chuckling quietly
over the Mayor!s
trick.
34
The same
characters. The
Mayor passes
the file to Bouba
The same Mayor: I!d like you to persuade your
wife to go to Bamako to defend
this electrification project.
Bouba: You mean Taba should go
on her own?!
The box or photo number
Its purpose is to ensure both during the writing and during produc-
tion that the script is not too long. If the publication is to consist
of 24 A4 pages, there will be at the very most 144 boxes (six per
page). If there were more, the photos would be too small and it
would be extremely difficult to include dialogue inserts. It also
matters to be able to vary the page format a little, both to avoid
monotony and to make best use of cinematographical possibilities
(wide-angle, close-up, panoramic shot, portrait or landscape, etc.).
This means that on some pages there will only be four or perhaps
even three photos, with some of them replacing two small pictures.
This gives us a maximum of 120 boxes for 24 pages, with on average
five boxes per page. The box number also helps to keep track during
the shoot, to number the photos to be passed on to the DTP desi-
gner and, in short, to provide reliable common reference points for
everyone involved.
The characters, their poses and their props
These instructions are of use to everyone: the project manager who
has to do the casting, the props person who has to find the props, the
producer and the photographer who have to get each shot right, and
the actors themselves who have to act out every point in the story.
Examples:
• X is standing at the door, hand on the door-knob, ready to leave,
car-keys in hand. He is half turning towards Y, to whom he is talking
as he leaves. Y is seated in the foreground, back to the camera.
• Z is whistling as he cycles through an empty street. He has a box
tied on behind.
Description of locations
This is primarily of use to the producer who has to organize the
shooting sessions. It will be easier to regroup the sessions rather
than having to move the entire troupe and all the equipment several
times a day.
It also helps the project manager and the props person, who have
to find a suitable place, preferably cost-free, when selecting all the
necessary locations.
Examples:
• A busy café;
• In front of an iconic monument in the city of X;
• A luxurious lounge with a glass door through which a garden or
pot-plants can be seen.
The dialogues
These help to make sense of the story during the photo shoot. They
will be finalized and corrected at the point where the publication
secretary passes them to the DTP designer. They must be short and
there should not be too many lines in a box (three at the very most
and two in most cases) or the page editing will be extremely compli-
cated and perhaps impossible.
20How to create and publish a photo novel © UNESCO 2008
CLT/CEI/CID/2008/PI/H/I

Examples of how dialogue can be presented in the script:
• Amadou: Well I’m blowed! You live here now? Boureïma: Oh yes,
I came back because my mother’s ill.
•Awa on the phone: When are you coming? Maïra’s voice from the
phone: I’ll be there in an hour!
The commentaries
As we have seen, these are texts designed to complement the
dialogue and the pictures to ensure that the story is completely unders-
tandable. They will be put in as inserts in just a few boxes. They are
only useful during the DTP.
Examples: “A few hours later…” or “Meanwhile, in Timbuktu…” or
“Maïra holds back her tears.”
Special notes
These are additional notes from the writer to the actors, the
producer or the photographer. They are generally very few. Here
are a few examples:
• for one of the actors: “Hamidou must look extremely surprised”;
• for the photographer: “Extremely close shot of Mohamadou’s face
to stress his fright”;
• for the producer: “At least six extras are needed for this scene.
Show different groups of them in the background of each shot, behind
the principal actors, to give the impression of quite a large group
of people”.
21How to create and publish a photo novel © UNESCO 2008
CLT/CEI/CID/2008/PI/H/I
One solution among many
There are several ways of getting a publishable script. Other than
commissioning one from a good house writer, we have already
mentioned the possibility of organizing a competition through the
press. The problem there is that because the photo novel is not a
very widespread genre and is often viewed as a very minor form,
few writers produce scripts of their own volition and few know how
to create them. For that reason, one interesting option is to hold a
writing workshop, especially if the intention is over time to publish
not one but several photo novels: it allows several writers to be
trained simultaneously and allows several scripts of publishable
quality to be obtained right from the first workshop.
A major advantage is that since one is present at the creation, one
can, for instance, ask the writers to work on a particular theme, set
limits on the number of actors involved, or influence the tone, the
values or the standard of language. It is, of course, expensive, but
the project may interest a development partner because the
training provided is a lasting investment.
Here, fairly succinctly, is how to organize such a workshop.
The workshop members
The workshop members should be chosen in the same way as the
writers we discussed earlier. The selection can be a little more
generous because their writing work will be guided and the writers
will not be left entirely to their own devices.
However, the participants should be restricted to about 10. Above
that number it becomes difficult to work with everyone individually
and, above all, the work-sharing sessions become too long and
involved.
Remember to include women as well as men. Not only is this an
ideal operation for promoting women’s creativity, it is also a strong
argument in your search for funding.
22How to create and publish a photo novel © UNESCO 2008
CLT/CEI/CID/2008/PI/H/I
III. HOW TO ORGANIZE A SCRIPT-WRITING WORKSHOP

Facilitating the workshop
Not everyone can just step into the role of facilitating a writing workshop.
There is more to it than simply handing the members paper and
pens and showing them examples of photo novels. You have to:
• give them ideas for finding interesting heroes;
• help them to set up a well-designed plot;
• work with them on the credibility of characters and dialogues;
• teach them how to present the scripts in a genuinely publishable way.
You also have to know how to work with a group of writers, which
is not at all easy as people who write are very sensitive to criticism
and, to be frank, quite touchy. Yet to be productive and enriching,
the workshop must allow everyone to receive well-meant and cons-
tructive feedback, which nonetheless does not spare the text on
which they’re working. For that to happen, everyone needs to be
given enough confidence to accept criticism and listen to peer input:
they must also adopt an open, cooperative attitude to enable them
to give the other writers helpful thoughts and observations on
their own texts. To put participants in such a frame of mind calls for
know-how and tact.
The process
The set-up
A script-writing workshop takes at least five days. If the participants
agree to work on Saturday as well, that is certainly not excessive!
The facilitator should start by establishing trust among the group,
by setting out the project and the timetable and, above all, by stipu-
lating that each writer is both the creator of a text and the first
reader of everyone else’s texts. Everyone must realize from the outset
that criticism can be very useful if it is based on careful and rigo-
rous thought and argument, if it suggests alternative ways forward
and if it is put openly, constructively and courteously. The facilita-
tor’s role is to moderate over-peremptory judgements, if necessary
to soothe wounded pride and especially to suggest solutions when
only the faults have been highlighted. At the end of the day, the aim
is to obtain good scripts: avoiding hurt feelings by saying that every-
thing is fine when it is not will not lead to a publishable production
– but neither will identifying faults without suggesting ways of impro-
ving on them.
No situation should remain frozen, and the writer who has just presented
his/her work and listened to positive and/or negative criticism
should be able to start writing again with precise suggestions and
a degree of confidence in their ability to improve their text.
The choice of topic
If the photo novel you plan to publish has been commissioned, then
the principal topic or at least the secondary topic, linked to the commis-
sioner’s field of activity, will have been decided for you. If the topic
is linked to health, hygiene, customs that oppress part of the public,
and so on, try to convince your partner that this should be an under-
lying theme but never the principal topic, or the work will quite
23How to create and publish a photo novel © UNESCO 2008
CLT/CEI/CID/2008/PI/H/I

simply never be read. Who would want to read 24 pages on exci-
sion?! A doctor might, but probably not a young woman in a village.
If the topic is decided for you, then the subject must be tackled through
the story, but the story must be strong and predominant. It cannot
be just a question of sugaring a bitter pill. What you are really trying
to make is a sweet with health benefits! The workshop facilitator
must get this message across from the start of the first session.
Next, whether the topic has been imposed or not, pre-prepared
key tools can be put forward, such as a set of characters from which
the writers can choose their heroes or rummage around at will (see
the list on the next page). It could also be a set of photographs of
characters in action, scenery, props, etc., put forward by the facili-
tator, among which the writers can choose the two or three which
give them the inspiration to invent their story. You can also try the
word pile-up technique to generate ideas: from two sets of cards
that the facilitator has prepared in advance, the writers draw one
card naming a character (a handsome but lame young man, a mature
childless woman, etc.) and one card summarizing an action or event
(meeting with a tramp, proposal of marriage, start of a journey, etc.).
When the writers have chosen the trigger elements, they are
completely free to think about the story, and are even free to move
away from those triggers if they have a better idea: they are tools
not constraints, and their only purpose is to make it easier to begin
writing.
24How to create and publish a photo novel © UNESCO 2008
CLT/CEI/CID/2008/PI/H/I
A young woman servant from a village
A widower (or widow)
A young man encouraged by his family to emigrate
The leader of a rural association
A midwife
A village head man
A national languages radio broadcaster
A journalist
A taxi-driver
An itinerant restaurant owner
An itinerant bookseller
A primary schoolteacher
A long-distance lorry driver
A musician
A fisher
A potter
An albino
A one-legged person
A “commercial whizzkid”
A confirmed bachelor/spinster
A woman with a heart of gold, “mother” to a whole
district
A man with five wives
A third wife
The synopsis
The workshop facilitator now asks the participants to sketch the
outline of a story, without flourishes, descriptions or details – rather
as one does when one reports an event in brief. In the process of
writing a script, this very brief outline of the story is called the synopsis.
When the writers have completed this task, the first full group discus-
sion is held. Everyone in turn reads out or describes their synopsis
to the others, who ask questions and make observations or sugges-
tions, in the constructive and cordial spirit we spoke of earlier. The
facilitator makes no judgement, not even a positive one, to avoid
influencing the group. He or she only speaks at the end, and only if
nothing of use has emerged from the group discussion or if an essen-
tial point is thought to have been overlooked. The facilitator’s obser-
vations should always be explained and tactfully presented.
At the end of this activity, each writer should have enough guidance
to develop his/her synopsis. Another writing session begins with the
aim of completing a more or less definitive synopsis, in principle by
the end of the first day of the workshop. This does not lead to a
second group reading, but during the session the facilitator visits
each writer in turn to discuss their work, answer questions and if
necessary suggest ways of improving it.
The final synopsis is a short, factual text (not more than one page).
Here is an example written by Fanta Coulibaly during the workshop
that UNESCO organized in Bamako:
Taba, a woman in her 40s, lives in a village with her husband Buba.
She wants to set up a women’s association but her husband is not
very keen on the idea (who will take care of the house, the chil-
dren, the fields?). Just the same she mentions it to her friend Sétou,
who is immediately enthusiastic, and a neighbour, Kadya, who refuses
to join in because she is too busy and because her husband, Chaka,
an old reactionary (grumpy and comical) is against it. There are various
discussions and dealings in the village until the mayor himself is told
about it and, convinced that it is a good thing for the village, asks
Buba to support his wife. Eventually Buba agrees. The mayor produces
a dossier about the electrification of the village that Taba and Sétou
are to defend in Bamako. Taba decides to take advantage of this trip
to visit her friend Alima, who left to get married in the capital and
broke off with her family a very long time ago in quite mysterious
circumstances. Alima’s mother and brother still live in the village and
are baffled by her long silence.
In Bamako Taba wins the case for electrification. She visits Alima and
discovers that her husband and children have died of AIDS and that
she herself is HIV-positive. That’s why she doesn’t dare to contact
her family in the village. Taba promises to do everything she can to
restore relations. On the way home, she and Sétou also decide to
have a midwife visit the village to talk about AIDS problems and try
to prevent other experiences like Alima’s.
Gradually the village comes round to the idea of the women’s asso-
ciation. The midwife visits the village. Taba tries to persuade Alima’s
brother to go to see her in Bamako and bring her back to the village.
The end of the story leaves the outcome in doubt.
25How to create and publish a photo novel © UNESCO 2008
CLT/CEI/CID/2008/PI/H/I
The breakdown
Now the story must be told in all its details, using not words but the
tools of the photo novel: i.e. the photographs (about 120 of them),
dialogues and commentaries.
This part of the work will take at least three days. It may be intro-
duced by an intermediate phase consisting of dividing the story into
scenes: the scene changes, as in the theatre, when a new character
joins the action or there is a change in location or juncture in the
story. This phase is not essential but it has the advantage of providing
better control over the number of photos needed for the whole story,
since a scene very rarely requires more than 10 photos and usually
involves no more than two to five. In 24 pages, therefore, there will
be at most some 30 scenes.
The easiest way to write it is to use the table on page 18, writing in
pencil to make corrections easy. If you decide to add more boxes or
photos whilst you are working, you can always insert a page and number
the additional boxes a, b, c, etc.
At each point in the story, the writers should start by asking “What
can I say with the photos?”, then “What can I say in the dialogues?”
and lastly “What is still needed for the story to be understood and
what must I add in the commentaries?”
They must also be concerned to “keep it short” and to ensure cons-
tantly that they are not using too many photos: if, for instance, they
are a quarter of the way through the story and they have already used
30 photos, they need to go back to see whether they can tighten it,
and they must try to be more economical with the rest of the story.
Writing the dialogues
The dialogues are written in several stages. The first is just a “first
draft” to put down everything there is to be said. It is done box by
box, or rather, photo by photo. The second is when the entire story
has been broken up into boxes and all the dialogues can be read in
one go to make sure that they sound right.
During the first stage, the writers’ two overriding concerns are to
put down everything there is to be said, and to do it concisely. During
the second stage, the object is to refine the choice of vocabulary
and tone appropriate for each character.
At this stage, or at any other intermediate point, the workshop faci-
litator may suggest cross-readings, in twos or small groups, of all or
part of the scripts to ensure that they all benefit from a critical external
eye. This is especially useful to avoid unintelligible passages, over-
large ellipses, etc., in the story and to ensure that the dialogues are
of good quality. Writers are too close to their texts to be able to
do this critical work themselves.
If the facilitator sees that there is too little time, each writer can be
allowed to continue writing whilst the facilitator personally visits
each in turn to play the part of the first reader.
Selecting the script to be published
In theory, by the end of the workshop most of the scripts will have
been finished or almost so. The publisher will in all events be able
to make a selection both on the basis of the synopses and by reading
26How to create and publish a photo novel © UNESCO 2008
CLT/CEI/CID/2008/PI/H/I

the scripts themselves. All that may remain is some additional work
with the writer of the selected script, which can be done more quietly
than in the very short timescale of a workshop.
Selecting the script is not always easy. Obviously the prime criteria
are the choice of theme, the quality of the story and the natural-
ness of the dialogues. Otherwise, the scripts still in contention can
be separated with regard to economic or technical factors. See the
section on feasibility on page 16.
When the script is fully ready it is sent for keying in, still in tabular
format, so that the necessary copies can be made for the producer,
the photographer, the props person, the actors and, later, the DTP
designer. See on the next page an extract of a script made ready
for the photo shoot. At this stage it has not yet been revised and
corrected.
27How to create and publish a photo novel © UNESCO 2008
CLT/CEI/CID/2008/PI/H/I

28How to create and publish a photo novel © UNESCO 2008
CLT/CEI/CID/2008/PI/H/I
Here English is used forthe dialogues andcommentaries, for easeof understanding. Ofcourse, they are normallywritten in the languageof the photo novel. This text still has typos or spelling mistakes: it will be revised and corrected later.

Organizing the shoot
By this we mean the purely physical organization of the shoot, or
in other words, the housekeeping. For 120 photos the shoot will
last eight to 10 days, during which people and equipment will have
to be ferried to the various locations, sometimes from one loca-
tion to the next, any equipment remaining with the crew will have
to be stored, drinking water supplied and food provided for the lunch-
break – if there is to be one.
That cannot be improvised: everything has to be organized in
advance, especially with regard to identifying, choosing and finding
the locations for each scene. Ways of providing food will vary accor-
ding to the location, number of actors and so on. They can range
from a meal prepared by a few women in the village where you are
on location to an order for X meals in a small restaurant. There is
no need to discuss this at length. To limit the transport requirement,
it is of course preferable to choose locations that are as close toge-
ther and as easy to reach as possible. If private vehicles are adequate,
that is perfect. Otherwise, hiring a minibus has the big advantage of
avoiding people turning up late and preventing everyone else from
working. If you hire a driver with the minibus, people can be picked
up in the morning and taken back at night. Meantime, the driver will
stay with the crew and can if necessary drive from location to loca-
tion during the day. All these decisions are above all to be made in
the light of the budget.
Preparing the basic design
Whilst the project manager and perhaps the props person are
working on the physical organization, the producer will be making
preparations with the publisher and/or the publication secretary and
the designer. The number of photos will now be known: the next
task is to allocate them over 24 pages bearing in mind that:
• the absolute maximum per page is six photos, otherwise they will
be too small to show anything clearly and, especially, it will be very
difficult to insert text balloons;
29How to create and publish a photo novel © UNESCO 2008
CLT/CEI/CID/2008/PI/H/I
IV. THE PHOTO SHOOT
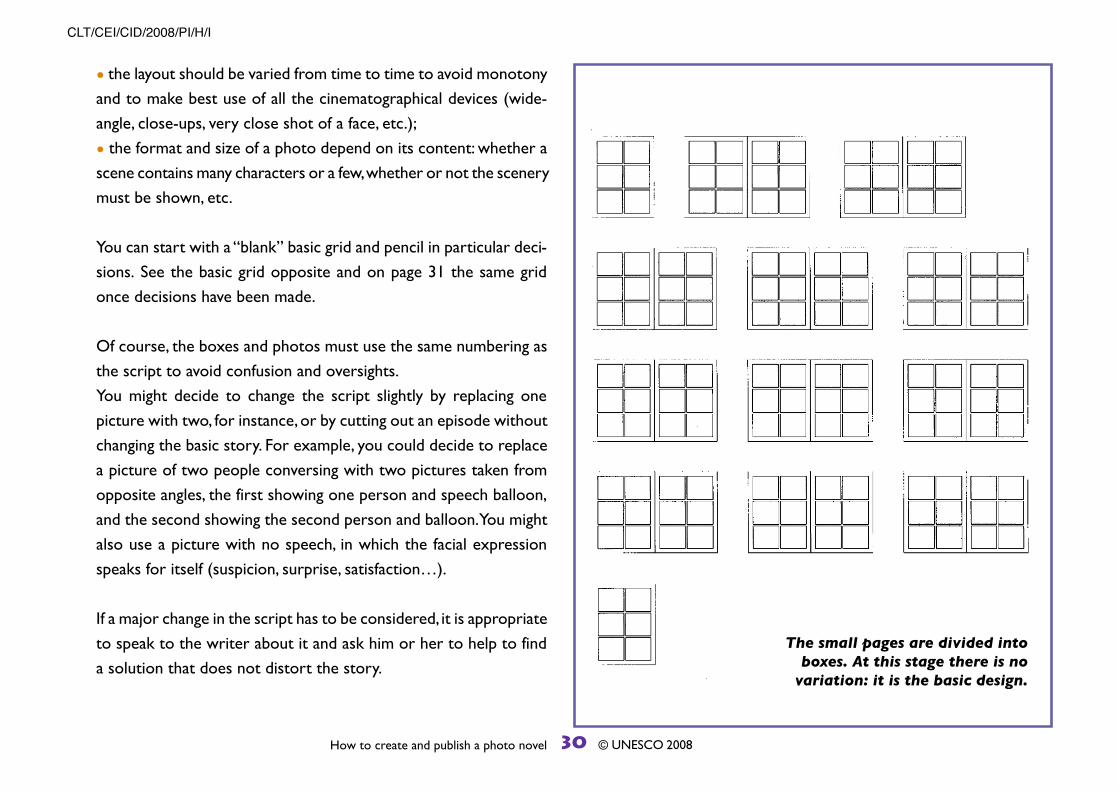
• the layout should be varied from time to time to avoid monotony
and to make best use of all the cinematographical devices (wide-
angle, close-ups, very close shot of a face, etc.);
• the format and size of a photo depend on its content: whether a
scene contains many characters or a few, whether or not the scenery
must be shown, etc.
You can start with a “blank” basic grid and pencil in particular deci-
sions. See the basic grid opposite and on page 31 the same grid
once decisions have been made.
Of course, the boxes and photos must use the same numbering as
the script to avoid confusion and oversights.
You might decide to change the script slightly by replacing one
picture with two, for instance, or by cutting out an episode without
changing the basic story. For example, you could decide to replace
a picture of two people conversing with two pictures taken from
opposite angles, the first showing one person and speech balloon,
and the second showing the second person and balloon. You might
also use a picture with no speech, in which the facial expression
speaks for itself (suspicion, surprise, satisfaction…).
If a major change in the script has to be considered, it is appropriate
to speak to the writer about it and ask him or her to help to find
a solution that does not distort the story.
30How to create and publish a photo novel © UNESCO 2008
CLT/CEI/CID/2008/PI/H/I
The small pages are divided intoboxes. At this stage there is no
variation: it is the basic design.

Selecting the order of shooting
The basic design as it stands at the end of this process will be used
by the producer and the photographer when they come to posi-
tion the actors and to frame the photos. It will also be used by the
DTP designer when setting up the pages on the computer before
integrating the photographs.
The producer continues preparing the necessary tools, next listing
the scenes, numbering them and establishing the following table for
each of them:
31How to create and publish a photo novel © UNESCO 2008
CLT/CEI/CID/2008/PI/H/I
Scene number
Location
Number of photos
Order number of photos
Characters present
Costume number
Props
The pages and photo boxes have beennumbered. The number and shape of theboxes has been changed. The instructions
on the first little page are for the DTPdesigner and relate to the size of themargins and gutters between photos.
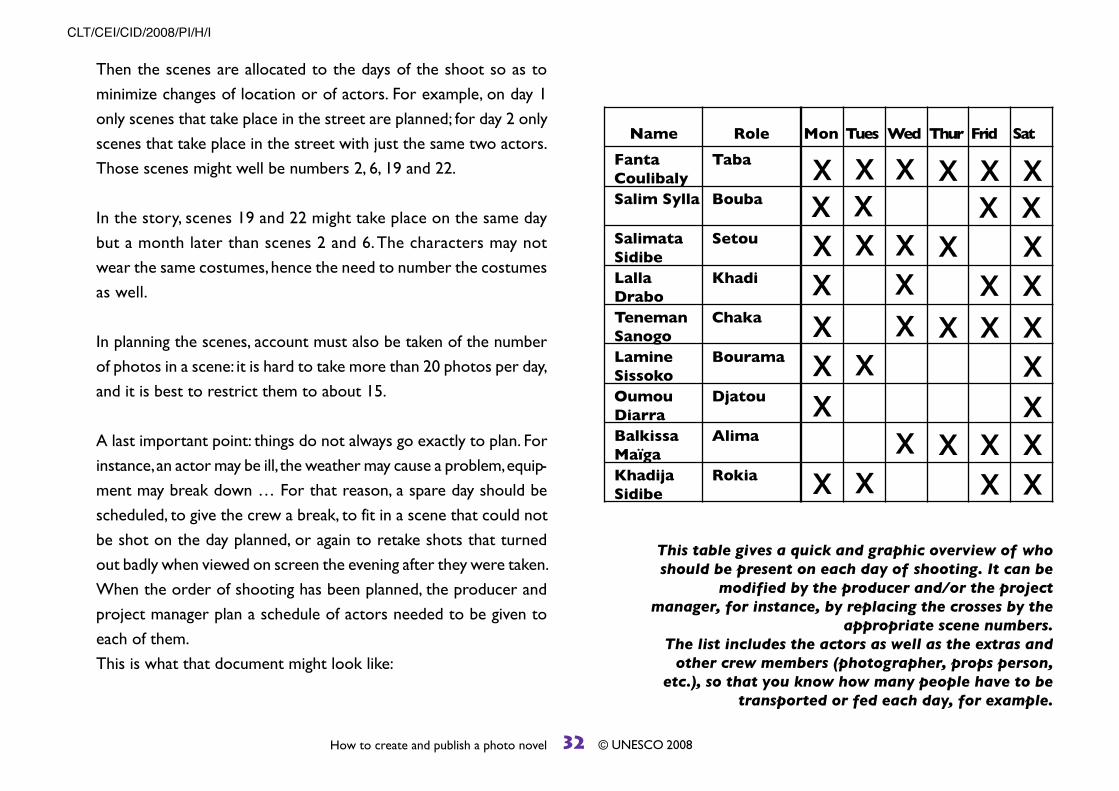
Then the scenes are allocated to the days of the shoot so as to
minimize changes of location or of actors. For example, on day 1
only scenes that take place in the street are planned; for day 2 only
scenes that take place in the street with just the same two actors.
Those scenes might well be numbers 2, 6, 19 and 22.
In the story, scenes 19 and 22 might take place on the same day
but a month later than scenes 2 and 6. The characters may not
wear the same costumes, hence the need to number the costumes
as well.
In planning the scenes, account must also be taken of the number
of photos in a scene: it is hard to take more than 20 photos per day,
and it is best to restrict them to about 15.
A last important point: things do not always go exactly to plan. For
instance, an actor may be ill, the weather may cause a problem, equip-
ment may break down … For that reason, a spare day should be
scheduled, to give the crew a break, to fit in a scene that could not
be shot on the day planned, or again to retake shots that turned
out badly when viewed on screen the evening after they were taken.
When the order of shooting has been planned, the producer and
project manager plan a schedule of actors needed to be given to
each of them.
This is what that document might look like:
32How to create and publish a photo novel © UNESCO 2008
CLT/CEI/CID/2008/PI/H/I
Mon Tues Wed Thur Frid SatName Role
FantaCoulibaly
Taba
Salim Sylla Bouba
SalimataSidibe
Setou
LallaDrabo
Khadi
TenemanSanogo
Chaka
LamineSissoko
Bourama
OumouDiarra
Djatou
BalkissaMaïga
Alima
KhadijaSidibe
Rokia
x x x x x xx x x xx x x x xx x x xx x x x xx x xx x
x x x xx x x x
This table gives a quick and graphic overview of whoshould be present on each day of shooting. It can be
modified by the producer and/or the projectmanager, for instance, by replacing the crosses by the
appropriate scene numbers. The list includes the actors as well as the extras and
other crew members (photographer, props person,etc.), so that you know how many people have to be
transported or fed each day, for example.
Scenery and costumes
Meanwhile the props person is not idle: he or she is getting toge-
ther all the costumes and props called for in the script. Even the
configuration of the locations may have to be changed in the light
of the scenery that the story requires.
When the producer has allocated the scenes, the props person numbers
the costumes and makes notes in a notebook or photographs the
costumes and numbers them. The term “costume” includes jewel-
lery, footwear, hats, etc. as well as clothing. A mistake here can ruin
a whole day’s shooting – for instance, if an actor wears different
shirts on photos taken on two different days, but in the story the
scenes happen on the same occasion.
Similarly, the props person must note carefully what props are used
in each scene, and where, so as to ensure that a bench, a tool or
perhaps a vase does not dematerialize from one picture to the next!
Lighting
The photographer is responsible for the lighting and for finding ways
of making up for bad light, dazzling light which might over-expose
or flatten the photos, or simply lighting that is unevenly distributed
among the characters.
Professional photographers generally have spotlights and floodlights
that allow light to be reflected onto faces or towards a particular
part of the scene.
Taking the photos
The actors do not need to learn their roles by heart as in the theatre
or cinema. They read through the synopsis at the beginning to learn
the general story, then before each shot they read their lines from
the script box by box so as to adapt their poses to the words they
are supposed to be saying. They are wearing the right costumes, as
checked by the props person, and have been made up to avoid shiny
foreheads or noses. The scenery has been set up and checked by
the producer and the props person. Everything is ready.
As would a film director, the producer organizes each scene, posi-
tions the actors, and checks the intended picture layout against the
design or the script if he or she has placed the formats on it. The
photographer takes up an appropriate position.
Theoretically, if the story is in a language that is written from left
to right, for ease of reading the first character to speak is positioned
on the left of the picture. But that should not lead to a monoto-
nous alternation of pictures with the characters always positioned
in the same order.
For instance, the following sequence might be chosen:
Photo 1, A left, B right, two speech balloons. Photo 2, close-up of A,
one speech balloon. Photo 3, B left, A right, two speech balloons.
Photo 4, B left, turning away with the back of his head towards the
camera, A right seen frontally, two balloons.
33How to create and publish a photo novel © UNESCO 2008
CLT/CEI/CID/2008/PI/H/I
Varying the positioning of the characters should not make the story
harder to follow. If, for example, it is decided to show fully just one
of the characters in a dialogue, to have more room in the picture,
in the foreground part of a shoulder and/or the head of the other
character can be shown in rear view or in three-quarter rear view.
This presentation has two advantages: firstly, the reader can see that
the second character is still there and a speech balloon might even
be positioned in loose relationship with the shoulder; and secondly,
the picture gains in depth and this gives it a third dimension and
makes it more lifelike.
As the photographer takes the picture, the actors speak their lines
and repeat them whilst also repeating the gestures and/or move-
ments that go with them, as naturally as possible. They should speak
at the same time, not one after the other, because the speech
balloons will be shown at the same time and their mouths have to
move with the speech. One risk to be managed at this stage is that
of the actors “over-acting”, exaggerating their gestures sometimes
to the point of the grotesque.
Usually about 10 shots are taken for each picture to be published,
so as to have a sufficient choice. Sometimes eyes may be closed, a
face may be hidden by a hand, a pose may be ridiculous or the ligh-
ting wrong. That makes some shots unusable and the best of the
series must be selected.
Selecting the photos
The photos are generally selected in three phases. Digital cameras
now make it possible to make a first selection on the spot, imme-
diately after each photo has been taken, which makes it possible to
start again if none of the shots seems good enough, or to make do
with a shorter series if you are quite confident that several of the
shots are satisfactory.
The second selection is made after shooting has ended each evening,
when the photographer downloads the photos from the camera to
the computer. As everyone is usually quite tired, if the computer
has enough memory this selection may also be left to the last day.
At this point the photographer, producer and project manager
select three to five shots for each picture to be published, so as to
leave some flexibility for the DTP designer, who makes the third
and last choice when placing the pictures on the model and espe-
cially when positioning the speech balloons. The pictures are care-
fully filed as work progresses, in separate folders, one per scene, to
ensure that the DTP designer can find them easily.
34How to create and publish a photo novel © UNESCO 2008
CLT/CEI/CID/2008/PI/H/I
Picture format and digital processing
In theory, when the shots reach the DTP designer’s computer,
they have been sorted not just by quality but also in line with the
preliminary design made up before the shoot. If changes have been
made during the shoot, they are normally noted on the design or
on the script.
Another important point is that these shots are very big files (three
to six megapixels or several MB). This means that the computer must
have a lot of storage, but also that the composition file must be parti-
tioned to prevent the computer continually “crashing” and destroying
part of the work each time.
Moreover the DTP designer will have to crop and re-size the photos
in Photoshop to avoid having to compress them too much when
importing them into the model (more than 80% reduction in XPress
will cause a loss of quality). Lastly, they have to be converted into
CMYK if the file is to be printed in four-colour printing or into
greyscale if it is to be done in black and white. All this takes a lot
of time: there are about 120 pictures to be processed one by one.
Of course, this work is only done with the final selection of
pictures for each box.
In theory, no colour touch-ups should be needed if the photogra-
pher has used the same camera for all the pictures. In any case, unless
the DTP designer is a specialist Photoshop user, touch-ups of that
kind are to be avoided because bad touch-ups are the worst possible.
Starting the page composition
Whilst the publication secretary is revising the dialogue, together
with the writer if changes have been made during the shoot, the
DTP designer starts creating his or her file on the basis of the preli-
minary design, keeping the size of the boxes (picture blocks) quite
close to that design.
35How to create and publish a photo novel © UNESCO 2008
CLT/CEI/CID/2008/PI/H/I
V. THE DESIGN AND THE PRODUCTION
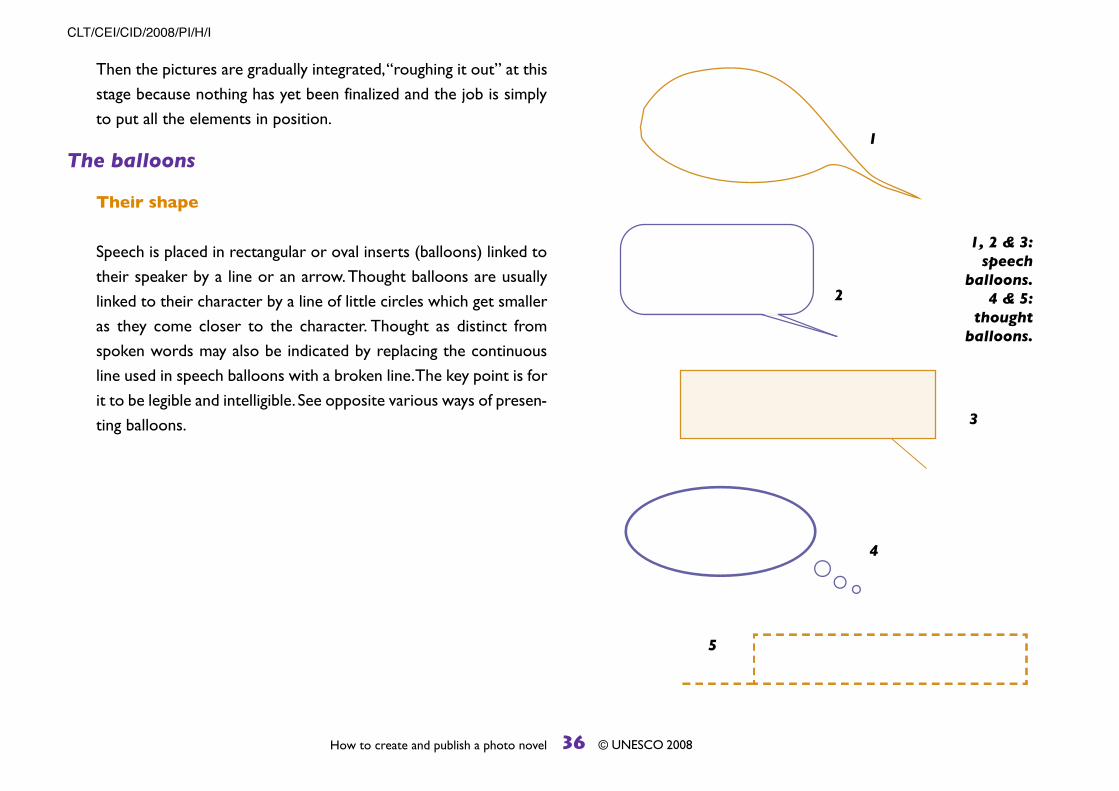
Then the pictures are gradually integrated, “roughing it out” at this
stage because nothing has yet been finalized and the job is simply
to put all the elements in position.
The balloons
Their shape
Speech is placed in rectangular or oval inserts (balloons) linked to
their speaker by a line or an arrow. Thought balloons are usually
linked to their character by a line of little circles which get smaller
as they come closer to the character. Thought as distinct from
spoken words may also be indicated by replacing the continuous
line used in speech balloons with a broken line. The key point is for
it to be legible and intelligible. See opposite various ways of presen-
ting balloons.
36How to create and publish a photo novel © UNESCO 2008
CLT/CEI/CID/2008/PI/H/I
1, 2 & 3:speech
balloons. 4 & 5:
thoughtballoons.
1
2
3
4
5
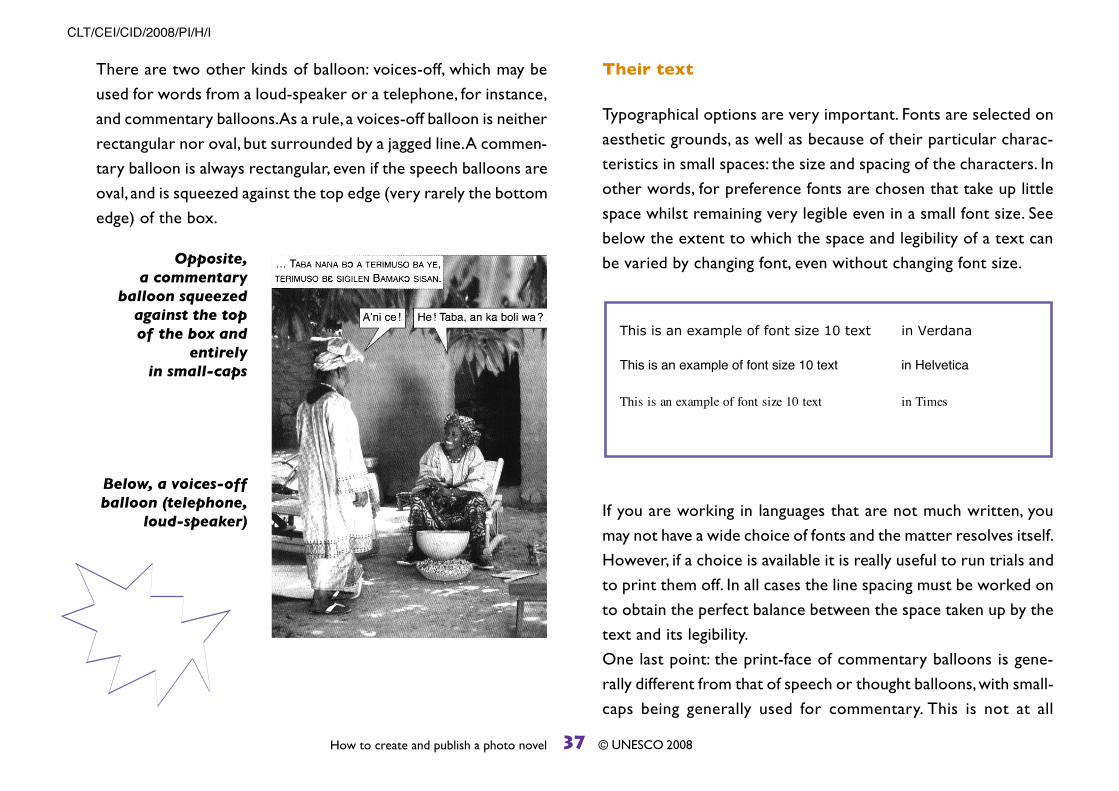
There are two other kinds of balloon: voices-off, which may be
used for words from a loud-speaker or a telephone, for instance,
and commentary balloons. As a rule, a voices-off balloon is neither
rectangular nor oval, but surrounded by a jagged line. A commen-
tary balloon is always rectangular, even if the speech balloons are
oval, and is squeezed against the top edge (very rarely the bottom
edge) of the box.
Their text
Typographical options are very important. Fonts are selected on
aesthetic grounds, as well as because of their particular charac-
teristics in small spaces: the size and spacing of the characters. In
other words, for preference fonts are chosen that take up little
space whilst remaining very legible even in a small font size. See
below the extent to which the space and legibility of a text can
be varied by changing font, even without changing font size.
If you are working in languages that are not much written, you
may not have a wide choice of fonts and the matter resolves itself.
However, if a choice is available it is really useful to run trials and
to print them off. In all cases the line spacing must be worked on
to obtain the perfect balance between the space taken up by the
text and its legibility.
One last point: the print-face of commentary balloons is gene-
rally different from that of speech or thought balloons, with small-
caps being generally used for commentary. This is not at all
37How to create and publish a photo novel © UNESCO 2008
CLT/CEI/CID/2008/PI/H/I
Opposite, a commentary
balloon squeezedagainst the top of the box and
entirely in small-caps
Below, a voices-offballoon (telephone,
loud-speaker)
This is an example of font size 10 text in Verdana
This is an example of font size 10 text in Helvetica
This is an example of font size 10 text in Times
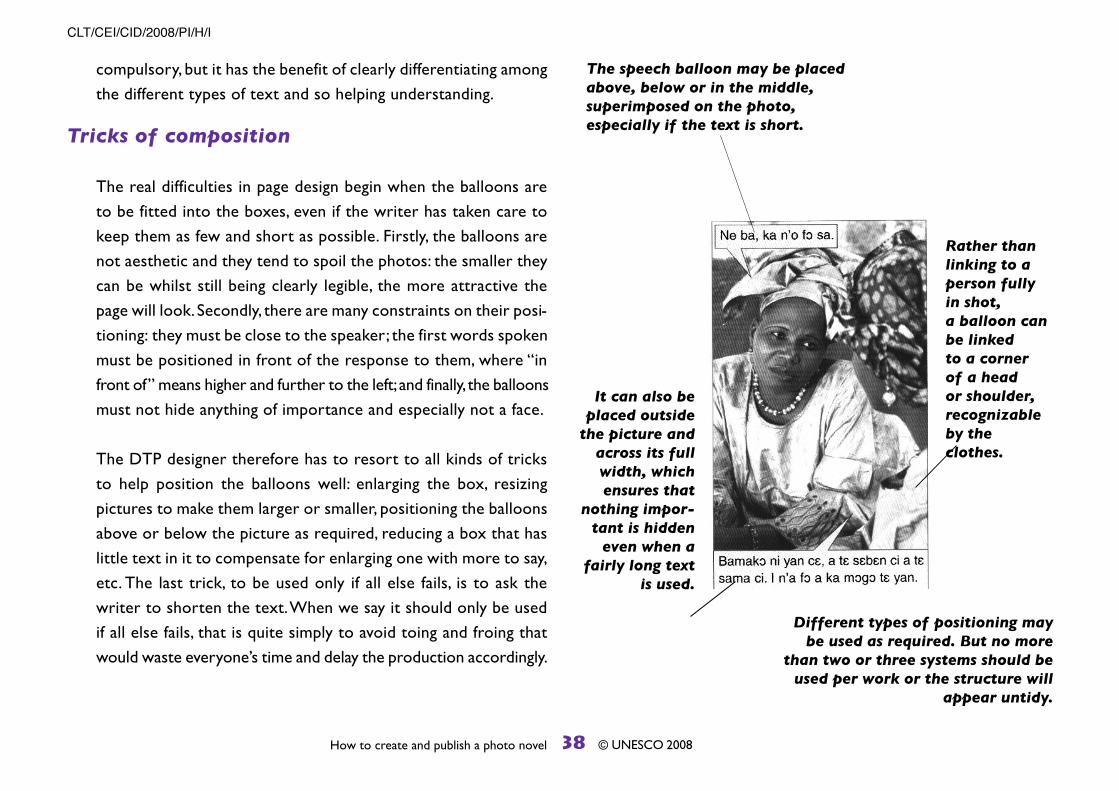
compulsory, but it has the benefit of clearly differentiating among
the different types of text and so helping understanding.
Tricks of composition
The real difficulties in page design begin when the balloons are
to be fitted into the boxes, even if the writer has taken care to
keep them as few and short as possible. Firstly, the balloons are
not aesthetic and they tend to spoil the photos: the smaller they
can be whilst still being clearly legible, the more attractive the
page will look. Secondly, there are many constraints on their posi-
tioning: they must be close to the speaker; the first words spoken
must be positioned in front of the response to them, where “in
front of” means higher and further to the left; and finally, the balloons
must not hide anything of importance and especially not a face.
The DTP designer therefore has to resort to all kinds of tricks
to help position the balloons well: enlarging the box, resizing
pictures to make them larger or smaller, positioning the balloons
above or below the picture as required, reducing a box that has
little text in it to compensate for enlarging one with more to say,
etc. The last trick, to be used only if all else fails, is to ask the
writer to shorten the text. When we say it should only be used
if all else fails, that is quite simply to avoid toing and froing that
would waste everyone’s time and delay the production accordingly.
38How to create and publish a photo novel © UNESCO 2008
CLT/CEI/CID/2008/PI/H/I
The speech balloon may be placedabove, below or in the middle, superimposed on the photo, especially if the text is short.
It can also beplaced outside
the picture andacross its fullwidth, whichensures that
nothing impor-tant is hidden
even when afairly long text
is used.
Rather thanlinking to aperson fullyin shot, a balloon canbe linked to a corner of a head or shoulder,recognizableby theclothes.
Different types of positioning maybe used as required. But no more
than two or three systems should beused per work or the structure will
appear untidy.
The final file
The proofs must be read particularly carefully, especially if the
DTP designer does not speak and/or read fluently the language
in which they are working, which is frequently the case.
Checking must cover:
• that none of the speech balloons is the wrong way round or
omitted;
• that the words are attributed to the correct speaker, i.e. that
the arrows link the balloons with the right people;
• that no commentary balloon is missing;
• that none of the photos themselves is wrong way round;
• that no face is hidden;
• that there are no errors left in the text.
The proofs must be read by both the publication secretary and
the writer.
Once the proofs have been corrected and the publisher has given
the sign-off, the DTP designer must check that all the photo files
have been converted into CMYK before transmitting the file to
the printer for photoengraving together with all the photos and
fonts. If Acrobat Distiller is available, it is strongly recommended
that the XPress file be converted into high definition PDF format,
which will ensure that nothing slips when switching machines. If
that is not possible, a reference print-out on a good-quality printer
will be sufficient.
Printing and binding
Photoengraving does not normally give rise to problems since the
photo files are already in digital format: the problems that occur
when scanning paper documents cannot arise. However, close super-
vision of the printing and binding is essential. Note that it is very
important to be present at the setting, if possible, especially if the
contents are in colour.
The list of points that the publisher should check is as follows:
• Paper quality: the paper must be thick enough to avoid any risk
of seeing through to the other side. It must also be a superior
quality to the offset paper used in normal publications. The ideal
is a coated paper, matt, satin or gloss, in which the fine coat of
kaolin prevents the ink from swimming and blurring all the pictures.
• Proper colour control at the point of setting, if the contents
are in four-colour printing. This must also be checked regularly
at intermediate stages in the printing, as well as at the “switchover”
point when the reverse side is to be printed. Otherwise the
colours of clothes, buildings etc. may appear to change as the pages
are turned.
• Correct setting of the stapler to ensure that the staples are
properly located on the fold: otherwise the brochure will be hard
to open.
• Correct setting of the guillotine to avoid the pages being cut
on a slant.
39How to create and publish a photo novel © UNESCO 2008
CLT/CEI/CID/2008/PI/H/I

As the publisher is not present at this stage of production, these
last two points can only be verified after the event by checking
finished publications.
The same holds true for checking the drying: if the pages have
not been dried in good conditions and for long enough, they will
be stained with blots.
If the work is really not up to prevailing standards, there should
be no hesitation in renegotiating with the printer or in deman-
ding a re-print, if necessary. It is not acceptable to ruin the work
of an entire team, at the end of the project, through lack of care
or through technical problems. Neither is it acceptable to bring
to market or place in readers’ hands a work whose legibility is
ruined by poor printing.
40How to create and publish a photo novel © UNESCO 2008
CLT/CEI/CID/2008/PI/H/I

The conditions for success
This book shows that to a greater extent than any other publishing
venture, the photo novel is the result of complex collaboration. A
very varied set of specialists work together or pass the work on to
each other in the course of its production, and are brought to pool
their skills to achieve the best possible results.
Consequently, the organization must enable each of them to commit
fully and to give of their best: technical or material problems must
be minimized; operations must be planned sufficiently far ahead for
each stage to take place without surprises; all members must know
clearly what their responsibilities and share in the work are and what
quality of result is expected; the budget must be managed prudently
and rigorously; nothing should be left to chance or overlooked. These
are essential conditions for success. But it is not enough to publish
a lovely book. None of that is of use unless the distribution of the
work is well organized.
Ideas for distribution
We discuss this in the context of West Africa, where we work
regularly: that does not mean that the distribution methods we
shall mention are valueless elsewhere, but it does mean that they
may possibly (or probably!) have to be adapted if you are working
in a different context. That is because distribution is so depen-
dent on the context that ideas that can be applied in one part of
the world may not be applicable in another.
We have emphasized two key points that must be considered when
thinking about the distribution of a photo novel: its high produc-
tion cost and its value as a tool for teaching the pleasure of
reading. The cost implies either that it must be very widely distri-
buted or that the sale price will be exorbitant. In an African
context, where the population that can read national languages
has a very limited purchasing power, the direct sales method is
virtually inapplicable.
41How to create and publish a photo novel © UNESCO 2008
CLT/CEI/CID/2008/PI/H/I
BY WAY OF CONCLUSION
However, the literacy NGOs may be both highly effective part-
ners and very interested in distributing this kind of document,
especially as a post-literacy training tool. Not only may they be
prepared to purchase relatively large stocks, but they already
have the structure in place to handle the distribution themselves,
usually through their networks of trainers who are in direct
contact with the public. Further, the NGOs should be encouraged
not to distribute the brochures free but to sell them at a symbolic
price commensurate with the public’s purchasing power, other-
wise the book will be devalued and the impression created that
it should always be free.
In the case of novels likely to interest children, adolescents or
young adults another possible track is to use school libraries, whether
financed by State budgets or their own funds and whether managed
by the district or by the schools themselves.
A secondary outlet may also be sought through national-language
newspapers, which may buy the serialization rights (publishing a
page per day or per week), as a way of retaining their readership.
Lastly, why not reach a publicity partnership deal under which the
outside back cover is reserved for one or more advertisers keen
to see their products promoted through a publication that will
remain in households? In exchange, you get a proportion of the
costs funded or logistical help with distribution.
You definitely have to be resourceful to publish photo novels!
42How to create and publish a photo novel © UNESCO 2008
CLT/CEI/CID/2008/PI/H/I

Contracts and remunerationWe have seen that in some circumstances it may be possible to agree
with the writer that publication will not attract a fee. This may be
so, for instance, where attendance of a writing workshop can be
considered as training and hence as a payment in kind.
It is also the case where publication is the first prize in a literary
competition. This does not alter the fact that a contract must be
agreed with the writer.
The contract will inter alia stipulate:
• the features of the work that is the subject of the contract;
• the duration and terms of the grant of rights, and in particular
whether the publisher is entitled to translate the work or to sell it
in other countries or to grant rights to other publishers, etc., and
on what terms;
• whether a fee is or is not to be paid, either as a lump sum or in
proportion to sales and, in the latter case, what percentage and when
payable. International copyright law stipulates that writers’ fees
should be royalty-based, but for works in national languages this would
be so unfavourable that a lump sum is customarily preferred;
• the competent jurisdiction in case of litigation.
The photographer’s contract will be similar to that of the writer,
but the remuneration will be higher and will almost certainly be a
lump sum. The photographer’s contract must stipulate that the
publisher is entitled to reproduce photographs without further
remuneration for purposes of publicizing the work.
43How to create and publish a photo novel © UNESCO 2008
CLT/CEI/CID/2008/PI/H/I
annexes : contracts, etc.

Letters of engagement
The other crew members cannot lay claim to royalties, but before
the photo shoot a letter of engagement stipulating the terms and
the detail of the work to be done, the remuneration and the sche-
dule should be signed with each of them.
Consent to publication
A document should be drawn up for signature by each actor and
possibly the extras or at least their agents stipulating that they agree
to the photographs in which they appear being published in the photo
novel and in related publicity.
44How to create and publish a photo novel © UNESCO 2008
CLT/CEI/CID/2008/PI/H/I
* **