a hands-on-guide-for-working-with-mapplets-130208025312-phpapp01 (2)
TRANSCRIPT

Informatica Power Center 9.0.1
Informatica Lab#1 “Working with Mapplets”
Description: BISP is committed to provide BEST learning material to the beginners and advance learners. In the same series, we have prepared a complete end-to end Hands-on Guide for building financial data model in Informatica. The document focuses on how the real world requirement should be interpreted. The mapping document template with very simplified steps and screen shots makes the complete learning so easy. The document focuses on loading duplicate and Unique records in separate tables. Join our professional training program and learn from experts.
History:Version Description Change Author Publish Date0.1 Initial Draft Upendra Upadhyay 12th Aug 20110.1 Review#1 Amit Sharma 18th Aug 2011
www.bispsolutions.com | www.hyperionguru.com | www.bisptrainings.com | Page 1

TABLE OF CONTENTS
S.NO TITLE PAGE. NO.
1 Introduction. 3-4
2 Creating Repository & Folder . 5-8
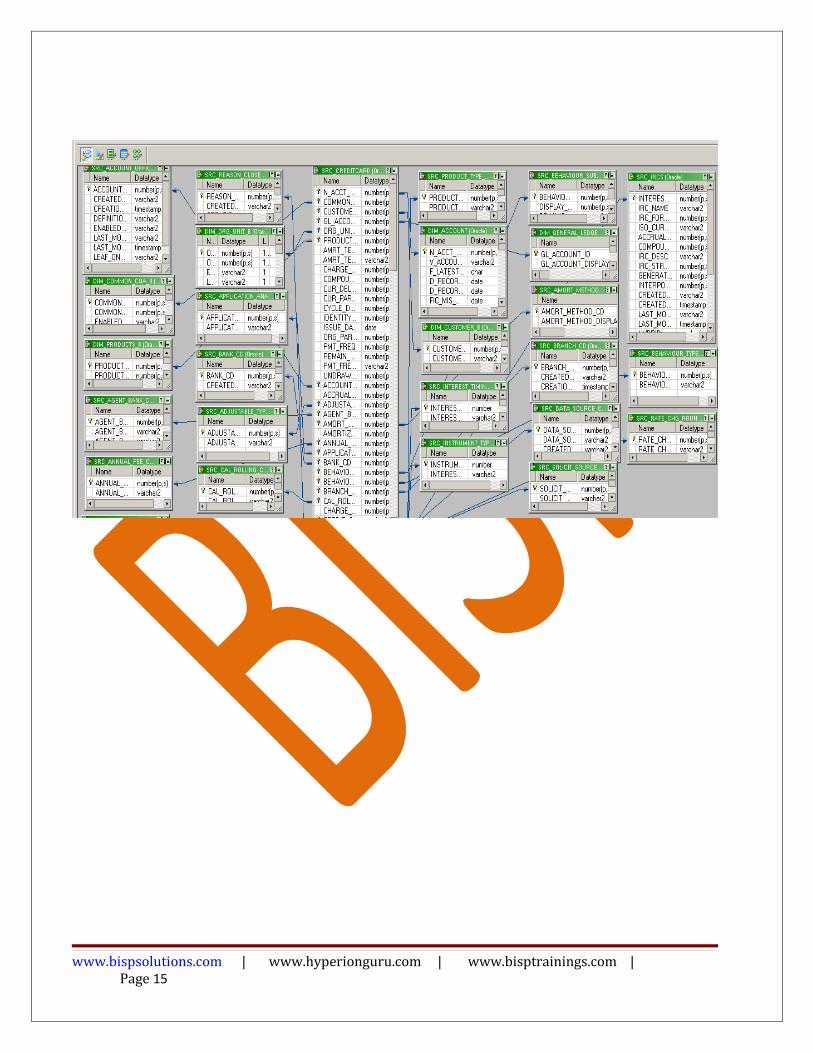
3 Import Data Source And Target Table. 9-16
4 Create Mapplet & Mapping. 17-29
5 Create Workflow. 30-35
6 Workflow Monitor & Review data. 36-37
www.bispsolutions.com | www.hyperionguru.com | www.bisptrainings.com | Page 2

Mapplet
A mapplet is a reusable object created in the Mapplet Designer. It contains a set of transformations and transformation logic that can be reused in multiple mappings. For example, if you have several fact tables that require a series of dimension keys, create a mapplet containing a series of Lookup transformations to find each dimension key. You can then use the mapplet in each fact table mapping, rather than recreate the same lookup logic in each mapping. When you use a mapplet in a mapping, you use an instance of the mapplet. Like a reusable transformation, any change made to the mapplet is inherited by all instances of the mapplet.
Mapplets help simplify the mappings in the following ways:
Include source definition. Use multiple source definitions and source qualifiers to provide source data for a mapping.
Accept data from sources in a mapping. Use an input transformation to receive source data from the mapping.
Include multiple transformations. A mapplet can contain as many transformations as you need.
Pass data to multiple transformations. Each output transformation in a mapplet represents one output group in a mapplet, to feed data to multiple transformations in the mapping.
Contain unused ports. Do not have to connect all mapplet input and output ports in a mapping.
In addition to transformation logic, a mapplet has the following components:
Mapplet Input
Mapplet input can originate from a source definition and/or from an Input transformation in the mapplet.
Using Source Definitions for Mapplet Input
Use one or more source definitions in a mapplet to provide source data. When you use such a mapplet in a mapping, it is the first object in the mapping pipeline and contains no input ports.
Using Input Transformations for Mapplet Input
Use an Input transformation in a mapplet when you want the mapplet to receive input from a source in a mapping. When you use the mapplet in a mapping, the input transformation provides input ports so you can pass data through the mapplet. Each port in the Input transformation connected to another transformation in the mapplet becomes an input port of the mapplet. Input transformations can
www.bispsolutions.com | www.hyperionguru.com | www.bisptrainings.com | Page 3
Introduction

receive data from a single active source. Unconnected ports do not display in the Mapping Designer. You can connect an Input transformation to multiple transformations in a mapplet. However, you cannot connect a single port in the Input transformation to multiple transformations in the mapplet.
Mapplet Output: Use an output transformation in a mapplet to pass data through the mapplet into a mapping. A mapplet must contain at least one output transformation with at least one connected port in the mapplet. Each connected port in an output transformation displays as a mapplet output port in a mapping. Each output transformation in a mapplet displays as an output group in a mapping. An output group can pass data to multiple pipelines in a mapping.
Mapplet Port: Mapplet ports display only in the Mapping Designer. Mapplet ports consist of input ports from input transformations and output ports from output transformations. If a mapplet uses source definitions rather than input transformations for input, it does not contain any input ports in the mapping.
Creating a Mapplet: A mapplet can be “active” or “passive” depending on the transformations in the mapplet. Active Mapplets contain one or more active transformations. Passive Mapplets contain only passive transformations. When you use a mapplet in a mapping, all transformation rules apply to the mapplet depending on the mapplet type. For example, as with an active transformation, you cannot concatenate data from an active mapplet with a different pipeline.
To create and configure a mapplet in the Mapplet Designer:
1. Create a mapplet. Click Mapplets > Create from the menu in the Mapplet Designer. The recommended naming convention for mapplets is mpltMappletName.
2. Create mapplet transformation logic. Create and link transformations in the same manner as in a mapping.
3. Create mapplet ports
www.bispsolutions.com | www.hyperionguru.com | www.bisptrainings.com | Page 4
Validating Mapplets
The Designer automatically validates a mapplet when you save it. You can also validate a mapplet using the Mapplets > Validate menu command. The Designer validates the mapplet pipeline in the same way it validates a mapping. In addition, the Designer performs the following checks specific to mapplets:
The mapplet should contain Input transformations and/or source definitions with at least one port connected to a transformation in the mapplet.
The mapplet should contain at least one Output transformation with at least one port connected to a transformation in the mapplet.
Editing Mapplets
You can edit a mapplet in the Mapplet Designer. When you save changes to a mapplet, all instances of the mapplet and all shortcuts to the mapplet inherit the changes. These changes may invalidate mappings that use the mapplet. You can make the following changes to a mapplet without affecting the validity of existing mappings and sessions:
Add input or output ports. Change port names or comments. Change Input or Output transformation names or comments. Change transformation names, comments, or properties. Change port default values for transformations in the mapplet. Add or remove transformations in the mapplet, providing you do not change the mapplet type
from active to passive or from passive to active. To keep existing mappings valid when you edit a mapplet used in the mapping: Do not delete a port from the mapplet. The Designer deletes mapplet ports in the mapping
when you delete links to an Input or Output transformation or when you delete ports connected to an Input or Output transformation.
Do not change the datatype, precision, or scale of a mapplet port. The datatype, precision, and scale of a mapplet port is defined by the transformation port to which it is connected in the mapplet. Therefore, if you edit a mapplet to change the datatype, precision, or scale of a port connected to a port in an Input or Output transformation, you change the mapplet port
Do not change the mapplet type. If you remove all active transformations from an active mapplet, the mapplet becomes passive. If you add an active transformation to a passive mapplet, the mapplet becomes active.
Using Mapplets in Mappings
In a mapping, a mapplet has input and output ports that you can connect to other transformations in the mapping. You do not have to connect all mapplet ports in a mapping. However, if the mapplet contains an SQL override, you must connect all mapplet output ports in the mapping.
Description
www.bispsolutions.com | www.hyperionguru.com | www.bisptrainings.com | Page 5
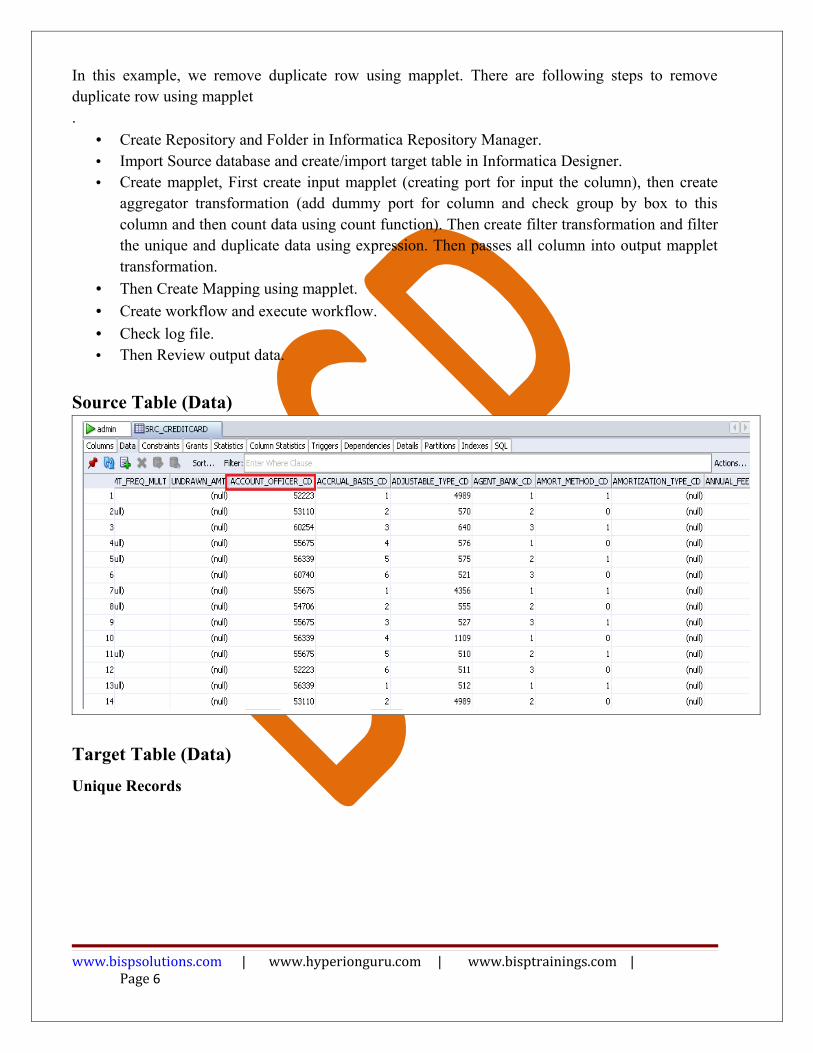
In this example, we remove duplicate row using mapplet. There are following steps to remove duplicate row using mapplet.
• Create Repository and Folder in Informatica Repository Manager.• Import Source database and create/import target table in Informatica Designer.• Create mapplet, First create input mapplet (creating port for input the column), then create
aggregator transformation (add dummy port for column and check group by box to this column and then count data using count function). Then create filter transformation and filter the unique and duplicate data using expression. Then passes all column into output mapplet transformation.
• Then Create Mapping using mapplet.
• Create workflow and execute workflow.
• Check log file.• Then Review output data.
Source Table (Data)
Target Table (Data)
Unique Records
www.bispsolutions.com | www.hyperionguru.com | www.bisptrainings.com | Page 6
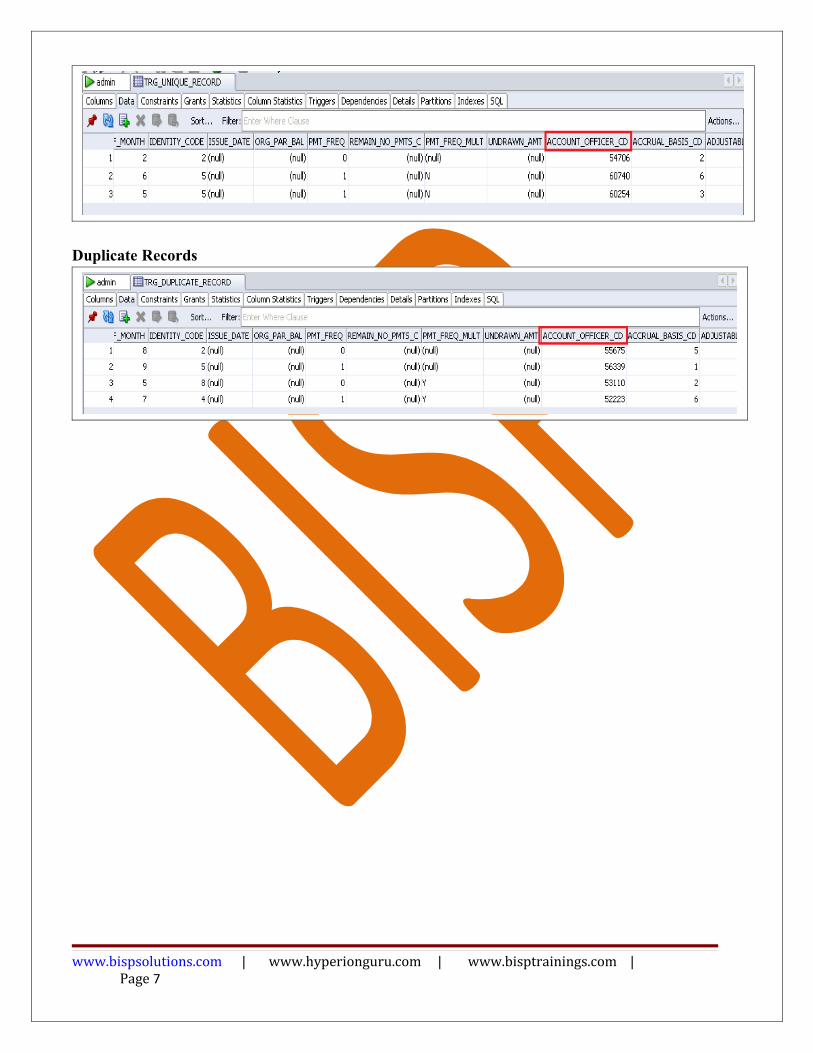
Duplicate Records
www.bispsolutions.com | www.hyperionguru.com | www.bisptrainings.com | Page 7
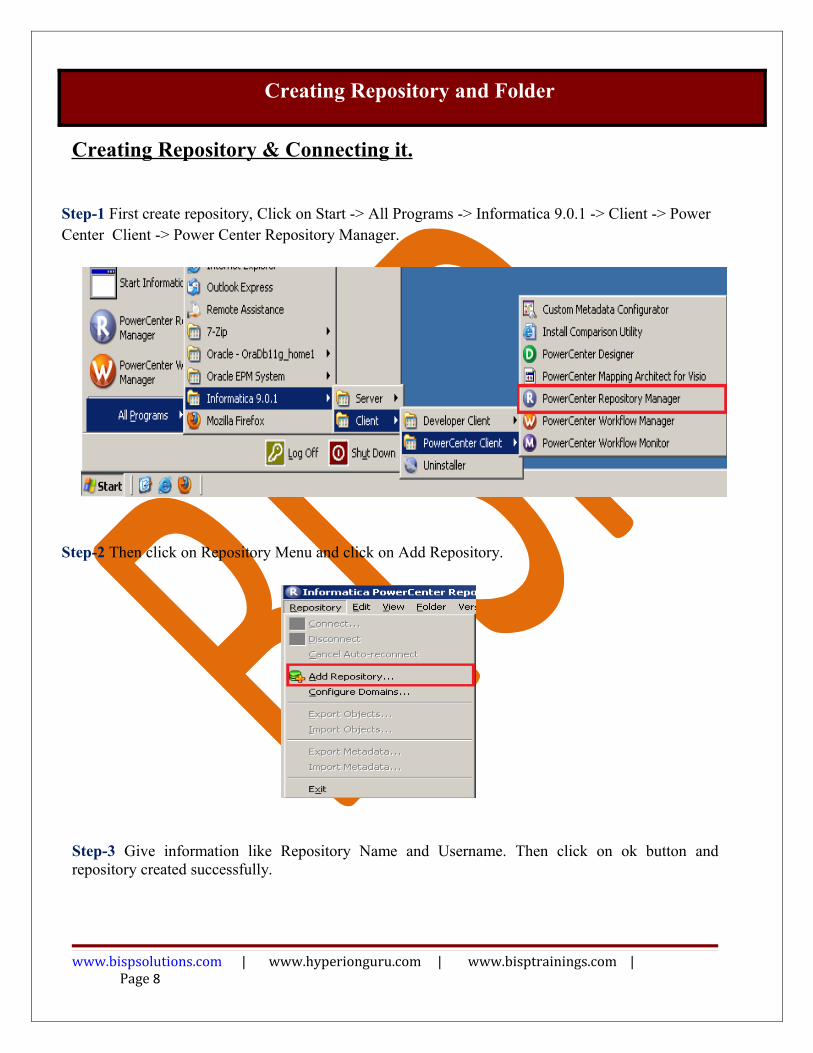
Creating Repository & Connecting it.
Step-1 First create repository, Click on Start -> All Programs -> Informatica 9.0.1 -> Client -> Power Center Client -> Power Center Repository Manager.
Step-2 Then click on Repository Menu and click on Add Repository.
Step-3 Give information like Repository Name and Username. Then click on ok button and repository created successfully.
www.bispsolutions.com | www.hyperionguru.com | www.bisptrainings.com | Page 8
Creating Repository and Folder
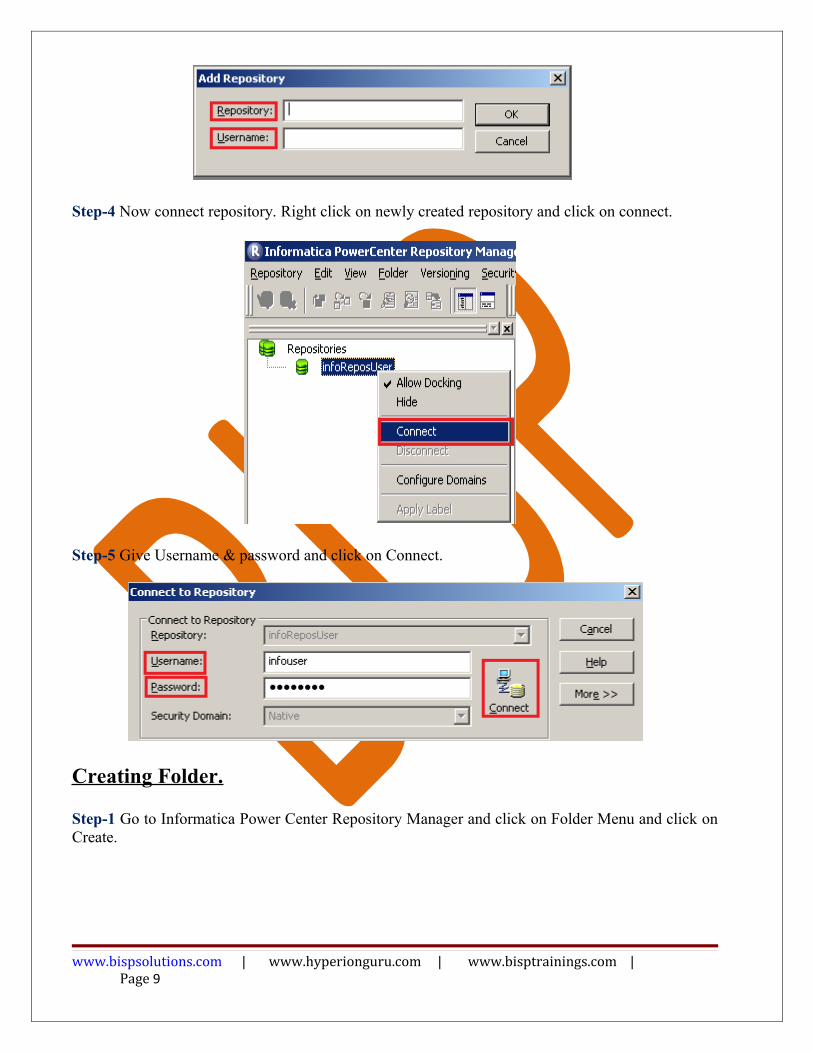
Step-4 Now connect repository. Right click on newly created repository and click on connect.
Step-5 Give Username & password and click on Connect.
Creating Folder.
Step-1 Go to Informatica Power Center Repository Manager and click on Folder Menu and click on Create.
www.bispsolutions.com | www.hyperionguru.com | www.bisptrainings.com | Page 9
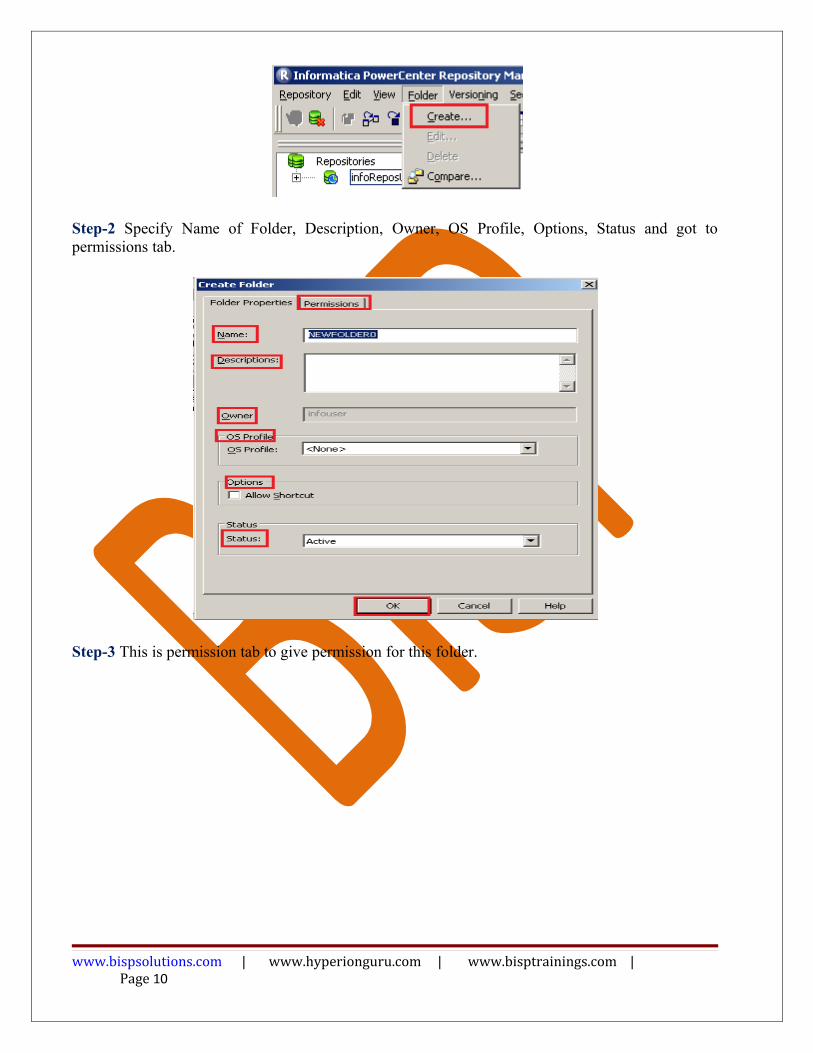
Step-2 Specify Name of Folder, Description, Owner, OS Profile, Options, Status and got to permissions tab.
Step-3 This is permission tab to give permission for this folder.
www.bispsolutions.com | www.hyperionguru.com | www.bisptrainings.com | Page 10

Step-4 This is newly created Folder
www.bispsolutions.com | www.hyperionguru.com | www.bisptrainings.com | Page 11
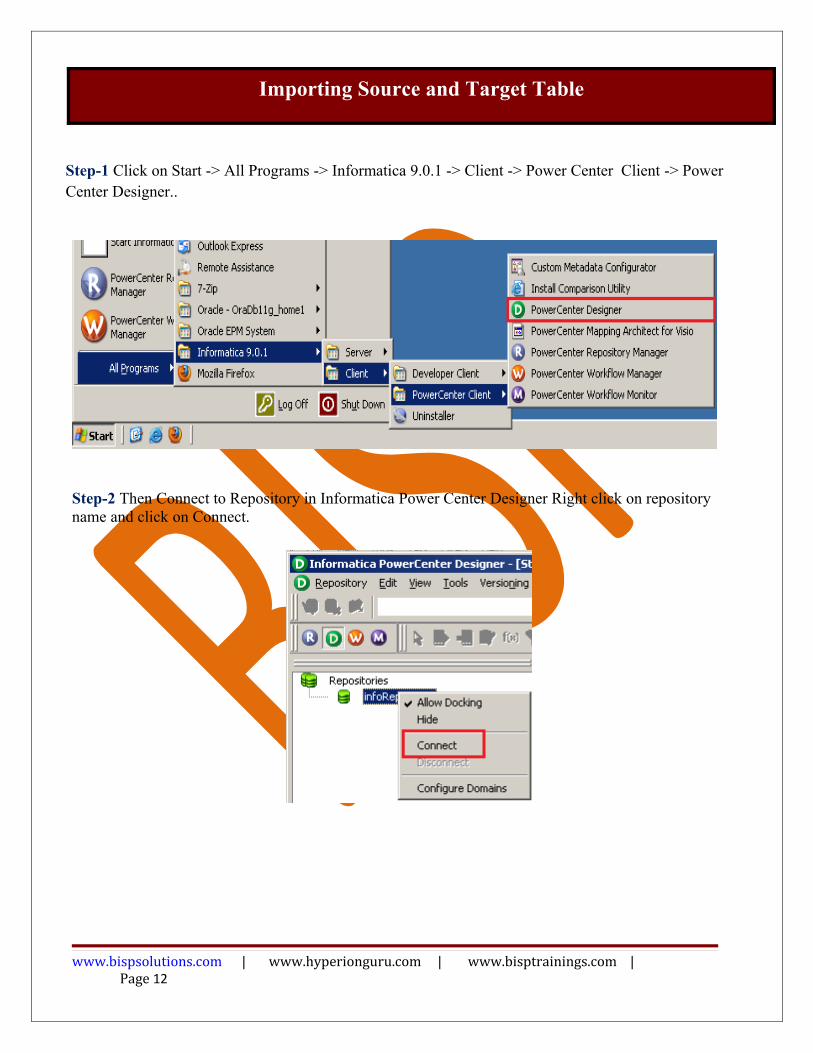
Step-1 Click on Start -> All Programs -> Informatica 9.0.1 -> Client -> Power Center Client -> Power Center Designer..
Step-2 Then Connect to Repository in Informatica Power Center Designer Right click on repository name and click on Connect.
www.bispsolutions.com | www.hyperionguru.com | www.bisptrainings.com | Page 12
Importing Source and Target Table

Step-3 Go to Tools Menu and click on Source Analyzer to import source table. And then go to Sources Menu in Informatica Power Center Designer.
Step-4 And then select Source menu and click on Import from database
www.bispsolutions.com | www.hyperionguru.com | www.bisptrainings.com | Page 13
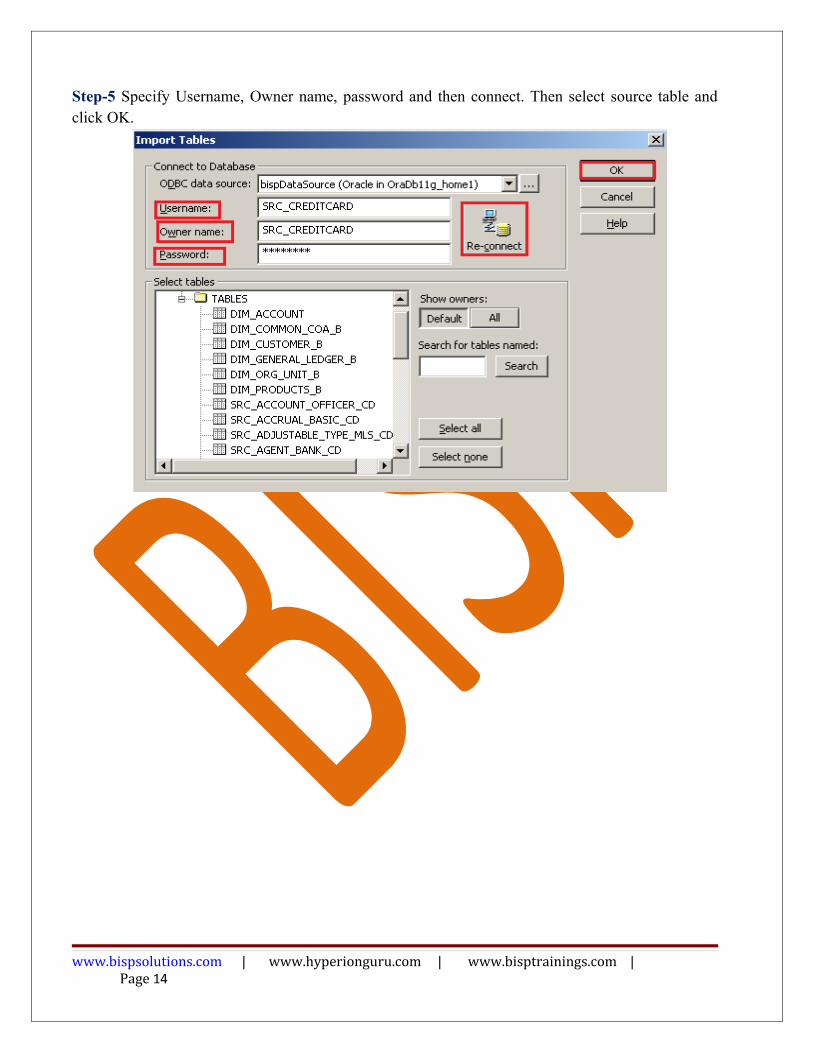
Step-5 Specify Username, Owner name, password and then connect. Then select source table and click OK.
www.bispsolutions.com | www.hyperionguru.com | www.bisptrainings.com | Page 14
www.bispsolutions.com | www.hyperionguru.com | www.bisptrainings.com | Page 15

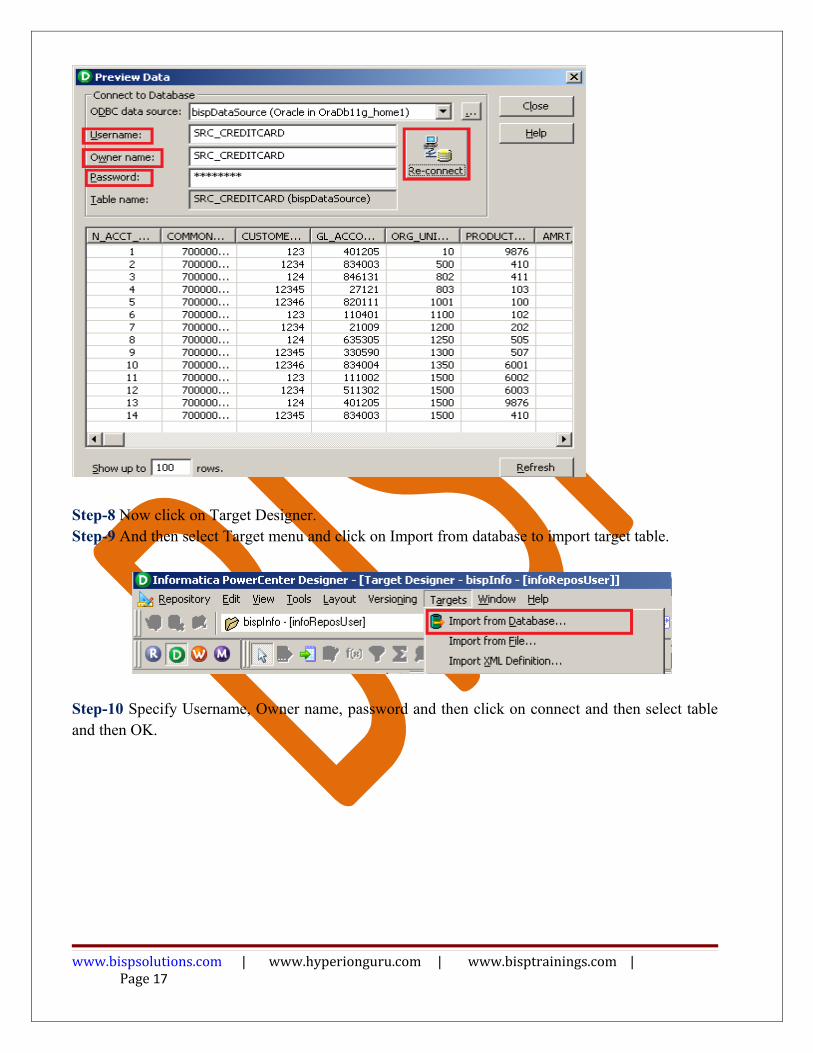
Step-6 View data in source analyzer, Right click on SRC_CREDITCARD and select Preview Data.
Step-7 Specify Username and Password and connect it. Then Close it.
www.bispsolutions.com | www.hyperionguru.com | www.bisptrainings.com | Page 16
Step-8 Now click on Target Designer.Step-9 And then select Target menu and click on Import from database to import target table.
Step-10 Specify Username, Owner name, password and then click on connect and then select table and then OK.
www.bispsolutions.com | www.hyperionguru.com | www.bisptrainings.com | Page 17

Step-11 To view data select table and Right click on that table after that specify Username and Password and connect it. Then Close it.
www.bispsolutions.com | www.hyperionguru.com | www.bisptrainings.com | Page 18

www.bispsolutions.com | www.hyperionguru.com | www.bisptrainings.com | Page 19
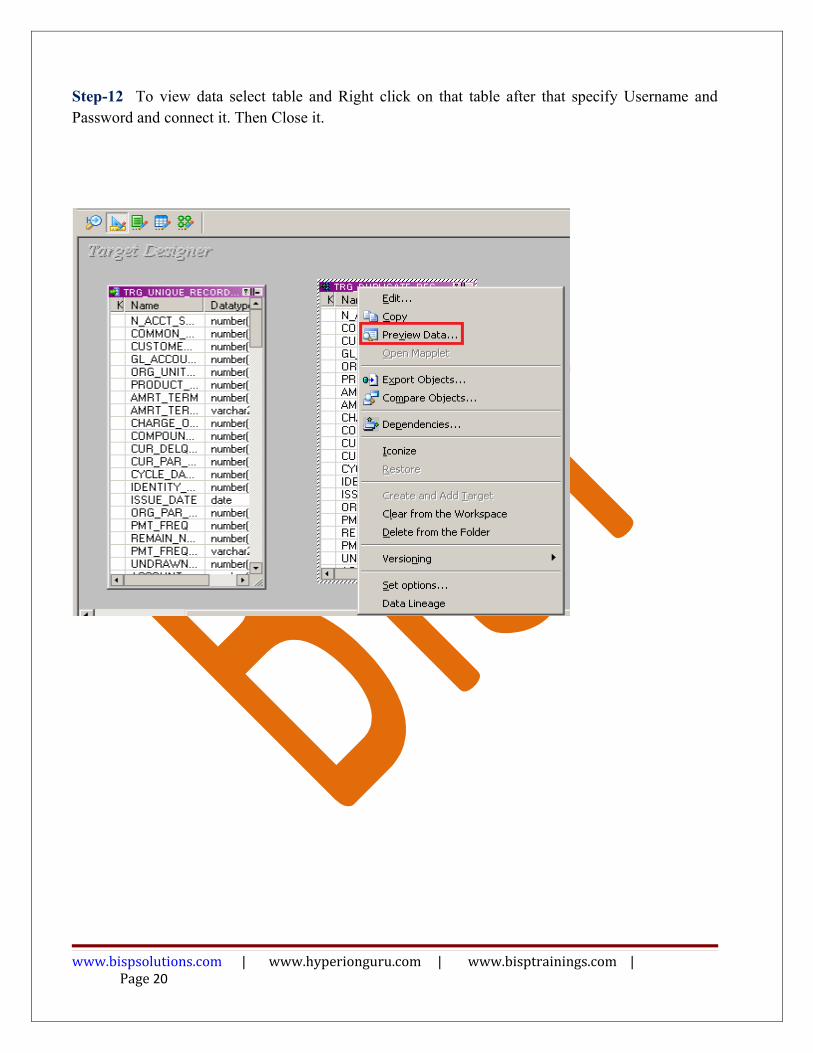
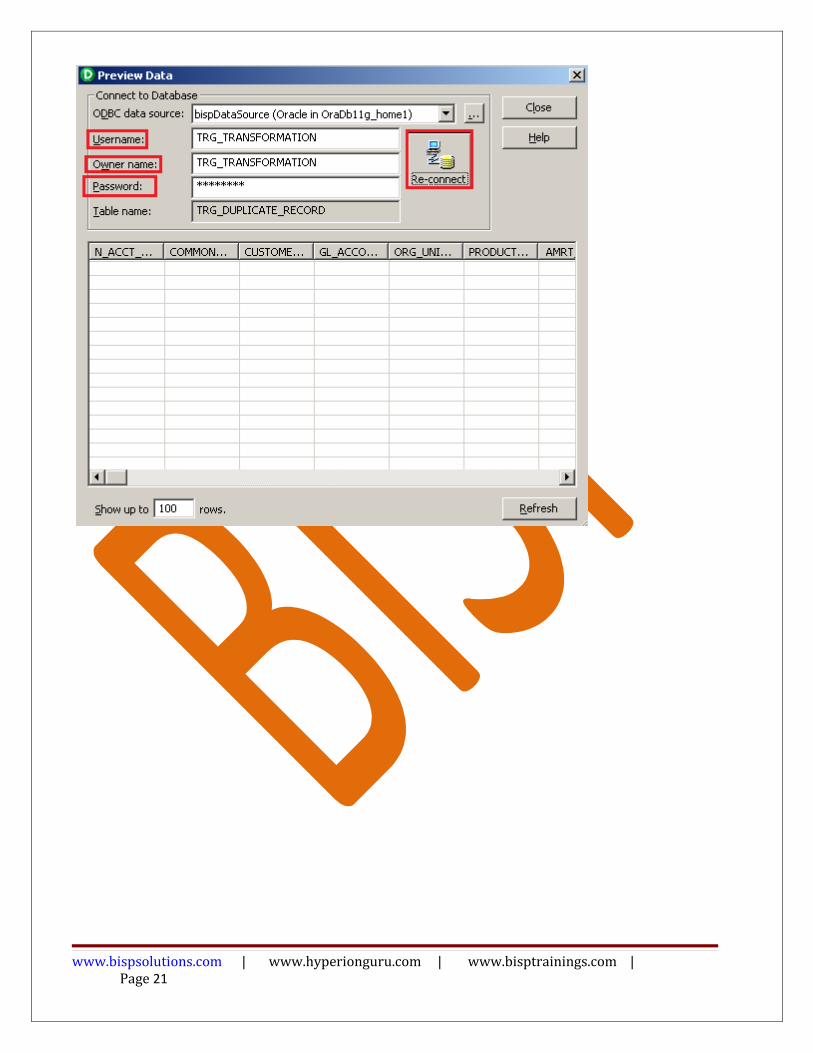
Step-12 To view data select table and Right click on that table after that specify Username and Password and connect it. Then Close it.
www.bispsolutions.com | www.hyperionguru.com | www.bisptrainings.com | Page 20
www.bispsolutions.com | www.hyperionguru.com | www.bisptrainings.com | Page 21
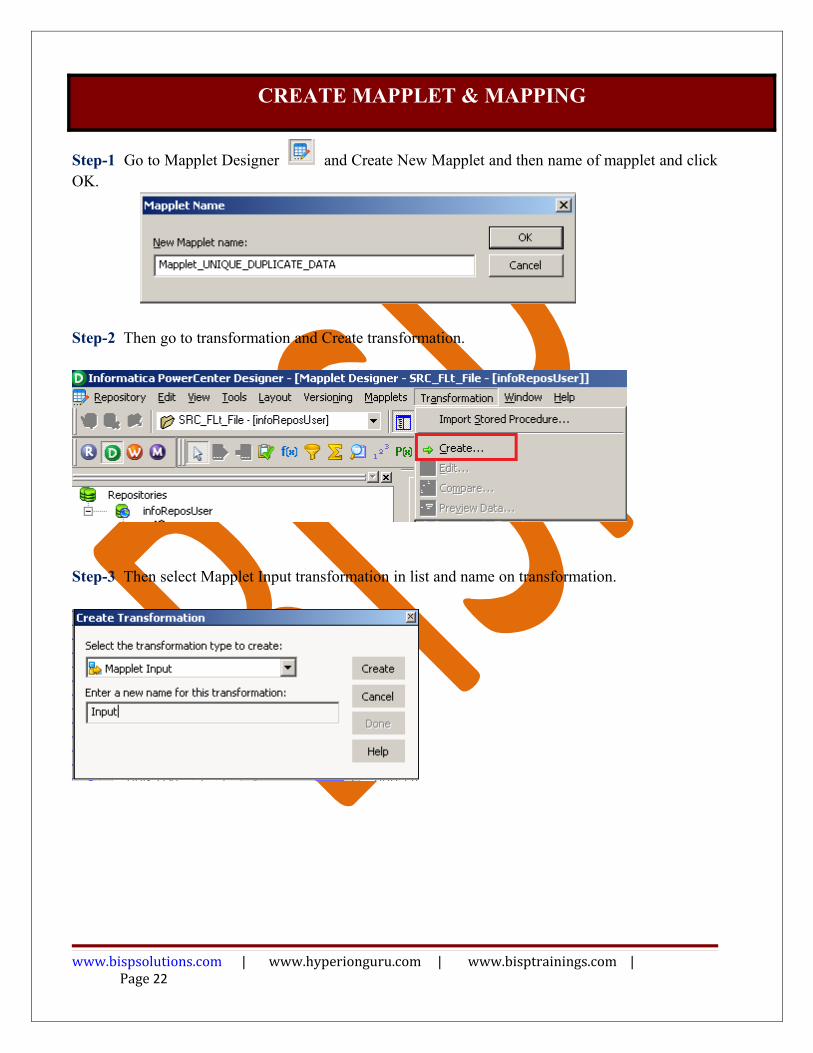
Step-1 Go to Mapplet Designer and Create New Mapplet and then name of mapplet and click OK.
Step-2 Then go to transformation and Create transformation.
Step-3 Then select Mapplet Input transformation in list and name on transformation.
www.bispsolutions.com | www.hyperionguru.com | www.bisptrainings.com | Page 22
CREATE MAPPLET & MAPPING
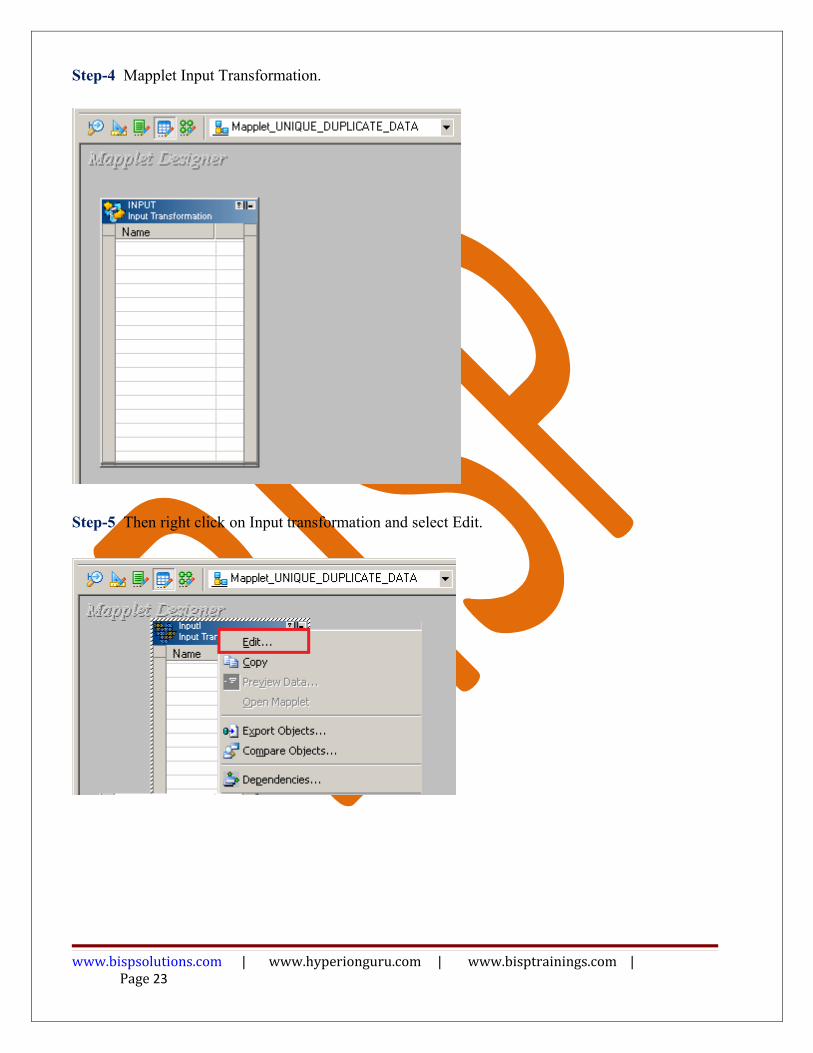
Step-4 Mapplet Input Transformation.
Step-5 Then right click on Input transformation and select Edit.
www.bispsolutions.com | www.hyperionguru.com | www.bisptrainings.com | Page 23

Step-6 Then go to Ports tab and create port and specify name of port and click apply and ok.
Step-7 Then create aggregator transformation, click on transformation menu ant select create then select aggregator in transformation drop down and name of transformation.
www.bispsolutions.com | www.hyperionguru.com | www.bisptrainings.com | Page 24
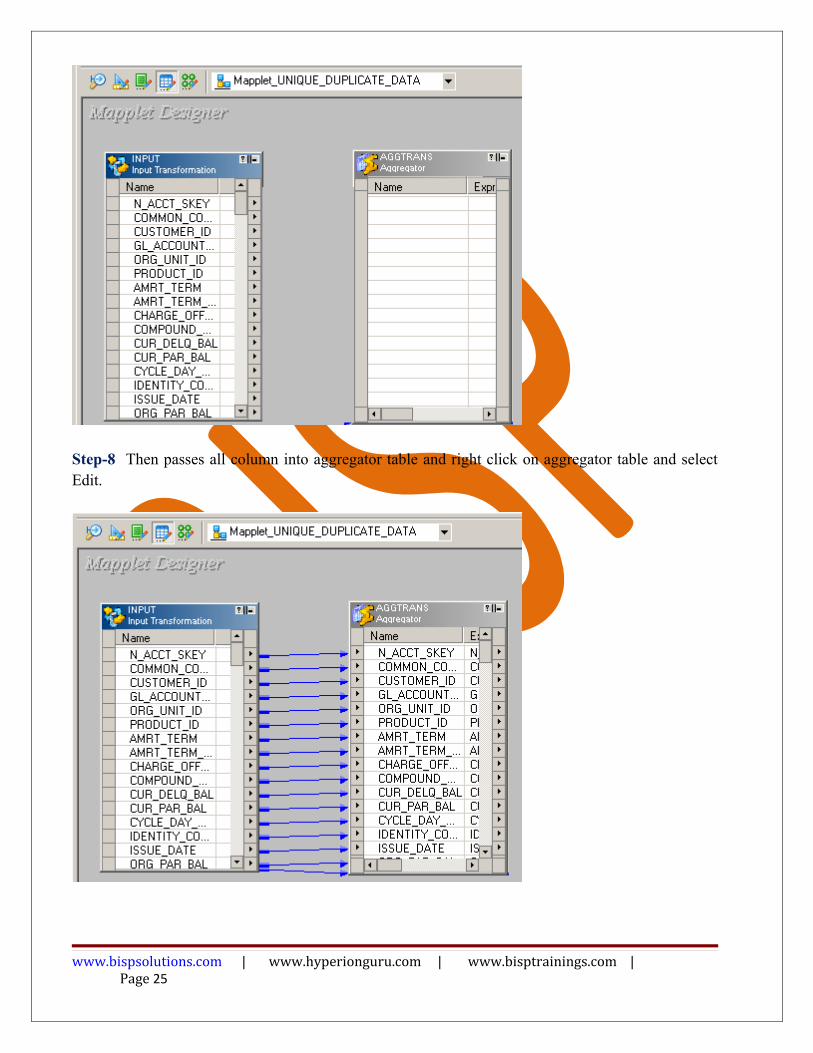
Step-8 Then passes all column into aggregator table and right click on aggregator table and select Edit.
www.bispsolutions.com | www.hyperionguru.com | www.bisptrainings.com | Page 25
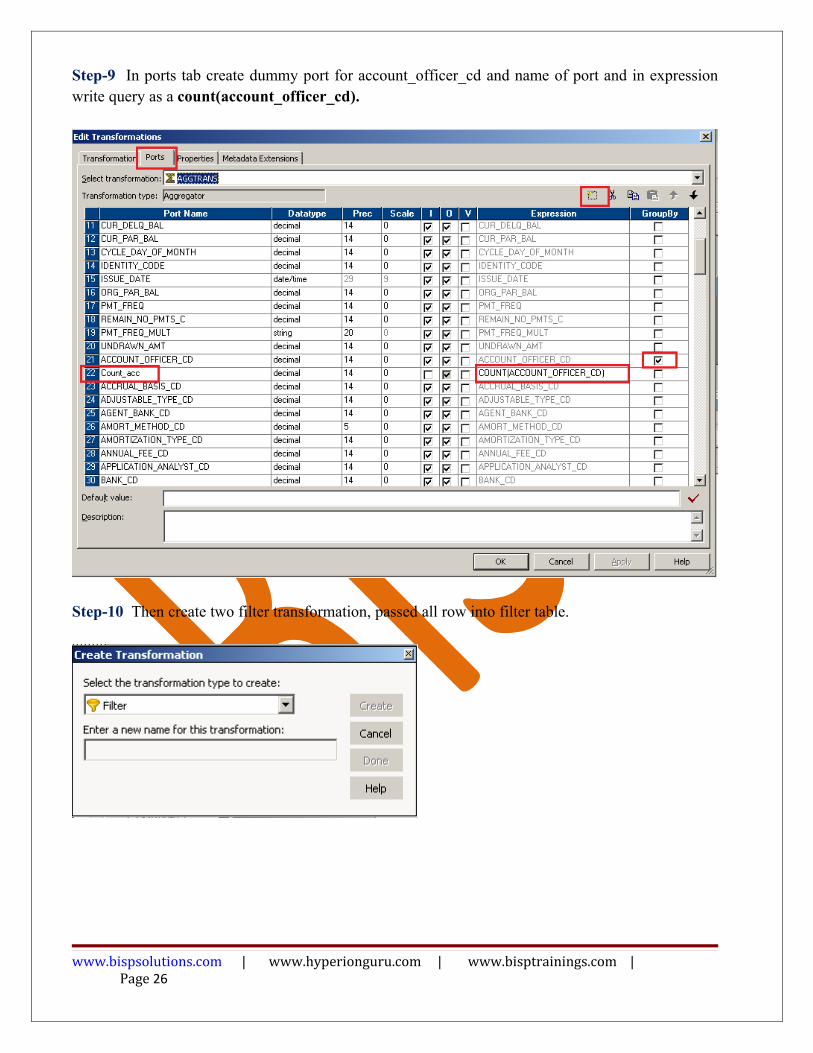
Step-9 In ports tab create dummy port for account_officer_cd and name of port and in expression write query as a count(account_officer_cd).
Step-10 Then create two filter transformation, passed all row into filter table.
www.bispsolutions.com | www.hyperionguru.com | www.bisptrainings.com | Page 26
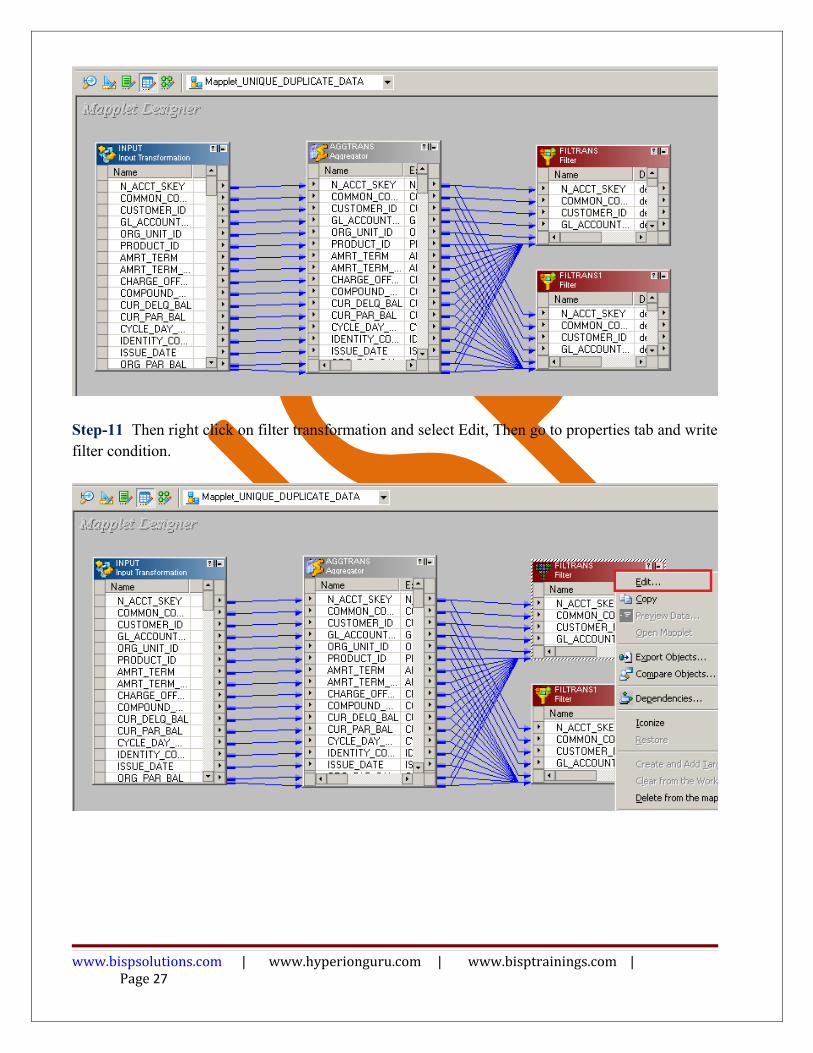
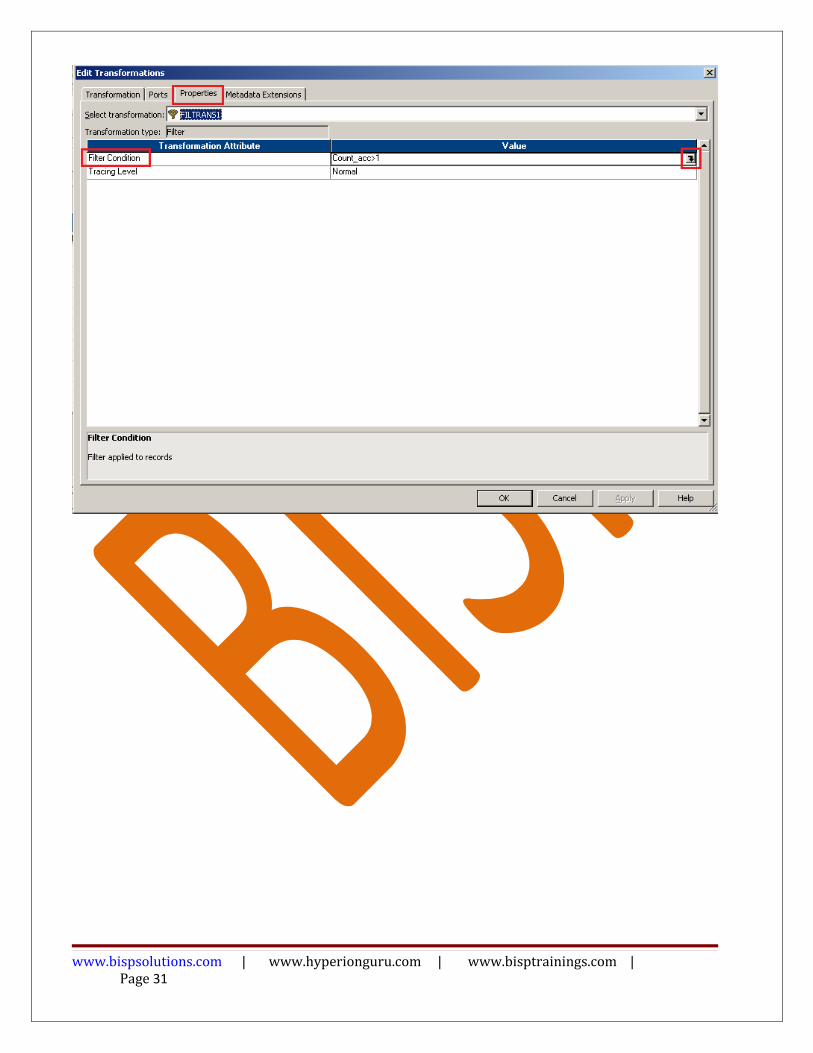
Step-11 Then right click on filter transformation and select Edit, Then go to properties tab and write filter condition.
www.bispsolutions.com | www.hyperionguru.com | www.bisptrainings.com | Page 27

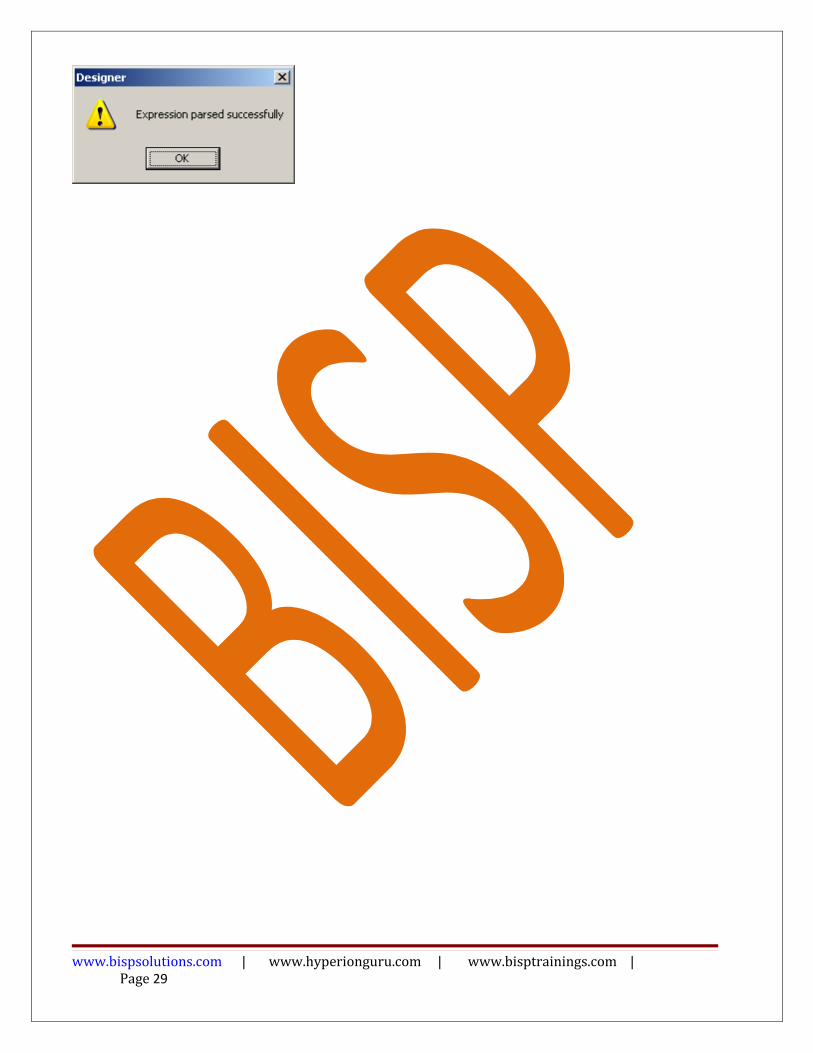
Step-11 Write Condition and Validate it.
www.bispsolutions.com | www.hyperionguru.com | www.bisptrainings.com | Page 28
www.bispsolutions.com | www.hyperionguru.com | www.bisptrainings.com | Page 29

Step-12 Then right click on second filter transformation and select Edit, Then go to condition and write condition.
www.bispsolutions.com | www.hyperionguru.com | www.bisptrainings.com | Page 30
www.bispsolutions.com | www.hyperionguru.com | www.bisptrainings.com | Page 31
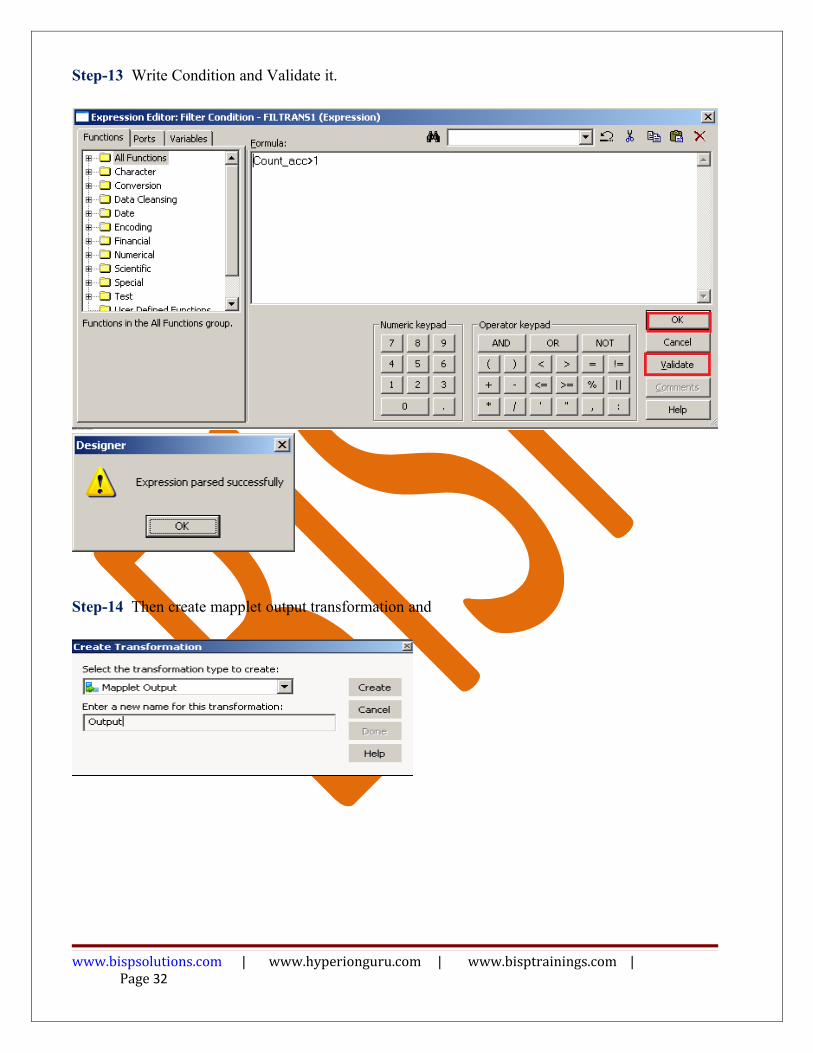
Step-13 Write Condition and Validate it.
Step-14 Then create mapplet output transformation and
www.bispsolutions.com | www.hyperionguru.com | www.bisptrainings.com | Page 32
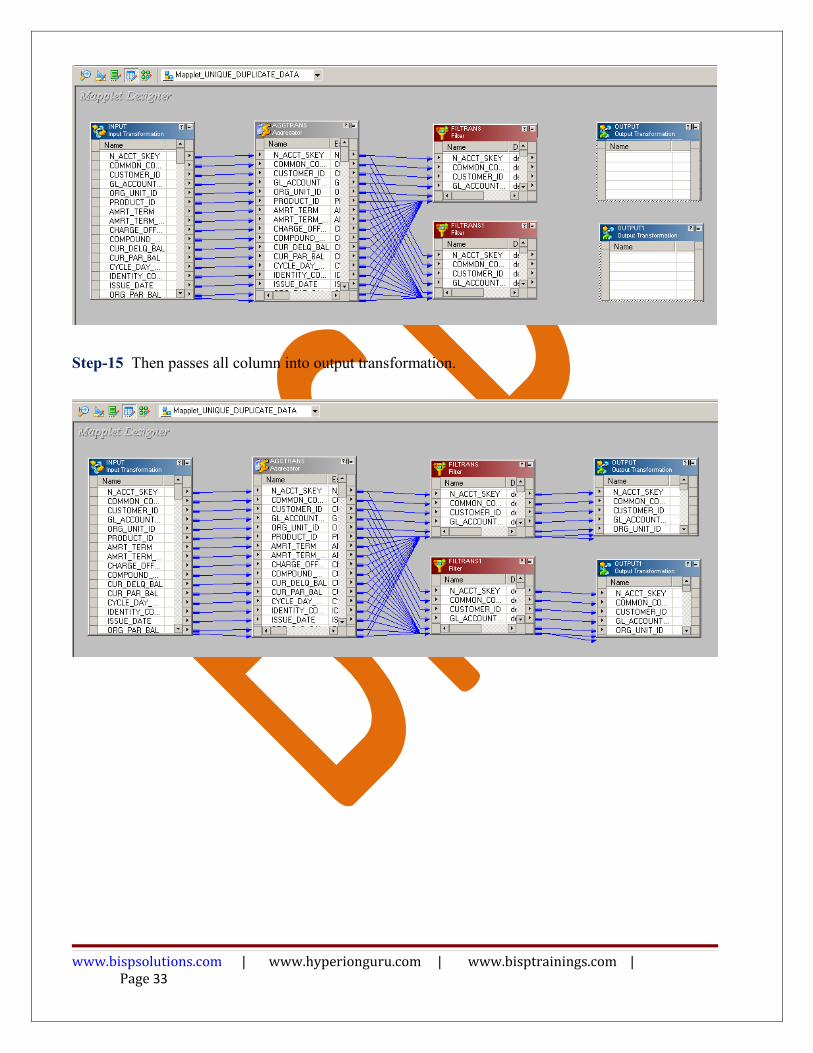
Step-15 Then passes all column into output transformation.
www.bispsolutions.com | www.hyperionguru.com | www.bisptrainings.com | Page 33
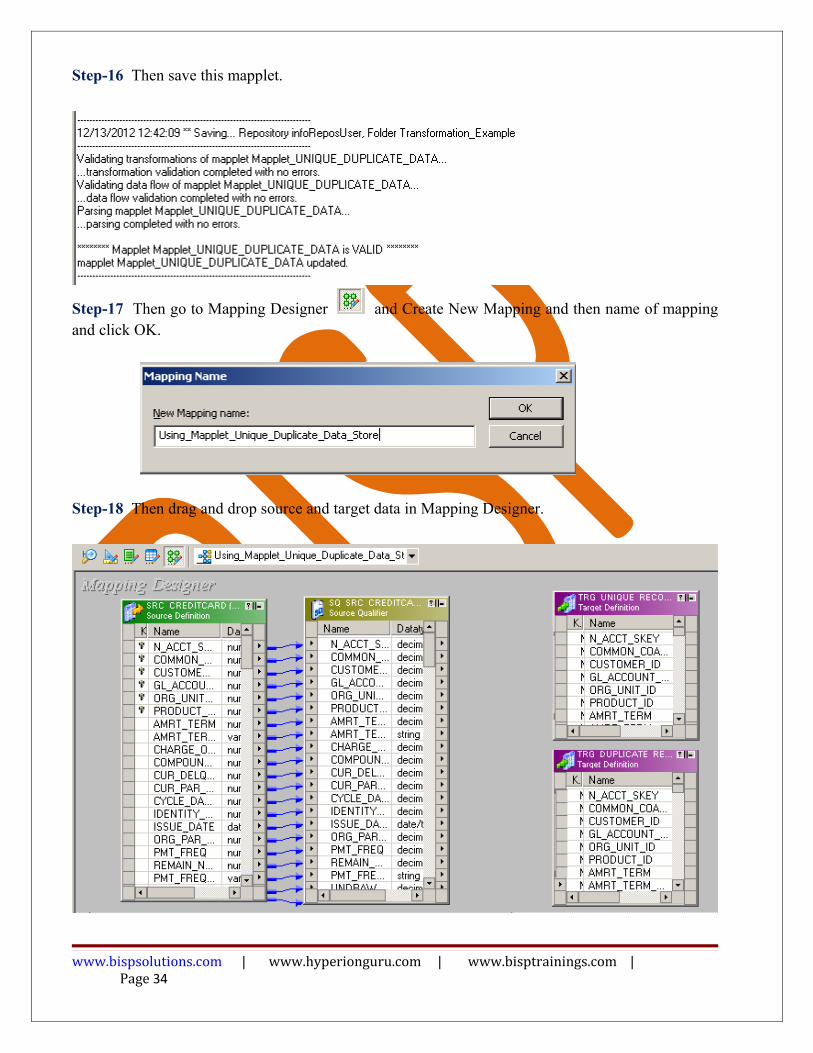
Step-16 Then save this mapplet.
Step-17 Then go to Mapping Designer and Create New Mapping and then name of mapping and click OK.
Step-18 Then drag and drop source and target data in Mapping Designer.
www.bispsolutions.com | www.hyperionguru.com | www.bisptrainings.com | Page 34
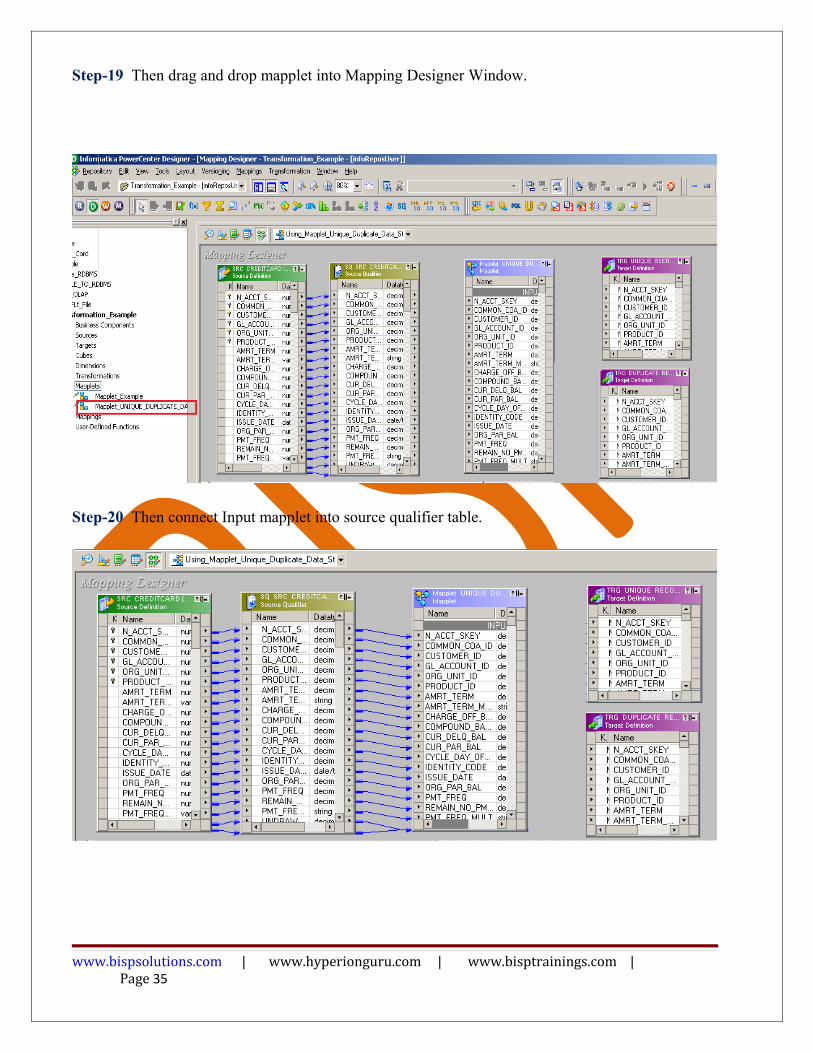
Step-19 Then drag and drop mapplet into Mapping Designer Window.
Step-20 Then connect Input mapplet into source qualifier table.
www.bispsolutions.com | www.hyperionguru.com | www.bisptrainings.com | Page 35
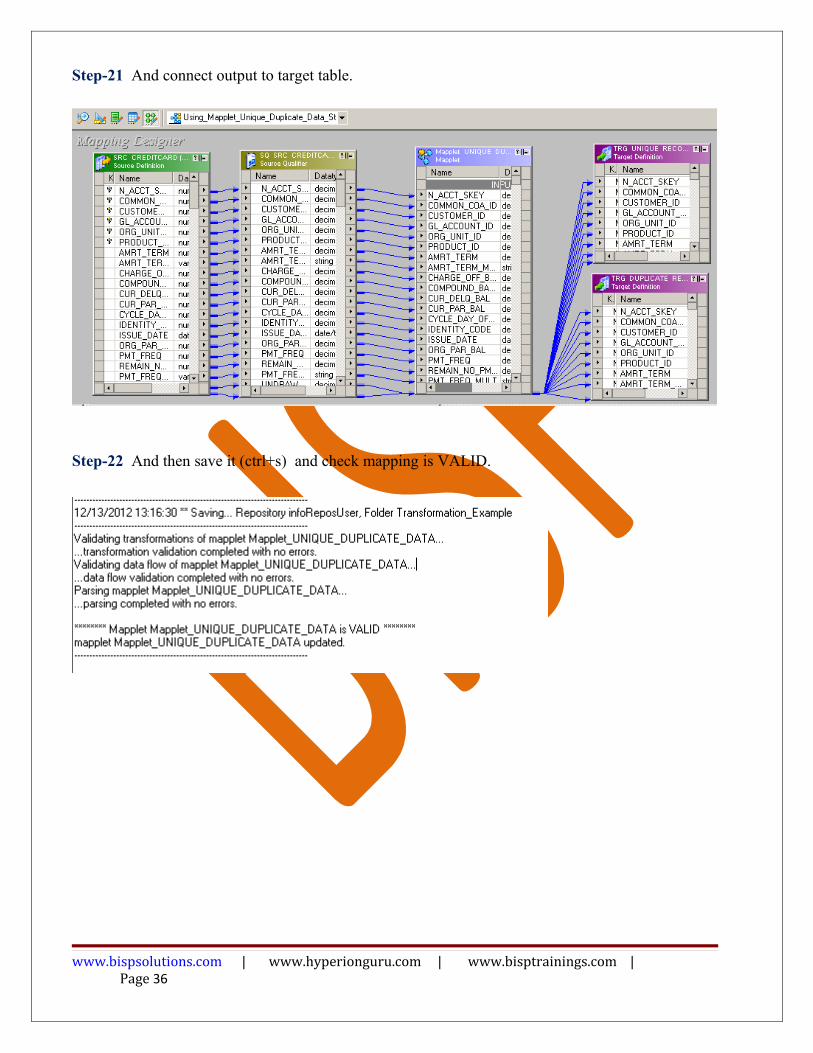
Step-21 And connect output to target table.
Step-22 And then save it (ctrl+s) and check mapping is VALID.
www.bispsolutions.com | www.hyperionguru.com | www.bisptrainings.com | Page 36

Step-1 Now go to Informatica Power Center Workflow Manager, and go to Tools menu and select Workflow Designer.
Step-2 Now to create workflows, Go to Workflows menu and select Create. After that Name of workflow and click OK buttons.
www.bispsolutions.com | www.hyperionguru.com | www.bisptrainings.com | Page 37
CREATE WORKFLOW

www.bispsolutions.com | www.hyperionguru.com | www.bisptrainings.com | Page 38
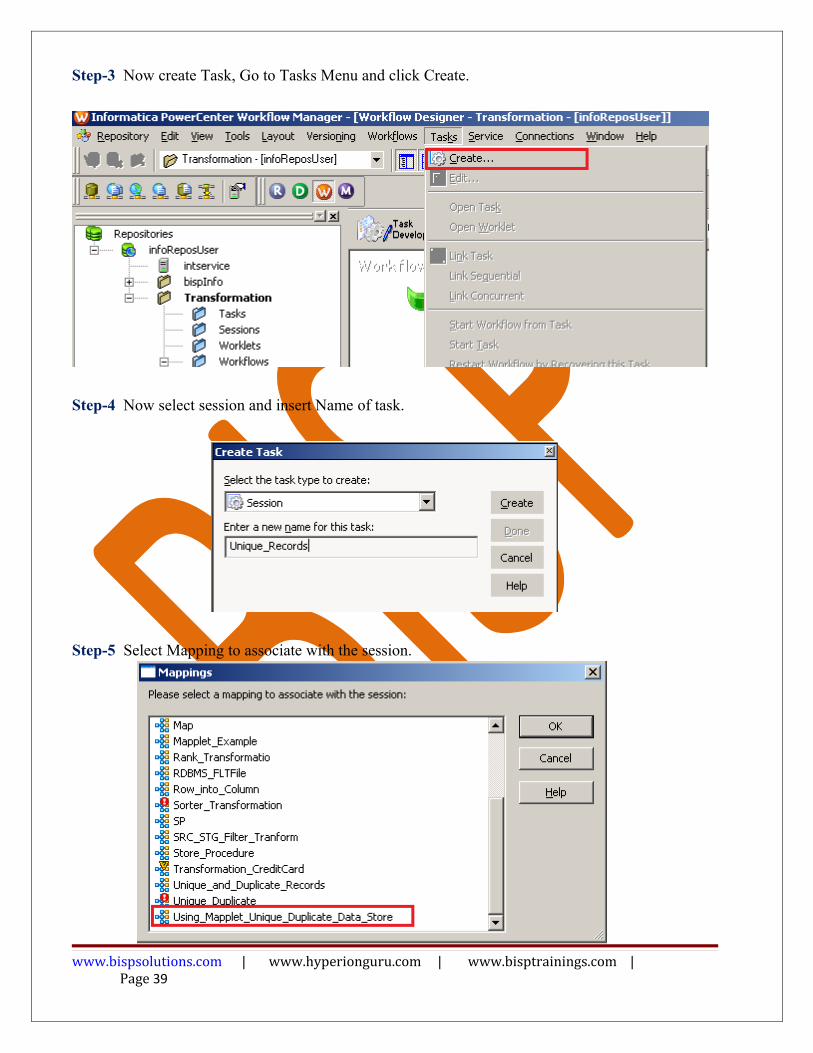
Step-3 Now create Task, Go to Tasks Menu and click Create.
Step-4 Now select session and insert Name of task.
Step-5 Select Mapping to associate with the session.
www.bispsolutions.com | www.hyperionguru.com | www.bisptrainings.com |
Page 39

Step-6 Workflow Designer Window.
Step-7 Now create flow B/W Workflow to Task. Select Line Task and link to Start to Filter.
Step-8 Work Designer Windows
Step-9 Now Configure Connection to Source and Target, Then Right Click on Unique_Records and select Edit, Then Click Mapping tab and configure connection for your source and target table schema in oracle 11g RDBMS. And then click OK.
www.bispsolutions.com | www.hyperionguru.com | www.bisptrainings.com | Page 40
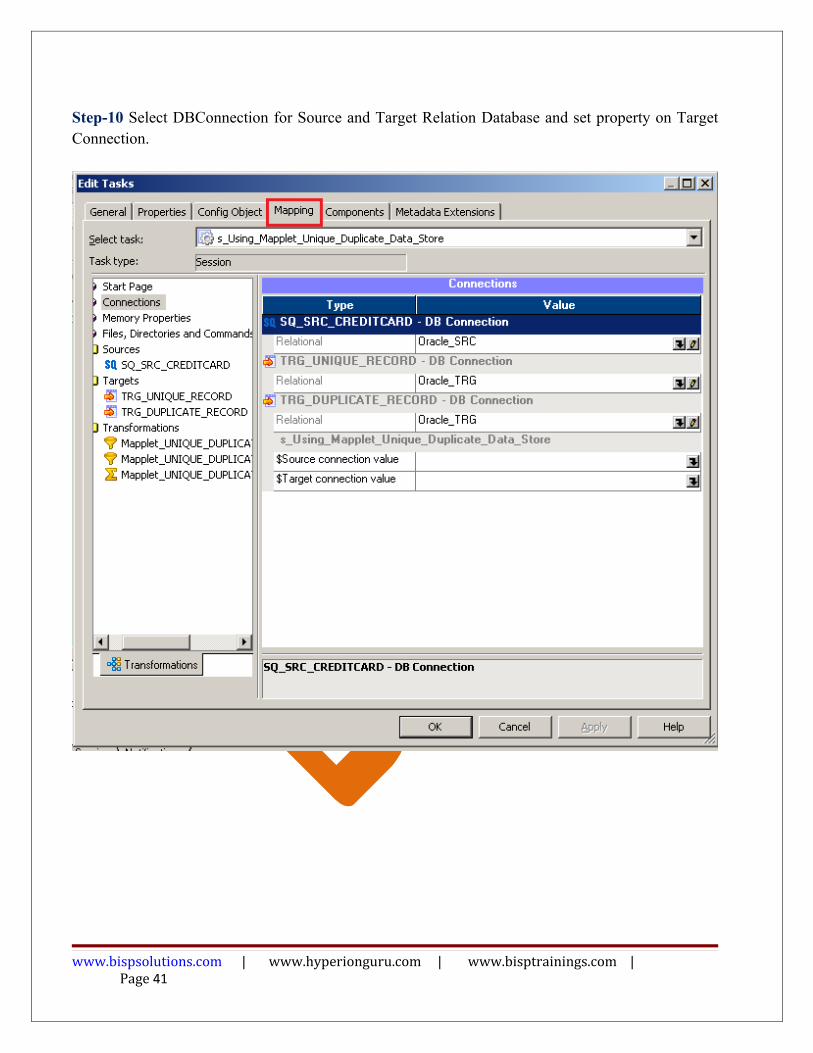
Step-10 Select DBConnection for Source and Target Relation Database and set property on Target Connection.
www.bispsolutions.com | www.hyperionguru.com | www.bisptrainings.com | Page 41

Step-11 Now save (ctrl+s) this workflow and check it.
www.bispsolutions.com | www.hyperionguru.com | www.bisptrainings.com | Page 42
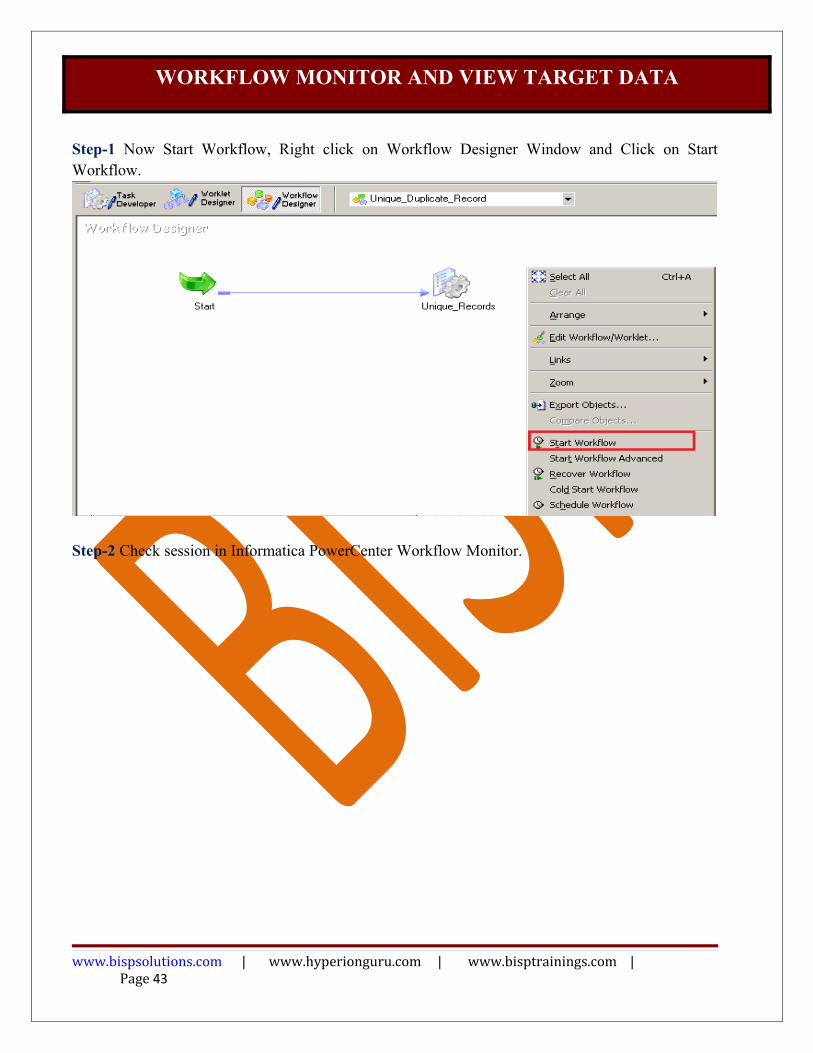
Step-1 Now Start Workflow, Right click on Workflow Designer Window and Click on Start Workflow.
Step-2 Check session in Informatica PowerCenter Workflow Monitor.
www.bispsolutions.com | www.hyperionguru.com | www.bisptrainings.com | Page 43
WORKFLOW MONITOR AND VIEW TARGET DATA

Step-3 Now view data in Target RDBMS (Oracle 11g)
Unique Records
Duplicate Records
www.bispsolutions.com | www.hyperionguru.com | www.bisptrainings.com | Page 44

Rules and Guidelines for Usage of Mapplets
You can connect an Input transformation to multiple transformations in a mapplet. However, you cannot connect a single port in the Input transformation to multiple transformations in the mapplet.
An Input transformation must receive data from a single active source. A mapplet must contain at least one Input transformation or source definition with at least
one port connected to a transformation in the mapplet. A mapplet must contain at least one Output transformation with at least one port connected to
another transformation in the mapping. When a mapplet contains a source qualifier that has an override for the default SQL query,
you must connect all of the source qualifier output ports to the next transformation within the mapplet.
If the mapplet contains more than one source qualifier, use a Joiner transformation to join the output into one pipeline. If the mapplet contains only one source qualifier, you must connect the mapplet output ports to separate pipelines. You cannot use a Joiner transformation to join the output.
When you change the mapplet type from passive to active, you might invalidate the mapping. When you delete ports in the mapplet, you might invalidate the mapping using it.
www.bispsolutions.com | www.hyperionguru.com | www.bisptrainings.com | Page 45

When you change the datatype, precision, or scale of a mapplet port, you might invalidate the mapping.
If you use a Sequence Generator transformation, you must use a reusable Sequence Generator transformation.
If you use a Stored Procedure transformation, you must configure the Stored Procedure type to be Normal.
You cannot include the following objects in a mapplet: Normalizer transformations Cobol sources XML Source Qualifier transformations XML sources Target definitions Pre- and post- session stored procedures Other Mapplets
www.bispsolutions.com | www.hyperionguru.com | www.bisptrainings.com | Page 46