a+ guide to managing & maintaining your pc, 8th edition chapter 10 maintaining windows
TRANSCRIPT

A+ Guide to Managing & Maintaining Your PC, 8th Edition
Chapter 10Maintaining Windows

© Cengage Learning 2014A+ Guide to Managing & Maintaining Your PC, 8th Edition
Objectives
• Learn how to set up and perform scheduled preventive maintenance tasks to keep Windows healthy
• Learn how to prepare for disaster by keeping good backups of user data and Windows system files
• Learn how to use commands to manage files and folders and how to use Disk Management to manage hard drives
• Learn how to configure Windows to use a language other than English
2

© Cengage Learning 2014A+ Guide to Managing & Maintaining Your PC, 8th Edition
Scheduled Preventive Maintenance
• Preventive maintenance– Alleviates slow computer performance
• Tasks– Verifying critical Windows settings– Clean up the hard drive– Checking drive for errors– Free up hard drive space
3

© Cengage Learning 2014A+ Guide to Managing & Maintaining Your PC, 8th Edition
Verify Critical Windows Settings
• Three Windows settings are critical for keeping a system protected– Explain importance to users so they do not change
the settings• Verify updates and service packs are installed
– Windows Updates should be configured to automatically allow updating
• Antivirus software should be set to scan regularly and up to date
• Check that the Windows 7 network location is set correctly
4

© Cengage Learning 2014
Clean Up the Hard Drive
• Delete unneeded files occasionally– Windows requires about 15% hard drive free space
• Defragmenting drives, burning CDs and DVDs, and other tasks
• Ways to improve drive performance and free up space:– Defragmenting the drive– Checking for errors– Compressing folders– Moving files and folders to other drives
A+ Guide to Managing & Maintaining Your PC, 8th Edition
5

© Cengage Learning 2014
Directory Structures
• User Profile Namespace – when a user logs onto Windows 7/Vista a user profile is created– A collection of user data and settings– Consists of two general items
• A user folder – created under the C:\Users folder and contains a group of subfolders collectively called the user profile namespace
• Ntuser.dat – file stored in the C:\Users\username folder
A+ Guide to Managing & Maintaining Your PC, 8th Edition
6

© Cengage Learning 2014
Directory Structures
• Program Files• C:\Program Files – where Windows stores program
files unless you select a different location• In 64-bit versions of Windows:
– 64-bit program files are stored in C:\Program Files and 32-bit program files are stored in C:\Program Files (x86) folder
A+ Guide to Managing & Maintaining Your PC, 8th Edition
7
© Cengage Learning 2014
Directory Structures
• Folders for Windows Data – Registry location: C:\Windows\system32\config– Backup of the registry: C:\Windows\system32\config\
RegBack– Fonts: C:\Windows\Fonts– Temporary files: C:\Windows\Temp– Offline files: stored in the client-side caching (CSC)
folder which is C:\Windows\CSC• Allows users to work with files in the folder when the
computer is not connected to a corporate network
A+ Guide to Managing & Maintaining Your PC, 8th Edition
8

© Cengage Learning 2014
Use the Disk Cleanup Utility
• Use the Windows Disk Cleanup utility to delete temporary files
• To use:– Open Windows Explorer, right-click the volume that
Windows is installed on, and select Properties– On the General tab, click Disk Cleanup– To see temporary system files that can also be
deleted, click Clean up system files– If even more space is needed click the More Options
to see what else could be deleted
A+ Guide to Managing & Maintaining Your PC, 8th Edition
9

© Cengage Learning 2014A+ Guide to Managing & Maintaining Your PC, 8th Edition
10
Figure 10-2 Clean up system files no longer needed in order to free up disk space
© Cengage Learning 2014
Defrag the Hard Drive
• Defragment: to rearrange fragments or parts of files so each file is stored in contiguous clusters
• Two types of hard drives:– Magnetic hard disk drives (HDDs) – contain spinning
platters• Windows 7/Vista automatically defrags once a week
– Solid-state drives (SSDs) – contain flash memory• Has no moving parts so defrag does not improve
read/write time• Defragmenting this type of drive is not recommended
A+ Guide to Managing & Maintaining Your PC, 8th Edition
11

© Cengage Learning 2014
Defrag the Hard Drive• Cluster (also called file allocation unit): group of
whole sectors in a file system– Number of sectors in a cluster is fixed
• A file is stored in whole clusters– Unused space at end of last cluster is called slack
and is wasted free space• As files are written and deleted from a drive, clusters
are used, released, and used again– Moving arm of drive may have to move all over a
drive to collect all fragments of a file• Slows down performance
• Solution is to defragment the driveA+ Guide to Managing & Maintaining Your PC, 8th Edition
12
© Cengage Learning 2014A+ Guide to Managing & Maintaining Your PC, 8th Edition
13
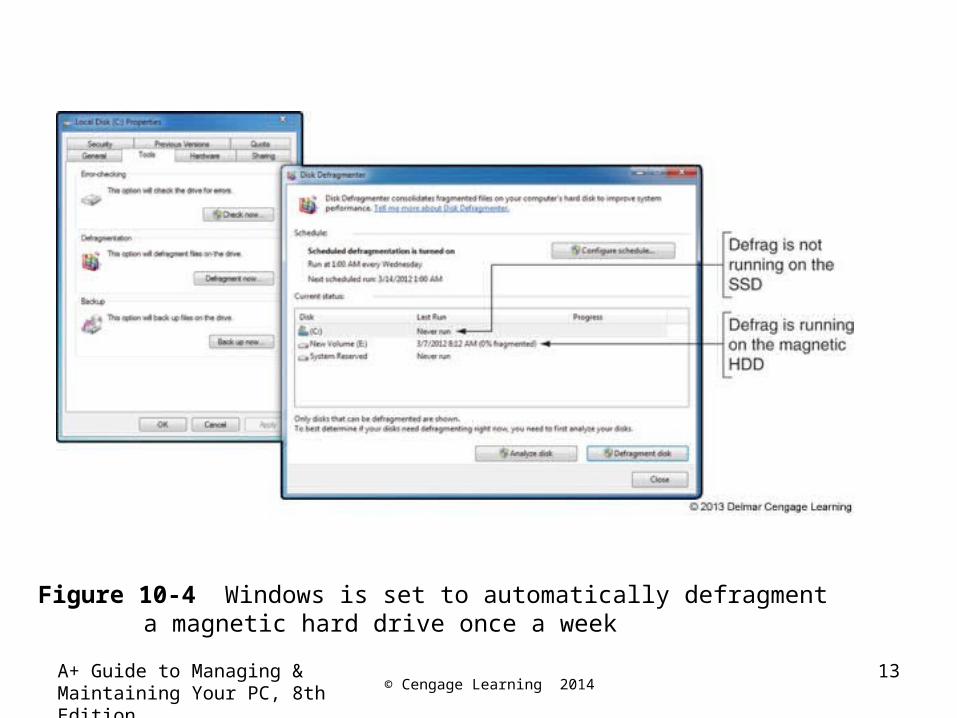
Figure 10-4 Windows is set to automatically defragment a magnetic hard drive once a week
© Cengage Learning 2014A+ Guide to Managing & Maintaining Your PC, 8th Edition
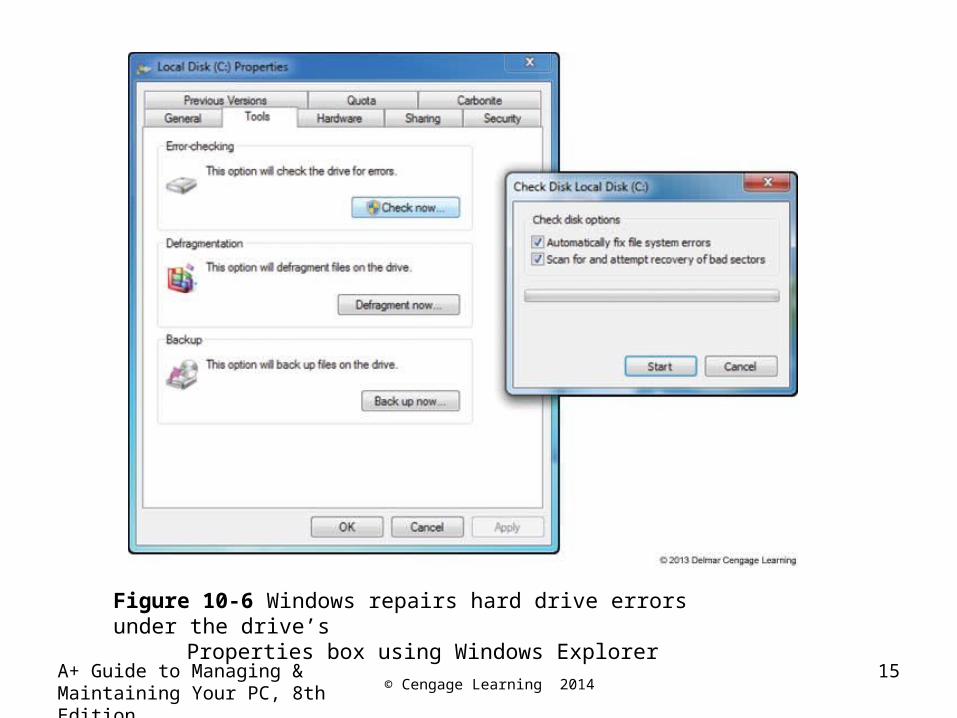
Check the Hard Drive for Errors
• Error checking utility: searches for bad sectors on a volume and recovers the data from them if possible
• To use error checking utility:– Right-click the drive in Windows Explorer and select
Properties from the shortcut menu– Click the Tools tab and click Check now– In the Check Disk dialog box, check Automatically
fix file system errors and Scan for and attempt recovery of bad sectors
– Click Start
14
© Cengage Learning 2014A+ Guide to Managing & Maintaining Your PC, 8th Edition
Figure 10-6 Windows repairs hard drive errors under the drive’s Properties box using Windows Explorer
15

© Cengage Learning 2014
Free Up Space On the Drive
• Uninstall software you no longer use• Move data off the drive
– Consider moving videos, photos, and other data to an external hard drive or burning them to DVDs
• Move programs off the drive– Uninstall a program and reinstall it on a second hard
drive• Use drive or folder compression
– It is not recommended to compress the volume on which Windows is stored
A+ Guide to Managing & Maintaining Your PC, 8th Edition
16

© Cengage Learning 2014A+ Guide to Managing & Maintaining Your PC, 8th Edition
Move the Virtual Memory Paging File
• Virtual memory: a file used to enhance the amount of RAM in a system
• To save space you can move virtual memory paging file– Pagefile.sys
• Hidden file stored in C drive root directory– Move to another partition on the same or different
drive• New drive speed should be equal to or greater than
existing drive and should have plenty of free space (at least three times the amount of installed RAM)
17

© Cengage Learning 2014A+ Guide to Managing & Maintaining Your PC, 8th Edition
Figure 10-7 Manage virtual memory using the System Properties box
18

© Cengage Learning 2014A+ Guide to Managing & Maintaining Your PC, 8th Edition
Figure 10-8 Move Pagefile.sys to a different drive
19

© Cengage Learning 2014A+ Guide to Managing & Maintaining Your PC, 8th Edition
Backup Procedures
• Backup– Extra copy of a data or software file
• Use if original file becomes damaged or destroyed
• Ways to lose data– System failure, virus, file corruption, or some other
problem• Never trust important data to only one media
20

© Cengage Learning 2014A+ Guide to Managing & Maintaining Your PC, 8th Edition
Planning For Disaster Recovery
• Decisions to make for a backup and recovery plan– Decide on backup media– Decide on the backup software
• Consider purchasing third-party backup software– Easier to use– Offers more features than Microsoft utility
– Decide how simple or complex your backup strategy should be• Large organizations might require backups be
documented daily, scheduled at certain times of the day or night, and recovery plans tested regularly
21

© Cengage Learning 2014
Planning For Disaster Recovery
• After backup plan is in place, test the recovery plan– Test the recovery process
• Erase a file and use the recovery procedures to verify that you can restore the file from backup
– Keep backups in a safe place and routinely test them• Should be kept under lock and key• In case of fire, keep backups off-site• Routinely verify backups are good by performing a test
recovery of a backed-up file or folder
A+ Guide to Managing & Maintaining Your PC, 8th Edition
22

© Cengage Learning 2014
Create and Use Backups in Windows 7
• Back up the Windows Volume– Called the system image
• Points to keep in mind :– A system image includes the entire drive on which
Windows is installed– A system image must be created on an internal or
external hard drive– Don’t depend just on the system image as your
backup– You can create a system image any time after
Windows is installed
A+ Guide to Managing & Maintaining Your PC, 8th Edition
23

© Cengage Learning 2014A+ Guide to Managing & Maintaining Your PC, 8th Edition
24
Figure 10-10 Use the Backup and Restore window to create a system image

© Cengage Learning 2014
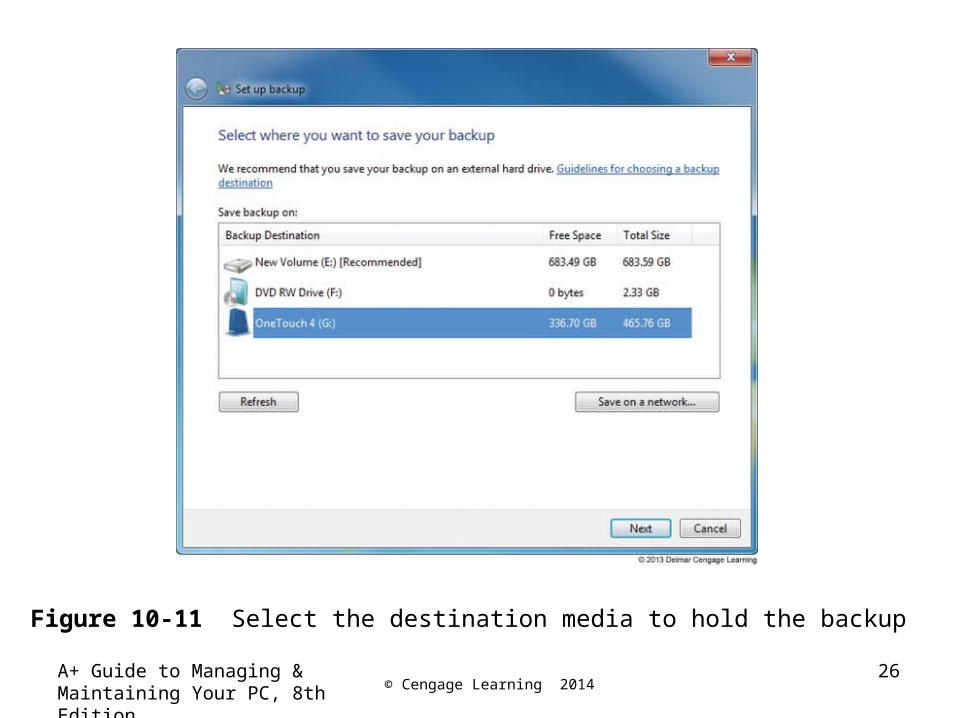
Create and Use Backups in Windows 7
• Back up user data– 1. Open the Backup and Restore window– 2. Select the media to hold the backup– 3. In the next box, select Let me choose so you can
select the folder to backup, then click Next– 4. In the next box, select the libraries and folders you
want to back up, click Next to continue– 5. Verify the correct folders and libraries are selected
• You can also change the frequency in this step– 6. Review your backup settings and click Save
settings and run backup
A+ Guide to Managing & Maintaining Your PC, 8th Edition
25
© Cengage Learning 2014A+ Guide to Managing & Maintaining Your PC, 8th Edition
26
Figure 10-11 Select the destination media to hold the backup

© Cengage Learning 2014A+ Guide to Managing & Maintaining Your PC, 8th Edition
27
Figure 10-13 Select the folders or libraries to include in the backup
© Cengage Learning 2014
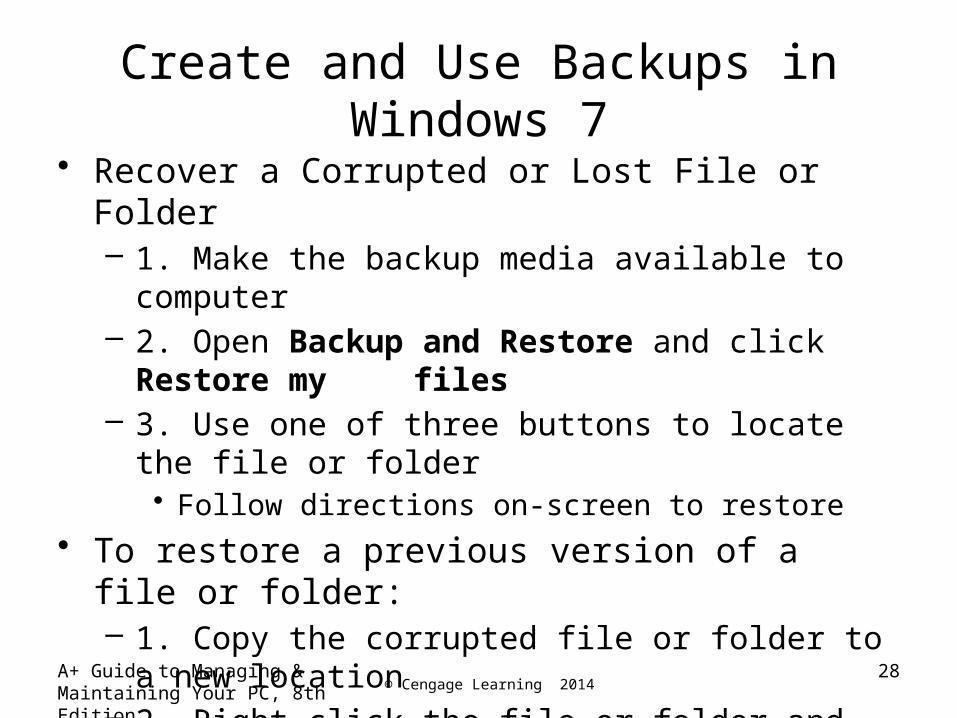
Create and Use Backups in Windows 7
• Recover a Corrupted or Lost File or Folder– 1. Make the backup media available to computer– 2. Open Backup and Restore and click Restore my
files– 3. Use one of three buttons to locate the file or folder
• Follow directions on-screen to restore
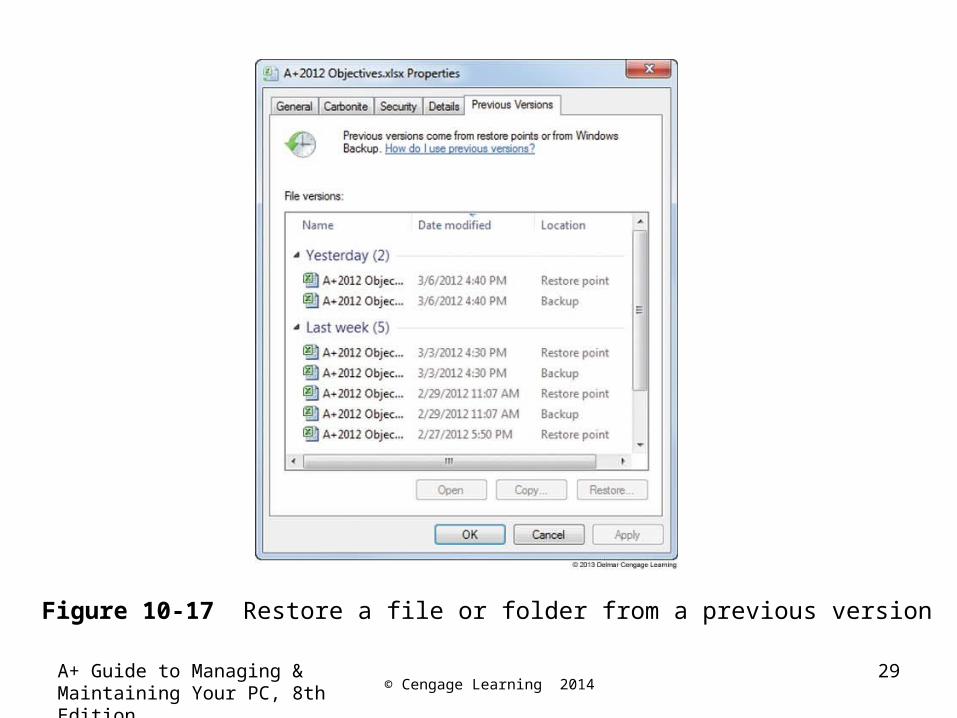
• To restore a previous version of a file or folder:– 1. Copy the corrupted file or folder to a new location– 2. Right click the file or folder and select Restore
previous version– 3. Select the version you want and click Restore
A+ Guide to Managing & Maintaining Your PC, 8th Edition
28
© Cengage Learning 2014A+ Guide to Managing & Maintaining Your PC, 8th Edition
29
Figure 10-17 Restore a file or folder from a previous version

© Cengage Learning 2014
Create and Use Backups in Windows 7
• Windows System Protection – automatically backs up system files and stores them at regular intervals
• Restore point– Condition at time a snapshot taken– Includes Windows system files
• Restore points are taken at least every 24 hours• Can use up to 15 percent of disk space
– If disk space gets too low, restore points are no longer made
• Can manually create restore point at any time using the System Protection tab of System Properties
A+ Guide to Managing & Maintaining Your PC, 8th Edition
30

© Cengage Learning 2014A+ Guide to Managing & Maintaining Your PC, 8th Edition
Figure 10-18 Make sure System Protection is turned on which Windows is installed
31

© Cengage Learning 2014A+ Guide to Managing & Maintaining Your PC, 8th Edition
Create and Use Backups in Windows 7
• Apply a restore point– System Restore restores the system to its condition at
the time a restore point is made– User data not altered– Can affect installed software, hardware, user settings,
and OS configuration settings– Changes made to settings are lost after restore point
is created– Always use most recent restore point capable of fixing
the problem
32
© Cengage Learning 2014
Create and Use Backups in Windows 7• Points to remember about system restore
– Great tool for fixing a device, restoring Windows settings, and solving application problems
– Limitations• Recovers from errors only if registry somewhat intact• Process cannot remove virus or worm infection• Process might create a new problem• Process might make many changes to a system• Process requires restore points• Restore points kept in a hidden folder on the hard drive• Viruses and malware sometimes hide in restore points• Can launch System Restore using startup recovery tools
A+ Guide to Managing & Maintaining Your PC, 8th Edition
33

© Cengage Learning 2014
Managing Files, Folders, and Storage Devices
• This section of the chapter covers:– Managing files and folders using commands in a
command prompt window– Managing hard drive partitions and volumes using the
Disk Management utility
A+ Guide to Managing & Maintaining Your PC, 8th Edition
34
© Cengage Learning 2014
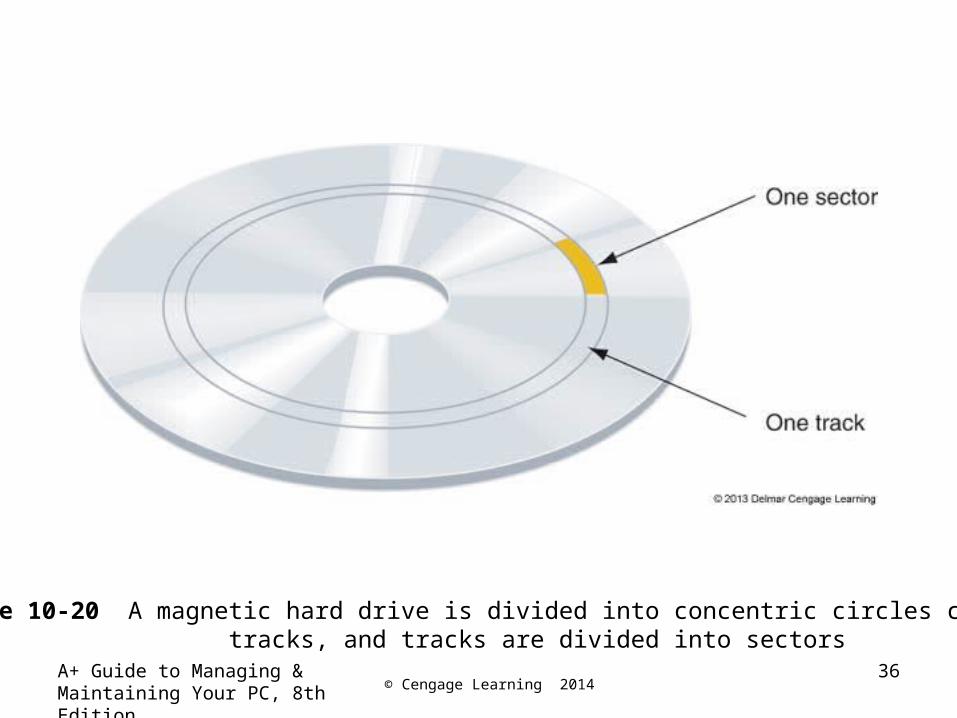
How Partitions and File Systems Work
• All data is stored on a hard drive in sectors (records)• Each sector on drive is the same size (usually 512
bytes)• Low-level formatting: A process (usually performed
at the factory) that electronically creates the hard drive tracks and sectors and tests for bad spots– Size of the sector and total number of sectors
determine capacity– Today’s drive capacities are measured in GB
(gigabytes) or TB (terabytes)
A+ Guide to Managing & Maintaining Your PC, 8th Edition
35
© Cengage Learning 2014A+ Guide to Managing & Maintaining Your PC, 8th Edition
36
Figure 10-20 A magnetic hard drive is divided into concentric circles called tracks, and tracks are divided into sectors

© Cengage Learning 2014A+ Guide to Managing & Maintaining Your PC, 8th Edition
How Partitions and File Systems Work
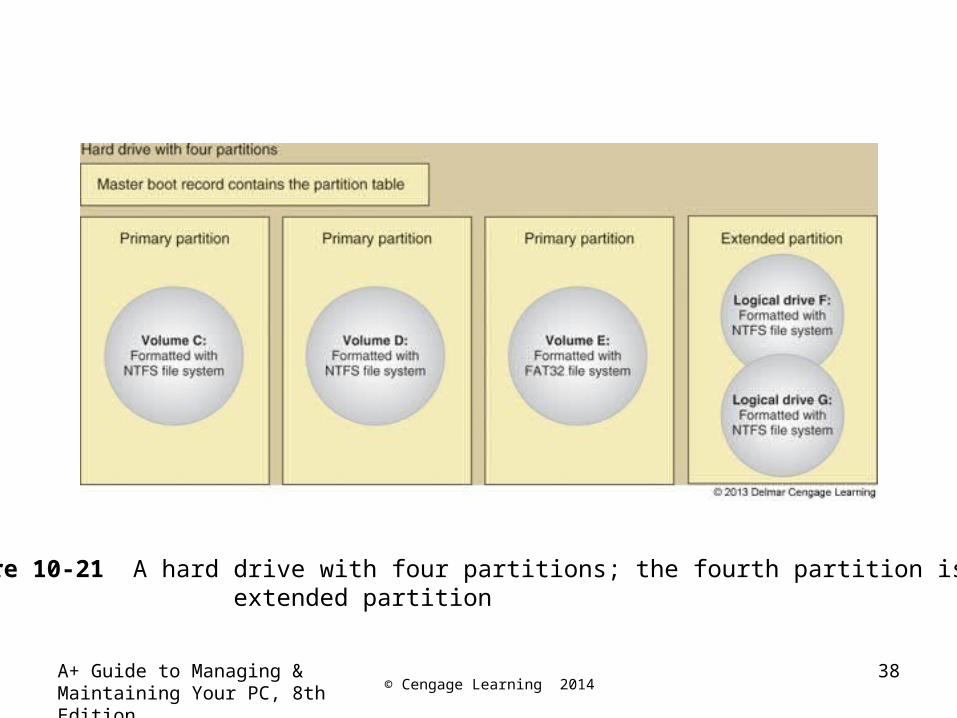
• Hard drives are further divided into one or more partitions (can have up to four in Windows)– Maps of the partitions are kept in a partition table in
the first sector of the drive called the Master Boot Record (MBR)
– Can have up to three primary partitions (also called volumes)
– A fourth partition (called extended partition) can hold one or more volumes called logical drives
37
© Cengage Learning 2014A+ Guide to Managing & Maintaining Your PC, 8th Edition
38
Figure 10-21 A hard drive with four partitions; the fourth partition is an extended partition

© Cengage Learning 2014A+ Guide to Managing & Maintaining Your PC, 8th Edition
How Partitions and File Systems Work
• Before a drive can be used it must be:– Assigned a drive letter (C: or D:)– Formatted using a file system
• File system is overall structure an OS uses to name, store, and organize files on a drive
• Windows 7 supports three types of file systems: NTFS, FAT32, and exFAT
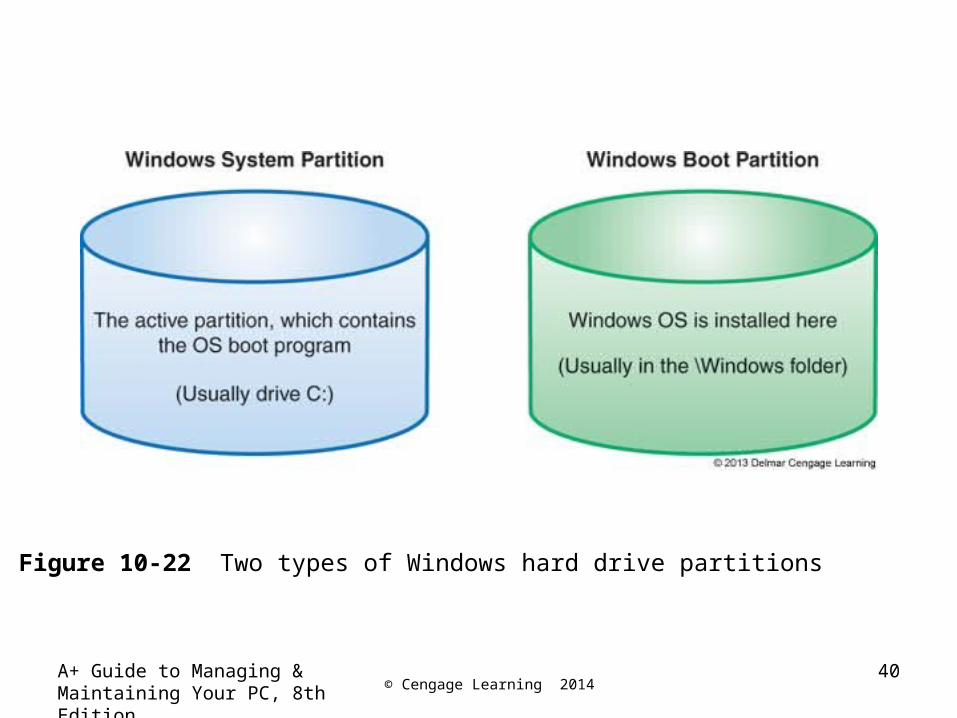
• Windows assigns two functions to partitions: – System partition (usually drive C:) – active partition
that contains the OS program to start up Windows– Boot partition – partition where Windows OS is stored
39
© Cengage Learning 2014A+ Guide to Managing & Maintaining Your PC, 8th Edition
40
Figure 10-22 Two types of Windows hard drive partitions

© Cengage Learning 2014
How Partitions and File Systems Work
• File systems supported by Windows for volumes that don’t hold the Windows installation:– NTFS – uses smaller allocation unit or cluster sizes
than FAT32 (more efficient)– exFAT – use for large external storage devices to be
used with other operating systems– FAT32 – use for small hard drives or USB flash drives– FAT16 – only recommended on volumes less than 4
GB– CDFS(Compact Disc File System) and UDF – CDFS
is an older file system used by optical discs and is being replaced by UDF (Universal Disc Format)
A+ Guide to Managing & Maintaining Your PC, 8th Edition
41
© Cengage Learning 2014
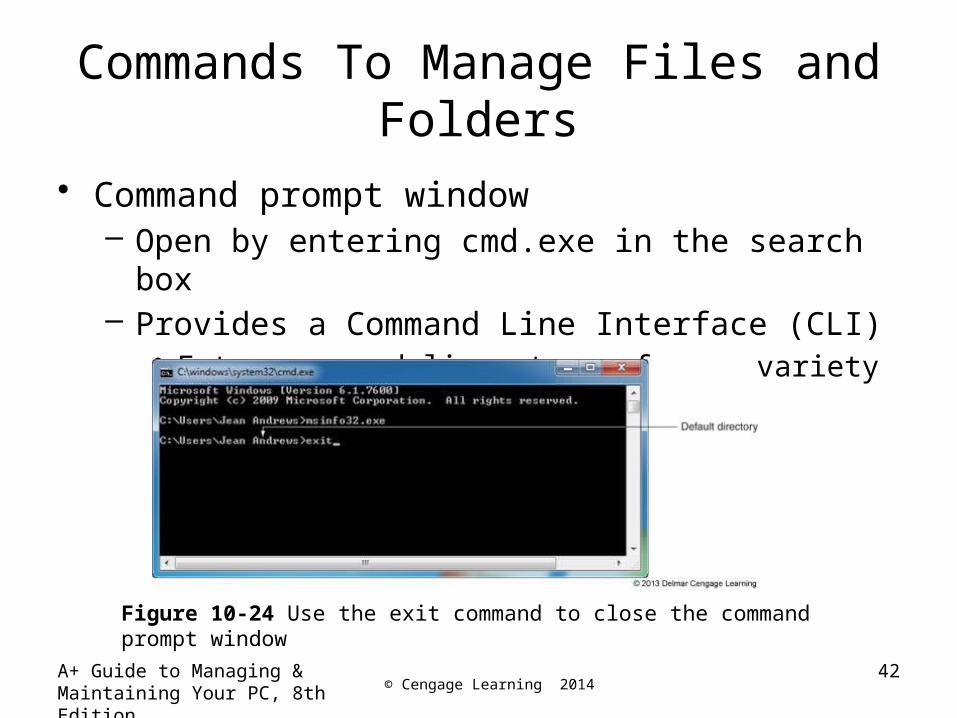
Commands To Manage Files and Folders
• Command prompt window– Open by entering cmd.exe in the search box– Provides a Command Line Interface (CLI)
• Enter command lines to perform a variety of tasks
A+ Guide to Managing & Maintaining Your PC, 8th Edition
Figure 10-24 Use the exit command to close the command prompt window
42

© Cengage Learning 2014
Commands to Manage Files and Folders
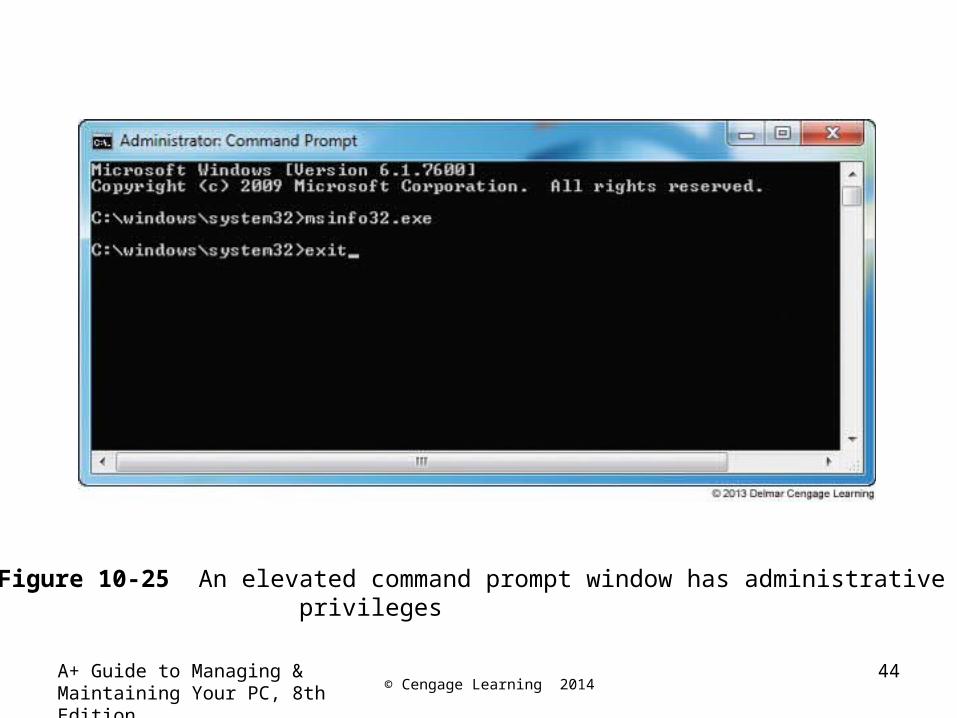
• Windows 7 and Vista have two levels of command prompt windows– Standard window – default directory is the currently
logged on user’s folder• Commands requiring administrative privileges will not
work– Elevated window – requires the user to logon as an
administrator• The word “administrator” will appear in the title bar• Default directory will be C:\Windows\system32
A+ Guide to Managing & Maintaining Your PC, 8th Edition
43
© Cengage Learning 2014A+ Guide to Managing & Maintaining Your PC, 8th Edition
44
Figure 10-25 An elevated command prompt window has administrative privileges

© Cengage Learning 2014
Commands to Manage Files and Folders
• Tips for working in a command prompt window:– Type cls and press Enter to clear the window– Press the up arrow to retrieve the last command– Press the right arrow to retrieve the last command
line one character at a time– Press Ctrl+Break or Ctrl+Pause to terminate a
command before it is finished– Type exit and press Enter to close the window
A+ Guide to Managing & Maintaining Your PC, 8th Edition
45

© Cengage Learning 2014A+ Guide to Managing & Maintaining Your PC, 8th Edition
Commands To Manage Files and Folders
• File naming conventions– Filename and file extension characters
• Letters a through z and numbers 0 through 9• Characters: _ ^ $~ ! # % & – { } ( ) @ ' `
– Filename with spaces:• Enclose filename in double quotation marks
• Wildcard characters in command lines– Question mark (?): wildcard for one character– Asterisk (*): wildcard for one or more characters
46

© Cengage Learning 2014A+ Guide to Managing & Maintaining Your PC, 8th Edition
Commands To Manage Files and Folders
• Help or <command name> /?
Table 3-1 Sample help commands
47

© Cengage Learning 2014
Commands to Manage Files and Folders
• Dir [<filename>] [/p] [/s] [/w]– List files and directories
A+ Guide to Managing & Maintaining Your PC, 8th Edition
48
Table 3-2 Sample dir commands
© Cengage Learning 2014A+ Guide to Managing & Maintaining Your PC, 8th Edition
Commands To Manage Files and Folders
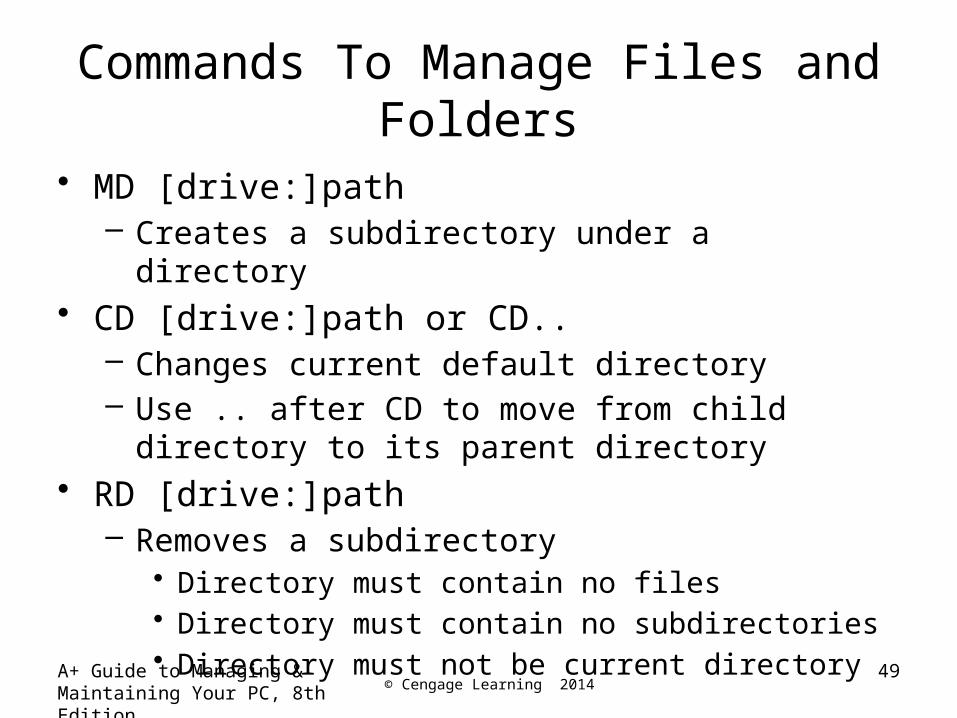
• MD [drive:]path– Creates a subdirectory under a directory
• CD [drive:]path or CD..– Changes current default directory– Use .. after CD to move from child directory to its
parent directory • RD [drive:]path
– Removes a subdirectory• Directory must contain no files• Directory must contain no subdirectories• Directory must not be current directory
49
© Cengage Learning 2014
Commands To Manage Files and Folders
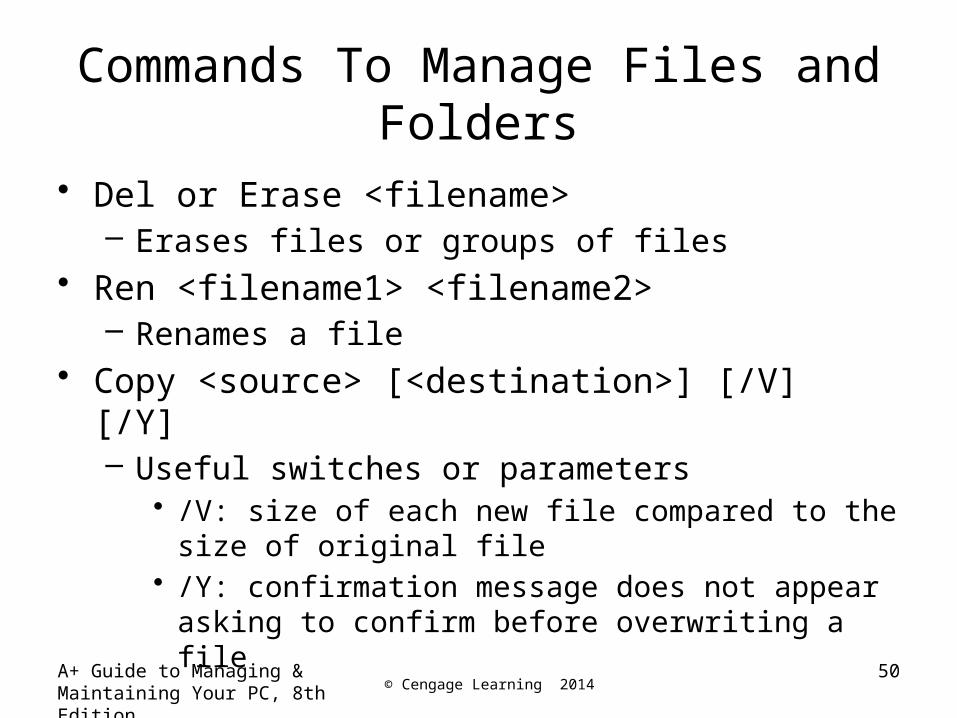
• Del or Erase <filename>– Erases files or groups of files
• Ren <filename1> <filename2>– Renames a file
• Copy <source> [<destination>] [/V] [/Y]– Useful switches or parameters
• /V: size of each new file compared to the size of original file
• /Y: confirmation message does not appear asking to confirm before overwriting a file
A+ Guide to Managing & Maintaining Your PC, 8th Edition
50

© Cengage Learning 2014A+ Guide to Managing & Maintaining Your PC, 8th Edition
Commands To Manage Files and Folders
• Recover <filename>– Attempts to recover a file when parts corrupted
• Xcopy <source> [<destination>] [/S] [/C] [/Y] [/D:date]
51

© Cengage Learning 2014A+ Guide to Managing & Maintaining Your PC, 8th Edition
Commands To Manage Files and Folders
• Robocopy <source> [<destination>] [/S] [/E] [/LOG:filename] [/LOG+:filename] [/move] [/purge]– Robust File Copy command
Table 3-4 Robocopy commands and results
52

© Cengage Learning 2014A+ Guide to Managing & Maintaining Your PC, 8th Edition
Commands To Manage Files and Folders
• chkdsk [drive:] [/f] [/r]– Fixes file system errors – Recovers data from bad sectors
Figure 10-27 Lost and cross-linked clusters
53

© Cengage Learning 2014A+ Guide to Managing & Maintaining Your PC, 8th Edition
Commands To Manage Files and Folders
• Defrag [drive:] [/C]– Examines a drive for fragmented files
• Rewrites fragmented files in contiguous clusters
Table 3-5 Defrag commands and results
54

© Cengage Learning 2014A+ Guide to Managing & Maintaining Your PC, 8th Edition
Commands To Manage Files and Folders
• Format <drive:> [/v:label] [/q] [fs:<filesystem>]– Format command
Table 3-6 Format commands and results
55

© Cengage Learning 2014
Commands To Manage Files and Folders
• Shutdown [/m \\computername] [/i] [/r] [/s] [/f] [/t xx]– Shut down the local computer or a remote computer
A+ Guide to Managing & Maintaining Your PC, 8th Edition
56
Figure 10-7 Shutdown commands and results
© Cengage Learning 2014
Use Disk Management To Manage Hard Drives
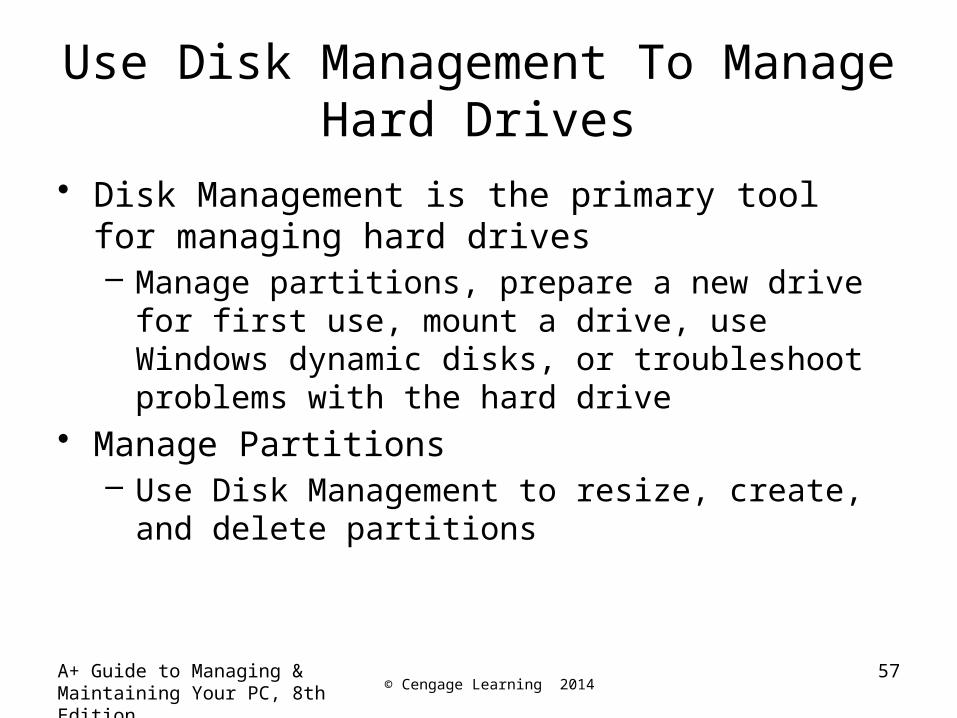
• Disk Management is the primary tool for managing hard drives– Manage partitions, prepare a new drive for first use,
mount a drive, use Windows dynamic disks, or troubleshoot problems with the hard drive
• Manage Partitions– Use Disk Management to resize, create, and delete
partitions
A+ Guide to Managing & Maintaining Your PC, 8th Edition
57
© Cengage Learning 2014A+ Guide to Managing & Maintaining Your PC, 8th Edition
58
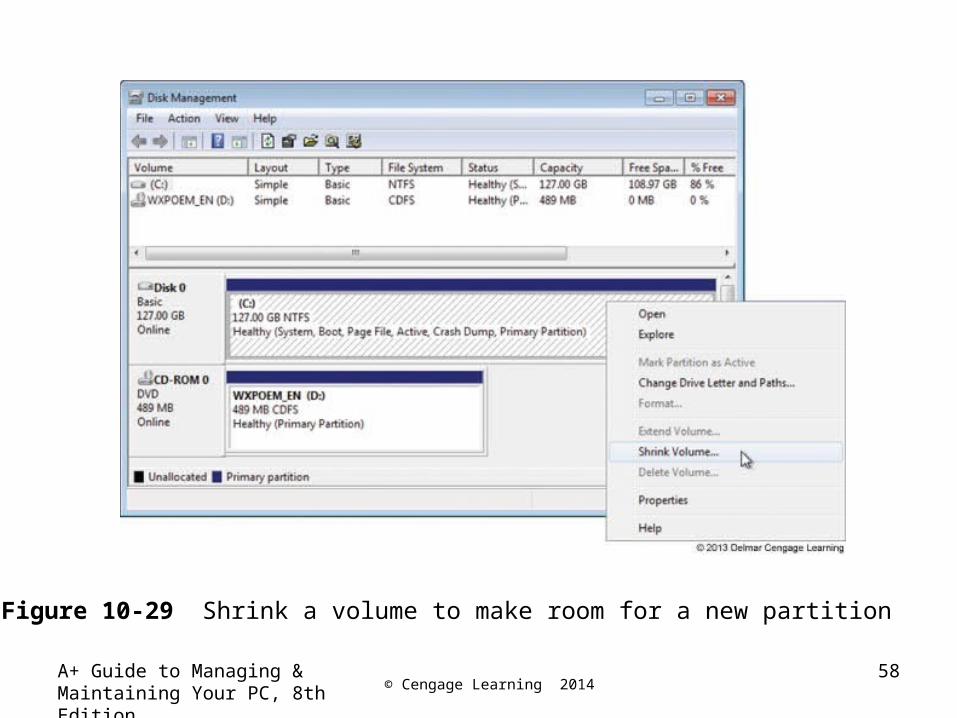
Figure 10-29 Shrink a volume to make room for a new partition

© Cengage Learning 2014
Use Disk Management To Manage Hard Drives
• Prepare a drive for first use– Step 1: Initialize the Disk
• Choose the MBR system or Globally Unique Identifier Partition Table (GUID or GPT) system
• MBR system can have up to four partitions• GPT system can support up to 128 partitions and is
recommended for drives larger than 2 TB– Step 2: Create a Volume and Format It with a File
System
A+ Guide to Managing & Maintaining Your PC, 8th Edition
59

© Cengage Learning 2014A+ Guide to Managing & Maintaining Your PC, 8th Edition
Use Disk Management To Manage Hard Drives
• How to Mount a Drive– Mounted drive is a volume accessible by a folder on
another volume• Folder has more available space
– Mount point: C:\Projects folder
Figure 10-33 The C:\Projects folder is the mount point for the mounted drive
60

© Cengage Learning 2014
Use Disk Management To Manage Hard Drives
• Windows Dynamic Disks– Several dynamic disks can work together to
collectively present a single dynamic volume– Data to configure each hard drive is stored in a disk
management database (resides in last 1 MB of space on each hard drive)
– Better reliability, spanning, stripping (RAID 0) to improve performance, mirror two hard drives for fault tolerance (RAID 1) for XP
A+ Guide to Managing & Maintaining Your PC, 8th Edition
61

© Cengage Learning 2014
Use Disk Management To Manage Hard Drives
• Windows dynamic disks (cont’d.)– Disk Management converts two or more basic disks to
dynamic disks
A+ Guide to Managing & Maintaining Your PC, 8th Edition
62
Figure 10-37 Convert a basic disk to a dynamic disk

© Cengage Learning 2014A+ Guide to Managing & Maintaining Your PC, 8th Edition
Use Disk Management To Manage Hard Drives
• Drive and volume statuses:– Healthy– Failed– Online– Active– Unallocated– Formatting– Basic– Dynamic
• Offline, foreign drive, and healthy (at risk)
63

© Cengage Learning 2014A+ Guide to Managing & Maintaining Your PC, 8th Edition
Regional and Language Settings
• Configure computer to use a different language– For Windows 7/Vista Ultimate and Enterprise editions,
use Windows Update to download and install the language pack
– For all editions of Windows 7/Vista/XP, download and install a limited Language Interface Pack (LIP) using Windows Update
• Getting LIP for other Windows editions– Go to Microsoft Web site
64

© Cengage Learning 2014A+ Guide to Managing & Maintaining Your PC, 8th Edition
Summary
• Regular preventive maintenance– Improves performance and troubleshooting
• Verify Windows settings, defragment hard drives, check drive for errors, reduce startup process to essentials, and free up hard drive space
• Windows offers may preventative maintenance tools• Plan for disaster recovery in the event a hard drive
fails by performing routine backups of data and system files
• Windows 7 Backup and Restore can be used to schedule routine backups of user data files
65

© Cengage Learning 2014
Summary
• Commands useful to manage files, folders and storage media include Help, Dir, Del, Copy, Recover, Xcopy, Robocopy, MD, CD, RD, Chkdsk, Defrag, and Format
• Use Disk Management to manage hard drives and partitions
• A language pack can be downloaded and installed in Windows 7/Vista Ultimate and Enterprise editions
• A limited LIP can be downloaded and installed in any edition of Windows 7/Vista
A+ Guide to Managing & Maintaining Your PC, 8th Edition
66