a+ guide to hardware, 9th edition - hessercan solutions
TRANSCRIPT

A+ Guide to Hardware, 9th Edition
Chapter 6Supporting Hard Drives and Other
Storage Devices

© Cengage Learning 2017A+ Guide to Hardware, 9th Edition 2
Objectives
• Discuss technologies used inside a hard drive and how a computer communicates with a hard drive
• Install and support a hard drive• Identify tape drives and tape cartridges• Support optical drives and flash memory devices• Troubleshoot hard drives

© Cengage Learning 2017A+ Guide to Hardware, 9th Edition 3
Hard Drive Technologies and Interface Standards
• Hard disk drive (HDD) or hard drive sizes– 2.5" size for laptop computers– 3.5" size for desktops– 1.8" size for low-end laptops, other equipment

© Cengage Learning 2017A+ Guide to Hardware, 9th Edition 4
Technologies Used Inside a Hard Drive
• Solid state drive (SSD) or solid state device (SSD)– No moving parts– Built using nonvolatile flash memory stored on
EEPROM (Electronically Erasable Programmable Read Only Memory) chips
– Memory in an SSD is called NAND flash memory– Lifespan is based on the number of write operations
to the drive– Expensive technology, but faster, more reliable, last
longer, and use less power than magnetic drives

© Cengage Learning 2017A+ Guide to Hardware, 9th Edition 5
Technologies Used Inside a Hard Drive
• Magnetic hard drive– One, two, or more platters, or disks
• Stacked together, spinning in unison inside a sealed metal housing
– Firmware controls data reading, writing and motherboard communication
– Read/write heads are controlled by an actuator– Data is organized in concentric circles, called tracks
• Tracks are divided into segments called sectors– Most current drives use 4096-byte sectors
• Hybrid hard drives use both technologies– Operating system must support it

© Cengage Learning 2017A+ Guide to Hardware, 9th Edition 6
Technologies Used Inside a Hard Drive
Figure 6-2 Solid-state drives by Toshiba

© Cengage Learning 2017A+ Guide to Hardware, 9th Edition 7
Technologies Used Inside a Hard Drive
Figure 6-3 Inside a magnetic hard drive

© Cengage Learning 2017A+ Guide to Hardware, 9th Edition 8
Technologies Used Inside a Hard Drive
Figure 6-4 A hard drive is divided into tracks and sectors; several sectors make one cluster

© Cengage Learning 2017A+ Guide to Hardware, 9th Edition 9
Technologies Used Inside a Hard Drive
• Low-level formatting – sector markings are written to the hard drive at the factory
– Not the same as high-level formatting performed for Operating System installation
• Firmware, UEFI/BIOS and OS use logical block addressing (LBA) to address all hard drive sectors
– Size of each sector + total number of sectors determine drive capacity
• S.M.A.R.T – Self-Monitoring Analysis ad Reporting Technology
– Used to predict when a drive is likely to fail
© Cengage Learning 2017A+ Guide to Hardware, 9th Edition 10
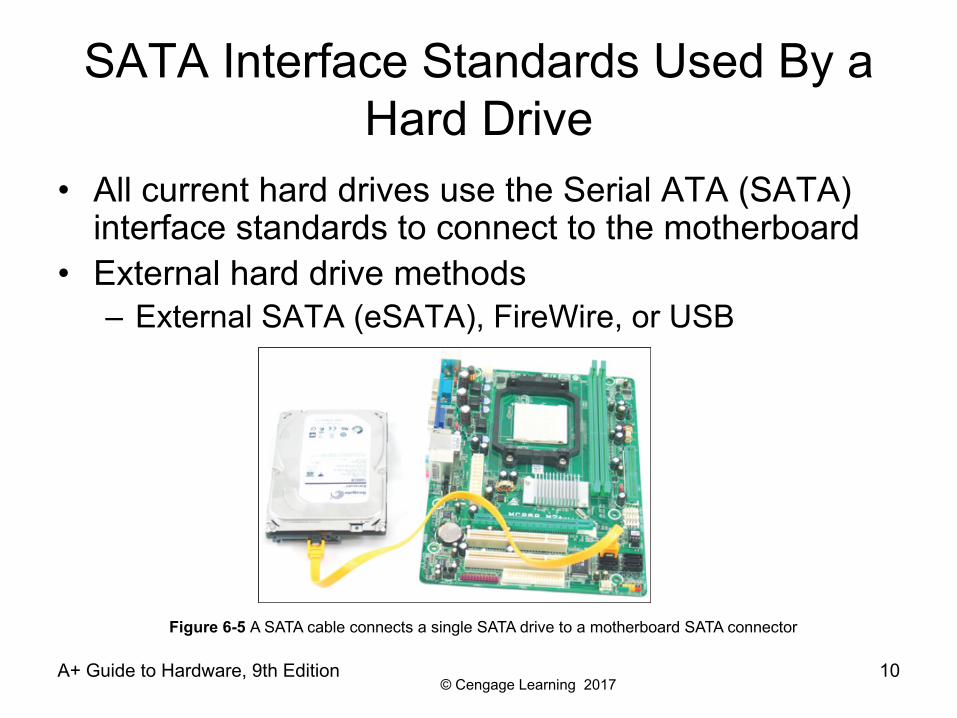
SATA Interface Standards Used By a Hard Drive
• All current hard drives use the Serial ATA (SATA) interface standards to connect to the motherboard
• External hard drive methods– External SATA (eSATA), FireWire, or USB
Figure 6-5 A SATA cable connects a single SATA drive to a motherboard SATA connector

© Cengage Learning 2017A+ Guide to Hardware, 9th Edition 11
SATA Interface Standards Used by a
Hard Drive
• Interface standards define data speeds and transfer
methods with a computer system
– Also define types of cables and connectors
• Standards
– Developed by Serial ATA International Organization
(SATA-IO)
– Have the oversight of the T13 Committee

© Cengage Learning 2017A+ Guide to Hardware, 9th Edition 12
SATA Interface Standards Used by a Hard Drive
Table 6-1 SATA standards

© Cengage Learning 2017A+ Guide to Hardware, 9th Edition 13
SATA Interface Standards Used by a Hard Drive
• Serial ATA standards are used by all drive types– Supports hot-swapping (hot-plugging)
• Connect and disconnect drive while system is running
– Connects to one internal SATA connector on the motherboard via a 7-pin SATA data cable
• Uses a 15-pin SATA power connector
– A motherboard might have two or more SATA connectors
• Use connectors in the order recommended in the motherboard user guide

© Cengage Learning 2017A+ Guide to Hardware, 9th Edition 14
SATA Interface Standards Used by a Hard Drive
Figure 6-6 A SATA data cable and SATA power cable

© Cengage Learning 2017A+ Guide to Hardware, 9th Edition 15
SATA Interface Standards Used by a
Hard Drive
• Motherboard or expansion card can provide external
SATA (eSATA) ports for external drives
• External SATA (eSATA)
– eSATA drives use special external shielded serial
ATA cable up to 2 meters long
• Purchasing considerations
– SATA standards for the drive and motherboard need
to match for optimum speed
– If no match, system runs at the slower speed

© Cengage Learning 2017A+ Guide to Hardware, 9th Edition 16
How to Select and Install Hard Drives
• Topics covered– Selecting a hard drive– Installation details for a SATA drive– How to install hard drive in a bay too wide for drive– How to set up a RAID system

© Cengage Learning 2017A+ Guide to Hardware, 9th Edition 17
Selecting a Hard Drive
• Hard drive must match OS and motherboard– Need to know what standards the motherboard or
controller card providing the drive interface can use– Consult documentation for the board or card
• UEFI/BIOS uses autodetection to prepare the device – Drive capacity and configuration selected– Best possible standard becomes part of configuration
© Cengage Learning 2017A+ Guide to Hardware, 9th Edition 18
Selecting a Hard Drive
• Considerations:– Drive capacity
• Today’s desktop hard drives range from 1 TB for SSD to more than 6 TB for magnetic
– Spindle speed• Most common is 7200 RPM• The higher the RPMs, the faster the drive
– Interface standard• Use standards the motherboard supports
– Cache or buffer size• Ranges from 2 MB to 128 MB

© Cengage Learning 2017
Steps to Install a SATA Drive
• A SATA drive might have jumpers– Most likely set by factory as they should be
• Some SATA drives have two power connectors– Choose only one to use– Never install two power cords at the same time
• May have to purchase controller card when the motherboard drives connectors are not functioning– Or the if the motherboard does not support a fast
SATA standard that your hard drives uses
A+ Guide to Hardware, 9th Edition 19

© Cengage Learning 2017
Steps to Install a SATA Drive
• Step 1: Know your starting point– How is your system configured?– Is everything working properly?– Write down what you know about the system
• Step 2: Read the documentation and prepare your work area– Read all installation instructions first– Visualize all the steps– Protect against ESD and avoid working on carpet
A+ Guide to Hardware, 9th Edition 20

© Cengage Learning 2017
Steps to Install a SATA Drive
• Step 2: Read the documentation and prepare your
work area (cont’d)
– Handle the drive carefully
– Do not touch any exposed circuitry
– Prevent other people from touching exposed
microchips
– Drain static electricity from the package and from your
body by touching metal for at least 2 seconds
– If you must set it down, place it component-side up
– Do not place the drive on the computer case or on a
metal table
A+ Guide to Hardware, 9th Edition 21

© Cengage Learning 2017A+ Guide to Hardware, 9th Edition 22
Steps to Install a SATA Drive
• Step 3: Install the drive– Shut down the computer and unplug it– Decide which bay will hold the drive– Slide drive in the bay and secure it (use two screws
on both sides)– Use correct motherboard SATA connector– Connect a 15-pin SATA or 4-pin Molex power
connector from the power supply to the drive– Check all connections and power up the system– Verify drive recognized correctly via UEFI/BIOS setup

© Cengage Learning 2017A+ Guide to Hardware, 9th Edition 23
Steps to Install a SATA Drive
• You are ready to prepare the hard drive for first use– Boot from Windows setup DVD
• Follow directions on the screen to install Windows on the new drive
– If installing a second hard drive with Windows installed on first drive use Windows Disk Management utility to partition and format the second drive

© Cengage Learning 2017A+ Guide to Hardware, 9th Edition 24
Installing a Drive in a Removable Bay
• Unplug the cage fan from its power source
• Turn handle on each locking device counterclockwise to remove it
• Slide the bay to the front and out of the case
• Insert hard drive in the bay
– Use two screws on each side to anchor the drive in the bay
• Slide the bay back into the case
• Reinstall the locking pins
• Plug in the cage fan power cord

© Cengage Learning 2017A+ Guide to Hardware, 9th Edition 25
Installing a Drive in a Removable Bay
Figure 6-19 The removable bay has a fan in front and is anchored to the case with locking pins

© Cengage Learning 2017A+ Guide to Hardware, 9th Edition 26
Installing a Drive in a Removable Bay
Figure 6-20 Install the hard drive in the bay using two screws on each side of the drive

© Cengage Learning 2017
Installing a Small Drive in a Wide Bay
• Use a universal bay kit to securely fit a small drive into the bay
• The adapter spans the distance between the sides of the drive and bay
A+ Guide to Hardware, 9th Edition 27
Figure 6-21 Use the universal bay kit to make the drive fit the bay

© Cengage Learning 2017
Installing a Hard Drive in a Laptop
• General guidelines:
– See manufacturer’s documentation for drive sizes and
connector types
– Be aware of voiding manufacturer’s warranty
• Considerations when shopping for a laptop drive:
– Laptop drive is 2.5 or 1.8 inches wide
• May use SSD (solid state device) technology
– Hard drives connector: SATA or PATA (older laptops)
– If upgrading, may want to use a USB-to-SATA
converter, so both drives can be working and you can
copy files from one to the other
A+ Guide to Hardware, 9th Edition 28

© Cengage Learning 2017
Installing a Hard Drive in a Laptop
• Older laptop computers required disassembly • Newer notebooks: easy to replace
– If UEFI/BIOS setup uses autodetect:• System boots up and UEFI/BIOS recognizes new drive• Searches for an operating system• If a new drive: boot from Windows recovery CD and
install the OS
A+ Guide to Hardware, 9th Edition 29

© Cengage Learning 2017
Setting Up Hardware RAID
• RAID (Redundant Array of Inexpensive Disks)
– Also called: Redundant Array of Independent Disks
– A technology that configures two or more hard drives
to work together as an array of drives
• Why use RAID?
– To improve fault tolerance by writing two copies of it,
each to a different hard drive
– To improve performance by writing data to two or
more hard drives to that a single drive is not
excessively used
A+ Guide to Hardware, 9th Edition 30

© Cengage Learning 2017
Types of RAID
• Spanning – sometimes called JBOD (just a bunch of
disks)
– Uses two hard drives to hold a single Windows
volume
– When one drive is full, data is written to second drive
• RAID 0 – uses two or more physical disks
– Writes to physical disks evenly across all disks so that
no one disk receives all activity
– Windows calls RAID 0 a striped volume
A+ Guide to Hardware, 9th Edition 31

© Cengage Learning 2017
Types of RAID
• RAID 1: Mirroring– Duplicates data on one drive to another drive and is
used for fault tolerance (mirrored volume)• RAID 5: uses three or more drives
– Stripes data across drives and uses parity checking– Data is not duplicated
• RAID 10: RAID 1+0 (pronounced RAID one zero)– Combination of RAID 1 and RAID 0– Takes at least 4 disks– Data is mirrored across pairs of disks
A+ Guide to Hardware, 9th Edition 32

© Cengage Learning 2017
Types of RAID
A+ Guide to Hardware, 9th Edition 33
Figure 6-26 Ways that hard drives can work together

© Cengage Learning 2017
Types of RAID
A+ Guide to Hardware, 9th Edition 34
Figure 6-27 RAID 1 and RAID 10

© Cengage Learning 2017A+ Guide to Hardware, 9th Edition 35
How to Implement Hardware RAID
• Hardware implementation– Hardware RAID controller or RAID controller card
• Motherboard does the work
• Software implementation uses operating system• Best RAID performance
– All hard drives in an array should be identical in brand, size, speed, other features
• If Windows is to be installed on a RAID hard drive– RAID must be implemented before Windows installed

© Cengage Learning 2017A+ Guide to Hardware, 9th Edition 36
How to Implement Hardware RAID
Figure 6-28 RAID controller card provides four SATA internal connectors

© Cengage Learning 2017A+ Guide to Hardware, 9th Edition 37
How to Implement Hardware Raid
• General directions to install RAID 5 array using three matching SATA drives– Install drives in the computer case and connect each
to motherboard– Boot system and enter UEFI/BIOS setup
• Verify drives recognized, select option to configure SATA, and select RAID
– Reboot the system• Press Ctrl and I to enter the RAID configuration utility
– Select option 1 to “Create RAID Volume”• Select RAID 5 (Parity), stripe size value, volume size• Create volume

© Cengage Learning 2017A+ Guide to Hardware, 9th Edition 38
How to Implement Hardware Raid
Figure 6-30 Configure SATA ports on the motherboard to enable RAID

© Cengage Learning 2017A+ Guide to Hardware, 9th Edition 39
How to Implement Hardware Raid
Figure 6-31 BIOS utility to configure a RAID array

© Cengage Learning 2017A+ Guide to Hardware, 9th Edition 40
How to Implement Hardware Raid
Figure 6-32 Make your choices for the RAID array

© Cengage Learning 2017
External Enclosures
• Hard drives are sometimes stored in external enclosures– Make it easy to expand storage capacity of a single
computer or make available hard drive storage to an entire network
• For network attached storage (NAS)– Enclosure connects to the network via Ethernet port
• Hard drives inside the enclosure might use a SATA connection
A+ Guide to Hardware, 9th Edition 41

© Cengage Learning 2017
External Enclosures
• What to know about supporting external enclosures:– Enclosure might contain firmware that supports RAID
– To replace a hard drive in an enclosure, see the documentation for the enclosure
– If a computer case is overheating, remove hard drives from the case and install them in an external enclosure
• It is better to leave the hard drive that contains the Windows installation in the case
A+ Guide to Hardware, 9th Edition 42

© Cengage Learning 2017
About Tape Drives
• Tapes drives – an inexpensive way of backing up a hard drive
• WORM (write once read many) – assures data written will not be deleted or overwritten
• Disadvantage: data is stored by sequential access – To read data from anywhere on the tape, you must
start at the beginning of the tape and read until you find the data you want
– Slow and inconvenient
A+ Guide to Hardware, 9th Edition 43

© Cengage Learning 2017
About Tape Drives
• Two kinds of tapes:– Full-sized data cartridges
– Minicartridges - popular because their drives can fit into a standard 3-inch drive bay of a PC case
• Common types of tape cartridges:– DDS (Digital Data Storage)
– LTO (Linear Tape-Open)
– DLT (Digital Linear Tape)
– SDLT (Super Digital Linear Tape)
– Travan
A+ Guide to Hardware, 9th Edition 44

© Cengage Learning 2017
About Tape Drives
• Common types of tape cartridges (cont’d):– AIT (Advanced Intelligent Tape)– SLR (Scalable Linear Recording)
• When selecting a tape drive, consider:– How many and what type of cartridges the drive can
use– How it interfaces with the computer
• External drives can connect to a computer using a USB, FireWire, SCSI, SAS, or eSATA port
A+ Guide to Hardware, 9th Edition 45

© Cengage Learning 2017
Supporting Other Types of Storage Drives
• Storage devices to support might include:– Optical discs– USB flash drives– Memory cards
A+ Guide to Hardware, 9th Edition 46

© Cengage Learning 2017
File Systems Used by Storage Devices
• File system – used to manage data stored on a device– Overall structure the OS uses to name, store, and
organize files on a drive– In Windows, each storage device is assigned a driver
letter• Formatting – installing a new file system on a device• Types of file systems:
– NTFS, exFAT, FAT32 and FAT
A+ Guide to Hardware, 9th Edition 47

© Cengage Learning 2017
Standards Used by Optical Drives and Discs
• CDs, DVDs, and Blu-ray discs (BD) use similar laser technologies– Tiny lands and pits on surface represent bits read by
a laser beam• CD drives use CDFS (Compact Disc File System) or
UDF (Universal Disk Format) file system• DVD and Blue-ray drives use UDF • Internal optical drive interfaces with motherboard via
a SATA connection– External might use eSATA, FireWire, or USB
A+ Guide to Hardware, 9th Edition 48

© Cengage Learning 2017
Standards Used by Optical Drives
• Data can be written to:– One side of a CD– One or both sides of a DVD or Blu-ray disc
• DVD or Blu-ray disc can hold in two layers on each side
A+ Guide to Hardware, 9th Edition 49
Figure 6-42 Storage capacities for CDs, DVDs,and BD discs

© Cengage Learning 2017
Replacing an Optical Drive on a Laptop
• Replacing optical drives:– Unplug the AC adapter and remove the battery pack– Remove keyboard (not all laptops require this step)– Remove screw holding DVD drive to the laptop – Slide drive out of the bay and new drive into the bay
• Ensure connection with drive connector• Replace the screw
A+ Guide to Hardware, 9th Edition 50

© Cengage Learning 2017
Solid State Storage
• Solid-state storage:– SSD hard drives, USB flash drives, and memory
cards• USB flash drives go by many names:
– Flash pen drive, jump drive, thumb drive, and key drive
– Might work at USB 2.0 or USB 3.0 speed– Use FAT or exFAT file system– Windows 8/7/Vista has embedded drivers to support
flash drives
A+ Guide to Hardware, 9th Edition 51

© Cengage Learning 2017
Solid State Storage
• Memory cards might be used in:– Digital cameras, tablets, cell phones, MP3 players,
digital camcorders, etc…– Most laptops have memory card slots
• SD (Secure Digital) Association is responsible for standards:– 1.x (regular SD)– 2.x (SD High Capacity or SDHC)– 3.x (SD eXtended Capacity or SDXC)
• SD cards come in three physical sizes
A+ Guide to Hardware, 9th Edition 52

© Cengage Learning 2017
Solid State Storage
• SDHC and SDXC slots are backward compatible with SD cards
• Cannot use:– SDHC card in an SD slot– SDXC card in an SDHC or SD slot
• SD and SDHC cards use FAT file system• SDXC cards use exFAT file system
A+ Guide to Hardware, 9th Edition 53

© Cengage Learning 2017
Troubleshooting Hard Drives
• Problems caused by hard drive during the boot can be caused by:– Hard drive subsystem– File system on the drive– Files required by Windows when it begins to load
• When trying to solve a problem with the boot– Decide if the problem is caused by hardware or
software
A+ Guide to Hardware, 9th Edition 54

© Cengage Learning 2017
Slow Performance
• Common complaint:
– Computer is running slowly
• Try running the defragmentation tool on the hard
drive
– The Windows defragmentation tool rearranges
fragments or part of files in contiguous clusters so
files are easier and faster to find
A+ Guide to Hardware, 9th Edition 55

© Cengage Learning 2017
Hard Drive Problems During the Boot
• Hardware problems usually show up at POST• Could be due to the drive, data cable, electrical
system, motherboard, or a loose connection• Things to do and check before opening case:
– Check to see if UEFI/BIOS displays a numeric error code or other message during POST
– Check UEFI/BIOS setup for errors in the hard drive configuration
– Try booting from another bootable media– For a RAID array, use the firmware utility to check the
status of each disk in the array and check for errors
A+ Guide to Hardware, 9th Edition 56

© Cengage Learning 2017
Hard Drive Problems During the Boot
• If the problem is still not solved, open case and check these things:– Remove and reattach all drive cables– If using a RAID, SATA, PATA, or SCSI controller
card, remove and reseat it or place in a different slot– Inspect drive for damage– Determine if hard drive is spinning by listening to it– Check the cable for frayed edges– Check installation manual– S.M.A.R.T. errors mean data should be backed up
and drive replaced as soon as possibleA+ Guide to Hardware, 9th Edition 57

© Cengage Learning 2017
Hard Drive Problems During the Boot
• If the problem is still not solved, open case and check these things (cont’d):
– Use Windows tools for checking a hard drive
– Check the drive manufacturer’s web site for diagnostic software
– Move the device to a working computer and install it as a second drive
– Exchange the three field replaceable units
• Reconnect or swap the data cable
• Reseat or exchange the controller card
• Exchange the hard drive for a known good drive
A+ Guide to Hardware, 9th Edition 58

© Cengage Learning 2017
Hard Drive Problems During the Boot
• If the problem is still not solved, open case and check these things (cont’d):
– Use Windows tools for checking a hard drive
– Check the drive manufacturer’s web site for diagnostic software
– Move the device to a working computer and install it as a second drive
– Try these things to clean the drive and get a fresh start:
• Format the drive
• Use diskpart to start over with a fresh file system
A+ Guide to Hardware, 9th Edition 59

© Cengage Learning 2017
Hard Drive Problems During the Boot
• If the problem is still not solved, open case and
check these things (cont’d):
– Exchange the three field replaceable units
• Reconnect or swap the data cable
• Reseat or exchange the controller card
• Exchange the hard drive for a known good drive
– If your drives whines loudly, try replacing it
– A bad power supply or a bad motherboard also might
cause a disk boot failure
A+ Guide to Hardware, 9th Edition 60

© Cengage Learning 2017A+ Guide to Hardware, 9th Edition 61
Summary
• A hard disk drive (HDD) comes in 3.5” for desktop and 2.5” and 1.8” for laptops
• A hard drive can be magnetic, solid-state, or hybrid• Most hard drives, tape drives, and optical drives use
the SATA interface standards• Three SATA standards provide data rates of 1.5
Gb/sec, 3.0 Gb/sec, and 16.0 Gb/sec• S.M.A.R.T is a self-monitoring technology whereby
the BIOS monitors the health of a hard drive

© Cengage Learning 2017A+ Guide to Hardware, 9th Edition 62
Summary
• When selecting a hard drive, consider storage capacity, technology, spindle speed, interface standard, and buffer size
• SATA drives require no configuration and are installed using a power cord and a data cable
• Laptop hard drives plug directly into a SATA connection on the system board
• RAID technology uses an array of hard drives to provide fault tolerance and/or improvement in performance

© Cengage Learning 2017
Summary
• Hardware RAID is implemented using the motherboard UEFI/BIOS or a RAID controller card
• Software RAID is implemented in Windows• Tape drives are an inexpensive way to back up an
entire hard drive or portions of it• File systems a storage device might use in Windows
include NTFS, exFAT, and FAT• Optical discs can be recordable (CD-R) or rewritable
(DVD-RW)
A+ Guide to Hardware, 9th Edition 63

© Cengage Learning 2017
Summary
• Types of flash memory standards include SD, MiniSD, MicroSD, SDHC, MiniSDHC, MicroSDHC, SDXC, MicroSDXC
• Other memory cards include Memory Stick PRO Duo, Memory Stick PRO, Memory Stick Micro M2, CompactFlash I and II, and xD-Picture Card
• Problems caused by the hard drive during a boot can be caused by the hard drive subsystem, file system, or by files required by Windows to load
A+ Guide to Hardware, 9th Edition 64