a digital integrated circuit tester
TRANSCRIPT
A DIGITAL INTEGRATED CIRCUIT TESTER
By
DONALD FARNESS HANSON
Department of Electrical EngineeringUniversity of Illinois at Urbana-Champaign, 1975
Urbana, Illinois
ACKNOWLEDGEMENT
The author would like to express his appreciation to Prof. M. H. Crothers
for his guidance and suggestions during the early phase of the project, to
Prof. M. L. Babcock for his help during the construction phase and for his
comments on the manuscript, and to Mr. J. S. Jacobsen for his help in obtaining
parts and printed circuit boards.
A special thanks goes to Mr. Eric Strand for assembling the unit.
The schematic drawings were done by M. C. Goebel. S. J. Holland did the
illustration in Figure 1. B. Cobbs did the typing.
>*^

Ill
TABLE OF CONTENTS
I. Introduction
II. The Design Philosophy
III. The Circuitry
A. Skipping the 1111 state
B. The Astable Multivibrator
C. The Five-Place Ring Counter
D. The Ripple Counter
E. The Power Supplies
F. The Circuit Test Boards
IV. The Printed Circuit Board Layouts
Page
1
3
6
8
8
8
8
8
14
14

iv
LIST OF FIGURES
Page
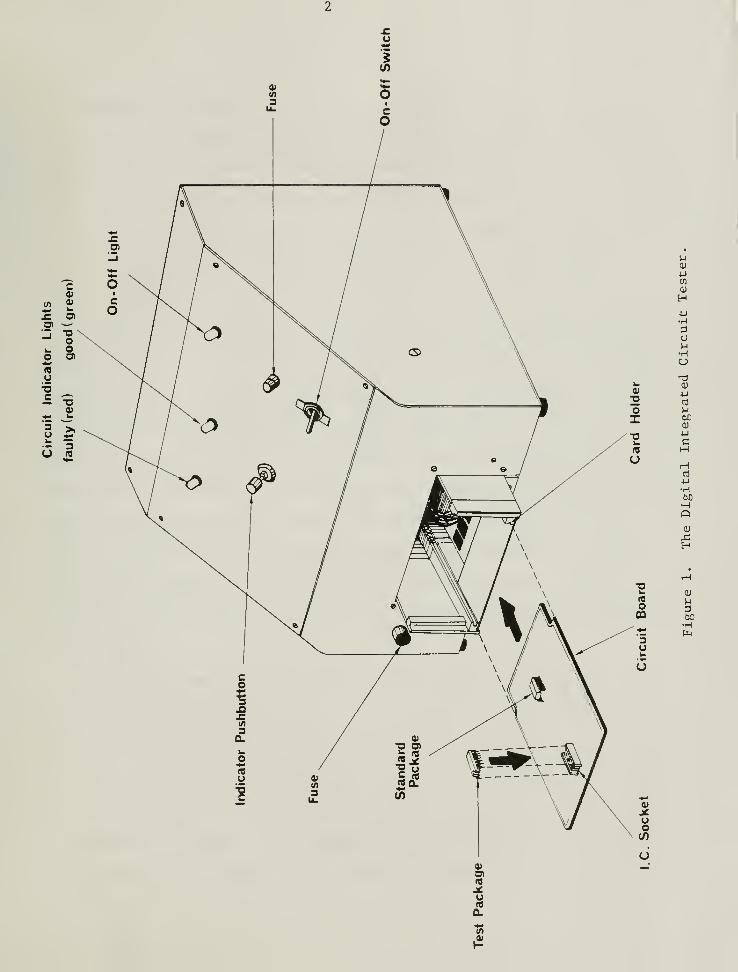
Figure 1. The Digital Integrated Circuit Tester. 2
Figure 2. Waveform Timing Relationships . 5
Figure 3. The System Diagram. 7
Figure 4. Circuit for Skipping 1111 state. 9
Figure 5. The Astable Multivibrator. 10
Figure 6. The Five-Place Ring Counter. 11
Figure 7. The 12-Bit Binary Ripple Counter. 12
Figure 8. The Power Supplies . 13
Figure 9. Example of Wiring for a Circuit Test Board. 15
Figure 10(a). The Top Side Layout. 17
Figure 10(b). The Bottom Side Layout. 18
Figure 11. The Part Locations. 19
Figure 12(a). General Circuit Test Board Printed Circuit Layout. Top Side. 20
Figure 12(b). General Circuit Test Board Printed Circuit Layout.
Bottom Side. 20
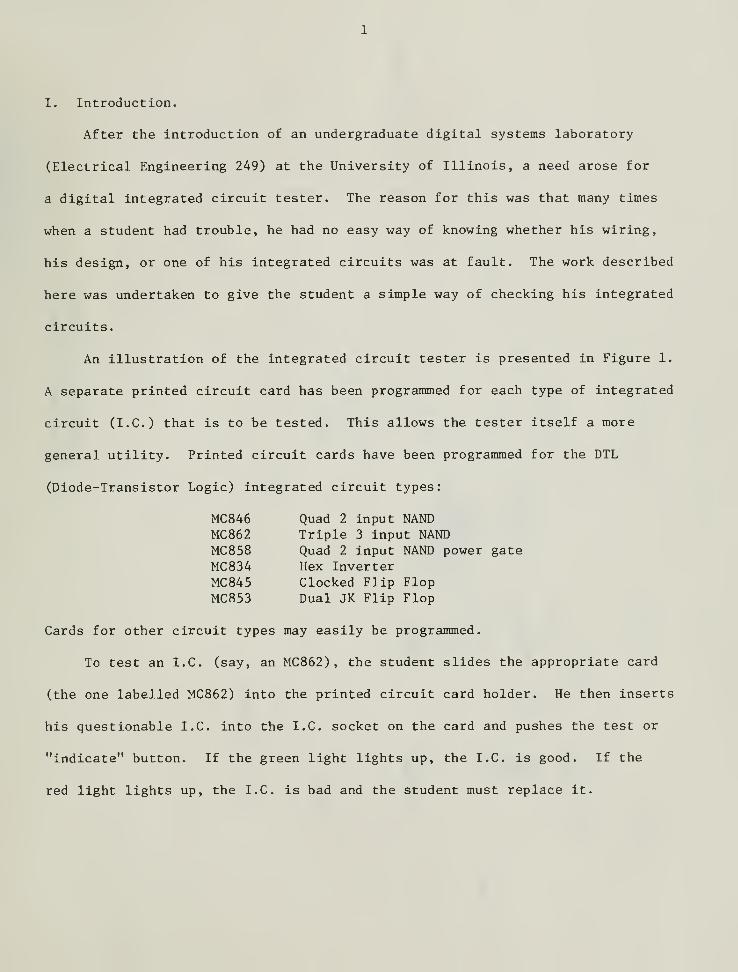
I. Introduction.
After the introduction of an undergraduate digital systems laboratory
(Electrical Engineering 249) at the University of Illinois, a need arose for
a digital integrated circuit tester. The reason for this was that many times
when a student had trouble, he had no easy way of knowing whether his wiring,
his design, or one of his integrated circuits was at fault. The work described
here was undertaken to give the student a simple way of checking his integrated
circuits.
An illustration of the integrated circuit tester is presented in Figure 1.
A separate printed circuit card has been programmed for each type of integrated
circuit (I.C.) that is to be tested. This allows the tester itself a more
general utility. Printed circuit cards have been programmed for the DTL
(Diode-Transistor Logic) integrated circuit types:
MC846 Quad 2 input NANDMC862 Triple 3 input NANDMC858 Quad 2 input NAND power gateMC834 Hex InverterMC845 Clocked Flip FlopMC853 Dual JK Flip Flop
Cards for other circuit types may easily be programmed.
To test an I.C. (say, an MC862) , the student slides the appropriate card
(the one labelled MC862) into the printed circuit card holder. He then inserts
his questionable I.C. into the I.C. socket on the card and pushes the test or
"indicate" button. If the green light lights up, the I.C. is good. If the
red light lights up, the I.C. is bad and the student must replace it.
5
u0)
jjCO
0)
H
•H3auHo
0)
4-1
cfl
Sj
00QJ
4-1
c
6£•HQCD
H
0)
3
•H

II. The Design Philosophy
In the early stages of design, it was decided that the tester should be
simple, versatile, fast, and reliable. A machine was desired that could
reliably test most DTL integrated circuits with an immediate verdict appearing
with the simple push of a button. A time deadline of four months of half-time
work for the design and PCB (Printed Circuit Board) layout work imposed a
further restriction.
Several different preliminary schemes were developed for testing digital
integrated circuits. Of these, it was felt that only one satisfied all of the
above constraints. This used a comparison scheme. In this scheme a sequence
of bit patterns is administered to a standard package (which is permanently
mounted on a test PCB) and to a test package such that all possible input
combinations are examined. The resulting output sequences of bit patterns are
compared and if they differ, a flag (a "faulty package" flip flop) is set.
Caution must be exercised in setting the flag. Should the delay of a test
package differ substantially from that of the standard package, a direct
comparison would erroneously set the flag. Use of a delayed strobe circumvents
this problem.
Testing the master-slave flip flops presents another problem. The data
inputs of these devices are locked out as soon as the clock goes high and the
outputs change state when the clock goes low. This being the case, a flip flop
clock is required that goes high briefly after each change in input data bit
pattern. After the flip flop clock has gone low, but before the data inputs
have changed, the outputs of the standard and test packages must be compared.
If they differ, the flag must be set. Use of a delayed strobe is again called
for.

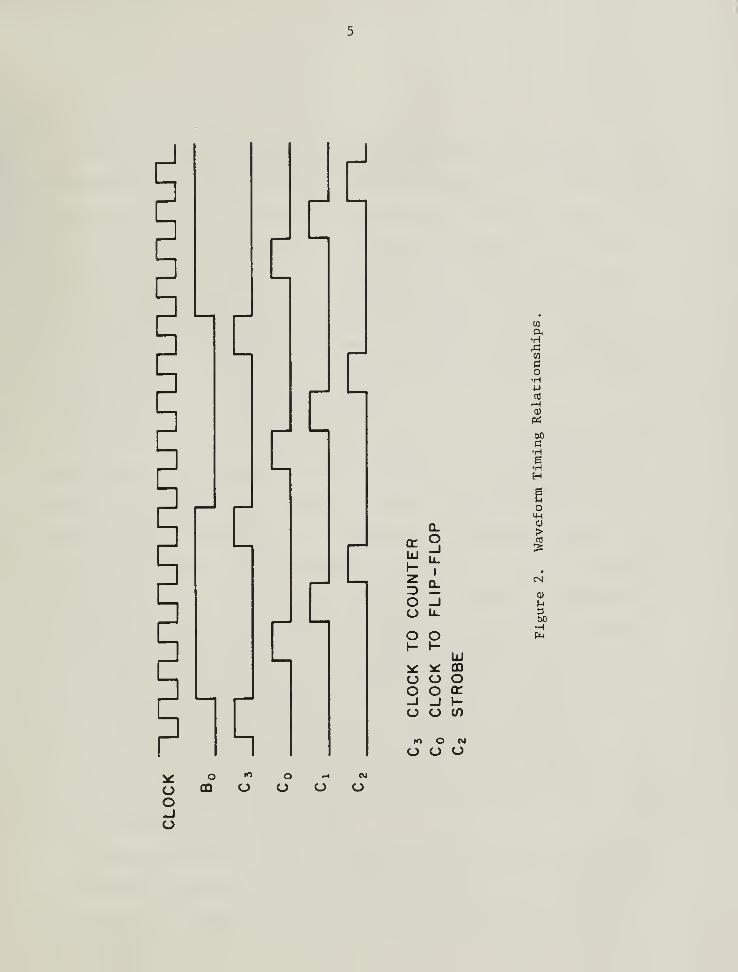
To provide a flip flop clock, a strobe, and a counter clock, a five-place
ring counter with the output timing characteristics shown in Figure 2 is used.
Output C. triggers a change in input bit pattern, B being the lowest order input
bit. After a one count delay, output C is used as a flip flop clock (if needed)
After another one count delay, output C„ is used as a strobe. The flag is set
only if the standard and test packages' outputs differ at some time while the
strobe signal is high. This flag can only be reset by restarting the test.
After another one count delay, the input bit pattern changes, and the cycle
begins again.
The sequence of bit patterns used for data input is that of a standard
ripple counter. This was used because of its simplicity.
J
CO
ex•H
CO
ao•H
ca
cu
erf
oots
•H
H
n
crUJ
3Oo
Q.O
I
0.
o o
o oo o
LUmocr
o o en
IO O CM
o o o
o
cu
>
5
0)
u3M•H
*

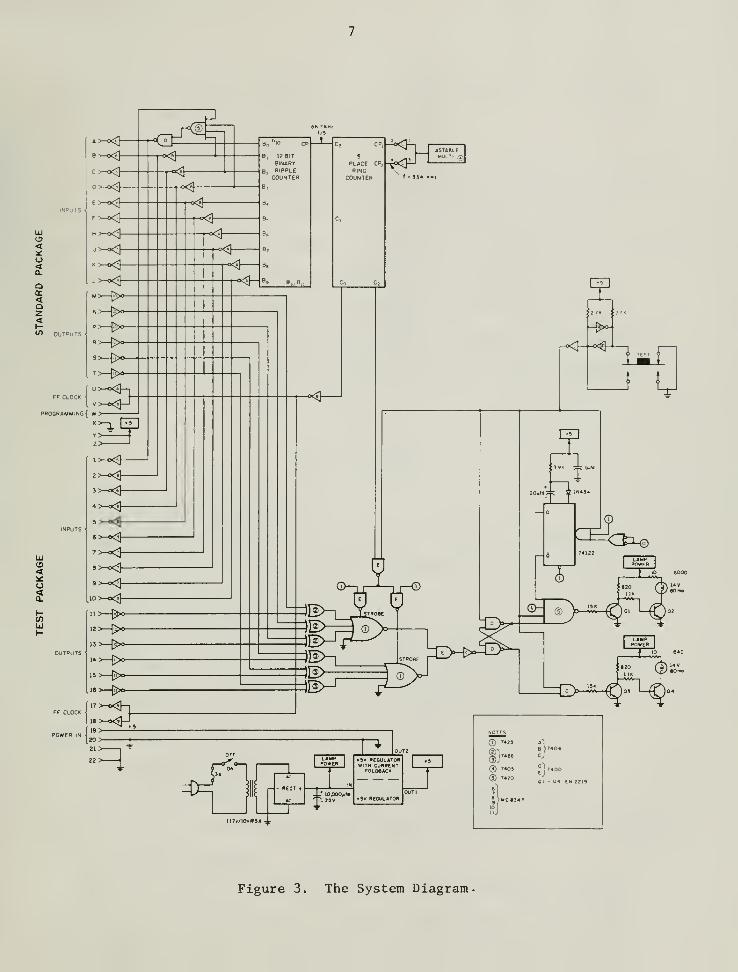
III. The Circuitry.
The system diagram is shown in Figure 3. The astable multivibrator clocks
the five-place ring counter. Outputs of the ring counter act as ripple counter
clock, flip flop clock, and strobe as was described in the last section. Out-
put C, of the ring counter clocks the 12-bit ripple counter. Only 10 bits of
the ripple counter are available. Between four and nine bits of the ripple
counter are used, depending upon the device being tested. These bits are
used as inputs to both the standard package and the test package. Buffer
inverters are used to make certain that a bad gate in the test package does
not affect the input to the standard package.
The outputs from the standard package are then compared with the respective
outputs from the test package using Exclusive-OR gates. The Exclusive-OR
outputs are ORed when the strobe signal is high. The strobe signal becomes
available only when the test button is depressed. A "de-bounce" circuit
provides a test signal free of "contact bounce" as the test button is depressed.
The test button signal is used to gate the strobe, to enable the flag flip flop,
to turn on one of the Good/Faulty indicator lights, and to trigger a monostable
which keeps the "Good" light off for about 40ms. The time delay of the latter
insures that the ripple counter will have cycled through all possible input
states before a good reading is registered. Note that the packages are being
tested before the test button is pushed, but that a verdict is announced only
after the button has been pushed. This is to allow flip flops a chance to get
"in sync" before a test readout is made.
Two power supplies are used. One supplies power to the system itself and
to the standard package, and the other supplies power to the test package only.
Both supplies are designed with a current foldback capability so that the
<o2o<
*>-0<]
B>^c>^<]
D~<]
F^OH>-<}-
.L>-0<1
w> ft>o
N ^_|>X,—
S^-[>o—
programming! w>-
UJ
O2
r
2^=rl>-o<J-
«>-°<}-
,ov-o<5]—
n >—fj^ao-
12 > [>o-
13 > [£>o-
»>>IS >—C>o-
17 >-D<l-J_
R'
<^e^*<h«$-
*$-
BINARY
,RlPPLECOUNTER
PLACE CP;
RINGCOUNTER
<*§-
~$-
O-E
T
•SV REGULATORWITH CURRENTFOLMAC*
>9v REGULATOR
-f>°-
j u
3Q
<̂3^10 GOOD
O- q
e >7*oa74 86 Cj
NOTES
© T4Z3
©'
©.® 7403
® 7«20
• >MCR94P
01-04 EN 2219
Figure 3. The System Diagram

supplies won't be damaged under short circuit loading conditions. This feature
is especially important for the test package supply.
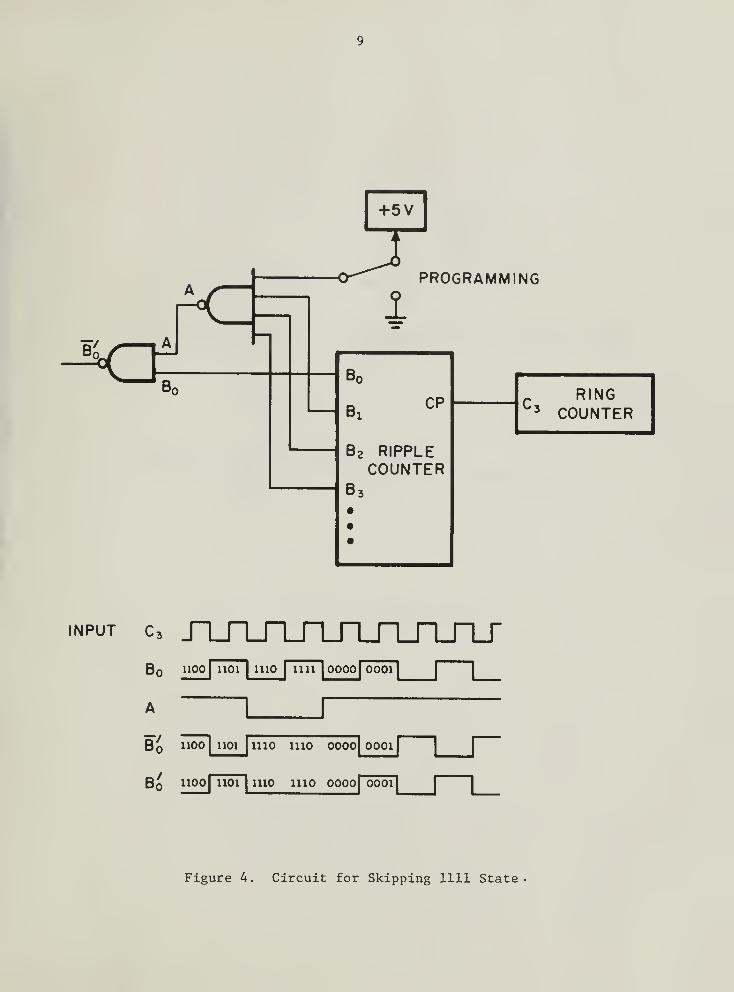
A. Skipping the 1111 state
The data sheet for the MC845 clocked flip flop states that when the device
is clocked with 1111 input, the output state is indeterminate. The circuit
shown in Figure 3 and again in Figure 4 was included to eliminate any possibility
of an incorrect verdict when testing the MC845. The circuit skips the 1111
state entirely as shown in Figure 4 by repeating the 1110 state twice. For
circuits other than the MC845, the use of B may be avoided or the programming
pin may be used to eliminate the effect of the circuit. With the programming
pin grounded,
V = Bo
'
B. The Astable Multivibrator
The astable multivibrator schematic diagram is shown in Figure 5. The
frequency of operation is about 300 KHz. This circuit is described in [1].
C. The Five-Place Ring Counter
The circuit diagram for the five-place ring counter is shown in Figure 6.
The timing relationships between the outputs are shown in Figure 2. The circuit
is both self-starting and self-correcting. A complete description of the circuit
operation is given in [2].
D. The Ripple Counter
The schematic diagram of the ripple counter is shown in Figure 7. The
frequency of B.. is the frequency of the astable multivibrator divided by 20480.
E. The Power Supplies
The power supplies are shown in Figure 8. The upper supply supplies
power for the tester itself and the standard package while the lower supply
supplies power to the test package only. Both supplies have the capability

10
CLOCK OUT
1000 pfd
NOTES: ALL INVERTERS SN7405OPERATING FREQUENCY f 300 kHZ
Figure 5. The Astable Multivibrator.

11
uo
<_>o
uQ)
Ou60a•HPS
QJ
OCO
HPh
I
aj
a)
H
a)
n300•H

12
uCD4-1
c3Ou
a•Hpi
nCO
C•HPQ
•Hpq
I
CN
H
0)
300•H

13
HEAT SINK
•2N3055!
3 I 1N54
OUT 1
1N54
1/2W 160ft
1N4742A/:/12V * "—<>
OUT 2
TOP HATHEAT SINK
NOTES: REGULATORS ARE WESTINGHOUSE WC 109
USE 1A FUSES ONLY. DO NOT USE "SLOW BLOW" FUSES.
RESISTOR VALUES IN PARENTHESES REFER TO ACTUAL VALUES USED.DESIGN DATA: (SEE MANUFACTURER'S DATA SHEET)
OUT 1 :

14
to shut down when an output is shorted to ground. Adjustment of the output
voltages is accomplished by means of the 500 fi potentiomenters. The SCR shown
provides over-voltage protection. Should either output go above about 6 volts,
the SCR will fire and the 1 Ampere fuse will blow.
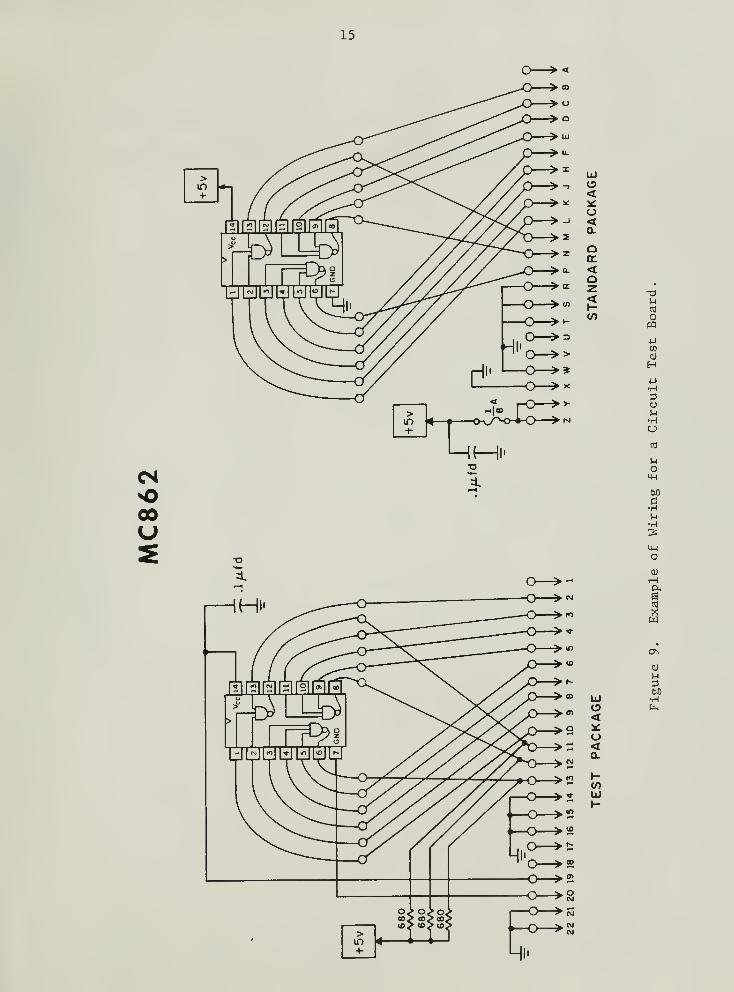
F. The Circuit Test Boards .
The schematic diagram of the circuit test board for the MC862 integrated
circuit is shown in Figure 9. In this case, there are nine inputs and three
outputs. This means that three output pins on each side of the board are not
needed. These pins are all grounded to provide proper signals to the unused
Exclusive-OR gates. In order that the test package may be tested under load
conditions, a load resistor has been attached to each test package output.
The loading resistor values used are
680 Q MC834, MC846, MC862
430 fi MC845, MC853
180 n MC858 •
Note that the circuits of Figure 3 and Figure 9 are joined by the PCB
connector in Figure 3 and by the PCB pins in Figure 9.
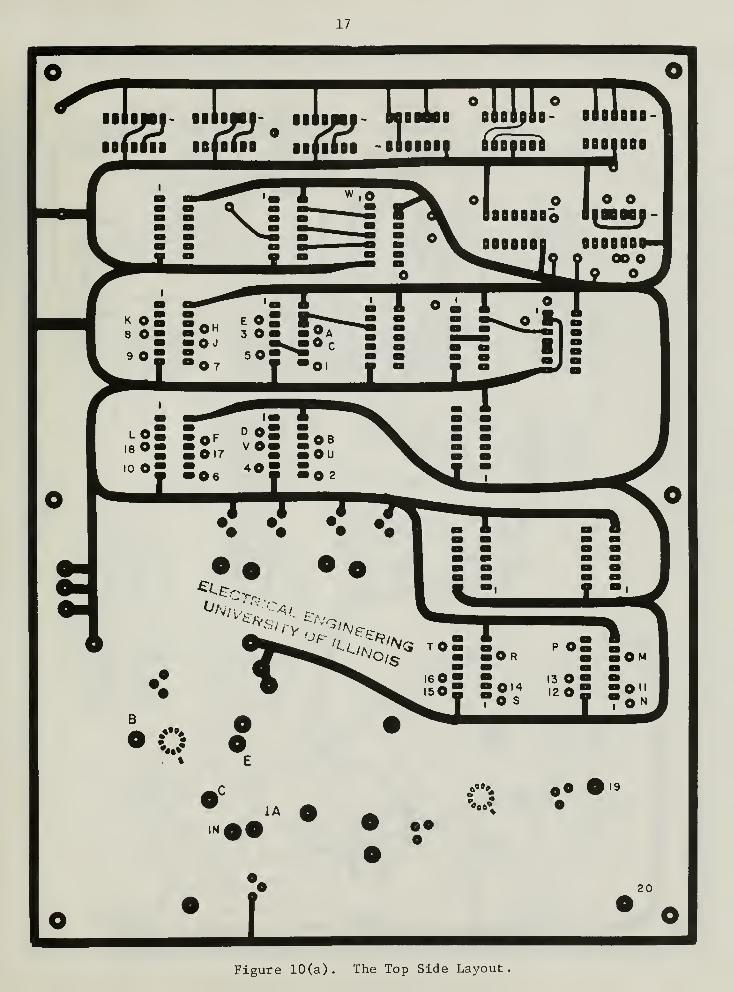
IV. The Printed Circuit Board Layouts.
The printed circuit board layout for the tester itself is shown in
Figure 10. Figure 10(a) is the layout of the top of the card. The circles
labelled with letters and numbers must be wired to the test card connector.
The letters and numbers refer to pins on the connector. Figure 10(b) is the
layout of the bottom of the card.
15
Ov/^o-i-O—>N
IH 1
CMOCOU2
=1
T3)-l
n)
opq
a)
H4-1
•H
ou•HU
O
60
•5
•H
M-l
O
0)
H
60•H

16
The part locations are shown in Figure 11.
The layout for the test boards is shown in Figure 12.
17
Figure 10(a). The Top Side Layout

18
imm\t^5)k}(iii o jj
•Iptii ftdab e o© o
III!
^
A
rn
mH
L: :j
-.1 ?\
«.«»«.
Fieure 10(b). The Bottom Side Layout

19
4-7 V2W
©IN
INS4 IN54
ooo l2
,K^
3.3 K I
©•o
3.9K
6.2 K
4»K .Ol^fdlii,
O ff
GEC6F T,oV
I-5.&K -»-
fd "THh
3°°
I.8K.
100/ifd
20
Figure 11. The Part Locations

20
Figure 12(a) General Circuit Test Board Printed Circuit Layout.
Top Side.
Figure 12(b) General Circuit Test Board Printed Circuit Layout,
Bottom Side.

21
REFERENCES
[1] Faiman, M. "Widerange multivibrator costs just 25c to build",Electronics , August 2, 1971, page 59.
[2] Malmstadt, H. and Enke, C. Digital Electronics for Scientists,
W. A. Benjamin, 1969, pages 272-273.