a-cr-ccp-804/pf-001 royal canadian air cadets …€¦ · a-cr-ccp-804/pf-001 m490.03-1 royal...
TRANSCRIPT
A-CR-CCP-804/PF-001
M490.03-1
ROYAL CANADIAN AIR CADETS
PROFICIENCY LEVEL FOUR
INSTRUCTIONAL GUIDE
SECTION 3
EO M490.03 – TIE KNOTS AND LASHINGS
Total Time: 60 min
PREPARATION
PRE-LESSON INSTRUCTIONS
Resources needed for the delivery of this lesson are listed in the lesson specification located in A-CR-CCP-804/PG-001, Proficiency Level Four Qualification Standard and Plan, Chapter 4. Specific uses for said resourcesare identified throughout the instructional guide within the TP for which they are required.
Review the lesson content and become familiar with the material prior to delivering the lesson.
Photocopy the knot-tying and lashing instructions located at Attachments A and B for each cadet.
Cut lengths of braided rope for the cadets to tie the knots. The rope should be 10 mm (3/8 inch) in diameterand 3 m (10 feet) in length. Each cadet will require two lengths of rope.
Collect poles from natural resources. Poles should be approximately 2 m in length and 6 cm in diameter. Eachcadet will require two poles.
PRE-LESSON ASSIGNMENT
Nil.
APPROACH
An interactive lecture was chosen for TP 1 to present background material on rope terminology.
A demonstration and performance was chosen for TPs 2 and 3 as it allows the instructor to explain anddemonstrate tying knots and lashings while providing an opportunity for the cadets to practice and developthese skills under supervision.
INTRODUCTION
REVIEW
Nil.
OBJECTIVES
By the end of this lesson the cadet shall have tied knots and lashings.
IMPORTANCE
It is important for the cadets to know how to tie different knots and lashings in order to construct sturdy shelters,tents, snares and camp crafts.

A-CR-CCP-804/PF-001
M490.03-2
Teaching Point 1 Describe the parts of a rope.
Time: 10 min Method: Interactive Lecture
Figure 1 Parts of a RopeNote. From Lost Knowledge Site, by B. Green. 2006. Retrieved March 6,2009, from http://lostknowledgesite.com/BackToBasics/Knots/Knots.html
PARTS OF A ROPE
The following definitions will assist cadets when tying each knot or lashing:
Working end (Bitter end). The very end of the rope that is used for tying a knot.
Working part (Running part). is the short length of rope that is manipulated to make the knot.
Standing end. The end of the rope opposite the end being used for tying a knot.
Standing part. The section of rope that usually “stands still” during the knot-tying process. Often it is the longerend that leads away from the loop, bight or knot.
Turn or Loop. A part of rope that crosses over itself. The working part can be over or under the standing partin a crossing turn.
Bight. A loop in the rope that does not cross over itself.

A-CR-CCP-804/PF-001
M490.03-3
CONFIRMATION OF TEACHING POINT 1
QUESTIONS:
Q1. What part of the rope is called the working part?
Q2. What is a bight?
Q3. What is the standing end?
ANTICIPATED ANSWERS:
A1. The working part (running part) is the short length of rope that is manipulated to make the knot.
A2. A bight is a loop in the rope that does not cross over itself.
A3. The standing end is the end of the rope opposite the end being used for tying a knot.
Teaching Point 2 Explain, demonstrate and have the cadets tie knots.
Time: 20 min Method: Demonstration and Performance
For this skill lesson, it is recommended that the instruction take the following format:
1. Explain and demonstrate the complete knot while cadets observe.
2. Explain and demonstrate each step required to complete the knot. Monitor cadets asthey imitate each step.
3. Monitor the cadets' performance as they practice the complete knot.
Note: Assistant instructors may be used to monitor the cadets' performance.
KNOTS
Reef knot. The reef knot is used for joining two ropes of equal diameter together. This knot can hold a moderateamount of weight and is ideal for first aid. It may be used when tying slings because the knot lies flat againstthe body.

A-CR-CCP-804/PF-001
M490.03-4
Steps for Tying a Reef Knot
1. Place the left-hand working end on the top of the right-hand working end.
Figure 2 Step 1Note. From Pocket Guide to Knots and Splices (p. 98), by D. Pawson, 2001,
London, England: Prospero Books Inc. Copyright 2001 by PRC Publishing Ltd.
2. Bring the left-hand working end under the right-hand working end.
Figure 3 Step 2Note. From Pocket Guide to Knots and Splices (p. 98), by D. Pawson, 2001,
London, England: Prospero Books Inc. Copyright 2001 by PRC Publishing Ltd.
A-CR-CCP-804/PF-001
M490.03-5
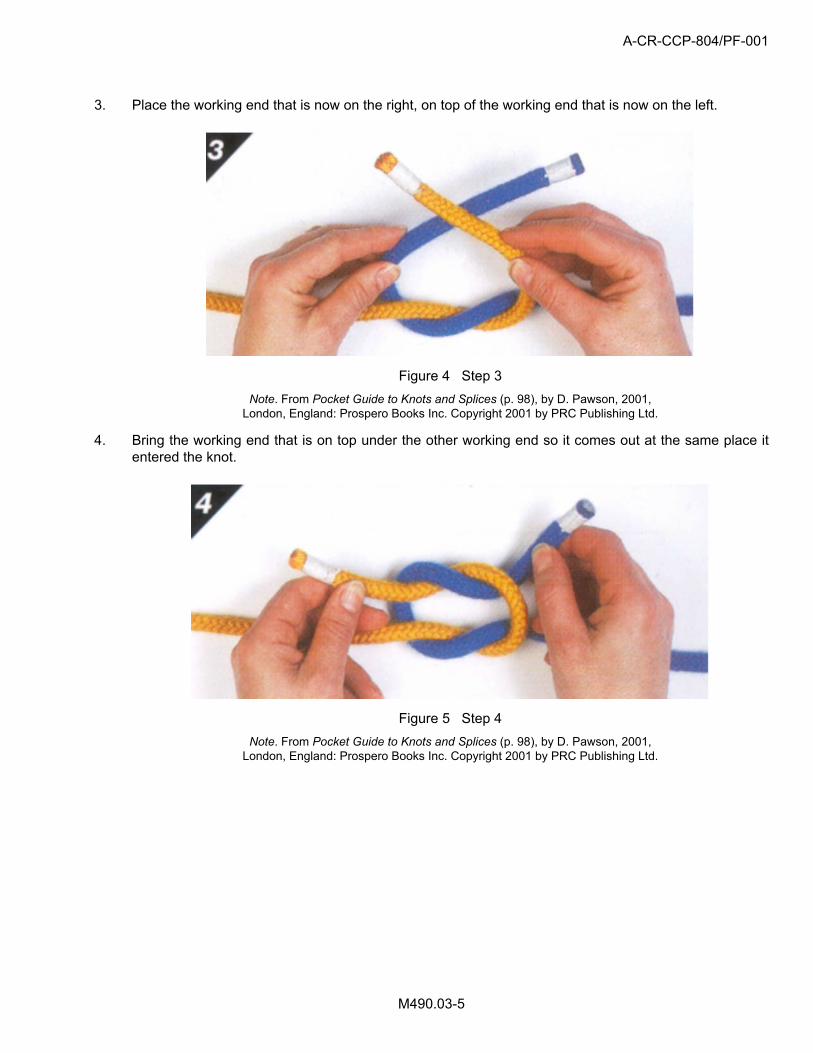
3. Place the working end that is now on the right, on top of the working end that is now on the left.
Figure 4 Step 3Note. From Pocket Guide to Knots and Splices (p. 98), by D. Pawson, 2001,
London, England: Prospero Books Inc. Copyright 2001 by PRC Publishing Ltd.
4. Bring the working end that is on top under the other working end so it comes out at the same place itentered the knot.
Figure 5 Step 4Note. From Pocket Guide to Knots and Splices (p. 98), by D. Pawson, 2001,
London, England: Prospero Books Inc. Copyright 2001 by PRC Publishing Ltd.

A-CR-CCP-804/PF-001
M490.03-6
5. Pull tight to complete the reef knot.
Figure 6 Step 5Note. From Pocket Guide to Knots and Splices (p. 98), by D. Pawson, 2001,
London, England: Prospero Books Inc. Copyright 2001 by PRC Publishing Ltd.
Figure-of-eight knot. The figure-of-eight knot is very simple and quick to tie. It makes an ideal stopper knotand is very easy to untie.
Steps for Tying a Figure-of-Eight Knot
1. Make a crossing turn with the working end passing under the standing part of the rope and then bringthe working end over the standing part.
Figure 7 Step 1Note. From Pocket Guide to Knots and Splices (p. 44), by D. Pawson, 2001,
London, England: Prospero Books Inc. Copyright 2001 by PRC Publishing Ltd.

A-CR-CCP-804/PF-001
M490.03-7
2. Now tuck the working end up through the loop from behind, forming a figure-of-eight.
Figure 8 Step 2Note. From Pocket Guide to Knots and Splices (p. 44), by D. Pawson, 2001,
London, England: Prospero Books Inc. Copyright 2001 by PRC Publishing Ltd.
3. Pull tight to complete the figure-of-eight knot.
Figure 9 Step 3Note. From Pocket Guide to Knots and Splices (p. 44), by D. Pawson, 2001,
London, England: Prospero Books Inc. Copyright 2001 by PRC Publishing Ltd.
Clove hitch. The clove hitch consists of two half hitches or crossing turns each made in the same direction.It is used to finish and start lashings and should not be used in a situation were the hitch has variable tensionas it can work loose.

A-CR-CCP-804/PF-001
M490.03-8
Steps for Tying a Clove Hitch
1. Make a turn around a pole / tree bringing the working end of the rope over and trapping the standing partof the rope. This makes the first half hitch.
Figure 10 Step 1Note. From Pocket Guide to Knots and Splices (p. 106), by D. Pawson, 2001,
London, England: Prospero Books Inc. Copyright 2001 by PRC Publishing Ltd.
2. Bring the working end behind the pole / tree, above the first half hitch.
Figure 11 Step 2Note. From Pocket Guide to Knots and Splices (p. 106), by D. Pawson, 2001,
London, England: Prospero Books Inc. Copyright 2001 by PRC Publishing Ltd.

A-CR-CCP-804/PF-001
M490.03-9
3. Put the working end under the turn just made. This gives the second half hitch and forms the clove hitch.
Figure 12 Step 3Note. From Pocket Guide to Knots and Splices (p. 106), by D. Pawson, 2001,
London, England: Prospero Books Inc. Copyright 2001 by PRC Publishing Ltd.
4. Pull tight to complete the clove hitch.
Figure 13 Step 4Note. From Pocket Guide to Knots and Splices (p. 106), by D. Pawson, 2001,
London, England: Prospero Books Inc. Copyright 2001 by PRC Publishing Ltd.
Bowline. The bowline is a very secure knot that will not slip, regardless of the load applied. Use this knotwhenever a non-slip loop is required at the end of a line.
A-CR-CCP-804/PF-001
M490.03-10
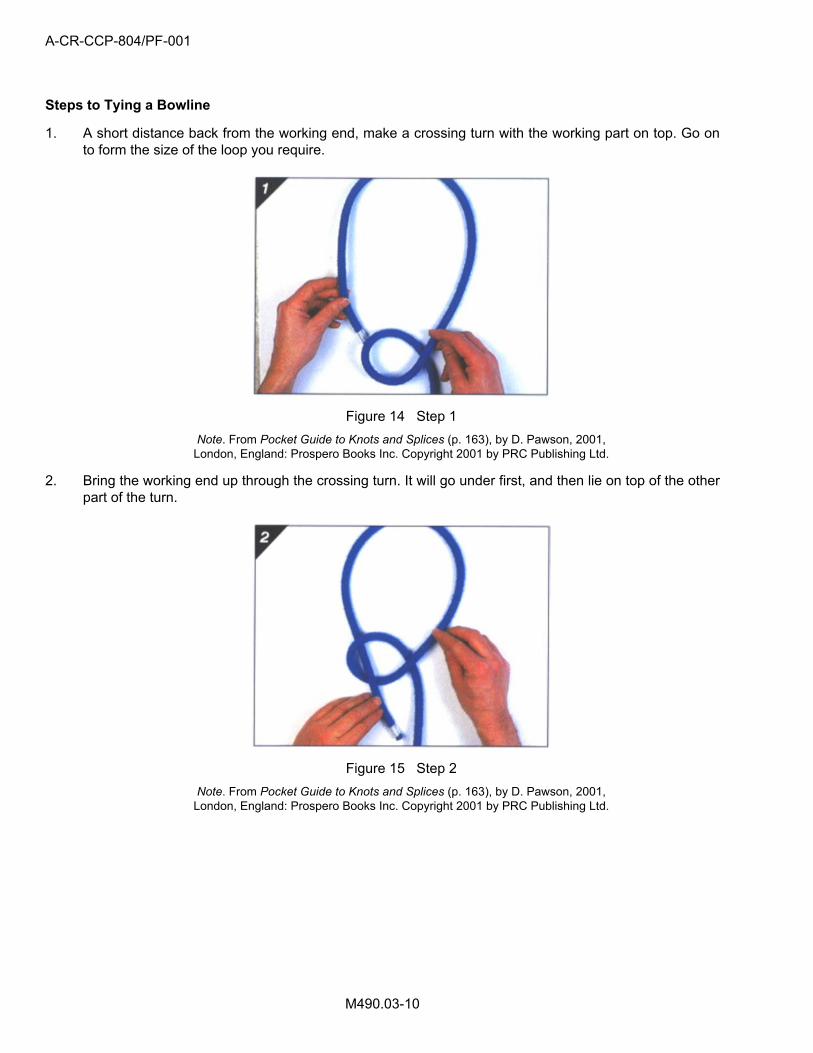
Steps to Tying a Bowline
1. A short distance back from the working end, make a crossing turn with the working part on top. Go onto form the size of the loop you require.
Figure 14 Step 1Note. From Pocket Guide to Knots and Splices (p. 163), by D. Pawson, 2001,
London, England: Prospero Books Inc. Copyright 2001 by PRC Publishing Ltd.
2. Bring the working end up through the crossing turn. It will go under first, and then lie on top of the otherpart of the turn.
Figure 15 Step 2Note. From Pocket Guide to Knots and Splices (p. 163), by D. Pawson, 2001,
London, England: Prospero Books Inc. Copyright 2001 by PRC Publishing Ltd.

A-CR-CCP-804/PF-001
M490.03-11
3. Bring the working end around behind the standing part and down through the crossing turn. A good wayto remember this is: “the rabbit comes out of the hole, around the tree and back down the hole again”.
Figure 16 Step 3Note. From Pocket Guide to Knots and Splices (p. 163), by D. Pawson, 2001,
London, England: Prospero Books Inc. Copyright 2001 by PRC Publishing Ltd.
4. Pull tight by holding the working end and pulling on the standing part to complete the bowline.
Figure 17 Step 4Note. From Pocket Guide to Knots and Splices (p. 163), by D. Pawson, 2001,
London, England: Prospero Books Inc. Copyright 2001 by PRC Publishing Ltd.
Distribute Attachment A to the cadets, so they may practice the knots after the lesson.

A-CR-CCP-804/PF-001
M490.03-12
CONFIRMATION OF TEACHING POINT 2
The cadets’ participation in tying knots will serve as the confirmation of this TP.
Teaching Point 3 Explain, demonstrate and have the cadets tie lashings.
Time: 20 min Method: Demonstration and Performance
For this skill, it is recommended that the instruction take the following format:
1. Explain and demonstrate the complete lashing while cadets observe.
2. Explain and demonstrate each step required to complete the lashing. Monitor cadetsas they imitate each step.
3. Monitor the cadets' performance as they practice the complete lashing.
Note: Assistant instructors may be used to monitor the cadets' performance.
LASHINGS
Round lashing. Sometimes called a sheer lashing, the round lashing has two distinct uses. First, it creates an"A" frame or set of using a single lashing. Second, two or three round lashings can be used to bind togethera couple of poles to make a longer spar. To make an "A" frame, tow poles are put side by side; the lashing ismade at one end as illustrated in Figures 18–24. A slightly different approach is used to join two poles togetherto make a longer pole. The procedure is exactly the same, except the initial and final clove hitches are tiedaround both poles and there is no space left between the poles and no frapping is used. For extra strength tothe spar, add extra lashings at the opposite end and middle of the adjoining poles.

A-CR-CCP-804/PF-001
M490.03-13
Steps to Tying a Round Lashing
1. Start by making a clove hitch around both poles.
Figure 18 Step 1Note. From Pocket Guide to Knots and Splices (p. 184), by D. Pawson, 2001,
London, England: Prospero Books Inc. Copyright 2001 by PRC Publishing Ltd.
A-CR-CCP-804/PF-001
M490.03-14
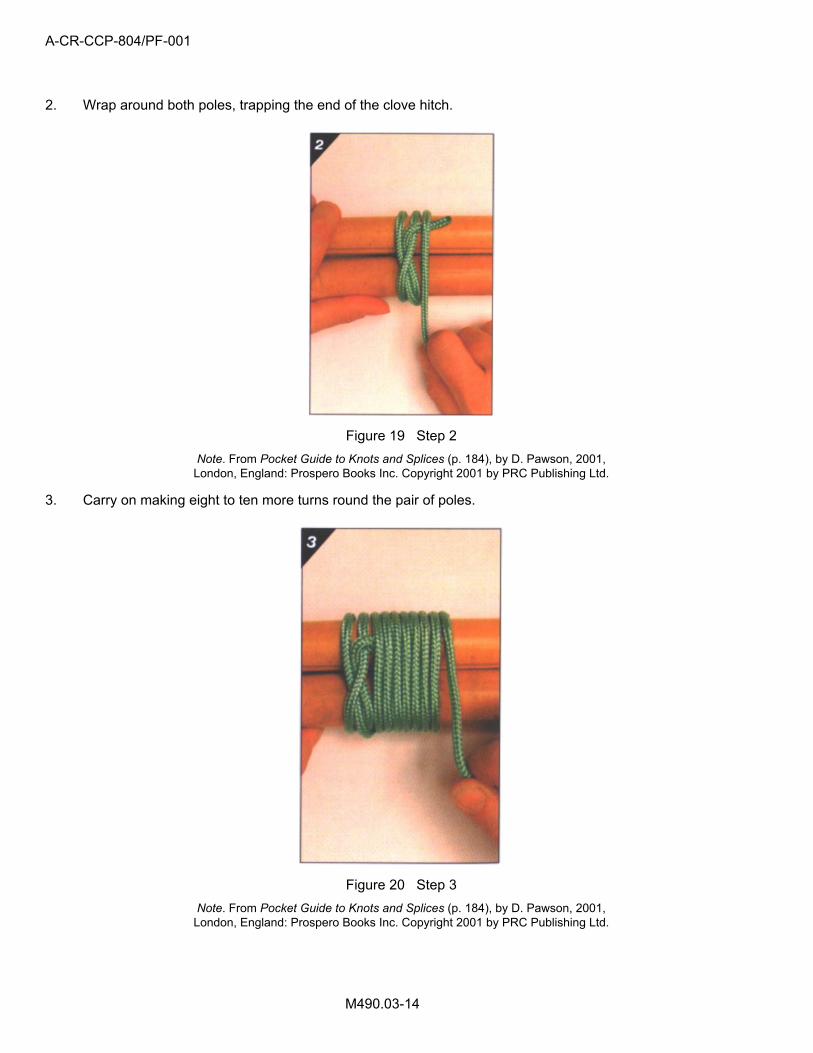
2. Wrap around both poles, trapping the end of the clove hitch.
Figure 19 Step 2Note. From Pocket Guide to Knots and Splices (p. 184), by D. Pawson, 2001,
London, England: Prospero Books Inc. Copyright 2001 by PRC Publishing Ltd.
3. Carry on making eight to ten more turns round the pair of poles.
Figure 20 Step 3Note. From Pocket Guide to Knots and Splices (p. 184), by D. Pawson, 2001,
London, England: Prospero Books Inc. Copyright 2001 by PRC Publishing Ltd.

A-CR-CCP-804/PF-001
M490.03-15
4. The lashing could now be finished with a clove hitch around both poles or put in a couple of frappingturns by bringing the end of the rope between the two poles.
Figure 21 Step 4Note. From Pocket Guide to Knots and Splices (p. 185), by D. Pawson, 2001,
London, England: Prospero Books Inc. Copyright 2001 by PRC Publishing Ltd.
5. Finish off with a clove hitch around one of the poles.
Figure 22 Step 5Note. From Pocket Guide to Knots and Splices (p. 185), by D. Pawson, 2001,
London, England: Prospero Books Inc. Copyright 2001 by PRC Publishing Ltd.

A-CR-CCP-804/PF-001
M490.03-16
6. Pull tight to finish the round lashing with the poles parallel.
Figure 23 Step 6Note. From Pocket Guide to Knots and Splices (p. 185), by D. Pawson, 2001,
London, England: Prospero Books Inc. Copyright 2001 by PRC Publishing Ltd.
7. If being used for an "A" frame then open the poles.
Figure 24 Step 7Note. From Pocket Guide to Knots and Splices (p. 185), by D. Pawson, 2001,
London, England: Prospero Books Inc. Copyright 2001 by PRC Publishing Ltd.
Square lashing. A square lashing secures two poles together at 90 degrees and can be used in the constructionof shelters and camp crafts. The cord used to make the lashing should be considerably smaller than the sizeof the poles. For the lashing to be effective, each turn must be pulled as tight as possible as it is made.

A-CR-CCP-804/PF-001
M490.03-17
Steps to Tying a Square Lashing
1. With the vertical pole on top of the horizontal pole, make a clove hitch on the vertical pole just belowthe horizontal pole.
Figure 25 Step 1Note. From Pocket Guide to Knots and Splices (p. 181), by D. Pawson, 2001,
London, England: Prospero Books Inc. Copyright 2001 by PRC Publishing Ltd.

A-CR-CCP-804/PF-001
M490.03-18
2. Bring all the cord around behind the horizontal pole.
Figure 26 Step 2Note. From Pocket Guide to Knots and Splices (p. 181), by D. Pawson, 2001,
London, England: Prospero Books Inc. Copyright 2001 by PRC Publishing Ltd.
A-CR-CCP-804/PF-001
M490.03-19
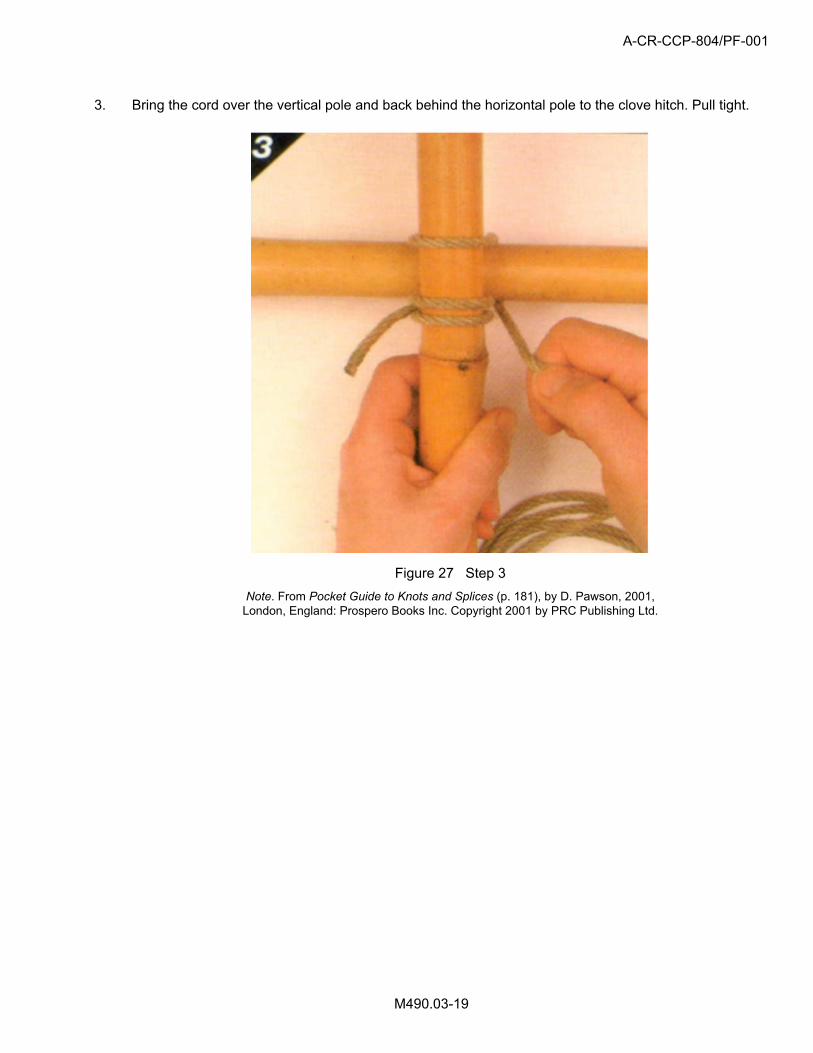
3. Bring the cord over the vertical pole and back behind the horizontal pole to the clove hitch. Pull tight.
Figure 27 Step 3Note. From Pocket Guide to Knots and Splices (p. 181), by D. Pawson, 2001,
London, England: Prospero Books Inc. Copyright 2001 by PRC Publishing Ltd.

A-CR-CCP-804/PF-001
M490.03-20
4. Carry on making two or three more complete turns around the two poles, pulling tight after each turn.
Figure 28 Step 4Note. From Pocket Guide to Knots and Splices (p. 181), by D. Pawson, 2001,
London, England: Prospero Books Inc. Copyright 2001 by PRC Publishing Ltd.

A-CR-CCP-804/PF-001
M490.03-21
5. After passing the clove hitch, bring the cord around the horizontal pole from behind and start to wraparound the junction between the two poles. These are frapping turns—pull them as tight as possible.
Figure 29 Step 5Note. From Pocket Guide to Knots and Splices (p. 181), by D. Pawson, 2001,
London, England: Prospero Books Inc. Copyright 2001 by PRC Publishing Ltd.

A-CR-CCP-804/PF-001
M490.03-22
6. Make two frapping turns.
Figure 30 Step 6Note. From Pocket Guide to Knots and Splices (p. 181), by D. Pawson, 2001,
London, England: Prospero Books Inc. Copyright 2001 by PRC Publishing Ltd.

A-CR-CCP-804/PF-001
M490.03-23
7. Finish off with a clove hitch around the horizontal pole.
Figure 31 Step 7Note. From Pocket Guide to Knots and Splices (p. 181), by D. Pawson, 2001,
London, England: Prospero Books Inc. Copyright 2001 by PRC Publishing Ltd.

A-CR-CCP-804/PF-001
M490.03-24
8. Pull tight to complete the square lashing.
Figure 32 Step 8Note. From Pocket Guide to Knots and Splices (p. 181), by D. Pawson, 2001,
London, England: Prospero Books Inc. Copyright 2001 by PRC Publishing Ltd.
Figure-of-eight lashing. The figure-of-eight lashing is used to join three poles together to create a tripod. Thetripod can be used for creating signal fires, shelters and camp crafts in a survival situation.
Steps to Lashing a Figure-of-Eight Lashing
1. Start with a clove hitch around one of the poles, and lead the rope under and over the other two poles.
Figure 33 Step 1Note. From Pocket Guide to Knots and Splices (p. 187), by D. Pawson, 2001,
London, England: Prospero Books Inc. Copyright 2001 by PRC Publishing Ltd.

A-CR-CCP-804/PF-001
M490.03-25
2. Go around the pole furthest away from the start and weave the rope back over and under.
Figure 34 Step 2Note. From Pocket Guide to Knots and Splices (p. 187), by D. Pawson, 2001,
London, England: Prospero Books Inc. Copyright 2001 by PRC Publishing Ltd.
3. Continue to weave the rope in the figure-of-eight manner for seven or eight full passes before bringingthe rope up between two of the poles.
Figure 35 Step 3Note. From Pocket Guide to Knots and Splices (p. 187), by D. Pawson, 2001,
London, England: Prospero Books Inc. Copyright 2001 by PRC Publishing Ltd.
A-CR-CCP-804/PF-001
M490.03-26
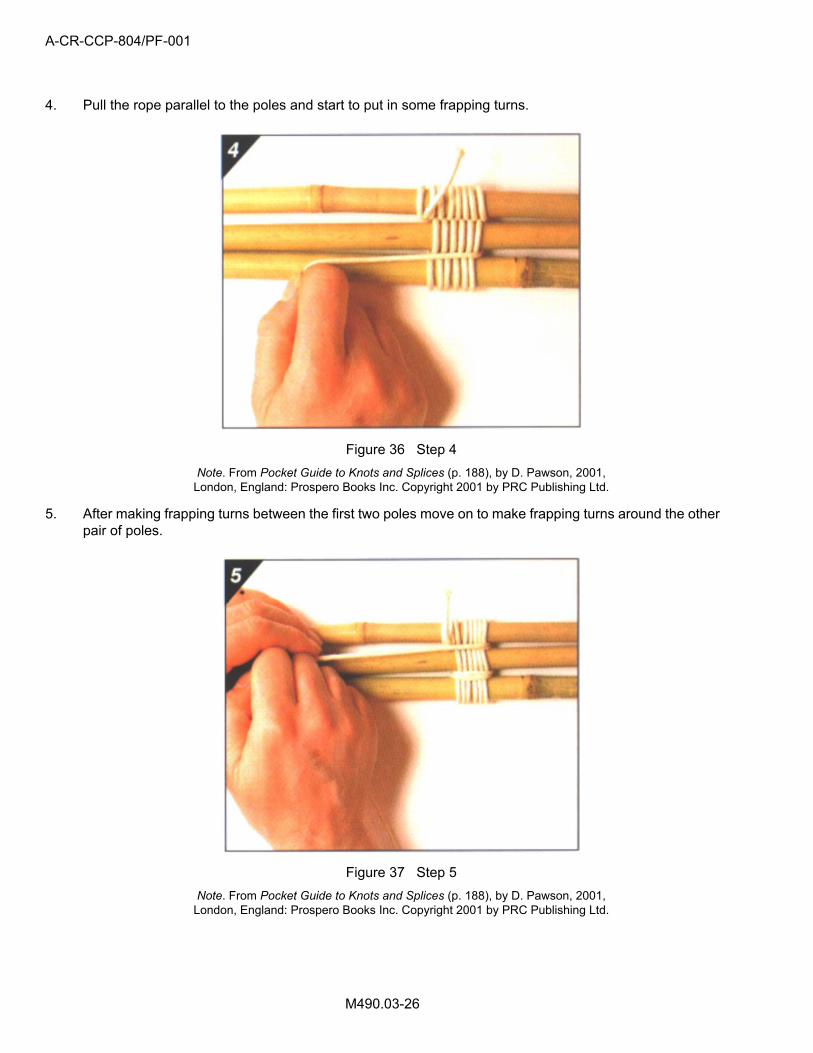
4. Pull the rope parallel to the poles and start to put in some frapping turns.
Figure 36 Step 4Note. From Pocket Guide to Knots and Splices (p. 188), by D. Pawson, 2001,
London, England: Prospero Books Inc. Copyright 2001 by PRC Publishing Ltd.
5. After making frapping turns between the first two poles move on to make frapping turns around the otherpair of poles.
Figure 37 Step 5Note. From Pocket Guide to Knots and Splices (p. 188), by D. Pawson, 2001,
London, England: Prospero Books Inc. Copyright 2001 by PRC Publishing Ltd.
A-CR-CCP-804/PF-001
M490.03-27
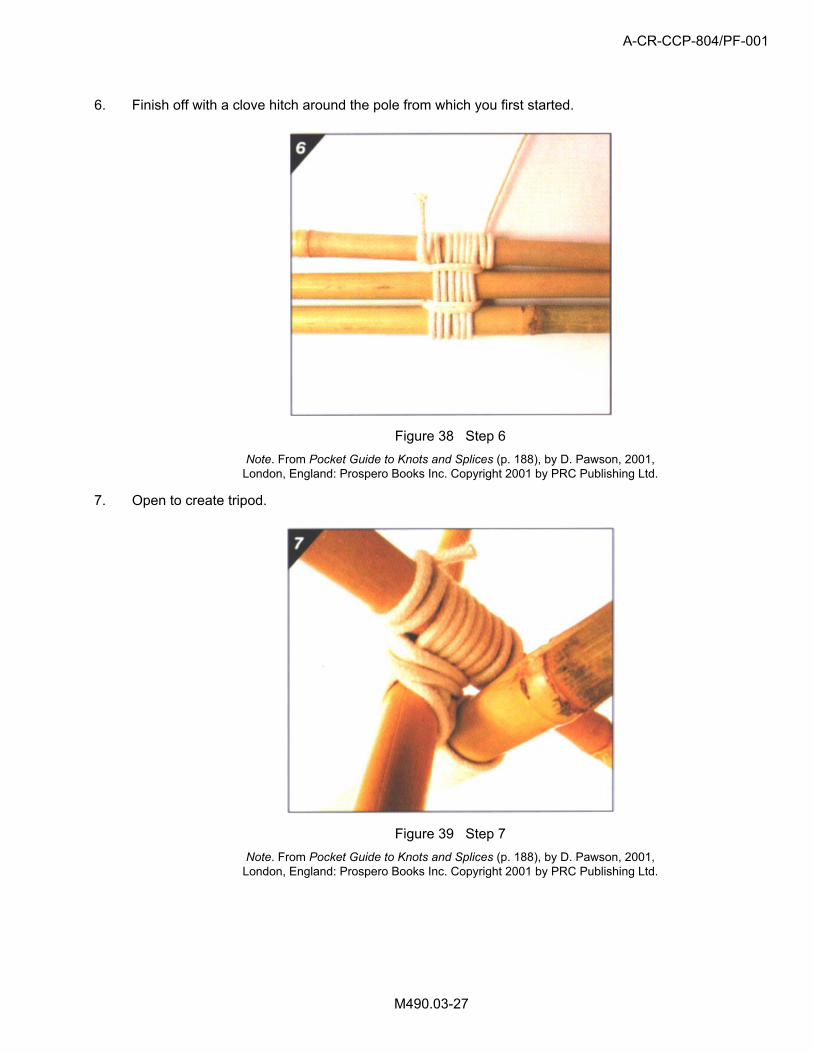
6. Finish off with a clove hitch around the pole from which you first started.
Figure 38 Step 6Note. From Pocket Guide to Knots and Splices (p. 188), by D. Pawson, 2001,
London, England: Prospero Books Inc. Copyright 2001 by PRC Publishing Ltd.
7. Open to create tripod.
Figure 39 Step 7Note. From Pocket Guide to Knots and Splices (p. 188), by D. Pawson, 2001,
London, England: Prospero Books Inc. Copyright 2001 by PRC Publishing Ltd.

A-CR-CCP-804/PF-001
M490.03-28
Distribute Attachment B to the cadets, so they may practice the knots after the lesson.
CONFIRMATION OF TEACHING POINT 3
The cadets’ participation in tying lashings will serve as the confirmation of this TP.
END OF LESSON CONFIRMATION
The cadets’ participation in tying knots and lashing will serve as the confirmation of this lesson.
CONCLUSION
HOMEWORK / READING / PRACTICE
Nil.
METHOD OF EVALUATION
This EO is assessed IAW A-CR-CCP-804/PG-001, Proficiency Level Four Standard and Plan, Chapter 3,Annex B, 490 PC.
CLOSING STATEMENT
It is important for the cadets to select the appropriate knot and lashing when constructing shelters, signal firesor camp crafts for safety and quality.
INSTRUCTOR NOTES / REMARKS
Cadets who are qualified Survival Instructor may assist with this instruction.
REFERENCES
C3-026 ISBN 1-55267-218-2 Pawson, D. (2001). Pocket guide to knots and splices. London, England: PRCPublishing.

A-CR-CCP-804/PF-001Attachment A to EO M490.03
Instructional Guide
M490.03A-1
KNOT-TYING INSTRUCTIONS
REEF KNOT
Figure A-1 Steps 1–5Note. From Pocket Guide to Knots and Splices (p. 98), by D. Pawson, 2001,
London, England: Prospero Books Inc. Copyright 2001 by PRC Publishing Ltd.
1. Place the left-hand working end on the top of the right-hand working end.
2. Bring the left-hand working end under the right-hand working end.
3. Place the working end that is now on the right on top of the working end that is now on the left.
4. Bring the working end that is on top under the other working end so that working end that is movingcomes out at the same place it entered the knot.
5. Pull tight to complete the reef knot.

A-CR-CCP-804/PF-001Attachment A to EO M490.03Instructional Guide
M490.03A-2
KNOT-TYING INSTRUCTIONS
FIGURE-OF-EIGHT KNOT
Figure A-2 Steps 1–3Note. From Pocket Guide to Knots and Splices (p. 44), by D. Pawson, 2001,
London, England: Prospero Books Inc. Copyright 2001 by PRC Publishing Ltd.
1. Make a crossing turn with the working end passing under the standing part of the rope and then bringthe working end over the standing part.
2. Now tuck the working end up through the loop from behind, forming a figure-of-eight.
3. Pull tight to complete the figure-of-eight knot.

A-CR-CCP-804/PF-001Attachment A to EO M490.03
Instructional Guide
M490.03A-3
KNOT-TYING INSTRUCTIONS
CLOVE HITCH
Figure A-3 Steps 1–4Note. From Pocket Guide to Knots and Splices (p. 106), by D. Pawson, 2001,
London, England: Prospero Books Inc. Copyright 2001 by PRC Publishing Ltd.
1. Make a turn around the pole / tree bringing the working end of the rope over and trapping the standingpart of the rope. This makes the first half hitch.
2. Bring the working end round behind the pole / tree, above the first half hitch.
3. Put the working end under the turn just made. This gives the second half hitch and forms the clove hitch.
4. Pull tight to complete the clove hitch.
A-CR-CCP-804/PF-001Attachment A to EO M490.03Instructional Guide
M490.03A-4
KNOT-TYING INSTRUCTIONS
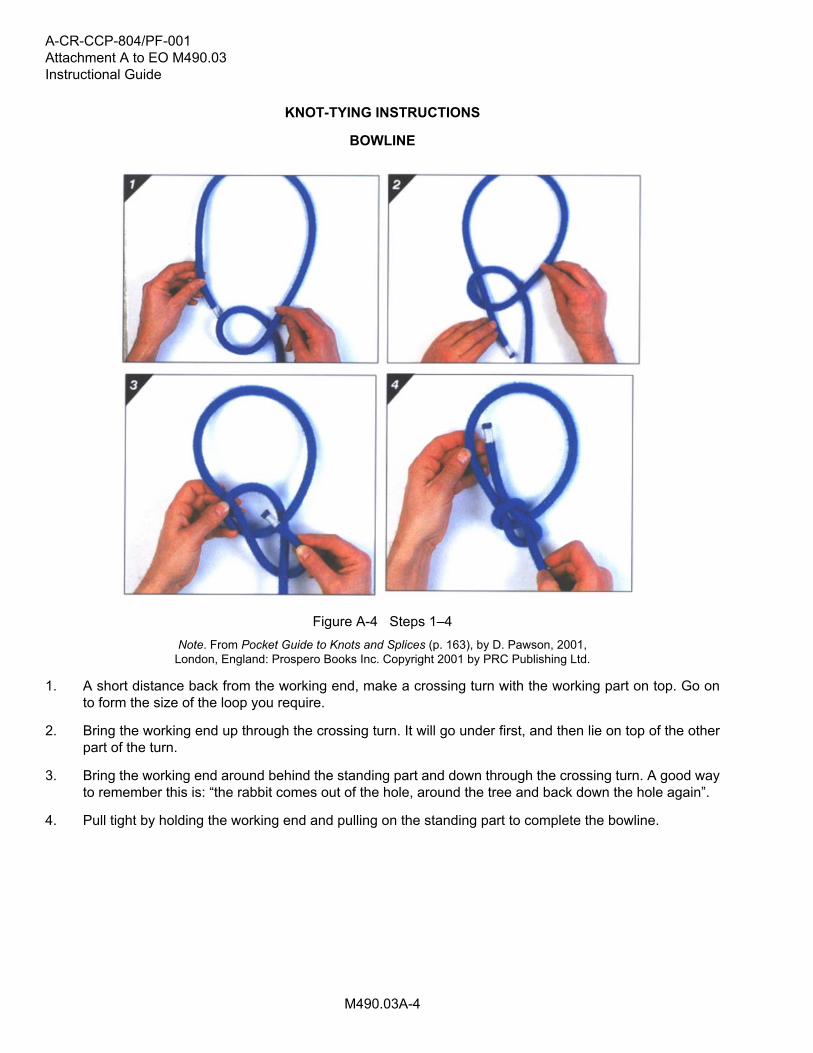
BOWLINE
Figure A-4 Steps 1–4Note. From Pocket Guide to Knots and Splices (p. 163), by D. Pawson, 2001,
London, England: Prospero Books Inc. Copyright 2001 by PRC Publishing Ltd.
1. A short distance back from the working end, make a crossing turn with the working part on top. Go onto form the size of the loop you require.
2. Bring the working end up through the crossing turn. It will go under first, and then lie on top of the otherpart of the turn.
3. Bring the working end around behind the standing part and down through the crossing turn. A good wayto remember this is: “the rabbit comes out of the hole, around the tree and back down the hole again”.
4. Pull tight by holding the working end and pulling on the standing part to complete the bowline.

A-CR-CCP-804/PF-001Attachment B to M490.03
Instructional Guide
M490.03B-1
LASHING INSTRUCTIONS
ROUND LASHING
Figure B-1 Steps 1–3Note. From Pocket Guide to Knots and Splices (p. 184), by D. Pawson, 2001,
London, England: Prospero Books Inc. Copyright 2001 by PRC Publishing Ltd.
1. Start by making a clove hitch around both poles.
2. Wrap around both poles, trapping the end of the clove hitch.
3. Carry on making eight to ten more turns round the pair of poles.
A-CR-CCP-804/PF-001Attachment B to M490.03Instructional Guide
M490.03B-2
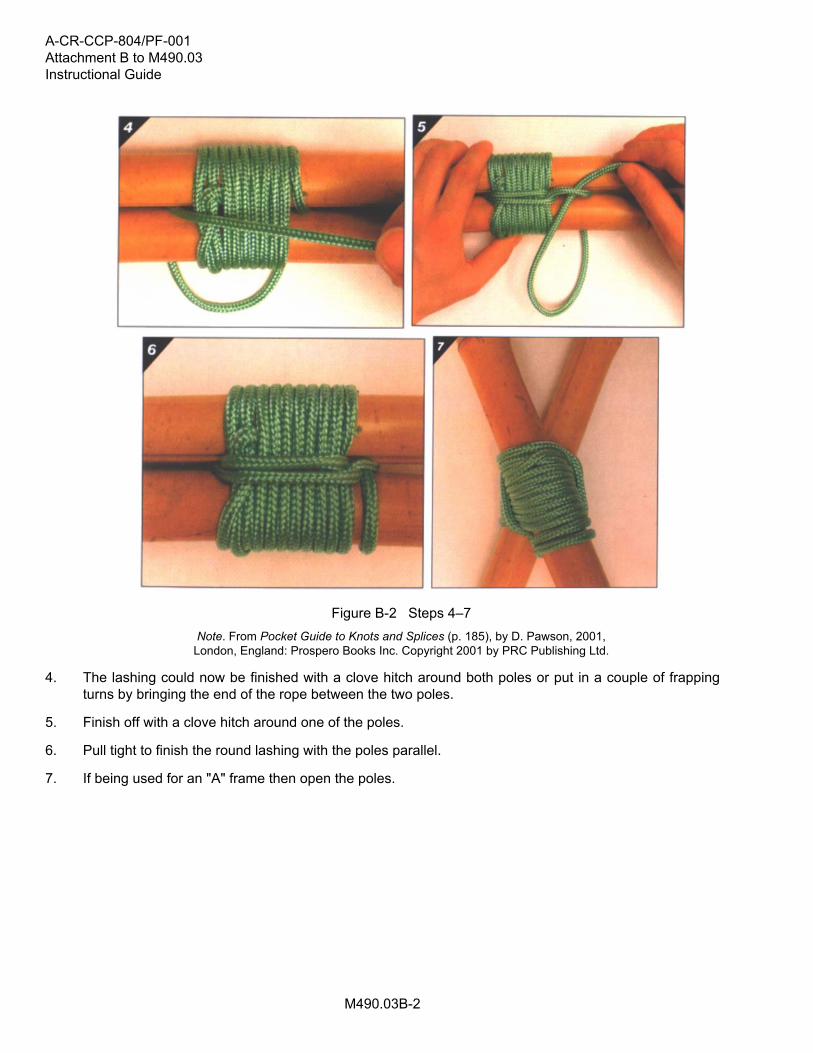
Figure B-2 Steps 4–7Note. From Pocket Guide to Knots and Splices (p. 185), by D. Pawson, 2001,
London, England: Prospero Books Inc. Copyright 2001 by PRC Publishing Ltd.
4. The lashing could now be finished with a clove hitch around both poles or put in a couple of frappingturns by bringing the end of the rope between the two poles.
5. Finish off with a clove hitch around one of the poles.
6. Pull tight to finish the round lashing with the poles parallel.
7. If being used for an "A" frame then open the poles.
A-CR-CCP-804/PF-001Attachment B to M490.03
Instructional Guide
M490.03B-3
LASHING INSTRUCTIONS
SQUARE LASHING
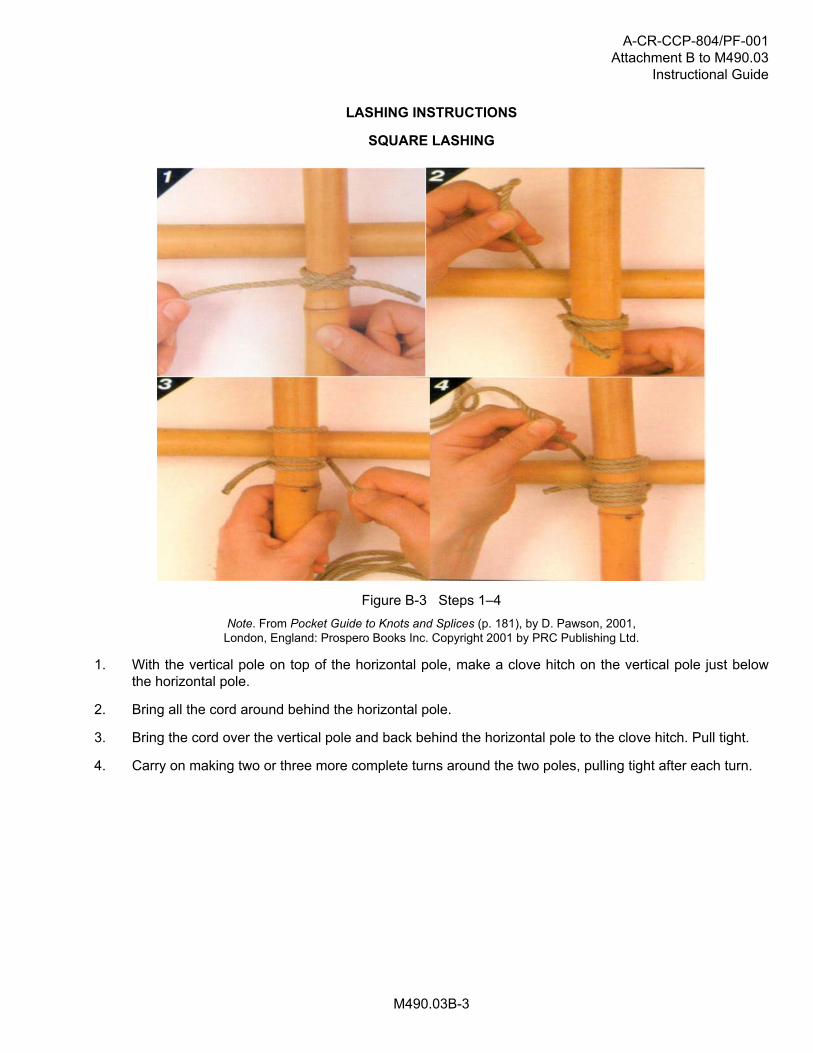
Figure B-3 Steps 1–4Note. From Pocket Guide to Knots and Splices (p. 181), by D. Pawson, 2001,
London, England: Prospero Books Inc. Copyright 2001 by PRC Publishing Ltd.
1. With the vertical pole on top of the horizontal pole, make a clove hitch on the vertical pole just belowthe horizontal pole.
2. Bring all the cord around behind the horizontal pole.
3. Bring the cord over the vertical pole and back behind the horizontal pole to the clove hitch. Pull tight.
4. Carry on making two or three more complete turns around the two poles, pulling tight after each turn.

A-CR-CCP-804/PF-001Attachment B to M490.03Instructional Guide
M490.03B-4
Figure B-4 Steps 5–8Note. From Pocket Guide to Knots and Splices (p. 181), by D. Pawson, 2001,
London, England: Prospero Books Inc. Copyright 2001 by PRC Publishing Ltd.
5. After passing the clove hitch, bring the cord around the horizontal pole from behind and start to wraparound the junction between the two poles. These are frapping turns—pull them as tight as possible.
6. Make two frapping turns.
7. Finish off with a clove hitch around the horizontal pole.
8. Pull tight to complete the square lashing.
A-CR-CCP-804/PF-001Attachment B to M490.03
Instructional Guide
M490.03B-5
LASHING INSTRUCTIONS
FIGURE-OF-EIGHT LASHING
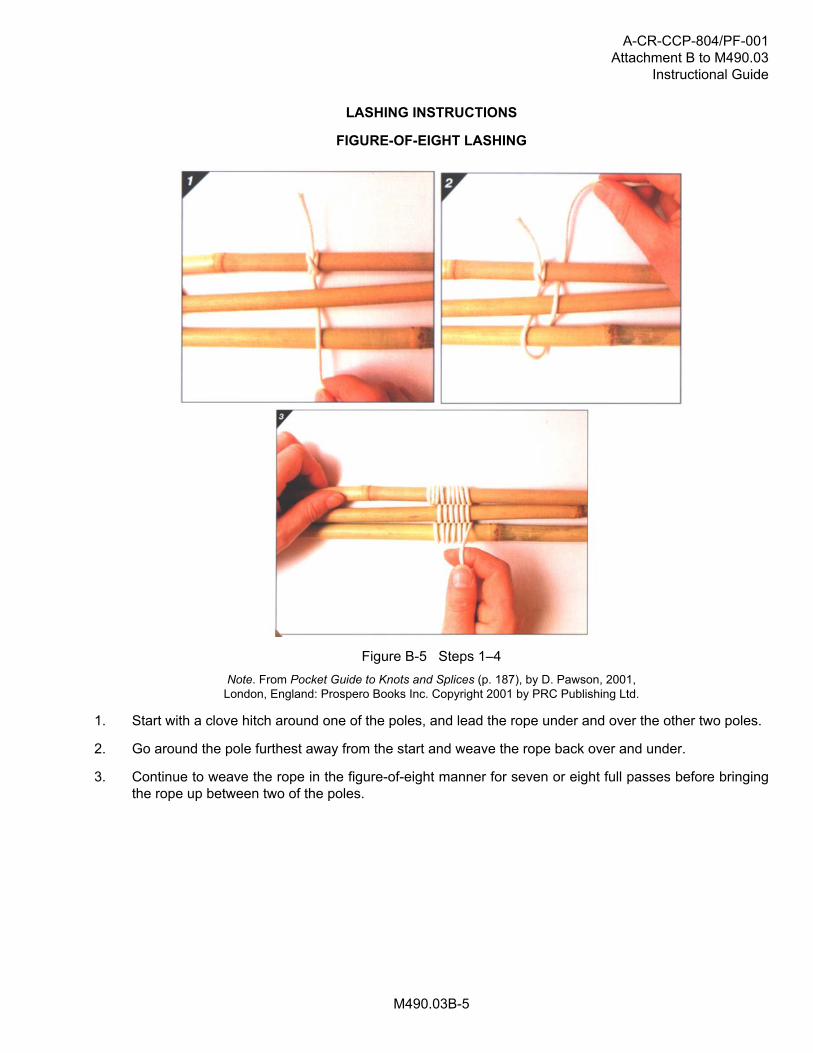
Figure B-5 Steps 1–4Note. From Pocket Guide to Knots and Splices (p. 187), by D. Pawson, 2001,
London, England: Prospero Books Inc. Copyright 2001 by PRC Publishing Ltd.
1. Start with a clove hitch around one of the poles, and lead the rope under and over the other two poles.
2. Go around the pole furthest away from the start and weave the rope back over and under.
3. Continue to weave the rope in the figure-of-eight manner for seven or eight full passes before bringingthe rope up between two of the poles.

A-CR-CCP-804/PF-001Attachment B to M490.03Instructional Guide
M490.03B-6
Figure B-6 Steps 4–7Note. From Pocket Guide to Knots and Splices (p. 188), by D. Pawson, 2001,
London, England: Prospero Books Inc. Copyright 2001 by PRC Publishing Ltd.
4. Pull the rope parallel to the poles and start to put in some frapping turns.
5. After making frapping turns between the first two poles move on to make frapping turns around the otherpair of poles.
6. Finish off with a clove hitch around the pole from which you first started.
7. Open to create tripod.