a common sense guide for industrial floor repair -...
TRANSCRIPT
1
A Common Sense Guide for Industrial Floor Repair
William R. Hier © 1999 William R. Hier

2
Table of Contents
Introduction 1 Concrete Repairs 3
Spall Repairs 3
Crack Repairs 9
Nosing Repairs 12
Sloping and Resloping to Drains 13
Industrial Floor Surfacings and Treatments 15
Concrete Moisture and Moisture Migration 17
Preparation 18
Clear Sealers 18
Coatings 19
1/8" Floor Surfacings (125 mils) 20
Heavy Duty Flooring 22
Membrane Waterproofing 25
Acid Brick and Quarry Tile 25
A Final Note 27
Conclusion 28 Summary of Golden Rules Author

3

1INTRODUCTION Plant Engineering and Maintenance Departments are normally called upon to repair or upgrade floors. Since these departments are typically charged with higher priority production demands and challenges, floor repairs and rehabilitation are usually accomplished haphazardly, simply to get the job done and out of the way. In many plants these tasks occur with infrequent regularity and suffer a low priority in both desire and expertise. In plants where sanitation or corrosion resistance are required, engineering and maintenance departments are usually more adept at flooring rehabilitation, because production is impacted by down-time caused by faulty or failing flooring applications. In both cases, however, engineering and maintenance generally rely a great deal upon outside expertise from manufacturers or contractors. A Common Sense Guide for Industrial Floor Repair is written to assist Plant Engineering and Plant Maintenance staffs to determine an objective approach to floor rehabilitation and repair. My daily involvement in industrial flooring over nearly 25 years doesn’t give me license to pontificate, but it does give me some insight how to find a good recommendation to repair a floor, and how to do it. Hopefully, this document will help to point you in the right direction to accomplish floor repairs correctly, with the least amount of cost and time. This “Guide” is written with a “nuts and bolts” approach, without empirical or erudite back up, footnotes, and references. If you really care about that kind of thing, I would like to think that all or most of my points can be proven in the volumes of reference material available by the organizations detailed at the end of this section. From my experience, however, I think it is safe to say that most plant engineers reading this work are not going to do that. I have made a living for a long time in the industrial flooring business. I have seen people and products come and go. I am convinced that basics never change. I am convinced that attention to detail creates success in this or any other business. I am convinced that organized investigation, proper planning and execution are the secrets to good industrial flooring. Short cuts in any part of the process increase odds of failure. Remember the old adage from school, “success is 90% perspiration and 10% inspiration?” I give you that benefit in this work. Successful industrial flooring repairs result from a methodical process from investigation to recommendation to installation. Basics. No frills. Nothing fancy. No cure-alls in a bag or pail. Objectivity is the goal of this work. Manufacturer’s names will not be mentioned. Nothing has bothered me more during my tenure in the industrial flooring industry than manufacturers and contractors who make recommendations based solely on what they sell instead of basing recommendations on need of the project. If a project obviously requires acid brick and a manufacturer or contractor only has epoxy and still recommends epoxy--shame on them. And, shame on my industry. And, shame on you if you don’t investigate and allow the incorrect installation. Remember some Golden Rules:
Golden Rule #1: There is no one cure all. No single product will do every job.
Golden Rule #2: No single manufacturer has the best product for every need.

2Golden Rule #3: No single contractor can do it better than any other contractor in
every case. If you favor some manufacturers and contractors over others, that is your right and prerogative. Some times the relationships between the plant and these people have high value, especially if they honor their obligations after the work is done, and they truly do have the plant’s best interests at heart. These people “put their money where their mouth is,” and the plant wins. But, if you do this, do it with the knowledge that your plant must receive just rewards. And, as mentioned, those rewards are reaped when problems occur after the job has been completed. Finally, if the reader desires more scientific and detailed information about concrete, corrosion resistance and repair and application methods, the following organizations are the cornerstones of our industry’s research and knowledge.
• American Concrete Institute (ACI) PO Box 9094 Farmington Hills, MI 48333 (248) 848-3700 www.aci-int.org
• International Concrete Repair Institute (ICRI)
1323 Shepard Drive - Suite D Sterling, VA 21064 (703) 450-0116 www.icri.org
• Society of Protective Coatings (SSPC) 40 24th Street, 6th Floor Pittsburgh, PA 15222-4656 (412) 281-2331 www.sspc.org
• National Association of Corrosion Engineers (NACE)
1440 South Creek Drive Houston, TX 77084 (281)-228-6200 www.nace.org

3CONCRETE REPAIRS Concrete problems are the most common challenges of all. At some time or another, every plant has spalls, holes, cracks or damaged control joint or expansion joint nosings. Surprisingly, concrete repair methods employed by both maintenance staffs and contractors cause the greatest number of failures in plant industrial flooring. So, we’re going to spend quite a little time on this particular subject. Probably because concrete is so familiar to most people, many seem to think that fixing concrete is no big deal. It’s not, if done properly. Unfortunately, most people, even those in the business, don’t know how to do it properly.
Golden Rule #4: Concrete doesn’t stick to itself very well.
Golden Rule #5: Thin concrete breaks, especially at the edges. Spall Repairs So, let’s start with the most common problem: potholes--or using the proper jargon--spalls or popouts. Remembering that concrete doesn’t stick to itself very well and thin concrete breaks at the edges, we have to do something to that hole or spall to create a better environment for the repair material to work. Simply, we have to do something to enhance the bond of the repair material to the existing concrete and make the edges deeper so we can get more material at the perimeter of the repair. Sound out all cracks and spalls to determine extent of degradation.
• Tap around spalls with a hammer, listening for a hollow sound. • Mark the approximate limits of the repair area where the sound is solid.
Sawcutting and chipping repair area.
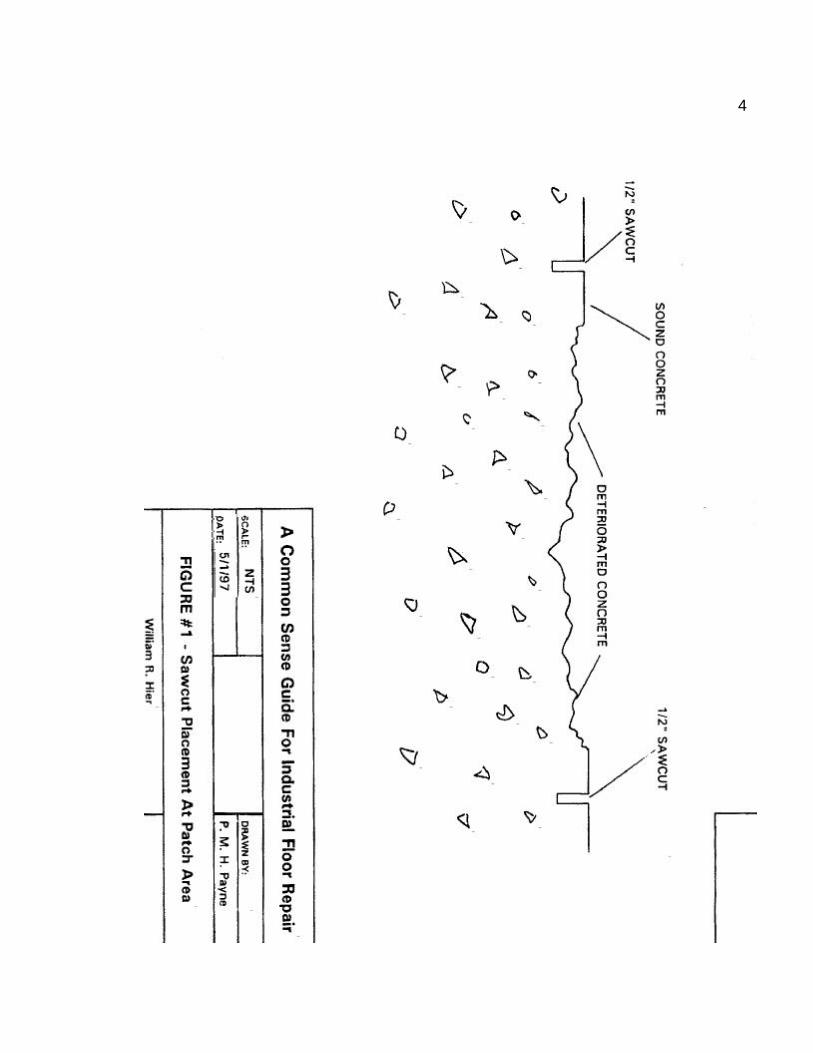
• After determining size of repair area, sawcut a minimum 1/2" deep around the perimeter of the damage. Sawcut should be made just into “good” concrete. (See Figure #1) � Perimeter should be as square as possible, without triangular patterns.
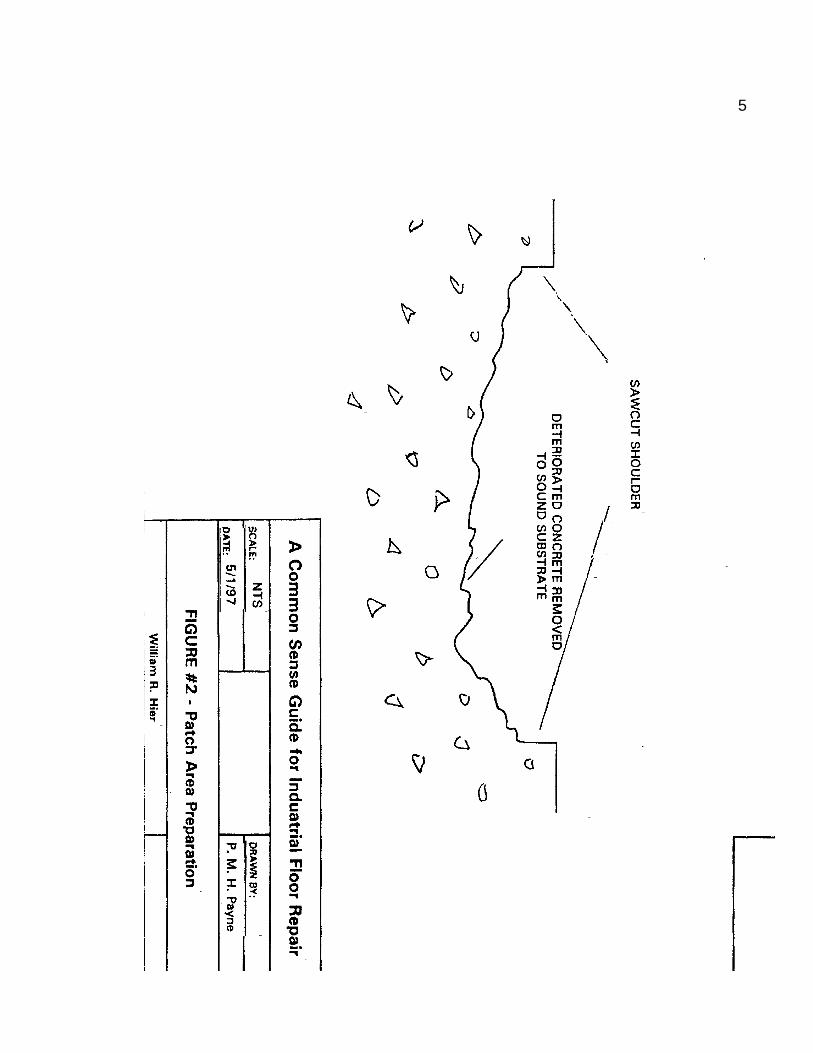
• Chip out concrete within the patch, ensuring all deteriorated concrete is removed, and the patch extends into good concrete. • Ensure all concrete is chipped out to the sawcut, creating a “shoulder” to which
patching material will abut. (See Figure #2) • Ensure minimum depth of field of patch is no less than 1/2" deep if cementitious repair
material is to be used, or 1/4" deep if resinous mortar is to be used. (Discussion of repair mortars will follow).
• Do not use large, pneumatic demolition hammers, as vibration from the hammering action will cause micro-cracking and further damage. Electric demolition hammers or pneumatic hammers no larger than 30# work very well.
Creation of 1/2" “shoulders” is the biggest preparation item that will make the repair last. Traffic, especially lift truck, is a menace to repaired concrete. Most of the time the edges will break away first, then start “raveling” back.
4
5
6If the repair area was chipped out, the surface is rough, creating a “tooth” to which the repair material can adhere. Remember:
Golden Rule #6: Bond of any repair material increases as substrate profile increases--the rougher the better.
Often in plant situations, repair materials are installed directly over marginally prepared or unprepared substrates. Substrate profile is either non-existent or minimal. Repair materials applied under these conditions are destined for premature failure, and are hardly worth the time or money spent to buy the product or to apply it.
Golden Rule #7: Bond of any repair material increases as substrate cleanliness increases.
Now, the repair area is sawcut with nice 1/2" shoulders and field of the patch is good and rough. But, if all the dust and dirt has settled on the substrate, bond could still be inhibited. So--clean it. Vacuum cleaners work best. Get out the shop vac and get every loose particle off the patch. Repair materials don’t stick to oil and grease, either. Any and all contaminants must be removed. Dirt. Dust. Oil. Grease. Get rid of it. There are probably 200 manufacturers of cementitious repair materials, each with about 10 or 20 products in their line. There are another 100 or 200 epoxy manufacturers who make patch kits with which to fill holes. Take your pick. Some are better than others. But, contrary to what any of them say, if you don’t prepare the patch as described, the stuff will die a premature death. Repair materials are generally classified as cementitious (cement), polymer-cementitious (latex or microsilica additives), or polymeric (epoxy, novolac epoxy, polyester, vinylester, methyl-methacrylate or modified urethane). Maybe by this writing there is something else not stated. All these things are miraculous--miracles in a can, bag or both. Everything has its place. Each one of these things can become even more miraculous by installing them within the confines of old fashioned good practices as outlined above. Let’s try to make some headway, now, figuring out what kind of repair materials to use, now that you’ve got your patch all set to be filled.
Golden Rule #8: Do not use gypsum-based cementitious repair materials for industrial floor repairs.
Gypsum-based repair materials are attractive, because they cure fast and are easy to use. Unfortunately, water and moisture will degrade the material. Depending on the degree of moisture exposure, the installation will fail between one month to three years. Sooner or later that patch is going to get wet; either from the top or just from moisture vapor coming through the slab from the bottom. Even properly installed, your work and good practices will go for naught. The type of repair product to be used is often dictated by how much time is available for the repaired area to be “open” or left under construction. Most plant conditions require fast turn-around, especially in traffic aisles or around equipment. For this reason, discussion of normal, unmodified concrete will be brief.
Golden Rule #9: Cementitious repair materials (applied without an epoxy bonding

7agent) should be applied over a Surface Saturated Dry (SSD) substrate.
SSD - Saturated Surface Dry means the concrete substrate is pre-soaked or pre-saturated with water for 20 minutes to 2 hours before the repair material is applied. Standing water should be swept off prior to application. Adhesion of cementitious materials will greatly increase, as the substrate moisture will act as a conduit for repair material to gain chemical bond. Also, the repair material will not lose moisture it needs to cure correctly. Cementitious repair mortars, unless otherwise directed by specific data sheet or instructions, should be applied over an SSD surface. Now, as promised, the most cementitious of all -- concrete. If you are going to use concrete, go back to the patch that is prepared, and do it over... The shoulders have go to be cut down 2" and the depth of the patch no less than 2". Go through the whole routine of cleaning it up and the whole nine yards. Get the substrate to an SSD condition. Regular concrete patches should be no less than 2" thick. Make up a mix of 1 part cement, 2 parts sand and 2 to 3 parts peastone. Add enough water so it is workable, but not soupy. If the mixed material can hold a slope without slumping down, the mixture should be right. Make a paste out of cement and water, then scrub it into the patch with a brush or broom, including the shoulders. While the “slurry” is still wet, fill the patch with concrete, consolidating it with a vibrator or with the trowel itself. After the material is consolidated, trowel the patch until the surface is closed, keeping the height of the patch between 1/16" and 1/8" above the adjacent concrete, as the material will shrink down as it hydrates. Place wet burlap over the patch after it will support some weight, then cover it with polyethylene for three days, keeping the patch wet under the polyethylene. After three days, pull the coverings, let it air dry for another four days before returning it to heavy traffic. You don’t have that kind of time? Okay, then we’ll work our way from concrete based products to polymeric based mortars. We’ll start on the basis of turn-around times. Generally, the faster the turn-around time, the more expensive the material, and the more expertise is required by the applicator--whether a plant’s own maintenance staff or a contractor. Just because an applicator may know one’s way around concrete, does not qualify that person to be as proficient in the installation of fast-setting repair mortars. Just think of all the concrete “experts” who have placed thousands of yards of concrete, but don’t know how to prepare a patch. It’s a different ball game, folks. Simple as that. If you find a repair material you want to use, because you have researched the properties, interrogate your prospective contractor about his familiarity with that type of product. Perhaps the contractor may have installed that product or something like it, but that doesn’t mean it was installed properly. Ask this person what preparation methods would be employed. Get specifics. Remember, it’s your plant’s money that’s being spent and you are the agent in charge of getting a good job. Talk is cheap and there is a lot of it out there on the street. Repairs are made incorrectly every day. Worse, these people are getting paid to do it wrong, either because they don’t know the right way themselves or they are taking short cuts. You are the only person that stands between getting a good job and a bad one.
8 If your applicator--staff or contractor-- is inexperienced with your chosen material, but you feel has the “moxy” to install it properly, go over the application with them...from preparation to application. If you don’t want to spend that kind of time, then it is imperative that you find an applicator who can do the work. Otherwise, your money will go down the tubes and you will look like a fool. Sorry, we’re getting off track a little. But, I have been around many, many “mechanics” who think they know more than they really do. And, the customer usually ends up being the one who bites the bullet. I don’t want you losing your teeth.
Golden Rule #10: Money talks and BS walks. Verify the credentials of your prospective applicators.
Turn-around times, like we were discussing. Plant turn-around time includes
1 clearing the area to be repaired 2 having a traffic plan to reroute personnel and vehicular traffic 3 mobilizing the installation crew (yours or a contractor) 4 preparation time to ready the project area to receive repair material 5 time to apply the repair material 6 time for the repair material to cure sufficiently to support initial and every day traffic 7 time to put the area back together and get back on line
Typically, plant engineering and maintenance under-estimate steps 4 and 6. And outside contractors don’t have an appreciation for steps 1, 2, 6 and 7. If turn-around times are critical for you, then the first thing you must do when talking to a prospective contractor is to enumerate the exact amount of time the area will be available for the contractor to work AND for the material to be cured sufficiently for plant traffic. You should check the repair material data sheet to verify the contractor has a handle on cure times. Contractors have a tendency to only focus on how long it takes to install the materials, not how long materials take to cure. After finding the cure time on the data sheet, have an idea when the contractor should have the repair materials installed so the cure rate meets your target. Then make certain the contractor understands that. Substrate and ambient temperatures significantly impact material selection and turn-around times. Colder temperatures tend to lengthen cure times, while warmer temperatures tend to reduce cure times. Most data sheets show cure rates at 72°F.
Golden Rule #11: Cold temperatures generally slow down or stop cure times of most repair materials.
Here’s where Golden Rule #8 comes into play. Watch out! There is a wide variety of good cementitious products on the market that will meet your needs for fast turn-around, even in reduced temperatures. But, gypsum-based repair materials are often a dollar or two less a bag and are easy to apply. Maintenance staffs and contractors often use them for one or both of the aforementioned reasons, not knowing the long term consequences. Manufacturer reps and distributors like to promote gypsum based products, because the prices are right, and they work okay in places other than industrial flooring. Most of the time they don’t

9know any better, either. All they know is people buy a lot of it. They like it. And the price is right so they can sell pallets of bags. Gypsum-based repair materials used in most industrial environments, especially on floors, is a source of many plant engineering nightmares, one or two years after the work is complete...and they don’t even know it. Most cementitious repair products require a minimum 1/4" application thickness. If the repair area is in a traffic aisle, do yourself a favor and install it a minimum 1/2". Earlier, during our preparation of the area, we chipped the patch down to a minimum 1/2" as shown on Figure #2. Regardless what the product manufacturer says, 1/2" will last longer than 1/4" in a traffic situation. Cementitious repair products can be applied over an epoxy bonding agent or slurry primed over an SSD condition as described earlier. If an epoxy bonding agent is used, do not wet the pre-pared substrate to SSD. Both methods work, contrary to what opposing manufacturers may say. If the area is wet and is hard to get dry, then obviously an epoxy bonding agent isn’t the better way to go. Epoxy mortar is another type of product that can be used for spall repairs. (Important Note: We are only talking about spall repairs here, without need for chemical resistance or thermal shock resistance. These items will be covered later). Unfortunately, most maintenance people and contractors don’t know how to use them very well. To compound the problem, manufacturers and reps run around saying that the material can be flashed down to nothing. The statement is true. But if traffic is run over it, the edges will break just like concrete and other cementitious repair products.
Golden Rule #12: If you adhere to the basic preparation repair procedure described in the beginning of this document, regardless of the material to be used, long term repair success rates will increase.
Epoxy repairs can be successfully installed at 1/4" thicknesses. Advantages over cementitious repairs are as follows:
• Adhesion to substrate is much better. • Tensile strength is greater • Epoxy mortar adheres to steel and steel reinforcing • Less permeable to oils and water • Generally more abrasion resistant
Disadvantages of epoxy repair mortars over cementitious repair mortars:
• Generally more expensive per cubic foot. • Substrate must be completely dry prior to, during and after application. • Cure times generally more affected by temperature differences • More complicated to use than even sophisticated cementitious repair mortars • Some--not all--epoxy mortars have an odor
Contractors proficient in the use of epoxies purchase the materials in bulk, measuring the various components at the job site. Maintenance people and contractors who don’t use resinous materials very often are better off using kits with pre-measured components. Less waste will result--and the patch has a better chance of “getting hard.” Nothing is worse than going through the motions of preparation and application than when epoxy

10mortar is not mixed properly and doesn’t cure or “get hard.” Oops. Problems. Big time. Production is breathing down your neck to get back on the floor. You’ve spent time preparing and installing the patch. And it doesn’t get hard. Ouch. No, you can’t roll hardener over it to make it cure. Don’t even try it. Get out the shovels, trowels, stiff brushes and solvent. Get it off the floor. Clean the repair area and do it again. It’s not pretty. Moral of the story: don’t use epoxy unless you follow the directions, or better, have someone who knows how to do it show you how to do it. Don’t use contractors to install epoxy unless you KNOW they are proficient. Epoxy mortars are very worthwhile repair materials, used every day. In some cases, they are the only repair material that will work. Just make sure your applicator--maintenance or contractor--knows what they are doing. Some epoxies are “moisture tolerant,” which means they can bond over damp surfaces. That’s true. But, they bond better over dry substrates. Further, while epoxy is curing, the material should be kept dry and free from moisture and water. Otherwise, some epoxies wont cure, and those that will, often turn white and ugly. A few manufacturers and reps will tell you, even print on their data sheets, that their epoxy mortar is self-priming. Do yourself a favor. Prime.
Golden Rule #13: Prime the substrate with epoxy primer before epoxy mortar application.
Priming ensures good adhesion and allows the resins in the mortar to stay in the mortar, rather than run down into the substrate. If a substrate is porous, more primer is used, because it just keeps penetrating into the surface. Epoxy mortar is comprised of epoxy liquids and aggregate. Without primer, a porous substrate will suck the epoxy out of the mortar, leaving a weak matrix. And, who knows if enough epoxy leached out to at least get a good bond? Epoxies are two component materials, consisting of Resin and Hardener. Resin must be mixed with hardener to cure. Most epoxies have “even” mix ratios, like 1:1 (1 to 1), 2:1, 3:1, 4:1, and so on. The data sheet or can should tell you what that mix ratio is. Some manufacturers won’t tell you what the mix ratio is, because they want their full container of hardener mixed with their full container of resin. That way, off-ratios are minimized, and the materials cure more consistently. For small projects and for applicators who don’t use epoxies very often the kit idea is good. But for larger projects, the costs of packaging and disposal are enormous. A specialty contractor installing epoxy every day will resist kit mixing, not only because of cost, but also because of time. Opening and draining small units, then mixing them, takes forever. Often one hears “three component epoxy.” All that means is aggregate must be added to the mixed liquids (resin and hardener). Adding aggregate to epoxy liquids does a number of things: it extends the material so it is cost effective; it makes epoxy less brittle, so it becomes more impact resistant; introduction of hard aggregates make the matrix more abrasion resistant; and aggregate loading allows the epoxy matrix to “move” more in tandem with a concrete substrate. “Neat” epoxies, just blended resin and hardener, should not be applied in thickness over 20 or 30

11mils. Most of them get too brittle. Impact will shatter them right off a concrete substrate. Neat epoxies are good for coatings, but not for spall repairs. We’ll get into coatings later. As mentioned, epoxy mortar consists of blended epoxy and aggregate. It is important to first mix the resin and hardener together for a few minutes with a drill and paddle (not a stick) so the resin and hardener molecules will “marry” and the stuff gets hard. Make certain the sides of the mixing vessel where the resin and/or hardener were poured down are scraped off and blended into the mix. Otherwise you will find uncured spots in your patch. After the liquids are mixed, add aggregate a little at a time so it all blends thoroughly. Again, mix the materials with a drill and paddle or in something called a Kol Mixer or some sort of epoxy mixer. Don’t mix it in a concrete mixer; you won’t get a thorough mix. Now that the matrix is mixed, it is ready to be applied. A note of caution--get it out of the bucket and on to the floor.
Golden Rule #14: Flooring epoxy hardens faster in a thick mass than in a thin layer. So, if you leave the mixed epoxy in the bucket as it is being scooped out and troweled down on to the floor, some epoxies, depending on their cure times, may end up staying in the bucket...Forever! Dump it on the floor and trowel out the patch. If you have to pick up extra material and put it back into the bucket or into another patch, then do that. Trowel out the material, making sure the surface is “closed,” especially around the edges. Open porosity collects dirt and creates an avenue for intrusion. The applicator should spend some time “finishing” the patch, but not “playing with it.” Over-troweling epoxy is not beneficial. Well, that’s how spall repairs are done. Cementitious-based or resin-based, if you do all the good stuff before material is applied, chances are very good that your repair will work--for a long time. There is an old adage in the industrial flooring business that has some merit: you’re better off installing the wrong product right than the right product wrong. Meaning? Basically, if your preparation is good even a lesser product has a better chance or working than the correct product that is applied over a poorly prepared substrate. Application of the right product, then, over a properly prepared substrate, drastically reduces the odds of failure. Crack Repairs If spall repairs are fun, crack repairs are like the Mardi Gras.

12

13
14Spall repair is pretty straight-forward. You’ve got a hole, prepare it and fill it. Cracks can be some funny animals. Are they shrinkage cracks, control joints, expansion joints or perimeters of broken pieces of concrete from impact or overloading? You’ve got to look around and think about these kids. The single most difficult question to answer is: Is the crack moving? Or, more specifically, is the concrete on one side or the other moving so the crack width increases or decreases? If so, don’t ‘stick something hard into it like epoxy mortar or concrete and expect it not to re-crack.
Golden Rule #15: Do not fill a moving crack with hard, inflexible material. A moving crack is really an expansion joint or a control joint, whether intended to be there or not. If it wasn’t intended to be where it is, it should have been. Something went wrong during construction--either poor design or poor installation. Doesn’t matter, though. Now it’s your problem and you’ve got to fix it. Moving cracks generally occur around columns, at column lines, at or near equipment pads and between old and new concrete construction. If control joints were not cut into the new concrete or expansion joints not installed in these areas during original construction, cracks develop. These cracks tend to run fairly straight or radiate off corners. Although moving cracks are found in other occurrences than those just described, it’s a safe bet that most moving cracks you find will be one of these. If you don’t know if a crack is moving or not, treatment of the crack as a moving crack will not cause harm. On the other hand, treatment of a crack as a non-moving crack that is moving, will cause you some grief. Routing and sealing a moving crack is a fairly economical, yet effective method of moving crack repair treatment. “Crack chasing” is the simplest treatment. This method involves “V-Grooving” a crack to a 1/4" or so in width with an end grinder. After the crack is “chased” the groove is cleaned out with a vacuum cleaner. The groove must be dry and clean, free of oil, grease or any other contaminant. To end up with a neat-appearing finish, tape both sides of the crack with masking or duct tape. Then dispense sealant or caulk into the groove. After the sealant is “slicked off” and still wet, remove the tape. If you wait until the sealant cures, you will have to cut the tape away. In areas where the floor is subject to traffic, a two-component, traffic-grade urethane sealant or epoxy caulk work best. Where traffic is not an issue, simple one-component urethane sealant will function, as well. Polysulfides, although more chemical resistant, are soft and may not hold up under traffic. Acrylics, latexes and silicones should be avoided in industrial flooring applications. If cracks are not V-Grooved, but cut with a saw and the bottom of the crack is generally flat, a bond breaker is needed. If a bond breaker is not used, the bottom of the caulk or sealant will bond to the bottom of the prepared crack. If the crack moves and the bottom of the sealant bead is bonded, it may break. Polyethylene tape or electrical tape placed in the bottom of the crack will function as a bond breaker. If the crack is prepared deep enough, backer rod can first be inserted before sealing. Refer to Figure #3. The object is to have the sealant bond to both sides of the crack, but not to the bottom.

15 Finally, as shown in Figure #3, the depth of sealant in cracks or joints 1/2" or wider, should be half the width. Or, for cracks widened out to 1", backer rod should be placed so the depth of the sealant will be 1/2". Sealant in joints 1/2" wide should be 1/4" deep, etc. Figure #4 shows concrete that found its own relief across a column line, since no control joints were cut into the original concrete. The choice here is to “chase” the crack as described above, or create a control joint that is neater in appearance. In this case, cut the crack wider with a saw and at least 1/2" deep. Clean it out. Then prime the crack with epoxy and fill it with epoxy mortar. Slick the epoxy mortar smooth and remove extraneous material. After the filled crack has cured, snap a chalk line across the column line and cut a 1/4" wide joint 1/4" deep. Clean it out and be sure it’s dry. Lay a bond breaker in the bottom of the joint. Tape both sides, then fill it with an appropriate sealant. Pull the tape, and voila--you have a decent looking control joint! If a crack really should be an expansion joint, where you know a great deal of movement exists, make one. Cut out the concrete at least 1/2" wide and 2" deep. Prepare it. Put in backer rod to the proper depth and seal with appropriate sealant. Another method for expansion joints is to use an epoxy bonded compression seal, available from several good suppliers. After the joint is cut out as described, epoxy gel is applied to either side of the joint. Then, while still wet, a compressible material of any specified width is inserted into the joint. After the epoxy cures, the joint material is solidly in place and secure. This application is a good, long lasting repair. That’s about the ball game on moving and non-moving cracks, except for bigger problems that involve structural repairs. We’ll discuss this briefly, because this item is too involved to cover in the theme of this document, and would require great detail. With structural repairs, a little bit of knowledge is dangerous. Suffice it to say, unless your plant engineering department is qualified to analyze structural problems and specify correct repair procedures--get an outside engineer to give you a hand. The first thing that must be done in a structural repair is to figure out why you have the problem. If you can’t do that, caulk the cracks, raise the red flag and wait for help. Epoxy injection by a qualified contractor specializing in such work may be a help. Good injection contractors can recognize many situations that can be remedied by “welding” the concrete back together with epoxy. A good contractor, too, won’t take a chance on getting involved with something that should be left to an engineer. Back to the usual problem, though--how do you determine a good injection contractor? I can’t really tell you. Here is where you have to rely on your experience, knowledge--and listen to your gut to tell you if the character makes sense. A lot of these injection artists are full of themselves and full of something else, too. If you have the least bit of trepidation about what you are being told, get it confirmed by an engineer. Epoxy injection, if the situation is right and the application is performed properly, can save huge dollars. Generally, the repair can be made without removal and replacement of the concrete. Certain epoxy injection resins are extremely tenacious, strong, and moisture tolerant. When injected properly, they work great.
16 In flooring situations, especially with slabs on grade, settlement is a common problem that causes cracking. If you have a panel or section of concrete that has broken away and is lower than adjacent concrete placed at the same time, it’s time to core drill. Get an idea of what is going on below the slab. You may have to core on the “high side” and “low side” of the crack. If you find a void between the subsurface and concrete, you can fix cracks all day long and still not fix the problem. Satisfy yourself that the cause for the void is not a problem, then the slab must be stabilized. Now, we’re getting into another big issue that I will dance around. You have a couple choices with this situation. You can pump grout under the slab to stabilize it or you can cut out the section and replace it. Again, if you haven’t pumped grout under a slab before, be careful. Without proper use of “relief” vents or ports and a little pressure, you can get into a bigger problem. Instead of sections too low, you may get sections too high. And, more broken slabs around the slab that’s already broken. So, we’re back to the same deal as epoxy injection--be careful. If you are unsure of yourself, your mechanics or contractor--get an outside engineer. Nosing Repairs Control and expansion joints present particular problems, especially if left uncaulked. One or both sides of the joint begins to break away and “ravel.” The area grows over time, and if left unattended, eventually turns into a spall. Raveling normally occurs with significance under lift truck or heavy wheeled traffic. Incidence of raveling would dramatically decrease if joints were filled with sealant. Even a wrong sealant is better than no sealant in this case. Sealant helps to support the “open” side of the joint when placed under compression or point loading. Often, when a building is built or a new slab is poured, joint sealing is either overlooked or looked upon as a frill or unneeded expense. Pay now when there is no production and the relative cost is low, or pay later when the cost is greater. Your choice.
Golden Rule #16: Unsealed control or expansion joints will break away at a much faster rate than caulked or sealed joints.
Well, for whatever reason now, we have a broken nosing. Let’s fix it. Figure #5 shows a joint with raveled nosings on either side. Treat the repair as a spall. Find sound concrete and cut from 1/2" to 2" in depth, depending on the anticipated traffic load. Chip out he concrete and prepare it. Use either a high strength cementitious repair mortar or epoxy mortar. Fill in the removed section with your repair material and allow it to cure. Following cure, within the patch, saw out the continuation of the joint to the same size and depth. Install the appropriate sealant. While you’re at it, if the rest of the existing joint isn’t sealed, do yourself a favor and seal that, too. Most attempts at nosing problems are made without cutting away the deteriorated concrete. Plastering on some kind of repair material over the problem area won’t work. Golden Rules #4 and #5 are really golden when it comes to nosings.
17That about does it for repairing damaged concrete. Certainly all situations were not covered, but the great bulk of concrete problems have been dealt with. It is important here to restate this work is not definitive, but a start. There may be other ways of skinning a cat, but these methods will work. They are basic--and common sense. When you find better ways of doing this work, just remember--short cuts will bite you. The basics don’t change. Sloping and Re-sloping to Drains It never fails. An area is built for warehousing and now you’re turning it into production. Sound familiar? The floors are flat with no pitch. Now you need drains and a way for the water to get to them. No problem putting in drains, your guys or your contractor do that all the time. Pitching the room to those drains gets a little dicey, though. In the industry, average acceptable slope is about 1/8" per foot. Dairies and chemical plants generally need about 3/16" or 1/4". If you try to run a slope much less than 1/8" you tend to get puddles or low spots somewhere in the run, especially in long runs. Sometimes, depending an area’s configuration and the amount of immovable equipment in it may make resloping nearly impossible or extremely expensive. Or, the area size may be so large and drains so few that the amount of material needed to reslope could cause the project cost to be prohibitive. Installation of new or added drains in combination with resloping may be the answer. Assume, for instance you have room 50' x 40' with one drain in the middle. If you need 1/8" pitch per foot, then approximately 400 cubic feet of material is needed to reslope the room. If you put in one more drain, the requirements would be reduced by approximately 100 cubic feet, or 300 cubic feet of product. The basics of applying sloping material over a concrete slab are no different than application basics for spall repairs: no thin edges, good shoulders, prepared substrates for bond, cure times, etc. If the area is small, a couple hundred square feet, material costs are less a concern than a 2,000 square foot area. In smaller areas you can get away with bagged cementitious products and epoxy mortars. But, in larger areas you really should look at concrete and modified concretes. Material selection usually is the easiest part of the problem to solve. The trickiest part of resloping is where to put high points in existing areas, where funny things like doors, stairwells and things like that are already in place. If you put the high points at the wall and a door happens to be there you’ve got two potential problems: a tripping hazard at the threshold and door height. The door will have to be cut or raised and the high point location has to be adjusted so there is no abrupt step.
Golden Rule #17: Resloping an existing floor is more difficult that it first appears. Resloping and repitching existing areas is an exercise in cause and effect. Most applications

18

19are not easy from a design point of view, and require thought. Taking care of one situation can easily cause a worse situation. The most common example is where you have a low spot that collects water.
Unless that low spot is within a “sloping run,” usually filling in the low spot will simply move the water to some place else. So what frequently happens is the water is moved from the place you didn’t want it to be, to some other place you don’t want it. Low spots can be frustrating. Earlier, 1/8" per foot pitch rate was mentioned to be a general industry standard. 1/8" pitch is really about the minimum rise over run to get water to flow any distance without puddling. Lesser pitch can be accomplished, but the incidence of puddling increases. Most plants want the least amount of pitch, because the elevations impact equipment, doors and load. If drainage is necessary and elevations are a problem, additional drains will have to be placed to lower those high points. The advent of pre-fabricated trench drains with traffic-bearing gratings has been a significant help to many plants. Trench drains are available in an assortment of compositions, from concrete to vinylester, and gratings from steel, stainless steel and fiberglass to accommodate just about any exposure or load. Interlocking sections are about a meter long with a built-in slope. Sections are numbered, with depths running from about 5" to 12". The drain system has end plugs and a variety of accessories and configurations to continue plumbing out of the trench to a pipe, or end the system directly to a sump. Installation of these systems is fairly fast, and work very well in many industrial flooring applications. Using a trench drain as a barrier to stop water flow, often is a relatively inexpensive alternative to repitching. Locating a trench drain across a doorway to stop water from spilling into a corridor or into an adjacent work area is a common use. Repitching in conjunction with pre-fabricated trench drain installation can save dollars as well as a lot of frustration.

20INDUSTRIAL FLOOR SURFACINGS AND TREATMENTS Now we enter an arena full of magic, foo-foo dust, and BS. Floor surfacings, be they sealers, coatings, toppings, linings, quarry tile or acid brick, all have a place. If ever a Golden Rule must be remembered, review #1. Review #2 and #3, as well. It is safe to say that most engineers, architects, plant engineers, manufacturers, manufacturer’s reps, distributors, contractors and specialty flooring contractors don’t have thorough knowledge and understanding of material performance under plant exposures. Don’t get me wrong--some of these people DO have extensive knowledge. I said most do not. And, I stand behind that statement. If you do not believe that statement, you increase your chances of spending a great deal of money on industrial floor surfacing installation that will not perform to your expectations. If you do believe that statement, you will question and research proposed materials, take a more active role in material selection, and increase your odds of getting a good floor. While you read this document, you need to understand that I look at industrial flooring as MY industry. And I get a little huffy when people shoot from the hip and spread bad information. Throughout my entire career, past and present, people have been making a living selling magic in a can. I don’t like it. And neither should you. Here’s a Golden Rule for you that you can live with:
Golden Rule #18: If a manufacturer or contractor cannot or will not give you a generic description of the product, do not use it.
Would customers buy your product if they didn’t know what it is? If someone won’t tell you what a product is, they are hiding something. Chances are they are hiding the fact that their product is the same as the competition’s, but they are trying to make it “special.” “Special” usually means more expensive. In reality, more expensive is not always better. Another buzz word is “proprietary.” Proprietary is okay for some added ingredients in a formulation, but if the manufacturer labels the product itself as proprietary, dump them, too. I guarantee you, there are products on the market that are not proprietary which will perform at least as well as the “special, proprietary” ones. Forthright, upstanding people will tell you what the proposed product is and why they believe it to be the right product. Industrial floor surfacings are not magic. There are scientific and chemical reasons why surfacings will work and not work. There is nothing special or mystical...only in salesmen’s minds. And, those people are not doing you any favors. Many plant engineers cringe at the thought of having to install industrial floor surfacings. They should. The variables are monstrously extensive, and the totality of information confusing. Unless a person spends just about every day doing this sort of thing, tremendous focus and time will be required to research good recommendations. Manufacturers with full product lines, including acrylics or polyacrylates, epoxies, novolac epoxies, urethanes, vinylesters and polyesters, as well as setting beds and grouts for quarry tile and acid brick, are more likely to provide impartial recommendations than single product suppliers. If a
21manufacturer or sales person only has epoxies, what do you think the recommendation will be? Always ask sales people about their back-grounds. Find out who you are talking to and about their qualifications. Experience isn’t absolutely necessary to do a good job, but if you are into something tricky, you probably want to send the rookie back for reinforcements. Ask if their company has access to a technical services department you can call freely. Most manufacturers welcome questions from customers. Good sales people also have no problem with a customer contacting their Tech Services. In fact, they welcome it. Sales Snakes get paranoid when you do that, because they want to be able to tell you what they want you to know A good, new sales person will probably not be able to answer many of your questions, and will tell you they don’t know, but will find those answers for you. A good, experienced sales person may not be able to answer all your questions, but will tell you they don’t know, but will find the answers for you...catch the similarity? A good sales person involved in providing surfacings for specific chemical exposures will always check with technical services before confirming the answer. A good specialty contractor or engineer will check with more than one technical services department. If conflicting answers are given, they will check with more. Then, they will really start doing homework to arrive at a good recommendation. A bad sales person will have a quick answer for every question. Avoid them. All specialty flooring contractors are not created equal. Contractors who specialize in commercial types of decorative and light duty epoxy flooring, probably won’t function too well in a plant environment with acids, caustics and vapors all over the place. These contractors are not familiar with heavy duty mechanical abuse and chemical attack, and tend to think that “paint-job” epoxy coatings solve all problems. Decorative and light duty epoxy contractors are typically more willing to sacrifice the quality of a recommendation to get a job than will an industrial surfacings contractor. Good contractors heavily involved in industrial flooring know the hazards of a mis-specified flooring system and will be more likely to walk away from the work than acquiesce to dollar or quality pressure. That’s not to say that you shouldn’t check a contractors price. You should. But you should do that by going through the contractor’s proposal or bid to make certain what is and what is not included. Then compare the other bidders in the same fashion. It’s amazing what some contractors leave out of their bids. And, it is equally amazing what some contractors include.
Golden Rule #19: No floor surfacing will hold a building together. That means, don’t expect a floor treatment, be it a coating or 1/2" troweled epoxy mortar to solve a substrate problem. If you have structural problems that are not addressed, and the floor is cracking all over the place, putting some goop over the floor won’t solve the problem. If your concrete substrate is so deteriorated from long term chemical attack that all the strength is gone, or penetrating oils have soaked deeply into the concrete, don’t look for miracles.

22Golden Rule #20: If concrete or structural problems are not addressed and
solved as a separate issue, sooner or later any surfacing treatment will mirror or transmit the problem below it.
Golden Rule #21: Correctly chosen and installed floor surfacings will maximize life
of a solid concrete substrate. Correctly chosen and installed floor surfacings applied over unsound substrates will fail. The moral of this story is to work with good people and rely on your knowledge and abilities to discern fact from fiction. Concrete Moisture and Moisture Migration Moisture in concrete is likely one the greatest causes for surfacings to disbond. Some learned professionals, manufacturers and contractors make their livings in the prevention and mitigation of moisture migration through slabs on grade. Certain areas of the country seem to be more prone to high incidence of moisture migration than others, especially near coastal areas. We aren’t going to solve moisture problems in this work, but we will become more aware of some precautions that must be taken. Nearly every surfacings manufacturer disclaims liability of failure if disbondment occurs as a result of moisture and moisture migration. As a general rule, concrete must cure or “hydrate” for a minimum of 28 days to reach an industry accepted emission rate of 3 pounds of moisture per 1,000 square feet per 24 hours. ASTM F 1869-98 Moisture Emission Test details how this value can be quantified by using anhydrous calcium chloride. Test kits are widely marketed by independent companies as well as floor surfacing manufacturers. Unfortunately, even if results produce readings of 3 pounds or less, there is no real assurance that moisture content may not exceed that level after the test. If the test, for example, is performed in a new construction project before temperature and humidity levels are stabilized, the forces driving moisture migration may change when the area is fully operable. Air conditioning, heat, and air movement may produce temperature and humidity differentials which may radically specific environmental conditions. Moisture in concrete seeks escape from areas of more humidity to less humidity. As heat and/or air conditioning reduces humidity above the concrete, guess what? Moisture tries to get out. If a surfacing is in its way, and if enough force is exerted in its attempt to escape, something has to give. Generally, concrete about 1/16" below the surfacing bond line starts to break away. And, with it, the surfacing. It’s the same deal with temperature. If the temperature within the slab is cooler than the temperature outside it, moisture will seek the area of higher temperature. That’s why moisture problems really start to first occur in the spring and early summer in temperate climates. No problem during the winter; warm weather comes, and bingo! If possible, moisture readings should be taken and floor surfacings should be installed in the same environmental condition in which they are designed to function. Sometimes that’s not possible. But, your surfacing projects will be more successful, on the average, if you can do that. Vapor barriers placed under slabs-on-grade reduce moisture migration from the sub-grade
23through the slab. Understand, concrete contractors don’t want to hear this, because it’s difficult not to puncture vapor barriers while pouring concrete. Further, if moisture during the hydration process cannot escape “down” then it must escape “up.” Vapor barriers lead to “curling,” or the raising of slab edges as the concrete cures. Hey, no one said this stuff is easy. Choices. It’s tough. You might have to grind the edges before a surfacing is installed if you need a floor surfacing to protect the concrete. Look at the entire operation as a system. The concrete guy looks at the concrete as a separate issue. The floor surfacing guys looks at the surfacing as a separate issue. You’ve got it all. You have to be the one to determine what your plant needs in the big picture. Other than the calcium chloride test, there are a slew of lesser methods of checking moisture. (And there are other more scientific methods of checking moisture than the calcium chloride test, that we will not get into). The Plastic Sheet Method is often used, but understand that it is just an indicator of moisture presence. In this test a sheet of polyethylene is duct taped to the concrete and left overnight. If moisture evidences itself in the form of droplets or “fog,” you’ve got troubles. So, now let’s assume we’ve determined we’re wet, but we really need a surfacing for protection from chemicals or mechanical abuse, or whatever. What do we do? Certain moisture vapor reduction systems are marketed today which can be installed over concrete, and under a floor surfacing. These systems are “negative side” vapor reducers which are able to reduce moisture emission levels to the 3 pound or less acceptable standard for successful surfacing installations. Preparation I’ve got to say this just one more time, and I cannot promise we won’t deal with it again: Preparation is the primary key to success of an industrial flooring application. If it is just a sealer or coating, it’s got to be prepared. If it’s a 1/16", 1/8", or 1/4" floor surfacing, it’s got to be prepared. If it’s a fabric reinforced lining, it’s got to be prepared. If it’s acrylic, polyacrylate, methylmethcrylate, epoxy, epoxy novolac, urethane, vinylester, polyester, tile or acid brick—it’s got to be prepared. Clear Sealers Sealers minimize “dusting” and help to keep water from intruding concrete. Always regard sealers as temporary protection against minimal exposures. Once they get scratched, any protection is lost in that area. Some sealers first function as curing compounds over fresh concrete. Generally two or three more coats are needed for the dual purpose curing compound to function as a sealer. Read the data sheets. Other sealers are acrylic, epoxy, urethane or silicone-based and may not be compatible with other sealers or curing compounds which may already have been applied. Take a little water and drop it on the floor. Watch it to see if it penetrates into the concrete or stays on top or beads up. Do it in a number of places on the area you wish to seal. If you ascertain a clear sealer to be in place, you need to do some things before you proceed. The safest thing to do is to have the area lightly shotblasted. Shotblasting will remove existing sealers and provide a profile in the concrete for better adhesion. Shotblasting is the industry

24standard for preparation for floor surfacing application. If you can’t shotblast, then mechanical scarification is next best. Light scarification can be achieved by grinding machines, various scarifiers or even “floor buffers” with sanding discs. Just remember, you are going to put back a thin film, clear material, so you can’t go digging up or gouging the concrete. Notice I did not mention acid etching. We are assuming that we have a potential for the existence of a clear sealer in this scenario. If so, acid etching will not remove existing sealers. Don’t try it. You’ll be wasting your time and money. After the existing sealers are removed and the concrete is prepared, apply the sealer in strict accordance with the manufacturer’s directions. Better yet, if it’s the first time you’re applying this material, get the manufacturer’s rep or a friendly flooring contractor on the job while you’re doing it, to advise you of any pit falls. If you know your concrete is free of any sealers or coatings, any of the above preparation methods will work. Even acid etching, my least favorite method. Most maintenance staffs and contractors don’t acid etch properly. In fact, if all the acid is not completely removed, the etch process will actually function as a contaminant and cause disbonding. If you want to find out how to properly acid etch, there are many publications available to tell you how to do it properly. But, you won’t find it in this one, because for every one person reading this work who will do it right, there will be 100 who will do it wrong. You can increase your odds of getting a better installation with other preparation methods. Coatings I used to work for a guy who loved the word “coatings.” It must have meant something exotic to him. I know it meant more to him than the word “paint,” because he always corrected me when I called floor coatings “paint jobs.” But, that’s what they are. Paint jobs. You can paint floors with all sorts of coatings, from simple acrylic latexes to high functionality novolac epoxies and vinylesters, which have great chemical resistance. Until they’re scratched. Do the floors in your plant ever get scratched? Do your floors ever get pallets dragged across them or tools dropped on them? Maybe you’re the lucky person who has lift truck drivers who never drop their forks and slide them across the floor. Probably not. Use coatings to make a floor pretty. Use coatings where you have minimal chemical attack and opportunity for getting scratched and dinged. Think of coatings as maintenance items. My distaste aside, there is a place for coatings. Unfortunately during my experience in plants and with plant engineers, I have found fewer expectation levels to be higher than performance for a paint job on a floor. Coatings are thin film floor surfacings, generally designed to be applied from 10 to 50 mils. (Remember, 1/16" is just a little more than 60 mils). That’s not a lot of space between a lift truck and the concrete! Coatings will resist light to moderate foot traffic where no sands or steel filings are picked up on shoes and ground into the surfacing as people walk across a floor). Further, coatings will resist incidental chemical attack in a splash and spill situation--as long as the coating is not compromised by scratching and thermal shock. Coatings will function if you put

25them into the right environment, and give them a chance to work. 1/8" Floor Surfacings (125 Mils). 1/8" surfacings, troweled or self-leveled, are generally the most minimal floor surfacing a plant should consider. At this thickness and application method requirement, a surfacing will begin to enter the “permanent” arena, and get beyond “maintenance” like coatings and sealers. Here is where you start to get some value for your money and down-time spent to get a decent floor surfacing. I can’t help it, but we’ve got to go back to preparation for a moment. Think about this: preparation costs are about the same for a thin mil floor surfacing as they are for a heavy duty troweled floor surfacing. Assuming your staff or a contractor is going to do any surfacing project correctly, the preparation costs are just about equal. If the preparation costs are about $1.00 per square foot (just as an example--they could be much more or much less), and coating costs 50 cents applied, preparation represents 67% of the project cost. If a troweled floor surfacing costs $2.50 per square foot, preparation represents 28% of the project cost, even though the preparation expense is just about equal. If the coating lasts 5 years, you will probably be lucky. If the troweled floor lasts 15 years, you’re about average. So, rocket scientist that I am, it seems to me if you’re one of those fortunate individuals with a 5 year paint job, you’ve spent 30 cents per square foot per year for the coating, and now you get to do it again. Your troweled floor would cost 70 cents for those 5 years and it’s still down. After 10 years, the square foot cost has dropped to 35 cents and after 15, you’re down to 28 cents. Doing the coatings three times in 15 years (again, if your lucky), will cost more just for the construction cost, not to mention the pain and suffering of having to do it over and over. ...just another way of looking at it. Most of my plant engineer friends don’t like to re-do floor surfacings that were applied during their “watch.” When others in the plant remember the same floor being resurfaced funny little things are either said out loud or whispered into the wrong ears. Everyone looks stupid, from top to bottom. When people see re-application, they see waste. It’s human nature. They’re probably right. 1/8" floors. Generic selection of the floor surfacing can get pretty rigorous, especially when high temperatures and chemical exposures come into play. Often forgotten in the selection process are the cleaning requirements. In our zeal to focus on reagents that may attack the surfacing from process, we overlook what often is more corrosive than what we consider to be the primary exposure. Food plants really come into play on this one. CIP and hot water/steam washdowns will blow many flooring materials right off the concrete. When you go back to the contractor or manufacturer for some help, you’ll get the standard, “well, you never told me that!” And, you probably didn’t. The sales person never asked you, and you either didn’t know enough to tell them or you forgot. And, the sales person didn’t know enough to ask you, either. Now we’ve got trouble in River City.

26 Another item that comes into play into material selection is odor. Some odors are toxic and some are not. In my experience, every “foreign” odor is a problem. If you have a fertilizer plant that stinks 10 miles away and 100% solids epoxy with 0% VOC (volatile organic compound) is being used to repair a floor, people are going to falling over, near death. This especially holds true on an 80� day in July, when the sun is shining. Today, and rightfully so, everyone is concerned for their personal safety, particularly when chemical compounds are being used. Check the material safety data sheets BEFORE the job is scheduled to be started. Have your safety department bless the application. Every product is going to have some kind of foreign odor, and your plant personnel aren’t going to like it. Make certain the product or system you want to use meets safety requirements. If you can schedule the work during off-hours when using a vinylester or methylmethacrylate your life will better. Otherwise, believe me, you will have a problem. Problems can be mitigated by proper exhaust, ventilation and isolation with temporary protection (tarping, sealing off doors, etc.). Discuss these issues with your contractor or manufacturer’s rep during the selection process. 1/8" floors are still pretty thin, so if you have dings and holes, they’ve got to be pre-patched. Otherwise, you’ll have an 1/8" floor surfacing with indentations. There are a number of application methods to install 1/8" floors. “Slurry/Broadcast” has become the most popular method over the past few years. These floors are more “resin rich” than troweled mortars. Following preparation, the floors are first primed and lightly “seeded” with aggregate and allowed to cure. If the primer isn’t allowed to cure, the finished floor will often pinhole from air escaping from the concrete substrate. The “seed” helps the next material application to bond better. Depending on the system, aggregate is mixed into the polymeric liquid and troweled down “wet” over the floor. While this mixture is still wet, aggregate is broadcast to “saturation” into the wet mix and allowed to cure. Excess aggregate is swept and vacuumed off the floor. Either the floor can be left as is or additional “grout” and “topcoats” can be applied over the system, depending on the texture and degree of cleanability your plant requires. The best way to determine the finish desired is to have a sample applied on the floor prior to the start of the work. Production will want the floor to be as rough as possible. Your maintenance or sanitation department will want the floor to be as smooth as possible. If you want real trouble, then you pick the finished texture: you will be wrong. Finished texture is best chosen by committee. Involve production, quality control and sanitation. Plant Engineering stays out of it! Your manufacturer’s representative or contractor can supply you with a range of textures and finishes. First choose from little hard samples some lab guy made under perfect conditions, then have a sample installed on your floor for evaluation. While you’re at it, have several samples put down in different textures, because they aren’t going to match the perfect little samples Sammy Salesman trotted over to you. Then let the committee choose. Your job becomes easier after that, because all you have to do
27is make certain whomever puts the floor down matches the approved sample on the floor. Job standard and all that.
Golden Rule #22: Unless a floor surfacing is going to be installed in the Plant Engineering Office, Plant Engineering should not select final texture.
Heavy Duty Flooring Heavy duty flooring is divided into two categories--chemical and non-chemical exposures. Non-chemical exposure flooring is kind of a “no-brainer” compared to flooring to be exposed to chemical attack. Attention need be focused on substrate quality, preparation methods and detail, potential through-slab moisture migration, potential for thermal shock, and strength of system to designed point load. Heavy duty flooring exposed to chemical attack can get very hairy, confusing, and sometimes selection becomes a compromise. Selection deduction integrates the requirements for non-chemical exposures as well as narrowing the field of choice for specific chemical resistance. This work will not and cannot explain those choices, but will provide a systematic plan to find a plausible system. Protecting concrete against the deleterious effects of traffic and mechanical abuse are probably the most common heavy duty surfacing applications in plants in non-chemical environments. Troweled epoxy mortar systems from 3/16" to 3/8" thick are generally the systems of choice, because of contractor and/or product availability. Similar to preparation methods already discussed, particular attention should be paid, however, to termination details and surface profile. Heavy duty surfacings require greater substrate profile to endure the effects of heavy traffic and impact. Shotblasting the concrete substrate should be sufficiently aggressive to expose the aggregate in the concrete. Although no surfacing should ever be “flashed” down to “nothing,” heavy duty surfacings will fail quickly and miserably if not “keyed.” Where the floor surfacing will not terminate against a vertical abutment such as a wall, equipment pad, curb, etc., the termination in the concrete should be cut to a minimum depth of 1/4" or to a depth at least as thick as the designed system, and chipped back about 4". See Figure #6. In other words, a 1/8" surfacing should have a 1/4" key and a 3/8" floor should have a 3/8" key.

28

29Terminations not keyed will break away and ravel as we found in concrete spall repairs. Although epoxy bonds much better than cementitious repair materials, epoxy flashed down to nothing will break away under traffic and use. Traffic-grade heavy duty surfacings should be mortar systems--resins combined with aggregate. Thick resins with no aggregates will be brittle and shatter under impact. Besides, the system costs are reduced with the aggregate inclusion. Too much aggregate, however, will weaken the system. Generally, an aggregate to resin ratio, depending on the particular system, should range from 3:1 to 5.5:1. Ratios in the approximate 5:1 range generally require additional “grout” and “topcoats” to fill any remaining porosity. Systems applied in the lower ranges (�3:1) generally result in trowel marks which may be objectionable from an appearance stand point. If the higher loaded systems are used and properly grouted and topcoated, both the lower and higher loaded systems will work. Where exposure to heavy abrasion and impact are expected, metallic-aggregate used in at least half the volume of total aggregate loading will greatly improve success. This is especially true where heavy pallet movement activity occurs. Wooden pallets are notorious for causing damage from protruding nails. Metallic aggregate filled systems will help to overcome this type damage. Simply broadcasting aluminum oxide over the top surface will not achieve the impact and abrasion resistance of a metallic-filled system. Metallic-filled systems are just that--metallic filled. The aggregates are incorporated into the resinous matrix--part of it. If you want this type of system, discuss the application with your manufacturer’s rep or contractor. Unfortunately not many of them are familiar with metallic fillers and their uses. Methylmethacrylates are extremely fast-curing systems, but are so extremely odiferous that their use has diminished over the past few years. Fast cure, 100% solids epoxy and hybrid urethane mortars that cure very quickly seem to be used more frequently. Although methyl-methacrylates perform extremely well, odors, perceived VOC problems and plant personnel reaction to extreme smell should enter into your selection equation. An old system widely used 20 or 30 years ago, which is under-used today is polyacrylate. Relatively inexpensive and “breathable,” polyacrylates have a place in many plants under non-chemical exposures. These systems are simply rich mixes of cement and sand with the addition of hard aggregates, like trap rock, and acrylic admixtures. Polyacrylates can achieve strengths over 6,000 psi and tensile strengths over 900 psi. Polyacrylates are appropriate for lift truck traffic aisles with low or moderate impact and many other floors without chemical attack potential. Most important, however, polyacrylates are the least affected by moisture migration. Since polyacrylates are basically sophisticated concrete, moisture vapors can escape through the system, as long as a heavy “non-breathing” topcoat is not applied over it. Corrosion and deleterious attack from chemicals and solvents make heavy duty surfacing selection interesting. The academic challenge to “solve the puzzle” can result in lengthy research and discussion among plant personnel, manufacturer, contractor, and if retained, consulting engineer. Time spent is worth the effort, because many failures occur from insufficient information derived at the front end of the selection process. In the quest to find the correct surfacing to protect against corrosion, we need to meticulously
30accumulate data: every particular chemical, including concentration and temperature; combinations of mixtures, including concentrations and temperatures; detailed cleaning processes which may be used, including all pertinent data. Let’s get really basic. Information must come not only from the theoretical side, Mr. or Ms. Plant Engineer, but if you overlook the operator or the people on the floor, chances are we will miss a lot of valuable information. Often, the best person to interrogate the plant people is the rep or contractor. It’s been common in my experience that different answers are given to the plant engineer than to the rep or contractor. Operators know the directed procedures, but often take short cuts that “have been working for years,” and often will not admit them to plant management. Sorry, folks, that’s the real world. It may not happen all the time, but it happens enough to warrant consideration. From my perspective, I don’t care where the information comes, as long as I can get it. You may not like me when I go around you to talk to the operators, but you will hate my guts if your floor fails. Let me give you a couple simple examples of how insufficient information caused failures. A guy in food plant had a floor where food-stuffs were being processed. Going through the investigation process, we checked out all the reagents, chemicals and temperatures that the floor had to resist. A 1/4" epoxy floor would handle all the exposures, and was installed. Several months later the floor surfacing began to lose bond and buckle in approximate 4' x 4' areas. We asked about thermal shock, because the failure appeared to be caused by high temperatures. We were assured all the equipment on the floor operated at no more than 130°F. Substrate preparation was then deduced to be the likely cause. About a month later the problem re-occurred. We knew substrate preparation could not be the problem, and the bond loss and appearance of the surfacing still appeared to be failure from high temperature. The plant engineer assured us no hot water or hot liquids were being used on the floor. So, we suspected moisture migration, although unlikely, because no odorous, thick liquids were under the system. It was repaired again. A few weeks later while in the same plant looking at another project, I happened to be walking past the problem area. Fifteen feet above the floor is a mezzanine with cookers. I observed an operator dumping boiling hot water over the mezzanine wall directly on to the floor. I got the plant engineer who knew nothing about the operation. Querying the operator, it turned out that dumping the cookers in that method was faster than running the boiling water down the appropriate drainage system on the mezzanine. Another time a novolac epoxy floor was specified to be installed to protect against caustics - sodium hydroxide. Novolac epoxy is a reasonable material to resist caustic exposure, in fact caustic resistance is one of epoxy’s greatest strengths. What the specifying authorities forgot to investigate was the operating temperature of the caustic attack...140°F to 170°F. Hot caustics vaporize silica. Sand was used in the mortar mix. The system needed a carbon or non-silica filler.
Golden Rule #23: pH readings alone are insufficient information to produce a floor surfacing recommendation.
All those things are going to tell you is whether the reagent is more acidic or caustic. So what? That’s like saying the outside temperature is hot or cold. What’s that mean? No manufacturer, contractor, consulting engineer or even you can produce a recommendation based on that non-information. Get into it, or make information available to those who are trying to help you.

31 Recommendations for chemical resistant floor surfacings should not be taken lightly. All the problems that can occur with non-chemical exposures are compounded by attack by other reagents. Proper approach is critical to success. Any chemical resistant floor surfacing should be applied in at least two layers. The more layers the better, because if there are any holidays or pinholes in one layer, avenues direct to the substrate are mitigated. Extreme care must be taken by your installer to ensure proper coverages and thicknesses are met. Failures in chemical resistant surfacing generally result in costly down-time for the plant. Membrane Waterproofing Wet areas on suspended slabs often leak. Membrane waterproofing is common in the industry and will support floor surfacings. Applied as liquids, the membranes cure to elastomeric rubbers. Surfacings, then, are applied over them. Most membranes are either acrylic-based, epoxy-based or urethane-based. Urethanes and flexiblized epoxies are more chemical resistant. If the surfacing cracks and allows liquid intrusion, the urethanes will have a better chance of survival than will acrylics. Membranes can be installed with or without fiberglass fabric reinforcement. Industry debates about whether fiberglass restricts elasticity has been going on for years, and membranes are used both with and without fiberglass. I have seen more successes than failures in both applications. Generally, if fabric reinforcement is not used, I like to see the floor/wall transition reinforced. From about 6" on the floor, up the wall to desired height, reinforced membranes seem to work well. If you want to use a membrane under a surfacing system, make certain the membrane is recommended by the manufacturer. A certain few systems will not bond to membranes, hybrid urethanes in particular. At any rate, make certain your warranty is not impacted by inappropriate membrane use. Acid Brick and Quarry Tile Acid brick flooring is probably the most long-lived industrial floor surfacing of all systems. It also is the most expensive. If you can get by the initial construction cost, acid brick is likely the least expensive flooring system, amortized over its life. There are many acid brick floors still in use today that are 50 years and older. Acid brick and quarry tile, if set and grouted with correct corrosion-proof materials, will withstand most chemical exposures at the highest of temperatures. Few other systems are likely to hold up as well under extreme thermal shock. Other than under hot caustic and fluoride exposures, acid brick and quarry tile are extremely chemical resistant. Acid brick is installed either by “tilesetters” method” or “bricklayers method.” Tilesetters method involves laying out the brick in the setting bed, allowing the bed to cure, then returning the next day and grouting the brick. Joints in tilesetters method are usually 1/4" wide. Bricklayers method involves “buttering” the sides of the brick, and shoving them home. The grout material squeezes up as the brick is pushed against the next brick, and the material cut off. Joints

32in bricklayers method are narrow, generally a little less than 1/8". Joints are the weakest link in most brick systems, so bricklayers method is generally preferred under corrosive conditions. Acid brick is supplied in 1", 1-3/16", 1-3/8", 1-1/2", 2-1/8" (singles) and 4-1/2" (doubles) thicknesses. All acid brick approximate 4" x 8" x one of the above thicknesses. Thickness uses are dependent upon intended use, including anticipated thermal shock and mechanical abuse. Acid brick and quarry tile are supplied in smooth, abrasive and double abrasive surfaces. Acid brick also is supplied in what is called “wire cut finish.” All Type L acid brick is relatively impervious to liquid absorption, and finish type should be chosen by the user. Since the initial construction cost of acid brick is so relatively high, use has diminished over the years. Consequently fewer and fewer contractors are proficient in their installation. tilesetter’s are often called to install acid brick, but most are unable to install brick in the desired bricklayers method. Standard industrial quarry tile is supplied in 6" x 6", and 4" x 8" dimensions. Thicknesses are 1/2" and 3/4". Don’t use 3/8" thick quarry tile in your plant. Chances are they will break. Finishes other than those described above include scored diamond for slip resistance, but the abrasive finishes are better. 1/2" quarry tile should not be used under heavy lift truck traffic. At least 3/4" quarries should be used or 1" brick as a minimum. Under extreme point loading and impact the units may break. One good thing about both quarry tile and acid brick is when repairs are made, they are not as noticeable as a seamless floor surfacing repairs. If the same tile or brick manufacturer is used, the standard red colors are fairly consistent, especially over use and time. Most acid brick and quarry tile problems occur with the grouts and setting beds. The actual units of tile and brick are only part of the system. Usually grout joints are the weakest link in a tile or brick floor and it is amazing how people will skimp on the most variable part of the system. If you put in a tile or brick floor, do yourself a favor and investigate the grouts and setting beds just as you would a resinous floor surfacing. If concrete will not hold up under your plant environment, neither will cement joints in tile or brick. If epoxies won’t hold up under specific chemical attack, neither will epoxy joints. Furan, novolac epoxy, vinylester and polyester grouting materials are viable and often used alternatives for specific chemical exposures. Investigate them. If you don’t use the proper setting and grouting materials in brick or tile floors, you stand to waste big money. Pay particular heed to control and expansion joints. “Honor” those joints in the concrete by installing proper sealants in your tile and brick, mirroring the joints below them. Further, it’s a good idea to isolate equipment pads and large changes in elevation with joints in the brick or tile. AND A FINAL NOTE… Quality assurance and quality control of floor surfacing installations in plant environments is poor. In-process applications are rarely checked or monitored by plant engineering. If plant engineering does not have qualified inspectors, then outside inspection should be contracted. Poor contractors fear qualified inspection. Good contractors welcome inspection because it helps

33them to provide a good installation. Golden Rule #24: Qualified inspection of a contractor’s work will increase quality in
every case. Qualified inspection adds to the initial cost of a project but decreases the overall cost by increasing the rate of success. Well-planned and correctly executed industrial flooring installations function well for a long time. Down time as a result of failure is expensive. Redoing a floor is expensive. Those costs are far greater than the cost of inspection. If a contractor has performed well over a long period of time under these conditions, maybe a little less monitoring will do. But, if it were my money and my plant, I would make certain the installation be installed correctly, according to specification.
34CONCLUSION Well, that’s the down and dirty, common sense approach to industrial floor surfacings. As mentioned in the introduction, ACI, ICRI, NACE, SSPC and other notable authoritative organizations have greatly detailed volumes of information available. Engineers and architects, especially, should refer to these organizations, as well as other parties sincerely interested in understanding the dynamics of industrial flooring. Significant manufacturers who focus on industrial flooring are great sources of information and can also help direct you in your search for information. Some manufacturers are more objective than others, however. The good ones will help you, even if they do not have a particular system to meet your needs. Whether you seek information from engineers, manufacturers or contractors, do not talk to just one. There is so much information and new research being done that no one person or organization has all the answers. Good luck--and sawcut and key your edges!

Summary of “Golden Rules”
Golden Rule #1: There is no one cure all. No single product will do every job.
Golden Rule #2: No single manufacturer has the best product for every need.
Golden Rule #3: No single contractor can do it better than any other contractor in every case.
Golden Rule #4: Concrete doesn’t stick to itself very well.
Golden Rule #5: Thin concrete breaks, especially at the edges.
Golden Rule #6: Bond of any repair material increases as substrate profile
increases--the rougher the better.
Golden Rule #7: Bond of any repair material increases as substrate cleanliness increases.
Golden Rule #8: Do not use gypsum-based cementitious repair materials for
industrial floor repairs.
Golden Rule #9: Cementitious repair materials (applied without an epoxy bonding agent) should be applied over a Surface Saturated Dry (SSD) substrate.
Golden Rule #10: Money talks and BS walks. Verify the credentials of your
prospective applicators.
Golden Rule #11: Cold temperatures generally slow down or stop cure times of most repair materials.
Golden Rule #12: If you adhere to the basic preparation repair procedure described
in the beginning of this document, regardless of the material to be used, long term repair success rates will increase.
Golden Rule #13: Prime the substrate with epoxy primer before epoxy mortar
application.
Golden Rule #14: Flooring epoxy hardens faster in a thick mass than in a thin layer.
Golden Rule #15: Do not fill a moving crack with hard, inflexible material.
Golden Rule #16: Unsealed control or expansion joints will break away at a much faster rate than caulked or sealed joints.
Golden Rule #17: Resloping an existing floor is more difficult that it first appears.

Golden Rule #18: If a manufacturer or contractor cannot or will not give you a
generic description of the product, do not use it.
Golden Rule #19: No floor surfacing will hold a building together.
Golden Rule #20: If concrete or structural problems are not addressed and solved as a separate issue, sooner or later any surfacing treatment will mirror or transmit the problem below it.
Golden Rule #21: Correctly chosen and installed floor surfacings will maximize life
of a solid concrete substrate.
Golden Rule #22: Unless a floor surfacing is going to be installed in the Plant Engineering Office, Plant Engineering should not select final texture.
Golden Rule #23: pH readings alone are insufficient information to produce a floor
surfacing recommendation. Golden Rule #24: Qualified inspection of a contractor’s work will increase quality in
every case.
Author William R. Hier is president and a founding owner of a specialty con-struction company located in Upstate New York, which focuses on industrial flooring installations, corrosion control in primary and secondary containment exposures and structural and non-structural concrete repair. The author also is an owner of a company which manufactures and provides concrete repair materials and corrosion resistant surfacings. Comments or questions may be directed to the author.
William R. Hier PO Box 135
Marcellus, NY 13108 Phone: 800-563-6665
email: