9lw1 short new - lowes holidaypdf.lowes.com/useandcareguides/099198850054_use.pdf · operator to...
TRANSCRIPT

6
5
8
OPERATION INSTRUCTIONS
TO RAISE THE LOAD1. Place vehicle in PARK (vehicles with automatic transmissions) or in GEAR (vehicles equipped with
standard transmissions) and apply emergency brake.2. Assemble two-piece jack handle securely.3. Close release valve tightly by turning handle clockwise.4. Center jack under load so that saddle contacts load firmly and will not slip. (Refer to vehicle
Owner's Manual for proper lifting points.) If needed, turn extension screw on jack counterclockwise until it comes in contact with vehicle.
5. Insert jack handle into handle socket. Pump handle of jack up and down until saddle contacts load. Check to ensure that saddle is centered correctly under lifting point before continuing. If not, re-center and continue.
6. Raise load to desired height and place jack stands in correct position. Open the release valve on the jack slightly and SLOWLY transfer load from the jack to the jack stands. When the load is secure on jack stands, lower jack completely and remove from under the vehicle.
7. Reverse above procedure to remove jack stands.
TO LOWER THE LOAD1. Remove handle, use small end to SLOWLY open release valve. (To open turn SLOWLY in
counterclockwise direction).2. When vehicle is fully lowered, remove jack. If extension screw has been extended, turn it
clockwise until it retracts enough to remove from vehicle.3. When jack has been removed from vehicle, close release valve for storage.
2
TABLE OF CONTENTS
Safety Information .............................................................................................................................. 2
Package Contents .............................................................................................................................. 4
Preparation Before Use...................................................................................................................... 4
Operation Instructions ........................................................................................................................ 5
Care and Maintenance ....................................................................................................................... 7
Troubleshooting.................................................................................................................................. 8
Warranty ............................................................................................................................................. 8
Replacement Parts List ...................................................................................................................... 9
SAFETY INFORMATION
Before using this product, read this manual and follow all Safety Rules and Operational Instructions.
Safety Markings• Study, understand, and follow all instructions, safety precautions and warnings before operating this device• Do not exceed rated capacity• Use only on hard, level surfaces• Use this product as a lifting device only. Immediately after lifting, support the vehicle with appropriate means• Do not move or dolly the vehicle while on the jack• Failure to heed instructions, safety precautions or warnings may result in personal injury and/or property damage
Safety Messages• Lift only on areas of the vehicle as specified by the vehicle manufacturer• No alterations shall be made to this product
Owner and/or Operator ResponsibilityThe owner and/or operator shall read and comprehend all instructions and warning labels for product and retain them for future reference.
OperationThe owner and/or operator shall have an understanding of the product, its operating characteristics, safety precautions and operating instructions before operating the PALD (Portable Automotive Lifting Device). Safety information shall be emphasized and understood. If the operator is not fluent in English, the product instructions and safety recommendations shall be read to and discussed with the operator in the operator's native language by the purchaser/owner or his designee, making sure that the operator comprehends their contents.
WARNING
4
PREPARATION BEFORE USE
During shipment or handling, air can become trapped in the hydraulic system of the jack, potentially causing the jack to malfunction.
To purge air from the hydraulic system:1. Turn release valve counterclockwise with handle no more than two full turns.2. Slowly loosen oil fill plug.3. Pump jack handle quickly several times using full strokes.4. Repeat above steps as needed. Remember to retighten oil fill plug.
IMPORTANT: DO NOT LOAD JACK BEYOND ITS RATED CAPACITY. NEVER MOVE THE JACK WHILE IT IS SUPPORTING A LOAD.
PACKAGE CONTENTS
QTY
AB
12
Jack
Pumping Handles
IMPORTANT: The release valve is to be used only to open and close the hydraulic system. Under no circumstances is it to be used as a point of temporary connection between the handle and jack for the purpose of pushing and/or pulling the jack. This action can and will damage the release valve and cause the unit to fail.
3
ITEM #0011191, 0011177, 0011099, 0010359
Français p. 10
Español p. 19
BOTTLE JACK
Item #0011099 Shown
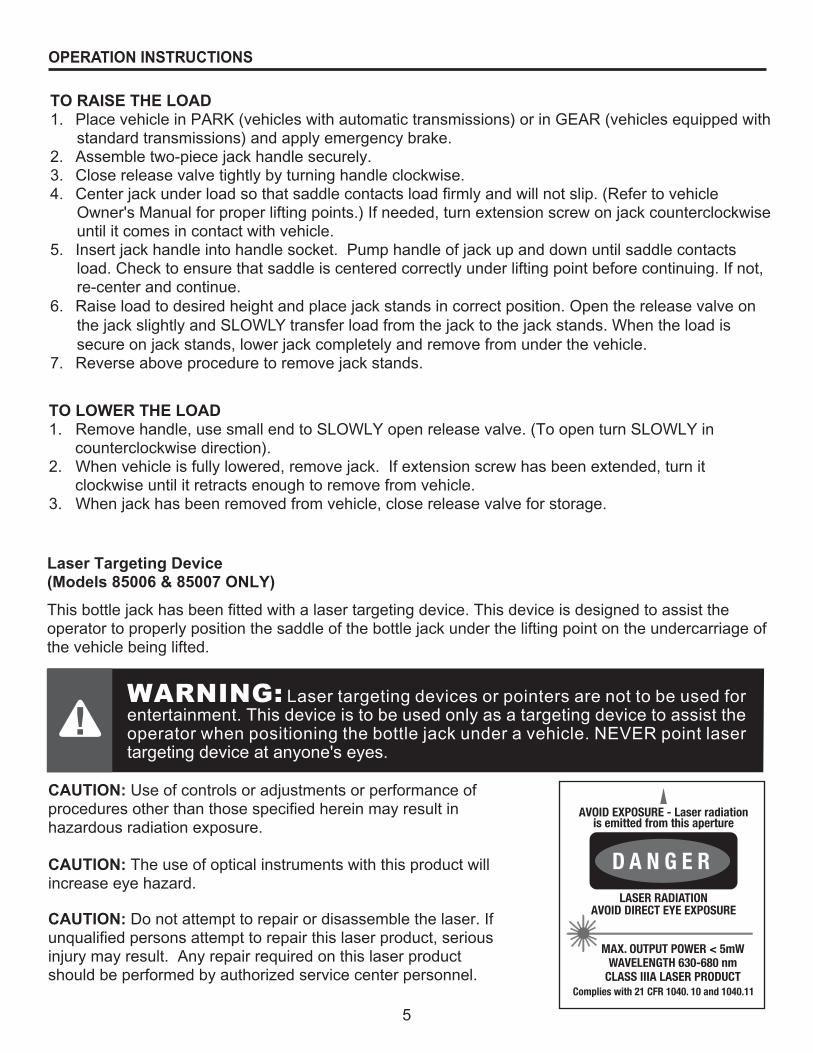
Laser Targeting Device (Models 85006 & 85007 ONLY)
This bottle jack has been fitted with a laser targeting device. This device is designed to assist the operator to properly position the saddle of the bottle jack under the lifting point on the undercarriage of the vehicle being lifted.
Laser Targeting Device (coninued) (Models 85006 & 85007 ONLY)
WARNING: Laser targeting devices or pointers are not to be used for entertainment. This device is to be used only as a targeting device to assist the operator when positioning the bottle jack under a vehicle. NEVER point laser targeting device at anyone's eyes.
1. To turn laser targeting device "ON", using index finger, push down on rubber retainer cap (A) located in center of jack's saddle.
2. Position bottle jack under vehicle to be lifted.3. A target will be projected onto the undercarriage
of vehicle.4. To turn laser targeting device "OFF", using index
finger, push down on rubber retainer cap located in the center of jack's saddle.
9Printed in China
REPLACEMENT PARTS LIST
For replacement parts, please call customer service at 1-888-3KOBALT, 8 a.m.- 8 p.m., EST, Monday-Friday.
ATTACH YOUR RECEIPT HERE
Serial Number Purchase Date
Questions, problems, missing parts? Before returning to your retailer, call our customer service department at 1-888-3KOBALT, 8 a.m.- 8 p.m., EST, Monday-Friday.
Before using this product, make sure all parts are present. Compare parts with package contents list. If any part is missing or damaged, do not attempt to use the product. Contact customer service.
*NOTE: Item Numbers H & I shown above are applicable to Models 85006 & 85007 ONLY.
DESCRIPTION
DESCRIPTION
QTYPART
PART
ABCDEFG
HI
JKLM
Cast BaseRelease ValvePiston HousingHandle ReceptacleSaddleJack HousingPumping Handles 2T Jack - P/N 87007 6T Jack - P/N 87009 12T Jack - P/N 87011 20T Jack - P/N 87014Laser Module*Rubber Retainer CapLaser Assembly P/N 87013 (H, I)Handle SystemLifting Handle Lifting Handle ScrewRubber Base 2T Jack - P/N 87008 6T Jack - P/N 87010 12T Jack - P/N 87012 20T Jack - P/N 87015
1111112
11
1121
TROUBLESHOOTING
PROBLEM POSSIBLE CAUSE CORRECTIVE ACTION
1. Air in hydraulic system2. Release valve stuck
Jack will not lower completely
1. Purge air from hydraulic system*2. Transfer weight load and clean valve
Jack will not hold load weight Release valve in open position Close release valve tightly
Jack will not lift tofull height
1. Oil level low2. Air in hydraulic system
1. Fill to recommended level2. Purge air from hydraulic system*
Poor jack lifting1. Air in hydraulic system2. Dirty oil3. Release valve not completely closed
1. Purge air from hydraulic system*2. Change oil. Use SAE 5W3. Close release valve tightly
Jack will not lift load
* For purging air, see the instructions described under “PREPARATION BEFORE USE” on page 4.
1. Excessive weight
2. Release valve in open position
3. Oil level low
1. Decrease weight or change to higher capacity jack2. Turn valve clockwise and tighten3. Fill to recommended level
WARRANTY
7
CARE AND MAINTENANCE
OIL LEVEL:
IMPORTANT: When adding or replacing oil, always use a good grade of hydraulic jack oil, transmission oil or turbine oil. Always avoid mixing different types of oil. Never use brake fluid, alcohol, glycerin, detergent motor oil or dirty oil of any kind. Improper oil usage will cause serious internal damage to jack.
ADDING OIL: With ram fully lowered and jack on level ground, remove oil fill plug. Add oil if level is more than 1/4 in. below fill hole. Replace oil fill plug and cover plate after filling.
REPLACING OIL: For best performance and longest life, oil should be replaced at least once every year. To drain oil, remove cover plate, oil filler plug and release valve. Be VERY CAREFUL to not allow dirt or any foreign matter into the system.
LUBRICATION: Put grease into fitting on base using a grease gun and lubricate lifting arm spindle with oil every 3 months.
RUST PREVENTION: Clean jack assembly. Wipe the piston ram and pump piston with an oily cloth every 3 months. When not in use, always leave the saddle and pump piston in the completely down position.
MaintenanceThe PALD (Portable Automotive Lifting Device) shall be maintained in accordance with the product's instructions.1. When jack is not in use, lifting arm should be in full down position.2. Always keep jack clean and keep the screws and bearings well lubricated with a light-weight oil.3. Keep moving parts clean; lubricate moving parts every 3 months.
Inspection1. Visual inspection shall be made before each use of the PALD (Portable Automotive Lifting Device)
by checking for abnormal conditions, such as cracked welds, leaks, and damaged, loose, or missing parts.
2. Other inspections shall be made per product operating instructions.3. Each PALD shall be inspected immediately if the device is believed to have been subjected to an
abnormal load or shock. It is recommended that this inspection be made by a manufacturer's or supplier's authorized repair facility.
4. Owners and/or operators should be aware that repairs to this equipment may require specialized knowledge and facilities. It is recommended that an annual inspection of the PALD be made by a manufacturer's or supplier's authorized repair facility and that any defective parts, decals, or safety labels or signs be replaced with manufacturer's or supplier's specified parts. A list of authorized repair facilities is available from the manufacturer or supplier.
Damaged EquipmentAny PALD (Portable Automotive Lifting Device) that appears to be damaged in any way, is found to be worn or operates abnormally SHALL BE REMOVED FROM SERVICE UNTIL REPAIRED. It is recommended that necessary repairs be made by a manufacturer's or supplier's authorized repair facility if repairs are permitted by the manufacturer or supplier.
Attachments and AdaptorsOnly attachments and/or adaptors supplied by the manufacturer shall be used.
The K & Design® is a registered trademark of LF, LLC. All Rights Reserved.
1-Year Hassle-Free Guarantee. You should never have a problem with your Kobalt tools. However, if you do, return the item to the place of purchase for a free replacement. No questions asked. For more information, call 1-888-3KOBALT, 8 a.m. - 8 p.m., EST, Monday - Friday.
1
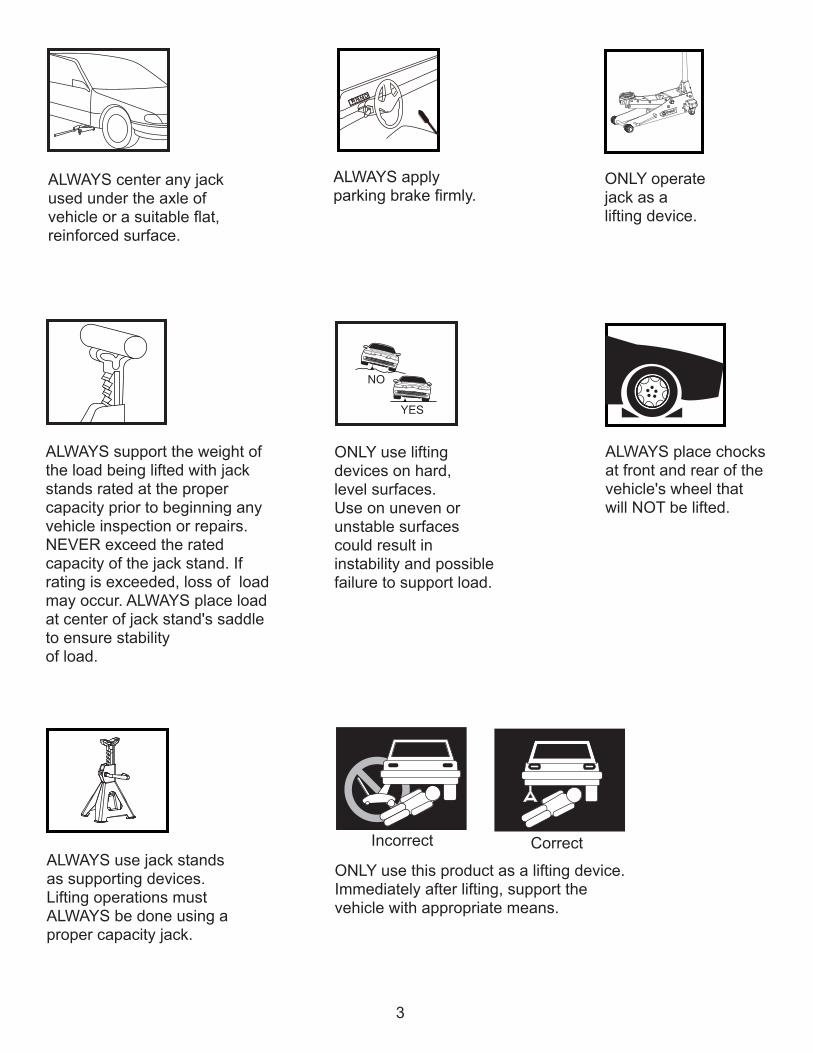
ONLY use this product as a lifting device. Immediately after lifting, support the vehicle with appropriate means.
CorrectIncorrect
ALWAYS place chocks at front and rear of the vehicle's wheel that will NOT be lifted.
ONLY operate jack as a lifting device.
ALWAYS applyparking brake firmly.
P R N D
REMOVE/INSTALL BATTERIES IN LASER MODULE (Use LR41 Button Battery, 3ea.)1. Remove the rubber retainer cap (A) by pulling upward.2. Remove the laser module (B) from the saddle.3. While holding body of laser module (B), twist
and pull the end cap assembly (C) and remove the old batteries from inside the body.
NOTE: When removing the batteries and installing the new ones, note the orientation of the battery cells and make sure to install the new cells in the same manner.
4. Reinstall the end cap assembly (C) by firmly pushing onto the laser module (B) untilfully seated.
5. Replace laser module back into the receptacle in the saddle with switch end (D) down and the lens cover facing up.
6. Replace the rubber retainer cap.
ALWAYS use jack stands as supporting devices. Lifting operations must ALWAYS be done using a proper capacity jack.
ONLY use lifting devices on hard, level surfaces. Use on uneven or unstable surfaces could result in instability and possible failure to support load.
ALWAYS center any jack used under the axle of vehicle or a suitable flat, reinforced surface.
ALWAYS support the weight of the load being lifted with jack stands rated at the proper capacity prior to beginning any vehicle inspection or repairs. NEVER exceed the rated capacity of the jack stand. If rating is exceeded, loss of load may occur. ALWAYS place load at center of jack stand's saddle to ensure stability of load.
YES
NO
A
B
B
CD
A
CAUTION: Use of controls or adjustments or performance of procedures other than those specified herein may result in hazardous radiation exposure.
CAUTION: The use of optical instruments with this product will increase eye hazard.
CAUTION: Do not attempt to repair or disassemble the laser. If unqualified persons attempt to repair this laser product, serious injury may result. Any repair required on this laser product should be performed by authorized service center personnel.
LASER RADIATIONAVOID DIRECT EYE EXPOSURE
AVOID EXPOSURE - Laser radiationis emitted from this aperture
MAX. OUTPUT POWER < 5mWWAVELENGTH 630-680 nm
CLASS IIIA LASER PRODUCTComplies with 21 CFR 1040. 10 and 1040.11
D A N G E R
MODEL # CAPACITY 85004 2 Tons/4,000 Lbs 85005 6 Tons/12,000 Lbs 85006 12 Tons/24,000 Lbs with Laser 85007 20 Tons/40,000 Lbs with Laser
LIFT RANGE (Including the height ofthe extension screw)7-1/8 in. - 13-9/16 in.8-1/2 in. - 16-1/4 in.9-1/2 in. - 18-7/16 in.9-1/2 in. - 17 in.
E
F
D
C
A
B
J
HG
L
K
I
M
6
5
8
OPERATION INSTRUCTIONS
TO RAISE THE LOAD1. Place vehicle in PARK (vehicles with automatic transmissions) or in GEAR (vehicles equipped with
standard transmissions) and apply emergency brake.2. Assemble two-piece jack handle securely.3. Close release valve tightly by turning handle clockwise.4. Center jack under load so that saddle contacts load firmly and will not slip. (Refer to vehicle
Owner's Manual for proper lifting points.) If needed, turn extension screw on jack counterclockwise until it comes in contact with vehicle.
5. Insert jack handle into handle socket. Pump handle of jack up and down until saddle contacts load. Check to ensure that saddle is centered correctly under lifting point before continuing. If not, re-center and continue.
6. Raise load to desired height and place jack stands in correct position. Open the release valve on the jack slightly and SLOWLY transfer load from the jack to the jack stands. When the load is secure on jack stands, lower jack completely and remove from under the vehicle.
7. Reverse above procedure to remove jack stands.
TO LOWER THE LOAD1. Remove handle, use small end to SLOWLY open release valve. (To open turn SLOWLY in
counterclockwise direction).2. When vehicle is fully lowered, remove jack. If extension screw has been extended, turn it
clockwise until it retracts enough to remove from vehicle.3. When jack has been removed from vehicle, close release valve for storage.
2
TABLE OF CONTENTS
Safety Information .............................................................................................................................. 2
Package Contents .............................................................................................................................. 4
Preparation Before Use...................................................................................................................... 4
Operation Instructions ........................................................................................................................ 5
Care and Maintenance ....................................................................................................................... 7
Troubleshooting.................................................................................................................................. 8
Warranty ............................................................................................................................................. 8
Replacement Parts List ...................................................................................................................... 9
SAFETY INFORMATION
Before using this product, read this manual and follow all Safety Rules and Operational Instructions.
Safety Markings• Study, understand, and follow all instructions, safety precautions and warnings before operating this device• Do not exceed rated capacity• Use only on hard, level surfaces• Use this product as a lifting device only. Immediately after lifting, support the vehicle with appropriate means• Do not move or dolly the vehicle while on the jack• Failure to heed instructions, safety precautions or warnings may result in personal injury and/or property damage
Safety Messages• Lift only on areas of the vehicle as specified by the vehicle manufacturer• No alterations shall be made to this product
Owner and/or Operator ResponsibilityThe owner and/or operator shall read and comprehend all instructions and warning labels for product and retain them for future reference.
OperationThe owner and/or operator shall have an understanding of the product, its operating characteristics, safety precautions and operating instructions before operating the PALD (Portable Automotive Lifting Device). Safety information shall be emphasized and understood. If the operator is not fluent in English, the product instructions and safety recommendations shall be read to and discussed with the operator in the operator's native language by the purchaser/owner or his designee, making sure that the operator comprehends their contents.
WARNING
4
PREPARATION BEFORE USE
During shipment or handling, air can become trapped in the hydraulic system of the jack, potentially causing the jack to malfunction.
To purge air from the hydraulic system:1. Turn release valve counterclockwise with handle no more than two full turns.2. Slowly loosen oil fill plug.3. Pump jack handle quickly several times using full strokes.4. Repeat above steps as needed. Remember to retighten oil fill plug.
IMPORTANT: DO NOT LOAD JACK BEYOND ITS RATED CAPACITY. NEVER MOVE THE JACK WHILE IT IS SUPPORTING A LOAD.
PACKAGE CONTENTS
QTY
AB
12
Jack
Pumping Handles
IMPORTANT: The release valve is to be used only to open and close the hydraulic system. Under no circumstances is it to be used as a point of temporary connection between the handle and jack for the purpose of pushing and/or pulling the jack. This action can and will damage the release valve and cause the unit to fail.
3
ITEM #0011191, 0011177, 0011099, 0010359
Français p. 10
Español p. 19
BOTTLE JACK
Item #0011099 Shown
Laser Targeting Device (Models 85006 & 85007 ONLY)
This bottle jack has been fitted with a laser targeting device. This device is designed to assist the operator to properly position the saddle of the bottle jack under the lifting point on the undercarriage of the vehicle being lifted.
Laser Targeting Device (coninued) (Models 85006 & 85007 ONLY)
WARNING: Laser targeting devices or pointers are not to be used for entertainment. This device is to be used only as a targeting device to assist the operator when positioning the bottle jack under a vehicle. NEVER point laser targeting device at anyone's eyes.
1. To turn laser targeting device "ON", using index finger, push down on rubber retainer cap (A) located in center of jack's saddle.
2. Position bottle jack under vehicle to be lifted.3. A target will be projected onto the undercarriage
of vehicle.4. To turn laser targeting device "OFF", using index
finger, push down on rubber retainer cap located in the center of jack's saddle.
9Printed in China
REPLACEMENT PARTS LIST
For replacement parts, please call customer service at 1-888-3KOBALT, 8 a.m.- 8 p.m., EST, Monday-Friday.
ATTACH YOUR RECEIPT HERE
Serial Number Purchase Date
Questions, problems, missing parts? Before returning to your retailer, call our customer service department at 1-888-3KOBALT, 8 a.m.- 8 p.m., EST, Monday-Friday.
Before using this product, make sure all parts are present. Compare parts with package contents list. If any part is missing or damaged, do not attempt to use the product. Contact customer service.
*NOTE: Item Numbers H & I shown above are applicable to Models 85006 & 85007 ONLY.
DESCRIPTION
DESCRIPTION
QTYPART
PART
ABCDEFG
HI
JKLM
Cast BaseRelease ValvePiston HousingHandle ReceptacleSaddleJack HousingPumping Handles 2T Jack - P/N 87007 6T Jack - P/N 87009 12T Jack - P/N 87011 20T Jack - P/N 87014Laser Module*Rubber Retainer CapLaser Assembly P/N 87013 (H, I)Handle SystemLifting Handle Lifting Handle ScrewRubber Base 2T Jack - P/N 87008 6T Jack - P/N 87010 12T Jack - P/N 87012 20T Jack - P/N 87015
1111112
11
1121
TROUBLESHOOTING
PROBLEM POSSIBLE CAUSE CORRECTIVE ACTION
1. Air in hydraulic system2. Release valve stuck
Jack will not lower completely
1. Purge air from hydraulic system*2. Transfer weight load and clean valve
Jack will not hold load weight Release valve in open position Close release valve tightly
Jack will not lift tofull height
1. Oil level low2. Air in hydraulic system
1. Fill to recommended level2. Purge air from hydraulic system*
Poor jack lifting1. Air in hydraulic system2. Dirty oil3. Release valve not completely closed
1. Purge air from hydraulic system*2. Change oil. Use SAE 5W3. Close release valve tightly
Jack will not lift load
* For purging air, see the instructions described under “PREPARATION BEFORE USE” on page 4.
1. Excessive weight
2. Release valve in open position
3. Oil level low
1. Decrease weight or change to higher capacity jack2. Turn valve clockwise and tighten3. Fill to recommended level
WARRANTY
7
CARE AND MAINTENANCE
OIL LEVEL:
IMPORTANT: When adding or replacing oil, always use a good grade of hydraulic jack oil, transmission oil or turbine oil. Always avoid mixing different types of oil. Never use brake fluid, alcohol, glycerin, detergent motor oil or dirty oil of any kind. Improper oil usage will cause serious internal damage to jack.
ADDING OIL: With ram fully lowered and jack on level ground, remove oil fill plug. Add oil if level is more than 1/4 in. below fill hole. Replace oil fill plug and cover plate after filling.
REPLACING OIL: For best performance and longest life, oil should be replaced at least once every year. To drain oil, remove cover plate, oil filler plug and release valve. Be VERY CAREFUL to not allow dirt or any foreign matter into the system.
LUBRICATION: Put grease into fitting on base using a grease gun and lubricate lifting arm spindle with oil every 3 months.
RUST PREVENTION: Clean jack assembly. Wipe the piston ram and pump piston with an oily cloth every 3 months. When not in use, always leave the saddle and pump piston in the completely down position.
MaintenanceThe PALD (Portable Automotive Lifting Device) shall be maintained in accordance with the product's instructions.1. When jack is not in use, lifting arm should be in full down position.2. Always keep jack clean and keep the screws and bearings well lubricated with a light-weight oil.3. Keep moving parts clean; lubricate moving parts every 3 months.
Inspection1. Visual inspection shall be made before each use of the PALD (Portable Automotive Lifting Device)
by checking for abnormal conditions, such as cracked welds, leaks, and damaged, loose, or missing parts.
2. Other inspections shall be made per product operating instructions.3. Each PALD shall be inspected immediately if the device is believed to have been subjected to an
abnormal load or shock. It is recommended that this inspection be made by a manufacturer's or supplier's authorized repair facility.
4. Owners and/or operators should be aware that repairs to this equipment may require specialized knowledge and facilities. It is recommended that an annual inspection of the PALD be made by a manufacturer's or supplier's authorized repair facility and that any defective parts, decals, or safety labels or signs be replaced with manufacturer's or supplier's specified parts. A list of authorized repair facilities is available from the manufacturer or supplier.
Damaged EquipmentAny PALD (Portable Automotive Lifting Device) that appears to be damaged in any way, is found to be worn or operates abnormally SHALL BE REMOVED FROM SERVICE UNTIL REPAIRED. It is recommended that necessary repairs be made by a manufacturer's or supplier's authorized repair facility if repairs are permitted by the manufacturer or supplier.
Attachments and AdaptorsOnly attachments and/or adaptors supplied by the manufacturer shall be used.
The K & Design® is a registered trademark of LF, LLC. All Rights Reserved.
1-Year Hassle-Free Guarantee. You should never have a problem with your Kobalt tools. However, if you do, return the item to the place of purchase for a free replacement. No questions asked. For more information, call 1-888-3KOBALT, 8 a.m. - 8 p.m., EST, Monday - Friday.
1
ONLY use this product as a lifting device. Immediately after lifting, support the vehicle with appropriate means.
CorrectIncorrect
ALWAYS place chocks at front and rear of the vehicle's wheel that will NOT be lifted.
ONLY operate jack as a lifting device.
ALWAYS applyparking brake firmly.
P R N D
REMOVE/INSTALL BATTERIES IN LASER MODULE (Use LR41 Button Battery, 3ea.)1. Remove the rubber retainer cap (A) by pulling upward.2. Remove the laser module (B) from the saddle.3. While holding body of laser module (B), twist
and pull the end cap assembly (C) and remove the old batteries from inside the body.
NOTE: When removing the batteries and installing the new ones, note the orientation of the battery cells and make sure to install the new cells in the same manner.
4. Reinstall the end cap assembly (C) by firmly pushing onto the laser module (B) untilfully seated.
5. Replace laser module back into the receptacle in the saddle with switch end (D) down and the lens cover facing up.
6. Replace the rubber retainer cap.
ALWAYS use jack stands as supporting devices. Lifting operations must ALWAYS be done using a proper capacity jack.
ONLY use lifting devices on hard, level surfaces. Use on uneven or unstable surfaces could result in instability and possible failure to support load.
ALWAYS center any jack used under the axle of vehicle or a suitable flat, reinforced surface.
ALWAYS support the weight of the load being lifted with jack stands rated at the proper capacity prior to beginning any vehicle inspection or repairs. NEVER exceed the rated capacity of the jack stand. If rating is exceeded, loss of load may occur. ALWAYS place load at center of jack stand's saddle to ensure stability of load.
YES
NO
A
B
B
CD
A
CAUTION: Use of controls or adjustments or performance of procedures other than those specified herein may result in hazardous radiation exposure.
CAUTION: The use of optical instruments with this product will increase eye hazard.
CAUTION: Do not attempt to repair or disassemble the laser. If unqualified persons attempt to repair this laser product, serious injury may result. Any repair required on this laser product should be performed by authorized service center personnel.
LASER RADIATIONAVOID DIRECT EYE EXPOSURE
AVOID EXPOSURE - Laser radiationis emitted from this aperture
MAX. OUTPUT POWER < 5mWWAVELENGTH 630-680 nm
CLASS IIIA LASER PRODUCTComplies with 21 CFR 1040. 10 and 1040.11
D A N G E R
MODEL # CAPACITY 85004 2 Tons/4,000 Lbs 85005 6 Tons/12,000 Lbs 85006 12 Tons/24,000 Lbs with Laser 85007 20 Tons/40,000 Lbs with Laser
LIFT RANGE (Including the height ofthe extension screw)7-1/8 in. - 13-9/16 in.8-1/2 in. - 16-1/4 in.9-1/2 in. - 18-7/16 in.9-1/2 in. - 17 in.
E
F
D
C
A
B
J
HG
L
K
I
M
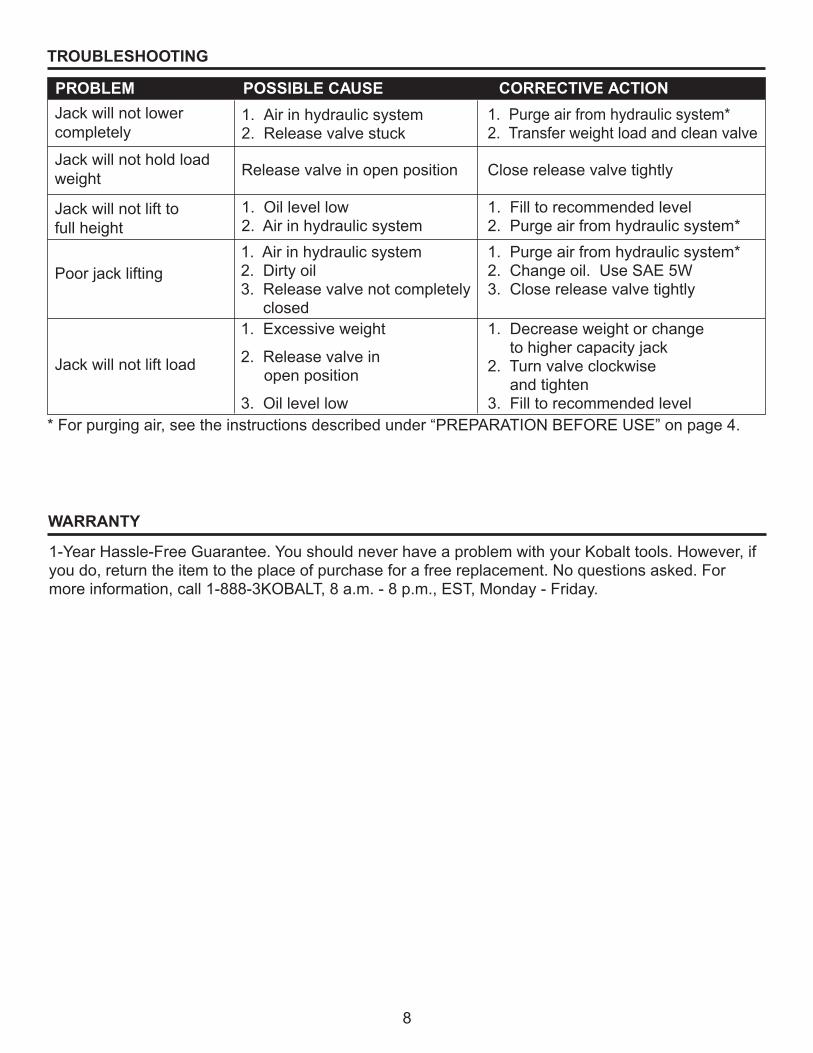
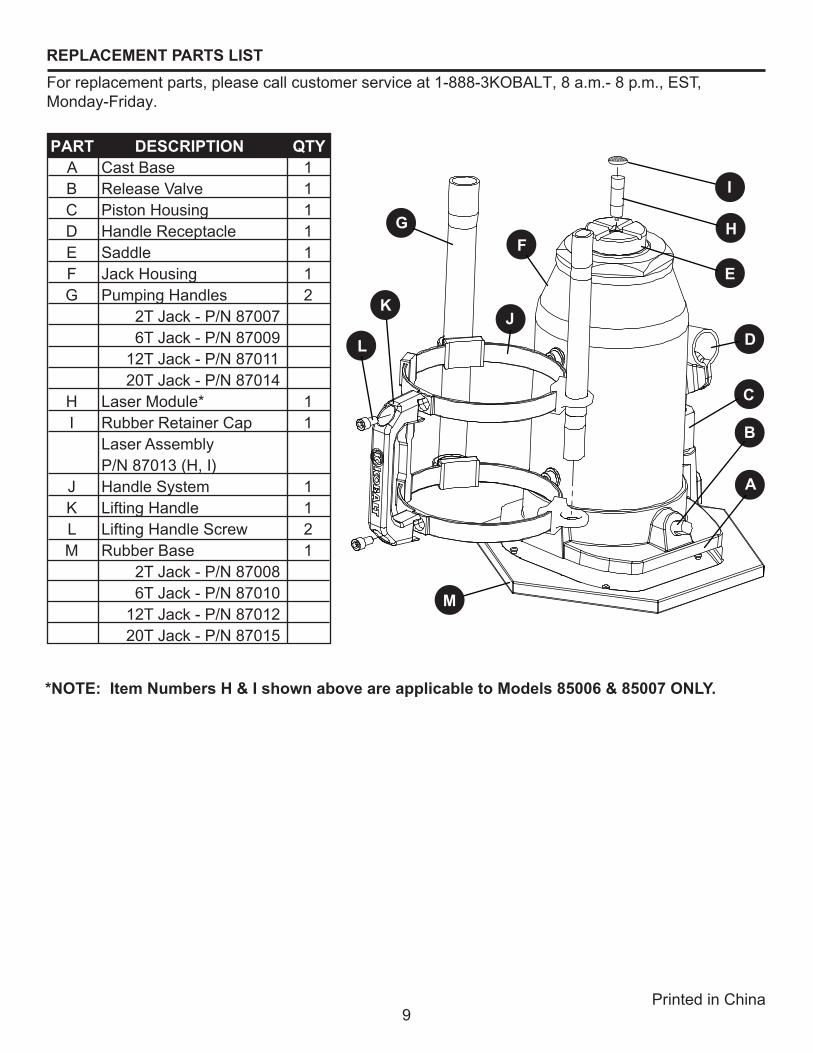