98 durango dashboard removal instructions
TRANSCRIPT

5/14/2018 98 Durango Dashboard Removal Instructions - slidepdf.com
http://slidepdf.com/reader/full/98-durango-dashboard-removal-instructions 1/5
AlC-HEA TER . SYSTEM
Selected Block1998 Dodge Durango
For eries #1 auto repair shopCopyright © 1998 MitcheHRepair Information Company, LLC
Thursday, February 12, 2009 02:56PM
IN STRUMENT PANE L
Removal & Installation1 ) D is ab le a ir bag system . S ee A IR B AG R E ST R AIN T S YS TE Marticle. Place front wheels in straight-ahead position. Remove sill
trim from both doorways. Remove k . i c k . panel covers from both sides of
vehicle. Remove mounting screws for hood release handle.
2) Remove steering column trim panel and support bracket.
Remove tilt steering column lever (if equipped). Remove upper and
lower shrouds from steering column. Unplug driver's side air bag
module. Loosen multi-functjon switch wiring harness connector screw
and disconnect from switch. Screw will remain in connector.
3) Disconnect PRNDL cable. Disconnect shift cable from
steering column. Remove steering coupler lock pin. Remove toe plate
retaining screws. Remove steering column mounting bolts and remove
steering column from vehicle.4) Remove screw from bulkhead wiring harness connector and
disconnect. Disconnect 2 body wiring harness connectors located next
to bulkhead connector. Disconnect 3 wiring harness connectors located
nearest to dash panel from junction block. Disconnect brake light
switch connector. Disconnect Rear Wheel Anti-Lock (RWAL) brake module
(if equipped), located near steering column support brackets.
5) Disconnect plastic retainer clip from parking brake
linkage rod, located at back of parking brake release handle. Remove
rod end from parking brake handle. Remove instrument panel center
support bracket. Unplug vacuum harness connector located at left end
of AlC-heater housing. Disconnect Air Bag Control Module (ACM)
connector.
6) Remove glove box. Reach through glove box opening and
disconnect antenna coaxial cable connector. Disconnect blower motor
connector located above glove box opening, near support brace for AlC-heater housing. Disconnect radio ground strap ..Loosen instrument panel
roll down bracket bolts about 2 turns, located at lower comers on
both sides of instrument panel. Remove 5 screws across top of dash
panel at base of windshield, removing center screw last.
7) Roll down instrument panel and jnstall a temporary support
hook that is about 18 inches in length. lnstall hook from center hole
in instrument panel to center hole of dash panel. Pull lower
instrument panel outward until both roll down bracket bolts are in
slotted roll down position. Instrument panel should now be supported
and away from firewall.8) Disconnect 2 door harness connectors, located on a bracket
near right end of instrument panel. Disconnect blower motor resistor.
Disconnect temperature control cable from NC-heater housing and
remove from housing. See Fig. 4. Disconnect demister duct flexible
hose from AlC-heater housing.
9) Ensure instrument panel is free and clear for removal.
With the aid of an assistant, remove temporary support hook. Liftinstrument panel off of roll down bracket bolts and remove from
vehicle.
10) To install, reverse removal procedure ..Ensure all wiring
and hoses are clear and not pinched. Tighten bolts and nuts to

5/14/2018 98 Durango Dashboard Removal Instructions - slidepdf.com
http://slidepdf.com/reader/full/98-durango-dashboard-removal-instructions 2/5
sp ec ific atio n. S ee TORQUE SPECIF ICAT IONS . E na ble air b ag sy stem. S ee
A IR B AG R ESTR AIN T SYSTEM artic le.
,'.1
", .". . .. ,
it ~
:0{i
, ' " ~It
\ . ,,
\ '. ~'l t 'l.., . .
fs ~ ~ . . ' , .o iI ~ 4; •. .
\I I,t
~ , .~ ,~ i'
f ' ! < ",,~
t-,
f : ,•
II' , .~,
, . ' ' ""t ~' ~f •
.&j , , . ,
A le-H EATER SYSTEMSele cted B lo ck (p . 2)199
5/14/2018 98 Durango Dashboard Removal Instructions - slidepdf.com
http://slidepdf.com/reader/full/98-durango-dashboard-removal-instructions 3/5
A lC -HEA TER SYSTEM
Sele cte d B lo c k1998 Dodge Durango
For erics #1 auto repair shopCopyright © 19 98 M itch ell R ep air In fo rm atio n C om pa ny , L LC
Thursday, February 12, 2009 02:55PM
AlC~HEATER ASSEMBLY
Removal (Front)
1) Disconnect negative battery cable. Drain cooling system.
Discharge AlC system, using approved refrigerant recovery/recycling
equipment. Disconnect refrigerant lines from evaporator and plug or
cover all openings in Ale system. Remove instrument panel. See
INSTRUMENT PANEL.
2) In engine compartment, disconnect heater hoses. Remove 4
AlC-heater assembly nuts from engine compartment firewall. Inside
vehicle, remove AlC-heater assembly support brace screw, and swing
support brace out of way. Move passenger seat rearward.
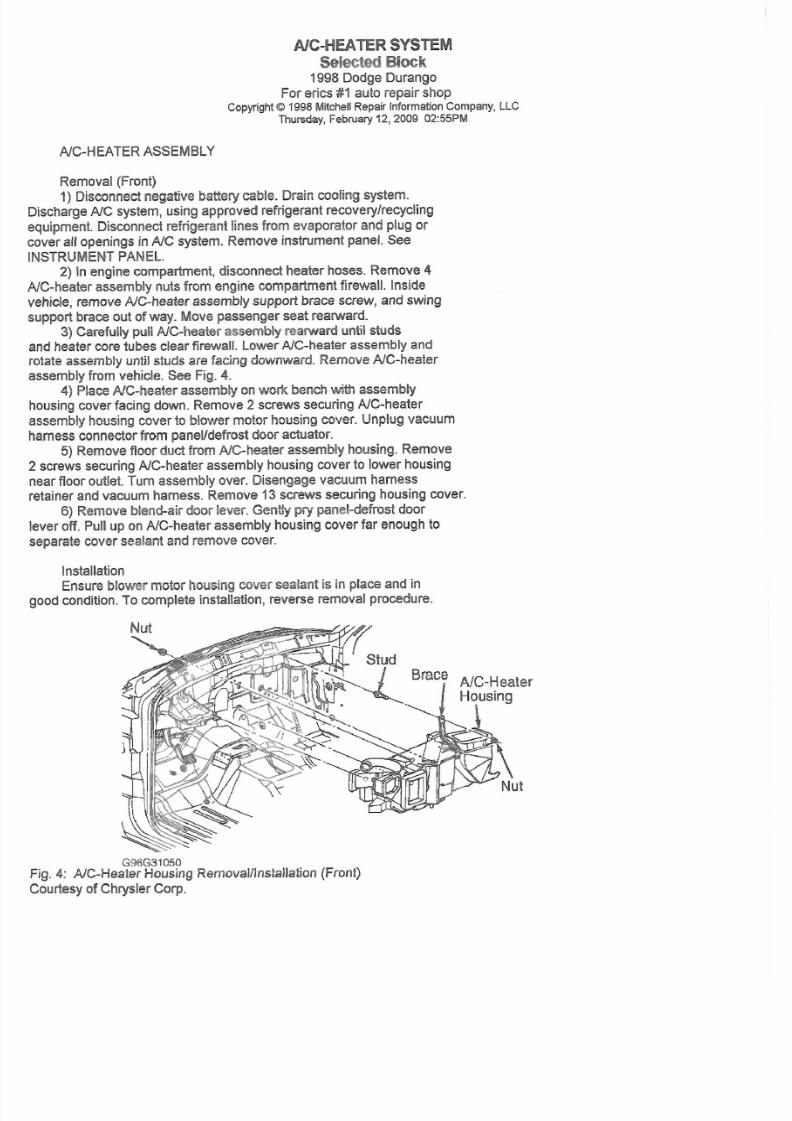
3) Carefully pull AlC-heater assembly rearward until studs
and heater core tubes clear firewall. Lower AlC-heaterassembly and
rotate assembly until studs are facing downward. Remove AlC-heater
assembly from vehicle. See Fig. 4.4) Place AlC-heater assembly on work bench with assembly
housing cover facing down. Remove 2 screws securing Ale-heater
assembly housing cover to blower motor housing cover. Unplug vacuum
harness connector from panel/defrost door actuator.
5) Remove floor duct from AlC-heater assembly housing. Remove
2 screws securing AlC-heater assembly housing cover to lower housing
near floor outlet. Tum assembly over. Disengage vacuum harness
retainer and vacuum harness. Remove 13 screws securing housing cover.
6) Remove blend-air door lever. Gently pry panel-defrost door
lever off. Pull up on AlC-heater assembly housing cover far enough to
separate cover sealant and remove cover.
Installation
Ensure blower motor housing cover sealant is in place and in
good condition. To complete installation, reverse removal procedure.
NC-HeaterHousing
~
Nut
G96G31050Fjg. 4: NC-Heater Housjng Removal/lnstallatjon (Front)
Courtesy of Chrysler Corp.
5/14/2018 98 Durango Dashboard Removal Instructions - slidepdf.com
http://slidepdf.com/reader/full/98-durango-dashboard-removal-instructions 4/5
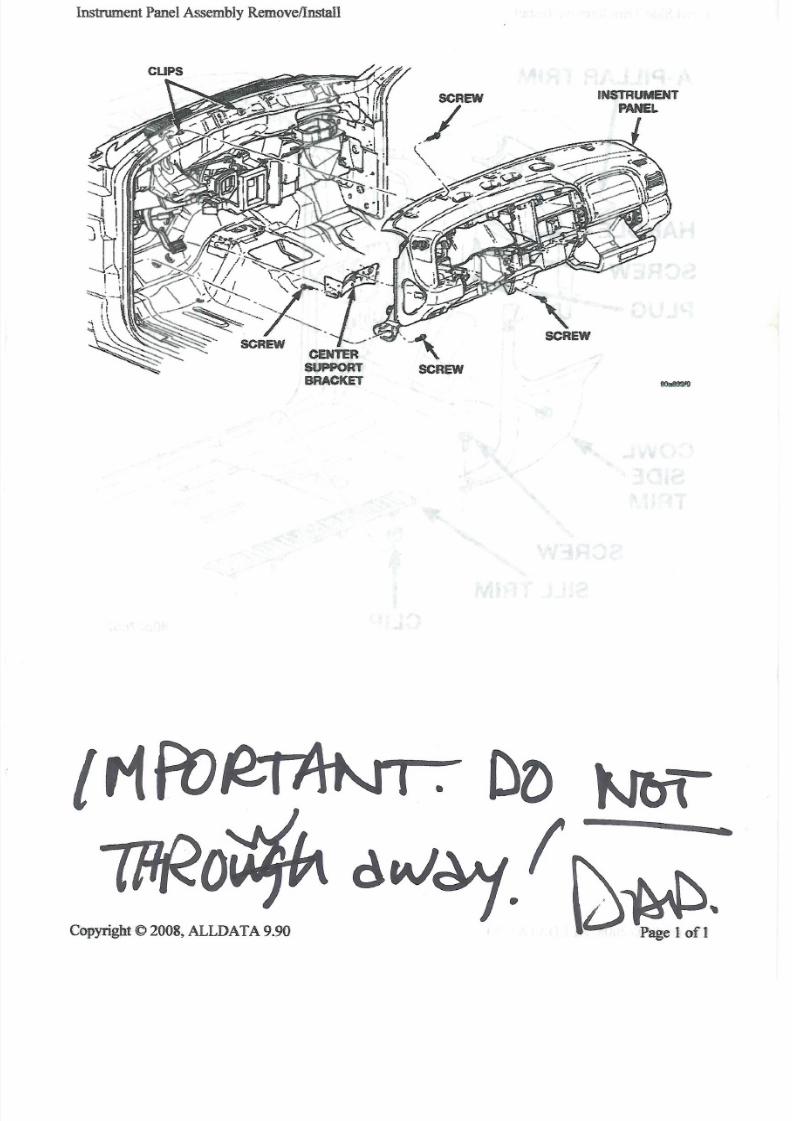
Instrument Panel Assembly Removellnstall
SCREW
SCREW
•
Copyright © 2008, ALLDATA 9.90

5/14/2018 98 Durango Dashboard Removal Instructions - slidepdf.com
http://slidepdf.com/reader/full/98-durango-dashboard-removal-instructions 5/5
Ro ll-Down Br acke t
ROLL- DOWNBRACKET
ROLL-DOWN
SLOT
~ - - - - . . , . ... ' - - . - . .
-
.j.
Copyright e 2 008, A LLD AT A 9.90 Page 1 of 1