91.204.201 computing iv chapter three: imgproc module image processing xinwen fu
TRANSCRIPT

91.204.201 Computing IV
Chapter Three: imgproc moduleImage Processing
Xinwen Fu

CS@UML
References Application Development in Visual Studio Reading assignment: Chapter 3
An online OpenCV Quick Guide with nice examples
By Dr. Xinwen Fu 2

Matrix Algebra Basics
Introduction

CS@UML
Matrix
A
a11 ,, a1n
a21 ,, a2n
am1 ,, amn
Aij
A matrix is any doubly subscripted array of elements arranged in rows and columns.

CS@UML
Row Vector
[1 × n] matrix
jn aaaaA ,, 2,1

CS@UML
Column Vector
i
m
a
a
a
a
A 2
1
[m × 1] matrix

CS@UML
Square Matrix
B
5 4 7
3 6 1
2 1 3
Same number of rows and columns

CS@UML
Transpose Matrix
A'
a11 a21 ,, am1
a12 a22 ,, am 2
a1n a2n ,, amn
Rows become columns and columns become rows

CS@UML
Matrix Addition and Subtraction
A new matrix C may be defined as the additive combination of matrices A and B where: C = A + B is defined by:
Cij Aij Bij
Note: all three matrices are of the same dimension

CS@UML
Addition
A a11 a12
a21 a22
B b11 b12
b21 b22
C a11 b11 a12 b12
a21 b21 a 22 b22
If
and
then

CS@UML
Matrix Addition Example
A B 3 4
5 6
1 2
3 4
4 6
8 10
C

CS@UML
Matrix Subtraction
C = A - BIs defined by
Cij Aij Bij

CS@UML
If A is an m × n matrix and s is a scalar, let kA denote the matrix obtained by multiplying every element of A by k.
This procedure is called scalar multiplication.
310
221A
930
663
331303
2323133A
Scalar Multiplication

CS@UML
Matrix Multiplication
Matrices A and B have these dimensions:
[r x c] and [s x d]

CS@UML
Matrix Multiplication
Matrices A and B can be multiplied if:
[r x c] and [s x d]
c = s

CS@UML
Matrix Multiplication
The resulting matrix will have the dimensions:
[r x c] and [s x d]
r x d

CS@UML
Computation: A x B = C
A a11 a12
a21 a22
B b11 b12 b13
b21 b22 b23
232213212222122121221121
2312131122121211 21121111
babababababa
babababababaC
[2 x 2]
[2 x 3]
[2 x 3]

CS@UML
Computation: A x B = C
A
2 3
1 1
1 0
and B
1 1 1
1 0 2
[3 x 2] [2 x 3]A and B can be
multiplied
1 1 1
3 1 2
8 2 5
12*01*1 10*01*1 11*01*1
32*11*1 10*11*1 21*11*1
82*31*2 20*31*2 51*31*2
C
[3 x 3]

CS@UML
Computation: A x B = C
1 1 1
3 1 2
8 2 5
12*01*1 10*01*1 11*01*1
32*11*1 10*11*1 21*11*1
82*31*2 20*31*2 51*31*2
C
A
2 3
1 1
1 0
and B
1 1 1
1 0 2
[3 x 2] [2 x 3]
[3 x 3]
Result is 3 x 3

CS@UML
Outline
By Dr. Xinwen Fu 20
3.15 Affine Transformations
3.16 Histogram Equalization
3.17 Histogram Calculation
3.18 Histogram Comparison
3.19 Back Projection
3.20 Template Matching
3.21 Finding contours in your image
3.22 Convex Hull
3.23 Creating Bounding boxes and circles for contours
3.24 Creating Bounding rotated boxes and ellipses for contours
3.25 Image Moments
3.26 Point Polygon Test

CS@UML
What is an Affine Transformation? It is any transformation that can be expressed in
the form of a matrix multiplication (linear transformation) followed by a vector addition (translation).
We can use an Affine Transformation to express: Rotations (linear transformation) Translations (vector addition) Scale operations (linear transformation)
In essence, an Affine Transformation represents a relation between two images.
By Dr. Xinwen Fu 21

CS@UML
Represent an Affine Transform The usual way to
represent an Affine Transform is by using a matrix.
Considering that we want to transform a 2D vector by using A and B, we can do it equivalently with:
By Dr. Xinwen Fu 22
or

CS@UML
How do we get an Affine Transformation?
We mentioned that an Affine Transformation is basically a relation between two images.
The information about this relation can come, roughly, in two ways:a. We know both X and T and we also know that they
are related. Then our job is to find M
b. We know M and X. To obtain T we only need to apply T = M.X. Our information for M may be explicit (i.e. have the 2-by-3 matrix) or it can come as a geometric relation between points.
By Dr. Xinwen Fu 23
CS@UML
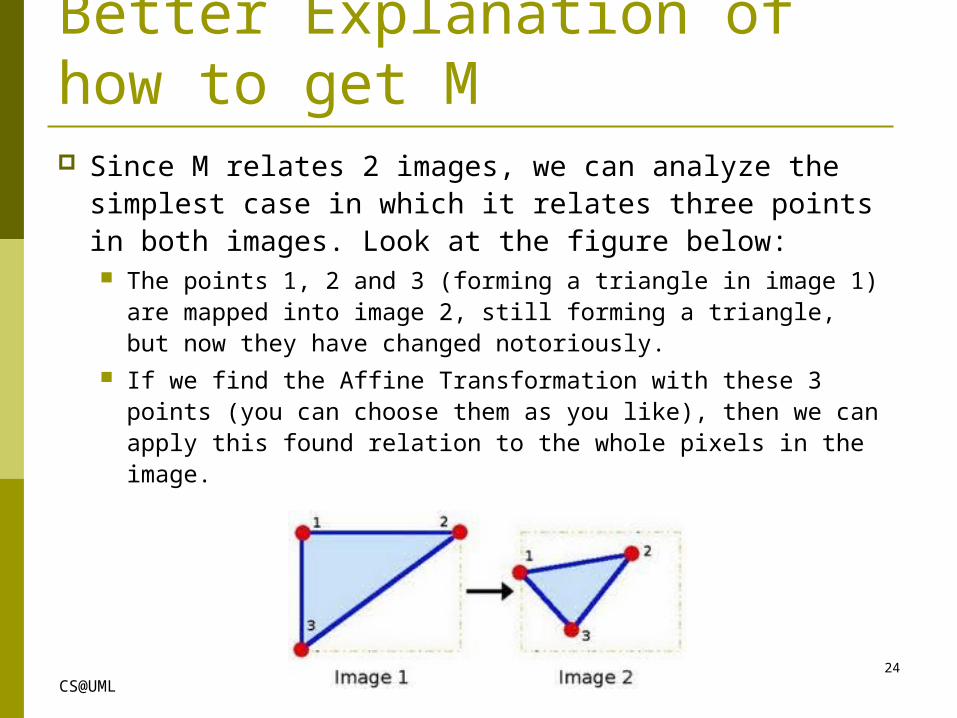
Better Explanation of how to get M Since M relates 2 images, we can analyze the
simplest case in which it relates three points in both images. Look at the figure below: The points 1, 2 and 3 (forming a triangle in image 1)
are mapped into image 2, still forming a triangle, but now they have changed notoriously.
If we find the Affine Transformation with these 3 points (you can choose them as you like), then we can apply this found relation to the whole pixels in the image.
By Dr. Xinwen Fu 24
CS@UML
Example Code Loads an image Applies an Affine Transform to the image.
This Transform is obtained from the relation between three points. We use the function warpAffine for that purpose.
Applies a Rotation to the image after being transformed. This rotation is with respect to the image center
Waits until the user exits the program
By Dr. Xinwen Fu 25

CS@UML
Outline
By Dr. Xinwen Fu 26
3.15 Affine Transformations
3.16 Histogram Equalization
3.17 Histogram Calculation
3.18 Histogram Comparison
3.19 Back Projection
3.20 Template Matching
3.21 Finding contours in your image
3.22 Convex Hull
3.23 Creating Bounding boxes and circles for contours
3.24 Creating Bounding rotated boxes and ellipses for contours
3.25 Image Moments
3.26 Point Polygon Test

CS@UML
What is an Image Histogram? It is a graphical representation of the
intensity distribution of an image. It quantifies the number of pixels for each
intensity value considered.
By Dr. Xinwen Fu 27

CS@UML
What is Histogram Equalization? It is a method that improves the contrast in an image, in order to
stretch out the intensity range. From the image above, you can see that the pixels seem clustered
around the middle of the available range of intensities. What Histogram Equalization does is to stretch out this range.
Take a look at the figure below: The green circles indicate the under-populated intensities. After applying the equalization, we get an histogram like the figure in the center. The resulting image is shown in the picture at right.
By Dr. Xinwen Fu 28

CS@UML
How does it work? Equalization implies mapping one distribution (the
given histogram) to another distribution (a wider and more uniform distribution of intensity values) so the intensity values are spread over the whole range.
To accomplish the equalization effect, the remapping should be the cumulative distribution function (cdf)
For the histogram H(i), its cumulative distribution H’(i) is:
By Dr. Xinwen Fu 29

CS@UML
How does it work? To use this as a remapping
function, we have to normalize H’(i) such that the maximum value is 255 ( or the maximum value for the intensity of the image ). From the example above, the cumulative function is: H’(i) = (L-1) H’(i) = 255 H’(i)
Finally, we use a simple remapping procedure to obtain the intensity values of the equalized image:
By Dr. Xinwen Fu 30

CS@UML
Example Code Loads an image Convert the original image to grayscale Equalize the Histogram by using the
OpenCV function EqualizeHist Display the source and equalized images
in a window.
By Dr. Xinwen Fu 31

CS@UML
Outline
By Dr. Xinwen Fu 32
3.15 Affine Transformations
3.16 Histogram Equalization
3.17 Histogram Calculation
3.18 Histogram Comparison
3.19 Back Projection
3.20 Template Matching
3.21 Finding contours in your image
3.22 Convex Hull
3.23 Creating Bounding boxes and circles for contours
3.24 Creating Bounding rotated boxes and ellipses for contours
3.25 Image Moments
3.26 Point Polygon Test

CS@UML
What are histograms? Histograms are collected
counts of data organized into a set of predefined bins
data can be intensity values and can also be whatever feature you find useful to describe your image.
Let’s see an example. Imagine that a Matrix contains information of an image (i.e. intensity in the range ):
By Dr. Xinwen Fu 33

CS@UMLBy Dr. Xinwen Fu
Counting the data Since we know that the range of information value for
this case is 256 values, we can segment our range in subparts (called bins) like:
Keep count of the number of pixels that fall in the range of each bin. For the example above we get the image below ( axis x
represents the bins and axis y the number of pixels in each of them).
34

CS@UML
Histogram Above is an example of histogram.
An histogram can keep count color intensities, and whatever image features to measure (i.e. gradients, directions, etc).
Let’s identify some parts of the histogram: dims: The number of parameters you want to collect data of. In
our example, dims = 1 because we are only counting the intensity values of each pixel (in a greyscale image).
bins: the number of subdivisions in each dim. In our example, bins = 16
range: The limits for the values to be measured. In this case: range = [0,255]
What if you want to count two features? In this case your resulting histogram would be a 3D plot (in which x and y would be binx and biny for each feature and z would be the number of counts for each combination of (binx, biny). The same would apply for more features.
By Dr. Xinwen Fu 35

CS@UML
Histogram in OpenCV For simple purposes, OpenCV implements
the function calcHist, which calculates the histogram of a set of arrays (usually images or image planes).
It can operate with up to 32 dimensions.
By Dr. Xinwen Fu 36

CS@UML
Example Code Loads an image Splits the image into its R, G and B planes
using the function split Calculate the Histogram of each 1-channel
plane by calling the function calcHist Plot the three histograms in a window
By Dr. Xinwen Fu 37

CS@UML
Outline
By Dr. Xinwen Fu 38
3.15 Affine Transformations
3.16 Histogram Equalization
3.17 Histogram Calculation
3.18 Histogram Comparison
3.19 Back Projection
3.20 Template Matching
3.21 Finding contours in your image
3.22 Convex Hull
3.23 Creating Bounding boxes and circles for contours
3.24 Creating Bounding rotated boxes and ellipses for contours
3.25 Image Moments
3.26 Point Polygon Test

CS@UML
Theory To compare two histograms (H1 and H2), first we
have to choose a metric ( d(H1, H2) ) to express how well both histograms match.
OpenCV implements the function compareHist to perform a comparison. It also offers 4 different metrics to compute the matching: Correlation ( CV_COMP_CORREL )
Where
and N is the total number of histogram bins.
By Dr. Xinwen Fu 39

CS@UML
More Metrics Chi-Square ( CV_COMP_CHISQR )
Intersection ( method=CV_COMP_INTERSECT )
Bhattacharyya distance ( CV_COMP_BHATTACHARYYA )
By Dr. Xinwen Fu 40

CS@UML
Example Code Loads a base image and 2 test images to be compared
with it. Generate 1 image that is the lower half of the base
image Convert the images to HSV format Calculate the H-S histogram for all the images and
normalize them in order to compare them. Compare the histogram of the base image with
respect to the 2 test histograms, the histogram of the lower half base image and with the same base image histogram.
Display the numerical matching parameters obtained.
By Dr. Xinwen Fu 41

CS@UML
Outline
By Dr. Xinwen Fu 42
3.15 Affine Transformations
3.16 Histogram Equalization
3.17 Histogram Calculation
3.18 Histogram Comparison
3.19 Back Projection
3.20 Template Matching
3.21 Finding contours in your image
3.22 Convex Hull
3.23 Creating Bounding boxes and circles for contours
3.24 Creating Bounding rotated boxes and ellipses for contours
3.25 Image Moments
3.26 Point Polygon Test

CS@UML
What is Back Projection? Back Projection is a way of recording how well the
pixels of a given image fit the distribution of pixels in a histogram model.
To make it simpler: For Back Projection, you calculate the histogram model of a feature and then use it to find this feature in an image.
Application example: If you have a histogram of flesh color (say, a Hue-Saturation histogram ), then you can use it to find flesh color areas in an image:
By Dr. Xinwen Fu 43

CS@UML
How does it work? We explain this by using the skin example: Let’s say you have gotten a skin histogram (Hue-
Saturation) based on the image below. The histogram besides is going to be our model histogram
(which we know represents a sample of skin tonality). You applied some mask to capture only the histogram of
the skin area:
By Dr. Xinwen Fu 44

CS@UML
Test Image Now, let’s imagine that you get another
hand image (Test Image) like the one below: (with its respective histogram):
By Dr. Xinwen Fu 45

CS@UML
Back Projection
By Dr. Xinwen Fu 46
Use our model histogram (that we know represents a skin tonality) to detect skin areas in our Test Image.
Here are the steps In each pixel of our Test Image (i.e. p(i, j)), collect the data
and find the correspondent bin location for that pixel (i.e. (hi,j, si,j)).
Lookup the model histogram in the correspondent bin - (hi,j, si,j) - and read the bin value.
Store this bin value in a new image (BackProjection). Also, you may consider to normalize the model histogram first, so the output for the Test Image can be visible for you.
Applying the steps above, we get the following BackProjection image for our Test Image:
CS@UML
What it means? In terms of statistics, the values stored in
BackProjection represent the probability that a pixel in Test Image belongs to a skin area, based on the model histogram that we use.
For instance in our Test image, the brighter areas are more probable to be skin area (as they actually are), whereas the darker areas have less probability (notice that these “dark” areas belong to surfaces that have some shadow on it, which in turns affects the detection).
By Dr. Xinwen Fu 47

CS@UML
Example Code Loads an image Convert the original to HSV format and separate
only Hue channel to be used for the Histogram (using the OpenCV function mixChannels)
Let the user to enter the number of bins to be used in the calculation of the histogram.
Calculate the histogram (and update it if the bins change) and the backprojection of the same image.
Display the backprojection and the histogram in windows.
By Dr. Xinwen Fu 48
CS@UML
Outline
By Dr. Xinwen Fu 49
3.15 Affine Transformations
3.16 Histogram Equalization
3.17 Histogram Calculation
3.18 Histogram Comparison
3.19 Back Projection
3.20 Template Matching
3.21 Finding contours in your image
3.22 Convex Hull
3.23 Creating Bounding boxes and circles for contours
3.24 Creating Bounding rotated boxes and ellipses for contours
3.25 Image Moments
3.26 Point Polygon Test

CS@UML
What is template matching? Template matching is a technique for
finding areas of an image that match (are similar) to a template image (patch).
By Dr. Xinwen Fu 50

CS@UML
How does it work? We need two primary components: Source image (I): The image in which we
expect to find a match to the template image Template image (T): The patch image
which will be compared to the source image Our goal is to detect the highest matching
area:
By Dr. Xinwen Fu 51

CS@UML
Sliding Strategy To identify the matching area, we have to compare the
template image against the source image by sliding it:
By sliding, we mean moving the patch one pixel at a time (left to right, up to down). At each location, a metric is calculated so it represents how “good” or “bad” the match at that location is (or how similar the patch is to that particular area of the source image).
By Dr. Xinwen Fu 52
CS@UML
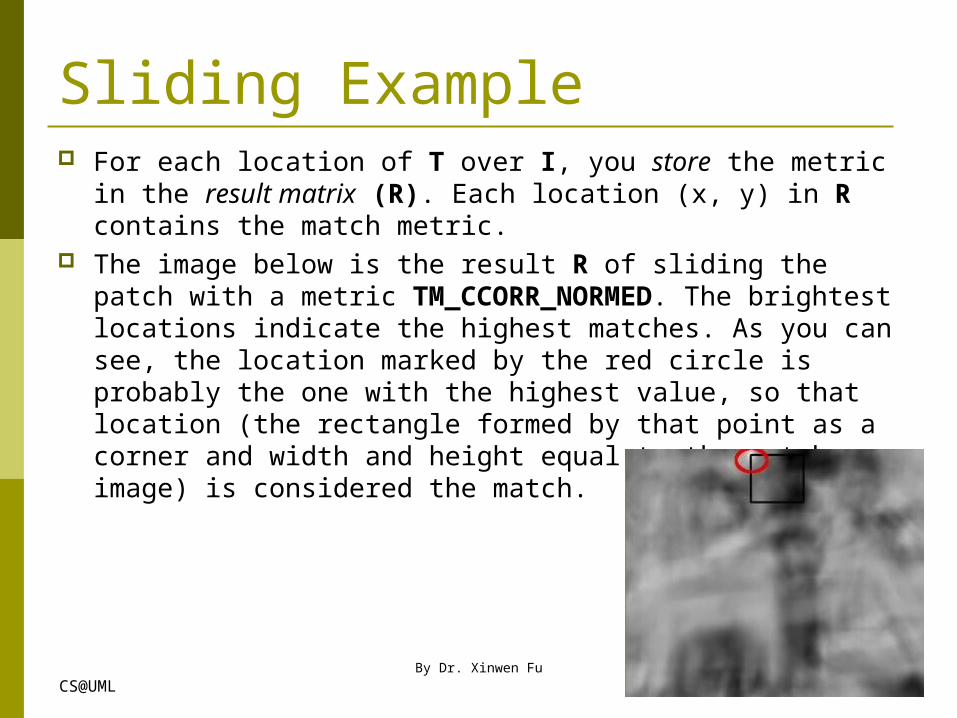
Sliding Example For each location of T over I, you store the metric in the
result matrix (R). Each location (x, y) in R contains the match metric.
The image below is the result R of sliding the patch with a metric TM_CCORR_NORMED. The brightest locations indicate the highest matches. As you can see, the location marked by the red circle is probably the one with the highest value, so that location (the rectangle formed by that point as a corner and width and height equal to the patch image) is considered the match.
By Dr. Xinwen Fu 53

CS@UML
Find the Highest Value In practice, we use the function
minMaxLoc to locate the highest value (or lower, depending of the type of matching method) in the R matrix.
By Dr. Xinwen Fu 54

CS@UML
Matching methods available in OpenCV? Good question. OpenCV implements
Template matching in the function matchTemplate.
6 available methods: method=CV_TM_SQDIFF
method=CV_TM_SQDIFF_NORMED
By Dr. Xinwen Fu 55
CS@UML
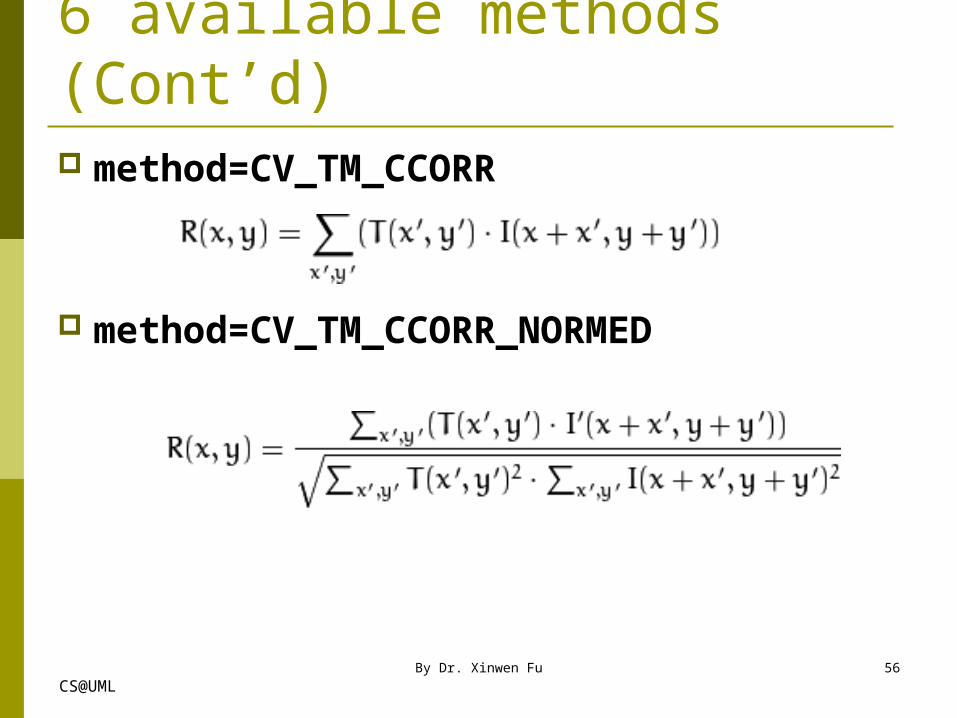
6 available methods (Cont’d) method=CV_TM_CCORR
method=CV_TM_CCORR_NORMED
By Dr. Xinwen Fu 56

CS@UML
6 available methods (Cont’d) method=CV_TM_CCOEFF
Where
method=CV_TM_CCOEFF_NORMED
By Dr. Xinwen Fu 57

CS@UML
Example Code Loads an input image and a image patch (template) Perform a template matching procedure by using the
OpenCV function matchTemplate with any of the 6 matching methods described before. The user can choose the method by entering its selection in the Trackbar.
Normalize the output of the matching procedure Localize the location with higher matching probability Draw a rectangle around the area corresponding to
the highest match
By Dr. Xinwen Fu 58

CS@UML
Outline
By Dr. Xinwen Fu 59
3.15 Affine Transformations
3.16 Histogram Equalization
3.17 Histogram Calculation
3.18 Histogram Comparison
3.19 Back Projection
3.20 Template Matching
3.21 Finding contours in your image
3.22 Convex Hull
3.23 Creating Bounding boxes and circles for contours
3.24 Creating Bounding rotated boxes and ellipses for contours
3.25 Image Moments
3.26 Point Polygon Test
CS@UML
Skipped
By Dr. Xinwen Fu 60

CS@UML
Outline
By Dr. Xinwen Fu 61
3.15 Affine Transformations
3.16 Histogram Equalization
3.17 Histogram Calculation
3.18 Histogram Comparison
3.19 Back Projection
3.20 Template Matching
3.21 Finding contours in your image
3.22 Convex Hull
3.23 Creating Bounding boxes and circles for contours
3.24 Creating Bounding rotated boxes and ellipses for contours
3.25 Image Moments
3.26 Point Polygon Test

CS@UML
Skipped
By Dr. Xinwen Fu 62

CS@UML
Outline
By Dr. Xinwen Fu 63
3.15 Affine Transformations
3.16 Histogram Equalization
3.17 Histogram Calculation
3.18 Histogram Comparison
3.19 Back Projection
3.20 Template Matching
3.21 Finding contours in your image
3.22 Convex Hull
3.23 Creating Bounding boxes and circles for contours
3.24 Creating Bounding rotated boxes and ellipses for contours
3.25 Image Moments
3.26 Point Polygon Test

CS@UML
Skipped
By Dr. Xinwen Fu 64

CS@UML
Outline
By Dr. Xinwen Fu 65
3.15 Affine Transformations
3.16 Histogram Equalization
3.17 Histogram Calculation
3.18 Histogram Comparison
3.19 Back Projection
3.20 Template Matching
3.21 Finding contours in your image
3.22 Convex Hull
3.23 Creating Bounding boxes and circles for contours
3.24 Creating Bounding rotated boxes and ellipses for contours
3.25 Image Moments
3.26 Point Polygon Test

CS@UML
Skipped
By Dr. Xinwen Fu 66

CS@UML
Outline
By Dr. Xinwen Fu 67
3.15 Affine Transformations
3.16 Histogram Equalization
3.17 Histogram Calculation
3.18 Histogram Comparison
3.19 Back Projection
3.20 Template Matching
3.21 Finding contours in your image
3.22 Convex Hull
3.23 Creating Bounding boxes and circles for contours
3.24 Creating Bounding rotated boxes and ellipses for contours
3.25 Image Moments
3.26 Point Polygon Test

CS@UML
Skipped
By Dr. Xinwen Fu 68

CS@UML
Outline
By Dr. Xinwen Fu 69
3.15 Affine Transformations
3.16 Histogram Equalization
3.17 Histogram Calculation
3.18 Histogram Comparison
3.19 Back Projection
3.20 Template Matching
3.21 Finding contours in your image
3.22 Convex Hull
3.23 Creating Bounding boxes and circles for contours
3.24 Creating Bounding rotated boxes and ellipses for contours
3.25 Image Moments
3.26 Point Polygon Test

CS@UML
Skipped
By Dr. Xinwen Fu 70