8232 dect handset - al-enterprise.com
TRANSCRIPT

8232 DECT Handset
OpenTouch™ Suite for MLE
User Manual
8AL90862USACed05 – 05/20

8232 DECT Handset
8AL90862USACed05
2 /57
This document describes the services offered by the 8232 DECT Handset connected to an OmniPCX Enterprise system. Your phone can be connected to an IBS or an IP-Dect radio base station depending on the company telephone system. Some features depend on the type of radio base station you are connected to. The main document describes features when connected to an IBS radio base station. A specific chapter is used to describe features when connected to an IP-Dect radio base station.
Operating conditions This approved DECT telephone is intended to be used with an ALE International cordless PABX. The following conditions must be respected, notably concerning the use of radioelectric frequencies:
• Changes or modifications to the equipment not expressly approved by the party responsible for compliance could void the user's authority to operate the equipment.
• To limit the risk of interference, people with pacemakers must keep the wireless telephone away from their equipment (minimum distance of 15 cm/6 inches).
• It is recommended to follow the standard acceptance procedures before using this equipment in human safety critical areas (hospitals...).
• DECT equipment can only be used to establish links between fixed points if these links are temporary.
• The conditions of access to a DECT equipment telepoint network shall be stipulated by contract with the operator of the authorized telepoint network concerned.
• Do not expose your telephone to severe conditions (rain, sea air, dust, etc.). • Switch off the telephone before changing the battery. • You must not switch on or use your telephone near gas or inflammable liquids. • The headset includes magnetic elements that may attract sharp metallic objects. • There is a danger of explosion if the battery is replaced incorrectly. Use only recommended battery:
Alcatel-Lucent 3BN67332AA (Dongguan DRN New Energy Co. Ltd. RTR001FXX - Li-ion 3.7V 1100mAh 4.1Wh).
• The mains power socket used must be close to the charger/holder and easily accessible, so that it can be used as an 'on/off' facility.
• Charge the battery for about 6 hours before initial use. • Use the following 82x2 DECT Handset charging units:
- 8232 DECT Handset Desktop charger (3BN67331AA). - 8232-8242 DECT Handset Desktop charger (3BN67331AB). - 82x2 DECT Handset Dual Charger (3BN67341AA). • With the following Power Supply Units: - 8232 DECT Handset Desktop charger PSU Europe (3BN67335AA)
TenPao (Model S005AYV0500100) – efficiency level VI (rating I/P:AC 100-240V, 0.2A; O/P: DC 5V, 1A). Friwo FW7713/XX – efficiency level V (rating I/P:AC 100-240V, 150mA; O/P: DC 5V, 1A).
- 8232 DECT Handset Desktop charger PSU WW (3BN67336AA) TenPao (Model S008ACM0500100 with UK,US,AUS plugs) – efficiency level VI (rating I/P:AC 100-240V, 0.3A; O/P:DC 5V, 1A). Friwo FW7712 - efficiency level V (rating I/P:AC 100-240V, 125mA; O/P: DC 5V, 0.9A).
• You can charge the device by connecting it to a USB 2.0 port (type A). • To prevent possible hearing damage, do not listen at high volume levels for long periods...
The labels and icons presented in this document are not contractually binding and may be modified without prior warning. The labels and icons displayed on your phone depend on the system to which you are connected and may differ from those specified in this document.

8232 DECT Handset
8AL90862USACed05
3 /57
1 Getting to know your telephone ....................................................................................... 5
1.1 Phone description 5
1.2 Status icons 7
1.3 MENU icons 8
1.4 Call icons 9
1.5 Accessing the MENU and navigating 10
2 Getting started ........................................................................................................ 11
2.1 Installing the battery in the telephone 11
2.2 Charging your telephone battery 12
2.3 Switching on your telephone 14
2.4 Switching off your telephone 14
3 Using your telephone ................................................................................................ 15
3.1 Making a call 15
3.2 Calling from your personal directory 15
3.3 Calling your caller by name (company directory) 16
3.4 Receiving a call 16
3.5 Redialing 17
3.6 Requesting automatic callback if internal number is busy 17
3.7 Sending text message if internal number is busy 17
3.8 Speaking on the loudspeaker of a busy internal contact 18
3.9 During a conversation 18
4 During a conversation ................................................................................................ 19
4.1 Make a second call 19
4.2 Receiving a second call 19
4.3 Switching between two calls (Broker call) 20
4.4 Transferring a call 20
4.5 Three-way conference with internal and/or external callers (conference) 20
4.6 Placing an outside call on hold (parking) 21
4.7 Activate/deactivate voice frequency 22
5 Sharing ................................................................................................................. 23
5.1 Answering the general bell 23
5.2 Call pick-up 23
5.3 Hunting groups 24
5.4 Sending a written message to an internal contact 25
5.5 Send a voice message copy 25
5.6 Sending a recorded message to a number or a distribution list 26
6 Keep in touch ......................................................................................................... 27
6.1 Forwarding calls to another number (immediate forward) 27
6.2 Different types of diversions / Example of diversion on busy 27
6.3 Diverting calls to your voice mailbox 28
6.4 Consulting your voice mailbox 28
6.5 Display an absence message 29
6.6 Program your associate number 29
6.7 Define an overflow number 30
6.8 Cancelling all forwards 31
6.9 Consulting text messages 31

8232 DECT Handset
8AL90862USACed05
4 /57
7 Programming your telephone ....................................................................................... 32
7.1 Identify the terminal you are on 32
7.2 Initializing your voice mailbox 32
7.3 Change your voice mailbox password 33
7.4 Adjusting the audio functions 33
7.5 Activating headset mode 34
7.6 Adjusting your telephone functions 34
7.7 Selecting language 35
7.8 Programming your personal directory 36
7.9 Modifying a record in the personal directory 36
7.10 Erase a record from the personal directory 37
7.11 Programming an appointment reminder 37
7.12 Locking your telephone 38
7.13 Modifying your personal code 39
8 Registering the telephone ........................................................................................... 40
8.1 Registering the telephone on a system for the first time 40
8.2 Registering the telephone on other systems 41
9 Using the telephone in GAP mode ................................................................................. 43
9.1 Getting to know your telephone 44
9.2 Making a call 47
9.3 Receiving a call 48
9.4 Calling from your personal directory 48
9.5 Redialing the last number dialed (redial) 48
9.6 Call log 49
9.7 Sending DTMF signals 49
9.8 Sending a calibrated cut-off 50
9.9 Programming your personal directory 50
9.10 Customizing and adjusting your telephone 51
10 Accessories .......................................................................................................... 54
10.1 Belt clip 54
10.2 Chargers 54
10.3 Power supply (optional) 55
10.4 Presentation of the battery pack 55
10.5 Headphone / external microphone 56
10.6 Cleaning your telephone 56
10.7 Transporting and protecting your telephone 56
11 Declaration of compliance ......................................................................................... 57

8232 DECT Handset
8AL90862USACed05
5 /57
1 Getting to know your telephone
1.1 Phone description
• Answer the call.
• Long press (feature depending on the
system): redial last number or access the
redial list.
• Switching between two calls (broker call).
• Switch off ringer.
• Hang up.
• Long press: switch on the phone / switch
off the phone.
• Return to previous menu.
• Erase a character.
• Delete an entire field.
• Short press: back to homepage.
• Long press: lock/unlock keypad.
• Access menu.
• Confirm.
• Navigate.
• Short press: access the company directory.
• Long press: identify the terminal you are on.
• In communication mode: activate/deactivate the mute feature. No feature is
associated with this key in idle mode.
In idle mode
• Short press: access the ringer and vibrate adjustment feature.
• Long press: activate/deactivate vibrate feature.
• In communication mode: activate/deactivate the loudspeaker.

8232 DECT Handset
8AL90862USACed05
6 /57
• Long press (features depending on the system): access to personal speed dial / access the
dtmf feature during a conversation.
• Gap mode: when you are on a call, you can initiate a second call.
Led
• Green steady: the phone is on the charger and the battery is fully charged.
• Red steady: the phone is on the charger and the battery is charging.
• Slow orange flashing: telephonic event such as unread message, missed call,
etc.
• Rapid orange flashing: incoming call.
• Red flashing: out of coverage.
• Flashing when the phone is plugged into the charger means the same as when
the phone is not plugged into the charger.
• Short press: increase the volume of ring tone during an incoming call (4 steps) or increase
volume of loudspeaker during a conversation (8 steps).
• Long press in conversation: activate/deactivate the loudspeaker.
• Short press: decrease the volume of ring tone during an incoming call (4 steps) or decrease
volume of loudspeaker during a conversation (8 steps).
• Long press: activate/deactivate the mute feature.
• 3.5 mm jack plug for headset and maintenance.
• Clip to hook your phone on your belt. You can remove the clip and instead use the cover that
is provided in the phone package.
• Usb plug for charging the battery.
• Press on this key to light up the screen when the phone is in idle state.

8232 DECT Handset
8AL90862USACed05
7 /57
1.2 Status icons
The status icons are displayed on the welcome screen and indicate the status of the telephone.
Battery charge level ( > > > ).
In charge (flashing icon).
Received messages,callback request and unanswered calls.
Call diversion activated.
Vibrate mode active.
Ringer active.
Ringer disabled.
Radio reception quality - Normal Mode.
Radio reception quality - 50 mW power.
Loudspeaker on (in conversation).
Mute on (in conversation).
Economy mode activated and used (green).
Economy mode activated (gray).
You can obtain details on the status icons from the tooltips that appear on the welcome screen
when you use the navigator:
8232 DECT Handset
8AL90862USACed05
8 /57
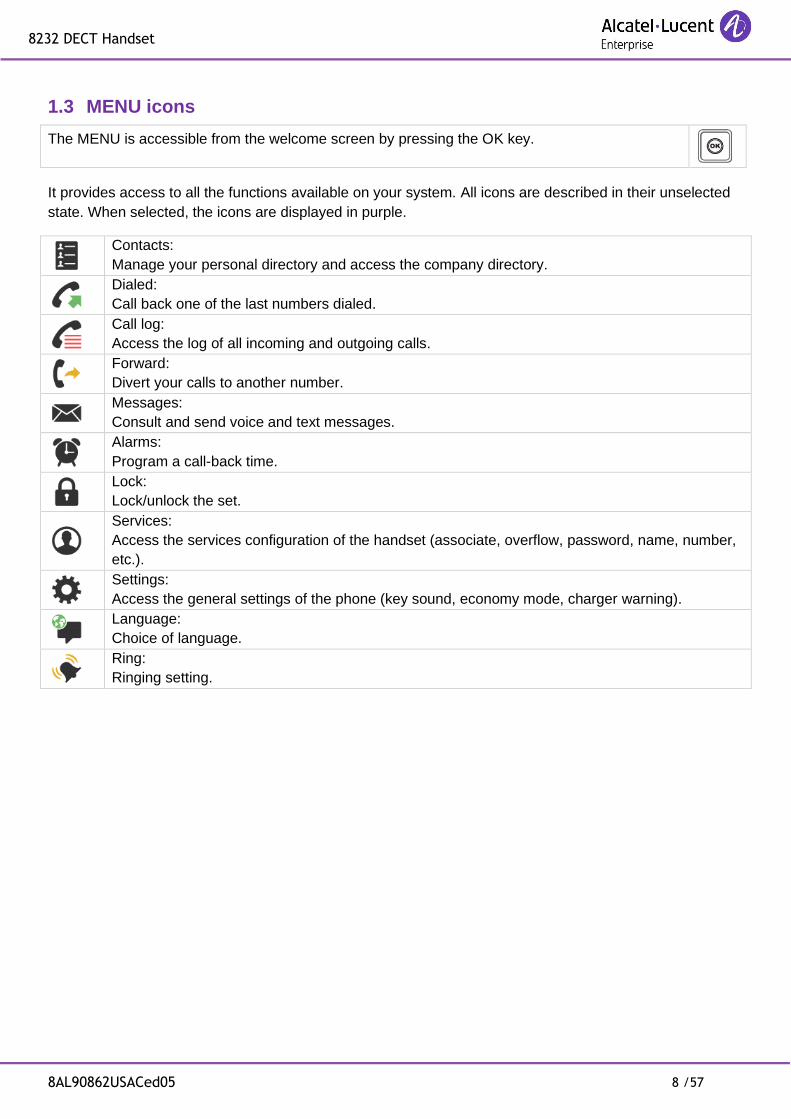
1.3 MENU icons
The MENU is accessible from the welcome screen by pressing the OK key.
It provides access to all the functions available on your system. All icons are described in their unselected
state. When selected, the icons are displayed in purple.
Contacts:
Manage your personal directory and access the company directory.
Dialed:
Call back one of the last numbers dialed.
Call log:
Access the log of all incoming and outgoing calls.
Forward:
Divert your calls to another number.
Messages:
Consult and send voice and text messages.
Alarms:
Program a call-back time.
Lock:
Lock/unlock the set.
Services:
Access the services configuration of the handset (associate, overflow, password, name, number,
etc.).
Settings:
Access the general settings of the phone (key sound, economy mode, charger warning).
Language:
Choice of language.
Ring:
Ringing setting.

8232 DECT Handset
8AL90862USACed05
9 /57
1.4 Call icons
Making a call.
Receiving a call.
Call on hold.
Sending text message if internal number is busy.
Accessing the directories.
Transferring a call.
Switching to DTMF signals.
Setting up a conference.
Forwarding your calls to your voice message service.
Parking an external communication.
Call duration and cost.
Additional options (Features depending on the system).
In the event of a multiple call, the icons have symbols (such as numbers) to distinguish between the
different callers.
Example: first call is on hold, second call is ongoing / .

8232 DECT Handset
8AL90862USACed05
10 /57
1.5 Accessing the MENU and navigating
Access the menu.
Press the Access menu key.
Select a function in the MENU.
Use the navigator keys and press the
OK key to select a function.
Navigating within a function.
You can move vertically along the
various labels within the function
Press the OK key to validate your
choice.
OR
You can move horizontally along the
various icons within the function
Press the OK key to validate your
choice.

8232 DECT Handset
8AL90862USACed05
11 /57
2 Getting started
In order to have a fully operational 8232 DECT Handset, make sure that you have the following items: the
battery, the AC/DC adapter, the power supply and the USB cable.
2.1 Installing the battery in the telephone
• Installing the battery in the telephone:
If the belt clip is installed, you must lift it up and maintain it in this position during the battery installation or replacement.
Lift up the cover.
Position the battery 'connectors ' side as shown in the drawing (A). Terminate the installation of the battery in its compartment by pressing as shown in the drawing (B).
Replace the cover.
• Removing the battery from the telephone
If the belt clip is installed, you must lift it up and maintain it in this position
during the battery installation or replacement.
Lift up the cover.
Remove the battery from its compartment as shown in the drawing.
8232 DECT Handset
8AL90862USACed05
12 /57
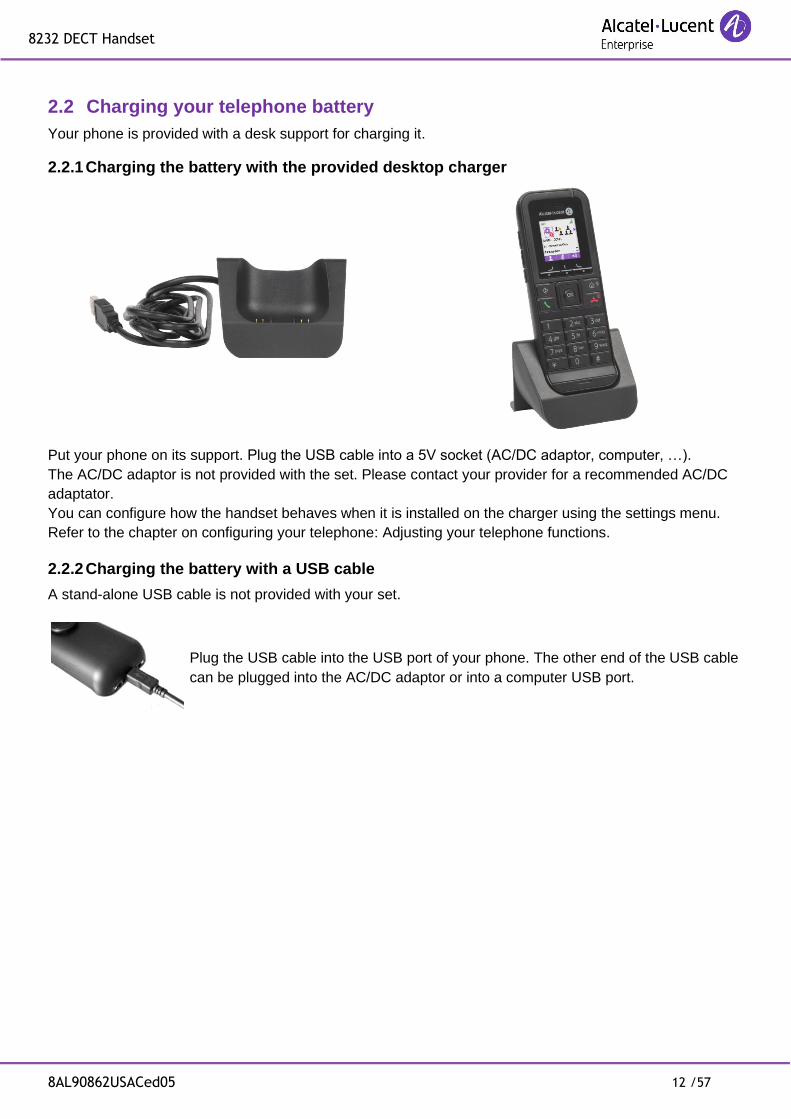
2.2 Charging your telephone battery
Your phone is provided with a desk support for charging it.
2.2.1 Charging the battery with the provided desktop charger
Put your phone on its support. Plug the USB cable into a 5V socket (AC/DC adaptor, computer, …).
The AC/DC adaptor is not provided with the set. Please contact your provider for a recommended AC/DC
adaptator.
You can configure how the handset behaves when it is installed on the charger using the settings menu.
Refer to the chapter on configuring your telephone: Adjusting your telephone functions.
2.2.2 Charging the battery with a USB cable
A stand-alone USB cable is not provided with your set.
Plug the USB cable into the USB port of your phone. The other end of the USB cable
can be plugged into the AC/DC adaptor or into a computer USB port.
8232 DECT Handset
8AL90862USACed05
13 /57
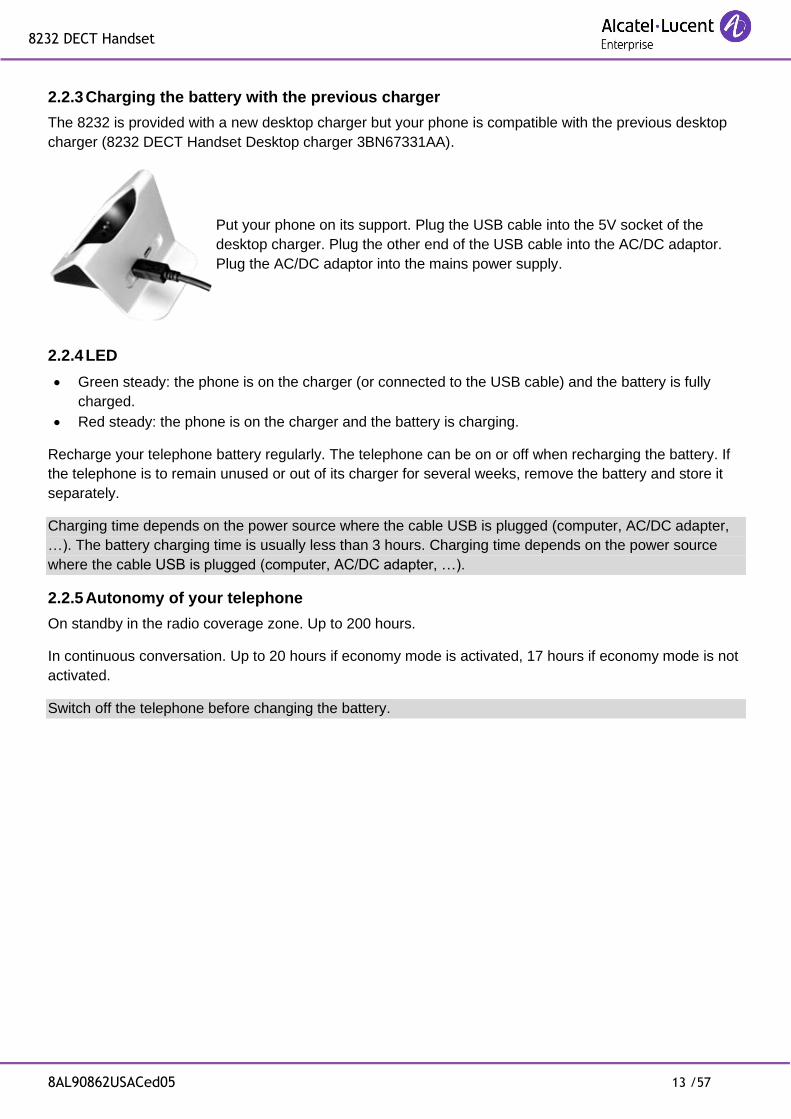
2.2.3 Charging the battery with the previous charger
The 8232 is provided with a new desktop charger but your phone is compatible with the previous desktop
charger (8232 DECT Handset Desktop charger 3BN67331AA).
Put your phone on its support. Plug the USB cable into the 5V socket of the
desktop charger. Plug the other end of the USB cable into the AC/DC adaptor.
Plug the AC/DC adaptor into the mains power supply.
2.2.4 LED
• Green steady: the phone is on the charger (or connected to the USB cable) and the battery is fully
charged.
• Red steady: the phone is on the charger and the battery is charging.
Recharge your telephone battery regularly. The telephone can be on or off when recharging the battery. If
the telephone is to remain unused or out of its charger for several weeks, remove the battery and store it
separately.
Charging time depends on the power source where the cable USB is plugged (computer, AC/DC adapter,
…). The battery charging time is usually less than 3 hours. Charging time depends on the power source
where the cable USB is plugged (computer, AC/DC adapter, …).
2.2.5 Autonomy of your telephone
On standby in the radio coverage zone. Up to 200 hours.
In continuous conversation. Up to 20 hours if economy mode is activated, 17 hours if economy mode is not
activated.
Switch off the telephone before changing the battery.

8232 DECT Handset
8AL90862USACed05
14 /57
2.3 Switching on your telephone
• Press the switch on/off key (long press).
• Your telephone is switched on.
If the display fails to light up or the battery icon is flashing, recharge the battery.
If the radio reception icon doesn't appear on the telephone display:
• Check that you're in an area covered (if you're not, move close to a radio base station).
• Check that the telephone is properly installed in the system (consult the PABX manager).
If the display indicates: 'Auto install ?', see paragraph 'Registering the telephone' or contact your installation
technician.
2.4 Switching off your telephone
• Press the switch on/off key (long press).
• Select the switch off feature.
• Your telephone is switched off.

8232 DECT Handset
8AL90862USACed05
15 /57
3 Using your telephone
3.1 Making a call
• Dial.
• Send the call.
You are in communication:
• Hang up.
To make an external call, dial the outside line access code before dialing your contact number.
3.2 Calling from your personal directory
Quick access:
• Access MENU.
(In idle state)
• Contacts
• Personal Dir
• Validate access to the 'personal directory '.
• Select the name of the person you wish to call.
• Send the call.
Quick access: .

8232 DECT Handset
8AL90862USACed05
16 /57
3.3 Calling your caller by name (company directory)
Quick access:
• Access MENU.
• Contacts
• Phone Book
• Enter the first letters of the name, name-first name or the initials of your caller.
• Apply.
• Select the type of search you want (last name, last name and first name or initials).
• Select the desired name.
• Send the call.
Name must be entered in format name / space / first name.
For fast access to this function from the home screen page, press the directory key.
3.4 Receiving a call
You are receiving a call.
or
• Answer the call
• Disabling the ringer: press the hang up key when your telephone rings: it is still possible to
answer by pressing the off hook key.
Speak.
• Hang up.
The ringer does not ring if:
- The vibrate mode is active, the vibrate mode active icon is displayed on the screen saver.
- The ringer is disabled, the ringer disabled icon is displayed on the screen saver.

8232 DECT Handset
8AL90862USACed05
17 /57
3.5 Redialing
Call back one of the last numbers dialed.
Quick access:
• Access MENU.
Long press
• Dialed
• Select the number in the list.
• Send the call.
3.6 Requesting automatic callback if internal number is busy
The telephone of the internal caller you are trying to contact is busy, and you want the person to call you
back as soon as they are free.
• Call Back.
To cancel the automatic callback request, enter the 'Cancel automatic callback' function code.
3.7 Sending text message if internal number is busy
The telephone of the internal contact you are trying to contact is busy and you want to leave them a text
message.
• Text Mail
• Select the type of message to send (Fixed Messages, Prg Messages, New Message).
• Follow information displayed on the screen.

8232 DECT Handset
8AL90862USACed05
18 /57
3.8 Speaking on the loudspeaker of a busy internal contact
In some cases, you might have to broadcast on the loudspeaker of a busy contact. This feature must be
configured by the administrator.
• LS announce
• You can talk, your contact will hear you on their loudspeaker.
3.9 During a conversation
During a call and without losing the connection, there are several ways to access the options offered by
your system, using:
• The list of icons at the top of the screen.
• The list of items at the bottom of the screen.
Call in progress.
Slot for second call (Call in progress / Call waiting).
Transfer.
Conference.
Contacts.
Voice frequency.
Additional options: Enquiry Call, Record, Park, Forbidden
service, Back.
Call duration and cost.

8232 DECT Handset
8AL90862USACed05
19 /57
4 During a conversation
4.1 Make a second call
• You are in conversation with one caller.
• Dial the number.
• Send the call.
• The first call is on hold.
Recover the call on hold:
• Hang up.
• Your telephone rings.
• Recover the call on hold.
You can also initiate another call by using the 'Enquiry call' feature.
4.2 Receiving a second call
You are in conversation and a caller is trying to contact you:
A beep is sent and the caller's name is displayed for 3 seconds.
• Answer the call.
• The first call is on hold.
Over 3 seconds, move with the navigate-left-right key to the receiving a second call icon, to see the identity
of the second caller (and off-hook if necessary).

8232 DECT Handset
8AL90862USACed05
20 /57
4.3 Switching between two calls (Broker call)
During a call, to recover the caller on hold:
• Recover the call on hold.
You can establish the identity of the waiting call without taking it by using the navigate-left-right key.
• Display the caller's identity.
• Recover the call on hold.
4.4 Transferring a call
During a conversation, to transfer the call to another number:
You are in communication with a first caller:
• Call the recipient of the transfer.
• Send the call.
You are in conversation with the destination number:
• Transfer
The two callers are connected.
After dialing the number of the recipient, you can use 'Transfer' to transfer the call directly without waiting
for the person to answer. The transfer between two external parties and the transfer action by the on-hook
key depends on the system configuration.
4.5 Three-way conference with internal and/or external callers (conference)
During a conversation, a second call is on hold:
• Conference
• You are in conference mode.
Cancel conference and return to first caller (If conference is active):
• End Conference

8232 DECT Handset
8AL90862USACed05
21 /57
After the conference, to leave your two callers talking together:
Your two callers are in conversation.
This feature needs setting up. If necessary, contact your system administrator.
Please note that the cost of the call between the parties remaining after you have left the conference will be
charged to your account.
4.6 Placing an outside call on hold (parking)
You can park an outside caller in order to take the call on another set.
You are holding an external conversation.
• Park
• Number to be called.
Your caller is parked and hears the hold melody.
If you on-hook without entering the number of a call park destination set, the call will be parked on your set.
To recover your parked call:
• Access MENU.
• Services
• Services
• Call pick up services
• Park
You are on a call.
If the parked call is not recovered within a preset time (by default 1 minute 30), it is directed to the operator.
However, this preset time can be modified by your administrator.

8232 DECT Handset
8AL90862USACed05
22 /57
4.7 Activate/deactivate voice frequency
This feature depends on the system configuration. If necessary, contact your administrator. During a call,
you sometimes have to send DTMF signals, for example, for a voice message service, an automatic
switchboard or when remotely consulting an answering machine:
• You are in conversation with one caller.
• Send MF
• To activate.
• Sending DTMF signals.
• Deactivate MF
The function is automatically cancelled when you hang up. During a conversation, you can activate and
deactivate the DTMF mode by pressing the * key (long press).

8232 DECT Handset
8AL90862USACed05
23 /57
5 Sharing
5.1 Answering the general bell
When the operator is absent, incoming external calls are diverted to a general bell. You can answer these
calls:
• Access MENU.
• Services
• Services
• Call pick up services
• Night call pick up
5.2 Call pick-up
You hear a telephone ringing in an office where no-one can answer. If authorised, you can answer the call
on your own telephone.
• Access MENU.
• Services
• Services
• Call pick up services

8232 DECT Handset
8AL90862USACed05
24 /57
If the telephone ringing is not in your pick-up group:
• Pick Up
• Dial a Number
• Enter number of ringing telephone.
• Apply.
If the telephone ringing is in your own pick-up group:
• Group call pick up
The system can be configured to prevent call pick-up on certain telephones.
5.3 Hunting groups
5.3.1 Hunting group call:
Some phone sets can be associated to form a group. You can contact any one of them by dialling the
group number.
Belonging to a group does not affect the management of direct calls. A specific telephone within a group
can always be called by using its own number.
5.3.2 Temporary exit from your hunting group: / Return into your group:
• Access MENU.
• Services
• Services
• Diverse services
• In hunting grp / Out hunting grp
• Your group number.
• Apply.

8232 DECT Handset
8AL90862USACed05
25 /57
5.4 Sending a written message to an internal contact
• Access MENU.
• Messages
• New Text Msg
• Confirm.
• Send a Message ?
• Confirm.
• Dial the number of your caller (dial, directories, last numbers dialed...).
• Confirm.
• Select the type of message to send (Fixed Messages, Prg Messages, New Message).
• Follow information displayed on the screen.
If selected message has to be completed:
• Confirm access to the message to be completed.
• Complete the message.
• Apply.
When editing a message to be completed you can use the delete key to delete any entered characters.
The browser lets you move the cursor in an input field.
5.5 Send a voice message copy
• Access MENU.
• Messages
• New voicemsg
• Confirm access to the voice mail.
• Enter your personal mailbox password.
• Confirm.
Listen to the message to send and follow the voice guide instructions.

8232 DECT Handset
8AL90862USACed05
26 /57
5.6 Sending a recorded message to a number or a distribution list
• Access MENU.
• Messages
• New voicemsg
• Confirm access to the voice mail.
• Personal code.
• Confirm.
Follow the instructions of the voice guide.

8232 DECT Handset
8AL90862USACed05
27 /57
6 Keep in touch
6.1 Forwarding calls to another number (immediate forward)
The number can be your home, mobile, voice mailbox or an internal extension (operator, etc.).
• Access MENU.
• Forward
• Confirm access to immediate diversion.
• Fwd Immediate
• Activate Fwd / Modify Fwd
• Dial the number of your caller (dial, directories, last numbers dialed...).
• Confirm.
You can continue to make calls while your telephone is diverted.
General remark concerning diversions: you can only activate a single diversion on your telephone.
Programming a new diversion will cancel the previous one.
6.2 Different types of diversions / Example of diversion on busy
6.2.1 Different types of diversions
You can initiate different types of forwarding from the call forward list.
• Access MENU.
• Forward
• Confirm access to immediate diversion.
• Select the 'List of diversions' icon.
Fwd on Busy When you are in conversation and all your lines are busy, all your calls are diverted to the defined number.
Fwd On No Rep When you are absent, all your calls are forwarded to the number of your choice (delayed forwarding on no answer).
Fwd Busy/NoRep When you are absent or already in communication (all lines are busy), all your calls are forwarded to the defined number.
Remote Forward Program the forwarding of a set from another set (immediate remote forwarding) A typical use of this feature is to program a forward from your set to another set from a third set.

8232 DECT Handset
8AL90862USACed05
28 /57
6.2.2 Example of diversion on busy
• Access MENU.
• Forward
• Confirm access to immediate diversion.
• Select the 'List of diversions' icon.
• Fwd on Busy
• Dial the number of your caller (dial, directories, last numbers dialed...).
• Confirm.
6.3 Diverting calls to your voice mailbox
• Access MENU.
• Forward
• Fwd Immediate Voice Mail
• Confirm.
6.4 Consulting your voice mailbox
When you have received a message, the Message icon is displayed on the welcome screen. The
orange LED on your telephone flashes to indicate there is a message.
• Select the message icon in the notification area.
• The number of new vocal messages is displayed in the phone notification area.
OR
• Access MENU.
• Messages

8232 DECT Handset
8AL90862USACed05
29 /57
• Voice Mail
• Confirm access to the voice mail.
• Enter your personal mailbox password.
• Confirm.
• Follow the instructions of the voice guide.
Please refer to the administrator for your password.
6.5 Display an absence message
When you are absent you can program an absence message that will be displayed on the caller's phone
when they call you.
• Access MENU.
• Forward
• Absence Msg
• Confirm.
• Select the message type between predefined messages, messages to complete and
message to create.
• Confirm.
6.6 Program your associate number
The associated number can be a phone set number, the voice mail number or the pager number. It can be
used as overflow number.
• Access MENU.
• Services
• Associate
• Apply.

8232 DECT Handset
8AL90862USACed05
30 /57
• Modify
• Dial the number of your caller (dial, directories, last numbers dialed...).
• Confirm.
6.7 Define an overflow number
When your set is not available, outside the coverage area or not working, calls to your set will be
automatically forwarded to this number if it has been defined.
• Access MENU.
• Services
• Overflow
• Apply.
• Modify
• Dial the number of your caller (dial, directories, last numbers dialed...).
• Confirm.

8232 DECT Handset
8AL90862USACed05
31 /57
6.8 Cancelling all forwards
• Access MENU.
• Forward
• Select the 'Diversion cancellation' icon.
• Deact Forward
• Confirm.
6.9 Consulting text messages
When you have received a message, the Message icon is displayed on the welcome screen.
The yellow LED on your telephone flashes to indicate there is a message.
• Select the message icon in the notification area.
• The number of new text messages is displayed.
OR
• Access MENU.
• Messages
• Text Mail
• Confirm.
• Select the desired message.
• Confirm to read it.
Read the message
• Confirm access to 'Options'.
• From the options menu, you can erase the message, callback the message sender, answer
the message or read the next message.
• The message icon disappears once the message has been read.

8232 DECT Handset
8AL90862USACed05
32 /57
7 Programming your telephone
7.1 Identify the terminal you are on
• Displays your telephone number (long press).
7.2 Initializing your voice mailbox
Before starting initialization, make sure the administrator has created a voice mailbox.
• You can use the Message icon on the welcome screen to initialize your voice mailbox.
OR
• Access MENU.
• Messages
• New msg
• Confirm access to the voice mail.
• Enter your temporary password.
• Enter your new password.
• Record your name.
• End of recording.
• Follow the instructions of the voice guide.

8232 DECT Handset
8AL90862USACed05
33 /57
7.3 Change your voice mailbox password
• Access MENU.
• Services
• Password
• Enter the old password.
• Enter the new password.
• Enter new password again to confirm.
• Apply.
Please contact your administrator for your initial voice mailbox password.
Each digit of the code is symbolized by an asterisk.
7.4 Adjusting the audio functions
You can select the ring tone for your telephone (6 choices) and adjust its volume (4 levels).
• Access MENU.
• Ring
7.4.1 Choose the tune
• Ring.Melody
• Select the melody of your choice.
• Apply.
7.4.2 Adjusting the ringer volume
• Ring.level
• Select the volume of your choice.
• Apply.
• Return to idle.

8232 DECT Handset
8AL90862USACed05
34 /57
7.4.3 You can adjust the buzzer/ringer mode according to your needs
• Press on the ringer/vibrate key.
• Off: Ringer and buzzer are deactivated.
• Ring only: Rings only.
• Vibrate then ring: The handset vibrates and then rings.
• Vibrate only: The handset vibrates and doesn 't ring.
• Vibrate and ring: The handset vibrates and rings simultaneously.
This key can be used to switch rapidly from the ringer to the vibrate mode and vice-versa.
7.5 Activating headset mode
You can use a headset with your phone. If you want the headset to ring only when receiving an incoming
call, you must activate the headset mode:
• Access MENU.
• Settings
• Headset mode
• On
When activated only the headset rings (if plugged in).
7.6 Adjusting your telephone functions
• Access MENU.
• Settings
• Select the function* you want and use the On/Off softkeys to activate or deactivate the
function.
• OR
• Select the function* you want and press the OK key to enter the function menu to configure
the function.
• Return to idle.

8232 DECT Handset
8AL90862USACed05
35 /57
* *You can activate or disable the following functions:
• Status To show Handset information such as the software version, the battery level, etc.
• Ascending ringing Activate or deactivate the ascending ringtone (Progressive ringing).
• Coverage warning To activate or deactivate Bip emission when your phone is out of DECT area
coverage.
• Keypad tone Activate or deactivate the keypad tone.
• Charger warning To activate or deactivate Bip emission when placing handset on charger.
• Low bat. warning Activate or deactivate Bip emission when low battery level is reached.
• Headset mode Activate or deactivate the headset mode. When activated only the headset rings (if
plugged in).
• Economy mode Activate or deactivate the economy mode When the economy mode is activated, the
set adjusts its radio emission power according to the distance between the set and the radio base. The
closer the set is to the radio base, the lower is the radio emission from the phone. This means that the
phone is not always emitting at full power and thus saves the battery.
• Vibrate/Ring You can adjust the buzzer/ringer mode according to your needs.
• Security Activate or deactivate a timeout to trigger the automatic keylock, change the keylock pin code
or lock the function key.
• Silent charging Deactivate ringing and/or vibrate when the phone is on its charging holder.
• Reset settings Reset the setting and go back to the default settings.
• 2s key repeat For people with a disability, increases the repeat-key delay for the dial by name feature.
• Language Choose a language other than system language.
• AGC Activate or deactivate automatic gain control to enhance the sound depending on the quality of
the audio signal.
7.7 Selecting language
• Access MENU.
• Language
• Select the language of your choice.
• Apply.
The initial language selection is made automatically by the system.

8232 DECT Handset
8AL90862USACed05
36 /57
7.8 Programming your personal directory
Your personal directory can contain up to 42 numbers.
• Access MENU.
• Contacts
• Personal Dir
• Position the cursor on an existing record.
• Apply.
• Create
• Enter the name.
• Apply.
• Enter the number.
• Apply.
To key in the name: the keys in the keypad include letters that you can display by pressing them
successively.
Example: press '8' twice to display the letter 'U'.
Press the # key to switch from lowercase letters mode to uppercase letters mode, and from uppercase
letters mode to numbering mode.
7.9 Modifying a record in the personal directory
• Access MENU.
• Contacts
• Personal Dir
• Select the record to be modified.
• Apply.
• Modify
• Modify the name (14 characters maximum).
• Apply.
• Modify the number.
• Apply.
8232 DECT Handset
8AL90862USACed05
37 /57
Press the # key to switch from lowercase letters mode to uppercase letters mode, and from uppercase
letters mode to numbering mode.Use the browser to position on the character or digit to modify.
To delete a character, briefly press the delete key. To erase a field full of characters, hold down the
erase key (long press).
7.10 Erase a record from the personal directory
• Access MENU.
• Contacts
• Personal Dir
• Select the record to erase.
• Apply.
• Delete
• Confirm.
7.11 Programming an appointment reminder
• Access MENU.
• Alarms
• Define an appointment
• Enter the time of the appointment.
• Apply.
• If the destination of the appointment reminder isn`t in your phone, dial the number of the
destination set.
• Apply.
At the programmed time, your telephone rings:
Press the On-hook key to accept the appointment.

8232 DECT Handset
8AL90862USACed05
38 /57
To cancel your appointment call-back request:
• Access MENU.
• Alarms
• Cancel an appointment
• Apply.
7.12 Locking your telephone
Locking features on your terminal (System lock)
This service enables you to prohibit outside calls and any programming changes on your telephone:
• Access MENU.
• Lock
• Apply.
Unlocking features on your terminal:
• Access MENU.
• Lock
• Apply.
• Personal code (Please refer to the administrator for your password).
• Apply.
Locking your terminal (key lock)
This service enables you to prevent your phone being used.
Long press.
Unlock your terminal:
Long press.

8232 DECT Handset
8AL90862USACed05
39 /57
7.13 Modifying your personal code
• Access MENU.
• Services
• Password
• Enter the old password (Please refer to the administrator for your password).
• Enter the new password (Twice).
• Confirm.
A weak personal code will be rejected by the system:
• Identical 4 digits (0000, 1111,).
• A simple sequence of 4 digits (0123, 1234,). Make sure you choose a strong password with at least 4 digits. The list of weak passwords provided does not contain all the possibilities.

8232 DECT Handset
8AL90862USACed05
40 /57
8 Registering the telephone
8.1 Registering the telephone on a system for the first time
For the mobile telephone to function, it must be registered on at least one ALE International or GAP system
(registration operation).If when first switched on the display indicates: 'System 1 Auto install ?' your
telephone has not been registered on any system.
• Auto install?
• Confirm.
Registration can begin.
A- If the system does not use an AC code.
• Launch subscription.
B- If the system uses an AC (authentication code).
• Register
• Enter the PIN Code (The default is 0000).
• Apply.
• Select a system (It is recommended that the first empty system is selected).
• Apply.
• Enter PARK code (enter nothing if not mandatory).
• Apply.
• Enter access code (enter nothing if not mandatory).
• Apply
• Select Power mode (You are advised not to select the 50 mW power mode unless required.
The '50mW power mode' is intended for hazardous sites such as nuclear plants where it is
requested that emissions do not exceed the maximum value.).
• Enhanced Security
• Yes / No Call from encrypted system to un-encrypted system is accepted (yes) or rejected (no).
The registration operation can last up to 2 minutes.
• If the operation has been done correctly (subscription accepted), the telephone is ready to be used and the radio reception quality icon is displayed.
• If the registration operation has not been successful, the station proposes launching the subscription again.
Utilization of the telephone in GAP mode can lead to functional limitations for which no claims will be
considered under the terms of the warranty.
During registration phase, to improve security and optimize registration in a multi-system environment, the
handset enforces a minimum signal strength level to accept to register to a base station. To achieve the
conditions, it is recommended to perform registration in a place where a base station is in direct visibility
within a 20 m range. If base station is not visible the range shall be lowered.
During registration phase in a multi-system environment, all systems are scanned without priority. The
system is selected when the signal strength is above a certain level and registration matches.

8232 DECT Handset
8AL90862USACed05
41 /57
8.2 Registering the telephone on other systems
The telephone can be registered on several systems (maximum of 4).
Note: the input is usually reserved for use with your main ALE International system. You can select the
other inputs to register the telephone under another system (ALE International or other system).
8.2.1 To make a new registration, when the telephone has already been registered on one or more systems, proceed as follows:
1. Prepare your system for registration (see the system installation manual or consult your installation
manager).
2. When the system is ready:
• Access MENU.
• Install
• Register
• Enter the PIN Code.
• Apply.
• Select a system.
• Enter PARK code (enter nothing if not mandatory).
• Apply.
• Enter access code (enter nothing if not mandatory).
• Apply
• Select Power mode.
• Enhanced Security
• Yes / No
Call from encrypted system to un-encrypted system is accepted (yes) or rejected (no)
Launch subscription.
• Return to idle.
• If the registration operation runs correctly (Subscription accepted), the telephone is ready for use, and
the radio coverage icon appears.
• If the registration operation has not been successful, the station proposes launching the subscription
again.
• Depending on the type of system concerned, registration may require one or more additional operations
on the system.
During registration phase, to improve security and optimize registration in a multi-system environment, the
handset enforces a minimum signal strength level to accept to register to a base station. To achieve the
conditions, it is recommended to perform registration in a place where a base station is in direct visibility
within a 20 m range. If base station is not visible the range shall be lowered.
During registration phase in a multi-system environment, all systems are scanned without priority. The
system is selected when the signal strength is above a certain level and registration matches.

8232 DECT Handset
8AL90862USACed05
42 /57
8.2.2 Selecting your telephone system
Your telephone can be programmed to function on 5 different DECT systems (ALE International or GAP).
• Access MENU
• Install
• Select network
• Select the desired input (the chosen option is indicated by the radio button with a central dot).
• Return to idle.
The selection is retained even after switching the telephone on/off. The selection of a specific system
(SYSTEM...) forces operation on a specific system. This selection must be changed if one wishes to
change system. Selecting 'Auto. select' enables the telephone to connect automatically when it enters a
system coverage zone. If the systems programmed in the telephone have common coverage zones, the
telephone selects the first system found.
Other

8232 DECT Handset
8AL90862USACed05
43 /57
9 Using the telephone in GAP mode
Your phone can be connected to an IBS or an IP-Dect radio base station depending on the company
telephone system. Some features depend on the type of radio base station you are connected to. Some
features such as conference are not available when connected to an IP-Dect radio base station.
Your telephone complies with the GAP standard and can be used in simplified mode on another
DECT/GAP system (other PABX or indoor relay unit).
Unless otherwise specified, the functions described below are available on your telephone in combination
with the mandatory functions provided by your fixed GAP system.
Automatic transfer between radio cells:
This telephone function enables you to move around between radio relay units, without any break in
communications. However, this facility depends on the inherent limitations of the fixed system, notably its
ability to manage several radio relays.
Display function:
When a call is made from the telephone, the digits dialed are displayed. When you receive a call, the
display indicates the caller's number or name, if this function is provided by the fixed system.
This utilisation may involve functional restrictions outside the coverage of our guarantee.
8232 DECT Handset
8AL90862USACed05
44 /57
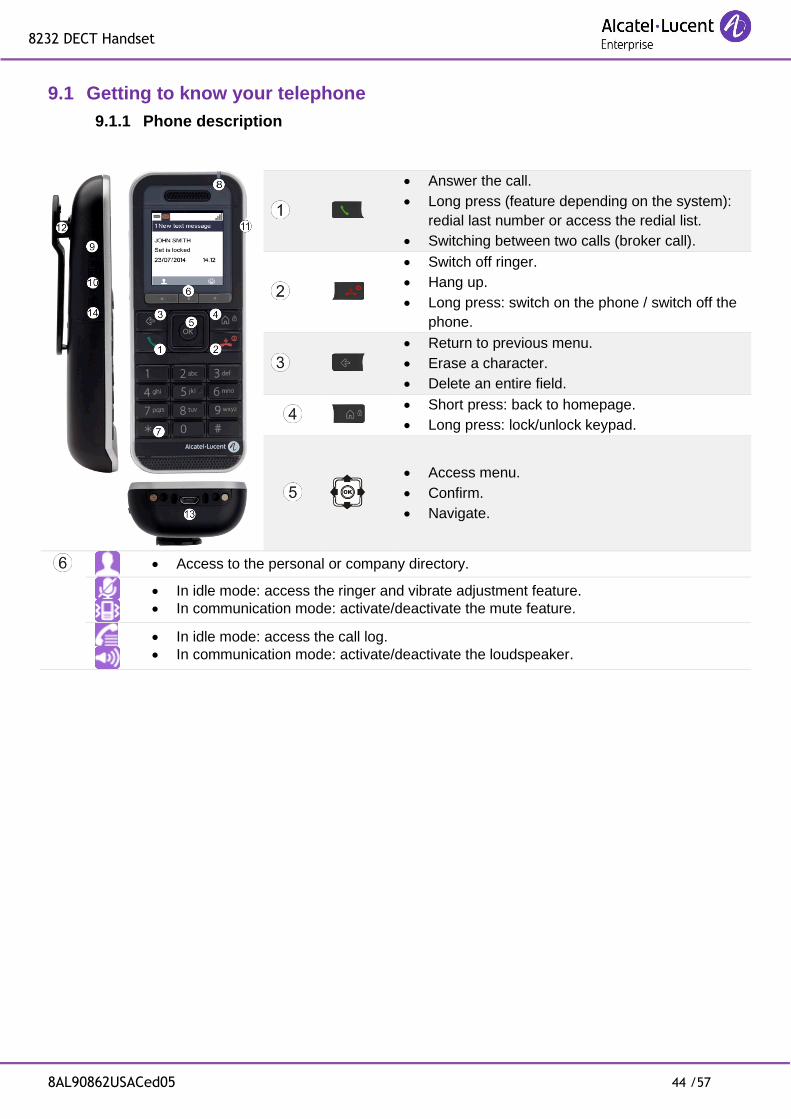
9.1 Getting to know your telephone
9.1.1 Phone description
• Answer the call.
• Long press (feature depending on the system):
redial last number or access the redial list.
• Switching between two calls (broker call).
• Switch off ringer.
• Hang up.
• Long press: switch on the phone / switch off the
phone.
• Return to previous menu.
• Erase a character.
• Delete an entire field.
• Short press: back to homepage.
• Long press: lock/unlock keypad.
• Access menu.
• Confirm.
• Navigate.
• Access to the personal or company directory.
• In idle mode: access the ringer and vibrate adjustment feature.
• In communication mode: activate/deactivate the mute feature.
• In idle mode: access the call log.
• In communication mode: activate/deactivate the loudspeaker.

8232 DECT Handset
8AL90862USACed05
45 /57
• Used to send dtmf signals when in a call with another person.
• Used to retrieve the first caller when you are speaking to the second caller.
Led
• Green steady: the phone is on the charger and the battery is fully charged.
• Red steady: the phone is on the charger and the battery is charging.
• Slow orange flashing: telephonic event such as unread message, missed call, etc.
• Rapid orange flashing: incoming call.
• Red flashing: out of coverage.
• Flashing when the phone is plugged into the charger means the same as when the
phone is not plugged into the charger.
• Short press: increase the volume of ring tone during an incoming call (4 steps) or increase
volume of loudspeaker during a conversation (8 steps).
• Long press in conversation: activate/deactivate the loudspeaker.
• Short press: decrease the volume of ring tone during an incoming call (4 steps) or decrease
volume of loudspeaker during a conversation (8 steps).
• Long press: activate/deactivate the mute feature.
• 3.5 mm jack plug for headset and maintenance.
• Clip to hook your phone on your belt. You can remove the clip and instead use the cover that is
provided in the phone package.
• Usb plug for charging the battery.
• Press on this key to light up the screen when the phone is in idle state.

8232 DECT Handset
8AL90862USACed05
46 /57
9.1.2 MENU icons
The MENU is accessible from the welcome screen by pressing the Menu key.
It provides access to all the functions available on your system. All icons are described in their unselected
state. When selected, the icons are displayed in purple.
Messages: Consult and send voice and text messages.
Call log:
Access the call log.
Contacts: Manage your personal directory and access the company directory.
Settings:
Access the general settings such as time and date, Language, Economy mode, key programming, etc.
Ring:
Access the ringing, key sound and warnings settings.
Calendar:
Access the calendar.
9.1.3 Call icons
Making a call.
Receiving a call.
Call is ended.
Earpiece and loudspeaker level.

8232 DECT Handset
8AL90862USACed05
47 /57
9.1.4 Accessing the MENU and navigating
Access the menu.
Press the Access menu key.
Select a function in the MENU.
Use the navigator keys and press the
OK key to select a function.
Navigating within a function.
You can move vertically along the
various labels within the function
Press the OK key to validate your
choice.
OR
You can move horizontally along the
various icons within the function
Press the OK key to validate your
choice.
9.2 Making a call
• Dial.
• Send the call.
You are in communication.
• Hang up.

8232 DECT Handset
8AL90862USACed05
48 /57
9.3 Receiving a call
You are receiving a call.
• Answer the call.
• Disabling the ringer: press the hang up key when your telephone rings: it is still possible to
answer by pressing the off hook key.
Speak.
• Hang up.
9.4 Calling from your personal directory
Quick access:
• Access MENU.
• Contacts
• Select the name of the person you wish to call.
• Send the call.
9.5 Redialing the last number dialed (redial)
Quick access:
• Access MENU.
Long press
• Dialed
• Select the number in the list.
• Send the call.

8232 DECT Handset
8AL90862USACed05
49 /57
9.6 Call log
Quick access:
• Access MENU.
• Call log
• All calls.
• Incoming calls.
• Outgoing calls.
• Missed calls.
9.6.1 Manage the call log
• Select an entry.
• Call
Call the contact.
• View
Display the log details.
• More
• View details
Display the log details.
• Save contact
If the contact is not in your local directory, you can save them as a new local
contact.
• Append to contact
Add the number to an existing local contact.
• Edit before call
View the number before making the call.
• Delete item
Delete the selected item of the call log.
• Delete all items
Delete the complete call log.
9.7 Sending DTMF signals
During a call, you sometimes have to send DTMF signals, for example, for a voice message service, an
automatic switchboard or when remotely consulting an answering machine. To do this:
• Press the star key (hold down for a few seconds).

8232 DECT Handset
8AL90862USACed05
50 /57
9.8 Sending a calibrated cut-off
The calibrated cut-off activates functions such as transfer to another telephone set.To make a calibrated
cut-off:
• Press the 0 key (hold down for a few seconds).
9.9 Programming your personal directory
Your directory can contain up to 12 numbers.
Quick access:
• Access MENU.
• Contacts
9.9.1 Add new contact
• More
• Add contact
• Apply.
• Name:
• Enter the name (10 characters maximum).
• Apply.
• Select the type of contact
Work: / Mobile: / Home:
• Enter the number.
• Apply.
• Save
• Yes
• Return to idle.
To key in the name: the keys in the numeric keypad include letters that you can display by pressing them
successively. Example: press twice in succession on 8 to display the letter 'U'. To insert a pause in a
number, press the 1 (hold down for a few seconds). To insert a measured break, press 0 (hold down for a
few seconds).

8232 DECT Handset
8AL90862USACed05
51 /57
9.9.2 Modify a contact
• Select the record to be modified.
• Edit
• Select the record to be modified.
• Modify the name.
• Apply.
• Modify the number.
• Apply.
• Save
• Yes
• Return to idle.
To delete a character, briefly press the delete key. To erase a field full of characters, hold down the
erase key (long press).
9.9.3 Deleting a card
• Select the contact to delete.
• Apply.
• Delete contact
• Apply.
• Yes
• Return to idle.
To delete all contacts, select: Delete all cont.
9.10 Customizing and adjusting your telephone
9.10.1 Choosing your melody:
• Access MENU.
• Ring
• Off-site ringing / On-site ringing
• Apply.
• Select the melody of your choice (You can play/stop and select the ringtone).

8232 DECT Handset
8AL90862USACed05
52 /57
• Apply.
• Return to idle.
9.10.2 Adjusting the ringer volume
• Access MENU.
• Ring
• Ring volume
• Apply.
• Increase / reduce the volume.
• Apply.
• Return to idle.
9.10.3 Selecting language:
• Access MENU.
• Settings
• Languages
• Select the language of your choice.
• Apply.
• Return to idle.
9.10.4 Other features
• Access MENU.
• Ring
• Vibrate/Ring You can adjust the buzzer/ringer mode according to your needs.
• Key sound Activate or deactivate the keypad tone.
• Confirmat. sound Activate or deactivate a signal when you confirm an action.
• Coverage warning Activate or deactivate the coverage warning.
• Charger warning Activate or deactivate a warning when the phone is charging.
• Low bat. warning Activate or deactivate Bip emission when low battery level is reached.
• Ascending ringing Activate or deactivate the ascending ringtone (Progressive ringing).
• Headset mode Activate or deactivate the headset mode.
• Apply.
• Return to idle.

8232 DECT Handset
8AL90862USACed05
53 /57
• Access MENU.
• Settings.
• Economy mode Activate or deactivate the economy mode When the economy mode is activated, the set adjusts its radio emission power according to the distance between the set and the radio base. The closer the set is to the radio base, the lower is the radio emission from the phone. This means that the phone is not always emitting at full power and thus saves the battery.
• Security Activate or deactivate a timeout to trigger the automatic keylock, change the keylock pin code or lock the function key.
• Handset name You can enter a name for your handset.
• Reset settings Reset the setting and go back to the default settings.
• Status Find out the software version of your phone.
• Auto answer Define how to answer an incoming call: off hook key, any key or automatic answer.
• Silent charging select whether silent mode is on or off when phone is charging.
• 2s key repeat For people with a disability, increases the repeat-key delay for the dial by name feature.
• Apply.
• Return to idle.
The selection is retained even after switching the telephone on/off. The selection of a specific system
(SYSTEM...) forces operation on a specific system. This selection must be changed if one wishes to
change system. Selecting 'Auto. select' enables the telephone to connect automatically when it enters a
system coverage zone. If the systems programmed in the telephone have common coverage zones, the
telephone selects the first system found.

8232 DECT Handset
8AL90862USACed05
54 /57
10 Accessories
10.1 Belt clip
When you purchase your phone, it is equipped with a belt clip on the back.
You can remove this belt clip and replace it with the cover provided in the
box of your new phone.
• Turn the belt clip by doing a counterclockwise quarter turn.
• Remove the belt clip by pulling it towards you.
Put on the cover instead of the belt clip as shown in the picture.
Push the cover towards the back of the phone until the cover is clipped on.
10.2 Chargers
Your phone charger is supplied with the following equipment:
A desk support with integrated USB cable for docking your phone.
10.2.1 How to dock your phone on the desk support
Put your phone on its support. Plug the USB cable into a 5V socket
(AC/DC adaptor, computer, …).
The AC/DC adaptor is not provided with the set. Please contact your
provider for a recommended AC/DC adaptator.

8232 DECT Handset
8AL90862USACed05
55 /57
• Charging the battery with a USB cable
A stand-alone USB cable is not provided with your set.
Plug the USB cable into the USB port of your phone. The other end of the
USB cable can be plugged into the AC/DC adaptor or into a computer USB
port.
Charging time depends on the power source where the cable USB is plugged (computer, AC/DC adapter,
…). The battery charging time is usually less than 3 hours. Charging time depends on the power source
where the cable USB is plugged (computer, AC/DC adapter, …).
10.3 Power supply (optional)
An AC/DC adapter made of a body and a separate plug head that clips
onto the AC/DC adapator body.
Characteristics of the mains power adapter
• Input: 100/240 V - 50/60 Hz.
• Output: 5V - 1A.
The mains power socket used must be close to the charger/holder and easily accessible, so that it can be
used as an 'on/off' facility.
10.4 Presentation of the battery pack
10.4.1 Autonomy of your telephone
On standby in the radio coverage zone. Up to 200 hours.
In continuous conversation. Up to 20 hours if economy mode is activated, 17
hours if economy mode is not activated.
10.4.2 Initial charge:
Place the telephone in the charging holder.
Battery icon flashing.
The battery is charged.

8232 DECT Handset
8AL90862USACed05
56 /57
Maximum battery performance is only reached after around 10 charge/discharge cycles.
These batteries contain polluting substances: do not dispose of them in a dustbin - take them to a
specialized collection point.
10.4.3 Battery charge level
> 66%
33% - 66%
10% - 33%
< 10%
10.5 Headphone / external microphone
The side of the telephone features a 3.5 mm jack connector for headphone / external microphone. Contact
your retailer for information on the various headphone models available.
10.6 Cleaning your telephone
Your telephone does not require any particular servicing. However, it may be cleaned using a soft, damp
cloth.
Use appropriate soap or detergent to clean the surface of the telephone.
10.7 Transporting and protecting your telephone
To avoid losing your telephone, get into the habit of clipping it onto your belt. Your telephone can also be
carried in a protective case.
Various models of carrying case are available. Ask your installation technician for information. It is vital to
use the special protective carrying case if your telephone is to be used in an industrial environment
(presence of dust, filings, vapours of diverse origins and risk of being dropped). If the telephone is used
with a carrying case, the belt clip must be removed.

8232 DECT Handset
8AL90862USACed05
57 /57
11 Declaration of compliance
This equipment uses DECT frequency range that depends on country: 1880 - 1900 Mhz in Europe, 1920 - 1930 MHz in US/Canada, 1910 - 1930 MHz in LATAM, 1910 - 1920 MHz in Brazil. The equivalent isotropically radiated power at the antenna is less than 110 mW or 250 mW (it depends on the country). EUROPE This equipment is in compliance with the essential requirements of Radio Equipment Directive (RED) 2014/53/EU and with Directive 2011/65/UE (ROHS). Declaration of Conformity may be obtained from:
ALE International 32 avenue Kléber – 92700 Colombes, France [email protected]
USA and Canada Handset: This device complies with Part 15 of the FCC Rules and with RSS of Industry Canada (FCC ID: T7HCT8111 IC: 4979B-CT8111). This device complies with Part 68 of the FCC Rules and with IC CS-03 Part V of Industry Canada. The ACTA registration number is: T7HW4NANCT8111. Chargers: this device complies with Part 15 of the FCC Rules and with ICES-003 of Industry Canada. Operation is subject to the following two conditions: (1) this device may not cause harmful interference, and (2) this device must accept any interference received, including interference that may cause undesired operation. Exposure to Radio Frequency Signals. This device has been designed and manufactured not to exceed the SAR (Specific Absorption Rate) radio frequency power transmission limits established by the different countries concerned. The SAR value measured is equal to 0.102 W/kg (the globally accepted maximum limit being 1.6 W/kg). User Instructions Only use the handset in temperatures between -10°C to +40°C (14°F to 104°F). -10 oC to +40 oC (14 oF to 104oF). Do not charge a battery when the ambient room temperature is above 40º C or below 5º C (above 104º F or below 41 ºF). This apparatus is Hearing Aid Compatible (HAC). Acoustic shock protection Maximum sound pressure level for handset is compliant with European, US and Australian standards. Directive 2003/10/EC specifying the risks inherent in noise at work The ring contributes towards overall daily noise. To reduce the level, the following is recommended: reduce the setting, program a progressive ring.
Disposal The equipment must be returned to a collection point for electronic equipment waste disposal. Defective batteries must be returned to a collection point for chemical waste disposal.
Related Documentation Other languages for these Safety and Regulatory Instructions and User Documentation are available at the following Web site: https://www.al-enterprise.com/products.
The Alcatel-Lucent name and logo are trademarks of Nokia used under license by ALE. To view other trademarks used by affiliated companies of ALE Holding, visit: www.al-enterprise.com/en/legal/trademarks-copyright. All other trademarks are the property of their respective owners. The information presented is subject to change without notice. Neither ALE Holding nor any of its affiliates assumes any responsibility for inaccuracies contained herein. © 2020 ALE International. www.al-enterprise.com.
Alc
ate
l-Lucent
8232 D
EC
T H
andse
t
Q
uic
k g
uid
e
Related Documentation - Other languages for these Safety and Regulatory Instructions and User Documentation are available at the following Web site https://www.al-enterprise.com/products. 8AL90862USACed05 - Copyright © ALE International 2020
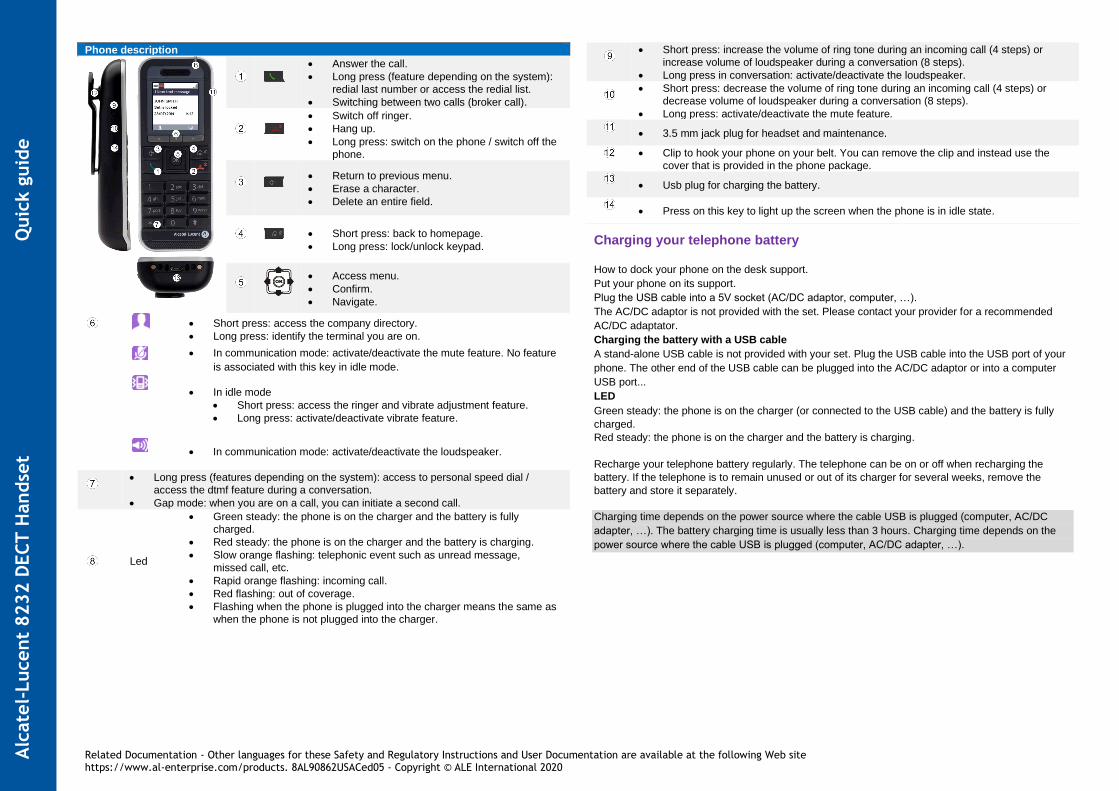
Phone description
• Answer the call.
• Long press (feature depending on the system):
redial last number or access the redial list.
• Switching between two calls (broker call).
• Switch off ringer.
• Hang up.
• Long press: switch on the phone / switch off the
phone.
• Return to previous menu.
• Erase a character.
• Delete an entire field.
• Short press: back to homepage.
• Long press: lock/unlock keypad.
• Access menu.
• Confirm.
• Navigate.
• Short press: access the company directory.
• Long press: identify the terminal you are on.
• In communication mode: activate/deactivate the mute feature. No feature
is associated with this key in idle mode.
• In idle mode
• Short press: access the ringer and vibrate adjustment feature.
• Long press: activate/deactivate vibrate feature.
• In communication mode: activate/deactivate the loudspeaker.
• Long press (features depending on the system): access to personal speed dial /
access the dtmf feature during a conversation.
• Gap mode: when you are on a call, you can initiate a second call.
Led
• Green steady: the phone is on the charger and the battery is fully
charged.
• Red steady: the phone is on the charger and the battery is charging.
• Slow orange flashing: telephonic event such as unread message,
missed call, etc.
• Rapid orange flashing: incoming call.
• Red flashing: out of coverage.
• Flashing when the phone is plugged into the charger means the same as
when the phone is not plugged into the charger.
• Short press: increase the volume of ring tone during an incoming call (4 steps) or
increase volume of loudspeaker during a conversation (8 steps).
• Long press in conversation: activate/deactivate the loudspeaker.
• Short press: decrease the volume of ring tone during an incoming call (4 steps) or
decrease volume of loudspeaker during a conversation (8 steps).
• Long press: activate/deactivate the mute feature.
• 3.5 mm jack plug for headset and maintenance.
• Clip to hook your phone on your belt. You can remove the clip and instead use the
cover that is provided in the phone package.
• Usb plug for charging the battery.
• Press on this key to light up the screen when the phone is in idle state.
Charging your telephone battery
How to dock your phone on the desk support.
Put your phone on its support.
Plug the USB cable into a 5V socket (AC/DC adaptor, computer, …).
The AC/DC adaptor is not provided with the set. Please contact your provider for a recommended
AC/DC adaptator.
Charging the battery with a USB cable
A stand-alone USB cable is not provided with your set. Plug the USB cable into the USB port of your
phone. The other end of the USB cable can be plugged into the AC/DC adaptor or into a computer
USB port...
LED
Green steady: the phone is on the charger (or connected to the USB cable) and the battery is fully
charged.
Red steady: the phone is on the charger and the battery is charging.
Recharge your telephone battery regularly. The telephone can be on or off when recharging the
battery. If the telephone is to remain unused or out of its charger for several weeks, remove the
battery and store it separately.
Charging time depends on the power source where the cable USB is plugged (computer, AC/DC
adapter, …). The battery charging time is usually less than 3 hours. Charging time depends on the
power source where the cable USB is plugged (computer, AC/DC adapter, …).

Alc
ate
l-Lucent
8232 D
EC
T H
andse
t
Q
uic
k g
uid
e
Related Documentation - Other languages for these Safety and Regulatory Instructions and User Documentation are available at the following Web site https://www.al-enterprise.com/products. 8AL90862USACed05 - Copyright © ALE International 2020
Status icons
The status icons are displayed on the welcome screen and
indicate the status of the telephone.
Battery charge level ( > > > ).
In charge (flashing icon).
Received messages,callback request and unanswered calls.
Appointment programmed.
Call diversion activated.
Vibrate mode active.
Ringer active.
Ringer disabled.
Radio reception quality - Normal Mode.
Radio reception quality - 50 mW power.
Loudspeaker on (in conversation).
Mute on (in conversation).
Economy mode activated and used (green).
Economy mode activated (gray).
You can obtain details on the status icons from the
tooltips that appear on the welcome screen when
you use the navigator:
MENU icons
The MENU is accessible from the welcome screen by pressing the
OK key. It provides access to all the functions available on your
system. All icons are described in their unselected state. When
selected, the icons are displayed in purple
Directories:
Manage your personal directory and access the company
directory.
Redial
Call back the last number dialed.
Call log (GAP mode).
Divert your calls to another number.
Consult and send voice and text messages.
Answer a call intended for another telephone.
Program a call-back time.
Lock/unlock the set.
Access the services configuration of the handset
(associate, overflow, password, name, number, etc.).
Access the general settings of the phone (key sound,
economy mode, charger warning, programming of F1 and
F2 keys, etc.).
Choice of language (GAP mode).
Ringing setting (GAP mode).
Call icons
Making a call.
Receiving a call.
Call on hold.
Accessing the directories.
Transferring a call.
Switching to DTMF signals.
Setting up a conference.
Forwarding your calls to your voice message service.
Parking an external communication.
Call duration and cost.
Additional options (Features depending on the system).
Features
Answer the call.
Redialing (long press).
Send the call.
Switching between two outgoing calls.
Ignore call.
End the call.
Calling from your personal directory (PersSpDial).
Calling your caller by name (company directory).
Programming your personal directory (PersSpDial).
Call from call log (All incoming, outgoing, missed or
unanswered calls are displayed in the call log).
Consulting external missed calls.
Consulting internal missed calls.
Consulting text messages.
Sending text messages.
Consulting your voice mailbox.
Sending a recorded message to a number or a
distribution list.
Divert your calls to another number.
Diverting calls to your voice mailbox.
Different types of diversions.
Automatic Message if no reply.
Do not disturb.
Cancelling all forwards.
Modifying your personal code.
Choice of language.
Choose the tune.
Adjusting the ringer volume.
Access the ringer and vibrate adjustment feature.
Your phone number.
Programming an appointment reminder.
Locking features on your terminal.
Define an overflow number.
Define an associate number.
Access the handset settings menu (Device info,
Coverage warning, Security, …).