802.1x deployment guide - cisco.com 2 deploying 802.1x 2-1 ... why it matters 2-1 security policy...
TRANSCRIPT

St r i c t ly C i sco Conf ident i a l
802.1X Deployment Guide April 18, 2008
Americas HeadquartersCisco Systems, Inc.170 West Tasman DriveSan Jose, CA 95134-1706 USAhttp://www.cisco.comTel: 408 526-4000
800 553-NETS (6387)Fax: 408 527-0883
Text Part Number: OL-16033-01

St r i c t ly C i sco Conf ident i a l
ALL DESIGNS, SPECIFICATIONS, STATEMENTS, INFORMATION, AND RECOMMENDATIONS (COLLECTIVELY, "DESIGNS") IN THIS MANUAL ARE PRESENTED "AS IS," WITH ALL FAULTS. CISCO AND ITS SUPPLIERS DISCLAIM ALL WARRANTIES, INCLUDING, WITHOUT LIMITATION, THE WARRANTY OF MERCHANTABILITY, FITNESS FOR A PARTICULAR PURPOSE AND NONINFRINGEMENT OR ARISING FROM A COURSE OF DEALING, USAGE, OR TRADE PRACTICE. IN NO EVENT SHALL CISCO OR ITS SUPPLIERS BE LIABLE FOR ANY INDIRECT, SPECIAL, CONSEQUENTIAL, OR INCIDENTAL DAMAGES, INCLUDING, WITHOUT LIMITATION, LOST PROFITS OR LOSS OR DAMAGE TO DATA ARISING OUT OF THE USE OR INABILITY TO USE THE DESIGNS, EVEN IF CISCO OR ITS SUPPLIERS HAVE BEEN ADVISED OF THE POSSIBILITY OF SUCH DAMAGES.
THE DESIGNS ARE SUBJECT TO CHANGE WITHOUT NOTICE. USERS ARE SOLELY RESPONSIBLE FOR THEIR APPLICATION OF THE DESIGNS. THE DESIGNS DO NOT CONSTITUTE THE TECHNICAL OR OTHER PROFESSIONAL ADVICE OF CISCO, ITS SUPPLIERS OR PARTNERS. USERS SHOULD CONSULT THEIR OWN TECHNICAL ADVISORS BEFORE IMPLEMENTING THE DESIGNS. RESULTS MAY VARY DEPENDING ON FACTORS NOT TESTED BY CISCO.
CCDE, CCVP, Cisco Eos, Cisco StadiumVision, the Cisco logo, DCE, and Welcome to the Human Network are trademarks; Changing the Way We Work, Live, Play, and Learn is a service mark; and Access Registrar, Aironet, AsyncOS, Bringing the Meeting To You, Catalyst, CCDA, CCDP, CCIE, CCIP, CCNA, CCNP, CCSP, Cisco, the Cisco Certified Internetwork Expert logo, Cisco IOS, Cisco Press, Cisco Systems, Cisco Systems Capital, the Cisco Systems logo, Cisco Unity, Collaboration Without Limitation, Enterprise/Solver, EtherChannel, EtherFast, EtherSwitch, Event Center, Fast Step, Follow Me Browsing, FormShare, GigaDrive, HomeLink, Internet Quotient, IOS, iPhone, IP/TV, iQ Expertise, the iQ logo, iQ Net Readiness Scorecard, iQuick Study, IronPort, the IronPort logo, LightStream, Linksys, MediaTone, MeetingPlace, MGX, Networkers, Networking Academy, Network Registrar, PCNow, PIX, PowerPanels, ProConnect, ScriptShare, SenderBase, SMARTnet, Spectrum Expert, StackWise, The Fastest Way to Increase Your Internet Quotient, TransPath, WebEx, and the WebEx logo are registered trademarks of Cisco Systems, Inc. and/or its affiliates in the United States and certain other countries.
All other trademarks mentioned in this document or Website are the property of their respective owners. The use of the word partner does not imply a partnership relationship between Cisco and any other company. (0801R)
802.1X Deployment Guide © 2008 Cisco Systems, Inc. All rights reserved.

St r i c t ly C i sco Conf ident i a l
OL-16033-01
C O N T E N T S
C H A P T E R 1 Introduction 1-1
What is 802.1X? 1-2
802.1X and EAP 1-2
How 802.1X Impacts the Network 1-3
Non 802.1X-Enabled Devices 1-3
802.1X Devices with Invalid Credentials 1-4
802.1X in Microsoft Environments 1-4
Windows Group Policy Object (GPO) 1-4
Windows Logon 1-5
Machine Authentication 1-5
Planning for 802.1X Deployment 1-7
802.1X Re-authentication 1-8
IP Telephony 1-8
Components of the Overall Solution 1-9
Supplicant 1-9
Authenticator 1-9
Authentication Server 1-10
User Database 1-10
EAP 1-10
C H A P T E R 2 Deploying 802.1X 2-1
Choosing an EAP Method 2-1
Why it Matters 2-1
Security Policy and EAP Method 2-1
PKI and EAP Method 2-1
Supplicant and EAP Method 2-2
Authentication Servers and EAP Method 2-2
Backend Data Storage and EAP Method 2-2
EAP Methods 2-2
EAP-TLS 2-2
PEAP-MSCHAPv2 2-10
EAP-FAST 2-13
Supplicant Specifics 2-18
1802.1X Deployment Guide

St r i c t ly C i sco Conf ident i a l
Contents
Matrix (EAP vs. Supplicant) 2-18
CSSC 2-19
Window XP 2-19
Registry Settings 2-19
RADIUS Server Specifics 2-22
Backend Directory Specifics 2-23
Matrix (EAP vs. Directory) 2-23
C H A P T E R 3 Configuring 802.1X 3-1
Authenticators 3-2
Cisco IOS 3-2
RADIUS Configuration for Cisco IOS 3-3
Globally Enable IEEE 802.1X for Cisco IOS 3-3
Interface IEEE 802.1X Configuration for Cisco IOS 3-3
IEEE 802.1X Timer Configuration for Cisco IOS 3-4
IEEE 802.1X Re-Authentication Configuration for Cisco IOS [Optional] 3-4
WoL Configuration for Cisco IOS (Optional) 3-7
Verify IEEE 802.1X Operation for Cisco IOS 3-7
Basic Configuration Example for Cisco IOS 3-7
Verifying 802.1X Port Status for Cisco IOS 3-8
Cisco Catalyst OS 3-8
RADIUS Configuration for Cisco Catalyst OS 3-8
Global IEEE 802.1X Configuration for Cisco Catalyst OS 3-9
Port IEEE 802.1X Configuration for Cisco Catalyst OS 3-9
Verify IEEE 802.1X Operation for Cisco Catalyst OS 3-9
Basic Configuration Example for Cisco Catalyst OS 3-10
Verifying 802.1X Port Status for Cisco Catalyst OS 3-10
Deploying EAP-TLS 3-11
Authentication Server Configuration 3-11
Step 1: Obtain and Install the Root CA Certificate on Cisco Secure ACS 3-11
Step 2: Configure Certificate Revocation 3-21
Step 3: Acquire and Configure Cisco Secure ACS Server Certificate 3-23
Step 4: Configure EAP-TLS Settings on the ACS 3-46
Step 5: Specify and Configure the Catalyst Switch as a AAA Client 3-50
Step 6: Configure the External User Databases 3-51
Client Configuration for EAP-TLS 3-56
Installation of Client Certificates 3-56
CSSC Configuration 3-82
Windows XP Client Configuration 3-106
2802.1X Deployment Guide
OL-16033-01
St r i c t ly C i sco Conf ident i a l
Contents
Deploying PEAP-MSCHAPv2 3-111
Authentication Server Configuration for PEAP-MSCHAPv2 3-111
Step 1: Obtain the Root CA Certificate on ACS 3-111
Step 2: Configure Certificate Revocation 3-111
Step 3: Obtain and Configure a Server Certificate for the ACS Server 3-111
Step 4: Configure PEAP-MSCHAPv2 Settings on the ACS 3-112
Step 5: Specify and Configure the Catalyst Switch as a AAA Client 3-113
Step 6: Configure the External User Databases 3-113
Client Configuration for PEAP-MSCHAPv2 3-113
Installation of Client Certificates 3-113
Configuring CSSC for PEAP-MSCHAPv2 3-114
Configuring XP Supplicant for PEAP-MSCHAPv2 3-135
Deploying EAP-FAST 3-139
EAP-FAST Configuration Steps 3-139
Step 1: Configure EAP-FAST Settings on the ACS 3-139
Step 2: Specify and Configure the Catalyst Switch as a AAA Client 3-142
Step 3: Configure the External User Databases 3-142
Step 4: CSSC Client Configuration for EAP-FAST 3-142
Conclusion and Next Steps 3-164
3802.1X Deployment Guide
OL-16033-01

St r i c t ly C i sco Conf ident i a l
Contents
4802.1X Deployment Guide
OL-16033-01
St r i c t ly C i sco Conf ident i a l
OL-16033-01
C H A P T E R 1
IntroductionThe need for secure network access has never been greater. In today’s diverse workplaces, consultants, contractors, and even guests require access to network resources over the same LAN connections as regular employees. As data networks become increasingly indispensable in day-to-day business operations, the possibility that unauthorized people will gain access to controlled or confidential information also increases.
One of the most vulnerable points of the network is the access edge. The access layer is where end users connect to the network. In the past, corporations have largely relied on physical security to protect this part of the network. Unauthorized users were not allowed to enter a secure building where they could plug into the network. Today, contractors and consultants regularly have access to secure areas. Once inside, there is nothing to prevent a contractor from plugging into a wall jack and gaining access to the corporate network. There is no need to enter an employee cube to do this. Conference rooms frequently offer network access through wall jacks or even desktop switches. Once connected to the network, everyone (employees, contractors, consultants, guests, and malicious users) has access to all the resources on the network.
The best and most secure solution to vulnerability at the access edge is to leverage the intelligence of the network. Cisco IOS software enables standards-based network access control at the access layer by using the 802.1X protocol to secure the physical ports where end users connect. 802.1X is an IEEE standard for media-level (Layer 2) access control, offering the capability to permit or deny network connectivity based on the identity of the end user or device. 802.1X is well-known as a way to secure wireless network access. It is equally essential in securing wired network access.
This configuration guide describes the basic deployment of an identity-based network access control system for wired networks using IEEE 802.1X. This system is implemented with the Cisco Catalyst family of switches and the Cisco Secure Access Control Server (ACS). Additional components of the system include an IEEE 802.1X compliant client, such as Cisco Secure Service Client (CSSC), and an optional X.509 Public Key Infrastructure (PKI) certificate architecture.
Beyond basic network access control, this 802.1X-based access control system offers the following services:
• Dynamic, user-specific policy-based authorization
• Policy enforcement at the port level
• Support for IP Telephony
• Support for non-802.1X-capable devices
These services are addressed in subsequent chapters.
1-1802.1X Deployment Guide
St r i c t ly C i sco Conf ident i a l
Chapter 1 Introduction What is 802.1X?
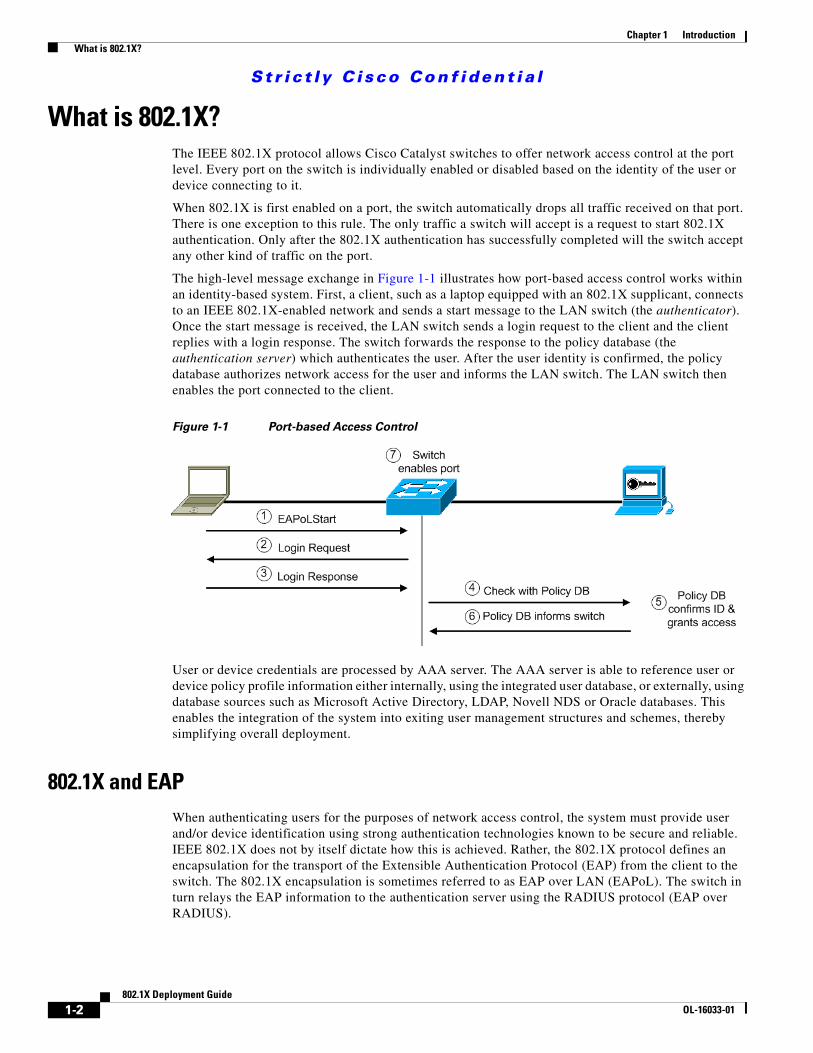
What is 802.1X?The IEEE 802.1X protocol allows Cisco Catalyst switches to offer network access control at the port level. Every port on the switch is individually enabled or disabled based on the identity of the user or device connecting to it.
When 802.1X is first enabled on a port, the switch automatically drops all traffic received on that port. There is one exception to this rule. The only traffic a switch will accept is a request to start 802.1X authentication. Only after the 802.1X authentication has successfully completed will the switch accept any other kind of traffic on the port.
The high-level message exchange in Figure 1-1 illustrates how port-based access control works within an identity-based system. First, a client, such as a laptop equipped with an 802.1X supplicant, connects to an IEEE 802.1X-enabled network and sends a start message to the LAN switch (the authenticator). Once the start message is received, the LAN switch sends a login request to the client and the client replies with a login response. The switch forwards the response to the policy database (the authentication server) which authenticates the user. After the user identity is confirmed, the policy database authorizes network access for the user and informs the LAN switch. The LAN switch then enables the port connected to the client.
Figure 1-1 Port-based Access Control
User or device credentials are processed by AAA server. The AAA server is able to reference user or device policy profile information either internally, using the integrated user database, or externally, using database sources such as Microsoft Active Directory, LDAP, Novell NDS or Oracle databases. This enables the integration of the system into exiting user management structures and schemes, thereby simplifying overall deployment.
802.1X and EAPWhen authenticating users for the purposes of network access control, the system must provide user and/or device identification using strong authentication technologies known to be secure and reliable. IEEE 802.1X does not by itself dictate how this is achieved. Rather, the 802.1X protocol defines an encapsulation for the transport of the Extensible Authentication Protocol (EAP) from the client to the switch. The 802.1X encapsulation is sometimes referred to as EAP over LAN (EAPoL). The switch in turn relays the EAP information to the authentication server using the RADIUS protocol (EAP over RADIUS).
1-2802.1X Deployment Guide
OL-16033-01

St r i c t ly C i sco Conf ident i a l
Chapter 1 Introduction How 802.1X Impacts the Network
EAP, which is defined by RFC 3748, is itself a framework—not a specific authentication method. EAP provides a way for the client and the authentication server to negotiate an authentication method that they both support. There are many EAP methods but the ones used more frequently for 802.1X wired authentication include EAP-TLS, EAP-PEAP, and EAP-FAST. These EAP methods are discussed in more detail later in this document.
How 802.1X Impacts the NetworkBefore enabling 802.1X in the network, it is essential to review the default security posture of a port enabled for 802.1X authentication: all traffic is dropped except 802.1X EAPoL packets. This is a fundamental change from the traditional model in which the port is enabled and all traffic is allowed from the moment that a device plugs into the port. Ports that were traditionally open will now be closed by default. This is one of the cornerstones of the strong security and network access control provided by 802.1X. However, this change in the default network access model can have a profound impact on network devices and applications. Understanding and providing for the impacts of this change will make for a smooth deployment of 802.1X network access control.
Non 802.1X-Enabled Devices802.1X must be enabled on both the host device and on the switch to which the device connects. If a device without an 802.1X supplicant attempts to connect to a port that is enabled for 802.1X, it will be subjected to the default security policy. The default security policy says that 802.1X authentication must succeed before access to the network is granted. Therefore, by default, non-802.1X-capable devices cannot get access to an 802.1X-protected network.
Although many devices increasingly support 802.1X, there will always be devices that require network connectivity but do not and/or cannot support 802.1X. Examples of such devices include network printers, badge readers, legacy servers, and PXE boot machines. Some provision must be made for these devices.
Cisco provides two features to accommodate non-802.1X devices. These are MAC Authentication Bypass (MAB) and the Guest VLAN. These features provide fallback mechanisms when there is no 802.1X supplicant. After 802.1X times out on a port, the port can move to an open state if MAB succeeds or if the Guest VLAN is configured. Judicious application of either or both of these features will be required for a successful 802.1X deployment.
Note Network-specific testing will be required to determine the optimal values for 802.1X timers to accommodate the various non-802.1X-capable devices on your network. See the Baseline Identity Design Overview Guide for more details on optimizing 802.1X timers for non-802.1X-enabled devices such as PXE-boot.
Wake-on-LAN (WoL) devices also require special handling in an 802.1X-enabled environment. WoL is an industry standard that defines a power management wake-up event. Many network interface cards (NICs) in the industry today support WoL. After a machine goes into low-energy suspend mode, it can be automatically reactivated when a "magic packet" is received by the NIC. This capability can be used to wake up a mail server machine to deliver mail, for software management pushes, to deploy patches overnight to desktops, and so on. By default, 802.1X controls traffic in both directions, which would prevent the magic packet from getting to a sleeping WoL device. To enable WoL to interoperate with 802.1X, Cisco provides the option of configuring unidirectional control on an 802.1X port.
1-3802.1X Deployment Guide
OL-16033-01
St r i c t ly C i sco Conf ident i a l
Chapter 1 Introduction How 802.1X Impacts the Network
Unidirectional control allows data packets (such as a magic packet) to leave the port while still denying all non-EAPoL traffic from coming into the port. Once the WoL device has been activated by the magic packet, it can complete an 802.1X authentication and gain full access to the network.
Note Since unidirectional port control represents a weaker deployment of 802.1X, best practice is to enable WoL only on the ports where it is needed.
802.1X Devices with Invalid Credentials802.1X protects the network by preventing users and devices without valid credentials from gaining access to the access port. However, there may be situations where legitimate users do not have valid credentials. For example, an employee’s certificate might expire while the employee is on leave. When the employee plugs back into the network, 802.1X authentication will fail and the port will remain closed. However, to get a new certificate, the employee must have network access. This is a chicken-and-egg problem. In a different scenario, a partner might attempt to connect to the network for guest access. The partner’s laptop is configured for 802.1X, but the partner’s credentials are only valid on the partner’s home network. 802.1X authentication fails, preventing the partner from gaining guest access.
To provide for situations such as these, Cisco offers the Auth-Fail VLAN feature. When 802.1X authentication fails (as opposed to timing out because there is no supplicant on the host), the port is moved to a configurable VLAN where restricted access can be enforced. Using the Auth Fail VLAN, network administrators can tailor network access for devices without valid credentials. For example, the Auth-Fail VLAN may be configured to permit access the Internet only or to a Certificate Authority for certificate renewal.
Note The Auth-Fail VLAN should always be deployed in accordance with an organization’s security policy.
For more information on using the Auth-Fail VLAN, see the 802.1X VLAN Authorization Deployment Guide.
802.1X in Microsoft EnvironmentsMany customers use the Microsoft Windows system (mostly Windows 2000, Windows XP, Windows Server 2003, and Windows Vista) as their core computing system. Windows environments are heavily dependent on network access for many basic functions. Understanding this dependency and how to design 802.1X environments accordingly is required for successful 802.1X deployments.
Windows Group Policy Object (GPO)
In a Microsoft Active Directory environment, Group Policy Objects (GPO) are widely used to apply Windows’ configuration or policy settings to a group of users and/or computers in the domain. GPOs can be used to deploy startup or logoff scripts, change registry values, install software packages, set security options, redirect folders, and many other tasks.
GPOs are defined on an Active Directory (AD) Domain Controller (DC). Computers and users download GPOs when logging into the domain. A computer logs into the domain when it is first booted. A user logs onto the domain by pressing Ctrl-Alt-Delete and entering an appropriate username and password
1-4802.1X Deployment Guide
OL-16033-01
St r i c t ly C i sco Conf ident i a l
Chapter 1 Introduction How 802.1X Impacts the Network
at the login screen (sometimes referred to as the GINA, after the Microsoft library that controls the interactive login process). If GPOs cannot be downloaded at login time because the network is unavailable, the Windows networking environment cannot function properly.
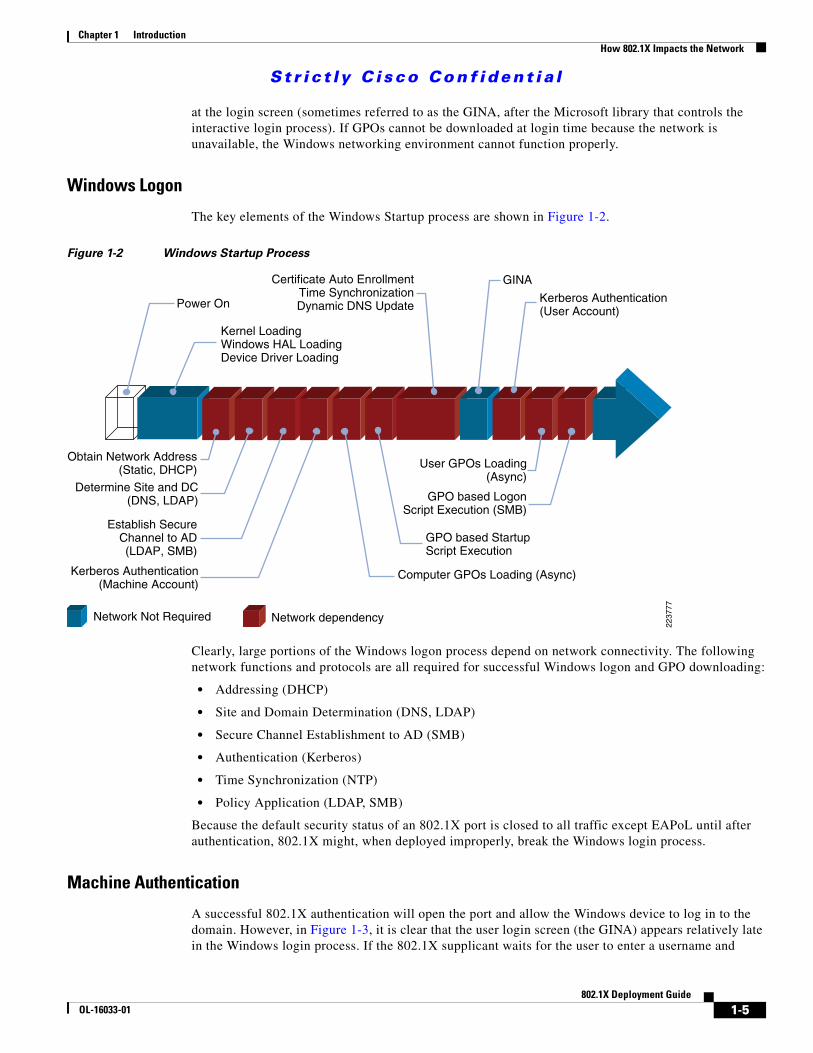
Windows Logon
The key elements of the Windows Startup process are shown in Figure 1-2.
Figure 1-2 Windows Startup Process
Clearly, large portions of the Windows logon process depend on network connectivity. The following network functions and protocols are all required for successful Windows logon and GPO downloading:
• Addressing (DHCP)
• Site and Domain Determination (DNS, LDAP)
• Secure Channel Establishment to AD (SMB)
• Authentication (Kerberos)
• Time Synchronization (NTP)
• Policy Application (LDAP, SMB)
Because the default security status of an 802.1X port is closed to all traffic except EAPoL until after authentication, 802.1X might, when deployed improperly, break the Windows login process.
Machine Authentication
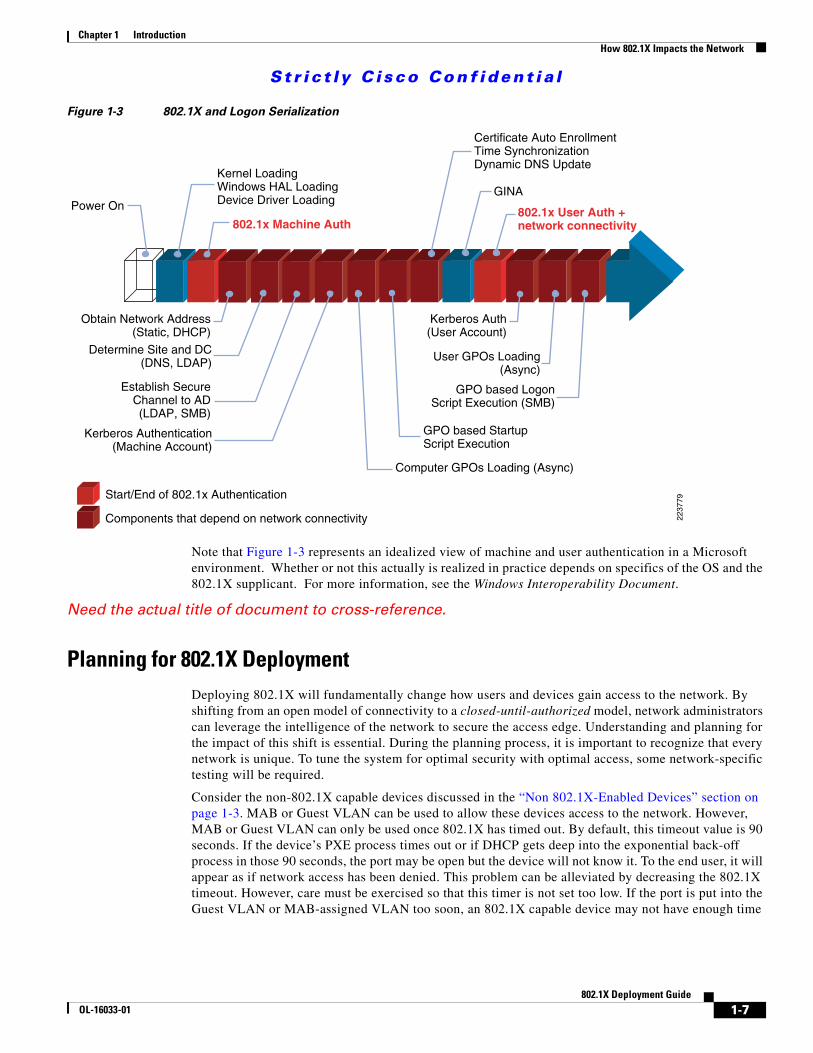
A successful 802.1X authentication will open the port and allow the Windows device to log in to the domain. However, in Figure 1-3, it is clear that the user login screen (the GINA) appears relatively late in the Windows login process. If the 802.1X supplicant waits for the user to enter a username and
Power On
Kernel LoadingWindows HAL LoadingDevice Driver Loading
Obtain Network Address(Static, DHCP)
Determine Site and DC(DNS, LDAP)
Establish SecureChannel to AD(LDAP, SMB)
Kerberos Authentication(Machine Account)
Computer GPOs Loading (Async)
GPO based StartupScript Execution
Certificate Auto EnrollmentTime SynchronizationDynamic DNS Update
GINA
Kerberos Authentication(User Account)
User GPOs Loading(Async)
GPO based LogonScript Execution (SMB)
Network Not Required Network dependency
2237
77
1-5802.1X Deployment Guide
OL-16033-01
St r i c t ly C i sco Conf ident i a l
Chapter 1 Introduction How 802.1X Impacts the Network
password at the GINA before initiating authentication, then all the networking protocols and network-based processes that come before the GINA will be blocked and Windows policies will not be properly applied.
To prevent this problem, the 802.1X system supports machine authentication. Machine authentication allows the machine itself to authenticate via 802.1X before the user logs in. Machine authentication is exactly the same as user authentication. The 802.1X supplicant uses special machine credentials (a machine-specific password or certificate) to complete the authentication. This allows the machine to have network access and download its GPOs before the user logs on to the machine.
To ensure successful Windows login, 802.1X machine authentication should adhere to these conditions:
• Machine authentication should always start as soon as device drivers are initialized and be completed before GINA is displayed to user.
• IP connectivity (DHCP, RARP) should always be established right after successful authentication.
• Logon process (Domain lookup, SChannel, Kerberos Auth, etc.) should be postponed until network connectivity is established and completed before GINA is displayed to user.
Machine authentication can be used by itself or in combination with user authentication. Machine authentication by itself is an excellent way to ensure that every device connecting to the network is a corporate asset (since only machines that have joined the Windows domain will have the appropriate credentials for successful machine authentication). Combining user authentication with machine authentication preserves the Windows machine login process while also enabling user-specific network access. User authentication, however, should not be deployed without machine authentication in Windows environments. If user authentication is deployed without machine authentication, then the Windows machine login process will break. We recommend always enabling machine authentication in Windows networking environments.
When machine and user authentication are both enabled and functioning properly, the Windows login sequence proceeds normally as shown in Figure 1-3.
1-6802.1X Deployment Guide
OL-16033-01
St r i c t ly C i sco Conf ident i a l
Chapter 1 Introduction How 802.1X Impacts the Network
Figure 1-3 802.1X and Logon Serialization
Note that Figure 1-3 represents an idealized view of machine and user authentication in a Microsoft environment. Whether or not this actually is realized in practice depends on specifics of the OS and the 802.1X supplicant. For more information, see the Windows Interoperability Document.
Need the actual title of document to cross-reference.
Planning for 802.1X Deployment Deploying 802.1X will fundamentally change how users and devices gain access to the network. By shifting from an open model of connectivity to a closed-until-authorized model, network administrators can leverage the intelligence of the network to secure the access edge. Understanding and planning for the impact of this shift is essential. During the planning process, it is important to recognize that every network is unique. To tune the system for optimal security with optimal access, some network-specific testing will be required.
Consider the non-802.1X capable devices discussed in the “Non 802.1X-Enabled Devices” section on page 1-3. MAB or Guest VLAN can be used to allow these devices access to the network. However, MAB or Guest VLAN can only be used once 802.1X has timed out. By default, this timeout value is 90 seconds. If the device’s PXE process times out or if DHCP gets deep into the exponential back-off process in those 90 seconds, the port may be open but the device will not know it. To the end user, it will appear as if network access has been denied. This problem can be alleviated by decreasing the 802.1X timeout. However, care must be exercised so that this timer is not set too low. If the port is put into the Guest VLAN or MAB-assigned VLAN too soon, an 802.1X capable device may not have enough time
Power On
Kernel LoadingWindows HAL LoadingDevice Driver Loading
Obtain Network Address(Static, DHCP)
Determine Site and DC(DNS, LDAP)
Establish SecureChannel to AD(LDAP, SMB)
Kerberos Authentication(Machine Account)
Computer GPOs Loading (Async)
GPO based StartupScript Execution
Certificate Auto EnrollmentTime SynchronizationDynamic DNS Update
GINA
Kerberos Auth(User Account)
User GPOs Loading(Async)
GPO based LogonScript Execution (SMB)
Start/End of 802.1x Authentication
Components that depend on network connectivity 2237
79
802.1x Machine Auth802.1x User Auth +network connectivity
1-7802.1X Deployment Guide
OL-16033-01
St r i c t ly C i sco Conf ident i a l
Chapter 1 Introduction How 802.1X Impacts the Network
to start its supplicant. Since the optimal value for the timeout will depend on the specifics of your network, Cisco recommends that you use the 802.1X deployment planning phase to test whichever value you select for this timer.
Similarly, the specifics of an organization’s Windows environment should be tested against 802.1X. For example, very large and complex Group Policies could introduce timing delays that would adversely affect the login process if not properly accounted for.
For an in-depth discussion of planning an 802.1X deployment, see the Baseline Identity Design Overview Guide.
802.1X Re-authenticationSince 802.1X is a port-based authentication technique, the physical status of the port directly impacts how long the authenticated session remains active. After a successful 802.1X authentication, the port remains open until the switch detects a physical link-down event (because the host unplugged from the port or the port was shutdown) or receives an explicit logoff notification indicating that the session should be terminated. Any device attempting to connect to the port after a link-down or a logoff will be required to authenticate again.
In the absence of link-down/logoff events, there is usually no need to re-authenticate a previously authenticated host that remains connected to the network. Since physical connectivity is continuously maintained, there is no question that the authenticated host remains connected to the port. Under these circumstances, re-interrogating the host’s credentials would serve no purpose. In some situations, however, re-authentication can be used as a de facto 802.1X keepalive mechanism. For example, if a host is connected to the port via an IP phone or a hub, the switch might not have direct knowledge of link-down events. During re-authentication, the switch sends an EAP-Request to the host to initiate a new 802.1X authentication session, thus providing a mechanism by which the switch can confirm that the authenticated host is still connected.
Because authentication and authorization are tightly coupled in 802.1X, re-authentication can also be used as a de facto re-authorization technique. In the absence of explicit mechanisms to dynamically push policy updates to switches, re-authentication provides a mechanism by which the switch can pull the latest authorization policy (such as VLAN or ACL assignment) for authenticated hosts.
Before configuring periodic re-authentication, network administrators should carefully weigh the perceived benefits against the potential impact to the network. Depending on the length of the re-authentication timer, periodic re-authentication could considerably increase the authentication traffic load on the network infrastructure. In addition, in some configurations, re-authentication can temporarily disrupt network connectivity for authenticated hosts. Special care must be taken when configuring re-authentication with MAC Authentication Bypass (MAB) and in IP Telephony environments. Refer to the MAC Authentication Bypass Deployment Guide and the VoIP and Identity Integration Guide for more information on MAB and IP Telephony deployment considerations.
IP TelephonyAs with PCs and laptops, IP phones connect to the network at the access edge. For a complete end-to-end security solution, IP phones must be able to function in an 802.1X environment. Moreover, IP phones typically have an extra Ethernet port to allow a PC to connect to the network via the phone, introducing one more avenue to network access that must also be secured. A complete 802.1X deployment must be able to grant secure access to IP phones and the devices that connect behind them.
1-8802.1X Deployment Guide
OL-16033-01

St r i c t ly C i sco Conf ident i a l
Chapter 1 Introduction Components of the Overall Solution
The Cisco 802.1X solution offers several features that allow for the smooth operation of IP Telephony in 802.1x-enabled networks. In the past, Cisco IP Phones could be granted access to the network via CDP-based bypass. With this method, devices that had identified themselves as IP phones via the Cisco Discovery Protocol (CDP) would be allowed to bypass 802.1X authentication and send traffic on the Voice VLAN. Devices connected to the phone would have to authenticate via 802.1X or MAB in order to gain access to the Data VLAN. More recently, Cisco IOS introduced Multi-Domain Authentication (MDA) which enables a broader, more secure solution that forces both the phone and the device behind it to authenticate using 802.1X or MAB. In addition, Cisco supports features such as Proxy EAPoL Logoff and MAB Inactivity Timers to ensure that the network can keep tabs on the devices connected via phones, reducing opportunities for session-hijacking while enabling mobility in telephony environments.
For more information on these and other IP Telephony features, see the VoIP and Identity Integration Guide.
Components of the Overall Solution IEEE 802.1X is not about a single product or feature. It is an end-to-end solution that relies upon the integration of multiple components. This section reviews those components and reviews common terminology.
SupplicantA supplicant is an 802.1X client that runs on an edge device (workstation, laptop, and the like). The job of the supplicant is to request access to the LAN and respond to requests from the authenticator (the switch). The supplicant communicates with the authenticator via 802.1X-encapsulated EAP packets. Examples of IEEE 802.1X-compliant supplicant software include the Cisco Secure Services Client (CSSC) or the native 802.1X client offered in the Microsoft Windows operating system.
AuthenticatorThe authenticator is a device (such as a Cisco Catalyst switch) that controls physical access to the network based on the authentication status of the supplicant. The authenticator acts as an intermediary (proxy) between the supplicant and the authentication server. The authenticator requests identity information from the supplicant via 802.1X, verifies that information with the authentication server via RADIUS, and then relays a response to the supplicant based on the response from the authentication server.
When the switch receives EAP over LAN (EAPoL) frames and relays them to the authentication server, the Ethernet header is stripped and the EAP frame is re-encapsulated into a RADIUS packet. The EAP frames are not modified or examined during RADIUS encapsulation. When the switch receives RADIUS packets from the authentication server, the RADIUS header is removed, leaving the EAP frame, which is then encapsulated in the IEEE 802.1X format and sent to the supplicant.
1-9802.1X Deployment Guide
OL-16033-01

St r i c t ly C i sco Conf ident i a l
Chapter 1 Introduction Components of the Overall Solution
Authentication ServerThe authentication server (such as Cisco ACS) performs the actual authentication of the supplicant. By examining the information in the encapsulated EAP messages relayed from the authenticator, the authentication server validates the identity of the supplicant and notifies the switch whether or not the supplicant is authorized to access the LAN.
While the 802.1X specification does not dictate the protocol that is used for communication between the authenticator and the authentication server, the industry has converged on RADIUS as the de facto standard. RADIUS uses a client-server model in which secure authentication is exchanged between the RADIUS server and one or more RADIUS clients. In the 802.1X case, the authentication server (such as a Cisco ACS) is the RADIUS server and the authenticator (the switch) is the RADIUS client.
User DatabaseThe user database is where user credentials used in 802.1X authentications are stored. This function can be integrated into the authentication server or it can be an external server to which the authentication server has access. Cisco ACS supports both models for the user database. The ACS has an internal user database that can be populated with usernames and passwords. The ACS also supports a number of protocols that allow it to verify user credentials that are stored in other repositories such as Microsoft Active Directory, generic LDAP databases, ODBC databases, and others.
EAPIn 802.1X, EAP provides the glue that ties the components together. The supplicant uses EAP to inform the authenticator that it is ready to begin or end authentication. In addition, EAP frames are passed between the supplicant and the authentication server to negotiate the EAP authentication type and carry out the authentication.
An EAP exchange proceeds as a series of Request/Response message pairs. The authenticator (on behalf of the authentication server) will send a Request to the supplicant and the supplicant will send a Response. The first Request that initiates authentication is typically for the supplicant’s identity. Once the supplicant responds, a series of Requests and Response is used to negotiate an EAP method and transfer the information required by that method.
At the end of the authentication process, the authentication server will either send an EAP-Success or an EAP-Failure to inform the supplicant whether the authentication passed or failed. Some EAP methods, such as EAP-TLS, further define an Alert message that offers additional information about why the authentication failed (supplicants as well as authentication servers can send Alerts).
There are two special EAP messages that the supplicant can send to the authenticator: EAPoL-Start and EAPoL-Logoff. The authenticator processes these messages locally and does not relay them to the authentication server. An EAPoL-Start is sent to indicate that the supplicant is ready to begin authentication. This message allows the supplicant to initiate an authentication. Typically, the authenticator will send an EAP-Request to initiate authentication as soon as the link comes up. However, the supplicant may not be listening at this stage and may miss the Request. The authenticator will retry, but the interval between retries may be long. In addition, after some number of unanswered Requests, the authenticator might move the port permanently into a Guest VLAN or MAB-assigned VLAN and stop sending further Requests. In these situations, the EAPoL-Start message allows the supplicant to inform the authenticator that it is ready to begin authentication.
1-10802.1X Deployment Guide
OL-16033-01

St r i c t ly C i sco Conf ident i a l
Chapter 1 Introduction Components of the Overall Solution
An EAPoL-Logoff can be sent by the supplicant to indicate that the 802.1X authentication should be terminated. It is not typically used except in IP Telephony deployments where it can be sent by the phone to the switch to indicate when an 802.1X-authenticated device behind the phone disconnects from the phone.
1-11802.1X Deployment Guide
OL-16033-01

St r i c t ly C i sco Conf ident i a l
Chapter 1 Introduction Components of the Overall Solution
1-12802.1X Deployment Guide
OL-16033-01

St r i c t ly C i sco Conf ident i a l
OL-16033-01
C H A P T E R 2
Deploying 802.1XChoosing an EAP MethodInside the framework provided by 802.1X and EAP, the end device and/or user must authenticate to the authentication server using a secure and reliable EAP method. Commonly used EAP methods include EAP-PEAP, EAP-TLS and EAP-FAST. When deploying 802.1X, it is essential to choose an EAP method that meets your organization’s security policy and that is supported by the available infrastructure.
Why it MattersChoosing an EAP method is one of the most important decisions in deploying 802.1X. Different EAP methods offer differing levels of security and complexity. Moreover, the choice of EAP type will affect all the components in the network from the supplicant to the backend database.
Note Multiple EAP methods can be configured on both the supplicant and authentication server. As part of the EAP negotiation, both sides will select the first method that they both support. As a best practice, we recommend configuring a single EAP method if possible, since that offers a deterministic way to enforce the same EAP method for every user and device on the network.
Security Policy and EAP Method
Not every EAP method is suitable for every organization’s security policy. Organizations with the highest security requirements might be required to implement EAP-TLS—which provides the strongest authentication method using client and server-side certificates. Other security policies might allow for the very good security offered by EAP-PEAP or EAP-FAST.
PKI and EAP Method
Each EAP method makes different demands on an organization’s Public Key Infrastructure (PKI). PKI refers to the infrastructure that creates, maintains, and revokes X.509 certificates for devices and users in the network. An organization’s ability to support PKI might influence the choice of an EAP method. Maintaining a PKI is a complex task and EAP methods with greater PKI requirements are typically more complex to deploy—especially if an organization is rolling out PKI for the sole purpose of supporting the 802.1X deployment.
The three most command EAP strategies generally differ in terms of complexity of PKI implementation as follows:
2-1802.1X Deployment Guide

St r i c t ly C i sco Conf ident i a l
Chapter 2 Deploying 802.1X Choosing an EAP Method
• EAP-TLS requires the most complex PKI
• EAP-PEAP requires moderately complex PKI
• EAP-FAST with autonomous provisioning requires no PKI
Note The most secure EAP method, EAP-TLS, is also the most complex to deploy. Finding the right balance between complexity and security is an important part of choosing an EAP method.
Supplicant and EAP Method
Not all supplicants support all EAP methods. When choosing a supplicant, be sure to verify that it supports the EAP method you wish to deploy.
Authentication Servers and EAP Method
Not all authentication servers support all EAP methods. When choosing an authentication server, be sure to verify that it supports the EAP method you wish to deploy.
Backend Data Storage and EAP Method
Not all backend data stores support all EAP methods. When choosing a backend data store, be sure to verify that it supports the EAP method you wish to deploy. Or, conversely, if you already have a backend data store, be sure to choose an EAP method that can leverage it. For example, an EAP type that uses MSCHAPv2 as the inner method (such as PEAP-MSCHAPv2) can use Active Directory as a backend database, but not a generic LDAP server.
EAP MethodsThe following section gives a detailed technical overview of different EAP methods, starting with a description of the basic functionality and ending with specific deployment considerations and recommendations for each method. Summaries are provided for the following:
• EAP-TLS, page 2-2
• PEAP-MSCHAPv2, page 2-10
• EAP-FAST, page 2-13
For more information on design recommendations and how to choose an EAP type, see [insert reference to Jason's design paper].
Comment: Specific doc link/title needed for X-ref.
EAP-TLS
This section provides the following EAP-TLS descriptions:
• Basic Functionality (EAP-TLS), page 2-3
• Deployment Recommendations (EAP-TLS), page 2-4
2-2802.1X Deployment Guide
OL-16033-01

St r i c t ly C i sco Conf ident i a l
Chapter 2 Deploying 802.1X Choosing an EAP Method
Basic Functionality (EAP-TLS)
EAP-Transport Layer Security (EAP-TLS) is an IETF standard defined in RFC 2716. As discussed in Chapter 1, “Introduction,” EAP-TLS addresses a number of weaknesses in other EAP protocols by using X.509 certificates for secure authentication. In addressing these weaknesses, however, EAP-TLS increases the complexity of deployment. Unlike PEAP-MSCHAPv2 (which requires only server-side certificates) and EAP-FAST (which requires no certificates), EAP-TLS requires client-side and server-side certificates for mutual authentication.
Some of the benefits of EAP-TLS include:
• The ability to provide per-packet confidentiality and integrity protection—which protects user identity.
• A standardized mechanism for key exchange.
• Support for acknowledged success/failure indications. The EAP-TLS protocol allows for TLS Alert messages which can be sent from the server or the client to describe exactly what caused the handshake to fail.
Within IEEE 802.1X, the EAP-TLS exchange of messages provides mutual authentication, negotiation of the encryption method, and encrypted key determination between a supplicant and an authentication server.
Figure 2-1 illustrates the EAP-TLS message exchange between the supplicant, authenticator, and authentication server.
Figure 2-1 EAP-TLS Message Exchange
SearchResponse
SearchRequest
EAP-Response/Identity
EAP-Response/TLS Client Hello
EAP-Request/TLS Start
EAP-Response
EAP-Success
EAPoL-Start
Supplicant User DirectoryAuthenticator
802.1x RADIUS LDAP
AuthenticatorServer
EAP-Response/Identity
EAP-Request/Identity
EAP-Response/TLS Client Hello
EAP-Request/TLS Start
EAP-Response
“Protected” TunnelEAP-Success
2238
50
EAP-Request/TLS Server_Hello, Server Certificate, Server_Key_Exchange,Certificate Request, Server_Hello_Done
EAP-Response/TLS Client Certificate, Client_Key_Exchange, Certificate Verify,Change_Cipher_Spec, TLS Finished
EAP-Request/TLS Change_Ciper_Spec, TLS Finished
2-3802.1X Deployment Guide
OL-16033-01

St r i c t ly C i sco Conf ident i a l
Chapter 2 Deploying 802.1X Choosing an EAP Method
The EAP-TLS message exchange can be described as follows:
1. First, a client running the IEEE 802.1X supplicant connects to the network and sends an EAPoL-Start message to the authenticator.
Note The CSSC client always sends EAPoL-Start messages. The native supplicant in Windows XP uses the SupplicantMode registry setting to control if and when the supplicant sends an EAPoL-Start. See “Registry Settings” section on page 2-19 for more information on Windows XP registry settings.
2. Next, the authenticator sends an EAP Identity request to the supplicant and the supplicant replies with an EAP Identity response—which sends the EAP outer-identity (typically, the username) in the clear. For more information, see RFC 2716.
3. The authenticator forwards the response to the authentication server inside a RADIUS Request message.
4. The authentication server sends an EAP-TLS Start message, packaged inside a RADIUS Response message.
5. The authenticator extracts the EAP-TLS Start message and forwards it to the client via 802.1X. The authenticator continues to forward all subsequent EAP-TLS messages via RADIUS to the authentication server and via 802.1X to the supplicant.
6. In response to the EAP-TLS Start, the supplicant replies with an EAP-TLS Client Hello.
7. The authentication server sends its X.509 PKI certificate to the supplicant and requests that the supplicant send its certificate.
8. The supplicant verifies the certificate with the authentication server’s public key and sends its certificate to the authentication server.
9. The authentication server verifies the supplicant’s certificate, thus authenticating the identity of the user. The authentication server queries a user database (either the ACS internal database or an external database such as Active Directory or OpenLDAP) to verify that this user is allowed access to the network.
10. The authentication server instructs the authenticator to authorize network access for the user.
11. The authenticator then enables the port connected to the supplicant.
Deployment Recommendations (EAP-TLS)
This section includes descriptions of the following:
• Certificate Requirements, page 2-4
• EAP-TLS and Machine Authentication, page 2-5
• Deployment Recommendations, page 2-7
Certificate Requirements
One of the biggest challenges when deploying EAP-TLS is meeting the certificate requirements. EAP-TLS provides authentication through the exchange and verification of X.509 certificates. Therefore, installing the correct certificates on 802.1X supplicants and the authentication server is absolutely essential to a successful deployment.
Every end user and computer (including the ACS) that participates in EAP-TLS must possess at least two certificates:
2-4802.1X Deployment Guide
OL-16033-01

St r i c t ly C i sco Conf ident i a l
Chapter 2 Deploying 802.1X Choosing an EAP Method
• Personal Certificate signed by the Certificate Authority (CA)
• A copy of the CA Root Certificate
The Personal Certificate is like a passport that cannot be forged. A user (or computer) presents a Personal Certificate as proof of identity. The Personal Certificate is signed by the Certificate Authority (CA) that issued it. Anyone in possession of a copy of that CA’s Root Certificate can validate the signature on the Personal Certificate. Thus, the CA is a trusted third party that allows entities to mutually authenticate.
In an EAP-TLS exchange, the authentication server must have a copy of the Root Certificate for the CA that signed the supplicant’s Personal certificate. Conversely, the supplicant must have the Root Certificate for the CA that signed the authentication server’s Personal certificate.
EAP-TLS cannot succeed without certificates. However, EAP-TLS does not define how to obtain, manage, or revoke certificates. Those tasks are the responsibility of an organization’s PKI. Although a complete discussion of designing a PKI is beyond the scope of this paper, the following guidelines illustrate key components of PKI design that can impact the deployment and functionality of EAP-TLS:
• Certificate Authorities—Choosing a Certificate Authority is an important step in designing an organization’s PKI. Broadly speaking, a Certificate Authority can be either external or internal. External CAs (such as RSA or Verisign) are owned and managed by third parties. Using an external CA can reduce some of the significant administrative overhead associated with provisioning and maintaining PKI.
Internal CAs are owned and managed by the organization itself. An internal CA provides local control, confidentiality, and flexibility at the cost of an increased burden on an organization’s security and IT administrators. In Microsoft environments, the administrative burden of an internal CA can be reduced by using a Microsoft Certificate Authority integrated into a Microsoft Active Directory infrastructure.
• Managing Certificates—Certificates do not live forever. Like passports, certificates can expire or be revoked. If either of these events occurs, the certificate can no longer be used for EAP-TLS authentication.
Certificates expire according to the date set by the Certificate Authority that issued them. Client certificates issued by the Microsoft CA have a lifetime of one year by default. The duration of a certificate’s lifetime should be configured in accordance with an organization’s security policy. An organization’s PKI should be designed to enable certificate renewal well in advance of the expiration date to prevent loss of connectivity.
Certificates can be revoked for a number of reasons. For example, the certificate may have been compromised or the person to whom the certificate was issued might have left the organization. These certificates will need to be revoked to prevent them being used to gain unauthorized access to an organization’s assets. Certificate revocation is achieved through a Certificate Revocation List (CRL). A CA periodically generates a CRL which contains a list of all certificates that should no longer be trusted. Entities with a need to validate certificates issued by a CA can download the CRL and use it to validate certificates. This eliminates the need to contact the CA for every authentication. The CRL is issued with a (usually short) lifetime during which it is valid. When the CRL is about to expire (or at some configurable interval), a device will download the latest CRL from the CA. The short lifetime of the CRL ensures that the entity possesses current information about which certificates have been revoked.
EAP-TLS and Machine Authentication
As discussed earlier, machine authentication enables secure and rapid login to enterprise Active Directory domains. When deploying EAP-TLS for machine authentication, it is important to remember that the machine and the user who logs into the machine are two separate entities as far as 802.1X is
2-5802.1X Deployment Guide
OL-16033-01
St r i c t ly C i sco Conf ident i a l
Chapter 2 Deploying 802.1X Choosing an EAP Method
concerned. The machine authenticates independently of any users that log onto the machine. This means that Personal Certificates are required for the machine itself as well as for any user who needs to log into that machine.
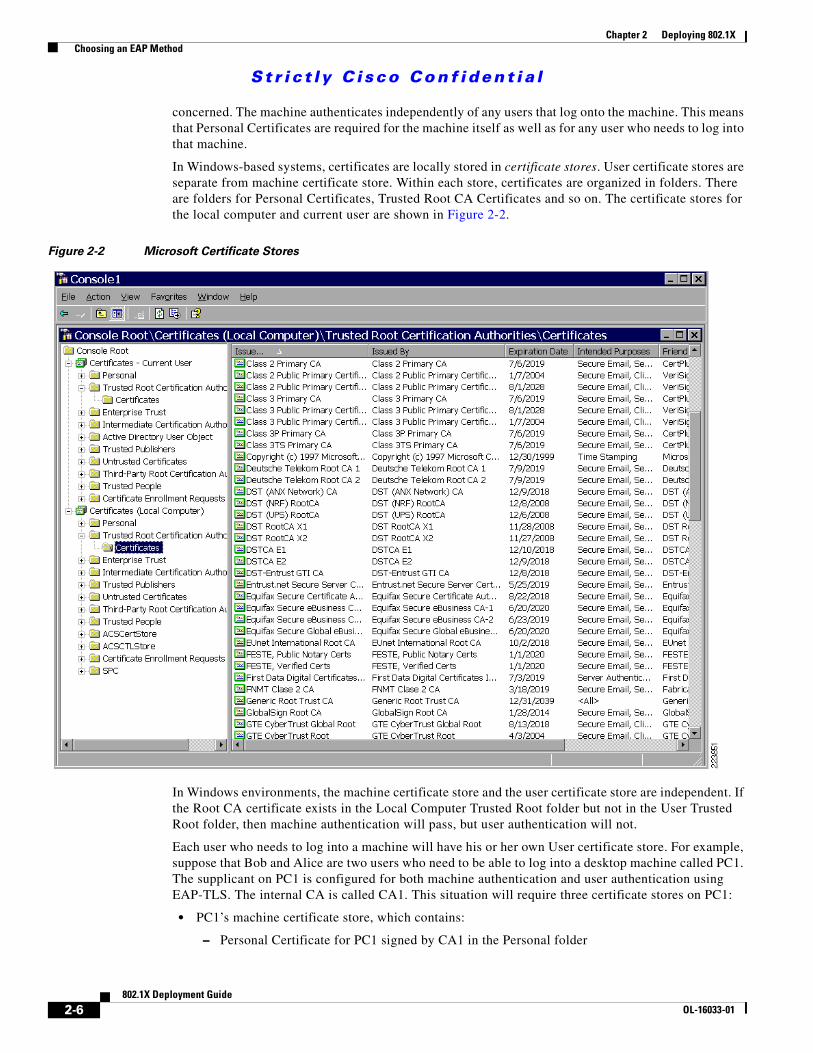
In Windows-based systems, certificates are locally stored in certificate stores. User certificate stores are separate from machine certificate store. Within each store, certificates are organized in folders. There are folders for Personal Certificates, Trusted Root CA Certificates and so on. The certificate stores for the local computer and current user are shown in Figure 2-2.
Figure 2-2 Microsoft Certificate Stores
In Windows environments, the machine certificate store and the user certificate store are independent. If the Root CA certificate exists in the Local Computer Trusted Root folder but not in the User Trusted Root folder, then machine authentication will pass, but user authentication will not.
Each user who needs to log into a machine will have his or her own User certificate store. For example, suppose that Bob and Alice are two users who need to be able to log into a desktop machine called PC1. The supplicant on PC1 is configured for both machine authentication and user authentication using EAP-TLS. The internal CA is called CA1. This situation will require three certificate stores on PC1:
• PC1’s machine certificate store, which contains:
– Personal Certificate for PC1 signed by CA1 in the Personal folder
2-6802.1X Deployment Guide
OL-16033-01
St r i c t ly C i sco Conf ident i a l
Chapter 2 Deploying 802.1X Choosing an EAP Method
– CA1’s Root Certificate in the Trusted Root folder
• Bob’s user certificate store which contains:
– Personal Certificate for Bob signed by CA1 in the Personal folder
– CA1’s Root Certificate in the Trusted Root folder
• Alice’s user certificate store which contains:
– Personal Certificate for Alice signed by CA1 in the Personal folder
– CA1’s Root Certificate in the Trusted Root folder
If either certificate in PC1’s store is missing, expired or revoked, then machine authentication will fail and the PC will not have access to the network until a subsequent user authentication succeeds. If either certificate in Bob’s store is missing, expired or revoked, then Bob’s EAP-TLS user authentication will fail when Bob logs into PC1 and Bob will not get access to the network. If either certificate in Alice’s store is missing, expired or revoked, then Alice’s EAP-TLS user authentication will fail when Alice logs into PC1 and Alice will not get access to the network. These three authentications are independent, so if the machine certificate is expired, machine authentication will fail, but Bob might still be able to access the network—if he has the correct certificates for user authentication.
Deployment Recommendations
A working public key infrastructure is a prerequisite for a successful deployment of 802.1X with EAP-TLS. Good design choices are essential to deploying PKI and EAP-TLS. This section discusses best practice recommendations for deploying a PKI for use with EAP-TLS.
Choosing a CA
As discussed previously, Certificate Authorities can be either internal or external. While there is no single best-practice for internal CAs vs. external CAs, choosing one over the other will depend on many factors, such as the following:
• Whether there is a pre-existing PKI
• The organization’s security policy
• The organization’s IT expertise.
• Cost of certificates signed by external CA
• Cost of maintaining an internal CA
An organization which already has an established PKI that uses an external CA should continue to use that same CA for EAP-TLS (unless security policy dictates otherwise). An organization that does not have PKI and is only interested in PKI for doing EAP-TLS should consider establishing an internal CA that can be integrated with existing directory services (such as Microsoft CA with Active Directory) to ease the deployment of PKI.
Note It is possible for EAP-TLS to function when the server and client certificates are not signed by the same CA. For example, a client may have a certificate signed by the Verisign CA while the authentication server’s certificate may be signed by an internal CA. As long as the client trusts the internal CA (the client has the internal CA’s root certificate) and the authentication server trusts the Verisign CA, then the client and the server can mutually authenticate via EAP-TLS. However, multiple CAs that are not in the same chain of authority can complicate the deployment, management, and troubleshooting of EAP-TLS. We recommend using a single CA certificate chain unless there is an explicit and well-understood need for multiple CAs with different certificate chains.
2-7802.1X Deployment Guide
OL-16033-01

St r i c t ly C i sco Conf ident i a l
Chapter 2 Deploying 802.1X Choosing an EAP Method
The configuration examples in this document reflect a best practice recommendation for an organization looking at PKI for the first time for the purposes of deploying EAP-TLS. In this topology, a single Microsoft Certificate Authority signs all certificates. Since there is a single CA, it is known as the Root CA. The CA is configured to integrate with Active Directory for simplified certificate provisioning and management. A Microsoft CA in this configuration is often referred to as an Enterprise Root CA as opposed to a Standalone Root CA—which is not integrated with Active Directory.
Note The choice of a CA may impact the choice of a supplicant. The native Microsoft Windows XP supplicant requires that the certificate presented by the ACS include an Enhanced Key Usage (EKU) field in the certificate that is set to Server Authentication. Likewise, the Microsoft supplicant requires that client certificates have an EKU field set to Client Authentication. Some CAs do not support the EKU field and thus cannot be used with the Microsoft supplicant.
Figure 2-3 shows the correct EKU field in an ACS certificate.
Figure 2-3 Required EKU for ACS Certificate
Certificate Auto-Enrollment
While it is possible to manually install the required certificates on each host, manual certificate enrollment does not scale well. Automating the certificate enrollment process will greatly facilitate the deployment of PKI and EAP-TLS.
2-8802.1X Deployment Guide
OL-16033-01

St r i c t ly C i sco Conf ident i a l
Chapter 2 Deploying 802.1X Choosing an EAP Method
Caution Certificate auto-enrollment should be enabled prior to enabling 802.1X on the authenticator. If 802.1X is enabled on the authenticator before the host has acquired the necessary certificates for EAP-TLS, then authentication will fail and the host will not be able to get access to the network to perform auto-enrollment.
In Microsoft environments, it is possible to utilize Active Directory-based auto-enrollment mechanisms to simplify the deployment of PKI. The Active Directory default Group Policy will automatically propagate the Root CA certificate to the appropriate store of any device or user that joins the domain. Active Directory Group Policies can also be configured to auto-enroll machine and user personal certificates and to renew all certificates in advance of expiration. Basic instructions for configuring auto-enrollment are included in this document.
Note User Auto-Enrollment is only supported on Windows 2003 Server Enterprise Edition Certificate Authorities. Windows 2003 Server Standard Edition CA cannot be used for user auto-enrollment. Machine auto-enrollment is supported on both Editions. Because user auto-enrollment greatly simplifies PKI deployment, using a Windows 2003 Server Enterprise Edition CA is the recommended best practice when deploying EAP-TLS in a Microsoft environment. For detailed information on configuring User Certificate Auto-enrollment in Windows environments, see also: http://www.microsoft.com/technet/prodtechnol/windowsserver2003/technologies/security/autoenro.mspx#EFD
Managing Certificates
Machines or users attempting to connect to an 802.1X-protected network for the first time must have a valid certificate to gain full access to the network. Therefore, it is best to deploy certificates to all devices before enabling 802.1X in the network. After IEEE 802.1X is enabled and EAP-TLS is deployed, additional planning will be required for certificate enrollment, expiration and/or revocation. This section describes various methods that can be used when a new device must acquire a certificate and when existing devices have expired or revoked certificates.
Once 802.1X has been enabled, there are several ways for new devices to acquire certificates:
• Organizations that pre-build device images should build certificates into the image before deploying the device—This greatly simplifies certificate deployment and is recommended for organizations that deploy devices in this way.
• MAB Authentication Bypass—The new device’s MAC address can be temporarily entered into a MAC database. After 802.1X times out, the device will be granted access to the network based on its MAC address. Once the device has obtained the necessary certificates, the MAC address can be removed from the MAC database so that the device will use EAP-TLS for all subsequent logins.
• Guest VLAN—If no MAC database is available to perform MAC authentication, then the authenticator can be configured to allow the device into the Guest VLAN after 802.1X times out. The Guest VLAN can be designed to allow limited access to the Certificate Authority so that valid certificates can be acquired. Full network access will be granted upon the next EAP-TLS authentication.
Certificates are always issued with an expiration date. To prevent devices from losing network access, these certificates must be renewed prior to expiration. A best practice is to automate certificate renewal. In Microsoft environments with Windows XP Pro clients and Windows 2003 Enterprise Edition Certificate Authority, certificates are, by default, renewed automatically within six weeks of expiration or when 80 percent of the certificate's lifetime has expired.
2-9802.1X Deployment Guide
OL-16033-01
St r i c t ly C i sco Conf ident i a l
Chapter 2 Deploying 802.1X Choosing an EAP Method
When certificates are revoked or expire without renewal, EAP-TLS will fail and network access will be denied. Since network access is required in order to request a new certificate, these devices and/or users will be permanently denied access by default. The device will not be able to gain access via the Guest VLAN or via MAB because those mechanisms only work when 802.1X times out, not when 802.1X fails because of a bad certificate. In this case, only the Auth-Fail VLAN can be used to grant limited access to machines or users that fail EAP-TLS authentication. The Auth-Fail VLAN can be designed to allow access to the Certificate Authority so that valid certificates can be acquired and used for the next authentication.
PEAP-MSCHAPv2
This section includes descriptions of the following:
• Basic Functionality (PEAP-MSCHAPv2), page 2-10
• Deployment Recommendations (PEAP-MSCHAPv2), page 2-12
Basic Functionality (PEAP-MSCHAPv2)
PEAP was developed by Cisco Systems, Microsoft Corporation, and RSA Security Inc. PEAP is an EAP type that addresses security issues by first creating a secure channel that is both encrypted and integrity-protected with TLS. This tunnel is created using a valid server certificate that the authentication server sends to the supplicant at the beginning of the PEAP negotiation. Inside this secure channel, a new EAP negotiation takes place to authenticate the client. This second EAP negotiation can be virtually any EAP type—such as MSCHAPv2 and Generic Token Card (GTC). This document addresses MSCHAPv2 because it is the default method of the Windows XP supplicant. The CSSC supplicant supports other inner methods as well.
Because the TLS channel protects EAP negotiation and authentication for the network access attempt, password-based authentication protocols that are normally susceptible to an offline dictionary attack can be safely used for authentication. By wrapping the EAP messages within TLS, any EAP method running within PEAP is provided with built-in support for key exchange, session resumption, fragmentation, and reassembly. Furthermore, since PEAP only requires a personal certificate on the authentication server, it is possible to securely authenticate LAN clients without requiring every client to have its own personal certificate. The client still needs a copy of the root CA certificate in order to validate the authentication server’s certificate, but managing root CA certificates is significantly simpler than managing a unique personal certificate for every device and user in the network. This greatly reduces the burden of deploying and maintaining a public key infrastructure (PKI) and thus simplifies the architecture of secure wired/wireless LANs.
Note PEAP is supported in Windows XP Service Pack 1 (SP1), Windows XP Service Pack 2 (SP2), Windows Server 2003, and Windows 2000 Service Pack 4 (SP4). CSSC supports PEAP under the full wired/wireless license.
MSCHAPv2 is commonly used as the second EAP type inside a PEAP tunnel. MS-CHAPv2 is a password-based, challenge-response, mutual authentication protocol that uses MD4 and DES to encrypt responses. The authenticator challenges a supplicant and the supplicant can challenge the authentication server. If either challenge is not correctly answered, the connection can be rejected. MS-CHAPv2 was originally designed by Microsoft as a PPP authentication protocol to provide better protection for dial-up and VPN connections, although it is now an EAP type as well. Although MSCHAPv2 provides better protection than previous challenge-response authentication protocols, it is still susceptible to an offline dictionary attack. A malicious user can capture a successful MSCHAPv2 exchange and guess passwords
2-10802.1X Deployment Guide
OL-16033-01

St r i c t ly C i sco Conf ident i a l
Chapter 2 Deploying 802.1X Choosing an EAP Method
until the correct one is determined. Used in the combination with PEAP, the MSCHAPv2 exchange is protected with the strong security of the TLS channel. Figure 2-4 illustrates the PEAP with MSCHAPv2 message exchange between the supplicant, authenticator, and authentication server.
Figure 2-4 PEAP MSCHAPv2 Message Exchange
The PEAP-MSCHAPv2 message exchange can be described by the following steps:
1. First, a client running the IEEE 802.1X supplicant connects to the network and sends an EAPoL-Start message to the authenticator.
2. The authenticator sends an EAP Identity request to the supplicant and the supplicant replies with an EAP Identity response which sends the EAP outer-identity (typically, the username) in the clear. For more information, see RFC 2716.
3. The authenticator forwards the response to the authentication server via RADIUS.
4. The authentication server sends an EAP-TLS Start message to the supplicant and the supplicant replies with an EAP-TLS Client Hello.
5. The authentication server sends its X.509 PKI certificate to the supplicant.
6. The supplicant verifies the certificate with the authentication server’s public key and sends an updated ciphersuite.
7. The authentication server agrees to the ciphersuite.
NTLM
EAP-Response/Identity
EAP-Response/TLS Client Hello
EAP-Request/TLS Start
EAPoL-Start
Supplicant User DirectoryAuthenticator
802.1x RADIUS LDAP
AuthenticatorServer
EAP-Response/Identity
EAP-Request/Identity
EAP-Response/TLS Client Hello
EAP-Request/TLS Start
Identity Response
“Protected”
Phase 1
Phase 2EAP-MSCHAPv2 Challenge
2238
53
EAP-Request/TLS Server_Hello, Server Certificate, Server_Key_Exchange,Server_Hello_Done
EAP-Request/TLS Change_Ciper_Spec [Identity-Request]
EAP-Response/Certificate Verify, Change_Cipher_Spec
EAP-MSCHAPv2 Challenge Response
EAP-Success
Identity Response
EAP-MSCHAPv2 Challenge
EAP-MSCHAPv2 Challenge Response
EAP-Success
2-11802.1X Deployment Guide
OL-16033-01

St r i c t ly C i sco Conf ident i a l
Chapter 2 Deploying 802.1X Choosing an EAP Method
8. With the TLS tunnel now established, the authentication server sends an encrypted EAP-MSCHAPv2 challenge to the supplicant and the supplicant replies with a challenge-response.
9. The authentication server confirms the user identity by consulting a user database and then instructs the authenticator to authorize network access for the user.
10. The authenticator then enables the port connected to the supplicant.
Deployment Recommendations (PEAP-MSCHAPv2)
This section includes descriptions of the following:
• Credential Requirements, page 2-12
• PEAP-MSCHAPv2 and Machine Authentication, page 2-12
• Deployment Recommendations, page 2-13
Credential Requirements
Like EAP-TLS, PEAP-MSCHAPv2 requires that the authentication server present a certificate to the supplicant. To validate the server certificate, the supplicant must have the Root Certificate for the CA that signed the authentication server’s Personal certificate. Unlike EAP-TLS, PEAP-MSCHAPv2 does not require that the supplicant have a Personal certificate. This is because supplicant establishes its identity inside the tunnel via MSCHAPv2. MSCHAPv2 authentication relies upon a shared secret (password), not a certificate.
Every end user and computer that participates in PEAP-MSCHAPv2 must possess the following credentials:
• Root CA Certificate for the CA that signed the authentication server's Personal certificate
• MSCHAPv2 password
The authentication server must possess the following credentials:
• Personal certificate signed by the root CA
• MSCHAPv2 password for every user and computer
Note For more specifics on certificate deployment and management, refer to the “EAP-TLS” section on page 2-2.
PEAP-MSCHAPv2 and Machine Authentication
When deploying PEAP-MSCHAPv2 for machine authentication, it is important to remember that the machine and the user who logs into the machine are two separate entities as far as 802.1X is concerned. The machine authenticates independently of any users that log onto the machine.
Note During PEAP-MSCHAPv2, the machine will send its username in the format host/machinename.domain.com. The host/ prefix distinguishes a machine authentication from an end user authentication.
Because machine authentication is independent from user authentication, the root CA certificate must be in the machine certificate store as well as the user store so that the authentication server’s certificate can be validated during machine authentication and during user authentication. For more information on Microsoft certificate stores, see “EAP-TLS” section on page 2-2. In addition, an MSCHAPv2 shared
2-12802.1X Deployment Guide
OL-16033-01
St r i c t ly C i sco Conf ident i a l
Chapter 2 Deploying 802.1X Choosing an EAP Method
secret is required for the machine as well as each user. In Microsoft environments, a machine automatically acquires a machine password when it joins the domain. The machine password is stored in Active Directory and is typically refreshed every 30 days.
Deployment Recommendations
Deploying and Managing Certificates
PEAP does require X.509 certificates, but the certificate requirements are significantly less than those needed for EAP-TLS. Since PEAP does not require personal certificates on the supplicants, the root CA certificate is the only certificate needed by end hosts. In a Microsoft Active Directory environment with an integrated Microsoft Certificate Authority configured as the Enterprise root CA, the root CA certificate will automatically be added to the machine certificate store and the user certificate store of every machine and user in the domain. Therefore, the only certificate needed by the end host will, in many cases, be automatically downloaded without intervention from the end user or IT staff.
Unlike the supplicants, the authentication server will need a personal server certificate in addition to the root CA certificate that is automatically downloaded. The server certificates must be manually downloaded to the authentication server. However, since there are relatively few authentication servers, manual certificate enrollment can be easily managed in most cases.
See the “Deployment Recommendations” section on page 2-13 for more information on choosing a CA and deploying PKI.
Passwords
Since PEAP clients do not have personal certificates, they must use some other method to authenticate themselves to the authentication server. In the case of PEAP-MSCHAPv2, the clients use passwords to successfully complete the inner MSCHAPv2 challenge. In Microsoft Active Directory environments, the Active Directory passwords can be used for the MSCHAPv2 exchange. This is often referred to as single sign-on because the end user enters his or her password only once (at the Microsoft login window). The 802.1X supplicant reuses this password for MSCHAPv2 without having to query the user again. Re-using Active Directory credentials also reduces administrative overhead since there is only one password repository to manage. CSSC and the native Windows XP supplicant both support single sign-on with Active Directory passwords. This is a recommended best practice.
For machine authentication, machines need Active Directory passwords for the same reasons that users need Active Directory passwords. Active Directory automatically provisions machines with machine passwords suitable for MSCHAPv2 when the machine joins the domain. In most cases, no further action is required to provision the machine with suitable credentials.
Password aging is often enabled in Active Directory as part of a larger Windows security policy. To prevent network outages when Active Directory passwords expire, the Cisco ACS server supports user-changeable passwords during PEAP authentication. When attempting PEAP-MSCHAPv2 using an expired Active Directory password, users receive a dialog box prompting them to change their passwords upon their first successful authentication after their passwords have expired.
EAP-FAST
This section includes descriptions of the following:
• Basic Functionality (EAP-FAST), page 2-14
• Deployment Recommendations (EAP-FAST), page 2-16
2-13802.1X Deployment Guide
OL-16033-01

St r i c t ly C i sco Conf ident i a l
Chapter 2 Deploying 802.1X Choosing an EAP Method
Basic Functionality (EAP-FAST)
EAP-FAST was developed by Cisco Systems and published as the IETF Informational RFC 4851. Similar to PEAP, the EAP-FAST protocol first establishes a TLS tunnel. Inside this encrypted tunnel, a secondary EAP method (such as MSCHAPv2 or GTC) is used to authenticate the user. While the overall process is similar to PEAP, EAP-FAST differs significantly in that tunnel establishment is based upon a strong shared secret key (not a server-side certificate as it is in PEAP). These shared secrets are called Protected Access Credentials (PACs). Because handshakes based upon PAC shared secrets are intrinsically faster than handshakes based upon a PKI infrastructure, EAP-FAST is significantly faster than PEAP.
EAP-FAST requires that every user and machine in the network have a unique PAC prior to attempting authentication. These PACs may be distributed automatically or manually to client devices. When a PAC is provisioned automatically, the provisioning process is referred to as EAP-FAST Phase 0. Once the PAC has been provisioned, it can be re-used until it expires or until the Master PAC that was used to create it expires. After a PAC expires, the host must re-provision its PAC by executing EAP-FAST Phase 0 again. Optionally, as an optimization, an authentication server can refresh a host’s PAC at the end of a successful EAP-FAST authentication. If a PAC is refreshed in this way, it is less likely to expire and require a full Phase 0 re-provisioning.
Note Cisco ACS automatically refreshes PACs after every successful EAP-FAST authentication.
When PACs are distributed automatically, the provisioning of the PAC must happen inside an encrypted tunnel so that the PAC cannot be snooped by malicious users. There are two ways to create an encrypted provisioning tunnel: anonymous and authenticated. In anonymous provisioning, the supplicant and the authentication server set up an anonymous TLS tunnel using the Diffie-Hellman protocol. The Diffie-Hellman key exchange protocol allows two anonymous parties to establish a shared secret key that can be used to encrypt further communication in a TLS tunnel. Diffie-Hellman does not require X.509 certificates of any sort on either the supplicant or authentication server side. Once this anonymous tunnel has been established, the supplicant and authenticator can use any EAP method that supports mutual authentication to verify each other’s identity. MSCHAPv2 is often used for this purpose since the challenge-response mechanism requires that both parties have knowledge of the username and password being authenticated. Whichever inner method is used, once the encrypted authentication has succeeded, the authentication server can securely send a PAC to the supplicant inside the encrypted tunnel.
Note EAP-GTC cannot be used with anonymous PAC provisioning because it provides one-way authentication only. With GTC, the server can verify that the client possesses a valid password, but the client does not know if it is talking to a valid server. Since the server did not prove its identity during the anonymous tunnel establishment, the inner method must provide a mechanism for doing so.
In authenticated PAC provisioning, the TLS tunnel is created based on a server-side certificate presented by the authentication server. This is very similar to the establishment of a tunnel in PEAP. After the tunnel has been created, the client must authenticate itself to the authentication server in order to receive a PAC. Since the server has already authenticated itself by presenting a valid server certificate, the client can use any method to authenticate itself and is not restricted to mutually-authenticating protocols such as MSCHAPv2. MSCHAPv2 can still be used, but so can EAP-GTC or even EAP-TLS (if the client also has a personal certificate).
Once a supplicant is in possession of a PAC, EAP-FAST authentication can occur. This happens in two phases. In Phase 1, an encrypted tunnel is established based on the PAC. The PAC itself is never sent on the wire where it could be snooped and subjected to a dictionary attack. Instead, the supplicant sends an encrypted PAC-Opaque value from which the authentication server can derive the PAC (assuming it
2-14802.1X Deployment Guide
OL-16033-01

St r i c t ly C i sco Conf ident i a l
Chapter 2 Deploying 802.1X Choosing an EAP Method
possesses the Master PAC). If the authentication server can derive the PAC and establish the tunnel, then the supplicant can be sure of the authentication server’s identity. Thus, the establishment of the PAC-based tunnel effectively authenticates the server to the supplicant. In Phase 2, the supplicant authenticates itself to the server using an authentication protocol that is known as the inner method. The inner method can be any EAP method. The most commonly used are MSCHAPv2, EAP-TLS, and EAP-GTC.
Figure 2-5 illustrates the EAP-FAST Phase 1 and Phase 2 message exchange between the supplicant, authenticator, and authentication server using EAP-GTC as the inner method in Phase 2. This exchange presumes that a PAC has been previously provisioned using one of the methods described above so Phase 0 is not shown.
Figure 2-5 EAP-FAST Message Exchange
The process illustrated in Figure 2-5, sequences as outlined in the following:
1. First, a client running the IEEE 802.1X supplicant connects to the network and sends an EAPoL-Start message to the authenticator.
2. The authenticator sends an EAP Identity request to the supplicant and the supplicant replies with an EAP Identity response which sends the EAP outer-identity (typically, the username) in the clear. For more information, see RFC 2716.
3. The authenticator forwards the response to the authentication server via RADIUS.
4. The authentication server sends an EAP-FAST Start message, which includes the Authority ID, to the supplicant.
EAP-Response/Identity
EAP-FAST Start [Authority-ID]
EAPoL-Start
Supplicant User DirectoryAuthenticator
802.1x RADIUS LDAP
AuthenticatorServer
EAP-Response/Identity
EAP-Request/Identity
EAP-FAST Start [Authority-ID]
Authentication via EAP-GTC
“Protected”
Phase 1
Phase 2Authentication Response
2238
54
EAP-FAST [TLS Change_Cipher-Spec, TLC Finished]
EAP-FAST [TLS Server_Hello [Server_random], Change_Cipher-Spec, TLS Finished]
EAP-FAST [TLS Client_Hello [Client_random, PAC-Opaque]]
Optional PAC Refresh
EAP-Success
Authentication via EAP-GTC
Authentication Response
Optional PAC Refresh
EAP-Success
2-15802.1X Deployment Guide
OL-16033-01

St r i c t ly C i sco Conf ident i a l
Chapter 2 Deploying 802.1X Choosing an EAP Method
5. Based on the Authority ID sent by the authentication server, the supplicant selects a stored PAC, which is a unique shared key used to mutually authenticate the supplicant and server.
6. The supplicant then replies to the authentication server with a PAC opaque (based on the PAC key).
7. The authentication server decrypts the PAC opaque using a master key to derive the PAC key. At this point, both the supplicant and server possess the same PAC key and create a TLS tunnel.
8. The authentication server sends an EAP-GTC request to the supplicant and the supplicant replies with a response.
9. The authentication server confirms the user identity (querying an external database if necessary), optionally refreshes the PAC and then instructs the authenticator to authorize network access for the user.
10. The authenticator then enables the port connected to the supplicant.
Deployment Recommendations (EAP-FAST)
This section includes descriptions of the following:
• PAC Provisioning, page 2-16
• PAC Expiration, page 2-17
• Inner Methods, page 2-17
• Supplicants, page 2-18
PAC Provisioning
Before deploying EAP-FAST, it is essential to decide how PACs will be provisioned (and re-provisioned) in your network. There are three basic provisioning choices:
• Manual provisioning
• Automatic Authenticated provisioning (with MSCHAPv2, TLS or GTC inner method)
• Automatic Anonymous provisioning (with MSCHAPv2 inner method)
Each of these methods offers varying levels of convenience and security.
Manual provisioning is completely immune to any network based attacks. Since the PAC is never sent on the wire, it can never be snooped or cracked. However, manual provisioning can be a time-consuming process with high overhead. Moreover, a process for manual distribution must be developed to avoid the possibility of non-network-based attacks.
Note CSSC 4.2 does not support manual PAC provisioning.
Automatic Authenticated provisioning provides excellent security in the form of certificate-based TLS encryption along with the convenience of automatic, network-based distribution. However, certificate-based TLS tunnels require a PKI infrastructure to issue and validate server certificates.
Automatic Authenticated provisioning with MSCHAPv2 or GTC has the same certificate requirements as PEAP. In cases where there is an existing PKI infrastructure that is sufficient to support either PEAP or EAP-FAST Authenticated provisioning with MSCHAPv2 or GTC, the choice between the two methods will rest with the nature of the endpoints being authenticated. In largely wireless environments where roaming is a consideration, the speed improvements offered by PAC tunnels will make EAP-FAST more attractive. In wired environments where authentication speed is not an issue, the optimizations
2-16802.1X Deployment Guide
OL-16033-01

St r i c t ly C i sco Conf ident i a l
Chapter 2 Deploying 802.1X Choosing an EAP Method
provided by EAP-FAST may not be worth the additional effort of deploying and maintaining PACs. This makes PEAP a better choice in wired environments with an existing PKI infrastructure that supports server-side certificates.
Automatic Authenticated provisioning with TLS has the same certificate requirements as EAP-TLS (server and client side certificates). In cases where there is an existing PKI infrastructure that is sufficient to support either EAP-TLS or EAP-FAST Authenticated provisioning with TLS, the choice between the two methods will rest with the nature of the endpoints being authenticated. In largely wireless environments where roaming is a consideration, the speed improvements offered by PAC tunnels will make EAP-FAST more attractive. In wired environments where authentication speed is not an issue, the optimizations provided by EAP-FAST might not be worth the additional effort of deploying and maintaining PACs. This makes EAP-TLS a better choice in wired environments with an existing PKI infrastructure that supports server-side and client-side certificates.
Automatic Anonymous provisioning with MSCHAPv2 offers the convenience of automatic, network-based PAC distribution without the need for any certificates. In situations where a PKI infrastructure does not exist and is not desired, Anonymous provisioning with MSCHAPv2 can be very attractive. However, the convenience of non-certificate-based PAC provisioning comes at the cost of a small security vulnerability. Since the supplicant begins the MSCHAPv2 exchange before authenticating the server, an attacker could intercept a PAC provisioning request and emulate the server. The attacker does not know the supplicant’s password, so the MSCHAPv2 exchange would fail. However, the attacker would be able to collect enough information to execute an offline dictionary attack on the supplicant’s password. This vulnerability, while real, is only present during EAP-FAST Phase 0 provisioning. Once the PAC is provisioned, the PAC-based encrypted tunnels will prevent any such attacks. In network environments without a PKI infrastructure and where the risk of provisioning attacks is low (where it is mitigated by physical security measures), EAP-FAST with Automatic Anonymous provisioning is a good choice for rapid deployments of 802.1X.
Note EAP-FAST with Automatic Anonymous provisioning requires a user database (such as Active Directory) that supports MSCHAPv2. Anonymous provisioning cannot be used with OTP, Novell or LDAP databases. The configuration examples in this document use Active Directory.
PAC Expiration
PACs expire in the same way passwords and certificates expire. An organization’s security policy will determine the appropriate lifetime for a PAC.
The Master PAC exists on the authentication server and is used to create PACs for end users, similar to the way in which a Root CA signs Personal Certificates. The Master PAC also has an expiration time which should be configured in accordance with the organization’s security policy.
Inner Methods
After the supplicant has been provisioned with a PAC, EAP-FAST authentication can begin. Phase 1 uses the PAC to establish an encrypted tunnel and, simultaneously, to authenticate the server to the supplicant. In Phase 2, the supplicant authenticates itself to the server using an inner method of authentication. Phase 2 inner methods include:
• EAP-TLS
• EAP-MSCHAPv2
• EAP-GTC
The Phase 2 inner method can be the same as the Phase 0 inner method, but need not be. The choice of a Phase 2 inner method can depend on several factors, including the Phase 0 inner method and an organization’s PKI infrastructure.
2-17802.1X Deployment Guide
OL-16033-01

St r i c t ly C i sco Conf ident i a l
Chapter 2 Deploying 802.1X Supplicant Specifics
If an organization has an existing (or planned) PKI infrastructure that supports client-side and server-side certificates, it would make sense to deploy Automatic Authenticated provisioning with EAP-TLS for the Phase 0 inner method. In this case, EAP-TLS would also be the natural choice for the Phase 2 inner method.
If an organization has a PKI infrastructure that supports only server-side certificates (and wants to deploy EAP-FAST instead of PEAP), then it would make sense to deploy Automatic Authenticated provisioning with MSCHAPv2 as the inner method for Phase 0 and GTC or MSCHAPv2 for Phase 2.
Note The Cisco ACS requires you to configure both GTC and MSCHAPv2 as inner methods.
If an organization had no PKI infrastructure, Automatic Anonymous provisioning with MSCHAPv2 would be the only option for Phase 0. In Phase 2, either GTC or MSCHAPv2 could be used.
Supplicants
EAP-FAST is supported by the CSSC supplicant. It is not supported by the Microsoft Windows XP supplicant.
Supplicant SpecificsNot every supplicant supports every EAP method. When planning an 802.1X deployment, it is important to choose a supplicant that supports the EAP method you wish to use. Table 2-1 lists the EAP methods supported by the Windows XP native supplicant and the Cisco SSC supplicant.
Matrix (EAP vs. Supplicant)
Table 2-1 EAP Methods Supported by Supplicants
Supplicant Windows XP Cisco SSC
EAP-MD5 Yes Yes
EAP-MSCHAPV2 No Yes
EAP-GTC No Yes
PEAP w/MSCHAPv2 Yes Yes
PEAP w/OTP No Yes
PEAP w/TLS Yes Yes
EAP-TLS Yes Yes
LEAP No Yes
TTLS No Yes
EAP-FAST w/ GTC No Yes
EAP-FAST w/ MSCHAPv2
No Yes
EAP-FAST w/ TLS No Yes
2-18802.1X Deployment Guide
OL-16033-01

St r i c t ly C i sco Conf ident i a l
Chapter 2 Deploying 802.1X Supplicant Specifics
CSSCThe Cisco Secure Services Client (CSSC) is Cisco’s 802.1X supplicant. CSSC supports user and machine authentication for wired and wireless clients. CSSC is a fully supported 802.1X supplicant with broad EAP support and an easy-to-use client interface. CSSC also offers an enterprise deployment mechanism in which user profiles can be distributed to the entire organization through a single Extensible Markup Language (XML) file.
The following options of the CSSC are available for download from the Cisco Software Center:
• Non-expiring, wired-only license for a limited feature set (see Cisco Client Services 4.1 Product Bulletin for detailed list of features)
• A 90-day full wired/wireless trial license
Window XPMicrosoft offers an integrated 802.1X supplicant as part of its Windows XP operating system. The supplicant’s behavior is partially configured on the Network Properties page for each interface and partly configured via Registry Settings. These Registry Settings, which are completely independent of EAP type, are described below. The other EAP-specific configuration settings are described in Chapter 3, “Configuring 802.1X.”
Registry Settings
Caution As with all modifications to the Windows Registry hive, caution must be exercised. Back up your registry before attempting these modifications. Errors in editing the registry may result in an unusable system. If you are unfamiliar or unsure of the procedures necessary to safely edit the Windows registry, do not attempt these changes.
The functionality of the Windows XP supplicant can be tuned by modifying two Windows Registry parameters: SupplicantMode and AuthMode. The functionality of these Registry settings is described below.
Note Starting with Windows 2003 server, these registry settings can also be changed via GPO. Using GPOs to modify the registry changes significantly decreases the configuration burden on the system administrator. For more information, see the Windows Interoperability Document.
Need the actual title of the above document .
SupplicantMode Parameter
By default, the Windows XP supplicant will not send EAPoL-Start messages. This is not compliant with the IEEE 802.1X specification and might cause synchronization issues with the authenticator. For example, take an Windows XP supplicant that is configured for user authentication only. The machine is initialized and the link comes up. The authenticator will send three EAP Identity Requests at 30 second intervals by default. If user authentication is not started in that 90 second period (no one enters a username and password at the Windows login page), then the authenticator assumes that no supplicant is on the wire. If the Guest VLAN is configured, the port is deployed into the Guest VLAN and the authenticator will never send another Identity Request. When the user does eventually log in, the
2-19802.1X Deployment Guide
OL-16033-01

St r i c t ly C i sco Conf ident i a l
Chapter 2 Deploying 802.1X Supplicant Specifics
supplicant needs to be able to send an EAPoL-Start to alert the authenticator that it is ready to perform 802.1X. Another situation where EAPoL-Starts are required occurs when machine authentication and user authentication are both enabled. After a successful machine authentication, the authenticator will no longer send EAPoL-Requests. When the user logs in, an EAPoL start is required to alert the switch to begin user authentication.
To configure the Windows XP supplicant’s EAPoL-Start behavior, create or modify the following registry setting:
• Hive HKEY_LOCAL_MACHINE Software\Microsoft\EAPOL\Parameters\General\Global\SupplicantMode --REG_DWORD
The location of the SupplicantMode registry setting is shown in Figure 2-6.
Figure 2-6 SupplicantMode Registry Setting
The AuthMode registry is a REG_DWORD variable with four possible settings:
• 0—Disable IEEE 802.1X operation.
• 1—Inhibit transmission of EAPOL-Start packets under all scenarios.
• 2—Include learning to determine when to initiate the transmission of EAPOL packets. A Windows XP Service Pack 2 (SP2)-based computer will only send an EAPOL start frame if the computer receives an EAP request identity frame and if no internal process is currently ongoing.
• 3—Compliant with IEEE 802.1X Specification.
This registry value is not created by default. If the registry value is not explicitly set, the Windows XP supplicant behaves as if the parameter is set as SupplicantMode = 2. We recommend setting SupplicantMode = 3. This registry setting affects all EAP methods. However, see the “Windows XP Client Configuration” section on page 3-106 for more discussion on EAP-TLS-specific implications of SupplicantMode.
Note If this parameter is set or modified in the registry, the service must be restarted for the parameters to take effect. To restart the Windows XP supplicant, select Start > All Programs > Administrative Tools > Services. Right-click Wireless Zero Configuration and select Re-Start. See Figure 2-7 for details.
2-20802.1X Deployment Guide
OL-16033-01

St r i c t ly C i sco Conf ident i a l
Chapter 2 Deploying 802.1X Supplicant Specifics
Figure 2-7 Restarting the Microsoft Supplicant Service
AuthMode Parameter
The AuthMode parameter controls whether or not the system performs user authentication. User authentication can be completely disabled, can be configured to execute after machine authentication, or can be configured as a fallback in case machine authentication fails. The AuthMode parameter cannot be used to globally enable or disable machine authentication, only user authentication. Machine authentication is enabled or disabled in the Authentication tab of the Network Properties pane of each interface. Conflicts between these two settings can cause loss of connectivity. If the AuthMode is set to globally disable user authentication and machine authentication is disabled in the Authentication tab, then the device will have no way to authenticate and will never gain access to the network.
To enable or disable the Windows XP supplicant’s user authentication settings, create or modify the following registry setting:
• Hive HKEY_LOCAL_MACHINE Software\Microsoft\EAPOL\Parameters\General\Global\AuthMode
The location of the AuthMode registry setting is shown in Figure 2-8.
2-21802.1X Deployment Guide
OL-16033-01

St r i c t ly C i sco Conf ident i a l
Chapter 2 Deploying 802.1X RADIUS Server Specifics
Figure 2-8 AuthMode Registry Setting
The AuthMode registry is a REG_DWORD variable with three possible values:
• 0—Machine authentication mode with user authentication fallback. When a user logs in, if the connection has already been authenticated with Machine credentials, the user’s credentials are not used for authentication. If the connection has not already been authenticated with Machine credentials, then the user’s credentials will be used for authentication.
• 1—Machine authentication with user re-authentication functionality. Whenever a user logs in, 802.1X authentication is performed using the user’s-credentials.
• 2—Machine authentication only - Whenever a user logs in, it has no effect on the connection. 802.1X authentication is performed using machine credentials only.
This registry value is not created by default. If the registry value is not explicitly set, the Windows XP supplicant behaves as if the parameter is set as AuthMode = 1. The recommended value for this parameter is AuthMode=1.
Note If this parameter is set or modified in the registry, the service must be restarted for the parameters to take effect. To restart the Windows XP supplicant, select Start > All Programs > Administrative Tools > Services. Right-click Wireless Zero Configuration and select Re-Start. See Figure 2-8 for more details.
RADIUS Server SpecificsNot all RADIUS servers supports all EAP types. Cisco ACS supports one of the widest arrays of EAP methods in the industry, including EAP-TLS, EAP-PEAP, EAP-FAST, and many others. Other RADIUS servers might support a subset of these types.
2-22802.1X Deployment Guide
OL-16033-01
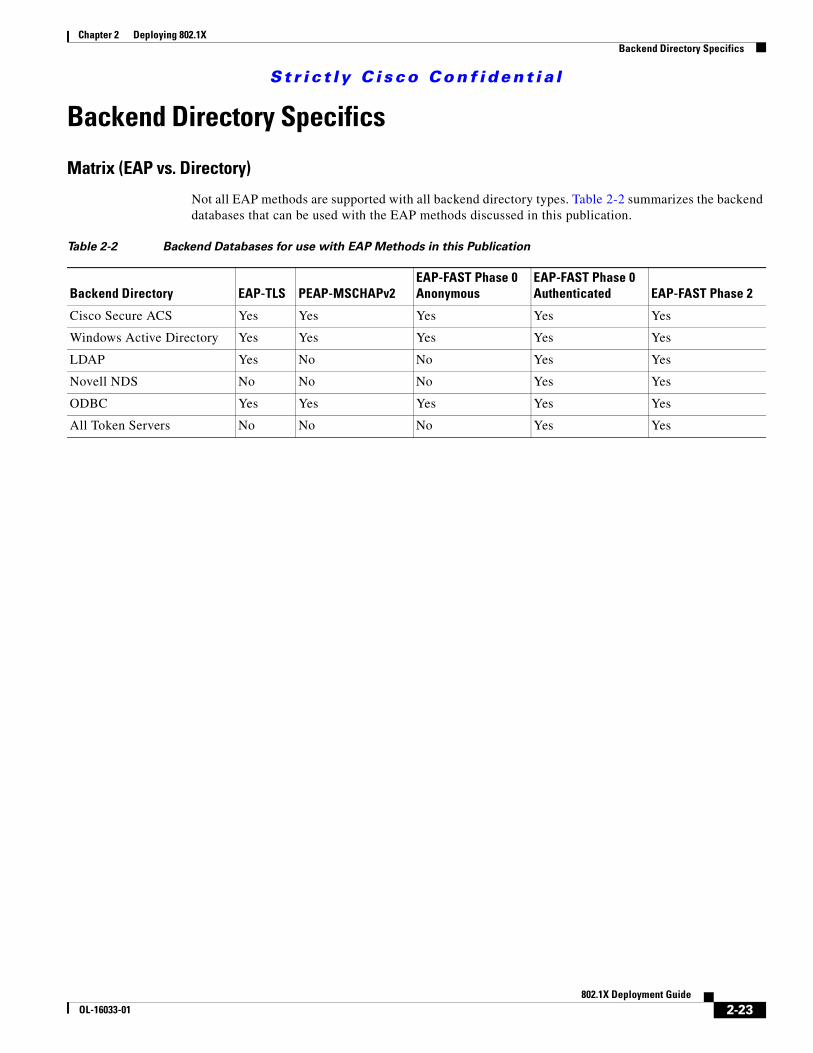
St r i c t ly C i sco Conf ident i a l
Chapter 2 Deploying 802.1X Backend Directory Specifics
Backend Directory Specifics
Matrix (EAP vs. Directory)
Not all EAP methods are supported with all backend directory types. Table 2-2 summarizes the backend databases that can be used with the EAP methods discussed in this publication.
Table 2-2 Backend Databases for use with EAP Methods in this Publication
Backend Directory EAP-TLS PEAP-MSCHAPv2EAP-FAST Phase 0 Anonymous
EAP-FAST Phase 0 Authenticated EAP-FAST Phase 2
Cisco Secure ACS Yes Yes Yes Yes Yes
Windows Active Directory Yes Yes Yes Yes Yes
LDAP Yes No No Yes Yes
Novell NDS No No No Yes Yes
ODBC Yes Yes Yes Yes Yes
All Token Servers No No No Yes Yes
2-23802.1X Deployment Guide
OL-16033-01

St r i c t ly C i sco Conf ident i a l
Chapter 2 Deploying 802.1X Backend Directory Specifics
2-24802.1X Deployment Guide
OL-16033-01

St r i c t ly C i sco Conf ident i a l
OL-16033-01
C H A P T E R 3
Configuring 802.1XThe three principal conceptual components of 802.1X are the supplicant, the authenticator, and the authentication server. Each of these components must be configured correctly for successful 802.1X authentication to occur.
Of the three key components, the authenticator is the only one from which configuration is completely independent of the EAP method. A Cisco Catalyst switch will be configured in the same way regardless of whether EAP-TLS, PEAP-MSCHAP, or EAP-FAST (or any EAP method) is used to authenticate the supplicant. In contrast, the supplicant and the authentication server are configured differently depending on the chosen EAP method.
The configuration steps listed in this guide are for a standard reference topology that represents a typically Enterprise environment. This topology is represented in Figure 3-1.
Figure 3-1 Standard Campus Design
Access Distribution/Core Data Center
ACS
DNS
DHCP
CA
ActiveDirectory
CSSCCisco 3750
Cisco 4509
Cisco 6506
XP
CSSC
XP
CSSC
XP
2238
58
3-1802.1X Deployment Guide
St r i c t ly C i sco Conf ident i a l
Chapter 3 Configuring 802.1X Authenticators
The processes and procedures presented in this guide make the following assumptions:
• The network has been deployed following current best practices for Campus Design.
• Basic network connectivity exists between all components.
• DNS and DHCP are fully operational.
• The Windows domain has been configured in Active Directory. The domain controller is a Windows 2003 Server.
• For certificate auto-enrollment to work, the Windows Certificate Authority must run on a Windows 2003 Enterprise Edition domain member server.
• Cisco ACS runs on a domain member server. Cisco ACS software has been installed.
• Client machines with Windows XP Service Pack 2 with CSSC (if used) are installed.
AuthenticatorsThis section details the basic configuration of the Cisco Catalyst switch deployed as an authenticator in an 802.1X deployment. The authenticator controls physical access to the network based on the authentication status of the client. The authenticator acts as an intermediary between the client and the authentication server, requesting identity information from the client, verifying that information with the authentication server, and relaying a response to the client. The authenticator communicates with the client via EAPoL and with the authentication server via RADIUS.
The basic configuration of the Cisco Catalyst switch remains constant within any IEEE 802.1X deployment regardless of the EAP method chosen for authentication. The EAP method is agreed upon by the client and authentication server and the authenticator simply proxies the information between the two of them.
Cisco IOSCisco Catalyst switches running Cisco IOS require certain commands to enable IEEE 802.1X. Additional commands can be configured to enable optional functionality or change default parameters. The necessary global and interface commands are explained in the following sections. A basic example is also provided to highlight the recommended configuration requirements. These configurations are valid for the versions listed in Table 3-1.
Table 3-1 Software Supported and Tested
Platform and OS Minimum Supported OS Version OS Version Tested
Cisco Catalyst 6500 CatOS 6.2(2) 8.6(1)
Cisco Catalyst 6500 Cisco IOS 12.1(12b)E 12.2(33)SXH
Cisco Catalyst 4500 Cisco IOS 12.1(12c)EW 12.2(37)SE
Cisco Catalyst 3750 Cisco IOS 12.1(11)AX 12.2(40)SG
3-2802.1X Deployment Guide
OL-16033-01
St r i c t ly C i sco Conf ident i a l
Chapter 3 Configuring 802.1X Authenticators
RADIUS Configuration for Cisco IOS
RADIUS is the protocol the switch uses to communicate with the ACS server during 802.1X authentication. The RADIUS commands required to configure IEEE 802.1X on a Cisco Catalyst switch running Cisco IOS are provided in this section. These commands are all entered at the CLI configuration mode.
Step 1 Enable AAA globally with the following command:
switch(config)# aaa new-model
Step 2 Configure the switch to use RADIUS as the sole method for 802.1X authentication with the following command:
switch(config)# aaa authentication dot1x [default] group radius
Note Though other methods appear as configuration options, only group radius is supported.
Step 3 Configure the RADIUS server parameters. Use the command below to specify the IP address (or hostname if the switch is configured for DNS) and the key of the RADIUS server. This key must match the key that is configured on the ACS.
switch(config)# radius-server host [host name | IP address] key [string]
Globally Enable IEEE 802.1X for Cisco IOS
IEEE 802.1X must be globally enabled on the switch. If 802.1X is not enabled with the following command, then the interface configurations will have no effect and the switch will not authenticate hosts connecting to its ports.
Enable IEEE 802.1X globally with the following command:
switch(config)# dot1x system-auth-control
Interface IEEE 802.1X Configuration for Cisco IOS
Once RADIUS has been configured and 802.1X has been globally enabled, each interface must also be configured to perform 802.1X.
Note To configure multiple ports at the same time, use the interface range command.
Step 1 Select the ports that will run IEEE 802.1X with the following command.
switch(config)# interface range GigabitEthernet 1/0/10-11switch(config-if-range)#
Step 2 Configure a port-type that is compatible with 802.1X. IEEE 802.1X can only be configured on static Layer-2 access ports and the voice VLAN port; IEEE 802.1X is not supported on dynamic access ports, trunk ports, or EtherChannel.
switch(config-if-range)# switchport mode access
3-3802.1X Deployment Guide
OL-16033-01

St r i c t ly C i sco Conf ident i a l
Chapter 3 Configuring 802.1X Authenticators
Step 3 Enable 802.1X on the port. Note that this command is added automatically if the port control is configured (as shown in the next step).
switch(config-if-range)# dot1x pae authenticator
Step 4 Configure the method of port control. To enable the 802.1X default security level, select auto.
switch(config-if-range)# dot1x port-control auto
Caution Once dot1x port-control auto is configured, the switch will revert to the default security level for 802.1X. All traffic except for EAP will be dropped until a successful authentication has occurred. To prevent unexpected loss of network access, ensure that the rest of the solution has been properly configured before enabling this command. This includes proper PKI deployment and complete configurations of the switch, supplicants, ACS and Active Directory.
IEEE 802.1X Timer Configuration for Cisco IOS
There are multiple timers that affect the operation of 802.1X. These timers should not be modified without a careful consideration of the impact on the operation of your network. See the Baseline Identity Design Overview Guide for a detailed discussion of these timers.
(config-if)# dot1x timeout ? quiet-period QuietPeriod in Seconds ratelimit-period Ratelimit Period in seconds reauth-period Time after which an automatic reauthentication should be initiated server-timeout Timeout for Radius Retries supp-timeout Timeout for supplicant reply tx-period Timeout for supplicant retries
IEEE 802.1X Re-Authentication Configuration for Cisco IOS [Optional]
By default, 802.1X reauthentication is disabled on Cisco IOS switches. If needed, it can be enabled on the switch on a per-port basis. The switch can be configured to use a locally configured reauthentication timer or to use values sent down by the RADIUS server in the attributes of the Access-Accept that is sent after a successful authentication. Only one method, switch-based timers or server-based timers, can be configured at one time. This avoids any potential conflict between locally configured timers and RADIUS-based timers.
We recommend configuring the switch to use values sent by the RADIUS server to control reauthentication behavior. The RADIUS server provides a centralized repository for the reauthentication timer that will ensure consistent behavior across all switches.
When configured to use values from the RADIUS server, the switch uses two attributes to control the timing and behavior of reauthentication:
• The Session-Timeout RADIUS attribute (Attribute [27]) specifies the time after which reauthentication occurs.
• The Termination-Action RADIUS attribute (Attribute [29]) specifies the action to take during reauthentication. When the attribute value is set to Default, the IEEE 802.1X session ends, and connectivity is lost during reauthentication. When the attribute value is set to RADIUS-Request, the session is not affected during reauthentication.
3-4802.1X Deployment Guide
OL-16033-01
St r i c t ly C i sco Conf ident i a l
Chapter 3 Configuring 802.1X Authenticators
Cisco recommends setting Attribute [29] to RADIUS-Request to ensure that connectivity is not lost during reauthentication.
Note If server-based reauthentication is configured on the switch and the RADIUS server does not send Attribute [29], the switch behaves as if it were set to Default and connectivity will be lost during reauthentication. If server-based reauthentication is configured on the switch and Attribute [27] is not sent, reauthentication will be disabled on the port.
Configuring Server-based Reauthentication for Cisco IOS
The section details how to configure Server-based Reauthentication on the switch and the ACS. This is the recommended method when reauthentication is required.
Step 1 Enable reauthentication on the switch port.
(config-if)# dot1x reauthentication
Step 2 Configure the switch to use setting sent by the RADIUS server during authentication.
(config-if)# dot1x timeout reauth-period server
Step 3 Open ACS Admin from the desktop shortcut created during the installation. Click Group Setup. Select the Group you wish to configure and click Edit Settings.
Step 4 In the Group Settings window, scroll down to IETF RADIUS Attributes. Check the box next to [27] Session-Timeout and enter a value between 1 and 65535 seconds. Check the box next to [029] Termination-Action and select RADIUS-Request from the drop-down box. Click Submit+Restart. See Figure 3-2.
Note The Group Setup is shown only as an example in Figure 3-2. The attributes can also be configured as part of the User Setup or as part of a RADIUS Authorization Component (RAC).
3-5802.1X Deployment Guide
OL-16033-01

St r i c t ly C i sco Conf ident i a l
Chapter 3 Configuring 802.1X Authenticators
Figure 3-2 Configuring RADIUS Attributes for Re-Authentication
Configuring Server-based Reauthentication for Cisco IOS
The section details how to configure switch-based reauthentication on the switch and the ACS.
Step 1 Enable reauthentication on the switch port.
(config-if)# dot1x reauthentication
Step 2 Configure a reauthentication timer.
(config-if)# dot1x timeout reauth-period 1800
Note If no timer value is specified, the switch will use a default value of 3600 seconds.
Note When reauthentication is locally configured on the switch, the existing session is not affected during reauthentication and connectivity is maintained (until and unless the reauthentication fails). The switch behaves the same way it would if it received Attribute [29] = RADIUS-Request during a server-based reauthentication.
3-6802.1X Deployment Guide
OL-16033-01

St r i c t ly C i sco Conf ident i a l
Chapter 3 Configuring 802.1X Authenticators
WoL Configuration for Cisco IOS (Optional)
If needed, the switch can be configured to support Wake-on-Lan (WoL) devices on 802.1X-enabled interfaces. Use the following interface configuration command to enable unidirectional port control for WoL devices connected to an interface configured for 802.1X:
(config-if)# dot1x control-direction in
Verify IEEE 802.1X Operation for Cisco IOS
There are several show commands that can be used in global exec mode to verify the operation of IEEE 802.1X on a Cisco Catalyst switch running Cisco IOS. See Table 3-2.
Basic Configuration Example for Cisco IOS
The following basic configuration example highlights the minimum command set required to enable IEEE 802.1X on a Cisco Catalyst switch running Cisco IOS:
aaa new-modelaaa authentication dot1x default group radius!dot1x system-auth-control!interface Gigabit 3/0/1switchport mode accessdot1x port-control auto!radius-server host 10.1.1.5 auth-port 1812 acct-port 1813 key cisco
It is important that the user understand the ramifications of adding AAA commands to the Cisco IOS configuration because they affect device access as well. For example, by adding the AAA commands listed in the sample configuration above, all administrative access (Telnet and console) will be blocked. If an administrative session is lost while enabling AAA and no default login authentication method has been defined, the administrator will be locked out of the router and the entire saved configuration could be lost. To avoid this scenario, specify alternative methods for administrative access using the default login configuration. For example, to authenticate administrative access via RADIUS or, if the RADIUS server is not available, by the enable password, add the following command:
aaa authentication login default group radius enable
Table 3-2 IEEE 802.1X Show Commands for Cisco IOS
Command Description
show dot1x Display the operational status of IEEE 802.1X.
show dot1x {all | {statistics {interface interface interface-number}}} details
Display the IEEE 802.1X status for all ports or a specific port
show dot1x {interface interface interface-number} Display IEEE 802.1X statistics for a specific port.
show aaa servers Display the status and operational information for all configured AAA servers.
3-7802.1X Deployment Guide
OL-16033-01

St r i c t ly C i sco Conf ident i a l
Chapter 3 Configuring 802.1X Authenticators
Verifying 802.1X Port Status for Cisco IOS
The output of the following command shows that a supplicant with the MAC address 0018.f809.cfc5 has successfully passed IEEE 802.1X authentication on this port. The output also shows the default values for IEEE 802.1X interface parameters that result from the minimum configuration described above.
Switch# show dot1x interface FastEthernet 2/5 detailsDot1x Info for FastEthernet2/5-----------------------------------PAE = AUTHENTICATORPortControl = AUTOControlDirection = Both HostMode = SINGLE_HOSTReAuthentication = DisabledQuietPeriod = 60ServerTimeout = 30SuppTimeout = 30ReAuthPeriod = 3600 (Locally configured)ReAuthMax = 2MaxReq = 2TxPeriod = 30RateLimitPeriod = 0
Dot1x Authenticator Client List-------------------------------Domain = DATASupplicant = 0018.f809.cfc5 Auth SM State = AUTHENTICATED Auth BEND SM Stat = IDLE Port Status = AUTHORIZEDAuthentication Method = Dot1xAuthorized By = Authentication ServerVlan Policy = N/A
Cisco Catalyst OSCisco Catalyst switches running Cisco Catalyst OS (CatOS) require certain commands to enable IEEE 802.1X.
Additional commands can be configured to enable optional functionality or change default parameters.
The RADIUS, global, and port commands are explained in the following sections. A basic example is also provided to highlight the minimum configuration requirement.
RADIUS Configuration for Cisco Catalyst OS
The RADIUS commands required to configure IEEE 802.1X on a Cisco Catalyst switch running Cisco Catalyst OS are provided in this section.
Step 1 Use the command below to specify the IP address of the RADIUS server. If more than one server is configured, the primary keyword can be used to select which server is contacted first.
set radius server [IP address] auth-port [port]acct-port [port] [primary]
Step 2 Use the command below to specify the key used to authentication communications between the switch and the RADIUS server. The key must match what is configured on the ACS.
3-8802.1X Deployment Guide
OL-16033-01

St r i c t ly C i sco Conf ident i a l
Chapter 3 Configuring 802.1X Authenticators
set radius key [key]
Global IEEE 802.1X Configuration for Cisco Catalyst OS
IEEE 802.1X must be globally enabled on the switch. If 802.1X is not enabled with the following command, then the interface configurations will have no effect and the switch will not authenticate hosts connecting to its ports.
Enable IEEE 802.1X globally with the following command:
set dot1x system-auth-control enabled
Port IEEE 802.1X Configuration for Cisco Catalyst OS
Once RADIUS has been configured and 802.1X has been globally enabled, each interface must also be configured to perform 802.1X.
Select the mode for 802.1X authentication. The default is force-authorized (meaning that the port is open to all traffic). To switch to the 802.1X default security level, select auto.
set port dot1x [module/port] port-control [force-authorized | force-unauthorized | auto]
Note Once set port dot1x port-control auto is configured, the switch will revert to the default security level for 802.1X. In other words, all traffic except for EAP will be dropped until a successful authentication has occurred. To prevent unexpected loss of network access, ensure that the rest of the solution has been properly configured before enabling this command. This includes proper PKI deployment and complete configuration of the switch, supplicants, ACS and Active Directory.
Verify IEEE 802.1X Operation for Cisco Catalyst OS
The show commands used to verify the operation of IEEE 802.1X on a Cisco Catalyst switch running Cisco Catalyst OS are provided in Table 3-3.
Table 3-3 IEEE 802.1X Show Commands for Cisco Catalyst OS
Command Description
show radius Displays configured RADIUS parameters.
show dot1x Displays system IEEE 802.1X capabilities.
show dot1x group [all | authenticated | group name] Displays IEEE 802.1X user group information.
show dot1x user [all | user name] Displays IEEE 802.1X user information.
show dot1x vlan [all | VLAN ID] Displays information about IEEE 802.1X authenticated users in a VLAN.
show dot1x vlan-group [all | VLAN-group-name] Displays IEEE 802.1X VLAN group information.
3-9802.1X Deployment Guide
OL-16033-01

St r i c t ly C i sco Conf ident i a l
Chapter 3 Configuring 802.1X Authenticators
Basic Configuration Example for Cisco Catalyst OS
The following basic configuration example is provided to highlight the minimum command set required to enable IEEE 802.1X on a Cisco Catalyst switch running Catalyst OS.
set radius server 10.100.10.117set radius key cisco!set dot1x system-auth-control enable!set port dot1x 1/5 port-control auto
Verifying 802.1X Port Status for Cisco Catalyst OS
The output of this command shows that the supplicant connected to port 1/5 has successfully passed 802.1X authentication. The output also shows 802.1X parameters configured for the port.
Switch> (enable) show port dot1x 1/5Port Auth-State BEnd-State Port-Control Port-Status ----- ------------------- ---------- ------------------- ------------- 1/5 authenticated idle auto authorized
Port Port-Mode Reauthentication Shutdown-timeout Control-Mode admin oper----- ------------- ----------------- ---------------- --------------- 1/5 SingleAuth disabled disabled Both Both
Port Posture-Token Critical-Status Termination action Session-timeout----- ------------- --------------- ------------------ --------------- 1/5 - no NoReAuth -
Port Session-Timeout-Override Url-Redirect----- ------------------------ ---------------------------------- 1/5 disabled -
Port Critical ReAuth-When ----- -------- ------------ 1/5 disabled -
show port dot1x [module/port] Displays all the configurable and current state values associated with the authenticator port access entity (PAE) and backend authenticator and statistics for the different types of Extensible Authentication Protocol (EAP) packets transmitted and received by the authenticator on a specific port.
show port dot1x statistics [module/port] Displays statistics for different EAP packets transmitted and received by the authenticator on a specific port.
show port dot1x [module/port] guest-vlan [VLAN ID | none] Displays the active VLAN that functions as an IEEE 802.1X guest VLAN.
show port dot1x auth-fail-vlan [VLAN ID | none] Displays information about ports that have VLANs for users that have failed IEEE 802.1X authentication.
Table 3-3 IEEE 802.1X Show Commands for Cisco Catalyst OS
Command Description
3-10802.1X Deployment Guide
OL-16033-01

St r i c t ly C i sco Conf ident i a l
Chapter 3 Configuring 802.1X Deploying EAP-TLS
Deploying EAP-TLSThe section describes how to configure EAP-TLS on the ACS and on the CSSC and native XP supplicants.
The username for EAP-TLS is acquired from the user when he or she logs into Windows via Single Sign-On (SSO). The supplicant uses this username to select a certificate from the local certificate stores to send to the ACS during authentication. ACS verifies the supplicant's certificate and consults Active Directory to verify that the user specified in the certificate is allowed access to the network.
EAP-TLS deployment is presented as a series descriptions in the following two primary sections:
• Authentication Server Configuration, page 3-11
• Client Configuration for EAP-TLS, page 3-56
Authentication Server ConfigurationThere are multiple steps to complete when configuring the Cisco ACS to act as the Authentication Server for IEEE 802.1X EAP-TLS authentications. The following steps are addressed in the sections that follow:
• Step 1: Obtain and Install the Root CA Certificate on Cisco Secure ACS, page 3-11
• Step 2: Configure Certificate Revocation, page 3-21
• Step 3: Acquire and Configure Cisco Secure ACS Server Certificate, page 3-23
• Step 4: Configure EAP-TLS Settings on the ACS, page 3-46
• Step 5: Specify and Configure the Catalyst Switch as a AAA Client, page 3-50
• Step 6: Configure the External User Databases, page 3-51
Once Step 6 is completed, you must restart the Cisco Secure ACS-based service.
Note These instructions are for Cisco Secure ACS on Windows. There is also an appliance version of ACS called the Solution Engine (SE). SE has functional and configuration differences compared with the ACS for Windows version, especially in the area of certificate management.
Step 1: Obtain and Install the Root CA Certificate on Cisco Secure ACS
The Cisco Secure ACS must possess the root certificate of the CA that issued the supplicant’s certificate in order to validate the client certificate sent by a supplicant during the EAP-TLS exchange. In a typical Windows environment, this will happen automatically when the Cisco Secure ACS server joins the Windows domain. Thus, in many cases, this is purely a verification exercise and little or no configuration will be required.
The following procedures are discussed in this section:
1. Verify that the CA Root Certificate is in the Cisco Secure ACS’s local machine certificate store. If the certificate is not present, acquire the certificate and install it in either the local machine store or the local Cisco Secure ACS store.
2. Verify that the CA is listed in the Cisco Secure ACS’s certificate trust list.
3-11802.1X Deployment Guide
OL-16033-01

St r i c t ly C i sco Conf ident i a l
Chapter 3 Configuring 802.1X Deploying EAP-TLS
Verify the CA Root Certificate in Local Machine Storage
When a server joins a Microsoft domain, it will automatically retrieve the Enterprise Root CA certificate from the Enterprise Root CA as a result of the Active Directory default Group Policy. Therefore, the Cisco Secure ACS server will most likely already have the Enterprise CA Root Certificate in its Windows local machine certificate storage. If the client’s certificate is issued by the same CA as per best Cisco’s practices recommendation, then this is the only CA that the Cisco Secure ACS needs to trust for EAP-TLS to succeed.
To verify that the Cisco Secure ACS server has the Enterprise CA Certificate in local machine storage, follow these steps on the Cisco Secure ACS server:
Step 1 On the Cisco Secure ACS server, enter Start > Run, type mmc, and click OK.
Step 2 On the File menu, click Add/Remove Snap-in and then click Add.
Step 3 Under Snap-in, double-click Certificates. Select Computer Account and click Next.
Step 4 Select Local Computer and click Finish.
Step 5 On the Add Standalone Snap-in window, click Close.
Step 6 On the Add/Remove Snap-in window, click OK
Step 7 On the Console, select Certificates (Local Computer) > Trusted Root Certification Authorities > Certificates.
Step 8 Verify that the Enterprise Root CA that issued the supplicant's certificate is in the list (imac-mcs-14 in Figure 3-3). If it is, proceed to configuring the Cisco Secure ACS Trust list.
Figure 3-3 Trusted Root Certificate on Cisco Secure ACS
If the CA certificate is not listed, it is possible to manually download the certificate. There are two options when downloading a root certificate. First, the root CA certificate can be downloaded into the Windows machine store. Once the download is finished, the certificate will appear in the MMC Console
3-12802.1X Deployment Guide
OL-16033-01

St r i c t ly C i sco Conf ident i a l
Chapter 3 Configuring 802.1X Deploying EAP-TLS
above and can be used by Cisco Secure ACS or any other service on the server. The second option is to download the certificate into the Cisco Secure ACS local store. This certificate will not be listed in the MMC console and it will only be available to the Cisco Secure ACS.
Manually Installing Root Certificate in Cisco Secure ACS
Most often, a CA’s root certificate will be in the Windows machine certificate storage if the Cisco Secure ACS is a Windows domain member. However, there might be some situations when it is not. The Cisco Secure ACS might not be a member of the domain. Or there might be a scenario in which the supplicant’s certificate was signed by a different CA than the one that signed the Cisco Secure ACS’s certificate. In that case, the supplicant’s CA root certificate may need to be manually downloaded to the Cisco Secure ACS.
If the root CA Certificate does not appear in the machine store list as described in the previous section, the certificate can be manually downloaded to the local Window machine certificate store on the Cisco Secure ACS. Alternatively, the root Certificate can be manually downloaded to the private certificate store maintained by the Cisco Secure ACS itself. Both methods are described below.
Note In the recommended solution topology that is the focus of this document, the same root CA issues certificates to the clients and the servers and the default Group Policy ensures that the Cisco Secure ACS server automatically downloads the root CA certificate to the local machine store. In this scenario, manually downloading the CA Certificate is not required. Therefore, this section is for reference only
Manually Installing the Root Certificate in Cisco Secure ACS Machine Store
If the root CA Certificate does not appear in the machine store list, the certificate can be manually downloaded to the Windows machine certificate store on the Cisco Secure ACS by the following steps:
Step 1 On the Cisco Secure ACS, point the browser at the Microsoft CA server: http://CA-srv-ip /certsrv.
Step 2 From the Select a Task option choose Download a CA certificate, certificate chain, or CRL.
Step 3 Click Download CA Certificate. See Figure 3-4.
3-13802.1X Deployment Guide
OL-16033-01

St r i c t ly C i sco Conf ident i a l
Chapter 3 Configuring 802.1X Deploying EAP-TLS
Figure 3-4 Download CA Certificate
Step 4 A File Download Security Warning window appears. Click Open
Step 5 A Certificate Installation Window appears. Click Install Certificate. See Figure 3-5.
3-14802.1X Deployment Guide
OL-16033-01

St r i c t ly C i sco Conf ident i a l
Chapter 3 Configuring 802.1X Deploying EAP-TLS
Figure 3-5 Install Certificate
Step 6 The Certificate Import Wizard opens. Click Next.
Step 7 Select Place all certificates in the following store and browse. See Figure 3-6.
Figure 3-6 Certificate Store
3-15802.1X Deployment Guide
OL-16033-01

St r i c t ly C i sco Conf ident i a l
Chapter 3 Configuring 802.1X Deploying EAP-TLS
Note The first option, automatically select the certificate store, will install the root certificate in the Current User Trusted Root Certificate Authorities, not the Local Computer Trusted Root Certificate Authorities. The certificate must be in the Local Computer store for Cisco Secure ACS to access it.
Step 8 In Select Certificate Store window, click Show physical stores. Click Trusted Root Certificate Authorities and select the Local Computer folder. Click OK. See Figure 3-7.
Figure 3-7 Select Certificate Store
Step 9 Click Next and Finish.
Step 10 Verify that the certificate has been properly installed by repeating the steps in the “Verify the CA Root Certificate in Local Machine Storage” section on page 3-12. Proceed to configuring the Cisco Secure ACS Certificate Trust List.
Manually Installing the Root Certificate in Cisco Secure ACS Private Store
If the root CA Certificate does not appear in the machine store list, the certificate can be manually downloaded to the Cisco Secure ACS’s private certificate store by the following steps.
Note The Cisco Secure ACS’s private store is independent of the Windows certificate store. The steps below detail how to get the root certificate into the Cisco Secure ACS private store only.
Step 1 On the Cisco Secure ACS server, point the browser at the Microsoft CA server: http://CA-srv-ip /certsrv.
Step 2 From the Select a Task option choose Download a CA certificate, certificate chain or CRL.
3-16802.1X Deployment Guide
OL-16033-01

St r i c t ly C i sco Conf ident i a l
Chapter 3 Configuring 802.1X Deploying EAP-TLS
Step 3 Choose the Base 64 radio encoding method and click Download CA Certificate. See Figure 3-8.
Figure 3-8 Download CA Certificate for Private Store
Step 4 A File Download Security Warning window appears. Click Save. See Figure 3-9.
Figure 3-9 Save Certificate
3-17802.1X Deployment Guide
OL-16033-01

St r i c t ly C i sco Conf ident i a l
Chapter 3 Configuring 802.1X Deploying EAP-TLS
Step 5 Enter a location to save the file and click Save. Make a note of the filename and directory since you will need this information when configuring Cisco Secure ACS to trust this CA’s certificate. See Figure 3-10.
Figure 3-10 Save Certificate for Private Storage
Because the root certificate was downloaded manually to the private Cisco Secure ACS store, it is not installed in the Microsoft local machine certificate storage. Therefore, it will not appear in the MMC Certificate snap-in nor will it be automatically added to the list of candidate CAs on the Cisco Secure ACS Certificate Trust List (CTL). The CTL defines the root CAs that the Cisco Secure ACS will trust when validating the signature on a certificate presented by a supplicant. Since the CTL is automatically updated with the root CAs in the Microsoft machine certificate store and since the Cisco Secure ACS automatically trusts the CA that issued its own certificate, there is no need to modify it in most cases. The CTL only becomes an issue when the root CA certificate is added to the Cisco Secure ACS private store (as described in this step) and when this CA is different from the CA that issued the Cisco Secure ACS's certificate.
If a CA has been manually added to the Cisco Secure ACS private certificate store and this CA is not the one that signed the Cisco Secure ACS’s own certificate, additional steps will be required to configure the Cisco Secure ACS to add the CA to the Certificate Trust List:
Step 6 On the Cisco Secure ACS Server, open Cisco Secure ACS Admin from the desktop shortcut created during the installation.
Step 7 Click System Configuration.
Step 8 Click ACS Certificate Setup
Step 9 Click ACS Certification Authority Setup. See Figure 3-11.
Step 10 Under the ACS Certification Authority Setup window, type the name and location of the *.cer file created earlier. In this example, the *.cer file created is EnterpriseRoot-CA-cert.cer in the root directory C:\.
3-18802.1X Deployment Guide
OL-16033-01
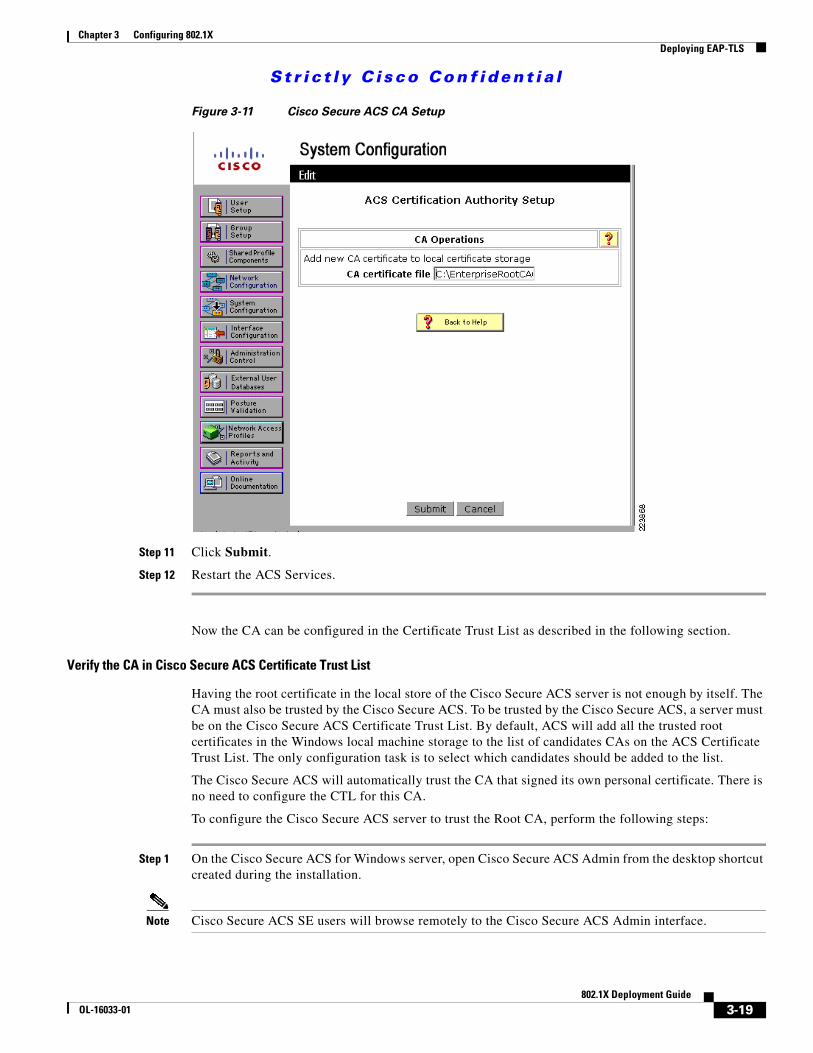
St r i c t ly C i sco Conf ident i a l
Chapter 3 Configuring 802.1X Deploying EAP-TLS
Figure 3-11 Cisco Secure ACS CA Setup
Step 11 Click Submit.
Step 12 Restart the ACS Services.
Now the CA can be configured in the Certificate Trust List as described in the following section.
Verify the CA in Cisco Secure ACS Certificate Trust List
Having the root certificate in the local store of the Cisco Secure ACS server is not enough by itself. The CA must also be trusted by the Cisco Secure ACS. To be trusted by the Cisco Secure ACS, a server must be on the Cisco Secure ACS Certificate Trust List. By default, ACS will add all the trusted root certificates in the Windows local machine storage to the list of candidates CAs on the ACS Certificate Trust List. The only configuration task is to select which candidates should be added to the list.
The Cisco Secure ACS will automatically trust the CA that signed its own personal certificate. There is no need to configure the CTL for this CA.
To configure the Cisco Secure ACS server to trust the Root CA, perform the following steps:
Step 1 On the Cisco Secure ACS for Windows server, open Cisco Secure ACS Admin from the desktop shortcut created during the installation.
Note Cisco Secure ACS SE users will browse remotely to the Cisco Secure ACS Admin interface.
3-19802.1X Deployment Guide
OL-16033-01

St r i c t ly C i sco Conf ident i a l
Chapter 3 Configuring 802.1X Deploying EAP-TLS
Step 2 Click System Configuration.
Step 3 Click ACS Certificate Setup.
Step 4 Click Edit Certificate Trust List. See Figure 3-12.
Figure 3-12 Certificate Trust List
Step 5 Scroll down the list to find the name of the Root CA that issues the client certificates. Check the box next to the Root CA’s name. Click Submit and then Restart.
Note In many cases, this step will not be required, since Cisco Secure ACS will automatically trust the CA that issued the Cisco Secure ACS's server certificate. If the client certificates are issued by the same CA that issued the Cisco Secure ACS server certificate, then this is the only CA that Cisco Secure ACS needs to trust and no further action is necessary. If, however, different CAs were used to issue the server certificate and the client certificates, then all the CAs that issued client certificates must be checked on the Cisco Secure ACS Certificate Trust List.
After this step is complete, the Cisco Secure ACS is ready to use the Enterprise Root CA Certificate to validate the user certificates it receives from supplicants during IEEE 802.1X EAP-TLS authentications.
3-20802.1X Deployment Guide
OL-16033-01
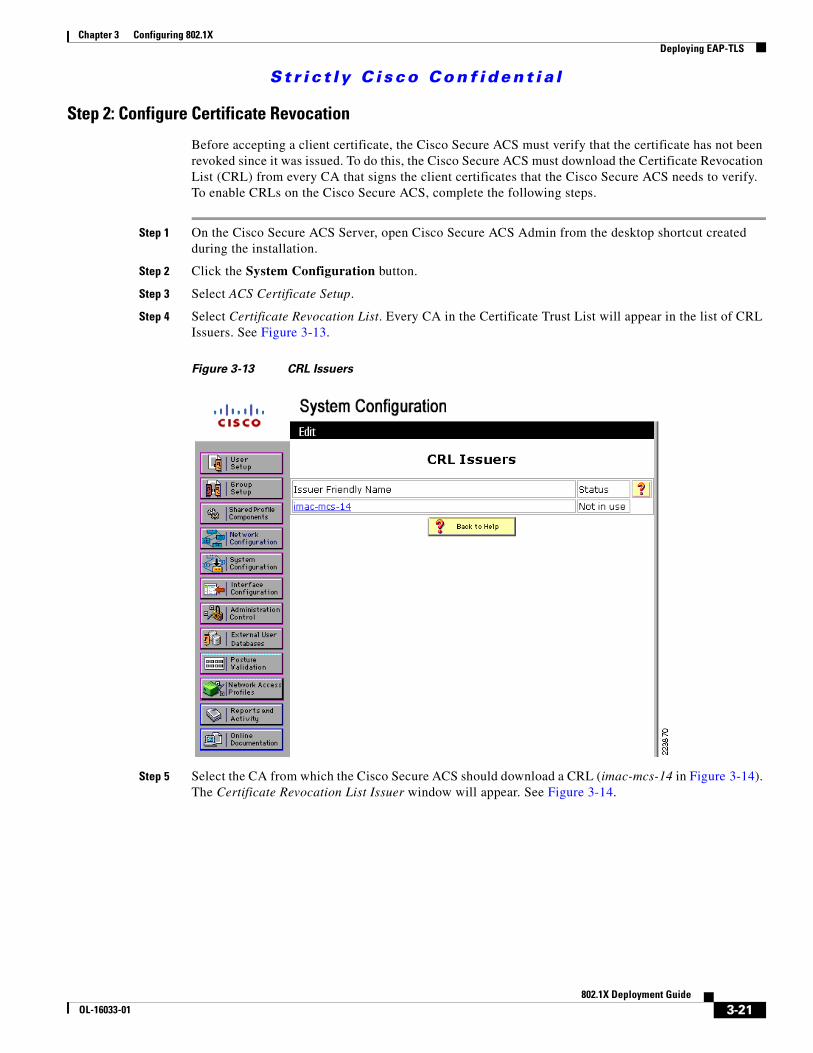
St r i c t ly C i sco Conf ident i a l
Chapter 3 Configuring 802.1X Deploying EAP-TLS
Step 2: Configure Certificate Revocation
Before accepting a client certificate, the Cisco Secure ACS must verify that the certificate has not been revoked since it was issued. To do this, the Cisco Secure ACS must download the Certificate Revocation List (CRL) from every CA that signs the client certificates that the Cisco Secure ACS needs to verify. To enable CRLs on the Cisco Secure ACS, complete the following steps.
Step 1 On the Cisco Secure ACS Server, open Cisco Secure ACS Admin from the desktop shortcut created during the installation.
Step 2 Click the System Configuration button.
Step 3 Select ACS Certificate Setup.
Step 4 Select Certificate Revocation List. Every CA in the Certificate Trust List will appear in the list of CRL Issuers. See Figure 3-13.
Figure 3-13 CRL Issuers
Step 5 Select the CA from which the Cisco Secure ACS should download a CRL (imac-mcs-14 in Figure 3-14). The Certificate Revocation List Issuer window will appear. See Figure 3-14.
3-21802.1X Deployment Guide
OL-16033-01

St r i c t ly C i sco Conf ident i a l
Chapter 3 Configuring 802.1X Deploying EAP-TLS
Figure 3-14 CRL Configuration
Step 6 The CRL Distribution URL is automatically filled in based on what was provided in the root CA certificate. If some other URL should be used to download the CRL, enter it in the CRL Distribution URL.
Note The CRL Distribution URL above was automatically filled in based on the information in the root CA certificate (as seen in MMC). See Figure 3-15.
3-22802.1X Deployment Guide
OL-16033-01

St r i c t ly C i sco Conf ident i a l
Chapter 3 Configuring 802.1X Deploying EAP-TLS
Figure 3-15 Finding the CRL in the Root CA Certificate
Step 7 Use the radio buttons on the Certificate Revocation List configuration page to select the method that Cisco Secure ACS should use for retrieving a CRL. This value should be determined in accordance with your organization’s security policy.
• Automatically—Uses the value contained in the Next Update field in the CRL file to retrieve a new CRL from the CA. If unsuccessful, Cisco Secure ACS tried to retrieve the CRL every 10 minutes after the first failure until it succeeds.
• Every—Determines the frequency between retrieval attempts. Enter the amount in units of time.
Note In both modes, if retrieval fails for some reason, a reattempt is tried every 10 minutes.
Step 8 Select the CRL is in use option to enable CRL checking for this CA.
Step 9 Click Submit.
Step 3: Acquire and Configure Cisco Secure ACS Server Certificate
During the EAP-TLS exchange with the 802.1X supplicant, the Cisco Secure ACS must present a valid server certificate that it has previously retrieved from the Enterprise CA. There are two ways to acquire a server certificate. The end result is the same in both cases. The only differences are in how the certificates are stored and retrieved.
3-23802.1X Deployment Guide
OL-16033-01

St r i c t ly C i sco Conf ident i a l
Chapter 3 Configuring 802.1X Deploying EAP-TLS
Method 1 retrieves a server certificate from the CA and installs it in the Windows machine certificate store on the Cisco Secure ACS. Once in the machine store, this certificate can be imported into Cisco Secure ACS by referencing the certificate's Common Name (CN). Because the certificate must have exportable keys in order to be exported from the machine store, a new certificate template must be created for use by the CA.
Method 2 uses the Cisco Secure ACS Certificate Signing Request feature to generate a certificate request. This certificate request is used to generate a certificate on the CA. This certificate and its associated key file can be saved to the Cisco Secure ACS server and then imported by Cisco Secure ACS. Because the certificate is not in the Windows machine certificate store, it does not need to be exported and so does not need exportable keys. Therefore, no new certificate template is need on the CA when using this method.
Cisco Secure ACS Certificate—Method 1
This method consists of the following:
1. Create Certificate Template on the Enterprise Root CA, page 3-24
2. Obtain a Server Certificate for the ACS Server, page 3-32
3. Configure ACS to Use the Server Certificate, page 3-36
Each of these steps is described in detail below.
Create Certificate Template on the Enterprise Root CA
For the Cisco Secure ACS to use a certificate in the Windows machine store, the certificate must have exportable keys. A certificate with exportable private keys can be exported from Windows storage and installed in Cisco Secure ACS. Exportable keys also allow the certificate to be exported from Windows and installed on another computer.
In earlier versions of the Microsoft CA, it was possible to use the pre-configured Web Server template when requesting an Cisco Secure ACS server certificate. However, Microsoft has changed the Web Server template with the release of the Windows 2003 Enterprise CA so that keys are no longer exportable (the option is grayed out). There are no other default certificate templates supplied with certificate services that are for server authentication and give the ability to mark keys as exportable. Therefore, you must create a new template. Once the template has been created, the Cisco Secure ACS can retrieve its server certificate. This section describes how to create the certificate template on the Enterprise CA. Subsequent sections describe how to retrieve the certificate from the Cisco Secure ACS.
Note Microsoft Certificate Authorities running on Windows 2000 allows for exportable keys and these procedures do not need to be followed if you use Windows 2000 Certificate Authority. Skip to Obtain a Server Certificate for the ACS Server, page 3-41, if your CA is running on Windows 2000 server and use the default Web server template. Before deploying a Windows 2000 CA, however, recall that user auto-enrollment (a best practice for simplifying PKI deployment) cannot be enabled on a Windows 2000 CA.
Install the Certificate Templates Snap-in
On the Enterprise CA or the Domain Controller (both can be used to configure templates), complete these steps:
Step 1 Choose Start > Run, type certtmpl.msc, and click OK to open the Certificate Templates snap-in. See Figure 3-16.
3-24802.1X Deployment Guide
OL-16033-01
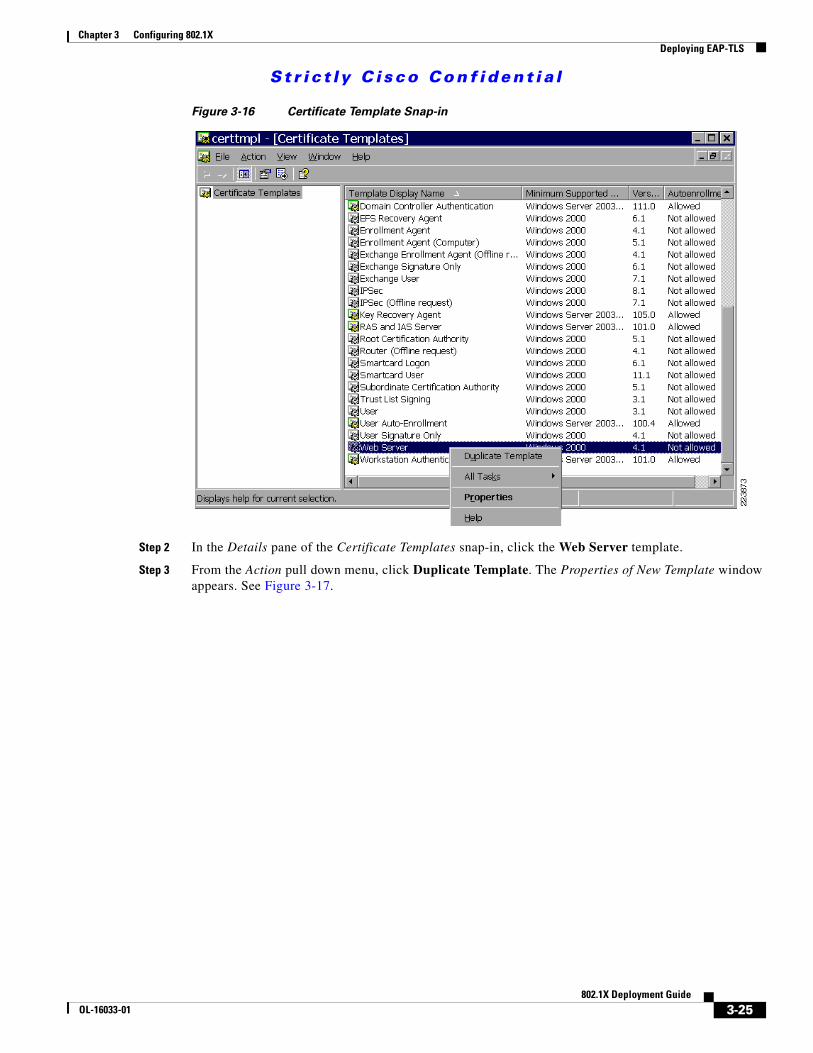
St r i c t ly C i sco Conf ident i a l
Chapter 3 Configuring 802.1X Deploying EAP-TLS
Figure 3-16 Certificate Template Snap-in
Step 2 In the Details pane of the Certificate Templates snap-in, click the Web Server template.
Step 3 From the Action pull down menu, click Duplicate Template. The Properties of New Template window appears. See Figure 3-17.
3-25802.1X Deployment Guide
OL-16033-01

St r i c t ly C i sco Conf ident i a l
Chapter 3 Configuring 802.1X Deploying EAP-TLS
Figure 3-17 Cisco Secure ACS Certificate Template: General Tab
Step 4 In the Template display name field of the General tab, enter Cisco Secure ACS.
Step 5 Go to the Request Handling tab and check Allow private key to be exported. See Figure 3-18.
3-26802.1X Deployment Guide
OL-16033-01

St r i c t ly C i sco Conf ident i a l
Chapter 3 Configuring 802.1X Deploying EAP-TLS
Figure 3-18 ACS Certificate Template: Request Handling tab
Step 6 Click the CSPs button near the bottom of the Request Handling tab. In the CSP Selection window, select Requests must use one of the following CSPs and check Microsoft Base Cryptographic Provider v1.0. Uncheck any other CSPs that are checked and then click OK. See Figure 3-19.
Figure 3-19 CSP Selection
Step 7 Go to the Subject Name tab, choose Supply in the request and click OK. See Figure 3-20.
3-27802.1X Deployment Guide
OL-16033-01

St r i c t ly C i sco Conf ident i a l
Chapter 3 Configuring 802.1X Deploying EAP-TLS
Figure 3-20 ACS Certificate Template: Subject Name Tab
Step 8 Go to the Extensions tab. Highlight Application Policies and verify that description of application policies includes Server Authentication. This should happen automatically if you have duplicated the default Web Server Template. See Figure 3-21.
3-28802.1X Deployment Guide
OL-16033-01

St r i c t ly C i sco Conf ident i a l
Chapter 3 Configuring 802.1X Deploying EAP-TLS
Figure 3-21 ACS Certificate Template: Extensions Tab
Note The Application Policy extension is used to populate the Enhanced Key Usage field on the certificate. This field is mandatory when you use the Microsoft supplicant for EAP-TLS or PEAP.
Step 9 Go to the Security tab, highlight the Domain Admins Group and ensure that the Enroll option is checked under Allowed. See Figure 3-22.
3-29802.1X Deployment Guide
OL-16033-01
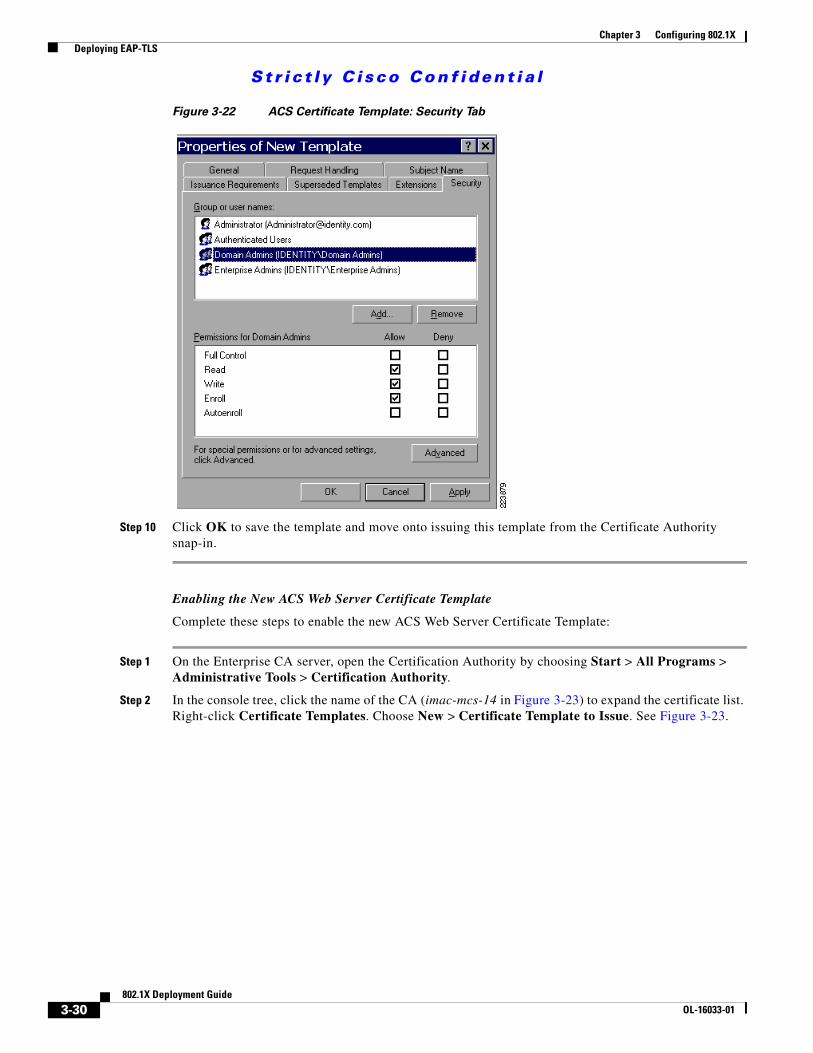
St r i c t ly C i sco Conf ident i a l
Chapter 3 Configuring 802.1X Deploying EAP-TLS
Figure 3-22 ACS Certificate Template: Security Tab
Step 10 Click OK to save the template and move onto issuing this template from the Certificate Authority snap-in.
Enabling the New ACS Web Server Certificate Template
Complete these steps to enable the new ACS Web Server Certificate Template:
Step 1 On the Enterprise CA server, open the Certification Authority by choosing Start > All Programs > Administrative Tools > Certification Authority.
Step 2 In the console tree, click the name of the CA (imac-mcs-14 in Figure 3-23) to expand the certificate list. Right-click Certificate Templates. Choose New > Certificate Template to Issue. See Figure 3-23.
3-30802.1X Deployment Guide
OL-16033-01

St r i c t ly C i sco Conf ident i a l
Chapter 3 Configuring 802.1X Deploying EAP-TLS
Figure 3-23 Issuing a New Certificate from the Certification Authority
Step 3 Select the ACS Certificate Template created in the previous section and click OK. See Figure 3-24.
Figure 3-24 Issue the ACS Certificate Template
3-31802.1X Deployment Guide
OL-16033-01

St r i c t ly C i sco Conf ident i a l
Chapter 3 Configuring 802.1X Deploying EAP-TLS
Obtain a Server Certificate for the ACS Server
Now that a suitable certificate template exists on the CA server, the ACS server can obtain a server authentication certificate that can be used for EAP-TLS authentication. Follow the steps below to download a server certificate to the ACS.
Step 1 Log into the ACS server with an account that has Enterprise Admin rights.
Step 2 On the local ACS machine, point the browser at the Microsoft certification authority server at http://IP-address-of-Root-CA/certsrv. In Figure 3-25, the IP address of the CA is 10.100.10.114. Select Request a Certificate. See Figure 3-25.
Figure 3-25 CA Web Interface
Step 3 In the Certificate Request window, click Advanced Certificate Request. See Figure 3-26.
3-32802.1X Deployment Guide
OL-16033-01
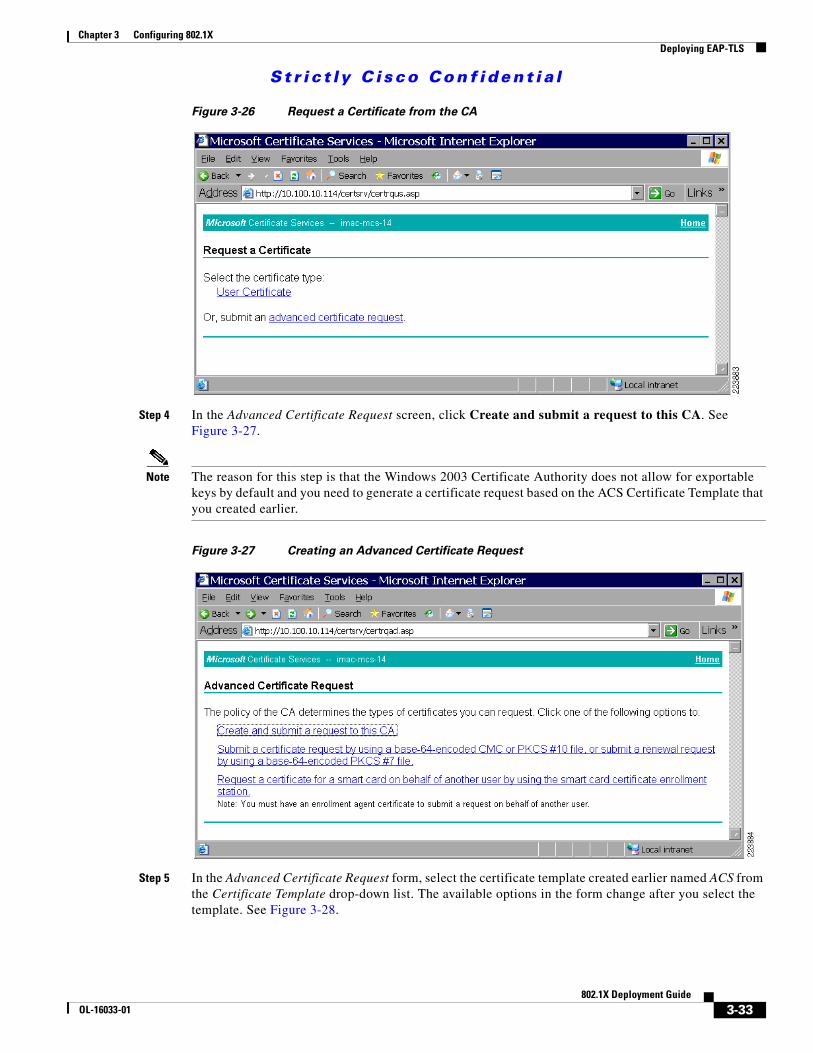
St r i c t ly C i sco Conf ident i a l
Chapter 3 Configuring 802.1X Deploying EAP-TLS
Figure 3-26 Request a Certificate from the CA
Step 4 In the Advanced Certificate Request screen, click Create and submit a request to this CA. See Figure 3-27.
Note The reason for this step is that the Windows 2003 Certificate Authority does not allow for exportable keys by default and you need to generate a certificate request based on the ACS Certificate Template that you created earlier.
Figure 3-27 Creating an Advanced Certificate Request
Step 5 In the Advanced Certificate Request form, select the certificate template created earlier named ACS from the Certificate Template drop-down list. The available options in the form change after you select the template. See Figure 3-28.
3-33802.1X Deployment Guide
OL-16033-01
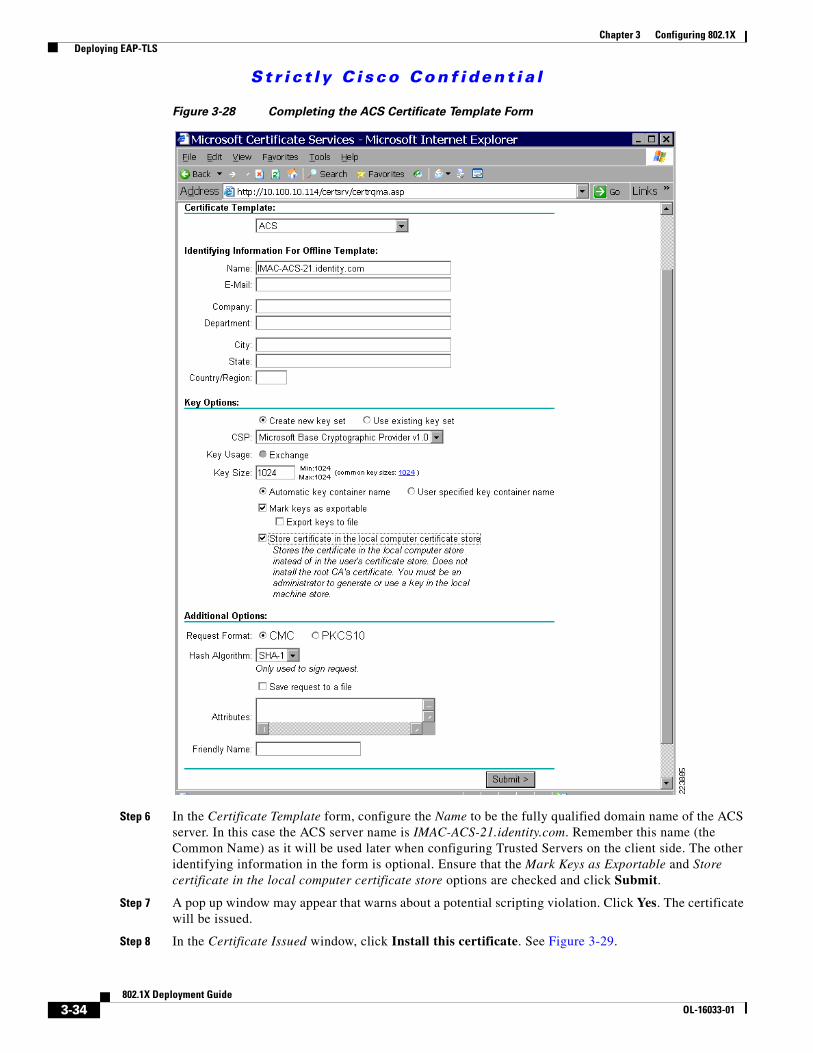
St r i c t ly C i sco Conf ident i a l
Chapter 3 Configuring 802.1X Deploying EAP-TLS
Figure 3-28 Completing the ACS Certificate Template Form
Step 6 In the Certificate Template form, configure the Name to be the fully qualified domain name of the ACS server. In this case the ACS server name is IMAC-ACS-21.identity.com. Remember this name (the Common Name) as it will be used later when configuring Trusted Servers on the client side. The other identifying information in the form is optional. Ensure that the Mark Keys as Exportable and Store certificate in the local computer certificate store options are checked and click Submit.
Step 7 A pop up window may appear that warns about a potential scripting violation. Click Yes. The certificate will be issued.
Step 8 In the Certificate Issued window, click Install this certificate. See Figure 3-29.
3-34802.1X Deployment Guide
OL-16033-01

St r i c t ly C i sco Conf ident i a l
Chapter 3 Configuring 802.1X Deploying EAP-TLS
Figure 3-29 Issuing the ACS Server Certificate
Step 9 A pop up window might appear that warns about a potential scripting violation. Click Yes. The certificate will be installed in the Local Computer store Personal certificates folder. See Figure 3-30.
Figure 3-30 Installing the ACS Server Certificate
Step 10 Verify that the certificate is installed in the Local Computer store Personal certificate folder using the Microsoft Management Console (MMC). See Figure 3-31.
3-35802.1X Deployment Guide
OL-16033-01

St r i c t ly C i sco Conf ident i a l
Chapter 3 Configuring 802.1X Deploying EAP-TLS
Figure 3-31 Verifying ACS Server Certificate Storage
Configure ACS to Use the Server Certificate
After the previous step, the ACS server has a server certificate in its local machine store. Complete the following steps to configure ACS to use the server certificate in the local machine store.
Step 1 Open ACS Admin from the desktop shortcut created during the installation.
Step 2 Click the System Configuration button.
Step 3 Select ACS Certificate Setup.
Step 4 Select Install ACS Certificate. See Figure 3-32.
3-36802.1X Deployment Guide
OL-16033-01

St r i c t ly C i sco Conf ident i a l
Chapter 3 Configuring 802.1X Deploying EAP-TLS
Figure 3-32 ACS Server Certificate
Step 5 Choose Use certificate from storage and enter the fully qualified domain name of the ACS server (IMAC-MCS-21.identity.com in this example). See Figure 3-33.
3-37802.1X Deployment Guide
OL-16033-01

St r i c t ly C i sco Conf ident i a l
Chapter 3 Configuring 802.1X Deploying EAP-TLS
Figure 3-33 Use Certificate from Storage
Step 6 Click Submit. See Figure 3-34.
3-38802.1X Deployment Guide
OL-16033-01

St r i c t ly C i sco Conf ident i a l
Chapter 3 Configuring 802.1X Deploying EAP-TLS
Figure 3-34 Certificate Installation Confirmation
Step 7 Restart the ACS to adopt the new settings.
ACS Certificate—Method 2
This method consists of the following:
1. Generate a Certificate Signing Request, page 3-39
2. Obtain a Server Certificate for the ACS Server, page 3-41
3. Configure ACS to Use the Server Certificate, page 3-45
Each of these steps is described in the sections that follow.
Note Method 2 is an alternative to Method 1. There is no need to perform Method 2 if Method 1 was successful and vice versa.
Generate a Certificate Signing Request
In this step, ACS is used to generate a certificate signing request that can be used to acquire a certificate from the CA.
Step 1 Open ACS Admin from the desktop shortcut created during the installation.
Step 2 Click the System Configuration button.
Step 3 Select ACS Certificate Setup.
3-39802.1X Deployment Guide
OL-16033-01

St r i c t ly C i sco Conf ident i a l
Chapter 3 Configuring 802.1X Deploying EAP-TLS
Step 4 Select Generate Certificate Signing Request. The Certificate Signing Request window will appear. See Figure 3-35.
Figure 3-35 Generating an ACS Certificate Signing Request
Step 5 Enter a Common Name (CN) for the certificate in the Certificate subject field with the format CN=<cert-name>.
Step 6 Under Private key file, enter the full path and file name for the private key file that will be downloaded with the certificate. Make a note of this file name as it will be required when configuring ACS to use this certificate.
Step 7 Enter a Private key password. Make a note of this password as it will be required when configuring ACS to use the private key file.
Step 8 Under Key length, select 1024.
Note While you can create the server certificate with key sizes larger than 1024, any key larger than 1024 does not work with EAP-PEAP. If there is any chance you will need to support EAP-PEAP in your network, do not select a key size greater than 1024.
Step 9 Click Submit.
Step 10 The encoded certificate signing request appears. Using the mouse to select the entire request (all the characters between MIIB and Dw== in Figure 3-36) and copy it to the clipboard on the ACS. This will be used in the next step when requesting a certificate from the CA. See Figure 3-36.
3-40802.1X Deployment Guide
OL-16033-01

St r i c t ly C i sco Conf ident i a l
Chapter 3 Configuring 802.1X Deploying EAP-TLS
Figure 3-36 Encoded Certificate Signing Request
Obtain a Server Certificate for the ACS Server
In this step, the certificate signing request from the previous step is used to acquire a certificate and save it on the ACS server.
Step 1 Log into the ACS server with an account that has Enterprise Admin rights.
Step 2 On the local ACS machine, open a browser and point it to the Microsoft certification authority server at http://IP-address-of-Root-CA/certsrv. In the example below, the IP address is 10.100.10.114. Click Request a certificate. See Figure 3-37.
3-41802.1X Deployment Guide
OL-16033-01
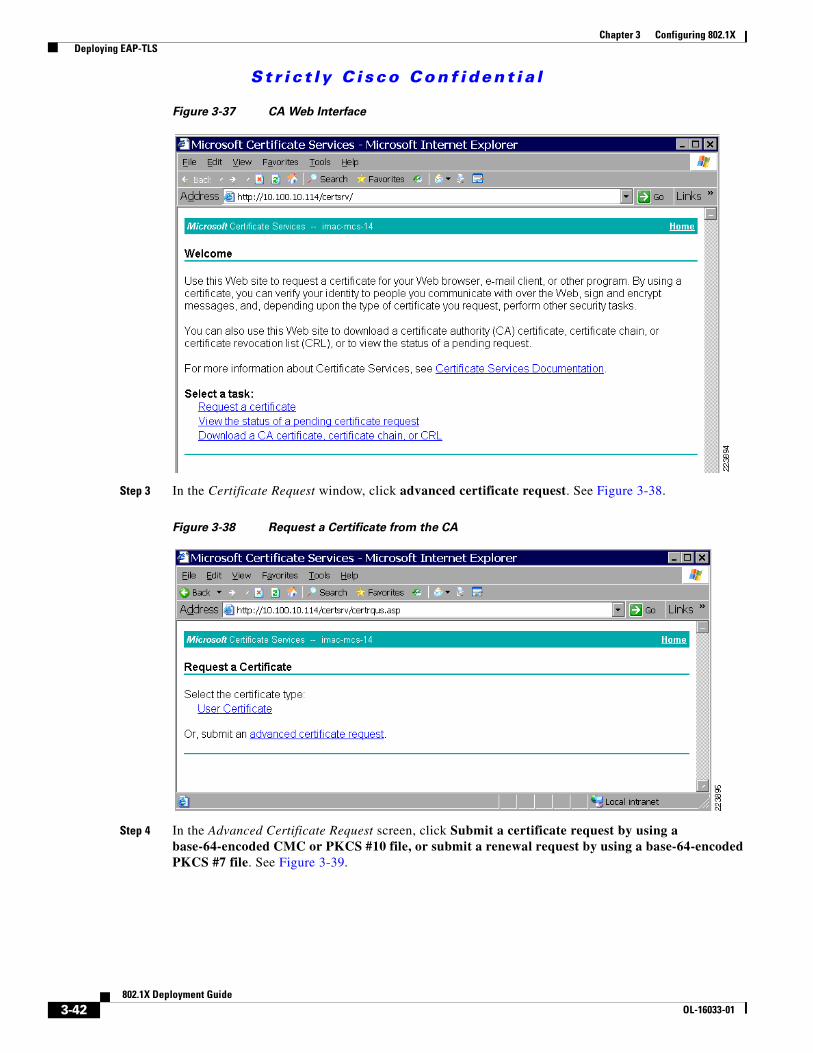
St r i c t ly C i sco Conf ident i a l
Chapter 3 Configuring 802.1X Deploying EAP-TLS
Figure 3-37 CA Web Interface
Step 3 In the Certificate Request window, click advanced certificate request. See Figure 3-38.
Figure 3-38 Request a Certificate from the CA
Step 4 In the Advanced Certificate Request screen, click Submit a certificate request by using a base-64-encoded CMC or PKCS #10 file, or submit a renewal request by using a base-64-encoded PKCS #7 file. See Figure 3-39.
3-42802.1X Deployment Guide
OL-16033-01
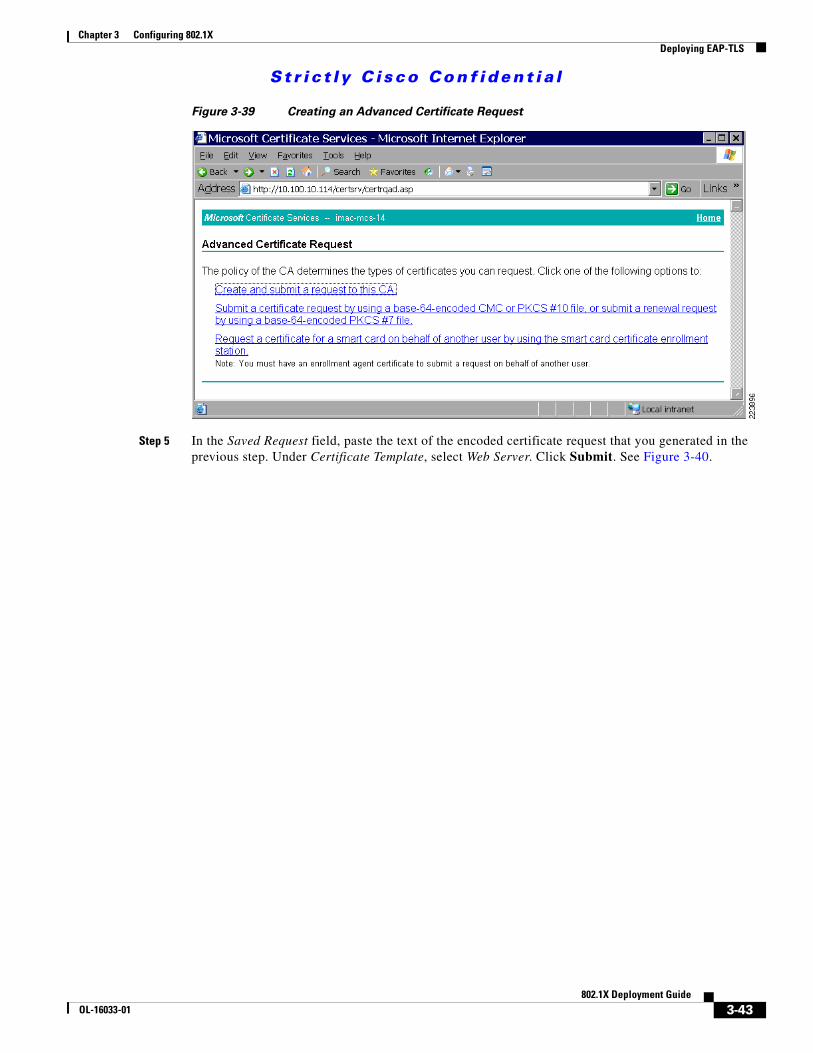
St r i c t ly C i sco Conf ident i a l
Chapter 3 Configuring 802.1X Deploying EAP-TLS
Figure 3-39 Creating an Advanced Certificate Request
Step 5 In the Saved Request field, paste the text of the encoded certificate request that you generated in the previous step. Under Certificate Template, select Web Server. Click Submit. See Figure 3-40.
3-43802.1X Deployment Guide
OL-16033-01
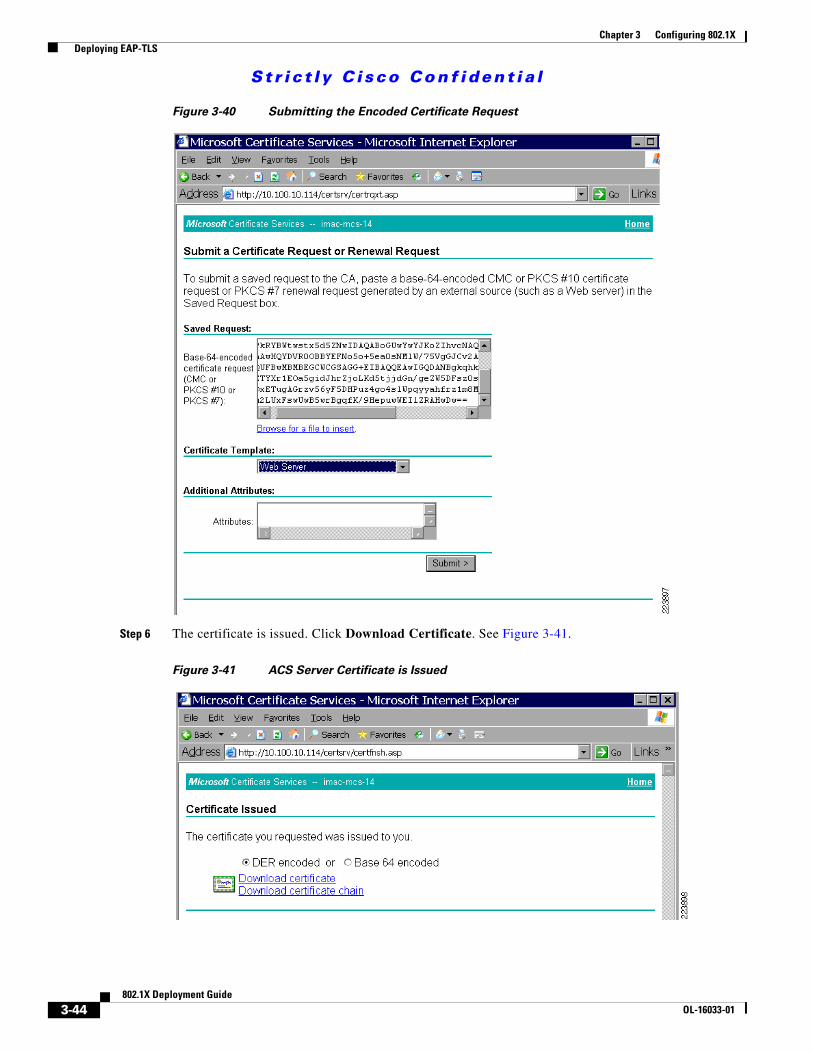
St r i c t ly C i sco Conf ident i a l
Chapter 3 Configuring 802.1X Deploying EAP-TLS
Figure 3-40 Submitting the Encoded Certificate Request
Step 6 The certificate is issued. Click Download Certificate. See Figure 3-41.
Figure 3-41 ACS Server Certificate is Issued
3-44802.1X Deployment Guide
OL-16033-01
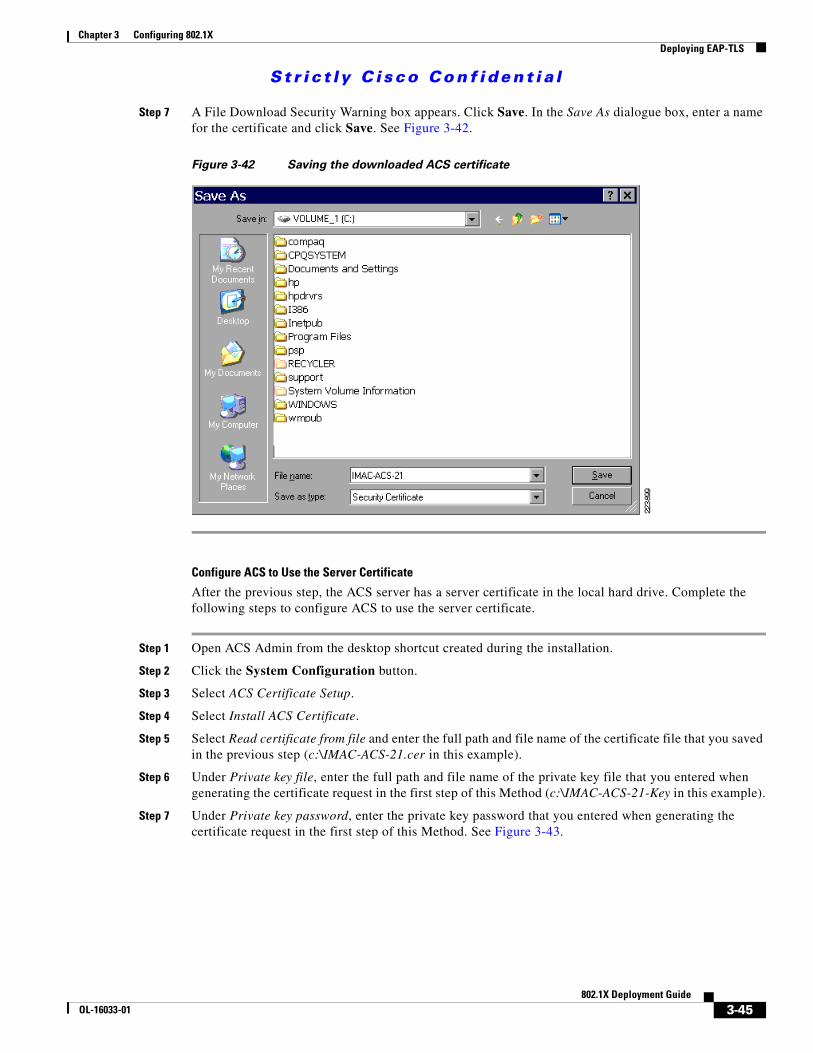
St r i c t ly C i sco Conf ident i a l
Chapter 3 Configuring 802.1X Deploying EAP-TLS
Step 7 A File Download Security Warning box appears. Click Save. In the Save As dialogue box, enter a name for the certificate and click Save. See Figure 3-42.
Figure 3-42 Saving the downloaded ACS certificate
Configure ACS to Use the Server Certificate
After the previous step, the ACS server has a server certificate in the local hard drive. Complete the following steps to configure ACS to use the server certificate.
Step 1 Open ACS Admin from the desktop shortcut created during the installation.
Step 2 Click the System Configuration button.
Step 3 Select ACS Certificate Setup.
Step 4 Select Install ACS Certificate.
Step 5 Select Read certificate from file and enter the full path and file name of the certificate file that you saved in the previous step (c:\IMAC-ACS-21.cer in this example).
Step 6 Under Private key file, enter the full path and file name of the private key file that you entered when generating the certificate request in the first step of this Method (c:\IMAC-ACS-21-Key in this example).
Step 7 Under Private key password, enter the private key password that you entered when generating the certificate request in the first step of this Method. See Figure 3-43.
3-45802.1X Deployment Guide
OL-16033-01
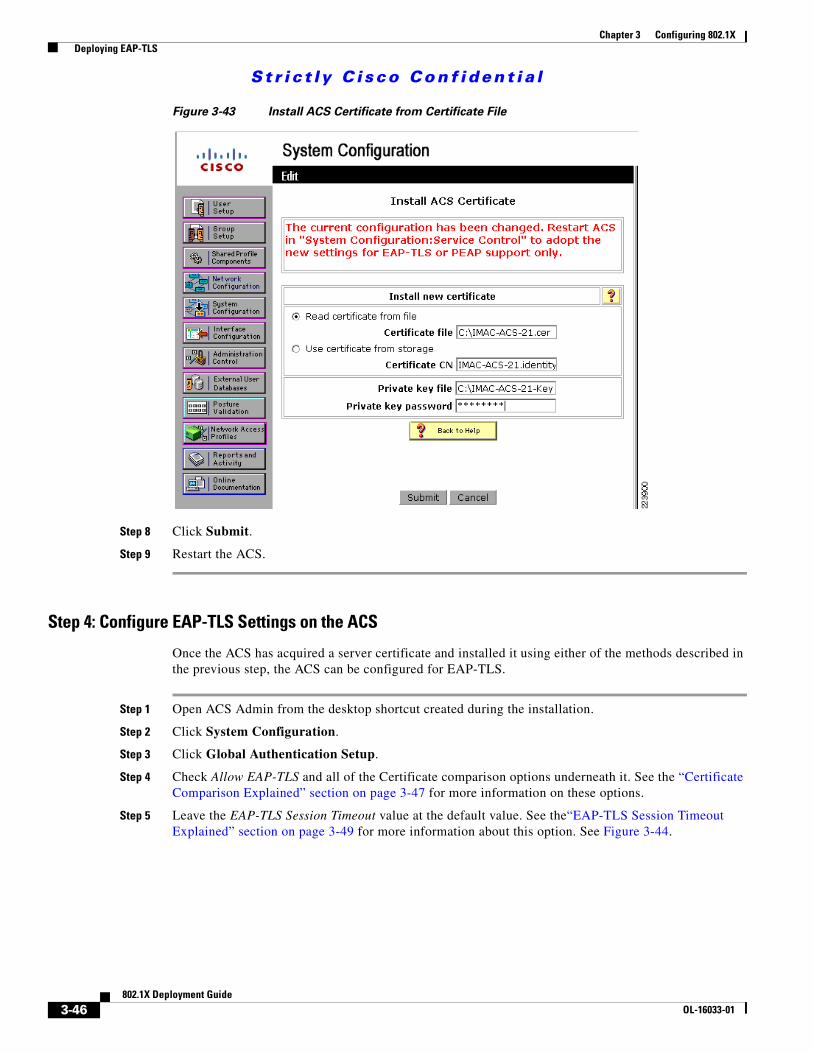
St r i c t ly C i sco Conf ident i a l
Chapter 3 Configuring 802.1X Deploying EAP-TLS
Figure 3-43 Install ACS Certificate from Certificate File
Step 8 Click Submit.
Step 9 Restart the ACS.
Step 4: Configure EAP-TLS Settings on the ACS
Once the ACS has acquired a server certificate and installed it using either of the methods described in the previous step, the ACS can be configured for EAP-TLS.
Step 1 Open ACS Admin from the desktop shortcut created during the installation.
Step 2 Click System Configuration.
Step 3 Click Global Authentication Setup.
Step 4 Check Allow EAP-TLS and all of the Certificate comparison options underneath it. See the “Certificate Comparison Explained” section on page 3-47 for more information on these options.
Step 5 Leave the EAP-TLS Session Timeout value at the default value. See the“EAP-TLS Session Timeout Explained” section on page 3-49 for more information about this option. See Figure 3-44.
3-46802.1X Deployment Guide
OL-16033-01

St r i c t ly C i sco Conf ident i a l
Chapter 3 Configuring 802.1X Deploying EAP-TLS
Figure 3-44 Global Authentication Setup for EAP-TLS
Step 6 Click Submit and Restart.
Certificate Comparison Explained
When a client presents a valid certificate (properly signed by a trusted root CA and neither expired nor revoked), the ACS knows the identity of the user (or host) attempting to gain access. However, the ACS does not know if the user is permitted onto the network. For that, ACS must verify that the user exists in the user database (either the local ACS database or an external database). This would be straight-forward except for the fact that the user’s certificate might list the user’s name in different fields in different formats in the certificate (this depends on the certificate template of the CA that issued the certificate). ACS provides three comparison options to allow any or all of these name fields to be checked against the user database:
• Certificate SAN Comparison uses the Subject Alternative Name when querying the user database. If the user certificate does not contain a SAN, then this method cannot be used. In Figure 3-44, the Subject Alternative Name in the certificate is [email protected].
3-47802.1X Deployment Guide
OL-16033-01

St r i c t ly C i sco Conf ident i a l
Chapter 3 Configuring 802.1X Deploying EAP-TLS
Figure 3-45 Certificate Subject Alternative Name (SAN)
• Certificate CN Comparison users the Common Name (CN) in the Subject field of the certificate. In Figure 3-45, the Common Name is Administrator.
3-48802.1X Deployment Guide
OL-16033-01

St r i c t ly C i sco Conf ident i a l
Chapter 3 Configuring 802.1X Deploying EAP-TLS
Figure 3-46 Certificate Common Name (CN)
• Certificate Binary Comparison compares the entire certificate in binary format to the user certificate in the LDAP server or Active Directory. You cannot use this comparison method to authenticate users in an ODBC external user database or the local user database.
Whichever method is selected, the information in the appropriate field (CN or SAN) must match the name that your database uses for authentication. Review these fields in your certificate templates to ensure that they match to valid usernames in your user database.
If more than one comparison method is checked, ACS will start with the first method. If that method fails, ACS will try the next method. The first method that passes will results in a successful authentication. The authentication will fail only when all enabled methods fail. Enabling all three Comparison methods maximizes the ACS’s ability to correctly locate users in the user database.
EAP-TLS Session Timeout Explained
ACS supports an EAP-TLS session resume feature that caches the TLS session created during a new EAP-TLS authentication. When an EAP-TLS client reconnects, the cached TLS session is used to restore the session without performing a certificate comparison, which improves EAP-TLS performance. ACS deletes cached TLS sessions when they time out.
Session resume is most appropriate in wireless environments where endpoints need to rapidly reauthenticate when roaming. The mechanism works the same way in wired environments, but the optimization is less important and it can be disabled without impacting the network. To disable the session resume feature, set the timeout value to 0 (zero).
3-49802.1X Deployment Guide
OL-16033-01

St r i c t ly C i sco Conf ident i a l
Chapter 3 Configuring 802.1X Deploying EAP-TLS
Note For session resume to work, it must be supported and enabled on both the ACS and the supplicant. Not all supplicants support session resume. See the Client Configuration for EAP-TLS, page 3-56 for more details.
Step 5: Specify and Configure the Catalyst Switch as a AAA Client
Complete the following steps to configure the ACS to accept RADIUS requests from the authenticator.
Step 1 On the ACS server, open ACS Admin from the desktop shortcut created during the installation.
Step 2 Click Network Configuration. See Figure 3-47.
Figure 3-47 ACS Network Configuration
Step 3 Click Add Entry under the AAA Clients table to add an authenticator.
Step 4 See Figure 3-48. For the AAA Client Host Name, enter the name of the Catalyst switch authenticator.
Step 5 For AAA Client IP Address, enter the IP address of the Catalyst switch authenticator.
Step 6 For Key, enter the same RADIUS key configured on the Catalyst switch.
Step 7 For the Authenticate Using option, select RADIUS (Cisco IOS/PIX 6.0).
3-50802.1X Deployment Guide
OL-16033-01

St r i c t ly C i sco Conf ident i a l
Chapter 3 Configuring 802.1X Deploying EAP-TLS
Figure 3-48 Adding a Catalyst Switch as a AAA Client
Note The RADIUS (Cisco IOS/PIX 6.0) option enables the use of Cisco IOS RADIUS Vendor-Specific Attributes (VSA).
Step 8 Click Submit + Apply.
Step 6: Configure the External User Databases
EAP-TLS is commonly deployed in networks where user credentials are stored in an external user database such as Active Directory. That configuration is described in detail in the following section. See the ACS Configuration Guide for detailed information on configuring external user databases other than Active Directory.
Note Although this configuration example uses Active Directory as an external user database, EAP-TLS by itself does not always require the use of an external user database. The internal ACS database can be used as long as the Certificate Binary Comparison method is not selected as the only option in the Global Authentication configuration for EAP-TLS. If Certificate Binary Comparison is the only comparison method allowed when using the internal user database, a failed authentication will result. The ACS Failed Authentication report will show Certificate name or binary comparison failed.
3-51802.1X Deployment Guide
OL-16033-01

St r i c t ly C i sco Conf ident i a l
Chapter 3 Configuring 802.1X Deploying EAP-TLS
Note A bug in ACS 4.1.3 Build 12 prevents CN Comparison from working with the local database: CSCsj97652.
Step 1 Click External User Databases on the main menu. In the External User Databases menu, select Unknown User Policy. See Figure 3-49.
Figure 3-49 External User Databases
Step 2 See Figure 3-50. In the Configure Unknown User Policy section, select the Check the following external user databases radio button. Move the Windows Database option from the External Databases column to the Selected Databases column. Click Submit.
3-52802.1X Deployment Guide
OL-16033-01

St r i c t ly C i sco Conf ident i a l
Chapter 3 Configuring 802.1X Deploying EAP-TLS
Figure 3-50 Configure Unknown User Policy
Step 3 Select the Database Configuration option from the External User Databases menu. In the External User Database Configuration section, select the Windows Database option. See Figure 3-51.
3-53802.1X Deployment Guide
OL-16033-01

St r i c t ly C i sco Conf ident i a l
Chapter 3 Configuring 802.1X Deploying EAP-TLS
Figure 3-51 External User Database Configuration
Step 4 See Figure 3-52. Click the Configure button in the External User Database Configuration section.
3-54802.1X Deployment Guide
OL-16033-01
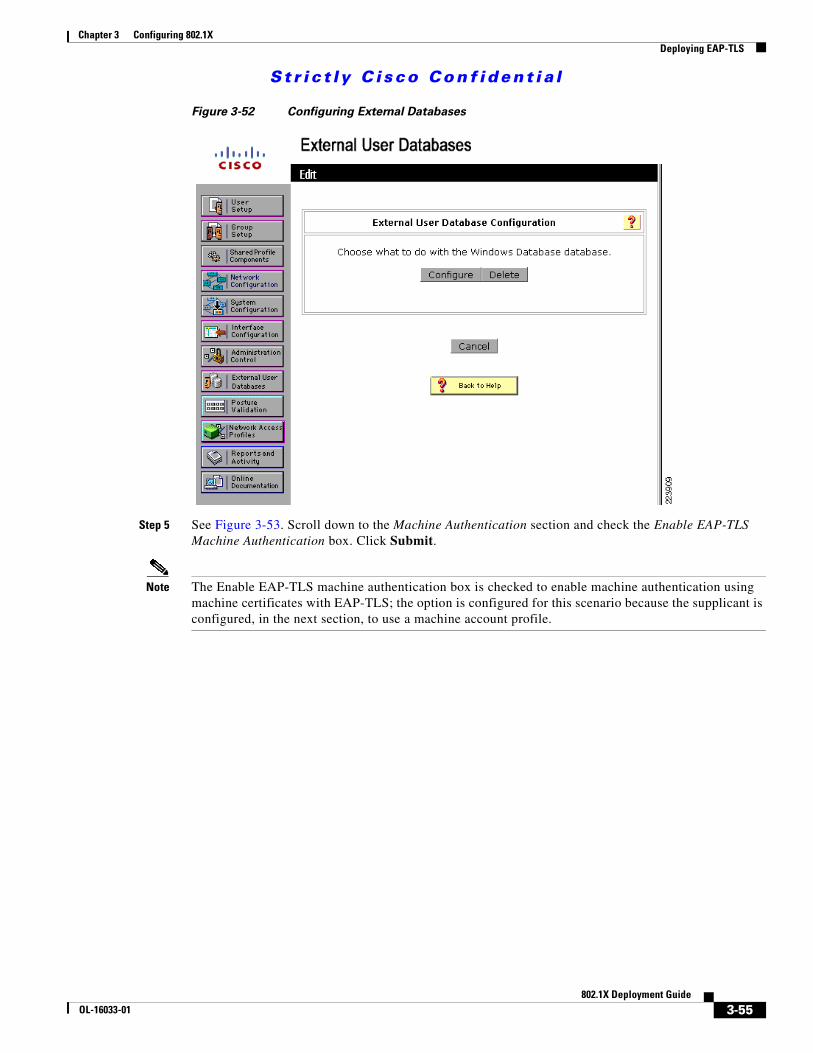
St r i c t ly C i sco Conf ident i a l
Chapter 3 Configuring 802.1X Deploying EAP-TLS
Figure 3-52 Configuring External Databases
Step 5 See Figure 3-53. Scroll down to the Machine Authentication section and check the Enable EAP-TLS Machine Authentication box. Click Submit.
Note The Enable EAP-TLS machine authentication box is checked to enable machine authentication using machine certificates with EAP-TLS; the option is configured for this scenario because the supplicant is configured, in the next section, to use a machine account profile.
3-55802.1X Deployment Guide
OL-16033-01
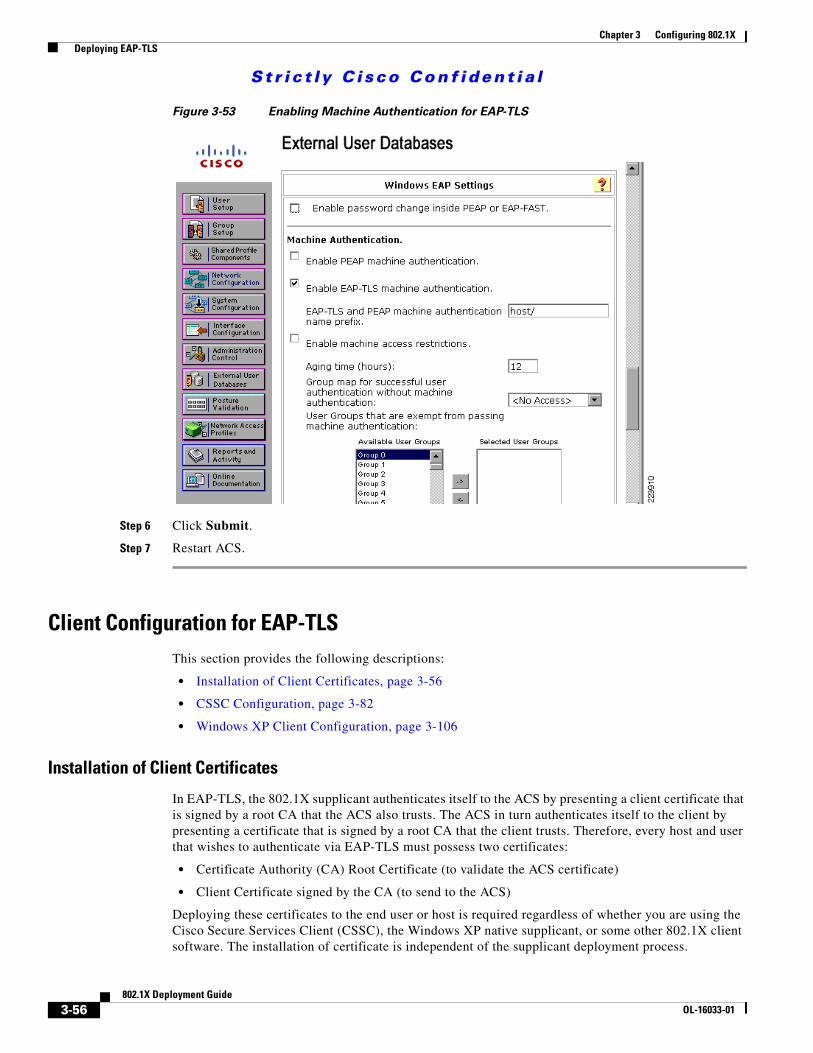
St r i c t ly C i sco Conf ident i a l
Chapter 3 Configuring 802.1X Deploying EAP-TLS
Figure 3-53 Enabling Machine Authentication for EAP-TLS
Step 6 Click Submit.
Step 7 Restart ACS.
Client Configuration for EAP-TLSThis section provides the following descriptions:
• Installation of Client Certificates, page 3-56
• CSSC Configuration, page 3-82
• Windows XP Client Configuration, page 3-106
Installation of Client Certificates
In EAP-TLS, the 802.1X supplicant authenticates itself to the ACS by presenting a client certificate that is signed by a root CA that the ACS also trusts. The ACS in turn authenticates itself to the client by presenting a certificate that is signed by a root CA that the client trusts. Therefore, every host and user that wishes to authenticate via EAP-TLS must possess two certificates:
• Certificate Authority (CA) Root Certificate (to validate the ACS certificate)
• Client Certificate signed by the CA (to send to the ACS)
Deploying these certificates to the end user or host is required regardless of whether you are using the Cisco Secure Services Client (CSSC), the Windows XP native supplicant, or some other 802.1X client software. The installation of certificate is independent of the supplicant deployment process.
3-56802.1X Deployment Guide
OL-16033-01

St r i c t ly C i sco Conf ident i a l
Chapter 3 Configuring 802.1X Deploying EAP-TLS
If the end host will be performing machine authentication and user authentication, then at least two client certificates will be required (one for the machine and one for every user who will log into that machine). The root CA certificate will must be installed in the user's Trusted Root certificate store and in the machine’s Trusted Root certificate store.
Certificates Required for Machine Authentication
The following sections describe how to verify and install the certificates needed to successfully complete machine authentication.
Note To verify and/or manipulate machine certificate stores, you must be logged into the machine as an Administrator.
Verifying Machine Root CA Certificate
When a user logs into a computer in the Microsoft domain, the Windows operating system will automatically retrieve the Enterprise CA Root Certificate from the Enterprise Root CA as a result of the Active Directory default Group Policy. Therefore, the client will most likely already have the Enterprise CA Root Certificate in the Trusted Root folder of the machine certificate store.
To verify that the client has the Enterprise CA Certificate in machine certificate storage, follow these steps on the client PC.
Step 1 Choose Start > Run, type mmc, and click OK.
Step 2 On the File menu, click Add/Remove Snap-in and then click Add.
Step 3 On the Add Standalone Snap-in, double-click Certificates. Select Computer Account and click Next.
Note If Computer Account is not listed, you do not have Administrative rights on this machine. Logoff and log back in using an Administrator's account credentials.
Step 4 Under Select Computer, select Local Computer and click Finish.
Step 5 On the Add Standalone Snap-in window, click Close.
Step 6 On the Add/Remove Snap-in window, click OK.
Step 7 On the Console, select Certificates (Local Computer) > Trusted Root Certification Authorities > Certificates.
Step 8 Locate the Enterprise Root CA Certificate in the list (imac-mcs-14 in Figure 3-54). If the certificate is listed, no further action is necessary. Proceed to downloading the client certificate in the “User Client Certificate” section on page 3-71. If the certificate is not listed, follow the instructions for manually downloading the CA certificate.
3-57802.1X Deployment Guide
OL-16033-01

St r i c t ly C i sco Conf ident i a l
Chapter 3 Configuring 802.1X Deploying EAP-TLS
Figure 3-54 Enterprise Root CA Certificate in Local Computer Store
Manually Downloading CA Certificate in Local Machine Store
Step 1 On the client, point the browser at the Microsoft CA server: http://CA-srv-ip /certsrv.
Step 2 From the Select a Task option choose Download a CA certificate, certificate chain or CRL.
Step 3 Click Download CA Certificate. See Figure 3-55.
3-58802.1X Deployment Guide
OL-16033-01
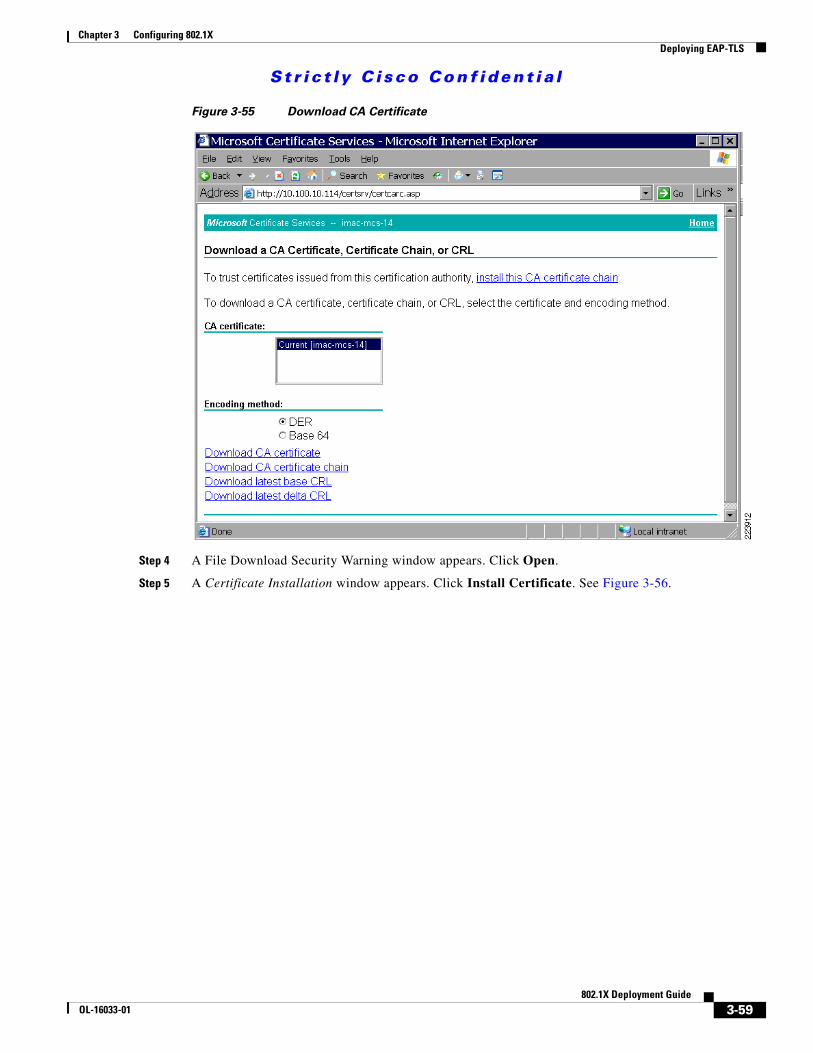
St r i c t ly C i sco Conf ident i a l
Chapter 3 Configuring 802.1X Deploying EAP-TLS
Figure 3-55 Download CA Certificate
Step 4 A File Download Security Warning window appears. Click Open.
Step 5 A Certificate Installation window appears. Click Install Certificate. See Figure 3-56.
3-59802.1X Deployment Guide
OL-16033-01

St r i c t ly C i sco Conf ident i a l
Chapter 3 Configuring 802.1X Deploying EAP-TLS
Figure 3-56 Install Certificate
Step 6 The Certificate Import Wizard opens. Click Next.
Step 7 Select Place all certificates in the following store and click Browse. See Figure 3-57.
Figure 3-57 Certificate Store
3-60802.1X Deployment Guide
OL-16033-01
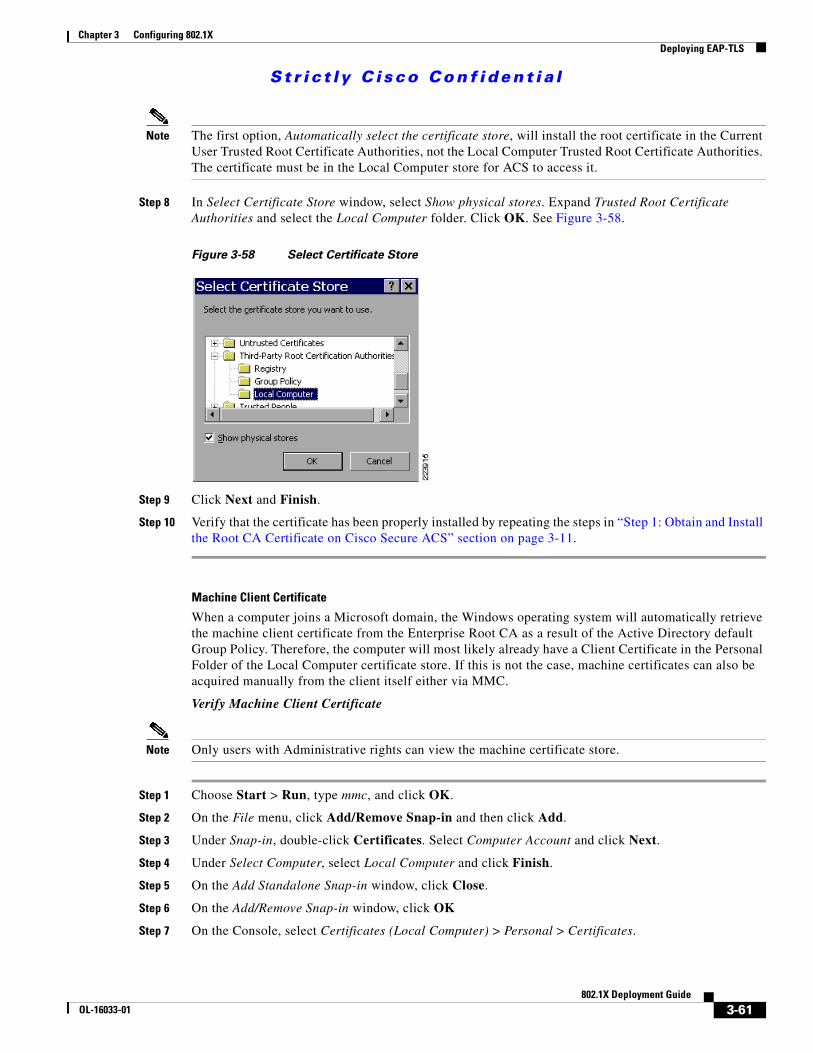
St r i c t ly C i sco Conf ident i a l
Chapter 3 Configuring 802.1X Deploying EAP-TLS
Note The first option, Automatically select the certificate store, will install the root certificate in the Current User Trusted Root Certificate Authorities, not the Local Computer Trusted Root Certificate Authorities. The certificate must be in the Local Computer store for ACS to access it.
Step 8 In Select Certificate Store window, select Show physical stores. Expand Trusted Root Certificate Authorities and select the Local Computer folder. Click OK. See Figure 3-58.
Figure 3-58 Select Certificate Store
Step 9 Click Next and Finish.
Step 10 Verify that the certificate has been properly installed by repeating the steps in “Step 1: Obtain and Install the Root CA Certificate on Cisco Secure ACS” section on page 3-11.
Machine Client Certificate
When a computer joins a Microsoft domain, the Windows operating system will automatically retrieve the machine client certificate from the Enterprise Root CA as a result of the Active Directory default Group Policy. Therefore, the computer will most likely already have a Client Certificate in the Personal Folder of the Local Computer certificate store. If this is not the case, machine certificates can also be acquired manually from the client itself either via MMC.
Verify Machine Client Certificate
Note Only users with Administrative rights can view the machine certificate store.
Step 1 Choose Start > Run, type mmc, and click OK.
Step 2 On the File menu, click Add/Remove Snap-in and then click Add.
Step 3 Under Snap-in, double-click Certificates. Select Computer Account and click Next.
Step 4 Under Select Computer, select Local Computer and click Finish.
Step 5 On the Add Standalone Snap-in window, click Close.
Step 6 On the Add/Remove Snap-in window, click OK
Step 7 On the Console, select Certificates (Local Computer) > Personal > Certificates.
3-61802.1X Deployment Guide
OL-16033-01

St r i c t ly C i sco Conf ident i a l
Chapter 3 Configuring 802.1X Deploying EAP-TLS
Step 8 Locate the machine client certificate in the list (IMAC-MCS-4.identity.com in Figure 3-59) and verify that it is issued by the appropriate CA (imac-mcs-14 in Figure 3-59). If the certificate is listed, no further action is necessary.
Figure 3-59 Machine Client Certificate
If the certificate is not listed, there are two options: Auto enrollment via Group Policy or certificate download via MMC. To determine which is appropriate, verify on the Windows Domain Controller that the default Group Policy supports machine certificate auto-enrollment. Auto-enrollment via Group Policy is the most efficient and scalable way to distribute machine client certificates. If auto-enrollment is not supported or cannot be configured, the machine client certificate can be downloaded via MMC. These procedures are described in the following sections.
Using Group Policy to Download Client Certificates for Machine Authentication (Preferred for Enterprise CAs)
The following steps outline how to configure the default Group Policy to enable auto-enrollment for machine certificates.
Step 1 On the Active Directory Domain Controller, open the Active Directory Users and Computers snap-in.
Note This can be performed on any Domain Controller in the domain.
Step 2 In the console tree, double-click Active Directory Users and Computers, right-click the domain, and then click Properties. See Figure 3-60.
3-62802.1X Deployment Guide
OL-16033-01
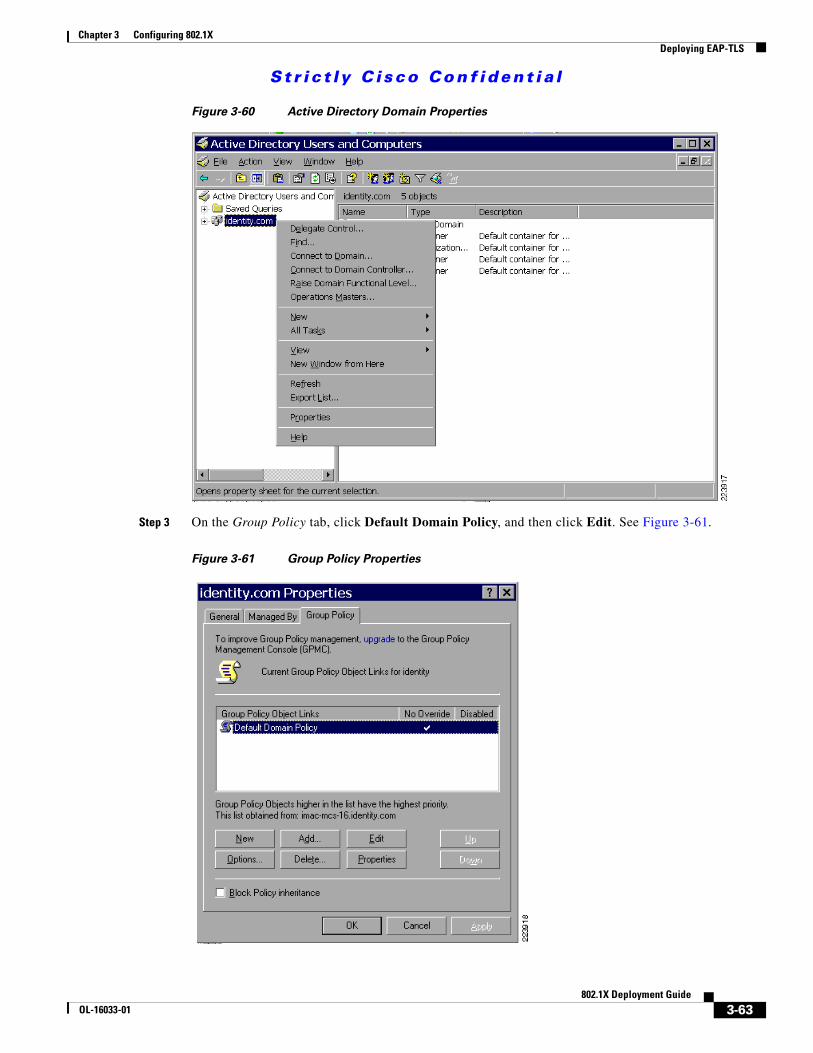
St r i c t ly C i sco Conf ident i a l
Chapter 3 Configuring 802.1X Deploying EAP-TLS
Figure 3-60 Active Directory Domain Properties
Step 3 On the Group Policy tab, click Default Domain Policy, and then click Edit. See Figure 3-61.
Figure 3-61 Group Policy Properties
3-63802.1X Deployment Guide
OL-16033-01

St r i c t ly C i sco Conf ident i a l
Chapter 3 Configuring 802.1X Deploying EAP-TLS
Step 4 The Group Policy Object Editor opens. In the console tree, expand Computer Configuration > Windows Settings > Security Settings > Public Key Policies. Right click Automatic Certificate Request Settings. Select New > Automatic Certificate Request. See Figure 3-62.
Figure 3-62 Configuring an Automatic Certificate Request
Step 5 The Automatic Certificate Request Setup Wizard will launch. Click Next. See Figure 3-63.
3-64802.1X Deployment Guide
OL-16033-01

St r i c t ly C i sco Conf ident i a l
Chapter 3 Configuring 802.1X Deploying EAP-TLS
Figure 3-63 Automatic Certificate Request Wizard
Step 6 On the Certificate Template page, click Computer and click Next. See Figure 3-64.
Figure 3-64 Selecting A Certificate Template for Automatic Request
Step 7 On the Completing the Automatic Certificate Request Setup Wizard page, click Finish. The Computer certificate type now appears in the details pane of the Group Policy Object Editor snap-in. See Figure 3-65.
3-65802.1X Deployment Guide
OL-16033-01

St r i c t ly C i sco Conf ident i a l
Chapter 3 Configuring 802.1X Deploying EAP-TLS
Figure 3-65 Newly Created Certificate Request
Step 8 Refresh the machine group policy on the client PC. This can be accomplished by rebooting the PC or by issuing the gpudpate command in a DOS window as shown in Figure 3-66.
Figure 3-66 Updating the Group Policy on the Client PC
Manually Downloading the Machine Client Certificate via MMC
In a Windows domain environment, the machine client certificate will typically already be in the Windows user certificate storage as a result of the default Group Policy. However, there may be some situations when it is not. If the certificate does not appear in the machine store list, the certificate can be downloaded manually using the following steps.
3-66802.1X Deployment Guide
OL-16033-01

St r i c t ly C i sco Conf ident i a l
Chapter 3 Configuring 802.1X Deploying EAP-TLS
Note Using Group Policy to deploy the root CA certificate as described in the previous section is a much more scalable and manageable process and is preferable in most circumstances.
Step 1 Choose Start > Run, type mmc, and click OK.
Step 2 On the File menu, click Add/Remove Snap-in and then click Add.
Step 3 Under Snap-in, double-click Certificates. Select Computer Account and click Next.
Step 4 Under Select Computer, select Local Computer and click Finish.
Step 5 On the Add Standalone Snap-in window, click Close.
Step 6 On the Add/Remove Snap-in window, click OK.
Step 7 In the Certificates window, right click Personal. Select All Tasks > Request New Certificate.
Step 8 Click Next on the Certificate Type window.
Step 9 Enter a friendly name and description. Click Next.
Step 10 Click Finish.
Certificates Required for User Authentication
The following sections describe how to verify and install the certificates needed to successfully complete user authentication.
Verify User Root CA Certificate
When a user logs into a computer in the Microsoft domain, the Windows operating system will automatically retrieve the Enterprise CA Root Certificate from the Enterprise Root CA as a result of the Active Directory default Group Policy. Therefore, the client will most likely already have the Enterprise CA Root Certificate in the Trusted Root folder of the user certificate store.
To verify that the client has the Enterprise CA Certificate in user certificate storage, follow these steps on the client PC.
Step 1 Choose Start > Run, type mmc, and click OK.
Step 2 On the File menu, click Add/Remove Snap-in and then click Add.
Step 3 Under Snap-in, double-click Certificates. Select My User Account and click Finish.
Step 4 On the Add Standalone Snap-in window, click Close.
Step 5 On the Add/Remove Snap-in window, click OK.
Step 6 On the Console, select Certificates (Current User) > Trusted Root Certification Authorities > Certificates.
Step 7 Locate the Enterprise Root CA Certificate in the list (imac-mcs-14 in Figure 3-67). If the certificate is listed, no further action is necessary. Proceed to downloading the client certificate in “Verifying Machine Root CA Certificate” section on page 3-57.
3-67802.1X Deployment Guide
OL-16033-01

St r i c t ly C i sco Conf ident i a l
Chapter 3 Configuring 802.1X Deploying EAP-TLS
Figure 3-67 Enterprise Root CA in User Certificate Storage
If the certificate is not listed, follow the instructions for manually downloading the CA certificate.
Manually Downloading the Root CA Certificate
In a Windows domain environment, the CA’s root certificate will typically already be in the Windows user certificate storage. However, there may be some situations when it is not. If the root CA Certificate does not appear in the user store list, the certificate can be manually downloaded by the following steps.
Note Using the default Group Policy to deploy the root CA certificate is a much more scalable and manageable process and is recommended in most circumstances.
Step 1 On the client, point the browser at the Microsoft CA server: http://CA-srv-ip /certsrv.
Step 2 From the Select a Task option choose Download a CA certificate, certificate chain or CRL.
Step 3 Click Download CA Certificate. See Figure 3-68.
3-68802.1X Deployment Guide
OL-16033-01

St r i c t ly C i sco Conf ident i a l
Chapter 3 Configuring 802.1X Deploying EAP-TLS
Figure 3-68 Download CA certificate
Step 4 A File Download Security Warning window appears. Click Open.
Step 5 A Certificate Installation Window appears. Click Install Certificate. See Figure 3-69.
3-69802.1X Deployment Guide
OL-16033-01

St r i c t ly C i sco Conf ident i a l
Chapter 3 Configuring 802.1X Deploying EAP-TLS
Figure 3-69 Certificate Installation Window
Step 6 The Certificate Import Wizard opens. Click Next.
Step 7 Select Automatically select the certificate store based on the type of certificate and click Next. See Figure 3-70.
Figure 3-70 Automatically Select Certificate Store
3-70802.1X Deployment Guide
OL-16033-01

St r i c t ly C i sco Conf ident i a l
Chapter 3 Configuring 802.1X Deploying EAP-TLS
Step 8 Click Finish.
Step 9 The CA Root certificate should now be in the Trusted Root folder of the User certificate store.
User Client Certificate
The most efficient and scalable way to download client certificates for user authentication is to configure the Group Policy in Active Directory to automatically download the client certificates. Client certificates can also be acquired manually from the client itself, either via the MMC or via Web enrollment. All three methods are described in the following section.
Note User Auto-Enrollment is only supported on Certificate Authorities running on Windows 2003 Server Enterprise Edition. Windows 2003 Standard Edition supports Machine Auto-Enrollment only, not User Auto-Enrollment.
Method 1: Using Group Policy to Download Client Certificates for User Authentication (Preferred for Enterprise CAs)
There are two steps for automating user certificate enrollment in a Windows environment. The first step is to create a user certificate template that has auto-enrollment enabled. The second step is to modify the default Group Policy to enable user auto-enrollment on the end host. These and subordinate steps are summarized in the following procedure.
Step 1 Create User Auto-Enroll Certificate Template on the Enterprise Root CA.
Unlike the default machine certificate template, the default User certificate template in the Microsoft CA is not enabled for auto-enrollment. In order to enable user auto-enrollment, you must create a duplicate User certificate template with auto-enrollment enabled.
Install the Certificate Templates Snap-in
On the Enterprise CA or the Domain Controller (either can be used to configure templates), complete these steps:
1. Choose Start > Run, type certtmpl.msc to open the Certificate Templates snap-in.
2. In the Details pane of the Certificate Templates snap-in, right-click the User template and select Duplicate Template. See Figure 3-71.
3-71802.1X Deployment Guide
OL-16033-01

St r i c t ly C i sco Conf ident i a l
Chapter 3 Configuring 802.1X Deploying EAP-TLS
Figure 3-71 Creating a Duplicate of the User Template
3. In the Template display name field of the General tab, enter the text User Auto-Enrollment. This will be the name of the template. See Figure 3-72.
Figure 3-72 User Auto-Enrollment Template: General Tab
3-72802.1X Deployment Guide
OL-16033-01

St r i c t ly C i sco Conf ident i a l
Chapter 3 Configuring 802.1X Deploying EAP-TLS
4. Go to the Subject Name tab, choose Build from this Active Directory information. Select Common name from the drop-down menu for Subject name format. Under Include this information in alternate subject name, check E-mail name and User principal name (UPN). Click OK. See Figure 3-73.
Figure 3-73 User Auto-Enrollment Template: Subject Name Tab
5. Go to the Security tab, highlight the Domain Users Group and ensure that the Auto-Enroll option is checked under Allowed. See Figure 3-74.
3-73802.1X Deployment Guide
OL-16033-01

St r i c t ly C i sco Conf ident i a l
Chapter 3 Configuring 802.1X Deploying EAP-TLS
Figure 3-74 User Auto-Enrollment Template: Security Tab
6. Click OK to save the template and move onto issuing this template from the Certificate Authority snap-in.
Enabling the New User Auto Enrollment Certificate Template
Complete these steps:
1. On the Enterprise CA server, open the Certification Authority by choosing Start > All Programs > Administrative Tools > Certification Authority.
2. In the console tree, click the name of the CA (imac-mcs-14 in Figure 3-75) to expand the certificate list. Right-click Certificate Templates. Choose New > Certificate Template to Issue. A list of un-issued templates appears. Highlight the User Auth-Enrollment Certificate Template and click OK.
3-74802.1X Deployment Guide
OL-16033-01

St r i c t ly C i sco Conf ident i a l
Chapter 3 Configuring 802.1X Deploying EAP-TLS
Figure 3-75 Issuing a New Certificate from the Certification Authority
3. Verify that the User Auto-Enrollment template is listed in the Certificate Templates folder as shown in Figure 3-76.
Figure 3-76 Verify that the User Auto-Enrollment Certificate Has Been Issued
Step 2 Using Group Policy to Download Client Certificates for User Authentication.
Once a User Auto-Enrollment Certificate template has been created, modify the default Group Policy to enable User Auto Enrollment as described below.
1. On the Active Directory Domain Controller, open the Active Directory Users and Computers snap-in.
2. In the console tree, double-click Active Directory Users and Computers, right-click the domain, and then click Properties. See Figure 3-77.
3-75802.1X Deployment Guide
OL-16033-01
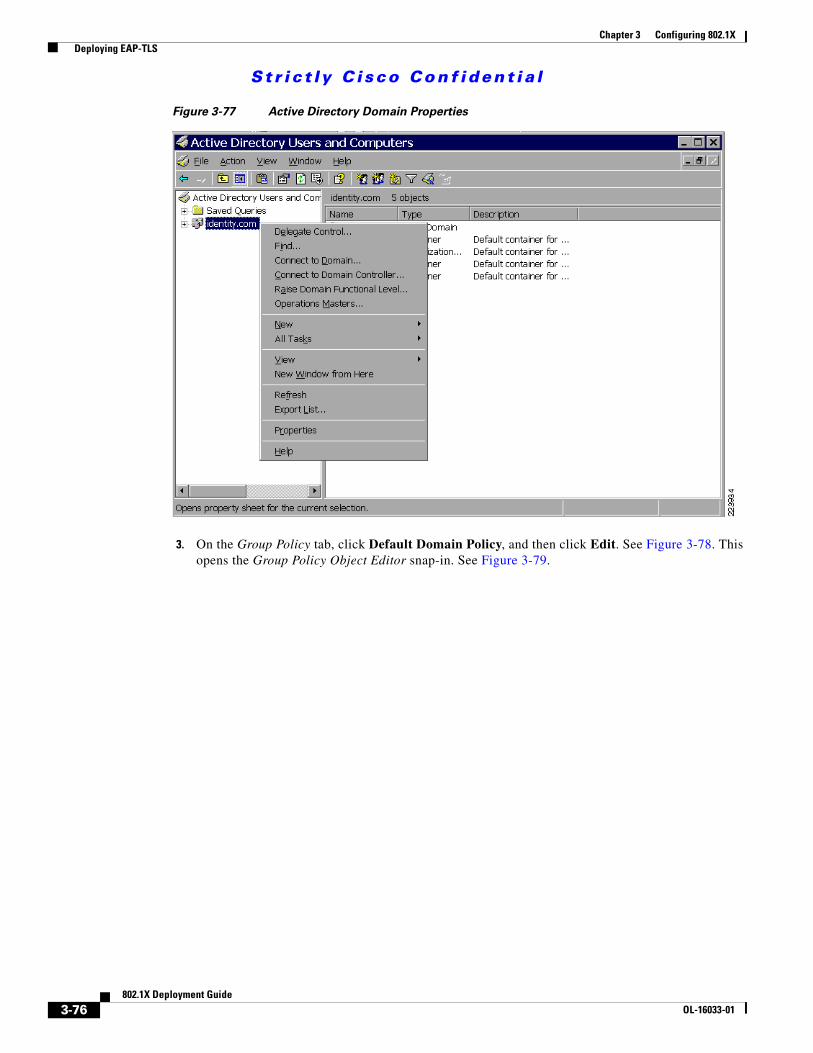
St r i c t ly C i sco Conf ident i a l
Chapter 3 Configuring 802.1X Deploying EAP-TLS
Figure 3-77 Active Directory Domain Properties
3. On the Group Policy tab, click Default Domain Policy, and then click Edit. See Figure 3-78. This opens the Group Policy Object Editor snap-in. See Figure 3-79.
3-76802.1X Deployment Guide
OL-16033-01

St r i c t ly C i sco Conf ident i a l
Chapter 3 Configuring 802.1X Deploying EAP-TLS
Figure 3-78 Default Domain Policy
4. In the console tree, expand User Configuration > Windows Settings > Security Settings > Public Key Policies. See Figure 3-79.
Figure 3-79 Group Policy User Configuration
5. In the details pane, double-click Auto-enrollment Settings.
3-77802.1X Deployment Guide
OL-16033-01

St r i c t ly C i sco Conf ident i a l
Chapter 3 Configuring 802.1X Deploying EAP-TLS
6. See Figure 3-80. Choose Enroll certificates automatically and check Renew expired certificates, update pending certificates and remove revoked certificates and Update certificates that use certificate templates.
Figure 3-80 User Auto-Enrollment Properties
7. Click OK. A client certificate should automatically be downloaded the next time the user logs into a machine. It can also be triggered by issuing the gpupdate command in a DOS window or rebooting the PC. Proceed to the sections for configuring the XP or CSSC client.
Method 2: Using MMC to Download User Certificate
If Active Directory cannot be used to automatically distribute user certificates as described in the previous section, then the certificate can be manually downloaded using the Microsoft Management Console (MMC) on the client.
Note The client must have sufficient network connectivity to contact the Domain Controller and the Certificate Authority in order to download a certificate.
1. Log into the client with the Windows user credentials of the user for whom a certificate is to be downloaded.
2. On the client, choose Start > Run, type mmc, and click OK.
3. On the File menu, click Add/Remove Snap-in and then click Add.
4. Under Snap-in, double-click Certificates. Select My User Account and click Finish.
5. On the Add Standalone Snap-in window, click Close.
6. On the Add/Remove Snap-in window, click OK
7. On the Console, select Certificates (Current User) > Personal > All Tasks > Request New Certificate. See Figure 3-81.
3-78802.1X Deployment Guide
OL-16033-01

St r i c t ly C i sco Conf ident i a l
Chapter 3 Configuring 802.1X Deploying EAP-TLS
Figure 3-81 Request User Certificate from MMC
8. The Certificate Request Wizard will appear. Click Next.
9. Under Certificate type, select User and click Next. See Figure 3-82.
Figure 3-82 Certificate Request Wizard
Note If there is more than one CA chain in the Active Directory domain, select Advanced instead of User. The wizard will give you an opportunity to select from all the CAs known to the Domain Controller.
10. Enter a friendly name and description for the certificate and click Next.
3-79802.1X Deployment Guide
OL-16033-01

St r i c t ly C i sco Conf ident i a l
Chapter 3 Configuring 802.1X Deploying EAP-TLS
Note The friendly name is a separate field from the common name and subject alternative name of the certificate. The certificate will be issued to the user who is logged into the PC making the request.
11. Click Finish. The user certificate will be added to the store.
Method 3: Download User Certificates via Web Enrollment
If Active Directory Group Policy cannot be used to automatically distribute user certificates, then the certificate can be manually downloaded using the Web interface on the CA. Web enrollment is equivalent to using MMC to manually download the certificate. The choice of one method over the other depends largely on end-user preference.
1. On the client, open a browser and point the browser at the Microsoft CA server: http://CA-srv-ip /certsrv.
Note IIS must be installed on the Certificate Authority for Web Enrollment to succeed. If browsing to the CA server results in a 404 file not found error, verify that IIS is installed on the CA.
2. A Windows login screen appears. Enter the username, domain and password for the user requesting a certificate. The Windows CA Web page appears.
3. From the Select a Task option, choose Request a Certificate. See Figure 3-83.
Figure 3-83 Windows CA Web Interface
4. Under Select the certificate type, click User Certificate. See Figure 3-84.
3-80802.1X Deployment Guide
OL-16033-01

St r i c t ly C i sco Conf ident i a l
Chapter 3 Configuring 802.1X Deploying EAP-TLS
Figure 3-84 Request a User Certificate
5. Click Submit. See Figure 3-85.
Figure 3-85 User Certificate Identification
6. A Potential Scripting Violation window appears. Click Yes. The Certificate Issued window appears. Click Install this Certificate. See Figure 3-86.
3-81802.1X Deployment Guide
OL-16033-01
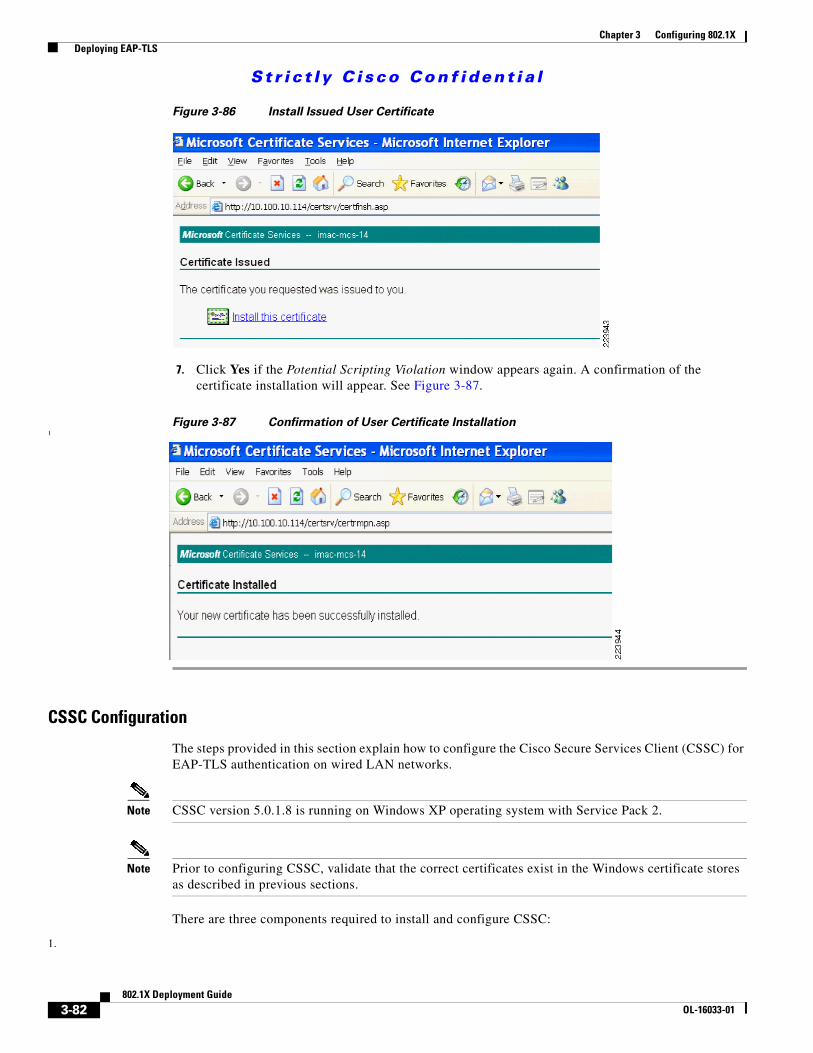
St r i c t ly C i sco Conf ident i a l
Chapter 3 Configuring 802.1X Deploying EAP-TLS
Figure 3-86 Install Issued User Certificate
7. Click Yes if the Potential Scripting Violation window appears again. A confirmation of the certificate installation will appear. See Figure 3-87.
Figure 3-87 Confirmation of User Certificate Installation1
CSSC Configuration
The steps provided in this section explain how to configure the Cisco Secure Services Client (CSSC) for EAP-TLS authentication on wired LAN networks.
Note CSSC version 5.0.1.8 is running on Windows XP operating system with Service Pack 2.
Note Prior to configuring CSSC, validate that the correct certificates exist in the Windows certificate stores as described in previous sections.
There are three components required to install and configure CSSC:
1.
3-82802.1X Deployment Guide
OL-16033-01

St r i c t ly C i sco Conf ident i a l
Chapter 3 Configuring 802.1X Deploying EAP-TLS
• CSSC client image (CSSC_SSC-XP2K)—802.1X client software that runs on the end host.
• Client Utilities (CiscoClientUtilities)—Troubleshooting tool that runs on the end host.
• Client Management Utility (SSCMgmtToolkit)—Management utility that configures user profiles that can be distributed to the entire organization through a single Extensible Markup Language (XML) file. This utility is typically run on a centralized server. For testing purposes, it can be run on the end client to modify and test the supplicant configuration on the fly.
Note The CSSC Management Utility does not address client-side certificate management and distribution. Those tasks must be accomplished using Active Directory Group Policies or some other mechanism as described in previous sections. Client-side certificates are required for EAP-TLS.
This section discusses how to use the Management Utility to configure an EAP-TLS profile for the CSSC client. Once created, the user profiles can be bundled with the client image into an .msi file which can be deployed using standard deployment tools, including Microsoft Active Directory GPOs, SMS, Altiris, and Novell Zenworks.
Step 1 Create a New Configuration Profile.
1. Click sscManagementUtility.exe to access the welcome page. Select Create New Configuration Profile. See Figure 3-88.
Figure 3-88 Cisco SSC Management Utility Window
2. Select Cisco SSC 5.0. See Figure 3-89.
3-83802.1X Deployment Guide
OL-16033-01

St r i c t ly C i sco Conf ident i a l
Chapter 3 Configuring 802.1X Deploying EAP-TLS
Figure 3-89 Select Cisco SSC Version Window
Step 2 Configure Client Policy.
In the Client Policy window, enter the license. Select Attempt connection after user logon and select Allow Wired (802.3) Media. See Figure 3-90.
3-84802.1X Deployment Guide
OL-16033-01

St r i c t ly C i sco Conf ident i a l
Chapter 3 Configuring 802.1X Deploying EAP-TLS
Figure 3-90 Client Policy Window
Note The Attempt connection after user logon setting enables the user to login to Windows before CSSC initiates 802.1X user authentication. This setting is important because of the way user certificates are stored in Windows. In the Windows operation system, the user must login to Windows before the user certificate storage can be accessed. Since the user certificate is required for user authentication with EAP-TLS, the Windows login must occur first if SSC is to be able to present a valid credential during the 802.1X authentication. If the machine authenticated previously, the user will login to the Windows domain on the VLAN that was enabled (or assigned) as a result of machine authentication. If machine authentication was not enabled or was unsuccessful, the user will login to the local machine using cached credentials.
Step 3 Configure Authentication Policy.
In the Authentication Policy window, select EAP TLS under Allowed Authentication Modes and click Next. See Figure 3-91.
3-85802.1X Deployment Guide
OL-16033-01

St r i c t ly C i sco Conf ident i a l
Chapter 3 Configuring 802.1X Deploying EAP-TLS
Figure 3-91 Authentication Policy Window
Step 4 Create a New Group.
1. In the Networks window, create a new group by clicking Add Group. See Figure 3-92.
3-86802.1X Deployment Guide
OL-16033-01

St r i c t ly C i sco Conf ident i a l
Chapter 3 Configuring 802.1X Deploying EAP-TLS
Figure 3-92 Networks Window
2. Enter a name for the new group and click OK. See Figure 3-93.
Figure 3-93 User Group Window
Step 5 Add a Network to the Group.
1. In the main Networks screen, use the Up arrow button on the right side of the screen to move the group that was just created (EapTlsWired) above the Default group. Select EapTlsWired and click Add Network. See Figure 3-94.
3-87802.1X Deployment Guide
OL-16033-01

St r i c t ly C i sco Conf ident i a l
Chapter 3 Configuring 802.1X Deploying EAP-TLS
Figure 3-94 Networks Window
2. In the Network Media window, select Wired (802.3) Network and click Next. See Figure 3-95.
3-88802.1X Deployment Guide
OL-16033-01

St r i c t ly C i sco Conf ident i a l
Chapter 3 Configuring 802.1X Deploying EAP-TLS
Figure 3-95 Networks Media Window
3. Provide a name for the profile and specify the Authenticating Network option. Leave the default Connection Timeout at 40 seconds. See Figure 3-96.
3-89802.1X Deployment Guide
OL-16033-01

St r i c t ly C i sco Conf ident i a l
Chapter 3 Configuring 802.1X Deploying EAP-TLS
Figure 3-96 Wired Network Settings Window
4. Leave the default Connection Settings and click Next. See Figure 3-97.
3-90802.1X Deployment Guide
OL-16033-01

St r i c t ly C i sco Conf ident i a l
Chapter 3 Configuring 802.1X Deploying EAP-TLS
Figure 3-97 Connection Settings Window
5. Select the type of authentication scenario. To perform machine authentication and user authentication, select the Machine and User Connection radio button. Clicking Next will initiate Machine Authentication configuration. See Figure 3-98.
3-91802.1X Deployment Guide
OL-16033-01

St r i c t ly C i sco Conf ident i a l
Chapter 3 Configuring 802.1X Deploying EAP-TLS
Figure 3-98 Network Connection Type Window
Step 6 Configure Machine Authentication Parameters.
1. In the Machine Authentication window, select EAP-TLS and click the Configure button. See Figure 3-99.
3-92802.1X Deployment Guide
OL-16033-01
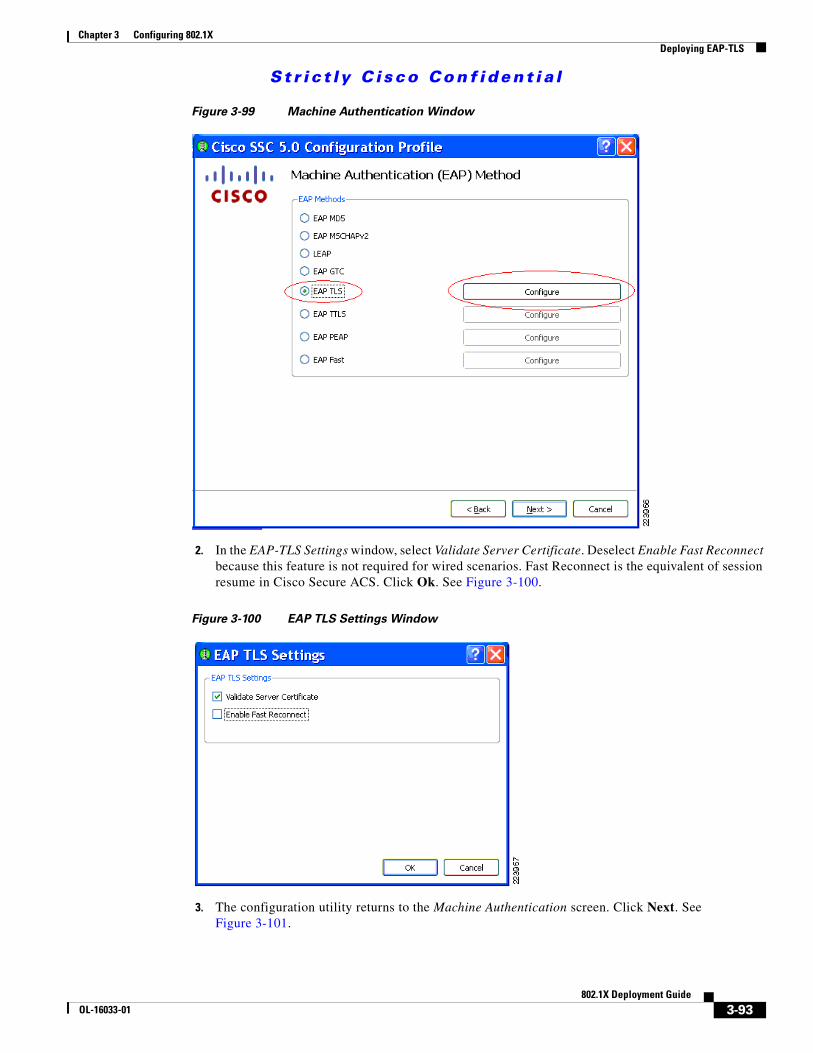
St r i c t ly C i sco Conf ident i a l
Chapter 3 Configuring 802.1X Deploying EAP-TLS
Figure 3-99 Machine Authentication Window
2. In the EAP-TLS Settings window, select Validate Server Certificate. Deselect Enable Fast Reconnect because this feature is not required for wired scenarios. Fast Reconnect is the equivalent of session resume in Cisco Secure ACS. Click Ok. See Figure 3-100.
Figure 3-100 EAP TLS Settings Window
3. The configuration utility returns to the Machine Authentication screen. Click Next. See Figure 3-101.
3-93802.1X Deployment Guide
OL-16033-01

St r i c t ly C i sco Conf ident i a l
Chapter 3 Configuring 802.1X Deploying EAP-TLS
Figure 3-101 Machine Authentication Window
4. [Optional] See Figure 3-102. The Machine Server Validation window can be used to restrict the ACS servers from which the client will accept a certificate authentication during machine authentication. If no Rule is added in this window, the client will accept any server certificate that has been signed by a trusted root CA.
3-94802.1X Deployment Guide
OL-16033-01
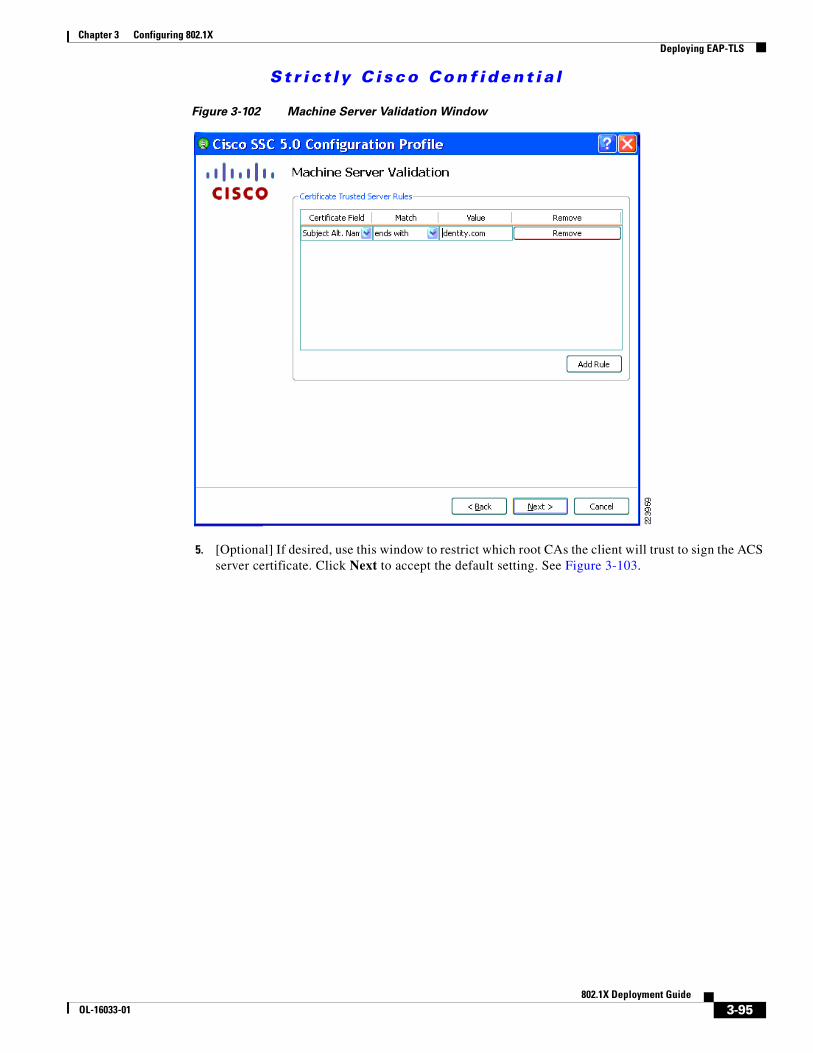
St r i c t ly C i sco Conf ident i a l
Chapter 3 Configuring 802.1X Deploying EAP-TLS
Figure 3-102 Machine Server Validation Window
5. [Optional] If desired, use this window to restrict which root CAs the client will trust to sign the ACS server certificate. Click Next to accept the default setting. See Figure 3-103.
3-95802.1X Deployment Guide
OL-16033-01

St r i c t ly C i sco Conf ident i a l
Chapter 3 Configuring 802.1X Deploying EAP-TLS
Figure 3-103 Machine Server Validation Window (Trusted Certificate Authority)
6. In the Machine Credentials window, add .[domain] to the Unprotected Identity Pattern. The Unprotected Identity Pattern refers to the identity that will be sent in the Identity field in the EAP messages. The client will replace [username] with the machine name and [domain] with the complete domain name. The Machine Credentials option instructs the client to use the machine certificate provided by Microsoft Active Directory. See Figure 3-104.
3-96802.1X Deployment Guide
OL-16033-01

St r i c t ly C i sco Conf ident i a l
Chapter 3 Configuring 802.1X Deploying EAP-TLS
Figure 3-104 Machine Credentials Window
7. Click Next to begin configuring User Authentication.
Step 7 Configure User Authentication.
1. In the User Authentication Method window, select EAP-TLS and click Configure. See Figure 3-105.
3-97802.1X Deployment Guide
OL-16033-01

St r i c t ly C i sco Conf ident i a l
Chapter 3 Configuring 802.1X Deploying EAP-TLS
Figure 3-105 User Authentication (EAP) Method Window
2. Check Validate Server Certificate and disable Fast Reconnect. Return to the main User Authentication window by clicking OK. See Figure 3-106.
Figure 3-106 EAP TLS Settings Window
3. In the main User Authentication Method window, click Next. See Figure 3-107.
3-98802.1X Deployment Guide
OL-16033-01

St r i c t ly C i sco Conf ident i a l
Chapter 3 Configuring 802.1X Deploying EAP-TLS
Figure 3-107 User Authentication (EAP) Method Window
4. [Optional] The User Server Validation window can be used to restrict the ACS servers from which the client will accept a certificate authentication during user authentication. If no Rule is added in this window, the client will accept any server certificate that has been signed by a trusted root CA. See Figure 3-108.
3-99802.1X Deployment Guide
OL-16033-01
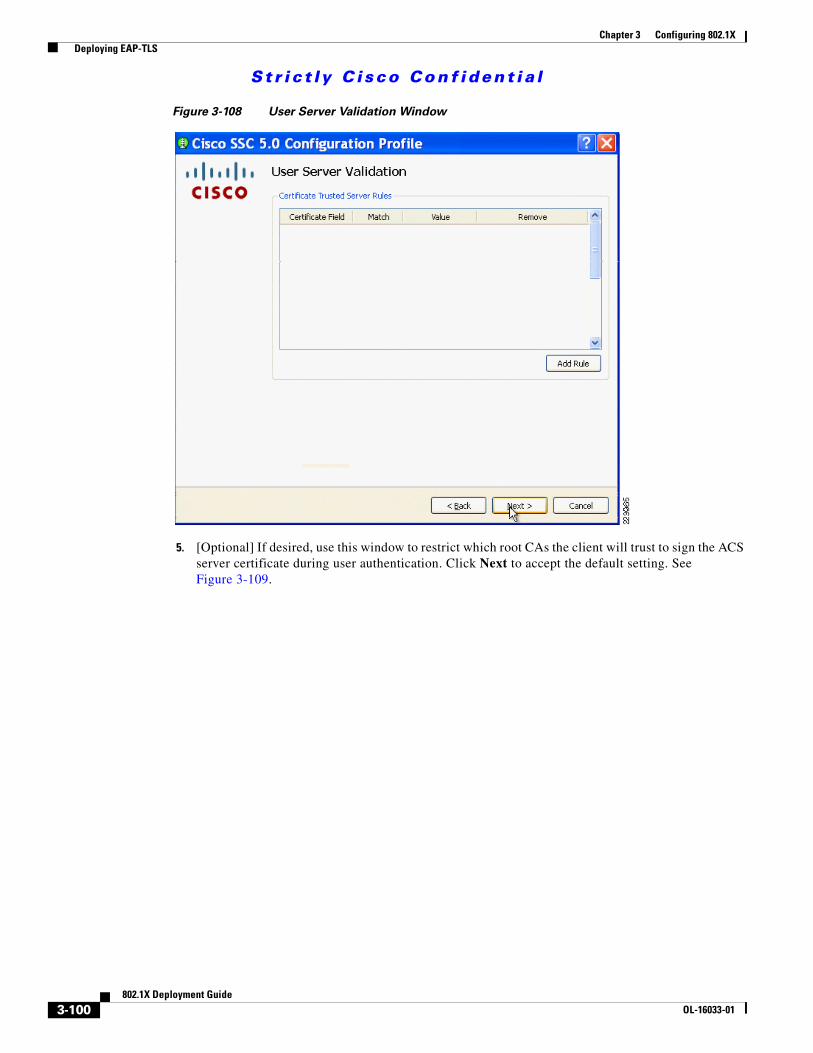
St r i c t ly C i sco Conf ident i a l
Chapter 3 Configuring 802.1X Deploying EAP-TLS
Figure 3-108 User Server Validation Window
5. [Optional] If desired, use this window to restrict which root CAs the client will trust to sign the ACS server certificate during user authentication. Click Next to accept the default setting. See Figure 3-109.
3-100802.1X Deployment Guide
OL-16033-01

St r i c t ly C i sco Conf ident i a l
Chapter 3 Configuring 802.1X Deploying EAP-TLS
Figure 3-109 User Validation Window (Trusted Certificate Authority)
6. In the User Credentials window, leave [username] as the unprotected identity. CSSC will substitute the username from the certificate during user authentication. Select Prompt for Credentials and click Finish. The Validation window will appear. See Figure 3-110.
3-101802.1X Deployment Guide
OL-16033-01
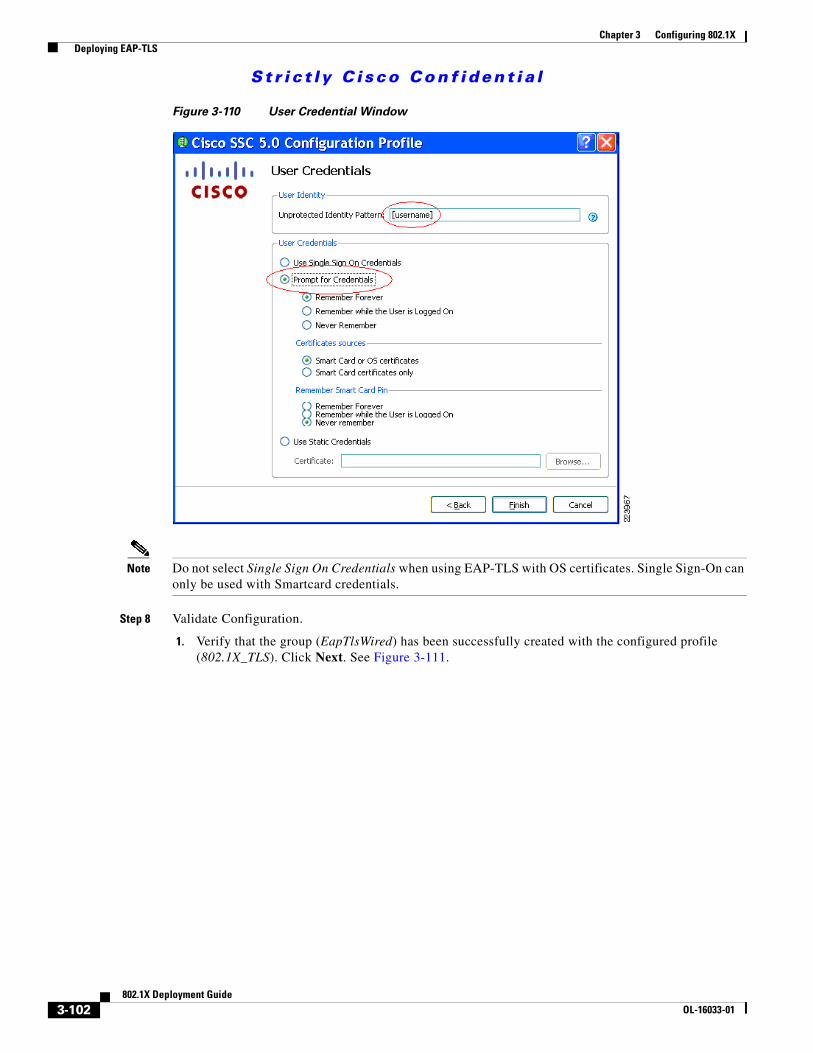
St r i c t ly C i sco Conf ident i a l
Chapter 3 Configuring 802.1X Deploying EAP-TLS
Figure 3-110 User Credential Window
Note Do not select Single Sign On Credentials when using EAP-TLS with OS certificates. Single Sign-On can only be used with Smartcard credentials.
Step 8 Validate Configuration.
1. Verify that the group (EapTlsWired) has been successfully created with the configured profile (802.1X_TLS). Click Next. See Figure 3-111.
3-102802.1X Deployment Guide
OL-16033-01

St r i c t ly C i sco Conf ident i a l
Chapter 3 Configuring 802.1X Deploying EAP-TLS
Figure 3-111 Verifying Group Creation in Networks Window
2. In the Validation window, click Finish to save the configuration files. The Processed Configuration file configuration.xml can be deployed to the client (this will happen automatically if the Management Utility is running on the same machine as the client software). The Unprocessed Configuration file unprocessed_configuration_do_not_deploy.xml should only be used to modify this profile as described in the following step. See Figure 3-112.
3-103802.1X Deployment Guide
OL-16033-01

St r i c t ly C i sco Conf ident i a l
Chapter 3 Configuring 802.1X Deploying EAP-TLS
Figure 3-112 Validation Window
Step 9 Modify Configuration.
1. To modify the configuration that was just created, return to the main screen of the Management Utility and click Modify Existing Configuration Profile. See Figure 3-113.
3-104802.1X Deployment Guide
OL-16033-01

St r i c t ly C i sco Conf ident i a l
Chapter 3 Configuring 802.1X Deploying EAP-TLS
Figure 3-113 Cisco SSC Management Utility Window
2. Select the unprocessed configuration file created earlier. Click Next. See Figure 3-114.
3-105802.1X Deployment Guide
OL-16033-01

St r i c t ly C i sco Conf ident i a l
Chapter 3 Configuring 802.1X Deploying EAP-TLS
Figure 3-114 Choosing a Configuration File Window
3. The Client Policy window appears with the previously configured settings. Step through the configuration and make any modifications. At the end of the profile validation, a new configuration.xml file will be created and can be deployed to the client.
Windows XP Client Configuration
The steps provided in this section explain how to configure the Windows XP native supplicant for EAP-TLS authentication on wired LAN networks.
Note The native client is running on Windows XP Service Pack 2.
Prior to configuring the Windows XP supplicant, validate that the correct certificates exist in the Windows certificate stores as described in “Client Configuration for EAP-TLS” section on page 3-56.
Configure IEEE 802.1X Parameters
Step 1 To configure the IEEE 802.1X parameters, click Start > Control Panel, and the select Network and Internet Connections. Next, select Network Connections, then open the correct Local Area Connection Properties menu.
Step 2 From the Local Area Connection Properties window, select the Authentication tab. See Figure 3-115.
3-106802.1X Deployment Guide
OL-16033-01
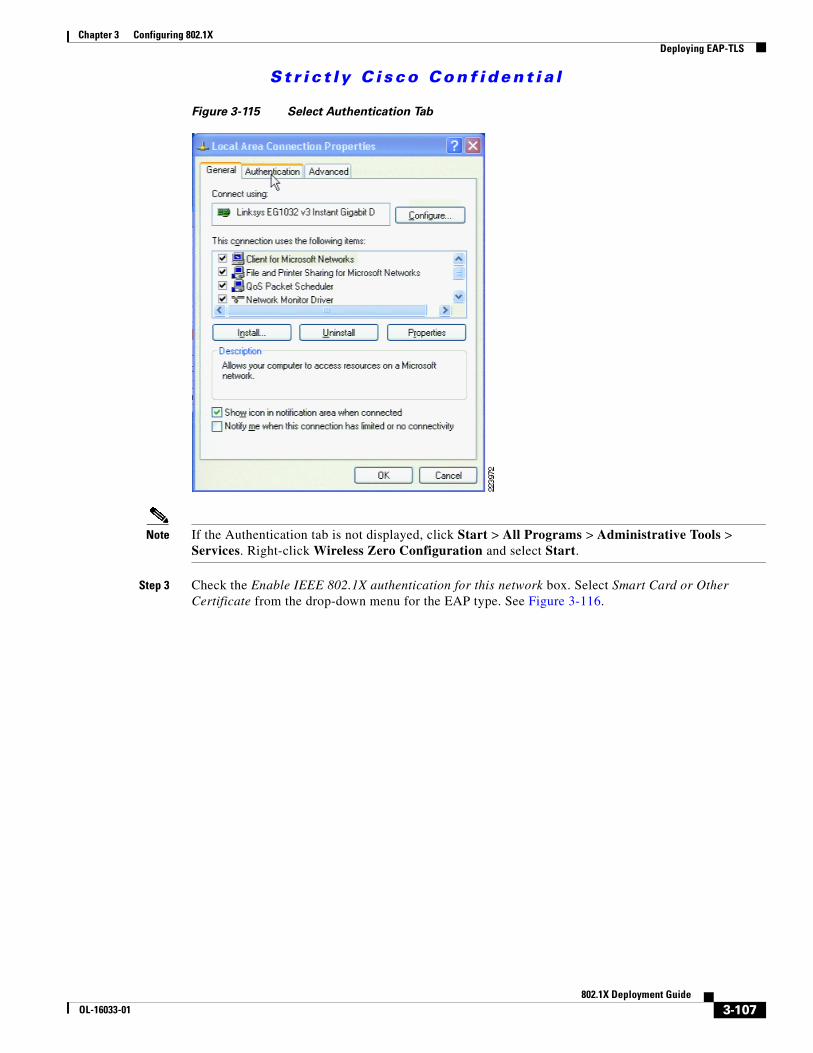
St r i c t ly C i sco Conf ident i a l
Chapter 3 Configuring 802.1X Deploying EAP-TLS
Figure 3-115 Select Authentication Tab
Note If the Authentication tab is not displayed, click Start > All Programs > Administrative Tools > Services. Right-click Wireless Zero Configuration and select Start.
Step 3 Check the Enable IEEE 802.1X authentication for this network box. Select Smart Card or Other Certificate from the drop-down menu for the EAP type. See Figure 3-116.
3-107802.1X Deployment Guide
OL-16033-01

St r i c t ly C i sco Conf ident i a l
Chapter 3 Configuring 802.1X Deploying EAP-TLS
Figure 3-116 Enable 802.1X Authentication
Step 4 Click Properties. The Certificate Properties window appears. See Figure 3-117.
3-108802.1X Deployment Guide
OL-16033-01

St r i c t ly C i sco Conf ident i a l
Chapter 3 Configuring 802.1X Deploying EAP-TLS
Figure 3-117 Certificate Properties
Step 5 The top box on the Certificate Properties window refers to client-side certificates. Select Use a certificate on the computer and check Use simple certificate selection.
Note During EAP-TLS authentication, the user might be prompted to choose a certificate if multiple personal certificates have been issued to that user and are present in the local certificate storage. When simple certificate selection is enabled, Windows presents a simplified list of certificates when prompting the user. The certificates that are usable for EAP-TLS authentication are grouped by the user that was issued the certificate based on the Subject Alternative Name and Subject fields of the certificates. When Use a certificate on this computer is selected, simple certificate selection is enabled by default.
Step 6 The lower box on the Certificate Properties window configures how the client will process the certificate presented by the authentication server. Select Validate Server Certificate.
Tip If EAP-TLS authentication fails with Validate Server Certificate checked, but passes when this option is unchecked, this indicates that client does not have the root certificate of the CA that signed the ACS’s certificate in the proper Trusted Root Authority store.
Step 7 [Optional] By default, the supplicant will accept any valid server certificate that has been signed by a trusted root CA. To restrict the server certificates that a supplicant will accept, check the Connect to These Servers box and enter the common name (CN) of the servers that the supplicant should accept. If the authentication server presents a server certificate with a CN that is not listed, the end user will be prompted to accept the unknown CN. If the user clicks OK, then the CN will be automatically added to the trusted servers list and the user will not be prompted again.
Step 8 Click OK in the Certificate Properties window to return to the main Authentication tab window.
3-109802.1X Deployment Guide
OL-16033-01

St r i c t ly C i sco Conf ident i a l
Chapter 3 Configuring 802.1X Deploying EAP-TLS
Step 9 Check Authenticate as computer when computer information is available to enable machine authentication.
Step 10 Leave the Authenticate as Guest option unchecked. Click OK.
Note Enabling the Authenticate as Guest option can cause unpredictable behavior with EAP-TLS and has no effect on other EAP methods. Leave the option unchecked.
Step 11 The supplicant will begin authentication.
Machine Authentication, EAP-TLS & User Certificate Auto-Enroll
It is possible for a user with valid Windows credentials to log into a machine that does not have a certificate for the user. For example, suppose Alice logs into Bob’s PC. Alice has a valid Window’s username and password which allow her to log into the PC at the Windows GINA. At this point, the supplicant begins 802.1X user authentication by sending an EAPoL-Start to the authenticator (assuming that the SupplicantMode registry setting has been set as recommended previously). The authenticator sends an Identity Request, but the supplicant cannot find a certificate for Alice in the user certificate storage. The supplicant will ignore the Identity Request and not send any more messages. The authenticator, knowing there is an 802.1X-capable supplicant on the port, retries authentication indefinitely. Since the PC cannot get access to the network to acquire a certificate for Alice, Alice is permanently denied access to the network. This may not be the desired behavior. One option in this situation is to configure dot1x guest-vlan supplicant on the authenticator. This command instructs the authenticator to move the port to the guest VLAN when the 802.1X supplicant becomes non-responsive in this scenario.
Another option is to leverage the network connectivity provided by machine authentication to do certificate auto-enrollment for the user. If machine authentication is enabled, a PC that has previously completed machine authentication will remain connected to the network for a brief period of time after a user without a certificate has logged into the Windows GINA. This only occurs if a user enters a valid Windows username and password, but has no certificate on the machine. Without the valid username and password, the user would not have been able to log into the machine in the first place. After the valid user logs into the Windows GINA, the supplicant will send an EAPoL-Start message and the switch will send three EAP-Request messages. During this period, the user has the same network access as the machine did after machine authentication. With the default 30-second timeout for each EAP Request message, this results in a 90-second window during which the switch allows the device to send packets to the network.
In some situations, the behavior of the Windows XP supplicant can be beneficial for user certificate auto-enrollment in a network that has 802.1X enabled. Depending on the configuration of the network, the 90 seconds of access might be enough for the user to update the group policy and auto-enroll a user certificate. If the user successfully acquires a certificate during this period, then the supplicant can subsequently authenticate using EAP-TLS and the user will continue to have access to the network. If the user cannot acquire a certificate, the switch will move the port to the default security status (deny all packets except EAPoL or deploy the Guest VLAN if configured) after 90 seconds.
Using the Guest VLAN to provide access to users without certificates and using the machine-authentication access window to auto-enroll user certificates are both valid design options. Security and guest access policies will help determine which one is best for any particular network.
3-110802.1X Deployment Guide
OL-16033-01

St r i c t ly C i sco Conf ident i a l
Chapter 3 Configuring 802.1X Deploying PEAP-MSCHAPv2
Deploying PEAP-MSCHAPv2The section describes how to configure PEAP-MSCHAPv2 on the ACS and on the supplicant.
The password used for MSCHAPv2 is acquired from the user when he or she logs into Windows (Single Sign-On). ACS verifies this password with the user password stored in Active Directory.
PEAP-MSCHAPv2 deployment is presented as a series descriptions in the following two primary sections:
• Authentication Server Configuration for PEAP-MSCHAPv2, page 3-111
• Client Configuration for PEAP-MSCHAPv2, page 3-113
Authentication Server Configuration for PEAP-MSCHAPv2There are multiple steps to complete when configuring the Cisco ACS to act as the Authentication Server for IEEE 802.1X PEAP-MSCHAPv2 authentications. The following steps are addressed in the sections that follow:
• Step 1: Obtain the Root CA Certificate on ACS, page 3-111
• Step 2: Configure Certificate Revocation, page 3-111
• Step 3: Obtain and Configure a Server Certificate for the ACS Server, page 3-111
• Step 4: Configure PEAP-MSCHAPv2 Settings on the ACS, page 3-112
• Step 5: Specify and Configure the Catalyst Switch as a AAA Client, page 3-113
• Step 6: Configure the External User Databases, page 3-113
Once Step 6 is completed, you must restart the Cisco ACS-based service.
Note These instructions are for Cisco Secure ACS on Windows. There is also an appliance version of ACS called the Solution Engine (SE). SE has functional and configuration differences compared with the ACS for Windows version, especially in the area of certificate management.
Step 1: Obtain the Root CA Certificate on ACS
The procedure is the same as described in the EAP-TLS section. See “Step 1: Obtain and Install the Root CA Certificate on Cisco Secure ACS” section on page 3-11 for details.
Step 2: Configure Certificate Revocation
The procedure is the same as described in the EAP-TLS section. See “Step 2: Configure Certificate Revocation” section on page 3-21 for details.
Step 3: Obtain and Configure a Server Certificate for the ACS Server
The procedure is the same as described in the EAP-TLS section. See “Step 3: Acquire and Configure Cisco Secure ACS Server Certificate” section on page 3-23 for details.
3-111802.1X Deployment Guide
OL-16033-01

St r i c t ly C i sco Conf ident i a l
Chapter 3 Configuring 802.1X Deploying PEAP-MSCHAPv2
Step 4: Configure PEAP-MSCHAPv2 Settings on the ACS
The PEAP-MSCHAPv2 settings are configured on the Global Authentication Setup window on the ACS.
Step 1 Open ACS Admin from the desktop shortcut created during the installation.
Step 2 Click System Configuration.
Step 3 Click Global Authentication Setup. See Figure 3-118.
Figure 3-118 Configuring ACS PEAP (ACS-PEAP-Config.bmp)
Step 4 Under PEAP, check Allow EAP-MSCHAPv2.
Note The Cisco client initial message is for Cisco Aironet clients only and is not applicable for CSSC or Windows XP supplicants.
Step 5 If using Fast Reconnect (see explanation that follows), select Enable Fast Reconnect and specify a timeout.
Step 6 Click Submit and Restart.
PEAP-MSCHAPv2 Fast Reconnect Explained
ACS supports an PEAP-MSCHAPv2 session resume feature that caches the session created during a new authentication. When a PEAP-MSCHAPv2 client reconnects, the cached session is used to restore the session, which improves performance. ACS deletes cached sessions when they time out.
3-112802.1X Deployment Guide
OL-16033-01

St r i c t ly C i sco Conf ident i a l
Chapter 3 Configuring 802.1X Deploying PEAP-MSCHAPv2
PEAP-MSCHAPv2 fast reconnect is equivalent to EAP-TLS session resume. Fast reconnect is most appropriate in wireless environments where endpoints need to rapidly reauthenticate when roaming. The mechanism works the same way in wired environments, but the optimization is less important and it can be disabled without impacting the network. To disable the fast reconnect feature, set the timeout value to 0 (zero) or uncheck the Enable Fast Reconnect checkbox.
Note For fast reconnect to work, it must be supported and enabled on both the ACS and the supplicant. Not all supplicants support fast reconnect. See the “Configuring XP Supplicant for PEAP-MSCHAPv2” section on page 3-135 and/or Configuring CSSC for PEAP-MSCHAPv2, page 3-114 for more details.
Step 5: Specify and Configure the Catalyst Switch as a AAA Client
The procedure is the same as described in the EAP-TLS section. See “Step 5: Specify and Configure the Catalyst Switch as a AAA Client” section on page 3-50 for details.
Step 6: Configure the External User Databases
The procedure is the same as described in the EAP-TLS section. See “Step 6: Configure the External User Databases” section on page 3-51 for details.
Client Configuration for PEAP-MSCHAPv2This section provides the following descriptions:
• Installation of Client Certificates, page 3-113
• Configuring CSSC for PEAP-MSCHAPv2, page 3-114
• Configuring XP Supplicant for PEAP-MSCHAPv2, page 3-135
Installation of Client Certificates
In PEAP-MSCHAPv2, ACS authenticates itself to the client by presenting a certificate that is signed by a Root CA that the client trusts. Therefore, every host and user that wishes to authenticate via PEAP-MSCHAPv2 must possess the Certificate Authority (CA) Root Certificate (to validate the ACS certificate).
Deploying this certificate to the end user or host is required regardless of whether you are using the Cisco Secure Services Client (CSSC), the XP native supplicant, or some other 802.1X client software. The installation of certificates is independent of the supplicant deployment process.
If the end host will be performing machine authentication and user authentication, then the Root CA certificate must be installed in the user’s Trusted Root certificate store and in the machine’s Trusted Root certificate store.
Root Certificate Required for Machine Authentication
The following describes how to verify and install the certificate needed to successfully complete PEAP-MSCHAPv2 machine authentication.
3-113802.1X Deployment Guide
OL-16033-01

St r i c t ly C i sco Conf ident i a l
Chapter 3 Configuring 802.1X Deploying PEAP-MSCHAPv2
Note To verify and/or manipulate machine certificate stores, you must be logged into the machine as an Administrator.
Verifying Machine Root CA Certificate
The procedure is the same as described in the EAP-TLS section. See the “Certificates Required for User Authentication” section on page 3-67 for details
Root Certificate Required for User Authentication
The following describes how to verify and install the certificate needed to successfully complete PEAP-MSCHAPv2 user authentication.
Verifying User Root CA Certificate
The procedure is the same as described in the EAP-TLS section. See the “Certificates Required for User Authentication” section on page 3-67 for details.
Configuring CSSC for PEAP-MSCHAPv2
The steps provided in this section explain how to configure the Cisco Secure Services Client (CSSC) for PEAP-MSCHAPv2 authentication on wired LAN networks.
Note CSSC version 5.0.1.8 is running on Windows XP operating system with Service Pack 2.
Note Prior to configuring CSSC, validate that the correct certificates exist in the Windows certificate stores as described in previous sections.
There are three components required to install and configure CSSC:
• CSSC client image (CSSC_SSC-XP2K)—802.1X client software that runs on the end host.
• Client Utilities (CiscoClientUtilities)—Troubleshooting tool that runs on the end host.
• Client Management Utility (SSCMgmtToolkit)—Management utility that configures user profiles that can be distributed to the entire organization through a single Extensible Markup Language (XML) file. This utility is typically run on a centralized server. For testing purposes, it can be run on the end client to modify and test the supplicant configuration on the fly.
Note The Cisco SSC Management Utility does not address client-side certificate management and distribution. Those tasks must be accomplished using Active Directory Group Policies or some other mechanism as described in previous sections. Client-side certificates are required for EAP-TLS.
This section discusses how to use the Management Utility to configure a PEAP-MSCHAPv2 profile for the CSSC client. Once created, the user profiles can be bundled with the client image into an .msi file which can be deployed using standard deployment tools—including Microsoft Active Directory GPOs, SMS, Altiris, and Novell Zenworks.
Step 1 Create a New Configuration Profile.
3-114802.1X Deployment Guide
OL-16033-01

St r i c t ly C i sco Conf ident i a l
Chapter 3 Configuring 802.1X Deploying PEAP-MSCHAPv2
This is the same as Step 1 in “CSSC Configuration” section on page 3-82.
Step 2 Configure Client Policy.
In the Client Policy window, enter the license. Select Attempt connection before user logon and select Allow Wired (802.3) Media. See Click Next. Figure 3-119.
Figure 3-119 SSC Configuration Profile
Note The Attempt connection before user logon setting causes CSSC to delay the user login into the Windows domain until 802.1X authentication has completed. This ensures that the machine has complete network connectivity when performing Windows domain login and Group Policy download for the user.
Step 3 Configure Authentication Policy.
In the Authentication Policy window, select EAP PEAP under Allowed Authentication Modes and click Next. See Figure 3-120.
3-115802.1X Deployment Guide
OL-16033-01
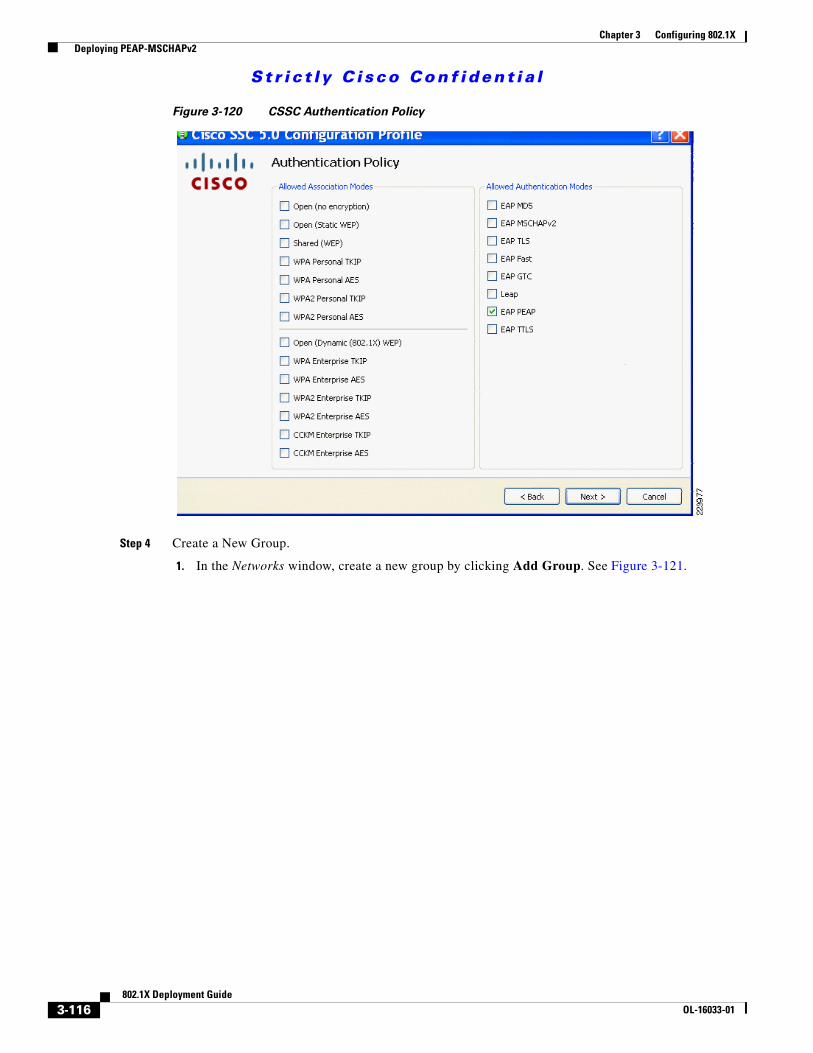
St r i c t ly C i sco Conf ident i a l
Chapter 3 Configuring 802.1X Deploying PEAP-MSCHAPv2
Figure 3-120 CSSC Authentication Policy
Step 4 Create a New Group.
1. In the Networks window, create a new group by clicking Add Group. See Figure 3-121.
3-116802.1X Deployment Guide
OL-16033-01
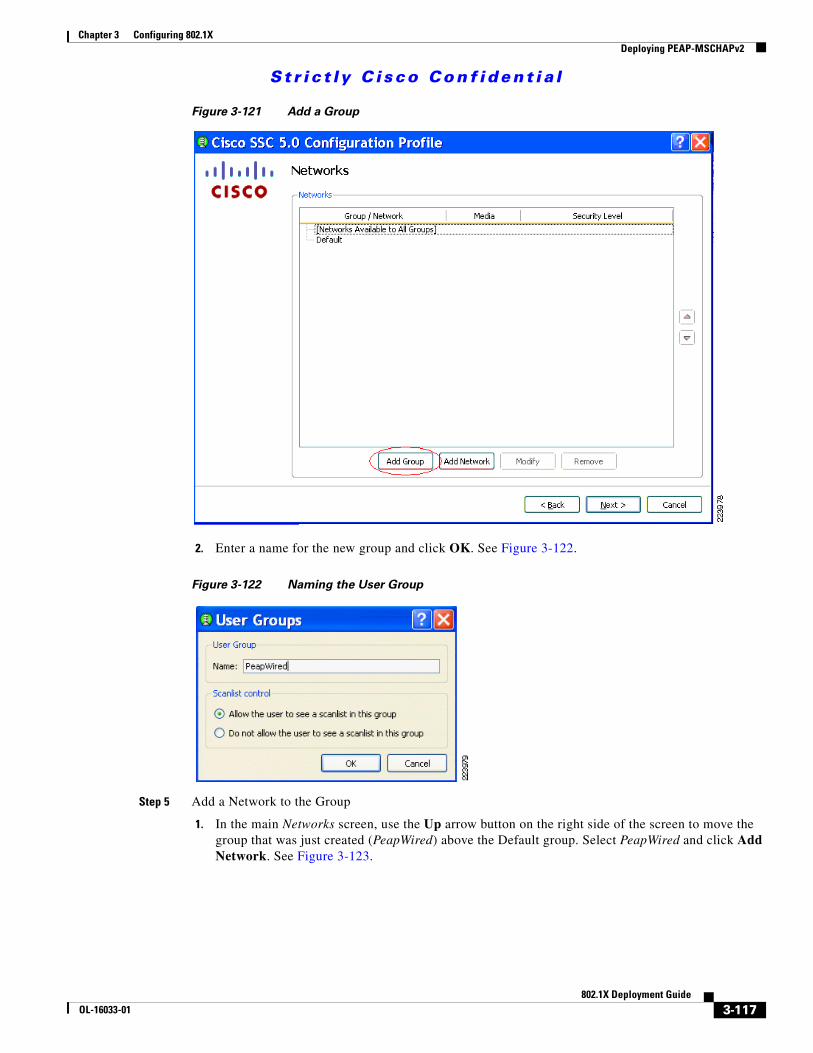
St r i c t ly C i sco Conf ident i a l
Chapter 3 Configuring 802.1X Deploying PEAP-MSCHAPv2
Figure 3-121 Add a Group
2. Enter a name for the new group and click OK. See Figure 3-122.
Figure 3-122 Naming the User Group
Step 5 Add a Network to the Group
1. In the main Networks screen, use the Up arrow button on the right side of the screen to move the group that was just created (PeapWired) above the Default group. Select PeapWired and click Add Network. See Figure 3-123.
3-117802.1X Deployment Guide
OL-16033-01

St r i c t ly C i sco Conf ident i a l
Chapter 3 Configuring 802.1X Deploying PEAP-MSCHAPv2
Figure 3-123 Adding a Network
2. In the Network Media window, select Wired (802.3) Network and click Next. See Figure 3-124.
3-118802.1X Deployment Guide
OL-16033-01

St r i c t ly C i sco Conf ident i a l
Chapter 3 Configuring 802.1X Deploying PEAP-MSCHAPv2
Figure 3-124 Select Network Media
3. Provide a name for the profile and specify the Authenticating Network option. Leave the default Connection Timeout at 40 seconds. Click Next. See Figure 3-125.
3-119802.1X Deployment Guide
OL-16033-01

St r i c t ly C i sco Conf ident i a l
Chapter 3 Configuring 802.1X Deploying PEAP-MSCHAPv2
Figure 3-125 Configuring Network Settings
4. Leave the default Connection Settings and click Next. See Figure 3-126.
3-120802.1X Deployment Guide
OL-16033-01

St r i c t ly C i sco Conf ident i a l
Chapter 3 Configuring 802.1X Deploying PEAP-MSCHAPv2
Figure 3-126 Connection Settings
5. Select the type of authentication scenario. To perform machine authentication and user authentication, select the Machine and User Connection radio button. Clicking Next will initiate Machine Authentication configuration. See Figure 3-127.
3-121802.1X Deployment Guide
OL-16033-01

St r i c t ly C i sco Conf ident i a l
Chapter 3 Configuring 802.1X Deploying PEAP-MSCHAPv2
Figure 3-127 Network Connection Type
Step 6 Configure Machine Authentication Parameters.
1. In the Machine Authentication window, select EAP-PEAP and click the Configure button. See Figure 3-128.
3-122802.1X Deployment Guide
OL-16033-01
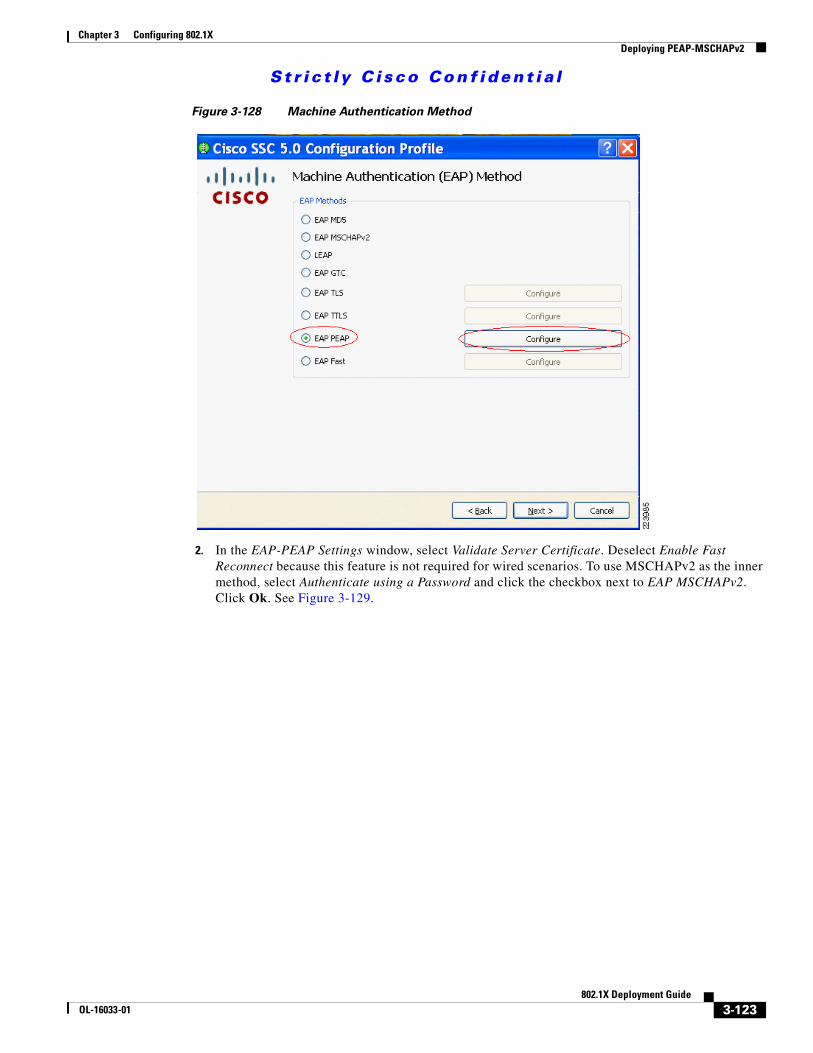
St r i c t ly C i sco Conf ident i a l
Chapter 3 Configuring 802.1X Deploying PEAP-MSCHAPv2
Figure 3-128 Machine Authentication Method
2. In the EAP-PEAP Settings window, select Validate Server Certificate. Deselect Enable Fast Reconnect because this feature is not required for wired scenarios. To use MSCHAPv2 as the inner method, select Authenticate using a Password and click the checkbox next to EAP MSCHAPv2. Click Ok. See Figure 3-129.
3-123802.1X Deployment Guide
OL-16033-01

St r i c t ly C i sco Conf ident i a l
Chapter 3 Configuring 802.1X Deploying PEAP-MSCHAPv2
Figure 3-129 PEAP Settings For Machine Authentication
3. The configuration utility returns to the Machine Authentication window. Click Next. See Figure 3-130.
Figure 3-130 Machine PEAP Configuration Complete
3-124802.1X Deployment Guide
OL-16033-01
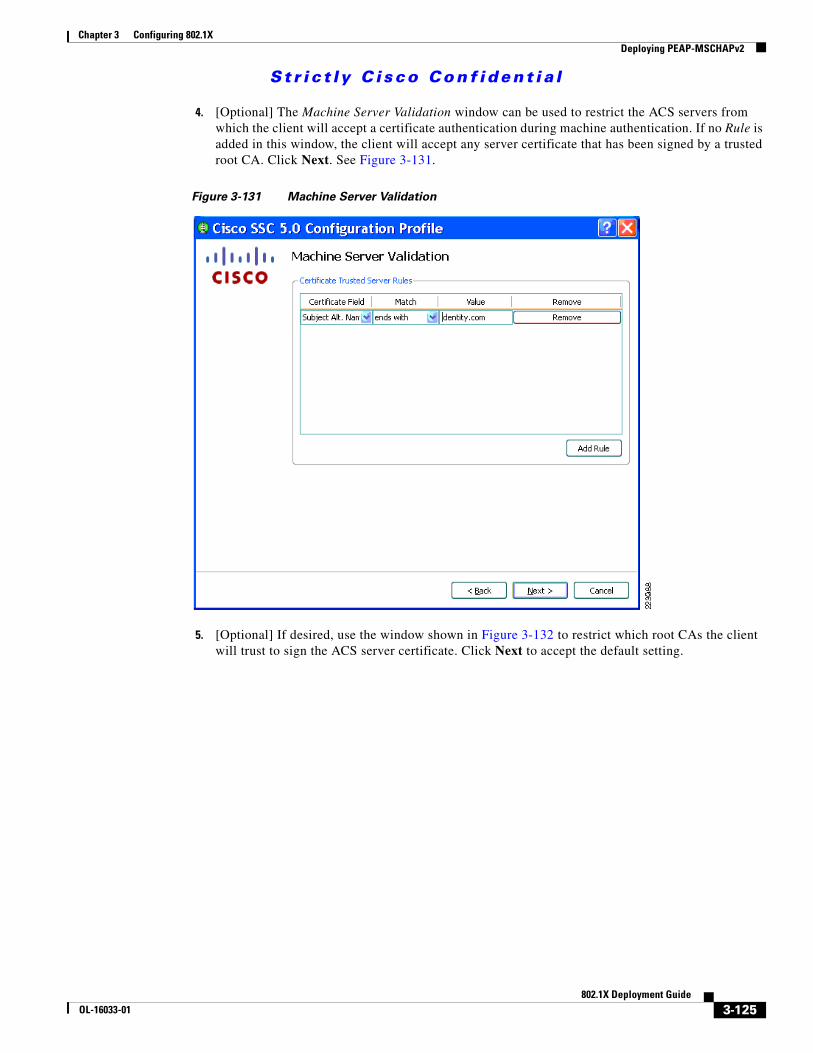
St r i c t ly C i sco Conf ident i a l
Chapter 3 Configuring 802.1X Deploying PEAP-MSCHAPv2
4. [Optional] The Machine Server Validation window can be used to restrict the ACS servers from which the client will accept a certificate authentication during machine authentication. If no Rule is added in this window, the client will accept any server certificate that has been signed by a trusted root CA. Click Next. See Figure 3-131.
Figure 3-131 Machine Server Validation
5. [Optional] If desired, use the window shown in Figure 3-132 to restrict which root CAs the client will trust to sign the ACS server certificate. Click Next to accept the default setting.
3-125802.1X Deployment Guide
OL-16033-01

St r i c t ly C i sco Conf ident i a l
Chapter 3 Configuring 802.1X Deploying PEAP-MSCHAPv2
Figure 3-132 Machine Trusted CA
6. In the Machine Credentials window in Figure 3-133, leave the default for the unprotected identity and add .[domain] to the protected identity. The client will replace [username] with the machine name and [domain] with the complete domain name. The Machine Credentials option instructs the client to use the machine password provided by Microsoft Active Directory.
3-126802.1X Deployment Guide
OL-16033-01

St r i c t ly C i sco Conf ident i a l
Chapter 3 Configuring 802.1X Deploying PEAP-MSCHAPv2
Figure 3-133 Machine Credentials
7. Click Next to begin configuring User Authentication.
Step 7 Configure User Authentication.
1. In the User Authentication Method window, select EAP-PEAP and click Configure. See Figure 3-134.
3-127802.1X Deployment Guide
OL-16033-01

St r i c t ly C i sco Conf ident i a l
Chapter 3 Configuring 802.1X Deploying PEAP-MSCHAPv2
Figure 3-134 Configure User Authentication Method
2. See Figure 3-135. Check Validate Server Certificate and disable Fast Reconnect. Select Authenticate using a Password and EAP MSCHAPv2. Return to the main User Authentication window by clicking OK.
3-128802.1X Deployment Guide
OL-16033-01

St r i c t ly C i sco Conf ident i a l
Chapter 3 Configuring 802.1X Deploying PEAP-MSCHAPv2
Figure 3-135 Configure User PEAP Settings
Note If authentication passes when Validate Server Identity is unchecked but fails when it is checked, then the supplicant does not have the certificate for the Root CA that signed the ACS's certificate in the appropriate certificate store.
3. See Figure 3-136. In the main User Authentication Method window, click Next.
3-129802.1X Deployment Guide
OL-16033-01
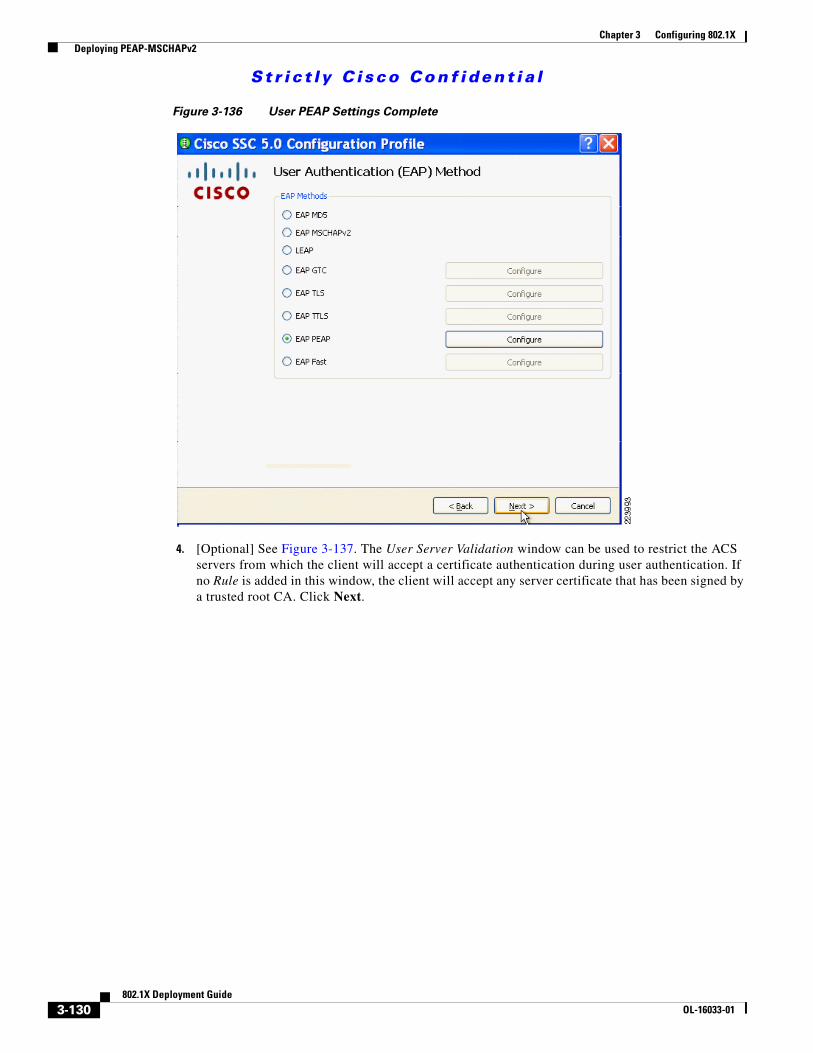
St r i c t ly C i sco Conf ident i a l
Chapter 3 Configuring 802.1X Deploying PEAP-MSCHAPv2
Figure 3-136 User PEAP Settings Complete
4. [Optional] See Figure 3-137. The User Server Validation window can be used to restrict the ACS servers from which the client will accept a certificate authentication during user authentication. If no Rule is added in this window, the client will accept any server certificate that has been signed by a trusted root CA. Click Next.
3-130802.1X Deployment Guide
OL-16033-01

St r i c t ly C i sco Conf ident i a l
Chapter 3 Configuring 802.1X Deploying PEAP-MSCHAPv2
Figure 3-137 User Server Validation
5. [Optional] See Figure 3-138. If desired, use this window to restrict which root CAs the client will trust to sign the ACS server certificate during user authentication. Click Next to accept the default setting.
3-131802.1X Deployment Guide
OL-16033-01

St r i c t ly C i sco Conf ident i a l
Chapter 3 Configuring 802.1X Deploying PEAP-MSCHAPv2
Figure 3-138 User Trusted CA
6. See Figure 3-139. In the User Credentials window, leave anonymous as the unprotected identity and [username] as the unprotected identity. Select Use Single Sign On. CSSC will automatically replace the [username] placeholder with the username that was entered during the Windows logon. Click Finish. The Validation window will appear.
3-132802.1X Deployment Guide
OL-16033-01

St r i c t ly C i sco Conf ident i a l
Chapter 3 Configuring 802.1X Deploying PEAP-MSCHAPv2
Figure 3-139 User Credentials
Note about Protected and Unprotected Identity
The EAP Identity field in EAP Identity Response messages is sometimes referred to as the outer or unprotected identity since it is sent in the clear, outside the protected TLS tunnel. PEAP has the option of sending anonymous instead of the actual username in the Identity field. If the outer identity is anonymous, the user’s real identity is conveyed inside the protected tunnel, ensuring that a sniffer cannot detect the true username from the EAP exchange. When the outer identity is anonymous, the inner or protected identity is used to validate the user’s credentials against the user database.
Although an anonymous outer identity is more secure, it can make RADIUS accounting more difficult since the authenticator has no knowledge of the protected identity. To alleviate this situation, ACS can send the protected username in the RADIUS Access Accept to the authenticator. Cisco switches reply with this username in RADIUS Accounting records.
Step 8 Validate Configuration.
1. Verify that the group (PeapWired) has been successfully created with the configured profile (802.1X_PEAP). Click Next. See Figure 3-140.
3-133802.1X Deployment Guide
OL-16033-01

St r i c t ly C i sco Conf ident i a l
Chapter 3 Configuring 802.1X Deploying PEAP-MSCHAPv2
Figure 3-140 Verify Group Configuration
2. In the Validation window (Figure 3-141), click Finish to save the configuration files. The Processed Configuration file configuration.xml can be deployed to the client (this will happen automatically if the Management Utility is running on the same machine as the client software). The Unprocessed Configuration file unprocessed_configuration_do_not_deploy.xml should only be used to modify this profile as described in the following step.
3-134802.1X Deployment Guide
OL-16033-01

St r i c t ly C i sco Conf ident i a l
Chapter 3 Configuring 802.1X Deploying PEAP-MSCHAPv2
Figure 3-141 Validate Configuration
Step 9 Modify Configuration.
This is the same as Step 9 in “CSSC Configuration” section on page 3-82.
Configuring XP Supplicant for PEAP-MSCHAPv2
The steps provided in this section describe how to configure the Windows XP native supplicant for PEAP-MSCHAPv2 authentication on wired LAN networks.
Note The native client is running on Windows XP Service Pack 2.
Prior to configuring the XP supplicant, validate that the correct certificates exist in the Windows certificate stores as described in “Installation of Client Certificates” section on page 3-56.
Configure IEEE 802.1X Parameters
Step 1 To configure the IEEE 802.1X parameters, click Start > Control Panel, and then select Network and Internet Connections. Next, select Network Connections and open the correct Local Area Connection Properties menu.
Step 2 From the Local Area Connection Properties window, select the Authentication tab. See Figure 3-142
3-135802.1X Deployment Guide
OL-16033-01

St r i c t ly C i sco Conf ident i a l
Chapter 3 Configuring 802.1X Deploying PEAP-MSCHAPv2
Figure 3-142 Selection Authentication Tab
Note If the Authentication tab is not displayed, click Start > All Programs > Administrative Tools > Services. Right-click Wireless Zero Configuration and select Start.
Step 3 See Figure 3-143. Check the Enable IEEE 802.1X authentication for this network box. Select Protected EAP from the drop-down menu for the EAP type.
3-136802.1X Deployment Guide
OL-16033-01

St r i c t ly C i sco Conf ident i a l
Chapter 3 Configuring 802.1X Deploying PEAP-MSCHAPv2
Figure 3-143 Configure PEAP Authentication
Step 4 Click Properties. The Protected EAP Properties window appears. See Figure 3-144.
Figure 3-144 Configure PEAP Properties
3-137802.1X Deployment Guide
OL-16033-01

St r i c t ly C i sco Conf ident i a l
Chapter 3 Configuring 802.1X Deploying PEAP-MSCHAPv2
Step 5 Select Validate Server Certificate.
Tip If PEAP-MSCHAPv2 authentication fails with Validate Server Certificate checked—but passes when this option is unchecked, the client does not have the root certificate of the CA that signed the ACS’s certificate in the proper Trusted Root Authority store.
Step 6 [Optional] By default, the supplicant will accept any valid server certificate that has been signed by a trusted root CA. To restrict the server certificates that a supplicant will accept, check the Connect to These Servers box (Figure 3-144) and enter the CN of the servers that the supplicant should accept.
Step 7 [Optional] If your security policy requires it, prevent the supplicant from prompting the user to accept certificates from unknown servers by checking the Do not prompt user to authorize new servers or trusted certification authorities option (Figure 3-144). This command only takes effect if the Connect to These Servers checkbox has been configured in the previous step. If this box is checked, a certificate from an unknown server will always result in failed authentication even if the certificate is signed by a trusted CA. If your security policy allows users to choose which servers can be authenticated against, then leave the box unchecked. If this box is not checked and an unknown ACS presents a certificate signed by a trusted CA, the end user will be prompted to accept the unknown server's certificate. If the user clicks OK, then the CN will be automatically added to the trusted servers list and the user will not be prompted again.
Step 8 In the Protected EAP Properties window (Figure 3-144), under Select Authentication Method, select Secured password (EAP-MSCHAP v2) from the dropdown menu and click Configure. The EAP MSCHAPv2 Properties window appears. See Figure 3-145.
Figure 3-145 Configure MSCHAPv2 Properties
Step 9 Select Automatically use my Windows logon name password and click OK to return to the Protected EAP Properties window. This enables the supplicant to use the username, password and domain entered at the Windows login screen for the MSCHAPv2 exchange without having to prompt the user for credentials a second time (Single Sign-On).
Step 10 [Optional] If you wish to enable Fast Session Reconnect and it was previously configured on the ACS (see “Step 4: Configure PEAP-MSCHAPv2 Settings on the ACS” section on page 3-112), check Enable Fast Reconnect. Click OK to return to the main Authentication tab.
Caution A known defect with the native supplicant in the Microsoft XP SP2 operating system can cause PEAP to fail when fast-reconnect is enabled on the ACS. For a hotfix, contact Microsoft and reference KB885453. As a workaround, disable fast reconnect on both the ACS and on the supplicant.
Step 11 In the Authentication tab, check Authenticate as computer when computer information is available to enable machine authentication. Click OK.
3-138802.1X Deployment Guide
OL-16033-01

St r i c t ly C i sco Conf ident i a l
Chapter 3 Configuring 802.1X Deploying EAP-FAST
Note Authenticate as Guest has no effect when using PEAP-MSCHAPv2 with Windows Single Sign-On. Leave this option unchecked.
Step 12 The supplicant will begin authentication.
Deploying EAP-FASTThe section describes how to configure EAP-FAST with Automatic Anonymous PAC provisioning. As discussed in the “Deployment Recommendations (EAP-TLS)” section on page 2-4, Anonymous provisioning enables rapid deployment of EAP-FAST without the complexities of certificates and PKI. The deployment recommendations section also discussed important security considerations associated with this type of EAP-FAST deployment that should be carefully reviewed prior to deploying EAP-FAST in this way.
The following inner methods are configured in this section:
• Anonymous Phase 0 provisioning with inner method of MSCHAPv2
• Phase 2 with inner method of EAP-GTC
The password used for both phases is acquired from the user when he or she logs into Windows (Single Sign-On). ACS verifies this password with the user password stored in Active Directory during both phases.
EAP-FAST Configuration StepsConfiguring EAP-FAST consists of the following steps:
• Step 1: Configure EAP-FAST Settings on the ACS, page 3-139
• Step 2: Specify and Configure the Catalyst Switch as a AAA Client, page 3-142
• Step 3: Configure the External User Databases, page 3-142
• Step 4: CSSC Client Configuration for EAP-FAST, page 3-142
Step 1: Configure EAP-FAST Settings on the ACS
The EAP-FAST settings are configured on the Global Authentication Setup page on the ACS.
Step 1 Open ACS Admin from the desktop shortcut created during the installation.
Step 2 Click System Configuration.
Step 3 Click Global Authentication Setup. This results in the window presented in Figure 3-146.
3-139802.1X Deployment Guide
OL-16033-01

St r i c t ly C i sco Conf ident i a l
Chapter 3 Configuring 802.1X Deploying EAP-FAST
Figure 3-146 EAP-Fast Global Configuration
Step 4 Under EAP-FAST, click EAP-FAST Configuration. The EAP-FAST Configuration window appears. See Figure 3-147.
3-140802.1X Deployment Guide
OL-16033-01

St r i c t ly C i sco Conf ident i a l
Chapter 3 Configuring 802.1X Deploying EAP-FAST
Figure 3-147 EAP Fast Configuration
Step 5 Select Allow EAP-FAST.
Step 6 Configure the PAC TTL (time to live) expiration timers in accordance with your security policy.
Step 7 Configure the Authority-ID. This is a mandatory field that can be used by the client to determine which ACS server is to be authenticated against.
Step 8 Select Allow Machine Authentication to enable EAP-FAST machine authentication.
Step 9 [Optional] Select Allow Stateless Session resume and an Authorization PAC TTL expiration time.
3-141802.1X Deployment Guide
OL-16033-01

St r i c t ly C i sco Conf ident i a l
Chapter 3 Configuring 802.1X Deploying EAP-FAST
Note Similar to EAP-TLS Session Resume and PEAP-MSCHAPv2 Fast Reconnect, EAP-FAST Stateless Session Resume shortcuts the reauthentication process by having the client present a special Authorization PAC in place of a full Phase 2 inner-method authentication. This Authorization PAC, which is completely separate from the Tunnel PAC which is used to create the Phase 1 tunnel, is provisioned on the client by the ACS. If a client attempts to reauthenticate with a valid Authorization PAC in the time period specified by the Authorization PAC TTL, then the Phase 2 inner method is skipped and the client is allowed access. This optimization is most useful in wireless environments where fast reauthentication is required for roaming.
Step 10 Under Allowed Inner Methods, select EAP-MSCHAPv2 and EAP-GTC. For back-compatibility reasons, ACS requires that both methods be configured when using Anonymous PAC provisioning.
Note The list of allowed inner methods applies to both Phase 0 and Phase 2. ACS always uses the first method in the inner method list that is enabled and supported. EAP-GTC is not supported in Phase 0 when Anonymous PAC Provisioning is enabled, so EAP-MSCHAPv2 will be used for Phase 0. EAP-GTC is supported in Phase 2, so EAP-GTC will be used for Phase 2 since it comes before EAP-MSCHAPv2 on this list.
Step 11 Select EAP-FAST master server. This permits other ACS servers to utilize this server as the master PAC authority to avoid having to provision unique Master keys for each ACS in a network.
Step 12 Click Submit + Restart.
Note All the other settings on this page are used for PKI-enabled environments that can do Authenticated PAC Provisioning and/or EAP-TLS inner methods. They are not required for Anonymous PAC Provisioning with EAP-MSCHAPv2 and EAP-GTC.
Step 2: Specify and Configure the Catalyst Switch as a AAA Client
The procedure is the same as described in the EAP-TLS section. See the “Step 5: Specify and Configure the Catalyst Switch as a AAA Client” section on page 3-50 for details.
Step 3: Configure the External User Databases
The procedure is the same as described in the EAP-TLS section. See the “Step 6: Configure the External User Databases” section on page 3-51 for details.
Step 4: CSSC Client Configuration for EAP-FAST
The steps provided in this section explain how to configure the Cisco Secure Services Client (CSSC) for EAP-FAST authentication with Anonymous provisioning on wired LAN networks.
Note CSSC version 5.0.1.8 is running on Windows XP operating system with Service Pack 2.
There are three components required to install and configure CSSC:
3-142802.1X Deployment Guide
OL-16033-01
St r i c t ly C i sco Conf ident i a l
Chapter 3 Configuring 802.1X Deploying EAP-FAST
• CSSC client image (CSSC_SSC-XP2K)—802.1X client software that runs on the end host.
• Client Utilities (CiscoClientUtilities)—Troubleshooting tool that runs on the end host.
• Client Management Utility (SSCMgmtToolkit)—Management utility that configures user profiles that can be distributed to the entire organization through a single Extensible Markup Language (XML) file. This utility is typically run on a centralized server. For testing purposes, it can be run on the end client to modify and test the supplicant configuration on the fly.
This section discusses how to use the Management Utility to configure an EAP-TLS profile for the CSSC client. Once created, the user profiles can be bundled with the client image into an .msi file which can be deployed using standard deployment tools, including Microsoft Active Directory GPOs, SMS, Altiris, and Novell Zenworks.
Note No certificates are required on the CSSC client for EAP-FAST with Anonymous PAC Provisioning.
Note The Microsoft Windows XP native supplicant does not support EAP-FAST.
Step 1 Create a New Configuration Profile:
This is the same as Step 1 in the “Configuring CSSC for PEAP-MSCHAPv2” section on page 3-114
Step 2 Configure Client Policy
This is the same as Step 2 in the “Configuring CSSC for PEAP-MSCHAPv2” section on page 3-114.
Step 3 Configure Authentication Policy
In the Authentication Policy window, select EAP FAST under Allowed Authentication Modes and click Next. See Figure 3-148.
3-143802.1X Deployment Guide
OL-16033-01

St r i c t ly C i sco Conf ident i a l
Chapter 3 Configuring 802.1X Deploying EAP-FAST
Figure 3-148 Configure Authentication Policy
Step 4 Create a New Group
1. In the Networks window, create a new group by clicking Add Group. See Figure 3-149.
3-144802.1X Deployment Guide
OL-16033-01

St r i c t ly C i sco Conf ident i a l
Chapter 3 Configuring 802.1X Deploying EAP-FAST
Figure 3-149 Add Group
2. Enter a name for the new group (EapFastWired in Figure 3-150) and click OK.
Figure 3-150 Add a New Group
Step 5 Add a Network to the Group
1. In the main Networks window, use the Up arrow button on the right side of the window to move the group that was just created (EapFastWired) above the Default group. Select EapFastWired and click Add Network. See Figure 3-151.
3-145802.1X Deployment Guide
OL-16033-01

St r i c t ly C i sco Conf ident i a l
Chapter 3 Configuring 802.1X Deploying EAP-FAST
Figure 3-151 Adding A Network
2. In the Network Media window, select Wired (802.3) Network and click Next. See Figure 3-152.
3-146802.1X Deployment Guide
OL-16033-01

St r i c t ly C i sco Conf ident i a l
Chapter 3 Configuring 802.1X Deploying EAP-FAST
Figure 3-152 Network Media
3. Provide a name for the profile and specify the Authenticating Network option. Leave the default Connection Timeout at 40 seconds. See Figure 3-153.
3-147802.1X Deployment Guide
OL-16033-01

St r i c t ly C i sco Conf ident i a l
Chapter 3 Configuring 802.1X Deploying EAP-FAST
Figure 3-153 Wired Network Settings
4. See Figure 3-154. Leave the default Connection Settings and click Next.
3-148802.1X Deployment Guide
OL-16033-01
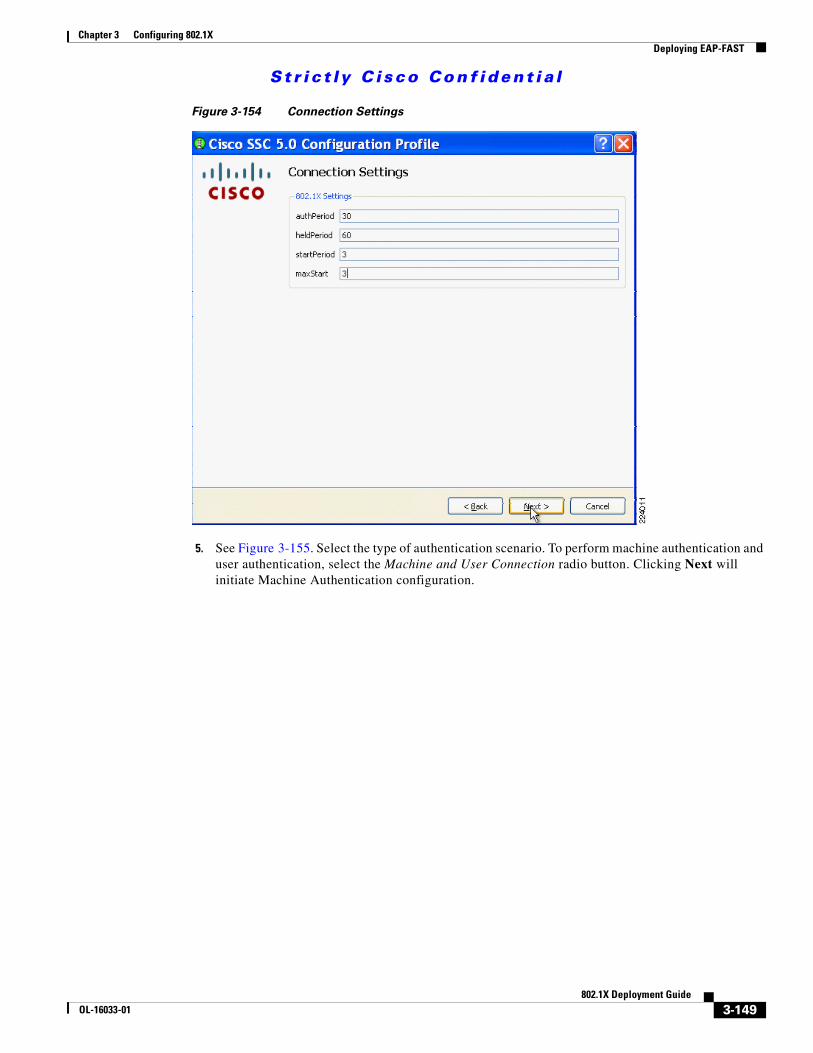
St r i c t ly C i sco Conf ident i a l
Chapter 3 Configuring 802.1X Deploying EAP-FAST
Figure 3-154 Connection Settings
5. See Figure 3-155. Select the type of authentication scenario. To perform machine authentication and user authentication, select the Machine and User Connection radio button. Clicking Next will initiate Machine Authentication configuration.
3-149802.1X Deployment Guide
OL-16033-01

St r i c t ly C i sco Conf ident i a l
Chapter 3 Configuring 802.1X Deploying EAP-FAST
Figure 3-155 Network Connection Type
Step 6 Configure Machine Authentication Parameters.
1. In the Machine Authentication window, select EAP-Fast and click the Configure button. See Figure 3-156.
3-150802.1X Deployment Guide
OL-16033-01
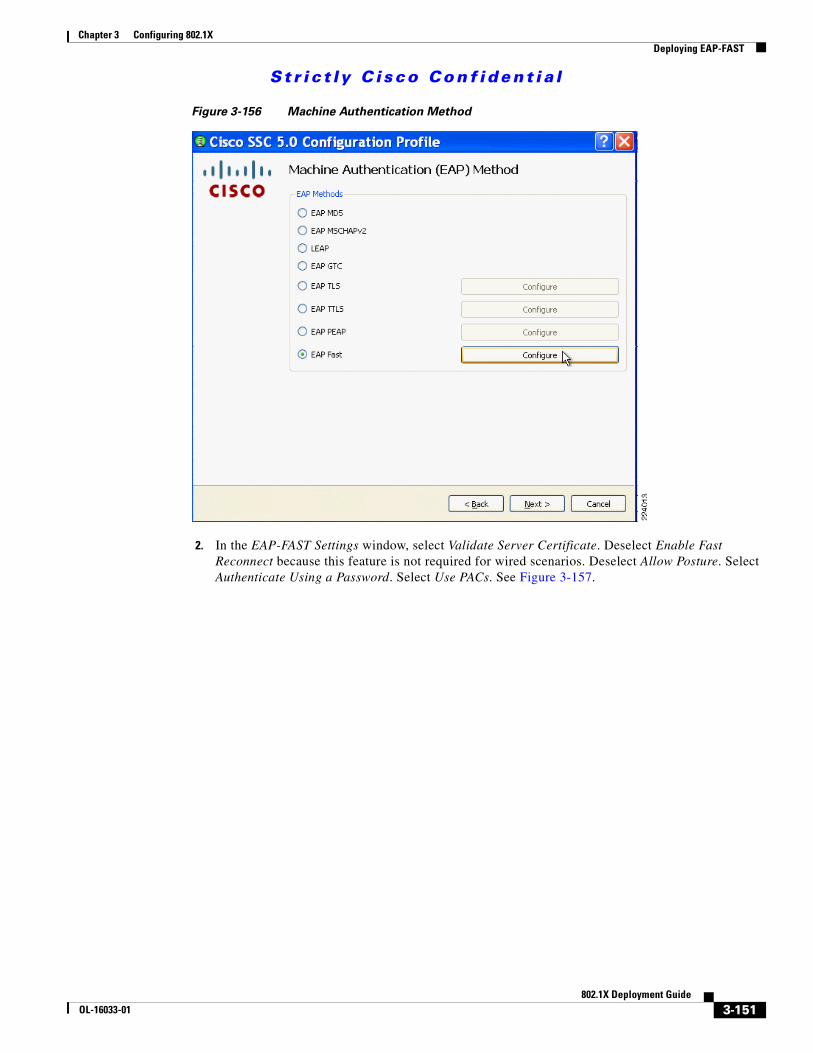
St r i c t ly C i sco Conf ident i a l
Chapter 3 Configuring 802.1X Deploying EAP-FAST
Figure 3-156 Machine Authentication Method
2. In the EAP-FAST Settings window, select Validate Server Certificate. Deselect Enable Fast Reconnect because this feature is not required for wired scenarios. Deselect Allow Posture. Select Authenticate Using a Password. Select Use PACs. See Figure 3-157.
3-151802.1X Deployment Guide
OL-16033-01

St r i c t ly C i sco Conf ident i a l
Chapter 3 Configuring 802.1X Deploying EAP-FAST
Figure 3-157 Machine EAP-FAST Settings
3. The configuration utility returns to the Machine Authentication window. Click Next. See Figure 3-158.
3-152802.1X Deployment Guide
OL-16033-01

St r i c t ly C i sco Conf ident i a l
Chapter 3 Configuring 802.1X Deploying EAP-FAST
Figure 3-158 Machine Authentication Method Complete
4. [Optional] The Machine Server Validation window can be used to restrict the ACS servers from which the client will accept a certificate authentication during machine authentication. If no Rule is added in this window, the client will accept any server certificate that has been signed by a trusted root CA. Click Next. See Figure 3-159.
3-153802.1X Deployment Guide
OL-16033-01

St r i c t ly C i sco Conf ident i a l
Chapter 3 Configuring 802.1X Deploying EAP-FAST
Figure 3-159 Machine Server Validation
5. [Optional] If desired, use this window to restrict which root CAs the client will trust to sign the ACS server certificate. Click Next to accept the default setting. See Figure 3-160.
3-154802.1X Deployment Guide
OL-16033-01

St r i c t ly C i sco Conf ident i a l
Chapter 3 Configuring 802.1X Deploying EAP-FAST
Figure 3-160 Machine CA Selection
6. In the Machine Credentials window, leave the default for the unprotected identity and the protected identity. The client will replace [username] with the machine name. The Machine Credentials option instructs the client to use the machine password provided by Microsoft Active Directory. See Figure 3-161.
3-155802.1X Deployment Guide
OL-16033-01
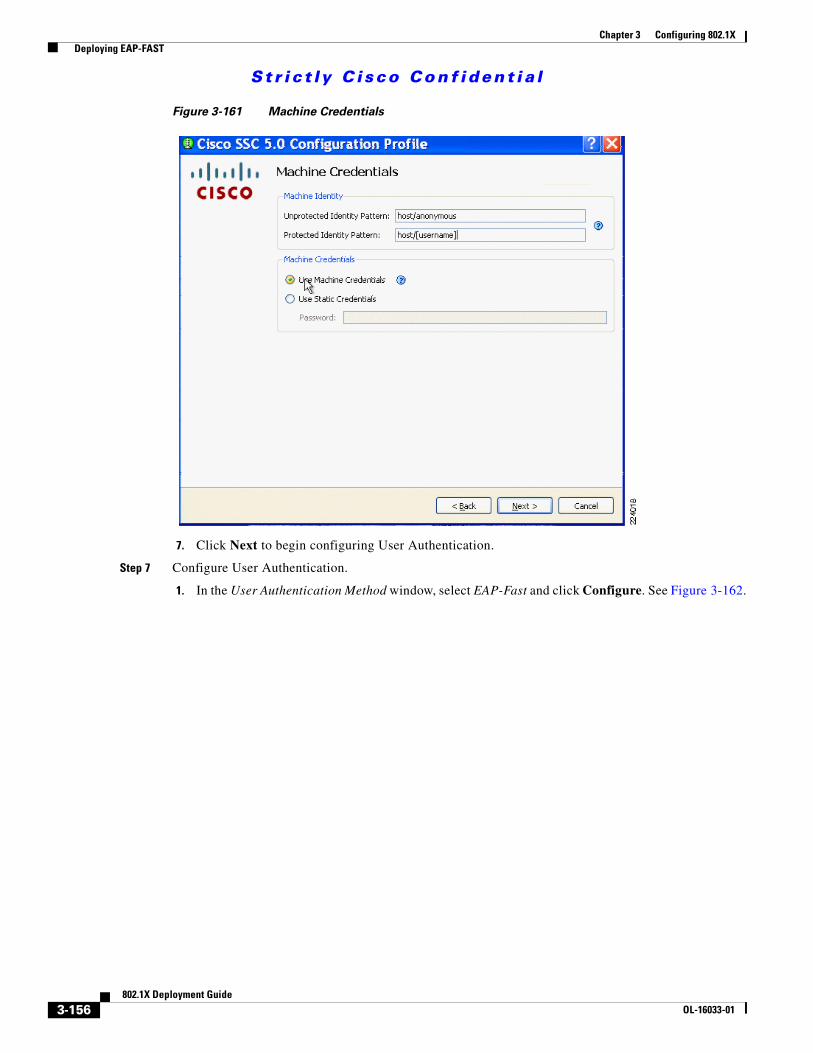
St r i c t ly C i sco Conf ident i a l
Chapter 3 Configuring 802.1X Deploying EAP-FAST
Figure 3-161 Machine Credentials
7. Click Next to begin configuring User Authentication.
Step 7 Configure User Authentication.
1. In the User Authentication Method window, select EAP-Fast and click Configure. See Figure 3-162.
3-156802.1X Deployment Guide
OL-16033-01

St r i c t ly C i sco Conf ident i a l
Chapter 3 Configuring 802.1X Deploying EAP-FAST
Figure 3-162 User Authentication Method
2. In the EAP-FAST Settings window, select Validate Server Certificate. Deselect Enable Fast Reconnect since this feature is not required for wired scenarios. Deselect Allow Posture. Select Authenticate Using a Password. Select Use PACs. Click OK. See Figure 3-163.
3-157802.1X Deployment Guide
OL-16033-01

St r i c t ly C i sco Conf ident i a l
Chapter 3 Configuring 802.1X Deploying EAP-FAST
Figure 3-163 User EAP-FAST Settings
Note If authentication passes when Validate Server Identity is unchecked but fails when it is checked, then the supplicant does not have the certificate for the Root CA that signed the ACS's certificate in the appropriate certificate store.
3. In the main User Authentication Method window, click Next. See Figure 3-164.
3-158802.1X Deployment Guide
OL-16033-01

St r i c t ly C i sco Conf ident i a l
Chapter 3 Configuring 802.1X Deploying EAP-FAST
Figure 3-164 User Authentication Method Complete
4. [Optional] The User Server Validation window can be used to restrict the ACS servers from which the client will accept a certificate authentication during user authentication. If no Rule is added in this window, the client will accept any server certificate that has been signed by a trusted root CA. Click Next. See Figure 3-165.
3-159802.1X Deployment Guide
OL-16033-01

St r i c t ly C i sco Conf ident i a l
Chapter 3 Configuring 802.1X Deploying EAP-FAST
Figure 3-165 User Server Validation
5. [Optional] If desired, use this window to restrict which root CAs the client will trust to sign the ACS server certificate during user authentication. Click Next to accept the default setting. See Figure 3-166.
3-160802.1X Deployment Guide
OL-16033-01

St r i c t ly C i sco Conf ident i a l
Chapter 3 Configuring 802.1X Deploying EAP-FAST
Figure 3-166 User CA Validation
6. In the User Credentials window, leave anonymous as the unprotected identity and [username] as the unprotected identity. Select Use Single Sign On. CSSC will automatically replace the [username] placeholder with the username that was entered during the Windows logon. Click Finish. The Validation window will appear. See Figure 3-167.
3-161802.1X Deployment Guide
OL-16033-01

St r i c t ly C i sco Conf ident i a l
Chapter 3 Configuring 802.1X Deploying EAP-FAST
Figure 3-167 User Credentials
Note about Protected and Unprotected Identity
The EAP Identity field in EAP Identity Response messages is sometimes referred to as the outer or unprotected identity since it is sent in the clear, outside the protected TLS tunnel. PEAP has the option of sending anonymous instead of the actual username in the Identity field. If the outer identity is anonymous, the user’s real identity is conveyed inside the protected tunnel, ensuring that a Sniffer cannot detect the true username from the EAP exchange. When the outer identity is anonymous, the inner or protected identity is used to validate the user’s credentials against the user database.
Although an anonymous outer identity is more secure, it can make RADIUS accounting more difficult since the authenticator has no knowledge of the protected identity. To alleviate this situation, ACS can send the protected username in the RADIUS Access Accept to the authenticator. Cisco switches reply with this username in RADIUS Accounting records.
Step 8 Validate Configuration.
1. Verify that the group (EAPFastWired) has been successfully created with the configured Network (802.1X_EAPFast). Click Next. See Figure 3-168.
3-162802.1X Deployment Guide
OL-16033-01

St r i c t ly C i sco Conf ident i a l
Chapter 3 Configuring 802.1X Deploying EAP-FAST
Figure 3-168 Confirm Group Creation
2. In the Validation window, click Finish to save the configuration files. The Processed Configuration file configuration.xml can be deployed to the client (this will happen automatically if the Management Utility is running on the same machine as the client software). The Unprocessed Configuration file unprocessed_configuration_do_not_deploy.xml should only be used to modify this profile as described in the following step. See Figure 3-169
3-163802.1X Deployment Guide
OL-16033-01

St r i c t ly C i sco Conf ident i a l
Chapter 3 Configuring 802.1X Conclusion and Next Steps
Figure 3-169 Finish Configuration
Step 9 Modify Configuration.
This is the same as Step 9 in “CSSC Configuration” section on page 3-82.
Conclusion and Next StepsDeploying IEEE 802.1X ensures secure, identity-based access control at the network edge. By authenticating users and known assets with IEEE 802.1X on wired ports, network administrators can ensure that only valid users can access the network.
This publication describes the steps necessary to deploy IEEE 802.1X, from the supplicant on the end host to the switch to the ACS RADIUS server. This paper has also discussed how to integrate commonly used components, such as Microsoft Active Directory and PKI infrastructure, to simplify the deployment and management of the solution.
After deploying IEEE 802.1X as described in this paper, further steps might be required to realize a true end-to-end solution. These steps could include:
• Authenticating users and devices that do not support an 802.1X supplicant
• Assigning granular network access through authorization techniques such as VLAN assignment
• Configuring the solution to support IP Telephony
These topics will be addressed in detail in subsequent documents.
3-164802.1X Deployment Guide
OL-16033-01