8. evo .1. 8.2. 9. 9.1. - codejunkiesuk.codejunkies.com/support_downloads/evo-customize... ·...
TRANSCRIPT

EVO™ Customizer
User Guide V1.0
Index
1. Introduction
2. Overview
3. Feature Overview
4. Connecting your Controller
5. Assigning Features
6. Feature Menu
6.1. Activating and Deactivating Features
6.2. Changing Feature Icon Colours
6.3. Loading and Saving
7. Sniper
7.1. Configuring Sniper using the EVO Customizer
7.2. Configuring Sniper using the Combat Command LCD Display
8. Rapid Fire
8.1. Configuring Rapid Fire using the EVO Customizer
8.2. Configuring Rapid Fire using the Combat Command LCD Display
9. Low Recoil
9.1. Configuring Low Recoil using the EVO Customizer
9.2. Configuring Low Recoil using the Combat Command LCD Display
10. Remap
10.1. Configuring Remap using the EVO Customizer
10.2. Configuring Remap using the Combat Command LCD Display
11. Y-Axis Reverse
11.1. Configuring Y-Axis Reverse using the EVO Customizer
11.2. Configuring Y-Axis Reverse using the Combat Command LCD Display
12. Sensitivity
12.1. Configuring Sensitivity using the EVO Customizer
12.2. Configuring Sensitivity using the Combat Command LCD Display
13. Left Handed Mode
13.1. Configuring Left Handed Mode using the EVO Customizer
13.2. Configuring Left Handed Mode using the Combat Command LCD Display
14. Custom Image
14.1. Configuring Custom Image using the EVO Customizer
15. Auto Fire
15.1. Configuring Auto Fire using the EVO Customizer
15.2. Configuring Auto Fire using the Combat Command LCD Display
16. Combo Sequences
16.1. Configuring Combo Sequences using the EVO Customizer
16.2. Configuring Combo Sequences using the Combat Command LCD Display
17. Pro Tips
18. Technical Support and Customer Services
1. Introduction
The EVO™ Customizer is designed for usage with the WildFire EVO™ and TurboFire® EVO™
controllers. Using the EVO™ Customizer and the USB Cable (supplied), you can choose from a
host of downloadable features including Combo Sequences, Y-Axis Reverse, Analogue
Sensitivity, Left Handed Mode, Auto Fire and Custom Image. You can also download the pre-
installed features Sniper, Remap, Rapid Fire and Low recoil.
In addition to being able to configure the assigned features using the Combat Command LCD
display as detailed in the user guide provided with your controller, you can also choose to
configure features using the EVO Customizer.
This fantastic feature gives you the ultimate freedom to customize the controller for how you
want to play and best of all it is completely free.
1
<A B
+- LAUTO
!
Drag and Drop
Reset Controller Assign S ettingE V O CUSTOMIZER
FUN CTIONS

2. Overview
3. Feature Overview
The following illustration gives an overview of the different feature icons. For advice on
assigning each of the features using the EVO Customizer, please refer to section ‘5’.
4. Connecting your Controller
5. Assigning Features
Using the EVO Customizer you can change the features which are assigned to your WildFire
EVO or TurboFire EVO controller. In order to do this, please follow these steps:
Step 1
Select the feature which you would like to assign.
Step 2
Drag the feature icon from the features section.
<A B
+- LAUTO
RemapLowRecoil
RapidFire
SniperComboSequences
Auto FireCustom ImageLeft HandedMode
SensitivityY-AxisReverse
Connect the larger end of the USBcable (supplied) to any free USBport on your computer.
Connect the smaller end of the USBcable (supplied) to the USB connectionlocated on the top of the controller.
L1
L2
LAUTO
Reset Controller Assign Setting
Drag and Drop
FUNCTIONS1
LAUTO
Reset Controller Assign Setting
AUTO
Auto Fire
AUTO
AUTO
1 2 3 4

Step 3
Drop the feature icon over Feature Slot 1, Feature Slot 2, Feature Slot 3 or Feature Slot 4.
Step 4
Repeat the same steps to assign any other features, when you have finished assigning features
save your changes by selecting the Assign Settings button.
6. Feature Menu
The feature menu contains a number of options which are selectable for each of the features.
In order to access the feature menu, as shown in the following illustration, right click on a
feature image stored under the feature slots. The options selectable from within the feature
menu may vary dependant on the feature.
6.1. Activating and Deactivating Features
It is possible to set each of the features to activate in one of five ways. You can choose to
activate and deactivate a feature by pressing the F1 or F2 button. You can choose to activate a
feature when you are pressing and holding the F1 or F2 button. Alternatively you can choose to
have a feature set to always on, meaning that you do not need to press any button to activate
the feature. When activating features you can use multiple instances of some features such as
Rapid Fire and Sniper.
You can choose how to activate and deactivate features at any time using the Combat
Command LCD display. In addition you can choose how to activate and deactivate features
using the options selectable from within the feature menu. Selectable from the feature menu
are the following options:
6.2. Changing Feature Icon Colours
Selectable from the Feature Menu is the option Adjust Icon Colour which allows you to change
the colour of the feature images assigned to the controller. Changing the colour of the feature
images is particularly usual for easily identifying different features as well as allowing you to
change the appearance of the Combat Command LCD Display.
For each of the feature images which you would like to change the colour, select the adjust
colour option from within the relevant feature menu and select a colour from the displayed
colour palette.
When you have finished customizing the controller, before disconnecting the USB cable you
need to ensure that you select the Assign Settings button. Failure to do so will cause any
changes which you have made to be lost.
1
<A B
+- LAUTO
!
Drag and Drop
Reset Controller Assign S ettingE V O CUSTOMIZER
FUN CTIONS
Press F2 to toggle feature
Hold F1to activate feature
Always active
Hold F2to activate feature
Adjust icon color
Load single slotSave single slot
Load complete profileSave complete profile
Press F1 to toggle feature
Not active
Sniper

6.3. Loading and Saving
You can choose to save the configuration of all four features as a profile. In saving your features
allows you to configure features specifically for usage with particular games or have a series of
different set-ups for the same game which you can easily assign to your controller when
required.
How to Save
In order to save all four features as a profile, please follow these steps:
Step 1
Select from within the relevant feature menu the option Save Profile if you want to save all four
features as a profile.
Step 2
Choose a location of your choice where you would like to save the data.
Step 3
Enter a name of your choice which the data will be saved under.
Step 4
Select the Save button in order to complete the save of a Profile.
How to Load
In order to load a profile, please follow these steps:
Step 1
Select Load Profile if you want to load all four features as a profile.
Step 2
Choose the location which contains the saved data you would like to load.
Step 3
Select the Load button in order to load the profile.
When you have finished customizing the controller, before disconnecting the USB cable you
need to ensure that you select the Assign Settings button. Failure to do so will cause any
changes which you have made to be lost.
7. Sniper
The Sniper Mode feature allows for you to slow down the movement of either analogue stick.
In slowing down the movement of either analogue stick allows for more precise movements,
which is an advantage when playing certain games which require accurate movements.
When configuring Sniper you are increasing or decreasing the speed of the analogue sticks by
adjusting the y-axis and x-axis for each analogue stick. The y-axis is up and down movement,
the x-axis is left and right movement.
7.1. Configuring Sniper using the EVO Customizer
Whilst Sniper is assigned to your controller, select the feature icon from the relevant feature slot to display the Sniper configuration screen. If you would like to exit the Sniper configuration screen select the Cancel button at any time.
The centre of a slider bar represents the normal speed of the axis. When moving a slider bar to the left you are slowing down the x-axis or y-axis. When moving a slider to the right you are speeding up the x-axis or y-axis. Decreasing the speed of any axis beneath 10% may result in no movement. In order to adjust each of the slider bars, using your mouse cursor click and drag each of the
sliders left or right to the desired position as shown in the following illustration. Once you are
happy with your configuration, select the Confirm button to save the configuration.

When you have finished customizing the controller, before disconnecting the USB cable you
need to ensure that you select the Assign Settings button. Failure to do so will cause any
changes which you have made to be lost.
7.2. Configuring Sniper using the Combat Command LCD Display
After entering the EVO Menu, using the A button select the Sniper feature image to enter the
Sniper configuration screen. If you would like to return to the EVO Menu at any time you can
do so by pressing the Back button.
The centre of a slider bar represents the normal speed of the axis. When moving a slider bar to the left you are slowing down the x-axis or y-axis. When moving a slider to the right you are speeding up the x-axis or y-axis. Decreasing the speed of any axis beneath 10% may result in no movement. In order to adjust each of the slider bars you need to scroll up or down to highlight the slider
bar which you would like to adjust. Whilst highlighting a slider bar, using any of the buttons
shown in the following illustration move the slider left or right to the desired position. Once
you are happy with your configuration press the Start button to save the configuration.
8. Rapid Fire
The unique programmable Rapid Fire feature can boost your firepower in any Xbox 360 game.
The Rapid Fire can be set to operate at different speeds and can be assigned to wide range of
buttons.
8.1. Configuring Rapid Fire using the EVO Customizer
Whilst Rapid Fire is assigned to your controller, select the feature icon from the relevant feature slot to display the Rapid Fire configuration screen. If you would like to exit the Rapid Fire configuration screen select the Cancel button at any time.
SNIPER
Left X-Axis
Left Y-Axis
Right X-Axis
Right Y-Axis
SNIPER
LX
LY
RX
RY
X-Axis Left Analogue Stick Slider Bar
Y-Axis Left Analogue Stick Slider Bar
X-Axis Right Analogue Stick Slider Bar
Y-Axis Right Analogue Stick Slider Bar
Use one of these controls
Left AnalogueStick
DirectionButtons
Right AnalogueStick
SNIPER
LX
LY
RX
RY

In order to assign Rapid Fire to buttons of your choice, select any of the buttons which can be
assigned Rapid Fire from the configuration screen. Buttons which you select are highlighted, as
shown in the following illustration:
Having chosen the buttons which you would like to assign Rapid Fire you can now choose to save the configuration by selecting the Confirm button or you can set the Rapid Fire speed. In order to change the Rapid Fire speed, as shown in the following illustration you need to click
and drag the Rapid Fire slider either to the left to decrease or to the right to increase. Once you
are happy with the setup, save the configuration by selecting the Confirm button.
When you have finished customizing the controller, before disconnecting the USB cable you
need to ensure that you select the Assign Settings button. Failure to do so will cause any
changes which you have made to be lost.
8.2. Configuring Rapid Fire using the Combat Command LCD Display
After entering the EVO Menu, using the A button select the Rapid Fire image to enter the Rapid
Fire configuration screen. If you would like to return to the EVO Menu at any time you can do
so by pressing the Back button.
As shown in the following illustration the Rapid Fire configuration screen displays the buttons
which are assigned Rapid Fire and a Rapid Fire speed slider bar which enables you to adjust the
rate of fire.
In order for you to get the most out of the Rapid Fire feature you can choose exactly which button or buttons it is assigned to. To program which buttons will use Rapid Fire press any of the buttons shown in the following illustration. In order to assign Rapid Fire to the Start button and Back button without exiting the Rapid Fire configuration screen. You need to press and hold the F1 or F2 button before pressing the Start button and Back button.
When making your selections, as shown button icons are displayed by the Rapid Fire configuration screen confirming the buttons which will be assigned Rapid Fire. Having chosen the buttons which you would like to assign Rapid Fire you can now choose to save the configuration by pressing the Start button or you can set the Rapid Fire speed. In order to set the speed of Rapid Fire you need to move the Rapid Fire slider bar either to the
left to decrease or to the right to increase. You can use any of the buttons shown in the
RAPID FIRE
A B
x Y
LB
RB
LS
RS RT
LTButtons AssignedRapid Fire
Rapid Fire SpeedSlider Bar
START
BACK
RB Button
Y ButtonB Button X Button A Button
Right AnalogueStick Click
LB Button
Left AnalogueStick Click
LT Button RT Button
Start Button
Back Button
RAPID FIRE
A B
x Y
LB
RB
LS
RS RT
LT START
BACK

following illustration. Having set the speed of Rapid Fire Speed, save the configuration by
pressing the ‘Start’ button.
9. Low Recoil
The Low Recoil feature allows you to set the level of rumble which you feel on either handle of
the pad during game-play.
9.1. Configuring Low Recoil using the EVO Customizer
Whilst Low Recoil is assigned to your controller, select the feature icon from the relevant feature slot to display the Low Recoil configuration screen. If you would like to exit the Low Recoil configuration screen select the Cancel button at any time.
In order to configure the level of rumble which you feel on either handle of the pad. You need
to adjust the Left Handle Slider Bar and the Right Handle Slider Bar. To do this click and drag
either the Left Handle Slider or the Right Handle Slider left to decrease or right to increase, as
shown in the following illustration. Once you are happy with the setup, save the configuration
by selecting the Confirm button.
When you have finished customizing the controller, before disconnecting the USB cable you
need to ensure that you select the Assign Settings button. Failure to do so will cause any
changes which you have made to be lost.
9.2. Configuring Low Recoil using the Combat Command LCD Display
After entering the EVO Menu, using the A button select the Low Recoil image to enter the Low
Recoil configuration screen. If you would like to return to the EVO Menu at any time you can do
so by pressing the Back button.
In order for you to configure the level of rumble which you feel on either handle of the pad.
You need to adjust the Left Handle Slider Bar and the Right Handle Slider Bar, when making
adjustments to either slider bar the actual level of rumble is given as feedback though each of
the handles of the pad. To do this, please follow these steps:
Use one of these controls
Left AnalogueStick
DirectionButtons
Right AnalogueStick
RAPID FIRE
A B
x Y
LB
RB
LS
RS RT
LT START
BACK

Left Handle Slider Bar
Moving the Left Analogue stick left and right will adjust the Left Handle Slider Bar, as shown in
the following illustration:
Right Handle Slider Bar
Moving the Right Analogue stick left and right will adjust the Right Handle Slider Bar, as shown
in the following illustration:
10. Remap
Button remapping gives you the ultimate control over the controller button layout by allowing
you to choose which buttons should be pressed to activate each control.
10.1. Configuring Remap using the EVO Customizer
Whilst Remap is assigned to your controller, select the feature icon from the relevant feature slot to display the Remap configuration screen. If you would like to exit the Remap configuration screen select the Cancel button at any time.
In order to configure Remap you need to choose which buttons should be pressed to activate
each control. To do this, please follow these steps:
Step 1
Select the control which you would like to assign to a button.
Step 2
Drag the control icon from the assignable controls section.
Step 3
Drop the control icon over the button which you would like to assign the control.
Left AnalogueStick
L1 2 3 4

Step 4
Repeat the same steps to assign any other controls, when you have finished assigning controls
select the Confirm button to save the configuration.
When you have finished customizing the controller, before disconnecting the USB cable you
need to ensure that you select the Assign Settings button. Failure to do so will cause any
changes which you have made to be lost.
10.2. Configuring Remap using the Combat Command LCD Display
After entering the EVO Menu, using the A button select the Remap image to enter the Remap
configuration screen. If you would like to return to the EVO Menu at any time you can do so by
pressing the Back button. As shown in the following illustration, the Remap configuration
screen displays which buttons are assigned to each of the controls.
In order to program which buttons should be pressed to activate each control, please follow
these steps:
Step 1:
Scroll up, down, left or right to highlight the button which you would like to remap.
Step 2: Select the highlighted button using the A button. Step 3: Scroll up or down to view the available buttons until you are shown the button which you would like to assign to the control. Step 4: Press the A button to confirm that you would like to assign the chosen button to the selected control. Step 5: Repeat the same steps to remap any other buttons. When you have finished remapping your
buttons, press the Start button to save the configuration.
11. Y-Axis Reverse
Y-Axis Reverse allows you to invert the Y-Axis on either the Right Analogue Stick or Left
Analogue stick. The Y-Axis is the upwards and downwards movement. When enabling this
feature moving either analogue stick upwards will apply a downwards movement and moving
either analogue stick downwards will apply an upwards movement. The Y-Axis Reverse is
particularly usual in first-person shooter games or flying games which do not offer this change
in setup.
11.1. Configuring Y-Axis Reverse using the EVO Customizer
Whilst Y-Axis Reverse is assigned to your controller, select the feature icon from the relevant
feature slot to display the Y-Axis Reverse configuration screen. If you would like to exit the Y-
Axis Reverse configuration screen select the Cancel button at any time.
Programmable Buttons

In order to choose on which analogue stick Y-Axis Reverse is applied. As shown in the following
illustration, select the Left Analogue Stick button to turn on Y-Axis Reverse for the Left
Analogue Stick and select the Right Analogue Stick button to turn on Y-Axis Reverse for the
Right Analogue Stick. Reselect the Right Analogue Stick button or left Analogue Stick button to
turn off Y-Axis Reverse for either analogue stick.
When you have finished customizing the controller, before disconnecting the USB cable you
need to ensure that you select the Assign Settings button. Failure to do so will cause any
changes which you have made to be lost.
11.2. Configuring Y-Axis Reverse using the Combat Command LCD Display
After entering the EVO Menu, using the A button select the Reverse-Y image to enter the
Reverse-Y configuration screen. If you would like to return to the EVO Menu at any time you
can do so by pressing the Back button.
As shown in the following illustration, the Reverse-Y configuration screen displays which of the
analogue sticks has Y-Axis Reverse turned on or off.
In order to choose which analogue stick Y-Axis Reverse is applied. Select either the left
analogue stick or the right analogue stick using any of the controls shown in the following
illustration. Whilst highlighting the analogue stick which you wish to turn on Y-Axis Reverse,
press your A to set the option to on. Whilst highlighting the analogue stick which you wish to
turn off Y-Axis Reverse, press your A to set the option to off. Once you are happy with your
configuration press the Start button to save the configuration.
The indication given if Y-Axis Reverse is turned on or off is as follows:
12. Sensitivity
Sensitivity allows you to adjust the sensitivity of the Left Analogue Stick, Right Analogue Stick,
LT Button and RT Button. This allows you to fine tune the configuration of the controls to suit
your own comfort.
12.1. Configuring Sensitivity using the EVO Customizer
Whilst Sensitivity is assigned to your controller, select the feature icon from the relevant
feature slot to display the Sensitivity configuration screen. If you would like to exit the
Sensitivity configuration screen select the Cancel button at any time.
Reverse Left StickY-Axis
Reverse RightStickY-Axis
Reverse Left StickY-Axis
Reverse RightStick Y-Axis
OFFOFF
Use one of these controls
Left AnalogueStick
DirectionButtons
Right AnalogueStick
R E V ERSE-Y
OFF

The centre of a slider bar represents the normal speed of the control. When moving a slider bar to the left you are slowing down the control. When moving a slider to the right you are speeding up the control. In order to adjust each of the slider bars, using your mouse cursor click and drag each of the
sliders left or right to the desired position as shown in the following illustration. Once you are
happy with your setup, select the Confirm button to save the configuration.
When you have finished customizing the controller, before disconnecting the USB cable you
need to ensure that you select the Assign Settings button. Failure to do so will cause any
changes which you have made to be lost.
12.2. Configuring Sensitivity using the Combat Command LCD Display
After entering the EVO Menu, using the A button select the Sensitivity feature image to enter
the Sensitivity configuration screen. If you would like to return to the EVO Menu at any time
you can do so by pressing the Back button.
The centre of a slider bar represents the normal speed of the control. When moving a slider bar to the left you are slowing down the control. When moving a slider to the right you are speeding up the control. In order to adjust each of the slider bars you need to scroll up or down to highlight the slider
bar which you would like to adjust. Whilst highlighting the chosen slider bar move each of the
sliders left or right. You can use any of the buttons shown in the following illustration. Once you
are happy with your configuration press the Start button to save the configuration.
SENSITIVITY
Left Analog
Left Trigger
Right Analog
Right Trigger
LS
LT
RS
RT
+- SENSITIVITYLeft Analogue Stick Slider Bar
Left Trigger Slider Bar
Right Analogue Stick Slider Bar
Right Trigger Slider Bar
LS
LT
RS
RT
+- SENSITIVITY
Use one of these controls
Left AnalogueStick
DirectionButtons
Right AnalogueStick

13. Left Handed Mode
Left Handed mode is designed to allow you to easily change the layout of the controller to suit
a left handed player. This feature is very simple to configure and gives you a number of options
as follows:
13.1. Configuring Left Handed Mode using the EVO Customizer
Whilst Left Handed Mode is assigned to your controller, select the feature icon from the
relevant feature slot to display the Left Handed Mode configuration screen. If you would like to
exit the Left Handed Mode configuration screen select the Cancel button at any time.
In order to configure Left Handed mode you need to choose which of the three options to turn
on or off. To do this select any or all of the three option buttons. Once you are happy with your
configuration select the Confirm button to save the configuration.
When selecting each of the option buttons the indication given that the option is turned on or
off is as follows:
When you have finished customizing the controller, before disconnecting the USB cable you
need to ensure that you always select the Assign Settings button. Failure to do so will cause any
changes which you have made to be lost.
13.2. Configuring Left Handed Mode using the Combat Command LCD Display
After entering the EVO Menu, using the A button select the Left Handed feature image to enter
the Left Handed configuration screen. If you would like to return to the EVO Menu at any time
you can do so by pressing the Back button.
In order to configure Left Handed mode you need to choose which of the three options to turn
on or off. To do this, scroll up or down to the option which you would like to turn on or off
using any of the buttons shown in the following illustration. Turn on or off the selected option
by pressing the A button. When you have made your selections press the Start button to save
the configuration.
Use one of these controls
Left AnalogueStick
DirectionButtons
Right AnalogueStick
L E F T H A N D E D
LT RTRBLB
L

When selecting each of the option buttons the indication given that the option is turned on or
off is as follows:
14. Custom Image
Custom Image is a simple yet brilliant feature which allows you to upload an image of your
choice which is displayed on Combat Command LCD Display when you have exited the EVO
Menu.
14.1. Configuring Custom Image using the EVO Customizer
Whilst Custom Image is assigned to your controller, select the feature icon from the relevant
feature slot to display the Custom Image configuration screen. If you would like to exit the
Custom Image configuration screen select the Cancel button at any time.
The Custom Image feature supports images in the PNG and JPG format. In order to correctly
display images on the Combat Command LCD Display they must be at least 160 pixels across by
128 pixels high.
In order to configure Custom Image you need to choose the image which you wish to display. It
is only possible to configure Custom Image using the EVO Customizer. To do this, please follow
these steps:
Step 1
Select the Load Image button.
Step 2
Choose the location which contains your image which you would like to display.
Step 3
Select the image and select the Open button.
Step 4
With your chosen image displayed within the Image Preview Window. Click and drag the image
to a desired position within the Image Preview Window. Once you are happy with the setup
select the Confirm button to save the configuration.
When you have finished customizing the controller, before disconnecting the USB cable you
need to ensure that you select the Assign Settings button. Failure to do so will cause any
changes which you have made to be lost.
15. Auto Fire
Auto Fire as with Rapid Fire can boost your firepower in any Xbox 360 game. Auto Fire can be
set to operate at different speeds and can be assigned to wide range of buttons. Unlike Rapid
Fire Auto Fire is designed so you don’t even need to press the button which it is assigned.
15.1. Configuring Auto Fire using the EVO Customizer
Whilst Auto Fire is assigned to your controller, select the feature icon from the relevant feature
slot to display the Auto Fire configuration screen. If you would like to exit the Auto Fire
configuration screen select the Cancel button at any time.
In order to assign Auto Fire to buttons of your choice, select the buttons from the configuration
screen. When selecting a button the configuration screen will show the button as selected as
shown in the following illustration:

Having chosen the buttons which you would like to assign Auto Fire you can now choose to
save the configuration by selecting the Confirm button or you can set the Auto Fire speed.
In order to change the Auto Fire speed you need to click and drag the Auto Fire slider either to
the left to decrease or to the right to increase as shown in the following illustration. Once you
are happy with the setup, save the configuration by selecting the Confirm button.
When you have finished customizing the controller, before disconnecting the USB cable you
need to ensure that you select the Assign Settings button. Failure to do so will cause any
changes which you have made to be lost.
15.2. Configuring Auto Fire using the Combat Command LCD Display
After entering the EVO Menu, using the A button select the Auto Fire image to enter the Auto
Fire configuration screen. If you would like to return to the EVO Menu at any time you can do
so by pressing the Back button. As shown the Auto Fire configuration screen displays the
buttons which are assigned Auto Fire and the Auto Fire speed slider bar which enables you to
adjust the rate of fire.
In order for you to get the most out of the Auto Fire feature you can choose exactly which button or buttons it is assigned to. To program which buttons will use Auto Fire press any of the buttons shown in the following illustration. In order to assign Auto Fire to the Start button and Back button without exiting the Auto Fire configuration screen. You need to press and hold the F1 or F2 button before pressing the Start button and Back button.
When making your selections, button icons are displayed by the Auto Fire configuration screen confirming the buttons which will be assigned Auto Fire. Having chosen the buttons which you would like to assign Auto Fire you can now choose to save the configuration by pressing the ‘Start’ button or you can set the Auto Fire speed. In order to set the speed of Auto Fire you need to move the Auto Fire slider bar either to the
left to decrease or to the right to increase. You can use any of the buttons shown in the
following illustration. Having set the speed of Auto Fire speed, save the configuration by
pressing the ‘Start’ button.
AUTOFIRE
A B
x Y
LB
RB
LS
RS RT
LTButtons AssignedAuto Fire
Auto Fire SpeedSlider Bar
START
BACK
AUTO
RB Button
Y ButtonB Button X Button A Button
Right AnalogueStick Click
LB Button
Left AnalogueStick Click
LT Button RT Button
Start Button
Back Button
A B
x Y
LB
RB
LS
RS RT
LT START
BACK
AUTOFIREAUTO

16. Combo Sequences
Combo Sequences enable you to assign a sequence of pre-programmed button presses to a
single button and unlock parts of a game when activated at certain points.
16.1. Configuring Combo Sequences using the EVO Customizer
Whilst Combo Sequences is assigned to your controller, select the feature icon from the
relevant feature slot to display the Combo Sequences configuration screen. If you would like to
exit the Combo Sequences configuration screen select the Cancel button at any time.
Using the Combo Sequences configuration screen you can choose which Combo Sequences you
would like to assign. The quantity of Combo Sequences which can be selected at one time is
dependent on the complexity of the chosen Combo Sequences. The Total Combo Sequences
Selected may not reach the maximum value and is only an indication of the number selected.
The Available Free Space gives a percentage of the space used by Combo Sequences and is a
good indication of how many Combo Sequences you can select.
Whilst viewing the available Combo Sequences for a particular game. As shown in the following
illustration, when you highlight a Combo Sequence an information box is displayed. The
information box contains instructions which explain the usage of the highlighted Combo
Sequence.
In order to choose which Combo Sequences you would like to assign, please follow these steps:
Step 1:
Click and drag the slider bar up or down to scroll though the list of available Combo Sequences.
Step 2: View the available Combo Sequences for a particular game by selecting the + Symbol before the game’s name. Step 3: Select the Combo Sequences which you would like to assign and take note of any instructions displayed within the information boxes. Step 4: Once you are happy with the setup, save the configuration by selecting the Confirm button.
When you have finished customizing the controller, before disconnecting the USB cable you
need to ensure that you select the Assign Settings button. Failure to do so will cause any
changes which you have made to be lost.
Use one of these controls
Left AnalogueStick
DirectionButtons
Right AnalogueStick
A B
x Y
LB
RB
LS
RS RT
LT START
BACK
AUTOFIREAUTO
- Call of Duy: Black Ops
Exit Chair
Exit Chair & Use Secert PC.
Unlock Dead Ops Arcade & P
Unlock & Launch Dead Ops A
Unlock Intel for viewing
Unlock & PlayZORKText Ga
COMBO SEQUEN
X
X
X
- Call of Duy: Black Ops
Exit Chair
Exit Chair & Use Secert PC.
Unlock Dead Ops Arcade & P
Unlock & Launch Dead Ops A
Unlock Intel for viewing
Unlock & PlayZORKText Ga
COMBO SEQUENL1 L2 L3 L4
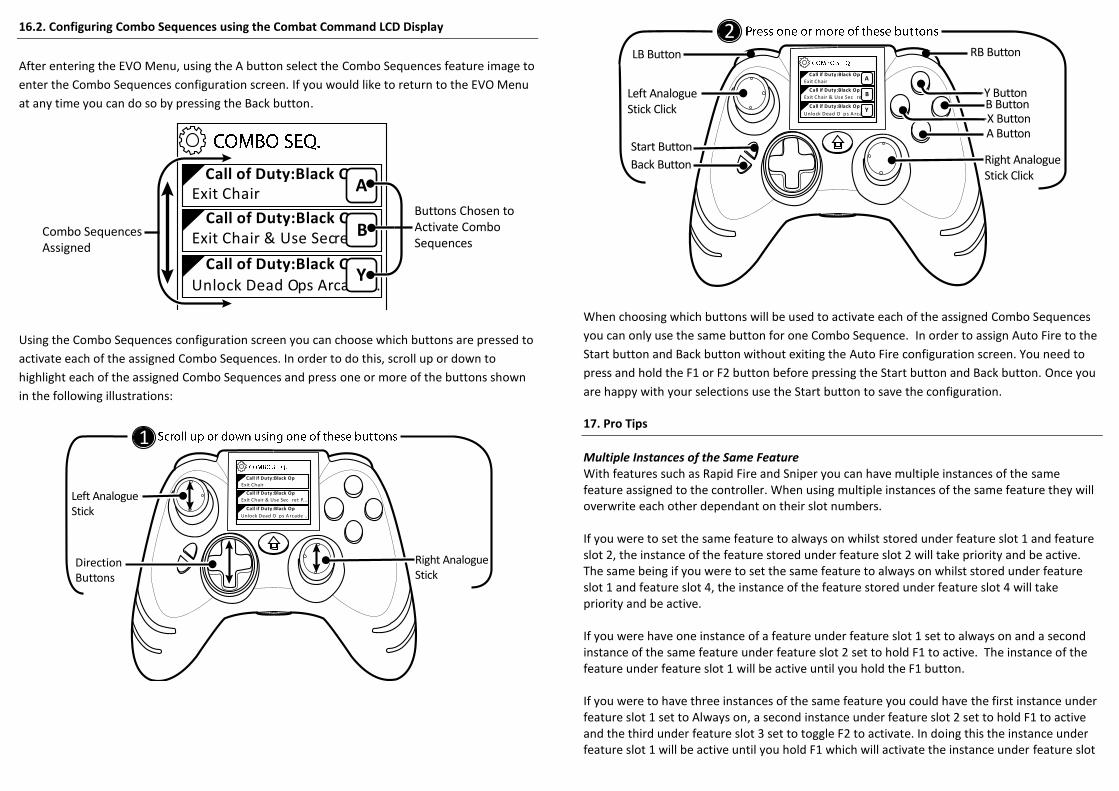
16.2. Configuring Combo Sequences using the Combat Command LCD Display
After entering the EVO Menu, using the A button select the Combo Sequences feature image to
enter the Combo Sequences configuration screen. If you would like to return to the EVO Menu
at any time you can do so by pressing the Back button.
Using the Combo Sequences configuration screen you can choose which buttons are pressed to
activate each of the assigned Combo Sequences. In order to do this, scroll up or down to
highlight each of the assigned Combo Sequences and press one or more of the buttons shown
in the following illustrations:
When choosing which buttons will be used to activate each of the assigned Combo Sequences
you can only use the same button for one Combo Sequence. In order to assign Auto Fire to the
Start button and Back button without exiting the Auto Fire configuration screen. You need to
press and hold the F1 or F2 button before pressing the Start button and Back button. Once you
are happy with your selections use the Start button to save the configuration.
17. Pro Tips
Multiple Instances of the Same Feature With features such as Rapid Fire and Sniper you can have multiple instances of the same feature assigned to the controller. When using multiple instances of the same feature they will overwrite each other dependant on their slot numbers. If you were to set the same feature to always on whilst stored under feature slot 1 and feature slot 2, the instance of the feature stored under feature slot 2 will take priority and be active. The same being if you were to set the same feature to always on whilst stored under feature slot 1 and feature slot 4, the instance of the feature stored under feature slot 4 will take priority and be active. If you were have one instance of a feature under feature slot 1 set to always on and a second instance of the same feature under feature slot 2 set to hold F1 to active. The instance of the feature under feature slot 1 will be active until you hold the F1 button. If you were to have three instances of the same feature you could have the first instance under feature slot 1 set to Always on, a second instance under feature slot 2 set to hold F1 to active and the third under feature slot 3 set to toggle F2 to activate. In doing this the instance under feature slot 1 will be active until you hold F1 which will activate the instance under feature slot
Call of Duty:Black Op
Call of Duty:Black Op
Call of Duty:Black Op
Exit Chair
Exit Chair & Use Secret P...
Unlock Dead Ops Arcade ..
A
B
Y
Combo SequencesAssigned
Buttons Chosen toActivate ComboSequences
L1
Right AnalogueStick
Left AnalogueStick
DirectionButtons
Call if Duty:Black Op
Call if Duty:Black Op
Call if Duty:Black Op
Exit Chair
Exit Chair & Use Sec ret P...
Unlock Dead O ps A rcade ..
RB Button
Y ButtonB Button X Button A Button
Right AnalogueStick Click
LB Button
Left AnalogueStick Click
Start Button
Back Button
L2
Call if Duty:Black Op
Call if Duty:Black Op
Call if Duty:Black Op
Exit Chair
Exit Chair & Use Sec ret P...
Unlock Dead O ps A rcade ..
A
B
Y

2. If you were toggle F2 this will overwrite the instance under feature slot 1 and feature slot 2 and activate the instance under feature slot 3. Reset to Default The Reset Controller button allows you to reset all four feature slots to factory default with the
pre-installed features Sniper, Remap, Rapid Fire and Low recoil. In order to apply controller
reset simply select the Reset Controller button. You are now asked to confirm that you would
like to reset to default, select Yes to proceed or select No to cancel.
Always Show an Image
As detailed under section ‘13’ you can upload an image of your choice which is displayed on
Combat Command LCD Display when you have exited the EVO Menu. In addition to this the
controller will continue to display the same image even when you remove the Custom Image
feature.
In order to do this, configure the Custom Image feature image as detailed under section ’13.1’
and disconnect the USB cable. Set the feature to always on to display your custom image when
you exit the menu. Reconnect the USB cable and assign a different feature to the same feature
slot overwriting the Custom Image feature.
The controller will now continue to display the same image on the Combat Command LCD
Display when you have exited the EVO Menu until you reassign the Custom Image with a
different image.
18. Technical Support and Customer Services
Before contacting Datel’s customer service department, please ensure that you have read
through and understood the information in this user guide. Please ensure that you have
information on when and where you purchased this product to hand.
Datel Customer Services Europe
Customers Services, Datel Design & Development Ltd
Stafford Road, Stone, STAFFS, ST15 0DG
UNITED KINGDOM
Email: [email protected] Web: http://uk.codejunkies.com
Datel Customer Services USA
ATTN: Customer Services, Datel Design & Development Inc
33 North Garden Avenue, Suite 900, Clearwater, FL 33755
UNITED STATES
Email: [email protected] Knowledgebase: http://www.datelcustomerservice.com Web: http://us.codejunkies.com
© 2011 Datel Ltd. Wildfire EVO is a trademark of Datel Ltd. TurboFire is a registered trademark
of Datel Design and Development Inc. EVO is a trademark of Datel Ltd.
WildFire EVO and TurboFire EVO for Xbox 360 are 100% unofficial products and are NOT sponsored, endorsed or
approved by MICROSOFT, nor any games developer or publisher. Xbox 360 and Xbox Live are registered trademarks or
trademarks of MICROSOFT in the United States and/or other countries.