7 series - dpwmltd.com · summary 7 series temp7 pt100 for pt100 rtd probes 0,1 °c from -99,9 to...
TRANSCRIPT

SUMMARY
7 Series
Temp7 PT100 For Pt100 RTD probes
0,1 °C from -99,9 to +199,9 °C / 1 °C from -200 to +999 °C
Temp7 NTC For NTC 30K probes
0,1 °C from -50,0 to +150,0 °C
Temp7 K/T For thermocouple K e T probes
K: 0,1 °C from -99,9 to +199,9 °C / 1 °C from -200 to +1350
°C
T: 0,1 °C from -99,9 to +199,9 °C / 1 °C from -250 to +400 °C
The Future Starts Now
Digital thermometers Temp7
Thermometers Temp7 _ Ver. 1.1
10/2014

SUMMARY
Content index
1. Description of the Instrument ...................................................................................................... 1
1.1 Display LCD ................................................................................................................................ 1
1.2 Keypad description ..................................................................................................................... 2
1.2.1 Keypad operations ............................................................................................................... 2
1.2.2 Switching on the instrument ................................................................................................. 2
1.2.3 Switching off the instrument ................................................................................................. 2
1.3 Function of the keys ................................................................................................................... 3
2. Temperature Measurement ........................................................................................................... 4
2.1 First power-on ............................................................................................................................. 4
2.2 Measurement .............................................................................................................................. 4
2.3 Min / Max function ...................................................................................................................... 4
2.4 Hold Function.............................................................................................................................. 5
3. Other Functions ............................................................................................................................. 5
3.1 Stability Criteria .......................................................................................................................... 5
3.2 Auto Power off ............................................................................................................................ 5
3.3 Select the type of thermocouple probe (only Temp7 K/T) .......................................................... 5
3.4 Offset adjustment........................................................................................................................ 6
4. Parameter Settings ........................................................................................................................ 7
4.1 Setup Menu ................................................................................................................................ 7
5. Disposal of electronic devices ..................................................................................................... 8
6. Technical specifications ............................................................................................................... 9
Portable Thermometers
The Future Starts Now
1
Temp7 PT100 / NTC / K-T
1.1 Display LCD
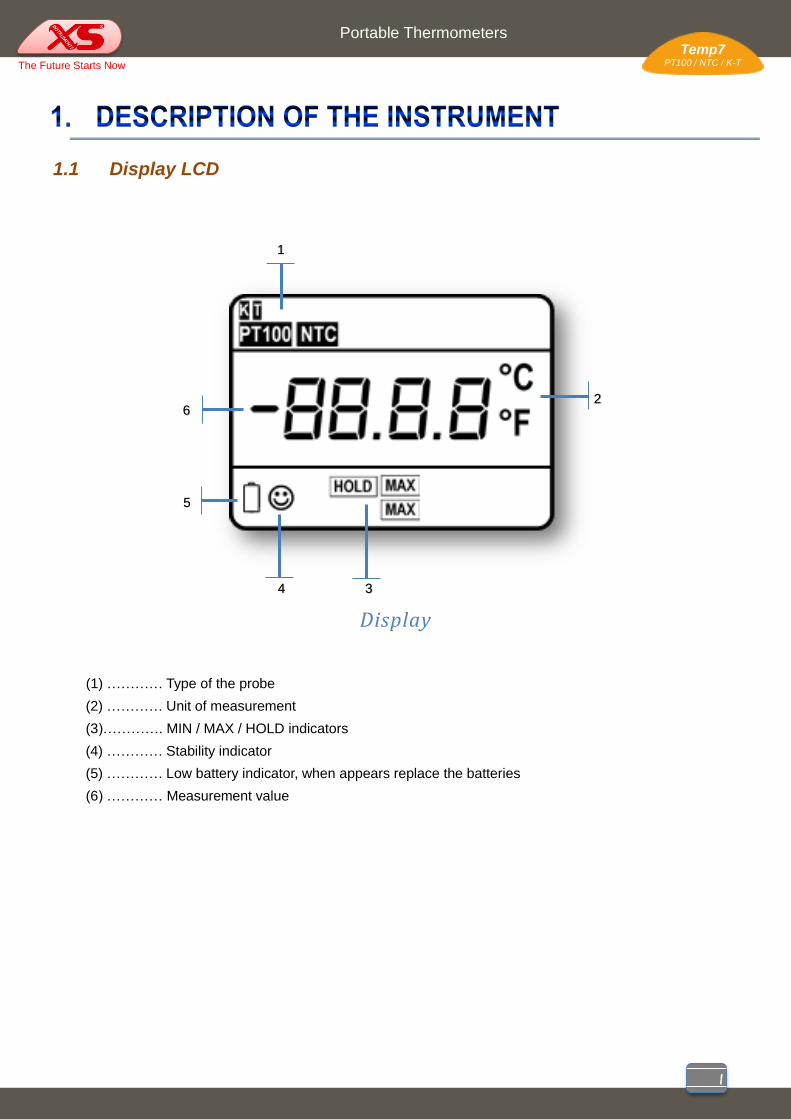
Display
(1) ………… Type of the probe
(2) ………… Unit of measurement
(3)…………. MIN / MAX / HOLD indicators
(4) ………… Stability indicator
(5) ………… Low battery indicator, when appears replace the batteries
(6) ………… Measurement value
1
6 2
4
5
3

Portable Thermometers
The Future Starts Now
2
Temp7 PT100 / NTC / K-T
1.2 Keypad description
keypad
1.2.1 Keypad operations
Momentary press <1,5 seconds, Long press >1,5 seconds.
1.2.2 Switching on the instrument
Press to power on the instrument:
The display shows the model, the firmware version and the values of the internal settings.
The instrument is now ready to measure.
1.2.3 Switching off the instrument
In the measurement mode, press and hold for 3 seconds to turn off the instrument.

Portable Thermometers
The Future Starts Now
3
Temp7 PT100 / NTC / K-T
1.3 Function of the keys
key Press Description
Momentary
press
With the meter turned off, press this button to turn it on.
During setup and memory recall (RM), press to return to measurement mode.
Long press During measurement, press and hold for 3 seconds to turn off the instrument.
Momentary
press
In the measurement mode, press to start recording the minimum and maximum
values.
While recording MIN / MAX, press to display the value of MIN / MAX.
Used to scroll through and change the values of the parameters of the setup
menu.
Long press Hold for 3 seconds to exit the MIN / MAX recording.
Momentary
press
Used to lock / unlock the reading.
Used to scroll through and change the values of the parameters of the setup
menu.
Momentary
press
In the measurement mode, press to enter setup.
During setup: Press to select/confirm the program.
During the calibration, press to confirm the calibration.

Portable Thermometers
The Future Starts Now
4
Temp7 PT100 / NTC / K-T
2.1 First power-on
At the first start you must set the following parameters:
- Select the unit of the measurement °C / °F P6.1 all models
- Select the type of the probe to be used Tc K/T P7.1 only Temp7 K/T
For additional settings, refer to the section Setup menu.
2.2 Measurement
Always connect the probe before turning on the power.
Turn ON the meter with . After the initial self-diagnosis the instrument enters directly into the
measurement mode.
Place the probe in the measuring point and wait for the stability.
When the value is stable and the icon of stability appears, you can take the reading.
2.3 Min / Max function
While measuring press to start the recording of the Min/Max values. The MIN MAX icons will start
flashing on the display.
Press once to see the maximum value reached until that time, press another time to see the minimum
value reached until that time. If you press again then the meter will again start recording the Min/Max
values with the icons flashing on the display.
When viewing the Min/Max value, the recording stops because the display isn’t showing the actual reading
but the same value for minimum and maximum recorded.
To exit from the recording of the Min/Max values, hold pressing for at least 3 seconds, the MIN MAX
icons will disappear.
If the instrument is set to the automatic shutdown then the instrument will turn off after 20 minutes. If you want to record the
minimum and maximum values over a longer period than it’s necessary to disable the auto power off P6.8
Warning:

Portable Thermometers
The Future Starts Now
5
Temp7 PT100 / NTC / K-T
2.4 Hold Function
During the measurement press key to lock the value. The display will
show HOLD icon and the value will freeze.
Press again to unlock the value.
This feature can be particularly useful when after performing the
measurement you must move with the instrument to write the value.
3.1 Stability Criteria
When the reading is stable the display shows . If this icon does not appear
or blinks, do not consider the reading as the final value. Always wait for the
stability of the measurement.
3.2 Auto Power off
This meter powers off automatically after 20 minutes of inactivity. To deactivate auto power-off go to the
parameter P6.8 of setup menu and select Off.
3.3 Select the type of thermocouple probe (only Temp7 K/T)
Go to the parameter P7.1 of setup menu and select the type of probe to be used.
K Thermocouple K (Yellow connector)
T Thermocouple T (Blue connector)
During the recording of Min/Max values the hold function is disabled.
Note:

Portable Thermometers
The Future Starts Now
6
Temp7 PT100 / NTC / K-T
3.4 Offset adjustment
All instruments are factory pre-calibrated and remain stable over time, but in the event of an error in the
reading, you can recalibrate the instrument to eliminate this error.
To recalibrate the instrument at 0.0 ° C, proceed as follows:
- Make the ice with double-distilled water.
- Put the ice cubes in a 500ml beaker up to half of the volume
- Add distilled water up to ¾ of the volume
- Place the beaker on a magnetic stirrer with gentle stirring.
- Immerse the probe in the beaker, making sure it is submerged in water and does not touch the
wall of the beaker.
- Cover the beaker with polystyrene to isolate the mixture of water / ice from the air as much as
possible.
- Allow to stir for about 10 minutes.
- In this way you reach a temperature of 0.0 ° C
If the meter reads 0.0 ° C (± accuracy of the measuring chain) then it means that the instrument is operating
properly and no adjustment is necessary, otherwise go to parameter P7.2 of the setup menu, adjust the
value with the arrow keys and confirm with .
The adjustment made at 0.0°C takes effect over the entire range of measurement, for example if you
correct to -1.0 ° C, then the measurement moves of -1.0°C over the entire field.
The adjustment made in this way is kept in memory after turning off the meter and also when replacing the
batteries.
In case you change the probe you must restore the factory calibration in setup menu P7.6 and proceed, if
necessary, with a new calibration.

Portable Thermometers
The Future Starts Now
7
Temp7 PT100 / NTC / K-T
During measurement mode press to enter in the setup menu.
Press and keys to scroll setup menu: P6.0→P7.0
P6.0: Settings of the meter
P7.0: Settings of the parameter Temperature
Press key to enter in the selected menu and to confirm the changes.
Press and keys to scroll the sub-menus and to change the values.
Anytime press key to exit from setup menu and to return in the measurement mode, the changes
made and confirmed with key will be saved.
4.1 Setup Menu
P7.1 Select type of thermocouple K or T (only
Temp7 K/T)
P7.2 Offset adjustment
P7.6 Restore factory calibration
Sub-menu of the parameter
Temperature
P6.1 Measurement unit (°C-°F)
P6.8 Activate / Deactivate auto power-off
Sub-menu of the meter settings
Main Menu

Portable Thermometers
The Future Starts Now
8
Temp7 PT100 / NTC / K-T
Parameters of the setup menu and factory default settings
Parameter Description Display Settings Default setting
P6.1 Measurement unit °C-°F °C
P6.8 Auto Power-off On - Off On
P7.1 Select type of thermocouple K or T* K / T K
P7.2 Offset adjustment ± 5 °C ----
P7.6 Restore factory calibration No-Yes No
* only for Temp7 K/T
The electrical and electronic equipment marked with this symbol cannot be disposed of in
public landfills.
According to the UE Directive 2002/96/EC, the European users of electrical and electronic
equipment can return it to the dealer or manufacturer upon purchase of a new one.
The illegal disposal of electrical and electronic equipment is punished with an administrative fine.
To power off the meter exit from SETUP!
Note:

Portable Thermometers
The Future Starts Now
9
Temp7 PT100 / NTC / K-T
Model Temp 7 RTD Basic Temp 7 NTC Temp 7 K/T
For Probes Pt100 NTC 30K Thermocouple K - T
Measuring range -200 … +999 °C -50 ... +150 °C K: -200 … 1350 °C T : -250 ... +400 °C
Resolution 0,1 °C from -99,9 to +199,9 °C 1 °C from -200 to +999 °C 0,1 °C from -50,0 to +150,0 °C
K: 0,1 °C from -99,9 to +199,9 °C 1 °C from -200 to +1350 °C
T: 0,1 °C from -99,9 to +199,9 °C 1 °C from -250 to +400 °C
Accuracy (meter only)
±2 °C (-200 … -100 °C) ±0,2 °C (-99,9 … +199,9 °C) ±2 °C (+200 … +850 °C)
±0,2 °C (-50,0 … +150,0 °C)
For type K - T ±0,1% of reading / ±0,4 °C (under –150 °C) ±0,25% o f r e a d i n g / ±1 °C (under –150 °C)
Datalogger – – –
Sampling time
–
–
–
Min/Max reading Yes Yes Yes
Stability indicator Yes fix Yes fix Yes fix
Hold function Yes Yes Yes
Working conditions
Temp: -20 … +65 °C UR: 10 … 90% (no condensation)
Temp: -20 … +65 °C UR: 10 … 90% (no condensation)
Temp: -20 … +65 °C UR: 10 … 90% (no condensation)
Protection class IP56 IP56 IP56
CE conformity EN61326-1/A1: 1998 (EU EMC)
EN61326-1/A1: 1998 (EU EMC)
EN61326-1/A1: 1998 (EU EMC)
Auto power-off After 20 min (deactivable) After 20 min (deactivable) After 20 min (deactivable)
Display LCD LCD LCD
Inputs Single 3-pin round connector Single CINCH connector Single ANSI connector
Power supply 3 x 1,5V “AA” alkaline 3 x 1,5V “AA” alkaline 3 x 1,5V “AA” alkaline
Batteries life >750 hours >750 hours >750 hours
Weight and dimensions (without probe)
86 x 196 x 33 mm / 295 g 86 x 196 x 33 mm / 295 g 86 x 196 x 33 mm / 295 g
Weight and dimensions carrying case (without probe) 260 x 135 x 75 mm / 580 g 260 x 135 x 75 cm / 580 g 260 x 135 x 75 cm / 580 g