642 lcd keypad - rangard · 642 lcd keypad user manual. esprit+ 642 lcd keypad 1 able of cot ntents...
TRANSCRIPT

642 LCD Keypad
User Manual


TABLE OF CONTENTS
TABLE OF CONTENTS ............................................. 1
INTRODUCTION ........................................................ 4Conventions Used in this Book ..................................... 4Basic Operation ............................................................ 5Keypad Indicator Lights ................................................ 5Visual Feedback ........................................................... 6Auditory Feedback ........................................................ 7Alarm Memory Display ................................................. 7Event List ...................................................................... 8Info List ......................................................................... 9Partitioning ................................................................... 9
ACCESS CODES..................................................... 10Deleting an Access Code ........................................... 12Duress Code ............................................................... 12
ARMING THE SYSTEM ........................................... 13Exit Delay ................................................................... 13Regular System Arming .............................................. 13Stay Arming ................................................................ 14One-Touch Arming ..................................................... 15Fast Exit ..................................................................... 16Keyswitch/Push-Button Arming .................................. 16Manual Bypass Arming ............................................... 17Bypass Recall ............................................................. 18Force Arming .............................................................. 18Arming a Partitioned System ...................................... 19
Esprit+ 642 LCD Keypad 1

No Movement Automatic Arming ................................ 21Automatically Arm on Time .........................................21
DISARMING ..............................................................23Disarming System A and B Separately .......................23
PANIC ZONES..........................................................25
ADDITIONAL FEATURES ........................................26LCD Settings ...............................................................26Time and Date Settings ..............................................27Keypad Mute ...............................................................27Chime Zone Selection ................................................. 28
KEY ACCESS PROGRAMMING ..............................29
TROUBLE DISPLAY.................................................31
FIRE ALARMS..........................................................33Silence/Reset ..............................................................33Fire Safety in the Home ..............................................33Provision for the Disabled ...........................................34
TESTING YOUR SYSTEM........................................35Fire Alarm Testing .......................................................35System Maintenance ..................................................35
SYSTEM CHECK LIST .............................................36Panic Buttons ..............................................................36Zone Checklist ............................................................36User Access Code List ................................................38
2 User’s Manual

1.0 INTRODUCTION
Thank you for selecting the Esprit+ Security System fromParadox Security Systems. The Esprit+ line of securitysystems bring together reliable, yet simple products that offerstate of the art security options. Such options enable you tocustomize many of the advanced features through a simplekeypad interface.
The Esprit+ system can report a wide range of statusconditions to the central monitoring station. Automatic testreports can also be sent to the central station to ensure thatyour system is functioning properly. We recommend that suchtests be conducted regularly. Consult your alarm systeminstaller for instructions.
All the actions performed in your security system will beexecuted and displayed through the keypad. We recommendthat you read this manual thoroughly and have your installerexplain basic system operation to you.
1.1 CONVENTIONS USED IN THIS BOOK
Throughout this book there are icons to represent points ofinterest. The following are used:
= to indicate notes or reminders.
= to indicate a warning or caution.
Esprit+ 642 LCD Keypad 3

= to indicate a tip.
= to indicate a button on the keypad.
1.2 BASIC OPERATION
Many of the features in your system must be enabled by yourinstaller. If the feature is not programmed, the keypad willemit a rejection beep and the action will be canceled.
1.3 KEYPAD INDICATOR LIGHTS
The state of each light on the Esprit+ 642 keypad representsa specific condition in your system as shown in Figure1.1.
Figure 1.1: Keypad Indicator Lights
[KEY]
Arm (Red)
Ready (Green)ON = Zone(s) closedOFF = Zone(s) openFLASH = During exit delay
ON = System armedOFF = System disarmedFAST FLASH = Alarm
4 User’s Manual

1.4 VISUAL FEEDBACK
Everything you need to know about your security system isdisplayed on the Esprit+ 642 keypad. The zones in yoursecurity system are immediately identified and importantmessages regarding system status appear right in front ofyou.
If zone status is normal, the LCD display will read: system
ready. If any zones are open, the display will read: zone
open. The display automatically shows which zones areopen but you can also press the [�] or [�] keys to view aspecific zone.
Figure 1.2: Overview of Esprit+ 642 LCD KeypadThe messages on the LCDscreen display systemstatus and guide you throughoperations.
AC indicates power.
Use these buttons to scrollthrough menus.
(option programmed by yourinstaller)
Esprit+ 642 LCD Keypad 5

1.5 AUDITORY FEEDBACK
Every time you press a key, the system emits a beep. Thissound affirms that an entry has been entered. When youenter information on the keypad, it will guide you with thesetones to communicate acceptance or rejection of yourentries. You should be familiar with the following keypad beeptones:
• Confirmation Beep: when an operation (i.e. arming/disarming) is successfully entered on the keypad or whenthe system switches to a new status/mode, the keypadsounder produces an intermittent beep tone (four shortbeeps).
• Rejection Beep: when the system reverts to its previousstatus, or when an operation is incorrectly entered on thekeypad, the sounder emits a continuous beep tone(beeep).
1.6 ALARM MEMORY DISPLAY
When the system is armed, any security breaches arerecorded and stored in memory. This record contains allalarm situations that occurred within the last arming period.Should there be an alarm recorded the display will read:zone(s) memory [mem] to view.
6 User’s Manual

Pressing the [CLEAR] key only erases the displaymessage and does not erase the memory contents.Arm or disarm to erase the memory contents.
1.7 EVENT LIST
Your control panel creates a buffer, which contains a recordof all system activities including time and date. This event listis saved even after total power loss.
How Do I View the Memory Record?
1) Press the [MEM] key to view the list of zones that werebreached during the last arming period. The systemwill display the zone(s) that were activated.
2) Use the [�] or [�] keys to scroll through the record.3) Press the [CLEAR] key to exit.
How Do I View the Event List?
1) Press the [MEM] key.2) Press the [INFO] key to view the event list. The display
will read: event time.3) Use the [�] or [�] keys to scroll through the event list.4) Press the [CLEAR] key to exit.
Esprit+ 642 LCD Keypad 7
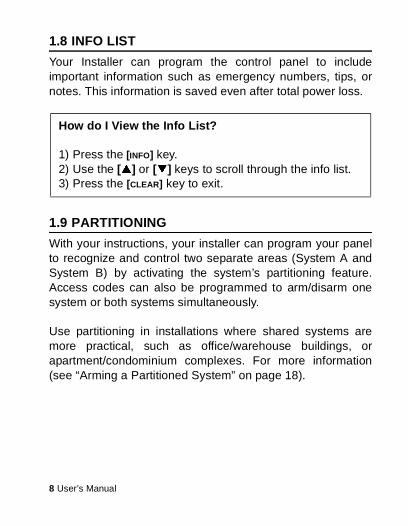
1.8 INFO LIST
Your Installer can program the control panel to includeimportant information such as emergency numbers, tips, ornotes. This information is saved even after total power loss.
1.9 PARTITIONING
With your instructions, your installer can program your panelto recognize and control two separate areas (System A andSystem B) by activating the system’s partitioning feature.Access codes can also be programmed to arm/disarm onesystem or both systems simultaneously.
Use partitioning in installations where shared systems aremore practical, such as office/warehouse buildings, orapartment/condominium complexes. For more information(see “Arming a Partitioned System” on page 18).
How do I View the Info List?
1) Press the [INFO] key.2) Use the [�] or [�] keys to scroll through the info list.3) Press the [CLEAR] key to exit.
8 User’s Manual

2.0 ACCESS CODES
Access codes are personal identification numbers that allowyou to enter certain programming modes and arm or disarmthe system. In addition to the master code the Esprit+ controlpanel can be programmed to accept up to 48 user codes,each with a unique access code.
Avoid programming simple or obvious access codes,such as your telephone number, address, or codeslike 1234.
Your installer will program the Esprit+ 642 to accept four- orsix-digit access codes and will assign code definitions to alluser codes. The Master Code (default: 474747) and usercodes are identified by a two digit “code number”, where“code numbers” 01-48 represent access codes 1-48 and“code number” 00 represents the master code. To create ormodify access codes follow the steps indicated below.
Esprit+ 642 LCD Keypad 9

How Do I Create an Access Code?
The Master or User Code 01 must be used to enterprogramming mode in order to create access codes.
1) Press the [ENTER] key. The display will briefly read:enter code to programming mode.
2) Enter the Master Code or User Code 01 in order tocreate access codes. The display will read:Programming mode section.
3) Enter a two digit code number (00 to 48). The displaywill read: programming in process. Thismessage remains until you have entered a validaccess code.
4) Enter a four- or six-digit access code. A valid entry willreturn the programming mode section
message.5) Return to step 3 to include additional entries or press
[CLEAR] to exit.
10 User’s Manual
2.1 DELETING AN ACCESS CODE
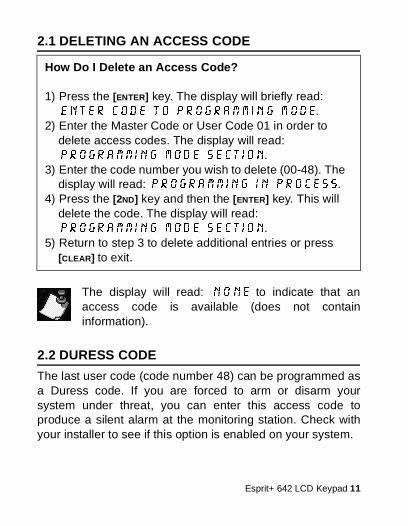
The display will read: none to indicate that anaccess code is available (does not containinformation).
2.2 DURESS CODE
The last user code (code number 48) can be programmed asa Duress code. If you are forced to arm or disarm yoursystem under threat, you can enter this access code toproduce a silent alarm at the monitoring station. Check withyour installer to see if this option is enabled on your system.
How Do I Delete an Access Code?
1) Press the [ENTER] key. The display will briefly read:enter code to programming mode.
2) Enter the Master Code or User Code 01 in order todelete access codes. The display will read:programming mode section.
3) Enter the code number you wish to delete (00-48). Thedisplay will read: programming in process.
4) Press the [2ND] key and then the [ENTER] key. This willdelete the code. The display will read:programming mode section.
5) Return to step 3 to delete additional entries or press[CLEAR] to exit.
Esprit+ 642 LCD Keypad 11

3.0 ARMING THE SYSTEM
You may arm the Esprit+ in five different ways in order tocover a wide variety of security situations. We suggest thatyou familiarize yourself with all five arming procedures to takefull advantage of your security system.
3.1 EXIT DELAY
After entering a valid arming sequence, an exit delay timerwill provide you with time to exit the protected area before thesystem arms. The keypad may beep during the exit delay.
3.2 REGULAR SYSTEM ARMING
The keypad’s green light must be on in order to regulararm the system. This light will only illuminate if all zones areclosed. The LCD display will read: system ready. Alldoors and windows must be closed and there can be nomovement in areas monitored by motion detectors. If thegreen light is not on, the LCD will display a sequential listof any zones that are open.
12 User’s Manual

3.3 STAY ARMING
Stay arming allows you to remain in the protected area whilepartially arming the system. You may choose to have entry/exit points such as doors, windows, and basement areasprotected, while other interior zones within the home areignored.
How Do I Regular Arm the System?
Once the light is on:
1) Enter your access code. The display will read:
system in exit during which the light will flash.2) After the exit delay, the display will read: full
armed, indicating that the system is armed.
How Do I Stay Arm the System?
1) Press the [STAY] key. The display will read: enter
code to stay arm system.2) Enter your access code. The display will read:
system in exit. The light will flash followed bya confirmation beep. The display will read: stay
armed.
Esprit+ 642 LCD Keypad 13

3.4 ONE-TOUCH ARMING
One-Touch arming enables you to arm the system using asingle key without using an access code. These featuresmust be enabled by your installer.
3.4.1 Once-Touch Regular ArmingThis method will arm all zones in the system.
3.4.2 One-Touch Stay ArmingRefer to “Stay Arming” on page 13 for a full explanation of thisfeature.
How Do I Regular Arm?
With the light on:
Press and hold the [ARM] key. The keypad will emit aconfirmation beep and display: system in exit. The
light will flash followed by a confirmation beep. Thedisplay will read: full armed.
How Do I Stay Arm?
Press and hold the [STAY] key. This will automatically Stayarm the system. After the exit delay, the display will read:stay armed.
14 User’s Manual

3.5 FAST EXIT
This feature enables you to leave a perimeter that is alreadyarmed in Stay mode and have the system rearm itself. Youcan set the system to rearm itself into one of two modes: Staymode or Regular mode. The system will arm after the exitdelay has expired.
3.6 KEYSWITCH/PUSH-BUTTON ARMING
Your system can include a keyswitch or push button, whichcan be used to arm or disarm the system instead of using a
How Do I Rearm in Stay Arming Mode?
1) With the system already Stay armed, press and hold the[STAY] key. The display will read: system in exit.
2) The system will switch to exit delay mode ( LEDflashes). At the end of the exit delay period, the systemwill return to Stay arming mode.
How Do I Rearm in Regular Mode?
1) With the system already Stay armed, press and hold the[ARM] key. The display will read: system in exit.
2) The system will switch to exit delay mode ( LEDflashes). At the end of the exit delay period, the systemwill rearm in Regular arming mode.
Esprit+ 642 LCD Keypad 15
code. If an alarm is generated in your system or in other rareinstances, you may have to disarm the system using thekeypad. Consult your installer for more information.
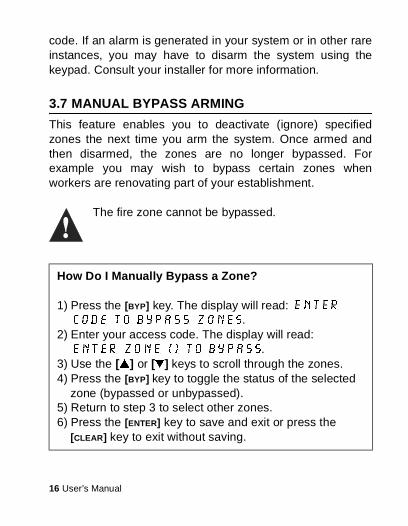
3.7 MANUAL BYPASS ARMING
This feature enables you to deactivate (ignore) specifiedzones the next time you arm the system. Once armed andthen disarmed, the zones are no longer bypassed. Forexample you may wish to bypass certain zones whenworkers are renovating part of your establishment.
The fire zone cannot be bypassed.
How Do I Manually Bypass a Zone?
1) Press the [BYP] key. The display will read: enter
code to bypass zones.2) Enter your access code. The display will read:
enter zone [] to bypass.3) Use the [�] or [�] keys to scroll through the zones.4) Press the [BYP] key to toggle the status of the selected
zone (bypassed or unbypassed).5) Return to step 3 to select other zones.6) Press the [ENTER] key to save and exit or press the
[CLEAR] key to exit without saving.
16 User’s Manual

You may also toggle the status of a zone by enteringthe 2-digit number of the selected zone.
3.8 BYPASS RECALL
Use the Bypass Recall feature to bypass the same zones thatwere bypassed previously at the touch of a button.
3.9 FORCE ARMING
Force arming enables you to rapidly arm the system withoutwaiting for all the zones in the system to close. Force armingis commonly used when a motion detector is protecting thearea occupied by a keypad.
How Do I Enable the Bypass Recall Function?
1) Press the [BYP] key.2) Enter your access code. The display will read:
Enter Zone [ ] To Bypass.
3) Press the [BYP] key.4) Press the [ENTER] key to confirm your entry.
Esprit+ 642 LCD Keypad 17
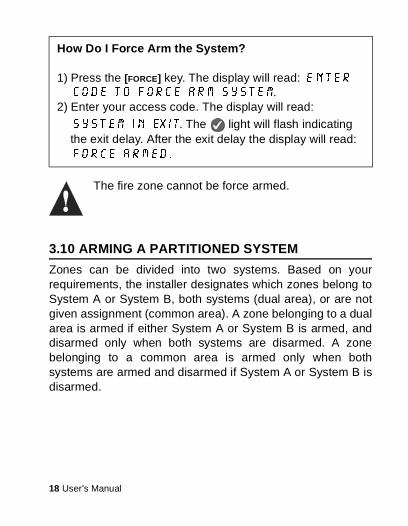
The fire zone cannot be force armed.
3.10 ARMING A PARTITIONED SYSTEM
Zones can be divided into two systems. Based on yourrequirements, the installer designates which zones belong toSystem A or System B, both systems (dual area), or are notgiven assignment (common area). A zone belonging to a dualarea is armed if either System A or System B is armed, anddisarmed only when both systems are disarmed. A zonebelonging to a common area is armed only when bothsystems are armed and disarmed if System A or System B isdisarmed.
How Do I Force Arm the System?
1) Press the [FORCE] key. The display will read: enter
code to force arm system.2) Enter your access code. The display will read:
system in exit. The light will flash indicatingthe exit delay. After the exit delay the display will read:force armed.
18 User’s Manual

The installer must program the required access codedefinitions. These definitions determine which access codescan arm System A, as well as which codes can arm SystemB. Codes can also be given access to both systems.
3.10.3 Arming Both Systems SimultaneouslyIf your code has access to both systems:
3.10.4 Arming System A and B SeparatelyIf your Access Code has access to System A:
How Do I Arm Systems A and B Simultaneously?
Enter your access code. The light will begin to flashand the exit timer will begin to countdown. The display willread: A+B Armed.
How Do I Arm System A?
1) Press the [STAY] key.2) Enter your Access Code. The will flash and the exit
timer will begin to countdown. The display will read:system in exit. After the exit delay the displaywill read: a Armed.
Esprit+ 642 LCD Keypad 19

If your Access Code has access to System B:
3.11 NO MOVEMENT AUTOMATIC ARMING
Your panel can be programmed by your installer to send areport and/or arm the system if the system is not armed andthere is no zone activity for a pre-programmed amount oftime. For example, you can use this feature when supervisingthe elderly, individuals with chronic health problems or aperson living alone.
3.12 AUTOMATICALLY ARM ON TIME
Your installer can program your panel, so that you can setupa specific time during the day, where the system will armitself. In this mode, all protected zones and detection devicesmust be closed before arming can occur.
How Do I Arm System B?
1) Press the [FORCE] key.2) Enter your Access Code. The will flash and the exit
timer will begin to countdown. The display will read:system in exit. After the exit delay the displaywill read: B armed.
20 User’s Manual

The auto-timer uses the control panel’s clock setting(see “Key access programming” on page 28) and notthe keypad’s.
How do I Setup Arm on Time?
1) Press the [ENTER] key.2) Enter the master code. The display will read:
Programing Mode Section.
3) Press the [9] key. The display will read: Auto-
Arming Time Time = .
4) Enter the time using the 24-hour clock (i.e 4:05pm =[1] [6] [0] [5]). The display will read: Programing
Mode Section, to confirm the entry.5) Press the [CLEAR] key to exit.
Esprit+ 642 LCD Keypad 21

4.0 DISARMING
4.1 DISARMING SYSTEM A AND B SEPARATELY
If your Access Code has access to System A:
How Do I Disarm the Security System?
1) Enter through the designated entry/exit door. Thekeypad will beep and begin the entry delay timer.
2) Enter your Access Code. The light will go off andthe keypad will stop beeping.
How Do I Disarm System A?
1) Enter through the designated entry/exit door. Thekeypad will beep and begin the entry delay timer.
2) Press the [STAY] key.
3) Enter a valid access code. The light will go off andthe keypad will stop beeping.
22 User’s Manual

If your Access Code has access to System B:
How Do I Disarm System B?
1) Enter through the designated entry/exit door. Thekeypad will beep and begin the entry delay timer.
2) Press the [FORCE] key.
3) Enter a valid access code. The light will go off andthe keypad will stop beeping.
Esprit+ 642 LCD Keypad 23
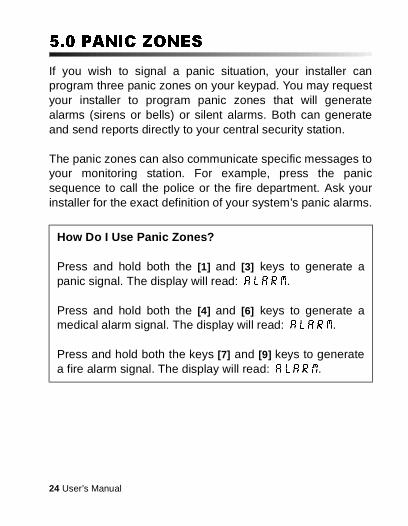
5.0 PANIC ZONES
If you wish to signal a panic situation, your installer canprogram three panic zones on your keypad. You may requestyour installer to program panic zones that will generatealarms (sirens or bells) or silent alarms. Both can generateand send reports directly to your central security station.
The panic zones can also communicate specific messages toyour monitoring station. For example, press the panicsequence to call the police or the fire department. Ask yourinstaller for the exact definition of your system’s panic alarms.
How Do I Use Panic Zones?
Press and hold both the [1] and [3] keys to generate apanic signal. The display will read: alarm.
Press and hold both the [4] and [6] keys to generate amedical alarm signal. The display will read: alarm.
Press and hold both the keys [7] and [9] keys to generatea fire alarm signal. The display will read: alarm.
24 User’s Manual

6.0 ADDITIONAL FEATURES
Several keypad features can be programmed directly by you,without the help of an installer.
6.1 LCD SETTINGS
You can modify the keypad settings to suit your needs
How Do I Adjust the LCD Settings?
1) Press and hold the [6] key.2) Choose an option.
[1] Backlight: the keypad’s light (7 is the brightest).[2] Contrast: character intensity (7 is the lightest).[3] Scroll speed: the scroll speed (1 is the fastest).
3) Use the [�] [�] keys to modify.4) Press the [ENTER] key to save your choice and return
to step 2 or press the [CLEAR] key to return to step 2without saving your choice.
Esprit+ 642 LCD Keypad 25

6.2 TIME AND DATE SETTINGS
Panel time must also be programmed. One-Touchaccess programming may be used to set panel time.(see “Key access programming” on page 28).
6.3 KEYPAD MUTE
The keypad can be programmed not to emit audible soundsincluding Chimed zones. During Muting, the keypad will onlyemit the Confirmation Beep, Rejection Beep, and beep when
How Do I Set a Time of Day?
1) Press and hold the [INFO] key. The display will read:Program keypad set time.
2) Press the [ENTER] key. The display will read: Setup
time time = :.3) Enter the time using the 24-hour clock (i.e. 4:05pm =
[1] [6] [0] [5]).4) Press the [�] key. The display will read: program
keypad set day.5) Press the [ENTER] key. The display will read: setup
day day = Fri.6) Use the [�] [�] keys to select the day.7) Press the [ENTER] key to save your entry. The display
will read: program keypad set time.8) Press the [CLEAR] key to exit.
26 User’s Manual
a button is pressed.
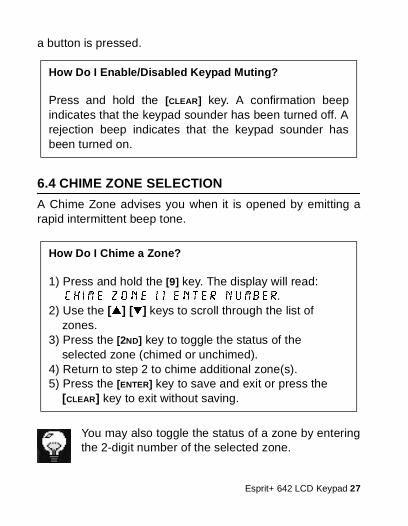
6.4 CHIME ZONE SELECTION
A Chime Zone advises you when it is opened by emitting arapid intermittent beep tone.
You may also toggle the status of a zone by enteringthe 2-digit number of the selected zone.
How Do I Enable/Disabled Keypad Muting?
Press and hold the [CLEAR] key. A confirmation beepindicates that the keypad sounder has been turned off. Arejection beep indicates that the keypad sounder hasbeen turned on.
How Do I Chime a Zone?
1) Press and hold the [9] key. The display will read:chime zone [] enter number.
2) Use the [�] [�] keys to scroll through the list ofzones.
3) Press the [2ND] key to toggle the status of theselected zone (chimed or unchimed).
4) Return to step 2 to chime additional zone(s).5) Press the [ENTER] key to save and exit or press the
[CLEAR] key to exit without saving.
Esprit+ 642 LCD Keypad 27

7.0 KEY ACCESS PROGRAMMING
Several control panel features can be programmed quickly onthe keypad. The Security Company or installer may ask youto perform some of these functions.
Table 1
How Do I Enter Key Access Programming Mode?
1) Press the [ENTER] key.2) Enter the [MASTER CODE] or [USER CODE 1].3) Press the key that corresponds to the feature you
wish to activate (see Table 1).4) Press the [ENTER] or [CLEAR] key to exit.
[MEM] Panel Time (and clear trouble 8). The display willread: Setup time Time =. Enter two digits (00to 23) for hours, and two digits (00 to 59) forminutes.
[TRBL] Call PC via Telephone. The display will read:call to PC. This will initiate communication tothe central monitoring station computer. Yourinstaller will indicate when this must be used.
28 User’s Manual

[FORCE] Answer PC. The display will read: answer PC.
This will initiate modem communication betweenyour system and a central monitoring station. Yourinstaller will indicate when this must be used.
[STAY] Hang Up. This will cancel modem communicationbetween your system and the central monitoringstation computer. Your installer will indicate whenthis must be used.
Esprit+ 642 LCD Keypad 29

8.0 TROUBLE DISPLAY
The screen can display several trouble conditions. Whentrouble conditions occur, the display reads: system
trouble. If programmed by your installer, the keypadsounder will beep. Only the troubles that are relevant to youare listed below. If a trouble appears and it is not listed below,call your Security Company to come service the system.
Trouble List
No Battery/Low battery
If the battery is not connected to the panel, the display willread: trouble 01 battery failure. The batteryconnected to the panel should be replaced, because it can nolonger provide adequate backup current in the event of apower failure.
How Do I Access the Trouble Display?
1) Press the [TRBL] key.2) Use the [�] or [�] keys to view the trouble(s). See the
corresponding explanation from the Trouble List. If norepair instructions are given, call your SecurityCompany for repairs.
3) Press the [CLEAR] key to erase troubles in memory andexit.
30 User’s Manual

Power Failure
If AC power is not being supplied to the control panel and/orthe power supply is unable to charge the battery. The LCDdisplay will read: trouble 02 power supply.
Bell Disconnect
If a bell or siren is not connected to the bell/siren output,trouble 04 NO BELL appears in the display.
Timer Loss
If the system timer is not functioning, usually after a totalbattery and AC power failure, the LCD display readstrouble 08 timer loss. The timer should bereprogrammed after total power loss. See “Key accessprogramming” on page 28.
Tamper/Zone Wiring Failure
Indicates that there is a wiring problem in a protected zone.The LCD display will read: trouble 09 zone wiring
fault.
Telephone Line Monitor
If the panel detects telephone line loss, the LCD display willread: trouble 10 telephone line.
Fire Trouble
If the fire zone is cut, the display will read: trouble 11
fire loop.
Esprit+ 642 LCD Keypad 31

9.0 FIRE ALARMS
Upon a fire alarm, the bell/siren will operate in pulse mode.
9.1 SILENCE/RESET
To silence/reset a fire alarm, enter a valid access code. Incase of fire, follow your evacuation plan. If there is no firecondition, contact your monitoring company to avoid anunnecessary response.
9.2 FIRE SAFETY IN THE HOME
Reasonable fire safety can be achieved following a threepoint program:
1) Minimizing fire hazards.2) Providing a fire warning system.3) Having and practicing an escape plan.
9.2.1 Minimizing fire hazardsThe three primary fire hazards are:1) Smoking in bed.2) Leaving children home alone.3) Cleaning with flammable liquids such as gasoline.
9.2.2 Providing a fire warning systemHousehold fires are especially dangerous at night. Firesproduce smoke and harmful gases that can overcomesleeping occupants. To warn against fire, smoke detectors
32 User’s Manual

should be installed outside the proximity of each sleepingarea or bedroom. In addition, a detector should be present oneach additional story of the family living unit, includingbasements.
9.2.3 Having and practicing an escape planOften there is little time between the detection of a fire andsuccumbing to its hazardous effects. This may occur withintwo or three minutes upon detection of a fire. Advancewarning of a fire may be wasted unless the family hasplanned in advance for a rapid exit from their residence.
Plan and practice for fire conditions with the focus on rapidexit from the residence. Drills should be held so that familymembers know what to do. Each person should plan analternative escape route (such as a bedroom window) shouldthe bedroom doorway become inaccessible.
9.3 PROVISION FOR THE DISABLED
In special circumstances where the life and safety of certainoccupant(s) depends upon prompt rescue by others, the firesystem includes a means of prompt, automatic notification tothose who are to be depended upon for the rescue.
Esprit+ 642 LCD Keypad 33

10.0 TESTING YOUR SYSTEM
It is recommended that your system be tested once a week.Contact your monitoring station BEFORE and AFTER testing.
Your installer can advise you of the best way to test yourparticular system.
10.1 FIRE ALARM TESTING
Do not use flame or burning materials to test your firedetection devices. Contact your alarm installer for safemethods to test your system.
10.2 SYSTEM MAINTENANCE
Under normal use, you system requires no maintenanceother than regular testing. It is recommended that the backupbattery be changed every three years.
How Do I Test the System?
With the system disarmed and the light on:1) Walk in protected areas to activate motion detectors.
The display should read: zone open.
2) Open and close protected doors and windows. Thedisplay should read: zone open.
34 User’s Manual

11.0 SYSTEM CHECK LIST
11.1 PANIC BUTTONS
11.2 ZONE CHECKLIST
Is this a partitioned system? Yes �����No �
System A =____________System B = _______________
Keys Panic Alarm Type
[1] and [3] Police or_________________________��Silent ��Audible ��Not Used
[4] and [5] Auxiliary or_______________________��Silent ��Audible ��Not Used
[7] and [9] Fire or___________________________��Silent ��Audible ��Not Used
Zone # andDescription
SystemA B
Zone # andDescription
SystemA B
01: ���� 04: ����
02: ���� 05: ����
03: ���� 06: ����
Esprit+ 642 LCD Keypad 35

Entry Delay 1 is ________seconds.Entry Delay 2 is ________seconds.Exit Delay is ___________seconds.
07: ���� 16: ����
08: ���� 17: ����
09: ���� 18: ����
10: ���� 19: ����
11: ���� 20: ����
12: ���� 21: ����
13: ���� 22: ����
14: ���� 23: ����
15: ���� 24: ����
36 User’s Manual

11.3 USER ACCESS CODE LIST
User Name System User Name System
01: 16:
02: 17:
03: 18:
04: 19:
05: 20:
06: 21:
07: 22:
08: 23:
09: 24:
10: 25:
11: 26:
12: 27:
13: 28:
14: 29:
15: 30:
Esprit+ 642 LCD Keypad 37

For security reasons, write only user names, and notactual access codes.
Other informationThis alarm system was installedon:____________By:______________.Service is provided by _____________Tel#:_____________.Your monitoring station’s number is:_______________.Your account number is_____________.Your alarm transformer location is_____________and is oncircuit#____________.
31: 41:
32: 42:
33: 43:
34: 44:
35: 45:
37: 46:
38: 47:
39: 48:
40:
38 User’s Manual

WarrantyThe Seller warrants its products to be free from defects in materials andworkmanship under normal use for a period of one year. Except asspecifically stated herein, express or implied warranties whatsoever,statutory or otherwise, including without limitation, any implied warranty ofmerchantability and fitness for a particular purpose, are expresslyexcluded. Because Seller does not install or connect the products andbecause the products may be used in conjunction with products notmanufactured by Seller. Seller cannot guarantee the performance of thesecurity system. Seller obligation and liability under this warranty isexpressly limited to repairing or replacing, at the Seller’s option, anyproduct not meeting the specifications. In no event shall the Seller beliable to the buyer or any other person for any loss or damages whetherdirect or indirect or consequential or incidental, including withoutlimitation, any damages for lost profits stolen goods, or claims by anyother party, caused by defective goods or otherwise arising from theimproper, incorrect or otherwise faulty installation or use of themerchandise sold.
Esprit+ is a trademark of Paradox Security Systems®
© 2002 Paradox Security Systems®
Esprit+ 642 LCD Keypad 39

Notes____________________________________________________________________________________________________________________________________________________________________________________________________________________________________________________________________________________________________________________________________________________________________________________________________________________________________________________________________________________________________________________________________________________________________________________________________________________________________________________________________________________________________________________________________________________________________________________________________________________________________________________________________________________________________________________________________________________________________________________________________________________________________________________________________________________________________________________________________________________________________________________________________________________________________________________________________________________________________________________________________________________________________________________________________________________________________________________________________________________________________________________________________________________________________________________________________________________________________________________________________________________
40 User’s Manual
