6 sponge dissection 2b cnidaria (jellyfish and...
TRANSCRIPT

1

Table of Contents
Week Phylum/Dissection Page
1 Overview of Animals Phyla Preview Rotation Lab
3
2a Porifera (Sponges) Sponge Dissection
6
2b Cnidaria (Jellyfish and Anemones) Hydra Observation
9
3a Platyhelminthes (Flatworms) Planaria Observation
12
3b Nematoda (Roundworms) Roundworm Observation
16
4 Mollusca (Snails, Clams & Squid) Freshwater Mussel Dissection
19
5 Annelida (Earthworms, Leeches) Earthworm Dissection
22
6 Arthropoda (Insects & Crustaceans) Grasshopper Dissection
25
7 Echinodermata (Sea Stars and Sea Urchins) Sea Star Dissection
28
8 Chordata (Vertebrates) Perch Dissection
31
2

Week 1: Phyla Preview
The animal kingdom is broken down into many smaller groups called phyla (singular: phylum). Each week we will be exploring
one or two of these groups.
In the first lab, you will rotate between stations. Each station contains examples of animals that have been grouped together into one phylum. Study each group of animals.
3

STATION PHYLUM CHARACTERISTICS (check only the ones you can see)
EXAMPLES (at least 3)
1 Porifera (sponges)
__bodies have many pores; water carries food and oxygen into the pores __larger opening for release of waste __grow attached to one spot on the ocean floor, usually in shallow water Type of symmetry: __ radial __ bilateral __ asymmetrical
1. 2. 3.
2 Cnidaria
(jellyfish and corals)
__ hollow body __ mouth is the only body opening __ most have tentacles with stinging cells to stun or kill prey Type of symmetry: __ radial __ bilateral __ asymmetrical
1. 2. 3.
3 Platyhelminthes
(flatworms, tapeworms and
leeches)
__ flat, thin, soft body __ digestive system has one opening Type of symmetry: __ radial __ bilateral __ asymmetrical
1. 2. 3.
4 Nematoda (nematodes: roundworms)
__round, slender body __tapered at both ends resemble strands of spaghetti with pointed ends __ body has two digestive openings, a mouth and an anus Type of symmetry: __ radial __ bilateral __ asymmetrical
1. 2. 3.
5 Mollusca
(mollusks: snails, clams, squid and
octopus)
__soft body in 3 continuous parts with a head, foot and body mass __may have one or two hard outer shells __can be noshelled, oneshelled, twoshelled, or tentacled Type of symmetry: __ radial __ bilateral __ asymmetrical
1. 2. 3.
6
Annelida (segmented worms:
earthworms, tapeworms and
leeches)
__ rounded, tubeshaped body __ body made of rings or segments __ bristles along the side of the body Type of symmetry: __ radial __ bilateral __ asymmetrical
1. 2. 3.
4

STATION PHYLUM CHARACTERISTICS (check only the ones you can see)
EXAMPLES (at least 3)
7 Arthropoda (insects and crustaceans)
__ hard exoskeleton divided into segments __ pairs of jointed legs __ some have wings or claws Type of symmetry: __ radial __ bilateral __ asymmetrical
1. 2. 3.
8 Echinodermata (echinoderms: sea stars and sea urchins)
__ rough, spiny or leathery skin __ body in 5 parts __ tube feet (suction cups) that help the organism move or catch prey Type of symmetry: __ radial __ bilateral __ asymmetrical
1. 2. 3.
9 Chordata (vertebrates:
fish, amphibians, reptiles, birds, mammals, marsupials +
more!)
__ internal structure is an endoskeleton __ backbone made of vertebrae __ head with a skull to protect the brain __ internal organs in a central body cavity __ protective skin with special structures Type of symmetry: __ radial __ bilateral __ asymmetrical
1. 2. 3.
Written Reflection: Reflect on your learning in this lab. Be sure to give details. ________________________________________________________________________________
________________________________________________________________________________
________________________________________________________________________________
________________________________________________________________________________
________________________________________________________________________________
________________________________________________________________________________
________________________________________________________________________________
5

Week 2a: Phylum Porifera Sponge Anatomy
6

Week 2a: Phylum Porifera Sponge Dissection
Materials: Sponge, dissection pan, forceps, probe, scissors, scalpel, loupe, microscope, slides, cover slips
Procedures:
1. Remove a sponge from the jar, using forceps. Handle the sponge carefully, so as not to crush its internal support system. Sponges contain a skeleton that is composed of microscopic needles, called spicules.
2. Rinse the sponge gently under running water, to remove sea sand and any debris covering the animal and clogging the tiny cells that make up the body wall. Place the sponge carefully onto the dissection pan with the rubber mat removed. If you sponge starts to dry out or collapse as you work, add a thin layer of water to the dissection pan to float the sponge and to keep its cells from collapsing.
3. Study your sponge using a loupe. Carefully draw and label what you see. Include the pores, holdfast and osculum.
4. Lift the sponge with your forceps, and using a pair of laboratory scissors, carefully make a vertical incision through the midsection. (Use the open pair of scissors to keep the body of the sponge spread open as you cut through the animal.)
5. Use the probe and forceps to tear the center cavity of the sponge, the spongocoel, which is hollow. Notice that the pores run through the entire body of this animal.
6. Study the inside of the the sponge with your loupe or the dissecting scope.
*If you have time, add some of the cells from the sponge to a microscope slide. Add water and a cover slip to create a wet mount slide. Focus on low power with a compound light microscope. Look for the spicules. If you find any structures, draw and label them.
7

Sponge Lab Observations: Date:_________________
4. Outside of sponge
8. If time, draw what you see through the microscope
Written Reflection: Reflect on your learning in this lab. Be sure to give details. ________________________________________________________________________________
________________________________________________________________________________
________________________________________________________________________________
________________________________________________________________________________
________________________________________________________________________________
________________________________________________________________________________
________________________________________________________________________________
________________________________________________________________________________
8
Week 2b: Phylum Cnidaria Hydra Anatomy
9

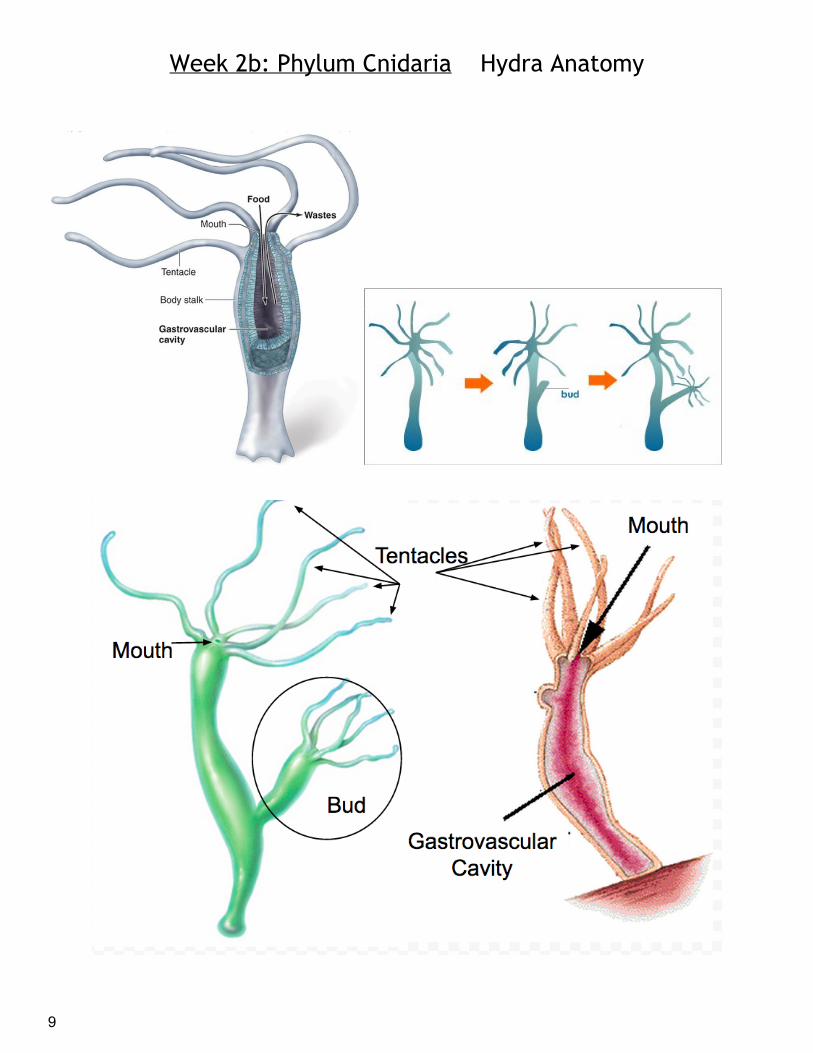
Week 2b: Phylum Cnidaria Hydra Observation Hydra is a freshwater member of the Phylum Cnidaria, which includes mostly marine organisms such as jellyfish and sea anemones. In these activities, you will investigate Hydra as an example of a simple animal.THIS IS A LIVE ANIMAL LAB NOT A DISSECTION!
Materials: Hydra, freshly hatched brine shrimp, Depression Slides( microscope slides), coverslips, pipets, dissecting needles(probes), scalpels, paper towel, vinegar solution, compound microscopes
Procedures:
1. Using a dropper, transfer a Hydra to the well of a concavity slide. Add enough water to fill the concavity. Place the slide onto the stage of a stereomicroscope and observe the Hydra for a few minutes. Do you observe anything to indicate that the Hydra is alive?
2. Draw and label what you see. Be sure to label the tentacles, mouth, and body stalk
3. The Hydra’s body consists of a column with arms (tentacles) at one end. How many tentacles are there? _____
4. Compare this number with the number other groups observe on their specimens. Do most of the hydra have the same number of tentacles? ______________
5. With the end of a dissecting probe, gently touch one of the tentacles. Describe what happens. 6. Use the blunt end of the dissecting needle’s handle to tap on the dissecting scope’s stage.
Describe what happens.
7. Use a dropper to add a Daphnia (or brine shrimp) to the concavity. Observe what happens and draw and describe what you see on the next page.
Hydra Lab Observations: Date:_________________
10

1. Hydra: 7. Hydra feeding:
Written Reflection: Reflect on your learning in this lab. Be sure to give details. ________________________________________________________________________________
________________________________________________________________________________
________________________________________________________________________________
________________________________________________________________________________
________________________________________________________________________________
________________________________________________________________________________
________________________________________________________________________________
________________________________________________________________________________
________________________________________________________________________________
11

Week 3a: Phylum Platyhelminthes Flatworm Anatomy
12

Week 3a: Phylum Platyhelminthes Flatworm Regeneration Lab
Planaria are a type of freshwater flatworm that can be cultured in the lab over short periods of time. THIS IS A LIVE ANIMAL LAB NOT A DISSECTION!
Materials: new petri dish, spring water, planarian, loupe, dissecting scope, coverslip Procedure:
1. Observe your worm, using a dissecting microscope or hand lens. Sketch the planarian on the next page. Label the eyespots. Label the anterior and posterior ends. Pay attention to detail on your sketch! Label the eyespots and auricles.
2. Observe the planarian for five minutes. Does the planarian seem active or passive? How does it move? Does it swim or creep?
3. Design an experiment to test the planarians reaction to light and dark. You may use devices for flashlights and the room will be darkened for this part of the lab.
4. Planarians reproduce sexually, but they can also reproduce asexually (regeneration). 5. Pour out some of the water into the lid of the petri dish, so the planarian is mostly
unsubmerged. 6. When it stretches out, use a clean coverslip to quickly chop it in ½. 7. Pour the water from the lid back into the dish
8. Observe the two pieces of planaria with a hand lens, loupe or dissecting scope. Draw and describe what your see in the first row on the next page. Be sure to add labels and include the date.
9. Replace the lid. Label the lid with your names and today’s date and store it according to your teacher’s instructions.
10.Observe your planarian as much as possible over the next 2 weeks, record your observations with the date, sketch and notes each time. Be sure to note any time you feed the animals or change the spring water. Watch for eyespots to appear on the tail section.
Flatworm Lab Observations: Date:_________________
1. Flatworm on day 1:
13

Flatworm Lab Observations continued: 8. & 10.
Date/ day# Draw/ & describe what you see. Label any structures that you can identify.
Other Notes
Written Reflection: Reflect on your learning in this lab. Be sure to give details. ________________________________________________________________________________
________________________________________________________________________________
________________________________________________________________________________
________________________________________________________________________________
________________________________________________________________________________
________________________________________________________________________________
________________________________________________________________________________
14

Week 3b: Phylum Nematoda Roundworm Anatomy
15

Week 3b: Phylum Nematoda Roundworm Observation
Roundworms are often parasites and often microscopic! In this, lab you will study preserved specimens.
Materials: preserved slides of roundworm species. photographs of roundworms, compound light microscope
Procedure: 1. Choose one slide, picture or specimen to study.
2. Observe your worm, using a dissecting microscope or hand lens. Sketch the animal on the next page. Label any structures you can see, if any.
3. Repeat this procedure with another slide, drawing or picture.
16

Roundworm Lab Observations: Date:_________________ 1. _________________________: 2. _________________________
Written Reflection: Reflect on your learning in this lab. Be sure to give details. ________________________________________________________________________________
________________________________________________________________________________
________________________________________________________________________________
________________________________________________________________________________
________________________________________________________________________________
________________________________________________________________________________
________________________________________________________________________________
________________________________________________________________________________
17

Week 4: Phylum Mollusca Freshwater Mussel Anatomy
18

Week 4: Phylum Mollusca Freshwater Mussel Dissection
Mussels and clams are bivalves, which are part of the phylum Mollusca.
Materials: dissecting pan, forceps, probe, scalpel, (screwdriver), safety goggles
Procedure: 1. Place the mussel in the dissecting tray.
2. Examine the exterior surfaces of the mussel’s valves. Draw and label the exterior of the mussel, including: the umbo and the anterior and posterior ends of the mussel. Also label the dorsal and ventral sides of the mussel.
11.Locate the position of the hinge ligament, which is used to hinge the valves (shells) together. 12.Place the mussel so that its dorsal side is flat on the dissecting tray. 13.Carefully work the tip of the screwdriver between
the clam’s valves. 14.Turn the screwdriver so that the mussel shell is
slightly ajar. (about 1 cm gap) 15. Insert your scalpel to cut the two adductor muscles. 16.Make the cuts as close to one of the valves as
possible, taking care to cut as close to the shell as possible.
17.Open the mussel, bending the top valve back so that it rests in the dissecting tray. Examine the interior of both valves. One valve holds the soft body of the clam. In the other valve, locate the thin lining, which is part of the mantle. Mantle tissue lines both valves and covers the body of the mussel.
18. Using this figure as a guide, draw and label what you see. Be sure to include: siphons, hinge ligament, foot, mantle, gills, palps, mouth, and heart.
19

Mussel Lab Observations: Date:_________________
2. Outside of mussel:
10. Inside of mussel:
Written Reflection: Reflect on your learning in this lab. Be sure to give details. ________________________________________________________________________________
________________________________________________________________________________
________________________________________________________________________________
________________________________________________________________________________
________________________________________________________________________________
________________________________________________________________________________
________________________________________________________________________________
20

Week 5: Phylum Annelida Earthworm Anatomy
21

Week 5: Phylum Annelida Earthworm Dissection
Annelids are segmented worms. We will be dissecting one familiar representative of this phylum: the earthworm. Be aware, though, that there are many different species of earthworm throughout the world.
Materials: dissecting pan, earthworm, scissors, dissecting probe, forceps
Procedure: External Anatomy
1. Examine your earthworm and determine the dorsal and ventral sides. Locate the clitellum which is on the anterior end of the worm.
2. Locate the mouth of the worm on the far anterior end of the worm 3. The openings toward the anterior of the worm are the sperm ducts. The openings near the
clitellum are the genital setae. 4. Locate the dark line that runs down the dorsal side of the worm, this is the dorsal blood vessel.
The ventral blood vessel can be seen on the underside of the worm, though it is usually not as dark.
5. Draw your worm and label it including: clitellum, segments, mouth, anus, bristles, sperm ducts, genital setae.
6. Place the specimen in the dissecting pan DORSAL side up. 7. Cut on the DORSAL side from the mouth to about 3 cm posterior (behind the clitellum).
Spread the skin of the worm out, use a probe to gently tear the connective tissue that holds the skin to organs below it).
8. Pin the skin to the side so it is out of your way. Place the pins at an angle. 9. The first structures you probably see are the gonads. Use tweezers to remove these white
structures from over the top of the digestive system that lies underneath it. 10.The heart or aortic arches can be found over the esophagus (just posterior to the pharynx).
Carefully tease away the tissues to expose the arches of the heart, the run across the worm. How many aortic arches can you count? ______ The ventral blood vessel cannot be seen at this time because the digestive system covers it.
11.The digestive system starts at the mouth. You will trace the organs all the way to the anus.
12. Label what you see on the external anatomy diagram on the next page. 13.Locate the ventral nerve cord by removing the intestines and searching for a white stringlike
structure that runs the length of the worm on the ventral side and attaches to the brain. If you can, find the brain, a small whitish structure near the mouth.
22

Earthworm Lab Observations: Date:_________________
5. Outside of earthworm:
12. Label the diagram of the earthworm below: aortic arches, brain, crop, dorsal blood vessel, esophagus, gizzard, gonad, intestine, pharynx, segments
Written Reflection: Reflect on your learning in this lab. Be sure to give details. ________________________________________________________________________________
________________________________________________________________________________
________________________________________________________________________________
________________________________________________________________________________
________________________________________________________________________________
________________________________________________________________________________
23

Week 6: Phylum Arthropoda Grasshopper Dissection
24

Week 6: Phylum Arthropoda Grasshopper Dissection
Grasshoppers are excellent specimens for invertebrate anatomy studies. The
Louisiana lubber grasshopper (Romalea) is most often studied since it is large
and readily available. A careful investigation of this specimen should lead
students to a better understanding of grasshopper behavior and how well the
grasshopper’s anatomical structures are adapted to its habitat.
Materials
Grasshoppers, Dissecting pan, Dissecting pins, Forceps, Hand lenses/loupes, Scissors
Procedure
1. Draw your specimen and label it. Be sure to label these: head, thorax, abdomen, antenna, simple eye, compound eye, fore wing, hind wing, femur, tibia, tympanum
2. The grasshopper’s thorax has 3 segments, each of which bears a pair of legs. The 2 posterior thoracic segments each have a pair of wings, also. Study the grasshopper’s thorax and locate the 3 segments and their appendages.
3. Observe the abdomen. Find the spiracles, the tiny openings into the tracheae. Tracheae are a system of tubes that function in gas exchange. These “breathing tubes” extend through much of the body. Spiracles can also be seen in the thorax.
4. The grasshopper’s head possesses sensory structures. Observe the 2 compound eyes and the 3 simple eyes (ocelli) located between them. The simple eyes do not form images but do sense light. One pair of antennae can also be seen.
5. Observe the mouth and feeding appendages. The mouth contains a pair of mandibles and 2 pairs of maxillae.
6. Place the specimen in the dissecting pan ventral side up. Use scissors to cut through the exoskeleton’s ventral side from the head to the posterior end of the abdomen.
7. Pull the cut sides apart and observe the tracheal tubes running into the internal organs. 8. Locate the yellow fatty tissue that covers the internal organs. Carefully remove this layer with
forceps to observe the organs. 9. Locate the digestive system. Use your diagrams to help you. The crop, found at the anterior
portion of the digestive tract, is an organ for storing food. The gastric ceca, or digestive glands, are attached to the stomach.
10. . Draw the internal anatomy of your animal and label: crop, gizzard, gastric ceca, stomach. Try to find the heart and ventral nerve cord. Label these if you can find them.
25

Grasshopper Lab Observations: Date:_________________
1. Outside of grasshopper:
10. Inside of grasshopper:
Written Reflection: Reflect on your learning in this lab. Be sure to give details. ________________________________________________________________________________
________________________________________________________________________________
________________________________________________________________________________
________________________________________________________________________________
________________________________________________________________________________
________________________________________________________________________________
________________________________________________________________________________
________________________________________________________________________________
26

Week 7: Phylum Echinodermata Sea Star Anatomy
Underside of Sea Star:
27

Week 7: Phylum Echinodermata Sea Star Dissection
Materials: Dissecting pan, scissors, forceps, probe, preserved sea star
Procedure:
1. Obtain a preserved starfish and rinse off any preservative with water.Place the starfish in the dissecting pan with its dorsal or aboral (top) surface upward.
2. Observe the sea star. Draw and label the starfish. Be sure to include: central disc, arms, madreporite,
3. Feel the upper surface of the starfish for spines. These spines protect the starfish and are part of their internal skeleton.
4. Look at the tip of each arm and try to find the eyespot. Label this on your diagram.
5. Turn the starfish over to its ventral or oral surface (underside).Locate the mouth in the center of the central disc. Find the ring of oral spines surrounding the mouth. Draw and label this side of your sea star. Be sure to label the mouth, ambulacral groove, & tube feet
6. With the starfish's aboral (top) surface facing you, cut off the tip of a ray. Cut along lines a, b, and c (see diagram) and then remove this flap of skin.
7. Inside each arm, locate two long digestive glands called the pyloric caeca. These make enzymes to digest food in the stomach. Cut a circular flap of skin from the central disc. (You will have to also cut around the madreporite in order to remove this flap.) Observe the stomach under the central disc.
8. Remove the pyloric caeca from the dissected arm. Find the gonads (testes or ovaries) underneath. These may be small if the starfish is NOT in breeding season. Remove these to see the rest of the water vascular system.
9. Cut off the tip of a ray to observe the parts of the tube feet. Find the zipperlike ridge that extends the length of the ray. The tube feet are attached to these.
10. Locate the bulblike top of a tube foot called the ampulla. This sac works like the top of an eyedropper to create suction. The bottom of the tube foot is a sucker.
11. Running down the center of each arm is a lateral canal to which tube feet are attached.
12. In the central disc the five lateral canals connect to a circular canal called the ring canal. Find this
canal.
13. Draw and label the internal anatomy of the sea star. Label as many structures
as you can.
28

Sea Star Lab Observations: Date:_________________
2. Aboral side of sea star: 5. Oral side of sea star:
13. Internal anatomy of sea star:
Written Reflection: Reflect on your learning in this lab. Be sure to give details. ________________________________________________________________________________
________________________________________________________________________________
________________________________________________________________________________
________________________________________________________________________________
________________________________________________________________________________
________________________________________________________________________________
________________________________________________________________________________
29

Week 8: Phylum Chordata Perch Anatomy
30
Week 8: Phylum Chordata Perch Dissection
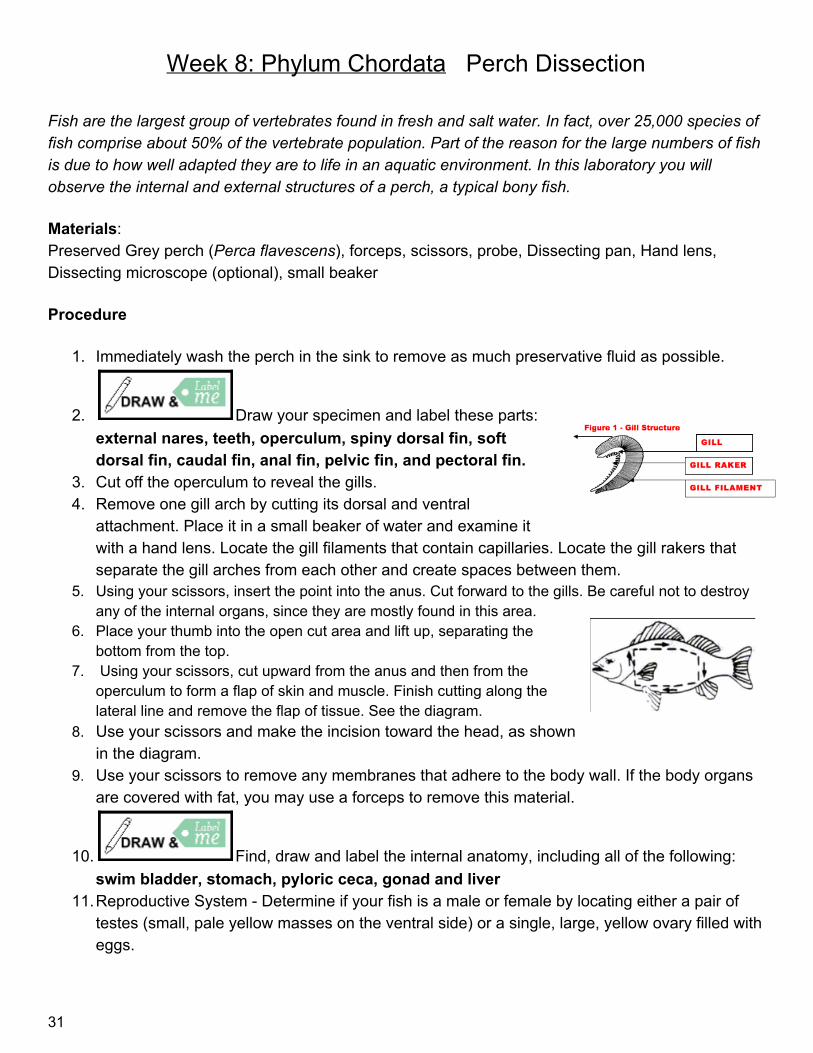
Fish are the largest group of vertebrates found in fresh and salt water. In fact, over 25,000 species of fish comprise about 50% of the vertebrate population. Part of the reason for the large numbers of fish is due to how well adapted they are to life in an aquatic environment. In this laboratory you will observe the internal and external structures of a perch, a typical bony fish.
Materials: Preserved Grey perch (Perca flavescens), forceps, scissors, probe, Dissecting pan, Hand lens, Dissecting microscope (optional), small beaker
Procedure
1. Immediately wash the perch in the sink to remove as much preservative fluid as possible.
2. Draw your specimen and label these parts: external nares, teeth, operculum, spiny dorsal fin, soft dorsal fin, caudal fin, anal fin, pelvic fin, and pectoral fin.
3. Cut off the operculum to reveal the gills. 4. Remove one gill arch by cutting its dorsal and ventral
attachment. Place it in a small beaker of water and examine it with a hand lens. Locate the gill filaments that contain capillaries. Locate the gill rakers that separate the gill arches from each other and create spaces between them.
5. Using your scissors, insert the point into the anus. Cut forward to the gills. Be careful not to destroy any of the internal organs, since they are mostly found in this area.
6. Place your thumb into the open cut area and lift up, separating the bottom from the top.
7. Using your scissors, cut upward from the anus and then from the operculum to form a flap of skin and muscle. Finish cutting along the lateral line and remove the flap of tissue. See the diagram.
8. Use your scissors and make the incision toward the head, as shown in the diagram.
9. Use your scissors to remove any membranes that adhere to the body wall. If the body organs are covered with fat, you may use a forceps to remove this material.
10. Find, draw and label the internal anatomy, including all of the following: swim bladder, stomach, pyloric ceca, gonad and liver
11.Reproductive System Determine if your fish is a male or female by locating either a pair of testes (small, pale yellow masses on the ventral side) or a single, large, yellow ovary filled with eggs.
31

Week 8: Phylum Chordata Perch Dissection
Perch Lab Observations: Date:_________________
2. Outside of perch:
10. Inside of perch:
Written Reflection: Reflect on your learning in this lab. Be sure to give details. ________________________________________________________________________________
________________________________________________________________________________
________________________________________________________________________________
________________________________________________________________________________
________________________________________________________________________________
________________________________________________________________________________
________________________________________________________________________________
32