5 interactive programs: events and event-handling
TRANSCRIPT

200
5 Interactive Programs: Events and Event-Handling
The real world around us is interactive. We drive cars that turn right or left when we turn the steering wheel. We change the channel on our television set by sending a signal from a remote
control. We press a button on a game-controller to make a character in a video game jump out of the way of danger. It’s time we looked at how to create interactive programs in Alice – where the objects in the scenes respond to mouse clicks and key presses. We have concentrated on writing
programs that were non-interactive – we watched the objects perform actions in a movie-styleanimation. In this chapter, we will see how programs can be made interactive.
Much of computer programming (and of the Alice movie-style animations seen earlier) is computer-centric. That is, the computer program basically runs as the programmer has intended
it. The programmer sets the order of actions and controls the program flow. However, many computer programs today are user-centric. In other words, it is the computer user (rather than the
programmer) who determines the order of actions. The user clicks the mouse or presses a key on the keyboard to send a signal to Alice about what to do next. The mouse click or key press is an event. An event is something that happens. In response to an event, an action (or many actions)
is carried out. We say the “event triggers a response.”
Section 5-1 focuses on the mechanics of how the user creates an event and how the program responds to the event. Naturally, all of this takes a bit of planning and arrangement. We need to tell Alice to listen for a particular kind of event and then we need to tell Alice what to do when
the event happens. This means we need to write methods that describe the actions objects in the animation should take in response to an event. Such a method is called an event-handler method.
Section 5-2 describes how to pass parameters to event-handler methods. In some programming languages, arranging events and writing event-handler methods is a rather complex kind of
programming. But, one of the achievements of Alice is that the event-response model is sufficiently simple to illustrate this material to novice programmers.
A special note to instructors:We have found that interactive programs are fun and highly motivating to students. Nonetheless,
this chapter may be safely skipped from a pedagogic perspective. Almost all exercises and projects in this book can be created in a non- interactive style.

201
5-1 Interactive Programming: Events and Event-Handlers
Control of flow
Writing an interactive program has one major difference from writing a program that is non-
interactive (like the Alice movies we wrote in the previous chapter). The difference is how the sequence of actions is controlled. In a non- interactive program, the sequence of actions is pre-determined by the programmer. The programmer designs a complete storyboard and then writes
the program code for the animated actions. Once the program is constructed and tested, then every time the program runs the same sequence of actions will occur. But, in an interactive
program the sequence of actions is determined at runtime, when
• the user clicks the mouse, or presses a key on the keyboard.
• objects in the scene move (randomly or guided by the user) to create some condition, such as a collision.
Events
Each time the user clicks the mouse, or presses a key on the keyboard, an event is generated that
triggers a response. Or, objects in the scene may move to positions that trigger a response. The point is: each time the program runs, it is possible that different user interactions or different object actions may occur such that the overall animation sequence is different from some
previous execution of the program. For example, in a video game that simulates a car race, where the player is "driving" a race car, the sequence of scenes is determined by whether the player is
skillful in steering the car to stay on the road through twists, turns, and hazards that suddenly appear in the scene.
Event-handlers
The question that must be answered is: how does this affect what you do as an animation
programmer? As the animation programmer, you must think about all possible events and make plans for what should happen -- responses to the events. Animation methods, called event-handlers, are then written to carry out responses. Finally, the event must be linked to the event-
handler. A link is a way to connect the event to the event-handler.
One important thing to keep in mind is that each time an event occurs and the event-handler is called, the location of objects in the scene may or may not be the same every time. This is
because the user's actions may change the scene and the location of objects in the scene between calls to the event-handler.
Keyboard-Control Example
We begin with an acrobatic air show flight simulator. The initial scene, as can be seen in Figure 5-1-1, consists of the biplane in midair and some objects on the ground (house, barn, and so on.)
A guidance system will allow the user to be the pilot. The biplane has controls that allow the pilot to maneuver the plane forward, left, and right. Of course, the biplane is a star in an
acrobatic air show so we will want to program the biplane to perform a popular show stunt – a barrel turn. In the exercises at the end of this section, other acrobatic stunts can be added.

202
Figure 5-1-1. Initial Scene
Input
The whole idea of a flight simulator is to allow the user to interact with the biplane. The
interaction consists of the user providing some input that sends a signal to Alice to animate a particular motion. Of course, a keyboard and mouse are two commonly available input devices
that allow the user to provide this input. For a flight simulator, the user might press a set of keys on the keyboard. For example, arrow keys can be used, where each arrow key corresponds to a given direction of movement. Of course, input can also be obtained from mouse-clicks, the
movement of a trackball, or the use of a game stick controller. In this text, we will rely on the keyboard and mouse to provide user input for interaction with the animations.
In our flight simulator, arrow-key and spacebar key presses will be used to provide input from the user. If the user presses the up arrow key, the biplane will move forward. If the user presses
the left or right arrow keys, the biplane will turn left or right. For the acrobatic barrel turn, we will use the spacebar. The selection of these keys is arbitrary -- other sets of keys could easily be
used.
Design -- Storyboards
Now, we are ready to design the flight simulator program – the set of instructions that tell Alice
how to perform the animations. Each time the user presses an arrow key or the spacebar, an eventis generated. The animation program consists of methods to respond to these events. Such
methods are called event-handlers. To simplify the discussion over the next few pages, let’s concentrate on two possible events: the spacebar press for the barrel turn and the up-arrow key to move the biplane forward. Two event-handler storyboards are needed, as illustrated in Figure 5-
1-2 (a) and (b). Note that sound is optional and can be omitted.
Event: Up Arrow key press
Response: Simultaneously:
e biplane forward
Event: Spacebar press
Response: Simultaneously:
roll biplane a full revolution
play biplane engine sound

203
Figure 5-1-2. Storyboards: a) Spacebar—barrel turn b) Up Arrow— fly forward
Event-handler methods
The only object affected by key press events is the biplane. So, the methods can be character-level methods for the biplane object. Two methods will be written, flyForward and barrel. The
flyForward method will handle an Up arrow key press event by moving the biplane forward as illustrated in Figure 5-1-3. The barrel method will handle a spacebar press event by rolling the biplane one complete revolution, seen in Figure 5-1-4. In the methods shown here, a sound clip
is played simultaneously with the movement. (Review importing sound clips in Tips&Tricks 3.) The duration of the biplane movement and the sound clip are set to 1 second each. As noted
previously, sound is a nice feature but can be omitted.
Figure 5-1-3. flyForward event-handler method
Figure 5-1-4. barrel event-handler method
Link Events to Event-handlers
Each event-handler method must be linked to the event that will be used to trigger the method as a response. The Events editor is where links are created. The Events editor is shown in Figure 5-

204
1-5. By default, Alice creates a link between "When the world starts" (an event) and "World.my first method", as seen in Figure 5-1-5.
Figure 5-1-5. Event Editor
In the flight simulator, two events (Up arrow key press and Spacebar key press) are each to be linked to their corresponding event-handler method (flyForward and barrel). First, create an
event by clicking the “create new event” button and then select the event from the pop-up menu of events. In Figure 5-1-6, the “When a key is typed” event is selected.
Figure 5-1-6. Creating a key press event
In Figure 5-1-7, an event for “any key” press has been added to the Events editor. Now, the Up
arrow key is selected by pressing the image to the right of “any key” and selecting Up.
Figure 5-1-7. Specify Up Arrow key
Now that Alice has been notified that an Up arrow key event may occur, it is time to tell Alice what to do when the event occurs. As shown in Figure 5-1-8, click the image to the right of Nothing in the event instruction and then select Biplane and flyForward from the pop-up menus.

205
Figure 5-1-8. Link Event-handler to Event
The process is repeated to link the Space bar to the barrel method. Figure 5-1-9 shows the Events editor with both links completed.
Figure 5-1-9. Links completed
Testing
Now that the links are completed, the world should be tested. To test the flight simulator, just save the world and press the play button. Note that this animation is not yet completed. Events
and methods need to be created for the Left and Right arrow keys and other acrobatic stunts could be written. However, it is important to test event-handler methods as they are developed. Write a method and test it…write a method and test it… until the program is completed. This is
a recommended program development strategy called incremental implementation. The advantage of this strategy is easier debugging. When something isn’t working as expected, it can
be fixed before it causes problems elsewhere.
Technical Notes
An interactive world such as a flight simulator requires that the user know what keys to press to
make the simulation work properly. A startup method could be written in World.my first methodto display 3D text for a quick explanation of the guidance system. After a few seconds, the 3D
text can be made to disappear (set the isShowing property to false) and then the simulation can begin.

206
The biplane in the flight simulator is a great example of an object that is likely to move out of view of the camera. Of course, the disappearance of the biplane from the world view would be
frustrating for the user. One technique to keep the camera focused on the biplane is to make the biplane a vehicle for the camera, as shown in Figure 5-1-10. (Review setting vehicle property in Tips&Techniques 2.) Each time the biplane moves, the camera will then move with it.
Figure 5-1-10. Make Biplane the Camera vehicle
Sometimes, when one problem is solved another problem is created. That is the case with
making the biplane the camera’s vehicle. Now, when a barrel turn is performed, the camera spins around with the biplane. What a wild effect this is -- the whole world seems to spin around! To prevent a stomach disorder caused by the wildly spinning world, perhaps the barrel method
should be revised to temporarily set the vehicle back to the World while the roll action takes place. Then, the vehicle can be set back to the biplane just before the method ends. Figure 5-1-10
illustrates the revised method.

207
Figure 5-1-10. Revised barrel method
Mouse-Control Example
In this second example, Slappy, an adventuresome squirrel, has just gotten her own squirrel-sized
Snowmobile. This animation will show Slappy's first ride on the Snowmobile. We want the user to control the forward and reverse motion of the Snowmobile. A remote control switch box will
be used (see lower right of the initial scene in Figure 5-1-11). When the user clicks the green button on the switch, the Snowmobile will move forward and Slappy will ride the Snowmobile while screaming something like "wahoo." When the user clicks the red button on the switch, the
Snowmobile and Slappy will move in reverse and Slappy will look at the camera and mutter something about having "the silly thing in reverse."
Figure 5-1-11. Initial Scene
Design -- Storyboards
Two events can occur: a click on the red button and a click on the green button of the control switch. Two event-handler storyboards need to be designed: one for a forward animation

208
(rideForward) and one for a reverse animation (rideBackward), as illustrated in Figure 5-1-12 (a) and (b). Note that sound is optional and can be omitted.
Figure 5-1-12. Storyboards: a) rideForward b) rideBackward
Event-handler methods
Of course, two objects are involved in these actions. So, the methods should be world- level
methods. In both methods, Slappy should appear to be riding on the Snowmobile. With this in mind, it is obvious that the motions of Slappy and the Snowmobile must take place at the same time. As is often the case in computer programming, there are two ways to make Slappy and the
Snowmobile move together. One way to synchronize the moves is to use A Do together block.A second way is to make the Snowmobile be the vehicle for Slappy. The event-handler methods
illustrated below will assume that the vehicle property is used to synchronize Slappy and Snowmobile motions. The advantage of using vehicle synchronization is that only one instruction is needed to move both objects. Do together blocks will still be useful for
synchronizing movement with sound.
Link Events to Event-handlers
Each animation method must be linked to the mouse-click event that will be used to trigger the method as a response. The rideForward method should be linked to a mouse click on the green button of the TwoButtonSwitch object. And, the rideBackward method should be linked to a
mouse click on the red button. To make a link, the "create new event" tile is clicked in the Events editor. In this example, "When the mouse is clicked on something." is selected, as shown in
Figure 5-1-13 (a). The result is the creation of a new event listing in the editor, as seen in Figure 5-1-13(b).
Event: Click on Red Button
Responding Method: Simultaneously:
Slappy and Snowmobile move
forward
Event: Click on Green Button
Responding Method: Simultaneously:
Slappy and Snowmobile move backward
Say “Had silly thing in reverse” or Play a "backwards" sound

209
Figure 5-1-13. (a) Selecting mouse click event (b) Result: mouse click event
Figure 5-1-14 shows the selection of the GreenButton as the target of the mouse click. Finally, a
link is made to the rideForward event-handler method is made, as shown in Figure 5-1-15. The linking process is repeated for the RedButton event and the rideBackward event-handler method.
The animation is not yet complete. Slappy's paw and head motions need to be added. Completion of the animation is left as an exercise.
Figure 5-1-14. Select GreenButton as Target of Mouse Click

210
Figure 5-1-15. Drag Event-Handler Method into Link
Technical Note
We noted that Slappy and the Snowmobile must move together as if they were only one object.
To guarantee that Slappy and the Snowmobile move together, not only did we make the snowmobile the vehicle for Slappy, we also used the orient to instruction on both objects in setting up the initial scene. See Tips & Techniques 3 for more details on orient to.

211
5-1 Exercises
1. Flight Simulator
(a) Create the world for the biplane acrobatic air show example as presented in this section. Implement the flyForward and barrel event-handling methods and link the methods to the
corresponding events. Make the move and roll actions have an abrupt style to reduce the pausein the animation between key presses. If your computer has sound, use a biplane sound clip to make the animation more realistic.
(b) When you have the flyForward and barrel methods working, add flyLeft and flyRight event-handlers for the left and right arrow keys to steer the biplane left or right.
(c) Add a forwardLoop stunt that works when the user presses the Enter key.
2. Flight Simulator – alternate version
The arrow key press events work when the user releases the key. Of course, this means that multiple key press-release events are needed to keep the biplane moving. In this exercise, you
can experiment with a different kind of event. Create a second version of the BiPlane Acrobat world (use File�SaveAs to save the world with a different name). In the second version of the world, remove the events that link the arrow keys to flyForward, flyLeft and flyRight event-
handler methods. In the Events editor create a new event by selecting “let the arrow keys move <subject>” as shown below.
Then, link the biplane, as shown below. Run the flight simulator again to see the effect.

212
3. SlappyRide
(a) One example illustrated in this chapter was Slappy riding on a Snowmobile. Set up the initial scene and create the rideForward and rideBackward methods as shown above. Link the
methods to mouse-clicks on the green and red buttons of the switch panel and test the program code to see if it works as described.
(b) When you have rideForward and rideBackward working properly, modify the methods: Add instructions in rideForward to make Slappy look forward, raise her front paws in the air (like you would on a roller coaster) and then lower her front paws back into the Snowmobile as the
method ends. And, modify rideBackward so the squirrel will look at the camera while the Snowmobile moves in reverse.
(c) If your computer system has sound, add sound files to be played when rideForward and rideBackward methods are invoked.
4. Typing Tutor
Learning to type rapidly (without looking at the keyboard) is a skill requiring much practice. In
this exercise, you are to create a typing tutor that encourages the beginning typist to type a specific set of letters. Use 3D text letters to create a word in the world. (For example, you could create the word ALICE with the letters A, L, I, C, and E) and create a method for each letter that
spins the letter two times. When the user types a letter key on the keyboard that matches the letter on the screen, the letter on the screen should perform its spin method. Also include an
additional method, spinWord, that spins the entire word in a circle when the user types the space bar. Hint: Use As seen by.
5. Rotational Motion
A popular topic in Physics is the study of rotational motion. Create a world with at least four
objects (such as a Compass, Mailbox, MantleClock and Tire object.) Create a realistic rotation method for each object. For example, if one of your objects is a Compass, make the compass needles spin around quickly in opposite directions and then slowly point North. For each of the
objects add a behavior that will invoke the rotational motion method for that object when the object is clicked.

213
6. Mad Scientist Magic
Who says that a Mad Scientist has no magic skills? Create a world using the Mad
Scientist character (People gallery) behind the Counter object (Furniture gallery). On the countertop place three objects, the blender, the cup and the mug objects (Kitchen gallery). The
point of the exercise is that when the Mouse clicks any one of the objects on the countertop the Mad Scientist will point at that object, raise his arm (like he is casting a spell of some sort) and have the object spin or turn in any way you wish. Hint: Both the mug and the cup have some
kind of liquid in them so it may be interesting to have the liquid disappear (by setting the isShowing property to false) when the Mad Scientist performs his “spell” on it.
7. Ninja Motion
A ninja is trying out for a karate movie. But he needs a little practice. Create a world with a
ninja object in a dojo. The motions the ninja needs to practice are: jump, duck, chop, and kick.Write motion methods for the ninja that include the following:
a) kickRightLeg, kickLeftLeg: allows the ninja to kick his right/left leg, including all appropriate movements (i.e. foot turning, etc.)
b) chopRightArm, chopLeftArm: allows the ninja to do a chopping motion with his arm
Create events and event-handlers that provide the user with controls to make the ninja jump, duck, chop and kick.

214
5-2 Passing Parameters to Event-Handlers
In chapters 3 and 4, parameters were shown to be powerful tools. Parameters allow us to customize methods to work with different objects and different numeric values. Parameters are useful in building either world- level or character- level methods. In this section, we will look at
how to use parameters with events and event-handlers in interactive programs.
Once again, we will use examples to provide a context for presenting the concepts of interactive programming. The first example illustrates the mechanisms available for using parameters in response to events. The second example, while still using parameters in response to an event,
illustrates an important concept used in game programs and simulations – namely that whatever the user clicks on can be passed as a parameter to an event-handling method.
Numeric parameter example
Jack is planning to try out for the school hockey team this fall. As a successful athlete, Jack knows that “practice is the name of the game.” Jack has set up a hockey net on the frozen lake
surface and is going to practice his aim with the hockey stick to improve his chances of making the team. The initial scene is illustrated in Figure 5-2-1.
Figure 5-2-1. Hockey practice initial scene
Design -- storyboard
This animation could be the first phase of developing an interactive ice-hockey game. To design an interactive program storyboard, some thought must be given to what events will occur and what event-handler methods are needed. Let’s allow the user to select the power factor behind
Jack’s swing of the hockey stick. The power factor will determine how fast Jack swings the stick and how far the hockey puck travels when hit by the stick. The power factor will be selected by
a mouse-click on one of the power buttons in the lower-right of the scene. The yellow button will select low, green will select average, and red will select a high power factor. A storyboard, in textual form, is shown in Figure 5-2-2.

215
Figure 5-2-2. Event-handler storyboards
Three events, one event-handler
Three events are possible and three event-handler methods could be written (one to respond to
each event). Somehow, writing three methods seems unnecessary for animations that perform the same simple action – just a different amount of power. A better solution might be to write just one method and send in the power factor as a parameter value.
A world- level method named swing will be created to manage the motion of Jack, the hockey
stick and the puck objects. In the editor for this new method, a new parameter is created and given the name power, the Type Number, and an initial value of 1, as illustrated in Figure 5-2-3(a) and the result is shown in Figure 5-2-3(b).
Figure 5-2-3. (a) Creating number parameter (b) Result
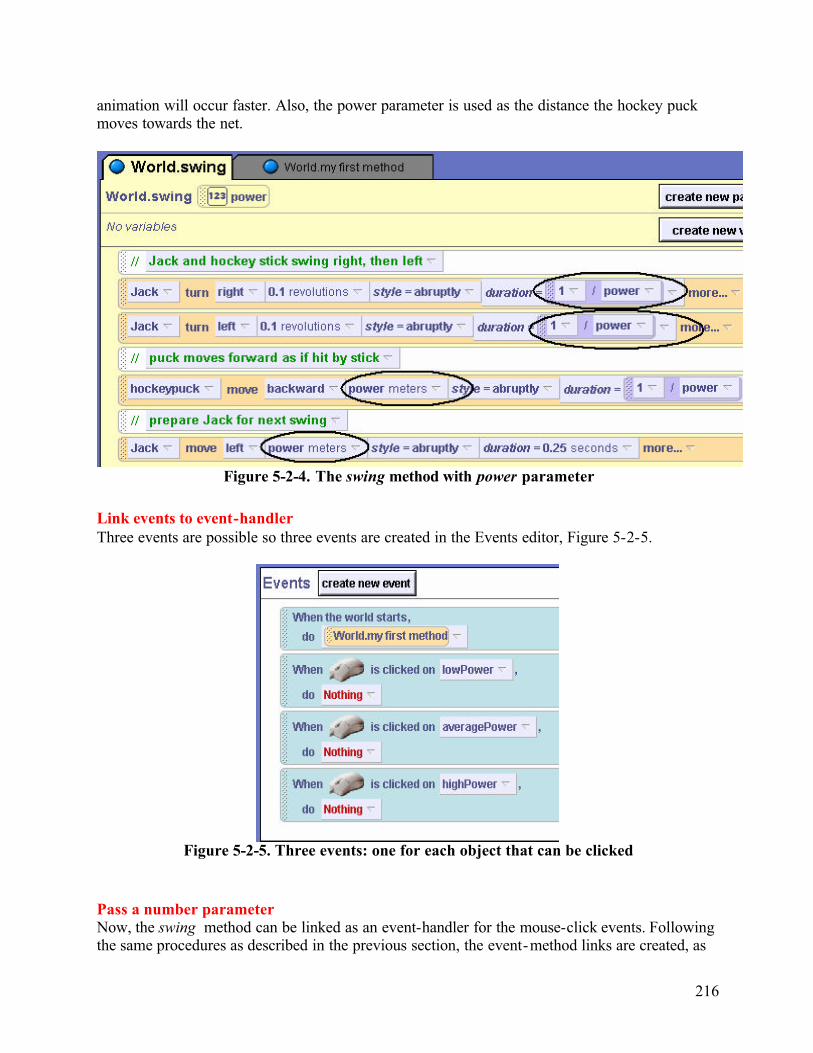
Parameter is used for both duration and distance
The swing method is then constructed using the power parameter for duration (to control speed).The swing method is shown in Figure 5-2-4. Note that the power parameter is used as a ratio
1/power. This way, if the power factor is a larger number, the duration will be shorter and the
Event: Click on lowPower
Responding Method:
Swing with power
Event: Click on avePower
Responding Method:
Swing with power factor 2
Event: Click on highPower
Responding Method:
Swing with power factor 3
216
animation will occur faster. Also, the power parameter is used as the distance the hockey puck moves towards the net.
Figure 5-2-4. The swing method with power parameter
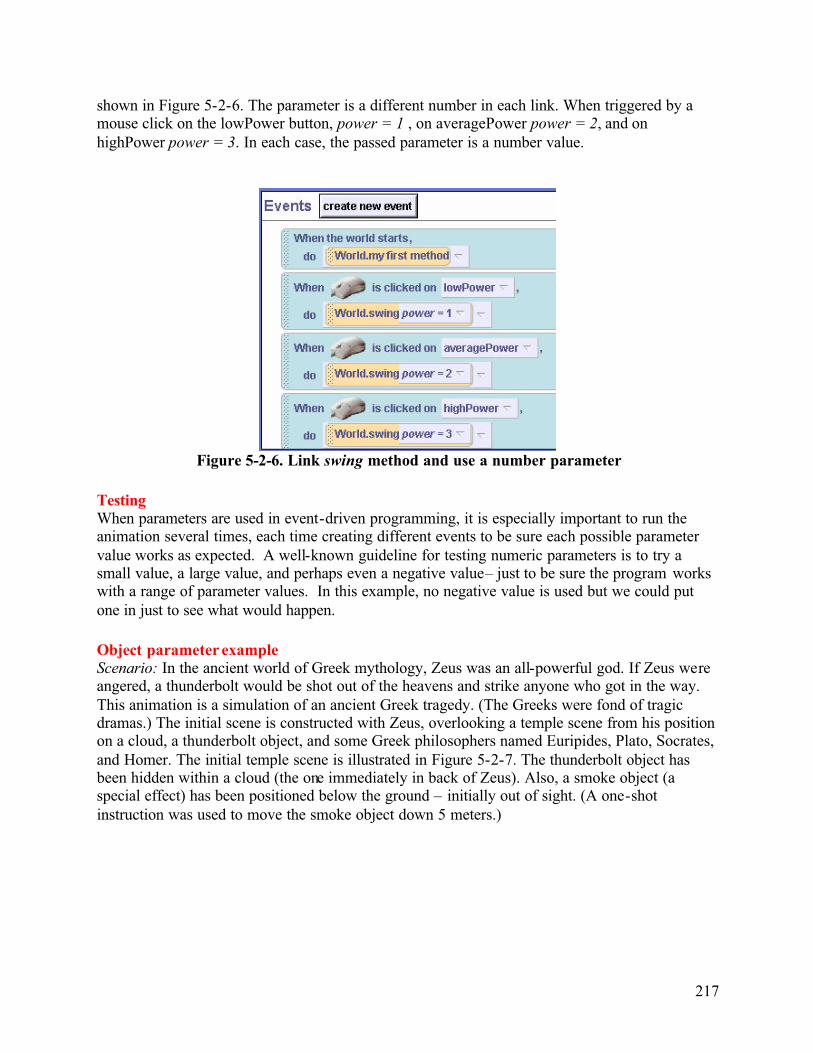
Link events to event-handler
Three events are possible so three events are created in the Events editor, Figure 5-2-5.
Figure 5-2-5. Three events: one for each object that can be clicked
Pass a number parameter
Now, the swing method can be linked as an event-handler for the mouse-click events. Following the same procedures as described in the previous section, the event-method links are created, as
217
shown in Figure 5-2-6. The parameter is a different number in each link. When triggered by a mouse click on the lowPower button, power = 1 , on averagePower power = 2, and on
highPower power = 3. In each case, the passed parameter is a number value.
Figure 5-2-6. Link swing method and use a number parameter
Testing
When parameters are used in event-driven programming, it is especially important to run the animation several times, each time creating different events to be sure each possible parameter
value works as expected. A well-known guideline for testing numeric parameters is to try a small value, a large value, and perhaps even a negative value– just to be sure the program workswith a range of parameter values. In this example, no negative value is used but we could put
one in just to see what would happen.
Object parameter example
Scenario: In the ancient world of Greek mythology, Zeus was an all-powerful god. If Zeus wereangered, a thunderbolt would be shot out of the heavens and strike anyone who got in the way.
This animation is a simulation of an ancient Greek tragedy. (The Greeks were fond of tragic dramas.) The initial scene is constructed with Zeus, overlooking a temple scene from his position on a cloud, a thunderbolt object, and some Greek philosophers named Euripides, Plato, Socrates,
and Homer. The initial temple scene is illustrated in Figure 5-2-7. The thunderbolt object has been hidden within a cloud (the one immediately in back of Zeus). Also, a smoke object (a special effect) has been positioned below the ground – initially out of sight. (A one-shot
instruction was used to move the smoke object down 5 meters.)

218
Figure 5-2-7. A Greek tragedy initial scene
Design -- Storyboard
To make this animation interactive, we will let the user choose the object that will be the next
victim of Zeus’s anger. When the user clicks on one of the objects, Zeus will point at that object. Then, a thunderbolt will strike the object that was clicked. The smoke object will move up to cover the object. The smoke is a special effect used to make an object appear to meet a sad fate.
A textual storyboard is shown in Figure 5-2-8.
Figure 5-2-8. Greek tragedy storyboard
Writing the event-handler
The first step, as in the previous example, is to create a world- level method, shootBolt. This method should receive an object parameter, as illustrated in Figure 5-2-9. In this example, the
parameter was arbitrarily named who.
Event: An object is clicked with the mouse
Event-handler method:The following actions occur in order:
1) Zeus turns to point at clicked object
2) A thunderbolt strikes the object3) Smoke appears as the object meets a
tragic ending

219
Figure 5-2-9. Creating an object parameter
The complete code for the shootBolt event-handler method is illustrated in Figure 5-2-10. In
interactive programs, it is possible the user can repeat an action. In this world, the user may mouse click on more than one philosopher and so we must prepare the lightening bolt for another possible strike. The lightening bolt is made to disappear (by changing its opacity to 0%) after it
strikes the object. Then, at the end of the method, the invisible bolt is moved back up to the cloud. Now, if the user clicks on another object, the bolt is back in position to become visible
and strike again.

220
Figure 5-2-10. The shootBolt event-handler
Link the event to the event-handler
To link the mouse-click event to the shootBolt event-handler, it is only necessary to go through a
similar set of steps as was done in previous interactive examples. Click on the create new eventbutton in the Events editor, and select when the mouse is clicked on something. Then the shootBolt method is dragged into the link. Of course, shootBolt expects to be passed a parameter
to identify the object that was clicked. Select expressions and then object under mouse cursor,as shown in Figure 5-2-11.

221
Figure 5-2-11. Pass object under mouse cursor as the parameter
Testing the program
The world is now complete. Of course, the program should be tested by running it and having Zeus shoot thunderbolts. When we tested this program, each of the philosophers was clicked on, to make sure the thunderbolt properly hit the target. But when we clicked on the clouds, the
thunderbolt struck the clouds, turning them black. And when we clicked on the scene itself, the whole scene was turned black! This is not the behavior we wanted or expected. Another
problem with the animation is that the user can click on an object that has already been zapped with lightening. A solution to these problems will be presented later.
Technical Notes
Several comments should be made concerning this example.
• Objects (such as the thunderbolt and the smoke) can be made to appear and disappear
several different ways. One approach is to move an object below the ground and then move it up when it is to appear. A second approach is to change the object’s opacity to
0% (invisible) or 100%(visible). Yet another approach is to change the object’s isShowing property. (See Tips & Techniques 3 for more details on opacity and isShowing.)
• The cyclesmoke method is a built- in method of the smoke object.
• One way to move an object (in this case, the lightening bolt and the smoke) to the
position of another object is to use a moveto instruction. We followed the three-stepapproach for creating a moveto instruction, as was presented in Tips & Techniques 3:

222
First, the Lightning object’s move to instruction was dragged into the editor with the default Vector3(0,0,0) as the target.
Second, the built- in Lightning’s position question was dragged over the Vector3(0,0,0) to replace it. (See Tips & Techniques 3 for details on built- in questions.)
Third, the who parameter tile was dragged into the position target to be a place-holder for any clicked object.

223
5-2 Exercises
1. CarouselGoRound
Create an amusement park scene with a carousel. In this animation, the carousel is to have at least four animals (horses, giraffes, or others of your choice). Add a two-way switch to the
initial scene. Create two event-handler methods – one to make the carousel rotate clockwise and one to make it rotate counterclockwise. When the green button is clicked the carousel should rotate clockwise and a click on the red button should make the carousel rotate counterclockwise.
Create a storyboard and then implement the carousel. Optional: add a sound clip that plays as the carousel goes around.
2. Snow Festival
Your team has created a snowman as the centerpiece of an entry in the Winter Snow Festival
competition. To gain attraction to your snow festival display, you have set up colored spotlights that will turn the color of the snowman any one of 4 different colors. Create an initial world with
4 spotlights (spheres of 4 different colors) and a snowman, as shown below. Write only onemethod to change the color of the snowman. When the user clicks on a spotlight pass the color of the spotlight to the method and make the snowman change to be that color.
3. Flowerbox
It’s spring and you are anxiously waiting for flowers to grow. You decide to give them a little help. Create an initial scene of a flowerbox (or a brown half cylinder, turned upside down) with
5 flowers (of your choosing) in it. (Use one-shot instructions to move the flowers down out of sight.)

224
Write one method to grow a flower in the box (move the flower up into view). The flower that grows in the box depends on which key the user presses on the keyboard. For example, if the
user presses “S” key, the sunflower will grow but if the user presses the “D” key, the daisy will grow. To grow the flowers, create a “When <key> is typed” event for each key selected to represent a specific flower. Link the key-pressed event to the growFlower event-handlermethod
using the particular flower represented by that key as its parameter. When all the flowers are grown, the flowerbox will look something like the following:
4. PenguinSlide. A favorite activity of penguins in the local zoo is to slide down an icy slope
into a pool of water in the pond. Create a world with a frozen lake scene and three penguins on the slope, as shown below. Make the program event-driven. Allow the user to click on the nextpenguin to slide down the slope into the pool of water. Each penguin slides on its back and spins
around as it slides. Each penguin should spin a different number of times. When the penguin reaches the pond, move the penguin down 5 meters so it disappears below the water. Write only
one event-handler method. When the penguin is mouse-clicked, pass the penguin object that was clicked and the number of times the penguin is to spin around as it slides down the slope. Optional: add a water-splash sound as the penguin hits the water.

225
5 Summary
This major focus of this chapter was the creation of interactive (event-driven) worlds. Creating
worlds with events allowed us to build significantly more interesting worlds such as game-likeanimations and simulations. In many object-oriented programming languages, event-driven
programming requires knowledge of design patterns such as Observer, Callback, or Model-View-Controller. In Alice, creating events and invoking event-handler methods that respond to events is quite simple. Many of the messy details of event-driven programming are handled by
Alice.
Important concepts in this chapter
• An event is something that happens.
• An event is created by user input (keyboard press or mouse click.)
• An event is linked to an event-handler method.
• Each time an event occurs, its corresponding event-handler method is invoked. This is what is meant by event-driven programming.
• The event-handler method contains instructions to carry out a response to the event.
• A parameter can be passed to an event-handler method when an event occurs.
• Parameters allow us to write one method that can handle several related events

226
5 Projects
1) SkaterWorld
The goal of this world is to simulate a skater girl and her moves. Create a world with a skater girl object on a skateboard. Add several some objects she can jump over. A sample scene is
shown below.
The skater should have both jump and spin methods. Allow the user to press the up/down arrow keys to move the camera and skater forward/backward and the left/right arrow keys to make the
skater lean left/right while the camera goes left/right. At the end of each motion, the skater should lean back to her original position. The j key can be used to make the skater jump and the
s key to make her spin.
Hints:
1) If you are having problems with the skater girl moving where you want her to move, trying using As seen by camera or As seen by skateboard.
2) One way to make the camera follow the action is to position the camera behind the skater and make the skater a vehicle of the camera. A “while the world is running” event can be used to make the camera constantly move forward. This will allow the skater to skate forward on
the ground while jumping and doing twists and the camera will continue to follow the action.
2. Skydiving Guidance System
Alice has taken up a new hobby: skydiving. She is on a helicopter, wearing a parachute. She is to jump to the carrier, which is a little ways in front of her. In the world shown below, we added
a half cylinder inverted and connected to the helicopter to be used as a jump platform. And, a torus was used to create a harness for Alice (although this isn’t absolutely necessary, it is helpful
due to Alice’s small waist compared to the parachute’s cords)

227
The idea of this animation is to provide a skydiving guidance system to allow the user to guide the movement of Alice as she jumps from the platform of the helicopter and glides down to the
carrier. When the user thinks Alice has hit the top of the carrier, the user can press the enter key to have Alice drop her chute.Guidance system methods (as smooth and lifelike as possible):
1) jump: which will allow Alice to jump from the helicopter’s platform2) glideUp, glideDown, glideRight, glideLeft: allows Alice to glide in the appropriate
direction3) swingLegs: allows Alice’s legs to swing a bit when gliding or jumping4) dropChute: allows Alice to get rid of her parachute (to simplify things, just have the chute
rotate as if it was falling and make it disappear)Keyboard controls:
1) Space bar -- Alice should jump off the platform.2) Up/down/right/left arrow -- Alice should glide up/down/right/left.3) When the enter key is pressed, Alice’s parachute drops.
Remember that Alice should first jump off the platform prior to gliding and should not drop her chute until she hits the carrier.
3. Golfing. Alice has been taking golf lessons and she wants to demonstrate her new golfing skills to her friends. A fancy trick she has learned is a “ricochet.” In a ricochet shot, the golf ball
is hit toward an intermediate object and then bounces off in a different direction to go in a hole.Create a world with Alice, a sphere that will act as a golf ball, four circle objects that will be the
holes in the ground, and four other small objects to act as intermediate objects for the ricochet shot. Arrange the four small objects so each one is ten meters away from Alice (at different angles from Alice). Also, arrange the holes so each small intermediate object is 10 meters away
from one of the holes. The images below show a possible initial scene.

228
To animate the ricochet shot, create a ricochet method that takes two object parameters, intermediateObject and whichHole. When the ricochet method is called, Alice should swing, the
sphere should travel ten meters and then bounce off the intermediateObject, changing direction so as to travel another ten meters into whichHole. (As SeenBy can be used to make the ball travel
where it should.)
Create links in the events editor so that a user click on one of the four intermediate objects calls
the ricochet method with the name of the object and the appropriate hole where the golf ball will fall in the cup. When Alice makes a ricochet shot, have her wave her hands in the air in triumph.
4. Turtle Motion Control
In this project, you are to create a turtle motion controller to help the turtle perform exercises for
his upcoming race with the hare. Create a world which contains only a turtle and then create motion control methods for the turtle:
a) headBob: allows the turtle’s head to bob a littleb) tailWag: allows the turtle’s tail to wag
c) oneStep: allows the turtle to move forward one step; his legs should move while he is taking that one step
d) walkForward: combines the above 3 methods, to make a realistic step; all movements should take the same amount of time and should occur at the same time
e) turnAround: turns the turtle 180 degrees; he should be walking while turning around
f) turnLeft, turnRight: turns the turtle left/right, walking while he is turningg) hide: allows the turtle to hide in his shell (you may assume that the turtle is currently
outside of his shell); remember to not leave the shell hanging in midairh) reappear: allows the turtle to reappear from his shell (you may assume that the turtle is
currently hidden)
i) talk: has the turtle look at the camera and say “hello” (or something different, if you wish) to the user
Create keyboard controls:a) When the up arrow key is pressed, the turtle is to walk forward.b) When the down arrow key is pressed, the turtle is to turn around.
c) When the left arrow key is pressed, the turtle is to turn left. d) When the right arrow key is pressed, the turtle is to turn right.
e) When the letter “H” is pressed, the turtle is to hide in his shell.f) When the letter “R” is pressed, the turtle is to reappear from his shell.g) When the letter “T” is pressed, the turtle is to talk to the user.
Test the turtle motion control system by running your world and trying all the interactions at
least once. Be sure to only hide the turtle when he is already out of his shell and only have him reappear when he is hiding.

229
Tips & Techniques 5
Let the mouse move objects
The interactive worlds introduced up to now have used events where the user mouse-clicks on some object or uses key presses to control the motion of some object. But, some interactive
worlds work best if the user is allowed to drag objects around with the mouse. When you are setting up a new world, you can move objects around the scene with the mouse. But, how do we
make that option available to the user while the program is running? As an example, suppose a world where the user will rearrange the furniture in a room, as in Figure T-5-1. (We removed the walls so as to make this for this example.)
Figure T-5-1. Furniture arrangement
To allow the user to move the furniture around, create a "Let the mouse move objects" event in
the event editor, as shown in Figure T-5-2. The result is shown in Figure T-5-3.
Figure T-5-2. Selecting Let the mouse move objects event
Figure T-5-3. Resulting event

230
Billboards
While Alice is a 3D programming environment, it is possible to display flat 2D images in
a scene. Flat 2D images can be created in any paint tool and saved in GIF, JPG, or TIF format.To add the2D image (Alice calls it a billboard) to your world, select Make Billboard from the
File menu, as seen in Figure T-5-4. In the selection dialog box, navigate to the stored image and then click
Figure T-5-4. Making a billboard
Alice will add the flat image to the world, as seen in Figure T-5-4.
Figure T-5-4. Billboard added to the scene
The billboard used in this example illustrates one of the uses of billboards -- providing
information to the user about how to play a game or simulation. In the example shown in Figure T-5-5, the billboard provides instructions for using keys from the keyboard to steer a biplane. To make the billboard easy to read, we resized the billboard and used it to cover the scene, Figure T-
5-5. Then, we set up an event so the user can click on the billboard and a method will be called that sets the opacity to 0%, causing the billboard to fade away to the opening scene, as seen in
Figure T-5-6.

231
Figure T-5-5. Billboard provides instructions
Figure T-5-6. When clicked, billboard fades away
Special Effect: fog
The examples above illustrate a number of character-level properties and built- in questions. Let’s
look at a world- level property. Consider the scene in Figure T-5-7. A knight is searching for a dragon in a forest. We would like to give the impression that the dragon is hiding from the
knight. In most stories involving dragons, it is dreary and gray out. Some sort of fog would to make the knight’s job (of finding the dragon) much harder.

232
Figure T-5-7. No fog
To add fog, click on the World object in the object-tree and select properties, as shown in Figure
T-5-8. Then, click on the image to the right of fogStyle and select density. Density refers to the thickness of the fog. To adjust the fog density, click the image to the right of fogDensity and adjust the density value to achieve the desired effect. The larger the density value, the thicker the
fog.
Figure T-5-8. fogStyle and fogDensity modified

233
Rotating around an invisible object
Consider the world illustrated in figure T-5-9. Suppose we wanted the pterodactyl to fly around
the dragon.
Figure T-5-9. A dragon and a pterodactyl
The pterodactyl will fly around the dragon if we use “as seen by = Dragon” in a turn left
instruction for the pterodactyl object.
But suppose we wanted them to each make a half-turn relative to each other, so that the dragon ended up at the pterodactyl’s location (facing the opposite direction as it will have made half a
circle), and the pterodactyl will end up at the dragon’s location (facing the opposite direction). A first attempt might be
But when this program is run, each animal ends up where it started, facing the opposite direction!
The problem is that once each animal has begun to move, its location has changed, so that further moves relative to each other lead to unexpected results! What we need is a stationary object, located somewhere in between the dragon and the pterodactyl, which does not move. Let’s add a
sphere object, placing it in between the dragon and the pterodactyl. Now, make the sphere invisible by changing its isShowing property to false. Now, we can write the following code:
When this code is run, the dragon and pterodactyl change places, as seen in Figure T-5-10!

234
Figure T-5-10. Pterodactyl and dragon change places