4nestcattowerpartslistslotted" frame"pipe. base" (nest"c) nest"c...
TRANSCRIPT
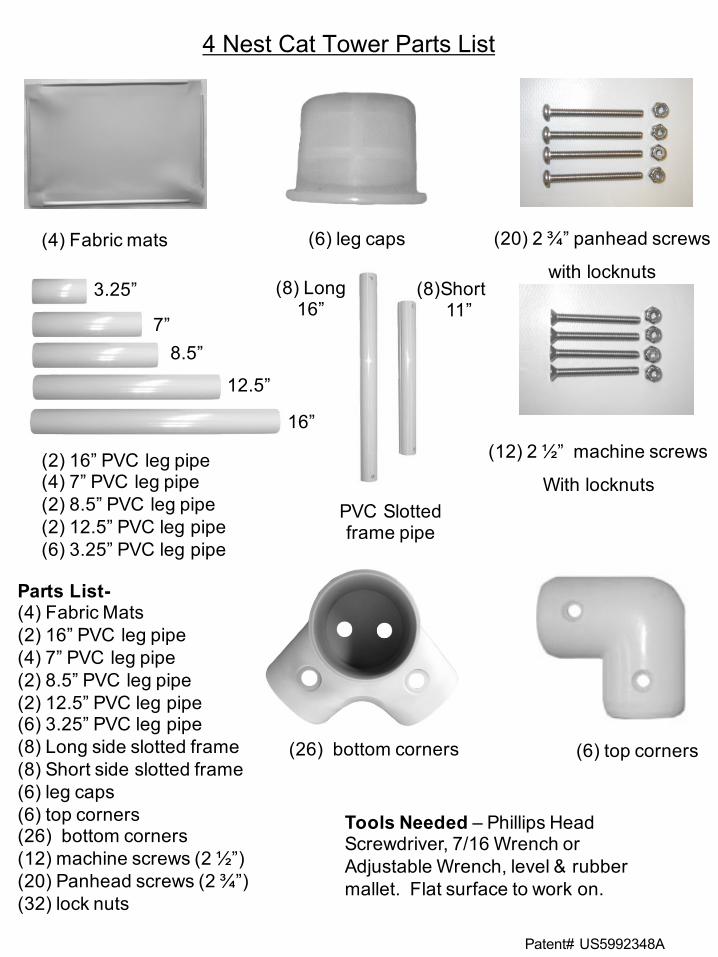
4 Nest Cat Tower Parts List
(4) Fabric mats (6) leg caps
(2) 16” PVC leg pipe(4) 7” PVC leg pipe(2) 8.5” PVC leg pipe(2) 12.5” PVC leg pipe(6) 3.25” PVC leg pipe
7”
16”
(20) 2 ¾” panhead screws
with locknuts
(12) 2 ½” machine screws
With locknuts
Parts List-(4) Fabric Mats(2) 16” PVC leg pipe(4) 7” PVC leg pipe(2) 8.5” PVC leg pipe(2) 12.5” PVC leg pipe(6) 3.25” PVC leg pipe(8) Long side slotted frame (8) Short side slotted frame(6) leg caps(6) top corners (26) bottom corners(12) machine screws (2 ½”)(20) Panhead screws (2 ¾”)(32) lock nuts
Tools Needed – Phillips Head Screwdriver, 7/16 Wrench or Adjustable Wrench, level & rubber mallet. Flat surface to work on.
(6) top corners(26) bottom corners
(8) Long16”
(8)Short11”
3.25”
8.5”
12.5”
Patent# US5992348A
PVC Slotted frame pipe

Base (Nest C)
Nest C
Nest C
Nest C
Nest C
Nest C
Nest C
Top Nest B
Top Nest A
3.25” legs
16”
8.5”
16”
16”
16”
16”
16”
7”
7”
7”
7”
7”
7”
7”
12.5”
Kuranda Bed Guarantees:We guarantee the structural integrity of the frame and fabric of our beds for a period of one year from date of purchase. As such Kuranda will replace *fabrics and frame parts, including legs and corner fittings, at no charge.
Individual cat owners. We will replace frame parts and *fabric damaged by purchaser's cats to the point of not being useable at no charge for a period of one year from date of purchase. This warranty includes chewing or scratching of legs and corner fittings. Multiple fabric replacements will be handled on a case by case basis.
Boarding kennels, veterinary hospitals, shelters, trainers, and breeders:We will replace frame parts damaged by client cats to the point of not being useable at no charge for a period of one year from date of purchase. This warranty includes chewing or scratching of legs and corner fittings. We will replace at no charge Cordura nylon, Ballistic nylon, and 40 oz solid vinyl fabrics for a period of 1 year from date of purchase.
*Textilene vinyl weave replacements are excluded from this warranty.
Please call us if you have any questions 800-752-5308 or 410-761-9551
Kuranda USA, PO Box 6651 Annapolis MD 21401www.kuranda.com 1-800-752-5308
Nest Tower Diagram (9 nest shown)
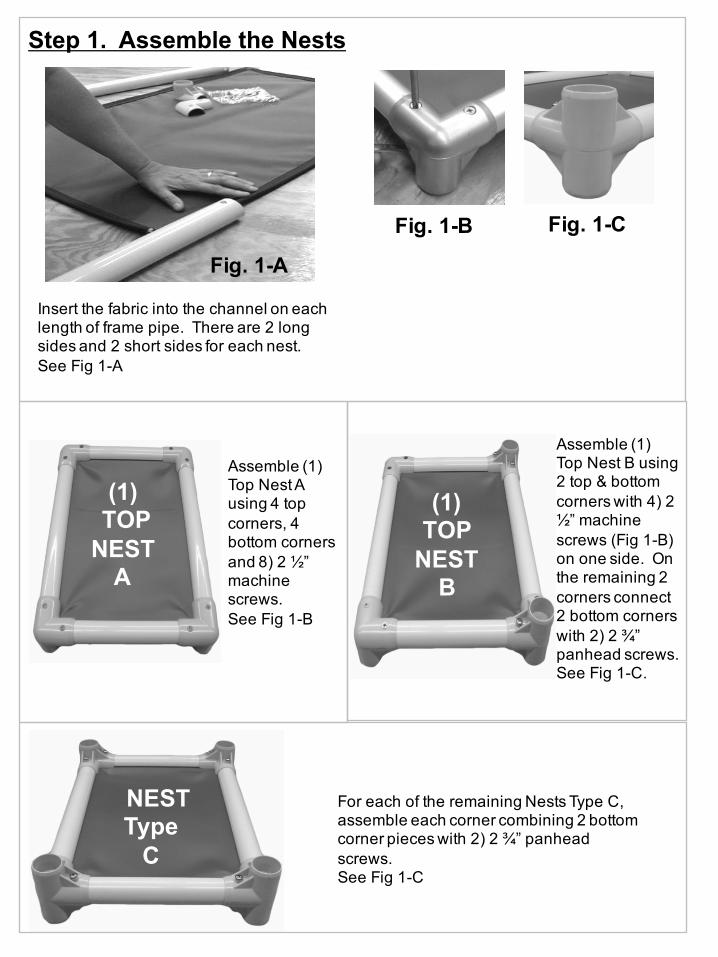
Fig. 1-A
Fig. 1-CFig. 1-B
Insert the fabric into the channel on each length of frame pipe. There are 2 long sides and 2 short sides for each nest. See Fig 1-A
(1)TOP NEST A
(1) TOP NEST B
NESTType C
Step 1. Assemble the Nests
For each of the remaining Nests Type C, assemble each corner combining 2 bottom corner pieces with 2) 2 ¾” panhead screws.See Fig 1-C
Assemble (1) Top Nest B using 2 top & bottom corners with 4) 2 ½” machine screws (Fig 1-B) on one side. On the remaining 2 corners connect 2 bottom corners with 2) 2 ¾” panhead screws.See Fig 1-C.
Assemble (1) Top Nest A using 4 top corners, 4 bottom corners and 8) 2 ½” machine screws.See Fig 1-B

Step 2. Assemble the BaseInsert a leg cap onto (4) of the 3.25” legs and insert into the bottom corners of a Nest Type C and place Base Nest on the floor. Using a level, tap gently with a rubber mallet to make sure the nest is secure and level.Insert the (2) remaining 3.25” legs into the topside corners, and the (2) 12.5” legs on the opposite topside corners.See Fig 2 –A
Insert a leg cap into (2) of the 8.5” legs and insert into the bottom corner of a Nest Type C. Place this nest over the Base Nest inserting the two bottom corner openings onto the 2 Base Nest upright 3.25” legs. Using a level, tap gently with a rubber mallet to make sure the nest is secure and level.Insert (2) 7” legs into the center openings.Insert (2) 16” legs into the outside corner openings See Fig 2 –B
Fig. 2 -B
Base Nest
NESTType C
12.5”
12.5”
7”
7”16”
16”
8.5”
3.25”legs
Base NestType C
Fig. 2 -A
12.5”
12.5”
Place a Nest Type C onto the (2) 12.5” and (2) 7” legs of the Base Nest. Using a level, tap gently with a rubber mallet to make sure the nest is secure and level.
Insert (2) 7” legs into the center openings of the top nest.See Fig. 3-A
12.5”
12.5”
7”
16”
16”
Base Nest
7”
8.5”
NESTType C
Fig. 3 -A
3.25”
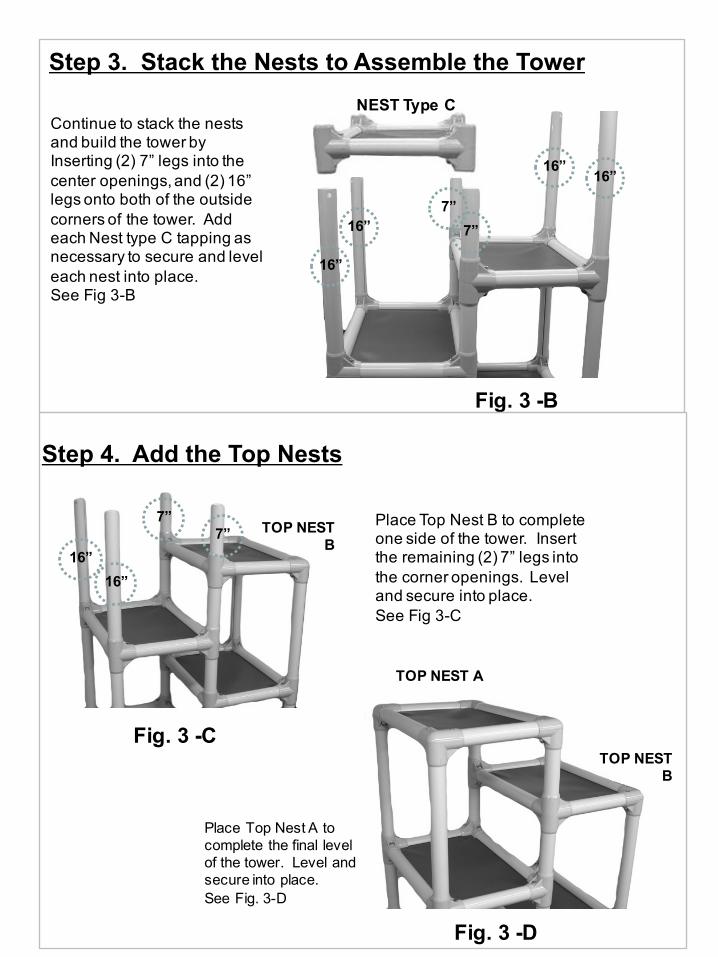
Step 3. Stack the Nests to Assemble the Tower
Place Top Nest B to complete one side of the tower. Insert the remaining (2) 7” legs into the corner openings. Level and secure into place. See Fig 3-C
7”7”
16”16”
16”
16”
Fig. 3 -B
TOP NEST B
7”7”
16”16”
Fig. 3 -CTOP NEST
B
TOP NEST A
Fig. 3 -D
Step 4. Add the Top Nests
Continue to stack the nests and build the tower byInserting (2) 7” legs into the center openings, and (2) 16” legs onto both of the outside corners of the tower. Add each Nest type C tapping as necessary to secure and level each nest into place. See Fig 3-B
Place Top Nest A to complete the final level of the tower. Level and secure into place. See Fig. 3-D
NEST Type C
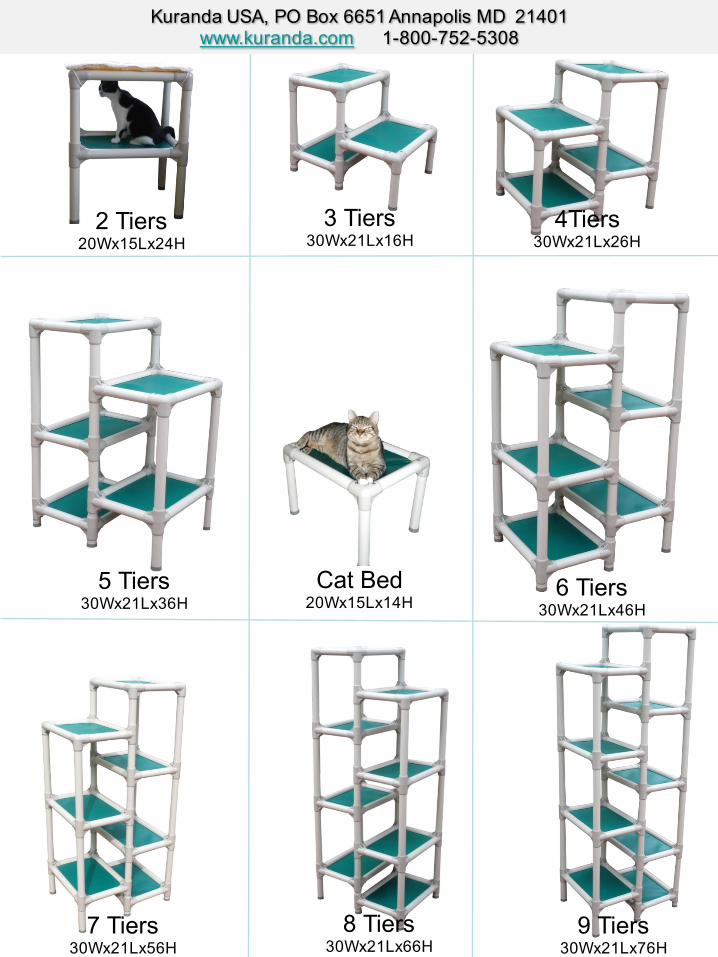
Cat Bed20Wx15Lx14H
nest #6
5 Tiers30Wx21Lx36H
6 Tiers30Wx21Lx46H
7 Tiers30Wx21Lx56H
8 Tiers30Wx21Lx66H
9 Tiers30Wx21Lx76H
3 Tiers30Wx21Lx16H
2 Tiers20Wx15Lx24H
Kuranda USA, PO Box 6651 Annapolis MD 21401www.kuranda.com 1-800-752-5308
4Tiers30Wx21Lx26H