42pd7800ta user manual - hitachi · hitachi cannot assume liabilities for damage caused by mistake...
TRANSCRIPT

1
EN
GL
ISH
USER'S MANUAL
Thank you very much for purchasing the HITACHI Plasma Display.Before using your monitor, please carefully read the "SAFETYINSTRUCTIONS" and this "USER'S MANUAL" so you will know how tooperate the monitor properly. Keep this manual in a safe place. Youwill find it useful in the future.
Notes on lnstallation Work:This product is marketed assuming that it is installed by qualifedpersonnel with enough skill and competence. Always have aninstallation specialist or your dealer install and set up the product.HITACHI cannot assume liabilities for damage caused by mistakein installation or mounting, misuse, modification or a naturaldisaster.
Note for Dealers:After installation, be sure to deliver this manual to the customerand explain to the customer how to handle the product.
2
ImportantPlease read this User's Manual thoroughly, especially the SafetyInstructions on Page 4 to 7. Mis-use may cause damage to yourplasma monitor, which could shorten its lifespan, or cause injury toyourself. Should you encounter any difficulty in the set-up oroperation of your monitor, firstly refer to the Troubleshooting guide atthe rear of this manual.In the unlikely event of a problem occurring with your plasmamonitor, switch off at the mains sockets, pull out the plugs, andcontact your dealer immediately.
CAUTIONUnder no circumstances remove the rear cover of your plasmamonitor.Never guess or take any chances with electrical equipment of anykind - it is better to be safe than sorry!
Software NoticeIt is prohibited for the end user of this product to copy, reverseengineer or reverse compile the software included therein, save tothe extent permitted by law.
Plasma MonitorAfter the plasma monitor has been on for any length of time, you willnotice that the screen becomes warm. Please note that this isnormal.Sometimes the screen might have some tiny bright or dark spots.Please note that this is normal.
CAUTIONTo prevent scratches or damages to the plasma screen, do notknock or rub the surface with sharp or hard objects. Clean thescreen with a soft cloth moistened with warm water and dry with asoft cloth. A mild soap may be used if the screen is extremely dirty.Do not use harsh or abrasive cleaners!
CAUTIONUse a soft cloth to clean the cabinet and control panel of themonitor. When excessively soiled dilute a neutral detergent in water,wet and wring out the soft cloth and afterward wipe with a dry softcloth.Never use acid/alkaline detergent, alcoholic detergent, abrasivecleaner, powder soap, OA cleaner, car wax, glass cleaner, etc.especially because they would cause discoloration, scratches orcracks.
FEATURESLarge-screen, high-definition plasma displaypanelThe 42-inch color plasma display panel, with a resolution of 1024 (H)x 1024(V) pixels, the 37-inch color plasma display panel with aresolution of 1024(H) x 1024(V) pixels, and the 32-inch color plasmadisplay panel with a resolution of 852(H) X 1024(V) pixels, creates ahigh-definition, large-screen (aspect ratio : 16:9) and low-profile flatdisplay. Free from electromagnetic interferences from geomagneticsources and ambient power lines, the panel produces high-qualitydisplay images free from color misconvergence and displaydistortion.
High Performance Digital ProcessorA wide range of input signals can be handed, including composite,component, and HDMI.High Definition Digital Processor creates the fine-textured image withdynamic contrast.In addition, it corresponds to a broad array of personal computersignals, from 640 x 400 and 640 x 480 VGA to 1600 x 1200 UXGA.(Analog Input)
Easy-to-use remote control and on screendisplay systemThe remote control included eases the work of setting displaycontrols. Further, the on-screen display system, displays the status ofsignal reception and display control settings in an easy-to-viewfashion.
Power saving systemThe International ENERGY STAR® power saver feature saves powerconsumption automatically when input signals are not available.When connected to a VESA DPMS-compliant PC, the monitor cuts itspower consumption while it is idle.
Connecting to an Audio Visual Device• Two composite/S terminals*1, three composite terminals*2, two
component terminals*2, a HDMI terminal and a photo input terminal(37/42 only) have been added. A composite video output terminalis also provided as a monitoring output. *1 A composite/S terminal = A side input*2 Two composite terminal and two component terminal are used
at the same time. The component terminal would govern.• A wide range of devices other than personal computers can also
be connected.• A RGB input is possible to switch to component signals from the
Menu screen.
Power Swivel Feature (TV model only)It allows to turn the plasma display left or right within ± 30 degreeusing the remote control.
Options (AV monitor model only)
Plasma monitor speaker

3
EN
GL
ISH
CONTENTS
FEATURES ..............................................................2SAFETY INSTRUCTIONS..............................4IMAGE RETENTION OF PLASMA DISPLAY ..8COMPONENT NAMES ..................................9Main Unit ............................................................................9Remote control ..................................................................10
Loading Batteries ............................................................10Handling the Remote Control..........................................10
INSTALLATION INSTRUCTIONS ................13Installation..........................................................................13Anti-tumble measures........................................................13Connecting to an Audio Visual Device..............................14Connecting to a PC ..........................................................16Mounting the Speaker Unit................................................17Mounting the Side Input ..................................................19Power Cord Connection ....................................................20OPERATING INSTRUCTIONS......................21Turning Power On and Off ................................................21Input Switching..................................................................22Size Switching ..................................................................22Volume Adjustment............................................................24Audio Mute ........................................................................24Power Swivel ....................................................................25Input Signal Screen Display ..............................................26Displaying MULTI PICTURE ..............................................27Picture Freezing ................................................................29Photo Input Display (37/42 only) ......................................30Using the Menu Screen (On-screen display system) ......33SETUP MENU (TV mode) ..................................................34SETUP MENU (Video mode) ............................................36SETUP MENU (RGB mode: RGB1 (DVI-PC),
RGB2 (RGB)) ..................................................................37FUNCTION MENU ............................................................39PICTURE MENU (TV/Video mode) ....................................40PICTURE MENU (RGB mode) ..........................................43AUDIO MENU....................................................................44TIMER MENU ....................................................................45LANGUAGE MENU ..........................................................45
Notes about This Manual• The information in this manual is subject to change without notice.• While meticulous care has been taken in the preparation of this manual, you are requested to notify your dealer or us should you have
any comments, views or questions about our product.• Fully understand the prerequisites to using the product, such as hardware and software specifications and constraints, in using the
product. We are not held liable for damages caused by improper handling of the product.• Reproduction of this manual in whole or in part without our prior written permission is prohibited.• The product names mentioned in this manual may be trademarks or registered trademarks of their respective owners.
OTHER FUNCTIONS ..................................46Automatic Store ................................................................46Audio Switching ................................................................47Power Save Mode ............................................................48DVD Player/STB Selection ................................................48Signal Check (RGB mode)................................................49TROUBLESHOOTING..................................50Symptoms That Seemingly Appear to be Failures............50Actions to Correct Abnormal Displays ..............................52PRODUCT SPECIFICATIONS ......................53Signal Input ......................................................................54Recommended Signal List ................................................55

4
SAFETY INSTRUCTIONS
About the Symbols
This Plasma monitor has been designed and manufactured to meet international safety standards, but like any electrical equipment, care mustbe taken if you are to obtain the best results and safety is to be assured.Before using this product, please read and understand the Safety Instructions thoroughly to ensure correct usage, and follow all the instructions.
Various symbols are used in this manual, the user’s manual and on the product itself to ensure correct usage, to prevent danger to the user andothers, and to prevent property damage. The meanings of these symbols are described below. It is important that you read these descriptionsthoroughly and fully understand the contents.
WARNING
WARNING
CAUTION
This symbol indicates information that, if ignored, could possibly result in personal injury or even death due toincorrect handling.
This symbol indicates information that, if ignored, could result possibly in personal injury or physical damage dueto incorrect handling.
Typical Symbols
This symbol indicates an additional warning (including cautions). An illustration is provided to clarify the contents.
This symbol indicates a prohibited action. The contents will be clearly indicated in an illustration or nearby (the symbol to the leftindicates that disassembly is prohibited).
This symbol indicates a compulsory action. The contents will be clearly indicated in an illustration or nearby (the symbol to the leftindicates that the power plug should be disconnected from the power outlet).
Never use the monitor if a problem should occur.Abnormal operations such as smoke, strange odor, no image, no sound, excessive sound, damaged casing, elements, cables,penetration of liquids or foreign matter, etc. can cause a fire or electrical shock.In such case, immediately turn off the power switch and then disconnect the power plug from the power outlet. After making surethat the smoke or odor has stopped, contact your dealer. Never attempt to make repairs yourself because this could bedangerous.
Do not insert liquids or foreign objects.Penetration of liquids or foreign objects could result in fire or electrical shock. Use special caution in households where childrenare present.If liquids or foreign objects should enter the monitor, immediately turn off the power switch, disconnect the power plug from thepower outlet and contact your dealer. • Do not place the monitor in a bathroom.• Do not expose the monitor to rain or moisture.• Do not place flower vases, pots, cups, cosmetics, liquids such as water, etc on or around the monitor.• Do not place metals, combustibles, etc on or around the monitor.
Never disassemble or modify the monitor.The monitor contains high voltage components. Modification could result in fire or electrical shock.• Never remove any fixed cover.
Do not give the monitor any shock or impact.If the monitor should be shocked and/or broken, it could result in an injury, and continued use could result in fire or electrical shock.If the glass panel is broken or damaged, immediately turn off the power switch, disconnect the power plug from the power outletand contact your dealer.
Do not place the monitor on an unstable surface.If the monitor should be dropped and/or broken, it could result in an injury, and continued use could result in fire or electrical shock.• Do not place the monitor on an unstable, slant or vibrant surface such as a wobbly or inclined stand.
Do not obstruct the ventilation of the monitor.If the ventilation is obstructed during the operation of the monitor or just after switching off the power, it could result in damageand shorten the lifespan of your monitor due to overheating. Make sure there is ample ventilation.• Keep a space of 100mm (10cm) or more between the sides, rear and top of the monitor and other objects such as walls.• Do not place anything around ventilation openings of the monitor.• Never block ventilation openings.• Do not put the plasma screen side up.• Do not cover the monitor with a tablecloth, etc.• Do not place the monitor on a carpet or bedding, or near a curtain.
Use only the correct power outlet.Incorrect power supply could result in fire or electrical shock. Use only the correct power outlet depending on the indication onthe monitor and the safety standard.• The enclosed power cord must be used depending on the power outlet to be used.
Disconnect theplug from thepower outlet.
Do notdisassemble.
5
EN
GL
ISH
WARNING
Be cautious of the power cord connection.Incorrect connection of the power cord could result in fire or electrical shock.• Do not touch the power cord with a wet hand.• Check that the connecting portion of the power cord is clean (with no dust), before using. Use a soft and dry cloth to clean the
power plug.• Insert the power plug into a power outlet firmly. Avoid using a loose, unsound outlet or contact failure.• Do not cut off the fitted power plug, the removal of which could lead to impaired performance. If you wish to extend the lead,
obtain an appropriate extension lead or consult your dealer.• Should you require replacing the fuse in the molded plug with a new fuse, then please replace with new one of the same value,
type and approval as the original. Ensure the fuse cover is returned to its original position.
Be sure to keep safety ground connection.Connect the ground terminal of AC inlet of this monitor with the ground terminal provided at the power outlet using the enclosedpower cord. If the provided plug does not fit your outlet, consult an electrician for replacement of the obsolete outlet.
Be careful in handling the power cord and external connection cables.If you keep using a damaged the power cord or cables, it can cause a fire or electrical shock. Do not apply too much heat,pressure or tension to the power cord and cables.If the power cord or cables are damaged (exposed or broken core wires, etc.), contact your dealer.• Do not place the monitor or heavy objects on the power cord and cables. Also, do not place a spread, cover, etc, over them
because this could result in the inadvertent placing of heavy objects on the concealed power cord or cables.• Do not pull the power cord and cables. When connecting and disconnecting the power cord or cables, do it with your hand
holding the plug or connector.• Do not place the cord near the heater.• Do not touch the power plug just after disconnecting it from the power outlet to prevent electric shock.• Do not touch the power plug when lightening is close to you.• Avoid coiling the power cord and bending it sharply.• Protect the power cord from being walked on, pinched particularly at plugs, conveniences receptacles, and the point where
they exit from the apparatus.• Do not modify the power cord.
Be careful in handling the battery of the remote control.Incorrect handling of the battery could result in fire or personal injury. The battery may explode if not handled properly.• Keep the battery away from children and pets. If swallowed consult a physician immediately for emergency treatment.• Do not allow the battery to be exposed to fire or water.• Avoid fire or high-temperature environment.• Do not hold the battery with metallic tweezers.• Keep the battery in a dark, cool and dry place.• Do not short circuit the battery.• Do not recharge, disassemble or solder the battery.• Do not physically impact the battery.• Use only the battery specified in the manual of this monitor.• Make sure the plus and minus terminals are correctly aligned when loading the battery.• If you observe a leakage of the battery, wipe out the liquid and then replace the battery. If the liquid adheres your body or
clothes, rinse well with water.• Obey the local laws on disposing the battery.
Surely connectthe ground wire.
SAFETY INSTRUCTIONS (continued)
About the Symbols (continued)

6
CAUTION
PRECAUTIONS
Be careful in moving the monitor.Neglect could result in an injury or damage.• Do not move the monitor during use. Before moving, disconnect the power plug and all external connections.• You are advised to move the monitor with two persons.• Avoid any impact or shock to the monitor; particularly take care of glass screen.
Do not put anything on top of the monitor.Placing anything on the monitor could result in loss of balance or falling, and cause an injury or damage. Use special caution inhouseholds where children are present.
Avoid a humid or dusty place.Placing the monitor in a smoke, a highly humid, dusty place, oily soot or corrosive gas could result in fire or electrical shock.• Do not place near the kitchen, a humidifier or other place where there is oil, smoke or humidity.
Avoid a high temperature environment.The heat could have adverse influence on the monitor and other parts, and could result in transformation, melting or fire.• Do not place the monitor, the remote control and other parts in direct sunlight or near a hot object such as heater, etc.• Do not put the monitor in a place where the temperature is widely changing.
Remove the power cord for complete separation.• For safety purposes, disconnect the power cord if the monitor is not to be used for prolonged periods of time.• Before cleaning, turn off and unplug the monitor. Neglect could result in fire or electrical shock.
Be careful in operating power swivel.Placing hands or faces near the monitor while operating the swivel function could cause a physical injury or damage.Use special caution in households where children are present.
• Installation environmentDo not obstruct a ventilation hole.Do not put the monitor on carpet or blanket, or near a curtain which has a possibility of obstructing a ventilation hole of the monitor.Do not put the monitor in the following places.• Hot places such as near heater, place exposed to the direct rays of the sun.• A place where the temperature is widely changing.• Places with soot, dust or high humidity.• Poor air ventilation place.• Place near fire.• A wet place such as bathroom, or shower room.• Place where you can trip over it.• Always vibrating or strongly vibrating places.• Distorted or unstable places.
• How to view the monitorIf you use the monitor in too dark a room, your eyes may become tired.Please use it in a reasonably bright room.Avoid direct rays of the sun to the screen in order to prevent eye fatigue.Your eyes will get fatigued after viewing the monitor for long period of time.Relax your eyes by viewing away from the monitor from time to time.Please watch the monitor in downward direction.
• Note on image retentionThe plasma monitor illuminates phosphor to display images. The phosphor has a finite illumination life. After extended periods of illumination,the brightness of the phosphor will be degraded to such extent that stationary images would burn-in that part of the screen as grayed-out images.Tips to prevent such image retention are:- Do not display images having sharp brightness differences or high-contrast images, such as monochrome characters and graphic patterns,
for long.- Do not leave stationary images appearing for long, but try to refresh them at appropriate intervals of time, or try to move them using screen
saver function.- Turn down the contrast and brightness controls.
• How to clean the plasma screen panel of the monitorBefore cleaning the monitor, turn off the monitor and disconnect the power plug from the power outlet.To prevent scratching or damaging the plasma screen face, do not knock or rub the surface with sharp or hard objects. Clean the screenwith a soft cloth moistened with warm water and dry with a soft cloth. If it is not enough, then use a cloth with mild detergent. Do not useharsh or abrasive cleaners.
• How to clean the cabinet of the monitorUse a soft cloth to clean the cabinet and control panel of the monitor. When excessively soiled dilute a neutral detergent in water, wet andwring out the soft cloth and afterward wipe with a dry soft cloth.Never use acid/alkaline detergent, alcoholic detergent, abrasive cleaner, powder soap, OA cleaner, car wax, glass cleaner, etc. especiallybecause they would cause discoloration, scratches or cracks.
Disconnect theplug from thepower outlet.
SAFETY INSTRUCTIONS (continued)
About the Symbols (continued)

7
EN
GL
ISH
• Prevention of an obstacle to Radio receiversThis monitor has been designed pursuant to the international EMI standards. This is to prevent a problem to Radio receivers.- Keep the monitor away from Radio.- Adjust Radio antennas in order for the monitor not to receive interference.- The antenna cable of Radio should be kept away from the monitor.- Use a coaxial cable for antenna.You can check if this monitor influences Radio receivers by turning off all other equipment other than the monitor.If you find a problem receiving Radio when using the monitor, check the instructions mentioned above.
• Precautions for the cable connection- Do ensure that all connections, (including the power plug, extension leads and interconnections between the pieces of equipment), are
properly made and in accordance with the manufacturers instructions. Switch off and withdraw the power plug before making or changingconnections.
- Confirm the connector is fixed tightly when the signal cable is connected.Also confirm the screws on the connector are tightened.
- Plug the power cord of the monitor into a different socket from that for other equipment, such as Radio etc..- Use a plug with ground terminal and make sure that it connects to the ground.
• Precaution during transportationPlease pay attention when you transport this monitor because it is heavy.Furthermore, use the original carton box and its packaging materials when the monitor is transported.Failure to transport the monitor in any carton except the original carton may result in damage to the monitor.Save the original carton box and all packing material.
Do not physically impact the remote control.A physical impact could cause damage or malfunction of the remote control.• Take care not to drop the remote control.• Do not place heavy objects on the remote control.
Avoid strong rays.Any strong rays (such as direct sun rays or room lighting) onto the remote control sensors could invalidate the remote control.
Avoid radio interference.Any interfering radiation could cause distorted images or noises.• Avoid radio generator such as a mobile telephone, transceiver, etc. around the monitor.
Set the sound volume at a suitable level.It is better to keep the volume level low and close the windows at night to protect the neighborhood environment.
• Precautions for the installation- Do not use makeshift stands and NEVER fix legs with wood screws - to ensure complete safety, always fit the manufacturers approved
stand or legs with the fixings provided according to the instructions.- Use only with the cart, stand, tripod, bracket, or table specified by the manufacturer, or sold with the apparatus. When a cart is used, use
caution when moving the cart/apparatus combination to avoid injury from tip-over.- This product is designed to comply with the recommended safety standards for tilt and stability. Do not apply excessive pulling force to the
front, or top, of the cabinet that could cause the product to overturn resulting in product damage and/or personal injury.- Follow instructions for wall, shelf or ceiling mounting as recommended by the manufacturer.- Only use the attachments/accessories specified by the manufacturer.- Consult your dealer if you are in any doubt about installation, operation or safety of your equipment.
• Other precautions- Do not leave equipment switched on when it is unattended unless it is specifically stated that it is designed for unattended operation or has
a stand-by mode. Switch off using the switch on the equipment and show your family how to do this. Make special arrangements for infirmor handicapped people.
- Disposal of this product may require specific instructions pertaining to your resident region.- Never guess or take any chances with electrical equipment of any kind - it is better to be safe than sorry!
SAFETY INSTRUCTIONS (continued)
About the Symbols (continued)

8
IMAGE RETENTION OF PLASMA DISPLAY
There are different characteristics that result in panel image retention depending on how the plasma display is used.Situations and effective usage methods related to ghosting are provided below.
Image retention characteristics of a plasma displayThe image retention phenomenon of a plasma panel occurs due to partial phosphor degradation arising from partial character and figuredisplay.
For example, when the character image as shown in Fig. A at the right iscontinuously displayed for a long period of time, the only part of the phosphor(Red,Green, Blue) that will degrade will be the color of the applicable characterdisplay portion. Consequently, when a white image is displayed on the entirescreen as shown in Fig. a, the character marks displayed up to that time willbecome a color difference visible to the eye, but the phosphor will never burn.
The degree of image retention is proportional to the brightness of the characters and figures displayed as well as the display time.
• The tendency of the phosphor is to degrade more the brighter the charactersand figures are displayed. When images of figures with different levels ofbrightness, as shown in Fig. B, are continuously displayed for a long periodof time, it becomes easier for image marks at locations when the brighterfigures are displayed to be noticeable.
* The image retention images in this document are exaggerated for the purpose of explanation. The actual manner in which the image retentionis seen differs depending on the operation time and brightness.
Methods to Reduce the Occurrence of Image Retention• Lower the Contrast and Brightness settings of the plasma display as much as possible.
A function is provided in the display that controls the brightness of the screen to reduce degradation of the panel. Using this function makes itpossible to reduce image retention.(Refer to Panel Life (Extend 1.or Extend 2) shown on )
• Set the plasma monitor to an “Screen Wipe” or “Luminance Manager” display.The occurrence of image retention when displaying images of identical patterns, such as static images, for long periods of time can bereduced by displaying a completely white screen for about 1 ~ 2 hours after terminating the display. Luminance Manager function works toreduce image retention when displaying images on the four corners, such as TV station logos and clock display.(Settings can be made using Screen Wipe and Luminance Manager from Function MENU shown on )
• Using in combination with moving imagesSince the degradation of the fluorescent material progresses comparatively uniform for moving images, the occurrence of partial imageretention can be controlled. We recommend to use in combination with moving images such as a DVD.* Please be careful since image retention will occur if display is left in a two screen display state for a long period of time. * Television broadcasts include images displayed for long periods of time in which the left and right or top and bottom of the image are cut
and broadcast station name or time are displayed for a long period of time at the same portion of the screen. Image retention in theseportions can be expected to occur, so please be aware.
[Fig. A]
[Fig. B]
[Fig. a]
[Fig. b]
39
39
NotesAbout screen defects• High precision technology is used in the making of plasma panels but there may be dark spots (points that do not illuminate) and bright
spots (points that are too bright) in some cases. These do not indicate a malfunction.
About residual images• In some cases, residual images may remain after the short-term display of still images and another image is displayed, but these will
disappear and return to normalcy. This is not a malfunction.
About the panel screen• Plasma displays display images by means of electrical discharges inside the panel. Because of this, the temperature of the panel surface
may rise in some cases.Also, plasma displays are made of finely processed glass. A reinforced glass filter is installed over the panel surfacebut avoid strong impact because there is still danger of glass breakage.
About the power swivel• Do not put hands or faces close to the monitor while operating the swivel function. It could cause a physical injury. Use special caution in
households where children are present. (Refer to Power Swivel shown on ) 25
9
EN
GL
ISH
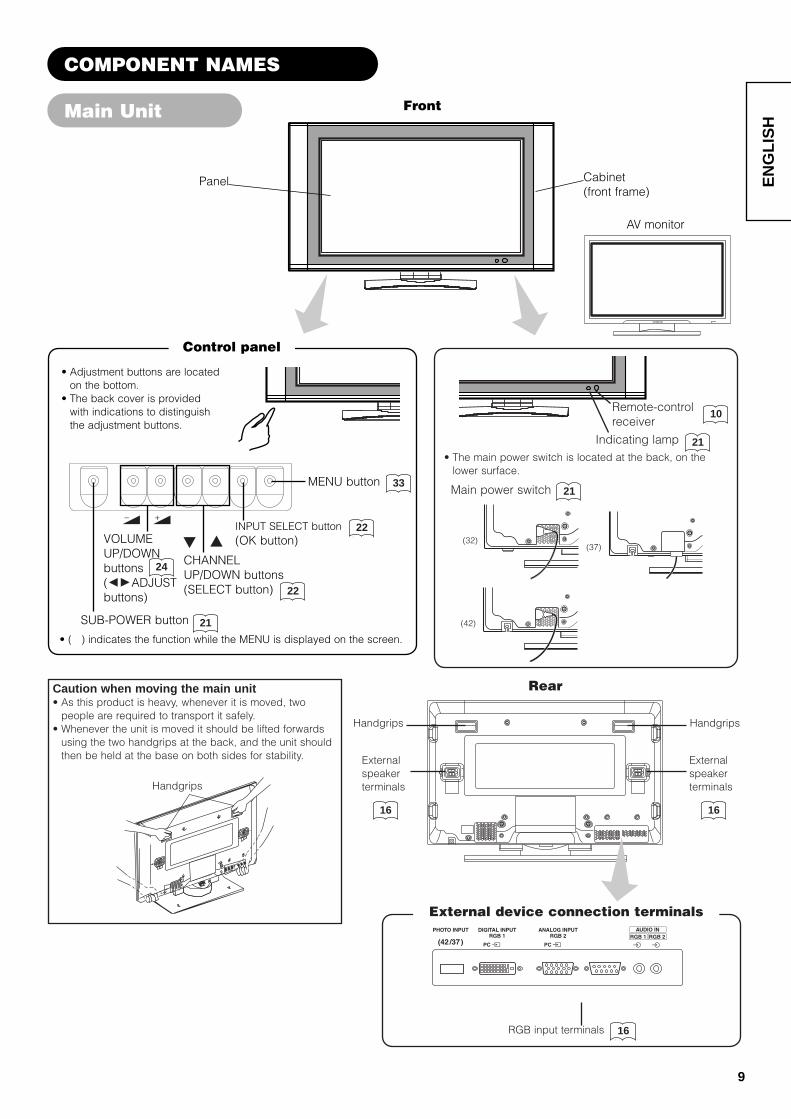
COMPONENT NAMES
Main Unit
Control panel
• Adjustment buttons are locatedon the bottom.
• The back cover is providedwith indications to distinguishthe adjustment buttons.
MENU button
SUB-POWER button
VOLUME UP/DOWN buttons( ADJUST buttons)
INPUT SELECT button(OK button)
CHANNELUP/DOWN buttons(SELECT button)
• ( ) indicates the function while the MENU is displayed on the screen.
33
22
22
24
21
(32)(37)
(42)
Remote-control receiver
10
Indicating lamp• The main power switch is located at the back, on the
lower surface.
Main power switch
21
21
Caution when moving the main unit• As this product is heavy, whenever it is moved, two
people are required to transport it safely.• Whenever the unit is moved it should be lifted forwards
using the two handgrips at the back, and the unit shouldthen be held at the base on both sides for stability.
Handgrips
Rear
Handgrips
Externalspeaker terminals
Handgrips
Externalspeaker terminals
16 16
External device connection terminals
RGB input terminals 16
Panel Cabinet (front frame)
Front
AV monitor

10
Remote control
POWER ON/OFF button
INPUT SELECT buttons
MENU buttonOK button
SOUND MODE button
VOLUME UP/DOWN button
PROGRAM SELECT buttons(TV)
MULTI MODE button
RECALL button
FUNCTION SELECT button
DVD CONTROL button
FREEZE/RETURN buttons
SELECT/ADJUST button
PICTURE MODE buttonCH I/CH II button (TV)
CHANNEL UP/DOWN button (TV)MUTE button
MULTI PICTURE button
PHOTO INPUT buttons
SWIVEL button
T/TEXT button(TV)
Loading Batteries
1. Open the battery cover.• Slide back and remove the battery
cover in the direction of the arrow.
2. Load batteries.• Load two Size AA batteries included
observing the correct polarities.
3. Close the battery cover.• Replace the battery cover in the
direction of the arrow and snap it backinto place.
Handling the Remote Control
Use the remote control within about 5 m from front of the unit’sremote-control sensor and within 30 degrees on both sides.
With in 30degrees
About 5m
About 3m
With in 30degrees
About 3m
• Do not use new and old batteries together. The batteries couldexplode or leak, resulting in fires, physical injury, or stains.
• When loading batteries, observe their correct polarities asmarked on the product. If loaded in the wrong direction, thebatteries could explode or leak, resulting in fires, physical injury,or stains.
CAUTIONATTENTION • Do not drop or impact the remote control.• Do not splash the remote control with water or put it on a wet
object to avoid possible failures.• Before leaving the remote control out of use for an extended
period of time, remove the batteries from it.• If the remote control begins to lack responsiveness, replace the
batteries.• Strong light such as direct sunlight impinging on the
photoreceptor of the remote control can cause operationalfailure. Position this unit to avoid direct contact with such light.
COMPONENT NAMES (continued)
@@@@@@@@e?@@@@@@@@e?@@h?@@h?@@h?@@h?@@h?@@h?
@@@@@@@@e?@@@@@@@@?e@@@@@@@@e?@@@@@@@@?e@@@@@@@@e?@@@@@@@@?e@@@@@@@@e?@@@@@@@@?e@@@@@@@@e?@@@@@@@@?e@@@@@@@@e?@@@@@@@@?e@@@@@@@@e?@@@@@@@@?e@@@@@@@@e?@@@@@@@@?e@@@@@@@@e?@@@@@@@@?e@@@@@@@@e?@@@@@@@@?e@@@@@@@@e?@@@@@@@@?e@@@@@@@@e?@@@@@@@@?e@@@@@@@@e?@@@@@@@@?e@@@@@@@@e?@@@@@@@@?e@@@@@@@@e?@@@@@@@@?e@@@@@@@@e?@@@@@@@@?e@@@@@@@@e?@@@@@@@@?e@@@@@@@@e?@@@@@@@@?e
@@@@@@@@@@@@@@@@@@@@@@@@@@@@
@@@@@@@@@@@@@@@@
@@@@@@@@@@@@@@@@
@@@@@@@@@@@@@@@@
@@@@@@@@@@@@@@@@
@@@@@@@@@@@@@@@@
@@@@@@@@@@@@@@@@
@@@@@@@@@@@@@@@@
@@@@@@@@@@@@@@@@
?@@?@@?@@?@@?@@?@@
?@@@@@@@@?@@@@@@@@
?@@@@@@@@?e@@@@@@@@e?@@@@@@@@?e@@@@@@@@e?@@@@@@@@?e@@@@@@@@e?@@@@@@@@?e@@@@@@@@e?@@@@@@@@?e@@@@@@@@e?@@@@@@@@?e@@@@@@@@e?@@@@@@@@?e@@@@@@@@e?@@@@@@@@?e@@@@@@@@e?@@@@@@@@?e@@@@@@@@?@@@@@@@@?e@@@@@@@@e?@@@@@@@@?e@@@@@@@@e?@@@@@@@@?e@@@@@@@@e?@@@@@@@@?e@@@@@@@@e?@@@@@@@@?e@@@@@@@@e?@@@@@@@@?e@@@@@@@@e?@@@@@@@@?e@@@@@@@@e?@@@@@@@@?e@@@@@@@@e?@@@@@@@@?e@@@@@@@@
@@g@@g@@g@@g@@g@@g@@@@@@@@@@@@@@@@
@@@@@@@@@@@@@@@@
@@@@@@@@@@@@@@@@
@@@@@@@@@@@@@@@@
@@@@@@@@@@@@@@@@
@@@@@@@@@@@@@@@@
@@@@@@@@@@@@@@@@
@@@@@@@@@@@@@@@@
@@@@@@@@@@@@@@@@

11
EN
GL
ISH
Dynamic Natural Cinema
Movie Music
Favorite SpeechPICTURE MODEYou may recall the picture mode bypressing this button. Each time pressed,picture mode is changed in followingsequence.
INPUT SELECTPress this button to change inputmode.
DVD CONTROLYou can use these buttons to operatethe selected brand of DVD player.
PROGRAM SELECTPress these buttons to select a TVprogram directly.
SOUND MODEYou may recall the sound mode by pressingthis button. Each time pressed, sound modeis changed in following sequence.
FUNCTION SELECTPress this button to indicate function mode with a lamp.
MULTI MODE In multi-picture mode, pressing thisbutton will change the multi-picturemode.
CH I/IIThis button is for A2 / NICAMmodels only.
MULTI PICTUREPress this button to change thescreen to multi-pictures. Press itagain to return to normal picture.
PHOTO INPUT (37/42 only)Press this button to display the pictures from digital camera and USB card reader.
SWIVELPress this button to rotate TV. Use cursor key ( ) to select the degreeof rotation.
MUTE Press this button to turn off the setsound. When press again or the volume up button, the audio will be restored.
FREEZE/RETURN Press this button to change thepicture to freeze mode. Press it againto return to normal picture.
ZOOM Press this button can change Picture size.
RECALL (TV)With this button, the display changebetween “--”,“---”,“-” and AV00 on thetop right hand corner of the screen.“--” is for 2 digit channel selection, “---”is for 3 digit channel selection and “-” isfor 1 digit channel selection.
RECALL (Video/RGB)Press this button to display input signal.
TIME (TV)Pressing this button can indicate thetime by On-Screen display whenreceiving a TV program on the screenincluding TELETEXT service with thetime information.
*2
*1
DVD and SAT
*1 FUNCTION SELECT button
This remote controls has functions to control DVD player, DVD recorder, and STB for certain makers, besides this set.Press button to operate those equipments.Each time pressed, LED lamps (TV, DVD, SAT) left to button lights to indicate the selection.For details, refer to
*2 LED
LED lamps of DVD and SAT have 2 conditions (lighting or blinking).Lighting: Indicate that the corresponding button becomes DVD (STB) mode.
Change to STB (TV) mode when press the button during LED lighting.Blinking: Indicate that DVD or STB makers can be set up.
Set up makers/types for DVD or STB during LED blinking (30 sec). For details, refer toIf press the button on the remote control after LED light is off, LED light becomes on the corresponding code.
Remote control (continued)
COMPONENT NAMES (continued)
48
48
12
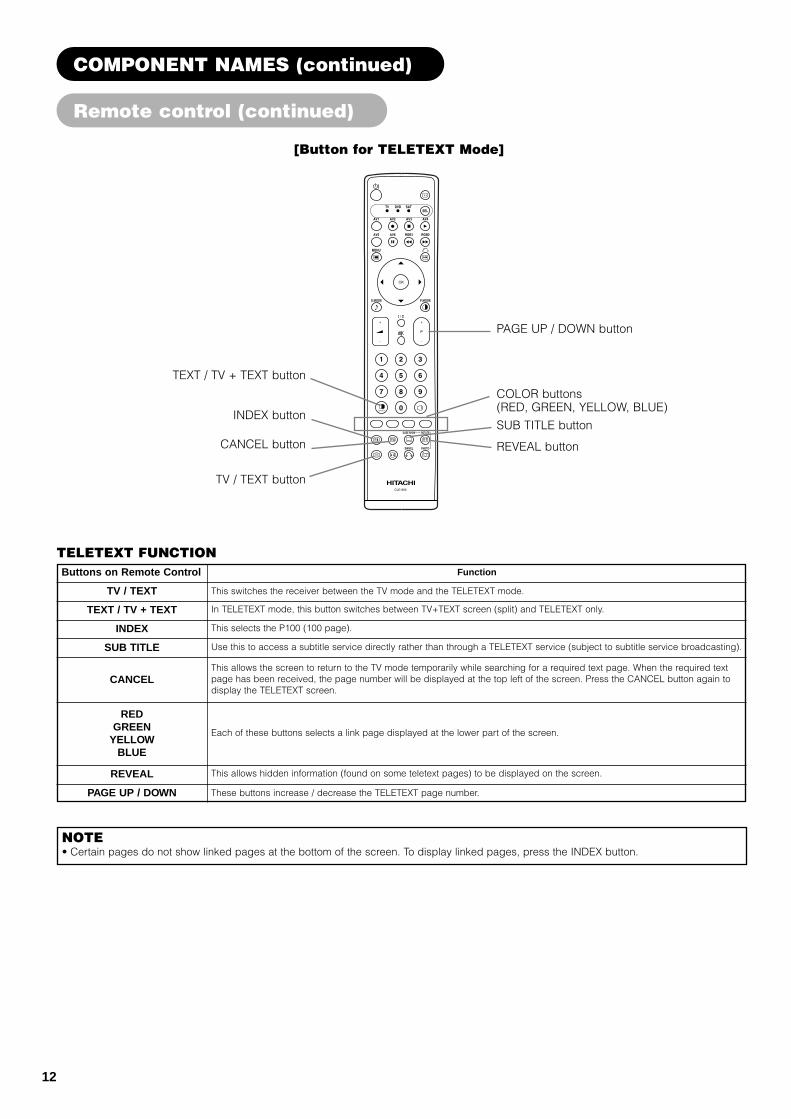
TV / TEXT button
CANCEL button
INDEX button
TEXT / TV + TEXT button
PAGE UP / DOWN button
COLOR buttons(RED, GREEN, YELLOW, BLUE)
SUB TITLE button
REVEAL button
Buttons on Remote Control
This switches the receiver between the TV mode and the TELETEXT mode.
Function
In TELETEXT mode, this button switches between TV+TEXT screen (split) and TELETEXT only.
This selects the P100 (100 page).
Use this to access a subtitle service directly rather than through a TELETEXT service (subject to subtitle service broadcasting).
This allows the screen to return to the TV mode temporarily while searching for a required text page. When the required textpage has been received, the page number will be displayed at the top left of the screen. Press the CANCEL button again todisplay the TELETEXT screen.
Each of these buttons selects a link page displayed at the lower part of the screen.
This allows hidden information (found on some teletext pages) to be displayed on the screen.
These buttons increase / decrease the TELETEXT page number.
TV / TEXT
TEXT / TV + TEXT
INDEX
SUB TITLE
CANCEL
REDGREEN
YELLOWBLUE
REVEAL
PAGE UP / DOWN
NOTE • Certain pages do not show linked pages at the bottom of the screen. To display linked pages, press the INDEX button.
[Button for TELETEXT Mode]
TELETEXT FUNCTION
Remote control (continued)
COMPONENT NAMES (continued)

• In order to prevent an internal temperature increase, maintain a space of 10cm (4 inches: For a desktop set-up) or more between the sides and other objects such as walls, etc.,so that the ventilation holes are not blocked.(*)
CAUTION
13
EN
GL
ISH
INSTALLATION INSTRUCTIONS
Installation
Use one of the special mount units to install this product. A mount of insufficient strength or inadequate design can cause overturning ordropping and result in fire, electrical shock or injury. Please note that our company assumes absolutely no responsibility for personal injuriesor property damage caused by use of other mount units or improper installation.
WARNING
Have this unit mounted in a stable place. Take measures to prevent it from tumbling down to avoid possible physical injury.
CAUTION
Loosen a cord or chain enough while operating power swivel to avoid possible physical injury.
CAUTION
10cm or more*
Cord or chain
Clamp
Wall or Pillar
Anti-tumble measures
Securing to a wall or pillarUsing a commercially available cord, chain and clamp, secure the set to a firm wall or pillar.
Securing desktop1) Using wood screws (two), fasten the set to the clamping screw holes on the rear of the
stand as shown.
2) Using commercially available wood screws, secure the set firmly in position.
Read SAFETY INSTRUCTIONS ( to ) carefully to ensure maximum safety before pro-ceeding to these steps:• Choose an appropriate site and install the product on a level table where the stand is secure.
• Install the monitor to have ready access to a power socket available.• Make sure that the power switch of this device is turned off.
Hook
Cord or chain
Clamp
Cord or chain
Wall or Pillar
Two placesWood screw
4 7

14
Connecting to an Audio Visual Device(1) Make sure that the power switch of the monitor is turned off.(2) Make sure that the power switch of the imaging device is turned off.(3) Use a commercially available cable and connector to connect the signal input terminal on the rear panel of this
device and the signal output terminal of the imaging device.
Monitor (rear panel)Speaker (R) Speaker (L)
Powercord
Side Input
To component
output terminals
To component
output terminals
To S video
output terminal
To composite
output terminals
To audio output term
inals
To audio output term
inals
To audio output term
inals
To composite
output terminal
To audio output term
inals
To S, com
posite audio output term
inal
To US
B output
terminal
Headphone
To composite
input terminals
To audio input term
inalsSet-Top Box
Antenna
VTR VTR
VTR
DVD Player
DVD Player
To component
input terminals
To component
input terminals
TV Type only
Photo input terminal (37/42 only)
• If a component input terminal and a composite input terminal of AV1 and AV2 connect to the monitor at the same time, component input wouldgovern.
• If a video equipment with an S video output terminal is used, cabling by the S video cable is recommended to provide finer video quality. (If an S video input terminal and a video input terminal of AV3 or AV5 (side input) connect to the monitor at the same time, S video input wouldgovern.)
• If the OUTPUT (Monitor) terminal is connected to an external monitor with a 75 Ohm terminal, it is possible to view the same image as on themain unit. But it is possible to monitor only the composite video signal from AV1 ~ AV5 input or the S video signal from AV3 and AV5 that isdisplayed on the screen at the time.
• The photo input function might not be provided, depending on a model.• Secure connecting cables to the stand with the provided clamp.
HDMI*• HDMI (High-Definition Multimedia Interface) is a digital interface based on DVI (Digital Visual Interface), which is an added function for audio
visual equipment.– It does not have degradation by transmission since it is digital.– With only one cable, it is possible to transmit both picture signals and audio signals.• In case of using analog audio as connecting with DVI-HDMI transformation connector, use an analog audio terminal for AV1 input.
[An example of connecting audio visual devices]
INSTALLATION INSTRUCTIONS (continued)

15
EN
GL
ISH
When the "ANT" terminal is connected to outdoor antenna instead of CATV system, please note that a goodantenna adaptor is necessary. See the diagram on the right.
Precautions when connecting the antenna• Clamp section A using pliers when installing the coaxial cable. If other types of adaptors are used, be
sure that the core and shielding are good.• Please use a coaxial cable which is free from interference to connect the antenna. Avoid using a parallel
flat feeder wire as interference may occur, causing reception to be unstable and stripe noise to appear onthe screen.
• Avoid using indoor antenna as this may be affected by interference. Please use CATV net or outdoorantenna.
• Keep the power cord as far away from the antenna wire as possible.• For safety, install an external antenna conforming to AS1417.1 (applicable for Australia only)
If there are noise appearance in the picture of VHF-Low band channel, please use the double-shielded cable (not provided) for RF LEADS to reduce the noise.
Connecting to an Audio Visual Device (continued)
INSTALLATION INSTRUCTIONS (continued)

16
Connecting to a PC
(1) Make sure that the display signal of the personal computer to be used is compatible with the specifications of thisdevice.• See "Product Specifications" concerning the specifications of this device.
(2) Make sure that the power switch of the personal computer is turned off.(3) Connect the signal input terminal (RGB 1 or RGB 2) on the rear panel of this device to the display signal output
terminal of the personal computer.• Use a cable that fits the input terminal of this device and the output terminal of the personal computer.• Depending on the type of personal computer being connected, the use of an optional conversion adapter or the adapter provided with
the personal computer may be necessary in some cases. For details, refer to the instruction manual of the personal computer or askthe personal computer manufacturer or your local retail dealer.
53 57
(D-sub)(DVI)
Monitor (rear panel)Speaker (R) Speaker (L)
Power cableconnector
Powercord
To signal outputterminal(DVI)
To audio outputterminal
To audio outputterminal
3.5mmStereo mini jack
PC
To signal outputterminal(D-sub)
To signal outputterminal(DVI)
(Example)DVD Player
Connecting to a PC Device Connecting to an Audio Visual Device
• SettingRGB1: DVI-PCRGB2: RGBFor details, refer to
• SettingRGB1: DVI-STBRGB2: ComponentFor details, refer to
INSTALLATION INSTRUCTIONS (continued)
56 57 55 56

17
EN
GL
ISH
Mounting the Speaker Unit
INSTALLATION INSTRUCTIONS (continued)
Make sure that the main power swich of the monitor is turned off (standby or indicating lamp: off/red) when removing or connecting thespeaker cables.
CAUTION
Make sure to use the speaker systems fastened with the speakerholders and the screws.
CAUTION
Mounting the Speaker System to the Monitor
1. Mounting the Speaker System to the MonitorHook the clamps (3 pieces) into the holes as shown in the figure,and pull them down.Follow the step in both Right and Left sides.
2. Attach the speaker holdersAfter twisting the screws off as shown, fasten the speaker system to the monitor with the speaker holder by the screws.The speaker holder direction is opposite on the Right and Left speaker systems.
3. Attach the speaker connecting cables to the monitor. (Make sure the ferrite core is toward the monitor side)
Right Side
Rear of the monitor
Clamps
Right Side
Rear of the monitor
Twist off the screws
Speaker holder
Monitor
Speaker System
Speaker holder
Screws x 4
Screws x 4
Aluminum pieces
Screwdriver
NOTE In case that the speakersystems do not fit withthe monitor body’sheight.When loosen the screwsfixing the aluminum pieces,the speaker system ismovable up and down.Adjust the position to themonitor body’s height, thentighten up the screws.
Pull off while twisting
Please prepare the supplieolspeaker cables
Treating the wire ends
Ferrite core Ferrite core
(R)RedBlack
(L)RedBlack
Connect the copper colored wire
Connect the silver colored wire
Connect the silver colored wire
Connect the copper colored wire
Press down the lever
Raise the lever
Insert the wireHow to connectthe speaker cables(Moniter side)
Place to attach the side input.

18
Mounting the Speaker Unit (continued)
INSTALLATION INSTRUCTIONS (continued)
4. Attach the speaker cables to speaker systems.
Connect the copper - colored wire to the Red side.
Connect the silver - colored wire to the Black side.
Speakerterminals
Hold down the lever
Release the lever
Insert the wireHow to connectthe speaker cables(Speaker side)
Make sure to secure the power cable and the connecting cables for other audio visual devices, except the speaker connecting cables, to theclamp of the monitor stand and the rear of it. When the monitor is swiveled, the connectors might be dropped out and generate heat. It couldcause fire and/or connector failures.
CAUTION

19
EN
GL
ISH
Mounting the Side Input
INSTALLATION INSTRUCTIONS (continued)
• With the speaker unit1. Mount the side input into the speaker holder.
Hook the clamps (4 pieces) of the speaker holder into the holes as shown in the figure and pull them down until it sounds click.Fasten the side input with the speaker holder by the screws.Refer to about the connection of side input.See the below figure how to treat the cable.
2. Mount the side input into the securing holder.Fasten the side input with the speaker holder by the screws.See the below figure how to treat the cable.
• Without the speaker unit1. Attach the holder for the side input.
14
Side input
Screw x 1Speaker holder
Clamp (42, 37)Side input
32 inch 42 inch37 inch
Screw hole Clamp (42, 37)
Clamp (32)
Screw x 2
Holder
Screw hole
Clamp (32)
Clamp (42, 37)
42 inch37 inch
32 inch
Side input

20
INSTALLATION INSTRUCTIONS (continued)
Connect the power cord, after completing all other connections. ...42, 32
Connect the power cord to this device. Connect the power cord plug to the power outlet.
(The type of plug is different from this drawing for some countries.)
Power Cord Connection
• Use only the power cord provided. (Ask your local retail dealer about the power cord for AV monitor)• Do not use a power supply voltage other than that indicated (AC100-240V, 50/60Hz) as this may cause fire or electric shock.
CAUTION
Connect the power cord, after completing all other connections. ...37

21
EN
GL
ISH
OPERATING INSTRUCTIONS
Indicating lamp
Main power switch
(32)(37)
(42)
SUB-POWER button
POWER ON/OFFbutton
Turning Power On and Off
• To turn the monitor power ON, press the main powerswitch on the monitor main unit to ON, and then pressthe SUB POWER button of control panel or the powerbutton on the remote control.
• To turn the monitor power OFF, press the SUB POWERbutton of control panel or the power button on theremote control, and then press the main power switchon the monitor main unit to OFF.• During normal use, the main power switch is set in the ON
position, and the monitor can then be turned ON/OFF using theSUB POWER button or the power button on the remote control.
Indicating lamp
Indicatinglamp
Power status Operating
Off OffWhen the main power switch is set toOFF.
Lights redOff
(standby)
When the main power switch is ON, andthe power button on the remote controlor the SUB POWER button on theunderside of the front of the frame isOFF.
Lights green On
When the main power switch is ON, andthe power button on the remote controlor the SUB POWER button on theunderside of the front of the frame isON.
Lights orangeOff
(Power Save)
When the main power switch is ON, andthe power button on the remote controlor the SUB POWER button on theunderside of the front of the frame isON.However, the state in POWER SAVEmode
When the indicating lamp lights in orange or the message “NoSync. Signal”, “Power Save” or “Invalid Scan Freq.” appears on thescreen, there is something unusual about the status of reception.See “Power Save Mode” or “Symptoms That Seemingly Appear tobe Failures.” 48 49
ATTENTION • Avoid repeatedly turning the monitor on and off at short time
intervals. Failures might result from such operation.• Turn off the main power switch before leaving the monitor out of
use for an extended period of time.• If a power failure occurs while the main unit is running, it would
be powered on upon recovery from the failure. Turn off the unitmain power switch before leaving the main unit.
50

22
OPERATING INSTRUCTIONS (continued)
INPUT SELECT buttonCHANNEL UP/DOWN buttons
Input Switching
Size Switching
• Input can be switched by pressing the AV1~6, RGB1 orRGB2 buttons of the remote control.
• Input can be switched to TV by pressing CHANNELUP/DOWN buttons or PROGRAM SELECT buttons.
• Input can be switched in the sequence of TV AV1 AV2 AV3 AV4 AV5 AV6 RGB1 RGB2 bypressing the INPUT SELECT button of the control panel.
* TV display is not available in the AV monitor.
Each time the ZOOM button of the remote control ispressed, the screen display size will change in sequenceand the status will be displayed at the bottom of thescreen.
• During TV/VIDEO signal input (TV, AV1, AV2, AV3, AV4,AV5, AV6, RGB1 (set to [DVI-STB]) and RGB2 (set to[Component]))
* TV display is not available in the AV monitor.
• The size will fix as Full mode and not change when receiving thecomponent signal of 1080i/50, 1080i/60 or 720p/60.
TV AV1 AV2 AV3 AV4
RGB2 RGB1 AV6 AV5
4:3 Panoramic Zoom
Full Cinema
Full
INPUT SELECTbuttons
RECALL button
ZOOM button
Display size selection diagramWhen you want to Set the display size to Input signal Display screen Remarks
Play a 4:3 image in a 16:9 screen faithfully. 4 : 3
(4:3 signal)
Blanking occurs on both sides.
Play a 4:3 image in a 16:9 screen with theheight and width of the middle of thescreen enlarged on equal scales and withboth sides appearing somewhat enlarged.
Panoramic
Play a 16:9 VISTA size image in the 4:3image faithfully reproduced on the 16:9screen.
Zoom(Vista)
• The 4:3 image is called a letterbox image.• In some cases, some slight blanking may
remain at the top and bottom.
Play a 21:9 Cinema size image in the 4:3image expanded vertically on the 16:9screen.
Cinema(Cinema)
In some cases, some slight blanking mayremain at the top and bottom.
Play a 4:3 image faithfully in a 16:9 screenin the standard vertical size and horizontal-ly squeezed.*
Full(Squeeze)
* An image with an aspect ratio of 16:9 shrunkhorizontally to 4:3 to display in a 4:3 screen
CHANNELUP/DOWN button
PROGRAMSELECT buttons

23
EN
GL
ISH
Vertical picture position can be adjusted for [Panoramic], [Zoom] and [Cinema] mode as follows.1. Press ZOOM button and SELECT buttons during picture size display.2. Position display will appear.3. Adjustment range of each picture size are as shown below.
[Panoramic] - 12 to + 12[Zoom] and [Cinema] - 31 to + 31
4. When 1080i/60 component signal is received, vertical position can be adjusted only one step up. (The range: 0 to +1)
Position + 31 Position - 31
Press Press
ATTENTION Using a wide-screen monitor• This monitor has a screen mode selection feature. If an incompatible screen mode is selected to play certain software, such as a TV
program, the image would appear different from the original. Take this into consideration when making screen mode choices.• Use of this monitor in its enlarged display mode with the wide feature enabled in coffee shops, hotels and other establishments for
commercial or pubic viewing purposes could infringe on the copyright holder’s right protected by Copyright Law.• When a normal 4:3 image is displayed over the entire screen in the Panoramic mode, parts of the periphery of the image may disappear
and/or appear distorted in some cases. Use the 4:3 mode to view images, which were created in 4:3 mode.This mode allows 4:3 content to be viewed without picture distortion.
• During RGB Input (RGB1 (set to [DVI-PC]) and RGB2 (set to [RGB]))
* Real mode gives the image of the same shape as it is displayed on a computer monitor.This mode is only available for VGA (640 X 480) and WVGA (864 X 480).
Display area selection diagram (RGB input)
Normal Full Zoom1
Real Zoom3 Zoom2*
Resolution Full display Circular display
Full Normal Real
* VGA and W-VGAonly
Zoom1 Zoom2 Zoom3Display
640 X 480(VGA)
800 X 600(SVGA)
1024 X 768 (XGA)
1280 X 1024(SXGA)
1600 X 1200(UXGA)
Processes such as compression (thinning) and expansion are performed for the above signal display. Because of this, there is a possibility thatflicker may become noticeable on Zoom (1 ~ 3) depending on the display contents. If this occurs, turning the Vertical Filter On canreduce the flicker.
38
OPERATING INSTRUCTIONS (continued)
Size Switching (continude)

24
OPERATING INSTRUCTIONS (continued)
Audio MuteVolume Adjustment
The audio volume can be temporarily mute by pressingthe MUTE button of the remote control.
The volume can be adjusted by pressing the and buttons of the remote control (or the and volumebuttons of the monitor unit).
Volume 15
Volume setting value
Adjustment status guide display(The display color will change to magenta: volume Mute)
Volume 15
Volume setting value
Adjustment status guide display
• When a button is pressed, the volume adjustment statusguide (magenta) will be displayed.• The volume setting can be lowered by pressing the button
while the audio is mute.• The muting can be cancelled by pressing the button or
MUTE button while the audio is mute.• The audio from the headphone terminal is not mute.• The audio from the speaker is automatically mute while
connecting the headphone to the headphone terminal of the sideinput (AV5).
When the MUTE button of the remote control is pressedagain, the audio will be restored and the volume display(green) will appear.
• When a button is pressed, the volume adjustment statusguide will be displayed.• The volume will increase when the button is pressed while
the guide is being displayed.• The volume will decrease when the button is pressed while
the guide is being displayed.

25
EN
GL
ISH
OPERATING INSTRUCTIONS (continued)
Power Swivel
• This feature controls the motorized stand. It allows turning the plasma display left or right using the remote control.
Make sure that the main power switch of the monitor is turned off when removing or connecting the power cord, the connector cables, andthe speaker cables.
CAUTION
1. Press Swivel button. The controlling icon appears on the screen.• If the connecting cable is not connected, the indication "Not Available" appears.• The swivel display disappears in about 6 seconds without any operation.
Swivel
2. Adjust for preferred angle.Facing directions are displayed on the screen while the monitor is swiveled.Adjust by using key while the swivel display is on the screen. Swiveling angle of the monitor is available within 30 degrees from the front face.
ATTENTION• Do not add excess power by hands while using the power swivel function. It could cause troubles.• Do not get on and/or hang down the monitor. Do not swing the monitor back and forth and around either. It could cause the failure of the
stand.• Do not put hands or faces close to the monitor while operating the swivel function. It could cause a physical injury. Use special caution in
households where children are present.• Do not put any object, like a vase, near the monitor in swiveling area. It would cause a breakage of the object and /or a failure of the stand.• Place the monitor on the stable location, or the swivel function would not operate correctly. It would cause the malfunction.• In the case of using the monitor wall mounted, be sure to detach the connecting cable between the monitor and the stand.
Caution when connecting the monitor with the stand
* This power swivel function might not be provided depending on a model.
• When detach the stand from themonitor, make sure to detach theconnector cable from the standconnection terminal on the rear of themonitor.
• Make sure that the direction of the connector for stand connecting cable is correct.
• When attach the stand to the monitoronce again, insert the connectorcable into the stand connectionterminal on the rear of the monitor.
Pinch right and leftlocks of the connectorand pull out downward.
Insert until it clicks.

26
OPERATING INSTRUCTIONS (continued)
Input Signal Screen Display
The input signal status can be displayed on the screenby pressing the RECALL button of the remote control.• The display will go out in approximately 6 seconds.
1ABCDE
-- -- Min.-- -- : -- --
OFF
TV
Off-timerOn-timer
TV positionNameSound mode
AV1Composite
-- -- Min.-- -- : -- --
OFF
VIDEO
Off-timerOn-timer
Input modeSignal mode
RGB2RGB
H : 48.4kHzV : 60.1 Hz
-- -- Min.-- -- : -- --
OFF
RGB
Off-timerOn-timer
Input modeSignal modeInput horizontal frequencyInput vertical frequency
RECALL button

27
EN
GL
ISH
OPERATING INSTRUCTIONS (continued)
Displaying MULTI PICTURE
If the MULTI PICTURE button on the remote control ispressed, multi pictures will display. And then three typesof the screen can be selected by pressing the MULTIMODE button on the remote control.The multi picture mode will change in the followingsequence each time the MULTI MODE button is pressed.
2 pictures (Split) 4 pictures 12 pictures
Activating the Split mode from the TV screen
Pressing the MULTI PICTURE button one time will display 2 pictures.• The speaker icon can be shifted left and right by pressing the and SELECT buttons; the audio will be
output from the side on which the speaker icon is located.• The same signal input cannot be selected for both screens at the same time.• The TV channel can be changed by pressing the CHANNEL UP/DOWN buttons on the remote control.• The signal input mode of picture-A or picture-B (the one that the speaker icon is located on) can be
selected by pressing INPUT SELECT button on the remote control.• Pressing the MULTI PICTURE button once again will cancel the multi picture mode.• Refer to the table for 2 pictures (Split) mode.• For AV monitor model, TV screen cannot be displayed.
Activating the 4 pictures mode from the TV screen
Pressing the MULTI MODE button one time at the 2 pictures mode will display 4 pictures.• Press and SELECT buttons to select picture A or picture B indicated by a red triangle. For pictures
on right, press and SELECT buttons to select picture. The input display on the selected picture wouldchange green.
• The TV channel can be changed by pressing the CHANNEL UP/DOWN buttons on the remote control.• The audio can only be output from picture A in 4 pictures mode.• The component signal input mode cannot be selected in pictures B. Refer to the table for 4 pictures
mode.• Pressing the MULTI PICTURE button at the 4 picture mode will cancel the multi picture mode. And then,
pressing the MULTI PICTURE button again will display the 4 pictures.• For AV monitor model, TV screen cannot be displayed.
Activating the 12 pictures mode from the TV screen
Pressing the MULTI MODE button one time at the 4 pictures mode will display 12 pictures.• Starting from channel 1, preset channels will automatically display in sequence on the 12 windows.• This function activates only in TV mode.• After several seconds, it refreshes the picture one by one.• Pressing the MULTI PICTURE button at the 12 picture mode will cancel the multi picture mode. And then,
pressing the MULTI PICTURE button again will display the 12 pictures again.• Pressing the MULTI MODE button at the 12 picture mode will display the 2 pictures (Split) mode.• This function is not provided for AV monitor model.
28
INPUT SELECTbuttons
RECALL button
SELECT/ADJUSTbutton( , , , )
CHANNELUP/DOWN button
MULTI PICTUREbutton
MULTI MODE button
A B5 AV1
AV1 8
6
11
B1
B2
B3
A
1 2 3 4
5 6 7 8
9 10 11 12
28

28
Activating the Split mode from the video input screen
Pressing the MULTI PICTURE button one time will display 2 pictures.• The speaker icon can be shifted left and right by pressing the and SELECT buttons. The audio of
the video will be output from the side on which the speaker icon is located.• The same video input mode cannot be selected for both screens at the same time.• Pressing the MULTI PICTURE button again will cancel the 2 pictures display.• Refer to the table for 2 pictures (Split) mode.
Activating the MULTI PICTURE mode from the RGB input screen
Pressing the MULTI PICTURE button one time will display 2 pictures.• This mode can be available from RGB1(DVI-PC) and RGB2(RGB) input.• The speaker icon can be shifted left and right by pressing the and SELECT buttons. The audio of the
video will be output from the side on which the speaker icon is located.• The sub-screen position can be selected up and down by pressing and SELECT buttons.• The sub-screen can be selected with the AV1AV6, TV channel buttons from the status that the speaker
icon appears on the left side of AV etc. as shown in the diagram to the right.• Pressing the MULTI PICTURE button again will cancel the 2 pictures display.• "Frequency Mode" in the Setup Menu should be set to Movie when sub-screen is the component signal of
1080i/50 or 1080i/60.AV1: Displays the VIDEO input signal of the sub-screen.
AV1 AV2
RGB2AV1
(Sub-screen)
Main Sub
Sub 1
Sub 2
Sub 3
Main
NOTE • Even if the input of the horizontal / vertical synchronizing signal (or video signal) stops in the multi picture display, the mode will not change
to power save mode.• Please be careful since image retention will occur if display is left in a multi picture display state for a long period of time.
2 Pictures (Split)
Input terminal AV1AV5 AV1, AV2, AV6 RGB1 RGB2
SubMain
AV1 AV5
RGB1RGB2
AV1AV2AV6
TV PAL, SECAM
NTSC3.58/4.43 576i, 576p 480i, 480p 1080i/50 1080i/60 720p/60
STBComponent
TVPAL
SECAMNTSC3.58NTSC4.43
576i576p
480i480p
1080i/50 1080i/60 720p/60 STB ComponentTELETEXT
4 PicturesInput terminal AV1AV5 AV1, AV2, AV6 RGB1 RGB2
SubMain
AV1
RGB1RGB2
AV1AV2AV6
TV PAL, SECAM
NTSC3.58/4.43 576i, 576p 480i, 480p 1080i/50 1080i/60 720p/60
STBComponent
TVPAL
SECAMNTSC3.58NTSC4.43
576i576p
480i480p
1080i/50 1080i/60 720p/60 STB ComponentTELETEXT
( : Available)Teletext is available only for TV
( : Available)
OPERATING INSTRUCTIONS (continued)
Displaying MULTI PICTURE (continued)

29
EN
GL
ISH
OPERATING INSTRUCTIONS (continued)
FREEZE button
Picture Freezing
When the FREEZE button on the remote control is pressed, the screen transfers into thefreeze mode.• There are two types of freezing screen mode, Split and Strobe. These are possible to select at the “Freeze
Mode” setting of the Function Menu.• The Split mode will display 2 pictures from the same source on the screen with one active picture and the
other still.• The Strobe mode will display 12 pictures with the last picture active, while other 11 windows are still.• Pressing the FREEZE button again changes the screen back to the normal picture.• This function is also available from video input mode besides TV mode. Refer to the table for Freeze function
as below:
A B5
1 2 3 4
5 6 7 8
9 10 11 12Active
[Split]
[Strobe]
Split StrobeTV
PAL, SECAM NTSC3.58/4.43
576i 480i 576p 480p
1080i/50 1080i/60 720p/60
RGB, DVI-PC( : Available)

30
OPERATING INSTRUCTIONS (continued)
ROTATE button
PHOTO button PHOTO INPUT button
SLIDE SHOW button
Photo Input Display (37/42 only)With the PHOTO button on the remote control, the pictures from a digital camera or Card Reader can be displayed.
Operating the Photo Input1. Make sure that the power switch of the monitor is turned off/standby before using.2. Set up the digital camera and its power in reference to the item relating to “connecting to PC” on the user manual of digital camera.
*Insert the memory card when use the USB Card Reader.3. Connect the monitor with the USB cable (see the above picture). Switch the input to the photo input by pressing PHOTO button. Then, turnon the power of the digital camera.(Refer to the user manual of your digital camera).4. The photo pictures will be displayed after a period of time turning on the camera, if connecting normally.
Digital Camera
USB Card Reader
USB cable

Information
No message
No message
“No Connection”
“No Connection”
“No Connection”
“No File”
“Loading”
31
EN
GL
ISH
OPERATING INSTRUCTIONS (continued)
Photo Input Display (37/42 only) (continued)
Photo Input Function
Buttons on Remote Control Function Operating
Thumbnail-Size Image• Select the pictures by using ( , , , ) key.• Display the next or previous thumbnail-view of 16 images per one
page by using (+), (–).• Display the selected picture in the full size by pressing button.
Full-Size Image• Return to the thumbnail-view by pressing button or return button.
Display the pictures in the thumbnail view.Return to the previous input display during thethumbnail or the full view.
• Each time pressed, the picture is rotated in the sequence of 90° 180° 270° 0°.
Press this to display the picture with rotate mode.
• Press the button while displaying the picture, the slide show begins fromthe first picture at a fixed interval.
• Press OK key, the slide show will be paused with OSD display [ OK start].The slide show starts if let the condition for a minute.
• Return to the thumbnail images when finishing the all of pictures.• Interval time during slide show can be changed from 5, 10 and 30
seconds in “Slide Interval” of function menu.
Press this to display the slide show of pictures.
PHOTO
ROTATE
SLIDE SHOW
1/ 6 2/ 6 3/ 6 4/ 6
5/ 6 6/ 6
No. 1/ 6 28/05/03 1600 × 1200
Thumbnail-Size Image Full-Size Image
• Specification
• Error Information
Max number of picture
Max number of pixel
Application Digital Camera corresponding to DCF standard. USB Card Reader with the memory containing pictures had taken by camera.
8176 x 8176 JPEG format
500
39
PHOTO INPUT
Accessing
Normal
Not insert USB
Not available format
Abnormal
No File
Loading Files

32
OPERATING INSTRUCTIONS (continued)
Photo Input Display (37/42 only) (continued)
• The picture may not be displayed in case of editing by computers. • Do not connect any apparatus other than a digital camera and a USB card reader to the photo input connector. It causes the malfunction.• Do not connect a digital camera and USB card reader with USB HUB. Pictures may not be displayed correctly, or it causes the malfunction.• Insert only one memory even though the USB card reader has multiple slots for memory card. Pictures in multiple memory cannot be seen
at the same time.• Certain types of digital cameras or card readers may not work with this photo input function.• Digital cameras with low battery power may not properly display photos in this input.• This function does not work for audio and moving images taken other than a digital camera.• Response time might vary according to each image content when switching pages.• Contrast will decrease automatically if stationary images such as digital still photos are left on the screen for more than 3 minutes.• The OSD message “No Connection” is displayed in case of the incomplete connection with USB cable and connection to a digital camera
or USB card reader without the memory card.• The menu items other than “Picture” and “Function” are not available with grayed-out display.• The functions of the multi picture, CH selection, freeze mode, aspect, mode display, and so on are not available.• During blinking LED which indicates the access of a digital camera or USB card reader, or displaying “Loading”, do not turn the power
off/standby mode nor remove/insert USB cable and memory card.• The picture may not be displayed correctly, depending on the connecting device in case of extending the USB cable.
CAUTION
* This photo input function might not be provided depending on a model.
33
EN
GL
ISH
OPERATING INSTRUCTIONS (continued)
MENU button
RECALL button
SELECT/ADJUSTbuttons( , , , )
OK buttonRETURN button
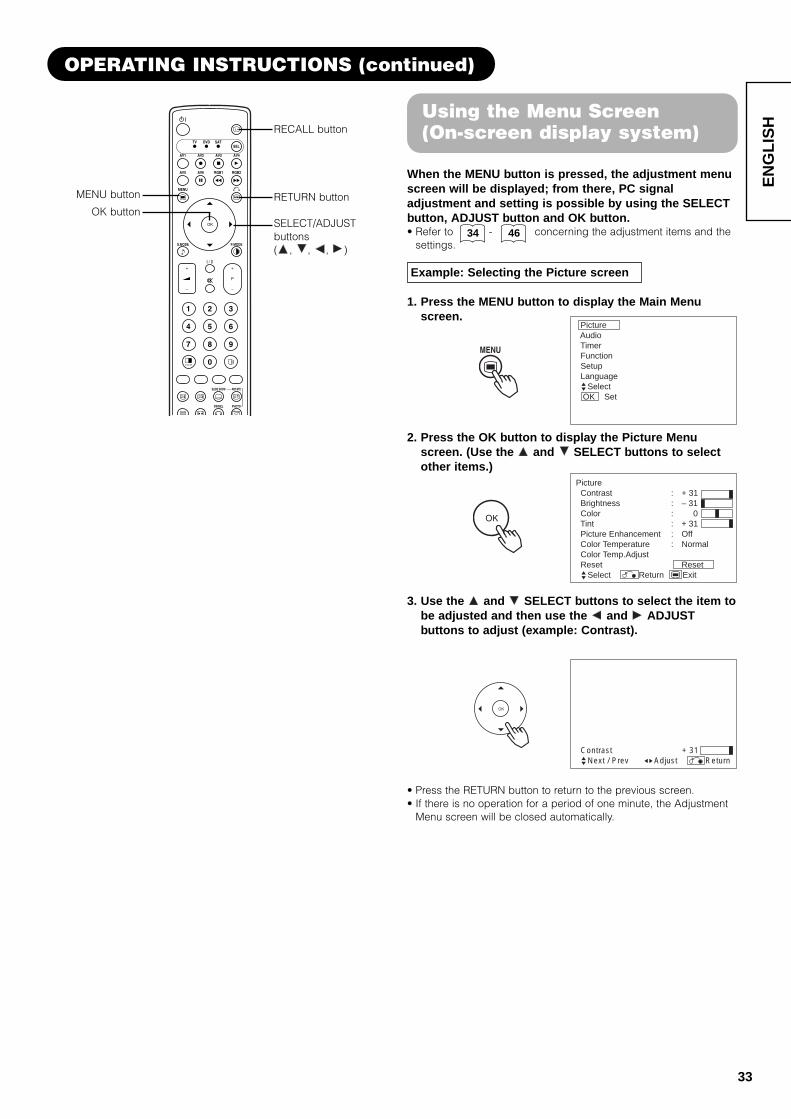
Using the Menu Screen(On-screen display system)
When the MENU button is pressed, the adjustment menuscreen will be displayed; from there, PC signaladjustment and setting is possible by using the SELECTbutton, ADJUST button and OK button.• Refer to - concerning the adjustment items and the
settings.
Example: Selecting the Picture screen
1. Press the MENU button to display the Main Menuscreen.
2. Press the OK button to display the Picture Menuscreen. (Use the and SELECT buttons to selectother items.)
3. Use the and SELECT buttons to select the item tobe adjusted and then use the and ADJUSTbuttons to adjust (example: Contrast).
• Press the RETURN button to return to the previous screen.• If there is no operation for a period of one minute, the Adjustment
Menu screen will be closed automatically.
34 46
Picture Audio Timer Function Setup Language Select OK Set
Picture Contrast : + 31 Brightness : – 31 Color : 0 Tint : + 31 Picture Enhancement : Off Color Temperature : Normal Color Temp.Adjust Reset Reset Select Return Exit
Contrast + 31 Next / Prev Adjust Return

34
Picture Audio Timer Function Setup Language Select OK Set
Setup Auto Tuning Manual Tuning Fine Tuning Sort Teletext Language Auto Off Off Select Set ReturnOK
Setup Auto Tuning Manual Tuning Fine Tuning Sort Teletext Language Auto Off Off Select Set ReturnOK
Setup Manual Tuning Position 99 Frequency 250MHz Name ABCDE Sound System BG Color System Auto Skip Off NR Off Antenna Att. Off Select Return Exit
Setup Auto Tuning Manual Tuning Fine Tuning Sort Teletext Language Auto Off Off Select Set ReturnOK
Setup Auto Tuning Manual Tuning Fine Tuning Sort Teletext Language Auto Off Off Select Set ReturnOK
Setup Auto Tuning Manual Tuning Fine Tuning Sort Teletext Language Auto Off Off Select Set ReturnOK
Setup Teletext Language West Europe East Europe Cyrillic Greek/Turkish Select Return Exit
Setup Auto Tuning Mode Position Search Select Set Return
OK
Setup Auto Tuning Mode Position Search Select Set Return
Setup Prog.No.199 Fine Tuning +56 Select Adjust Return
Setup Sort Position Name MHz 100 ABCDE 62MHz 101 BBC1 83MHz 102 ----- 97MHz 103 BBC 106MHz 104 FGHIJ 175MHz 105 XYZAB 189MHz 106 ----- 199MHz 107 ----- 225MHz
Select Return Exit
Setup Auto Tuning Scanning Channel Number: 33
CancelOK
Cancel
MENU
OPERATING INSTRUCTIONS (continued)
SETUP MENU (TV mode)

35
EN
GL
ISH
OPERATING INSTRUCTIONS (continued)
SETUP MENU (TV mode) (continued)
Selected characters Setup hint
Select the channel entry method between position setting or directsetting. And press the OK button to fix it.• If [Position] is selected, the screen display will be numbers (1~199
and AV00).• If [Direct] is selected, the screen display will be C at the chan-
nel 0~99 and S at the channel 100~199.
Press the OK button and it starts the auto tuning.
This is used to input the name of the TV station within 5 letters. Afterfixing the cursor on the first digit, select a letter by and SELECT buttons and move to next digit by ADJUST button.Press the OK button again after finished.• Selectable letters are “0”~”9”, ”A”~”Z”, “+”, “–”, ” ”(blank),
”,”(comma) and ”.”(period) .
• If [Position] has been selected, search the frequency here bypressing and buttons.
• If [Direct] has been selected, this function will be not available(grayed out).
Select the sound system through the 5 different settings.
Select the color system through the 5 different settings.
If this is set to On, it helps to reduce the noise interference visible onthe screen, especially in the weaker signal reception areas.
If this is set to On, that position will be skipped while selecting posi-tions by CHANNEL UP/DOWN buttons.This is automatically set to On for those non-broadcasting channels.
After completing the fine-tuning, press the RETURN button to exitthis mode.• The variable range is -56 ~ +56.
Select the teletext language through the 4 settings.• Select West Europe when watch in Singapore, Australia, Malaysia,
and so on.
If this is set to On, the power will be turned off when there is notransmission signal and no operation for about 10 minutes in the TVmode.
Press OK button at the a line that is required to change order, thenthe characters will change to green. And move it up or down in thelist by pressing and SELECT buttons. And press OK buttonto complete it. Press the RETURN button to exit.
If this is set to On, it helps to reduce the noise interference visible onthe screen in case of strong airwave.
Set the position number(0~199) or channel number(C, S) by (+) (–) CHANNEL UP/DOWN buttons.
Auto Tuning
Search
Manual Tuning
Position
Frequency
Name
Sound System
Color System
Skip
NR
Antenna Att.
Fine Tuning
Sort
Increasing the frequency datafor the main tuner.
Decreasing the frequencydata for the main tuner
– –
– –
– –
––
––
(When the Mode in Auto Tuning menu is set to [Direct], this function will be not available (grayed out).)
(A Line of position List)
Teletext Language
Auto Off
Mode Position Direct
( :a letter)
Auto M BGDK I
Auto PAL SECAMNTSC3.58 NTSC4.43
Off On
Off On
Off On
Off On

36
OPERATING INSTRUCTIONS (continued)
SETUP MENU (Video mode)
Picture Audio Timer Function Setup Language Select OK Set
Setup System System 1 Color System Video Input RGB1 DVI-STB RGB2 Component HDTV
Select Set ReturnOK
Setup Color System
AV1 Auto AV2 PAL AV3 SECAM AV4 PAL AV5 Auto
Select Return Exit
Setup Video Input
AV1 Auto AV2 Auto
Select Return Exit
MENU
Setup System System 1 Color System Video Input RGB1 DVI-STB RGB2 Component HDTV
Select Set ReturnOK
Selected characters Setup hint
System1 System2
Auto PAL SECAMSystem1
System2
NTSC3.58 NTSC4.43
Auto NTSC-MPAL-N PAL-M
Auto HDTV SDTV/DVD
System
Color System
Video Input
AV1~AV5
AV1, AV2
Do not change the original setting.(System1 : Europe/Asia, System2 : North America)
DVI-PC DVI-STBRGB1This should correspond to the signal mode of the signal from the equip-ment that is connected to RGB1 DVI terminal.
This should correspond to the color system of the signal from the equip-ment that is connected to AV1~AV5 video input terminal.• Normally, set this to Auto. The system of the input signal will be auto-
matically recognized.• If the input signal contains much noise or has a low level at Auto and
the operation is found erratic, set this to match the input signal.• When the component signal is received, this would be not available
(grayed out).
This should correspond to the signal mode of the signal from the equip-ment that is connected to AV1, 2 video input terminal.• Normally, set this to Auto. The signal mode of the input signal will be
automatically recognized.• If the input signal contains much noise or has a low level at Auto and
the operation is found erratic, set this to match the input signal.
RGB ComponentRGB2 (1st step)This should correspond to the signal mode of the signal from the equip-ment that is connected to RGB2 D-sub terminal.
Auto HDTV SDTV/DVDRGB2 (2nd step)
This step should be set only when [Component] is selected on the 1ststep.This should correspond to the signal mode of the signal from the equip-ment that is connected to RGB2 D-sub terminal.• Normally, set this to Auto. The signal mode of the input signal will be
automatically recognized.• If the input signal contains much noise or has a low level at Auto and
the operation is found erratic, set this to match the input signal.

37
EN
GL
ISH
OPERATING INSTRUCTIONS (continued)
SETUP MENU (RGB mode: RGB1 (DVI-PC), RGB2 (RGB))
MENU
Picture Audio Timer Function Setup Language Select OK Set
Setup Auto Adjust Adjust Horizontal Position 0 Vertical Position + 31 Horizontal Clock – 20 Clock Phase 10 Reset Reset Select Set ReturnOK
Horizontal Position 0 Next / Prev Adjust Return
Setup Auto Adjust Adjust Horizontal Position 0 Vertical Position + 31 Horizontal Clock – 20 Clock Phase 10 Reset Reset Select Set ReturnOK
Setup Input Level 0.7V Frequency Display Off WVGA Type Off WXGA Mode Off Vertical Filter On Frequency Mode Movie RGB1 DVI-PC RGB2 RGB Select Set Return
Clock Phase 10 Next / Prev Adjust Return
Selected characters Setup hint
Off 1280x768 1366x768
Off On
Off On
0.7V 1.0V
Auto Adjust*
Horizontal Position
Vertical Position
Horizontal Clock
Clock Phase
Reset
Input Level
Frequency Display
WVGA Type
WXGA Mode
Horizontal Position, Vertical Position, Horizontal Clock and ClockPhase are adjusted automatically.
Adjust the left-side display position.Screen display changes to Magenta color if beyond the availablerange. (This function is only for RGB2. It’s not available (grayed out)for RGB1 (DVI-PC).)
Adjust the vertical display position.Screen display changes to Magenta color if beyond the availablerange. (This function is only for RGB2. It’s not available (grayed out)for RGB1 (DVI-PC).)
Adjust for maximum character clarity.(This function is only for RGB2. It’s not available (grayed out) forRGB1 (DVI-PC).)
Adjust for clear character visibility.(This function is only for RGB2. It’s not available (grayed out) forRGB1 (DVI-PC).)
The original factory settings for the items of this Menu page can berestored by pressing the OK button.
Normally set to 0.7 V. If white is found to spread across the screen,set to 1.0 V. (This is effective only for RGB2.)
Set this to Off if the frequency information of the Input Signal ScreenDisplay is not required.
This is only available for W-VGA signal.When it is set to On, the display area mode can be selected Full orReal. (With RGB1 INPUT, the screen remains the same. RGB2 (ANA-LOG) INPUT only)
This is only available for W-XGA signal.(RGB2 (ANALOG) INPUT only)
AdjustPressing the OK button here,Automatic regulation is started.Moves the horizontal positionto right.
Moves the horizontal positionto left.
Moves down the vertical posi-tion.
Slows the dot clock phase(shifts slightly to left).
(off the function) (waiting to reset)
Advances the dot clock phase(shifts slightly to right).
Reduces the dot clock fre-quency (shrinks the right side).
Increases the dot clock fre-quency (expands the rightside).
Moves up the vertical position.
–

38
Movie PC
DVI-PC DVI-STB
RGB Component
Auto HDTV SDTV/DVD
Off On
Selected characters Setup hint
Vertical Filter
Frequency Mode
RGB1
RGB2 (1st step)
RGB2 (2nd step)
Turn On when concerned about screen flicker.
Set to Movie when viewing moving images on a personal computer.
This should correspond to the signal mode of the signal from theequipment that is connected to RGB1 DVI terminal.
This should correspond to the signal mode of the signal from theequipment that is connected to RGB2 D-sub terminal.
This step should be set only when [Component] is selected on the1st step.This should correspond to the signal mode of the signal from theequipment that is connected to RGB2 D-sub terminal.• Normally, set this to Auto. The signal mode of the input signal will
be automatically recognized.• If the input signal contains much noise or has a low level at Auto
and the operation is found erratic, set this to match the input signal.
OPERATING INSTRUCTIONS (continued)
SETUP MENU (RGB mode: RGB1 (DVI-PC), RGB2 (RGB)) (Continued)
* Depending on the type of signal displayed, displays may not be optimized through automatic adjustment. Adjust manually to optimize them.
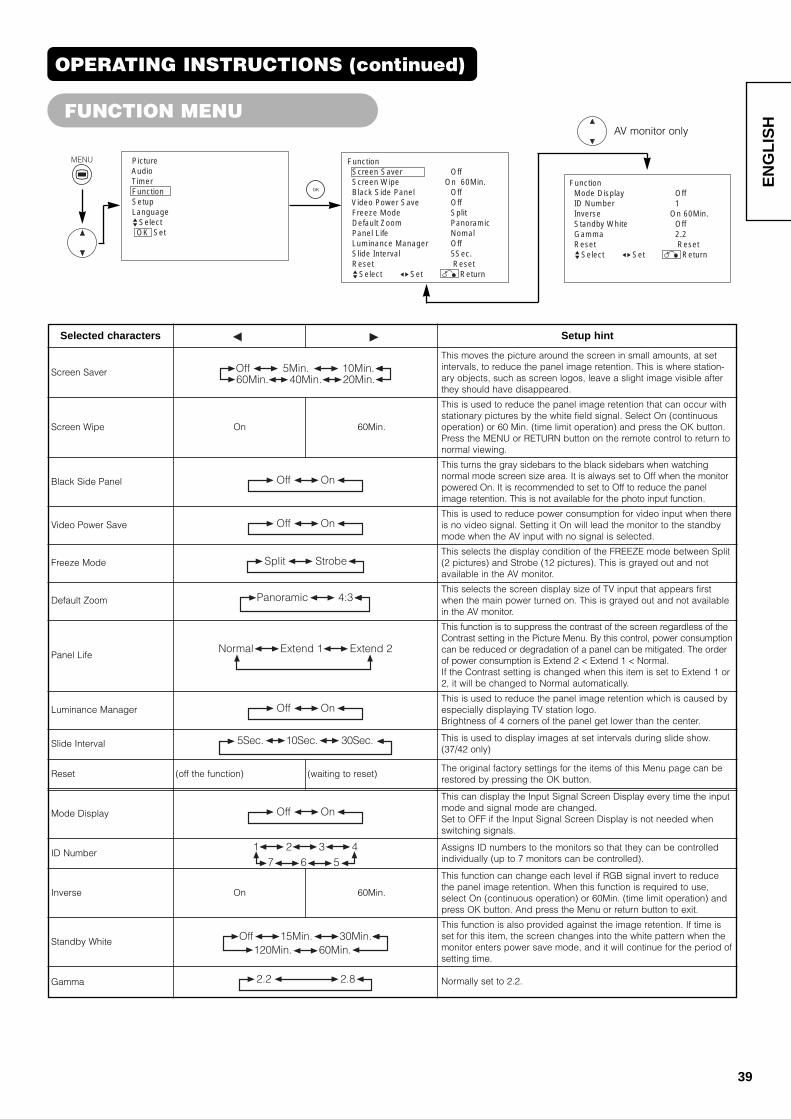
39
EN
GL
ISH
FUNCTION MENU
MENU Picture Audio Timer Function Setup Language Select OK Set
Function Screen Saver Off Screen Wipe On 60Min. Black Side Panel Off Video Power Save Off Freeze Mode Split Default Zoom Panoramic Panel Life Nomal Luminance Manager Off Slide Interval 5Sec. Reset Reset Select Set Return
Function Mode Display Off ID Number 1 Inverse On 60Min. Standby White Off Gamma 2.2 Reset Reset Select Set Return
Off 5Min. 10Min.60Min. 40Min. 20Min.
Off On
Off On
Split Strobe
Panoramic 4:3
Normal Extend 1 Extend 2
Off On
5Sec. 10Sec. 30Sec.
Selected characters Setup hint
This moves the picture around the screen in small amounts, at setintervals, to reduce the panel image retention. This is where station-ary objects, such as screen logos, leave a slight image visible afterthey should have disappeared.
This is used to reduce the panel image retention that can occur withstationary pictures by the white field signal. Select On (continuousoperation) or 60 Min. (time limit operation) and press the OK button.Press the MENU or RETURN button on the remote control to return tonormal viewing.
This turns the gray sidebars to the black sidebars when watchingnormal mode screen size area. It is always set to Off when the monitorpowered On. It is recommended to set to Off to reduce the panelimage retention. This is not available for the photo input function.
This is used to reduce power consumption for video input when thereis no video signal. Setting it On will lead the monitor to the standbymode when the AV input with no signal is selected.
This selects the display condition of the FREEZE mode between Split(2 pictures) and Strobe (12 pictures). This is grayed out and notavailable in the AV monitor.
This selects the screen display size of TV input that appears firstwhen the main power turned on. This is grayed out and not availablein the AV monitor.
This function is to suppress the contrast of the screen regardless of theContrast setting in the Picture Menu. By this control, power consumptioncan be reduced or degradation of a panel can be mitigated. The orderof power consumption is Extend 2 < Extend 1 < Normal.If the Contrast setting is changed when this item is set to Extend 1 or2, it will be changed to Normal automatically.
This is used to reduce the panel image retention which is caused byespecially displaying TV station logo.Brightness of 4 corners of the panel get lower than the center.
This is used to display images at set intervals during slide show.(37/42 only)
The original factory settings for the items of this Menu page can berestored by pressing the OK button.
On 60Min.
(off the function) (waiting to reset)
Screen Saver
Screen Wipe
Black Side Panel
Video Power Save
Freeze Mode
Default Zoom
Panel Life
Luminance Manager
Slide Interval
Reset
Off OnThis can display the Input Signal Screen Display every time the inputmode and signal mode are changed.Set to OFF if the Input Signal Screen Display is not needed whenswitching signals.
Mode Display
1 2 3 47 6 5
Off 15Min. 30Min. 120Min. 60Min.
2.2 2.8
Assigns ID numbers to the monitors so that they can be controlledindividually (up to 7 monitors can be controlled).
ID Number
This function can change each level if RGB signal invert to reducethe panel image retention. When this function is required to use,select On (continuous operation) or 60Min. (time limit operation) andpress OK button. And press the Menu or return button to exit.
On 60Min.Inverse
This function is also provided against the image retention. If time isset for this item, the screen changes into the white pattern when themonitor enters power save mode, and it will continue for the period ofsetting time.
Standby White
Normally set to 2.2.Gamma
AV monitor only
OPERATING INSTRUCTIONS (continued)

40
MENU
Picture Audio Timer Function Setup Language Select OK Set
Picture Picture Mode Dynamic Contrast +31 Brightness -31 Color 0 Sharpness +15 Tint 0 Color Temperature Normal Contrast Mode Normal Reset Reset Select Set ReturnOK
Picture Mode Dynamic Next/Prev Select Return
Picture Picture Mode Dynamic Contrast +31 Brightness -31 Color 0 Sharpness +15 Tint 0 Color Temperature Normal Contrast Mode Normal Reset Reset Select Set ReturnOK
Contrast Mode Normal Next/Prev Select Return
Picture Dynamic YNR Off CNR Off Film Mode On PAL Comb Filter On LTI Off CTI Off Black Enhancement Off Auto Color Off Reset Reset Select Set ReturnOK
YNR Off Next/Prev Select Return
Picture Dynamic YNR Off CNR Off Film Mode On PAL Comb Filter On LTI Off CTI Off Black Enhancement Off Auto Color Off Reset Reset Select Set ReturnOK
Auto Color Off Next/Prev On/Off Return
Picture Dynamic Color Temp. Adjust Color Management Color Decoding Select Set ReturnOK
Picture Color Temp. Adjust On Amplitude Red – 63 Green 0 Blue – 31 Cut Off Red + 31 Green 0 Blue + 31 Reset Reset Select On/Off Return
Picture Dynamic Color Temp. Adjust Color Management Color Decoding Select Set ReturnOK
Picture Color Management On Magenta + 60 Red + 30 Yellow 0 Green + 60 Cyan + 30 Blue 0
Reset Reset Select On/Off Return
Picture Dynamic Color Temp. Adjust Color Management Color Decoding Select Set ReturnOK
Picture Color Decoding RGB R G B Red 0 Green + 60 Color 0 Tint + 31
Reset Reset
Select Return Exit
OPERATING INSTRUCTIONS (continued)
PICTURE MENU (TV/Video mode)

41
EN
GL
ISH
OPERATING INSTRUCTIONS (continued)
PICTURE MENU (TV/Video mode) (continued)
Selected characters
Picture Mode
Setup hint
Dynamic: This setting is best for very bright ambient lighting.Natural: This setting is for normal lighting conditions.Cinema: This setting is best for watching movie.
Contrast
Adjust for maximum visibility to suit the ambient brightness.This can adjust further till [+40] by pressing and holding SELECTbutton at [+31]. The color for [+32] to [+40] numbers will change fromwhite to magenta. This special mode is better for dark scenes.For normal viewing we recommend that the Contrast is set to [+31]."Panel Life" in the Function Menu should be set to Normal when thisContrast setting is adjusted.
Narrows the gap betweenbrightness and darkness.
Broadens the gap betweenbrightness and darkness.
BrightnessBlack is subdued forincreased overall darkness.
Black is set off for increasedoverall brightness.
Adjust to preference.
Color Temperature Normally set to Cool.
Dynamic Natural Cinema
Cool Normal Warm Black / White
Off On
Off Low Middle High
Off On
Off On
Contrast Mode
Dynamic:Emphasizes the differences between video shadings to improve the feeling of contrast.
Normal : The gradation of an image is reproduced as faithfully as possible.
Auto:Detects image brightness and automatically adjusts for naturalbrightness.
Normal Auto Dynamic
Color Decrease color intensity. Increase color intensity. Adjust to preference.
Sharpness Soft SharpNormally set to Centre position Shift to the minus (-) side for a softereffect and plus (+) for sharper picture.
Reset (off the function) (waiting to reset)
Brighter scene is decreasedin reddish color.
Brighter scene is increased inreddish color.
The original factory settings for the items of this Menu page can berestored by pressing the OK button.
TintEnhances red and weakensgreen.
Enhances green and weakensred.
This is not available to adjust when receiving PAL/SECAM signal.Then the character will be grayed out.Adjust for most realistic skin color.
PAL Comb FilterThis is available only when receiving a PAL composite signal. TurnOn to reduce the discolorations in fine picture detail and providespurer color.
YNR Performs picture signal noise reduction. Turn up to reduce noise.
LTI Adjusts the sharpness of the picture signal.
CNR Performs color signal noise reduction. Turn up to reduce noise.And it will be fixed as Off only when selecting DVI-STB mode.
Color Temp. Adjustment Turn On when you wish to change color temperature depending onthe user's preference.
Adjust color temperature depending on the user’s preference. Thesesettings are independently stored in each of the 4 Color Temperaturemodes.
Off Low High
Film Mode
On:Automatically detects the movie film material and faithfully reproduces the original film image.Off:Set to OFF when switching between images does not appear natural.
Off On
CTI Adjusts the sharpness of the color signal.
Black Enhancement Adjusts the black level compensation.
Auto Color
This is available only when receiving an NTSC composite/S.Videosignal. This monitors and adjusts the color to maintain constant colorlevels. It also maintains natural flesh tones while preserving fidelity ofbackground colors.
Red
Brighter scene is decreasedin greenish color.
Brighter scene is increased ingreenish color.GreenAmplitude
Brighter scene is decreasedin bluish color.
Brighter scene is increased inbluish color.Blue
Dark scene is decreased inreddish color.
Dark scene is increased inreddish color.Red
Dark scene is decreased ingreenish color.
Dark scene is increased ingreenish color.GreenCut Off
Dark scene is decreased inbluish color.
Dark scene is increased inbluish color.
Blue

42
OPERATING INSTRUCTIONS (continued)
PICTURE MENU (TV/Video mode) (continued)
Selected characters
Color Management
Setup hint
Turn On when the original balance of each color is required to adjustdepending on the user’s preference.
This adjusts listed colors individually to make them either deeper ormore pure. These settings are independently stored in each of the 4Color Temperature modes.
Select the single color screen when that is required to adjust R/G/Blevel individually depending on the user’s preference. And set it backto RGB mode that indicates all color after adjusting.Press the OK button every time the setting is changed.
This adjusts R/G/B level or tint to make the color appear natural forthe user’s preference. These settings are independently stored ineach of the 4 Color Temperature modes.This does not work for receiving PAL/SECAM signal.Guide display become unavailable to select with gray color.
Off On
RGB R G B
Magenta Magenta is weakened. Magenta is strengthened.
Red Red is weakened. Red is strengthened.
Yellow Yellow is weakened. Yellow is strengthened.
Green Green is weakened. Green is strengthened.
Cyan Cyan is weakened. Cyan is strengthened.
Blue Blue is weakened. Blue is strengthened.
Color Decoding
Red Darkens red only. Lightens red only.
Green Darkens green only. Lightens green only.
Color Decrease color intensity. Increase color intensity.
Tint Enhances red and weakensgreen.
Enhances green and weak-ens red.

43
EN
GL
ISH
MENU
Picture Audio Timer Function Setup Language Select OK Set
Picture Contrast : + 31 Brightness : – 31 Color : 0 Tint : + 31 Picture Enhancement : Off Color Temperature : Normal Color Temp.Adjust Reset Reset Select Set ReturnOK
Contrast + 31 Next / Prev Adjust Return
Picture Contrast : + 31 Brightness : – 31 Color : 0 Tint : + 31 Picture Enhancement : Off Color Temperature : Normal Color Temp.Adjust Reset Reset Select Set ReturnOK
Color Temperature Normal Next/Prev Select Return
Picture Contrast : + 31 Brightness : – 31 Color : 0 Tint : + 31 Picture Enhancement : Off Color Temperature : Normal Color Temp.Adjust Reset Reset Select Set ReturnOK
Picture Color Temp. Adjust On Amplitude Red – 63 Green 0 Blue – 31 Cut Off Red + 31 Green 0 Blue + 31 Reset Reset Select On/Off Return
Selected characters
ContrastNarrows the gap betweenbrightness and darkness.
Broadens the gap betweenbrightness and darkness.
Setup hint
Adjust for maximum visibility to suit the ambient brightness.This can adjust further till [+40] by pressing and holding SELECTbutton at [+31]. The color for [+32] to [+40] numbers will change fromwhite to magenta. This special mode is better for dark scenes.For brighter scene some parts of the picture might not be clear. Werecommend to set at [+31]."Panel Life" in the Function Menu should be set to Normal whenContrast setting is adjusted.
Off Low Middle High
Cool Normal Warm Black / White
Off On
Brightness Black is subdued forincreased overall darkness.
Black is set off for increasedoverall brightness.
Adjust to preference.
Picture Enhancement Sets the clarity of small details to the desired level.
Color Temperature Normally set to Normal.
Color Temp. Adjustment
Amplitude
Cut Off
Reset
Turn On when you wish to change color temperature is required toadjust depending on the user’s preference.
The original factory settings for the items of this Menu page can berestored by pressing the OK button.
Color Decrease color intensity. Increase color intensity. Adjust to preference.
Tint Enhances red and weakensgreen.
Enhances green and weak-ens red.
This is not available to adjust when receiving PAL/SECAM signal.In this case the character will be grayed out.Adjust for most realistic skin color.
Brighter scene is decreasedin reddish color.
Brighter scene is increasedin reddish color.
Brighter scene is decreasedin greenish color.
Brighter scene is increasedin greenish color.
Brighter scene is decreasedin bluish color.
Brighter scene is increasedin bluish color.
Dark scene is decreased inreddish color.
Dark scene is increased inreddish color.
Dark scene is decreased ingreenish color.
Dark scene is increased ingreenish color.
Dark scene is decreased inbluish color.
(off the function)
Dark scene is increased inbluish color.
(waiting to reset)
Red
Green
Blue
Red
Green
Blue
Adjust color temperature depending on the user’s preference. Thesesettings are independently stored in each of the 4 Color Temperaturemodes.
OPERATING INSTRUCTIONS (continued)
PICTURE MENU (RGB mode)

44
OPERATING INSTRUCTIONS (continued)
AUDIO MENU
MENU
Picture Audio Timer Function Setup Language Select OK Set
Audio Audio Mode : Movie Treble : + 10 Bass : – 10 Balance : 0 L R Dynamic Bass : Middle Matrix Surround : Off Perfect Volume : Off Reset Reset Select Set Return
Audio Headphone Volume : + 20 Headphone Select : A/B
Select Set Return
A/B B
Selected characters
Audio Mode
Setup hint
Movie: This selects the audio suitable for Movie.Music: This selects the audio suitable for Music.Speech: This selects the audio suitable for News, Talk show etc.Favorite: This mode should be adjusted depending on user’s prefer-ence.
Dynamic BassDynamic Bass takes advantage of the ability of the human ear to beable to distinguish between two different tones. By using this ability,Dynamic Bass gives enhanced bass sound that otherwise would notbe heard. Adjust it depending on the user’s preference.
Movie Music Speech Favorite
Off Low Middle High
Off On
Off On
Treble Suppresses treble. Enhances treble. Adjust to preference.
Bass Suppresses bass. Enhances bass. Adjust to preference.
Balance Suppresses right-side sound. Suppresses left-side sound. Adjust to preference.
Headphone Volume
Headphone Select
Turns down the volume. Turns up the volume.
(off the function) (waiting to reset)
This is to set the volume for headphone. The audio from the speakeris mute when connected to headphone terminal.
A/B: During the 2 picture mode, the audio will be output fromheadphone on A (left picture) or B (right picture) to be select-ed. The speaker icon is located on the selected picture.
B: The audio of B (right picture) is from headphone.
Matrix Surround This features the spacious sound effects of a stadium.
Perfect VolumeThis will automatically adjust volume so each channel and input hasthe same average volume level.
ResetThe original factory settings for the items of this Menu page can berestored by pressing the OK button.

45
EN
GL
ISH
TIMER MENU
MENU
Picture Audio Timer Function Setup Language Select OK Set
Timer Off Timer : 30Min. On Timer : - - : - - Select Adjust Return
MENU
Picture Audio Timer Function Setup Language Select OK Set
Language Select Return Exit
English
LANGUAGE MENU
Select a language by and SELECT buttons and press the OK button.
Selected characters
Off Timer
On Timer - - ( : - - )hours
(- - : ) - - minutes
Setup hint
This function automatically sets the power to standby status when theindicated time period has elapsed.
This automatically sets the power from standby to ON when the indi-cated time period has elapsed. The settable time is 00:00~11:59. Inputthe required time by and SELECT buttons on the remote control.
--Min. 30Min. 60Min.120Min. 90Min.
OPERATING INSTRUCTIONS (continued)

Picture ModeContrastBrightnessColorShapnessTintColor TemperatureContrast ModeYNRCNRFilm ModePAL Comb FilterLTICTIBlack EnhancementAuto ColorColor Temp. Adjust
R AmplitudeG AmplitudeB Amplitude
R Cut OffG Cut OffB Cut Off
Color Management
MagentaRed
YellowGreenCyanBlue
Color DecodingRed
Green
Color
Tint
Audio ModeTrebleBassBalanceDynamic BassMatrix SurroundPerfect VolumeHeadphone VolumeHeadphone Select
1 setting is registered.For every input function and everyPicture Mode, 1 setting is registered.
For every Color Temperature, 1setting is registered.
For every input function and everyPicture Mode, 1 setting is registered.1 setting is registered.
-For every Color Temperature, 1setting is registered.For every input function and everyPicture Mode, 1 setting is registered.1 setting is registered.For every Audio Mode, 1 setting isregistered.1 setting is registered.For every Audio Mode, 1 setting isregistered.
46
Screen SaverScreen WipeBlack Side PanelVideo Power SaveFreeze ModeDefault ZoomPanel LifeLuminance ManagerSlide IntervalMode DisplayID NumberInverseStandby WhiteGammaSystemColor System
AV1AV2AV3AV4AV5
Video InputAV1AV2
RGB1RGB2Auto AdjustHorizontal PositionVertical PositionHorizontal ClockClock PhaseInput LevelFrequency DisplayWVGA TypeWXGA ModeVertical FilterFrequency Mode
Function
Setup
Language
OTHER FUNCTIONS
Automatic StoreApproximately 1 sec. after adjustment is completed, the adjustments will be recorded as shown in the table below.
Picture
Audio
Menu Display Registration condition1 setting is registered.(not registered)1 setting is registered.1 setting is registered.
1 setting is registered.-For every input function, 1 settingis registered.
-1 setting is registered.
(not registered)For every signal Mode, 1 setting isregistered. (Only for RGB2)
1 setting is registered.
1 setting is registered.
Menu Display Registration condition
• The previously recorded items will be lost.• The signal mode can be identified by the horizontal/vertical sync
frequency and the sync signal polarity. Different signals with whichall the elements are the same or similar will be handled as thesame signal.

47
EN
GL
ISH
A2 / NICAM / Sound Multiplex (TV mode)• The CH I / II button is only useful for NICAM and sound multiplex signals.
Otherwise pressing this button will have no effect.
BILINGUAL / DUAL sound broadcastWhen bilingual program is received, sound mode display appears in yellow as shown onright.Press the CH I / II button to select the sound to be heard.Each time the button is pressed, I, II or (force mono) appear cyclically on the screen.When receiving NICAM signals, NICAM display will appear as below.
8
NICAM [II]
8
[I] [II]
NICAM [I] NICAM [II]
Sound multiplex signal received
Select I, II or (force mono) to hear the CH I, CH II or MONO broadcast respectively.
NICAM signal received
Yellow
YellowYellow
YellowGreen
Green
STEREO sound broadcastWhen a stereo program is received, sound mode display will appear in red, and you canpress the CH I / II button to select between stereo and mono sound.
Each time the button is pressed, or (force mono) appear cyclically on the screen.When receiving NICAM signals, NICAM display will appear as below.
NICAM
Sound multiplex signal received
Select or (force mono) to hear the STEREO or MONO broadcast respectively.
NICAM signal received
Red Green
Red Green
8
Monaural sound broadcastWhen a monaural program is received, sound mode display will appear in green.You can press the CH I / II button to select the sound mode between monaural and forcedmono (sound is same).Each time the button is pressed, or (force mono) appear cyclically on the screen.
NOTE • If sound signal is not strong enough for quality reception, press the CH I / II button until appears on the screen to receive a clear mono sound.• If sound has hiss noise or keep switching between stereo and mono mode due to signal condition, press the CH I / II button until appears
on the screen to receive a clear mono sound.
OTHER FUNCTIONS (continued)
Audio Switching

48
OTHER FUNCTIONS (continued)
Power Save Mode
When the RGB1, RGB2 input is selected• When this unit is connected to a VESA DPMS computer, the Power Save (Off) mode can be set to be activated automatically when the
computer is not being used to reduce power consumption by this unit.
Returning to operating status• Operate the personal computer, or press either the INPUT SELECT button of the main unit or the RGB1/RGB2 buttons of the remote control.
DVD Player/STB Selection
• You can use this remote control to operate the selected maker of DVD player by pressing the following buttons on the remote controlsimultaneously.
<“DVD” Selection>
Makers of DVD player Set Maker Set Type Makers of DVD player Set Maker Set Type
HITACHI
FUNAI
Pioneer
Panasonic
TOSHIBA
Philips
JVC
SAMSUNG
Sony
Sharp
1 31
2
3
4
5
6
7
8
9
~ RCA 0 1
Mitsubishi 1
ONKYO 31 ~
ZENITH 1
THOMSON 1
SHINCO 1
SKYWORTH 1
BUBUKO 1
DENON 21 ~
1
61 ~
41 ~
41 ~
21 ~
1
1
41 ~
21 ~2-4-12
RED
GREEN
YELLOW
BLUE
<“SAT” Selection>
Makers of STB player Set Maker Set Type
HITACHI
TOSHIBA
DGTECH
Panasonic
1 21
2
3
4
~
1
1
1
RGB sync signalHorizontal Yes No Yes No
Vertical
PC signal
Operation mode
Indicating lamp
Power consumption
Active (normal display)
On
Lights green
245W (32)320W (37)380W (42)
Blank (no display)
Off
Lights orange
3W or less (RGB1)1W or less (RGB2 ; 100V≤AC≤120V)3W or less (RGB2 ; 120V<AC<240V)
Yes Yes No No
49
EN
GL
ISH
OTHER FUNCTIONS (continued)
DVD Player/STB Selection (continued)
Set up hintExample) HITACHI DVD To operate HITACHI DVD player, press and hold the button,followed by the button.1. Press button to indicate the lamp of DVD on the remote
control.During LED lighting, press and to set up the maker.
2. Release the button once while keeping button, pressthe button again to set the maker type.
* After set up the maker type, press the button related withDVD, and make sure that DVD player is working. In caseDVD player does not work, repeat 1 and 2 with othernumbers for the maker type to make sure it. (In this example,press or .)
NOTE• Not all models of the listed makers can be operated using
this remote control.
Signal Check (RGB mode)
Changes in the signal status are displayed on the screen as they arise.
Status Display Action
When Mode Display is set to ON,the input signal is switched orwhen the RECALL button ispressed.
A guide is displayed for the inputterminal and the horizontal andvertical sync frequency.
When the sync signal is nolonger detected.
• A guide displays No Sync.Signal, and Power Save (forapprox. 5 sec.)
• When the condition continueswhere the sync signal cannotbe detected, indicator lamp ofpower source changes inorange and the mode switchesto power save mode.
Recheck the personal computerpower switch status and theconnection status.
When the input signal does notmatch the monitor specificationsor is in an unstable status.
A guide displays Invalid ScanFreq.
Recheck the input signalspecifications.
54 57~
RGB2RGB
H : 48.4kHzV : 60.1 Hz
-- -- Min.-- -- : -- --
OFF
! No Sync. Signal
! Invalid Scan Freq.
RGB

39
50
TROUBLESHOOTING
Symptoms That Seemingly Appear to be Failures
Make the checks suggested below depending on the symptoms observed. If the symptoms remain uncorrected, contact your dealer.
Customer servicing can be hazardous.
WARNING
Symptom Point to check See page
• No picture with the power-indicating lampoff.
• Check the way the power cable is connected.• Press the power switch.
• The power indicating lamp is normally lit butno picture.
• Check the contrast and brightness settings (adjust them for highercontrast and brightness).
• Check the way the signal cable is connected.
AAAAA
AAAAA
• The message “Invalid Scan Freq.” is dis-played.
An input signal is not received normally.• Check to see if the input signal matches the monitor
specifications.• Check the way the signal cable is connected.
! Invalid Scan Freq.
• The message “No Sync. Signal” or “PowerSave” is displayed.
• No picture with the power indicating lamplights in orange.
No sync signal is detected.• Check the way the signal cable is connected.• Make sure that the switch of the computer, imaging equipment,
etc., is turned on.• Make sure the computer is not in the power-save mode.• Check to see if the input selection matches the connection
terminal.
! No Sync. Signal
• The display image appears flowing slant-wise.
• Text displayed across the screen appearsvertically streaked, with the characters invertical columns blurred.
• Adjust the dot clock frequency and phase. (Adjust the dotclock frequency first, the dot clock phase next.)(RGB input)
• Text displayed across the screen appearsblurred.
• A fine pattern flickers when displayed onthe screen.
• Adjust the dot clock phase for the clearest viewing.(RGB input)
• The remote control does not work. • Check to see if the batteries are loaded in the remote control inopposite direction.
• Check to see if the batteries in the remote control are OK.
20
21
16
16
55
56
57
16
37
52
41
43
16
55
56
57
39
37
52
10
• The display image does not appear in thenormal position.
• Check to see if the displayed input signal match the monitor speci-fication by pressing button.
• Turn off the screen saver.
• The display has picture missing on thescreen.(PC input mode only)
• Turn off the screen saver.
• The temperature of the display panel surface is high. • The plasma display panel is lighting the phosphors by thedischarge of internal radiation. In some cases, this may cause thetemperature of the panel surface to increase. Please note that thisis not a malfunction.
–

51
EN
GL
ISH
TROUBLESHOOTING (continued)
Symptoms That Seemingly Appear to be Failures (continued)
Symptom Point to check See page
• If the direct frequency from the computer is below 85Hz, try ahigher frequency (upper limit 85Hz). There may be a slightattenuation of the current image.
• Try turning the Vertical Filter On. For this case however, the vertical resolution will drop.
• Flickering in the form of horizontal lines oscillating up anddown.(PC INPUT MODE only)
• When used for long periods of time, the top of the monitor mayheat up. This is not a malfunction.
• The top of the monitor heats up.
• The thicknesses of characters and lines may vary if images witha vertical resolution greater than 512 lines are displayed; however, this is not a malfunction.
• Text characters are displayed with varying thicknesses.
–
–
• This sometimes occurs when a component output VTR such as the480i is connected.This is not a malfunction; therefore, please take note that this mayoccer. When it does occur, change to composite output,or S.videooutput.
• The screen becomes dark and the images cannnot be seenduring VTR special playback (fast forward, rewind)
• Sub pictures image might not be able to be displayed, dependingon the combination.(Reter to the table of “2 picture mode” and “4 picture mode”)
• During multi picture mode, sub pictures are not displayed.
• The screen dicplay size is fixed at “Full” as receiving 1080i/60Hz,1080i/50Hz, and 720p.
• The screen display sizes are not switched.
• Check the cable and output format of connecting device.(Reter to “Connecting to an Audio Visual Device”)
• Images from AV6 (HDMI) are not displayed.
• Check the connecting device and image format.(Reter to “Photo Input Display”)
• Images from Photo Input are not displayed.
–
–
37
38
28
14
32
31
30
• Coarse horizontal stripes appear in FULL display.
• There are locations on the screen that are different fromthe periphery (*).*Points that do not light, points with brightness differentfrom that of the periphery, points with color different fromthat of the periphery, etc.
• High-precision technology is used to manufacture the plasmadisplay panel, However in some cases, there are minor defects insome parts of the screen. Please note that this is not a malfunction.
• Vertical stripes appear, depending on the screen contents. • The plasma display panel is lighting the phosphors by the discharge of internal radiation. Depending on the screen contents, in rare cases this may cause vertical stripes to appearbecause of failure to light. Please note that this is not a malfunction.
–
–
• Adjusting the Clock Phase will reduce the horizontal stripes.(RGB input)

52
TROUBLESHOOTING (continued)
Actions to Correct Abnormal Displays
Depending on the kind of system equipment used, images may not be displayed normally. In this case, make theadjustments suggested below. (only for RGB2)
Symptom 1
Figure 1
Text displayed across the screen appears vertically streaked, with some characters blurred (Figure 1).(RGB input).
1) Press the MENU button. The Main Menu will be displayed.2) Press the SELECT button and select Setup.3) Press the OK button. The Setup Menu will be displayed.4) Press the SELECT button and select Auto Adjust.
When adjustment is not possible with Auto Adjust5) Press the MENU button. The Main Menu will be displayed.6) Press the SELECT button and select Setup.7) Press the OK button. The Setup Menu will be displayed.8) Press the SELECT button and select Horizontal Clock.(Display fine patterns as characters or a vertical striped pattern over the entire screen during Horizontal Clock adjustment.)9) Press the or ADJUST buttons and search for clear characters over the entire screen.10) Perform adjustment for symptom 2 below, when the characters are blurred on the entire screen.
Adjustmentprocedure
Example
Symptom 2
Figure 2 Figure 3
Text displayed across the screen appears blurred in its entirety (Figure 2).A fine pattern flickers when displayed on the screen (Figure 3).
1) Press the MENU button. The Main Menu will be displayed.2) Press the SELECT button and select Setup.3) Press the OK button. The Setup Menu will be displayed.4) Press the SELECT button and select Auto Adjust.
9) Press or ADJUST buttons to make the text appearclean across the screen.
9) Press or ADJUST buttons to make the text appearwithout flickering.
When adjustment is not possible with Auto Adjust5) Press the MENU button. The Main Menu will be displayed.6) Press the SELECT button and select Setup.7) Press the OK button. The Setup Menu will be displayed.8) Press the SELECT button and select Clock Phase.(Display fine patterns as characters or a vertical striped pattern over the entire screen during Clock Phase adjustment.)
Adjustmentprocedure
Example
ABC
BABCDEFGHIJ
abcdefgABCDEFGabcd
ABCDEFGHIJ
abcdefgABCDEFGabcd
Verticalstreaks
Before adjustment,some charactersare blurred.
After adjustment,all characters appearcrisp now.
After adjustment,all characters areblurred.
ABC
ABC
ABC
ABCDEFGHIJ
abcdefgABCDEFGabcd
ABCDEFGHIJ
abcdefgABCDEFGabcd
Before adjustment
After adjustment
ABC
ABCABC
Before adjustment
After adjustment
• The display image may be momentarily disturbed during clock adjustment but this is not a failure.
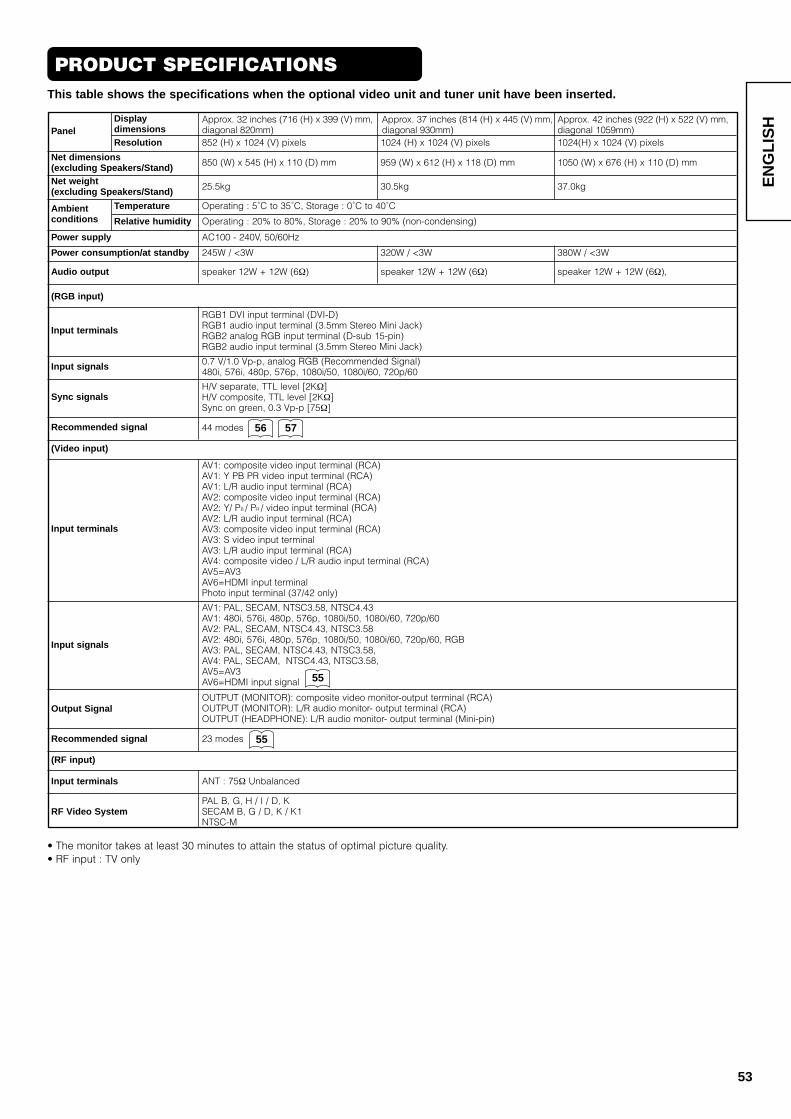
PAL B, G, H / I / D, KSECAM B, G / D, K / K1NTSC-M
OUTPUT (MONITOR): composite video monitor-output terminal (RCA)OUTPUT (MONITOR): L/R audio monitor- output terminal (RCA)OUTPUT (HEADPHONE): L/R audio monitor- output terminal (Mini-pin)
AV1: composite video input terminal (RCA)AV1: Y PB PR video input terminal (RCA)AV1: L/R audio input terminal (RCA)AV2: composite video input terminal (RCA)AV2: Y/ PB / PR / video input terminal (RCA)AV2: L/R audio input terminal (RCA)AV3: composite video input terminal (RCA)AV3: S video input terminalAV3: L/R audio input terminal (RCA)AV4: composite video / L/R audio input terminal (RCA)AV5=AV3AV6=HDMI input terminalPhoto input terminal (37/42 only)
53
EN
GL
ISH
Panel
PRODUCT SPECIFICATIONSThis table shows the specifications when the optional video unit and tuner unit have been inserted.
• The monitor takes at least 30 minutes to attain the status of optimal picture quality.• RF input : TV only
Ambientconditions
Power supply
Power consumption/at standby
Audio output
(RGB input)
Input terminals
Input terminals
Input terminals
RF Video System
Input signals
Input signals
Sync signals
Recommended signal
Recommended signal
(RF input)
(Video input)
Output Signal
Temperature
Relative humidity
Net dimensions(excluding Speakers/Stand)Net weight(excluding Speakers/Stand)
Resolution
Display dimensions
Approx. 32 inches (716 (H) x 399 (V) mm,diagonal 820mm)852 (H) x 1024 (V) pixels
850 (W) x 545 (H) x 110 (D) mm
25.5kg
Operating : 5˚C to 35˚C, Storage : 0˚C to 40˚C
Operating : 20% to 80%, Storage : 20% to 90% (non-condensing)
AC100 - 240V, 50/60Hz
245W / <3W
speaker 12W + 12W (6Ω)
RGB1 DVI input terminal (DVI-D)RGB1 audio input terminal (3.5mm Stereo Mini Jack)RGB2 analog RGB input terminal (D-sub 15-pin)RGB2 audio input terminal (3.5mm Stereo Mini Jack)
0.7 V/1.0 Vp-p, analog RGB (Recommended Signal)480i, 576i, 480p, 576p, 1080i/50, 1080i/60, 720p/60
H/V separate, TTL level [2KΩ]H/V composite, TTL level [2KΩ]Sync on green, 0.3 Vp-p [75Ω]
44 modes
23 modes
ANT : 75Ω Unbalanced
AV1: PAL, SECAM, NTSC3.58, NTSC4.43AV1: 480i, 576i, 480p, 576p, 1080i/50, 1080i/60, 720p/60AV2: PAL, SECAM, NTSC4.43, NTSC3.58 AV2: 480i, 576i, 480p, 576p, 1080i/50, 1080i/60, 720p/60, RGBAV3: PAL, SECAM, NTSC4.43, NTSC3.58,AV4: PAL, SECAM, NTSC4.43, NTSC3.58,AV5=AV3AV6=HDMI input signal
speaker 12W + 12W (6Ω) speaker 12W + 12W (6Ω),
320W / <3W 380W / <3W
30.5kg 37.0kg
959 (W) x 612 (H) x 118 (D) mm 1050 (W) x 676 (H) x 110 (D) mm
1024 (H) x 1024 (V) pixels 1024(H) x 1024 (V) pixels
Approx. 37 inches (814 (H) x 445 (V) mm,diagonal 930mm)
Approx. 42 inches (922 (H) x 522 (V) mm,diagonal 1059mm)
56 57
55
55

54
Pin
4
32
1
Frame
4
32
1
Pin
RGB terminal (D-sub 15-pin connector)
• When different kinds of input signals are simultaneously input tothe monitor via a graphics board or the like, the monitor willautomatically select the signals in the following priority order:
* Even in the case of the recommended signals shown on thefollowing page, there may be instances when correct display is notpossible. In this case, use H/V separate sync, H/V composite sync.
S-input connector pin specifications
Photo-input connector pin specifications
HDMI connector pin specifications
Pin Input signal1 R (PR/CR)
2 G or sync on green (Y)
3 B (PB/CB)
4 No connection
5 No connection
6 R.GND (PR/CR, GND)
7 G.GND (Y, GND)
8 B.GND (PB/CB, GND)
9 No connection
10 GND
11 No connection
12 [SDA]
13 H. sync or H/V composite sync
14 V.sync. [V.CLK]
15 [SCL]
( ) : With component input
Input signal
Y
Y-GNDC
C-GND
GND
Input signal
5V
DMDP
GND
Pin Input signal Pin Input signal
1
234
5
6
7
89
10
TMDS Data2+
TMDS Data2 ShieldTMDS Data2-
TMDS Data 1+
TMDS Data1 ShieldTMDS Data1-
TMDS Data0+TMDS Data0 Shield
TMDS Data0-TMDS Clock+
11
1213
14
1516
17
1819
TMDS Clock Shield
TMDS Clock-
CEC
Reserved(N.C. on device)SCLSDA
DDC/CED Ground
+5V PowerHot Plug Detect
Sync signal typeH/V separate sync.
sync.on Green *
H/V composite sync.
Priority1
2
3
PRODUCT SPECIFICATIONS (continued)
Signal Input

55
EN
GL
ISH
D-sub
Applicable video signals for input terminal (TV mode)
With Composite Input(AV1~AV5 input) and S-video Input (AV3, AV5 input).
With component input (AV1, AV2 and RGB2-component input).
With HDMI input (AV6 input).
( : Available)
PRODUCT SPECIFICATIONS (continued)
Recommended Signal List
Signal CVBS S-video Component PC STB RGB Component
AV1 Refer to Setup Menu
AV2 Refer to Setup Menu
AV3 Refer to Setup Menu
AV4 Refer to Setup Menu
AV5 Refer to Setup Menu
AV6
RGB1 Refer to Setup Menu
RGB2 Refer to Setup Menu
Terminal DVIHDMI
RemarksRCA/S-video
No.
1
2
NTSC4.43NTSC3.58
PALSECAM
525
625
59.94
50.00
15.73
15.63
—
—
Signal mode Horizontal frequency (kHz)
Dot clock frequency (MHz)
RemarksSignal Name Resolution
Vertical frequency(Hz)
Horizontal frequency (kHz)
Dot clock frequency (MHz)
RemarksVertical frequency(Hz)
No.
1
2
576i
480i
576
480
50.00
59.94
15.63
15.73
—
—
3 576p 576 50.00 31.26 —
4 480p 480 59.94 31.47 —
5 1080i/50 1080 50.00 28.13 —
6 1080i/60 1080 60.00 33.75 —
7 720p/60 720 60.00 45.00 —
Signal mode
Signal Name Resolution
25.18
27.00
27.00
27.00
27.00
74.25
74.25
Horizontal frequency (kHz)
Dot clock frequency (MHz)
RemarksVertical frequency(Hz)
No.
1
2
VGA
576i
640 x 480
720(1440) x 576
59.94
50.00
31.47
15.63
3 480i 720(1440) x 480 59.94 15.73
4 576p 720 x 576 50.00 31.25
5 480p 720 x 480 59.94 31.47
6 1080i/50 1920 x 1080 50.00 28.13
7 1080i/60 1920 x 1080 60.00 33.75
74.25
EIA-861B
EIA-861B
EIA-861B
EIA-861B
EIA-861B
EIA-861B
EIA-861B
EIA-861B8 720p/60 1280 x 720 60.00 45.00
Signal mode
Signal Name Resolution
36
36
37
37
36
36
36

56
PRODUCT SPECIFICATIONS (continued)
Recommended Signal List (continued)
With Digital signal input
1 640 X 400 70.08 31.47 25.18 2 640 X 480 59.94 31.47 25.18 3 W-VGA 864 X 480 59.94 31.47 34.24 WVGA type : On4 640 X 480 72.81 37.86 31.50 5 640 X 480 75.00 37.50 31.50 6 640 X 480 85.01 43.27 36.00 7 800 X 600 56.25 35.16 36.00 8 800 X 600 60.32 37.88 40.00 9 VESA 800 X 600 72.19 48.08 50.00 10 800 X 600 75.00 46.88 49.50 11 800 X 600 85.06 53.67 56.25 12 1024 X 768 60.00 48.36 65.00 13 1024 X 768 70.07 56.48 75.00 14 1024 X 768 75.03 60.02 78.75 15 480p 720 X 480 59.94 31.47 27.00 EIA-861B
16 576p 720 X 576 50.00 31.25 27.00 EIA-861B17 720p/60 1280 X 720 60.00 45.00 74.25 EIA-861B
18 1080i/60 1920 X 1080 60.00 33.75 74.25 EIA-861B19 1080i/50 1920 X 1080 50.00 28.13 74.25 EIA-861B
No.
VGA
Signal Name ResolutionVertical frequency
(Hz)
Horizontalfrequency
(kHz)
Dot clockfrequency
(MHz)
Setup Menu Condition
DVI-PC DVI-STBRemarks
Signal mode
( : acceptable)

57
EN
GL
ISH
PRODUCT SPECIFICATIONS (continued)
Recommended Signal List (continued)
With Analog signal input (RGB2 input)
No.
1
2
3
4
5
6
7
8
9
10
11
12
13
14
15
16
17
18
19
20
21
22
23
24
25
26
27
28
29
30
Signal Name
VGA
W-VGA
Macintosh
W-XGA
W-XGA
VESA
Resolution
640 X 400
640 X 480
864 X 480
640 X 480
640 X 480
640 X 480
800 X 600
800 X 600
800 X 600
800 X 600
800 X 600
1024 X 768
1024 X 768
1024 X 768
1024 X 768
1152 X 864
1280 X 1024
1280 X 1024
1280 X 1024
1600 X 1200
1600 X 1200
1600 X 1200
640 X 480
832 X 624
1024 X 768
1152 X 870
1280 X 768
1280 X 768
1280 X 768
1366 X 768
Vertical frequency(Hz)70.08
59.94
59.94
72.81
75.00
85.01
56.25
60.32
72.19
75.00
85.06
60.00
70.07
75.03
85.00
75.00
60.02
75.03
85.02
60.00
75.00
85.00
66.67
74.55
74.93
75.06
59.833
69.997
59.876
60.015
Horizontalfrequency (kHz)
31.47
31.47
31.47
37.86
37.50
43.27
35.16
37.88
48.08
46.88
53.67
48.36
56.48
60.02
68.68
67.50
63.98
79.98
91.15
75.00
93.75
106.25
35.00
49.72
60.24
68.68
47.986
56.137
47.776
47.712
Dot clockfrequency (MHz)
25.18
25.18
34.24
31.50
31.50
36.00
36.00
40.00
50.00
49.50
56.25
65.00
75.00
78.75
94.50
108.00
108.00
135.00
157.50
162.00
202.50
229.50
30.24
57.28
80.00
100.00
81.00
94.760
79.50
85.50
Remarks
WVGA type : On
WXGA Mode : 1280x768
WXGA Mode : 1366x768
Signal mode
• The type of video board or connecting cable used may not allow for correct displays adjustment of Horizontal Position, Vertical Position,Horizontal Clock and Clock Phase.
• The monitor may fail to display an animation image correctly when a signal having a vertical frequency of 85Hz or higher is input to it.• The monitor differentiates the signal modes according to the horizontal and vertical frequencies and the horizontal and vertical sync signal
polarities. Note that different signals having all these elements alike may be handled as the same signal.• Displaying images with more than 512 lines of vertical resolution at Full diplay (compressed display) can result in the interpolation of stripes.