4 microbar 04 uk 29 56 - nuova · pdf filechase this coffee-making machine, since the microbar...
TRANSCRIPT

29Rel. 02 - 2003
E
DB
A
C
Congratulations,upon the wise choice you have made by purchasing the MICROBAR model.In fact, you are now the owner of not just a simple coffee dispenser, but a true espresso coffee-making machine which is fully automatic and comple-tely controlled by a microprocessor. This means absolute reliability and simple to use.We are certain that our MICROBAR model will increase your confidence in Nuova Simonelli and that you will undoubtedly recommend others to pur-chase this coffee-making machine, since the MICROBAR model has been chosen to increase the profitability of the coffee shop, thus fully optimisingrunning costs.This machine has been manufactured in compliance with the EEC directives 89/392, 89/336, 73/23, 89/109 and subsequent modifications.With best wishes
Nuova Simonelli s.r.l.
TECHNICAL CHARACTERISTICS
EN
GL
ISH
NET WEIGHT 30 Kg 66 LbGROS WEIGHT 33 Kg 72 LbPOWER 2000 W 2000 WDIMENSIONS A 320 mm A 121/4 inc
B 200 mm B 73/8 incC 480 mm C 183/8 incD 260 mm D 101/16 incE 400 mm E 155/16 inc

30
TECHNICAL CHARACTERISTICS . . . . .29
1. DESCRIPTION . . . . . . . . . . . . . . . . . . .311.1 KEYBOARD DESCRIPTION (Standard configuration) . .321.2 MICROBAR INTERNAL DESCRIPTION . . . . . . . . . . . . .32
2. SAFETY INSTRUCTIONS . . . . . . . . . . .33
3. TRANSPORT AND HANDLING . . . . . . .363.1 MACHINE IDENTIFICATION . . . . . . . . . . . . . . . . . .363.2 TRANSPORT . . . . . . . . . . . . . . . . . . . . . . . . . . . . . .363.3 HANDLING . . . . . . . . . . . . . . . . . . . . . . . . . . . . . . .36
4. INSTALLATION AND PRELIMINARYOPERATIONS . . . . . . . . . . . . . . . . . . . .37
5. ADJUSTMENTS TO BE MADEBY A QUALIFIED TECHNICIAN . . . . . . .38
5.1 GRINDING ADJUSTMENT . . . . . . . . . . . . . . . . . . . .385.2 MILK FOAMER ADJUSTMENT . . . . . . . . . . . . . . . . .385.3 MILK FLOW ADJUSTMENT . . . . . . . . . . . . . . . . . . .39
6. USE . . . . . . . . . . . . . . . . . . . . . . . . . . .396.1 STANDARD CONFIGURATION . . . . . . . . . . . . . . . . .396.2 SELECTION CONFIGURATION . . . . . . . . . . . . . . . .406.3 HOW TO MAKE COFFEE . . . . . . . . . . . . . . . . . . . . .406.4 HOW TO MAKE 2 COFFEES . . . . . . . . . . . . . . . . . .406.5 HOW TO MAKE CAFFELATTE . . . . . . . . . . . . . . . . .416.6 HOW TO MAKE CAPPUCCINO BIG CAPPUCCINO . .416.7 MACCHIATO (3 layers: milk/coffee/milk) . . . . . . . . .416.8 HOT MILK . . . . . . . . . . . . . . . . . . . . . . . . . . . . . . . .416.9 HOW TO MAKE DECAFFEINATED COFFEE . . . . . . .416.10 HOW TO MAKE SHORT ESPRESSO
AFFE CREME . . . . . . . . . . . . . . . . . . . . . . . . . . . . .426.11 HOT WATER . . . . . . . . . . . . . . . . . . . . . . . . . . . . . .426.12 STEAM . . . . . . . . . . . . . . . . . . . . . . . . . . . . . . . . . .42
7. PROGRAMMING . . . . . . . . . . . . . . . . . .437.1 LEGENDA . . . . . . . . . . . . . . . . . . . . . . . . . . . . . . . .437.2 PROGRAMMING . . . . . . . . . . . . . . . . . . . . . . . . . . .437.3 EXITING PROGRAMMING . . . . . . . . . . . . . . . . . . . .447.4 PROGRAMMING CYCLE . . . . . . . . . . . . . . . . . . . . .44
8. SPECIAL MACHINESCALING FUNCTIONS . . . . . . . . . . . . .47
8.1 RESETTING CLEANING FILTRE LITRE COUNTER . .478.2 RESETTING WASHING CYCLES . . . . . . . . . . . . . . .478.3 RESETTING MACHINE PARAMETRES . . . . . . . . . . .478.4 HANDLING MANUAL COFFEE DELIVERY GROUP . .47
9. CLEANING AND MAINTENANCE . . . . . .489.1 SWITCHING OFF THE MACHINE . . . . . . . . . . . . . . .489.2 CLEANING THE BODY . . . . . . . . . . . . . . . . . . . . . .489.3 CLEANING THE DELIVERY UNIT
AND THE MILK FOAMER . . . . . . . . . . . . . . . . . . . . .489.4 REINSTATING AN INTERRUPTED
WASHING CYCLE . . . . . . . . . . . . . . . . . . . . . . . . .499.5 COFFEE HOLDER AND COFFEE
DELIVERY UNIT CLEANING . . . . . . . . . . . . . . . . . .499.6 CLEANING THE STEAM NOZZLE . . . . . . . . . . . . . .509.7 CLEANING THE DROP COLLECTING TRAY GRID . .509.8 CLEANING THE WATER COLLECTING TRAY . . . . .509.9 CLEANING THE WATER TANK . . . . . . . . . . . . . . . .509.10 CLEANING THE GASKET . . . . . . . . . . . . . . . . . . . .509.11 CLEANING THE MILK FOAMER . . . . . . . . . . . . . . . .51
10. STANDARD SETTING TABLE . . . . . . . .52
11. MACHINE FUNCTIONS MESSAGES . . .53
12. MACHINE BLOCKALARM MESSAGES . . . . . . . . . . . . . . .55
ELECTRICAL SYSTEM . . . . . . . . . . . . .57
PLUMBING SYSTEM . . . . . . . . . . . . . . .58
INDEX
EN
GL
ISH

31
Fig. 1
LEGENDA
1 Coffee bean holder cap2 Control panel3 Front door4 Steam pipe / Hot water pipe5 Drop collecting tray grid6 Coffee grounds drawer
7 Coffee nozzles8 Milk/Cappuccino nozzle
(Cappuccino version only)9 Control panel hatch opening / locking key10 Ground coffee conveyor hatch11 Milk suction tube
(Cappuccino version only)
12 Milk flow adjusting tap(Cappuccino version only)
13 Water tank opening14 Main switch (ON / OFF)15 Mains connecting plug16 Water collecting tray
13
3
12
11
4
6
7 16 5
8
9
2
10
1
14
15
1. DESCRIPTION
EN
GL
ISH

32
LEGENDA
1 1 Espresso key2 2 Espressos key3 1 Coffee key 4 2 Coffees key 5 Decaffeinated coffee key6 1 Caffe Creme key (Coffee version)6 1 Caffelatte key (Cappuccino version)7 Hot water key8 Steam key9 LCD display
LEGENDA
1 Ground coffee conveyor2 Coffee bean holder3 Coffee grinder adjusting screw4 Delivery unit5 Water collecting tray6 Coffee grounds drawer7 Milk Foamer (Cappuccino version only)8 Milk Foamer air regulator (Cappuccino version only)9 Door key10 Door microswitch
Fig. 2 Fig. 3
1
18
3
5
7
2
9
4
6
8
2
3
4
56
7
9
10
1.1 KEYBOARD DESCRIPTION (Standard configuration)
1.2 MICROBAR INTERNAL DESCRIPTION
EN
GL
ISH

33
This book is an integral and essentialpart of the product and must be givento the user. Read this book carefully.It provides important informationconcerning safety of installation, useand maintenance. Save it carefullyfor future reference.
☞
After unpacking, make sure theappliance is complete. In case ofdoubts, do not use the appliance, butconsult a qualified technician.Packaging items which are poten-tially dangerous (plastic bags,polystyrene foam, nails, etc.) must bekept out of children’s reach and mustnot be disposed of in the environ-ment.
☞
RISK OF POLLUTION
Before connecting the appliancemake sure the rating plate data corre-spond with the mains. This plate ison the front panel at the top righthand side of the appliance. Theappliance must be installed by quali-fied technicians in accordance withcurrent standards and manufacture-r’s instructions.The manufacturer is not liable for anydamage caused due to failure toground the system. For the electricalsafety of the appliance, it is neces-sary to equip the system with the pro-per grounding. This must be carriedout by a qualified electrician whomust ensure that the electric powerof the system is sufficient to absorbthe maximum power input stated onthe plate.
☞
In particular you must ensure that thesize of the wiring cables is sufficientto absorb power input.The use of adapters, multiple socketsor extensions is strictly forbidden. Ifthey prove necessary, call a fullyqualified electrician.
☞
The machine must be installed accor-ding to the local standards in forcewith regard to plumbing systems. Forthis reason, the plumbing connec-tions must be carried out by a quali-fied technician.
☞
This appliance must only be used asdescribed in this handbook. Themanufacturer shall not be liable forany damage caused due to improper,incorrect and unreasonable use.
☞
Fig. 4
Fig. 5
2. SAFETY INSTRUCTIONS
EN
GL
ISH

34
Basic rules must be observed whenusing any electric appliance.
In particular:• do not touch the appliance when
hands or feet are wet;
• do not use the appliance whenbarefoot;
• do not use extensions in bath orshower rooms;
• do not pull the supply cord out ofthe socket to disconnect it fromthe mains;
☞
CAUTIONRISK OF ELECTRIC SHOCK
• do not leave the appliance expo-sed to atmospheric agents (rain,sun, etc.);
• do not let the appliance be usedby children, unauthorised staff orstaff who have not read and fullyunderstood the contents of thishandbook.
Before servicing the appliance, theauthorised technician must firstswitch off the appliance and removethe plug.
☞
To clean the appliance, set themachine to the “0” energy level, thatis, “WITH THE MACHINE SWITCHEDOFF AND THE PLUG REMOVEDFROM THE MAINS” and follow theinstructions in this handbook.
☞
If the appliance breaks down or failsto work properly, switch it off. Anyintervention is strictly forbidden.Contact qualified experts only.Repairs should only be made by themanufacturer or authorized servicecentres. Only original spare partsmust be used. Failure to observe theabove, could make the applianceunsafe.
☞
For installation, the qualified electri-cian must fit an omnipolar switch inaccordance with the safety regula-tions in force and with 3 (0,12) ormore mm (in) between contacts.
☞
To avoid dangerous overheating,make sure the supply cord is fullyuncoiled.
☞
Do not obstruct the extraction and/ordissipator grids, especially of the cupwarmer.
☞
The user must not replace theappliance supply cord. If the cord isdamaged, switch off the applianceand have a qualified technician chan-ge the cord.
☞
If no longer using the appliance, werecommend making it inoperative;after removing the plug from themains electricity, cut the powersupply cable.
☞
Fig. 6
Fig. 7
Fig. 9
EN
GL
ISH
Fig. 8

35
CAUTIONRISK OF POLLUTION
Do not dispose of the machine in theenvironment: to dispose of themachine, use an authorised centre,or contact the manufacturer for relati-ve information.
☞
To ensure that the machine is pro-perly ventilated, place it with the ven-tilation side at a distance of 15 cm(5,9 in) from walls or other objects.
☞
Once a machine wash cycle has beenstarted, do not interrupt it, as deter-gent residues may then be left insidethe delivery group.
☞
CAUTIONRISK OF INTOXICATION
Use the steam nozzle with care andnever place hands below the jet ofsteam. Do not touch the nozzle imme-diately after use.
☞
CAUTIONRISK OF BURNS OR SCALDING
We remind you that before carryingout any installation, maintenance,unloading or adjustment operations,the qualified operator must put onwork gloves and protective footwear.
☞
When adding coffee beans, themachine operator must not placehis/her hands inside the container.
☞
CAUTIONRISK OF CUTTING
Fig. 10
Fig. 11
EN
GL
ISH

36
Always quote the machine serial number in allcommunications to the manufacturer, NuovaSimonelli.
The machine is transported on pallets whichalso contain other machines - all boxed andsecured to the pallet with supports.Prior to carrying out any transport or handlingoperation, the operator must:
• put on work gloves and protective footwear,as well as a set of overalls which must beelasticated at the wrists and ankles.The pallet must be transported using a sui-table means for lifting (e.g., forklift).
CAUTION
RISK OF IMPACT OR CRASHING
CAUTION
RISK OF IMPACT OR CRASHING
During all handling operations, the operatormust ensure that there are no persons,objects or property in the handling area.The pallet must be slowly raised to a heightof 30 cm (11,8 in) and moved to the loadingarea. After first ensuring that there are nopersons, objects or property, loading opera-tions can be carried out.Upon arrival at the destination and afterensuring that there are no persons, objectsor property in the unloading area, the pro-per lifting equipment (e.g. forklift) should beused to lower the pallet to the ground andthen to move it (at approx. 30 cm (11,8 in)from ground level), to the storage area.
Before carrying out the following operation,the load must be checked to ensure that it isin the correct position and that, when thesupports are cut, it will not fall.The operator, who must first put on workgloves and protective footwear, will pro-ceed to cut the supports and to storing theproduct. To carry out this operation, thetechnical characteristics of the productmust be consulted in order to know theweight of the machine and to store it accor-dingly.
CAUTIONRISK OF POLLUTION
Fig. 12
Fig. 13
3. TRANSPORT AND HANDLING
3.1 MACHINEIDENTIFICATION
3.2 TRANSPORT
3.3 HANDLING
EN
GL
ISH

37
CAUTIONRISK OF POLLUTION
Do not dispose of packaging in the environ-ment.
Before carrying out any installation andadjustment operations you must read andfully understand the SAFETY INSTRUC-TIONS of this handbook.The company cannot be held responsiblefor damage to things or injury to personscaused by failure to comply with the safetyinstructions and installation and maintenan-ce instructions contained in this handbook.
CAUTIONRISK OF SHORT CIRCUITS
Before connecting the machine to the mainspower supply, please check that the supplyvoltage corresponds to the machine voltage.
Once the machine has been withdrawn fromthe packaging, carry out the following instruc-tions:1 Position the unit on a horizontal surface.2 Open the hatch.3 Withdraw the water tank by pulling it
upwards.
WARNING
4 Particularly the first time, wash the tankwith soapy water and then carefully rinseoff all soap.
5 Fill the water tank with water.6 Make sure that the outside of the water
tank is dry.7 Return the water tank to its site.
8 Close the hatch.9 Remove the coffee bean holder cap.
Pour ONLY toasted coffee beans into thecoffee bean holder. any other kind of coffee,for example ground coffee, will damage thecoffee grinder.Don't insert caramelized, sugar coated, orsimilarly coated coffee beans, or instantcoffee or other sugary beverages becausethey will harm the appliance.
10 Don't fill to the brim but pour just enoughtoasted coffee beans into the coffee beanholder to ensure correct closure of the unit.
Fig. 14
Fig. 16
Fig. 15
Fig. 17
11 Close the cap.
4. INSTALLATION AND PRELIMINARY OPERATIONS
EN
GL
ISH

38
the machine automatically loads the heaterwith water and begins heating operations.When the desired temperature is reachedthe display will show the following messa-ge:
NOTE: the starting time is about 3 minutes.
NOTE: the appliance is endowed with a secu-rity system that will stop the machineafter about 1.5 minutes of constantfunctioning of the pump (to avoid pumpoverheating). In this case, switch off themain switch of the machine and thenturn it on again.
The machine is now ready to be used.
Switch on the grinder to carry out the grin-ding adjustment procedures.
NOTE: the procedure is possible also with theappliance on.
• Put the key into its lock.• Turn the control panel hatchdoor key coun-
ter- clockwise.• Open the hatchdoor, to gain access to the
coffee grinder adjusting screw. Followingthe direction of the arrows and using a 3 mm(0,12 in) allen wrench, grinding of the coffeebeans can be adjusted to COARSER(counter-clockwise) or FINER (clockwise).
• Lock the hatchdoor.
WARNING NOTE: the procedure is possible also with theappliance on.
• Put the key into its lock.• Turn the control panel hatchdoor key coun-
ter-clockwise.• Open the hatchdoor, to gain access to the
adjusting screw.To adjust the delivery of air from the milkfoamerand, consequently, the amount of foam delive-red, turn the adjusting screw as follows:
• Loosen the safety ring nut counter-clockwi-se.
• Turn the adjusting screw as shown on thehatchdoor label to increase/decrease airdelivery from the foam maker.
• Once the desired airflow has been reached,tighten the safety ring nut by turning it clock-wise.
NOTE: in case the following procedure should-n't take effect, see the chapter on"Problems and Solutions".
After the preliminary operations:
1 Press the main switch so that the LCD dis-play turns on showing the message:
Fig. 19
FINOFINE
GOARSEGROSSO
Fig. 18
OPEN
CLOSED
5. ADJUSTMENTS TO BE MADEBY A QUALIFIED TECHNICIAN ONLY
5.1 GRINDINGADJUSTMENT
5.2 MILK FOAMERADJUSTMENT
EN
GL
ISH

39
IMPORTANT: Keys 1-2-3-4-6 (see 'DIS-PLAY' description), can corre-spond to different drinksaccording to taste and localtraditions (see PROGRAM-MING and paragraph onSELECTIONS CONFIGURA-TION).
Before starting usage of the appliance, the ope-rator must read and fully understand the safetyinstructions in this handbook.
START UP: By pressing the ON / OFF key,the machine will begin to carryout a self-diagnostic check atthe end of which (if the machi-ne is cold, this cycle may lastas long as 3 minutes), the dis-play will read:
WARNING
In the event that malfunctions or break-downs are shown after the self-diagnosisoperation, call the technical assistance cen-tre. The operator must not intervene.
SWITCHINGOFF: By pressing and holding
down the ON / OFF key, themachine and the display willswitch off.
1 Espresso
1 Coffee
1 Decaffeinated Coffee
Hot water
2 Espressos
2 Coffees
Steam
Fig. 20
NOTE: the procedure is possible also with theappliance on.
To adjust both the flow and the temperature ofthe milk delivery, turn the adjusting tap as fol-lows:
• Turn the milk suction tapCLOCKWISE/COUNTER-CLOCKWISE toINCREASE/DECREASE the milk suctionand then DECREASE/INCREASE.
• Turn the tap until the milk reaches the desi-red temperature.
KEYS LEGENDA(Standard Configuration)
6. USE5.3 MILK FLOW ADJUSTMENT
6.1 STANDARDCONFIGURATION
EN
GL
ISH
Cafe creme(Coffee version)
Caffelatte(Cappuccino version)

40
NOTE: The nozzles can be adjusted to fit allkinds of cups.
Position the nozzles carefully in such a way asto limit the space between cup and nozzles.
• Position one cup under each nozzle.
• Press the desired coffee delivery key once.
• The coffee is being made.
The procedure for making espresso andlong espresso is the same.
• Position a cup under the nozzles.
The beverages always flow from both nozz-les.
• Press the desired coffee delivery key once.
• The coffee is being made.• According to the kind of coffee selected the
display will read.
Leave the cup beneath the nozzles until themessages on the display disappear.
Fig. 21
Fig. 23
Fig. 24
Set the desired function on keyboard keys n. 1-2-3-4-6 (see 'DISPLAY' chapter), by followingthe programming procedures (see Chapter onProgramming).Keys 1-2 can correspond only to coffee beve-rages; keys 2-4-6 can correspond to all bevera-ges.Then apply the corresponding label supplied.
Fig. 22
LEGENDA(Selection configurations)
Cappuccino Big Cappuccino
Macchiato Latte
1 Ristretto 2 Ristretto
1 Cafe Creme 2 Cafe Creme
6.2 SELECTIONSCONFIGURATION
6.3 HOW TO MAKE THECOFFEE’
6.4 HOW TO MAKE TWOCOFFEES
EN
GL
ISH

41
To make this, proceed as for CAFFELATTE(see CAFFELATTE paragraph).
• Position a milk container next to the machi-ne.
• Insert the milk suctioning tube inside themilk container.
• Position the cup.• Adjust the tap along the tube to regulate the
amount of milk desired.• Press the caffe latte delivery key once.
• The display will read as follows:
Lasciare la tazza sotto gli erogatori fino aquando non scompaiono le scritte sul dis-play.
Fig. 25
To make this, proceed as for CAFFELATTE(see CAFFELATTE paragraph).
• Open the ground coffee conveyor hatch.
WARNING
Pour only ground coffee into the coffeebean holder. Any other kind of coffee willdamage the coffee grinder.Don't put caramelized, sugar coated, orsimilarly coated coffee beans, or instantcoffee or other sugary beverages becausethey will harm the appliance.
• Insert only 1 dose of decaffeinated groundcoffee.
• NUR KAFFEEPULVER
• COFFEE POWDER ONLY
• CAFE MOULU UNIQUEMENT
• SOLO CAFFE MACINATO
• SOLO CAFE MOLIDO
Fig. 26
• Press the key corresponding to the desiredkind of coffee following the procedure of theparagraph "HOW TO MAKE THE COFFEE".
• The coffee is being made.
• Press the key once.
• The display will read:
To make this, proceed as for CAFFELATTE(see CAFFELATTE paragraph).
• According to the kind of coffee selected thedisplay will read.
Leave the 2 cups beneath the nozzles untilthe messages on the display disappear.
• The caffè latte is being made.
6.5 HOW TO MAKECAFFELATTE
6.6 HOW TO MAKECAPPUCCINOBIG CAPPUCCINO
6.7 MACCHIATO(three layers: milk/coffee/milk)
6.8 HOT MILK
6.9 HOW TO MAKE DECAF-FEINATED COFFEE
EN
GL
ISH

42
This provides delivery of hot water for brewingtea, chamomile-tea or herb teas.Position a suitable container (a cup) under theSteam pipe / Hot water pipe:
• Press the hot water delivery key once.
WARNING
Before proceeding with the following opera-tions, ensure that the water tank has waterin it. If it hasn't, proceed to filling it withwater. Not be used for pots of Tea.
• The display will read the following message:
• When the desired amount of hot water hasbeen delivered, press the hot water deliverykey again to stop the delivery of hot water.
WARNING
During steam delivery, never touch thesteam pipe with any part of you body orplace your hands underneath it. Keep thesteam pipe inclined downwards on the gridwhere the cup is positioned.
This allows the delivery of steam to emulsifymilk and to heat other liquids.
• Press the Steam delivery key once.
• Residual water will drip from the steam pipeand as soon as the steam starts being deli-vered, use it for the desired time.
• The display will read as follows (example):
• Press the STEAM delivery key once againto stop the delivery of steam.
IMPORTANT: At the end of every steam deli-very, carefully clean the tubewith a damp cloth.
To make these, proceed as for Espresso -Coffee (see the paragraph "HOW TO MAKETHE COFFEE").
• Hot water will come out of the steam pipe.
Fig. 27
Leave the cup beneath the nozzles until themessage on the display disappears.
6.10 HOW TO MAKESHORT ESPRESSO AND CAFE CREME
6.11 HOT WATER 6.12 STEAM • The display will read:
EN
GL
ISH

43
ENTER key: to enter menus
CURSOR keys: scrolling menus,increasing / decrea-sing values
RESET key: to exit menus
For accessing the programming sites proceedas follows:
NOTE: can be performed with machine on.
• Insert the key into the appropriate lock.• Turn the control panel hatch key counter-
clockwise.• Open the control panel hatch; the display
will read:
• Press the ENTER key, close the front panel,the display will read:
• Once the ejection cycle is over, the unit willenter resting phase position and the displaywill show the first item on the programmingmenu:
LIST OF PROGRAMMABLEFUNCTIONS
1. CUMULATIVE TOTAL2. PRODUCT NAME3. WATER VOLUME4. GRIND TIME5. MILK TIME6. PRE-BREWING7. TAMPING8. GROUNDS NUMBER9. MILK CLEAN WARN. H10. CLEAN WARNING11. GROUP SETTING12. GRINDER SETTING13. COFFEE TEMPERAT.14. STEAM TEMPERAT.15. WATER FILTER L.
KEY FUNCTIONS
▲▼ : Scrolling function listProgrammable and/or decreasing /increasing values.
ENTER : To enter menus/ submenus and con-firming data.
RESET : Moving back to preceding level.
1
3
5
7
2
4
6
8
Fig. 28
1
3
2
4
7. PROGRAMMING
7.1 LEGENDA 7.2 PROGRAMMING
EN
GL
ISH
This operation should be realized byan Expert Technician ONLY.Adjustement carried out by NONCertified Technichians or other per-sons, may invalidate the Warranty.

44
1. CUMULATIVE TOTALThe submenus can be entered by pus-hing the ENTER key.The quantity of doses delivered for eachkind of beverage will be displayed.
1 Total Ristretto2 Total 2 Ristretto3 Total Espresso4 Total 2 Espresso5 Total Cafee6 Total 2 Cafee7 Total Cafecream8 Total Latte9 Total Caffelatte10 Total Macchiato11 Total Cappuccino12 Total Big Cappuccino13 Total Deca14 Total Cleaning15 Total Litres
The arrow keys ▲▼ scroll all the totals of thevarious beverages.The RESET key moves back to the precedingmenu.
Per azzerare i conteggi, premere contempora-neamente i tasti ▲▼.The display will read “Counters reset”.
To exit programming sites, proceed as follows:
NOTE: can be performed with machine on andfrom any of the visualized functions.
• Insert the key into the appropriate lock.• Turn the control panel hatch key counter-
clockwise.• Open the control panel hatch; the display
will read:
• Close the front panel and turn the key clock-wise. The display will read:
• The unit will enter resting phase positionand the display will read:
• The machine is now ready to deliver thedesired beverages with its new memorizedsetting. Alternatively scroll all the functionsby pushing the arrow keys ▼ until the dis-play reads:
2. PRODUCT NAME:By pressing the ENTER key, the subme-nus can be accessed.A beverage is assigned to each key.
Example:
In this case the beverage ‘Espresso’ is assi-gned to key number.
The arrow keys ▲▼ scroll the names of thebeverages on each key available in the agenda.The RESET key is for exiting the submenu.The ENTER key confirms the type of beveragefor the key number being taken into considera-tion, and then passes on to the beverage of thenext key.The programmable keys are the following:
Once the programming of the final key hasbeen completed, you pass on to the next menuitem.
NOTA: The keyscan be programmed for both milk-based and coffee drinks.
The keyscan be programmed exclusively for cof-fee drinks.
1 32 4 6
2 64
1 3
7.3 EXITINGPROGRAMMING
7.4 PROGRAMMING CYCLE
1
EN
GL
ISH

45
1 Pre-Brewing Ristretto2 Pre-Brewing 2 Ristretto3 Pre-Brewing Espresso4 Pre-Brewing 2 Espresso5 Pre-Brewing Coffee6 Pre-Brewing 2 Coffee7 Pre-Brewing CoffeeCreme8 Pre-Brewing caffellatte9 Pre-Brewing Macchiato10 Pre-Brewing Cappuccino11 Pre-Brewing Big Cappuccino
The arrow keys ▲▼ confirm/disconfirm thepre-brewing function.Press the RESET key to exit the submenu andgo back to the main menu and to confirm thepre-brewing choice programmed.Press the ENTER key to scroll all the items onthe submenu and see confirmation of the pre-brewing choice programmed.
7. TAMPINGPress the ENTER key to access the sub-menu.This allows you to program the coffeetamping for each drink (YES or NO).
1 Tamping Ristretto2 Tamping 2 Ristretto3 Tamping Espresso4 Tamping 2 Espresso5 Tamping Coffee6 Tamping 2 Coffee7 Tamping CoffeeCreme8 Tamping caffellatte9 Tamping Macchiato10 Tamping Cappuccino11 Tamping Big Cappuccino
The arrow keys ▲▼ confirm/disconfirm thetamping function for each drink.Press the RESET key to exit the submenu andgo back to the main menu and to confirm thetamping programmed.
3. WATER VOLUME CCBy pressing the ENTER key the subme-nus can be accessed.The doses of water to be used for eachsingle drink can be programmed.
1 Water volume cc Ristretto2 Water volume cc 2 Ristretto3 Water volume cc Espresso4 Water volume cc 2 Espresso5 Water volume cc Coffee6 Water volume cc 2 Coffee7 Water volume cc CoffeCreme8 Water volume cc caffelatte9 Water volume cc macchiato10 Water volume cc Cappuccino11 Water volume cc Big Cappuccino12 Water volume sec Tea
The arrow keys ▲▼ increase/decrease theamount of water used to make the desireddrink.Press the RESET key to exit the submenu andgo back to the main menu and to confirm thedose programming.Press the ENTER key to scroll all the items onthe submenu and see confirmation of the doseprogrammed.
4. GRIND TIMEPress the ENTER key to access the sub-menu.The grinding times of each drink can beprogrammed (sec.).
1 Grind Time Ristretto2 Grind Time 2 Ristretto3 Grind Time Espresso4 Grind Time 2 Epresso5 Grind Time Coffee6 Grind Time 2 Coffee7 Grind Time CoffeCreme8 Grind Time Caffellatte9 Grind Time s. Macchiato
10 Grind Time s. Cappuccino11 Grind Time s. Big Cappuccino
The arrow keys ▲▼ allow you toincrease/decrease the grinding time needed formaking the selected drink.Press the RESET key to exit the submenu andgo back to the main menu and to confirm thegrinding time set.Press the ENTER key to scroll all the items onthe submenu and see confirmation of the setgrinding time.
5. MILK TIMEPress the ENTER key to access the sub-menu.This allows you to program the milk deli-very time.
1 Latte2 Caffellatte3 Macchiato4 Cappuccino5 Big Cappuccino
The arrow keys ▲▼ allow you toincrease/decrease the delivery time and thedose of the milk to be used to make the selec-ted drink.Press the RESET key to exit the submenu andgo back to the main menu and to confirm thegrinding time set.Press the ENTER key to scroll all the items onthe submenu and see confirmation of the setgrinding time.
6. PRE-BREWINGPress the ENTER key to access the sub-menu.This allows you to program the choice ofcoffee pre-brewing for each drink (YES orNO).
EN
GL
ISH

46
Press the ENTER key to scroll all the items onthe submenu and see confirmation of the tam-ping programmed.
8. GROUNDS NUMBERPress the ENTER key to access the sub-menu.This allows you to program theGROUNDS NUMBER. When the numberhas been reached, a message will be dis-played instructing you to empty the coffeegrounds drawer and the machine will stopworking to allow the procedure to be donesafely.
The arrow keys ▲▼ increase/decrease thegrounds number to proceed to the emptying ofthe coffee grounds drawer.Press the RESET key to exit the submenu andgo back to the main menu and to confirm thegrounds number programmed.The ENTER key is disabled.
9. MILK CLEAN WARN. HPress the ENTER key to access the sub-menu.This allows you to program after howmany hours, following the last milk deli-very, the milk foamer cleaning warning willbe displayed.
The arrow keys ▲▼ increase/decrease theamount of hours for the display of the milk foa-mer cleaning warning message.Press the RESET key to exit the submenu andgo back to the main menu and to confirm thenumber of hours programmed.The ENTER key is disabled.
10. CLEAN WARNINGPress the ENTER key to access the sub-menu.
This allows you to program the number ofcycles after which the group clean war-ning will be displayed.
The arrow keys ▲▼ increase/decrease theamount of hours for the display of the groupclean warning message.Press the RESET key to exit the submenu andgo back to the main menu and to confirm thenumber of cycles programmed.The ENTER key is disabled.
11. GROUP SETTINGPress the ENTER key to access the sub-menu.This allows you to program the grouprepositioning.
The arrow keys ▲▼ increase/decrease theriascent of the motor.Press the RESET key to exit the submenu andgo back to the main menu and to confirm theprogramming.The ENTER key is disabled.
12. GRINDER SETTINGPress the ENTER key to access the sub-menu.This allow you to program the choice ofincreasing grinding times by o.5 secondsevery 50-250 deliveries.By setting the program at 0, the function isdisabled
The arrow keys ▲▼ increase/decrease thenumber of deliveries, after which there will bean increase in grinding time.The available values are 0, 50,100, 150, 200,250.Press the RESET key to exit the submenu andgo back to the main menu and to confirm thenumber of deliveries programmed.The ENTER key is disabled.
13. COFFEE TEMPERAT.Press the ENTER key to access the sub-menu.This allow you to program the temperatu-re of the coffee heater.
The arrow keys ▲▼ increase/decrease thetemperature of the coffee heater.Press the RESET key to exit the submenu andgo back to the main menu and to confirm thetemperature programmed.The ENTER key is disabled.
14. STEAM TEMPERAT.Premendo il tasto ENTER è possibileentrare nel sottomenù.This allow you to program the temperatu-re of the steam boiler.
The arrow keys ▲▼ increase/decrease thetemperature of the steam boiler.Press the RESET key to exit the submenu andgo back to the main menu and to confirm thetemperature programmed.The ENTER key is disabled.
15. WATER FILTERPress the ENTER key to access the sub-menu.This allows you to program the number oflitres of water to be delivered for the dis-play of the message clean water filter.
The arrow keys ▲▼ increase/decrease thenumber of litres of water delivered for the dis-play of the message clean water filter.Press the RESET key to exit the submenu andgo back to the main menu and to confirm thenumber of litres programmed.The ENTER key is disabled.
EN
GL
ISH

47
This function makes it possible to remove incor-rect functioning data and to reinstate theStandard Programming settings (see PRESETSETTINGS chart) . Proceed as follows:
• Release voltage by turning the main switchoff (OFF).
• Reinstate voltage by turning the mainswitch on (ON) and simultaneously pres-sing down on the keys
ENTER
and RESET
;
until the display reads:
This function makes it possible to activate themotor manually forming the automation of themanual coffee delivery group. Proceed as fol-lows:
• Release voltage by turning the main switchoff (OFF).
• Reinstate voltage by turning the main switchon (ON) and simultaneously pressing down on the arrow keys ▲ and ▼ ;
until the display reads:
IMPORTANT: When the machine is switchedon, since the arrow key ▼ isused to access this site, thepiston will automatically startto move downwards.
• Press the arrow key ▼ to move thepiston DOWNWARDS.
• Press the arrow key ▲ to move thepiston UPWARDS.
• Release and reinstate voltage using themain switch to end the procedure.
This function allows you to reset the totalamount of water used.Proceed as follows:
• Release voltage by turning the main switchoff (OFF).
• Reinstate voltage by turning the main switchon (ON) and pressing down on the key:
until the display reads:
This function makes it possible to reset the totalnumber of washing cycles.Proceed as follows:
• Release voltage by turning the main switchoff (OFF).
• Reinstate voltage by turning the main switchon (ON) and pressing down on the key:
until the display reads:
5
7
8. SPECIAL MACHINE SCALING FUNCTIONS
8.1 RESETTING THE CLEA-NING FILTER LITRECOUNTER
8.2 RESETTING WASHINGCYCLE
8.3 RESETTING MACHINEPARAMETRES
8.4 HANDLING MANUALCOFFEE DELIVERYGROUP
1
3
2 4
4
2
EN
GL
ISH

48
To switch the machine off the main switch mustbe pressed again.
Before carrying out any cleaning operations,set the machine to the “O” energy level, (machi-ne switched off and plug removed from themains).
Never use solvents, chlorine-based pro-ducts, abrasives.
CAUTION
Cleaning the work area: remove the worktop,lifting it up from the front and sliding it out.Remove the water collection dish underneathand clean everything with hot water and clean-sers.Cleaning the external surfaces: To clean thepanels, use a soft, damp cloth.
NOTE:Only the Cappuccino version is equip-ped with the milk foamer washer.
NOTE:Follow the instructions on the labelapplied on the inside of the front door.
NOTE:Before starting the washing cycle checkand refill the level of water in the watertank.
The machine is equipped to wash the deliveryunit with detergent tablets and the milk circuitwith liquid cleansers (Cappuccino versiononly).The machine will begin a wash cycle that con-
CAUTIONRISK OF INTOXICATION.
Fig. 29
Fig. 30 4. Press the following key:
OFFOFF
9. CLEANING AND MAINTENANCE
9.1 SWITCHING OFF THEMACHINE
9.2 CLEANING THE OUTSI-DE OF THE MACHINE
9.3 CLEANING THE DELI-VERY UNIT AND MilkFoamer:
Fig. 31
sists of hot water deliveries alternated with pau-ses. The whole cycle lasts approximately 4minutes.We recommend that you carry out a WAS-HING CYCLE at least once a day using spe-cial cleansers.
Fig. 32
We remind you not to interrupt a washingcycle using detergent tablets once started,otherwise detergent residues may remaininside the machine.
In order to execute the washing procedure pro-ceed as follows (for coffee version go directly tostep 4):1. Position a container with water beside the
machine.2. Put the suction tube inside it.3. Add the specific cleaning product (20 ml
[0.005 Gal] of Puly Milk).
EN
GL
ISH

49
WARNING
If the DECAFFEINATED key is not pressed,after about 20 seconds the machine willautomatically continue the washing cycle.
NOTE:during the washing cycle the dose keysare disabled.
• Should the washing cycle be interrupted byelectricity failure, when the appliance is nextturned on the unit will be in rest position andthe display will read:
• Press the DECAFFEINATED key again inorder to repeat the procedure describedabove in the paragraph ‘CLEANING THEDELIVERY UNIT AND Milk Foamer.’
CAUTIONRISK OF BURNS OR SCALDING
• Set the machine to the “O” energy level.• Insert the key in the lock.• Turn the Front panel key counter-clockwise.• Open the Front panel
Reposition a container only with water in it.
NOTE:during the washing and rinsing cycleskeeping a container under the deliveryunit is advisable or empty the water col-lector once the wash and rinse cycleshave been completed.
9.4 REINSTATING ANINTERRUPTED WAS-HING CYCLE
9.5 COFFEE HOLDER ANDCOFFEE DELIVERYUNIT CLEANING
5. Keep pressing down on the key for about 5seconds until the display reads:
6. Open the ground coffee conveyor hatch.7. Insert the cleanser tablet (puly Caff) and
close the hatch
Fig. 33
8. Press the following key:
The display will read:
• Afterwards the rinsing procedure will beginand the display will read:
Fig. 34
• Remove any coffee residues deposited onthe delivery unit sides.
Fig. 35
EN
GL
ISH

50
CAUTIONRISK OF BURNS OR SCALDING
If cleaned when the nozzle is still hot, avoidtouching it with bare hands.
Use a cloth dipped in hot water and/or a neutralcleanser.
• Wash the grid clean with a brush and hotwater and soap.
• Clean the water collecting tray with hotwater and soap, if necessary using a brush.
NOTE: the water collecting tray can be washedin the dishwasher.
CAUTION
Never use any sort of solvent.
• Clean the water tank with hot water andsoap, if necessary using a swab
• Use a small brush to clean any deposits orcoffee residues off the piston and the deli-very unit site or any other areas soiled withcoffee.
9.6 CLEANING THE STEAMNOZZLE
9.7 CLEANING THE DROPCOLLECTING TRAYGRID
9.8 CLEANING THE WATERCOLLECTING TRAY
9.9 CLEANING THE WATERTANK
9.10 CLEANING THEGASKET
Fig. 36
NOTE:rinse carefully so that undesirable resi-dues aren’t deposited on the bottom ofthe tank.
Fig. 39
Fig. 40
Fig. 37
Fig. 38
Clean the steam nozzle each time it is used towarm up drinks.
EN
GL
ISH

51
• Insert the key in the lock.• Turn the Front panel opening key counter-
clockwise.• Open the Front panel.
Fig. 42
IMPORTANT: Proceed with caution
• Extract the whole delivery unit including themilk foamer, pulling it towards you.
• Extract the milk foamer from the deliverygroup by sliding it upwards.
• Disconnect all the tubes attached to it.• Disassemble the milk foamer and wash it
carefully.
Fig. 44
Fig. 43
1
2
NOTE:If the pause between one cappuccinoand another is over one hour long, it isadvisable to wash the milk foamer by fis-hing the milk suction tube in hot waterrather than in milk.
• To reassemble proceed inversely, attachingthe milk foamer tubes properly.
NOTE:Follow the instructions applied on thelabel on the inside of the front door too.
• Set the machine to the “O” energy level.
Fig. 41
9.11 CLEANING THE MILKFOAMER
NOTE:To make the reassembling procedureeasier, an explanatory label has beenattached to the front door.
• Clean the drop collector (see paragraphTHE DROP COLLECTING TRAY GRID)
EN
GL
ISH
52
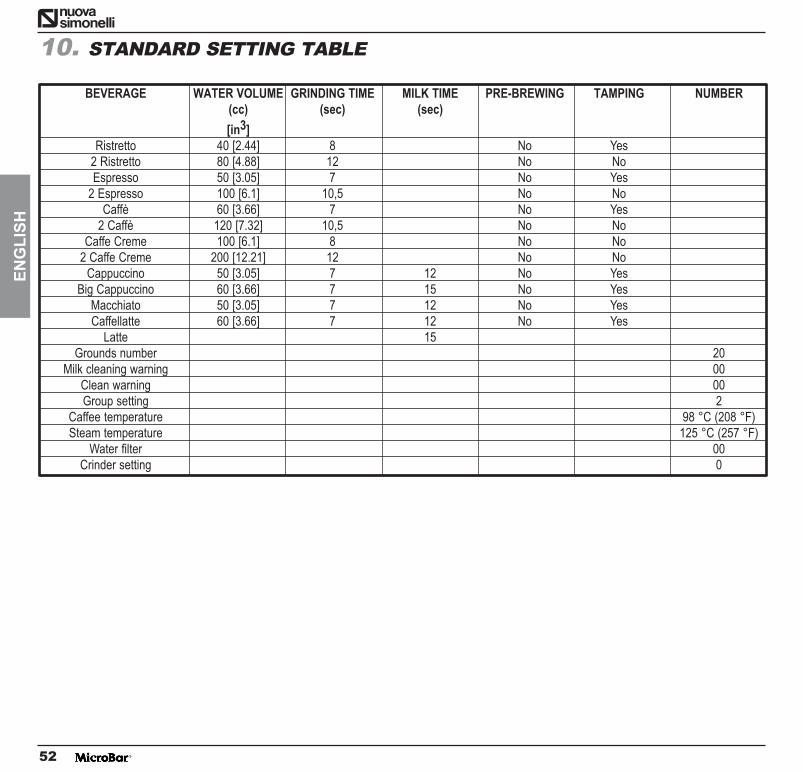
BEVERAGE WATER VOLUME GRINDING TIME MILK TIME PRE-BREWING TAMPING NUMBER(cc) (sec) (sec)
[in3]Ristretto 40 [2.44] 8 No Yes
2 Ristretto 80 [4.88] 12 No NoEspresso 50 [3.05] 7 No Yes
2 Espresso 100 [6.1] 10,5 No NoCaffè 60 [3.66] 7 No Yes
2 Caffè 120 [7.32] 10,5 No NoCaffe Creme 100 [6.1] 8 No No
2 Caffe Creme 200 [12.21] 12 No NoCappuccino 50 [3.05] 7 12 No Yes
Big Cappuccino 60 [3.66] 7 15 No YesMacchiato 50 [3.05] 7 12 No YesCaffellatte 60 [3.66] 7 12 No Yes
Latte 15Grounds number 20
Milk cleaning warning 00Clean warning 00Group setting 2
Caffee temperature 98 °C (208 °F)Steam temperature 125 °C (257 °F)
Water filter 00Crinder setting 0
10. STANDARD SETTING TABLE
EN
GL
ISH

53
DISPLAY CAUSE EFFECT SOLUTION NOTE
Grounds drawer full. Thenumber of coffee grounds inthe drawer has reached thenumber set during program-ming stage.
Keys delivering coffee baseddrinks are blocked.
Pull out the grounds drawerand empty it into a garbagebag. Put the drawer back intoplace, when the display reads:
Grounds drawer out of place. Keys delivering coffee baseddrinks are blocked.
Insert the grounds drawer intoits special slot.
Should this alarm turn onduring the delivery of a coffeebased drink:
• up until brewing, the alarmis displayed but the drinkwill be delivered;
• after brewing, the cycle inprogress will be suspend-ed.The coffee cycle willrecom-mence only whenthe drawer has been putback in its place.
Should this alarm turn onduring the group movementphase:
• the movement will be inter-ruptedWhen the drawer is back inits place, the reset groupwill be repeated.
Front panel open. The machine functions areblocked.
Close the front panel.
GROUNDS DRAWER FULL
GROUNDS DRAWER OUTOF PLACE
FRONT PANEL POSITION
11. MACHINE FUNCTIONS MESSAGES
EN
GL
ISH

54
Perform a washing cycle forthe milk foamer only. As in thecase of a complete washingcycle, you must keep the keypressed down for 5seconds without, however,inserting cleanser tablets forthis group’s washing.(See only points 1,2,3,4 of theparagraph ‘WASHING THEDELIVERY UNIT AND MILKFOAMER’)
The set number of cycles pro-grammed before washing, hasbeen exceeded.
The message will appear onthe display but the machinewill continue to deliver drinks.
Do a washing cycle (see para-graph WASHING THE DELI-VERY UNIT AND MILK FOA-MER)
WASHING CYCLEIS NEEDED
The set number of hours pro-grammed from time of lastmilk based drink before was-hing, has been exceeded.
The message will appear onthe display but the machinewill continue to deliver drinks.
WASHING THE MILK CIRCUIT IS NEEDED
DISPLAY CAUSE EFFECT SOLUTION NOTE
EN
GL
ISH
55
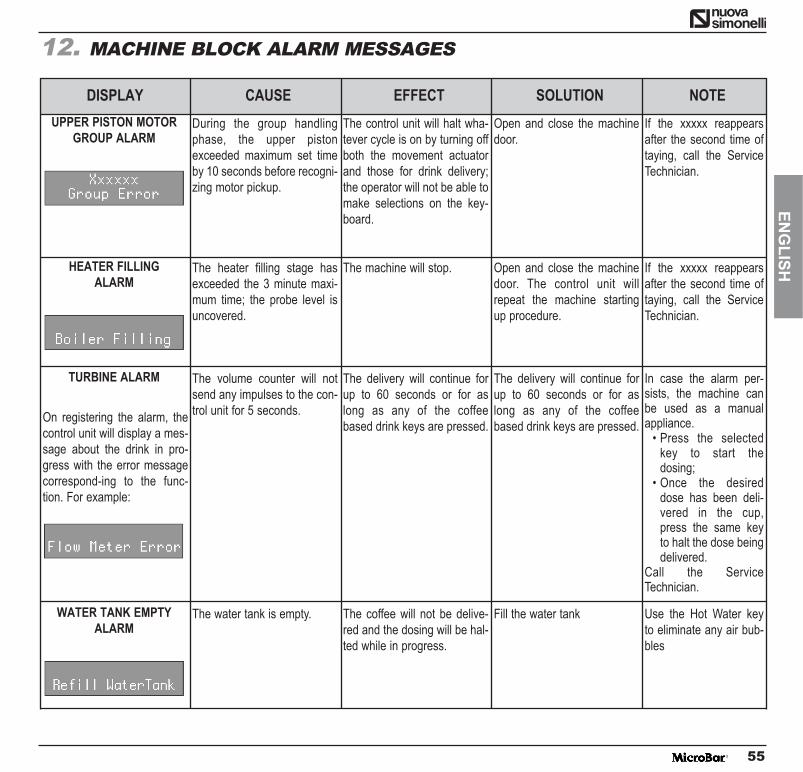
Use the Hot Water keyto eliminate any air bub-bles
Fill the water tankThe coffee will not be delive-red and the dosing will be hal-ted while in progress.
The water tank is empty.
During the group handlingphase, the upper pistonexceeded maximum set timeby 10 seconds before recogni-zing motor pickup.
The control unit will halt wha-tever cycle is on by turning offboth the movement actuatorand those for drink delivery;the operator will not be able tomake selections on the key-board.
Open and close the machinedoor.
If the xxxxx reappearsafter the second time oftaying, call the ServiceTechnician.
UPPER PISTON MOTORGROUP ALARM
The heater filling stage hasexceeded the 3 minute maxi-mum time; the probe level isuncovered.
The machine will stop. Open and close the machinedoor. The control unit willrepeat the machine startingup procedure.
If the xxxxx reappearsafter the second time oftaying, call the ServiceTechnician.
HEATER FILLING ALARM
The volume counter will notsend any impulses to the con-trol unit for 5 seconds.
The delivery will continue forup to 60 seconds or for aslong as any of the coffeebased drink keys are pressed.
The delivery will continue forup to 60 seconds or for aslong as any of the coffeebased drink keys are pressed.
In case the alarm per-sists, the machine canbe used as a manualappliance.
• Press the selectedkey to start thedosing;
• Once the desireddose has been deli-vered in the cup,press the same keyto halt the dose beingdelivered.
Call the ServiceTechnician.
TURBINE ALARM
On registering the alarm, thecontrol unit will display a mes-sage about the drink in pro-gress with the error messagecorrespond-ing to the func-tion. For example:
DISPLAY CAUSE EFFECT SOLUTION NOTE
WATER TANK EMPTYALARM
12. MACHINE BLOCK ALARM MESSAGES
EN
GL
ISH

56
DISPLAY CAUSE EFFECT SOLUTION NOTE
The volume counter has rea-ched the number of litres ofdeliverable water set duringprogramming phase.
Coffee will not be delivered;the dose will not be halted or itis variable.
Regenerate cleaning filtersalts. To erase the alarm seeparagraph on ‘RESETTINGCLEANING FILTER LITRECOUNTER’.
This alarm will not haltdelivery. The cleaning fil-ter alarm can be elimina-ted by programming thenumber of litres to zero(see paragraph on‘PROGRAMMING’)
CLEANING FILTER ALARM
One of the two temperatureprobes is broken.
Coffee will not be delivered. Substitute the broken probe. This alarm blocks alldeliveries.
TEMPERATURE PROBEMALFUNCTION ALARM
Too much coffee. Coffee will not be deliveredand an ejection cycle will beeffected.
Reduce the quantity of coffee. This alarm will not haltdelivery. The cleaning fil-ter alarm can be elimina-ted by programming thenumber of litres to zero(see paragraph on‘PROGRAMMING’).
COFFEE QUANTITY ALARM
EN
GL
ISH