3388tt - trovaprezzi.it
TRANSCRIPT

RICEVITORE DVB-T2 HDCON H.265/HEVC
HD DVB-T2 RECEIVERWITH H.265/HEVC
RICEVITORE DVB-T2 HD PERRICEZIONE CANALI GRATUITI DA
DIGITALE TERRESTRE SUTV ANALOGICI
Manuale d’uso e collegamento
HD DVB-T2 RECEIVER TO VIEW FREE CHANNELS FROM DIGITAL
TERRESTRIAL TO ANALOGUE TV’SUser’s guide
HE
3388TT
Questo manuale d’istruzione è fornito da trovaprezzi.it. Scopri tutte le offerte per Trevi HE 3388 TT o cerca
il tuo prodotto tra le migliori offerte di Decoder

2
HE 3388TTITALIANO
1 PREFAZIONEGrazie per aver acquistato questo prodotto Trevi!Prima di utilizzarlo si prega di leggere attentamente il seguente manuale d’uso. Accertarsi che il prodotto non sia danneggiato, in tal caso rivolgersi al venditore. Controllare che siano presenti tutti gli accessori. Non aprire l’apparecchio: all’interno non vi sono nè comandi manipolabili dall’utente nè parti di ricambio. Per
tutte le operazioni rivolgersi ad un Centro Assistenza Autorizzato Trevi.
2 PRECAUZIONI DI SICUREZZA Posizionare l’apparecchio in un luogo areato. Non coprire le fessure di ventilazione. I cavi devono essere nascosti e protetti. Tenere l’apparecchio lontano dai seguenti luoghi: vicino a fonti di calore (caloriferi, stufe, raggi diretti del sole, ecc...); vicino a zone umide (stanze da bagno, piscine, ecc...); zone polverose; zone soggette a forti vibrazioni. Scollegare il cavo di alimentazione durante i temporali o per lunghi periodi di inutilizzo.
3 CURA E MANUTENZIONE Scollegare l’apparecchio prima di pulirlo. Non usare solventi o liquidi, ma solo un panno morbido e asciutto.
ATTENZIONE
RISCHIO DI SCOSSEELETTRICHE NON ESPORRE
A PIOGGIA E UMIDITÀ
ATTENZIONE: NON APRITE L’APPARECCHIO. ALL’INTERNO NON VI SONO COMANDI MANIPOLABILI DALL’UTENTE NE PARTI DI RICAMBIO. PER TUTTE LE OPERAZIONI DI SERVIZIO RIVOLGERSI AD UN CENTRO DI ASSISTENZA AUTORIZZATO TREVI
VOLTAGGIO PERICOLOSOQuesto simbolo riportato sul retro dell’apparecchio e in questo manuale segnala la presenza all’interno di questo apparecchio di componenti operanti ad alta tensione, non apritelo per evitare il rischio di scosse elettriche.
ATTENZIONEQuesto simbolo riportato sul retro dell’apparecchio e in questo manuale indicano la presenza sugli stessi di importanti istruzioni per la sicurezza d’uso. Leggetele attentamente prima di utilizzare l’apparecchio.
3
HE 3388TT ITALIANO
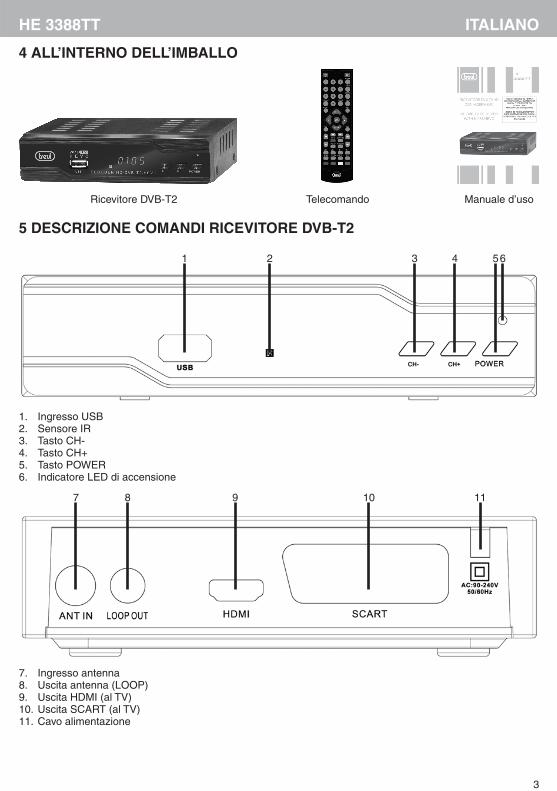
5 DESCRIZIONE COMANDI RICEVITORE DVB-T2
1
1. Ingresso USB2. Sensore IR3. Tasto CH-4. Tasto CH+5. Tasto POWER6. Indicatore LED di accensione
7. Ingresso antenna8. Uscita antenna (LOOP)9. Uscita HDMI (al TV)10. Uscita SCART (al TV)11. Cavo alimentazione
2 3 4 56
7 8 9 10 11
4 ALL’INTERNO DELL’IMBALLO
Ricevitore DVB-T2 Telecomando Manuale d’uso 5
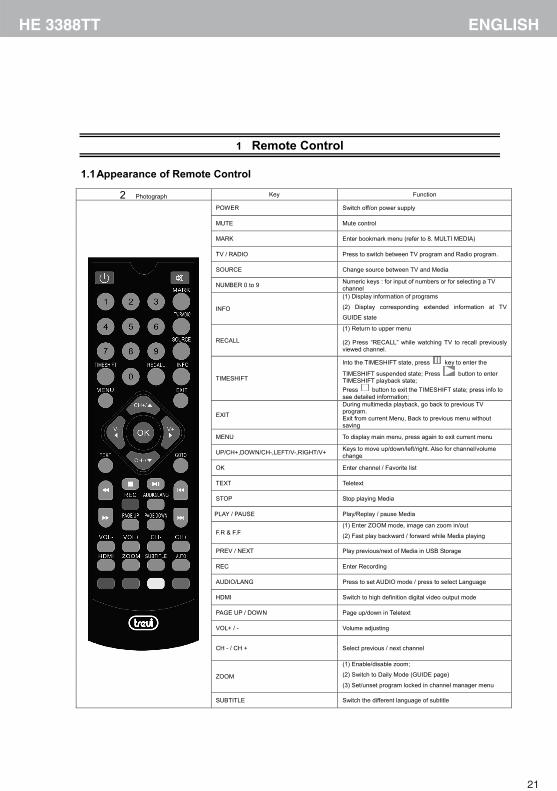
1 Remote Control
1.1 Appearance of Remote Control
2 Photograph Key Function
POWER Switch off/on power supply
MUTE Mute control
MARK Enter bookmark menu (refer to 8. MULTI MEDIA)
TV / RADIO Press to switch between TV program and Radio program.
SOURCE Change source between TV and Media
NUMBER 0 to 9 Numeric keys : for input of numbers or for selecting a TV channel
INFO
(1) Display information of programs
(2) Display corresponding extended information at TV
GUIDE state
RECALL
(1) Return to upper menu
(2) Press “RECALL” while watching TV to recall previously viewed channel.
TIMESHIFT
Into the TIMESHIFT state, press key to enter the
TIMESHIFT suspended state; Press button to enter TIMESHIFT playback state; Press button to exit the TIMESHIFT state; press info to see detailed information;
EXIT
During multimedia playback, go back to previous TV program. Exit from current Menu, Back to previous menu without saving
MENU To display main menu, press again to exit current menu
UP/CH+,DOWN/CH-,LEFT/V-,RIGHT/V+ Keys to move up/down/left/right. Also for channel/volume change
OK Enter channel / Favorite list
TEXT Teletext
STOP Stop playing Media
PLAY / PAUSE Play/Replay / pause Media
F.R & F.F (1) Enter ZOOM mode, image can zoom in/out
(2) Fast play backward / forward while Media playing
PREV / NEXT Play previous/next of Media in USB Storage
REC Enter Recording
AUDIO/LANG Press to set AUDIO mode / press to select Language
HDMI Switch to high definition digital video output mode
PAGE UP / DOWN Page up/down in Teletext
VOL+ / - Volume adjusting
CH - / CH + Select previous / next channel
ZOOM
(1) Enable/disable zoom;
(2) Switch to Daily Mode (GUIDE page)
(3) Set/unset program locked in channel manager menu
SUBTITLE Switch the different language of subtitle

4
HE 3388TT
7
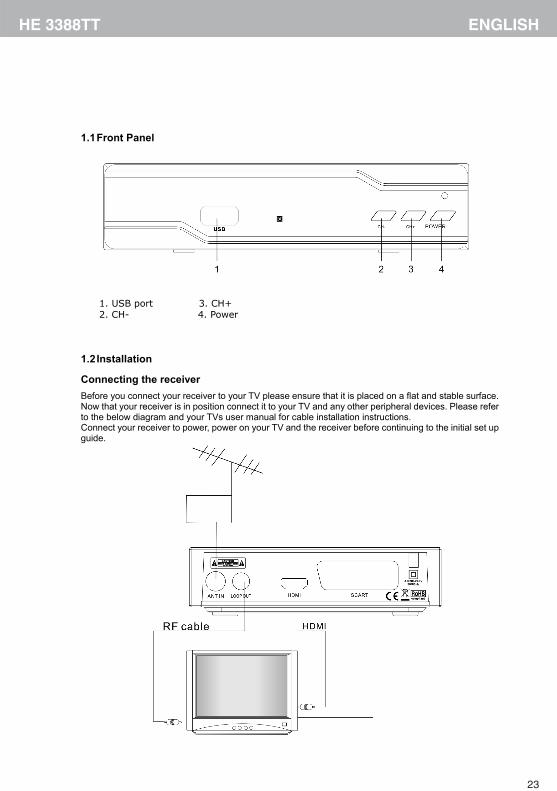
1.1 Front Panel
1. USB port 3. CH+ 2. CH- 4. Power
1.2 Installation
Connecting the receiver Before you connect your receiver to your TV please ensure that it is placed on a flat and stable surface. Now that your receiver is in position connect it to your TV and any other peripheral devices. Please refer to the below diagram and your TVs user manual for cable installation instructions. Connect your receiver to power, power on your TV and the receiver before continuing to the initial set up guide.
7 TELECOMANDO7.1 INSTALLAZIONEAttenzione: batterie non incluse Aprire il vano batterie posto sul retro del telecomando. Inserire le batterie (formato AAA) assicurandosi di rispettare la polarità e i segni guida all’interno del vano
batterie. Richiudere il vano batterie.Per prevenire la perdita di liquido da parte delle batterie con il conseguente danneggiamento del telecomando, assicurarsi di installare correttamente le batterie e di non installare tipologie di batterie diverse (vecchie e nuove, alcaline e zinco-carbone, ecc...).Rimuovere le batterie dal telecomado se non si usa per lunghi periodi.
ITALIANO
6 INSTALLAZIONE E COLLEGAMENTI Collegare il cavo d’antenna 75 ohm all’ingresso antenna. Collegare l’antenna di by-pass (NON INCLUSO NELLA CONFEZIONE) dall’uscita antenna al TV. Questo
collegamento si rende necessario per poter visualizzare i canali televisivi analogici. Collegare l’uscita SCART dell’HE 3388TT al televisore tramite un cavo SCART (NON INCLUSO NELLA
CONFEZIONE). Per usufruire al meglio della qualità dell’HE 3388TT e per poter visualizzare i canali HD ricevuti, collegare
l’uscita HDMI dell’HE 3388TT al televisore tramite un cavo HDMI (NON INCLUSO NELLA CONFEZIONE).
Cavo antenna by-pass(NON INCLUSO)
Cavo HDMI(NON INCLUSO)
Cavo SCART(NON INCLUSO)

5
HE 3388TT
5
1 Remote Control
1.1 Appearance of Remote Control
2 Photograph Key Function
POWER Switch off/on power supply
MUTE Mute control
MARK Enter bookmark menu (refer to 8. MULTI MEDIA)
TV / RADIO Press to switch between TV program and Radio program.
SOURCE Change source between TV and Media
NUMBER 0 to 9 Numeric keys : for input of numbers or for selecting a TV channel
INFO
(1) Display information of programs
(2) Display corresponding extended information at TV
GUIDE state
RECALL
(1) Return to upper menu
(2) Press “RECALL” while watching TV to recall previously viewed channel.
TIMESHIFT
Into the TIMESHIFT state, press key to enter the
TIMESHIFT suspended state; Press button to enter TIMESHIFT playback state; Press button to exit the TIMESHIFT state; press info to see detailed information;
EXIT
During multimedia playback, go back to previous TV program. Exit from current Menu, Back to previous menu without saving
MENU To display main menu, press again to exit current menu
UP/CH+,DOWN/CH-,LEFT/V-,RIGHT/V+ Keys to move up/down/left/right. Also for channel/volume change
OK Enter channel / Favorite list
TEXT Teletext
STOP Stop playing Media
PLAY / PAUSE Play/Replay / pause Media
F.R & F.F (1) Enter ZOOM mode, image can zoom in/out
(2) Fast play backward / forward while Media playing
PREV / NEXT Play previous/next of Media in USB Storage
REC Enter Recording
AUDIO/LANG Press to set AUDIO mode / press to select Language
HDMI Switch to high definition digital video output mode
PAGE UP / DOWN Page up/down in Teletext
VOL+ / - Volume adjusting
CH - / CH + Select previous / next channel
ZOOM
(1) Enable/disable zoom;
(2) Switch to Daily Mode (GUIDE page)
(3) Set/unset program locked in channel manager menu
SUBTITLE Switch the different language of subtitle
7.2 DESCRIZIONE COMANDI
ITALIANO
1. Tasto POWER, consente di accendere e spegnere il TV dalla modalità stand-by.
2. Tasto MUTE, consente di escludere momentaneamente l’audio. Premerlo di nuovo o utilizzare i tasti volume per ripristinarlo.
3. Tastierino numerico (0-9).4. Tasto MARK, consente di assegnare un segnalibro
nella riproduzione dei file multimediali.5. Tasto TV/RADIO, consente di passare dai canali TV
alle stazioni Radio e viceversa.6. Tasto SOURCE, consente di accedere lla riproduzione
dei file multimediali.7. Tasto TIMESHIFT, consente di attivare la funzione
Timeshift per mettere in attesa e riprendere successi-vamente le trasmissioni televisive.
8. Tasto RECALL, consente il ritorno all’ultimo canale visualizzato.
9. Tasto INFO, consente di visualizzare le informazioni sulle trasmissioni di ogni canale.
10. Tasto MENU, consente di attivare l’OSD (menù).11. Tasto EXIT, consente di uscire dai menù.12. Tasto CH+/- / /, consente di selezionare il canale
successivo/precedente a quello che si sta guardando/ tasto di navigazione menù alto/basso.
13. Tasto V-/+ / /,consente di diminuire/aumentare il volume d’ascolto / tasto di navigazione menù sinistra/destra.
14. Tasto OK, consente di confermare/attivare una voce di menù selezionata / visualizza la lista dei canali TV.
15. Tasto TEXT, consente di attivare il Teletext (se disponibile).
16. Tasto GOTO, consente la ricerca di un particolare di un file multimediale.
17. Tasto STOP, consente di arrestare la riproduzione dei file multimediali.
18. Tasto >/II PLAY/PAUSA, consente di arrestare momen-taneamente la riproduzione dei file multimediali.
19. Tasto << RWD, consente di andare indietro veloce nella riproduzione dei file multimediali.
20. Tasto I<< PREV, consente di passare al file multimediale precedente.
21. Tasto REC, consente di avviare la registrazione delle trasmissioni televisive.
22. Tasto AUDIO/LANG, consente di selezionare le lingue di ascolto della trasmissione televisiva (se disponibile).
23. Tasto >> F.FWD, consente di andare avanti veloce nella riproduzione dei file multimediali.
24. Tasto >>I NEXT, consente di passare al file multimediale successivo.
25. Tasto PAGE UP, consente di scorrere alla pagina superiore/successiva.26. Tasto PAGE DOWN, consente di scorrere alla pagina inferiore/precedente.27. Tasti VOL+/-, consentono di aumentare o diminuire il volume dei file multimediali.28. Tasti CH+/CH-, consentono di selezionare il canale successivo/precedente a quello che si sta guardando.29. Tasto HDMI, consente di commutare le risoluzioni disponibili dell’uscita HDMI.30. Tasto AUTO, consente di avviare la ricerca automatica dei canali.31. Tasto ZOOM, consente di zoommare l’immagine riprodotta a video32. Tasto SUBTITLE, consente di selezionare il linguaggio dei sottotitoli trasmessi (se disponibili).33. Tasti funzione colorati.
.1 .2
.4
.5
.6
.3
.7.8.9
.10 .11
.12
.12
.14.13.13
.16.15
.18.17
.20.19
.22.21
.24.23
.26.25
.28.27
.30.29
.32.33.31

6
HE 3388TT
8 PRIMA INSTALLAZIONEAlla prima accensione verrà richiesto di impostare la configurazione di base del decoder.Per navigare all’interno dei menù occorre utilizzare i tasti di navigazione e , premere OK per confermare la selezione oppure premere il tasto EXIT per uscire. LINGUA OSD: premere OK e poi i tasti di navigazione fino a selezionare la lingua del menù desiderata. PAESE: premere OK e poi i tasti di navigazione fino a selezionare il Paese dove si effettua la scansione
dei canali. ZONA GMT: premere OK e poi i tasti di navigazione per selezionare il fuso orario. LCN: premere OK e poi i tasti di navigazione per attivare o disattivare la funzione LCN Selezionare INIZIA RICERCA e premere il tasto OK per avviare la scansione automatica dei canali.La ricerca inizia automaticamente e vengono memorizzati in maniera progressiva tutti i programmi TV disponibili; l’operazione richiede alcuni minuti.È possibile terminare la scansione dei canali digitali premendo il tasto EXIT.Nota: Al termine della scansione dei canali del digitale terrestre (DTV) è possibile che venga visualizzato un messaggio di conflitto di numerazione canali. Scegliere se utilizzare o meno l’impostazione predefinita per ogni numero in conflitto. Se entro 10 secondi non verrà effettuata nessuna scelta, verrà attivata automaticamente l’impostazione predefinita.
9 TELEVISIONE DIGITALE TERRESTRE (DTV)Per navigare all’interno dei menù occorre utilizzare i tasti di navigazione e , premere i tasti di navigazione per entrare ed uscire dalle voci menù e premere il tasto OK per confermare la selezione. Premere il tasto EXIT per uscire dal menù.
9.1 OPERAZIONI PRELIMINARI
9.1.1 CAMBIO LINGUA MENU Premere il tasto MENU per entrare nel MENU PRINCIPALE. Premere i tasti di navigazione fino a selezionare la voce PREFERENZA e premere OK. Selezionare LINGUA OSD e premere i tasti di navigazione fino a selezionare il linguaggio dell’OSD
(menù) in ITALIANO o altra lingua desiderata. Premere il tasto EXIT per uscire.
9.1.2 RICERCA AUTOMATICA DEI CANALI Premere il tasto MENU per entrare nel MENU PRINCIPALE. Premere i tasti di navigazione fino a selezionare la voce INSTALLAZIONE e premere OK. Premere i tasti di navigazione e selezionare la funzione RICERCA AUTOMATICA. Selezionare se si vuole iniziare la ricerca dei canali oppure no.La ricerca inizia automaticamente e vengono memorizzati in maniera progressiva tutti i programmi TV disponibili; l’operazione richiede alcuni minuti.Nota: Se il TV visualizza il messaggio ”Nessun segnale” significa che non riceve segnale, occorre quindi verificare il cavo o l’impianto d’antenna.
9.1.3 RICERCA MANUALE DEI CANALI Premere il tasto MENU per entrare nel MENU PRINCIPALE. Premere i tasti di navigazione fino a selezionare la voce INSTALLAZIONE e premere OK. Premere i tasti di navigazione e selezionare la funzione RICERCA MANUALE. In NUMERO CANALE selezionare il numero del canale sul quale si desidera effettuare la sintonia manuale.
Si può inoltre modificare la frequenza e la larghezza di banda direttamente con il tastierino numerico. Spostarsi su INIZIA RICERCA e premere OK per avviare la ricerca.Nota: Se il TV visualizza il messaggio ”Nessun segnale” significa che non riceve segnale, occorre quindi verificare il cavo o l’impianto d’antenna.
ITALIANO

7
HE 3388TT ITALIANO
9.1.4 FUNZIONE LCNQuesto decoder è dotato di funzione LCN (Logical Channel Number) che è uno standard a livello nazionale che assegna i numeri ai canali uguali per tutto il paese in cui si effettua la scansione.Di fabbrica questa funzione è attiva.Se a causa del segnale d’antenna la numerazione dei canali non rispetta lo standard nazionale, o si vuole cambiare la numerazione dei canali a proprio piacimento, occorre disattivare questa funzione e spostare i canali come descitto precedentemente. Premere il tasto MENU per entrare nel MENU PRINCIPALE. Premere i tasti di navigazione fino a selezionare la voce INSTALLAZIONE e premere OK Premere i tasti di navigazione fino a selezionare la voce LCN. Impostare la voce LCN su SPENTO.Nota: Ogni volta che la funzione LCN viene modificata viene richiesto di rieffettuare la Ricerca Automatica dei Canali.
9.1.5 SPOSTAMENTO CANALI MEMORIZZATI Premere il tasto MENU per entrare nel MENU PRINCIPALE. Premere i tasti di navigazione fino a selezionare la voce CANALE e premere OK Premere i tasti di navigazione fino a selezionare la voce GESTIONE CANALI. Premere i tasti di navigazione fino a selezionare il canale da spostare. Premere il tasto OK. Il canale verrà evidenziato. Assegnare il nuovo numero canale tramite il tastierino numerico. Ripetere le precedenti operazioni per tutti i canali da spostare. Al termine premere EXIT.Nota: Per assegnare il numero del canale in base alla posizione data, occorre che la funzione LCN sia disabilitata (vedi paragrafo 9.1.4), altrimenti il canale si sposterà solo di posizione, mantenendo il numero assegnato dalla funzione LCN.
9.2 VISUALIZZAZIONE CANALI MEMORIZZATI Premere il tasto CH+ per posizionarsi sul canale memorizzato successivo. Premere il tasto CH- per posizionarsi sul canale memorizzato precedente.È possibile utilizzare anche il tastierino numerico; per cercare canali a doppia/tripla cifra digitare i numeri che compongono il canale e attendere il cambio del canale. Nel caso il cambio canale non avvenga significa che il canale digitato non esiste.
9.3 REGOLAZIONE VOLUME Premere i tasti VOL+ e VOL- del telecomando per aumentare/diminuire il volume del decoder. Premere il tasto MUTE per escludere momentaneamente l’audio, ripremerlo per ripristinarlo.
10 MENU PRINCIPALE DTVPer navigare all’interno dei menù occorre utilizzare i tasti di navigazione e , premere i tasti di navigazione per entrare ed uscire dalle voci menù e premere il tasto OK per confermare la selezione. Premere il tasto EXIT per uscire dal menù.
10.1 INSTALLAZIONE Premere il tasto MENU per entrare nel MENU PRINCIPALE. Premere i tasti di navigazione fino a selezionare la voce INSTALLAZIONE e premere OK.
RICERCA AUTOMATICAVedere paragrafo 9.1.2
RICERCA MANUALEVedere paragrafo 9.1.3

8
HE 3388TT
FILTRO CANALE Premere i tasti di navigazione e selezionare la funzione FILTRO CANALE. Selezionare se si vuole visualizzare la lista di tutti i canali o solo dei canali gratuiti (FTA).Nota: Ogni volta che la funzione FILTRO CANALE viene modificata occorre rieffettuare la Ricerca Automatica dei Canali.
PAESE Premere i tasti di navigazione e selezionare la funzione PAESE. Selezionare il Paese dove si effettua la scansione dei canali.Nota: Ogni volta che la funzione PAESE viene modificata viene richiesto di rieffettuare la Ricerca Automatica dei Canali.
LCNVedere paragrafo 9.1.4
10.2 CANALE Premere il tasto MENU per entrare nel MENU PRINCIPALE. Premere i tasti di navigazione fino a selezionare la voce CANALE e premere OK.
GESTIONE CANALI Premere i tasti di navigazione e selezionare la funzione GESTIONE CANALI. BLOCCA: consente di bloccare la visione di un canale. Selezionare un canale tramite i tasti di navigazione
e premere il tasto ROSSO. Occorere confermare il blocco inserendo il codice sicurezza (default 0000). Verrà visualizzato un segno di spunta rosso. Attivando questa funzione il canale potrà essere visionato solo dopo aver inserito la password di sicurezza.
CANC: consente di cancellare un canale dalla lista dei canali. Selezionare un canale tramite i tasti di naviga-zione e premere il tasto VERDE. Occorere confermare la cancellazione inserendo il codice sicurezza (default 0000). Verrà visualizzato un segno di spunta verde.
SALTA: consente di saltare la visione di un canale quando si utilizzano i tasti CH+/CH-. Selezionare un canale tramite i tasti di navigazione e premere il tasto GIALLO. Verrà visualizzato un segno di spunta giallo.
RINOMINA: consente di rinominare il nome di un canale. Selezionare un canale tramite i tasti di navigazione e premere il tasto BLU. Rinominare il canale utilizzando la tastiera e le indicazioni che compaiono a video.
SPOSTA: consente di rinumerare o spostare un canale. Premere i tasti di navigazione fino a selezionare il canale da rinumerare/spostare e premere il tasto OK. Il canale verrà evidenziato. Assegnare il nuovo numero canale tramite il tastierino numerico.
Nota: Per assegnare il numero del canale in base alla posizione data, occorre che la funzione LCN sia disabilitata (vedi paragrafo 9.1.4), altrimenti il canale si sposterà solo di posizione, mantenendo il numero assegnato dalla funzione LCN.
LISTA FAVORITI Premere i tasti di navigazione e selezionare la funzione LISTA FAVORITI.Sono presenti quattro liste a cui aggiungere i canali preferiti, associate ai colori dei tasti del telecomando. Premere i tasti di navigazione fino a selezionare il canale da associare a una lista. Per aggiungere un canale alla lista FAV1 premere il tasto ROSSO; per aggiungere un canale alla lista FAV2
premere il tasto VERDE; per aggiungere un canale alla lista FAV3 premere il tasto GIALLO; per aggiungere un canale alla lista FAV4 premere il tasto BLU.
L’aggiunta di un canale alla lista verrà confermato dalla presenza di un segno di spunta di colore rosso cor-rispondente alla lista a cui si è aggiunto.
Per eliminare un canale dalla una lista dei preferiti, portarsi con i tasti di di navigazione sul canale che si desidera togliere e premere il tasto del colore corrispondente alla lista a cui appartiene il canale.
L’eliminazione verrà confermata dalla sparizione del segno di spunta dalla lista.
ITALIANO
9
HE 3388TT ITALIANO
10.3 PREFERENZA Premere il tasto MENU per entrare nel MENU PRINCIPALE. Premere i tasti di navigazione fino a selezionare la voce PREFERENZA e premere OK.
LINGUA OSD Premere OK e poi i tasti di navigazione fino a selezionare la lingua del menù desiderata.
TEMPO OSD Premere OK e poi i tasti di navigazione fino a selezionare il tempo di permanenza delle finestre infor-
mative dei canali sullo schermo.
TRASPARENZA OSD Premere OK e poi i tasti di navigazione fino a selezionare il livello di trsparenza delle finetre del menù
sullo schermo.
1° SOTTOTITOLO PREFERITO Premere OK e poi i tasti di navigazione fino a selezionare la prima lingua dei sottotitoli dei programmi
televisivi.
2° SOTTOTITOLO PREFERITO Premere OK e poi i tasti di navigazione fino a selezionare la seconda lingua dei sottotitoli dei programmi
televisivi.
UDITO DIFFICOLTOSO Premere OK e poi i tasti di navigazione per attivare o disattivare la funzione di aiuto per gli utenti ipou-
denti (se disponibile).
1° AUDIO PREFERITO Premere OK e poi i tasti di navigazione fino a selezionare la prima lingua di ascolto dei programmi
televisivi.
2° AUDIO PREFERITO Premere OK e poi i tasti di navigazione fino a selezionare la seconda lingua di ascolto dei programmi
televisivi.
10.4 IMPOSTAZIONE Premere il tasto MENU per entrare nel MENU PRINCIPALE. Premere i tasti di navigazione fino a selezionare la voce IMPOSTAZIONE e premere OK.
TIMERIn TIMER si impostano le programmazioni delle trasmissioni desiderate. Selezionare il numero della programmazione e premere OK. Impostare la programmazione impostando i vari parametri: Data: impostare la data della programmazione nel formato anno/mese/giorno premendo il tasto per avviare
la modifica e poi i tasti numerici del telecomando. Nome Programma: impostare il canale della programmazione premendo il tasto per avviare la modifica
e poi i tasti . Ora inizio: impostare l’ora di inizio della programmazione premendo il tasto per avviare la modifica e poi
i tasti numerici del telecomando. Ora fine: si modifica automaticamente. Durata: impostare la durata della programmazione premendo il tasto per avviare la modifica e poi i tasti
numerici del telecomando. Modo: impostare la ciclicità della programmazione premendo il tasto per avviare la modifica e poi i tasti
; si può scegliere tra UNA VOLTA, GIORNALIERO, SETTIMANALE, MENSILE.
10
HE 3388TTITALIANO
Tipo: impostare il tipo di programmazione premendo il tasto per avviare la modifica e poi i tasti ; si può scegliere tra REGISTRATORE, CANALE, IN ATTESA (spegnimento in Standby), ACCESO.
In caso di registrazione programmata (impostazione REGITRATORE) su un altro canale diverso da quello visualizzato, la visualizzazione commuterà automaticamente sul canale da registrare e una volta terminata la registrazione la visualizzazione rimarrà sul canale registrato.Durante la registrazione programmata non è possibile cambiare canale, se non interrompendo la registrazione. Registra AD / Registra Sottotitolo / Registra Televideo: impostare l’attivazione o meno della registrazione
delle opzioni del canale durante la programmazione in modalità Registrazione premendo il tasto per avviare la modifica e poi i tasti .
BLOCCOIn BLOCCO si impostano i parametri di sicurezza.Per accedere alla funzione BLOCCO occorre inserire il codice di sicurezza (default 0000). BLOCCO SISTEMA: premere OK e poi i tasti di navigazione per attivare o disattivare la funzione di
blooc dei canali (vedi voce GESTIONE CANALI al paragrafo 10.2). CAMBIA CODICE PIN: consente di cambiare il codice di sicurezza (password). Occorre inserire il vecchio
codice, il nuovo codice, e riconfermare il nuovo codice (codice default 0000).
DATA ORAIn DATA ORA si impostano la data e l’ora di sistema. MODO DATA E ORA: premere OK e poi i tasti di navigazione fino a selezionare il modo AUTOMATICO
o MANUALE. DATA: impostare la data nel formato anno/mese/giorno premendo il tasto per avviare la modifica e poi i
tasti numerici del telecomando.DATA è attivo solo se MODO DATA E ORA è impostato su MANUALE ORA: impostare l’ora premendo il tasto per avviare la modifica e poi i tasti numerici del telecomando.ORA è attivo solo se MODO DATA E ORA è impostato su MANUALE ZONA GMT: premere OK e poi i tasti di navigazione fino a selezionare il fuso orario.ZONA GMT è attivo solo se MODO DATA E ORA è impostato su AUTOMATICO
IMPOSTAZIONI DI FABBRICAIn IMPOSTAZIONI DI FABBRICA, si riportano le impostazioni del decoder alle condizioni iniziali. Riavviare la scansione automatica dei canali (vedi capitolo 8 PRIMA INSTALLAZIONE).
AGGIORNAMENTOIn AGGIORNAMENTO, si aggiorna il software del decoder (se disponibile). AGGIORNAMENTO USB: premere OK per commutare alla visualizzazione del contenuto della memoria del
dispositivo USB. Ricercare il file rom.bin memorizzato sul dispositivo USB e premere il tasto OK per avviare l’aggiornamento. Al termine dell’aggiornamento si presenterà la schermata di prima installazione (vedi capitolo 8 PRIMA INSTALLAZIONE).
VERSIONEIn VERSIONE, si visualizzano le informazioni riguardanti il software del decoder.
STANDBY AUTOMATICOIn STANDBY AUTOMATICO, si imposta lo spegnimento automatico del decoder in caso di inattività da parte dell’utente. Premere OK e poi i tasti di navigazione fino a selezionare dopo quanto tempo il decoder si deve spe-
gnere; si può scegliere tra 1 ORA, 2 ORE, 3 ORE o SPENTO (decoder sempre acceso).
11
HE 3388TT
10.5 AV Premere il tasto MENU per entrare nel MENU PRINCIPALE. Premere i tasti di navigazione fino a selezionare la voce AV e premere OK.
RAPPORTO D’ASPETTO Premere OK e poi i tasti di navigazione fino a selezionare la modalità di visualizzazione delle trasmissioni;
si può scegliere tra 4:3LB, 4:3PS, 16:9, SCHERMO PIENO.
USCITA VIDEO Premere OK e poi i tasti di navigazione fino a selezionare la modalità di uscita video; si può scegliere
tra RGB o CVBS.
RISOLUZIONE VIDEO Premere OK e poi i tasti di navigazione fino a selezionare la risoluzione video.
HDMI AUDIO Premere OK e poi i tasti di navigazione fino a selezionare la modalità dell’uscita audio HDMI; si può
scegliere tra PCM, RAW o MUTO.
10.6 MEDIA CENTER Premere il tasto MENU per entrare nel MENU PRINCIPALE. Premere i tasti di navigazione fino a selezionare la voce MEDIA CENTERe premere OK.
MULTIMEDIAVedi Capitolo 13 OPERAZIONI CON DISPOSITIVO USB
CONFIGURAZIONE PVR DIMENSIONE FILE: premere OK e poi i tasti di navigazione fino a selezionare la dimensione del file
della registrazione in Timeshift in 1GB, 2GB, 3GB, 4GB, o lasciare in modo Automatico. Se la dimensione del file della registrazione in Timeshift supera il limite impostato, la registrazione di dividerà in più parti.
TIMESHIFT: premere OK e poi i tasti di navigazione per selezionare lo stato della funzione Timeshift. Automatico: la funzione è sempre attiva in background. Si può cambiare canale, ma verrà cancellato ciò che
si è registrato del canale precedente. Spento: la funzione è arrestata. Pausa: la funzione si attiva alla pressione del tasto PLAY/PAUSA, la trasmissione del canale si fermerà
per poi riprenderla premendo nuovamente il tasto PLAY/PAUSA. Non è possibile cambiare canale se si stà riproducendo una registrazione in Timeshift di un programma.
DURATA TIMESHIFT: premere OK e poi i tasti di navigazione fino a selezionare la duarata della regi-strazione in Timeshift in 30 minuti, 1 ora, 2 ore, o lasciare in modo Automatico. In modo Automatico la durata della registrazione in Timeshift dipende dalla dimensione della memoria del dispositivo USB collegato.
TIMESHIFT DA REGISTRARE: premere OK e poi i tasti di navigazione per abilitare o disabilitare il salvataggio della registrazione Timeshift nella memoria del dispositivo USB collegato.
11 TELETEXTIl Teletext è un sistema di informazioni trasmesso da alcune emittenti che si consulta come un giornale, sfoglian-dolo pagina per pagina. Premere il tasto TEXT per attivare il Teletext. Sullo schermo apparirà il sommario con le varie rubriche formate da pagine di tre cifre. Comporre il numero di pagina voluta con il tastierino numerico. Digitare le tre cifre che compongono il numero
della pagina (per esempio “201”) premendo in sequenza il numero 2 - 0 - 1, il numero viene visualizzato in alto a sinistra, il conta pagine inizia la ricerca, la pagina viene visualizzata.
Per consultare un’altra pagina ripetere l’operazione. Premere il tasto EXIT per uscire dal teletext.Nota: nel caso il canale selezionato non trasmetta il Teletext, apparirà il messaggio ”Non disponibile” sullo schermo.
ITALIANO
12
HE 3388TT
12 REGISTRAZIONE DIRETTA (PVR)Durante una visualizzazione di un programma è possibile effettuarne la registrazione. Premere il tasto REC: a video comparirà un messaggio di inizializzazione della registrazione e dopo pochi
istanti comparirà il simbolo REC in alto a destra. Premere il tasto STOP per fermare la registrazione.Durante la registrazione diretta è possibile cambiare canale.Durante la registrazione programmata (vedi voce TIMER al paragrafo 10.4) non è possibile cambiare canale, se non interrompendo la registrazione.In caso di spazio insufficiente sulla memoria del dispositivo USB verrà mostrato un messagio a video.Il decoder potrebbe segnalare che il dispositivo USB è lento nel trasferimento dati (La velocità del dispositivo non è sufficiente: procedere comunque con la REGISTRAZIONE?). Confermando (selezionare SI e premere il tasto OK) è comunque possibile registrare ma potrebbero esserci errori nel trasferimento dati da decoder al dispositivo USB. Per ovviare a questo occorre munirsi di dispositivo USB ad alta velocità.
13 OPERAZIONI CON DISPOSITIVO USBAttenzione: prima di effettuare qualsiasi operazione inserire un dispositivo USB nell’ingresso USB del decoder.Premere il tasto SOURCE per commutare alla visualizzazione del contenuto della memoria del dispositivo
USB. In alto a sinistra sono presenti 6 icone rappresentanti ciascuna una categoria; utilizzando i tasti è possibile selezionare: FILM (per visualizzare i file video), MUSICA (per riprodurre i file audio), FOTO (per visualizzare i file immagine) GESTORE REGISTRAZIONI (per visualizzare le registrazioni effettuate con il decoder), GESTIONE DISCO (per effettuare operazioni sul contenuto della memoria del dispositivo USB) e EBOOK (per visualizzare i file di testo).Una volta selezionato il tipo di file che si desidera visualizzare, premere il tasto OK, il cursore si sposterà nella finestra in basso dove vengono visualizzate le cartelle (directory) presenti nel dispositivo USB. Per ogni cartella selezionata verranno mostrati i file presenti relativi alla categoria precedentemente selezionata.Premere i tasti di navigazione fino a selezionare il file desiderato e premere OK per avviare la riprodu-
zione.Premere il tasto PAGE UP o PAGE DOWN per selezionare la pagina precedente o successiva dei file presenti
nella cartella (directory).Premere il tasto RECALL per tornare indietro alla selezione delle cartelle e delle categorie.Premere il tasto EXIT per uscire dalla modalità di riproduzione file multimediali e tornare alla modalità DTV.
13.1 COMANDI DI RIPRODUZIONEDurante la riproduzione dei file multimediali è possibile operare su alcuni comandi di riproduzione.Premere il tasto PLAY/PAUSA per arrestare momentaneamente la riproduzione. Ripremerlo per riavviarla.Premere il tasto STOP per arrestare definitivamente la riproduzione.Premere il tasto << RWD o >> F.FWD per retrocedere o avanzare velocemente la riproduzione (file video,
file audio, registrazioni).Premere il tasto I<< PREV o >>I NEXT per selezionare il file precedente o successivo.
13.2 GESTIONE DISCOSelezionando la categoria GESTIONE DISCO è possibile effettuare operazioni sui file contenuti nella memoria del dispositivo USB: Tasto ROSSO: consente di muovere/copiare il file selezionato. Tasto VERDE: consente di rinominare il file selezionato. Tasto GIALLO: consente di cancellare il file selezionato. Tasto BLU: consente di cancellare tutti i file presenti nella cartella (directory).
ITALIANO
13
HE 3388TT
13.3 MENU DISPOSITIVO USBPer navigare all’interno dei menù occorre utilizzare i tasti di navigazione e , premere i tasti di navigazione per entrare ed uscire dalle voci menù e premere il tasto OK per confermare la selezione.Premere il tasto EXIT per uscire dal menù. A riproduzione arrestata, premere il tasto MENU. Accedere alla voce Media Center e successivamente alla voce Configurazione Multimedia.
CONFIGURAZIONE MULTIMEDIA LINGUAGGIO SOTTOTITOLI MP4: premere OK e poi i tasti di navigazione fino a selezionare la lingua
preferita dei sottotitoli dei file video. PAGINA CODIFICA SOTTOTITOLI MP4: premere OK e poi i tasti di navigazione fino a selezionare la
codifica dei sottotitoli dei file video. LINGUA EBOOK: premere OK e poi i tasti di navigazione fino a selezionare la lingua preferita dei file
di testo. PAGINA CODICE EBOOK: premere OK e poi i tasti di navigazione fino a selezionare la codifica dei file
di testo. RIPETIZIONE FILM: premere OK e poi i tasti di navigazione fino a selezionare la ripetizione dei file
video tra RIPETIZIONE-SINGOLA (ripetizione della sola traccia video selezionata), RIPETIZIONE-CARTELLA (ripetizione di tutte le tracce video presenti nella cartella) e RIPETIZIONE-OFF (riproduzione singola di tutte le tracce video presenti nella cartella).
RIPETIZIONE BRANI MUSICALI: premere OK e poi i tasti di navigazione fino a selezionare la ripetizione dei file audio tra RIPETIZIONE-SINGOLA (ripetizione della sola traccia audio selezionata), RIPETIZIONE-CARTELLA (ripetizione di tutte le tracce audio presenti nella cartella) e RIPETIZIONE-OFF (riproduzione singola di tutte le tracce audio presenti nella cartella).
RIPETIZIONE FOTO: premere OK e poi i tasti di navigazione fino a selezionare la ripetizione dei file immagine tra RIPETIZIONE-CARTELLA (ripetizione di tutti i file immagine presenti nella cartella) e RIPETI-ZIONE-OFF (riproduzione singola di tutti i file immagine presenti nella cartella).
BGMUSIC: premere OK e poi i tasti di navigazione per attivare o disattivare la musica in sottofondo durante la visualizzazione dei file immagine. Occorre avviare la riproduzione dei file audio prima di quella dei file immagine.
TEMPO DIAPOSITIVA: premere OK e poi i tasti di navigazione per impostare il tempo di permanenza dell’immagine a video (3, 6, 9, 12, 15 secondi).
EFFETTO: premere OK e poi i tasti di navigazione fino a selezionare il tipo di dissolvenza tra un’imma-gine e l’altra.
ITALIANO

14
HE 3388TT
14 PROBLEMI E SOLUZIONISe il vostro decoder non funziona correttamente controllare questa breve lista prima di portare il decoder presso un centro assistenza autorizzato TREVI.In ogni caso non tentare di riparare l’apparecchio da soli, questo farebbe decadere la garanzia. Solo i centri assistenza tecnica TREVI sono autorizzati ad eseguire interventi su questo TV.
Assenza di immagine Controllare il collegamento d’antenna. Controllare il corretto inserimento dei cavi.
Immagine scadente Controllare il cavo d’antenna. Effettuare una ricerca manuale dei canali. Tenere il TV lontano da fonti elettromagnetiche (lampade al neon, telefoni cellulari, ecc...).
Assenza di suono Controllare che non sia inserita la funzione MUTE. Regolare il volume.
Il decoder si spegne automaticamente E’ stato impostato lo Standby automatico (vedi voce STANDBY AUTOMATICO al paragrafo 10.4).
Il telecomando non funziona Sostituire le batterie.
I comandi non rispondono Scollegare la presa d’alimentazione dell’apparecchio per 30 secondi per effettuare un reset.
15 CARATTERISTICHE TECNICHE Alimentazione Ingresso: 100-240V~50/60Hz Assorbimento 6W Max / Stand-by <0,5W Range di frequenza VHF: da 177.5MHz a 226.5MHz UHF: da 474MHz a 866MHz Larghezza di banda 7/8MHz Impedenza d’ingresso 75Ohm Formato schermo 4:3 e 16:9 Decoding video MPEG-2 SD/HD (MP@ML e MP@HL) / MPEG-4, HEVC (H.265), H.264/AVC SD/HD Decoding audio MPEG-1 e MPEG-2 Layer I&II, WMA e HE-AAC 22.1/32/44.1/48kHz Ingresso USB 2.0. Collegabili dispositvi USB con file system FAT32. Dimensioni 148x40x102mm Peso (senza accessori) 225g
Avvertenze per il corretto smaltimento del prodotto.Il simbolo riportato sull’apparecchiatura indica che il rifiuto deve essere oggetto di “raccolta separata” pertanto il prodotto non deve essere smaltito insieme ai rifiuti urbani. L’utente dovrà consegnare il prodotto presso gli appositi “centri di raccolta differenziata” predisposti dalle amministrazioni comunali, oppure consegnarlo al rivenditore contro acquisto di un nuovo prodotto.La raccolta differenziata del rifiuto e le successive operazioni di trattamento, recupero e smaltimento favo-riscono la produzione di apparecchiature con materiali riciclati e limitano gli effetti negativi sull’ambiente e sulla salute causati da una gestione impropria del rifiuto.Lo smaltimento abusivo del prodotto comporta l’applicazione di sanzioni amministrative.
TREVI persegue una politica di continua ricerca e sviluppo, pertanto i prodotti possono presentare carat-teristiche diverse da quelle descritte.
ITALIANO
15
HE 3388TT
16 INDICE1 PREFAZIONE pag. 2
2 PRECAUZIONI DI SICUREZZA pag. 2
3 CURA E MANUTENZIONE pag. 2
4 ALL’INTERNO DELL’IMBALLO pag. 3
5 DESCRIZIONE COMANDI RICEVITORE DVB-T pag. 3
6 INSTALLAZIONE E COLLEGAMENTI pag. 4
7 TELECOMANDO 7.1 INSTALLAZIONE pag. 4 7.2 DESCRIZIONI COMANDI pag. 5
8 PRIMA INSTALLAZIONE pag. 6
9 TELEVISIONE DIGITALE TERRESTRE (DTV) 9.1 OPERAZIONI PRELIMINARI pag. 6 9.1.1 CAMBIO LINGUA MENU pag. 6 9.1.2 RICERCA AUTOMATICA DEI CANALI pag. 6 9.1.3 RICERCA MANUALE DEI CANALI pag. 6 9.1.4 FUNZIONE LCN pag. 7 9.1.5 SPOSTAMENTO CANALI MEMORIZZATI pag. 7 9.2 VISUALIZZAZIONE CANALI MEMORIZZATI pag. 7 9.3 REGOLAZIONE VOLUME pag. 7
10 MENU PRINCIPALE DTV 10.1 INSTALLAZIONE pag. 7 10.2 CANALE pag. 8 10.3 PREFERENZA pag. 9 10.4 IMPOSTAZIONE pag. 9 10.5 AV pag. 11 10.6 MEDIA CENTER pag. 11
11 TELETEXT pag. 11
12 REGISTRAZIONE DIRETTA (PVR) pag. 12
13 OPERAZIONI CON DISPOSITIVO USB pag. 12 13.1 COMANDI DI RIPRODUZIONE pag. 12 13.2 GESTIONE DISCO pag. 12 13.3 MENU DISPOSITIVO USB pag. 13
14 PROBLEMI E SOLUZIONI pag. 14
15 CARATTERISTICHE TECNICHE pag. 14
16 INDICE pag. 15
ITALIANO

16
HE 3388TT
17
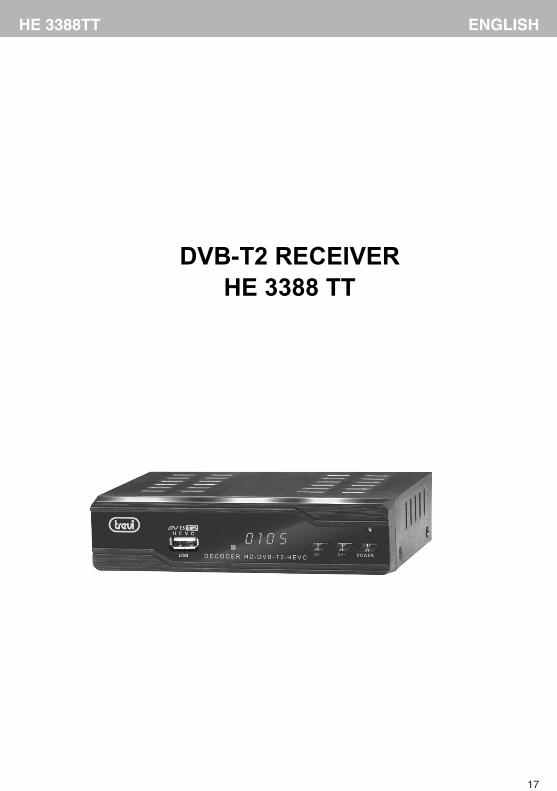
HE 3388TT ENGLISH
DVB-T2 RECEIVER HE 3388 TT

18
HE 3388TTENGLISH
2
Contents
IMPORTANT SAFETY INSTRUCTIONS ...................................................................................................... 4
1 Remote Control ....................................................................................................................................... 5
1.1 Appearance of Remote Control ......................................................................................................5 1.1 Front Panel........................................................................................................................................7 1.2 Installation ........................................................................................................................................7 Connecting the receiver ..........................................................................................................................7
2 Basic Functions ...................................................................................................................................... 8
2.1 First Installation ................................................................................................................................8 2.2 TV/RADIO Programs Switch............................................................................................................8 2.3 Channel Switch ................................................................................................................................8 2.4 TV & Radio Channel List / FAV List ................................................................................................8 2.5 Display Information of Programs ...................................................................................................8 2.6 Program RECALL .............................................................................................................................8 2.7 Audio Language Switch and L/R Channel Switch ........................................................................8 2.8 Subtitle ..............................................................................................................................................9 2.9 Teletext ..............................................................................................................................................9 2.10 PVR & Time shift functions .............................................................................................................9
2.10.1 PVR (instant recording) ..........................................................................................................9 2.10.2 Time shift ................................................................................................................................9
3 Installation ............................................................................................................................................. 11
3.1 Auto Search .................................................................................................................................... 11 3.2 Manual Search ................................................................................................................................ 11 3.3 Channel Filter ................................................................................................................................. 11
4 Channel ................................................................................................................................................. 12
4.1 Channel Manager .......................................................................................................................... 12 4.2 Favorite List ................................................................................................................................... 12
5 Preference Setting ................................................................................................................................ 13
5.1 OSD Language .............................................................................................................................. 13 5.2 Preferred Subtitle .......................................................................................................................... 13
6 System Setting ...................................................................................................................................... 13
6.1 Timer ............................................................................................................................................... 13 6.2 Child Lock ...................................................................................................................................... 14 6.3 Date Time ....................................................................................................................................... 14 6.4 Factory Reset ................................................................................................................................ 15 6.5 Upgrade .......................................................................................................................................... 15 6.6 Version ........................................................................................................................................... 15
7 AUDIO / VIDEO Setting......................................................................................................................... 15
20
21
21232323
24
2424242424 24242525252525
27
272727
28
2828
29
2929
29
293030313131
31
19
HE 3388TT ENGLISH
3
7.1 Aspect Ratio .................................................................................................................................. 15 7.2 Video resolution ............................................................................................................................ 15 7.3 HDMI resolution ............................................................................................................................. 15 7.4 HDMI Audio .................................................................................................................................... 15
8. MEDIA CENTER ..................................................................................................................................... 16
8.1 Multimedia ........................................................................................................................................ 16 8.1.1 Media Selection Mode ................................................................................................................. 16 8.1.2 Movie ............................................................................................................................................ 16 8.1.3 Music ............................................................................................................................................ 16 8.1.4 Recorder Manager ....................................................................................................................... 17 8.1.3 Recorder Manager Browser ........................................................................................................ 17 8.1.4 Rename ..................................................................................................................................... 17 8.1.5 Photo ............................................................................................................................................ 17 8.16 E-Book .......................................................................................................................................... 17 8.17 Disc manager ................................................................................................................................ 17
8.2 Multimedia Configuration ............................................................................................................... 17 8.3 PVR Configuration .......................................................................................................................... 17
9. SPECIFICATIONS ................................................................................................................................... 18
31313131
32
323232323333333333333333
35
20
HE 3388TTENGLISH
4
To inform users of possible dangers on the apparatus or on its components, the above symbols can be applied. To reduce the risk of fire and electric shock, do not expose this unit to rain or moisture. Please carefully read these precautions and instructions before operating this unit. Keep the manual for future reference. Power Cord Protection To avoid any malfunctions of the unit and to protect against electric shock, fire or personal injury, please observe the following: Hold the plug firmly when connecting or disconnecting the AC power cord. Keep the AC power cord away from heating appliances. Never put any heavy object on the AC power cord. Do not attempt to repair or reconstruct the AC power cord in any way. Never make or change connections with the power switched on.
IMPORTANT SAFETY INSTRUCTIONS
- The ventilation should not be impeded by covering the ventilation openings with items, such as newspapers, table-cloths, curtains, etc.;
- No naked flame sources, such as lighted candles, should be placed on the apparatus; - Attention should be drawn to the environment aspects of battery disposal. Don’t throw used
batteries in dustbin. Please contact your retailer in order to protect the environment. - Don’t use the apparatus in tropical climates; - The apparatus shall not be exposed to dripping or splashing and that no objects filled with liquids,
such as vases, shall be placed on the apparatus. - Where the mains plug is used as the disconnect device, the disconnect device shall remain readily
operable. The main plug shall remain readily operable. - Keep minimum distances (5 cm) around the apparatus for sufficient ventilation. (Minimum distance
around the apparatus for sufficient ventilation.) - If the electric cable is damaged, it must be replaced by the manufacturer, or by the qualification
persons, in order to avoid a danger.
21
HE 3388TT ENGLISH
5
1 Remote Control
1.1 Appearance of Remote Control
2 Photograph Key Function
POWER Switch off/on power supply
MUTE Mute control
MARK Enter bookmark menu (refer to 8. MULTI MEDIA)
TV / RADIO Press to switch between TV program and Radio program.
SOURCE Change source between TV and Media
NUMBER 0 to 9 Numeric keys : for input of numbers or for selecting a TV channel
INFO
(1) Display information of programs
(2) Display corresponding extended information at TV
GUIDE state
RECALL
(1) Return to upper menu
(2) Press “RECALL” while watching TV to recall previously viewed channel.
TIMESHIFT
Into the TIMESHIFT state, press key to enter the
TIMESHIFT suspended state; Press button to enter TIMESHIFT playback state; Press button to exit the TIMESHIFT state; press info to see detailed information;
EXIT
During multimedia playback, go back to previous TV program. Exit from current Menu, Back to previous menu without saving
MENU To display main menu, press again to exit current menu
UP/CH+,DOWN/CH-,LEFT/V-,RIGHT/V+ Keys to move up/down/left/right. Also for channel/volume change
OK Enter channel / Favorite list
TEXT Teletext
STOP Stop playing Media
PLAY / PAUSE Play/Replay / pause Media
F.R & F.F (1) Enter ZOOM mode, image can zoom in/out
(2) Fast play backward / forward while Media playing
PREV / NEXT Play previous/next of Media in USB Storage
REC Enter Recording
AUDIO/LANG Press to set AUDIO mode / press to select Language
HDMI Switch to high definition digital video output mode
PAGE UP / DOWN Page up/down in Teletext
VOL+ / - Volume adjusting
CH - / CH + Select previous / next channel
ZOOM
(1) Enable/disable zoom;
(2) Switch to Daily Mode (GUIDE page)
(3) Set/unset program locked in channel manager menu
SUBTITLE Switch the different language of subtitle
22
HE 3388TTENGLISH
6
AUTO Auto scan channels of TV & Radio
RED Depend on OSD Hints
GREEN Depend on OSD Hints
YELLOW Depend on OSD Hints
BLUE Depend on OSD Hints
GOTO Enter into GOTO menu, select time of playing or stopping Media
Remark: When connecting outside hard-disk, the hard-disk must have its own power source.
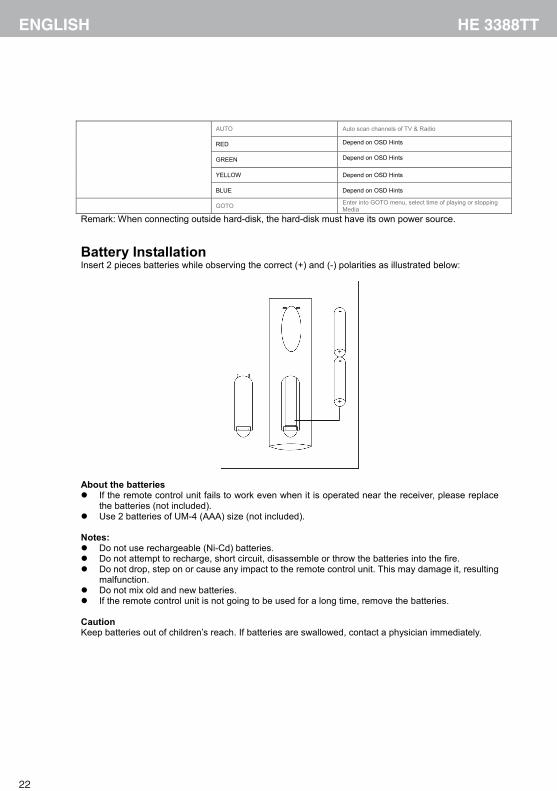
Battery Installation Insert 2 pieces batteries while observing the correct (+) and (-) polarities as illustrated below:
About the batteries If the remote control unit fails to work even when it is operated near the receiver, please replace
the batteries (not included). Use 2 batteries of UM-4 (AAA) size (not included). Notes: Do not use rechargeable (Ni-Cd) batteries. Do not attempt to recharge, short circuit, disassemble or throw the batteries into the fire. Do not drop, step on or cause any impact to the remote control unit. This may damage it, resulting
malfunction. Do not mix old and new batteries. If the remote control unit is not going to be used for a long time, remove the batteries. Caution Keep batteries out of children’s reach. If batteries are swallowed, contact a physician immediately.
23
HE 3388TT ENGLISH
7
1.1 Front Panel
1. USB port 3. CH+ 2. CH- 4. Power
1.2 Installation
Connecting the receiver Before you connect your receiver to your TV please ensure that it is placed on a flat and stable surface. Now that your receiver is in position connect it to your TV and any other peripheral devices. Please refer to the below diagram and your TVs user manual for cable installation instructions. Connect your receiver to power, power on your TV and the receiver before continuing to the initial set up guide.

24
HE 3388TTENGLISH
8
2 Basic Functions
2.1 First Installation
If you are using the unit for the first time or have restored the unit to Factory Default, the installation Guide Menu will appear on your TV screen. Follow each of the option of the Installation Menu to setup your preferred menu language and suitable country (Region) etc. First installation shall setup some important settings. Use the arrow keys on the remote control to select your preferred Language, Country, Time Zone, LCN, then select channel search.
2.2 TV/RADIO Programs Switch
Press “TV/RADIO” to switch between Digital TV programs and Digital Radio programs when watching TV.
2.3 Channel Switch
Press “CH+/CH-” to switch to the previous or next program. Press number keys to input program number.
2.4 TV & Radio Channel List / FAV List
Press “OK” to switch to channel program list, press “LEFT/RIGHT” to select different program Column, press “UP/DOWN” to select program item. Press “OK” to confirm the program selection, press “EXIT” to exit the program list. If there are some favorite programs that have been set up, just press “OK” to enter into the favorite program list. Press “UP/DOWN” to select favorite program, press “OK” to confirm the selection, press “RECALL” to return to previous menu.
2.5 Display Information of Programs
Press “INFO” to show the information of current program when it is in normal playing state.
2.6 Program RECALL
Press “RECALL” under state of full-screen to return to the previously played program.
2.7 Audio Language Switch and L/R Channel Switch
The program might have multilingual audio languages and the audio broadcast on different audio mode such as Stereo, Left or Right. All the available audio languages will be displayed while you press AUDIO/LANG key. The screenshot is illustrated as below. If there is no audio output after you select the audio language, it indicates that there is no audio on the current audio mode, so you have to select preferable audio mode.
25
HE 3388TT ENGLISH
9
1. Press “AUDIO” to switch the language of sound of current programs and switch among “stereo” “left” “right” (stereoleft channelright channel).
2. Press “LEFT/RIGHT” to switch among “stereo” “left” “right” (stereoleft channelright channel), press “UP/DOWN” to switch the language of sound. 3. Press “OK” to confirm the selection and return to full-screen play mode, press “EXIT” to return to full-screen play mode and save the setting.
2.8 Subtitle
1. Subtitle is defaulted to be off. The programs might have multilingual subtitle information. Press “SUB” key on the remote control to enter the Subtitle menu of the current programs. All available subtitle languages will be displayed.
2. Press “UP/DOWN” to move upward and downward to select the language.
2.9 Teletext
1. If you want to watch Teletext, please press “TEXT” on the remote controller to enter into Teletext page. 2. Input three digits to go to corresponding page you want to reach,
2. Press “UP” to go to the previous page, while press “DOWN” to go to the next page;
3. Press “OK” to adjust the transparence of the Teletext page. 4. Press “TEXT” or “EXIT” to exit from teletext menu.
2.10 PVR & Time shift functions
2.10.1 PVR (instant recording)
During TV watching press “REC” to start recording, system has 3 seconds for initialization. When initialization is finished, the screen left top will show “REC” icon, then it’s recording and playing current program. You can press “info” to watch current recorded information. Press “stop” while recording, will stop recording and resume normal play mode. In the recording mode, you can also use REC key to set timer for subscribe stop record, besides you can reset the time optionally. (Can set the time length as cancel (00:00), or user define length). When the space is insufficient while recording, system will show “Storage Device Disk is Full” then stop recording and resume normal play back mode. During recording, if a write failure happened, system will exit and stop recording.
2.10.2 Time shift
1) Press key to enter the TIMESHIFT mode. In Timeshift mode, you can watch the program meanwhile record the program.

26
HE 3388TTENGLISH
10
2) the “TIMESHIFT” icon will be shown on left top side of the screen, and record program play will begin at recording start time.
a) In normal playback mode, and Timeshift set as Auto or Pause within PVR Config menu. b) In recording mode.
3) In the below case press “<<” key also can enter into time shift mode, and playing program will fast rewind.
a) In normal playback mode, and time shift set as Auto or Pause within PVR Config menu. b) In recording mode.
4) In Timeshift mode, when press “STOP” will exit Timeshift mode and other functions will be continued. 5) In Timeshift mode, when operate fast forward, the recording is still going on.

27
HE 3388TT ENGLISH
11
3 Installation
There are two kinds of Installation mode as follow: 1. Auto Search 2. Manual Search
3.1 Auto Search
Auto search is a kind of intelligent and convenient mode of programs searching, which covers programs of all frequent points of target countries or regions.
At present, this system covers many target countries and regions. You can move the cursor to “auto search” via press “UP/DOWN” under “installation menu”, then press “OK” to enter into Auto searching page. %_ After entering into auto search page, system will scan all programs one by one under
frequency points of current countries or regions selected automatically. %_ During scanning, press “EXIT” to stop and exit scanning.
%_ When all channels are detected and the scanning process is finished, press EXIT to quit the “Main Menu / Installation” page and display the channel to play.
3.2 Manual Search
If you understand much about digital TV and know the frequency of the program or if you want to scan the program at any frequency required, you can select manual search, which will allow you to save much time.
1. You can move the cursor to “manual search” via press “UP/DOWN” under “installation menu”, then press “OK” to enter into manual search page.
2. Prior manual search, you need to setup relevant parameters including:
(1) Frequency (KHz): the default frequency is settled by different country, you can input relevant digitals to modify it.
(2) Bandwidth: the default value of bandwidth is settled by different country, while you can set it to 7MHz, 8MHz.
3. Press “OK” after setting all parameters to start manual scan. Move to START SEARCH, then press “OK” to start the manual search.
3.3 Channel Filter
All of channels or only unencrypted channels are set to be searched by selective settings.
28
HE 3388TTENGLISH
12
4 Channel
System offers an efficient function of channel management such as channel deleting, marking, moving, locking, rename and grouping. There are two independent pages for channel management: TV and RADIO,
4.1 Channel Manager
Channel manager page includes channel deleting, moving, locking and rename.
1. You can enter the page as shown in the figure below via “MENU->channel-> Channel Manager”. 2. It will pop up a dialogue box prompting that “Channel not available” when there are no
channels in database to enter into, and it will not enter into channel organizer page. 3. Channel organizer menu includes: Delete Channel, Skip Channel, Lock Channel and Channel
Rename. Press “UP/DOWN” to choose the line where channel is, then press the 4-color key on the remote control: • press the red key to set and cancel Lock Channel, • the green key to set or cancel Delete Channel, • press the yellow key to set or cancel Skip Channel, • the blue key to set or cancel Rename Channel. After setting, corresponding figure will
appear. 4. To rename channel , press “UP/DOWN” to choose the line where the channel to be renamed ,
press the blue key to enter the page to rename the channel. 5. Press the blue key to exit Channel Rename page. 6. To set or cancel Lock Program, the system will hint to input “0000”. To set Delete Program, the
system will hint to choose dialogue box “Delete selected Channels?”, Press “LEFT/RIGHT” to choose, choose “Yes” to delete the program or choose “No” to cancel.
7. Press “EXIT” to exit Channel manager page and saving the edit result.
4.2 Favorite List
1. You can press “FAV” on the remote control to enter into “Favorite list”. 2. It will pop up a dialogue box prompting that “Channel not available” when there are no programs in database to enter into, and it will not enter into channel grouping page. 3. Press “UP/DOWN” to choose the line where the channel to be grouped in is, and then press the color keys on the remote control to set different channel grouping.
4. When changing favorite channel is finished, press “EXIT”, and then saving the selection and indicating with the hint of “Data Saving…”.

29
HE 3388TT ENGLISH
13
5 Preference Setting
5.1 OSD Language
OSD Language option: The system has the user interface supporting a couple of languages, you can set language via OSD Language option:
(1) Move the cursor onto OSD Language option, Press “RIGHT” to enter OSD Language List. (2) Press “UP/DOWN” to choose language. (3) Press “OK” to confirm system interface language selection, then the setting is effective, and
then the interface language turns into the currently chosen language, the cursor can move onto OSD Language option on the left.
(4) OSD TIMEOUT To set the automatic exit time from MENU: 1S-6S.
(5) OSD TRANSPARENCY To set the transparency of MENU: from 0% to 60%.
5.2 Preferred Subtitle
(1) Set the subtitle to your preferable language. (2) When the preferred subtitle is selected, it will be displayed automatically while the stream has the selected subtitle. (3) User can set another preferred subtitle language in the “2nd preferred subtitle” option.
4. Timeshift to Record Either of options, ON/OFF, can be selected. If ON is selected, whenTimeshift operation will stop and the recorded file buffered by the Timeshift will be stored in USB equipment; if OFF is selected, Timeshift will operate continuously and the recorded file buffered by the Timeshift will not be stored in USB equipment.
6 System Setting
System Setup menu can provide convenient system setup.
6.1 Timer
If you want to set channel playing at certain time or REC some programs, you can set via Timer menu.
Application shall provide list of timer for adding, viewing, editing and deleting. “Timer” shall list all the timers that are added through the “TV PROGRAM GUIDE” as
well as the timer that are manually added by the user through the “Timer” menu. Application supports a maximum of 10 “Timer”.
In Timer Edit menu, the system can support at most 10 events. Date: Specifies the timer date Program Name: Specifies the channel for which the timer is set Start time: Specifies the start time of the timer

30
HE 3388TTENGLISH
14
End time: Specifies the end time of the timer,be used in Recorder Type Duration: Specifies the duration time of the timer,be used in Recorder Type Mode: Specifies the frequency of the timer, duration can be any of the following: Once - timer will be triggered only once. Daily - timer will be triggered daily at the specified time. Weekly - timer will be triggered every week at the specified time. Monthly - timer will be triggered every Monthly at the specified time. Type: Specifies the channel type for which the timer is set, user can select the below options : Channel, Recorder, Standby, or On. Channel : you can preset the time to switch to selected channel. You can only enter START
TIME but not End Time and Duration. Standby : you can preset the time you want the unit to go into standby mode. You can only
enter START TIME but not End Time and Duration. On : you can preset the time you want the unit to power ON. Enter the start time and then
switch off the unit. The unit will power on at the preselected Start time. Recorder : you can set the Channel you want to record, the start time and the duration. After setting the duration, the system will calculate the End Time automatically. Then press OK key to confirm your settings and press POWER key to enter the unit into standby mode. Remark : WARNING ! Please do not omit to insert an USB device in the USB port compatible for recording function.
If you select recorder type, it can be set Enable or Disable options such as AD Record, Subtitle
Record and Txt Record. Press “OK” after your settings and the system will return to previous menu.
6.2 Child Lock
Child Lock menu can provide convenient locked setup.
1. Here you can set Enables or Disables the system lock, and also can set the parental rating from 0 to 18.
2. You can revise system password. (1) Press the 0-9 number key on the remote control to input Old Password, the default
password is set as “0000”. (2) If the password is input correctly, the cursor can move onto Input New Password option,
press 0-9 number key on the remote control to input new 4-digit Password.
6.3 Date Time
Clock Menu contains different clock settings. Following menu layout shows the Time Settings. If the “Time Mode” is set to “Auto”, then “Time Zone” and “DST” shall be active for editing. If the Mode is “Manual”, these options shall be disabled. If the “Time Mode” is set to “Manual” then, “Date” and “Time” shall be active for editing. If the Mode is “Auto”, these options shall be disabled.
.

31
HE 3388TT ENGLISH
15
6.4 Factory Reset
It allows you to restore the unit to its default factory settings. When you select this option, you will be asked to enter your password (or default password “0000”). Press OK to resume the unit to factory default settings.
6.5 Upgrade
If you want to upgrade the software, please contact supplier. Caution: Please don’t cut off the power when you are upgrading the software.
6.6 Version
Via menu (MENU->setting-> Version) to check the software version
7 AUDIO / VIDEO Setting
Video output mode can change the mode of video output, you can adjust TV mode according to the actual situation of you receiving equipment.
(1) Move the cursor to the corresponding option to be adjusted and press OK / Right key to display the available settings, and then press UP/DOWN key to move circularly and choose the desired option.
(2) Press OK key to save the settings.
7.1 Aspect Ratio
Aspect Ratio can be set as 16:9, 4:3PanScan, 4:3LetterBox, Full screen.
7.2 Video resolution
7.3 HDMI resolution
7.4 HDMI Audio
Below are the available options: HDMI Mute; HDMI PCM, HDMI RAW.

32
HE 3388TTENGLISH
16
8. MEDIA CENTER
8.1 Multimedia
This product is compatible to play the MP3, JPEG and MPEG files. It can support only the files displaying in the list and the file format this product is compatible with. Insert USB external device into the USB port compatible of the decoder. Press USB key to enter into the Multi Media menu. Press EXIT key to return to previously viewed TV program and exit the Multi Media menu.
8.1.1 Media Selection Mode Use the “LEFT” or “RIGHT” key to select the music / photo / movie…etc. playback mode. Then press “OK” to enter the file list.
8.1.2 Movie Movie File Browser
This menu helps the user to select and play a movie from a list of movies that are stored in the USB device. Supported file formats are DivX、MPEG1、MPEG2、MPEG4、AVI、MOV、DAT、MKV、RMVB、DivX Plus、TS、ASF、FLV Following menu layout shows the “Movie” menu.
Movie Playback
When the video is playing, the following information shall be displayed on OSD: a. File name. b. Total time and the current time for this playing file. c. Play state of this video. d. Progress bar. e. File size and resolution of this video. f. Repeat mode such as off/one/dir.
Go to Menu
Use the GOTO button of the Remote Control to switch to anytime time section of a movie and start the playback. Press GOTO button again to exit.
Book Mark Menu
To keep a memory of the playback section of any multi-media file, and start the playback at that particular time at any time again. Press the MARK key on the remote control to enter book mark menu. Press MARK key again to exit.
8.1.3 Music This menu helps the user to select and play a song from a list of songs that are stored in the storage device. WMA, WAV, RA and MP3 format will be supported for playing. When the music file is playing, the following information shall be displayed on OSD (see below picture)
g. Equalizer information.

33
HE 3388TT ENGLISH
17
h. Total time for this playing file. i. Play state of this music. j. Progress bar. k. Current number of this file in total file list. l. File size, artist, album and genre.
8.1.4 Recorder Manager
8.1.3 Recorder Manager Browser To view the recorded TV programs stored in storage device.
8.1.4 Rename In this menu the user can change the program’s name as they like.
8.1.5 Photo To view all the photos stored in the storage device. Follow the instructions at the bottom of the OSD screen. To go to next picture, press Right navigation key. Press OK to see the picture on the screen. To navigation keys, you can reverse the picture up, down, right, left.
8.16 E-Book
Please download the text file on the internet and save in your USB drive and insert to device. Press “OK” to enter to E-book on the screen and find text file in USB Drive and then you can
read the file on the screen.
8.17 Disk manager
You can - MOVE/COPY, RENAME, DELETE, DELETE ALL – which are stored in the USB device. Please follow the OSD Hints to press the corresponding key of the remote controller.
8.2 Multimedia Configuration
在 media 菜单的时候通过按 menu 按键调出该菜单,可以设置 MP4,EBOOK 的语言,codepage,MoveRepeat,MusicRepeat,PhotoRepeat,BGmusic,Slide Time,Effect 等设置,
8.3 PVR Configuration
You can enter the page via “MENU->Preference->PVR Config”. it contains five options as follow: File Size Timeshift Timeshift Length Timeshift to Record
1. File Size Any of options, 4G/3G/2G/1G, can be selected to set the size of the file to be recorded; if the size of the file exceeds the setting size during the record of the program, record program will

34
HE 3388TTENGLISH
Precautions for correct disposal of the product.The symbol shown on the equipment indicates that waste must be disposed of in “separate collection” and so the product must not be disposed of together with urban waste. The user must take the product to special “separate waste collection centres” provided by local government, or deliver it to the retailer against the purchase of a new product.Separate collection of waste and subsequent treatment, recycling and disposal operations promotes the production of equipment with recycled materials and limits negative effects on the environment and on health caused by improper handling of waste.Illegal disposal of the product leads to the enforcement of administrative penalties.
18
2. Timeshift Any of options, AUTO/OFF/ PAUSE, can be selected to set the status of the current Timeshift, if AUTO is selected, Timeshift operation will perform automatically on the background, can change channel but discard previous Timeshift buffer and restart a new one; if OFF is selected, Timeshift operation will stop; if PAUSE is selected, Timeshift operation will be Manual start by PAUSE key, screen freeze at once, can resume by PLAY key, allow channel change only in the same TP, Timeshift buffer only record first channel; and if the preceding three options are changed when the AUTO is selected, Timeshift will restart.
3. Timeshift Length Any of options, AUTO/30min/1h/2h, can be selected to set the time depth of the Timeshift; if AUTO is selected, the time depth of the Timeshift is depended on the available size of USB equipment; if any of options, 30min/1h/2h, is selected, the usable time depth of the Timeshift is 30min/1h/2h in the case that the available size of USB equipment is big enough, whereas, the usable time depth of the Timeshift is depended on available size of USB equipment.
9. SPECIFICATIONS
Tuner

35
HE 3388TT ENGLISH
19
9. SPECIFICATIONS
Tuner Input Connector IEC 16902. Female Input Frequency Range VHF(177.5-226.5),UHF(474-866MHz) Num of RF Inputs 1 Input impedance 75 ohm RF output Connector (bypass)IEC 16902 Male Loop through support Demodulation Standard ETSI EN302 755 (V1.3.1) Guard interval Modes 1/4,19/256,1/8,19/128,1/16,1/32,1/128 Active Symbol duration FEC Modes Rate 1/2,3/5,2/3,3/4,4/5,5/6 Automatic Carriers/Constellation All modes supported including nonhierarchical Demodulation COFDM(QPSK, 16QAM, 64QAM,256QAM) 1K,2K,4k,8k,16k,32k Channel bandwidth 7MHz, 8 MHz Video Decoder Standard ISO/IEC 13818-2 and ISO/IEC 14496-10 Transport stream ISO/IEC 13818-1 Video decoding MPEG-2 SD/HD (MP@ML and MP@HL), MPEG-4, HEVC(H.265), H.264/AVC SD/HD
DivX 4.X ~ 5.X, AVI, VOB, MOV, MKV, TS, FLV, JPEG、BMP、PNG、 Aspect ratio 4:3, 16:9 Audio Decoder Standard ISO/IEC13818-3 TR1011154 Audio decoding MPEG-1 and MPEG-2 Layer I & II, WMA and HE-AAC Digital Audio Sample rate 32 kHz, 22.1 kHz, 44.1KHz,48 kHz Subtitles Subtitle DVB Subtitle Accessories Remote control unit IR (38kHz) RC3 / other on request (38kHz) User Manual 1 pcs Power AC input range AC 100V ~ 240V 50/60Hz Power consumption < 6W Standby consumption < 0.5W
! As a switching equipment, power adaptor should be convenient for operating. the device should be far away from water dropping and splashing, as well as vase full of liquid.

TR
EV
I S.p
.A. -
Str
ada
Con
sola
re R
imin
i-San
Mar
ino,
62
4792
4 R
imin
i (R
N)
Italy
- T
el. 0
541-
7564
20 -
Fax
054
1-75
6430
- w
ww
.trev
i.it -
E-m
ail:
info
@tr
evi.i
t
MADE IN CHINA