6153ch07.qxd 3/20/06 5:02 pm page 127 maze games:...
TRANSCRIPT

Maze Games: More CuteThings in Peril
Maze games have been popular since the days of Pac-Man, and they’re another kind ofgame that’s easy to make in Game Maker. In this chapter, we’ll create a puzzle game where theplayer must help koala bears escape from a maze full of hazardous obstacles. The focus of thegame will be on puzzles rather than action, and the levels will be designed to make the playerthink carefully about the strategies they must use to avoid any unpleasant accidents. (Noanimals were hurt in the making of this game.)
Designing the Game: Koalabr8The name Koalabr8 is a play on the word “Collaborate” with a bit of text-speak thrown in forgood measure. This is because the puzzle of the game is based on the idea of controlling manykoalas at the same time. So, for example, when you press the up key, all the koalas in yourteam will move up together. If you imagine trying to steer several koalas through a minefieldin this way, then you’ll get a sense of the kind of challenge we’re aiming for (see Figure 7-1).Anyway, here’s the full description of the game:
A colony of koala bears have been captured by the evil Dr. Bruce for use in his abominableexperiments. The koalas manage to escape from their cages only to find that the doctor hasimplanted some kind of mind control device in their brains. The only way they can overpowerthe controlling effect is to combine their thoughts and all perform the same actions at once. Thekoalas must work together to find their way past the many dangers in the doctor's laboratoryand escape to freedom.
The arrow keys will simultaneously move all of the bears on a level, except bears whosepaths are blocked by a wall or another bear. Each level will be a hazardous maze that is com-pleted by getting all of the koalas to an exit. However, if a koala touches a dangerous hazard onthe way, then he dies and the level must be replayed. The game will contain a number of fataland nonfatal hazards shown in the following feature list:
• Fatal hazards
• Explosive TNT
• Moving circular saws
127
C H A P T E R 7
6153CH07.qxd 3/20/06 5:02 PM Page 127
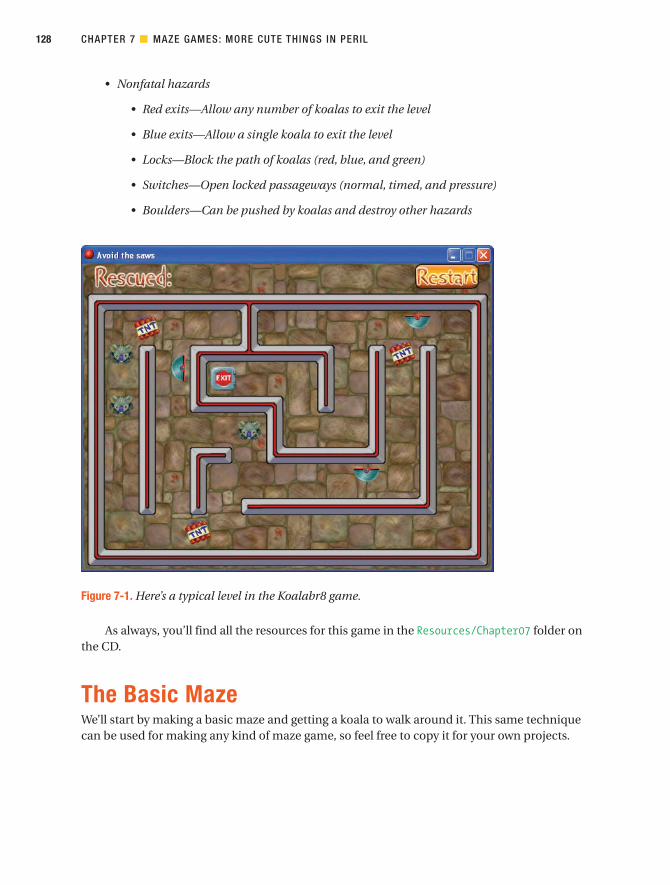
• Nonfatal hazards
• Red exits—Allow any number of koalas to exit the level
• Blue exits—Allow a single koala to exit the level
• Locks—Block the path of koalas (red, blue, and green)
• Switches—Open locked passageways (normal, timed, and pressure)
• Boulders—Can be pushed by koalas and destroy other hazards
Figure 7-1. Here’s a typical level in the Koalabr8 game.
As always, you’ll find all the resources for this game in the Resources/Chapter07 folder onthe CD.
The Basic MazeWe’ll start by making a basic maze and getting a koala to walk around it. This same techniquecan be used for making any kind of maze game, so feel free to copy it for your own projects.
CHAPTER 7 ■ MAZE GAMES: MORE CUTE THINGS IN PERIL128
6153CH07.qxd 3/20/06 5:02 PM Page 128

The Game FrameworkThis game will use the same basic framework as we made in the previous chapter. This con-sists of a front-end with buttons to start a new game, load a saved game, show help, and quitthe game, as well as a completion screen that congratulates the player. However, there is noscore in this game so there will be no high-score table. The instructions that follow will showyou how to create the front-end for this game, although you might want to refer back toChapter 6 for a more detailed explanation. Alternatively, you can just load the completedframework from Games/Chapter07/koala1.gm6 on the CD and skip to the next section, “A Moving Character.”
Creating the front-end:
1. Launch Game Maker and start a new game from the File menu.
2. Create sprites using the following files from the Resources/Chapter07 folder on the CD:Title.gif, Button_start.gif, Button_load.gif, Button_help.gif, and Button_quit.gif.Remember to name them appropriately.
3. Create a background using the file Background.bmp.
4. Create sounds using the files Music.mp3 and Click.wav.
5. Create a title object using the title sprite. Add an Other, Game Start event and includea Play Sound action, with Loop set to true.
6. Create a start button object using the start sprite. Add a Mouse, Left Pressed mouseevent and include an action to play the click sound followed by an action to move tothe next room.
7. Create a load button object using the load sprite. Add a Mouse, Left Pressed mouseevent and include an action to play the click sound followed by an action to load thegame (use the default file name).
8. Create a help button object using the help sprite. Add a Mouse, Left Pressed mouseevent and include an action to play the click sound followed by an action to show thegame information.
9. Create a quit button object using the quit sprite. Add a Mouse, Left Pressed mouseevent and include an action to play the click sound followed by an action to endthe game.
10. Create a room using the background, and place the title and four button objects in it sothat it looks like Figure 7-2.
CHAPTER 7 ■ MAZE GAMES: MORE CUTE THINGS IN PERIL 129
6153CH07.qxd 3/20/06 5:02 PM Page 129

Figure 7-2. The finished front-end for Koalabr8 should look something like this.
Now follow these instructions to create the completion screen. Refer to Chapter 6 for amore detailed explanation.
Creating the completion screen:
1. Create a sprite using the file Congratulation.gif.
2. Create a new object using this sprite. Add a Create event and include a Set Alarmaction to set Alarm 0 using 120 Steps.
3. Add an Alarm, Alarm 0 event and include an action to move to the front-end room.
4. Create a completion room using the background and place an instance of the congrat-ulations object in it.
We also need to create the game information and change some of Game Maker’s defaultsettings for the game.
Changing the game settings:
1. Double-click Game Information near the bottom of the resource list and create a shorthelp text based on the game’s description.
2. Double-click Global Game Settings at the bottom of the resource list.
3. Switch to the Other tab and disable the two options Let <Esc> end the game and Let<F5> save the game and <F6> load a game as we handle this ourselves.
CHAPTER 7 ■ MAZE GAMES: MORE CUTE THINGS IN PERIL130
6153CH07.qxd 3/20/06 5:02 PM Page 130

That completes our game framework for Koalabr8, which can also be loaded from the fileGames/Chapter07/koala1.gm6 on the CD.
■Caution Beware of disabling the Let <Esc> end the game option and forgetting to include your ownmethod for quitting your game (using the End the Game action). If this happens, you’ll need to pressCtrl+Alt+Delete to bring up the Task Manager and end the task from the Applications list. This will endthe game and return you to Game Maker.
A Moving CharacterThe basis of every maze game is a character that moves around walled corridors, so we willbegin by creating a wall object.
Creating the wall object:
1. Create a sprite called spr_wall using the file Wall.gif. Disable the Transparent option,as our wall is just one large solid block.
2. Create a new object called obj_wall using this sprite and enable the Solid option.
You might be wondering why we are using an ugly black square for our walls. Don’t worry;we’ll transform it into something that looks much nicer when we learn how to use tiles later onin the chapter.
Next we need to create a character, which in this case is a koala bear. We’ll use five differ-ent sprites for the koala: four animations for walking in each of the four directions andanother sprite for when koalas are standing still.
Creating the koala sprites:
1. Create a sprite called spr_koala_left using the file koala_left.gif and enable theSmooth edges option.
2. Create sprites in the same way using the files koala_right.gif, koala_up.gif,koala_down.gif, and koala_stand.gif.
Now we can create our koala object and give it actions that allow the player to move itaround the screen. You can probably work out how to do this yourself by now, using eitherJump or Move actions in a similar way to one of the previous games. You may even like to havea try for yourself before continuing, but you’ll actually find that it’s very tricky to move a char-acter through a maze using just these actions. This is because the sprites of both the walls andkoalas are exactly 40✕40 pixels, so all the corridors are only just big enough for the koalas towalk down. You’ll see the problem if you imagine running through a maze with your arms fullystretched out, where the width of the corridors is exactly the same as your arm span! Bumpinginto walls and struggling to change direction in corridors soon removes all feeling of controland the game stops being fun.
CHAPTER 7 ■ MAZE GAMES: MORE CUTE THINGS IN PERIL 131
6153CH07.qxd 3/20/06 5:02 PM Page 131

Fortunately, Game Maker comes to the rescue with the Check Grid action. This condi-tional action allows us to test for when a koala is exactly lined up with the corridors. Thismeans we can ignore the player’s badly timed key presses (that normally cause the koala towalk into walls) and wait until Game Maker knows the koala is in exactly the right place. Onlythen do we let the player stop or turn their character, so that the koalas end up gliding grace-fully along the corridors with no fuss at all.
In addition to checking that koalas are aligned correctly, we will check that there isnothing blocking their way before even starting to move. This results in a reliable control sys-tem that feels slick to the player and is a solid basis for any kind of maze game you might bemaking. Follow these steps and you’ll see what we mean.
Creating the koala object:
1. Create a new object called obj_koala using the standing koala sprite. Set the object’sParent to be the wall object—this may sound odd, but all will be explained in the fol-lowing steps.
2. Add a Keyboard, <Left> event and include the Check Grid action (control tab). Setboth Snap hor (horizontal snap) and Snap vert (vertical snap) to 40 to indicate a gridsize of 40✕40 pixels. Also enable the NOT option so that the event checks for koalasnot being aligned with the grid. The form should look like Figure 7-3.
Figure 7-3. Check whether the instance is not aligned with the grid.
3. Include the Exit Event action. This action stops any more actions from beingperformed in the Actions list. We have put it underneath our Check Grid conditionso that none of the following actions are performed when the koala is not alignedwith the grid.
4. Include the Check Object action. Indicate the wall object and enable the NOT option.Set X to –40 and Y to 0 and then enable the Relative option so that it checks that thereare no wall objects one grid square to the left of the koala.
CHAPTER 7 ■ MAZE GAMES: MORE CUTE THINGS IN PERIL132
6153CH07.qxd 3/20/06 5:02 PM Page 132
5. Include the Start Block action followed by the Move Fixed action. Select the left arrowand set Speed to 5 (this speed must divide exactly into the grid size of 40; otherwise thekoalas will not stop on each grid square).
6. Include the Change Sprite action and indicate the left-facing koala sprite. Set Subimageto -1 so that the animation keeps playing despite the sprite being changed.
7. Those are all the actions we need to move the koala, so include an End Block action.
8. However, if there is a wall in the way, then we must stop the koala from moving. We’vealready checked for walls not being present using the Check Object action, so includ-ing an Else action will allow us to define what should happen when a wall is present.Include the Else followed by a new Start Block action.
9. Include the Move Fixed action, select the middle square, and set Speed to 0.
10. Include the Change Sprite action using the standing sprite with a Subimage of -1.
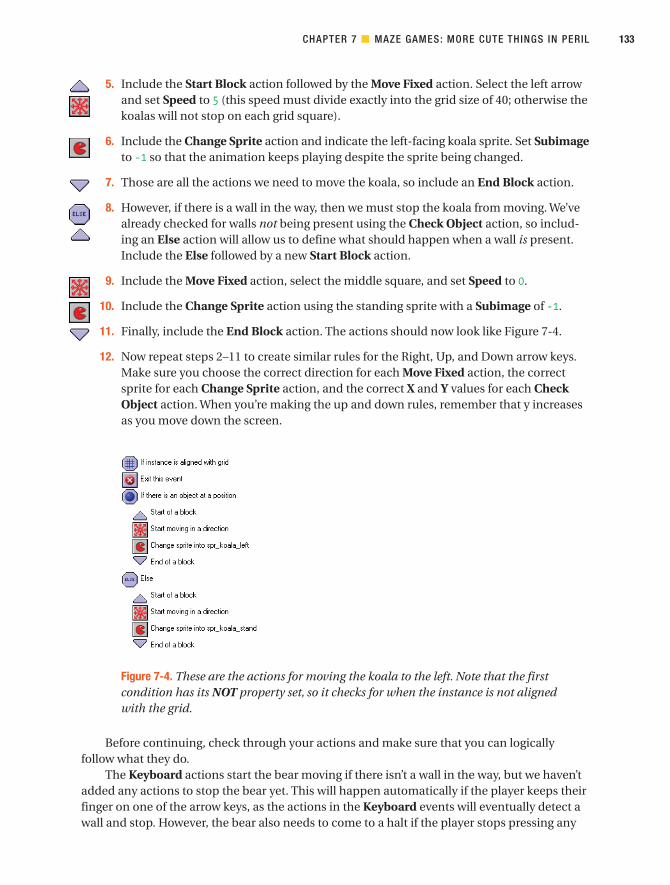
11. Finally, include the End Block action. The actions should now look like Figure 7-4.
12. Now repeat steps 2–11 to create similar rules for the Right, Up, and Down arrow keys.Make sure you choose the correct direction for each Move Fixed action, the correctsprite for each Change Sprite action, and the correct X and Y values for each CheckObject action. When you’re making the up and down rules, remember that y increasesas you move down the screen.
Figure 7-4. These are the actions for moving the koala to the left. Note that the firstcondition has its NOT property set, so it checks for when the instance is not alignedwith the grid.
Before continuing, check through your actions and make sure that you can logicallyfollow what they do.
The Keyboard actions start the bear moving if there isn’t a wall in the way, but we haven’tadded any actions to stop the bear yet. This will happen automatically if the player keeps theirfinger on one of the arrow keys, as the actions in the Keyboard events will eventually detect awall and stop. However, the bear also needs to come to a halt if the player stops pressing any
CHAPTER 7 ■ MAZE GAMES: MORE CUTE THINGS IN PERIL 133
6153CH07.qxd 3/20/06 5:02 PM Page 133

arrow keys. If you’re thinking that we need a <No Key> event, then you’re on the right track,but if we stopped bears moving in a <No Key> event, then what would happen if the playerwas pressing another key such as the spacebar? The spacebar isn’t used in this game, but it’sstill a key—so the <No Key> event would never be called and the koala would never stop!
Instead of using a <No Key> event, we’re going to use a Begin Step event. This will keepchecking if the bear has reached the next grid square, and stop it when it does. We need to usea Begin Step rather than any other kind of Step event, because the Begin part means that theactions will be called at the beginning of each step—before the Keyboard events. Therefore,we can stop the bear moving in Begin Step and start it again in <Left> if the player is pressingthe Left key. If we used a Step or End Step, then these events would happen the other wayaround: <Left> would start the bear moving and Step would stop it again—canceling the effectof the pressing the key. Once you’ve added the actions that follow, try changing the Begin Stepevent to a <No Key> or a normal Step event and seeing what effect it has on the game.
Adding a Begin Step event to the koala object:
1. Add a Step, Begin Step event to the koala object and include the Check Grid action.Set Snap hor to 40 and Snap vert to 40, but this time leave NOT disabled.
2. Include a Start Block action followed by a Move Fixed action. Set Speed to 0 and selectthe center square to stop the koala moving.
3. Include a Change Sprite action, indicating the standing koala sprite with Subimage setto -1.
4. Include an End Block action and close the koala object’s properties.
■Caution When setting a Move Fixed action with a speed of 0, you must also select the center square ofthe direction grid. If no direction square is selected at all, then the action is ignored!
Okay, hopefully that makes sense so far, but we still haven’t explained why we made thewall object a parent of the koala. While this may be against the laws of nature, it’s not againstthe laws of Game Maker, and it’s actually saved us a lot of work. Koalas need to stop for bothwalls and other koalas so we could add extra actions to check for koalas in the same way wedid earlier. However, this happens automatically when we make walls a parent of koalas, asGame Maker now treats koalas as a special kind of wall!
Before we can test our work, there is something we need to fix. When we were making thefront-end we indicated that pressing the Esc key should not automatically end the game. How-ever, we need some way of quitting a level once it is running, so we’ll use a controller object totake us back to the front-end when the Esc key is pressed.
CHAPTER 7 ■ MAZE GAMES: MORE CUTE THINGS IN PERIL134
6153CH07.qxd 3/20/06 5:02 PM Page 134

Creating the controller object:
1. Create a new object called obj_controller and leave the sprite as <no sprite>.
2. Add a Key Press, Others, <Escape> key event. Include the Different Room action andindicate the front-end room.
To test our basic maze game system, we’ll need to create a test level by adding a new roombetween the front-end and closing rooms.
Creating a test room:
1. Right-click the completion room in the resource list and select Insert Room from thepop-up menu. This will insert the new room between the two existing rooms.
2. Switch to the settings tab and give the room an appropriate name and caption.
3. Switch to the backgrounds tab and give the room the background.
4. Set the Snap X and Snap Y on the toolbar to the correct cell size of 40 pixels.
5. Select the objects tab and create a maze out of instances of the wall object. Leave thetop row free, as we’ll need this space for displaying other game information later on.Place three or four instances of the koala object in the maze and put one instance ofthe controller object in the top-left corner of the room. The room should then looksomething like Figure 7-5.
Figure 7-5. Here’s our first maze.
CHAPTER 7 ■ MAZE GAMES: MORE CUTE THINGS IN PERIL 135
6153CH07.qxd 3/20/06 5:02 PM Page 135

Save your work and run the game to test it. Check that the koalas don’t get stuck walkingaround and that the animations play correctly. Also notice how the koalas react when theybump into each another. If you need it, you’ll find this version of the game in the fileGames/Chapter07/koala2.gm6 on the CD.
Save the KoalaMost of what we have done so far could be used for any kind of maze game, but now we’llbegin adding features specific to the Koalabr8 game design. The aim of each level is to get allthe koalas out alive, so in this section we’ll add exits and check whether all koalas have beenrescued before moving on to the next level.
We’ll begin by creating objects for the two different kinds of exits: one that can be used byany number of koalas to escape, and one that is destroyed after being used by just a singlekoala. When a koala collides with an exit, we know it has escaped the level and so we candestroy the koala instance. We’ll use Game Maker’s built-in mechanism for controlling theplayer’s lives to indicate how many koalas have been saved in each level.
Creating the exit objects:
1. Create sprites called spr_exit1 and spr_exit2 using Exit1.gif and Exit2.gif andenable the Smooth edges option for them both.
2. Create an object called obj_exit1, and give it the first exit sprite and a Depth of 10.We only want the koala to disappear when it’s completely on top of the exit, so add aCollision event with the koala object and include a Check Grid conditional action.Select Other from Applies to (the koala) and set Snap hor and Snap vert to 40.
3. Include a Start Block action.
4. Include a Destroy Instance action and select Other from Applies to (the koala).
5. Include a Set Lives action with New Lives set to 1 and the Relative option enabled.
6. Finally, include an End Block action and close the properties form.
7. Now create another exit object in exactly the same way using the sprite for exit2. Theonly difference is that you need to include an additional Destroy Instance action afterstep 4 with Applies to set to Self (the exit).
We’ll use the controller object to check when all koalas have been rescued. It will alsodisplay the rescued koalas along the top of the screen using the Draw Lives action.
Adding events to handle rescued koalas in the controller object:
1. Create a sprite called spr_rescued using Rescued.gif and enable the Smooth edgesoption.
2. Reopen the properties form for the controller object by double-clicking it in theresource list.
CHAPTER 7 ■ MAZE GAMES: MORE CUTE THINGS IN PERIL136
6153CH07.qxd 3/20/06 5:02 PM Page 136

3. Add a Create event and include the Set Lives action with New Lives set to 0. We’reusing lives to represent rescued koalas—so the lives need to start at 0.
4. Add a new Step, Step event and include the Test Instance Count action. Set Object tothe koala object and Number to 0. When there are no koala instances left, then theplayer must have completed the level.
5. Include the Start Block action followed by the Sleep action. Set Milliseconds to 2000(2 seconds).
6. Include the Next Room action and set Transition to Create from center (or any otherone that takes your fancy).
7. Include the End Block action to complete the actions for this event.
8. Add a new Draw event. Switch to the draw tab and include the Draw Sprite action. SetSprite to the rescued sprite, X to 10, and Y to 0. Leave the Relative option disabled, aswe want this sprite to be drawn in the top left of the screen.
9. Include the Draw Life Images action with Image set to the standing koala sprite, X to150, and Y to 0. This will draw the sprite once for each of the player’s lives (savedkoalas).
■Caution Draw actions all have a light yellow background and can only be used in Draw events. If youput them in a different event, then they are ignored.
Now add some exits to your test room and give it a quick play to make sure they areworking correctly. You might also want to add a second test room (remember that you canduplicate rooms). You’ll find the current version in Games/Chapter07/koala3.gm6 on the CD.
Creating HazardsOur maze is rather dull at the moment, so it’s time to create some challenges by making it a lotmore dangerous for the koalas. We’ll start by adding TNT that blows koalas off the level if theytouch it and restarts the level. This may sound like an easy hazard to avoid, but carefully posi-tioned TNT can present quite a challenge when you’re controlling several koalas at once!
We’ll begin by creating a dead koala (how often do you get to say that?). Dead koalas willfly off the screen in an amusing fashion—nothing too gory, as we want to keep this a familygame. We’ll do this using Game Maker’s gravity action, as that will do most of the work for usand make the movement look realistic.
CHAPTER 7 ■ MAZE GAMES: MORE CUTE THINGS IN PERIL 137
6153CH07.qxd 3/20/06 5:02 PM Page 137

Creating the dead koala object:
1. Create a sprite called spr_koala_dead using Koala_dead.gif and enable Smooth edges.
2. Create a new object called obj_koala_dead using this sprite. Give it a Depth of -10 tomake sure it appears in front of all other objects.
3. Add a Create event and include the Move Free action. Set Direction to 80 and Speedto 15.
4. Include the Set Gravity action with Direction set to 270 (downward) and Gravity setto 2.
5. Add an Other, Outside room event and include the Sleep action. Set Milliseconds to1000.
6. Include the Restart Room action with Transition left as <no effect>. It would soonannoy the player to have to wait for a transition to restart the level each time.
Next we’ll create our TNT object. It is a very simple object that just sits there and turnskoalas into dead koalas when they collide with it.
Creating the TNT object:
1. Create a sprite called spr_TNT using TNT.gif and enable Smooth edges.
2. Create a new object called obj_TNT using this sprite.
3. Add a Collision event with the koala object. Include the Change Instance action andselect Other from Applies to, in order to change the koala. Set Change into to the deadkoala object and set Perform events to yes.
We’ve now actually created a bug (an unintentional error) in our game. Remember thatthe controller object moves to the next room when there are no koalas left on the level—assuming that the player must have rescued them all. However, if the last koala is killed byTNT, then there will also be no koalas left on the level—but the player has failed! Conse-quently, we must alter the controller object so that it also checks that there are no dead koalasbefore moving to the next level.
Editing the controller object to fix the dead koala bug:
1. Double-click the controller object in the resource list and select the Step event.
2. At the top of the action list, include another Test Instance Count action and set Objectto the dead koala. As this appears directly above the old check for koalas, the block ofactions will only be performed if both conditions are true.
Test this out by adding some TNT to your levels. It’s actually possible to build very difficultlevels just using TNT. The level, shown in Figure 7-6, looks almost impossible to solve, but it issolvable once you work out how to use the extra wall piece on the left. It’s designing puzzleslike this that will make this game interesting.
CHAPTER 7 ■ MAZE GAMES: MORE CUTE THINGS IN PERIL138
6153CH07.qxd 3/20/06 5:02 PM Page 138

Figure 7-6. This is a surprisingly difficult maze level.
TNT is fun, but moving hazards should add an even greater challenge, so we’re going tocreate two kinds of circular saws. One will move vertically and the other will move horizon-tally, but both will leave koalas wishing they had stayed in bed!
Creating the saw objects:
1. Create sprites called spr_saw_horizontal and spr_saw_vertical usingSaw_horizontal.gif and Saw_vertical.gif. Enable the Smooth edges option for both.
2. Create an object called obj_saw_horizontal and give it the horizontal sprite. Add aCreate event and include the Move Fixed action. Select the right arrow and set Speedto 4. This is slightly slower than the speed of the koala to give the player a chance toescape.
3. Add a Collision event with the wall object and include the Reverse Horizontal action.
4. Add a Collision event with the koala object. Include the Change Instance action andselect Other from Applies to, in order to change the koala. Set Change into to the deadkoala object and set Perform events to yes.
5. Create an object called obj_saw_vertical and give it the vertical sprite. Add a Createevent and include the Move Fixed action. Select the down arrow and set Speed to 4.
6. Add a Collision event with the wall and include the Reverse Vertical action.
7. Finally add a Collision event with the koala object. Include the Change Instanceaction and select Other from Applies to. Set Change into to the dead koala objectand set Perform events to yes.
CHAPTER 7 ■ MAZE GAMES: MORE CUTE THINGS IN PERIL 139
6153CH07.qxd 3/20/06 5:02 PM Page 139

At this point, you might be wondering why having the wall as a parent doesn’t mess thingsup for the koala’s collisions with saws. After all, if koalas are a “special kind of wall,” then whydon’t the saws just turn themselves around when they collide with koalas? Fortunately GameMaker automatically chooses the most specific collision event and ignores the other (a koala isa koala first and only a wall second). However, if you remove the collision event between thesaw and the koala, then saws will start treating koalas as if they were walls again!
Create some new levels using the moving saws. You might also want to add a cheat in thecontroller object, so that pressing the N key moves you to the next room and pressing the Pkey moves you to the previous room. You should know how to do this by now. You’ll find thecurrent version in Games/Chapter07/koala4.gm6 on the CD.
TilesThe walls of our maze need brightening up a bit, and we’re going to do this by using tiles. Tileswork by creating a new background resource that consists of a number of small, identicallysized images (40✕40 pixels in our case). This is called a tile set, and we’ve created one that con-tains all the various combinations of wall connections that are needed to draw a maze (seeFigure 7-7).
Figure 7-7. This tile set contains 16 wall segments.
Creating the tile set:
1. Create a new background called back_tiles using the file Wall_tiles.bmp. Enable theTransparent option so that the green areas appear transparent.
2. Enable the Use as tile set option. The properties form will then become larger to dis-play all the properties of a tile set.
3. Set Tile width and Tile height to 40 and leave the other values as 0. The image will nowshow an exploded view of the tiles, as shown in Figure 7-8.
4. Close the properties form.
CHAPTER 7 ■ MAZE GAMES: MORE CUTE THINGS IN PERIL140
6153CH07.qxd 3/20/06 5:02 PM Page 140

Figure 7-8. Add the tile set to the game.
Now we can begin adding these tiles to the rooms. You might have noticed that there is aspecial tab in the room properties form for this. This allows us to add tiles to the backgroundimage of the room. However, these tiles have no behavior and instances won’t react to them,so how do we stop the koalas from moving through the walls? The answer is that we use thewall object we’ve already created and place instances of this object on top of the tiles. Oncethis is done, we make the wall object invisible, so that the player doesn’t see the ugly walls inthe game. When the koalas walk around, they will still be blocked by the invisible wallinstances, but the player only sees the nice-looking tiles.
Adding tiles to your rooms:
1. Double-click the first room in the resource list and use the right mouse button todelete all of the wall instances in the room.
2. Click the tiles tab. Use the menu halfway down on the left to select the backgroundwith the tiles. Once this is done, the tiles will be displayed in the left top.
3. Click on one of the tile images to select a particular tile, and it will become outlined.Now you can place and remove copies of that tile using the left and right mouse but-tons in the same way as for instances. You can also hold the Shift key to add multiplecopies.
4. Select and place tiles in order to create a maze that looks like the one in Figure 7-9.
5. Select the objects tab and carefully place instances of the wall object on top of thewall tiles.
6. Repeat the process for the other rooms.
CHAPTER 7 ■ MAZE GAMES: MORE CUTE THINGS IN PERIL 141
6153CH07.qxd 3/20/06 5:02 PM Page 141

Figure 7-9. Add tiles to the room.
■Tip When creating levels, you may find it helpful to hide tiles or objects using the magnifying glass menuin the toolbar. This allows you to temporarily hide all the tiles or objects in the room. However, you cannothide objects while the objects tab is selected or hide tiles while the tiles tab is selected.
Finally we must make the wall object invisible so that the tiles can be seen instead.
Making the wall object invisible:
1. Double-click the wall object in the resource list to open the properties form.
2. Disable the Visible option to make it invisible.
Test the game again to make sure that the tiles are displayed correctly and koalas cannotwalk through walls. You’ll find the current version in the file Games/Chapter07/koala5.gm6 onthe CD.
CHAPTER 7 ■ MAZE GAMES: MORE CUTE THINGS IN PERIL142
6153CH07.qxd 3/20/06 5:02 PM Page 142

Adding Additional HazardsYou can already build some interesting levels using just the TNT and the saws, but we’re goingto add a couple of other features to add a bit more variation.
Locks and SwitchesLocks block the path of koalas in the maze and open only when the corresponding switch ispressed. We’ll create three different types of locks: the blue lock will disappear forever once itsswitch is activated, the yellow lock will reappear 5 seconds later, and the red lock will only stayopen while the switch continues to be pressed. So in this final case one koala must keep thelock open for another one to pass.
We’ll begin with the blue switch since this is the simplest to do. We’ll use two objects: onefor the lock, and one for the switch. The switch sprite will contain two subimages showing theswitch in closed and open positions, and we’ll use actions in the switch object to display thecorrect one.
Creating the blue lock and switch objects:
1. Create sprites called spr_lock_blue and spr_switch_blue using Lock_blue.gif andSwitch_blue.gif. Enable the Smooth edges option for them both. Notice how theswitch sprite has two frames of animation showing the switch in different positions.
2. Create a new object called obj_lock_blue and give it the blue lock sprite. Enable theSolid option. Set Parent to the wall object so that it behaves like a wall (blockingkoalas).
3. Create a new object called obj_switch_blue and give it the blue switch sprite. SetDepth to 10 to make sure that it appears behind other objects.
4. Add a Create event and include a Change Sprite action. Select the blue switch spriteand set both Subimage and Speed to 0. This will display the first subimage and willstop the sprite from animating.
5. Add a Collision event with the koala object and include the Destroy Instance action.Select Object from Applies to and select obj_lock_blue from the menu.
6. Include the Change Sprite action, selecting spr_switch_blue with a Subimage of 1 anda Speed of 0.
The other switches are a bit more complicated as they both involve temporarily removingthe locks. The trick here is to move the lock to a place just outside the room and set an alarmclock. When the time is up, we can use the Jump to Start action to bring the lock back intoplay. However, we will need to make sure that there is nothing in the way when we bring itback and set the alarm clock to try again later if there is.
CHAPTER 7 ■ MAZE GAMES: MORE CUTE THINGS IN PERIL 143
6153CH07.qxd 3/20/06 5:02 PM Page 143

Creating the yellow and red lock and switch objects:
1. Create sprites called spr_lock_yellow and spr_switch_yellow using Lock_yellow.gifand Switch_yellow.gif. Enable the Smooth edges option for them both.
2. Create a new object called obj_lock_yellow and give it the yellow lock sprite. Enablethe Solid option. Set Parent to the wall object.
3. Add an Alarm, Alarm 0 event and include the Check Empty action. Set X to xstart, Yto ystart, and Objects to all. Using the variables xstart and ystart will check thatthere are no collisions at the start position of the lock.
4. Switch to the move tab and include the Jump to Start action.
5. Include the Else action followed by a Set Alarm action. Set Number of Steps to 2 sothat the lock tries again quite quickly.
6. Create a new object called obj_switch_yellow and give it the yellow switch sprite. SetDepth to 10 to make sure that it appears behind other objects.
7. Add a Create event and include a Change Sprite action. Select spr_switch_yellow andset Subimage and Speed to 0.
8. Add a Collision event with the koala object and include the Jump to Position action.Select Object from Applies to and select obj_lock_yellow from the menu. Set X to 1000and Y to 0 to make it move way off the screen.
9. Add a Set Alarm action with 150 Steps (5 seconds). Select Object from Applies to andselect obj_lock_yellow from the menu.
10. Finally add the Change Sprite action, selecting spr_switch_yellow with a Subimage of1 and a Speed of 0.
11. Reopen the properties form for the yellow lock and select the Alarm 0 event. Include aChange Sprite action at the top of the list of actions. Select Object from Applies to andselect obj_switch_yellow from the menu. Select spr_switch_yellow and set Subimageand Speed to 0. This will return the switch to the normal position.
12. Create the red lock and the red switch in the same way. However, this time set thealarm to only 2 Steps so that it resets as soon as the koala moves away from the switch.
If you try using them in your rooms, you’ll see that you can use switches to create somevery interesting and tricky levels.
A DetonatorThis one’s going to be very easy. The detonator object will blow up all the TNT on a level—making the koala’s life much easier. As with the switches, we’ll use a sprite that consists of twosubimages to show the detonator before and after the explosions.
CHAPTER 7 ■ MAZE GAMES: MORE CUTE THINGS IN PERIL144
6153CH07.qxd 3/20/06 5:02 PM Page 144

Creating the detonator object:
1. Create a sprite called spr_detonator using Detonator.gif and enable the Smoothedges option.
2. Create a new object called obj_detonator and give it the detonator sprite. Set theDepth to 10.
3. Add a Create event and include the Change Sprite action. Select the detonator spriteand set Subimage and Speed to 0.
4. Add a Collision event with the koala object and include a Destroy Instance action.Select Object from Applies to and select obj_TNT from the menu.
5. Include a Change Sprite action. Select spr_detonator, and then set Subimage to 1 andSpeed to 0.
Detonators can potentially make your levels very easy, so make sure you put them inlocations that are very difficult to reach!
RocksRocks can be pushed around by koalas, as long as there is free space to push them into. Rockswill block moving saws and cause TNT to explode when they are pushed onto it—harmlesslydestroying both the rock and TNT. When a rock is pushed onto a switch or detonator, it willalso be destroyed, allowing the player to remove switches without pressing them.
Creating the basic rock object:
1. Create a sprite called spr_rock using Rock.gif and enable the Smooth edges option.
2. Create a new object called obj_rock and give it the rock sprite. Enable the Solid optionand set Depth to -5 so that it appears in front of most objects but behind the deadkoala object.
To push the rock in the right direction, we need to know which direction the koala wasmoving in when it collided with the rock. We can find this out using the variables hspeed (thecurrent horizontal speed of an instance) and vspeed (the vertical speed of an instance). Thekoala will be the other object involved in the collision, so its speed is indicated by other.hspeedand other.vspeed. The koala moves with a speed of 5 and the cell size is 40, so multiplying thekoalas’ horizontal speed by 8 will give us the rock’s new x-position (5 ✕ 8 = 40). Likewise, mul-tiplying the koala’s vertical position by 8 will give us the rock’s new y-position. Therefore, wecan use this calculation to verify that there is nothing in the way of the new position and movethere.
CHAPTER 7 ■ MAZE GAMES: MORE CUTE THINGS IN PERIL 145
6153CH07.qxd 3/20/06 5:02 PM Page 145

Adding actions to the rock object to allow koalas to push it around:
1. Add a Collision event with the koala object.
2. Include the Check Object action and indicate the wall object. Set X to 8*other.hspeedand Y to 8*other.vspeed. Enable both the Relative and NOT options.
3. Add a similar Check Object action for the rock object using all the same settings.
4. Add two more similar Check Object actions for the horizontal and vertical saw objectsusing all the same settings.
5. Finally, include a Jump to Position action. Set X to 8*other.hspeed and Y to8*other.vspeed, and enable the Relative option.
This will do the trick. You might want to add some rocks to your levels and push themaround to check that they work correctly. Next we need to make the rock destroy TNT,switches, and the detonator.
Adding actions to the rock object to make it destroy things:
1. Add a Collision event with the TNT object and include the Destroy Instance actionwith default settings (to destroy the rock). Include another Destroy Instance actionand select Other (to destroy the TNT) from the Applies to option.
2. Add a Collision event with the detonator object and include the Destroy Instanceaction. Select Other from the Applies to option (to destroy the detonator).
3. In the same way, add Collision events with the three switches and include DestroyInstance actions that apply to the switches.
We also need to make sure that the saws do not move through rocks.
Adding events to the saw objects to make them turn for rocks:
1. Double-click the horizontal saw object in the resource list to open its properties form.
2. Add a Collision event with the rock object and include the Reverse Horizontal action.
3. Close the properties form.
4. Double-click the vertical saw object in the resource list to open its properties form.
5. Add a Collision event with the rock object and include the Reverse Vertical action.
6. Close the properties form.
Now go ahead and make levels using every combination of locks, switches, detonators,and rocks you can think of. You can create an almost endless combination of different chal-lenges. For example, Figure 7-10 shows a level in which the koalas must move the rocksaround very carefully if they are to reach the exit (it is solvable). You can find the currentversion in the file Games/Chapter07/koala6.gm6 on the CD.
CHAPTER 7 ■ MAZE GAMES: MORE CUTE THINGS IN PERIL146
6153CH07.qxd 3/20/06 5:02 PM Page 146
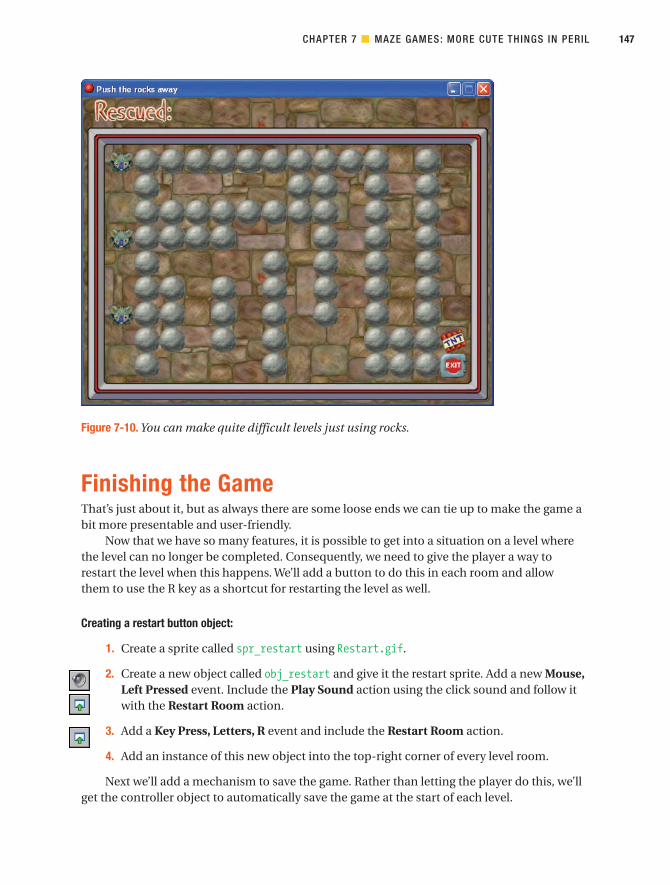
Figure 7-10. You can make quite difficult levels just using rocks.
Finishing the GameThat’s just about it, but as always there are some loose ends we can tie up to make the game abit more presentable and user-friendly.
Now that we have so many features, it is possible to get into a situation on a level wherethe level can no longer be completed. Consequently, we need to give the player a way torestart the level when this happens. We’ll add a button to do this in each room and allowthem to use the R key as a shortcut for restarting the level as well.
Creating a restart button object:
1. Create a sprite called spr_restart using Restart.gif.
2. Create a new object called obj_restart and give it the restart sprite. Add a new Mouse,Left Pressed event. Include the Play Sound action using the click sound and follow itwith the Restart Room action.
3. Add a Key Press, Letters, R event and include the Restart Room action.
4. Add an instance of this new object into the top-right corner of every level room.
Next we’ll add a mechanism to save the game. Rather than letting the player do this, we’llget the controller object to automatically save the game at the start of each level.
CHAPTER 7 ■ MAZE GAMES: MORE CUTE THINGS IN PERIL 147
6153CH07.qxd 3/20/06 5:02 PM Page 147

Save the game in the controller object:
1. Double-click the controller object in the resource list to open its properties form.
2. Add an Other, Room Start event and include the Save Game action to save the game.
Finally, we should add some sound effects. You should be able to do this by yourself, sohere is a list of the ones that are required.
Adding sound effect to objects:
1. Explosion.wav needs to play in the Collision event between the TNT and the koala andthe Destroy event of the TNT.
2. Saw.wav needs to play in the Collision events between both the saws and the koala.
3. Saved.wav needs to play in the Collision event between the two exit objects and thekoala. Put it inside the block, so that it is only played when the koala is removed.
4. Rock.wav needs to play in the Collision event between the rock objects and the koala.However, you only want to play it when the rock actually moves, so add Start Blockand End Block around the Jump to Position action and include the Play Sound actionwithin it.
You might also want to attempt to add a sound for pressing the switches and openinglocks. However, this is a lot more difficult than it seems because Collision events happen con-stantly while the koala stands on a switch. So if you play a sound in this event, it will also playcontinuously in a very annoying way! There are several (complex) ways of working aroundthis, and we have provided a sound effect if you fancy the challenge.
Finally, you might want to update the game information to include details about the dif-ferent hazards—although you might want to let the players find out for themselves!
CongratulationsWe hope you enjoyed creating Koalabr8 and that you’ve had fun designing challenging levels.You may get some more ideas by playing ours from Games/Chapter06/koala7.gm6 on the CD.The great thing about puzzle games is that the possibilities are endless, and we look forwardto seeing what you come up with.
The two Game Maker concepts that we have introduced in this chapter are Grid actionsand tiles. Both Grid actions and tiles are very useful for making this kind of game. There isactually a lot more to learn about tiles, such as creating different layers. You can use layers tolet characters walk in front of certain tiles and behind others, giving a feeling of depth. If youwant to know more, then take a look at the Game Maker documentation on tiles.
Anyway, we hope you like koalas, because you haven’t seen the last of them yet! In thenext chapter we’ll be using Koalabr8 as an example of how designing good levels and featurescan make your game more fun to play. So time to take a rest from programming for a whileand start thinking of some new ways of keeping koalas “entertained.”
CHAPTER 7 ■ MAZE GAMES: MORE CUTE THINGS IN PERIL148
6153CH07.qxd 3/20/06 5:02 PM Page 148