§3. arduino i/o – motor drive & pwm - city tech roboticscitytechrobotics.org/emt2461/pwm...
TRANSCRIPT

EMT2461
§ 3. Arduino I/O – Motor Drive & PWM
Dr. Xiaohai [email protected]
Dept. of Computer Eng. Tech
New York City College of Technology
Last update: October 2013

Copyright Notice
The slides here include pictures, figures, diagrams,tables and other contents from a variety ofsources. Use them for educational purpose ONLY.Copyrights are reserved by their original authorsand/or publishers.
Copyright of all other contents is reserved.
EMT2461 Dr. Li 2

Lecture Objectives
Learn how to use Arduino to generate an output: to drive a motor
Prepare the electrical and programming components for the course project
EMT2461 Dr. Li 3

Outline of Contents
How to connect a DC Brush Motor to Arduino
How to use a Transistor to drive a DC Brush Motor
How to use Arduino to control a DC Brush Motor’s Speed.
EMT2461 Dr. Li 4

Outline of Contents
How to connect a DC Brush Motor to Arduino?
Can you directly connect a DC motor to the 5V or 3.3V pin on Arduino board? Yes or No?
Why Not?
Do NOT blow your Arduino!!Max DC Current per I/O Pin : 40mAMax DC Current VCC and GND Pins: 200mA
EMT2461 Dr. Li 5

Use a Transistor to Drive a Brush Motor
EMT2461 Dr. Li 6
Transistor
Flyback Diode (also called “freewheel diode”)
• NEVER ever connect a load directly with Arduino, especially a load like motor that may draw a large current!• Max current that the 5V/3.3V on Arduino UNO can provide: 200mA

Example Sketch to Drive a DC Brush Motor
EMT2461 Dr. Li 7

Drive a DC Brush Motor with H-Bridge IC (will be discussed in another week)
EMT2461 Dr. Li 8

How to Control the Speed of DC Brush Motors
EMT2461 Dr. Li 10
Ans: PWM (Pulse Width Modulation), the key technique to control motor speed, and many other applications such as power control in your cellphone. What is PWM?Why PWM works?How PWM works? i.e., how to change motor speed by using PWM signal?

Control the Speed of DC Brush Motors
EMT2461 Dr. Li 11
PWM: Pulse Width Modulation

Control the Speed of DC Brush Motors
EMT2461 Dr. Li 12
Generate a PWM signal from Arduino:analogWrite(port#, value); // Write a value (duty cycle of a
// PWM wave) to an Arduino port. Parameters:
port#: The Arduino port from that the PWM will be produced. value: Duty cycle: in 0~255! 0: always off and 255: always on.Returns: nothing
Example: analogWrite(3, 127); // Generate a PWM signal with a Duty cycle of 50% on port3

PWM Waveforms
Display PWM waveform by oscilloscope
EMT2461 Dr. Li 13

After calling analogWrite(port#, value), the port will generate a steady PWM wave of the specified duty cycle until the next call to analogWrite() (or a call to digitalRead() or digitalWrite() on the same port).
EMT2461 Dr. Li 14
Generate PWM from Arduino (Contd):

Generate PWM from Arduino (Contd):
On most Arduino boards (those using the ATmega168 or ATmega328 MCU), like UNO, PWM ports are 3, 5, 6, 9, 10, and 11 by default. On Arduino Mega, PWM works on ports 2 through 13.
The analogWrite function has nothing whatsoever to do with the analog pins or the analogRead function.
The default frequency of PWM signal generated by ArduinoUNO is approximately 490 Hz.
Recommended PWM frequency for industrial applicatioins: 4Kor 5KHz ~20KHz.
EMT2461 Dr. Li 15

EMT2461 Dr. Li 16
Example Sketch//Sets the output to the LED proportional to the value read from a potentiometer.
int ledPin = 9; // a LED connected to digital port 9int analogPin = 3; // potentiometer connected to analog port 3int val = 0; // variable to store the read value
void setup(){pinMode(ledPin, OUTPUT); // sets the port 9 as output
}
void loop(){val = analogRead(analogPin); // read in inputs from port3analogWrite(ledPin, val / 4); // analogRead values go from 0 to 1023, analogWrite
values from 0 to 255}
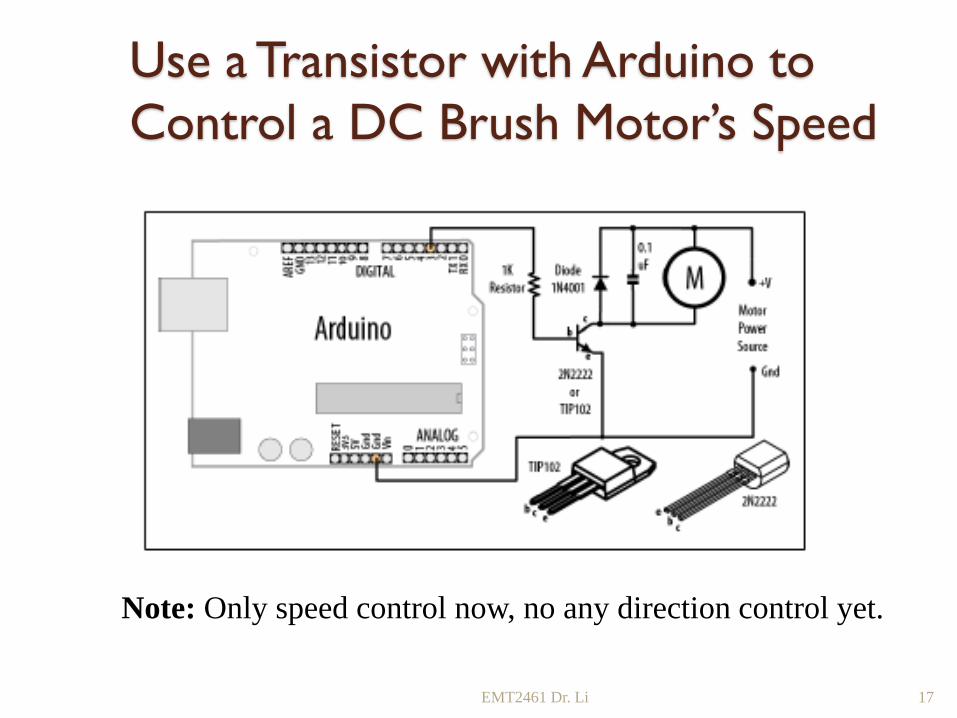
Use a Transistor with Arduino to Control a DC Brush Motor’s Speed
EMT2461 Dr. Li 17
Note: Only speed control now, no any direction control yet.

Example Sketch to Control a Brush Motor’s Speed
EMT2461 Dr. Li 18

Lab Experiment
Lab: PWM & Speed Control of a DC Brush Motor
EMT2461 Dr. Li 19